

Page 1
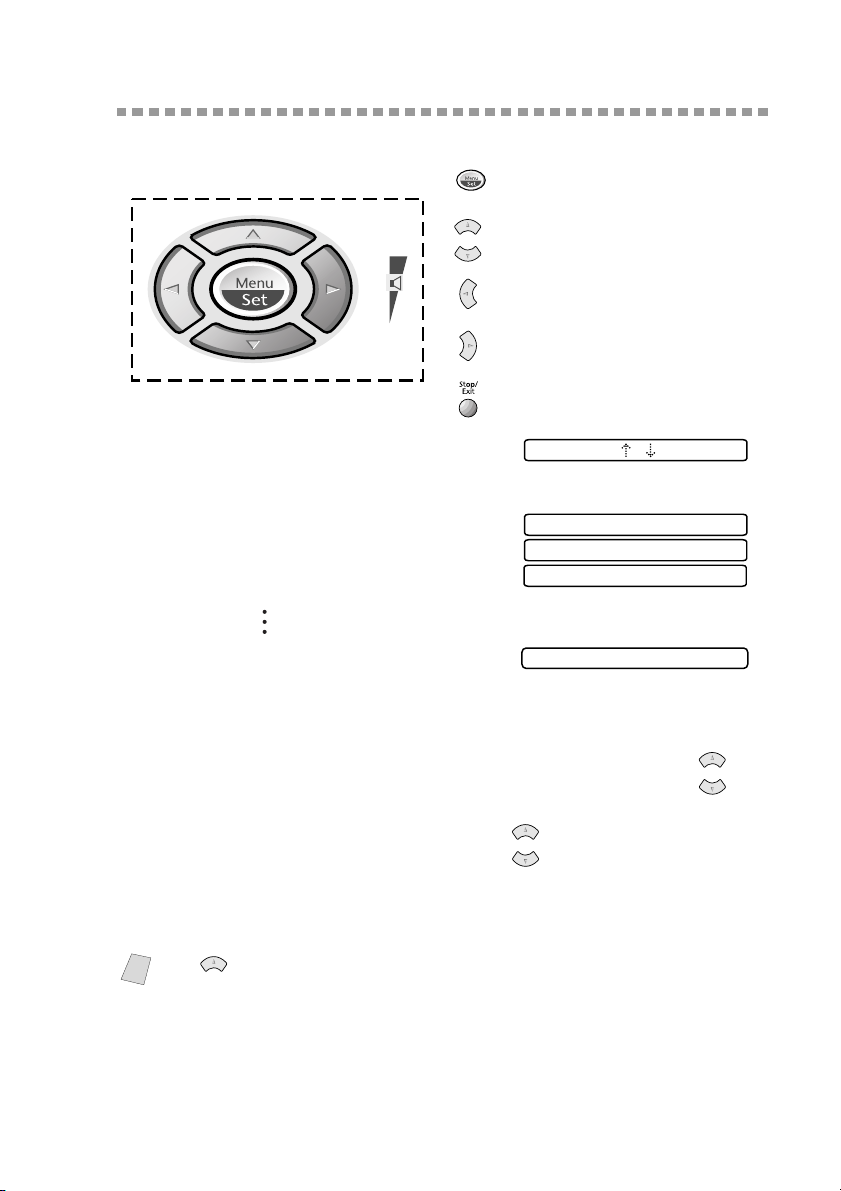
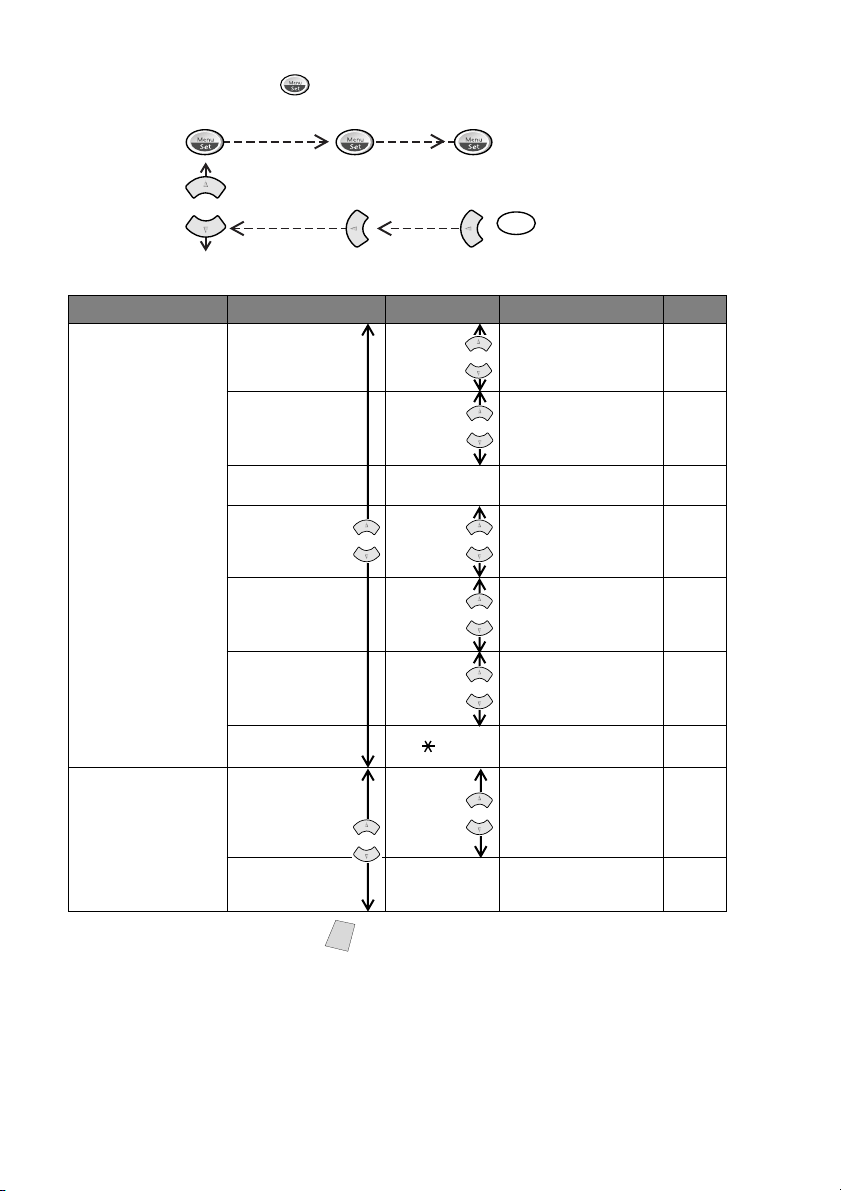
Navigation Keys
* Access the Menu
* Go to next menu level
* Accept an option
* Scroll through the
current menu level
* Back to previous menu
level
* Forward to next menu
level
* Exit the Menu
You can access the menu mode by pressing
Menu/Set. When you enter the Menu, the
SELECT & SET
LCD scrolls:
Then press 1 for Initial Setup Menu—OR—
Press 2 for Setup Receive Menu—OR—
1.INITIAL SETUP
2.SETUP RECEIVE
3.SETUP SEND
Press 3 for Setup Send Menu
Press 0 for
TEL SERVICE
0.TEL SERVICE
—OR—
You can scroll more quickly through the each menu level by pressing , and
then set an option by pressing Menu/Set when that option appears on the LCD.
Then the LCD shows next menu level. Press to scroll to your next menu
or
selection, and then press Menu/Set.
When you finish setting an option, the LCD shows ACCEPTED.
Use to scroll backward if you passed your choices or to save keystrokes.
Note
or
ON-SCREEN PROGRAMMING
3 - 2
Page 2
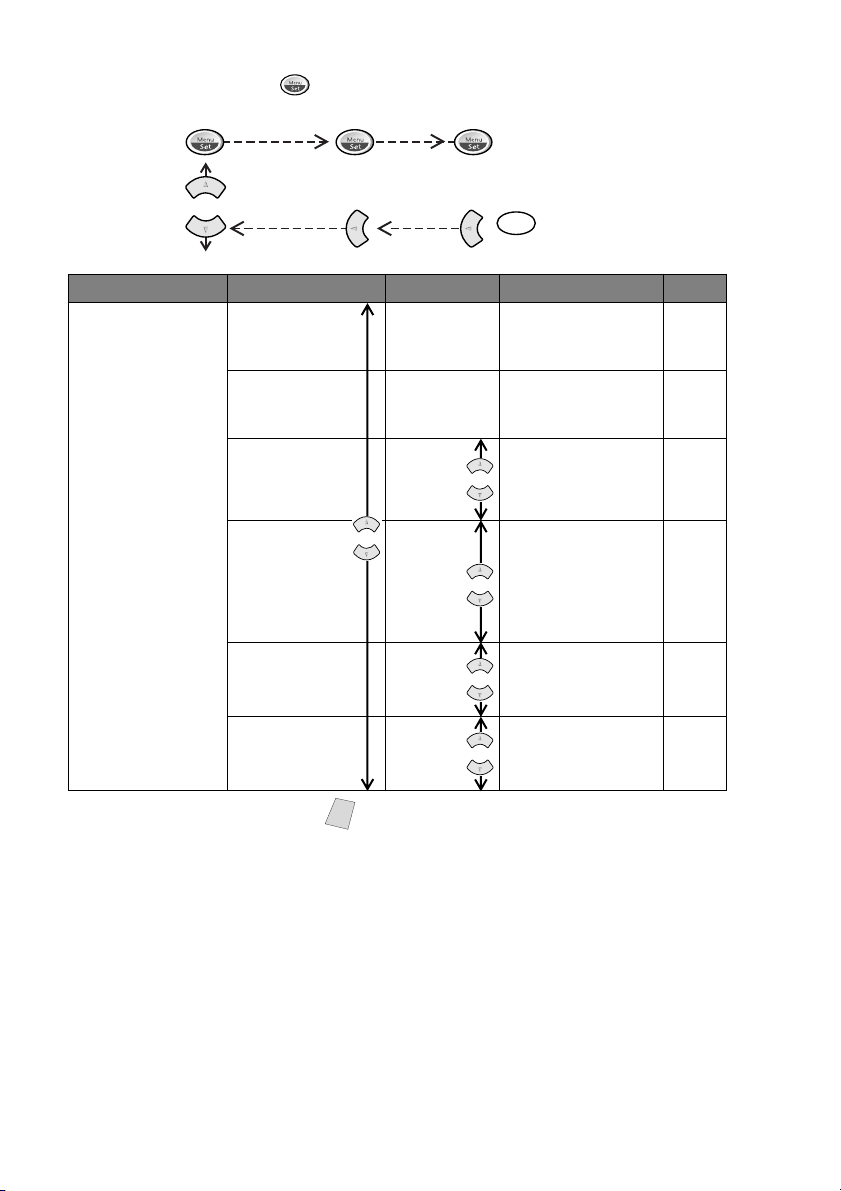
To access the menu, press Menu/Set.
to accept
Stop
to Exit
Main Menu Menu Selections Options Descriptions Page
1. INITIAL SETUP 1. DATE/TIME
2. STATION ID
3. BEEPER OFF
4. VOLUME
AMPLIFY
5. TONE/PULSE TONE
6. LOCAL
LANGUAGE
(For Canada Only)
—
—
HIGH
LOW
ON
(PERMANENT/
TEMPORARY)
OFF
PULSE
ENGLISH
FRENCH
The factory setting (option) is shown in bold.
Note
Enter date and time for the
LCD display and the
heading on fax
transmissions.
Program your name, fax
number and telephone
number to appear on each
transmitted page.
Adjusts the beeper volume.
For the hearing-impaired,
you can set the volume to
the VOL AMPLIFY:ON
setting on a permanent or
temporary basis.
Selects the dialing mode.
Allows you to change the
LCD Language to French.
4-1
4-1
4-5
4-5
4-6
See
French
manual
3 - 3
ON-SCREEN PROGRAMMING
Page 3
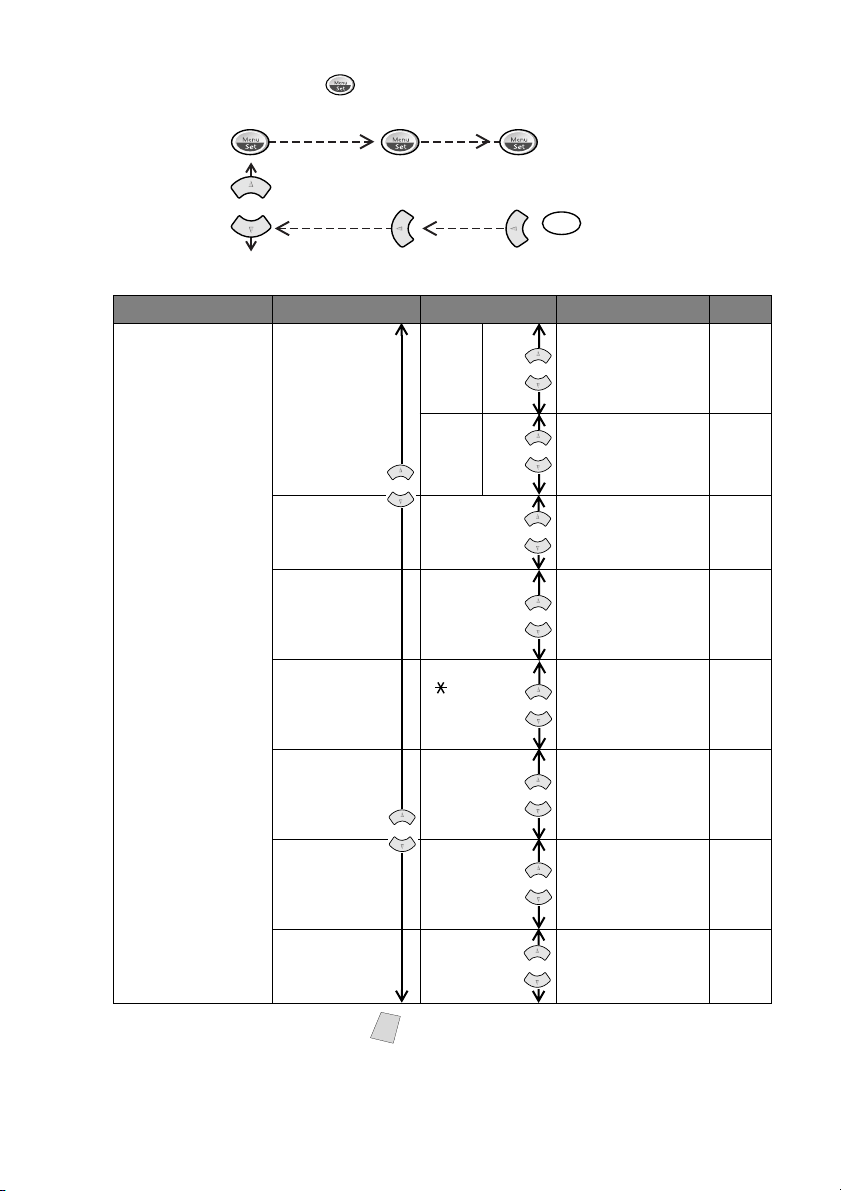
To access the menu, press Menu/Set.
to accept
Stop
to Exit
Main Menu Menu Selections Options Descriptions Page
2. SETUP RECEIVE 1. RING DELAY
2. F/T
RING TIME
3. EASY
RECEIVE
4. REMOTE
CODE
5. REDUCTION AUTO
6. PAPER LETTER
7. POLLING RX ON
RING
DELAY
TOLL
SAVER
70
40
30
20
ON
SEMI
OFF
ON
( 51, #51)
OFF
100%
93%
87%
75%
LEGAL
A4
OFF
04
03
02
01
00
ON
OFF
The number of rings
before the fax machine
answers in FAX/TEL,
FAX ONLY or TAD
mode.
Machine rings two extra
times if there are no
messages to get, so you
can hang up and not pay
for the call.
Sets the time for
“double-ring” in
FAX/TEL mode.
Receive fax messages
without pressing the
Fax Start key.
Activate or deactivate
the fax machine from a
remote location.
You can also
personalize these codes.
Reduces the size of the
image.
Selects size of paper for
fax receiving.
Sets up your fax
machine to poll another
fax machine.
5-3
9-6
5-3
5-4
5-6
5-5
5-5
5-7
The factory setting (option) is shown in bold.
Note
ON-SCREEN PROGRAMMING
3 - 4
Page 4

To access the menu, press Menu/Set.
to accept
Stop
to Exit
Main Menu Menu Selections Options Descriptions Page
3. SETUP SEND 1. COVERPG
SETUP
2. COVERPAGE
MSG
3. CONTRAST AUTO
4. RESOLUTION
5. OVERSEAS
MODE
6. CALL
RESERVE
7. DELAYED
FAX
8. POLLED TX ON
NEXT FAX ONLY,
ON
OFF
PRINT SAMPLE
—
S.LIGHT
S.DARK
STANDARD
FINE
S.FINE
PHOTO
ON
OFF
OFF
ON
PRINT SAMPLE
—
OFF
Automatically sends a
cover page you program.
Programs a customized
message for the fax cover
page.
Changes the lightness or
darkness of a fax you are
sending.
Changes the fax
resolution.
Adjusts for sometimes
difficult overseas
transmissions.
You can send a fax and then
speak.
Sends documents later.
Sets up your fax machine
with a document to be
retrieved by another fax
machine.
6-5
6-5
6-6
6-6
6-6
6-7
6-8
6-8
The factory setting (option) is shown in bold.
Note
3 - 5
ON-SCREEN PROGRAMMING
Page 5
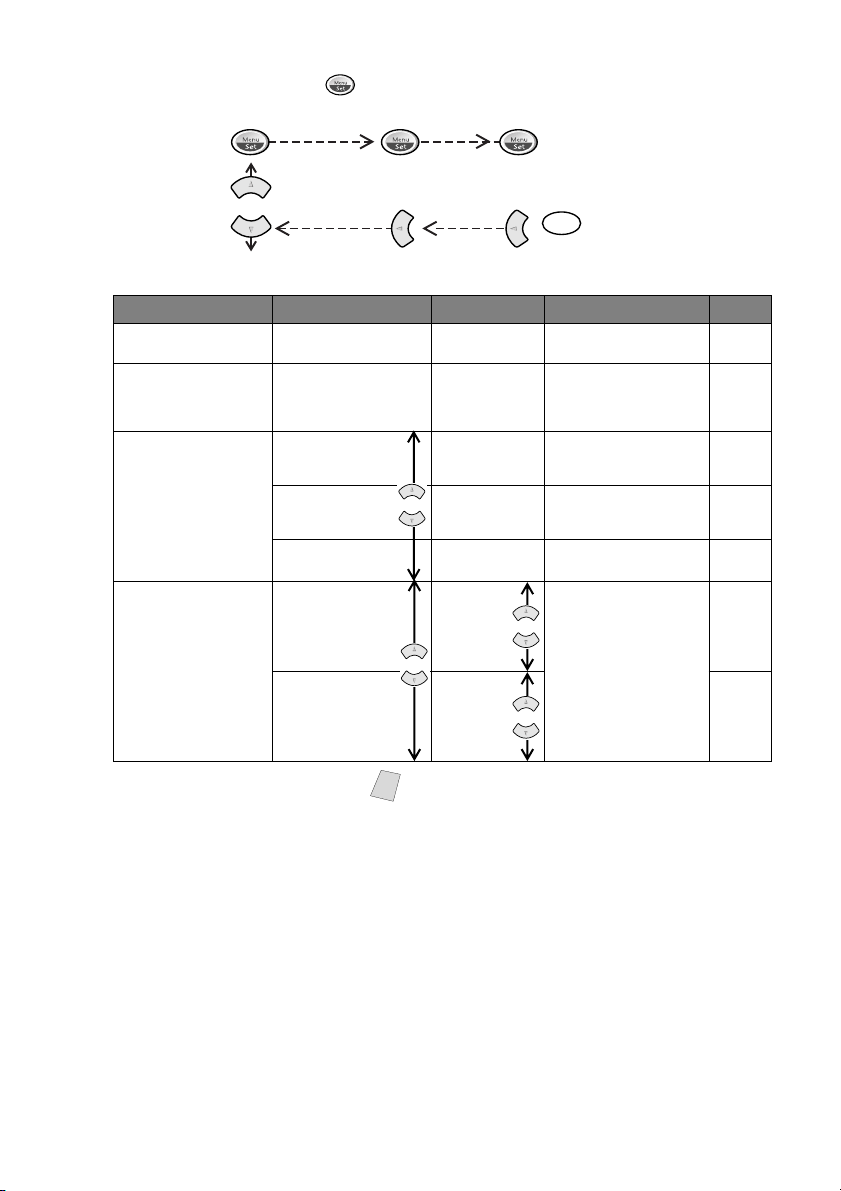
To access the menu, press Menu/Set.
to accept
Stop
to Exit
Main Menu Menu Selections Options Descriptions Page
4. CANCEL JOB
5. INTERRUPT
6. SET
AUTO DIAL
7. SETUP REPORTS
——
——
1. ONE-TOUCH
DIAL
2. SPEED-DIAL
3. SETUP
GROUPS
1. TRANSMISSION
2. ACT
.INTERVAL
—
—
—
ON
OFF
OFF
6/12/24 Hours
2/4/7 Days
Cancel a delayed fax or
polling job.
Send a fax now, even if
you have the machine set
to send a fax later, or if
you have it set for polling.
Stores dial numbers in
memory you can to dial them
by pressing only one key.
Stores dial numbers in
memory so you can to dial
them
by pressing four keys.
Sets up a Group number
for Broadcasting.
Print lists and reports of
activity.
(See details in Chapter 11.)
6-9
6-9
7-1
7-2
7-3
11-1
11-1
The factory setting (option) is shown in bold.
Note
ON-SCREEN PROGRAMMING
3 - 6
Page 6
To access the menu, press Menu/Set.
to accept
Stop
to Exit
Main Menu Menu Selections Options Descriptions Page
8. SETUP MSG CTR 1. MSG
STORAGE
2. BACKUP
PRINT
3. OGM
4. ICM
MAX. TIME
FAX:
ON/OFF
VOICE:
ON/EXT/OFF
ON
OFF
MSG CTR OGM
F/T OGM
20/25/30/
35/40/45/
50/55/60
Select if memory will
store fax, voice or both.
Prints a copy of faxes
received into memory.
Select/Record the
outgoing message.
Select the maximum
length of incoming
messages.
9-2
9-5
9-2
9-6
5. ICM REC.
MONITR
6. FAX
FWD/PAGING
7. REMOTE
ACCESS
0. TEL SERVICE 1. DISTINCTIVE ON
2. CALLER ID
(For USA Only)
The factory setting (option) is shown in bold.
Note
3 - 7
ON-SCREEN PROGRAMMING
ON
OFF
OFF
FAX FORWARD
PAGING
159
OFF
SET
—
Adjust the speaker volume
for voice messages as they
come in.
Set the machine to forward
fax messages –OR– to call
your pager.
Personalize the code for
retreiving messages.
Use with telephone
company’s Distinctive
Ring service to register the
ring pattern with the fax
machine.
Register your AREA
CODE to dial from the
Caller ID log.
9-6
9-7
9-9
8-3
4-6
8-3
Page 7
4
Initial Setup
Getting Started
After you have assembled your machine using the Brother Quick Setup Guide,
continue the initial setup by programming the rest of the initial settings.
Setting Date and Time
Your fax machine displays the date and time, and prints it on every fax you send.
In the event of a power failure, the fax machine maintains date and time information
for up to two hours. All other settings remain unaffected.
1
Press Menu/Set, 1, 1.
2
Enter the last two digits of the year,
and then press Menu/Set. (For example, 03 for 2003)
3
Enter two digits for the month, and then press
Menu/Set. (For example, enter 09 for September,
or 10 for October)
4
Enter two digits for the day,
and then press Menu/Set. (For example, 06 for the 6th)
5
Enter the time in 24-hour format, and then press
Menu/Set. (For example, enter 1525 for 3:25 PM)
6
Press Stop/Exit.
The LCD now shows the date and time you set and displays it whenever the fax
machine is in Standby mode.
1.DATE/TIME
ENTER YEAR:XX
ENTER MONTH:XX
ENTER DAY:XX
ENTER TIME:XX:XX
Setting Station ID
You can store your name, fax number, and telephone number to be printed on all fax pages.
The telephone number you enter will be printed on Call Back Message and Cover
Page you send.
1
Press Menu/Set, 1, 2.
2
Enter your fax number (up to 20 digits),
and then press Menu/Set.
3
Enter your telephone number (up to 20 digits),
and then press Menu/Set. If your telephone
number and fax number are the same, enter the
same number again. The LCD shows your entry.
2.STATION ID
FAX:
TEL:
INITIAL SETUP
4 - 1
Page 8
4
Use the dial pad to enter your name (up to 20
characters), and then press Menu/Set. (You can
use the chart below to help you enter letters.)
5
Press Stop/Exit.
NAME:
NOTICE
The Telephone Consumer Protection Act of 1991 makes it unlawful for
any person to use a computer or electronic device to send any message
via a telephone fax machine unless such messages clearly contain, in a
margin at the top or bottom of each transmitted page, or on the first page
of the transmission, the date and time it is sent and an identification of the
business or other entity or other individual sending the message and the
telephone number of the sending machines or such business, other entity
or individual.
In order to program this information into your fax machine, you should
complete the steps described on page 4-1.
Details for Entering Text
When you are setting certain functions, such as the Station ID, you may need to enter
text into the fax machine. Most keys on the dial pad have three or four letters printed
above them. The keys for 0, # and don’t have printed letters because they are used
for special characters or operations.
By pressing the appropriate number on the dial pad the correct number of times, you
can access the character you want.
Press Key once twice three times four times five times
2 ABC 2A
3 DEF3D
4 GH I 4 G
5 JKL5J
6 MNO 6M
7 PQRS7
8 TUV8 T
9 WXYZ 9
Inserting Spaces
If you want to enter a blank space, press twice.
4 - 2
INITIAL SETUP
Page 9

Making Corrections
If you entered a letter incorrectly and want to change it, press to move the cursor
after the last correct letter. Then press Stop/Exit; the letters above and to the right of
the cursor are deleted. Re-enter the correct text and/or digits. You can also back up
and type over incorrect letters.
Repeating Letters
If you need to enter a character that is assigned to the same key as the previous
character, press to move the cursor to the right.
Special Characters and Symbols
Press , # or 0 repeatedly or press to move the cursor under the special character
or symbol you want. Then press Menu/Set to select it.
Press for (space) ! “ # $ % & ’ ( ) + , - . /
Press # for : ; < = > ? @ [ ] ^ _
Press 0 for É À È Ê Î Ç Ë Ö 0
■ If you do not enter a fax number, no additional information can be entered.
■ To enter a space, press once between numbers and twice between characters.
■ If your Station ID has already been programmed, the screen prompts “1” to make
a change, or “2” to exit without changing.
Setting the Speaker Volume
You can adjust the speaker volume by pressing Speaker phone, and then selecting
a speaker volume level.
or
Press to adjust the volume level. The LCD shows the setting you are choosing.
Each key press changes the volume to the next setting. The new setting will remain
until you change it again.
■ You can adjust the speaker volume while you are listening to your OGM (Outgoing
Message) and ICMs (Incoming Messages).
■
If you turn Incoming Recording Monitor to OFF (
screening calls with be disabled and you won’t hear callers leaving messages. The
volume for other operations can still be controlled using .
Menu/Set, 8, 5
) the Speaker for
or
INITIAL SETUP
4 - 3
Page 10

Choosing the Handset Volume (For Volume Amplify)
Before you begin to use the machine, you must decide if you need to set the handset
volume to AMPLIFY:ON for a user who is hearing-impaired. The AMPLIFY
volume level complies with FCC standards.
VOLUME AMPLIFY: OFF
This default setting is appropriate if none of the users are hearing-impaired. During a
conversation, users can press Volume on the control panel to adjust the volume
or
to LOW or HIGH. When the handset is replaced, the handset volume will remain
until you change it again.
VOLUME AMPLIFY: ON–TEMPORARY
This setting is appropriate if some of the users are hearing-impaired. During a
conversation, users can press Volume on the control panel to adjust the volume
or
to LOW, HIGH or AMPLIFY. When the handset is replaced, the handset volume
returns to the default setting of LOW.
VOLUME AMPLIFY:ON–PERMANENT
Choose VOL AMPLIFY:ON–PERMANENT if all of the users are hearing-
impaired. During a conversation, users can press Volume on the control panel to
or
adjust the volume to LOW, HIGH or AMPLIFY. When the handset is replaced, the
handset volume returns to the default setting of AMPLIFY.
m
When you press Volume on the control panel to adjust the volume, the LCD shows
or
the setting you are choosing. Each key press changes the volume to the next setting.
WARNING
It is important that you do not choose PERMANENT unless all users are
hearing-impaired. Otherwise, the default setting of AMPLIFY may damage the
hearing of some users.
4 - 4
INITIAL SETUP
Page 11

Setting Volume Amplify
Please carefully read Choosing the Handset Volume (For Volume Amplify), page 4-4
before you do the following steps:
1
Press Menu/Set, 1, 4.
4.VOLUME AMPLIFY
2
3
4
5
or
Press to select VOL AMPLIFY:OFF? if
none of the users are hearing-impaired and go to
Step 4—OR—If some or all of the users are hearingimpaired, select VOL AMPLIFY:ON? and then press Menu/Set.
or
Press to select PERMANENT? if all the users
are hearing-impaired—OR—Select
TEMPORARY? if only some of the users are
hearing-impaired.
Press Menu/Set.
Press Stop/Exit.
VOL AMPLIFY:OFF?
PERMANENT?
Setting the Ring Volume
You can adjust the ring volume when your fax machine is idle. You can select a ring
volume level or press until the ring is off.
or
Press to adjust the volume level. With each key press, the fax machine rings so
you can hear the current setting and the LCD shows the setting you are choosing. Each
key press changes the volume to the next setting. The new setting will remain until you
change it again.
Setting Beeper Volume
You can set the beeper to LOW, HIGH or OFF. The default setting is LOW. When
the beeper is set to LOW or HIGH, the fax machine beeps every time you press a key
or make an error, and at the end of fax sending or receiving.
1
Press Menu/Set, 1, 3.
3.BEEPER
2
3
or
Press to select your setting, and then press Menu/Set.
Press Stop/Exit.
INITIAL SETUP
4 - 5
Page 12

Memory Storage
In the event of a power failure, all settings in the INITIAL SETUP, SETUP
RECEIVE and SET AUTO DIAL plus the COVERPG SETUP and
COVERPAGE MSG (from SETUP SEND) operations are stored permanently. You
may have to reset the date and time.
Setting Tone/Pulse Dialing Mode
Your fax machine comes set to accommodate Tone (multi-frequency) dialing service.
If you have Pulse (rotary) dialing service, you need to change the dialing mode.
1
Press Menu/Set, 1, 5.
5.TONE/PULSE
2
3
or
Press to select TONE or PULSE,
and then press Menu/Set.
Press Stop/Exit.
DIALING:TONE?
DIALING:PULSE?
Setting Up Your Area Code (USA Only)
If you must dial the area code to call within your area code, do not enter this setting.
1
Press Menu/Set, 0, 2.
2
Use the dial pad to enter your area code,
and then press Menu/Set.
3
Press Stop/Exit.
2.CALLER ID
AREA CODE:000
AREA CODE:908
4 - 6
INITIAL SETUP
Page 13

5
Setup Receive
Basic Receiving Operations
Select Receive Mode
MANUAL—You must answer all calls yourself. If you hear fax tones, press
Fax Start to begin receiving the fax, then hang up. You can use this mode with
Distinctive Ringing. (See Distinctive Ring, page 8-1.)
FAX ONLY—The fax machine automatically answers every call as a fax call. You
cannot receive a voice call, but you can dial out and make a voice call.
FAX/TEL—The fax machine automatically answers every call. If the call is a fax, it
prints the fax. If the call is not a fax, it signals you with a double-ring (ring-ring),
different from the phone company ringing, to alert you to pick up the call. If you select
this setting, you’ll need to set the Ring Delay and F/T Ring Time features (on the
following pages). If you have extension phones on the same line as the fax machine,
set Ring Delay to 4. (See For FAX/TEL Mode Only, page 5-6.)
MSG CTR— The fax machine has a built-in degital Message Center for fax and
voice. When you set the machine to answer calls, it will record messages up to 15
minutes. For more information about the Message Center operation, see Chapter 9.
SETUP RECEIVE
5 - 1
Page 14

09/06 15:25 FAX
To select or change your Receive Mode
1
Press Receive Mode. The LCD shows your current selection.
FAX ONLY
FAX/TEL
MANUAL
Or, if Message Center mode is ON, it overrides your Receive Mode setting, so the
LCD shows:
MC:MSG CTR
2
Continue to press Receive Mode until your new selection appears. After two
seconds, the LCD returns to the date and time, along with your new Receive Mode
setting.
5 - 2
SETUP RECEIVE
Page 15

Setting Ring Delay
The Ring Delay setting determines the number of times the fax machine rings before
it answers. If you have extension phones on the same line as the fax machine, keep
the Ring Delay default setting of 4. (See Easy Receive, page 5-4, Operation from
External or Extension Telephone, page 5-6 and For FAX/TEL Mode Only, page 5-6.)
1
Press Menu/Set, 2, 1.
1.RING DELAY
2
3
4
or
Press to select Ring Delay, and then press Menu/Set.
or
Press to select how many times the line rings before the fax machine answers
(00 – 04), and then press Menu/Set.
If you select 00, the line doesn’t ring at all.
Press Stop/Exit.
Setting F/T Ring Time
You need to determine how long the fax machine will notify you (with its special
double-ring) when you have a voice call. This ringing happens after the initial ringing
from the phone company. Only the fax machine rings, for 20, 30, 40 or 70 seconds;
no other phones on the same line ring the special double-ring. However, you can
answer the call on any phone on the same line as the fax machine.
1
Press Menu/Set, 2, 2.
2
3
or
Press to select how long the fax machine will
ring to alert you that you have a voice call, and then press Menu/Set.
Press Stop/Exit.
Now, when a call comes in and the machine is set to FAX/TEL mode, all phones on
this line will ring the number of times you selected in Ring Delay.
You can let the fax machine pick up and detect if it’s a fax or voice call. If it’s a fax
call, the machine prints the fax. If it’s a voice call, the machine signals you with a
double-ring for the length of time you selected in F/T Ring Time.
Even if the caller hangs up during the double-ringing, the fax machine continues for
the set time.
2.F/T RING TIME
RING TIME:20 SEC
SETUP RECEIVE
5 - 3
Page 16

Record FAX/TEL Outgoing Message (F/T OGM)
This is the announcement played by your FAX (not an external TAD) when someone
calls and your machine is set to FAX/TEL mode. Although callers hear your
announcement, they cannot leave a message. To erase the announcement, see Erasing
Outgoing Message (OGM), page 9-3.
1
Press Menu/Set, 8, 3. The screen prompts you to choose F/T OGM or MSG CTR
OGM.
2
3
4
5
or
Press to select F/T OGM (not MSG CTR OGM), and then press Menu/Set.
or
Press to select RECORD OGM?, and then press Menu/Set.
Then pick up the handset and speak your message.
Replace the handset. Your OGM is played.
Press Stop/Exit.
Easy Receive
When you use this feature, you don’t have to press Fax Start when you answer a fax
call and hear calling beeps. Just hold the handset and wait a few seconds. When you
see RECEIVE on the LCD or when you hear “chirps” through the handset of an
extension phone connected to another wall jack, just replace the handset and your
machine does the rest. Selecting ON allows the fax machine to receive fax calls
automatically, even if you lift the handset of an extension or external phone. Selecting
SEMI lets the machine receive the call only if you’ve answered it at the fax machine.
Selecting OFF means you’ll have to activate the fax machine yourself, by pressing
Fax Start or by pressing 5 1 if you are not at your machine.
External or Extension Telephone
If you’ve set the feature to ON, but your fax machine doesn’t automatically connect a
fax call when you lift an external or extension phone handset, press the Fax Receive
code 5 1. At the fax machine lift the handset, and then press Fax Start.
1
Press Menu/Set, 2, 3.
and
For FAX/TEL Mode Only, page 5-6
3.EASY RECEIVE
(See
Operation from
.)
2
3
5 - 4
SETUP RECEIVE
or
Press to select ON, SEMI or OFF,
and then press Menu/Set.
Press Stop/Exit.
Page 17

Printing a Reduced Incoming Fax
You can always reduce the size of an incoming fax to a fixed percentage, regardless
of the size of the paper (up to legal) in your fax machine. If you choose AUTO, your
machine chooses the level of reduction for you.
1
Press Menu/Set, 2, 5.
5.REDUCTION
2
3
or
Press to select the reduction ratio you want (AUTO, 100%, 93%, 87% or 75%),
and then press Menu/Set. Choose 100% if you don't want a reduction.
Press Stop/Exit.
Recommended Reductions
If your paper is letter size (8.5" × 11"), and the incoming fax is
letter size, select 93%
A4, select 87%
legal size, select 75%.
If your paper is legal size (8.5" × 14"), and the incoming fax is
letter size, select 100%
A4, select 100%
legal size, select 93%.
If your paper is A4 (8.2" × 11.6"), and the incoming fax is
letter size, select 100%
A4, select 93%
Setting Paper Size
You can use three sizes of paper for printing your faxes—letter, legal and A4. When
you change the kind of paper in the paper tray, you will need to change the setting for
paper size, so your machine will know how to fit the incoming fax on the page. You
can also select the level of page reduction to fit the paper in your machine.
1
Press Menu/Set, 2, 6.
6.PAPER
2
3
4
5
or
Press to select LETTER, LEGAL or A4, and then press Menu/Set.
Press 1 if you want to change the reduction
setting—OR—Press 2 to go to Step 5.
or
Press to select AUTO, 100%, 93%, 87% or 75%, and then press Menu/Set.
Press Stop/Exit.
CHANGE REDUCTION
1.YES 2.NO
SETUP RECEIVE
5 - 5
Page 18

Advanced Receiving Operations
Operation from External or Extension Telephone
If you answer a fax call on an extension phone or on an external phone in the EXT.
jack, you can make your fax machine take over by using the Fax Receive Code. When
you press the Fax Receive Code 5 1, the fax machine starts to receive a fax.
(See Easy Receive, page 5-4.)
If the fax machine answers a voice call and double-rings for you to take over, use the
Telephone Answer Code # 5 1 to take the call at an extension phone.
(See Setting F/T Ring Time, page 5-3.)
If you answer a call, and no one is on the line, assume you’re receiving a fax. At the fax
machine phone, press Fax Start, then hang up. At an extension phone, press 5 1,
wait for fax receiving tones (chirps), then hang up. At an external phone, press
5 1 and wait for the phone to be disconnected (the LCD shows
you hang up. (Your caller will have to press Fax Start to send the fax.)
For FAX/TEL Mode Only
When the fax machine is in FAX/TEL mode, it will use the F/T Ring Time
(double-ringing) to alert you to a voice call. If you’re at the fax machine, you can lift
the handset to answer.
If you’re at an extension phone, you’ll need to lift the handset during the F/T Ring Time,
and then press
wants to send you a fax, send the call back to the fax machine by pressing
# 5 1
between the double-rings. If no one is on the line, or if someone
RECEIVE
) before
5 1
.
Changing Remote Codes
Remote Codes might not work with some telephone systems. The preset Fax Receive
Code is 5 1. The preset Telephone Answer Code is # 5 1.
If you are always disconnected when accessing your external TAD remotely, try
changing the Fax Receive Code from 5 1 to # # # and the Telephone Answer Code
from # 5 1 to 9 9 9.
To Change Remote Codes
1
Press Menu/Set, 2, 4.
2
3
4
5
5 - 6
SETUP RECEIVE
or
Press to select ON (or OFF), and then press
Menu/Set.
If you want to, enter a new Fax Receive Code, and
then press Menu/Set.
If you want to, enter a new Telephone Answer
Code, and then press Menu/Set.
Press Stop/Exit.
4.REMOTE CODE
FAX RECEIVE:*51
TEL ANSWER:#51
Page 19

Polling
Polling is the process of retrieving faxes from another fax machine. You can use your
fax machine to “poll” other machines, or you can have someone poll your machine.
All parties involved in polling need to set up their fax machines to accommodate
polling. When someone polls your machine to receive a fax, they pay for the call; if
you poll someone’s fax machine to receive a fax, you pay for the call.
(See Canceling a Scheduled Job, page 6-9.)
Some fax machines do not respond to the Polling feature.
Setting Up Sequential Polling Receive
Your fax machine can request documents from several fax units in a single operation.
Afterward, a Sequential Polling Report will be printed.
1
Press Menu/Set, 2, 7.
The LCD shows:
2
Press to select Polling ON.
or
3
Press Menu/Set. The LCD prompts you to
enter the fax numbers to be polled.
4
Specify the destination fax machines you wish to poll, using One Touch, Speed Dial
or a Group.
5
Press Fax Start.
Your fax machine will poll each number or
group member in turn for an original.
7.POLLING RX
POLLING RX:ON?
ENTER FAX NO.
ACCEPTED
DIALING
Setting Up for Polled Transmit
Polling Transmit is when you set up your fax machine to wait with a document so
another fax machine can retrieve it.
1
Place the document to be retrieved face down in the ADF.
2
Press Menu/Set, 3, 8.
3
Press to choose ON, and then press
or
Menu/Set.
4
Press 1 if you want to select additional settings. The LCD returns to the SETUP
SEND menu—OR—Press 2 if you are finished choosing settings and go to step 5.
5
Press Fax Start. The LCD displays POLLED WAITING.
If you prefer to have the document waiting in memory, press Quick-Scan/Reports
before pressing Fax Start.
8.POLLED TX
POLLED TX:ON?
SETUP RECEIVE
5 - 7
Page 20

6
Setup Send
Before You Begin
Before you begin sending faxes, make sure you read all the instructions and cautions
for placing originals in the automatic document feeder.
Automatic Document Feeder (ADF)
■ Originals must be between 5.8 and 8.5 inches wide and between 5.9 and 23.7 inches
long. Your fax machine can scan an image only 8.2 inches wide, regardless of the
paper width.
■ Make sure you place the original face down, top edge first in the ADF.
■ Adjust the paper guides to fit the width of your original.
Paper guides
■ The ADF can hold up to 20 pages (17lb -20 lb), feeding each one individually through
the fax machine. Use standard (17 lb –24 lb) paper when using the ADF; if you’re
using heavier paper, feed each sheet individually to prevent paper jams.
DO NOT use curled, wrinkled, folded or ripped paper, or paper with staples, paper
clips, paste or tape attached. DO NOT use cardboard, newspaper or fabric.
■ Make sure originals written with ink are completely dry.
If you want to change from Standard resolution, press Resolution to select the type
of original before you send the fax. (See Resolution, page 6-6.)
6 - 1
SETUP SEND
Page 21

Manual Transmission
Manual transmission lets you hear the dial tone, ringing and fax receiving tones before
sending the fax.
1
Place the original face down in the ADF.
2
Pick up the handset and listen for a dial tone
—OR—press Speaker phone and listen for a dial tone.
3
Enter the fax number you want to call. (You can enter the digits using the dial pad, or
you can enter a One Touch or Speed Dial number, or you can call using
Search/Speed Dial.) (See One Touch Dialing, page 7-4 and Search, page 7-6.)
4
When you hear the fax tone, press Fax Start.
5
If you’re using the handset, hang up.
Automatic Transmission
This is the easiest way to send a fax.
IMPORTANT: Do not pick up the handset or press Speaker phone.
1
Place the original face down in the ADF.
2
Enter the fax number using One Touch, Speed Dial, Search or the dial pad.
(See One Touch Dialing, Speed Dialing and Search, pages 7-4 to 7-6.)
3
Press Fax Start.
Manual and Automatic Fax Redial
If you’re sending a fax manually and the line is busy, press Redial/Pause to try
again. Anytime you want to make a second call to the last number dialed, press
Redial/Pause to save time.
If you’re sending a fax automatically and the line is busy, the fax machine will redial
automatically up to three times at 5 minute intervals.
SETUP SEND
6 - 2
Page 22

Quick-Scan Fax Transmission
You can scan a fax into the fax machine’s memory to be sent as soon as the scan is
complete. This way, you don’t have to wait for the entire fax to be transmitted before
you retrieve your original.
If you get an OUT OF MEMORY message while scanning the first page of a fax,
press Stop/Exit to cancel the scan. If you get an OUT OF MEMORY message
while scanning in a subsequent page, you’ll have the option to press Fax Start to
transmit the pages scanned so far, or to press Stop/Exit to cancel the Quick Scan
operation.
1
Place the original face down in the ADF.
2
Press Quick-Scan/Reports. The LCD indicates how much memory is available.
3
Enter the fax number.
4
Press Fax Start to begin scanning the document into memory. Once the scan is
complete, the fax machine dials the call.
Basic Sending Operations
Composing Electronic Cover Page
The cover page is generated at the receiving party’s machine. Your cover page
includes the name stored in the One Touch or Speed Dial memory. If you’re dialing
manually, the name is left blank.
(See One Touch Dialing, page 7-4 and Speed Dialing, page 7-5)
The cover page indicates the fax is from your Station ID, and the number of pages
you’re sending. If you have Coverpage Setup set to ON (Menu/Set 3 1), the number
of pages remains blank. (See Setting Station ID, page 4-1)
Most of the SETUP SEND settings are temporary to allow you to make adjustments
for each original you send. However, so that you can set up your cover page and cover
page comments in advance, the Cover Page Setup and Cover Page Message settings
will change their default settings.
You can select a comment to include on your cover page.
1.COMMENT OFF
2.PLEASE CALL
3.URGENT
4.CONFIDENTIAL
Instead of using one of the comments above, you can enter up to two customized
messages, each 27 characters long. Use the chart on page 25 to help enter characters.
6 - 3
SETUP SEND
Page 23

Cover Page for Next Fax Only
Make sure the Station ID is set up (See Setting Station ID, page 4-1). This feature does
not work without the Station ID.
You can set the fax to send a cover page with a particular original. This cover page
will include the number of pages in your original.
1
Place the original in the ADF.
2
Press Menu/Set, 3, 1.
3
When the LCD shows NEXT FAX ONLY?, press Menu/Set.
4
Press to select ON.
or
5
Press Menu/Set.
6
Press to view the comment selections.
or
7
Press Menu/Set when the LCD shows your
selection.
8
Enter two digits to indicate the number of
pages your are sending. (Enter 0 0 to leave the
number of pages blank.) If you make a
mistake, press to back up and reenter the
number of pages.
9
Press Menu/Set. The LCD shows:
10
Press 1 if you want to select additional
settings. The LCD returns to the Setup Send
menu—OR—Press 2 if you are finished
choosing settings, and go to Step 11.
11
Enter the fax number you’re calling.
12
Press Fax Start.
1.COMMENT OFF
2.PLEASE CALL
3.URGENT
4.CONFIDENTIAL
5.(USER DEFINED)
6.(USER DEFINED)
ACCEPTED
OTHER SETTINGS?
Always Send a Cover Page
Make sure Station ID is set up (See Setting Station ID, page 4-1). This feature does not
work without the Station ID.
You can set the fax machine to send a cover page whenever you send a fax. The
number of pages in your fax is not included when you use this setting.
1
Press Menu/Set, 3, 1.
2
Press to select.
or
3
Press Menu/Set when the LCD shows
COVERPAGE: ON?. (If you select ON, a
coverpage is always sent when you send a fax.)
COVERPAGE:OFF?
COVERPAGE:ON?
SETUP SEND
6 - 4
Page 24

4
If you selected ON, you must select a
comment. Press to view possible
selections. (You can select your custom
comment.)
or
1.COMMENT OFF
2.PLEASE CALL
3.URGENT
4.CONFIDENTIAL
5.(USER DEFINED)
6.(USER DEFINED)
5
Press Menu/Set when the LCD shows your
selection. The LCD shows:
6
Press 1 if you want to select additional settings. The
LCD returns to the Setup Send menu—OR—Press 2
to exit if you are finished choosing settings.
ACCEPTED
OTHER SETTINGS?
Using a Printed Cover Page
If you prefer using a printed cover page that you can write on, you can print the sample
page and attach it to your fax.
1
Press Menu/Set, 3, 1.
2
Press to select PRINT SAMPLE?.
or
3
Press Menu/Set when the LCD shows your selection. Your fax machine prints a copy
of your cover page.
- - -
COVER PAGE
- - -
TO:
FROM:
FAX:
TEL:
COMMENT:
PAGE[S] TO FOLLOW
1.COVERPG SETUP
- - -
- - -
Composing Your Own Comments
1
Press Menu/Set, 3, 2. The LCD shows: COVERPAGE MSG.
2
Press to choose position 5 or 6 for your customized comment.
or
3
Press Menu/Set.
4
Use the dial pad to enter your customized comment (up to 27 characters).
5
Press Menu/Set. The LCD shows:
6
Press 1 if you want to select additional
settings. The display returns to the Setup Send
menu—OR—Press 2 to exit.
6 - 5
SETUP SEND
ACCEPTED
OTHER SETTINGS?
Page 25

Contrast
If your original is very light or very dark, you might want to set the contrast accordingly.
Use
S.LIGHT
1
Place the original face down in the ADF.
2
Press Menu/Set, 3, 3.
to send a very light original. Use
S.DARK
3.CONTRAST
to send a very dark original.
3
4
5
or
Press to select AUTO, S.LIGHT or
S.DARK, and then press Menu/Set.
Press 2 if you are finished choosing settings, and go to Step 5—OR—Press 1 if you
want to select additional settings. The display returns to the Setup Send menu.
Enter a fax number, and then press Fax Start to send a fax—OR—Press Copy to
make a copy.
Resolution
When you have an original in the ADF, you can use the Resolution key. Press
Resolution continuously until you see your selection on the LCD.
STANDARD Suitable for most typed originals.
FINE
S. FINE
PHOTO Use when original has varying shades of gray; slowest
Good for small print; transmits a little slower than standard resolution.
Good for small print or artwork; transmits slower than fine
resolution.
transmission time.
Advanced Sending Operations
Overseas Mode
If you have difficulty sending a fax overseas, use the Overseas mode.
After you send a fax using this feature, the feature turns itself off.
1
Place the original face down in the ADF.
2
Press Menu/Set, 3, 5.
5.OVERSEAS MODE
3
4
5
6
or
Press to select ON (or OFF), and then press
Menu/Set.
Press 1 if you want to select additional settings. The LCD returns to the Setup Send
menu—OR—Press 2 if you are finished choosing settings, and then go to Step 5.
Enter the fax number you’re calling.
Press Fax Start.
SETUP SEND
6 - 6
Page 26

Call Reservation / Call Back Message
You can send a fax and let the other person know that you want to have a conversation
after the fax transmission is complete. The receiving fax machine will ring as if it were
receiving a telephone call and shows CALL PICKUP. If the other party picks up the
handset, your fax machine will ring. Lift the handset to speak.
If you set Call Reservation and Call Back Message to ON, your fax machine leaves a
message if the other party does not answer.
1
Place the original in the ADF.
2
Press Menu/Set, 3, 6. The LCD shows the
current setting for Call Reservation.
3
Press to select ON (or OFF).
or
4
If you set Call Reservation to ON, press
Menu/Set when the LCD shows your
selection. The LCD shows the current setting
for Call Back Message.
5
Press to select ON (or OFF).
or
6
Press Menu/Set when the LCD shows your
selection. The LCD shows
7
Press 1 if you want to select additional settings.
The LCD returns to the SETUP SEND menu—OR—Press 2 if you are finished
choosing settings, and go to Step 8. The LCD prompts you to enter the fax number you
want to call.
8
Enter the fax number.
9
Press Fax Start.
10
If you’ve set Call Reservation to ON, pick up your handset if the fax machine rings.
You cannot use auto redial with Call Reservation. You cannot use Call Reservation
with Delayed Transmission or with Polling. You must register your Station ID to set
Call Back Message to ON.
6.CALL RESERVE
CALL RESERVE:OFF
CALL RESERVE:ON
CALL BACK:OFF?
CALL BACK:ON?
ACCEPTED
OTHER SETTINGS?
Print Sample Call Back Message
1
Press Menu/Set, 3, 6.
2
Press to select PRINT SAMPLE?.
or
3
Press Menu/Set.
6 - 7
SETUP SEND
6.CALL RESERVE
Page 27

Delayed FAX
You can use this setting to send a fax up to 24 hours later.
1
Place the original face down in the ADF.
2
You can press Quick-Scan/Reports to use memory transmission—OR—
Leave the original in the ADF to be scanned at the specified time.
3
Press Menu/Set, 3, 7.
4
Enter the time you want the fax to be sent, in
24-hour format, and then press
Menu/Set. (For example, enter 1945 for 7:45 PM)
5
Press Menu/Set.
6
Press 1 if you want to select additional
settings. The LCD returns to the Setup Send
menu.
—OR—
Press 2 if you are finished choosing settings
and go to Step 7. The LCD prompts you to
enter the fax number.
7
Enter the fax number.
8
Press Fax Start. The machine will wait to send the fax at the time you set up.
7.DELAYED FAX
ACCEPTED
OTHER SETTINGS?
1.YES 2.NO
MEMORY 100%
ENTER FAX NO.
Setting Up for Polled Transmit
Polling Transmit is when you set up your fax machine to wait with a document so
another fax machine can retrieve it.
1
Place the document to be retrieved face down in the ADF.
1
Press Menu/Set, 3, 8.
8.POLLED TX
2
Press to choose ON, and then press
or
Menu/Set.
3
Press 1 if you want to select additional settings. The LCD returns to the SETUP
SEND menu—OR—Press 2 if you are finished choosing settings and go to step 5.
4
Press Fax Start. The LCD displays POLLED WAITING.
If you prefer to have the document waiting in memory, press Quick-Scan/Reports
before pressing Fax Start.
POLLED TX:ON?
SETUP SEND
6 - 8
Page 28

Canceling a Scheduled Job
or
You can cancel tasks you’ve scheduled, such as Delayed Fax or Polling Transmit.
1
Press Menu/Set, 4. Any waiting jobs appear on
the LCD. If there are no jobs waiting, the LCD
shows NO JOB WAITING.
2
If you have more than two jobs waiting, press to select the job you want to
cancel, and then press Menu/Set.
—OR—
If you have only one job waiting, go to Step 3.
3
Press 1 to cancel—OR—Press 2 to exit without canceling.
4
Press Stop/Exit.
4.CANCEL JOB
Interrupting Delayed Fax and Polled Transmit Jobs
You can send a fax or make a copy now, even if you have the fax machine set to send
a fax later or if you have it set to be polled. However, you cannot use automatic redial
or the Menu mode.
1
Press Menu/Set, 5.
2
Wait two seconds, and then remove the original
that is waiting in the ADF.
3
Place the original you want to send now face
down in the ADF.
4
Enter the number for the fax you want to send
now.
5
Press Fax Start.
6
After the transmission is finished, return the first original to the ADF.
7
Press Menu/Set, 5 to restore the Delayed Fax and/or Polling.
If you have set up a Delayed Fax or Polled Transmit job, the machine will send an
original without storing it in memory.
REMOVE ORIGINAL
INSERT ORIGINAL
6 - 9
SETUP SEND
Page 29

Auto Dial Numbers
7
and Dialing Options
Storing Numbers for Easy Dialing
You can set up your fax machine to do three types of easy dialing:
One Touch, Speed Dial and Groups for Broadcasting of faxes.
If you lose electrical power, auto dial numbers in memory will not be lost.
Storing One Touch Dial Numbers
You can store twelve fax/phone numbers that you can dial by pressing one key (and
Fax Start). To access numbers 07 to 12, hold down Shift. You also can store names
with these numbers. When you press a One Touch dial key, the LCD shows the name
or number as the call is dialed.
One Touch keys are not the dial pad keys. They are the six keys (numbers 01–12)
located on the left side of the control panel.
1
Press Menu/Set, 6, 1.
2
Press the One Touch key where you want to store a number.
(USA Only) For your convenience, One Touch key 1 is pre-programmed for the
Brother fax-back system. You can change this number if you wish.
1.ONE-TOUCH DIAL
3
Enter a number (up to 20 digits), and then press
Menu/Set.
If you want to enter a pause in the dialing sequence (to wait for an “outside line,” for
example), press
enters a 3.5-second pause when the number is dialed, and a dash appears on the LCD.
4
Use the dial pad to enter the name or company
(up to 15 characters), and then press Menu/Set.
—OR—To store the number without a name, press
Menu/Set.
(See Details for Entering Text, page 4-2.)
5
Press to select the type of number, and then press Menu/Set.
FAX a fax only number
TEL a telephone (voice) number
FAX/TEL both a fax and telephone (voice) number
CHAIN a number (usually an access code) for chain dialing
AUTO DIAL NUMBERS AND DIALING OPTIONS
For example, press One Touch key 2:
Redial/Pause
or
as you’re entering digits. Pressing
*O2:
Redial/Pause
NAME:
7 - 1
Page 30

6
Return to Step 2 to store another One Touch number—OR—Press Stop/Exit.
When you dial an AUTO DIAL number the LCD shows the name you’ve stored,
or if you haven’t stored a name, the number you’ve stored.
If you must wait for another dial tone at any point in the dialing sequence, store a
pause at that place in the number by pressing Redial/Pause. Each key press adds a
3.5 second pause.
You can use chain dialing to store long dialing sequences. For example, to store
9 1 201 555 1234 987 65 4321, divide the number into two parts. Store the first part
as a Chain type number (this tells the system that the dialing sequence is not
complete).
CHAIN—9 1 201 555 1234
The last part of the One Touch number must be stored as any of the other following
three types.
FAX or FAX/TEL or TEL—987 65 4321
Now when you dial, just press the two keys (one after the other in order) where you’ve
stored the two parts of the number.
Storing Speed Dial Numbers
You can store Speed Dial numbers, so you can dial by pressing only four keys and Fax
Start. There are 100 Speed Dial numbers.
1
Press Menu/Set, 6, 2.
2
Use the dial pad to enter a two-digit number
(00–99), and then press Menu/Set.
3
Enter the number (up to 20 digits),
and then press Menu/Set.
4
Use the dial pad to enter the name or company
(up to 15 characters), and then press
Menu/Set—OR—Press Menu/Set to store
the number without a name. (See Details for Entering Text, page 4-2.)
2.SPEED-DIAL
SPEED-DIAL? #
#05:
NAME:
5
6
7 - 2
AUTO DIAL NUMBERS AND DIALING OPTIONS
or
Press to select the type of number, and then press Menu/Set.
FAX a fax only number
TEL a telephone (voice) number
FAX/TEL both a fax and telephone (voice) number
CHAIN a number (usually an access code) for chain dialing
Return to Step 2 to store another Speed Dial number—OR—Press Stop/Exit.
 Loading...