

Page 1
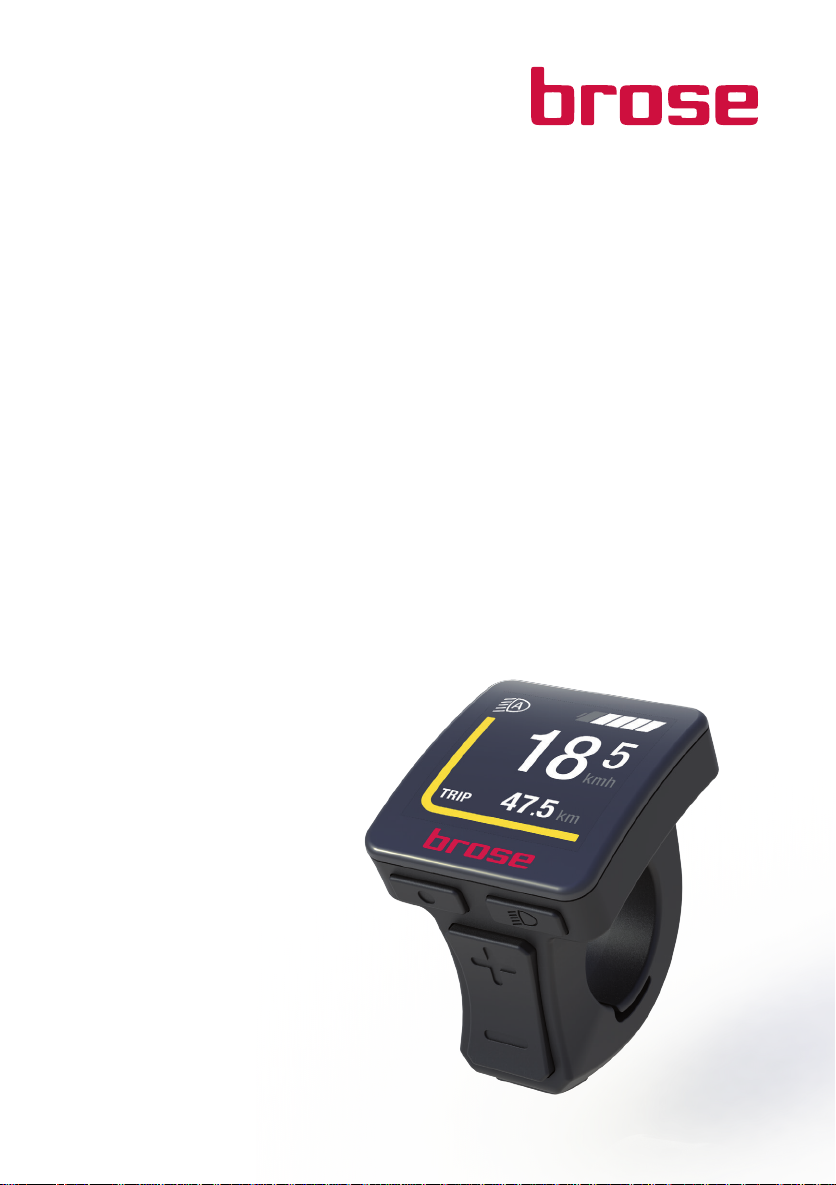
Brose Display Allround
E 41230
N User Manual
E
Page 2
Brose Display Allround2
km
kmh
18
5
47.5
5
A
5
WALK
kmh
18
5
kmh
3
B
C
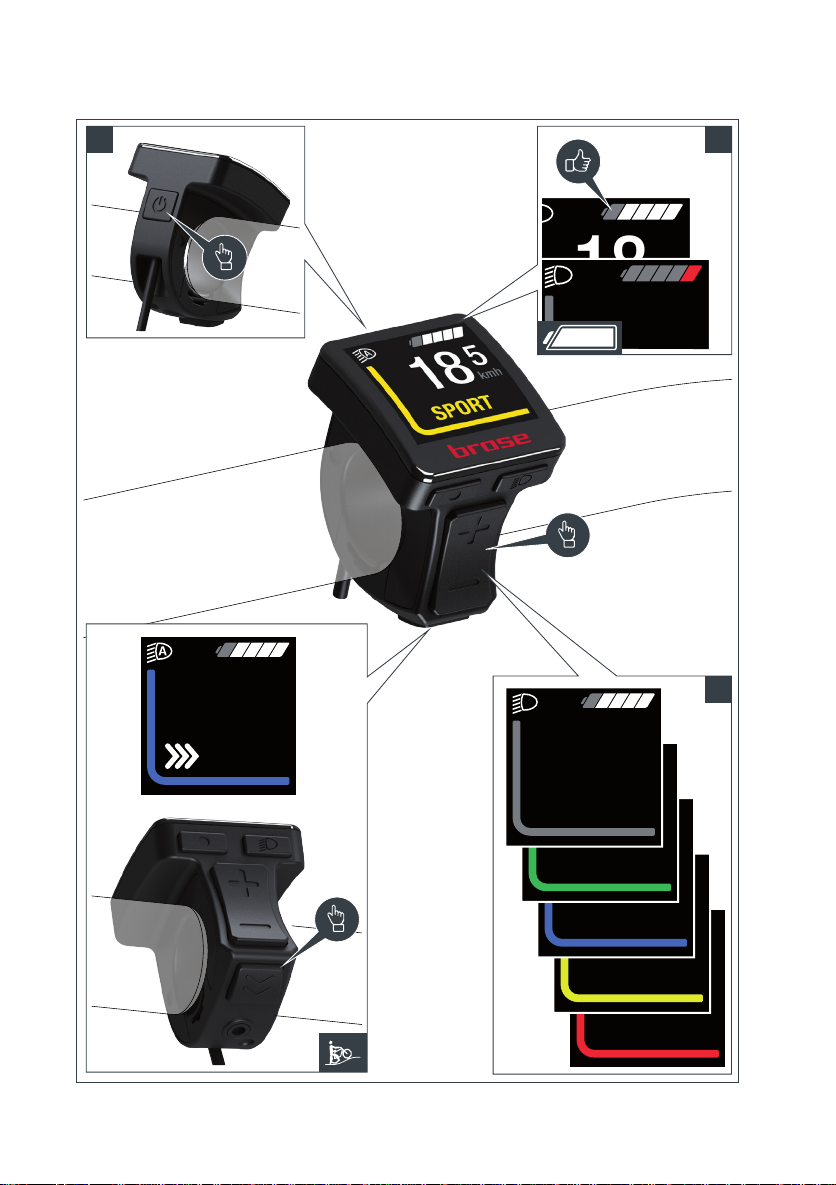
A. Schnellstart / Quickstart
OFF
ECO
TOUR
SPORT
BOOST
Page 3
Brose Display Allround 3
(a)
(b)
(c)
(d)
(e)
(f)
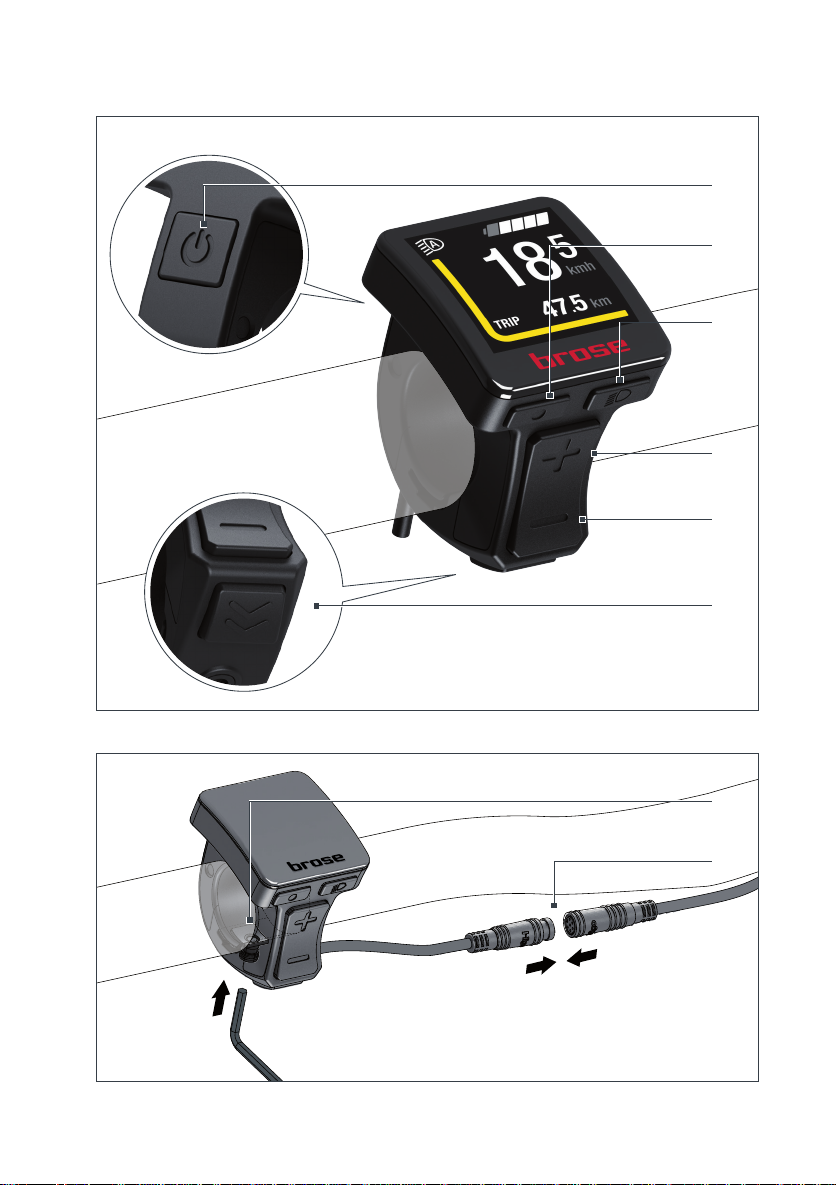
B. Tastenbelegung / key assignment
Inbus 2
C. Montage / Assambly
(g)
(h)
Page 4
Table of Contents
1. Safety Advice 22
2. Intended Use 24
3. Product Description 24
4. Assembly 26
5. Operation and Control 26
5.4.1. Display 28
5.4.2. Menu and Settings 31
Safety Advice | Brose Display AllroundEN | 22
6. Troubleshooting 34
7. Service 36
The user manual contains important
information about the use and settings of
Brose components.
This user manual is based on the standards
and regulations valid in the European Union.
Read the operating instructions, especially the
safety instructions, carefully in the following
chapter before using the Brose Drive System.
Failure to follow the instructions in the user
manual may result in serious injury or damage
to your e-bike. Keep the operating instructions
at hand for further use.
If you pass on the Brose components to third
parties, please always include the respective
user manual.
1. Safety Advice
Read the user manual carefully
and observe all safety advice and
instructions.
› The «Allround» display and control unit
is part of the drive system of your e-bike.
Read and observe the safety advice and
instructions in this manual as well as in
all other instructions enclosed with the
e-bike. Only then is the safe use of the
e-bike possible.
The term «e-bike» used in this user
manual relates to electric bikes, pedelecs
and EPAC. It is an electric bicycle with
electronic assistance.
The term «battery» refers equally to
mounted down tube batteries, luggage
carrier batteries and batteries integrated in
the frame.
The term battery is used synonymously for
rechargeable energy stores.
› Failure to comply with or observe the
safety advice and instructions may result
in electric shock, fire and/or serious injury.
› Keep this user manual and all other
enclosed information for future reference.
› Do not open the «Allround» control unit.
Opening the control unit can destroy it and
the warranty claim becomes void.
› Never open the drive unit. This is low
maintenance and must be repaired only by
Page 5

Brose Display Allround | Safety Advice 23 | EN
qualified personnel and only with original
spare parts. The drive unit requires an
inspection by a certified service centre
after 15,000 km.
» This preserves the safety of the drive
unit. Unauthorised opening of the drive
unit voids the warranty claim.
› The walk assist may only be used when
pushing the e-bike.
» If the e-bike wheels have no ground
contact when using the Walk assist,
there is a risk of injury.
› All components belonging to the Brose
Drive System as well as components
that are mounted on the drive unit (e.g.
chainring, chainring mount, pedals)
must only be replaced with approved
components.
» This protects the drive unit from damage
(e.g. due to overload).
› Do not make any changes to your Brose
Drive System. Never try to increase the
performance of your Brose Drive System.
» You otherwise reduce the life of the
components and risk damaging the
Brose Drive System and your e-bike. In
addition, any kind of manipulation of the
Brose Drive System voids all guarantee
and warranty claims for your e-bike.
Improper use of the system will also
jeopardise your own safety and that of
other road users. Unauthorised changes
to the Brose Drive System could result
in high levels of personal liability or
even the risk of prosecution in the event
of accidents due to manipulation.
› Comply with all national regulations for
the approval and use of e-bikes. These
may differ depending on which country
you are in.
› Remove the battery from the e-bike
before handling it (e.g. before assembly,
maintenance, working on the chain, etc.),
and before transporting or storing it.
» Inadvertent activation of the Brose Drive
System may result in injury.
› Do not use the control unit as a handle. If
you lift the e-bike by the control unit, you
can irreparably damage the «Allround»
control unit.
› CAUTION! Using the control unit with
Bluetooth® may interfere with other
equipment, aircraft, and medical devices
(such as pacemakers or hearing aids).
Also, damage to humans and animals in the
immediate vicinity cannot be completely
ruled out. Do not use the control unit with
Bluetooth® near medical devices, petrol
stations, chemical plants, explosive areas,
and blasting areas.
› Do not use the control unit with Bluetooth®
in aircraft. Avoid operation for a long
period of time close to the body.
› The Bluetooth® word mark as well as the
logo(s) are registered trademarks owned
by Bluetooth SIG, Inc. Any use of this word
mark/symbol by Brose Antriebstechnik
GmbH and Co. is under license.
› NOTE: It ia possible that Bluetooth® is
not activated. For further questions please
contact an authorised bicycle dealer.
Page 6
Intended Use | Brose Display AllroundEN | 24
› Do not let the display and/or control
unit distract you.
If you do not focus solely on traffic, you
risk being involved in an accident. If you
want to make a keypad entry apart from
changing the assist mode and ride data,
stop and enter the appropriate data.
› ATTENTION: There is a risk of burns if the
motor housing is touched. Under extreme
conditions, e.g. sustained high load at low
speed when riding uphill or with a load,
temperatures >60°C can occur on some
parts of the drive.
› NOTE: Familiarise yourself with the
functions of the e-bike and its operation
before starting your first journey.
2. Intended Use
The «Allround» display and control unit of the
Brose Drive System is intended exclusively for
use in this system. It serves to display riderelevant information and to control the drive
unit.
› NOTE: Keep the user manual with you on
all trips. This will allow you to look up less
frequently needed functions at any time.
› DATA PRIVACY NOTE: If the on-board
computer is sent to the service department
for servicing, the data stored on the device
may be transmitted to service employees.
WARNING! Make the basic settings
on the control unit before starting
to ride. Unconcentrated riding
endangers you and other road users.
In addition to the functions shown here, it may be
that software changes for troubleshooting and
enhanced functions are introduced at any time.
3. Product Description
3.1. Brose Display Allround
The Brose displays ensure an optimal
interaction between cyclist and drive.
These new Brose control units are precisely
coordinated to the Brose Drive product family.
This allows the rider to enjoy a holistic e-bike
experience.
The functions are displayed on a 1.5 inch
colour screen. The convex screen can be
mounted flexibly on the right or left of the
handlebars and nestles seamlessly next to the
shifter or grip. Six specially emobossed control
buttons offer a sure feel and are ergonomically
positioned for optimum ease of use. For
optimal and quick readability, the selection of
data to be displayed can be set individually.
Page 7
Brose Display Allround | Product Description 25 | EN
3.2. Explanation of Illustrations
(a)
(b)
(c)
(d)
(e)
(f)
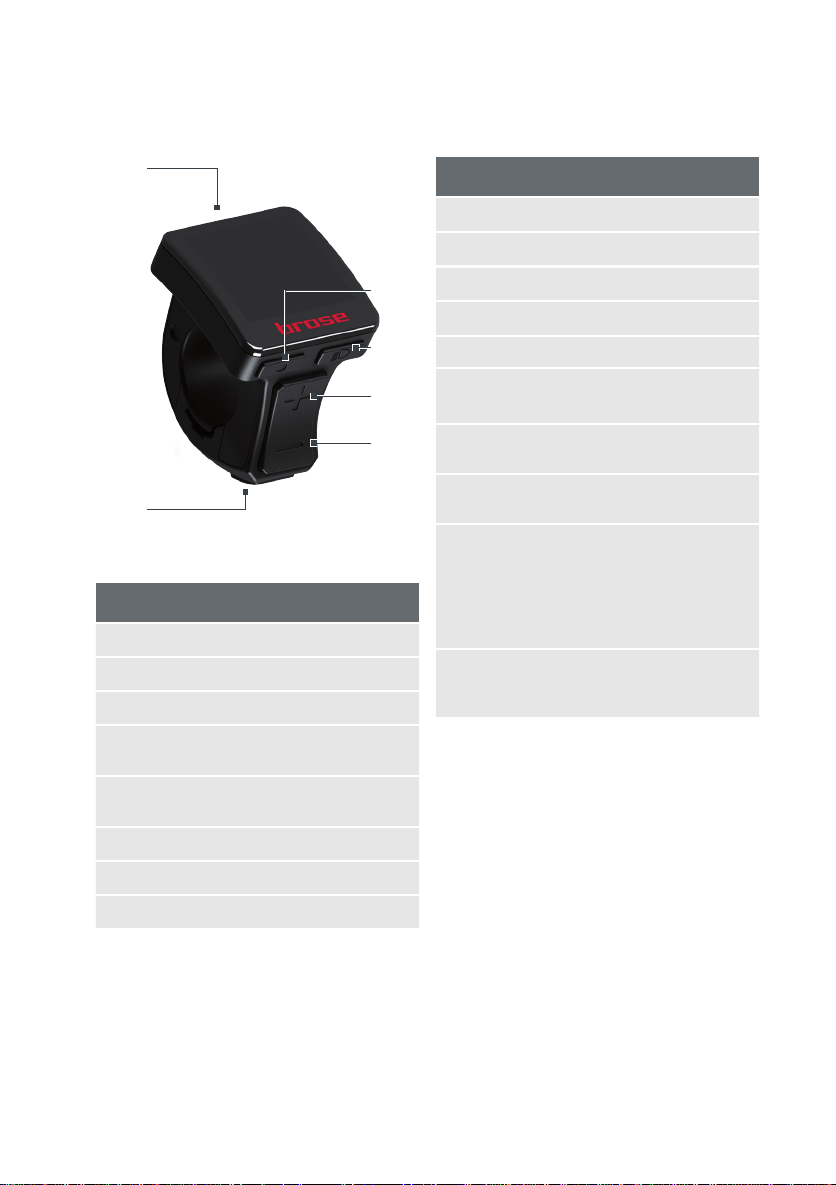
Fig. 1: Key Assignment
Allround display and control unit
(a) «On/Off» key
(b) «Menu» key / select key
(c) «Light» key
(d) «Increase» assistance level /
scroll menu up
(e) «Decrease» assistance level /
scroll menu down
(f) «Walk Assit» key / menu back one level
(g) Control unit grub screw
(h) Plugs
The numbering of the described components
also refers to the illustrations on the graphics
pages at the beginning of the manual. All
illustrations are schematic and may differ in
details from the actual features of your e-bike.
3.3. Technical Data
Allround display and control unit
Brose material no. E41230
L × W × H 44 × 37 × 50 mm
Weight, approx. 50 g
Handlebar (d) 22,2 mm
Electrical data 12V / max. 3W
Display 1,5 Zoll TFT colour display
(240 × 240 px)
Operating and storage
temperature
-10°C bis 60°C
IP X7 (HMI)
Dust-tight, water-tight
CE, ROHS, Reach,
Certificates
Bluetooth (EU,
Switzerland, USA,
Canada, Japan)
BLUETOOTH low energy® 5.0 (optional ANT+)
Frequency 2400–2480 MHz
Transmission power < 10 mW
3.4. Declaration of Conformity
Brose Antriebstechnik GmbH & CoKG hereby
declares that the «Display Allround» wireless
system complies with Directive 2014/53/
EU. The full text of the EU Declaration of
Conformity is available at the following Internet
address(Service/Servicetool):
www.brose-ebike.com
Page 8

4. Assembly
Assembly | Brose Display AllroundEN | 26
The control unit can be mounted on both the
left and the right side of the handlebar.
NOTE: Brose recommends positioning on the
left side of the handlebar.
NOTE: Check all fixing screws regularly.
Shocks, heat and cold can cause the screws
to become loose. Tighten all screws to the
required torque.
› Carefully remove the grip and open the
brake, gears and all other components
mounted on the selected handlebar side.
› Carefully loosen the hexagon socket screw
with a size 2 wrench (Fig. B-g) on the
control unit.
» NOTE: The screw cannot be removed
from the control unit.
› Now slide the control unit from the side
onto the handlebar.
› Position the control unit close to the grip,
so that all keys can be easily pressed with
the thumb.
› NOTE: Please make sure that the operation
of safety-relevant parts (e.g. brake grips)
is always ensured.
› Make sure that the connection cable is not
crushed or bent.
› Now tighten the hexagon socket screw
slightly with a size 2 wrench. Do not
tighten the screws yet. Check the position
of the control unit.
» Can all keys be reached with the thumb?
» Is the display clearly visible?
› Tighten the hexagon socket screw with the
wrench (Fig. B-g).
» Torque 0.5 Nm
› Connect the control unit cable to the motor
cable connectors (Fig. B-h). This may vary
depending on the features of your e-bike.
5. Operation and Control
5.1. Before First Use
Commissioning of the display and control unit
requires no further steps after installation. The
display/control unit is ready for use as soon
as it has been correctly connected and the
battery is sufficiently charged.
NOTE: A full function is only possible if the
speed sensor and all cables have been
connected correctly and the battery is
sufficiently charged.
NOTE: The display unit does not have its
own battery and therefore cannot be used or
operated outside the e-bike.
NOTE: If the e-bike is switched on, the display
unit remains switched on while riding; even if
the motor assistance is deactivated.
Page 9

Brose Display Allround | Operation and Control 27 | EN
5.2. Basic Control Elements
With the control unit keys, you can
ergonomically control the functions of the
e-bike system. The hand can remain on the
handlebar grip while the thumb operates
the control unit keys. The information on the
display tells you about the selected assistance
level and gives you more information about
your Brose Drive System.
Switch the e-bike on or off with the «On/Off»
key (Fig. A-a).
With the «Menu» key (Fig. A-b), a range of
information can be called up while riding.
Mit Use the «Increase» (Figure A-d) and
«Decrease» (Figure A-e) keys to increase or
decrease the assist level. If you are in a menu
(e.g. settings), you can use these two keys
to scroll up or down in the menu. Press the
«Menu» key (Fig. A-b) to confirm the settings.
You can go back one level at any time using
the «Walk assist» key (Fig. A-f). Changed
settings are saved.
NOTE: The menu and the settings menu cannot
be accessed while riding.
NOTE: All the interface illustrations and text on
the following pages correspond to the release
status of the software. Due to the fact that
the software can be updated several times
during a year, it is possible that the interface
illustrations and/or interface texts will change
slightly after an update.
5.3. Switching the Brose Drive
System On and Off
The Brose Drive System can only be operated
with a sufficiently charged battery.
Switching on
To switch on the e-bike system you have the
following options:
› With the e-bike battery inserted, briefly
press the «On/Off» key on the control unit
once.
› NOTE: Depending on the installed battery,
it may take a few moments for the display
to turn on.
› Press the «On/Off» key on the e-bike
battery (bicycle manufacturer-specific
solutions are possible that do not have
access to the battery «On/Off» key, see
battery/bicycle manufacturer‘s manual).
The display unit activates automatically.
› The Brose Drive System is now ready to
operate.
The drive is activated as soon as you pedal
(except in the «Walk Assist» function or in
the «OFF» assistance mode). The motor power
depends on the set assistance level on the
control unit.
As soon as you stop pedalling in normal
operation, or once you have reached a speed
of 25 km/h, the e-bike drive assistance
will be disabled. The drive is automatically
re-activated as soon as you pedal and the
speed is below 25 km/h.
Page 10
Operation and Control | Brose Display AllroundEN | 28
Switching off
To switch off the e-bike system you have the
following options:
Press the «On/Off» key on the control unit for
at least 1.5 seconds.
› Switch off by pressing the «On/Off» key on
the e-bike battery (bicycle manufacturerspecific solutions are possible that do
not have access to the battery «On/Off»
key, see battery/bicycle manufacturer‘s
manual). The system takes about
3 seconds to completely switch off. You
will not be able to turn the system on again
until it has completely shut down.
NOTE: Control and display unit, drive unit and
battery are completely switched off.
NOTE: If the e-bike drive power is not called
up for approx. 15 minutes (e.g. because the
e-bike is stationary) and no key is pressed on
the e-bike control unit, the e-bike system and
5.4. Display and Settings
thus the battery will switch off automatically
for energy saving reasons.
The time in which the control unit goes to
«Shutdown Time» can be adjusted to your
needs at any time in the settings (refer to the
«Settings» chapter).
NOTE: The control/ display unit is always
switched on; even if motor assistance is
deactivated («OFF»).
NOTE: Always turn off the Brose Drive System
when you stop the e-bike.
5.4.1. Display
(1)
(2)
(5)
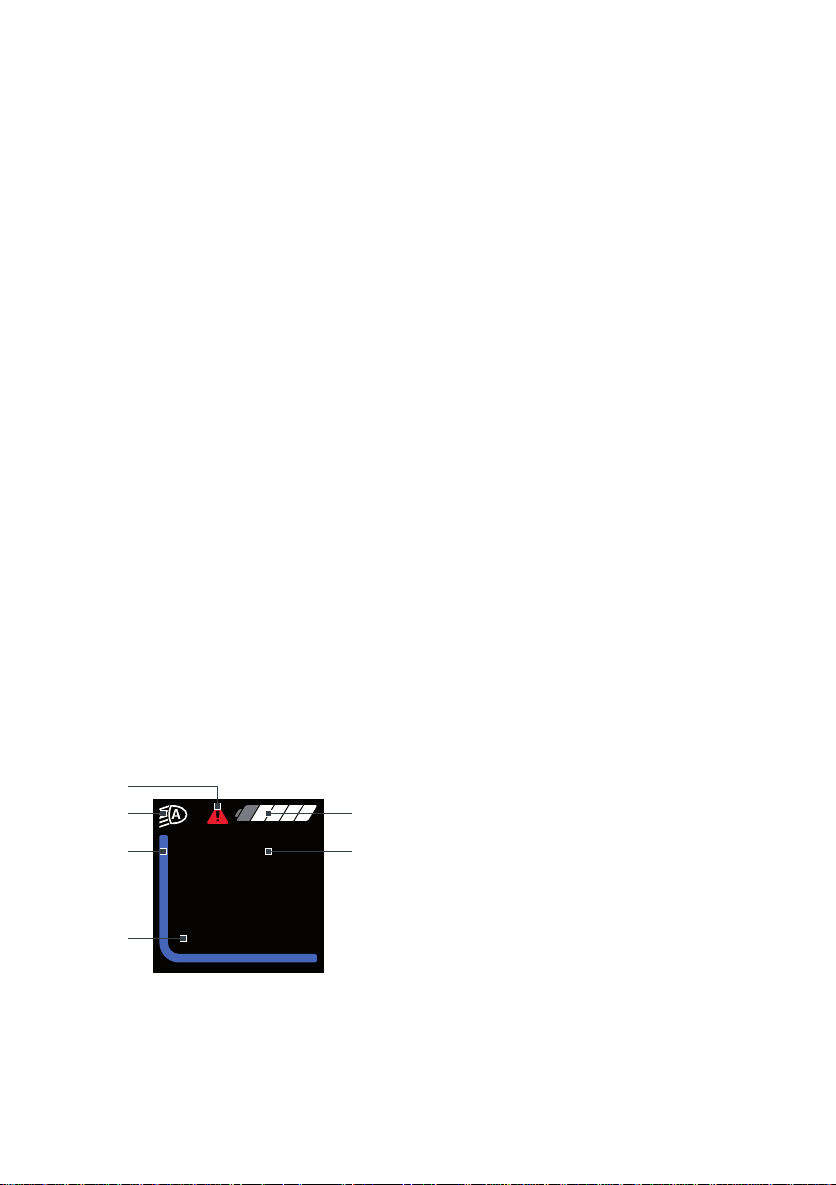
Fig. 2: Drive Mode
TRIP
18
47.5
5
kmh
km
The display (Fig. 1) offers an overview of the
following information:
(1) System status information (e.g. faults)
(2) Lighting indicator
(3)
(3) Battery charge level indicator
(6)(4)
(4) Display of current assistance
(5) Trip information (incl. unit)
(6) Speed (incl. unit)
The displays 1-3 form the status bar and are
displayed in the ride display on each screen.
With the «Menu» key you can also display
a range of information about your trip while
riding, so both hands can remain on the
handlebar while riding.
Page 11
Brose Display Allround | Operation and Control 29 | EN
Use the «Increase» and «Decrease» keys to
increase or decrease the assist level. If, for
example, you are in the settings menu, you can
use these keys to scroll up or down.
Bicycle lights
In the version in which the bike lights are
powered by the e-bike system, the front light
and the rear light can be switched on and off
simultaneously using the «Light» key (Fig. A-c)
on the control unit.
When the light is on, an icon appears in the
status bar (Fig.1-2) on the display.
Light status
Lighting not activated
Lighting switched on
Automatic control activated
Switching the bike lights on and off has no
influence on the display backlight.
Hinweis: Is the battery removed or fully
discharged, the light does not turn on if it
is connected to the electric power system.
Be aware that using the bicycle under these
conditions will be considered non-observance
of the road traffic laws.
Check
Speed
sensor
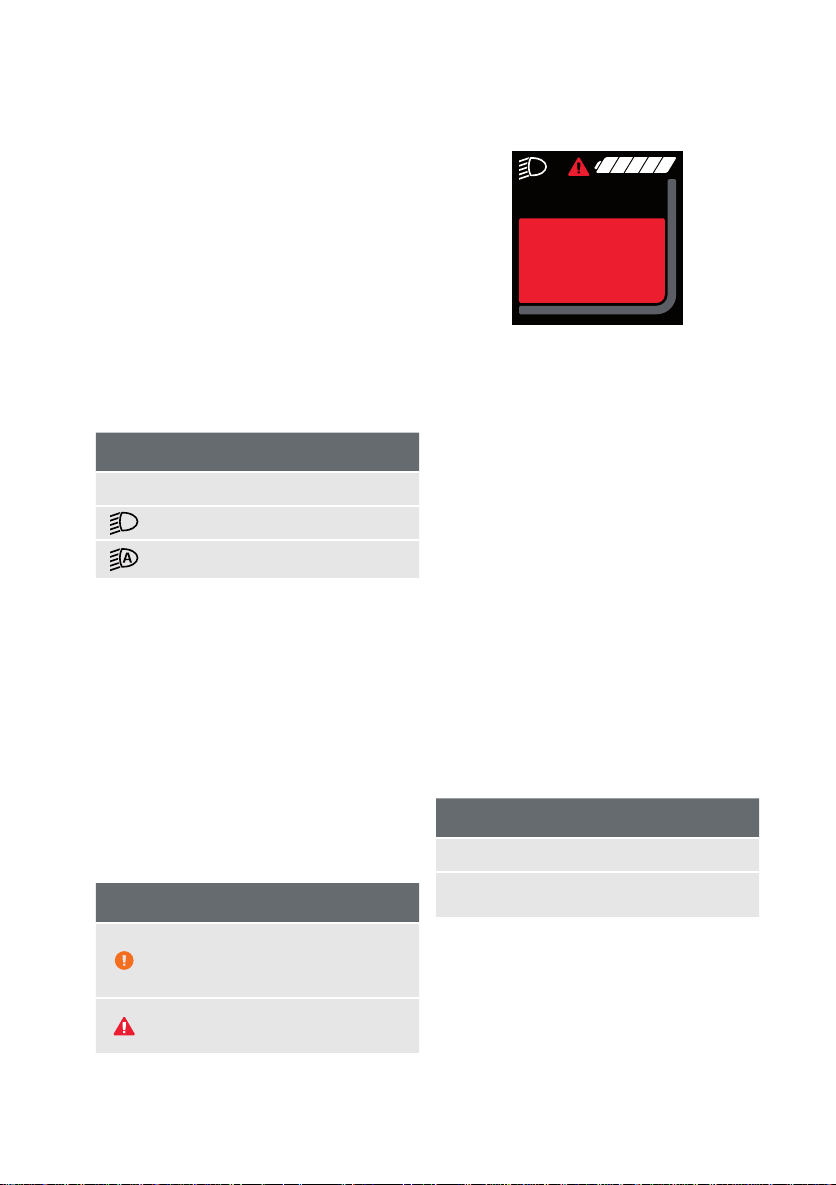
Fig. 3: Sample Error
Battery charge level
The battery charge level (Fig.1-3) is shown on
the display of the display unit with 5 segments.
Each segment corresponds to approx. 20% of
the battery capacity.
Depending on the features of your e-bike,
the battery charge level can also be from the
battery itself.
If the battery charge level is <10%, the
charge level indicator will start flashing. If the
charge state is <5%, the last segment of the
display turns red. In this condition, the motor
assistance is switched off to ensure the use
of lighting for an additional 2 hours in an
emergency.
kmh99,9
System information
The following is displayed to you in the status
bar:
Error & status symbols
Battery reserve is reached or
battery is drained and the system is
switched off
A fault has occurred (refer to
Troubleshooting chapter)
Charge level
white Battery capacity >10%
Battery capacity ≤10%
red
(last segment red)
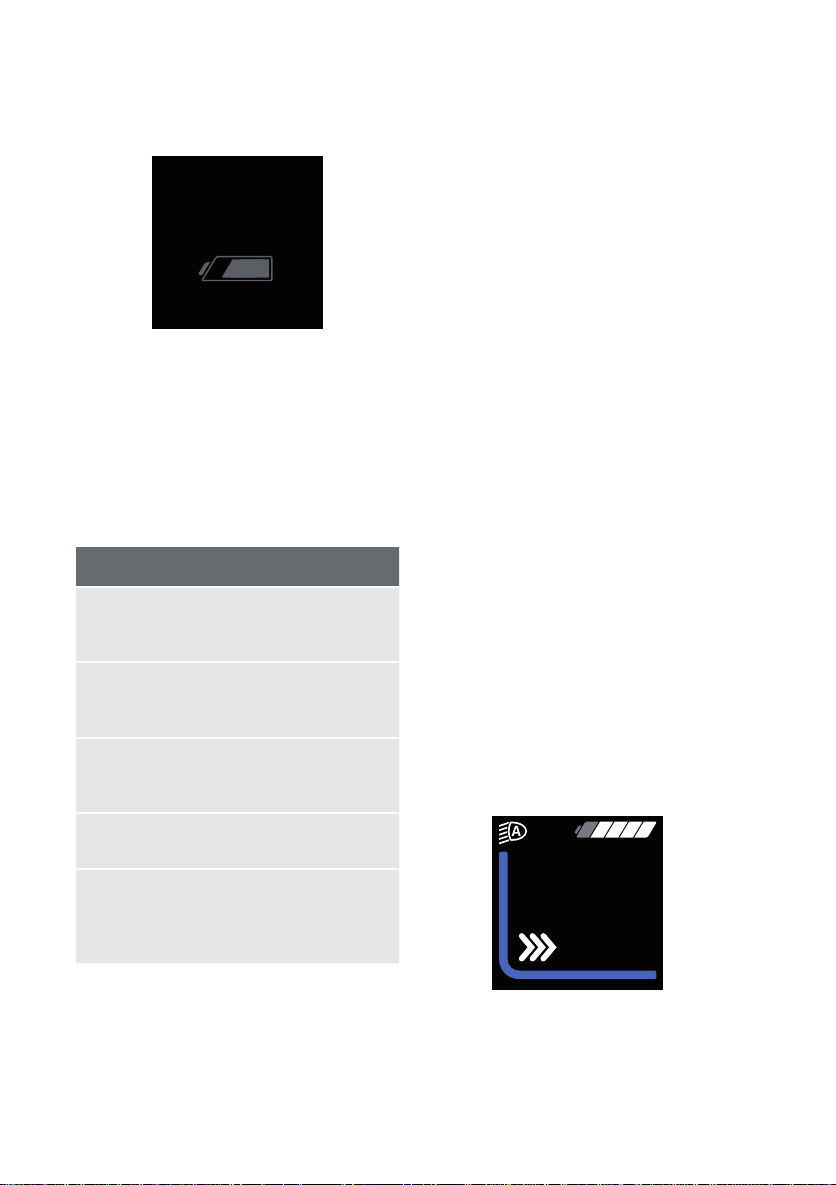
If the battery is being charged on the wheel, a
message will be displayed.
Page 12
Operation and Control | Brose Display AllroundEN | 30
75 %
Fig. 4: Battery Charging
Assistance level
Your Brose Drive System has four assistance
levels. While riding, you will see the level as a
coloured bar (Fig.1-4). The characteristics of
the respective assistance mode can be found
in the following table:
Assistance levels
(grey): No motor assistance. At
OFF
ECO
TOUR
the same time resistance-free
cycling.
(green): Noticeable motor
assistance for maximum
efficiency and range.
(blue): Very noticeable motor
assistance, ideal for lengthy
tours.
To increase the level of assistance, press the
«Increase key» (Fig. A-d) on the control panel until
the desired level of assistance appears on the
display; to decrease, press the «Decrease key» (Fig.
A-e).
For 2 seconds you will see the selected assistance
level in the ride information area (Fig. 1-5), also as
text.
Walk Assist
The Walk assist key (Fig. A-6) helps you to
push your e-bike.
It is activated as follows:
Press and hold the «Walk assist» key (Fig.
A-f). The e-bike accelerates without pedal
assistance to a speed between 3 and 6 km/h
specified by the bicycle manufacturer.
The trip information display (Fig.1-5) will show
you when Walk assist is activated.
Release the Walk assist key to deactivate the
Walk assist.
The Walk assist is switched off as soon as one
of the following occurs:
› You release the «Walk assist» key,
› the e-bike wheels are blocked (e.g. due to
braking or hitting an obstacle),
› the speed exceeds 6 km/h.
SPORT
BOOST/
BOOST FX
You can use the control unit to adjust how much
the e-bike drive assists you when pedalling. The
assistance level can be changed at any time, even
while riding.
(yellow): Powerful assistance for
sport cycling
(red): Full assistance for sport
cycling, on hilly routes and in
city traffic with normal battery
range
Fig. 5: Walk Assist (activ)
3
WALK
5
kmh
Page 13

Brose Display Allround | Operation and Control 31 | EN
NOTE: The Walk assist function may only be
used when pushing the e-bike. If the e-bike
wheels have no contact with the ground when
using the Walk assist, there is a risk of injury.
NOTE: The Walk assist cannot be activated in
the «OFF» assistance mode and in the menu
and Settings.
Changing the trip information view
Press the «Menu» key (Fig. A-b) on the display
unit to change between information about your
trip.
You can view the following information
› Range
› Time
› Route
› Trip time
› Average speed
› Maximum speed
› Total distance
NOTE: Some features may be deactivated
depending on the bike model. Detailed
information is available from your bike
manufacturer and your bike dealer.
The Menu and settings menu cannot be called
up whilst cycling.
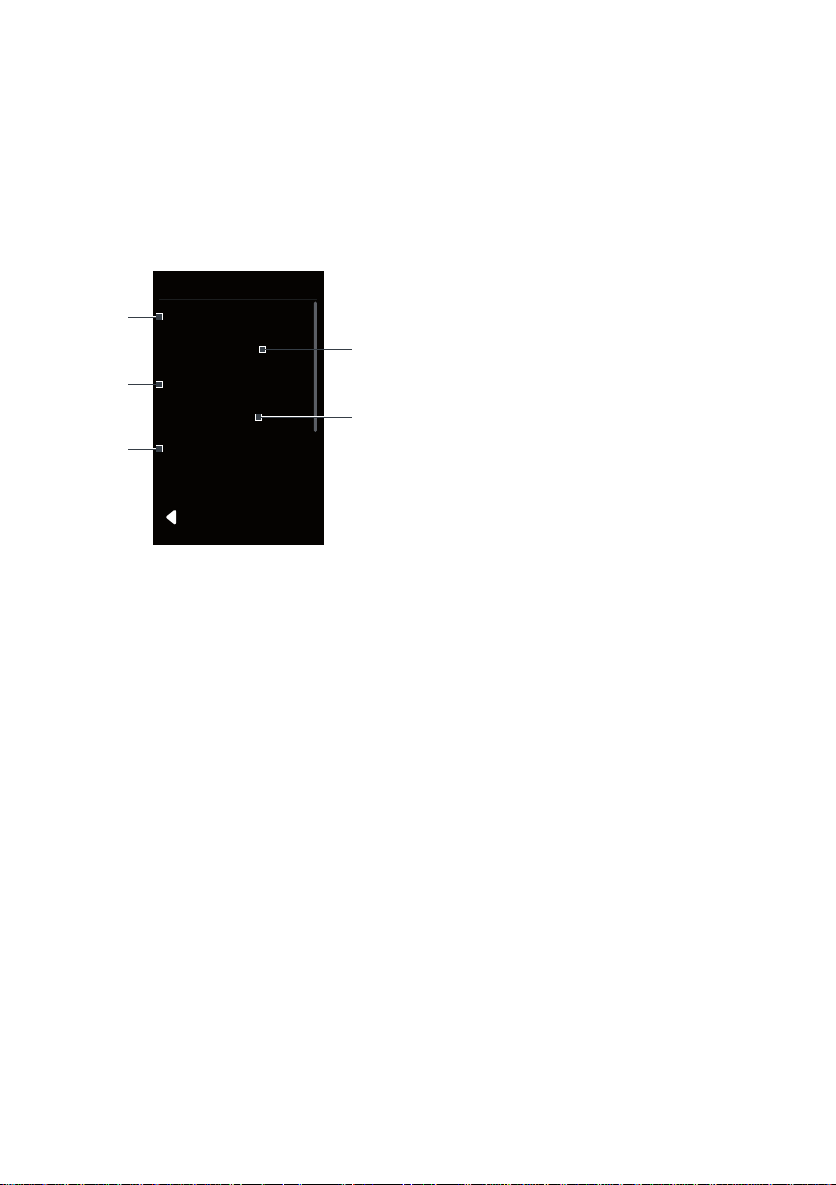
A menu in the Brose «Allround» display/
control unit is arranged as follows:
(1) Title (always visible)
(2) Menu sub-point
(3) Back (last item, alternative to «Walk
assist» key (Fig. A-f))
(4) Navigation bar
To call up the menu, stop or start the e-bike
and, with the bike stationary, do the following:
› Open the menu by pressing the «Menu»
key (Fig. A-b) for two seconds.
› Use the «Increase» (Fig. A-d) and
«Decrease» keys (Fig. A-e) to navigate
to the desired item and call it up with the
«Menu» key (Fig. A-b).
Menu
You can obtain the following information via
the menu:
› Trip information (overview of full trip
information)
› Reset (all trip data)
› Settings
5.4.2. Menu and Settings
(1)
(2)
(3)
Fig. 6: Menu
Menu
Trip Information
Reset
Settings
BACK
Trip Information
Overview of all trip data
Reset Trip Information
To reset the display values in the trip
information, proceed as follows:
(4)
› To reset the display values in the trip
information, proceed as follows:
› Select «Reset» in the menu by pressing
the «Menu» key.
› If you would like to delete all trip
information, confirm this by pressing the
«Menu» key again.
Page 14
Operation and Control | Brose Display AllroundEN | 32
› Note: All trip information values are reset
to zero.
› Note: Reset cannot be called up while
cycling.
Settings
Settings
(1)
(3)
(5)
Language
Screens
Display
System
Information
(2)
(4)
BACK
Fig. 7: Setting menu
You can access the settings via the menu
Settings item.
Using the «Increase» and «Decrease» keys,
you can call up further submenus and open
them with the «Menu» key.
From the settings menu, you can scroll back to
the menu with the «Walk assist» key.
In the settings menu you will find the following
setting options:
(1) Languages: The selection of a language
causes an immediate change of the
language presentation.
(2) Screen: Personalisation of the Trip
Information display (Fig.1-5). Switch
between the data you want to display
while riding:
» Range
» Trip (route)
» Time (trip time)
» Average speed
» Maximum speed
» Total distance
(3) Display: Ajustment of the display
» «Automatic» Automatic control of the
display brightness as well as the day
and night cycling display («White/
Black»).
» «Brightness» Control of the display
brightness; this can only be changed if
the automatic control is deactivated.
» «White/Black» Change between white
and black background.
» «Stealth Mode» The backlight of the
display will turn off after 5 seconds
of inactivity. All e-bike and display
functions remain active. Press any key
to turn on the backlight.
(4) System: Refer to the System Settings
chapter
(5) Information: Displays information about
your Brose Drive System (e.g.: Product
name & software version)
System Settings
Navigate to the «System» sub-point.
You can use the «Increase» (Fig. A-d) and
«Decrease» (Fig. A-e) keys to select the
required setting and open it and, if necessary,
further submenus using the «Menu» key (Fig.
A-b). From the respective point, you can return
to the previous menu by pressing the «Walk
assist» key (Fig. A-f). Alternatively, call up the
last menu item with «Back».
› Note: Please note that not every Brose
Drive System features a «clock» Module.
Therefore some options can´t be seen in
your e-Bike Display.
Page 15
Brose Display Allround | Operation and Control 33 | EN
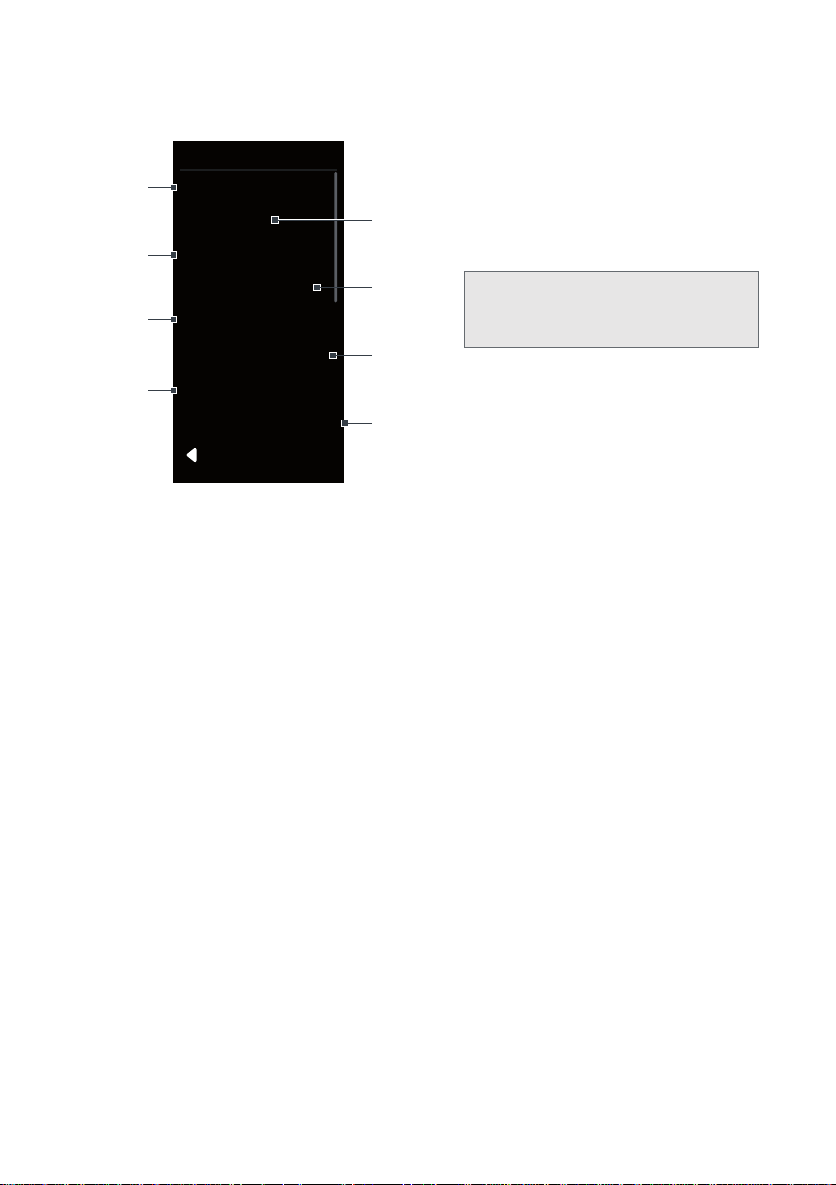
» The minute display flashes. Set the
System
(1)
(3)
(5)
(7)
Light
Unit Format
Time Format
Battery Status
Clock
Shutdown Time
Custom. Assistance
Default Settings
(2)
(4)
(6)
(8)
BACK
required minute using the «Increase»
and «Decrease» keys. Confirm your
entry with the «Menu» key.
» Exit the menu with the help of the «Walk
assist» key.
HINWEIS: Please note that not every
Brose Drive System features a «clock»
Module.
(6) «Shutdown time»: Define the automatic
switch-off time (1-20min) for your Brose
Drive System.
(7) «Custom.Assistance» Adjust your
assistance mode individually to your
Fig. 8: System Settings
You can make the following settings here:
(1) «Light»
» Activate automatic bike lighting
» Switch bike lighting on continuously
(2) «Unit format» The displayed units are
needs.
(8) Reset «Default Settings»
» Select the «Default Settings» menu
point.
» Pressing the «Menu» key again resets
all settings to the delivery status.
changed between «km/mi» and «km/h
/ mph».
(3) «Time format» (12h/24h) ): The display
times are switched between «12h / 24h».
(optional)
(4) «Battery status» Choose between
» Battery status as segments
» Battery status in percent (%)
(5) «Clock» (ss : mm) (optional)
» Press the «Menu» key. The hours
display flashes.
» Set the required hour using the
«Increase» and «Decrease» keys.
Conrm your entry with the «Menu» key.
Page 16
6. Troubleshooting
Troubleshooting | Brose Display AllroundEN | 34
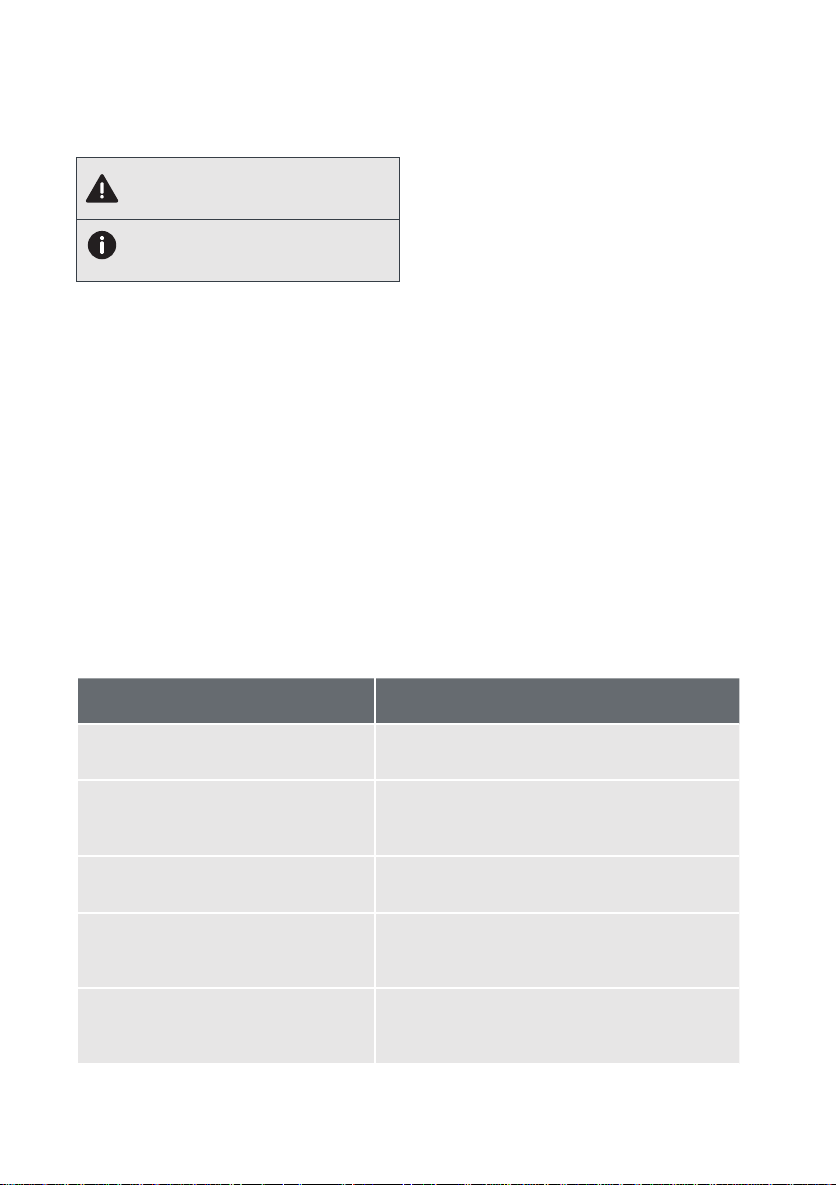
WARNING!
Always observe all error information!
NOTE: Have repairs done by a
certified bicycle dealer only.
The «Allround» display/control unit displays
error messages from the entire pedelec
system.
The fault display indicates fault that the
system can detect independently.
Depending on the type of fault, the drive
may be automatically switched off. Check
the e-bike before making any further trips.
Driving on without the assistance of the drive
is possible at any time.
Depending on the type of fault, the drive
may be automatically switched off. Check
the e-bike before making any further trips.
Driving on without the assistance of the drive
is possible at any time.
Fault information Remedy
Speed sensor fault
Check the speed sensor and position of the spoke
magnet.
› The fault display may indicate serious
errors in your Brose Drive system. Errors
prevent the safe operation of the e-bike.
There is a risk of accidents involving
personal injury and damage to the e-bike.
› Stop riding the e-bike. Inform yourself
about the meaning of the error information
and take note of the solution.
› If the meaning of the information is unclear,
stop riding and turn the bike off. Contact
the bike manufacturer, dealer or workshop
for information on the next steps.
Turn off the system completely. Then check all
Bicycle lighting faults
Internal system error identified Restart the system.
If the problem persists, contact an
authorised e-bike dealer.
Brake lighting faults
cables and connectors of the front and/or rear
lighting system. Restart the system.
Restart the system.
If the problem persists, contact an authorised
e-bike dealer.
Turn off the system completely. Then check all
cables and connectors of the brake system. Restart
the system.
Page 17

Brose Display Allround | Troubleshooting 35 | EN
If you experience any problems using your
Brose Drive System, first check the items
listed in the following table. In many cases,
you can already remedy this yourself.
Symptom Possible cause Solution
Display unit and/or
Brose Drive System
cannot be activated.
Display unit does not
provide trip data even
though the e-bike is
in motion.
Bicycle lighting
cannot be activated.
Display unit indicates
an error in the
multifunction panel.
Battery not correctly clicked
into the holder.
Battery not charged up.
Battery contacts and/or
holder soiled.
Display unit not correctly
connected.
Display unit contacts and/or
holder soiled.
Plug connections on the
drive unit not correctly
inserted.
Spoke magnet not correctly
mounted (distance to the
speed sensor).
Lighting cable incorrectly
connected.
There is an active error in
the system.
If possible, remove the battery and
reinsert it. Pay attention that it is in
the proper position.
Charge up fully using the supplied
battery charger.
Make sure all contacts are clean. If
necessary, clean with a soft, dry cloth.
Check the plug connection of the
display unit. Pay attention that is it
properly connected.
Make sure all contacts are clean. If
necessary, clean with a soft, dry cloth.
Check cabling and connections and
connect them correctly if necessary.
Check the mounting of the spoke
magnet, in particular its distance to
the speed sensor on the chainstay.
This must be between 5 and 17 mm
(see Fig B). Correct the distance if
necessary.
Check cabling and connections and
connect them correctly if necessary.
Please note the following table.
Page 18

7. Service
Service | Brose Display AllroundEN | 36
7.1. Maintenance and Cleaning
› Keep all components of your e-bike clean,
especially the battery contacts and all
exposed cable connections.
› Prevent the drive unit from coming into
contact with aggressive cleaning products
and care products, in particular creep oils
and brake cleaners.
› The drive unit must not be submerged in
water or cleaned with a high-pressure
cleaner.
› Have your e-bike system checked at least
once a year (including mechanics, system
software update, etc.).
› For e-bike service or repairs, please
contact an authorised Brose dealer.
› Have all repairs done by an authorised
Brose dealer.
7.2. Customer Service and Advice
on Use
For all questions about the Brose Drive
System and its components, please contact an
authorised bicycle dealer.
Contact details of authorised bicycle dealers
can be found on the website (Service)
www.brose-ebike.com
7.3. Inspection
NOTE: Have your e-bike system checked
at least once a year (including mechanics,
system software update, etc.).
For e-bike service or repairs, please contact an
authorised bicycle dealer.
Information of authorised bicycle dealers can
be found on the website (Service)
www.brose-ebike.com
7.4. Transport
If you have your e-bike outside of your car, e.g.
you are transporting it on a car rack, remove
the e-bike battery to avoid damage.
Even at a speed of over 100km/h, moisture can
penetrate system components.
NOTE: Protect all e-bike components, such as
the display, open plugs, etc. from penetrating
water. You can obtain corresponding protectors
from bike retailers.
The battery may only be shipped with
dangerous goods packaging and the necessary
warnings.
If you have questions about transportation,
contact an authorised bicycle dealer. You can also
get suitable transport packaging from the dealer.
Page 19
Brose Display Allround 37
7.5. Disposal
Drive unit, display/control unit, battery, speed
sensor, accessories and packaging should be
recycled in an environmentally friendly way.
Do not throw e-bikes and their components in
the household waste!
Only for EU countries
According to European Directive
2012/19/EU, electrical appliances
that can no longer be used and,
according to European Directive
2006/66/EC, defective or used
batteries, must be collected
separately and recycled in an
environmentally friendly way.
Old machines, replacement parts and
packaging are made of recyclable materials.
The owner is obliged to dispose of them in
accordance with legal regulations in a proper
and environmentally friendly manner.
All plastic injection-moulded parts are provided
with a recycling symbol.
REACH directive no. 1907/2006 (EC)
RoHS directive (2011/65/EU)
Please return any unusable Brose E-Bike
components to an authorised bicycle dealer.
Subject to changes.
If Brose accepts a warranty claim, this in no
case implies the assumption of liability for
possible damages. In the event of disputes
regarding the (correlative) damages suffered,
Brose excludes any liability, as the company is
not legally obliged to pay compensation.
WARNING! Any unauthorised
modication to the components of the
electrical system can be dangerous
and will void warranty claims.
7.7. Copyrights
The contents of this manual are protected by
copyright. Their use is permitted within the
scope of use of the device. Any further use is
not permitted without the written consent of
the manufacturer.
7.6. Liability
Brose Antriebstechnik GmbH & Co.
Kommanditgesellschaft, Berlin, shall not be
liable for damage to (or parts of) the bicycle
resulting from incorrect adjustment of the
moving parts of the bicycle or inappropriate
use and/or maintenance of the bicycle
(including late replacement of wear parts).
All rights reserved.
The contents of this document are created with great care. However,
Brose assumes no liability for the accuracy, completeness and
timeliness of the content. The contents are for information only and do
not constitute legally binding offers.
Page 20
Brose Antriebstechnik GmbH und Co.
Kommanditgesellschaft, Berlin
Sickingenstr. 29-38
10553 Berlin
Deutschland
Telefon: +49 30 343498 100
[email protected]
www.brose-ebike.com V 1.1 · 08/19 · de
 Loading...