

Page 1

10" Digital Picture Show
DIGITAL PICTURES—PLUS MUSIC AND VI DEOS
MY LIFE
Page 2

TABLE OF CONTENTS
Warnings and Cautions
Accessories
…………………………………………………………
Location of Parts and Controls
Frame Operation
Frame Features
………………………………………………………
……………………………………………
………………………………………
……………………………………………………
Optimizing Photo Storage Capacity
Installing Software on your Computer
Software Control Locations
HOW TO Clock and Settings
HOW TO Photos
HOW TO Video
HOW TO Music
Screen Prompts
Specifications
…………………………………………………
…………………………………………………
…………………………………………………
…………………………………………………
………………………………………………………
Care and Maintenance
Compatible File Formats
Troubleshooting Guide
……………………………………………
………………………………………
………………………………………………
……………………………………………
……………………………………………
……………………………………
…………………………………
9-10
11-18
19-24
25-31
32-33
35-38
2-3
3
4
5
6
7
7
8
34
34
34
Notes
……………………………………………………………
Warranty
……………………………………………………………
1
39-41
42
Page 3

IMPORTANT SAFETY INFORMATION
Please read all safety and operating instructions carefully before use and keep
these for future reference.
RI SK O F ELE CT RI C SHO CK
CAUTION
TO REDUCE THE RISK OF ELECTRIC SHOCK, DO NOT REMOVE COVER.
•
THERE ARE NO SERVICEABLE PARTS INSIDE.
TO REDUCE THE RISK OF FIRE OR ELECTRIC SHOCK, DO NOT EXPOSE
•
THIS UNIT TO RAIN OR MOISTURE.
The lightning flash with arrow-head symbol within an equilateral triangle
is intended to alert the user to the presence of uninsulated “dangerous
voltage” within the unit’s enclosure that may be of sufficient magnitude
to constitute a risk of electric shock.
The exclamation point within an equilateral triangle is intended to alert
the user to the presence of important operating and maintenance
(servicing) instructions in the literature accompanying the unit.
DO N OT O PEN
IMPORTANT SAFETY INSTRUCTIONS
All the safety and operating instructions should be read, adhered to and
followed before the unit is operated.
DANGER
To reduce the risk of electric shock, burns, fire or injury:
Always unplug the unit from the electrical outlet immediately after using.
1.
Do not use while bathing or in a shower.
2.
Do not place or store unit where it can fall or be pulled into a tub or sink.
3.
Do not place in or drop into water or other liquid.
4.
Do not reach for the unit if it has fallen into water. Unplug it immediately.
5.
6.
Care should be taken so that objects do not fall and liquids are not spilled
onto the unit.
2
Page 4

WARNING
1.
Close supervision is necessary when this unit is used by or near children.
2.
Use this unit only for its intended use as described in this manual.
3.
Unplug this unit during lightning storms or when unused for long periods of time.
4.
Never drop or insert an object into any opening.
5.
Protect the power cord from being walked on or pinched, particularly at plug
outlets, convenience receptacles, and the point where it exits the unit.
6.
Do not allow cord to touch hot surfaces. Wrap cord loosely around the unit
when storing.
7.
The unit should be situated away from direct sunlight or heat sources, such as
radiators, electric heaters, heat registers, stoves, or other units (including amplifiers)
that produce heat. Avoid placing on top of stereo equipment that radiates heat.
8.
Never block the air openings of the unit with materials such as clothing,
plastic bags or papers, or place it on a soft surface such as a bed or couch,
where the air openings may be blocked.
9.
Do not overload electrical outlet. Use the power source as indicated.
10.
Do not carry this unit by the cord or use the cord as a handle.
11.
Never operate this unit if it has a damaged cord or plug, if it is not working
properly, if it has been dropped or damaged, or dropped into water. If the unit’s
power supply cord or plug is damaged, do not attempt to fix it yourself.
12.
To avoid the risk of electric shock, do not disassemble or attempt to repair
the unit. Incorrect repair can cause risk of electric shock or injury to persons
when unit is used.
13.
Do not operate in the presence of explosive and/or flammable fumes.
ACCESSORIES
Adapter
1.
Bonus Walnut Finish Frame
2.
MediaImpressionTM Software CD
3.
3
Page 5
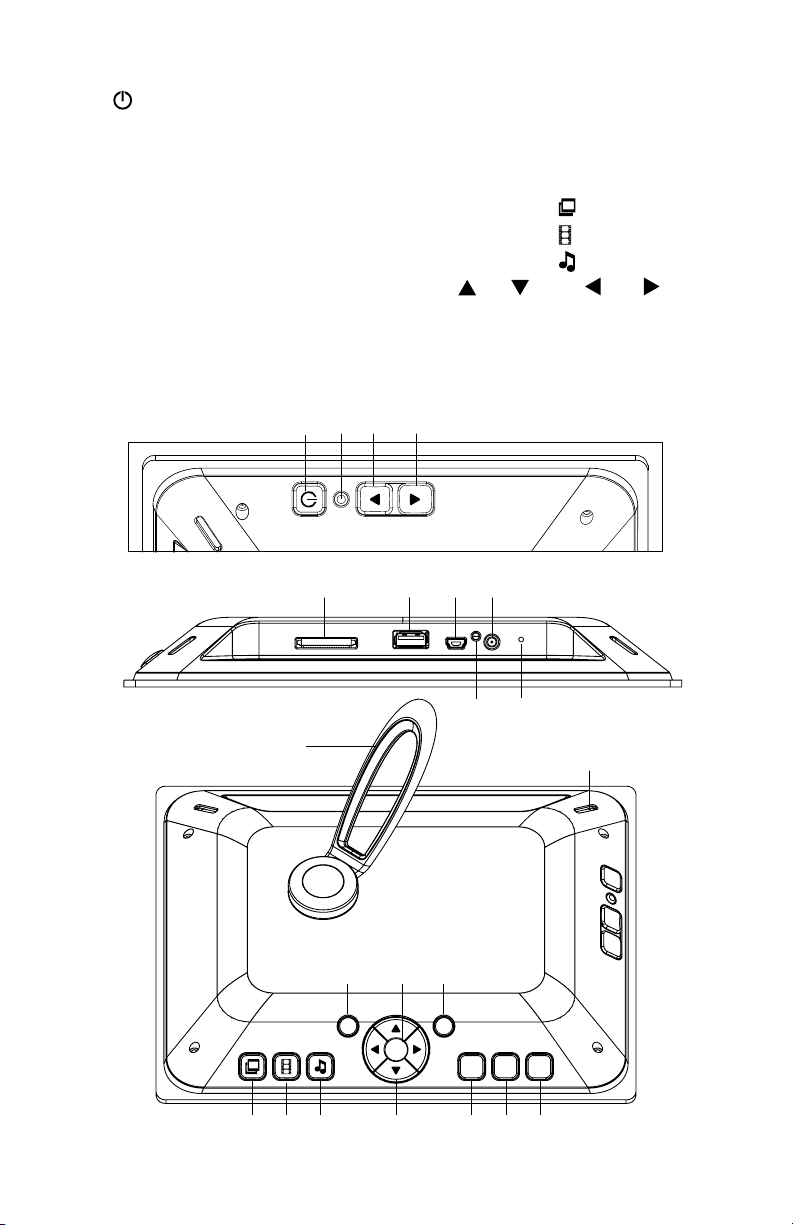
LOCATION OF PARTS AND CONTROLS
Speaker (2)
Power
1.
2.
Power Save Light Sensor
3.
Volume Down
4.
Volume Up
5.
Card Reader Slot
6.
Flash Drive
7.
USB In
8.
DC In
9.
Reset
10.
Power On LED
11.
Stand
12.
13.
Menu
14.
Select
15.
Exit
16.
Quick Access
17.
Quick Access
18.
Quick Access
Up, Down, Left, Right
19.
20.
Copy
21.
Delete
22.
Rotate
Slide Show
Video
Music
11
1
432
765
8
10
9
12
151413
Select
ExitMenu
RotateDelete
py
Co
2221201917 1816
4
Page 6
FRAME OPERATION
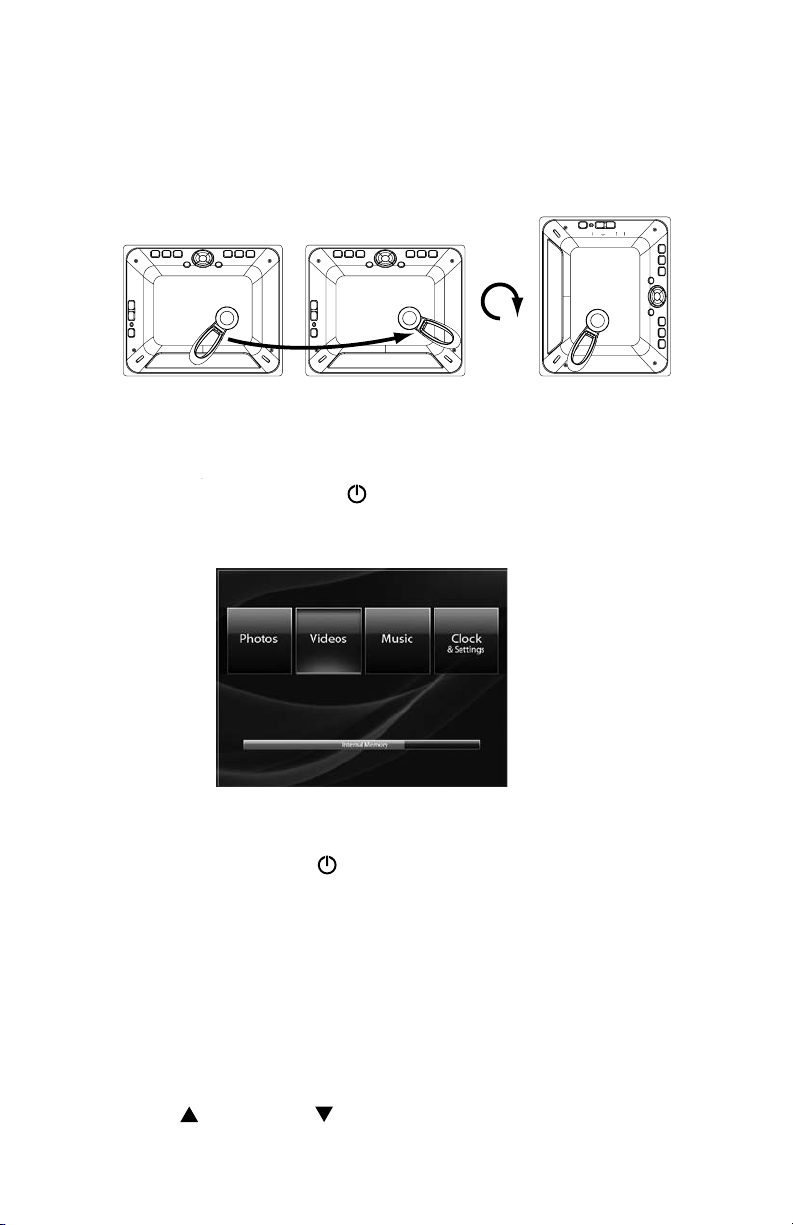
ATTACHING THE STAND
Line up pins on stand with holes on the frame and insert stand.
Rotate stand to first position for landscape viewing (see A). Or, rotate stand to second
position (see B) and stand the frame upright for portrait viewing (see C).
A
CB
TURNING THE FRAME ON/OFF
Plug in adapter.
Press and hold the POWER BUTTON
on screen to turn on the frame (5-6 seconds). The Home Screen with memory
bar appears on the display after the frame is turned on. See below.
Note: A blue fill in the bar indicates used memory. When the bar is completely blue,
the memory is full.
Press and hold POWER BUTTON
The Brookstone® logo will appear on the screen as it is shutting down.
until the Brookstone® logo appears
for 2 to 3 seconds to turn off the frame.
INSERTING A MEMORY CARD OR FLASH DRIVE
With the frame powered on, insert your memory card or flash drive into the appropriate
slot. The Home Screen will show for 60 seconds if no selection is made. After 60
seconds the media will auto-play.
Note: When a memory card is inserted into the frame, the frame’s internal memory
(media you have copied to the frame’s drive) will not be available.
USING THE VOLUME
Press VOLUME and VOLUME to adjust volume level. Volume graphic appears
on screen to show volume level.
5
Page 7

FRAME FEATURES
PHOTO SMOOTH
The PHOTO SMOOTH feature modifies faces within your photos with a smoothing
airbrush effect. Feature only works in Slide Show mode (normal transition).
DYNAMIC LIGHTING
The DYNAMIC LIGHTING feature improves your photo’s light balance to enhance
dark photos. Feature only works in Slide Show mode (normal transition).
FACE ZOOM
The FACE ZOOM feature automatically pans and zooms to faces within your photos.
Feature only works in Slide Show mode (normal transition).
MULTI SHOW
The MULTI SHOW slide show transition will show multiple photos at the same time.
POWER SAVE
The POWER SAVE feature detects the room’s light level and automatically puts the
frame into energy saving mode by shutting down the LED display. If the frame senses
that the room is dark for more than 15 minutes and no buttons have been pressed,
the following graphic appears on screen.
When the frame senses light, or any button on the frame is pressed,
the LED display will turn on and the frame will resume current operation.
ANTI-VIRUS
When the frame is powered on, any files with the extension “.exe” or “.bat”
(common extensions for possible viruses) that have been put on the frame’s
drive via the computer will be automatically deleted from the frame.
RESET
Press the RESET button with a thin, pointed object (such as a paper clip).
Power the unit on after pressing the RESET button. The frame will default
to the factory settings, however, the frame’s internal memory will remain intact.
Note: Frame should not be used as a storage device.
6
Page 8

OPTIMIZING PHOTO STORAGE CAPACITY
When the photos are downloaded to the frame with either a memory card or
a flash drive, photos are automatically optimized for the frame’s screen resolution.
MediaImpressionTM SOFTWARE
When using your computer to download photos onto the frame, it is recommended
to use the included MediaImpression™ software.
The MediaImpression™ software optimizes your photos for the frame’s screen
resolution. (800 x 600 pixel dimensions, 72 dpi (pixels per inch)).
The MediaImpression™ software will make new files of your photos when
it saves them to the frame. Your original photos will remain intact/unchanged.
Note: If your photo’s dimensions are smaller than 800 x 600, there is no need
to resize. To find out the dimensions of a photo, simply place your cursor over
the thumbnail while using the MediaImpression
™
software. This will show a
pop-up box with your photo's dimensions.
An example of the MediaImpression™ screen is on the following page.
INSTALLING SOFTWARE ON YOUR COMPUTER
Photos placed on the frame using a computer and without using the MediaImpression™
software will not be optimized to your frame’s specifications and could possibly use
more memory than necessary.
FOR WINDOWS® 2000/XP/VISTA®/7:
Insert MediaImpression™ SOFTWARE CD into your computer’s CD -ROM drive.
1.
Open the CD and double click Windows folder (this software does not auto-run).
2.
Double click on the Setup.exe file.
3.
4.
InstallShield
on-screen instructions to install the MediaImpression™ software on your computer.
To open MediaImpression™, locate the installed software on your computer and
5.
double click on the MediaImpression™ icon.
®
Wizard will launch on your computer. Follow the InstallShield® Wizard
FOR MAC® OS X 10.4 AND LATER:
Insert MediaImpression™ SOFTWARE CD into your computer’s CD-ROM drive.
1.
Open the CD and double click on the Mac folder (this software does not auto-run).
2.
Double click on “MediaImpression Installer".
3.
Follow the MediaImpression
4.
™
Installer on-screen instructions to install
the MediaImpression™ software on your computer.
To open MediaImpression
5.
™
, locate the installed software on your computer
and double click on the MediaImpression™ icon.
7
Page 9

SOFTWARE CONTROL LOCATIONS
Locate
Photos
Photo Edit
Convert
Convert: To convert files to
correct format for frame.
Destination (Browse):
To choose destination
of converted files.
Choose the frame
drive to load files
onto the frame.
Resize:
Choose size.
Destination (Browse):
To choose destination of resized
files. Choose the frame drive to
load files onto the frame.
See detailed instructions on how to use the MediaImpression™ software on page 13.
8
Page 10

HOW TO… IT’S EASY!
CLOCK & SETTINGS
I want to… Do thIs…
Set the Time
and Date.
1.
Press EXIT until you get to the Home Screen.
Press and to highlight
2.
CLOCK & SETTINGS.
Press SELECT if no media is loaded
3.
on the frame, or press MENU if media is loaded
on the frame.
“Set Time and Date” menu selection will appear.
4.
Press SELECT. Clock and Calendar area becomes
5.
active and Time is highlighted.
Press
6.
Press
7.
Press
8.
Press
9.
Press
10.
Press
11.
Press
12.
Press
13.
Press
14.
Press EXIT to exit Time/Date
15.
and save selections.
or to select time.
to highlight AM/PM.
or to select AM or PM.
to highlight Year.
or to select Year.
to highlight Day.
or to select Day.
to highlight Month.
or to select Month.
Select the
Brightness Level.
1.
When in Clock mode press MENU.
2.
Press
menu selection.
Press
3.
Press SELECT to save choice. Selection
4.
will appear in blue at the top of the list.
Press EXIT to exit menu.
5.
to go to the “Brightness Level”
or to highlight choice.
9
Page 11

CLOCK & SETTINGS (continued)
I want to… Do thIs…
When in Clock mode press MENU.
Activate the Power
Save feature.
1.
Press
2.
Press
3.
Press SELECT to save choice. Selection will
4.
appear in blue at the top of the list.
Press EXIT to exit menu.
5.
to go to the “Power Save” menu selection.
or to highlight choice.
Display Time and
Date in a Full Screen
Slide Show.
Display Time and
Date in a Multi Show.
1.
Press EXIT until you get to the Home Screen.
2.
Press
Press SELECT if no media is loaded on the frame,
3.
or press MENU if media is loaded on the frame.
Press
4.
menu selection.
Press
5.
Press SELECT to save choice. Selection will
6.
appear in blue at the top of the list.
Press EXIT to exit menu. Display will show Time
7.
and Date in a Full Screen Slide Show.
NOTE: Photos will be shown with Normal Slide Show
transition when in Clock mode.
Press EXIT until you get to the Home Screen.
1.
Press
2.
Press SELECT if no media is loaded on the frame,
3.
or press MENU if media is loaded on the frame.
Press to go to the “Time/Date Display”
4.
menu selection.
Press
5.
Press SELECT to save choice. Selection will appear
6.
in blue at the top of the list.
7.
Press EXIT to exit menu. Display will show Time
and Date in a Multi Show.
Note: Photo features such as Photo Smooth, Face
Zoom and Dynamic Lighting are not available in
Clock mode.
and to highlight CLOCK & SETTINGS.
to go to the “Time/Date Display”
or to highlight “With Photo.”
and to highlight CLOCK & SETTINGS.
or to highlight “With Multi Show.”
10
Page 12

PHOTOS
I want to… Do thIs…
Press EXIT until you get to the Home Screen.
View my photos
in Full Screen.
View my photos
in Thumbnail.
1.
Press
2.
Press SELECT. Unit will be in Thumbnail mode.
3.
Search for photo and highlight selection by
4.
pressing , , or .
With chosen photo highlighted, press SELECT.
5.
Press
6.
in Full Screen.
1.
Press EXIT until you get to the Home Screen.
2.
Press
Press SELECT.
3.
Press
4.
in Thumbnail mode.
or to highlight PHOTOS.
and to scroll through photos
and to highlight PHOTOS.
, , or to scroll though photos
QUICK ACCESS
Copy my photos
onto the frame
from my memory
card or flash drive.
ADVANCED
Copy my photos onto the
frame from my memory
card or flash drive.
COPY SINGLE PHOTO
Insert your memory card or flash drive into the frame.
1.
Press or to highlight PHOTOS.
2.
Press SELECT.
3.
Select photo to copy in either Full Screen or
4.
Thumbnail mode.
Press COPY.
5.
Prompt will come on screen to confirm photo
6.
to be copied.
Press COPY to confirm.
7.
COPY ALL PHOTOS
Insert your memory card or flash drive into the frame.
1.
Press
2.
Press SELECT.
3.
When in either Full Screen or Thumbnail mode,
4.
press and hold COPY button for 2 seconds.
Prompt will come on screen to confirm all photos
5.
to be copied.
Press COPY to confirm.
6.
COPY SELECTED PHOTOS
Insert your memory card or flash drive into the frame.
1.
Press or to highlight PHOTOS.
2.
or to highlight PHOTOS.
11
Page 13

PHOTOS (continued)
I want to… Do thIs…
ADVANCED
Copy my photos
onto the frame from
my memory card or
flash drive (continued).
3. Press SELECT.
4. Press MENU.
5. Press
6. Press
then press SELECT.
7. Search for photo by pressing
8. Highlight your chosen photo and press SELECT.
9. A
of the photo to confirm it is to be copied.
10. Repeat steps 7 and 8 to select additional photos
to be copied.
11. After all photos to be copied are selected, press
MENU or EXIT. The “Copy” menu will highlight.
12. Press or to highlight “Copy Selected.”
13. Press SELECT. After all photos are copied, the unit
will revert to Thumbnail mode.
HELPFUL HINTS: To deselect a photo that has been
selected to be copied, highlight the photo and press
SELECT. The
right corner of the photo.
To select all photos on your media card or flash drive
to be copied while using the “Select to Copy” function,
press and hold SELECT for 2 seconds. The
will appear in lower right corner of every photo.
COPY ALL PHOTOS
Insert your memory card or flash drive into the frame.
1.
Press or to highlight PHOTOS.
2.
Press SELECT.
3.
Press MENU.
4.
Press
5.
Press
6.
Press SELECT.
7.
Prompt will come on screen to confirm all photos to
8.
to go to the “Copy” menu selection.
or to highlight “Select to Copy” and
, , or .
graphic will appear in the lower right corner
graphic will no longer be in the lower
graphic
to go to the “Copy” menu selection.
or to highlight “Copy All.”
be copied. Press SELECT to confirm. After all photos
are copied, the unit will revert to Thumbnail mode.
12
Page 14

PHOTOS (continued)
I want to… Do thIs…
Ensure MediaImpression™ software (included) is
Copy my photos onto
the frame using my
computer. (See page 8
for MediaImpression™
controls locations.)
1.
installed on your computer. See page 7 for
installation instructions.
2.
Insert one end of a USB cable (not included) into the
USB In port on the unit and the other end of the cable
into your computer’s USB port. The frame display will
show “USB Connected” and an external “MyLifeFrame”
drive will appear on your computer.
3.
Open MediaImpression
4.
Use “Folders” window to select location to find photos
to put on frame. Photos will appear as thumbnails.
5.
Click on photos to be copied/resized or click on Select
All to select all photos.
6.
Click on the Convert icon and select “Resize Photo”
from the drop-down menu.
7.
A window will appear and prompt you to choose a
file size and a destination for copied/resized photos.
Choose “Classic Size” of 800 x 600.
8.
Click on the Browse icon to choose the frame’s
external drive as the destination for the copied/
resized photos.
9.
Click on “Resize.” Photos will be resized and saved
onto frame.
10.
Disconnect the “MyLifeFrame” external drive from
the computer properly to avoid any loss of data.
HELPFUL HINTS: Use the Photo Edit feature to
rotate your photos.
™
software.
Play Slide Show.
Stop Slide Show.
Press . If you are in a menu selection
screen, press EXIT then
.
While Slide Show is playing, press and the Slide
Show will stop and the unit will revert to Full Screen
mode. Or, press EXIT and the Slide Show will stop
and the unit will revert to Thumbnail mode.
13
Page 15

PHOTOS (continued)
I want to… Do thIs…
When in either Full Screen or Thumbnail mode,
Select Slide
Show time.
1.
press MENU.
2.
“Slide Show Time” menu selection will appear.
3.
4.
5.
or to highlight choice.
Press
Press SELECT to save choice. Selection will
appear in blue at the top of the list.
Press EXIT to exit menu.
Select Slide
Show Transition.
Select Slide Show
Photo Order.
Activate Face
Zoom Feature.
When in either Full Screen or Thumbnail mode,
1.
press MENU.
2.
Press
menu selection.
3.
Press
4.
Press SELECT to save choice. Selection
will appear in blue at the top of the list.
5.
Press EXIT to exit menu.
1.
When in either Full Screen
or Thumbnail mode, press MENU.
2.
Press
menu selection.
3.
Press
4.
Press SELECT to save choice. Selection
will appear in blue at the top of the list.
5.
Press EXIT to exit menu.
1.
When in either Full Screen or Thumbnail mode,
press MENU.
2.
Press
3.
Press
4.
Press SELECT to save choice. Selection will appear
in blue at the top of the list.
5.
Press EXIT to exit menu.
to go to the “Slide Show Transition”
or to highlight choice.
to go to the “Slide Show Photo Order”
or to highlight choice.
to go to the “Face Zoom” menu selection.
or to highlight “On”.
14
Page 16

PHOTOS (continued)
I want to… Do thIs…
When in either Full Screen or Thumbnail mode,
Activate Photo
Smooth Feature.
1.
press MENU.
2.
Press
3.
Press
4.
Press SELECT to save choice. Selection will appear
in blue at the top of the list.
5.
Press EXIT to exit menu.
to go to the “Photo Smooth” menu selection.
or to highlight “On”.
Activate Dynamic
Lighting Feature.
Rotate photo.
Arrange my photos
in a specific order.
When in either Full Screen or Thumbnail mode,
1.
press MENU.
2.
Press
menu selection.
3.
Press
4.
Press SELECT to save choice. Selection will
appear in blue at the top of the list.
5.
Press EXIT to exit menu.
When in Full Screen mode, press or to select
1.
photo to rotate.
2.
Press ROTATE. Photo will rotate 90 degrees.
3.
Press ROTATE again to rotate photo another
90 degrees. Photo will be saved in rotated
position when in the internal memory only.
The frame automatically arranges photos
1.
by file name numerically, then alphabetically.
2.
For example, a photo with the file name
“01.jpg” will come before a photo with the
file name “a.jpg.”
3.
Using your computer, rename your photo files
numerically or alphabetically and copy the photos
onto the frame.
to go to the “Dynamic Lighting”
or to highlight “On”.
HELPFUL HINTS: If ordering photos numerically,
be sure to start with “01”, “02", etc... not “1”, “2”,
as “10” will come before “2.”
15
Page 17

PHOTOS (continued)
I want to… Do thIs…
QUICK ACCESS
Delete photos from
the frame.
DELETE SINGLE PHOTO
Remove your memory card or flash drive
1.
from the frame.
2.
3.
4.
5.
6.
or to highlight PHOTOS.
Press
Press SELECT.
Select photo to delete in either Full Screen
or Thumbnail mode.
Press DELETE.
Prompt will come on screen to confirm photo
to be deleted. Press DELETE to confirm.
DELETE ALL PHOTOS
Remove your memory card or flash drive
1.
from the frame.
2.
3.
4.
5.
or to highlight PHOTOS.
Press
Press SELECT.
When in either Full Screen or Thumbnail mode, press
and hold DELETE button for 2 seconds.
Prompt will come on screen to confirm all photos to be
deleted. Press DELETE to confirm. After all photos are
deleted the unit will revert to the Home Screen.
16
Page 18

PHOTOS (continued)
I want to… Do thIs…
ADVANCED
Delete photos
from the frame.
DELETE SELECTED PHOTOS
Remove your memory card or flash drive from the frame.
1.
2.
3.
4.
5.
6.
7.
8.
9.
10.
11.
12.
or to highlight PHOTOS.
Press
Press SELECT.
Press MENU.
Press
Press
Search for photo and highlight selection by pressing
With chosen photo to delete highlighted, press SELECT.
An
After all photos to be deleted are selected, press MENU
Press
Press SELECT. After photos are deleted, the unit will
to go to the “Delete” menu selection and then
press SELECT.
or to highlight “Select to Delete.”
, , or .
graphic will appear in the lower right corner of
the photo to confirm it is to be deleted. Repeat steps
7 and 8 to select additional photos to be deleted.
or EXIT. The “Delete” menu will highlight.
or to highlight “Delete Selected” in menu.
revert to Thumbnail mode.
HELPFUL HINTS: To deselect a photo that has been
selected to be deleted, highlight the photo and press
SELECT. The
graphic will no longer be in the lower
right corner of the photo.
To select all photos on the frame to be deleted while
using the “Select to Delete” function, press and hold
SELECT for 2 seconds. The
graphic will appear
in the lower right corner of every photo.
DELETE ALL PHOTOS
Remove your memory card or flash drive from the frame.
1.
2.
3.
4.
5.
6.
7.
8.
or to highlight PHOTOS.
Press
Press SELECT.
Press MENU.
Press
Press
Press SELECT.
Prompt will come on screen to confirm all photos to
to go to the “Delete” menu selection.
or to highlight “Delete All.”
be deleted. Press SELECT to confirm. After all photos
are deleted the unit will revert to the Home Screen.
17
Page 19

PHOTOS (continued)
I want to… Do thIs…
Insert one end of a USB cable (not included) into the
Delete photos
from the
frame using
my computer.
1.
USB In port on the unit and the other end of the cable
into your computer’s USB port. The display will show
“USB Connected” and an external “MyLifeFrame” will
appear on your computer.
2.
Access the “MyLifeFrame” drive.
3.
Select photos to be deleted and drag them to the trash,
or select and press delete.
4.
Empty the trash.
5.
Disconnect the “MyLifeFrame” external drive from the
computer properly to avoid any loss of data.
Convert my photo
files to JPEG.
Ensure MediaImpression™ software (included) is
1.
installed on your computer. See page 7 for
installation instructions.
Open MediaImpression™ software.
2.
3.
Use “Folders” window to select photos to convert
to JPEG. Photos will appear as thumbnails.
4.
Click on photos to be converted or click on Select All
to select all photos.
5.
Click on the Convert icon and select “Change File
Type” from the drop-down menu.
6.
A window will appear and prompt you to choose the
“Convert To” file type and destination for converted
photos. Choose “JPEG” and click on the Browse icon
to choose the destination for the converted photos.
7.
Click on “Convert.” Photos will be converted to JPEG.
Note: Converting photo files to JPEG will
leave them at their original size. To optimize
your photos for the frame’s screen resolution,
use the MediaImpression
™
software to resize
your photos (see page 13).
18
Page 20

VIDEO
I want to… Do thIs…
Play Videos.
Stop Video.
View my videos
in Full Screen.
View my videos
in Thumbnail.
QUICK ACCESS
Copy my videos onto
the frame from my
memory card or
flash drive.
Press . If you are in a menu selection
screen, press EXIT and then .
While video is playing, press to stop the video,
or press EXIT to go to the Thumbnail screen.
Press EXIT until you get to the Home Screen.
1.
Press and to highlight VIDEOS.
2.
Press SELECT. Unit will be in Thumbnail mode.
3.
4.
Search for video and highlight selection
by pressing , , or .
With chosen video highlighted, press SELECT.
5.
Video will start playing.
6.
7.
1.
2.
3.
4.
and to scroll through videos
Press
in Full Screen.
Press EXIT until you get to the Home Screen.
Press and to highlight VIDEOS.
Press SELECT.
Press , , or to scroll through videos.
COPY SINGLE VIDEO
Insert your memory card or flash drive into the frame.
1.
Press or to highlight VIDEOS.
2.
Press SELECT.
3.
Select video to copy in Thumbnail mode.
4.
5.
Press COPY.
6.
Prompt will come on screen to confirm video to be
copied. Press COPY to confirm.
COPY ALL VIDEOS
Insert your memory card or flash drive into the frame.
1.
Press or to highlight VIDEOS.
2.
Press SELECT.
3.
When in Thumbnail mode press and hold COPY button
4.
for 2 seconds.
Prompt will come on screen to confirm all videos to
5.
be copied. Press COPY to confirm.
19
Page 21

VIDEO (continued)
I want to… Do thIs…
ADVANCED
Copy my videos
onto the frame from
my memory card or
flash drive (continued).
COPY SELECTED VIDEOS
Insert your memory card or flash drive into the frame.
1.
Press
2.
Press SELECT.
3.
Press MENU.
4.
5.
Press
6.
Press
press SELECT.
7.
Search for video and highlight selection by pressing
8.
With chosen video to copy highlighted, press SELECT.
9.
A
video to confirm it is to be copied. Repeat steps 7 and
8 to select additional videos to be copied.
10.
After all videos to be copied are selected, press MENU
or EXIT. The “Copy” menu will highlight.
11.
Press
12.
Press SELECT. After videos are copied, the unit will
revert to Thumbnail mode.
or to highlight VIDEOS.
to go to the “Copy” menu selection.
or to highlight “Select to Copy” and then
, or .
graphic will appear in the lower right corner of the
or to highlight “Copy Selected.”
HELPFUL HINTS: To deselect a video that has been
selected to be copied, highlight the video and press
SELECT. The
graphic will no longer be in the lower
right corner of the video.
To select all videos on your media card or flash drive
to be copied while using the “Select to Copy” function,
press and hold SELECT for 2 seconds. The
graphic
will appear in lower right corner of every video.
,
20
Page 22

VIDEO (continued)
I want to… Do thIs…
ADVANCED
Copy my videos
onto the frame from
my memory card or
flash drive (continued).
Copy my videos onto
the frame using
my computer.
COPY ALL VIDEOS
Insert your memory card or flash drive
1.
into the frame.
Press
2.
Press SELECT.
3.
When in either Full Screen or Thumbnail
4.
mode, press MENU.
Press to go to the “Copy” menu selection.
5.
Press or to highlight “Copy All.”
6.
Press SELECT.
7.
Prompt will come on screen to confirm all videos to
8.
be copied. Press SELECT to confirm. After all videos
are copied, the unit will revert to Thumbnail mode.
Insert one end of a USB cable (not included) into
1.
the USB In port on the unit and the other end of
the cable into your computer’s USB port. The frame
display will show “USB Connected” and an external
“MyLifeFrame” drive will appear on your computer.
2.
Drag and drop video files from your computer
to the “MyLifeFrame” external drive.
3.
Disconnect the “MyLifeFrame” external drive from
the computer properly to avoid any loss of data.
or to highlight VIDEOS.
Select Video playback.
When in either Full Screen
1.
or Thumbnail mode, press MENU.
2.
“Playback” menu selection will appear.
3.
4.
5.
or to highlight choice.
Press
Press SELECT to save choice. Selection
will appear in blue at the top of the list.
Press EXIT to exit menu.
21
Page 23

VIDEO (continued)
I want to… Do thIs…
The frame automatically arranges videos by file
Arrange my videos
in a specific order.
1.
name numerically, then alphabetically.
2.
For example, a video with the file name “01.mpg” will
come before a video with the file name “a.mpg.”
3.
Using your computer, rename your video files
numerically or alphabetically and copy the videos
onto the frame.
HELPFUL HINTS: If ordering videos
numerically, be sure to start with “01”, “02",
etc... not “1”, “2”, as “10” will come before “2.”
QUICK ACCESS
Delete videos from
the frame.
DELETE SINGLE VIDEO
Remove your memory card or flash drive from
1.
the frame.
Press or to highlight VIDEOS.
2.
3.
Press SELECT.
4.
Select video to delete in Thumbnail mode.
5.
Press DELETE.
6.
Prompt will come on screen to confirm video
to be deleted. Press DELETE to confirm.
DELETE ALL VIDEOS
Remove your memory card or flash drive
1.
from the frame.
Press or to highlight VIDEOS.
2.
Press SELECT.
3.
When in Thumbnail mode, press and hold DELETE
4.
button for 2 seconds.
Prompt will come on screen to confirm all videos
5.
to be deleted. Press DELETE to confirm. After all
videos are deleted the unit will revert to the
Home Screen.
22
Page 24

VIDEO (continued)
I want to… Do thIs…
ADVANCED
Delete videos from
the frame.
DELETE SELECTED VIDEOS
Remove the memory card or flash drive from
1.
the frame.
Press or to highlight VIDEOS.
2.
3.
Press SELECT.
4.
Press MENU.
5.
Press
Press or to highlight “Select to Delete” and
6.
then press SELECT.
Search for video and highlight selection by pressing
7.
With chosen video to delete highlighted,
8.
press SELECT.
An graphic will appear in the lower right corner of
9.
the video to confirm it is to be deleted. Repeat steps
7 and 8 to select additional videos to be deleted.
After all videos to be deleted are selected, press
10.
MENU or EXIT. The “Delete” menu will appear.
Presss or to highlight “Delete Selected.”
11.
Press SELECT. After videos are deleted, the unit
12.
will revert to Thumbnail mode.
to go to the “Delete” menu selection.
, , or .
HELPFUL HINTS: To deselect a video that has been
selected to be deleted, highlight the video and press
SELECT. The
graphic will no longer be in the lower
right corner of the video.
To select all videos on the frame to be deleted while
using the “Select to Delete” function, press and hold
SELECT for 2 seconds. The
graphic will appear
in the lower right corner of every video.
23
Page 25

VIDEO (continued)
I want to… Do thIs…
Delete videos
from the frame
(ADVANCED continued).
Delete videos from
the frame using
my computer.
DELETE ALL VIDEOS
Remove the memory card or flash drive
1.
from the frame.
Press or to highlight VIDEOS.
2.
3.
Press SELECT.
4.
Press MENU.
5.
6.
7.
8.
1.
2.
3.
4.
5.
to go to the “Delete” menu selection.
Press
or to highlight “Delete All.”
Press
Press SELECT.
Prompt will come on screen to confirm
all videos to be deleted. Press SELECT
to confirm. After all videos are deleted
the unit will revert to the Home Screen.
Insert one end of a USB cable (not included)
into the USB In port on the unit and the other
end of the cable into your computer’s USB port.
The display will show “USB Connected” and
an external “MyLifeFrame” will appear on
your computer.
Access the “MyLifeFrame” drive.
Select videos to be deleted and drag them
to the trash or select and press delete.
Empty the trash.
Disconnect the “MyLifeFrame” external
drive from the computer properly to avoid
any loss of data.
24
Page 26

MUSIC
I want to… Do thIs…
Play Music.
Stop Music.
View my Music List.
Play music with
my Slide Show.
Press . If you are in a menu selection screen,
press EXIT then .
While music is playing, press to stop music,
or EXIT to go to the music list.
Press EXIT until you get to the Home Screen.
1.
Press
2.
Press SELECT.
3.
Press
4.
With chosen song highlighted, press SELECT.
5.
Song will start playing.
6.
When in Music List mode press MEN U.
1.
Press
2.
menu selection.
Press and to highlight “On”.
3.
Press SELECT to save choice. Selection
4.
will appear in blue at the top of the list.
Press EXIT to exit Menu.
5.
Press .
6.
Press the and buttons during
7.
the Slide Show to change songs.
and to highlight MUSIC.
and to scroll though songs.
to go to the “Slide Show Music”
25
Page 27

MUSIC (continued)
I want to… Do thIs…
QUICK ACCESS
Copy my music onto
the frame from my
memory card or
flash drive.
COPY SINGLE SONG
Insert your memory card or flash drive
1.
into the frame.
Press or to highlight MUSIC.
2.
Press SELECT.
3.
Select song to copy in Music List mode.
4.
Press COPY.
5.
Prompt will come on screen to confirm music
6.
to be copied. Press COPY to confirm.
COPY ALL SONGS
1.
Insert your memory card or flash drive
into the frame.
Press or to highlight MUSIC.
2.
Press SELECT.
3.
When in Music List mode, press and hold
4.
COPY button for 2 seconds.
Prompt will come on screen to confirm all
5.
songs to be copied. Press COPY to confirm.
26
Page 28

MUSIC (continued)
I want to… Do thIs…
ADVANCED
Copy my music onto
the frame from my
memory card
or flash drive.
COPY SELECTED SONGS
Insert your memory card or flash drive into
1.
the frame.
Press or to highlight MUSIC.
2.
Press SELECT.
3.
Press MENU.
4.
5.
Press
6.
Press
and then press SELECT.
7.
Search for song and highlight selection by pressing
8.
With chosen song to copy highlighted, press SELECT.
9.
An
name to confirm it is to be copied. Repeat steps
7 and 8 to select additional songs to be copied.
10.
After all songs to be copied are selected, press
MENU or EXIT. The “Copy” menu will appear.
11.
Press
12.
Press SELECT. After songs are copied,
the unit will revert to Music List mode.
to go to the “Copy” menu selection.
or to highlight “Select to Copy”
, , or .
graphic will appear to the right of the song
or to highlight “Copy Selected.”
HELPFUL HINTS: To deselect a song that has been
selected to be copied, highlight the song and press
SELECT. The
graphic will no longer be to the right
of the song name.
To select all songs on your media card or flash drive
to be copied while using the “Select to Copy” function,
press and hold SELECT for 2 seconds. The
graphic
will appear to the right of the song name of every song.
27
Page 29

MUSIC (continued)
I want to… Do thIs…
Copy my music onto
the frame from my
memory card or flash drive
(ADVANCED continued).
Copy my songs
onto the frame
using my computer.
COPY ALL SONGS
Insert your memory card or flash drive
1.
into the frame.
Press or to highlight MUSIC.
2.
Press SELECT.
3.
Press MENU.
4.
5.
Press
6.
Press
7.
Press SELECT.
8.
Prompt will come on screen to confirm all songs to
Insert one end of a USB cable (not included) into
1.
the USB In port on the unit and the other end of
the cable into your computer’s USB port.
The frame display will show “USB Connected”
and an external “MyLifeFrame” drive will appear
on your computer.
2.
Drag and drop music files from your computer
to the “MyLifeFrame” external drive.
3.
Disconnect the “MyLifeFrame” external drive from
the computer properly to avoid any loss of data.
to go to the “Copy” menu selection.
or to highlight “Copy All.”
be copied. Press SELECT to confirm. After all songs
are copied, the unit will revert to Music List mode.
28
Page 30

MUSIC (continued)
I want to… Do thIs…
When in Music List mode, press MENU.
Select music playback.
Arrange my songs
in a specific order.
1.
2.
“Playback” menu selection will appear.
3.
4.
5.
1.
2.
3.
or to highlight choice.
Press
Press SELECT to save choice. Selection will appear
in blue at the top of the list.
Press EXIT to exit menu.
The frame automatically arranges songs by file name
numerically, then alphabetically.
For example, a song with the file name “01.mp3” will
come before a song with the file name “a.mp3.”
Using your computer, rename your song files
numerically or alphabetically and copy the songs onto
the frame.
HELPFUL HINTS: If ordering songs numerically, be
sure to start with “01”, “02", etc... not “1”, “2”, as “10”
will come before “2.”
QUICK ACCESS
Delete songs from
the frame.
DELETE SINGLE SONG
Remove your memory card or flash drive from
1.
the frame.
Press or to highlight MUSIC.
2.
3.
Press SELECT.
4.
Select song to delete in Music List mode.
5.
Press DELETE.
6.
Prompt will come on screen to confirm song to be
deleted. Press DELETE to confirm.
DELETE ALL SONGS
Remove your memory card or flash drive from
1.
the frame.
2.
When in Music List mode, press and hold DELETE
button for 2 seconds.
3.
Prompt will come on screen to confirm all songs to be
deleted. Press DELETE to confirm. After all songs are
deleted, the unit will revert to the Home Screen.
29
Page 31

MUSIC (continued)
I want to… Do thIs…
ADVANCED
Delete songs
from the frame.
DELETE SELECTED SONGS
Remove your memory card or flash drive from
1.
the frame.
Press or to highlight MUSIC.
2.
3.
Press SELECT.
4.
Press MENU.
5.
Press
6.
Press
then press SELECT.
7.
Search for song and highlight selection by pressing
8.
With chosen song to delete highlighted, press SELECT.
9.
An
name to confirm it is to be deleted. Repeat steps
7 and 8 to select additional songs to be deleted.
10.
After all songs to be deleted are selected, press
MENU or EXIT. The “Delete” menu will highlight.
11.
Press
12.
Press SELECT. After songs are deleted,
the unit will revert to Music List mode.
to go to the “Delete” menu selection.
or to highlight “Select to Delete” and
, , or .
graphic will appear to the right of the song
or to highlight “Delete Selected.”
HELPFUL HINTS: To deselect a song that has been
selected to be deleted, highlight the song and press
SELECT. The
graphic will no longer be to the right
of the song name.
To select all songs on the frame to be deleted while
using the “Select to Delete” function, press and hold
SELECT for 2 seconds. The
graphic will appear
to the right of the song name of every song.
30
Page 32

MUSIC (continued)
I want to… Do thIs…
Delete songs
from the frame
(ADVANCED continued).
Delete songs from
the frame using
my computer.
DELETE ALL SONGS
Remove the memory card or flash drive from
1.
the frame.
Press or to highlight MUSIC.
2.
3.
Press SELECT.
4.
Press MENU.
5.
Press
6.
Press
7.
Press SELECT.
8.
Prompt will come on screen to confirm all songs to
be deleted. Press SELECT to confirm. After all songs
are deleted, the unit will revert to the Home Screen.
Insert one end of a USB cable (not included) into the
1.
USB In port on the unit and the other end of the cable
into your computer’s USB port. The display will show
“USB Connected” and an external “MyLifeFrame” drive
will appear on your computer.
2.
Access the “MyLifeFrame” drive.
3.
Select songs to be deleted and drag them to the trash
or select and press delete.
4.
Empty the trash.
5.
Disconnect the “MyLifeFrame” external drive from
the computer properly to avoid any loss of data.
to go to the “Delete” menu selection.
or to highlight “Delete All.”
31
Page 33

SCREEN PROMPTS
Screen Prompts are messages you may see on the frame’s screen. The following
are examples of what you might see, with a brief explanation.
IF you see… It means…
The media inserted into the
frame is either incompatible
with the frame or is corrupt.
The file is incompatible
with the frame.
The photo is either incompatible
with the frame or is corrupt.
The media inserted into the frame
contains no files or contains files that
are incompatible with the frame.
The Copy button has been
pressed when there is no
media inserted in the frame.
A button has been pressed
for a function that is not available
in the frame’s current state.
32
Page 34

SCREEN PROMPTS (continued)
IF you see… It means…
The frame’s internal memory is full.
Files cannot be copied to the frame
until some files are deleted.
The Quick Access Slide Show
button has been pressed and
there are no photo files on the
frame or on the media inserted
into the frame.
The Quick Access Video button
has been pressed and there are
no video files on the frame or on
the media inserted into the frame.
The Quick Access Music button
has been pressed and there are
no music files on the frame or on
the media inserted into the frame.
33
Page 35

SPECIFICATIONS
Key Features: . . . . . . . . . . . . . . . . . . . . . . . . . . . . . . . . 10" TFT LCD Screen,
512MB Internal Memory,
USB Mass Storage,
800 x 600 Screen Resolution
Compatible Memory Cards*: . . . . . . . . . . . . . . . . . . SD® and Mini SDTM (Secure DigitalTM),
MMC® (MultiMedia Card), MS, MS
PRO, MS Duo (with adapter), MS PRO
Duo (with adapter) (Memory Stick®)
Power Supply: . . . . . . . . . . . . . . . . . . . . . . . . . . . . . . . AC Adapter (included)
Compatible Software: . . . . . . . . . . . . . . . . . . . . . . . . Windows® 2000/XP/Vista®/7,
Mac® OS X 10.4 and later
*Cards must have a minimum of 64MB.
CARE AND MAINTENANCE
Clean frame with a soft, dry, clean cloth.
1.
2.
If the LCD screen needs additional cleaning, power off and unplug frame and
clean LCD screen with a soft, clean cloth and an LCD screen cleaning solution.
COMPATIBLE FILE FORMATS
PHOTO
JPEG
•
VIDEO
AVI (MPEG 1/2/4, MJPEG)
•
MPG (MPEG 1, MPEG 2)
•
MP4 (MPEG 4)
•
MOV (MJPEG)
•
Video audio compatibility: AAC or MP3
MUSIC
MP3
•
Windows and Vista are registered trademarks of Microsoft Corporation.
Mac is a registered trademark of Apple, Inc. SD is a trademark of Toshiba Corporation.
MMC is a trademark of MultiMedia Card Associates. Memory Stick is a registered
trademark of Sony Corporation. ArcSoft MediaImpression is a trademark of ArcSoft, Inc.
34
Page 36

TROUBLESHOOTING GUIDE
prob lem possI ble cause actIon
Frame does
not power on.
Frame does
not read
memory card.
File does not
download, the
file is distorted, the
unit freezes or the
file will not copy to
the frame.
The adapter is
not inserted correctly.
Power outlet does
not have power.
Memory card is not
inserted correctly.
Using a Memory Stick®
Duo adapter.
Card is below 64MB.
Using a memory card
that is not compatible
with the frame.
File is very large. Files above 2.0 megapixels
Internal memory
is full.
Ensure adapter is
connected correctly.
Relocate to a power
outlet that has power.
All cards are inserted
with the label-side up.
Remove and reinsert
card and adapter to
ensure proper contact
in card reader.
Use a 64MB or
higher card.
Ensure the memory card
is compatible with the
frame. See page 34.
take longer to download.
Files will not download
when memory is full.
Delete files from the frame
before downloading.
Some of my photos
are not showing on
the frame.
Photo file is a
scanned image.
Photos are not in
JPEG format.
35
Scanned images can
be very large. Some may
be too large for the
frame to handle.
Use MediaImpression
software to convert your
photos to JPEG. See
page 13 for instructions.
™
Page 37

TROUBLESHOOTING GUIDE (continued)
prob lem possI ble cause actIon
When selecting a photo
from THUMBNAIL to
show in FULL SCREEN,
“File not supported” or
“Photo Error” appears
on screen.
Photos are taking
a long time to
load/slide show
times are inaccurate.
When photos, videos or
music are loading, the
display shows a blank
screen or screen graphics
for several seconds
before file is displayed.
Photo data cannot be
viewed in this mode.
Photo Smooth, Dynamic
Lighting and Face Zoom
features are active.
Photos are not
optimized and photo
size is very large.
Files are too large. Make sure photos are
Photos not viewable
in this mode may be
removed by user.
Photo Smooth,
Dynamic Lighting
and Face Zoom features
increase load time.
Make sure photos
are optimized for frame.
optimized for frame.
Face Zoom, Photo
Smooth and Dynamic
Lighting features are
not functioning on
certain faces.
Face Zoom, Photo
Smooth and Dynamic
Lighting features are
not working with certain
Slide Show transitions.
These features may
not work due to photo
angle, distance in photo,
clothing, accessories etc.
These features will only
run under the NORMAL
Slide Show transition.
36
Software limitation.
Software limitation.
Page 38

TROUBLESHOOTING GUIDE (continued)
prob lem possI ble cause actIon
The frame drive is
not mounting on
my computer.
The frame is
not reading my
flash drive.
Received an error that
my JPEG failed to resize
while resizing with the
MediaImpressionTM software.
Frame may not be
powered on.
USB cable connections
may be loose.
Flash drive is inserted
into the frame.
Flash drive connection
may be loose.
USB cable is
inserted into the frame
but not hooked up to
the computer.
The frame’s internal
memory is full.
Make sure frame is
powered on.
Make sure USB cable
connections are secure.
Remove flash drive from
frame before connecting
to computer.
Make sure flash drive
connection is secure
Remove USB cable
from frame before
inserting your flash drive.
Remove files to free
up internal memory.
The frame is not
saving as many
photos on the
internal memory
as I expected.
JPEG files are large.
Video and music
files are taking up
memory space.
37
Use included
MediaImpression™ software
to resize your JPEGS
(see page 13) or copy
your photos directly from
a media card or flash
drive to the frame.
Remove files to free
up internal memory.
Page 39

TROUBLESHOOTING GUIDE (continued)
prob lem possI ble cause actIon
Music is not playing
with my Slide Show.
Slide Show Music
is not on.
Turn Slide Show Music
on (see page 25).
My rotated photo
goes back to its
original orientation
when I exit out of
Photo Full Screen.
My photos are not
playing in the order
I want them to play.
There are no music
files on the internal
memory, media card
or flash drive.
Media card or flash
drive is inserted into
the frame.
Files are not named
correctly for the frame
to order them.
Files are in folders
on the frame drive.
Make sure there are music
files on the internal memory,
media card or flash drive.
Rotated photos will not
be saved when viewing
photos on a media card
or flash drive. Only photos
on the internal memory
will be saved when they
are rotated.
The frame will order
files numerically, then
alphabetically. A common
mistake is to name the
files 1, 2, 3, 4, 5, 6, 7, 8,
9,10. In this case, “10”
would come after “1” and
before “2” because of the
“0”. The best way to order
them numerically is, “01”,
“02”, etc...
The frame does not
recognize folders when
ordering files.
My frame’s screen
is frozen and the
frame will not
perform functions.
The Slide Show Order
is set to “Random.”
38
Change the Slide Show
Photo Order to “Normal.”
See page 14.
Disconnect and reconnect
the adapter from the
frame. Press and hold
the power button for 3
seconds to turn the frame
on. The frame should
resume normal operation.
Page 40

NOTES
39
Page 41

NOTES
40
Page 42

NOTES
41
Page 43

ONE (1) YEAR LIMITED WARRANTY
Brookstone warrants this product against defects in materials and/or workmanship under
normal use for a period of ONE (1) YEAR from the date of purchase by the original purchaser
(“Warranty Period”). If a defect arises and a valid claim is received within the Warranty Period,
at its option, Brookstone will either 1) repair the defect at no charge, using new or refurbished
replacement parts, or 2) replace the product with a new product that is at least functionally
equivalent to the original product, or 3) provide a store credit in the amount of the purchase
price of the original product. A replacement product or part, including a user-installable part
installed in accordance with instructions provided by Brookstone, assumes the remaining
warranty of the original product. When a product or part is exchanged, any replacement
item becomes your property and the replaced item becomes Brookstone’s property. When
a store credit is given, the original product must be returned to Brookstone and becomes
Brookstone’s property.
Obtaining Service:
Service at 1-800-292-9819. Please be prepared to describe the product that needs
service and the nature of the problem. A purchase receipt is required. All repairs and
replacements must be authorized in advance. Service options, parts availability
and response times will vary. You are responsible for delivery and the cost of delivery
of the product or any parts to the authorized service center for replacement, per
our instructions.
Limits and Exclusions:
America, including the District of Columbia and the U.S. Territories of Guam, Puerto Rico, and
the U.S. Virgin Islands.
This Limited Warranty applies only to products manufactured for Brookstone that can be
identified by the “Brookstone” trademark, trade name, or logo affixed to them or their packaging.
The Limited Warranty does not apply to any non-Brookstone products. Manufacturers or
suppliers other than Brookstone may provide their own warranties to the purchaser, but
Brookstone, in so far as permitted by law, provides these products “as is.”
This warranty does not apply to: a) damage caused by failure to follow instructions relating to
product’s use or the installation of components; b) damage caused by accident, abuse, misuse,
fire, floods, earthquake or other external causes; c) damage caused by service performed by
anyone who is not a representative of Brookstone; d) accessories used in conjunction with a
covered product; e) a product or part that has been modified to alter functionality or capability;
f) items intended to be periodically replaced by the purchaser during the normal life of the
product including, without limitation, batteries or light bulbs; or g) any and all pre-existing
conditions that occur prior to the effective date of this Limited Warranty relating to any product
sold “as is” including, without limitation, floor demonstration models and refurbished items.
BROOKSTONE SHALL NOT BE LIABLE FOR INCIDENTAL OR CONSEQUENTIAL
DAMAGES RESULTING FROM THE USE OF THIS PRODUCT, OR ARISING OUT OF ANY
BREACH OF THIS WARRANTY. TO THE EXTENT PERMITTED BY APPLICABLE LAW,
BROOKSTONE DISCLAIMS ANY AND ALL STATUTORY OR IMPLIED WARRANTIES,
INCLUDING, WITHOUT LIMITATION, WARRANTIES OF MERCHANTABILITY, FITNESS
FOR A PARTICULAR PURPOSE AND WARRANTIES AGAINST HIDDEN OR LATENT
DEFECTS. IF BROOKSTONE CANNOT LAWFULLY DISCLAI M STATUTORY OR
IMPLIED WARRANTIES, THEN TO THE EXTENT PERMITTED BY LAW, ALL SUCH
WARRANTIES SHALL BE LIMITED IN DURATION TO THE DURATION OF THIS
EXPRESS WARRANTY.
Some states disallow the exclusion or limitation of incidental or consequential damages or how
long an implied warranty lasts, so the above exclusions or limitations may not apply to you. This
warranty gives you specific legal rights and you may also have other rights, which vary from
state to state.
To obtain warranty service, call Brookstone Limited Warranty
Coverage under this Limited Warranty is limited to the United States of
42
Page 44

Merrimack, New Hampshire USA 03054 • 800-846-3000 • www.Brookstone.com
634592
 Loading...