

Page 1

Quick Start Guide
- All Set in 5 Minutes
Guide D’installation Rapide
- Prêt à l’emploi en 5 minutes
Kurzanleitung
- Schnelleinrichtung in 5 Minuten
Guia Rápida
- Todo listo en 5 minutos
快速入門指南
-
五分鐘快速上手
快速入门指南
-
五分钟快速上手
EN
TW
CN
FR
DE
ES
Page 2
EN
FR
DE
ES
TW
CN
2
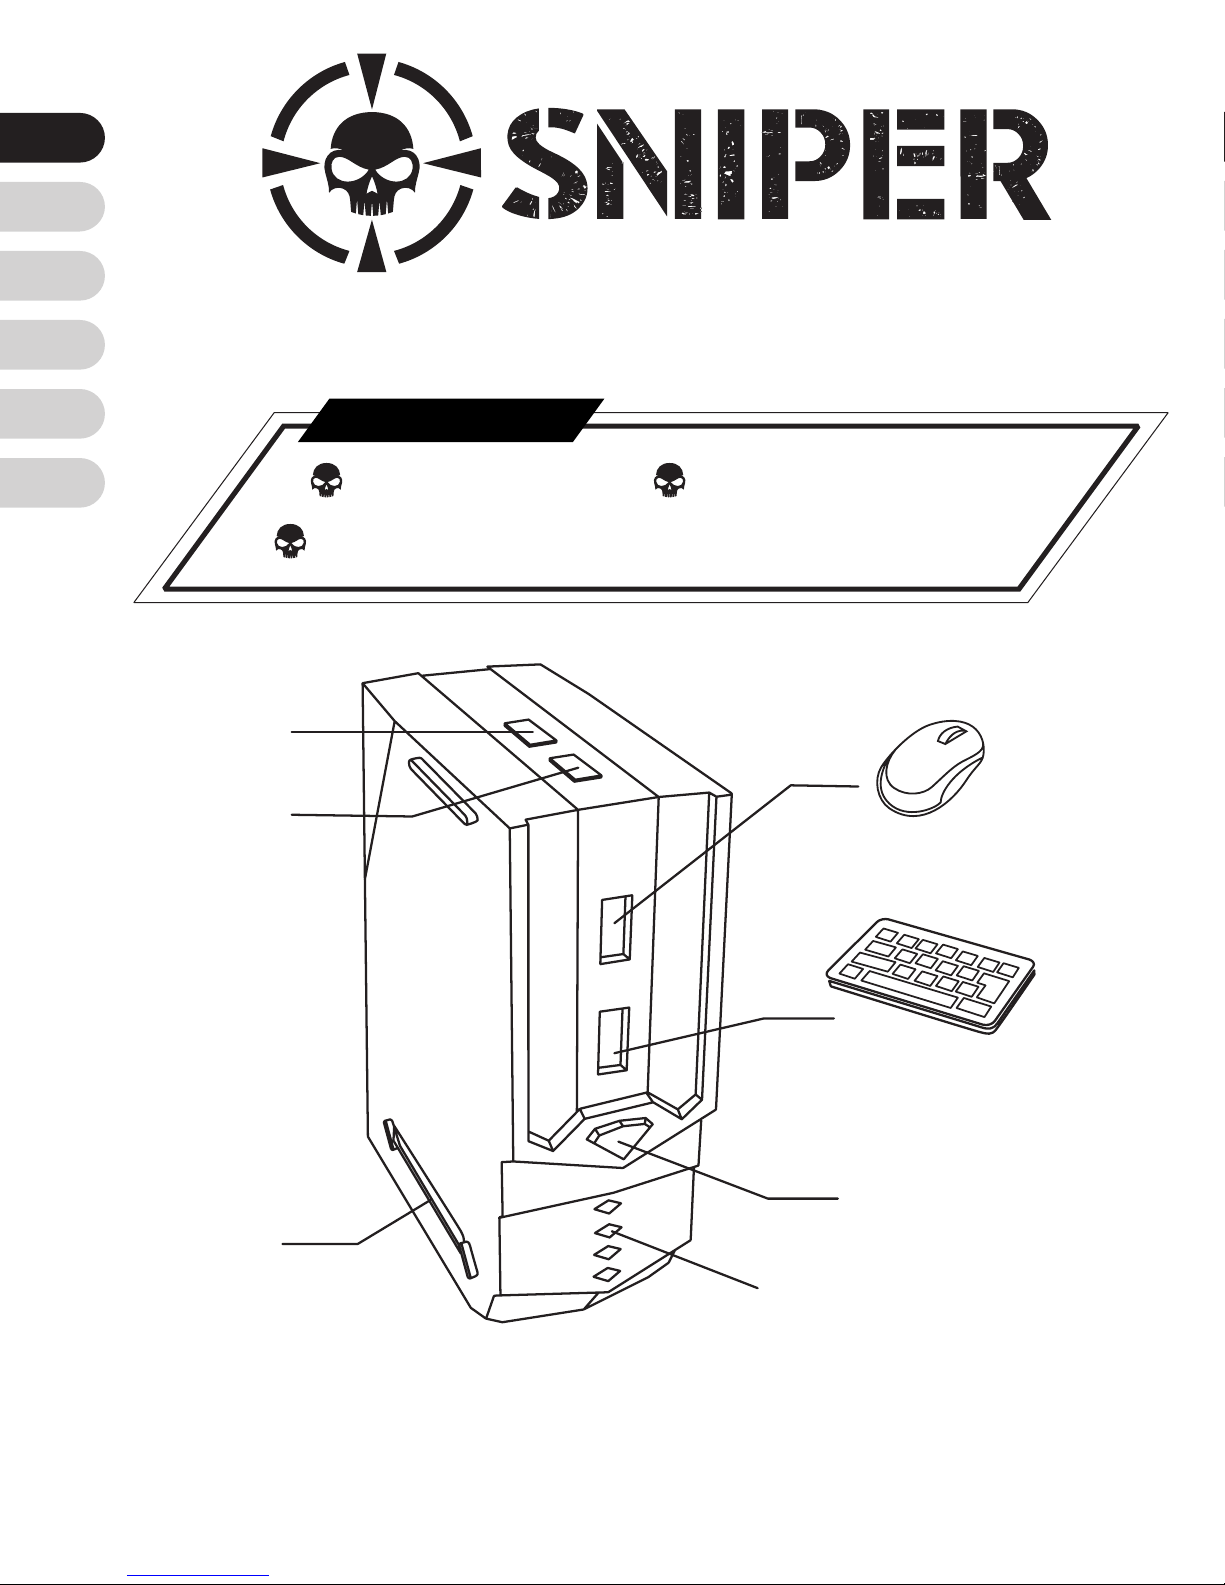
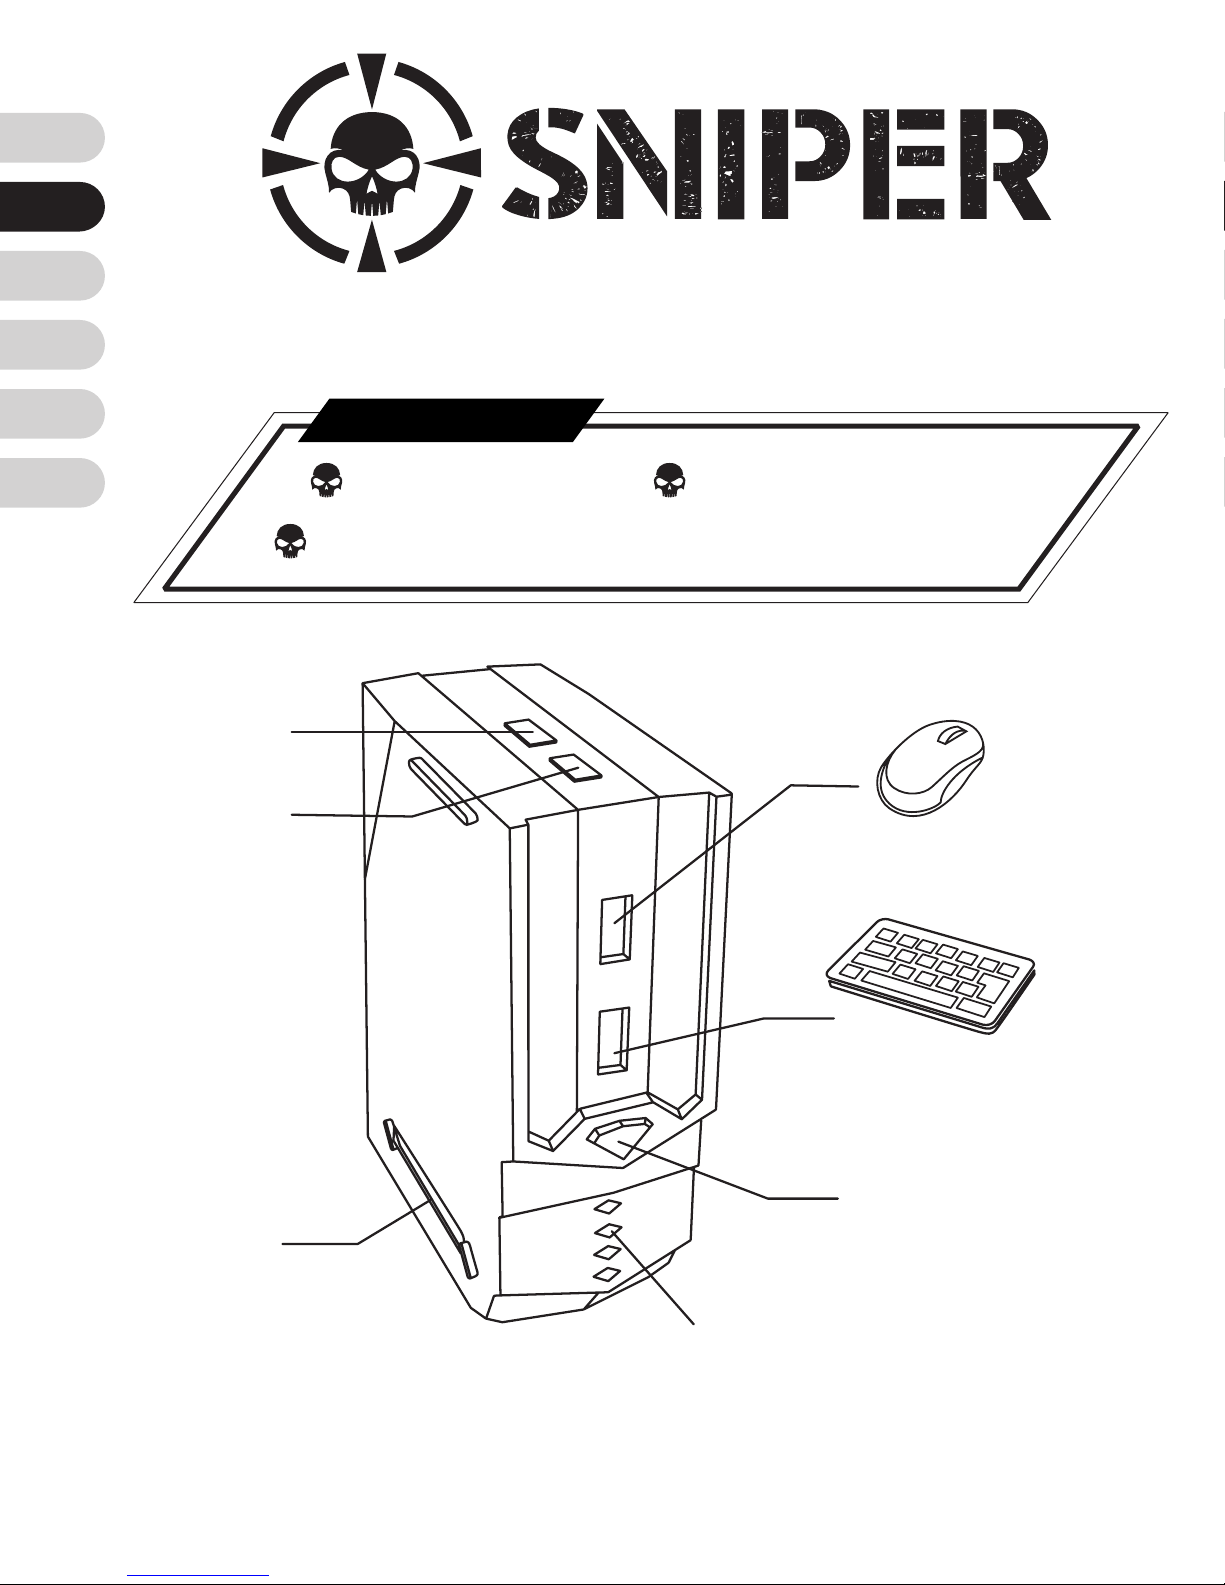
M
o
u
s
e
F
n
BT
K
e
y
b
o
a
rd
Fn
BT
Cong LED
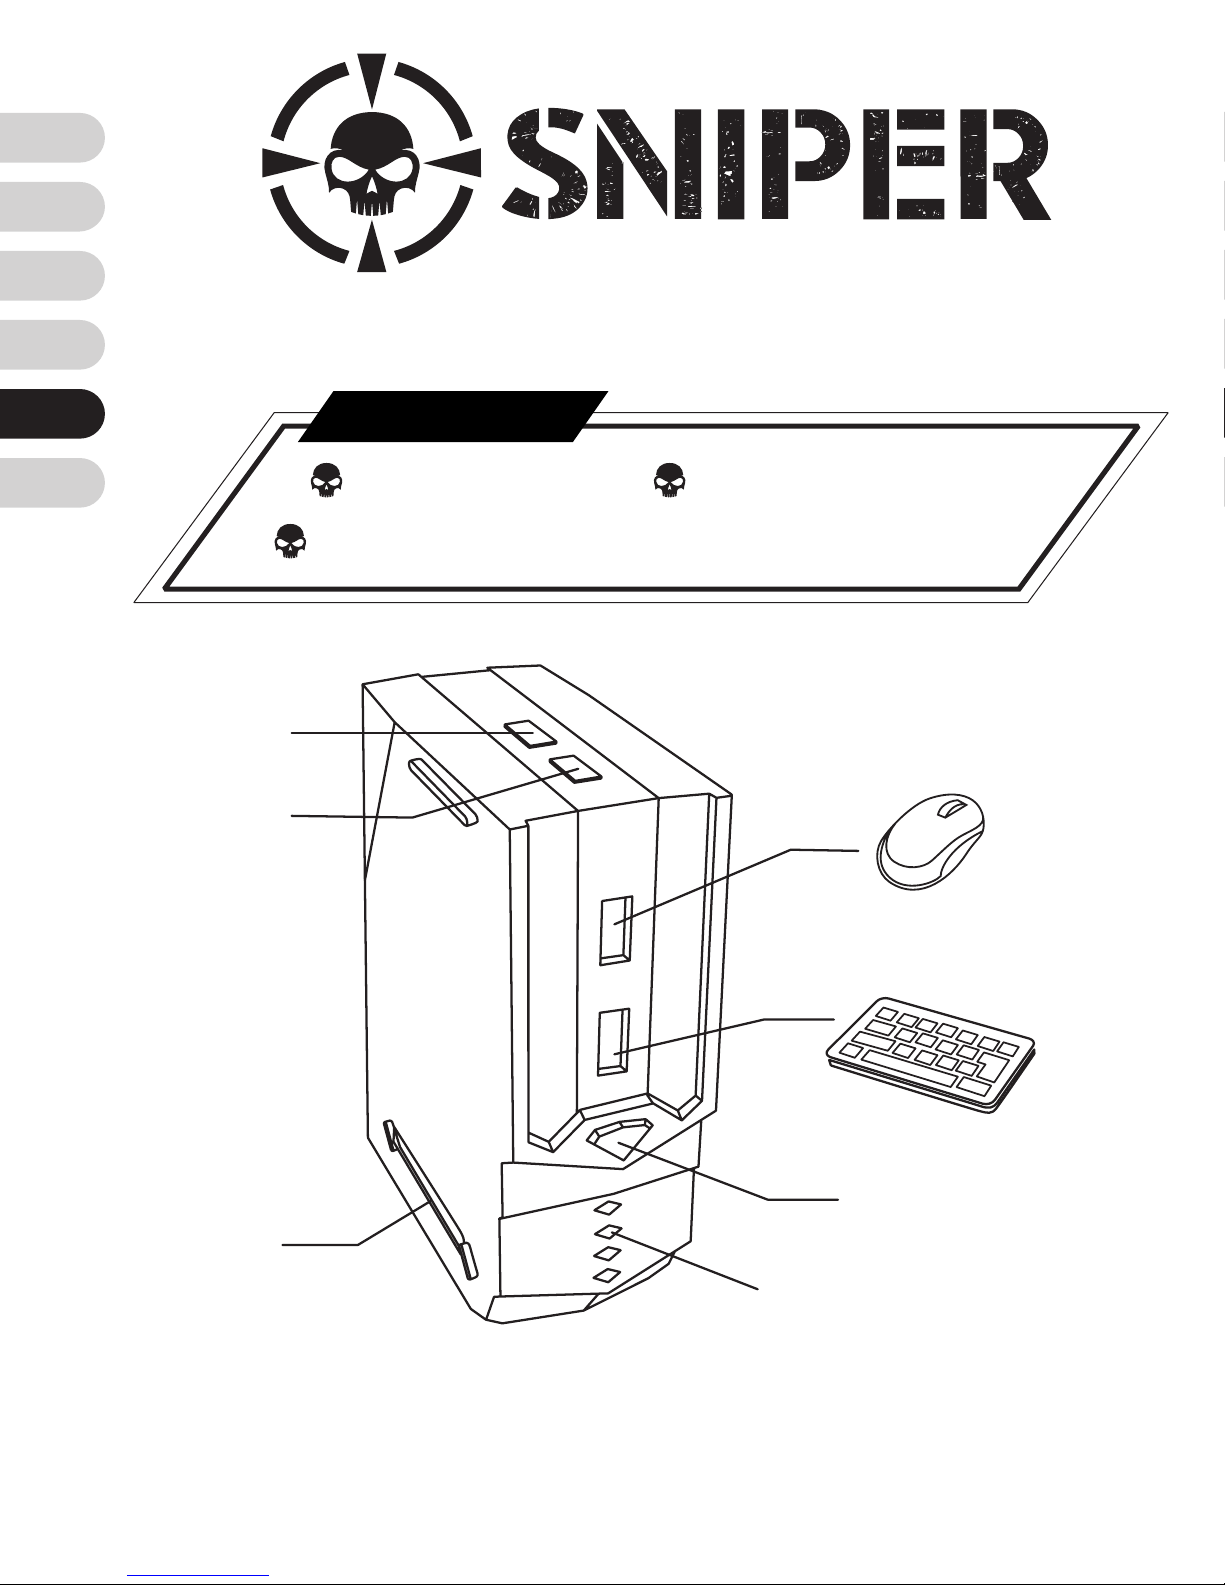
Mouse
Keyboard
Home
Console LED
PS3/ PS4: blue light
Xbox One/ Xbox 360: green light
- Setup from your phone -
Brook Sniper x1
Quick Start Guide x1
USB cable x1
Content
Page 3
EN
FR
DE
ES
TW
CN
3
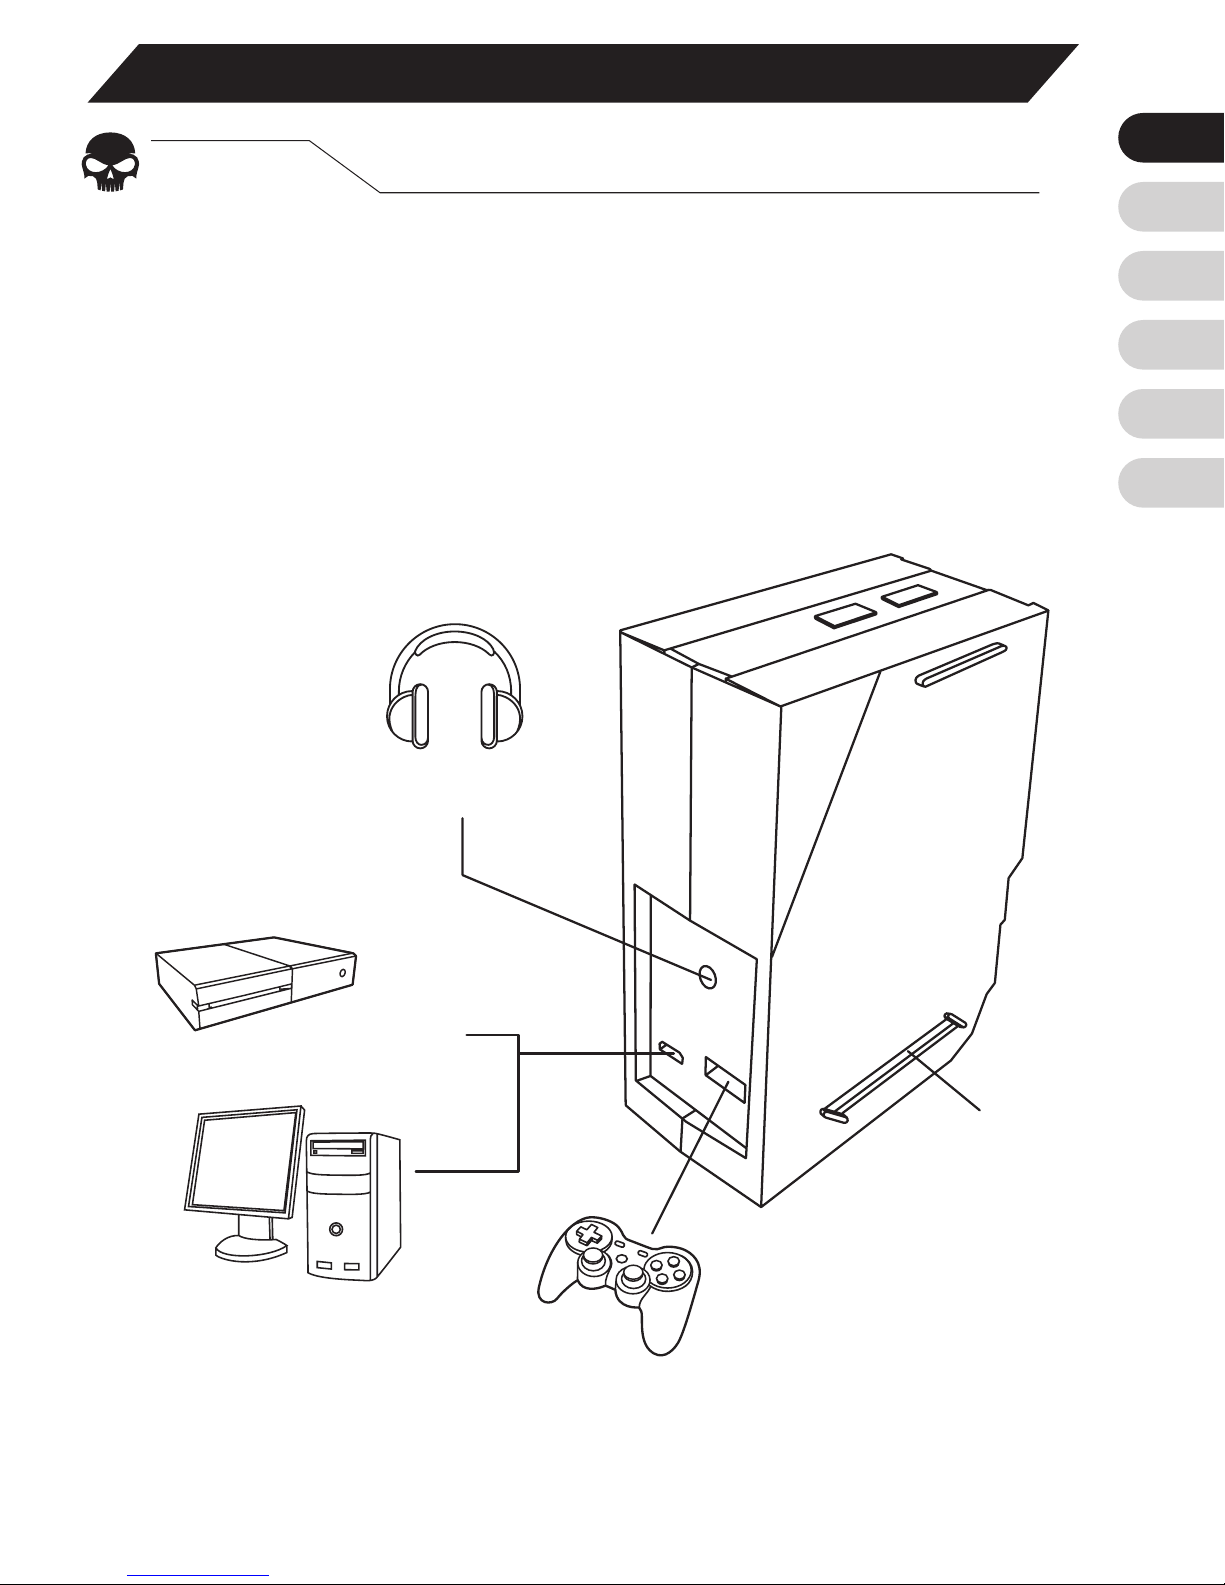
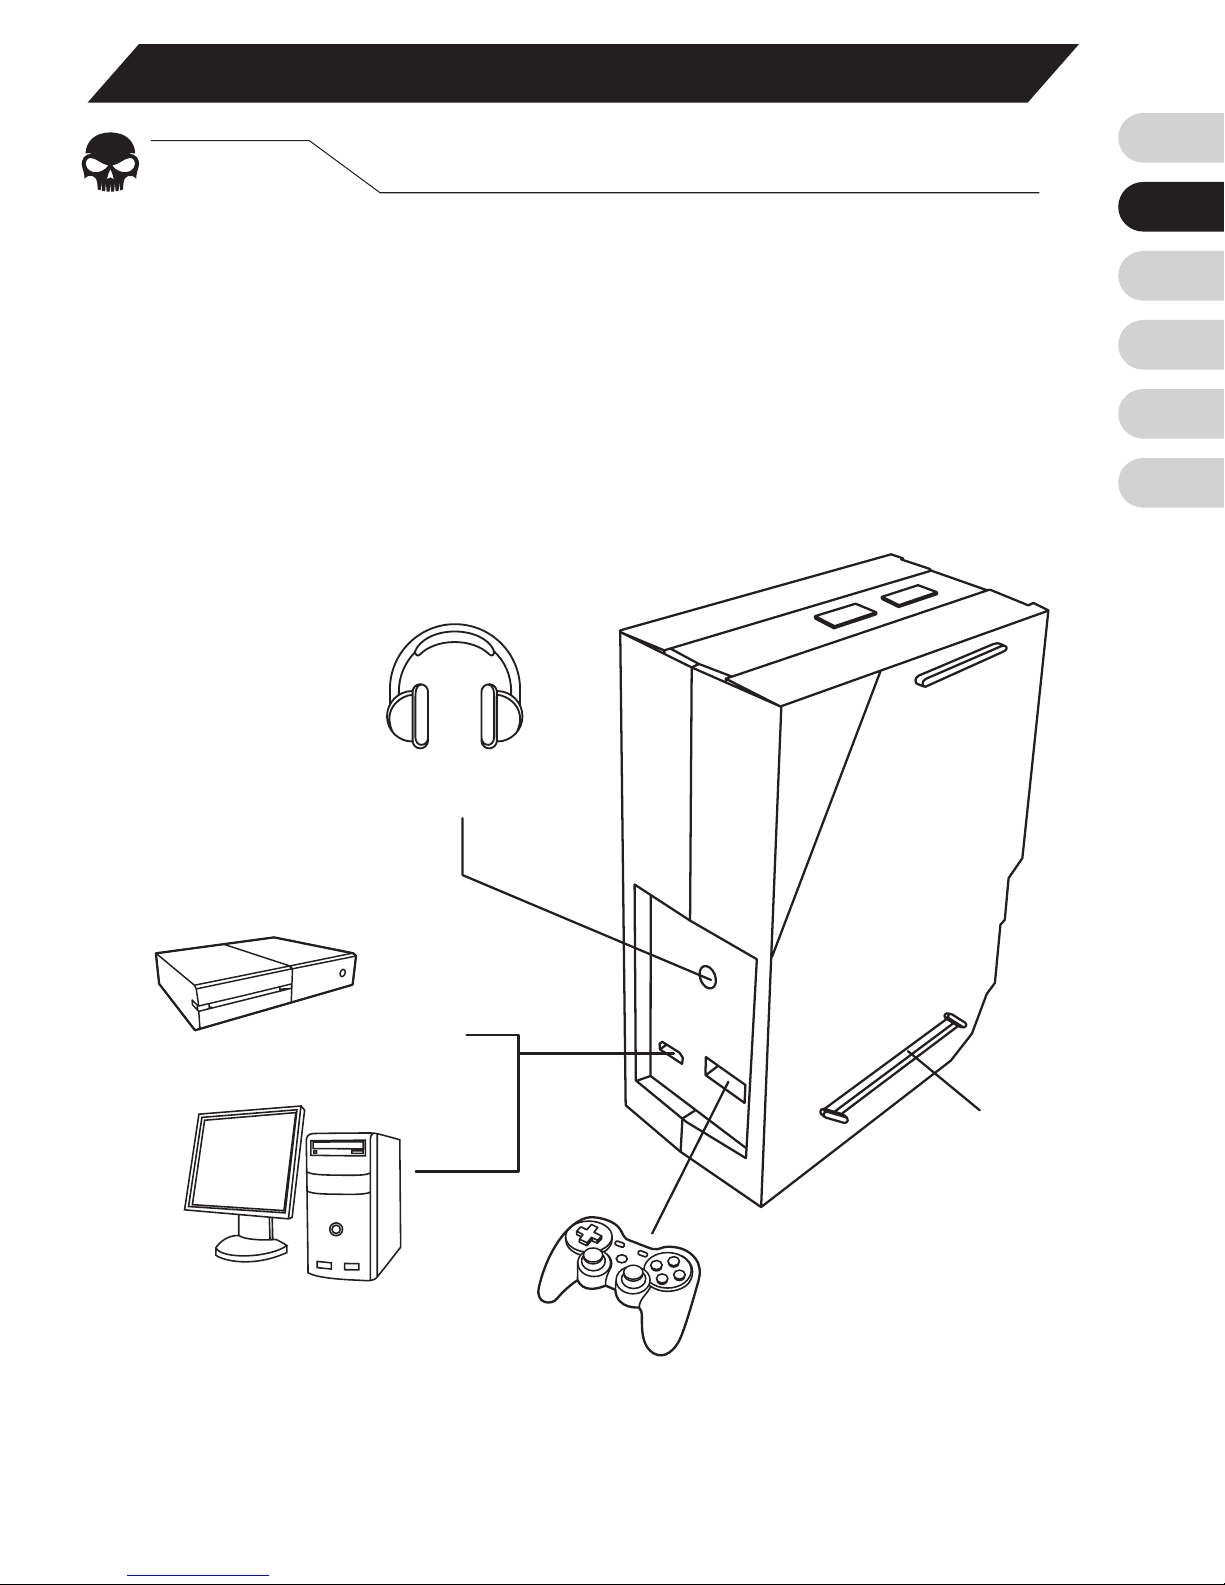
Getting Started
STEP. 1
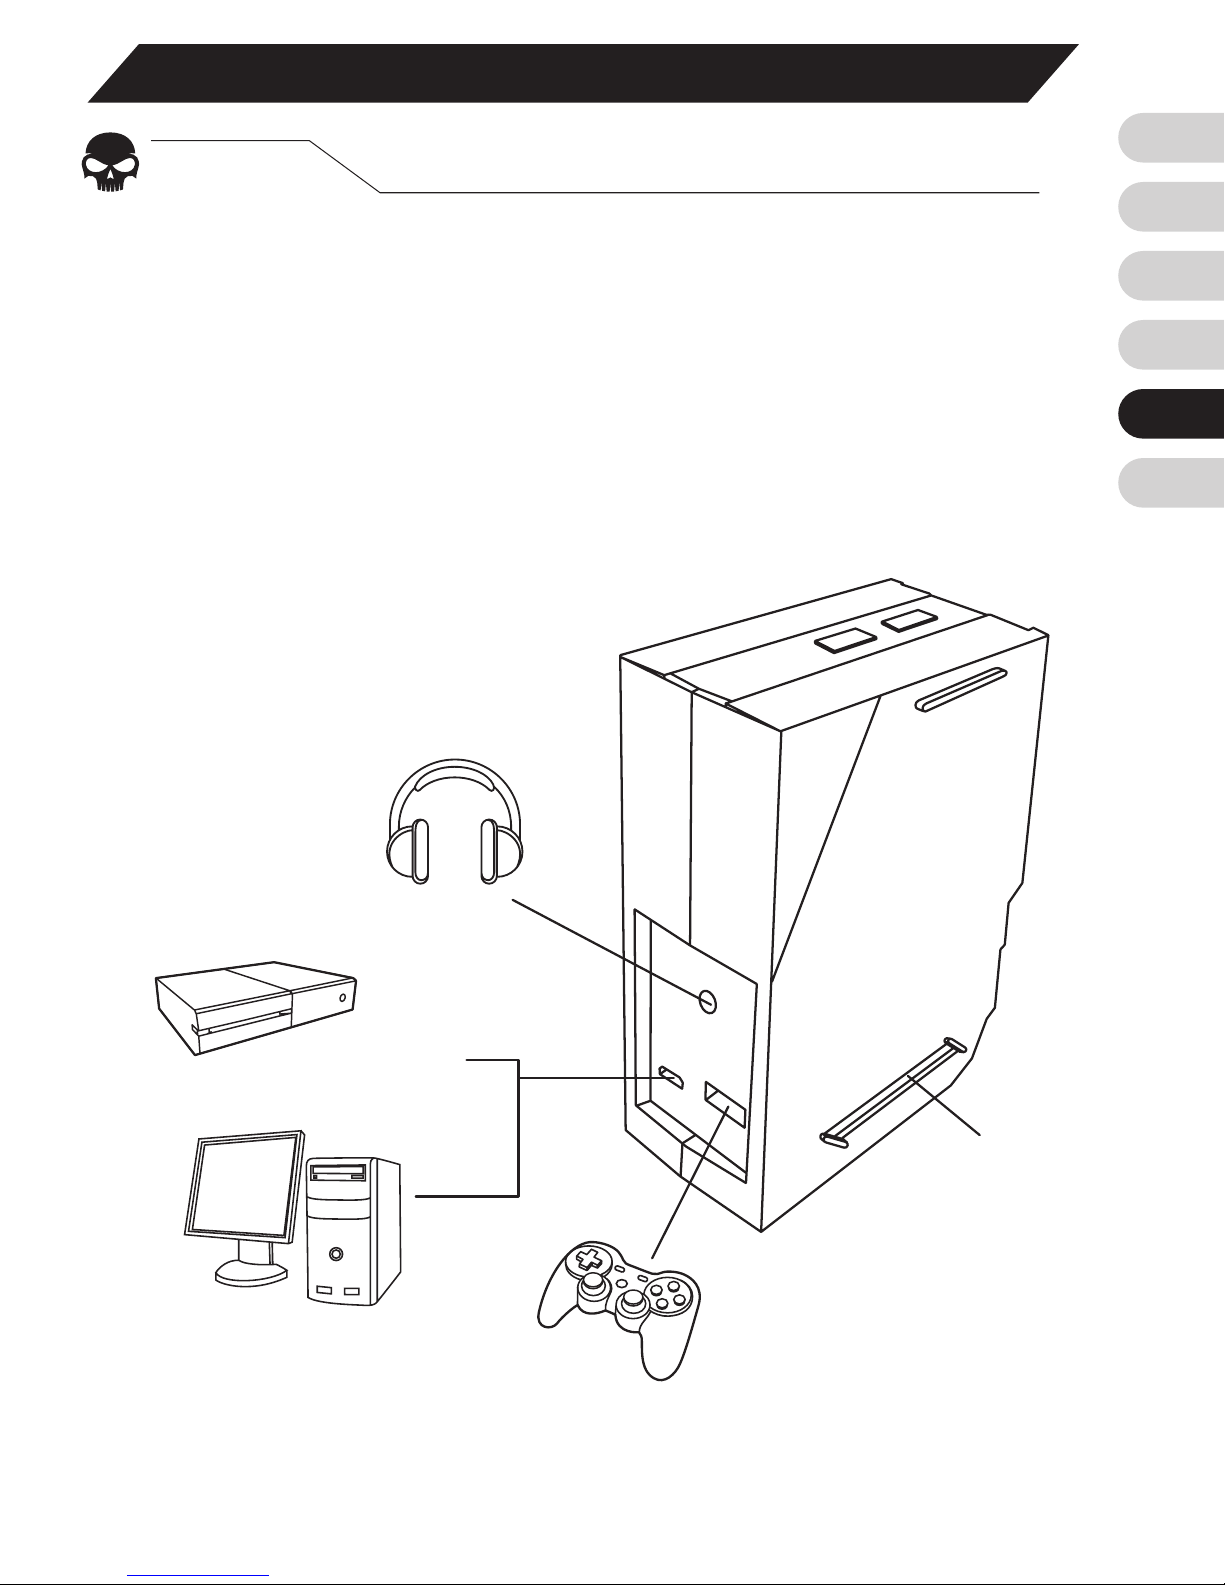
Connect all devices
Connect your keyboard, mouse, console controller
(optional), and earphones (optional) to the Brook Sniper.
Then connect the Brook Sniper to your console and pair
your Brook Sniper to your phone.
BT
F
n
Cong LED
Console
PC
Earphones
Gamepad
Page 4
EN
FR
DE
ES
TW
CN
4
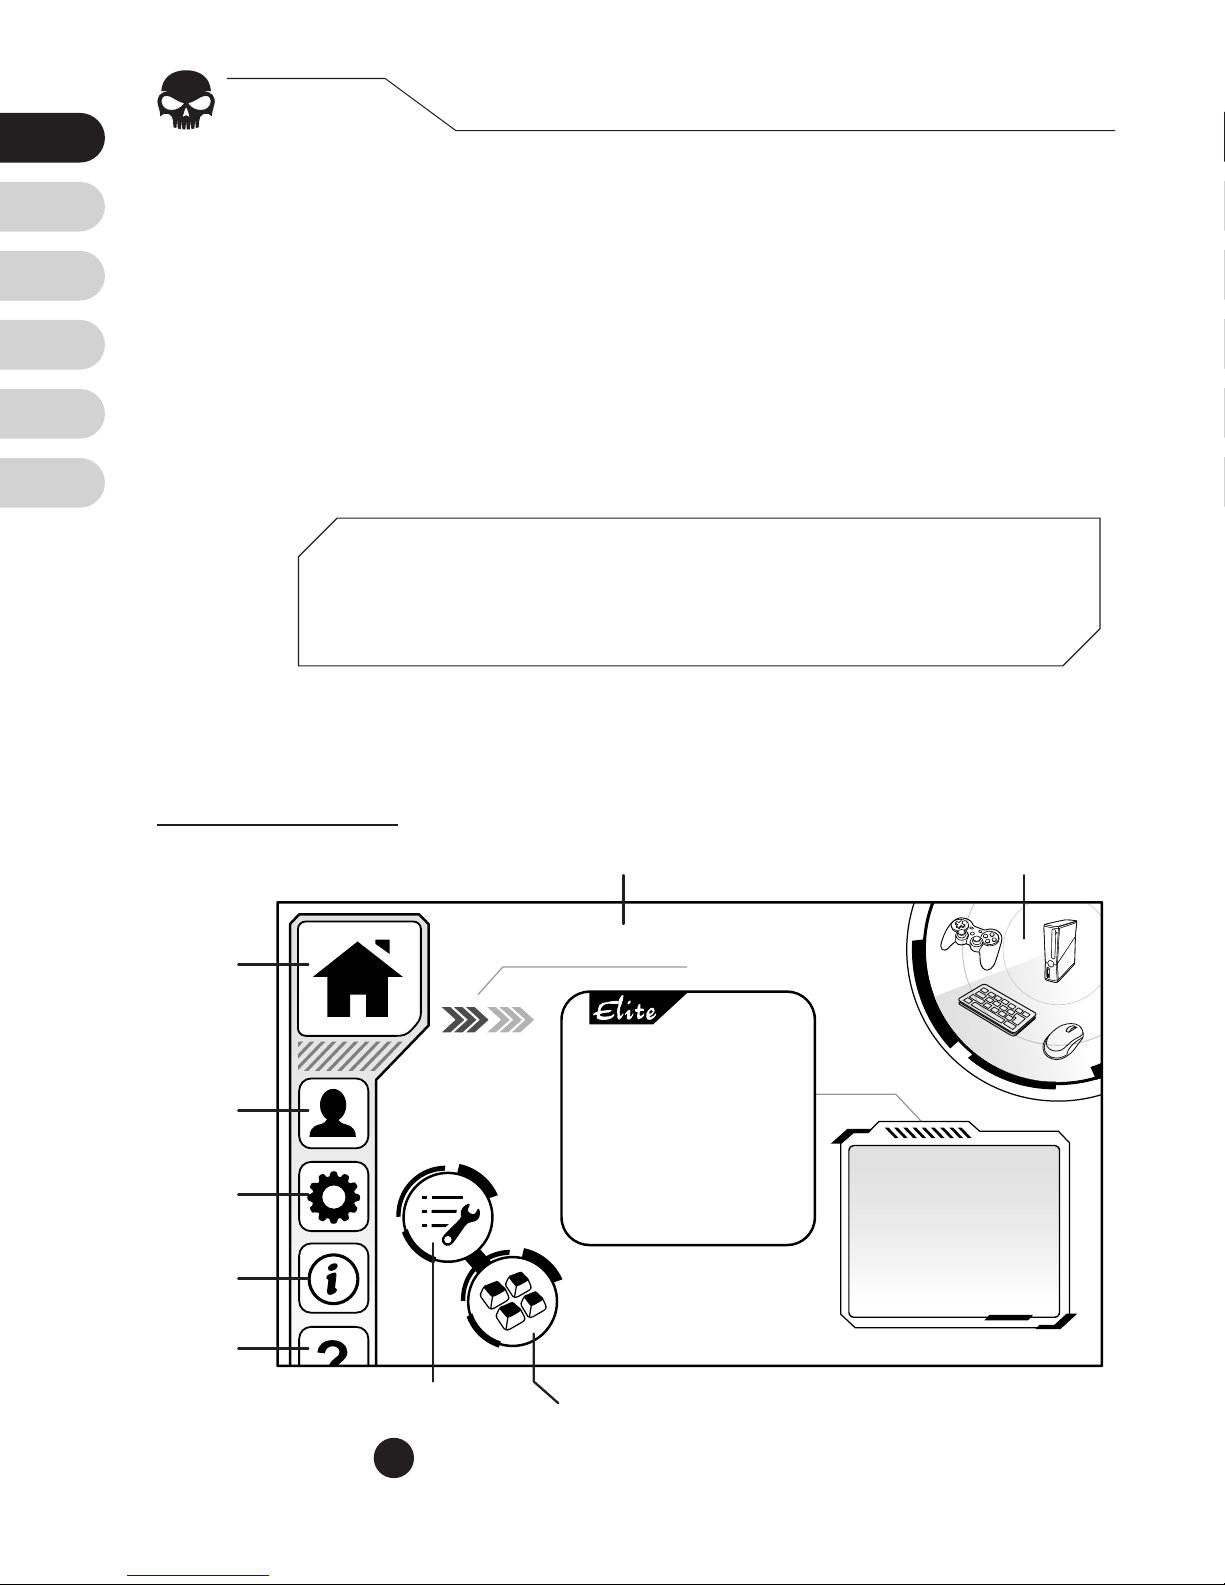
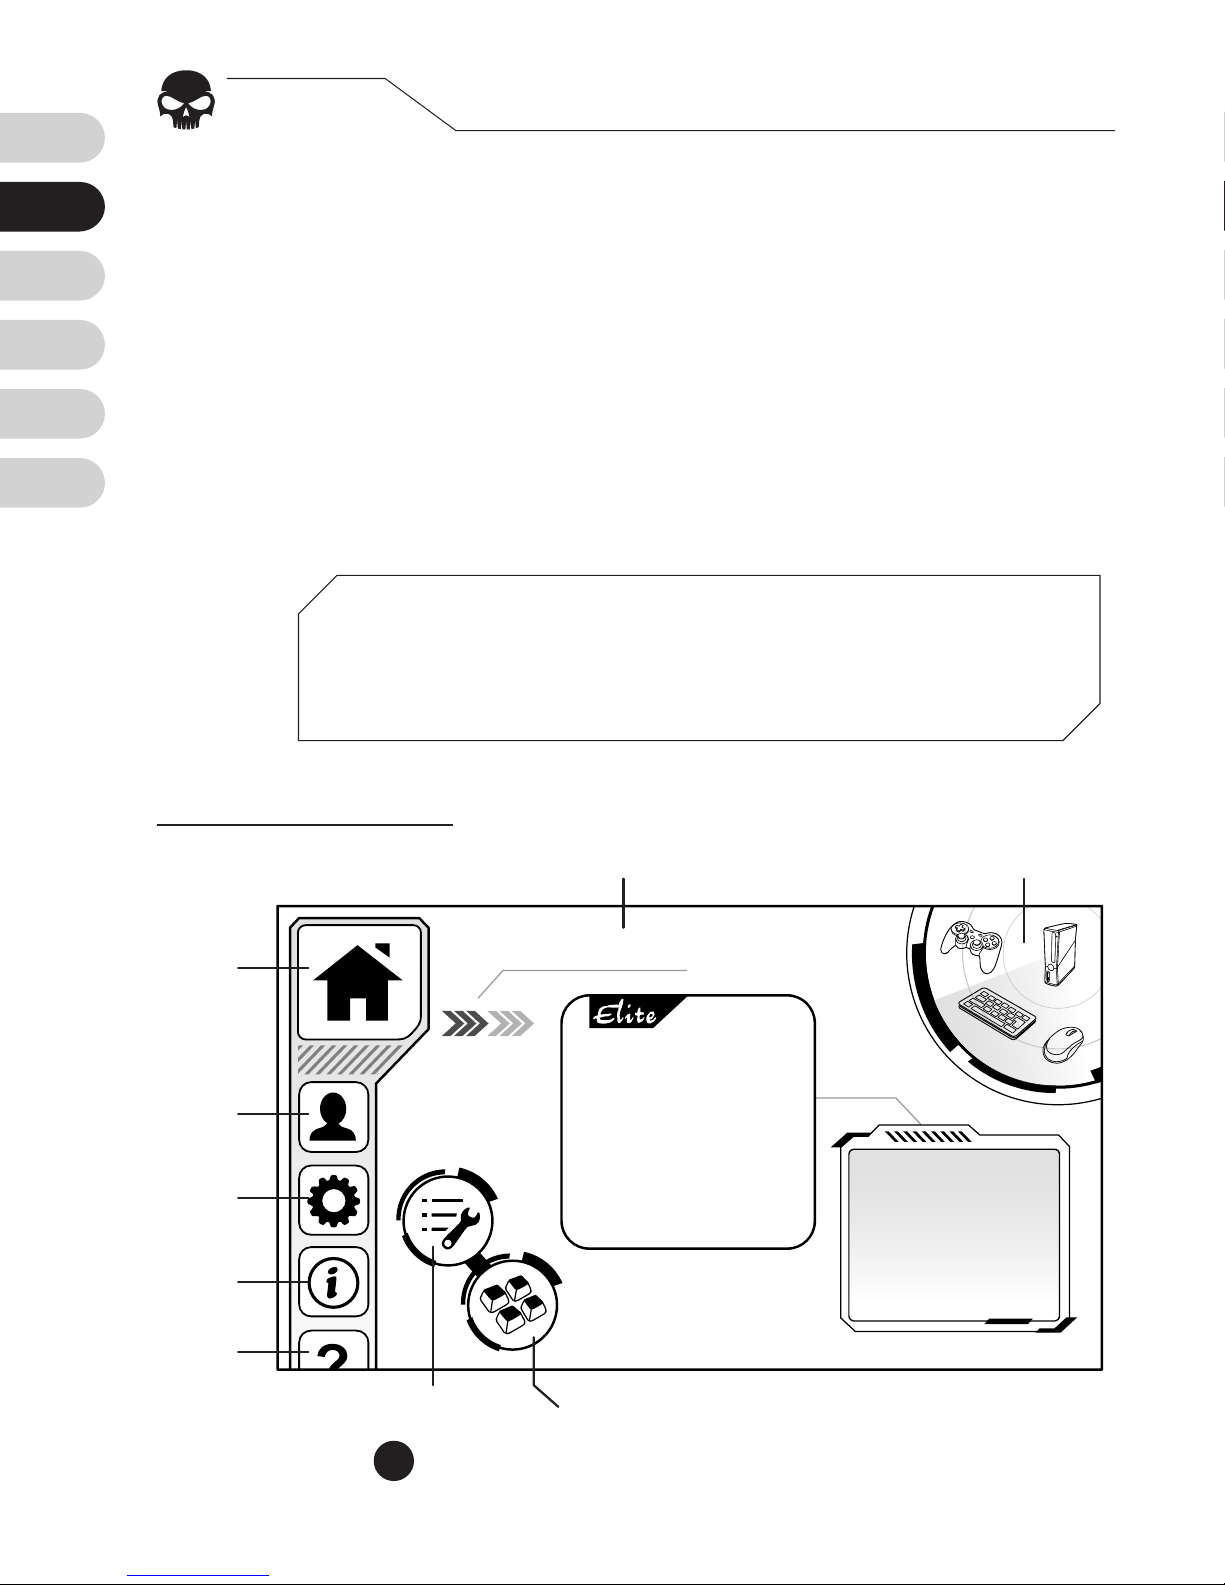
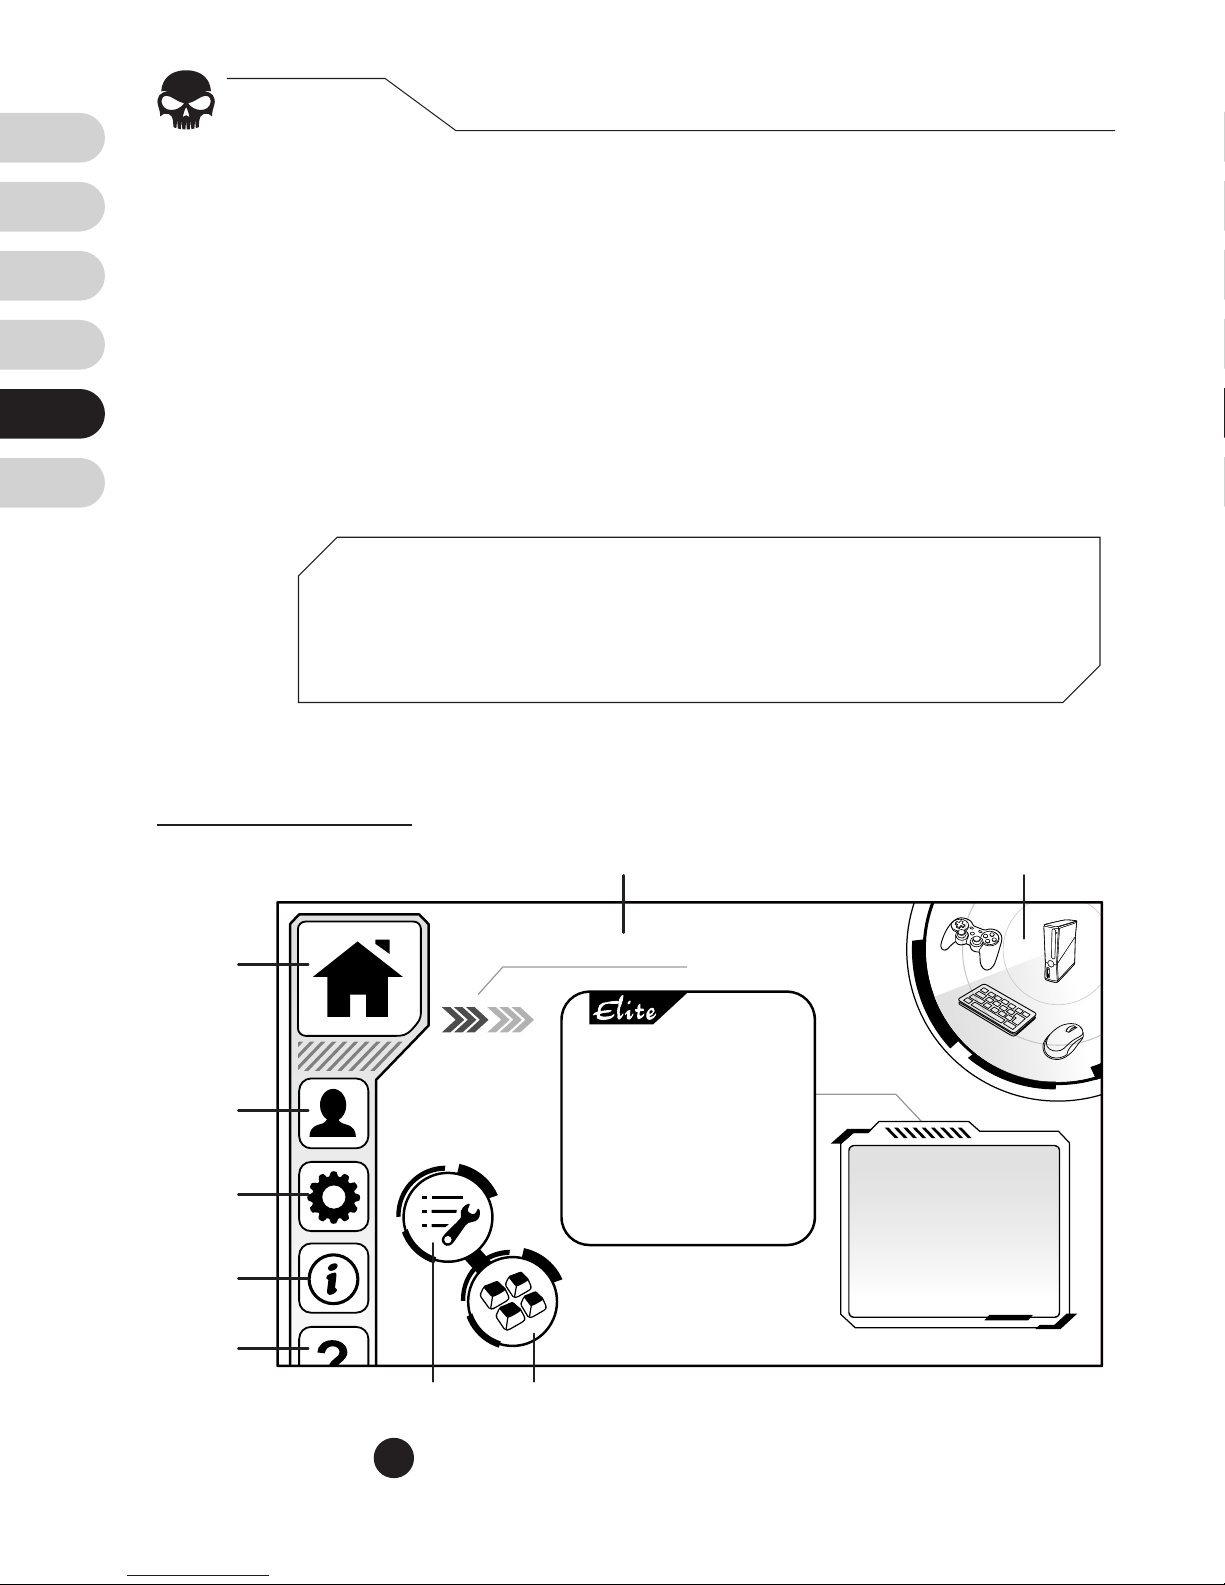
When all devices are connected properly, go to App
store/Google Play to download Brook Sniper.
On the main page of the application, the connection
status with all devices is shown. When properly
congured, proceed to the personal settings.
STEP. 2
Download Brook Sniper app
For optimal user experience, register with Sniper for free
and access cloud services.
Config Name
Main
Page
Cong Name
Cong Setting Macro Setting
HUD
(heads-up-
display)
Device Status
Cong
Image
Login
Settings
About
Help
▼
Main Page
1
Page 5
EN
FR
DE
ES
TW
CN
5
STEP. 3
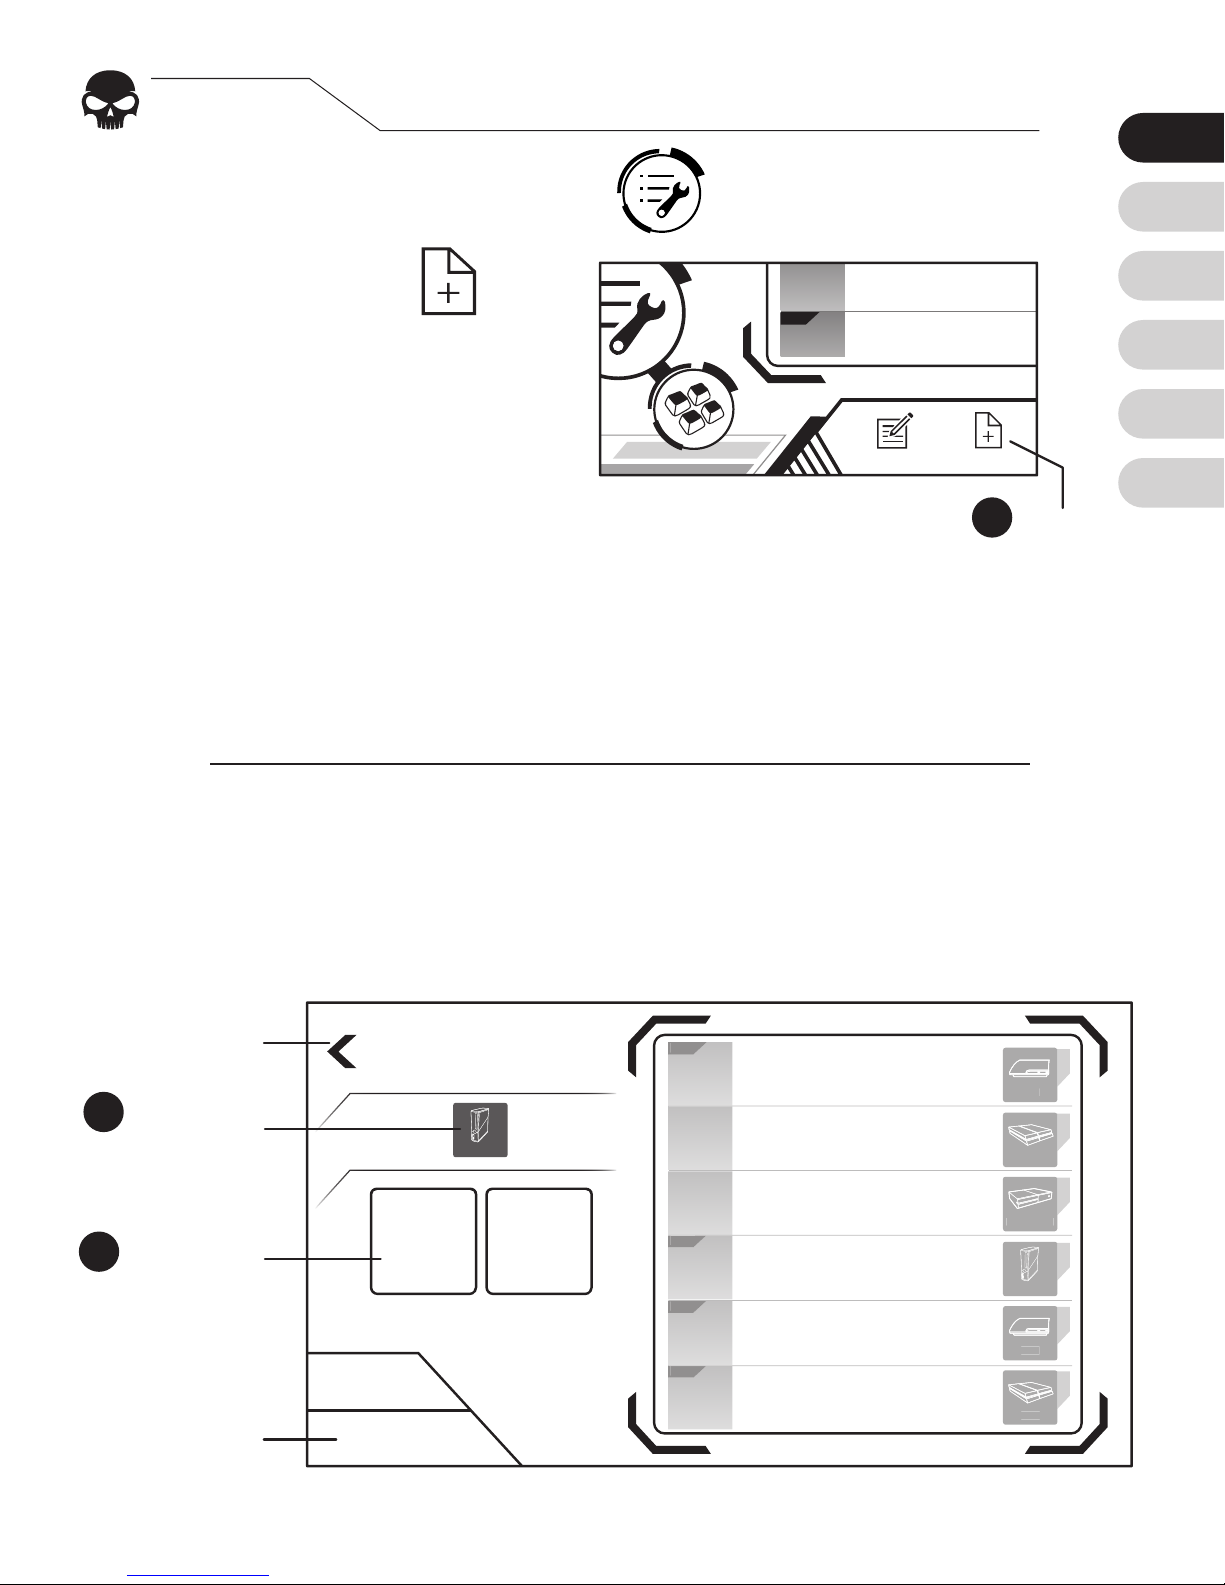
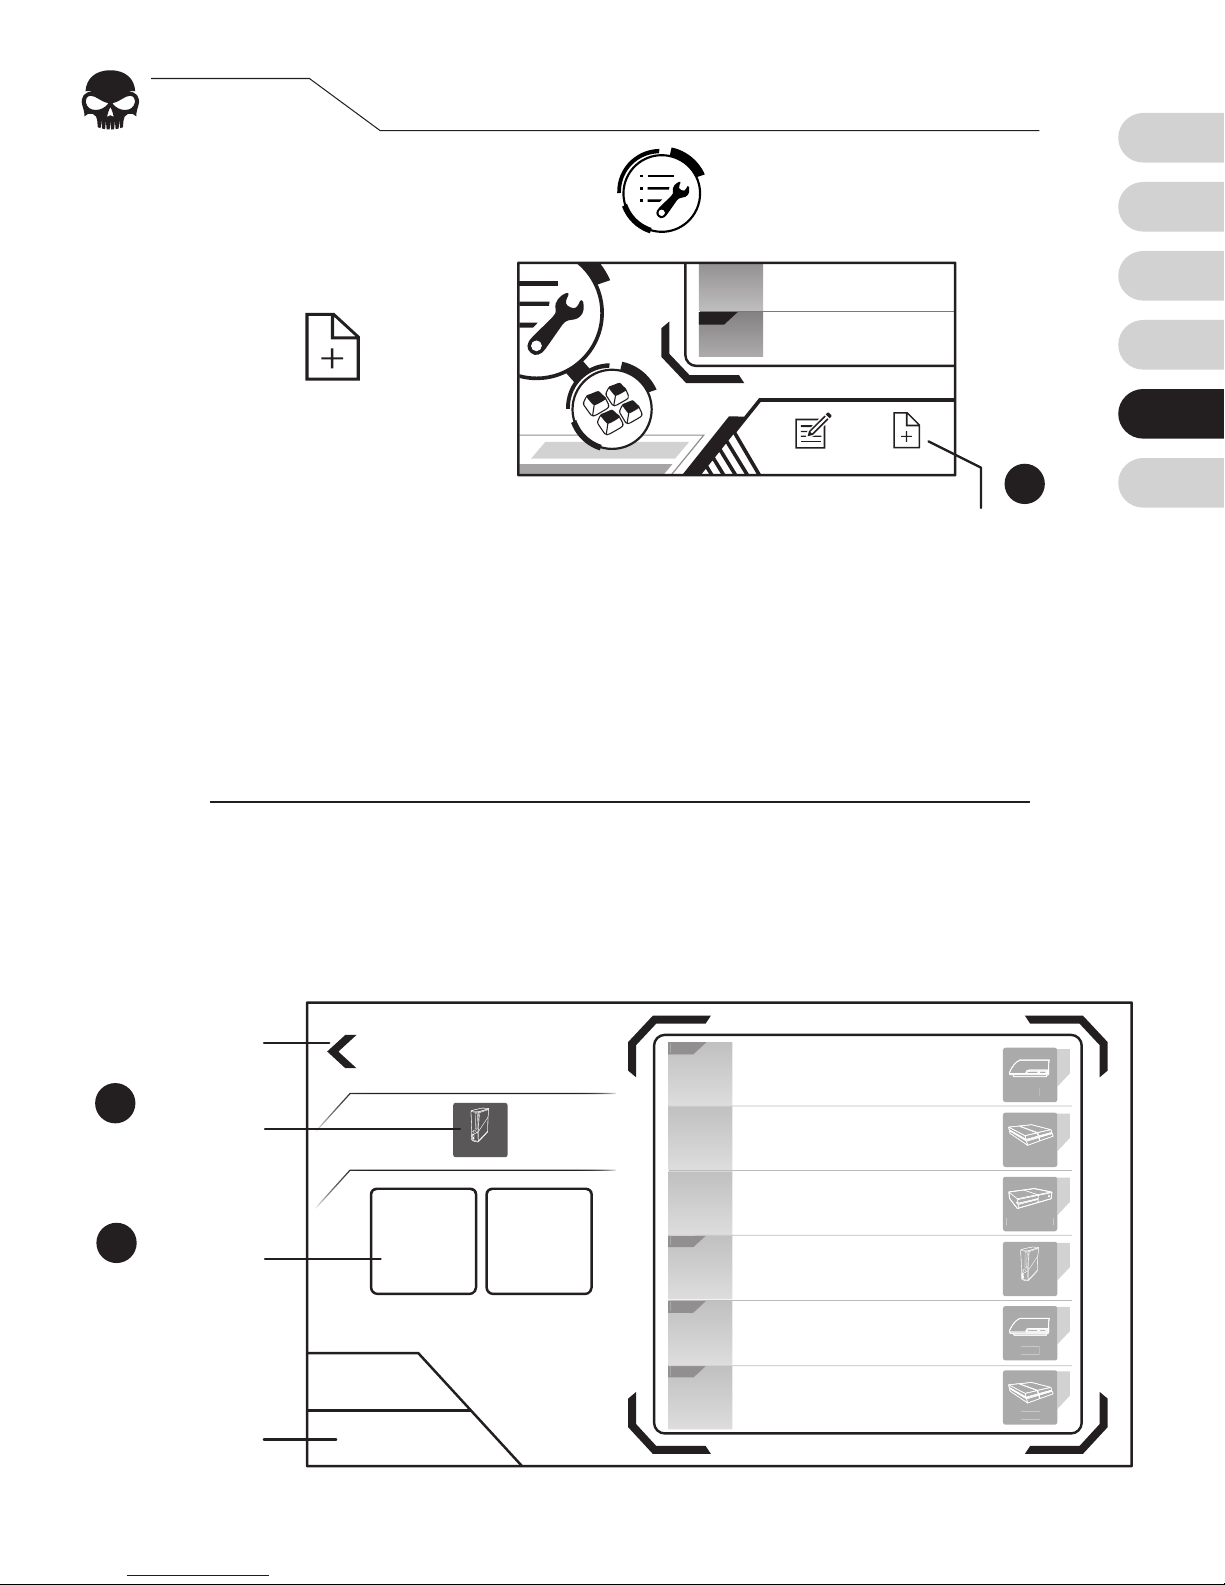
Add congurations
Press Cong Setting Icon
on the mian page.
Press “New”
to add a conguration,
which is a set of settings
for a particular game.
[1]
Elite Congurations provide optimized dead zone and mouse
movement speed curves for specic games. Check if there is an
Elite version available for your game, otherwise choose Custom.
1.
2.
Choose the console you will be connecting.
Press “Custom” or “Elite”
[1]
. Select a platform that
corresponds to your console and the congurations.
3.
4.
Create New
Custom Elite
Xbox 360
Cancel
Last Page
Choose
the console
Choose
the platform
Cancel
3
4
Elit e
Elit e
Elit e
Elit e
Config 1
Config 2
Config 3
Config 4
Config 5
Config 6
Xbox 360
PS3
PS4
Xbox One
PS3
PS4
Save
2
Elit e
Config 4
Config 5
NewEdit
New
Page 6
EN
FR
DE
ES
TW
CN
6
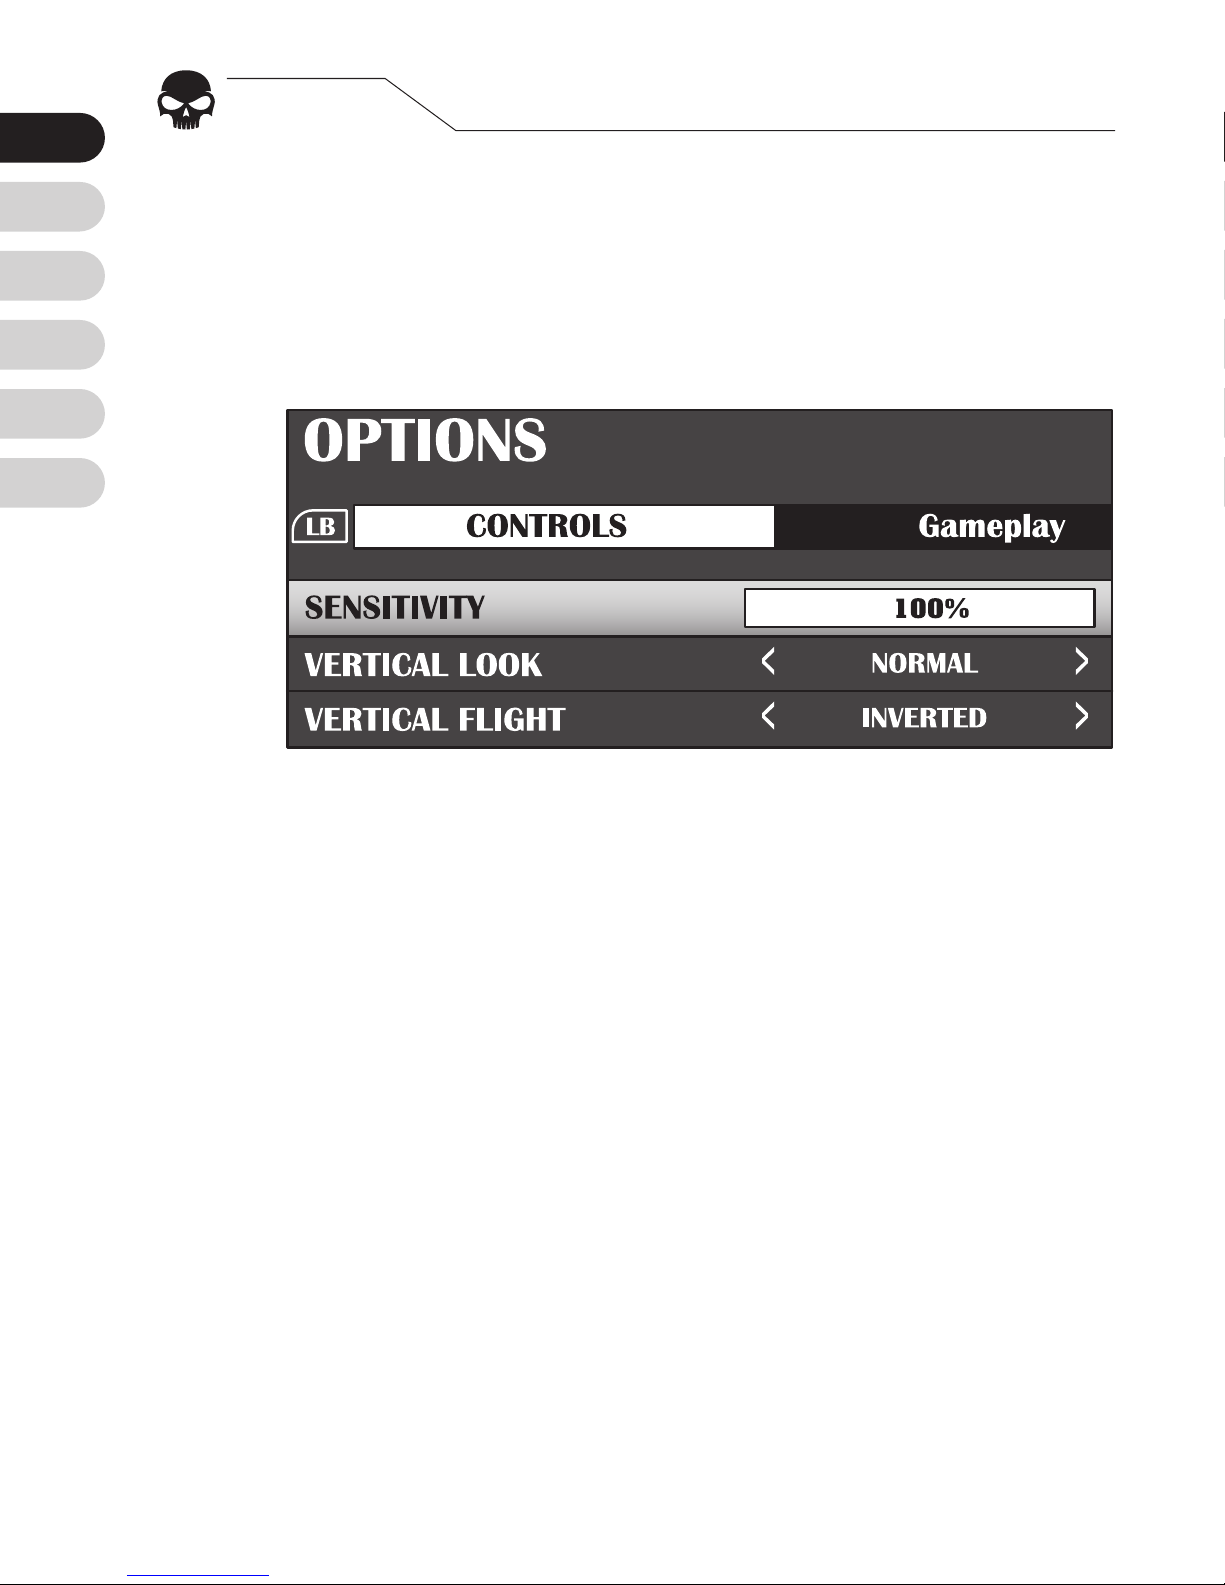
To optimize the signal transmission from your mouse
to the Brook Sniper, set the sensitivity of your mouse
to maximum. Some games call this 100%, Fastest or
Insane mode.
STEP. 4
Set your sensibility to max
Page 7
EN
FR
DE
ES
TW
CN
7
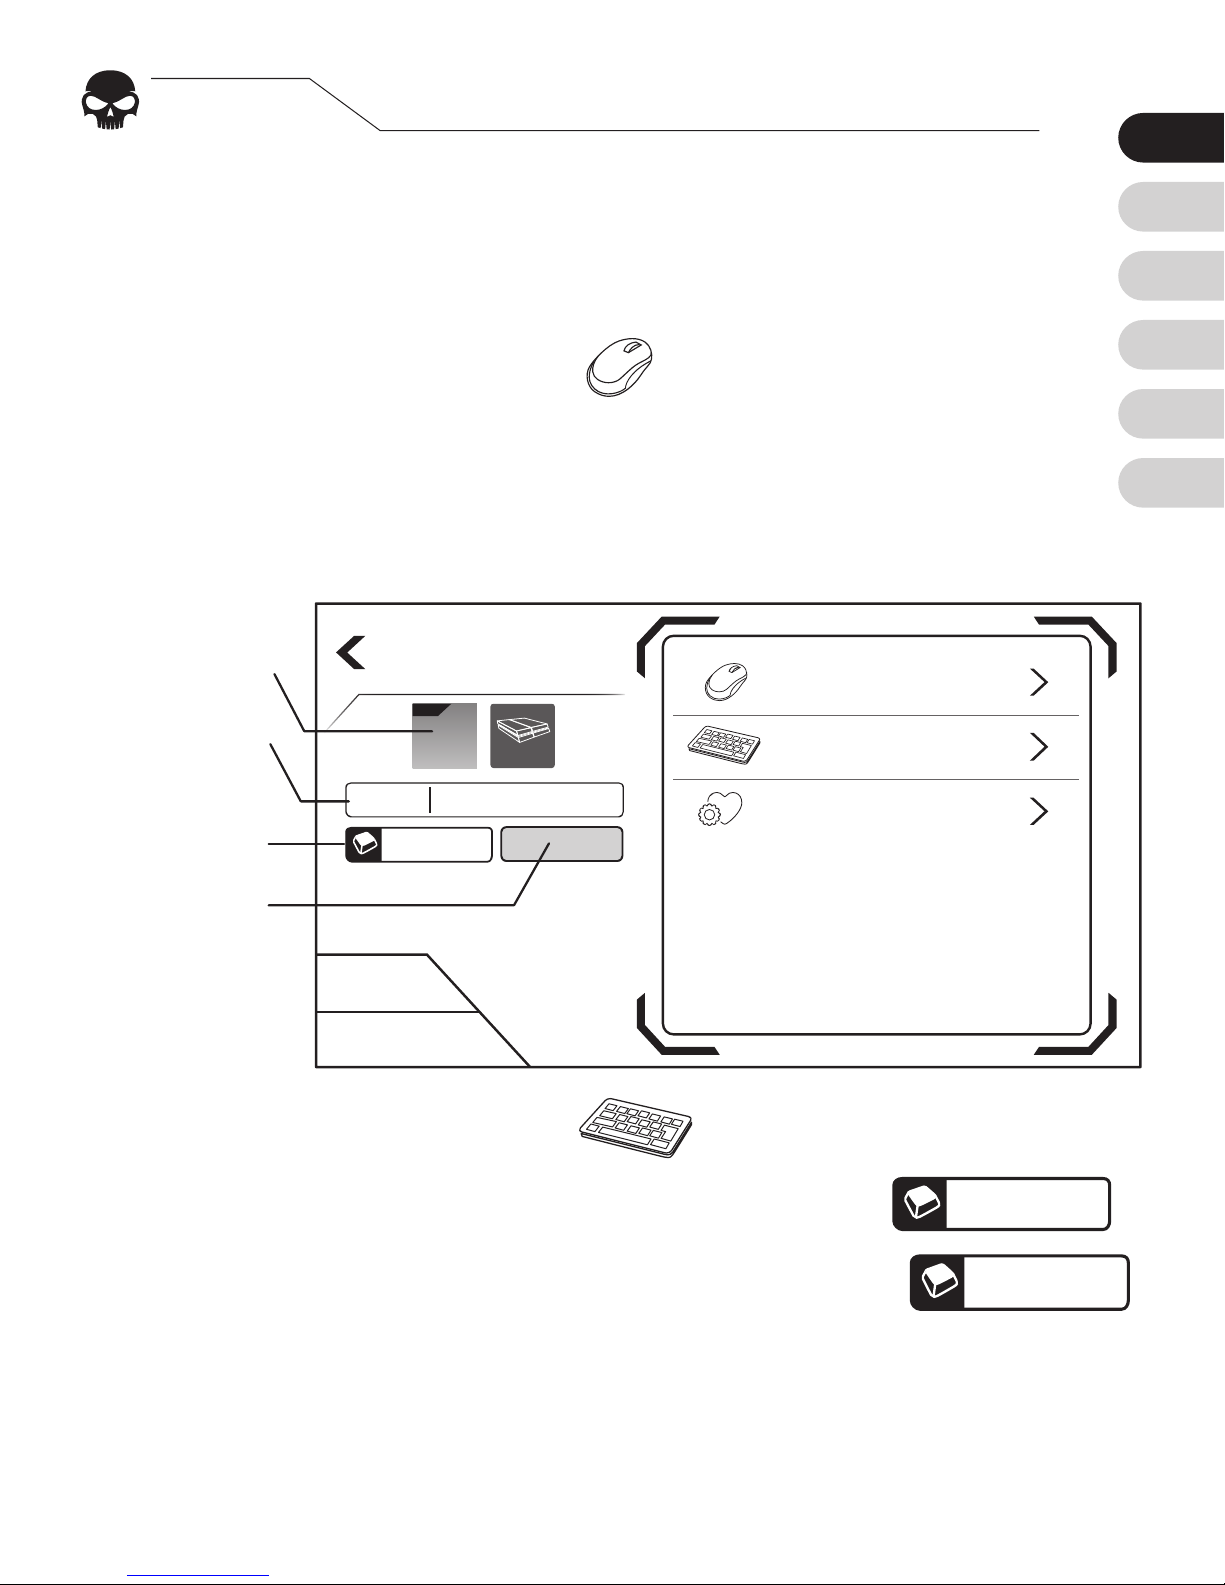
On the left side of the screen, you can edit:
1. Cong Image 2. File name 3. Hotkeys
4. Indicator lights
Clicking the
Mouse
icon to the right, you can edit
these mouse functions:
1. Sensitivity 2. Dead zone 3. Mouse movement speed
→
You may press Save to complete edition
STEP. 5
Edit congurations
Click the
Keyboard
icon to remap buttons:
1. Press the controller button you want to edit.
G
2. When the application displays “Listening…”
Listening...
press the new key on your keyboard or mouse.
3. Repeat steps 1 and 2 until all keys are set.
→
You may press Save to complete edition
Cancel
Save
Edit Config
Keyboard
Preferences
Mouse
Config 1
F2
Elit e
PS4
Cong Image
File Name
Hotkey
Indicator
lights
Page 8
EN
FR
DE
ES
TW
CN
8
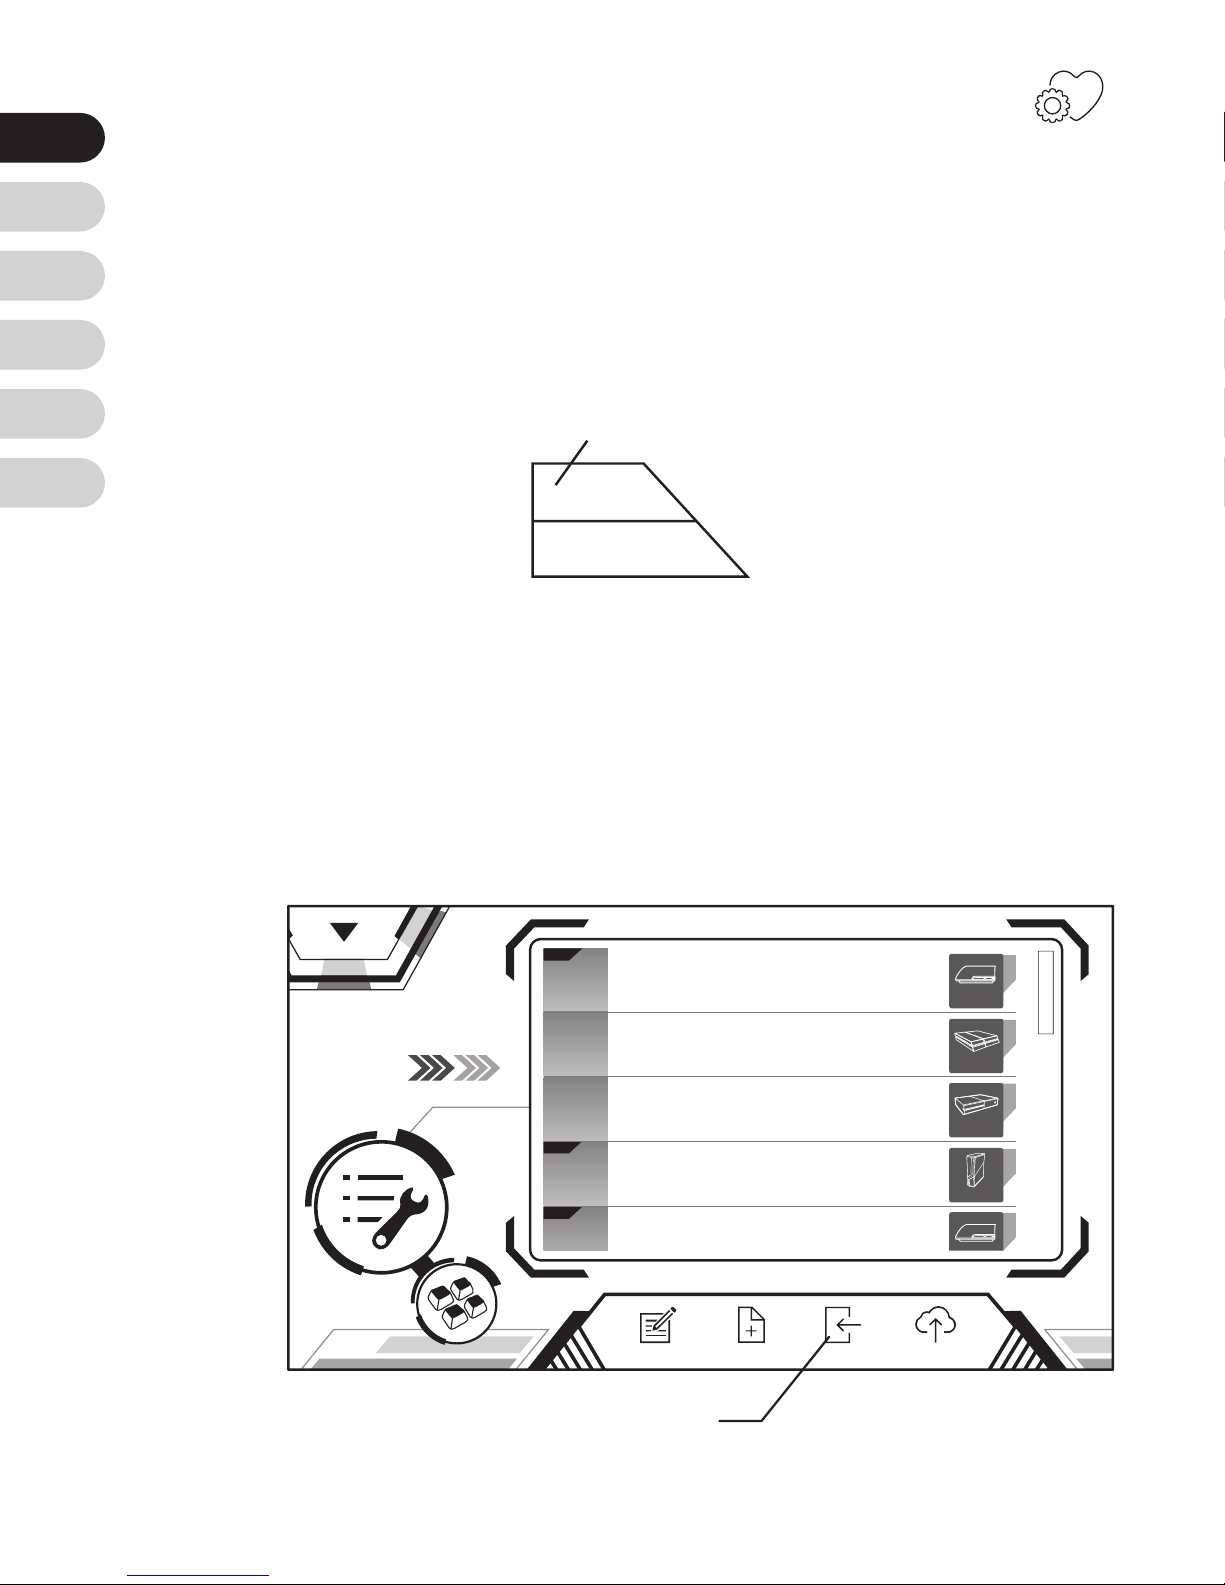
From Preferential Settings
preference
settings
you can also edit:
1. Shooting frequency
2. Inverted Y-axis
3. Sniper Breath (Elite Conguration only)
4. Anti Recoil (Elite Conguration only)
Press “
Save
” when you have finished editing. Press
"
Load
" to load the cong to Sniper and back to homepage.
Now, all settings are completed. You are now ready to
play your favorite games!
Config
Elit e
Elit e
Elit e
Config 1
Config 2
Config 3
Config 4
Config 5
Xbox 360
PS3
PS4
Xbox One
NewEdit BackupLoad
Load
Save
Cancel
Save
Page 9
EN
FR
DE
ES
TW
CN
9
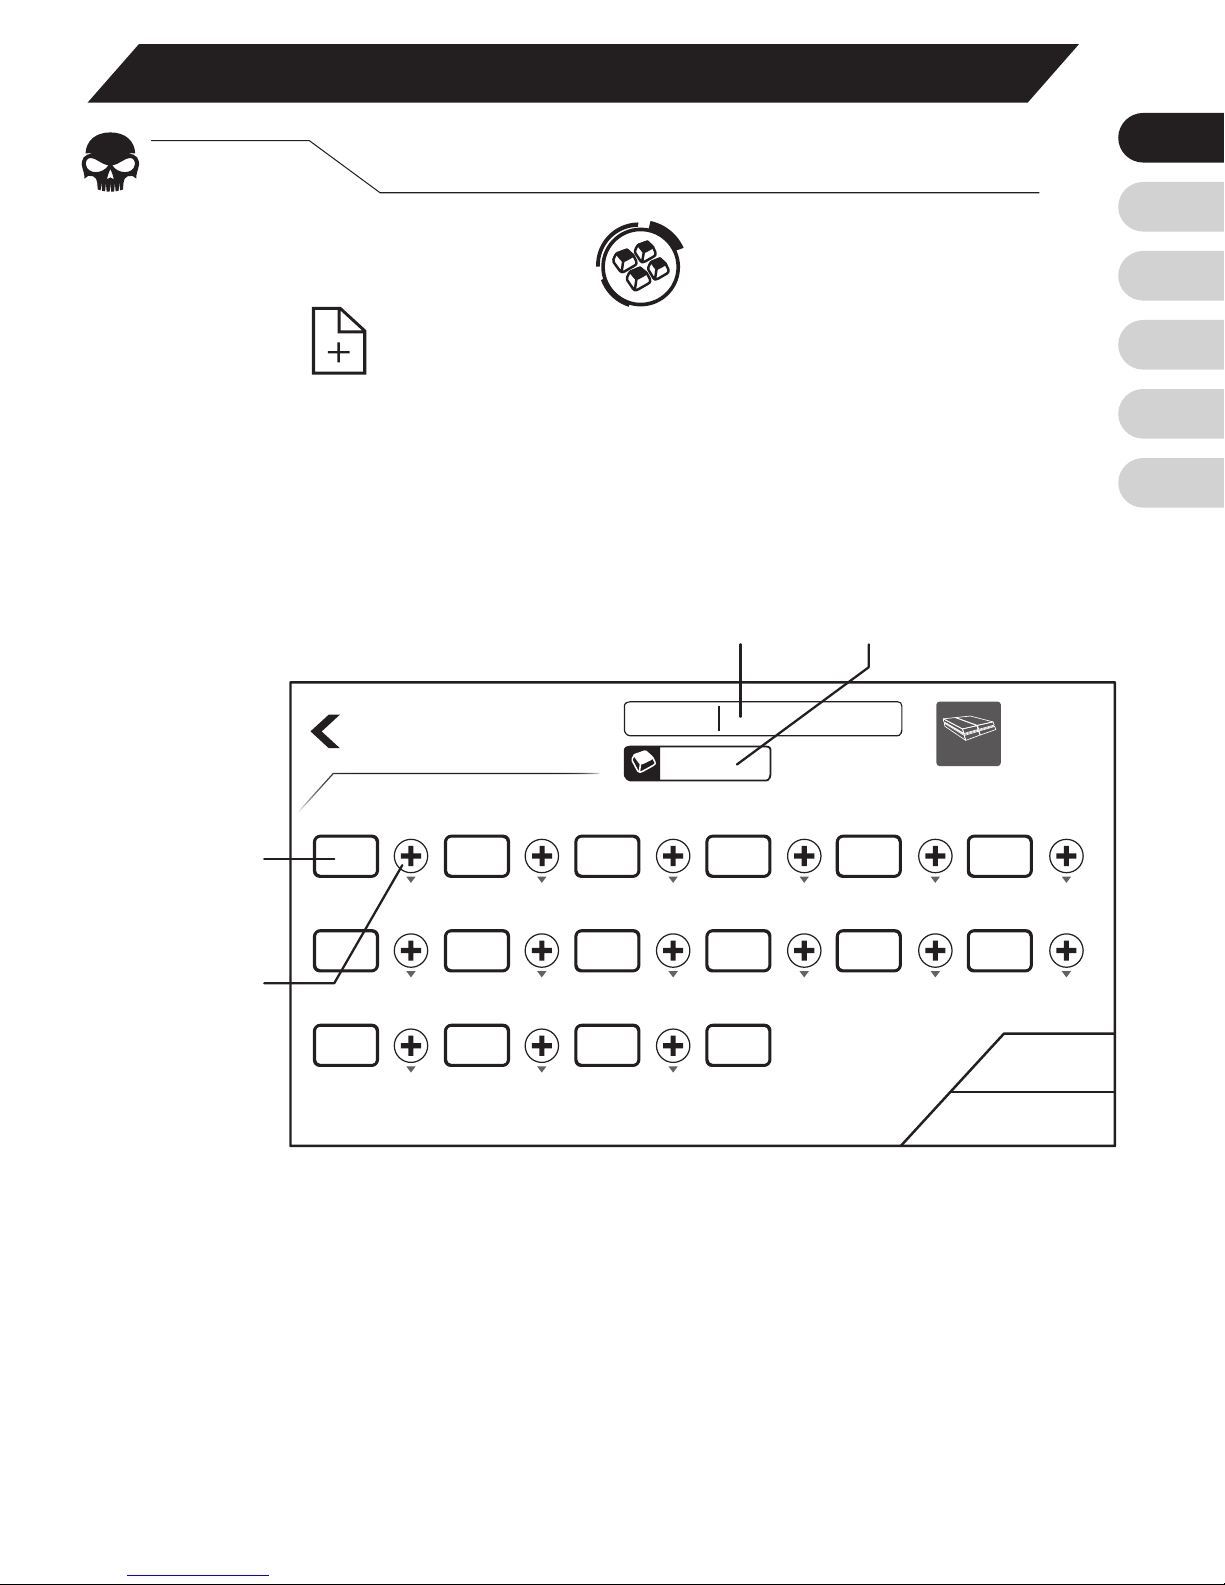
Press Macro Setting icon on the menu and click
“New” to add a macro. You only need to choose
the console you want to play on and follow the below
steps:
1. Set le name and hot keys.
Other Settings
STEP. 1
Macro Settings
Create New
Cancel
Save
PS4
Macro 01
HotkeyFile Name
command
column
2. Press command column and click any key on the
keyboard or the mouse. A dialog box will pop-up and
let you dene it as a “Click” or “Release” action. Press
“Save” when done.
interval
mark
Page 10
EN
FR
DE
ES
TW
CN
10
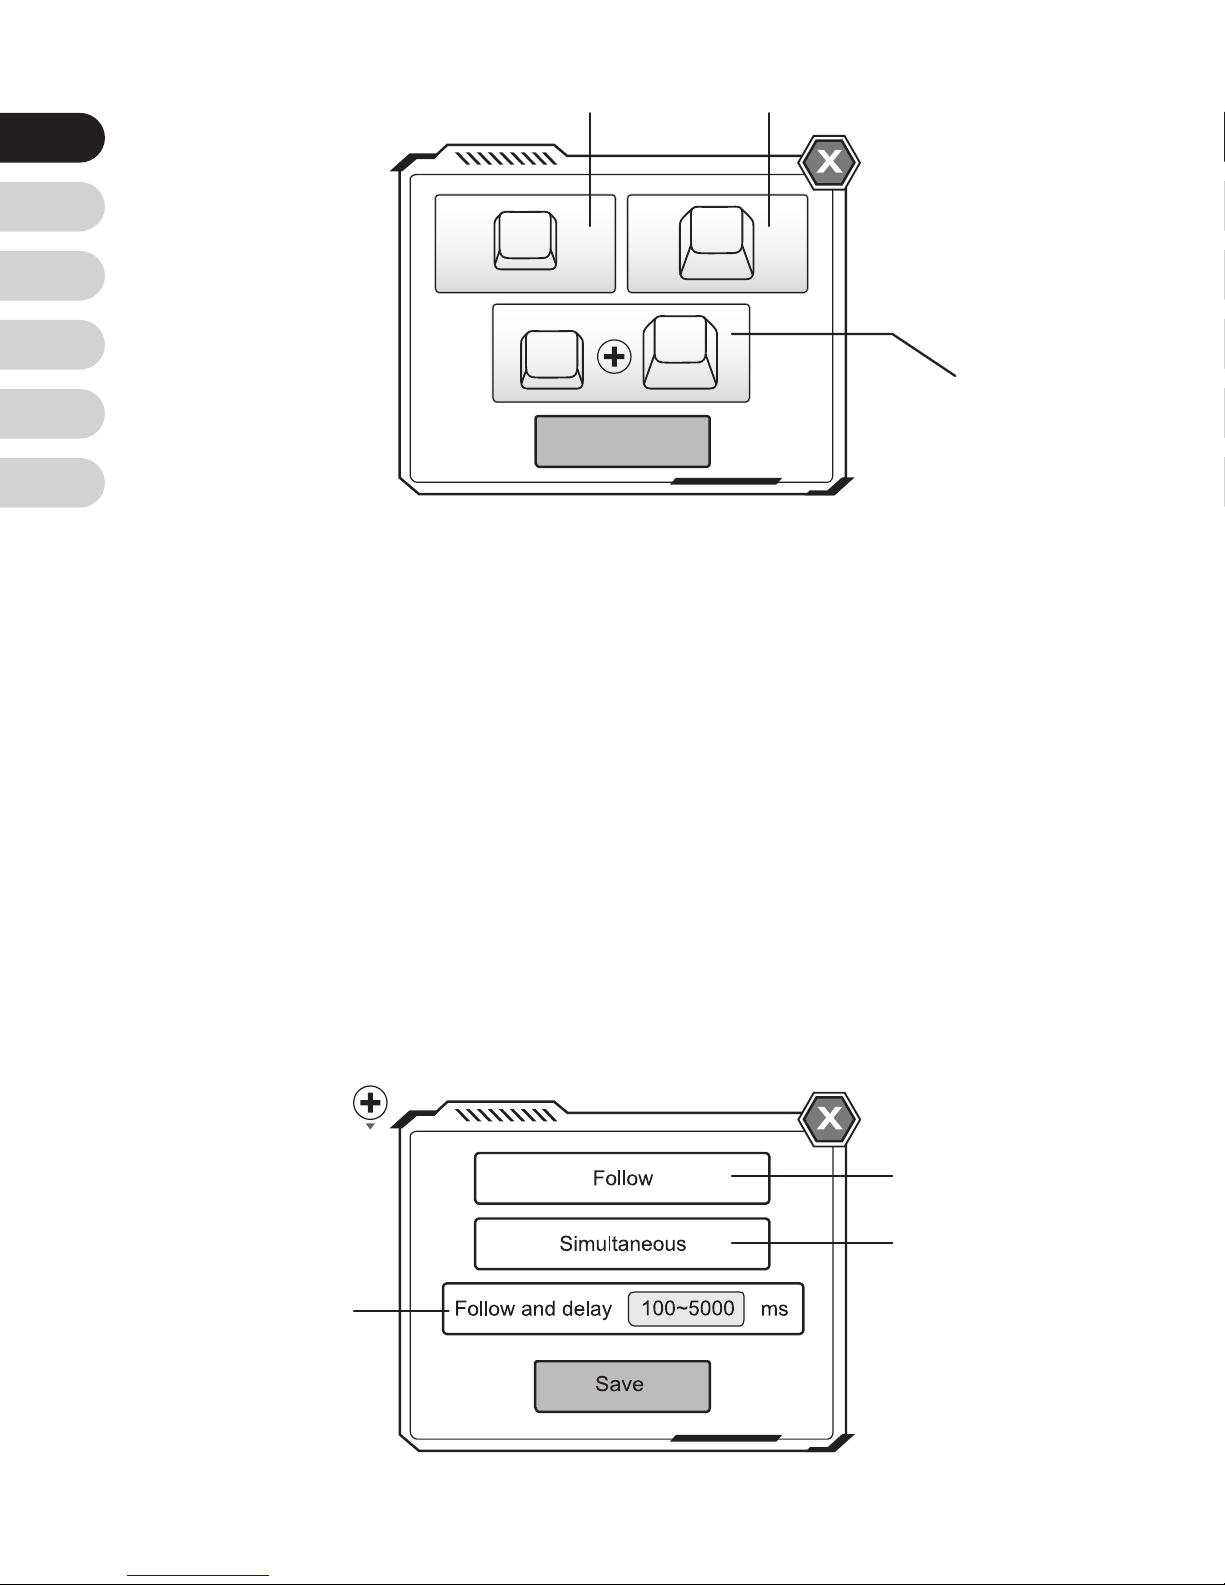
3. For every 2 commands, An interval mark will be
shown. Intervals can be set by clicking. There are 3
modes:
Follow
:
Simultaneous
:
Follow and delay
:
Execute a command right after the
previous one
2 commands execute at the same
time
The 2nd command executes after a
certain time
Save
K
K
K
K
click
click+release
release
Follow
Simultaneous
Follow and
delay
Page 11

EN
FR
DE
ES
TW
CN
11
4. Repeat the above steps to create your own custom
macro!
If you have any questions please visit us at:
www.brookaccessory.com
. We also invite you to
register for a free membership on our website for news
and updates.
Page 12
EN
FR
DE
ES
TW
CN
12
M
o
u
s
e
F
n
BT
K
e
y
b
o
a
rd
Fn
BT
Cong LED
Souris
Clavier
Home
Console LED
PS3/ PS4: lumière bleue
Xbox One/ Xbox 360: lumière verte
- Conguration à partir d’un téléphone -
Brook Sniper x1
Câble USB x1
Contenu
Guide d’installation
rapide x1
Page 13
EN
FR
DE
ES
TW
CN
13
Configuration
Étape. 1
Connecter les périphériques
Connectez votre clavier, souris, manette de jeu
(facultatif) et votre casque (facultatif) au Brook Sniper.
Ensuite connectez le Brook Sniper à votre console et
synchronisez le avec votre téléphone.
BT
F
n
Cong LED
Console
PC
Écouteurs
Manette de jeu
Page 14
EN
FR
DE
ES
TW
CN
14
Après avoir correctement connectez chaque périphérique,
rendez vous sur votre App store/Google Play pour
télécharger l’application Brook Sniper. Si vous utiliser un
PC, rendez vous sur
www.brookaccessory.com
pour
télécharger nos pilotes. Lancer Brook Sniper.
Sur la page principale de l’application vous devez voir
afché le statut de connexion de chaque périphérique.
Étape. 2
Télécharger l’application Brook Sniper
Pour une utilisation optimale, enregistrez vous sur la page.
L’enregistrement est gratuit et vous permet d’utiliser notre
service Cloud.
Config Name
Page
d'accueil
Cong nom
Cong Réglage Créer une macro
HUD
(Afchage tête
haute)
Statut de l'appareil
Cong
image
S'identier
Réglage
À propos de
Aider
▼ Page d'accueil
1
Page 15
EN
FR
DE
ES
TW
CN
15
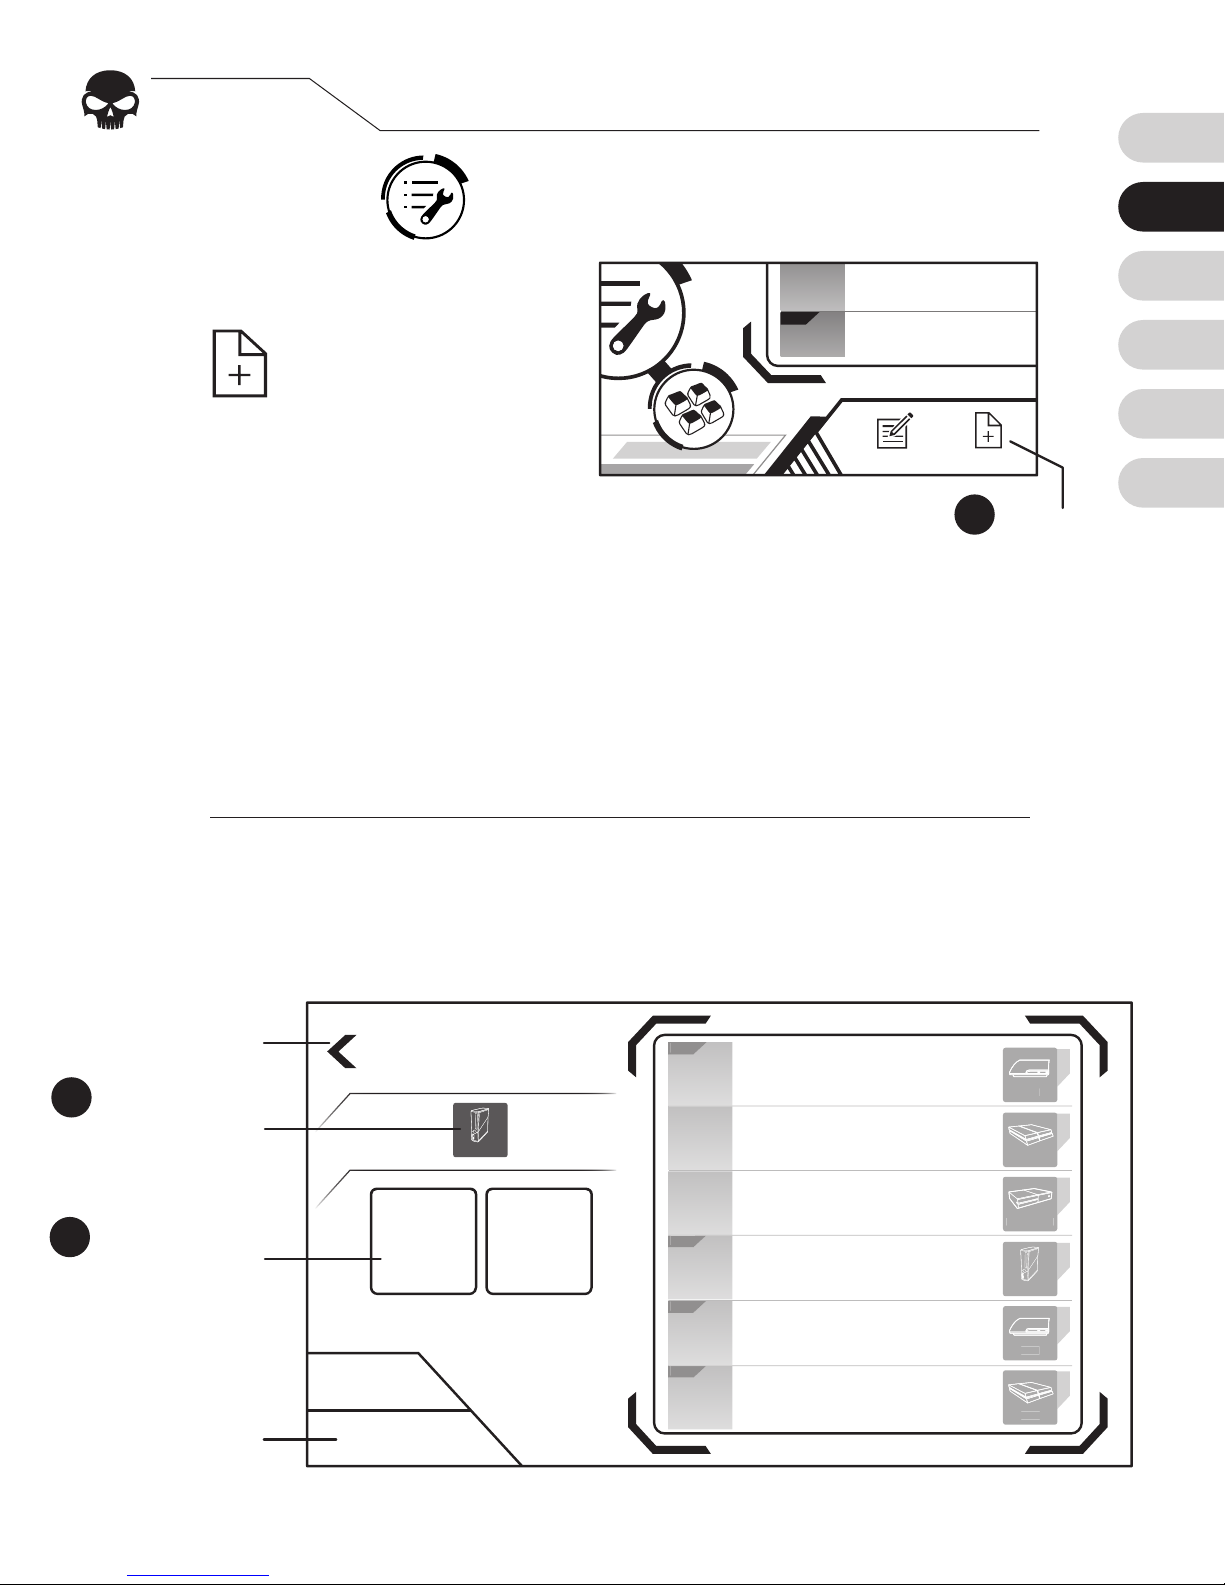
Étape. 3
Ajouter une conguration personnalisée
Choisissez Cong Setting Icon sur la page d'accueil.
[1]
La configuration Élite offre une gestion optimisée des
zones mortes et de la courbe d’accélération de la souris pour
certains jeux. Vériez si une version Élite existe pour votre jeu,
autrement choisissez Custom.
1.
2.
Choisissez la console à laquelle vous souhaitez vous
connecter.
Choisissez « Custom » ou « Élite »
[1]
.
Sélectionnez la
plateforme correspondant à votre console et à vos
congurations.
3.
4.
Create New
Custom Elite
Xbox 360
Cancel
Dernière
page
Choisissez
la console
Choisissez
la plateforme
Annuler
3
4
Elit e
Elit e
Elit e
Elit e
Config 1
Config 2
Config 3
Config 4
Config 5
Config 6
Xbox 360
PS3
PS4
Xbox One
PS3
PS4
Save
2
Elit e
Config 4
Config 5
NewEdit
Nouveau
Choisissez « Nouveau »
pour ajouter une
nouvelle conguration,
c'est-à-dire un ensemble
de paramètres pour un jeu en particulier.
Page 16
EN
FR
DE
ES
TW
CN
16
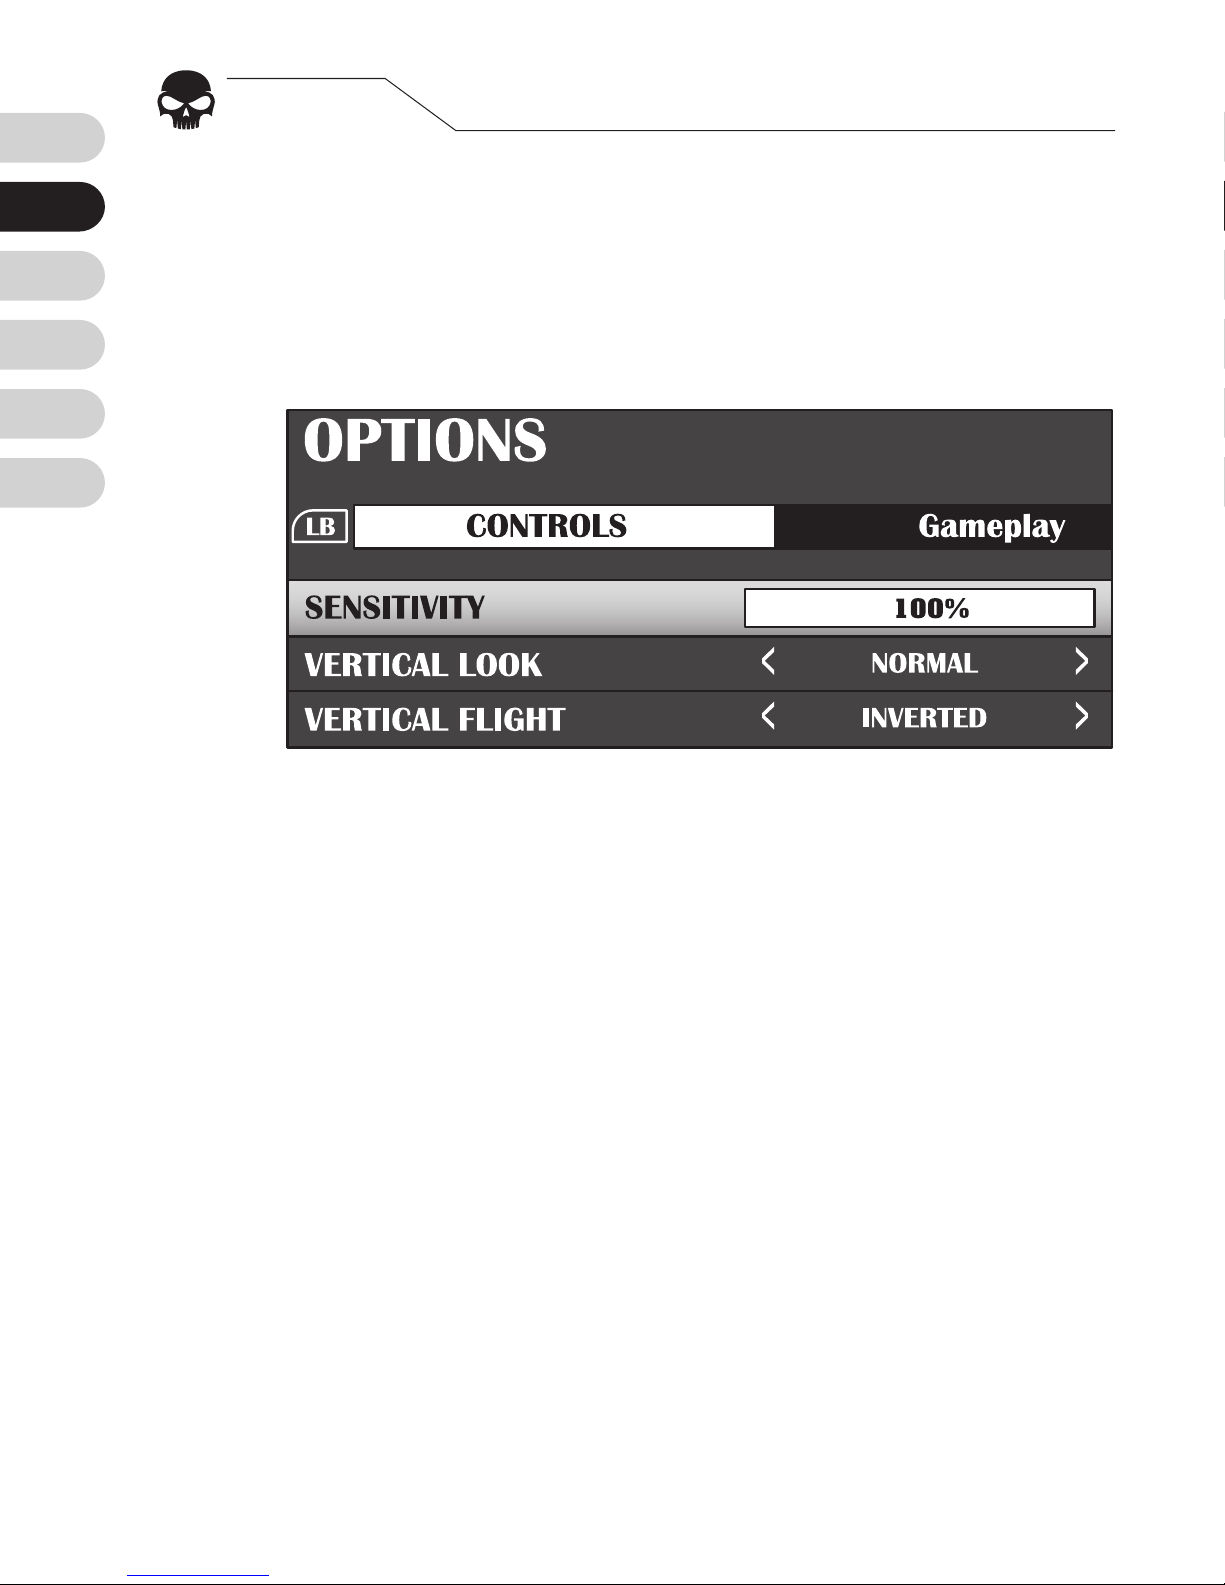
TAfin d’optimiser la transmission entre votre souris et
le Brook Sniper, réglez la sensibilité de la souris à son
maximum. Certains jeux qualifie ce réglage de 100%,
Fastest ou encore Insane mode.
Étape. 4
Régler la sensibilité à son maximum
Page 17
EN
FR
DE
ES
TW
CN
17
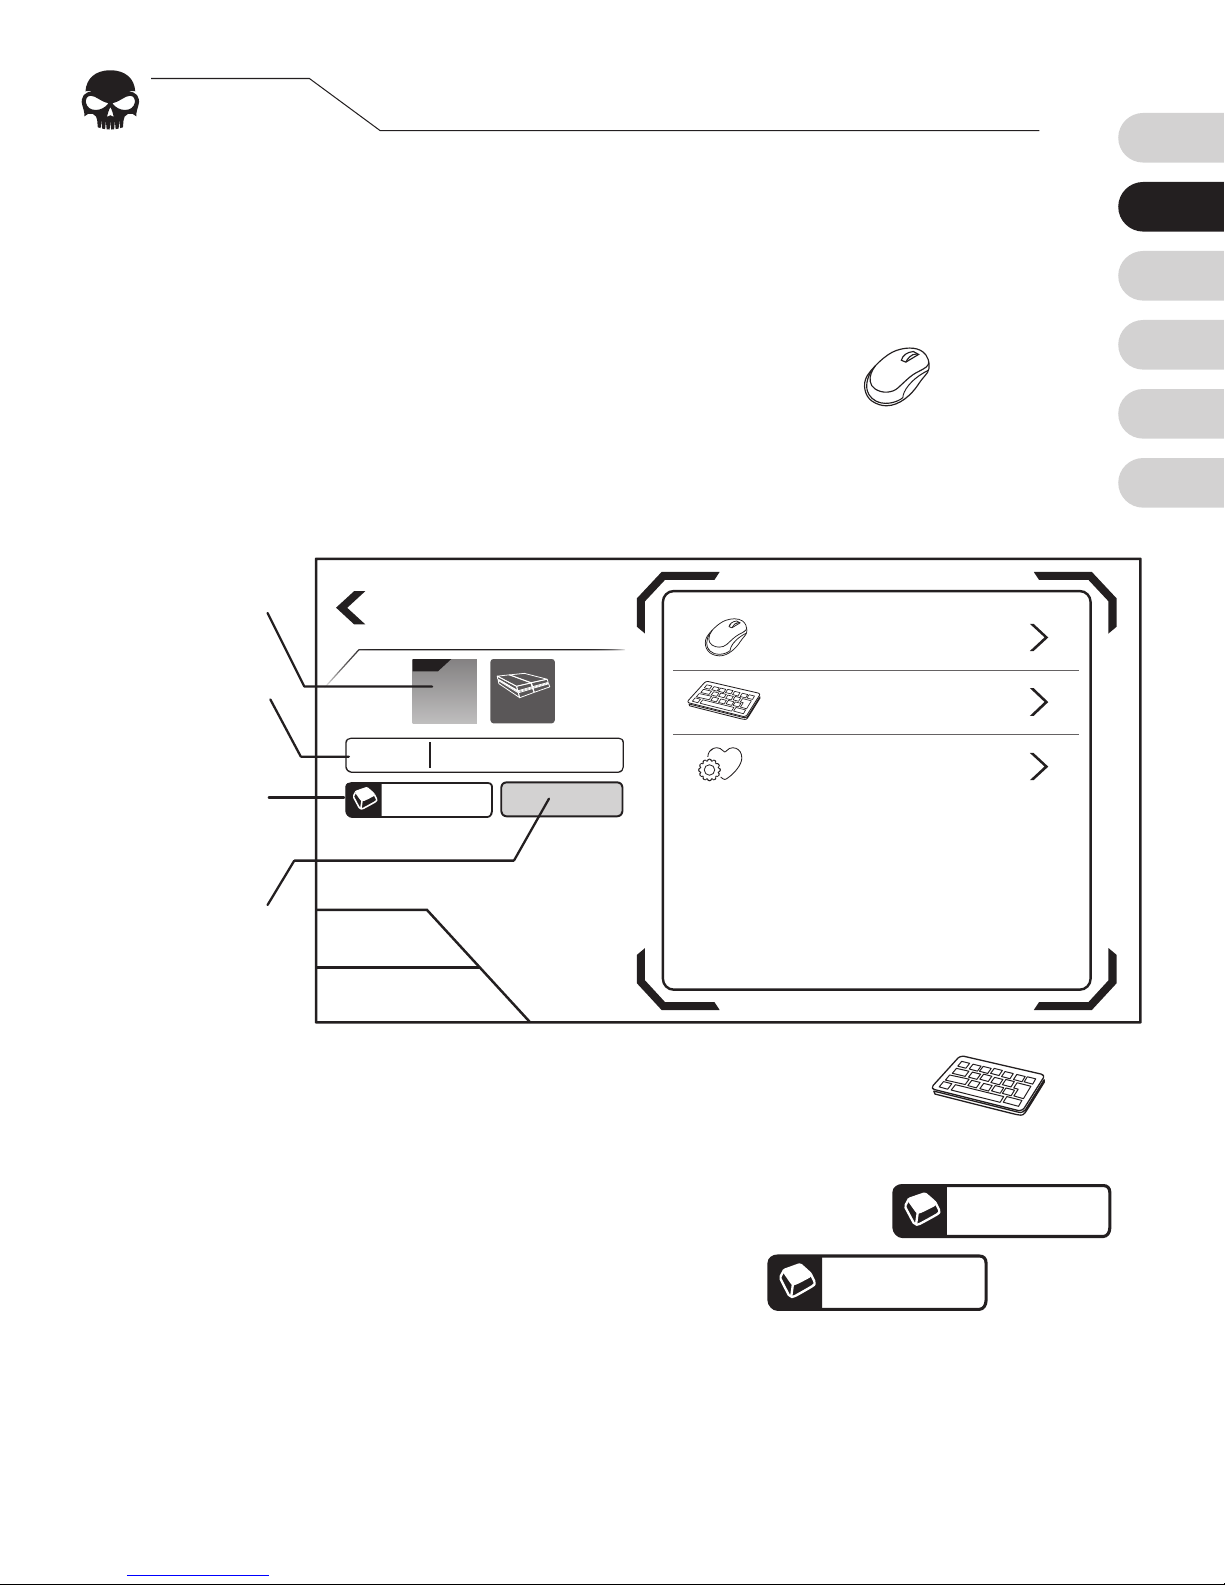
Sur le côté gauche de l’écran vous pouvez modier:
1. Cong image 2. Le nom 3. Touche de raccourci
4. les lumières
Cliquez sur l’icône représentant une
souris
pour modier les paramètres suivants:
1. Sensibilité 2. Zone morte 3. Accélération
Étape. 5
Modier les paramètres de conguration
Cliquez sur l’icône représentant un
clavier
pour
réassigner les touches:
1. Appuyez sur le bouton le bouton à changer.
G
2. Lorsque s’affiche « Listening… »
Listening...
à l’écran
appuyez sur une touche de votre clavier ou un bouton de votre
souris.
3. Répétez les étapes 1 et 2 jusqu’à ce que toutes les touches
aient été réassignées.
Cancel
Save
Edit Config
Keyboard
Preferences
Mouse
Config 1
F2
Elit e
PS4
Cong
image
Le nom
Touche de
raccourci
les lumières
Page 18
EN
FR
DE
ES
TW
CN
18
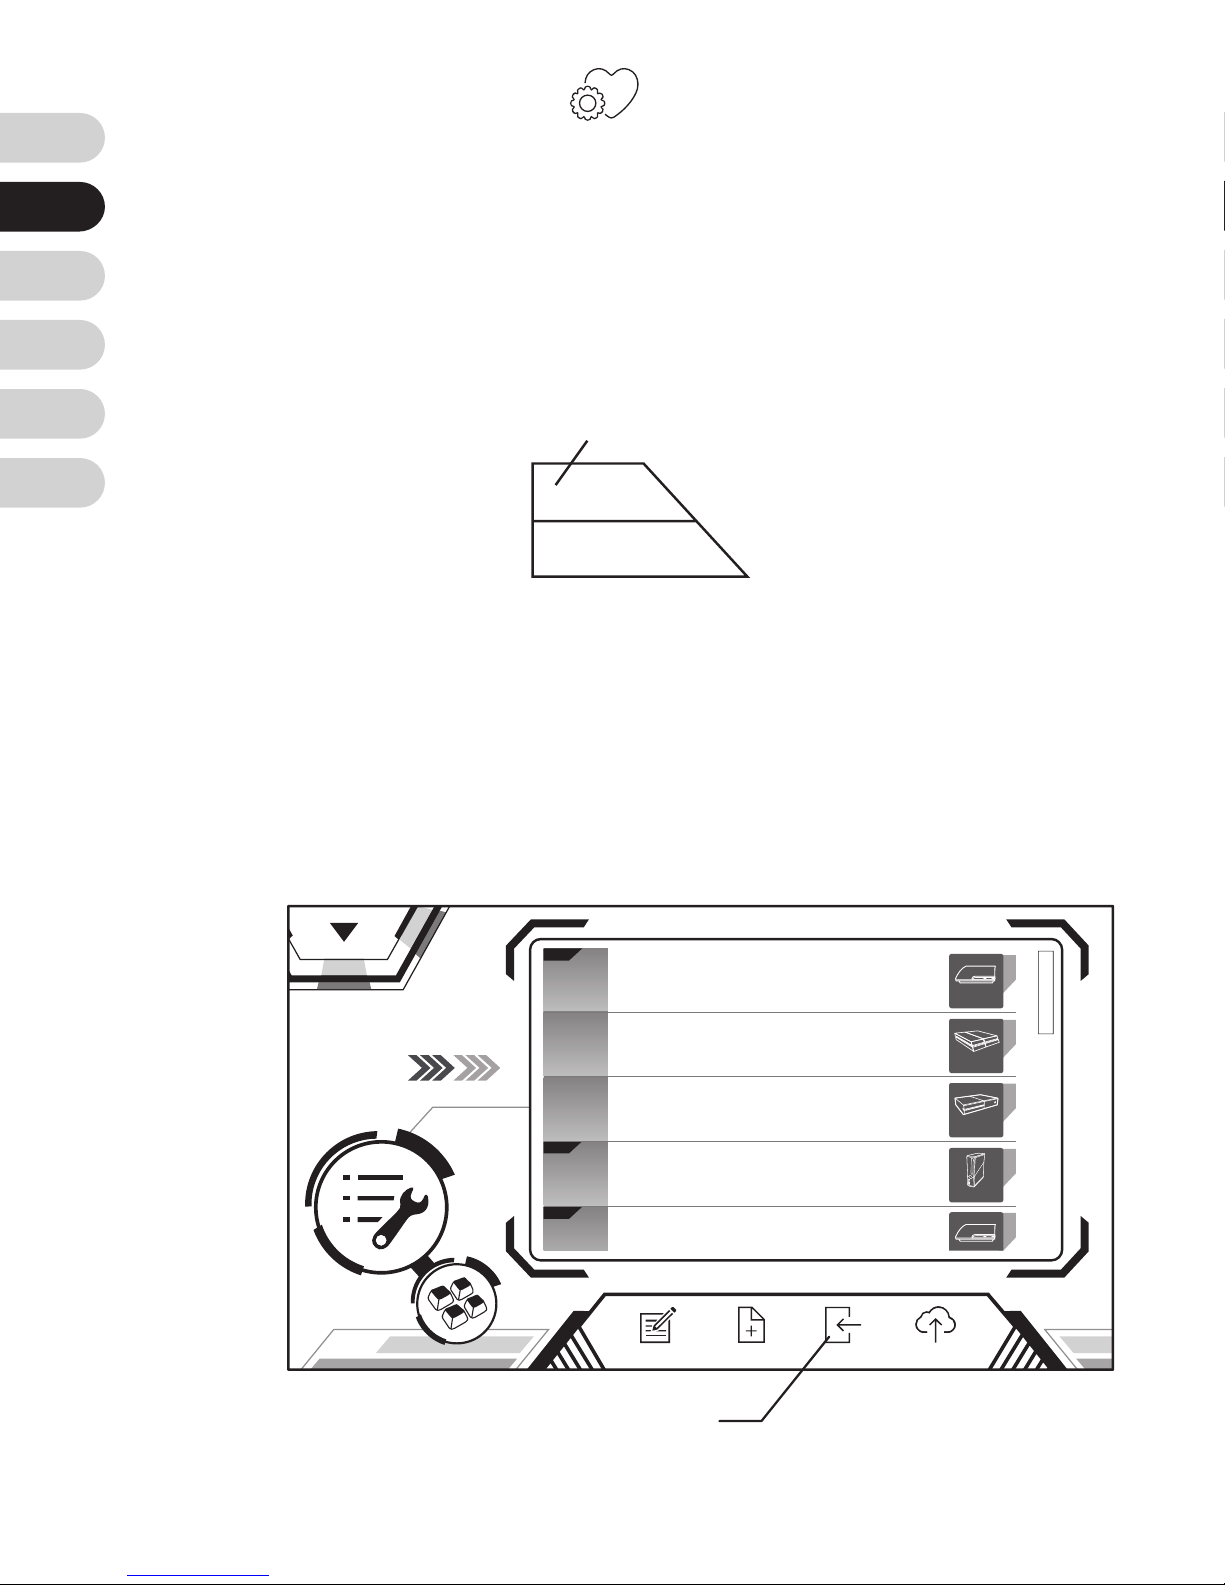
Dans
Preferences
vous pouvez aussi modier:
1. La Fréquence de tir.
2. L’Inversion de l’axe Y.
3. La respiration en mode sniper (seulement en Élite).
4. L’anti recul de l’arme (seulement en Élite)
Cliquez sur «
Enregistrer
» lorsque vous avez terminé.
Appuyez sur «
Charger
» pour charger la conguration
sur Sniper et retourner à la page d'accueil. À présent,
tous les réglages sont effectués. Vous êtes maintenant
n prêts à jouer à vos jeux préférés !
Config
Elit e
Elit e
Elit e
Config 1
Config 2
Config 3
Config 4
Config 5
Xbox 360
PS3
PS4
Xbox One
NewEdit BackupLoad
Charger
Save
Cancel
Enregistrer
Page 19
EN
FR
DE
ES
TW
CN
19
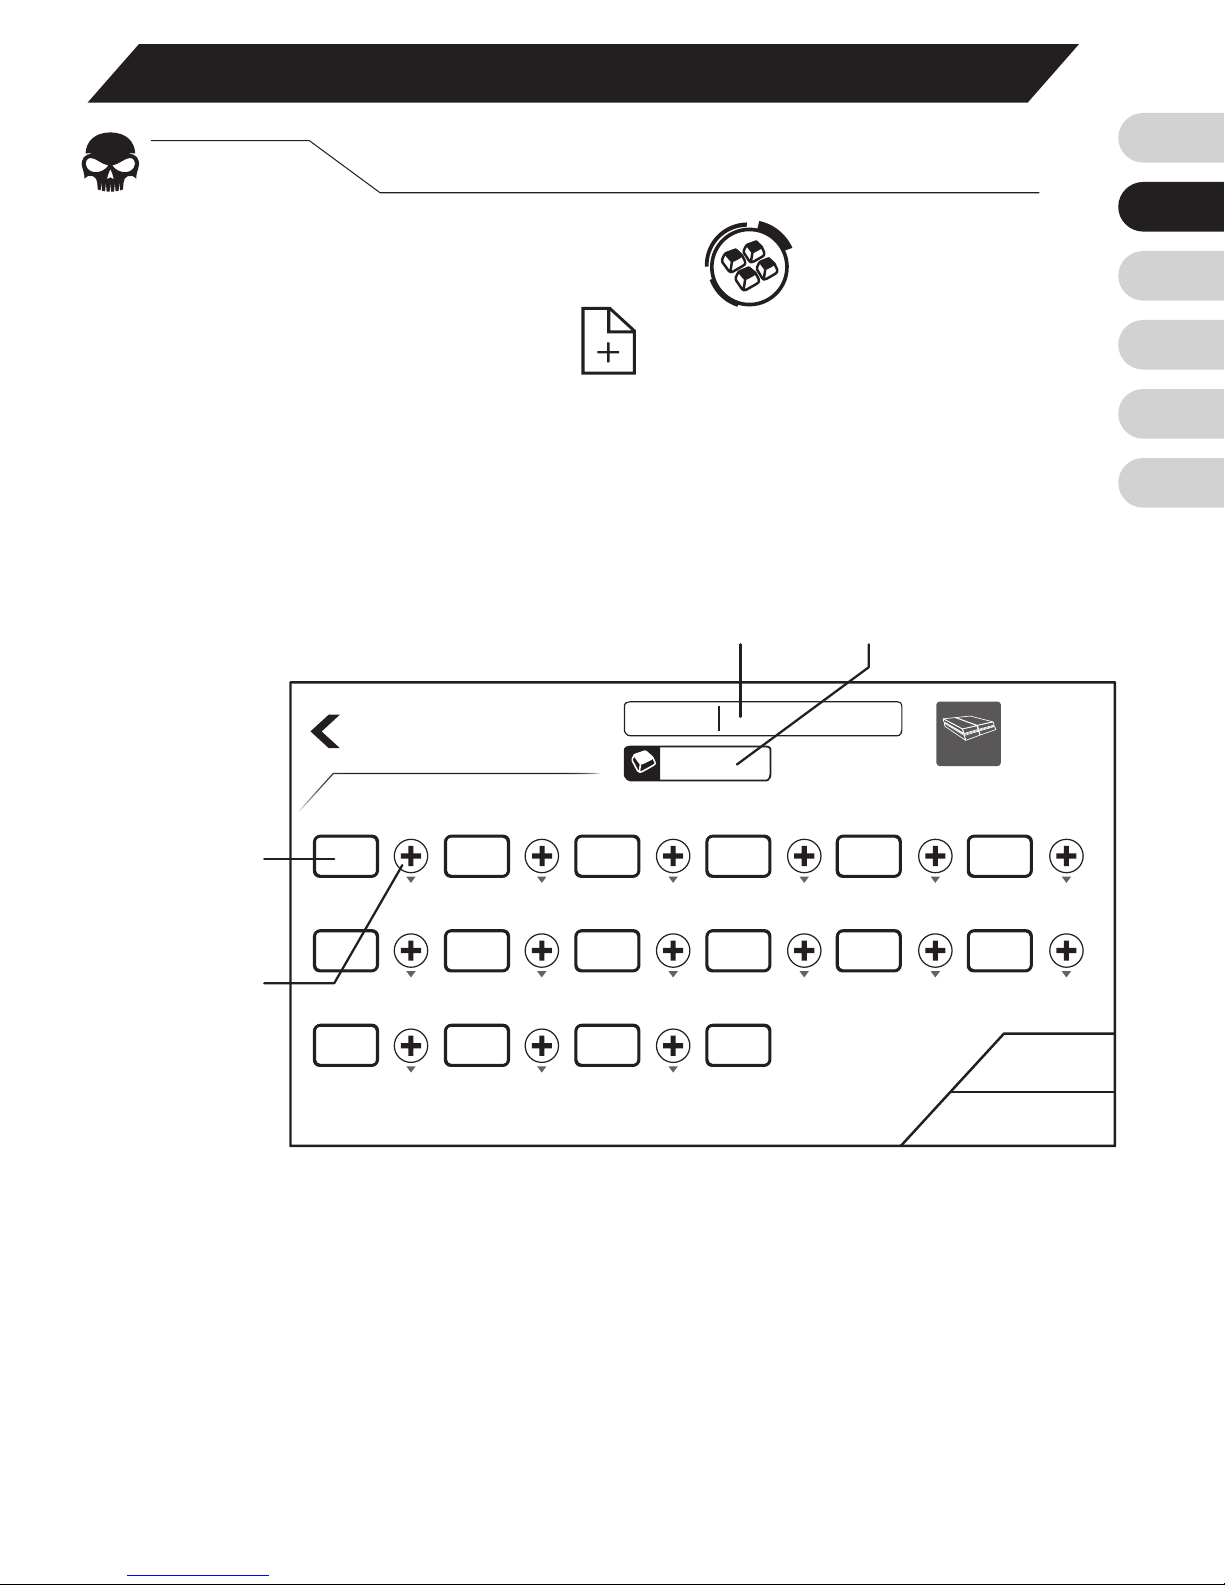
Choisissez « Macro Setting »
dans le menu
et cliquez sur « New »
pour ajouter une macro.
Ensuite choisissez console sur laquelle vous jouer et
suivez les indications ci-dessous :
1. Choisissez un nom de chier.
Autres paramètres
Étape. 1
Créer une macro
Create New
Cancel
Save
PS4
Macro 01
Touche de
raccourci
Le nom
Colonne
commande
2. Choisissez la colonne « command » et appuyez sur
une touche du clavier ou sur un bouton de la souris.
Une fenêtre apparaît et vous laisse choisir entre « Click
» ou « Release ». Choisissez « Save » une fois que
vous avez terminé.
Marque
d'intervalle
Page 20
EN
FR
DE
ES
TW
CN
20
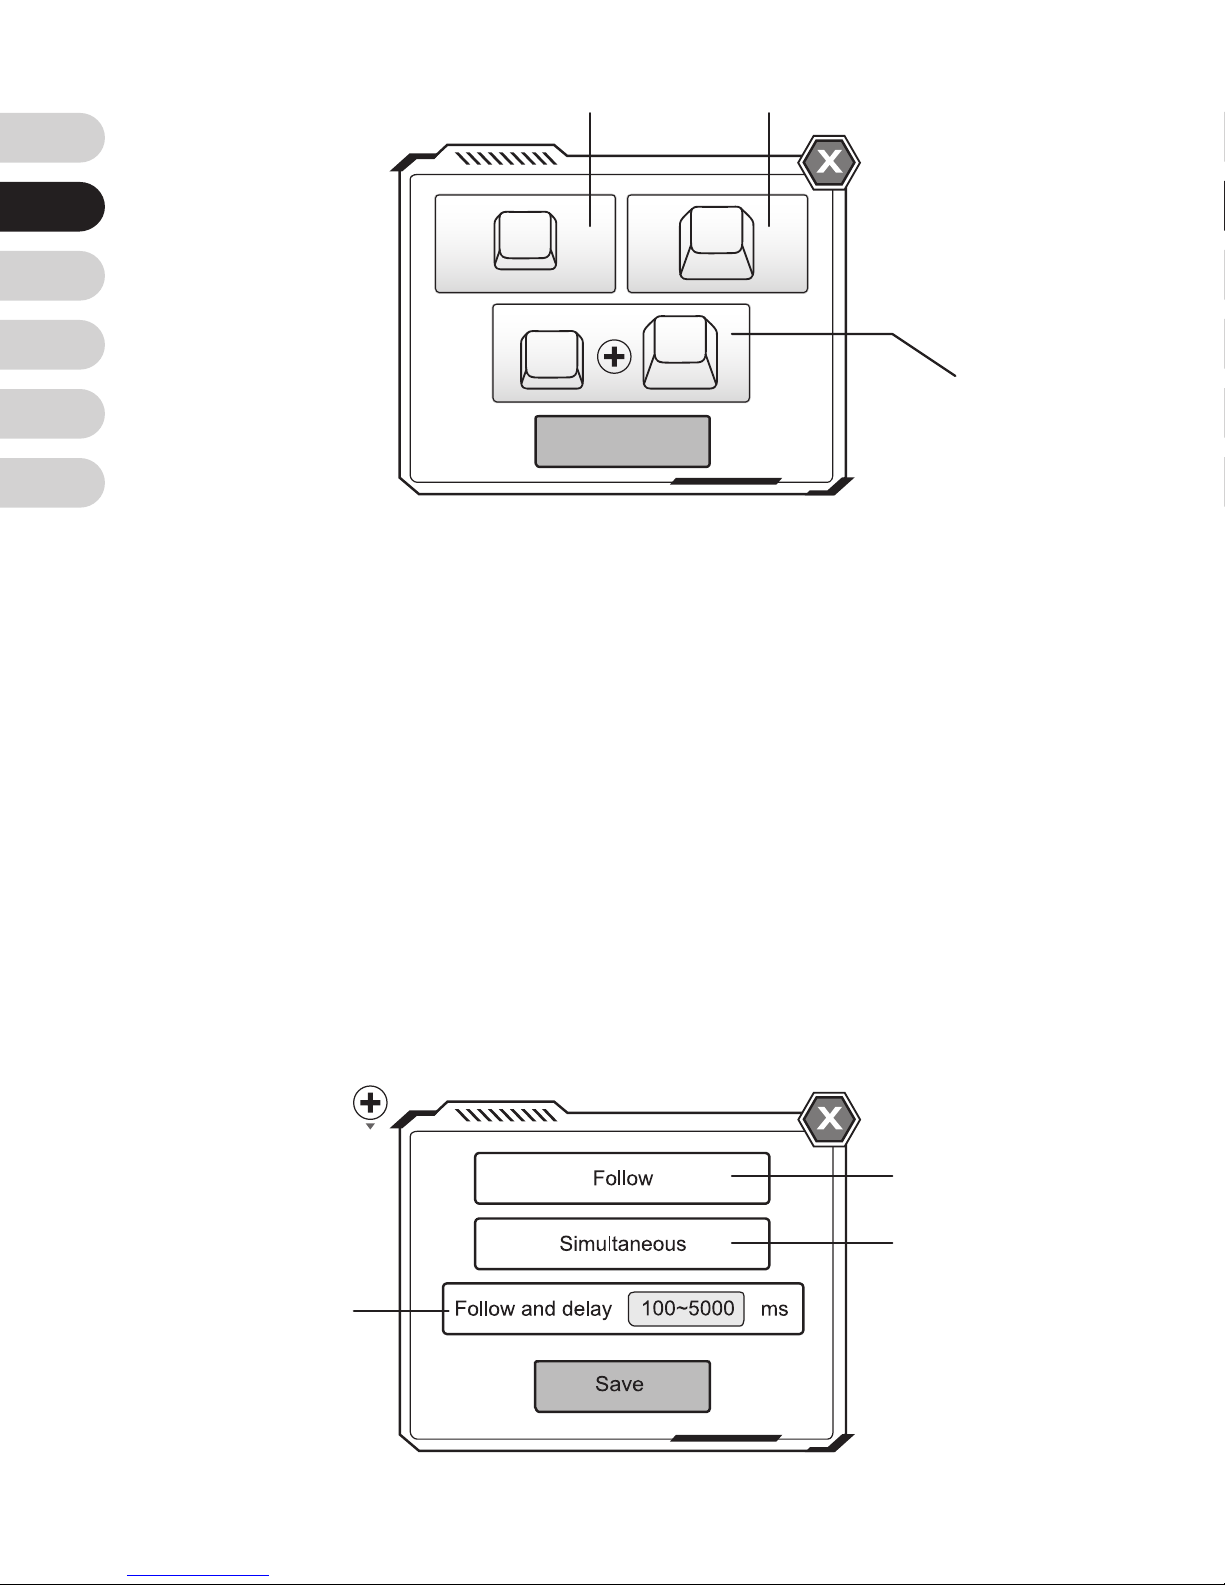
3. Pour chaque combinaison, An interval mark sera
affiché. Cliquez dessus pour les modifier. Il y a trois
modes:
« Suivre » :
« Simultané »:
«
Suivre et retard
» :
Exécute une commande
immédiatement après la précédente.
Exécute deux commandes en même
temps.
La deuxième commande s’exécute
après un délai.
Save
K
K
K
K
Cliquer
Cliquer+Version
Version
Suivre
Simultané
Suivre et retard
Page 21

EN
FR
DE
ES
TW
CN
21
4. Répétez les étapes 1 à 3 pour créer vos propres
macros !
Pour plus d’informations rendez vous sur notre site
internet
www.brookaccessory.com
. Nous vous invitons
aussi à vous enregistrer sur notre site pour vous tenir
au courant des nouveautés et des mises à jour.
Page 22
EN
FR
DE
ES
TW
CN
22
M
o
u
s
e
F
n
BT
K
e
y
b
o
a
rd
Fn
BT
Cong LED
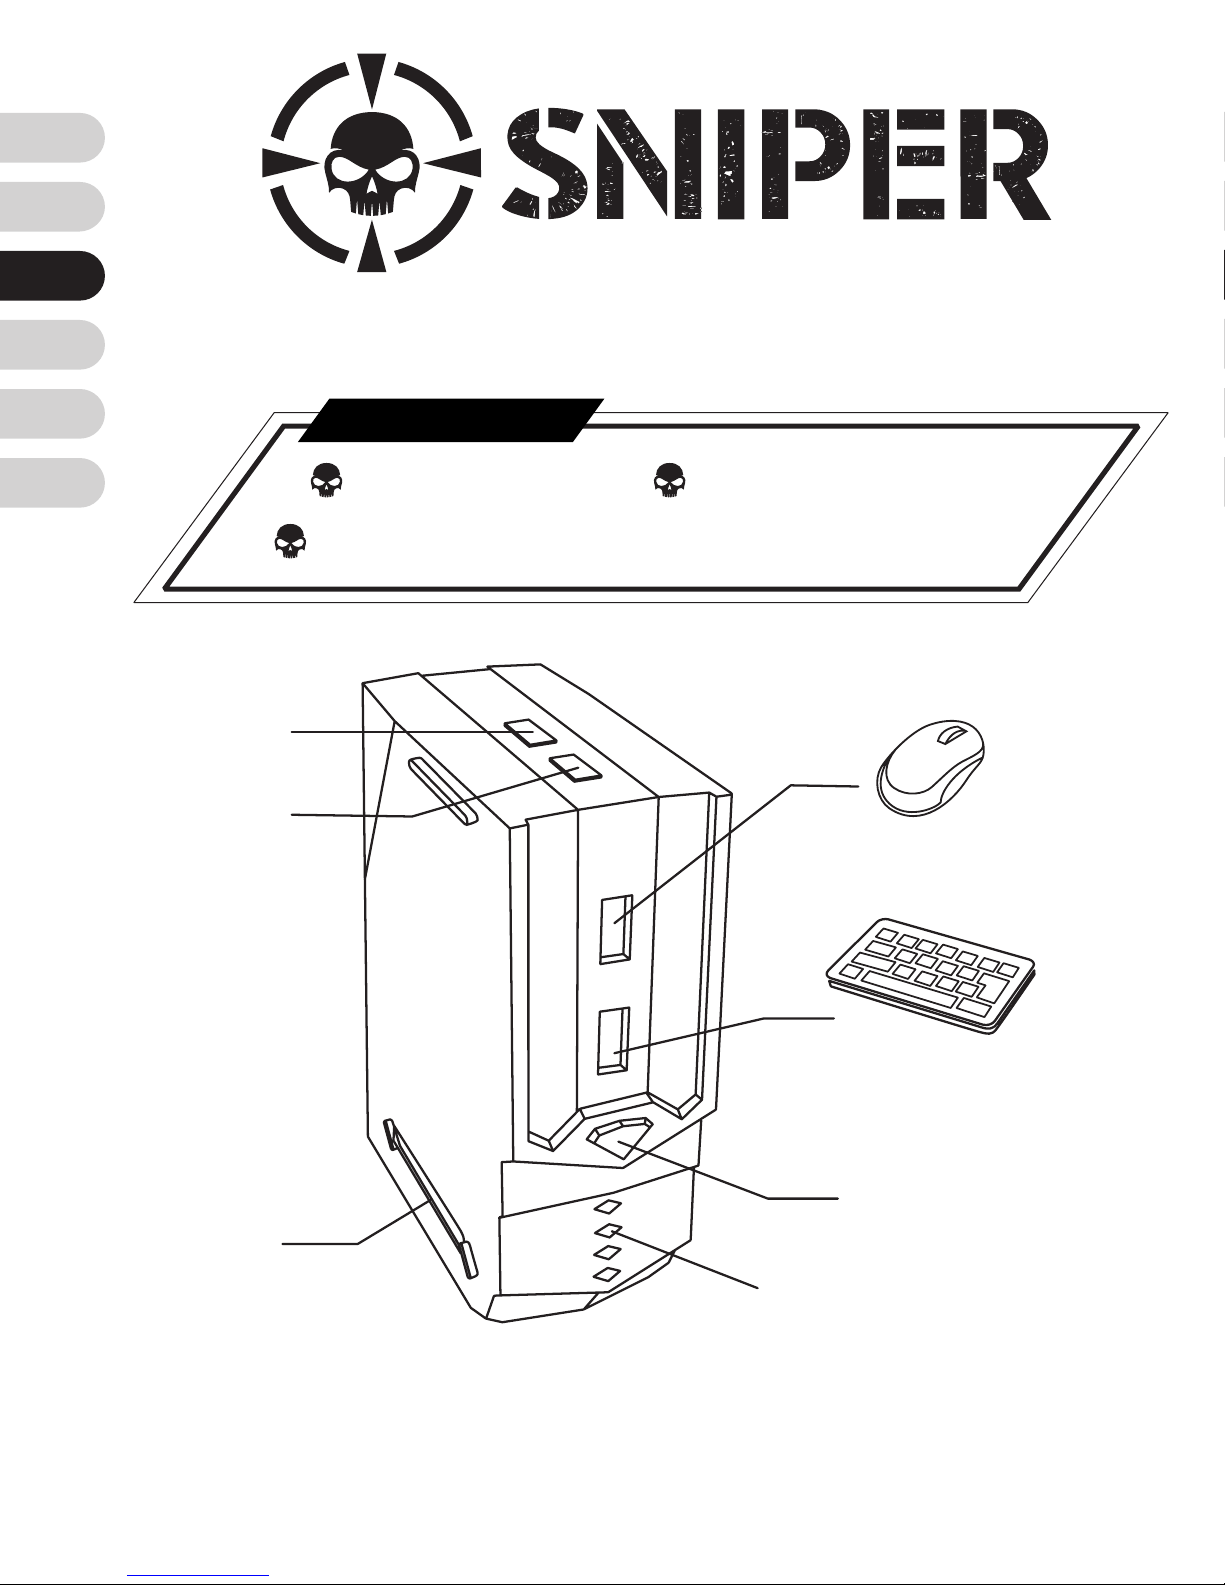
Maus
Tastatur
Home
Konsole LED
PS3/ PS4: blau Licht
Xbox One/ Xbox 360: grün licht
- Per Smartphone einrichten -
Brook Sniper x1
Kurzanleitung x1
USB-Kabel x1
Lieferumfang
Page 23
EN
FR
DE
ES
TW
CN
23
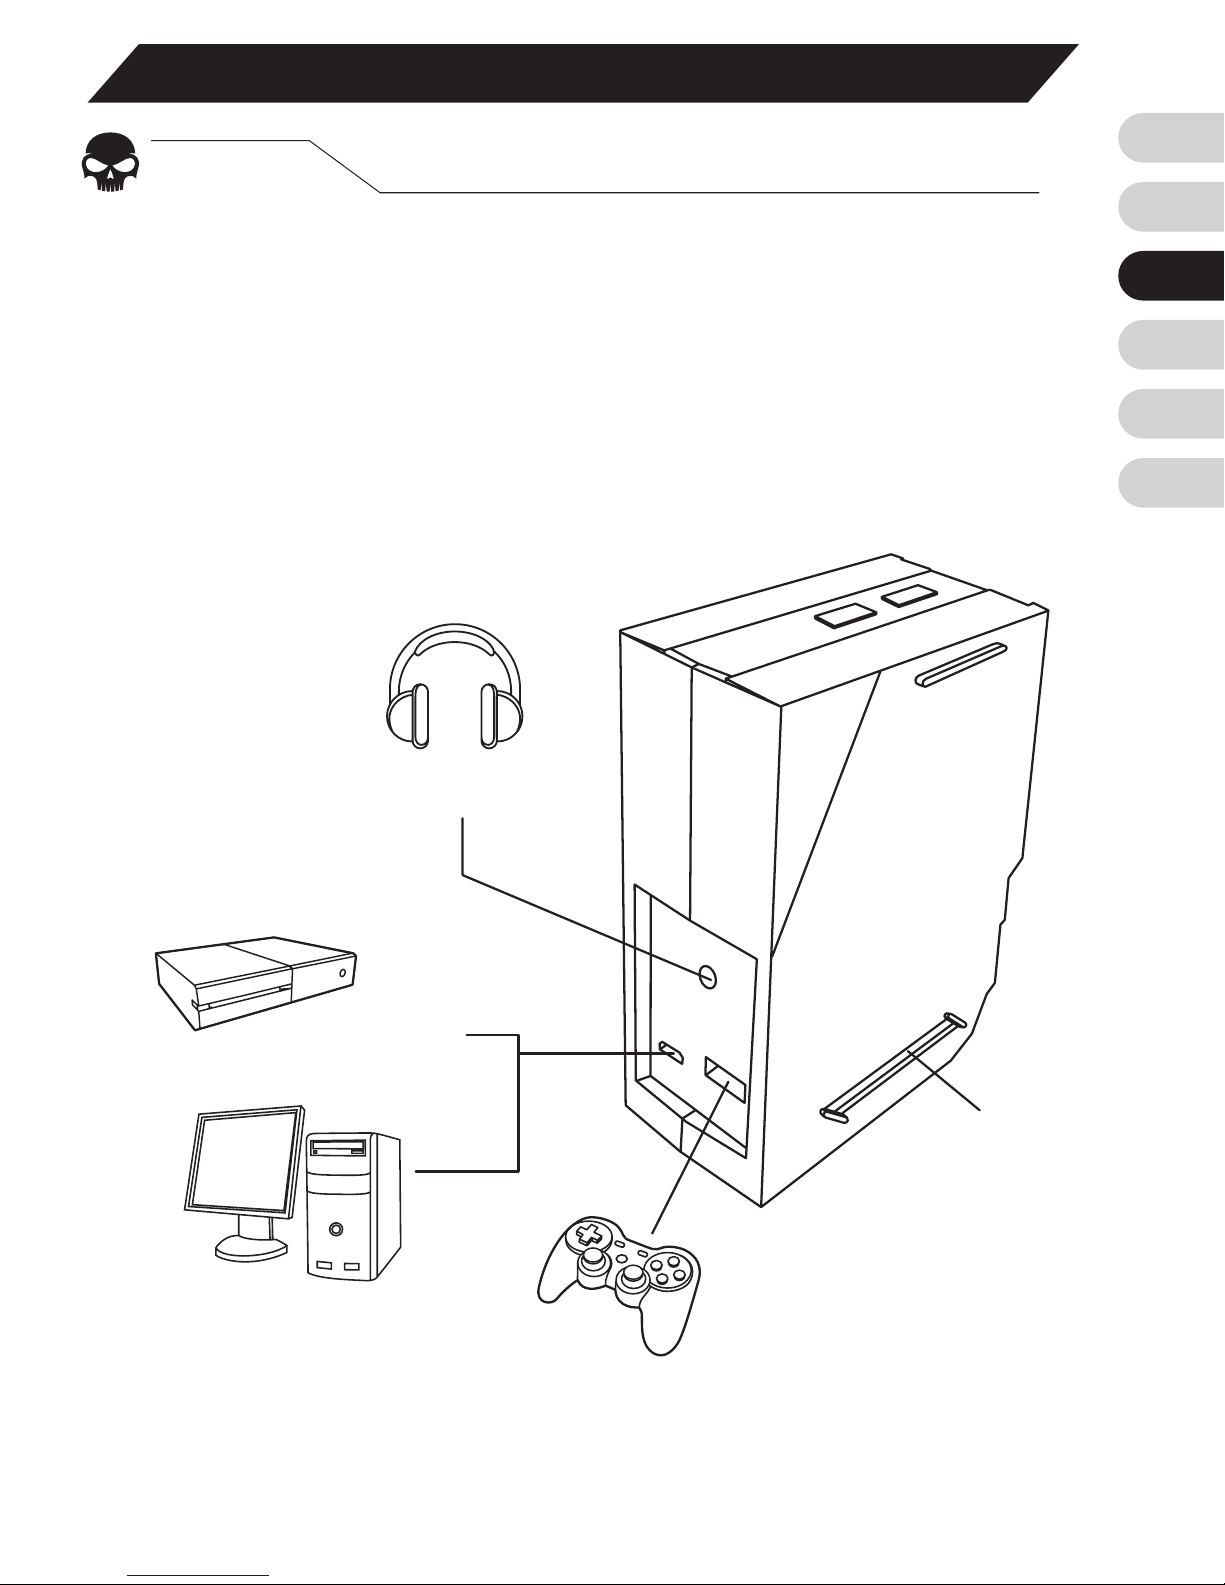
Erste Schritte
Schritt. 1
Alle Geräte verbinden
Tastatur, Maus, Konsolen-Controller (optional) und
Kopfhörer (optional) mit dem Brook Sniper verbinden.
Anschließend Brook Sniper mit der Konsole verbinden
und Brook Sniper mit dem Smartphone.
BT
F
n
Cong LED
Konsole
PC
Kopfhörer
Gamepad
Page 24
EN
FR
DE
ES
TW
CN
24
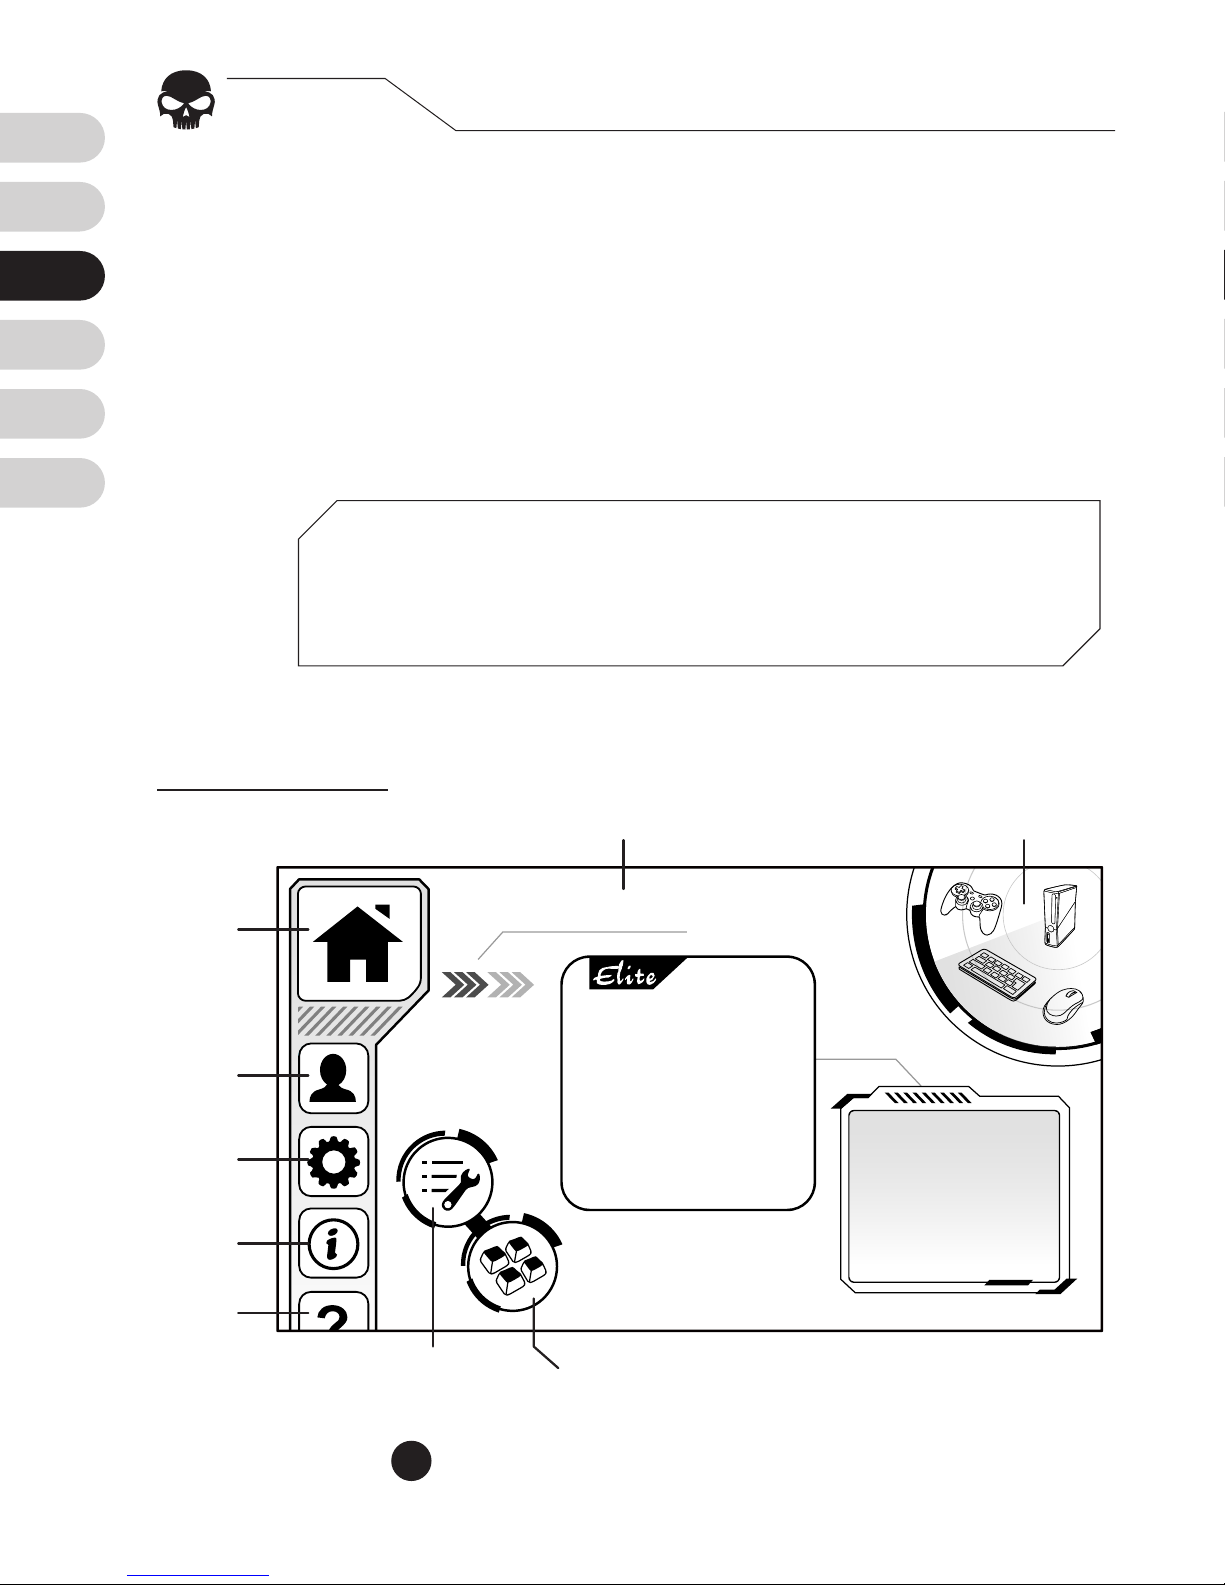
Nach Verbindung aller Geräte App Store/Google Play
aufrufen und Brook Sniper herunterladen.
Auf der Hauptseite der App werden die Verbindungsstatus
aller Geräte angezeigt. Bei guten Status mit den
persönlichen Einstellungen fortfahren.
Schritt. 2
Brook Sniper-App herunterladen
Für beste Nutzererfahrung unter registrieren. Die
Registrierung ist kostenlos und bietet Ihnen Zugang zu
unseren Cloud-Diensten.
Config Name
Startseite
Cong Name
Cong
Einstellung
Makroeinstellungen
HUD
(head-up-
display)
Gerätestatus
Cong
Image
Anmeldung
Rahmen
Über
Hilfe
▼ Startseite
1
Page 25
EN
FR
DE
ES
TW
CN
25
Schritt. 3
Konguration zufügen
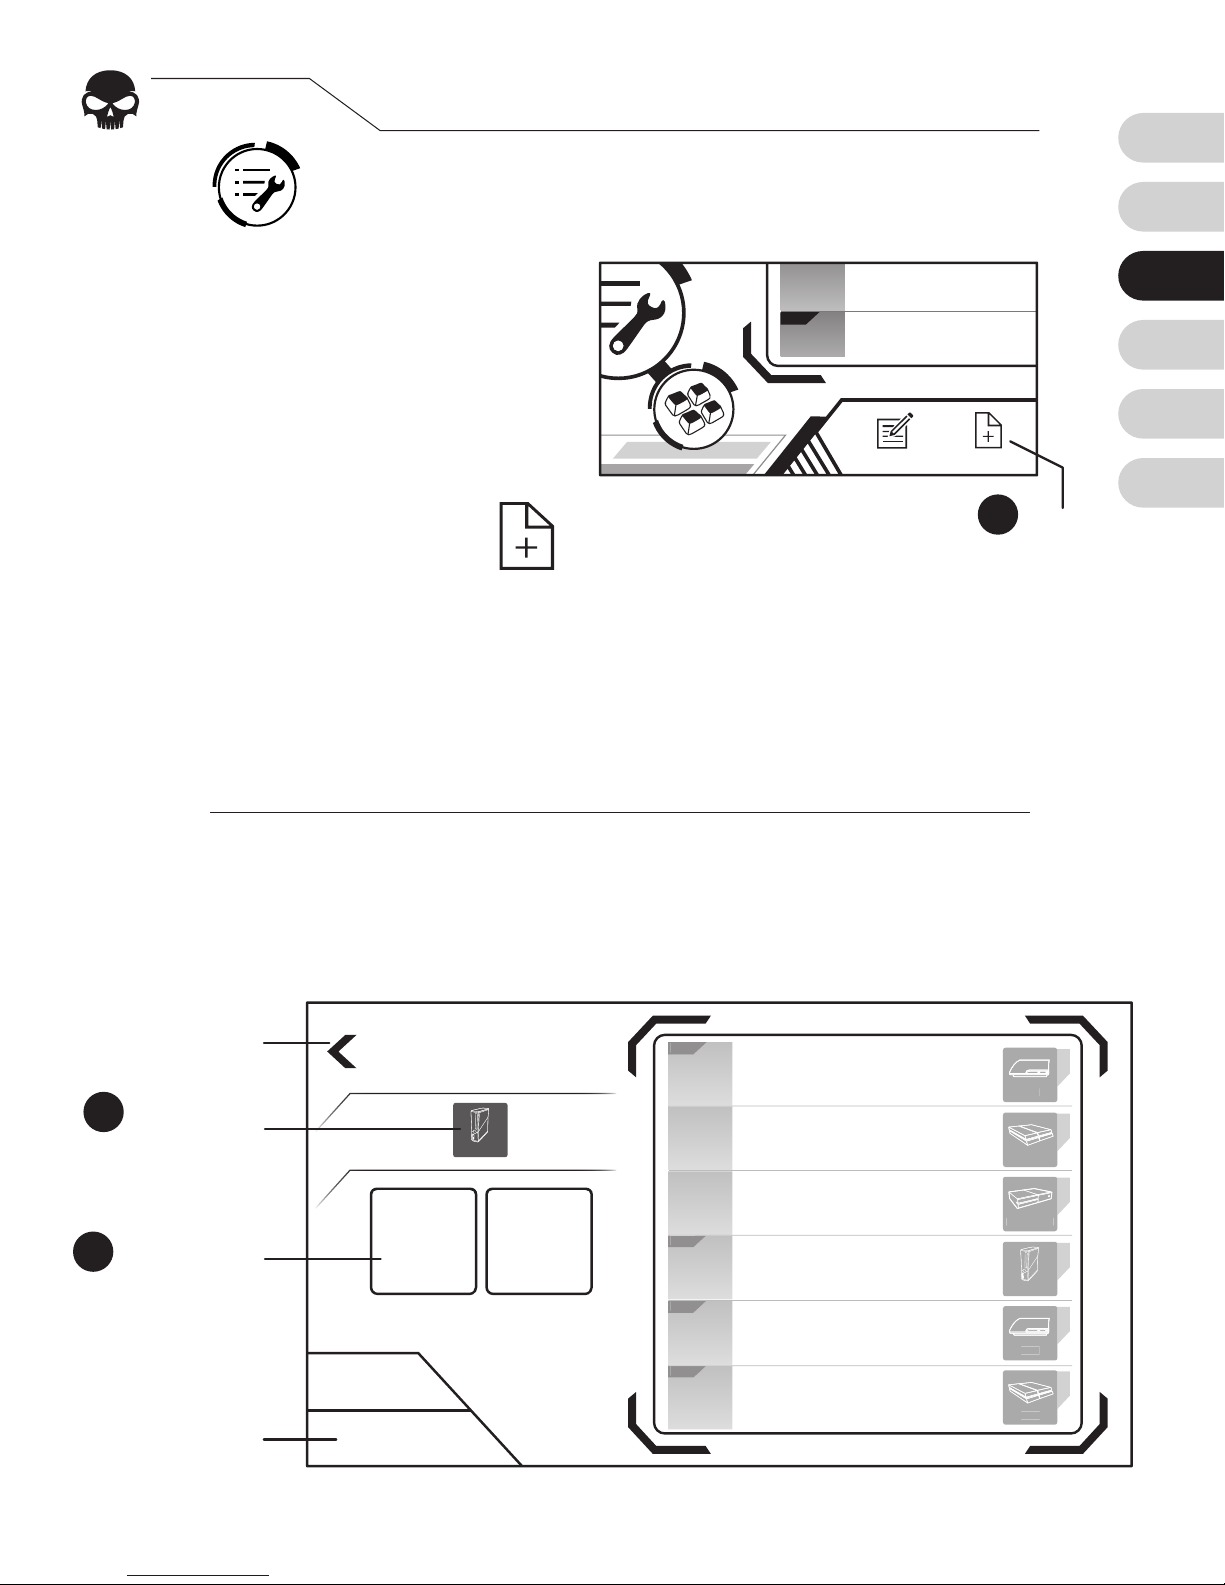
Auf der Startseite auf das Kongurationseinstellung-
Symbol tippen
Zum Zufügen einer
Konfiguration – bei der
es sich um eine Auswahl
Einstellungen für ein
bestimmtes Spiel handelt
– auf „New“ tippen .
[1]
„Elite“ Konfigurationen bieten optimierte tote Zone und Ma
usbewegungsgeschwindigkeitskurven für spezifische Spiele.
Prüfen Sie, ob eine „Elite“-Version bei Ihrem Spiel verfügbar ist;
andernfalls wählen Sie „Custom“.
1.
2.
Die Konsole wählen, die Sie verbinden möchten
Dann auf „Custom“ oder „Elite“
[1]
tippen. Wählen Sie
dann eine Plattform, die Ihrer Konsole entspricht, und
die Kongurationen.Konguration zufügen
3.
4.
Create New
Custom Elite
Xbox 360
Cancel
Letzte Seite
Konsole
wählen
Plattform
wählen
Abbrechen
3
4
Elit e
Elit e
Elit e
Elit e
Config 1
Config 2
Config 3
Config 4
Config 5
Config 6
Xbox 360
PS3
PS4
Xbox One
PS3
PS4
Save
2
Elit e
Config 4
Config 5
NewEdit
New
Page 26
EN
FR
DE
ES
TW
CN
26
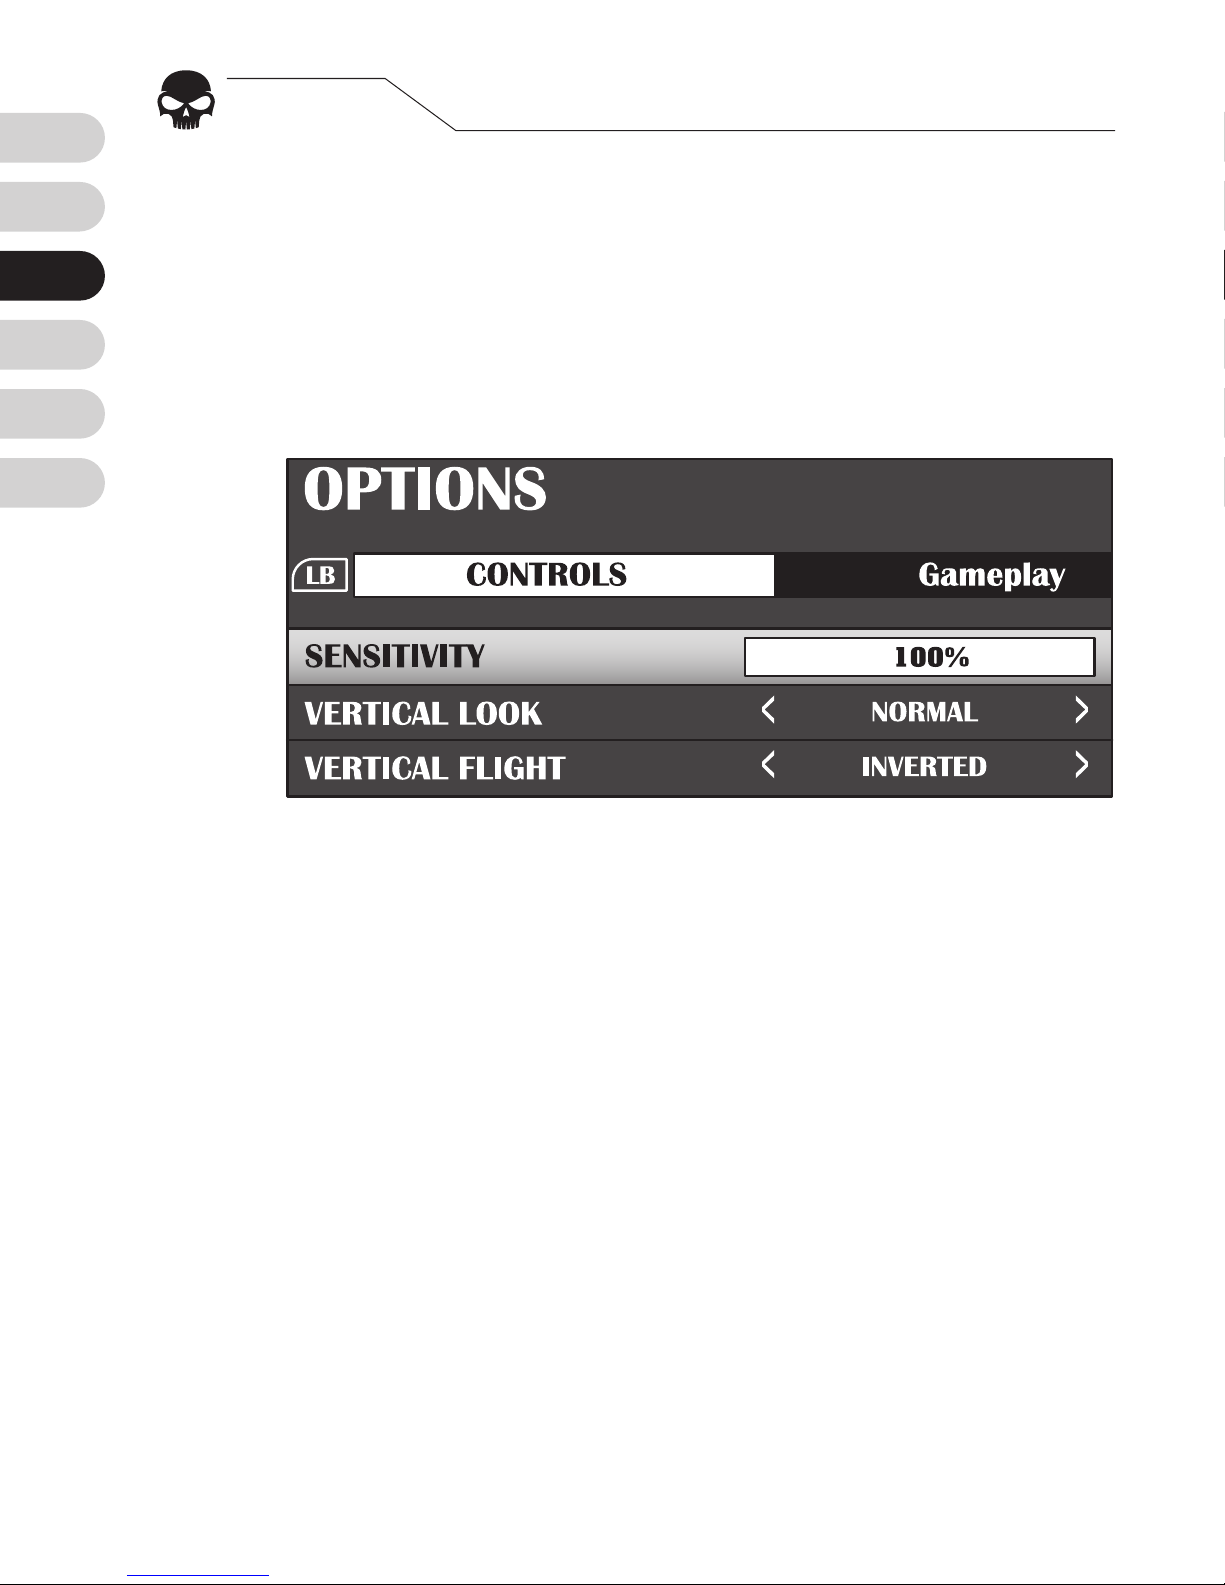
Zur Optimierung der Signalübertragung Ihrer Maus
an Brook Sniper die Empfindlichkeit Ihrer Maus auf
das Maximum einstellen. Je nach Spiel gibt es dafür
unterschiedliche Bezeichnungen, beispielsweise 100 %,
höchste Geschwindigkeit oder Insane-Modus.
Schritt. 4
Empndlichkeit auf das Maximum
einstellen
Page 27
EN
FR
DE
ES
TW
CN
27
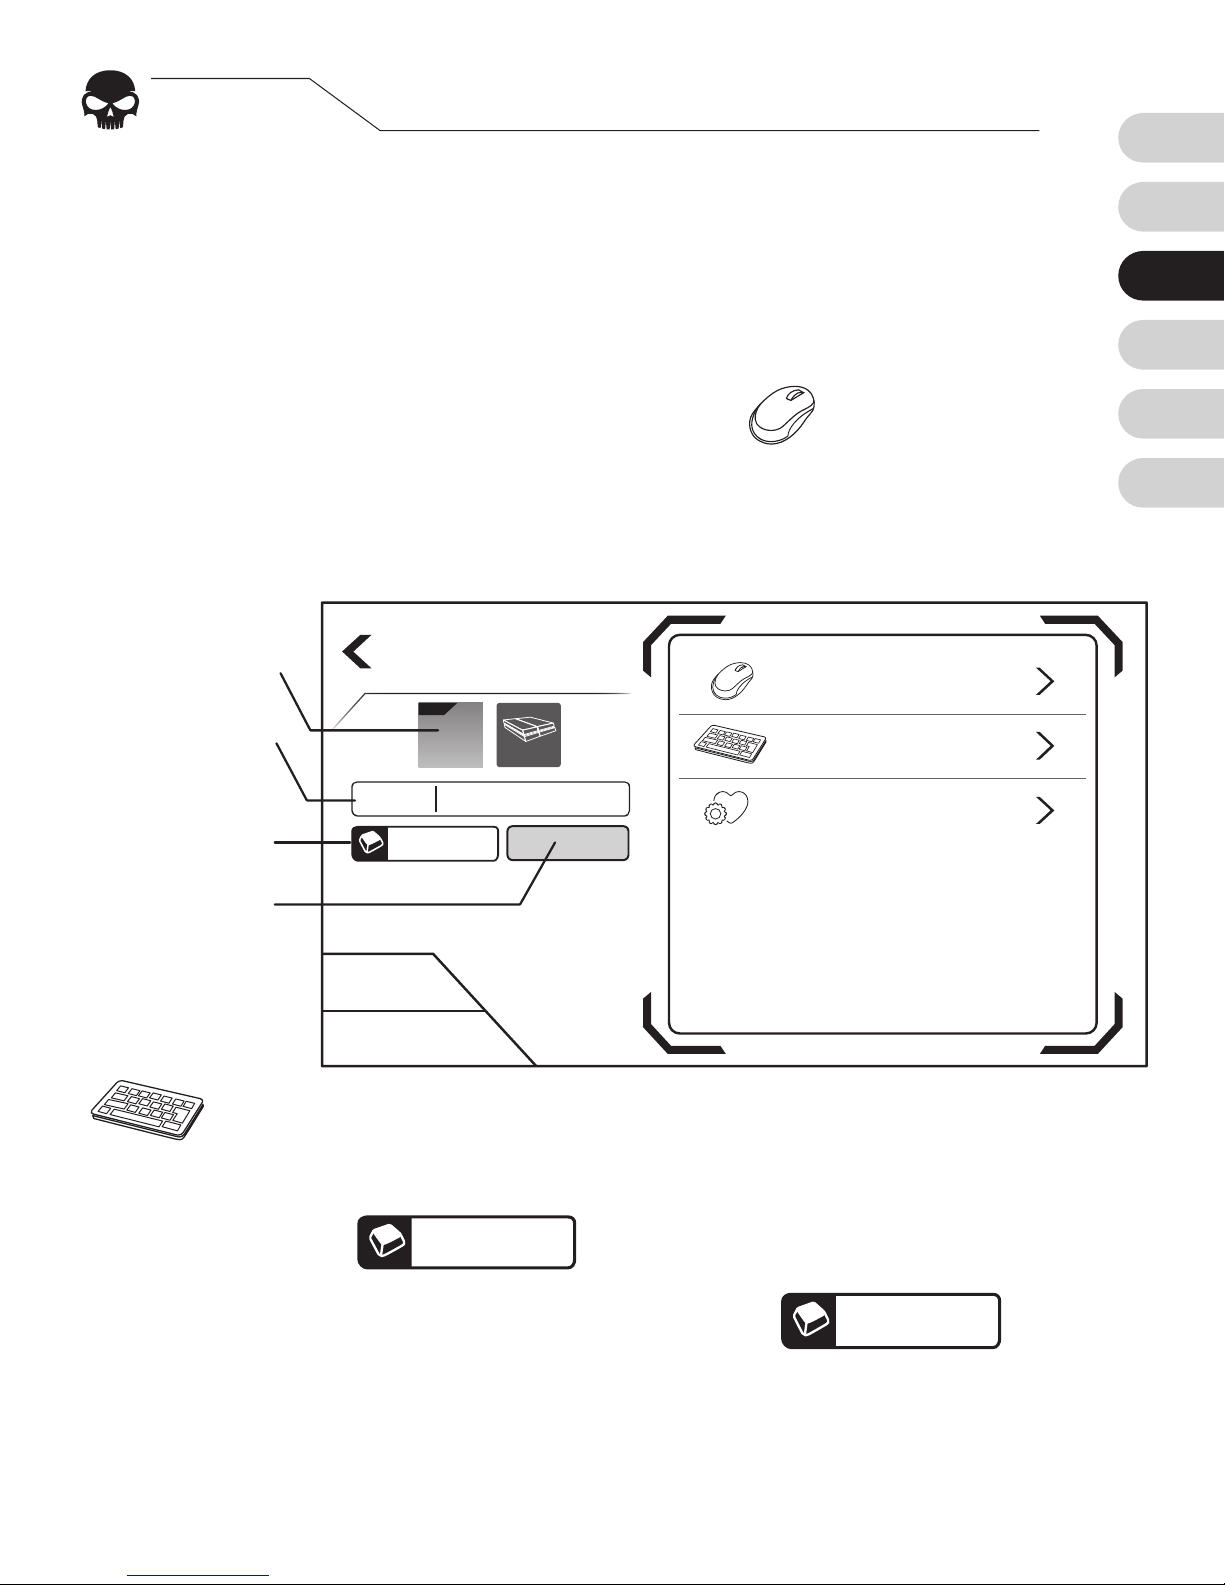
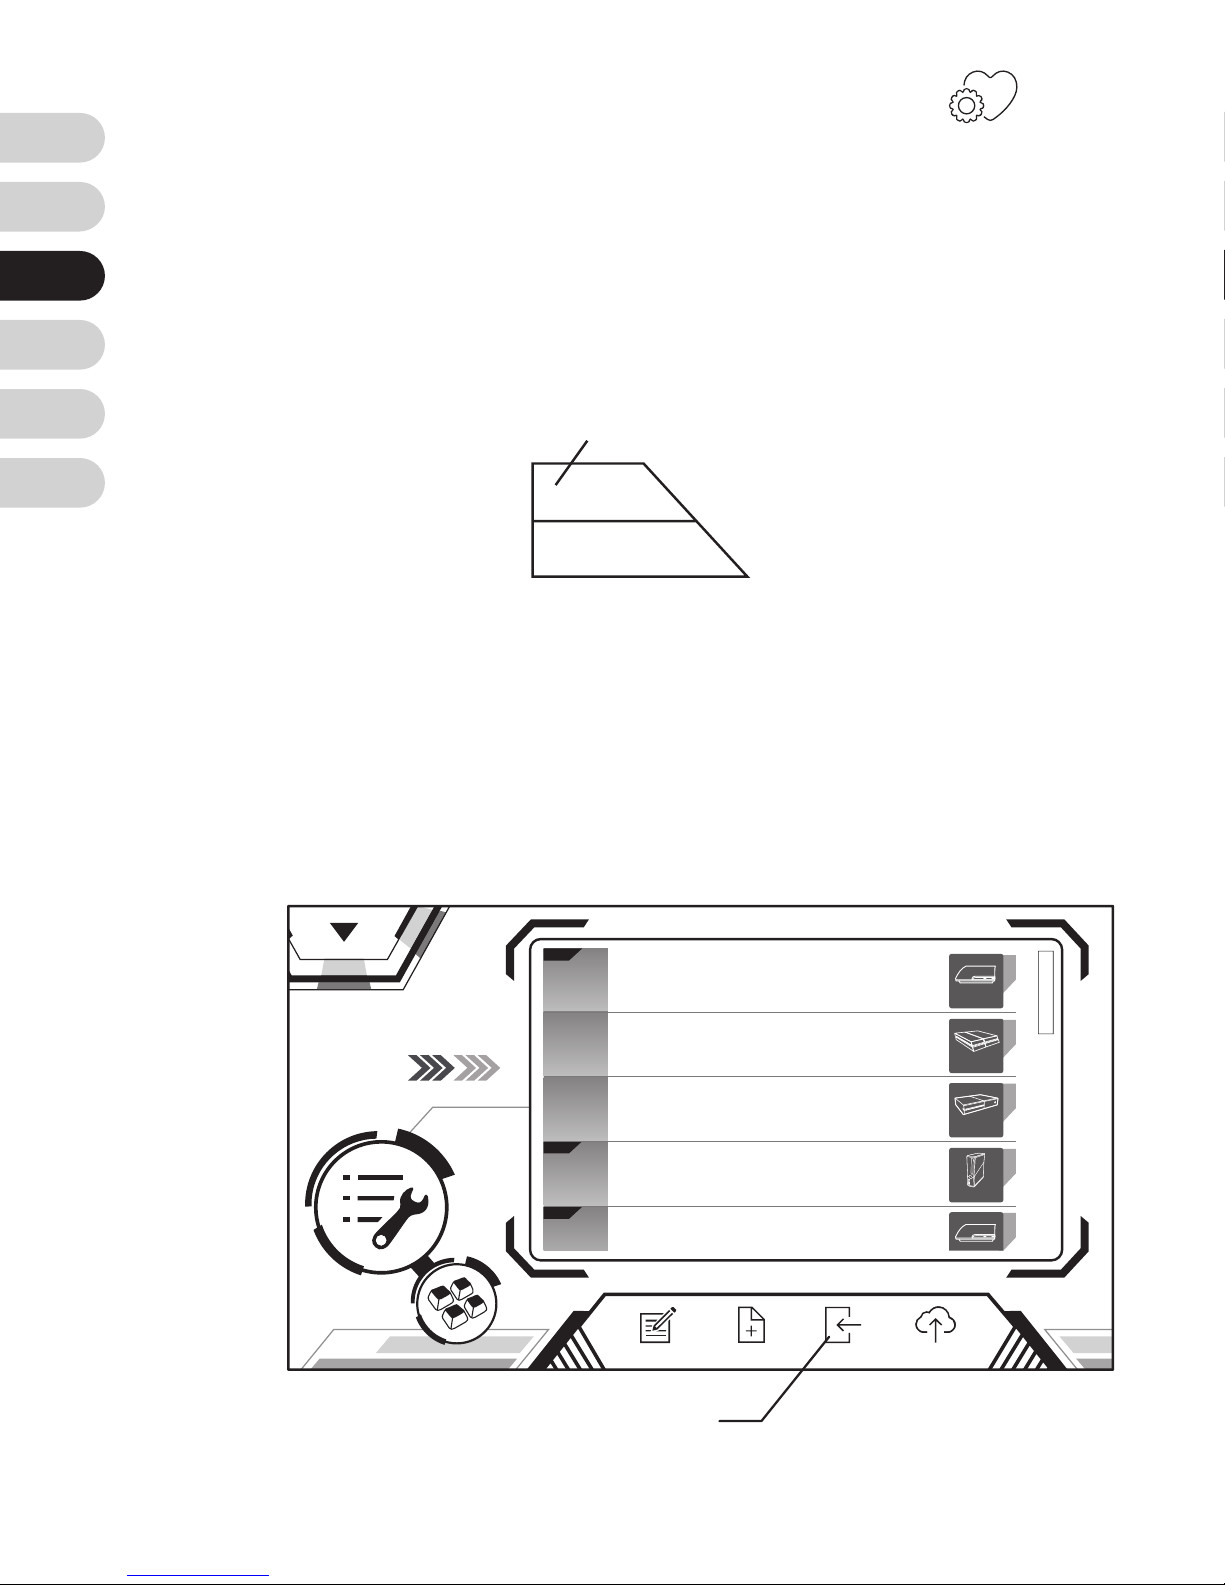
Auf der linken Bildschirmseite können Sie Folgendes
bearbeiten:
1. Cong Image 2. Dateiname 3. Schnelltasten
4. Anzeigen
Durch Klicken auf das
Maussymbol
rechts können
Sie diese Mausfunktionen bearbeiten:
1. Empndlichkeit 2. Tote Zone
3. Mausbewegungsgeschwindigkeitskurven
Schritt. 5
Konguration bearbeiten
1. Drücken Sie die Controller-Taste, die Sie bearbeiten
möchten.
G
2. Wenn die Applikation „Listening…“
Listening...
anzeigt,
drücken Sie die neue Taste an Ihrer Tastatur oder Maus.
3. Wiederholen Sie die Schritte 1 und 2, bis alle Taste
eingestellt sind.
Klicken Sie zur erneuten Tastenzuweisung auf das
Tastatursymbol
:
Cancel
Save
Edit Config
Keyboard
Preferences
Mouse
Config 1
F2
Elit e
PS4
Cong
image
Dateiname
Schnelltaste
Anzeigen
Page 28
EN
FR
DE
ES
TW
CN
28
Über die Option
Präferenzeinstellungen
lässt
sich zudem Folgendes bearbeiten:
1. Schießfrequenz
2. Umgekehrte Y-Achse
3. Scharfschützenatmung (nur „Elite“-Konguration)
4. Anti-Rückstoß (nur „Elite“-Konguration)
Nach Abschluss der Bearbeitung auf „
Speichern
“
tippen. Drücken Sie zum Laden des Konguration auf
Sniper und zum Zurückkehren zur Startseite „
Laden
“.
Damit sind alle Einstellungen abgeschlossen. Nun
können Sie mit Ihren Lieblingsspielen loslegen!
Config
Elit e
Elit e
Elit e
Config 1
Config 2
Config 3
Config 4
Config 5
Xbox 360
PS3
PS4
Xbox One
NewEdit BackupLoad
Laden
Save
Cancel
Speichern
Page 29
EN
FR
DE
ES
TW
CN
29
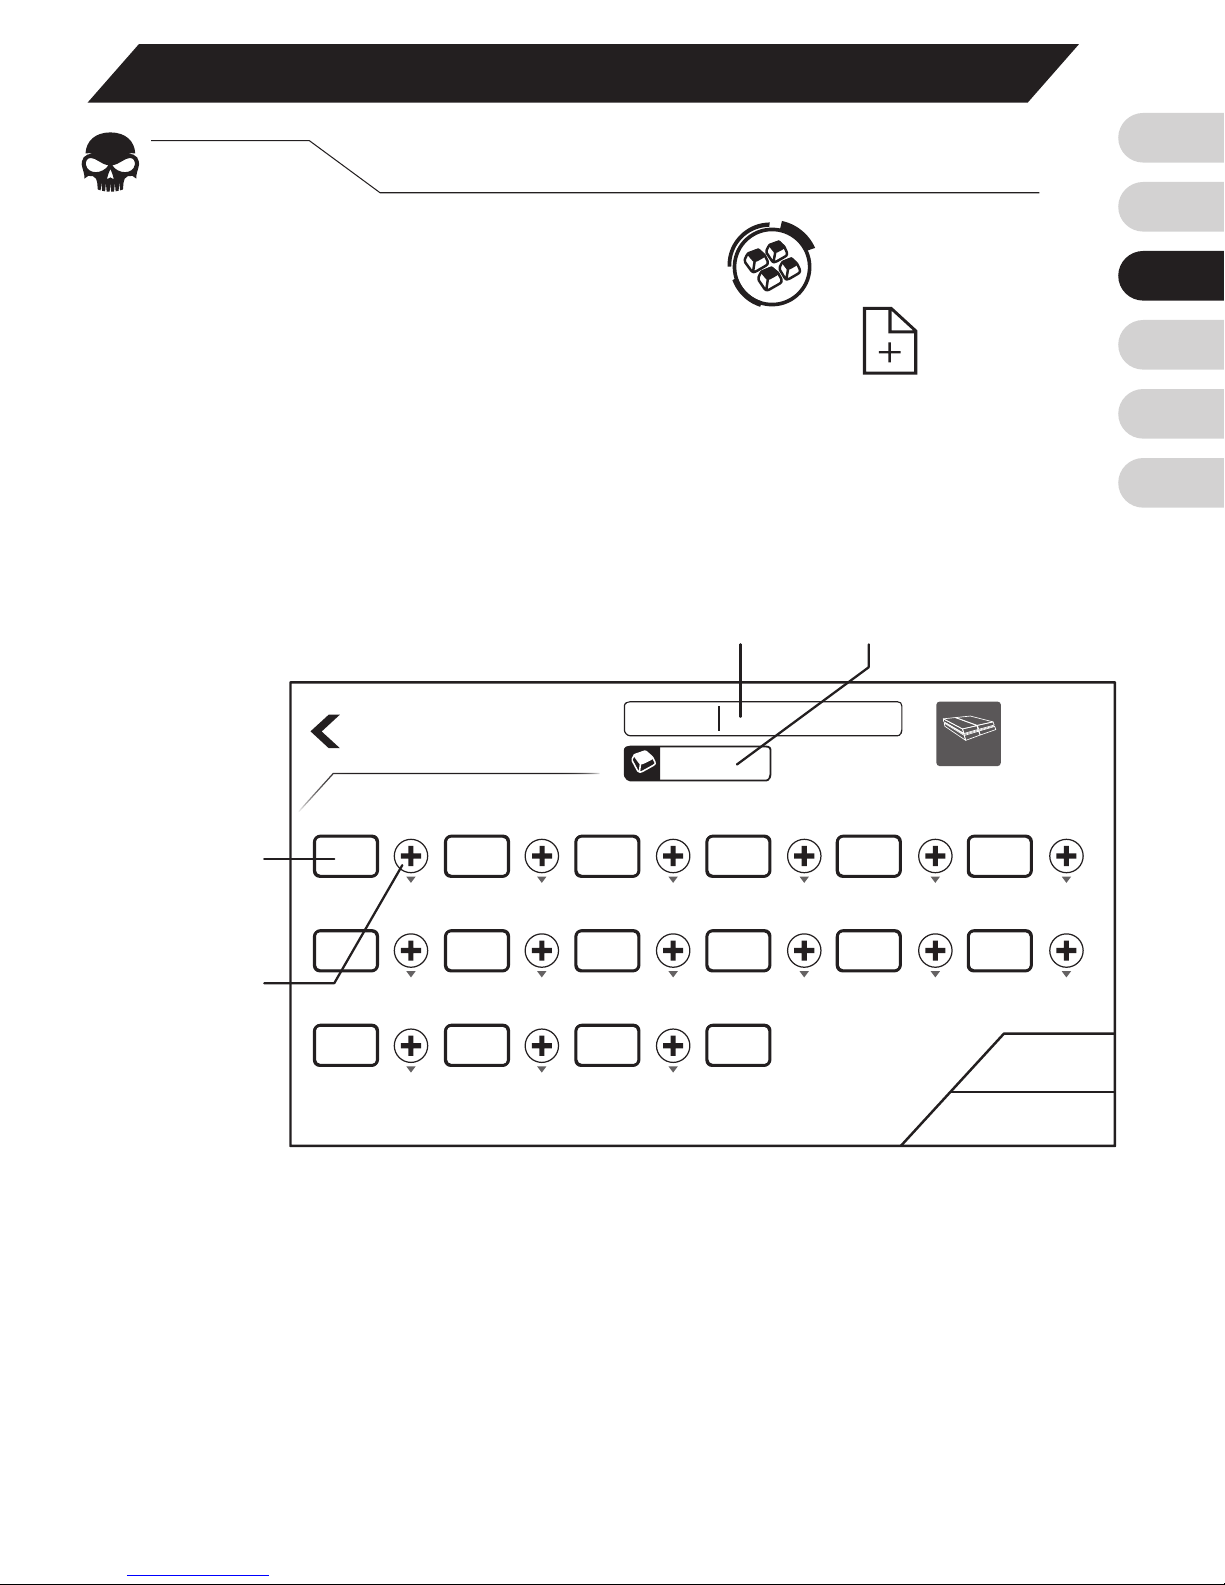
Auf das Makroeinstellung-Symbol im Menü und
dann zum Zufügen eines Makros auf „New“ tippen.
Anschließend die Konsole wählen, an der Sie spielen
möchten, und die nachstehenden Schritte befolgen:
1. Dateinamen und Schnelltasten festlegen.
Weitere Einstellungen
Schritt. 1
Makroeinstellungen
Create New
Cancel
Save
PS4
Macro 01
SchnelltasteDateiname
Befehlss-
palte
2. Auf Befehlsspalte tippen und dann eine beliebige
Taste an Tastatur oder Maus wählen. Ein Dialog
erscheint und ermöglicht die Festlegung als „Drücken“-
oder „Loslassen“-Aktion. Anschließend auf „Speichern“
tippen.
Intervall-
markierung
Page 30
EN
FR
DE
ES
TW
CN
30
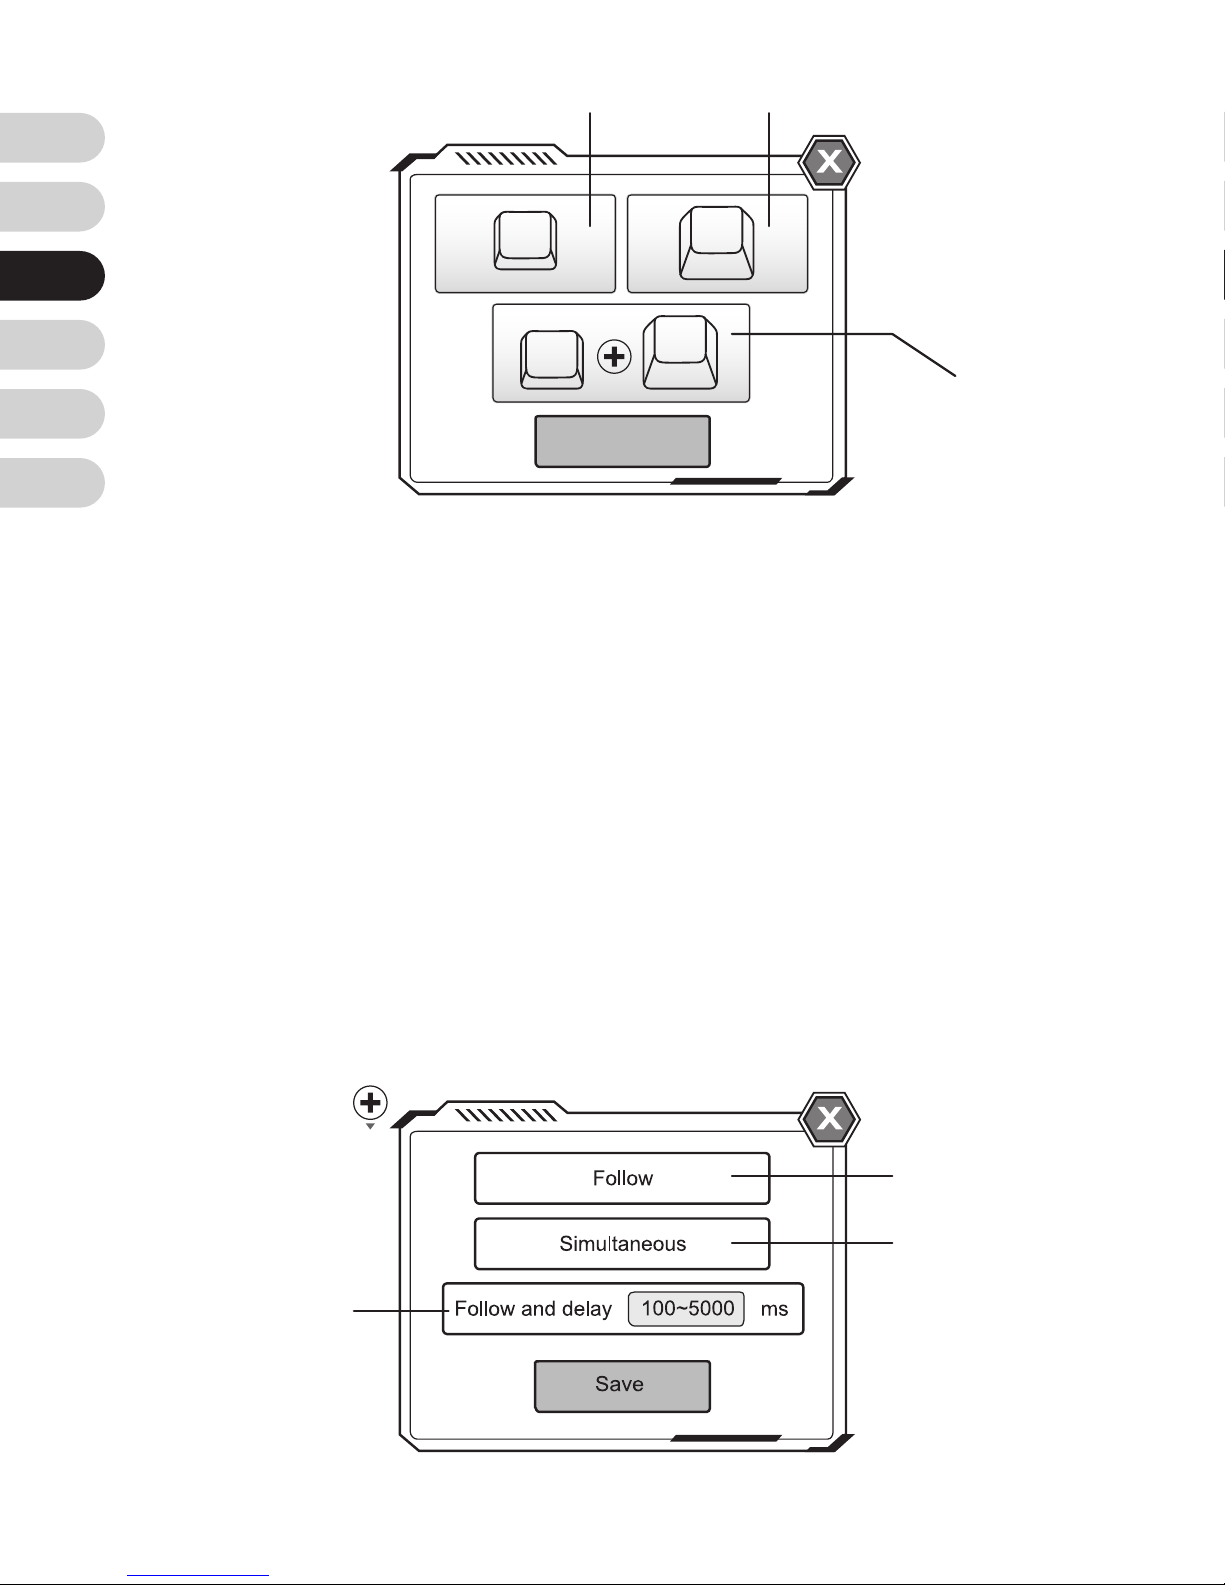
3. Bei 2 Befehlen erscheint immer Eine Intervallmarkierung.
Intervalle können per Klick festgelegt werden. Es gibt 3
Modi:
Folgen:
Gleichzeitig:
Mit Verzögerung folgen:
Einen Befehl direkt nach einem
vorherigen ausführen.
2 Befehle gleichzeitig ausführen.
Den 2. Befehl nach einer bestimmten
Zeit ausführen.
Save
K
K
K
K
Klicken
Klicken
+
Loslassen
Loslassen
Folgen
Gleichzeitig
Mit Verzögerung
folgen
Page 31

EN
FR
DE
ES
TW
CN
31
4. Zur Erstellung Ihres eigenen angepassten Makros die
obigen Schritte befolgen!
IFalls Sie Fragen haben, besuchen Sie uns bitte
unter:
www.brookaccessory.com
. Außerdem sind
Sie herzlich eingeladen, sich für Neuigkeiten und
Aktualisierungen kostenlos als Mitglied auf unserer
Webseite zu registrieren.
Page 32
EN
FR
DE
ES
TW
CN
32
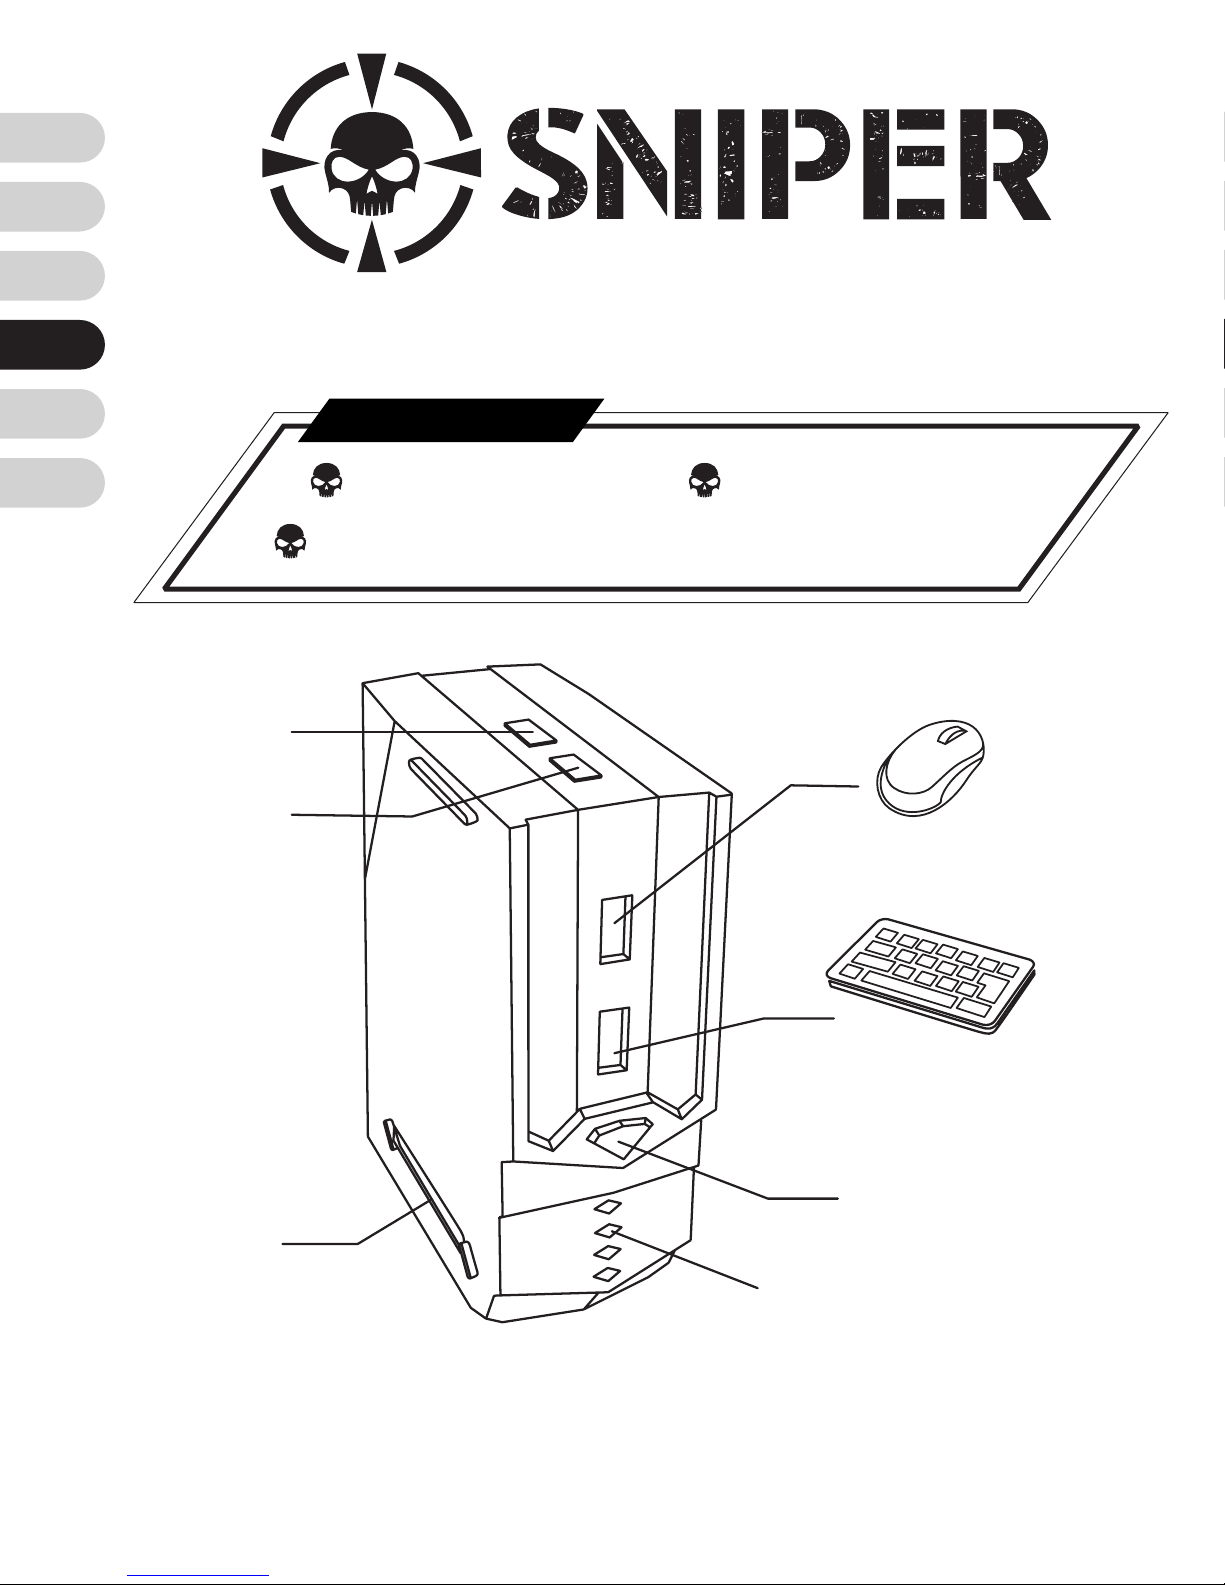
M
o
u
s
e
F
n
BT
K
e
y
b
o
a
rd
Fn
BT
Cong LED
Ratón
Teclado
Home
Consola LED
PS3/ PS4: luz azul
Xbox One/ Xbox 360: luz verde
- Congura desde celular -
Brook Sniper x1
Guia Rápida x1
Cable USB x1
Contenido
Page 33
EN
FR
DE
ES
TW
CN
33
Como empezar
Paso. 1
Conectar todos los dispositivos
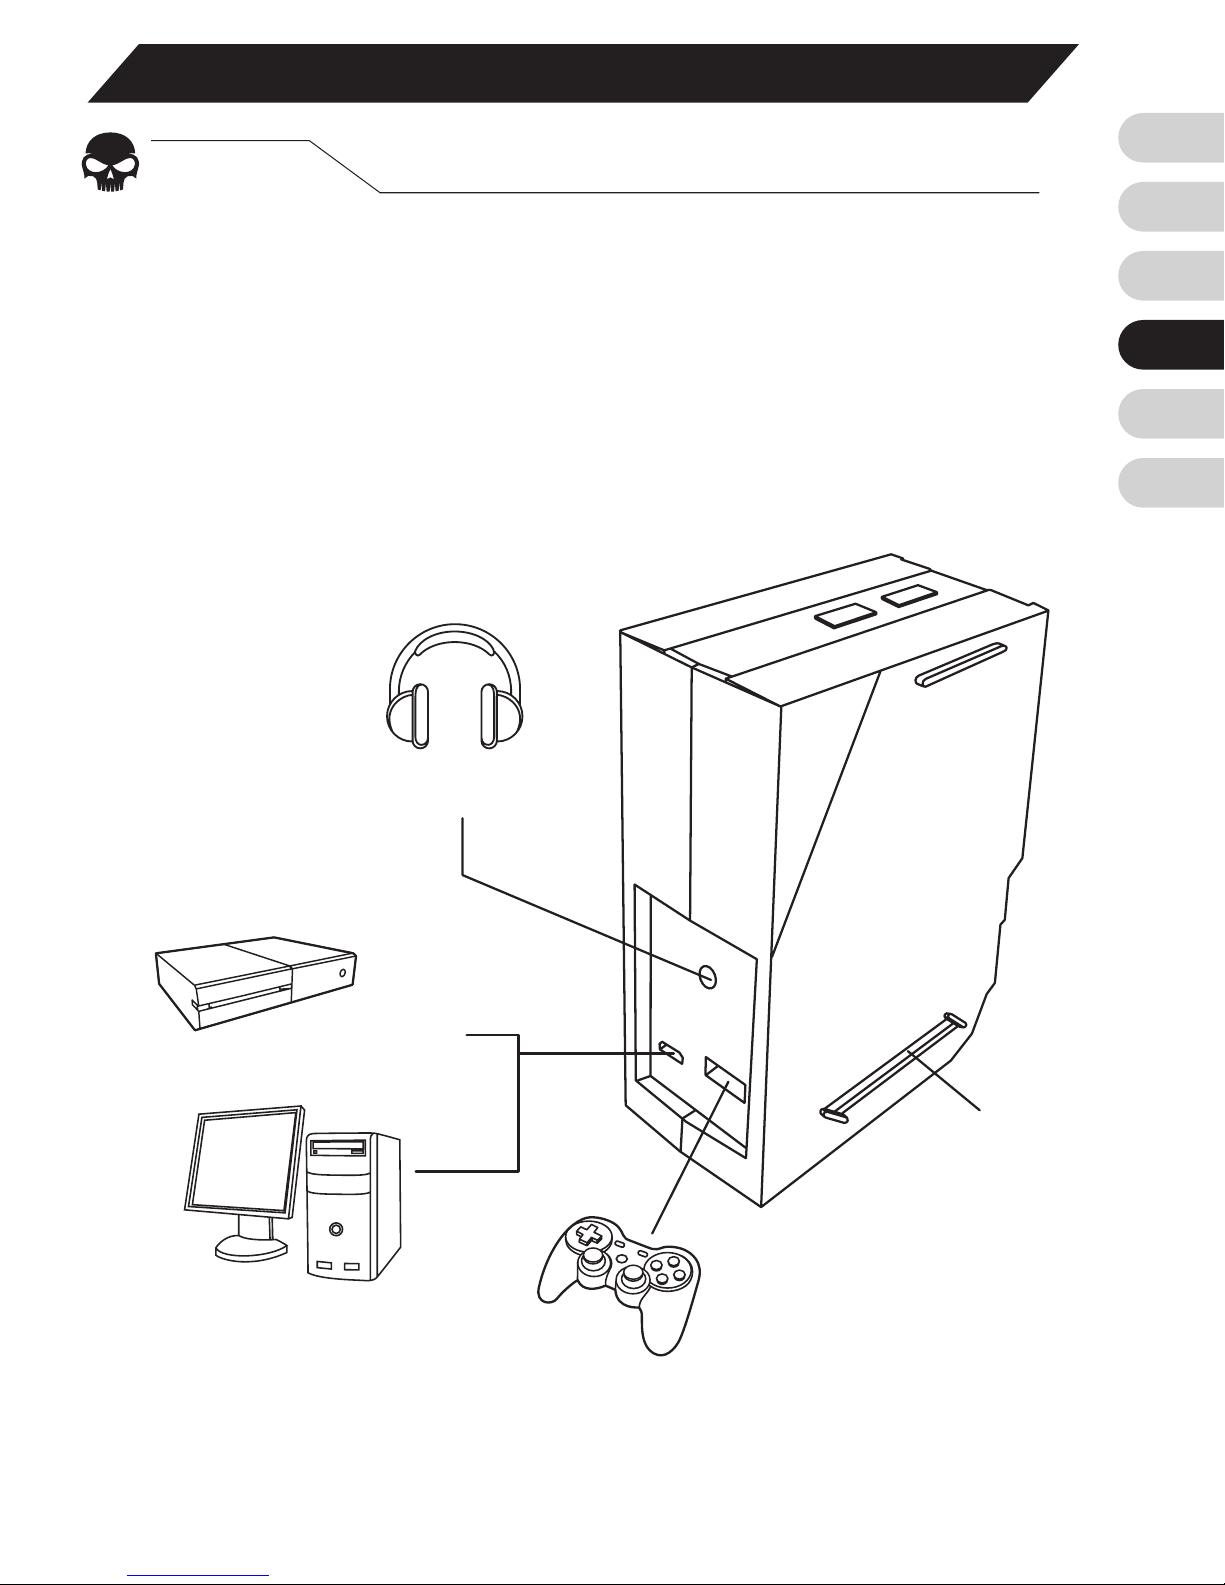
Conecta su teclado, ratón, controlador de consolas
(opcional) y audífonos a Brook Sniper. Conecta Brook
Sniper a su consola y empareja su Brook Sniper con su
celular.
BT
F
n
Cong LED
Consola
PC
Auriculares
Control de mandos
Page 34
EN
FR
DE
ES
TW
CN
34
Después de conectar todos los dispositivos, visita Google
Play o su tienda de aplicaciones para descargar Brook
Sniper.
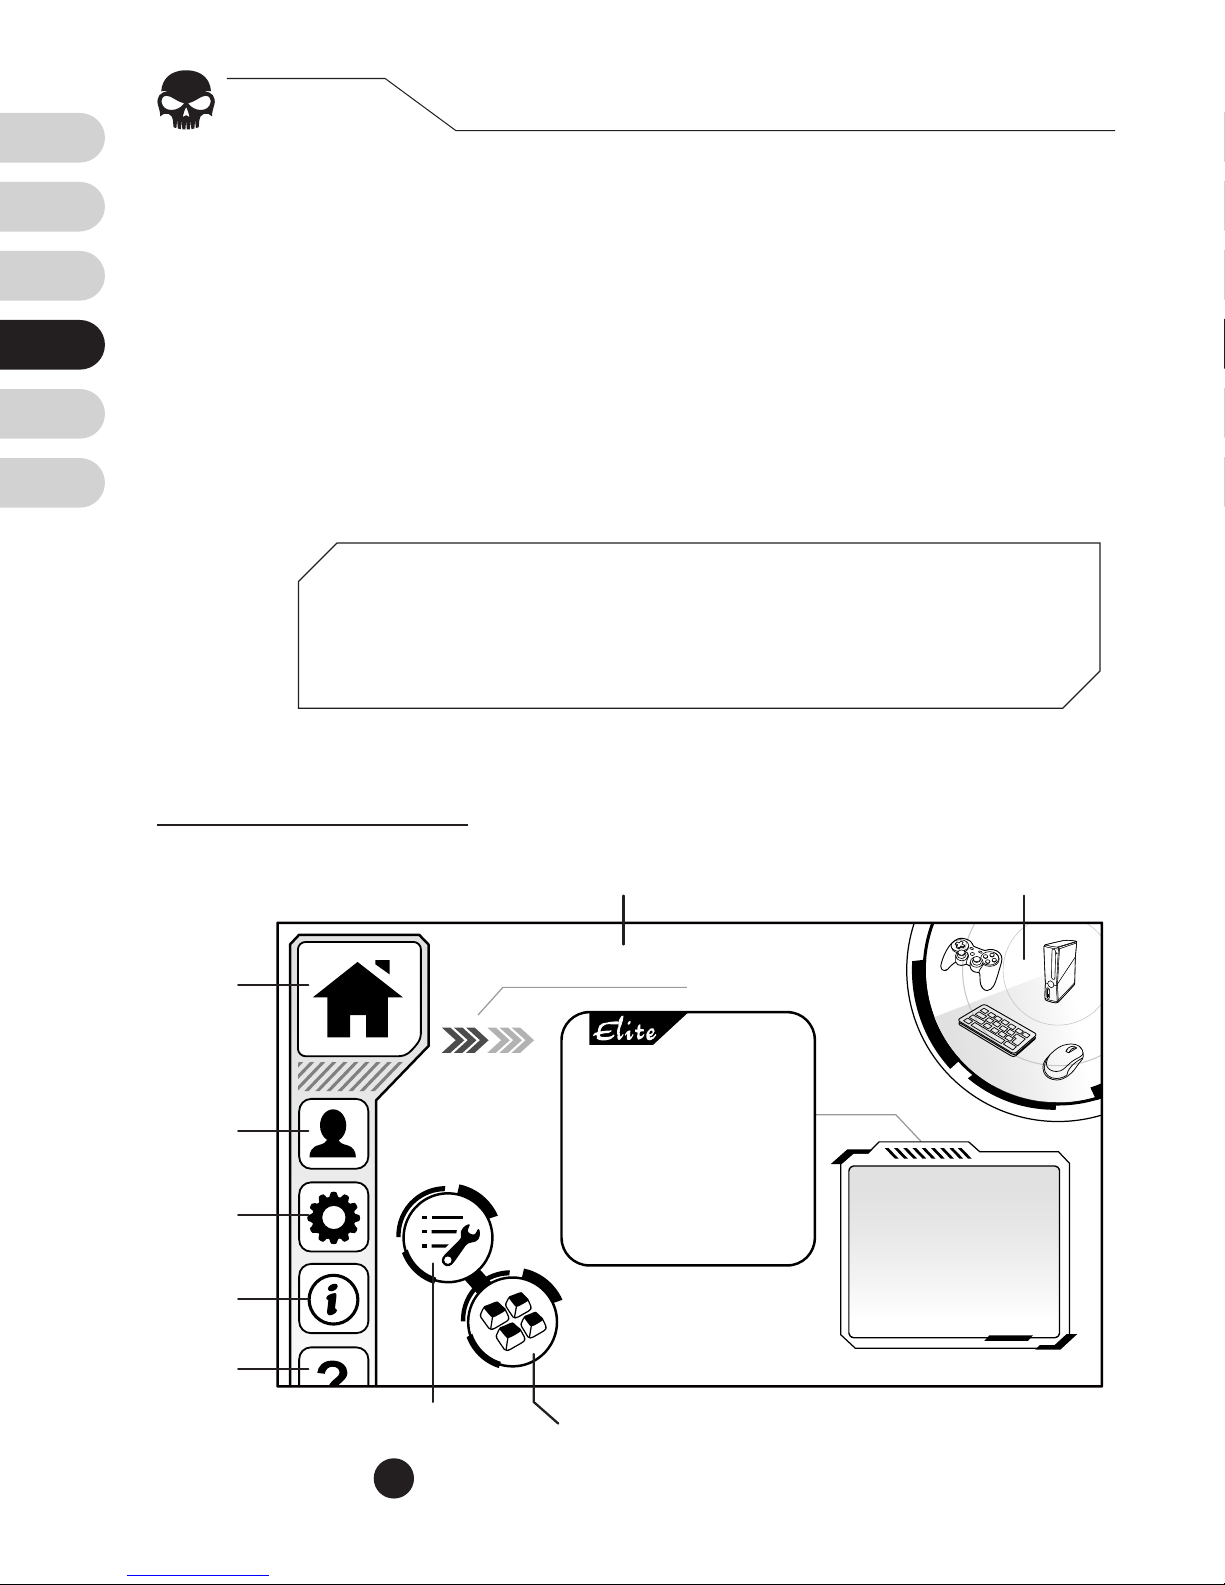
La página principal de la app muestra el estatus de
conexión de todos los dispositivos. Cuando todo esté listo
puede proceder a las conguraciones personales.
Paso. 2
Descarga la aplicacion de Brook Sniper
Para disfrutar de la mejor experiencia recomendamos que se
registre en nuestra página web
www.brookaccessory.com
.
Es gratis y le permite acceder a nuestros servicios de la nube.
Config Name
Página
principal
Cong nombre
Cong ajuste Conguraciones Macro
HUD
(pantalla de
datos)
Estado del dispositivo
Cong
imagen
Lniciar
sesión
Ajuste
Sobre
Ayuda
▼
Página principa
1
Page 35
EN
FR
DE
ES
TW
CN
35
Paso. 3
Añade conguraciones
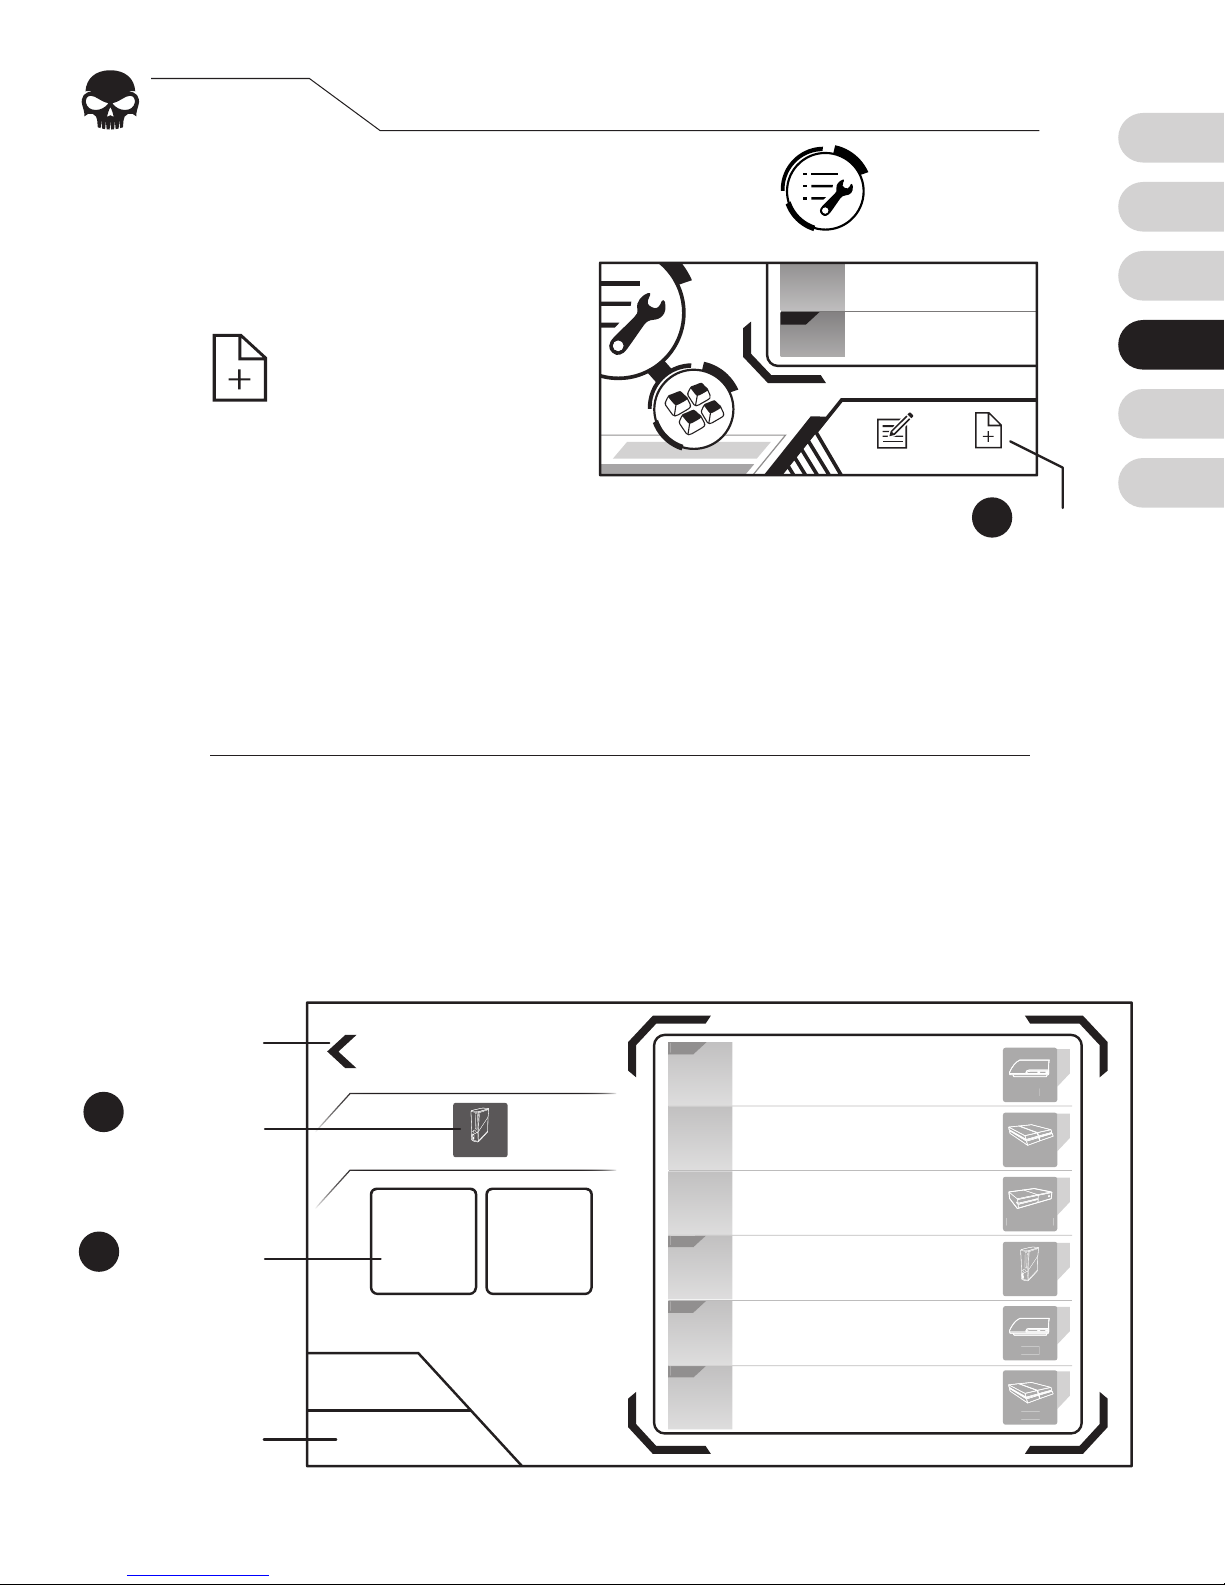
Aprieta el icono Conguration Settings
de la página
principal
Aprieta el icono Nuevo
, que es un conjunto
de conguraciones para
un juego particular.
[1]
Las conguraciones Elite permiten optimizar zonas de muerte
y curvas de velocidad del ratón para juegos especícos. Revisa
si una versión Elite está disponible para su juego, en caso que
no escoge Custom.
1.
2.
Escoge la consola que usará.
Aprieta “Custom” o “Elite”
[1]
y escoge la plataforma que
corresponde a su consola y las conguraciones.
3.
4.
Create New
Custom Elite
Xbox 360
Cancel
Última
página
Elegir la
consola
Elegir la
plataforma
Cancelar
3
4
Elit e
Elit e
Elit e
Elit e
Config 1
Config 2
Config 3
Config 4
Config 5
Config 6
Xbox 360
PS3
PS4
Xbox One
PS3
PS4
Save
2
Elit e
Config 4
Config 5
NewEdit
Nuevo
Page 36
EN
FR
DE
ES
TW
CN
36
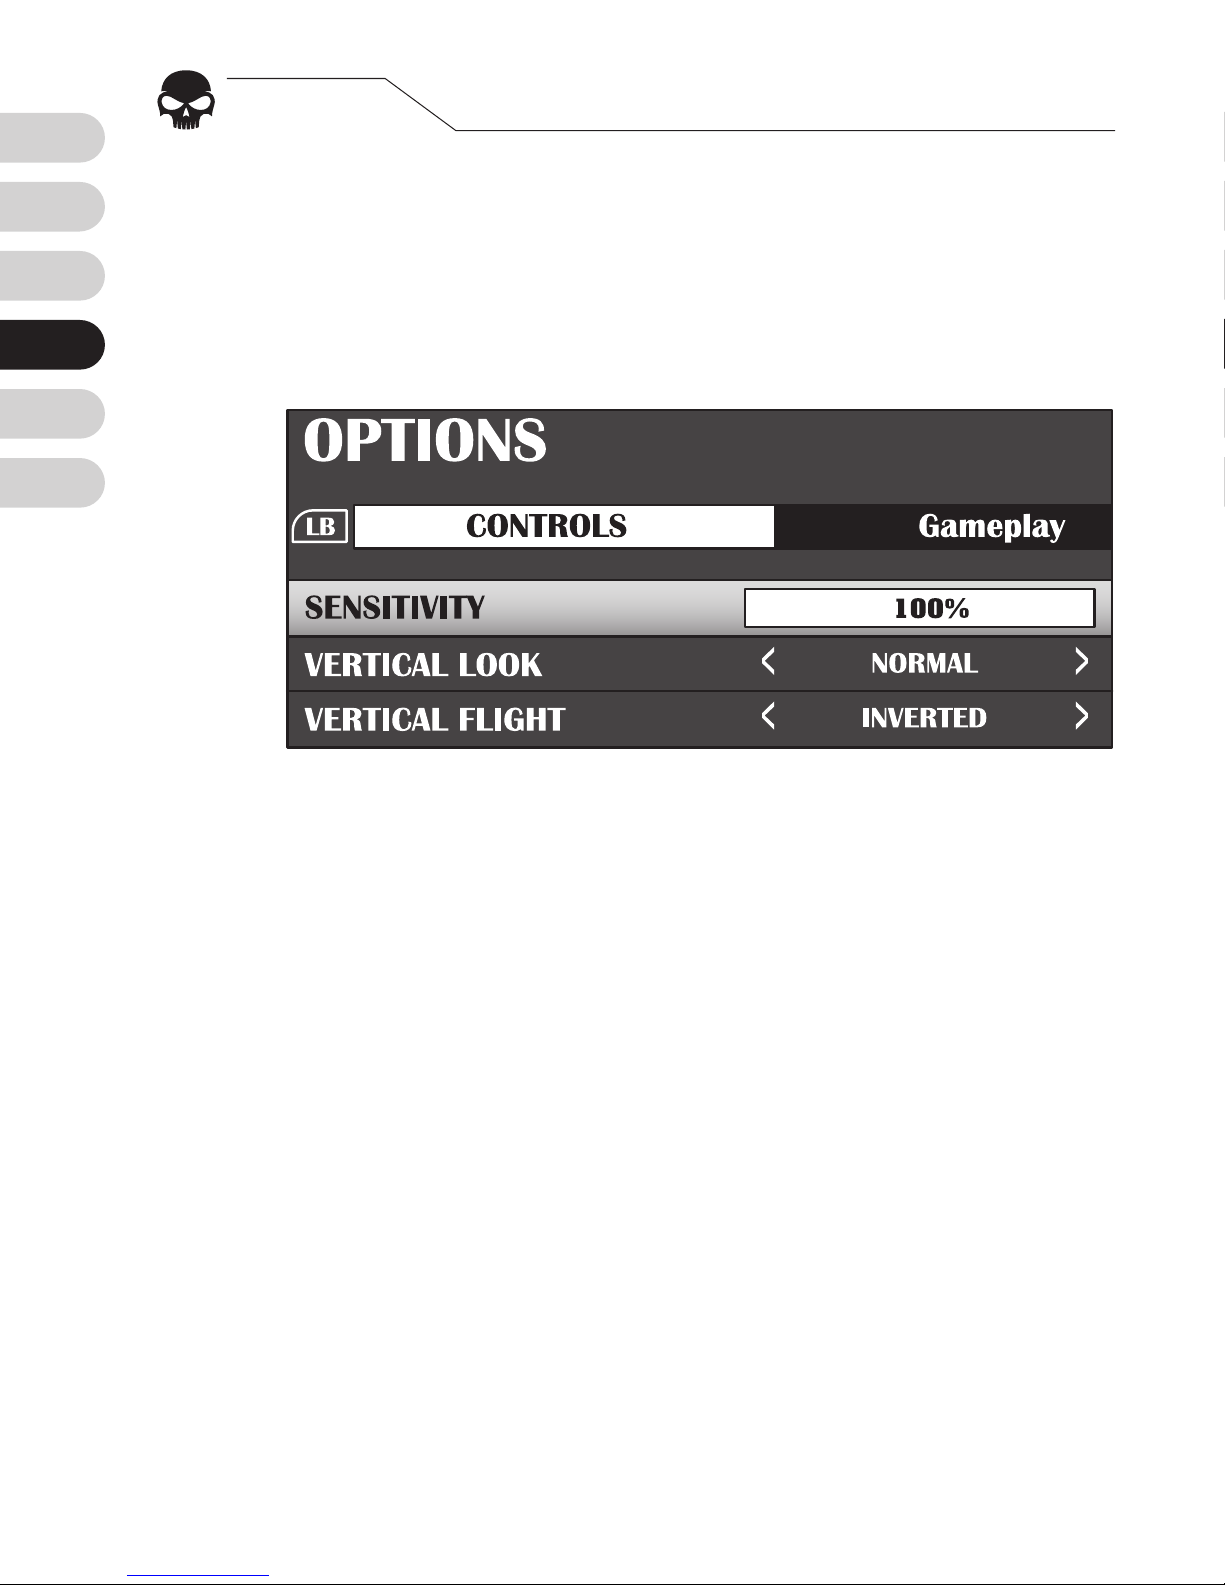
Para optimizar la transmisión de señales del ratón a
Brook Sniper, ponga al máximo la sensibilidad del ratón.
Algunos juegos llaman a eso Modo 100%, Fastest o
Insane.
Paso. 4
Ajuste su sensibilidad al máximo
Page 37
EN
FR
DE
ES
TW
CN
37
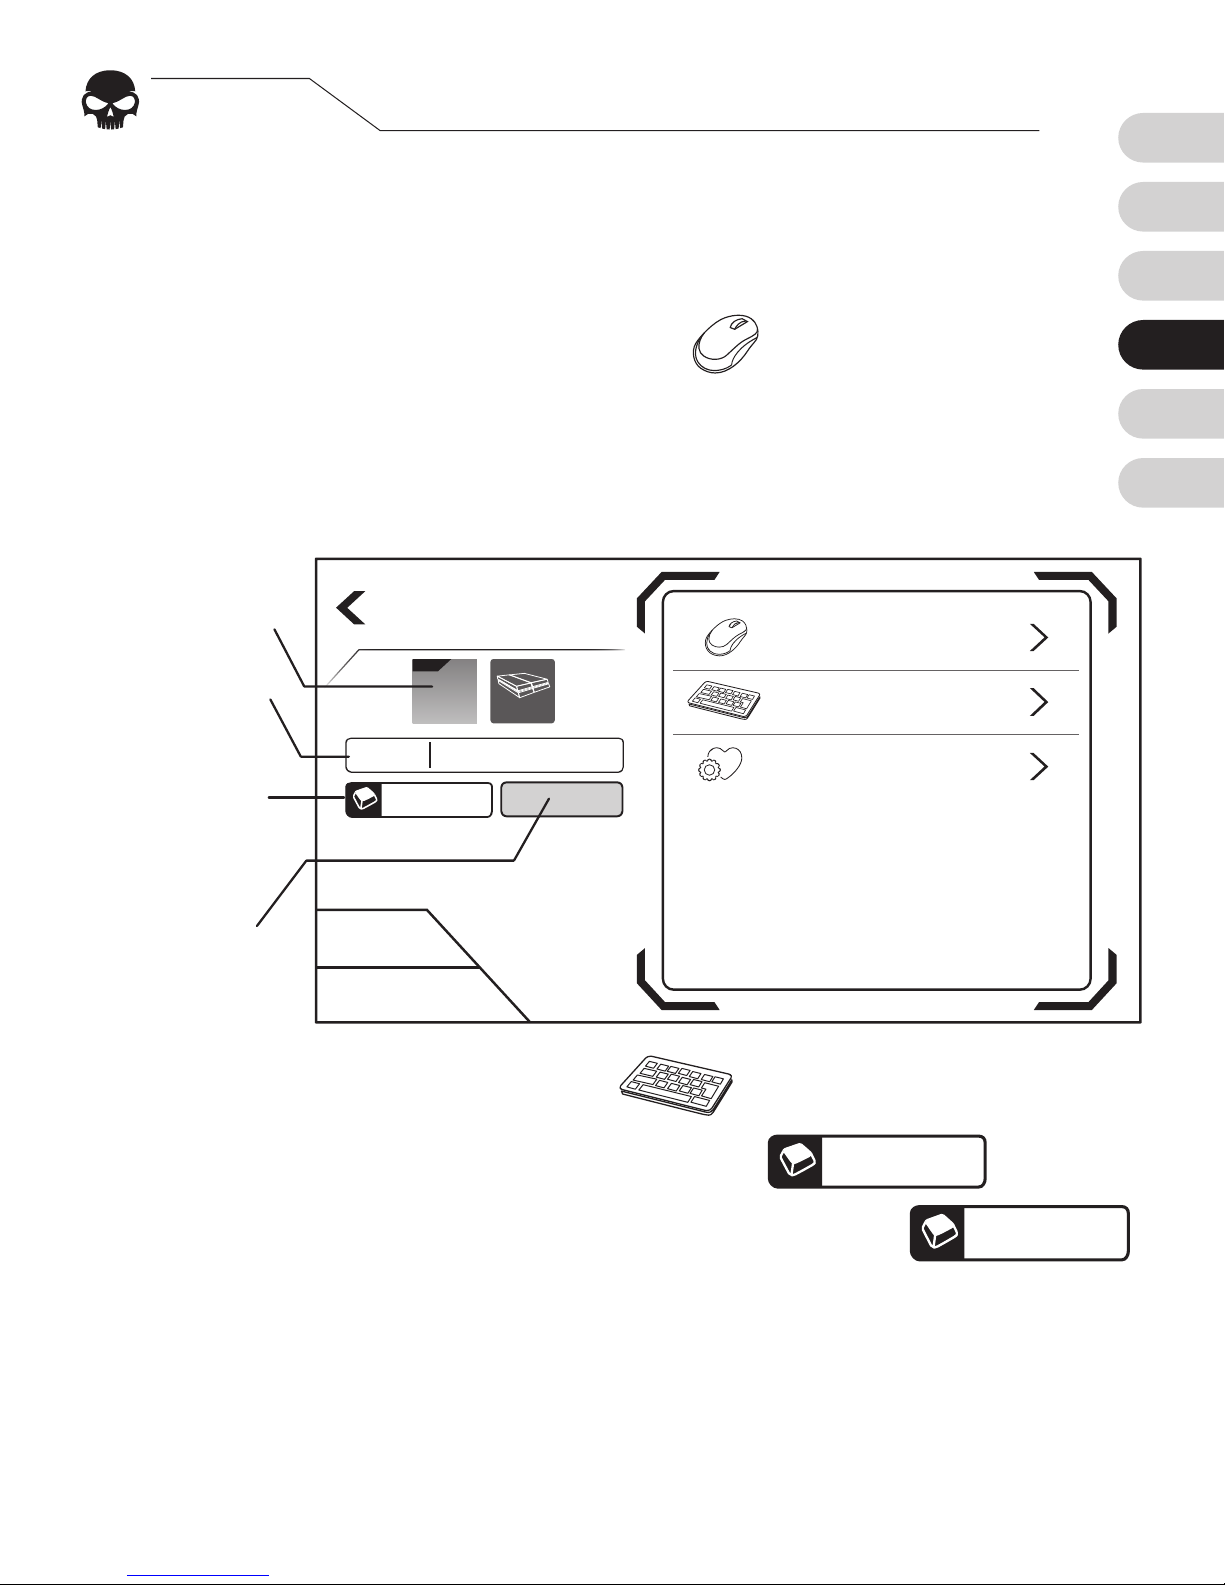
Desde la parte izquierda de la pantalla se puede editar:
1. Cong imagen 2. Nombre de archive 3. Teclas de
acceso rápido 4. Luces indicadoras
Apretando el icono de
ratón
a la derecha se
puede editar las siguientes funciones de ratón:
1. Sensibilidad 2. Zona muerta 3. Velocidad de
movimiento de la ratón
Paso. 5
Edita conguraciones
Aprieta el icono de
teclado
para remapear botones:
1. Aprieta el botón que quieres editar.
G
2. Cuando la aplicación muestra “Listening…”
Listening...
aprieta el nuevo botón en el teclado o el ratón.
3. Repite los pasos 1 y 2 hasta que todos los botones estén
listos.
Cancel
Save
Edit Config
Keyboard
Preferences
Mouse
Config 1
F2
Elit e
PS4
Cong
imagen
Nombre de
archive
Teclas de
acceso
rápido
Luces
indicadoras
Page 38
EN
FR
DE
ES
TW
CN
38
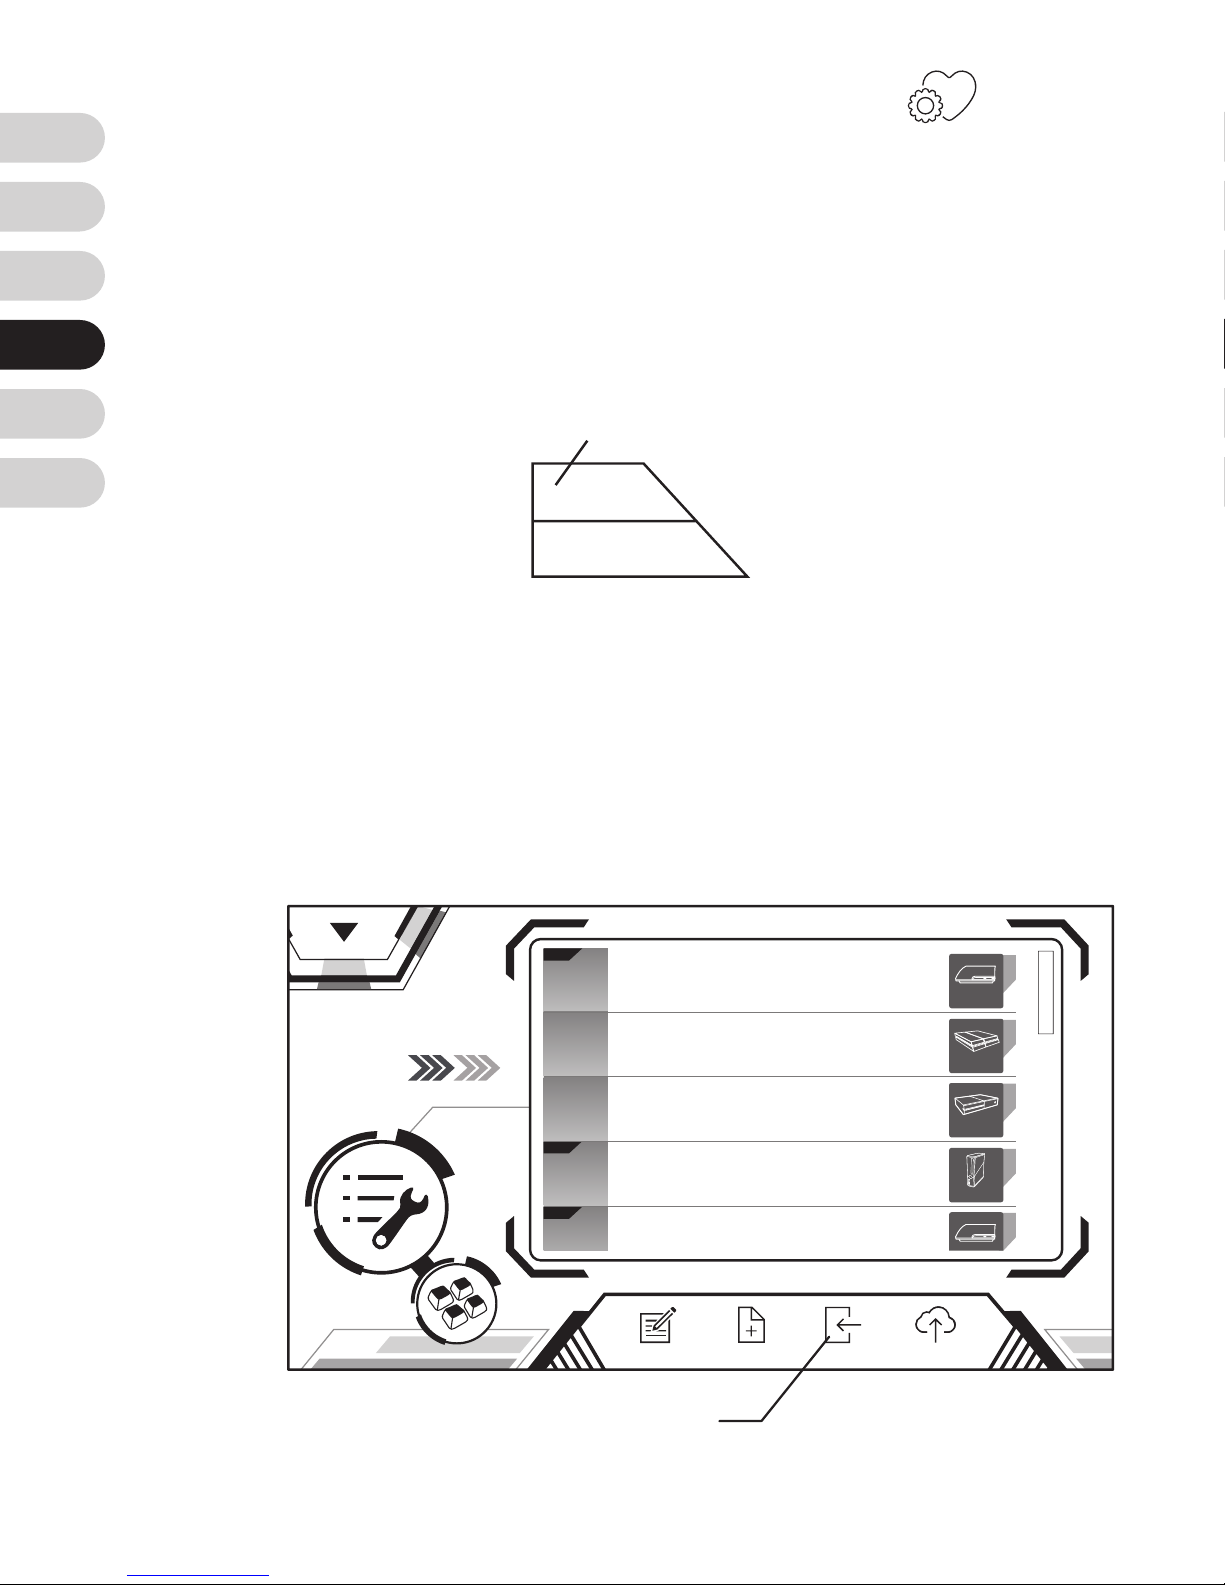
Desde las Conguraciones
Preferenciales
también
se puede editar:
1. Frecuencia de disparo
2. IInvertir eje Y
3. Respiración Sniper (solo Conguraciones Elite)
4. Anti retroceso (solo Conguraciones Elite)
Escoge “
Guardar
” cuando termina de editar. Presione
"
Cargar
" para cargar la conguración en Sniper y volver
a la página de inicio. Ahora, toda la configuración se
habrá completado. Y ¡arranque el juego!
Config
Elit e
Elit e
Elit e
Config 1
Config 2
Config 3
Config 4
Config 5
Xbox 360
PS3
PS4
Xbox One
NewEdit BackupLoad
Cargar
Save
Cancel
Guardar
Page 39
EN
FR
DE
ES
TW
CN
39
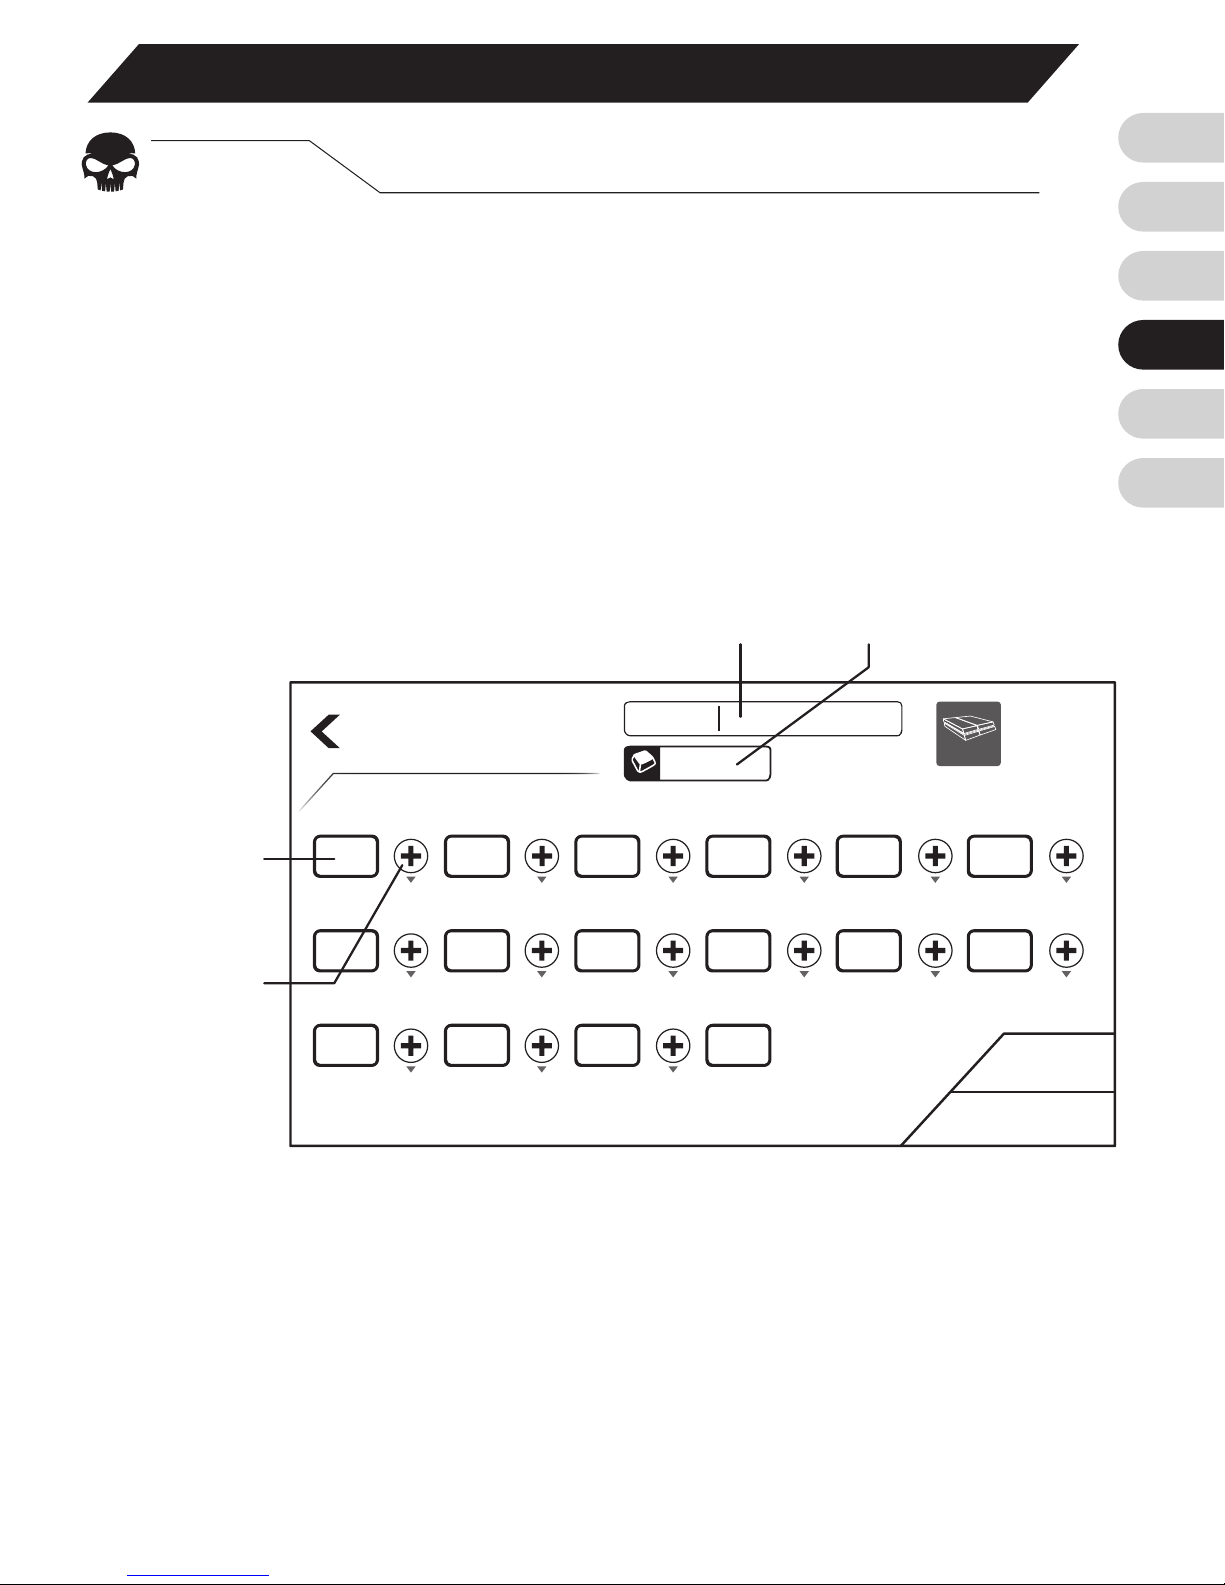
Aprieta el icono Conguraciones Macro y escoge “New”
para añadir un macro. Solamente necesitas escoger
la consola que quiere ocupar y seguir los siguientes
pasos:
1. Escoge nombre de archive y teclas de acceso rápido
.
Otras configuraciones
Paso. 1
Conguraciones Macro
Create New
Cancel
Save
PS4
Macro 01
Tecla de acceso rápidoNombre de archive
Columna de
comandos
2. Aprieta la columna de comando y aprieta cualquier
botón en el teclado o del ratón. Un cuadro de dialogo
aparecerá y le deja denir como un acción de “Apretar”
o “Soltar”. Aprieta “Save” cuando termina.
marca de
intervalo
Page 40
EN
FR
DE
ES
TW
CN
40
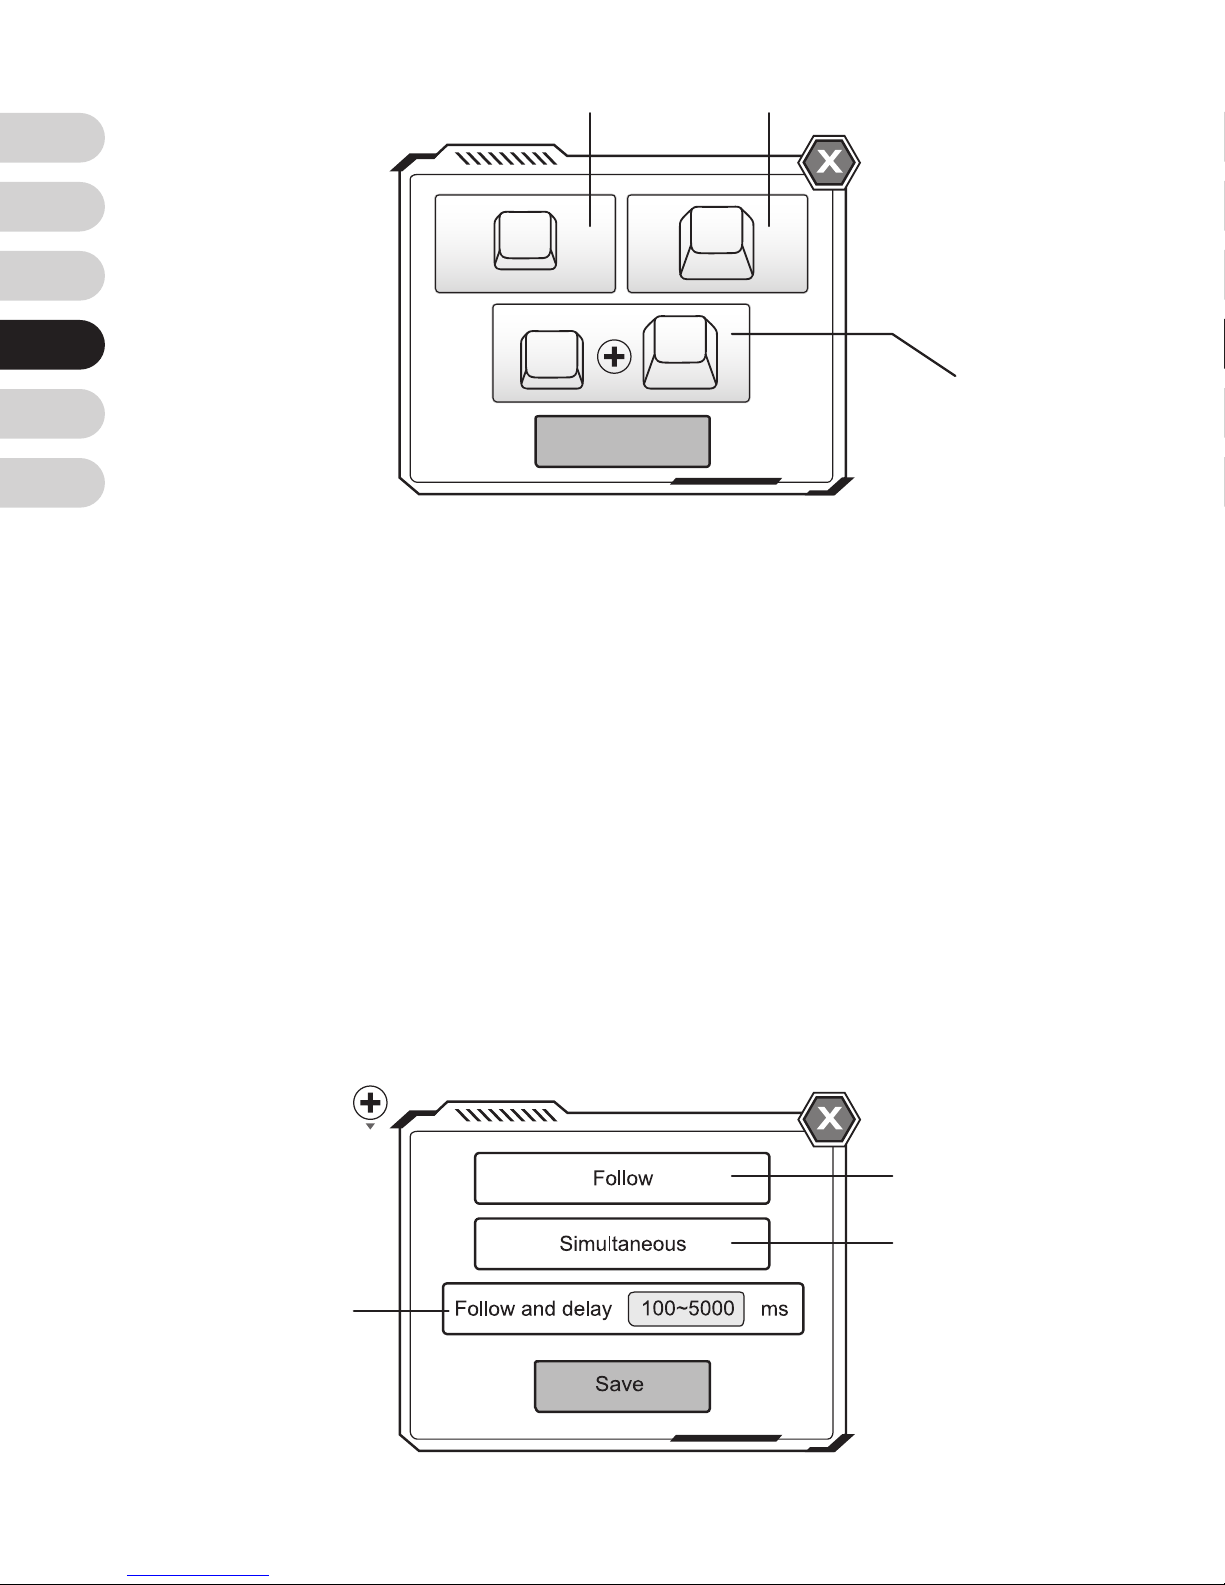
3. Por cada 2 comandos, se muestra una marca
de intervalos. Los intervalos se pueden configurar
mediante clics. Hay tres modos:
Seguir:
Simultaneo:
Seguir y demorar:
Ejecuta el comando en cuanto
termine el previo
2 comandos ejecutan al mismo
tiempo
El segundo comando ejecuta
después de un cierto tiempo
Save
K
K
K
K
clic
clic+soltar
soltar
Seguir
Simultaneo
Seguir y
demorar
Page 41

EN
FR
DE
ES
TW
CN
41
4. Repite los pasos para crear su macro personalizado!
Si tiene alguna duda o pregunta visite nuestra página
web
www.brookaccessory.com
. También le invitamos
a registrarse gratuitamente para recibir actualizaciones
y noticias.
Page 42
EN
FR
DE
ES
TW
CN
42
Brook Sniper x1
快速導覽手冊
x1
USB
線
x1
產品內容物
M
o
u
s
e
F
n
BT
K
e
y
b
o
a
rd
Fn
功能鍵
BT
藍芽
Cong
燈
滑鼠
鍵盤
Home
主機顯示燈:
PS3/ PS4-
藍色燈
Xbox One/ Xbox 360-
綠色燈
- Setup from your phone -
Page 43
EN
FR
DE
ES
TW
CN
43
初次使用
STEP. 1
將所有裝置連接
請先將您的鍵盤、滑鼠、手把(非必要)、耳機(非
必要)插上
Sniper
,並確認所有設備都連接完成。
接下來,請將
Sniper
插上家用主機,並開啟手機
藍芽與
Sniper
配對。
BT
F
n
Cong
燈
家用主機
PC
耳機
手把
Page 44
EN
FR
DE
ES
TW
CN
44
設備連接完成後,請至
App Store/GooglePlay
下
載
Brook Sniper App
。
開啟過程中請不要中斷網路連線及藍芽連線,進入
首頁後,可透過右上角的裝置顯示區來了解設備連
接的狀況,接著,準備開始做個人化的設定。
STEP. 2
下載並開啟
Brook Sniper
備註:請務必註冊一個帳號以獲得完整的體驗,同時可享有
免費及便利的雲端功能,期待你的加入!
Config Name
首頁
Cong
名稱
Cong
設置 巨集設置
訊息
顯示區
裝置顯示區
Cong
圖 片
會員登入
環境設定
關於
幫助
1
▼首頁 頁面圖
Page 45
EN
FR
DE
ES
TW
CN
45
點擊首頁的
Cong
設置
接著點擊下方的
New
來新增
一個
Cong
STEP. 3
新增
Cong
[1]
Elite Cong
提供部分熱門遊戲最優化的盲區及曲線設定值,
提供較便利的選項及更多的功能,請確認欲進行的遊戲是否有
Elite
版本,否則請選擇
Custom
。
1.
2
2.
選擇一個家用主機平台
再選擇
Custom
或
Elite
[1]
版本,就完成了第一個
Cong
的建立。(請務必選擇正確的平台及
Cong
版本,否則可能會無法順利進行遊戲
)
3.
4.
Elit e
Config 4
Config 5
NewEdit
Create New
Custom Elite
Xbox 360
Cancel
上一頁
選家用
主機平台
選版本
取消
3
4
Elit e
Elit e
Elit e
Elit e
Config 1
Config 2
Config 3
Config 4
Config 5
Config 6
Xbox 360
PS3
PS4
Xbox One
PS3
PS4
Save
新增
Page 46
EN
FR
DE
ES
TW
CN
46
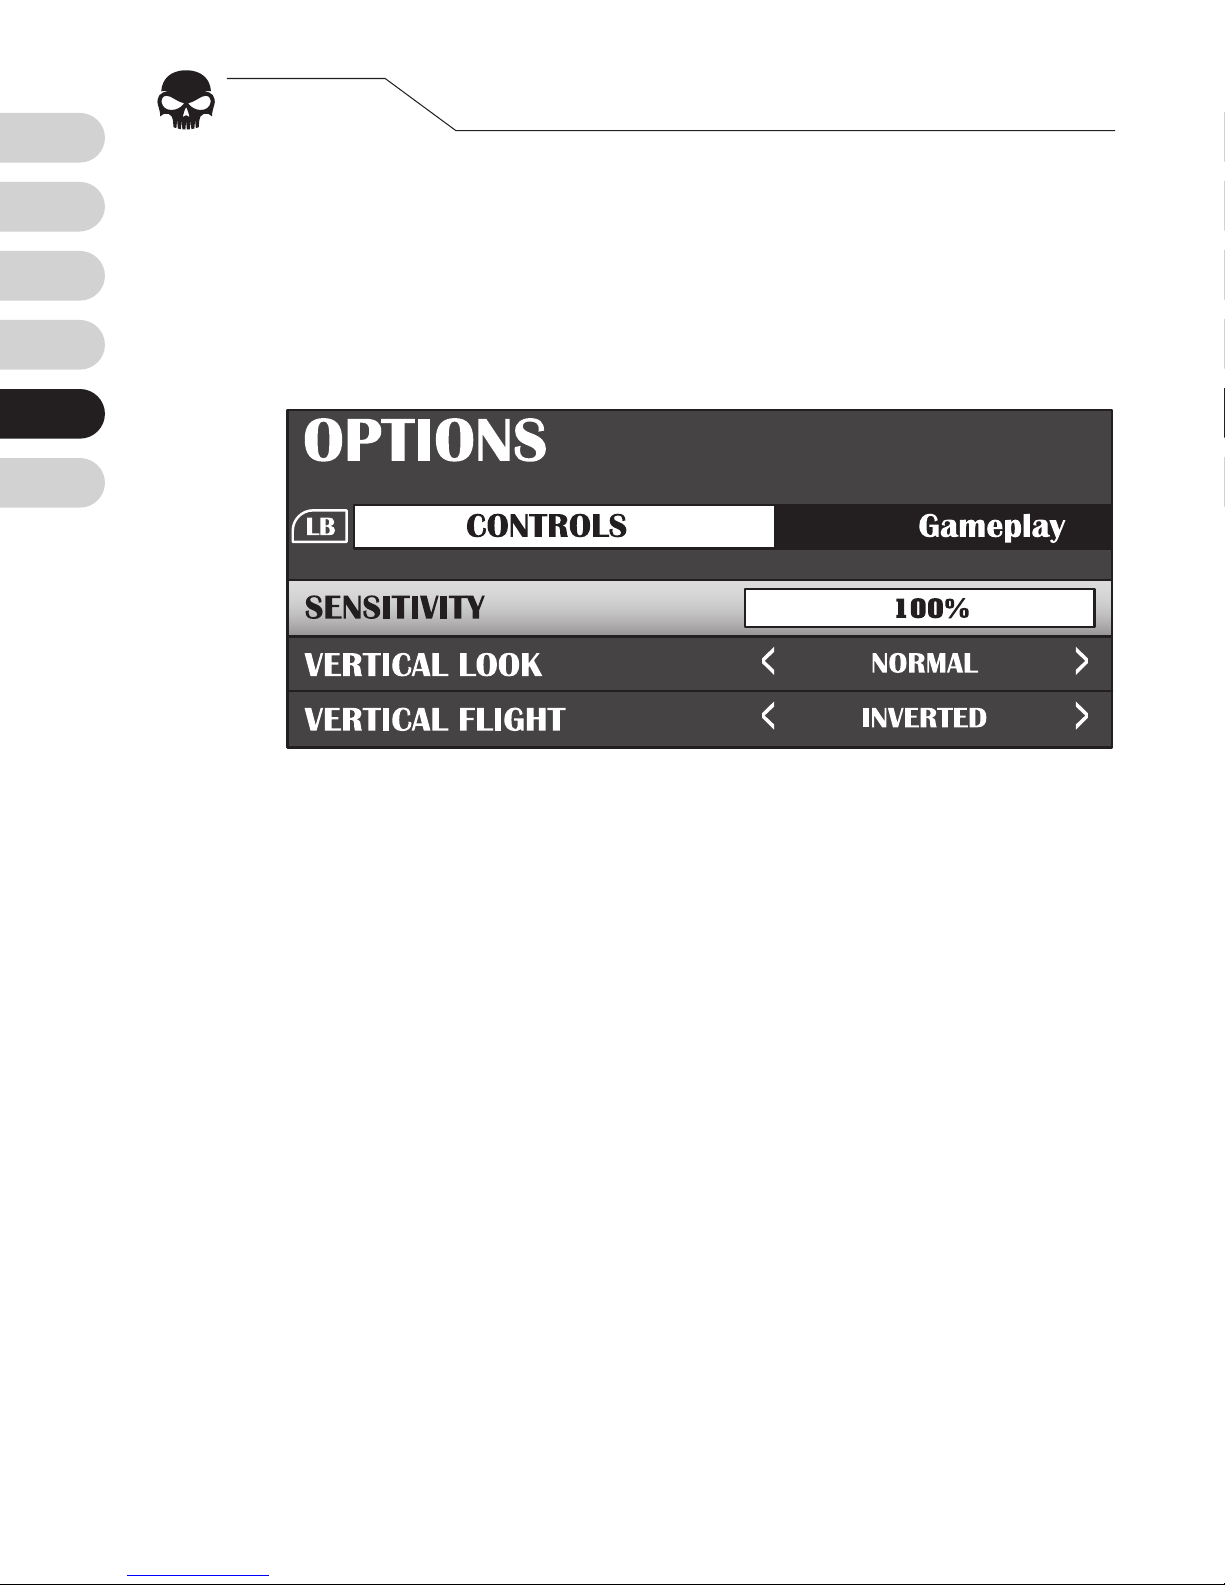
為了讓
Sniper
能將滑鼠訊號轉換功能達到最佳化,
請先將遊戲中的靈敏度選項調到最快(最快的名稱
會是
100%,fastest,Maximum
或
Insane…
等
)
STEP. 4
將滑鼠靈敏度調至最高
Page 47
EN
FR
DE
ES
TW
CN
47
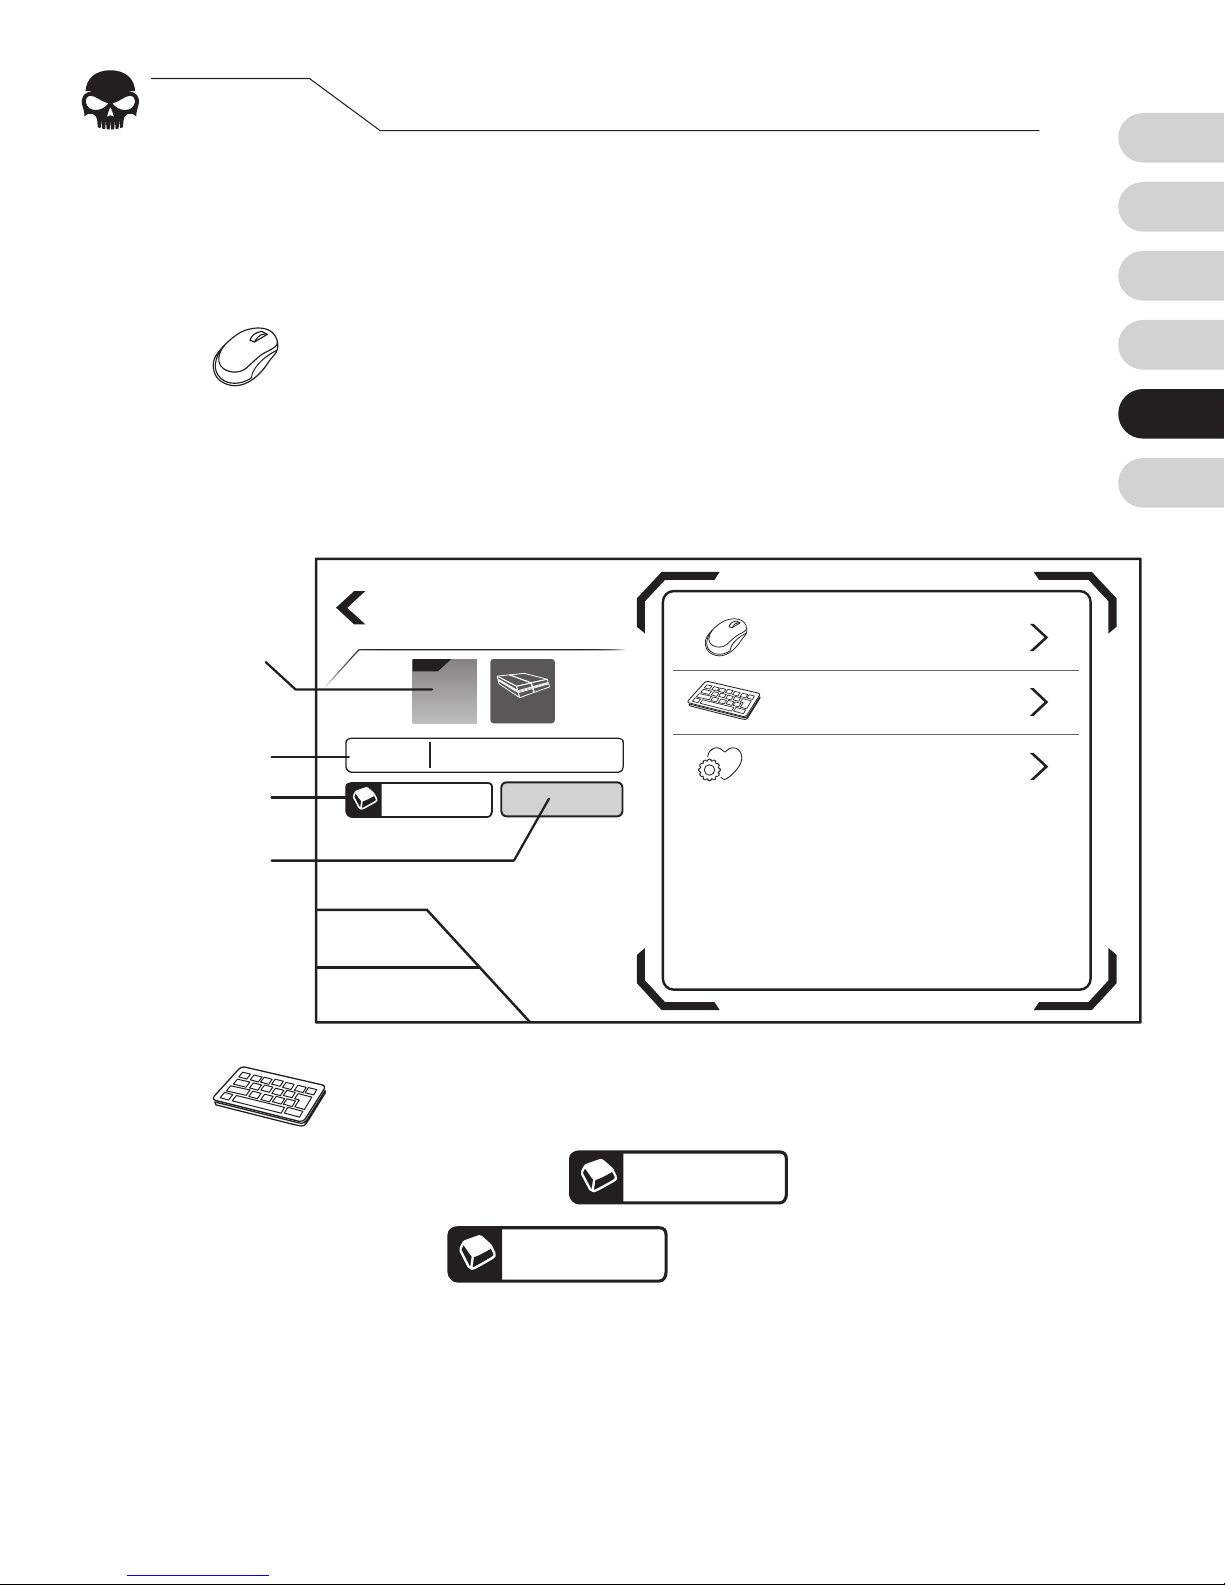
首先,在畫面左側你可以編輯:
1. Cong
圖片
2.
檔名
3.
熱鍵 4.燈號顏色
Mouse
,對滑鼠相關的功能編輯:
1.
靈敏度
2.
盲區
3.
曲線
→ 編輯完成可按
Save
儲存
Keyboard
,編輯手把對應的按鍵,方法如下:
1.
按下要編輯的按鍵
G
2.
當它顯示為
Listening...
時,按下滑鼠或鍵盤上
欲設置的鍵,即修改完成
3.
重複以上步驟直到完成編輯
→ 編輯完成可按
Save
儲存
STEP. 5
編輯
Cong
Cancel
Save
Edit Config
Keyboard
Preferences
Mouse
Config 1
F2
Elit e
PS4
Cong
圖片
檔名
熱鍵
燈號顏色
Page 48
EN
FR
DE
ES
TW
CN
48
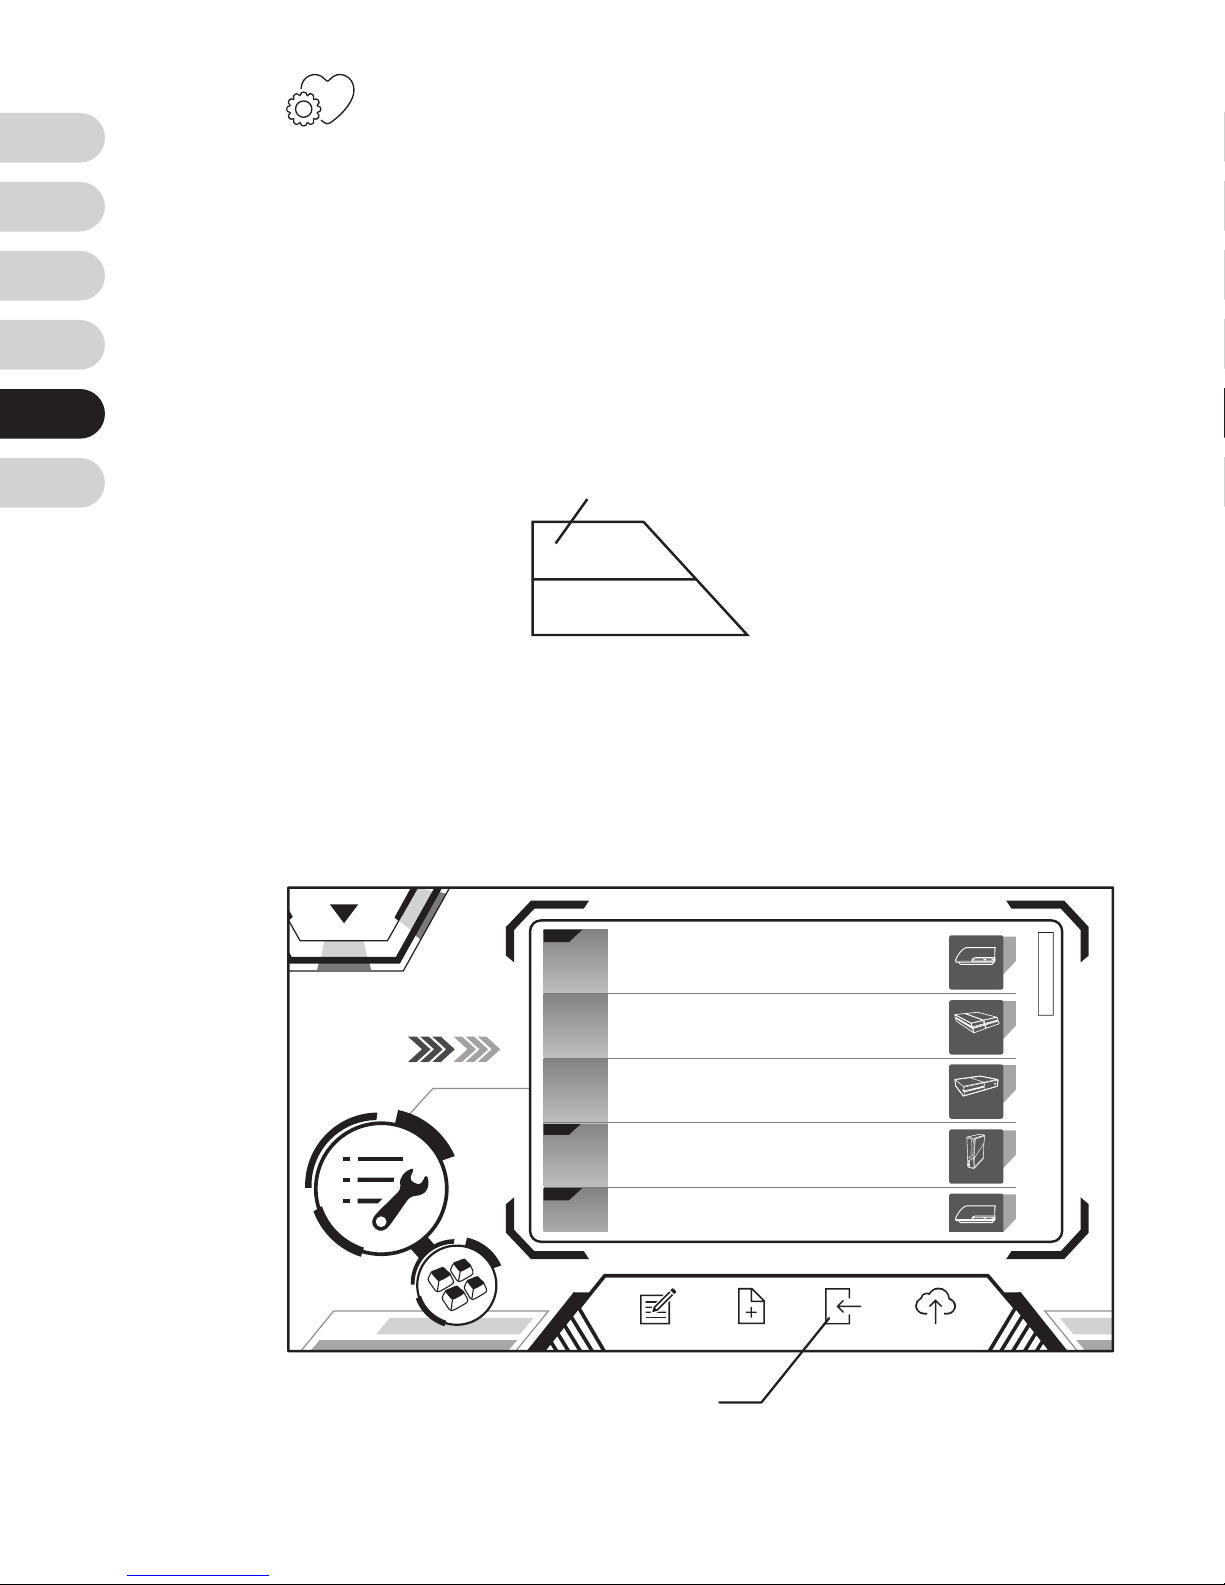
偏好設定,待設備設定成慣用的按鍵後即可
調整:
1.
射速加強
2.
反轉
Y
軸
3.
狙擊屏息
(Elite Cong
限定
)
4.
反後座力
(Elite Cong
限定
)
當所有項目都編輯完成,別忘了按下儲存鈕,再至
載入頁面載入剛剛設定好的
Cong
。基礎的設置
就大功告成了,可以盡情地使用滑鼠及鍵盤啦!
Save
Cancel
儲存
Config
Elit e
Elit e
Elit e
Config 1
Config 2
Config 3
Config 4
Config 5
Xbox 360
PS3
PS4
Xbox One
NewEdit BackupLoad
載入
Page 49
EN
FR
DE
ES
TW
CN
49
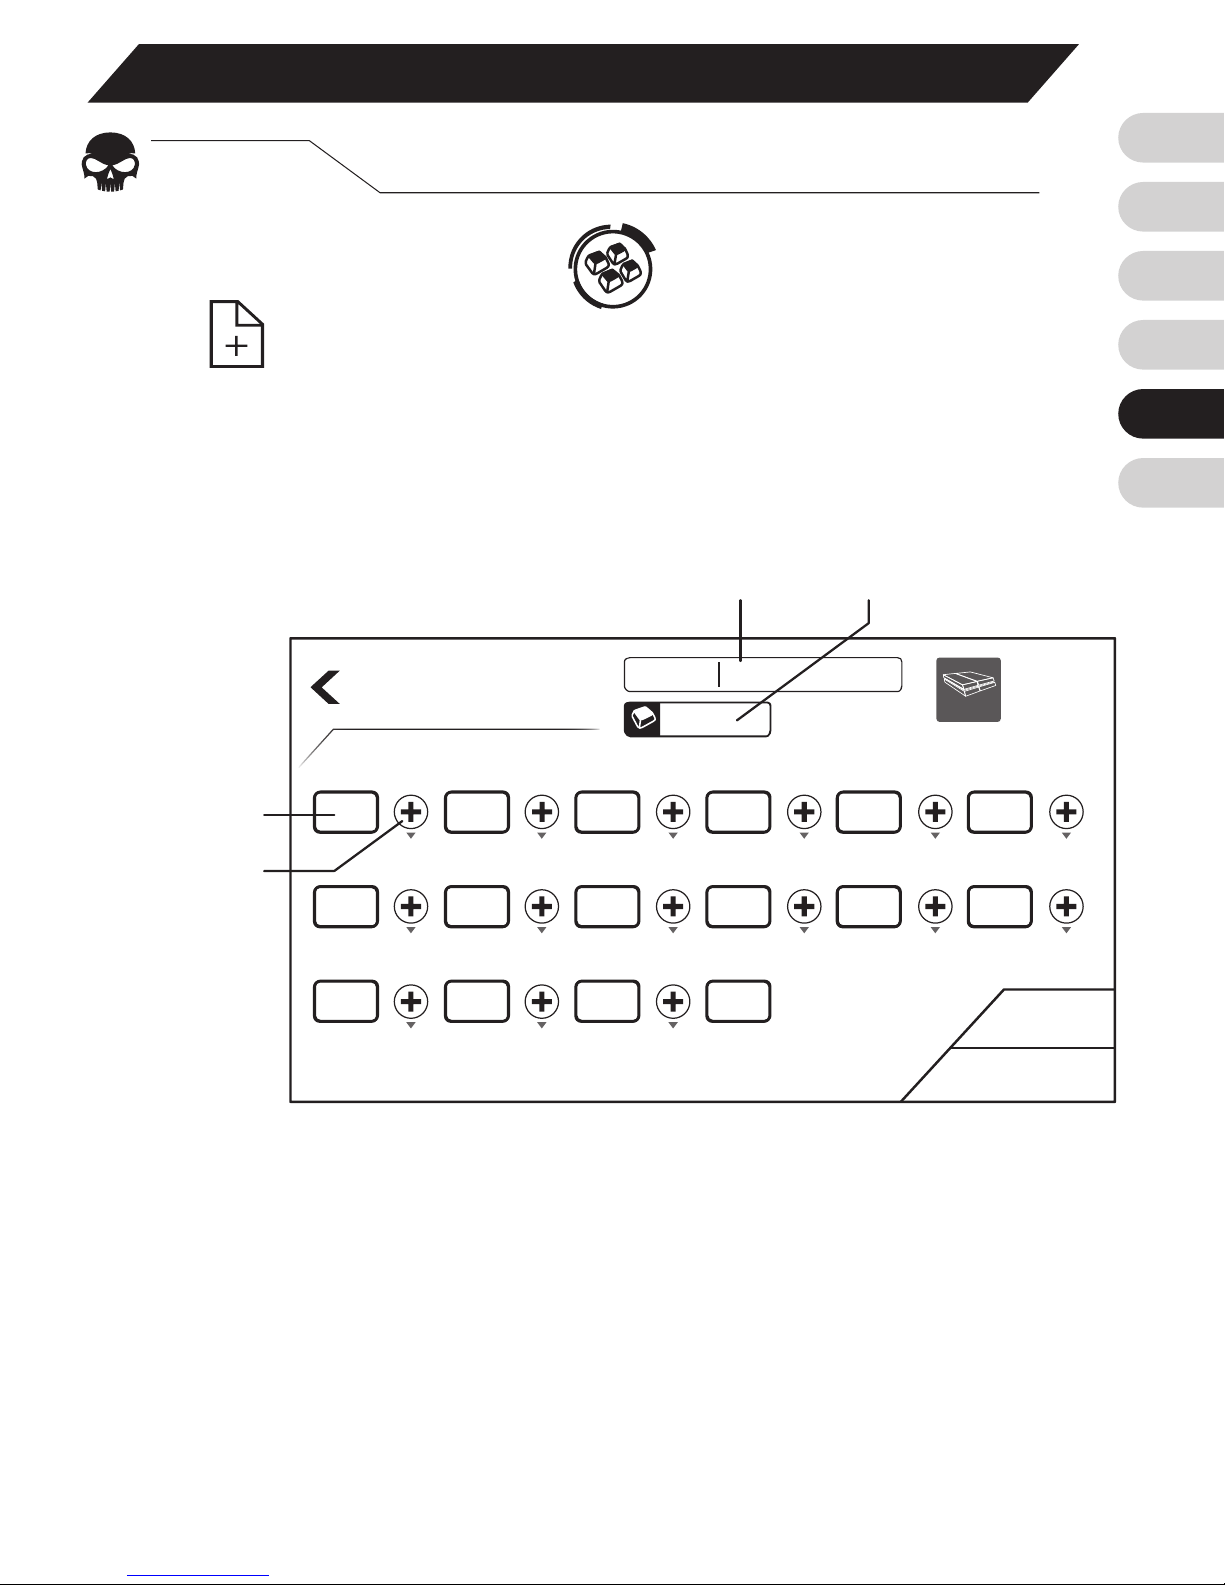
在主頁點選巨集設置 ,接著點擊下方的新增
來新增一個巨集,新增時僅需要選擇平台,新
建完成後就依照以下步驟來設置。
1.
畫面上方可設定檔名及熱鍵
其他設置
STEP. 1
巨集設置
Create New
Cancel
Save
PS4
Macro 01
熱鍵檔名
指令框
時差設置
2.
點選一個指令框,按下滑鼠或鍵盤上的任一鍵,
接著會跳出視窗,選擇該指令是”按下”或是”彈起
”
的動作,點選儲存即完成一個指令的設置。
Page 50
EN
FR
DE
ES
TW
CN
50
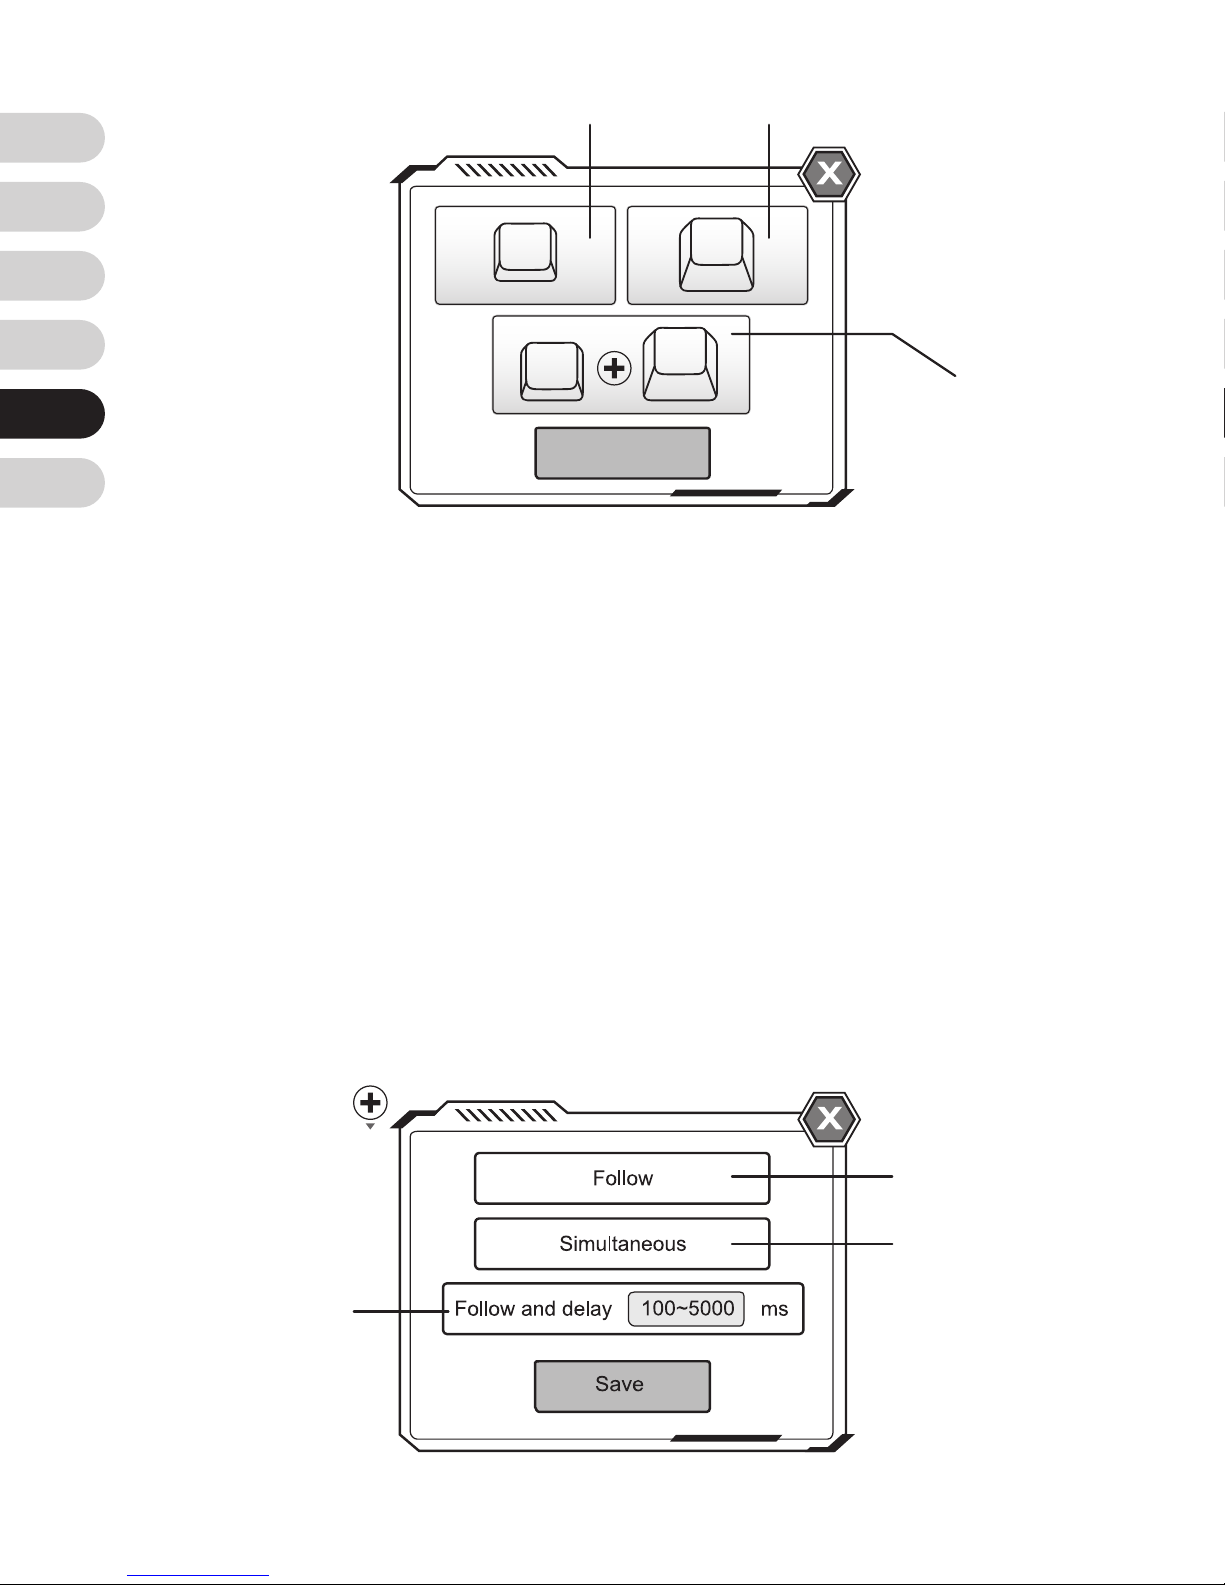
3.
每兩個指令框中間會有一個時差設置,點擊後
可設置前一個指令和下一個指令的間隔時間,分為
三種 :
接續 :
同步 :
接續且延遲 :
指令執行完畢接著下一個指令
兩個指令同時執行
經過延遲的時間後才執行下一
個指令
Save
K
K
K
K
按下
按下+彈起
彈起
接續
同步
接續且延遲
Page 51

EN
FR
DE
ES
TW
CN
51
4.
重複上述步驟來完成一組屬於你自己慣用的巨
集吧!透過巨集,相信你會在遊戲中更加得心應
手!
這份
Quick Guide
沒辦法解答你全部的疑問嗎?想
知道更多進階的功能嗎?請上我們的產品網站來了
解更多!
www.brookaccessory.com
最後,我們誠摯地邀請您註冊
Brook
的會員,在
這裡你可以得到產品的第一手消息並獲得完整的售
後服務!
Page 52
EN
FR
DE
ES
TW
CN
52
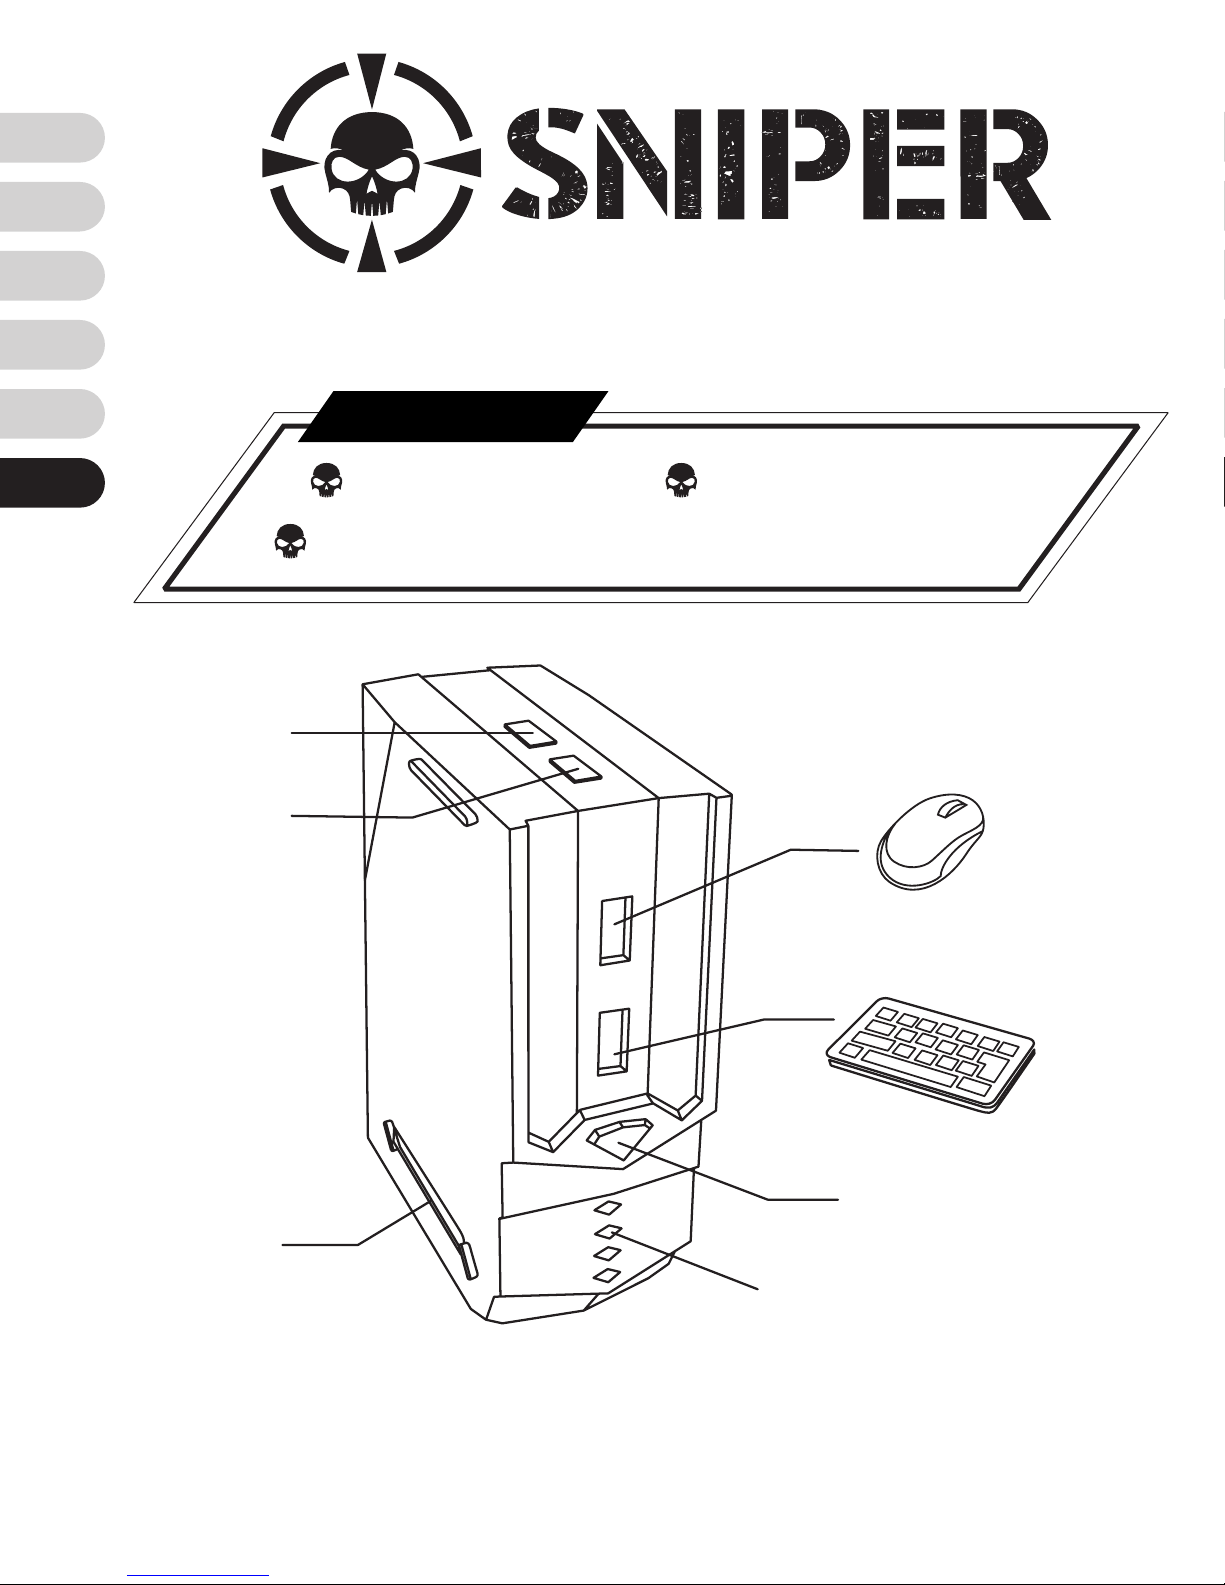
Brook Sniper x1
快速导览手册
x1
USB
线
x1
产品内容物
M
o
u
s
e
F
n
BT
K
e
y
b
o
a
rd
Fn
功能键
BT
蓝芽
Cong
灯
鼠标
键盘
Home
主机显示灯:
PS3/ PS4-
蓝色灯
Xbox One/ Xbox 360-
绿色灯
- Setup from your phone -
Page 53
EN
FR
DE
ES
TW
CN
53
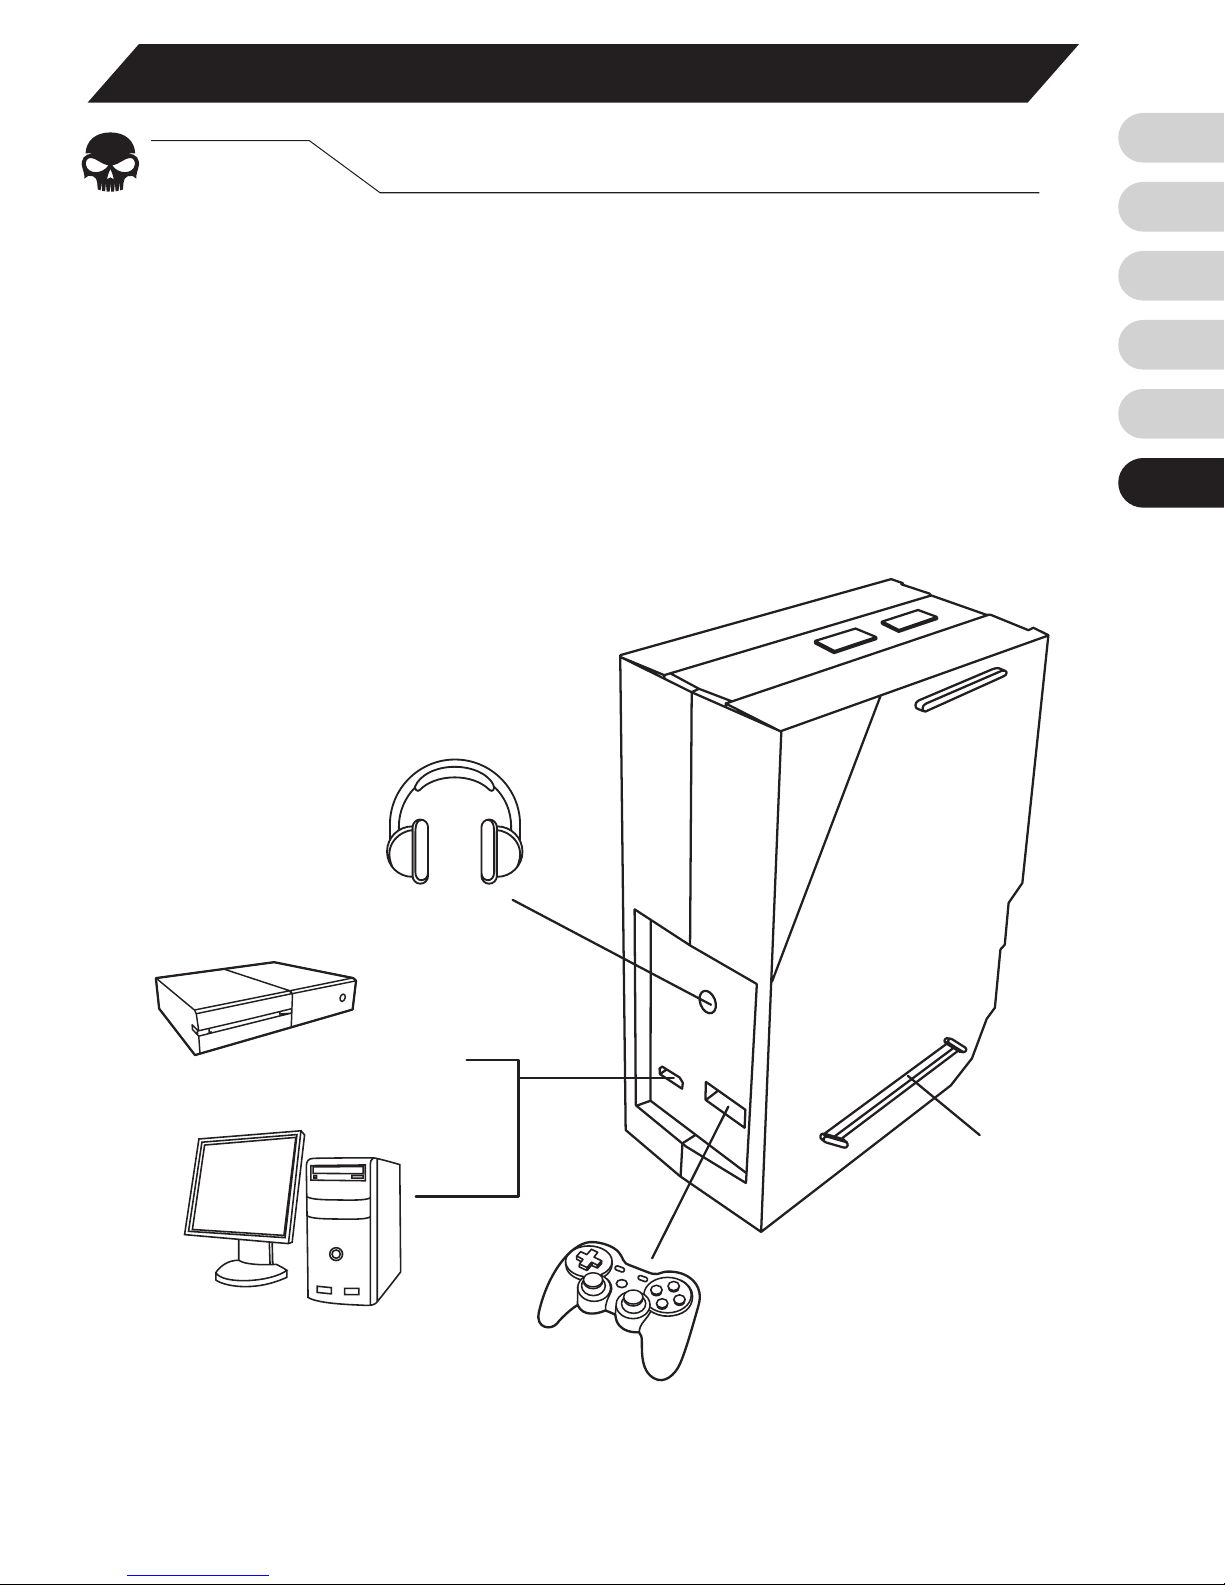
初次使用
STEP. 1
将所有外设连接
请先将您的键盘丶鼠标丶手把(非必要)丶耳机(非
必要)插上
Sniper
,并确认所有外设都连接完成。
接下来,请将
Sniper
插上家用主机,并开启手机
蓝芽与
Sniper
配对。
BT
F
n
Cong
灯
家用主机
PC
耳机
手把
Page 54
EN
FR
DE
ES
TW
CN
54
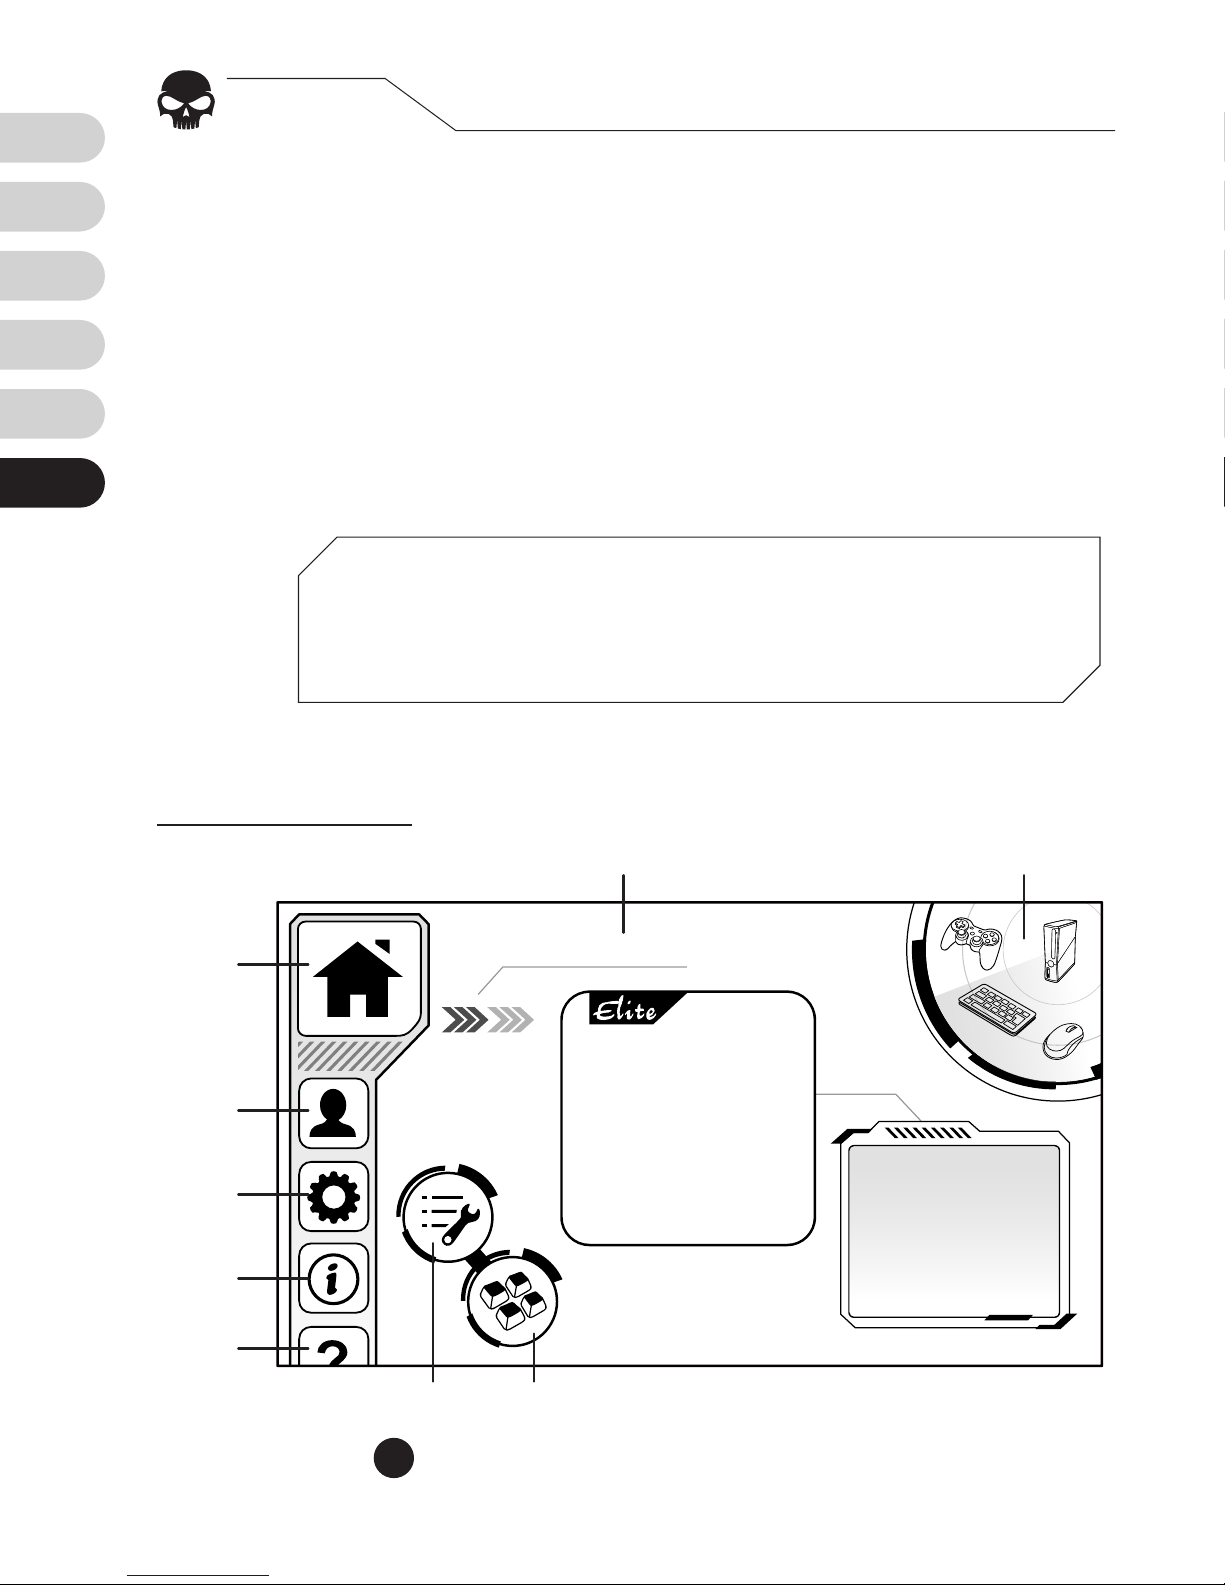
外设连接完成後,请至
App Store/GooglePlay
下载
Brook Sniper App
。
开启过程中请不要中断网络连线及蓝芽连线,进入
首
页後,可以透过右上角的
装置显示区
来了解外设
连接的状况,再来就可以准备开始做个人化的设定。
STEP. 2
下载并开启
Brook Sniper
备注:请务必注册一个帐号以获得完整的体验,同时可享有
免费及便利的云端功能,期待你的加入!
Config Name
首
页
Cong
名称
Cong
设置 巨集设置
讯息
显示区
装置显示区
Cong
图片
会员登入
环境设定
关于
帮助
1
▼
首页
页面图
Page 55
EN
FR
DE
ES
TW
CN
55
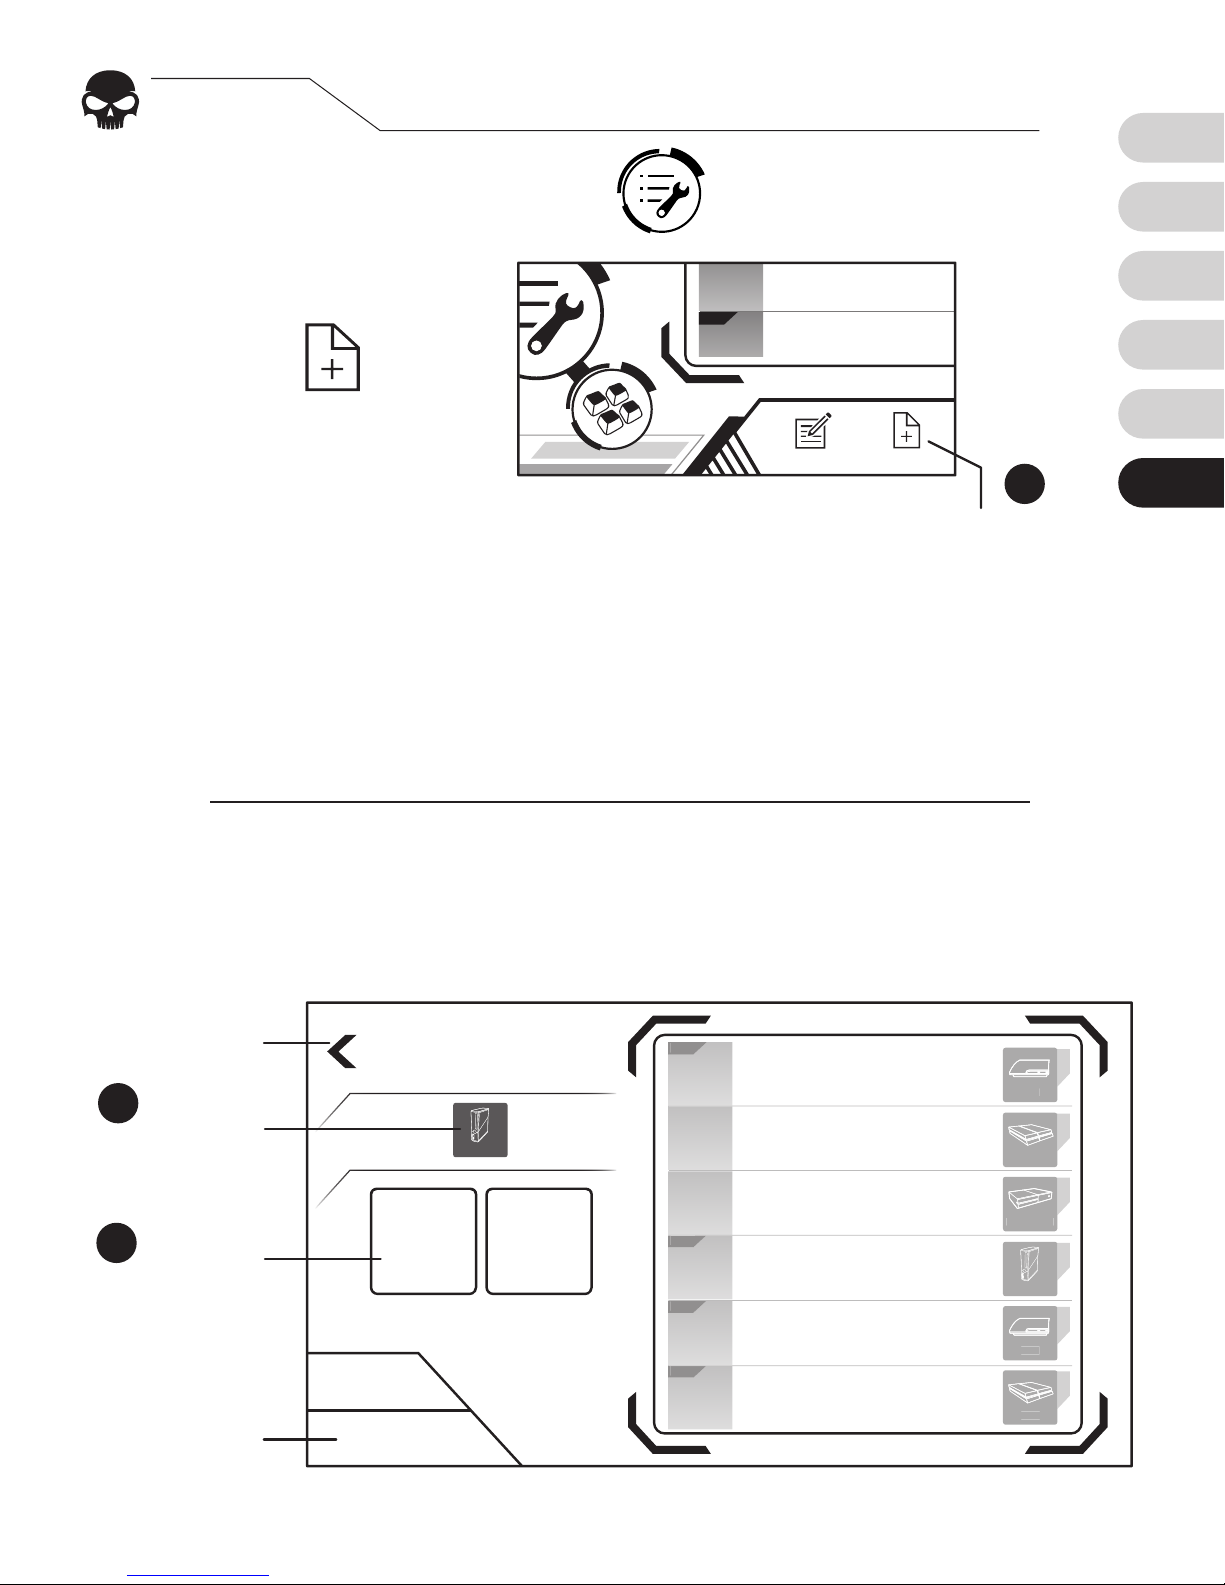
点击首页的
Cong
设置
接着点击下方的
New
来新
增一个
Cong
STEP. 3
新增
Cong
[1]
Elite Cong
提供部分热门游戏最优化的盲区及曲线设定值,
提供较便利的选项及更多的功能,请确认欲进行的游戏是否有
Elite
版本,否则请选择
Custom
。
1.
2
2.
选择一个家用主机平台
再选择
Custom
或
Elite
[1]
版本
Cong
,就完成了
第一个
Cong
的建立。(请务必选择正确的平台及
Cong
版本,否则可能会无法顺利进行游戏
)
3.
4.
Elit e
Config 4
Config 5
NewEdit
Create New
Custom Elite
Xbox 360
Cancel
上一页
选家用
主机平台
选版本
取消
3
4
Elit e
Elit e
Elit e
Elit e
Config 1
Config 2
Config 3
Config 4
Config 5
Config 6
Xbox 360
PS3
PS4
Xbox One
PS3
PS4
Save
新增
Page 56
EN
FR
DE
ES
TW
CN
56
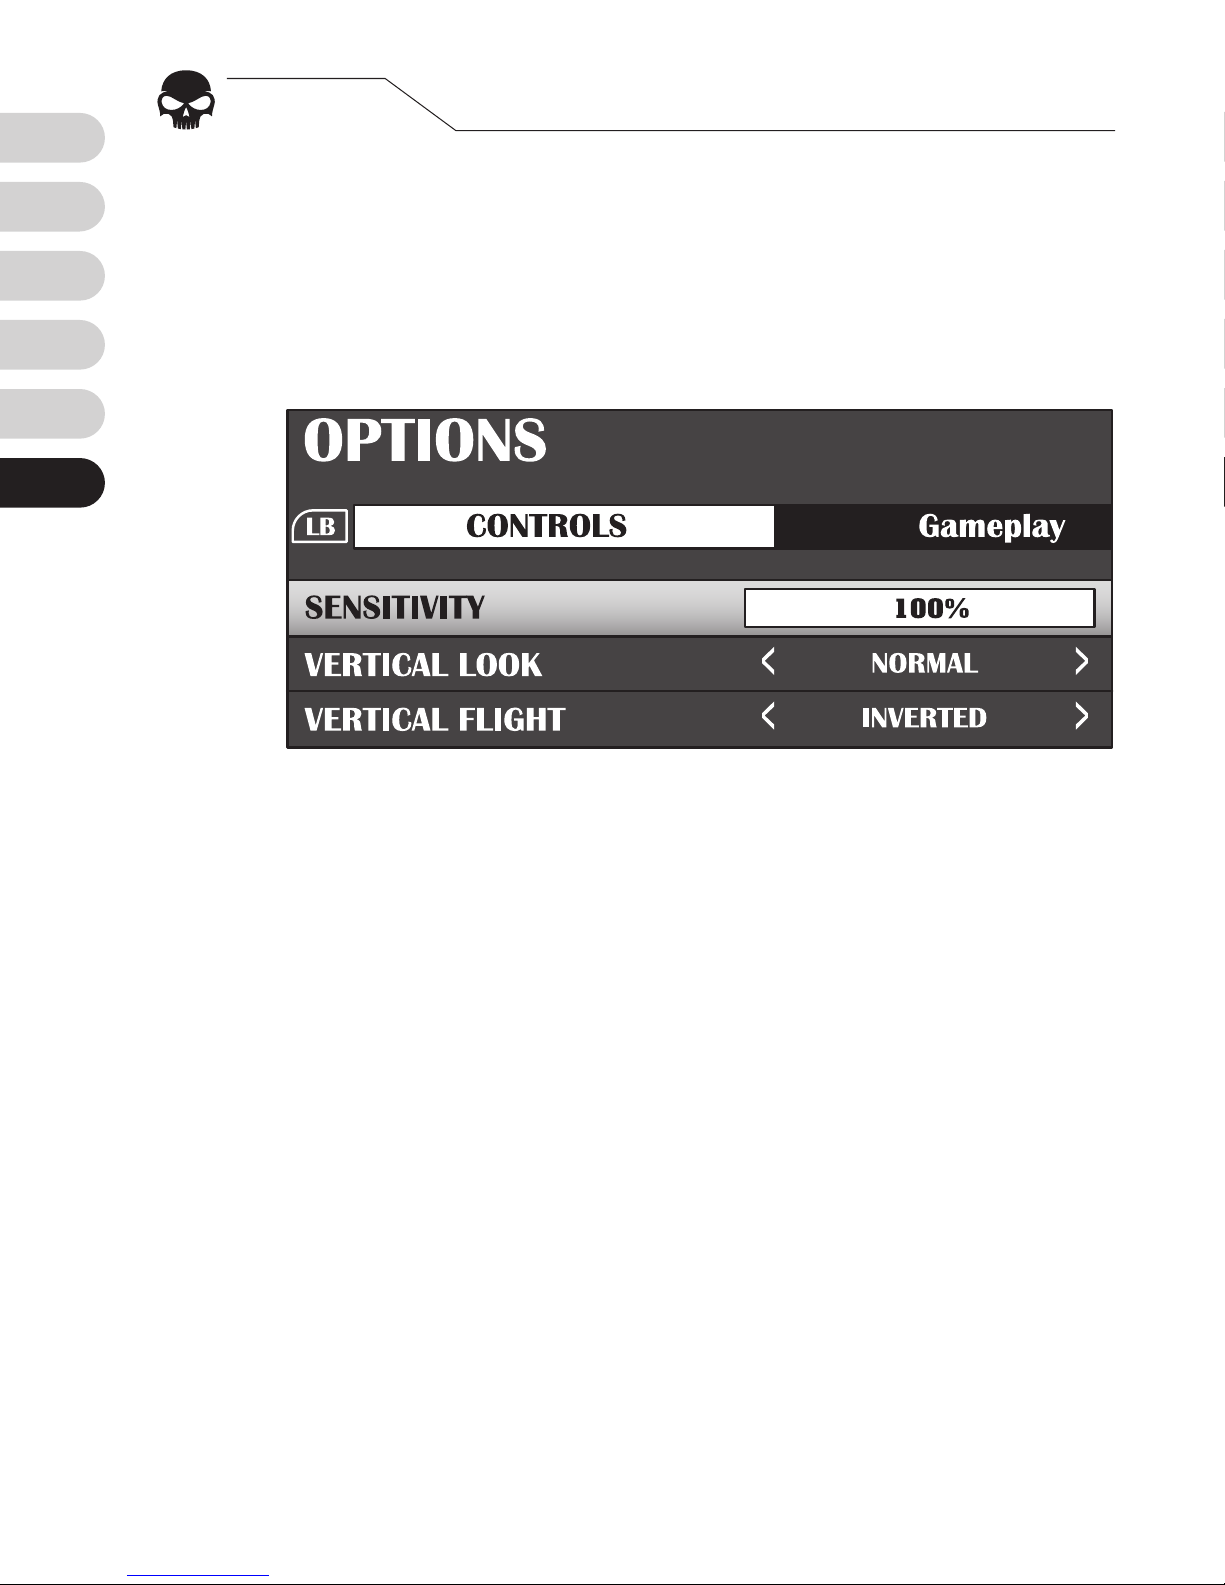
为了让
Sniper
能将鼠标讯号转换功能达到最佳化,
请先将游戏中的灵敏度选项调到最快(最快的名称
会是
100%,fastest,Maximum
或
Insane…
等
)
STEP. 4
将游戏中的灵敏度选项调至最高
Page 57
EN
FR
DE
ES
TW
CN
57
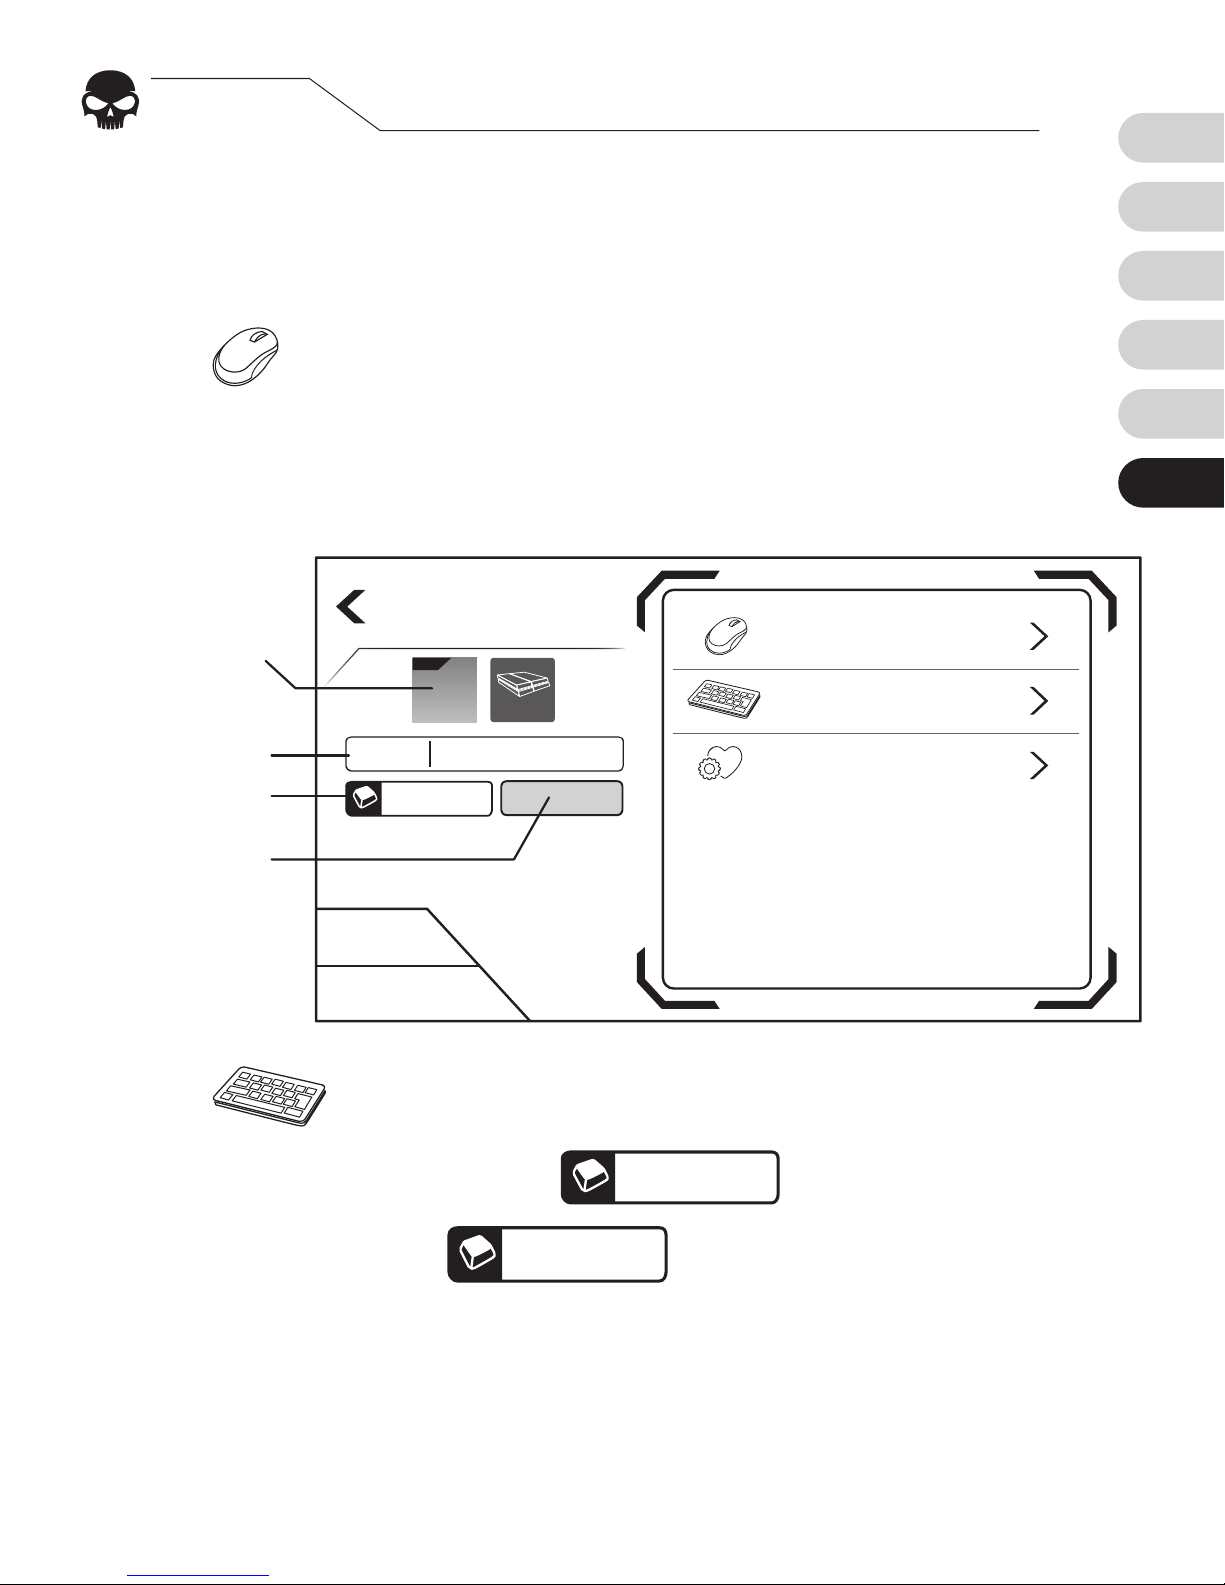
首先在画面左侧你可以编辑:
1. Cong
图片
2.
档名
3.
热键
4.
灯号颜色
Mouse
,
对鼠标相关的功能编辑
:
1.
灵敏度
2.
盲区
3.
曲线
→
编辑完成可按
Save
储存
KeyBoard
编辑手把对应的按键,方法如下:
1.
按下要编辑的按键
G
2.
当它显示为
Listening...
时,按下鼠标或键盘上
欲设置的键,即修改完成
3.
重复以上步骤直到完成编辑
→
编辑完成可按
Save
储存
STEP. 5
编辑
Cong
Cancel
Save
Edit Config
Keyboard
Preferences
Mouse
Config 1
F2
Elit e
PS4
Cong
图片
档名
热键
灯号颜色
Page 58
EN
FR
DE
ES
TW
CN
58
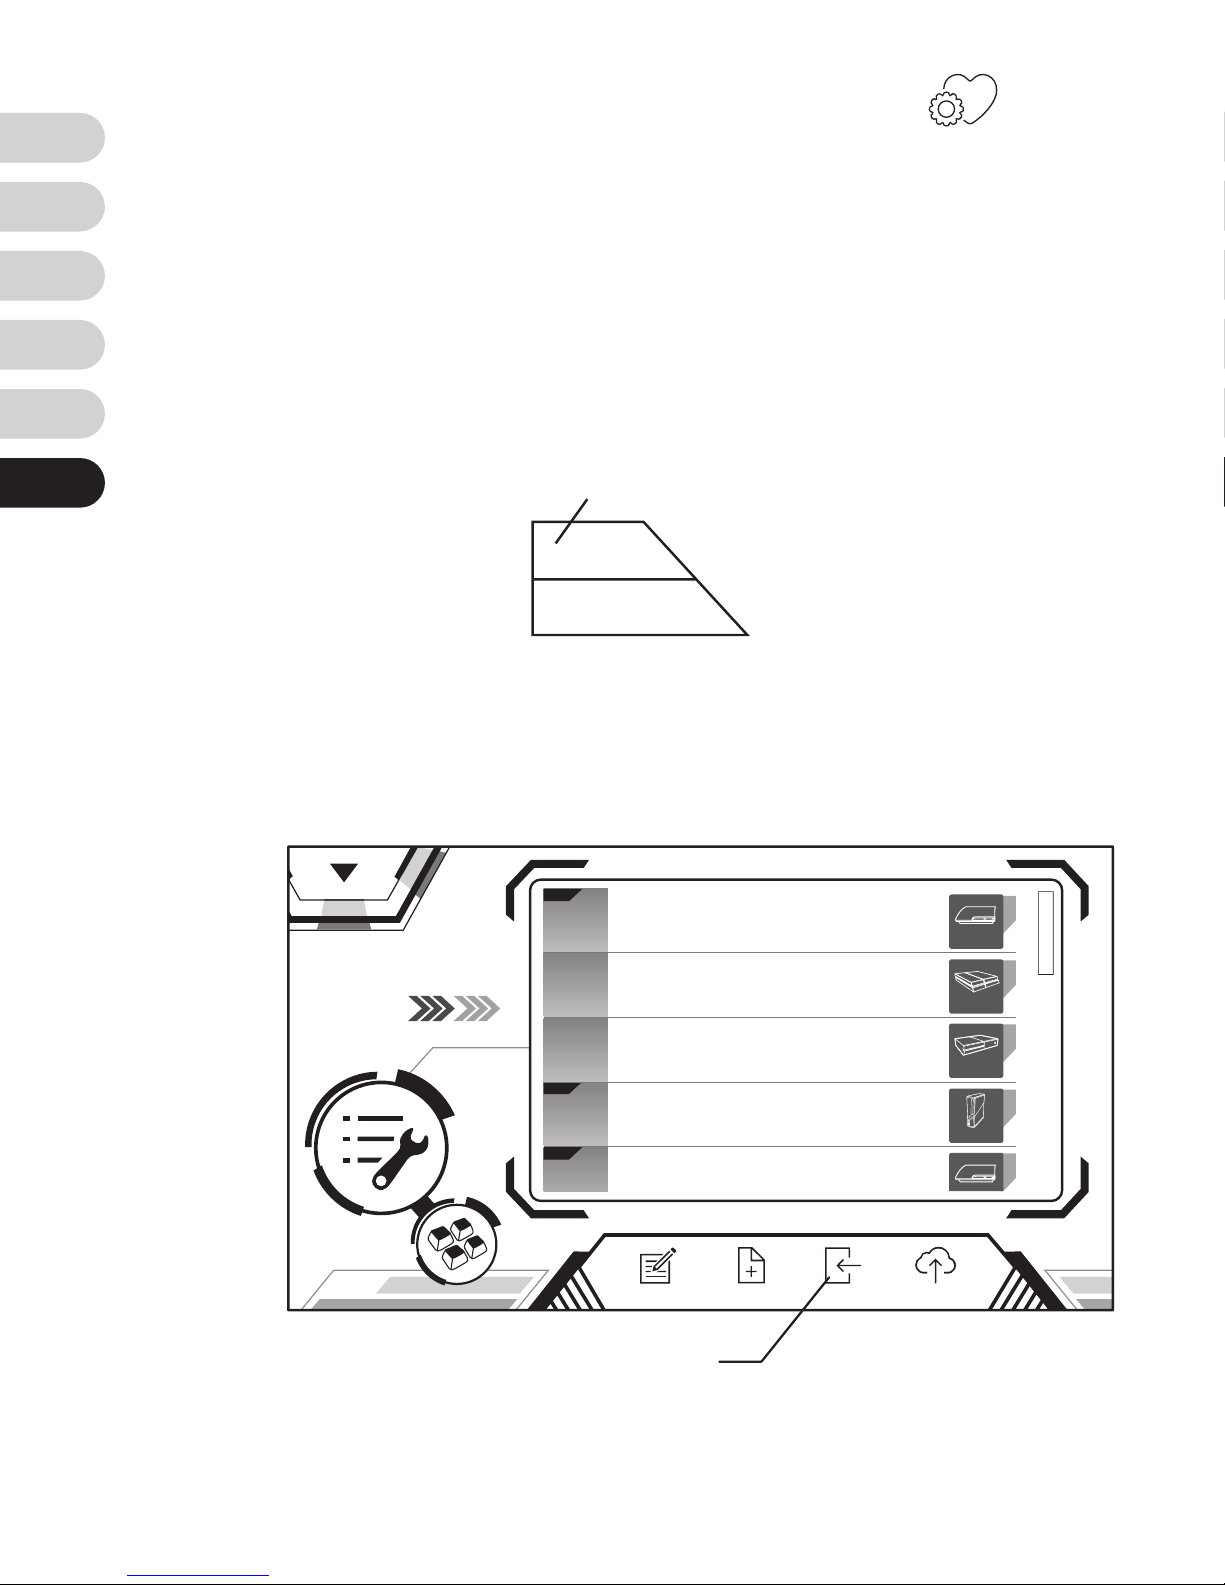
将外设设定成惯用的按键後,最後则是 偏好
设定:
1.
射速加强
2.
反转
Y
轴
3.
狙击屏息
(Elite Cong
限定
)
4.
反後座力
(Elite Cong
限定
)
当所有项目都编辑完成,别忘了按下储存钮及读取
钮。基础的设置就大功告成了!
Config
Elit e
Elit e
Elit e
Config 1
Config 2
Config 3
Config 4
Config 5
Xbox 360
PS3
PS4
Xbox One
NewEdit BackupLoad
读取
Save
Cancel
储存
Page 59
EN
FR
DE
ES
TW
CN
59
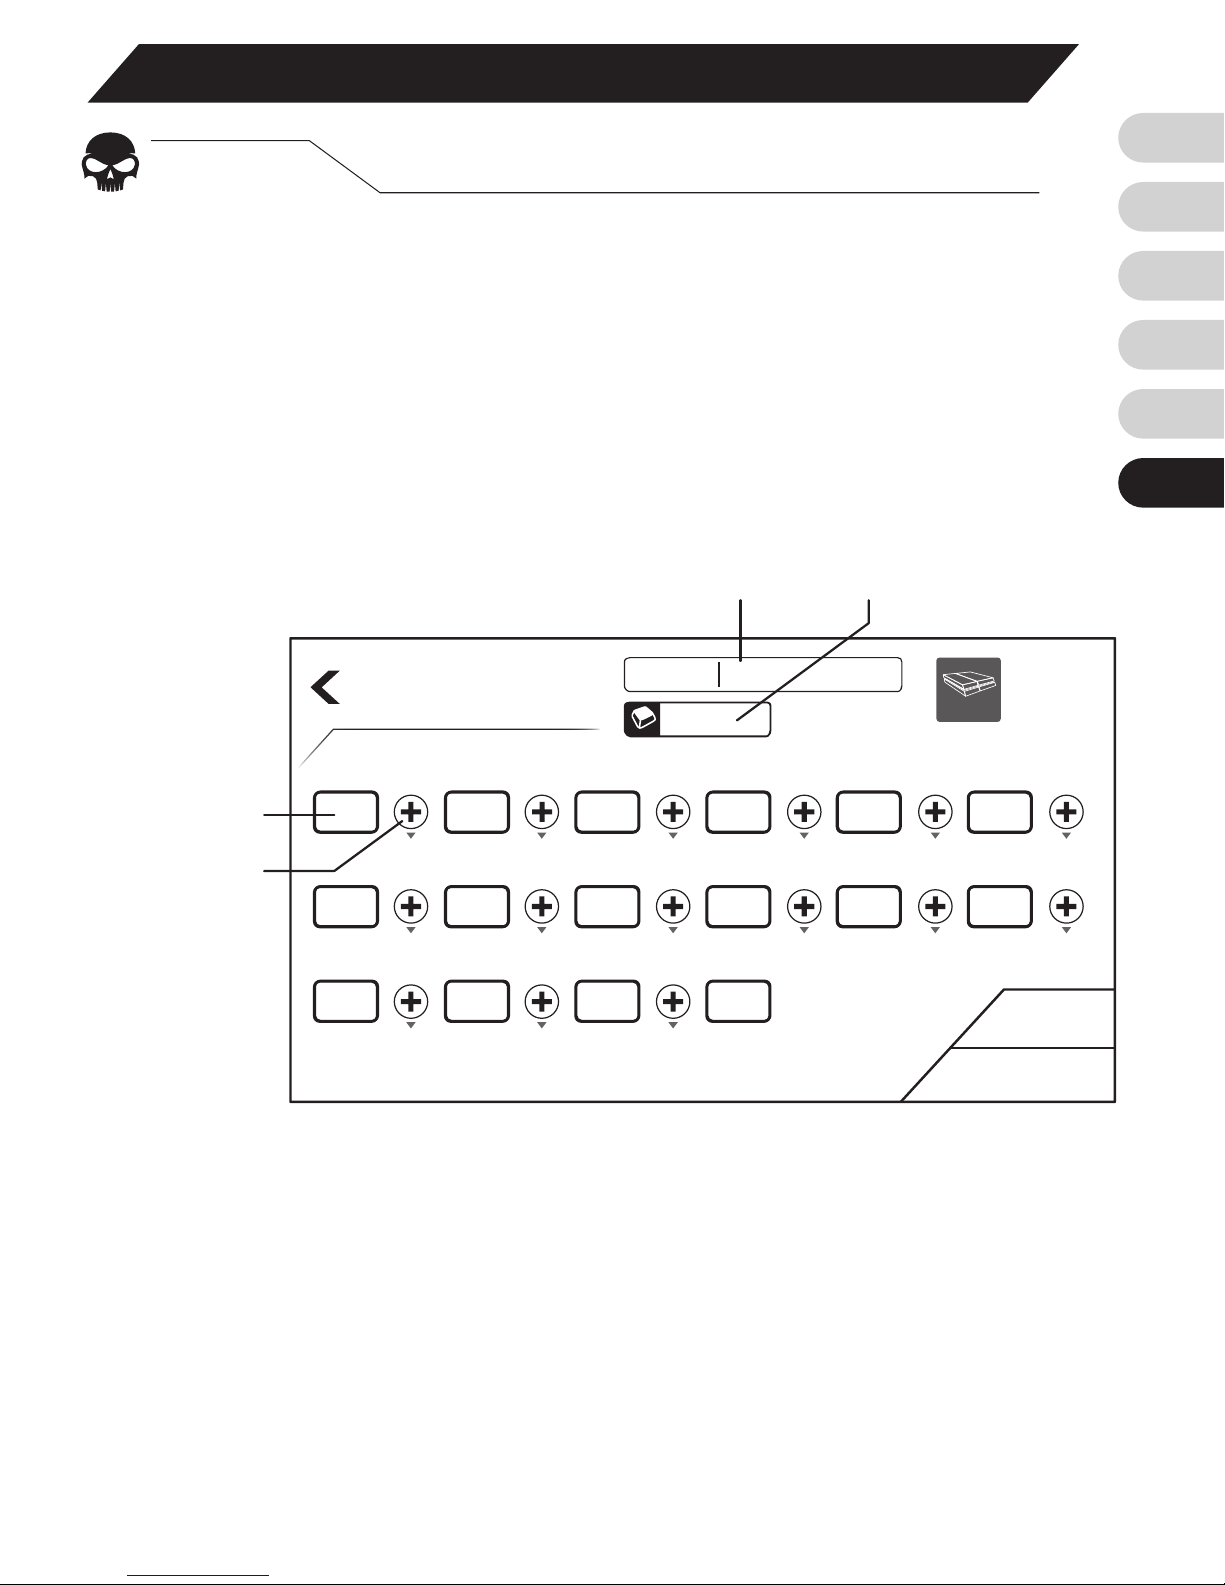
在主页点选巨集设置,接着点击下方的新增来新增
一个巨集,新增时仅需要选择平台,新建完成後就
依照以下步骤来设置。
1.
画面上方可设定档名及热键
其他设置
STEP. 1
巨集设置
Create New
Cancel
Save
PS4
Macro 01
热键档名
指令框
时差设置
2.
选一个指令框,按下鼠标或键盘上的任一键,
接着会跳出视窗,选择该指令是”按下”或是”弹起
”
的动作,点选储存即完成一个指令的设置。
Page 60
EN
FR
DE
ES
TW
CN
60
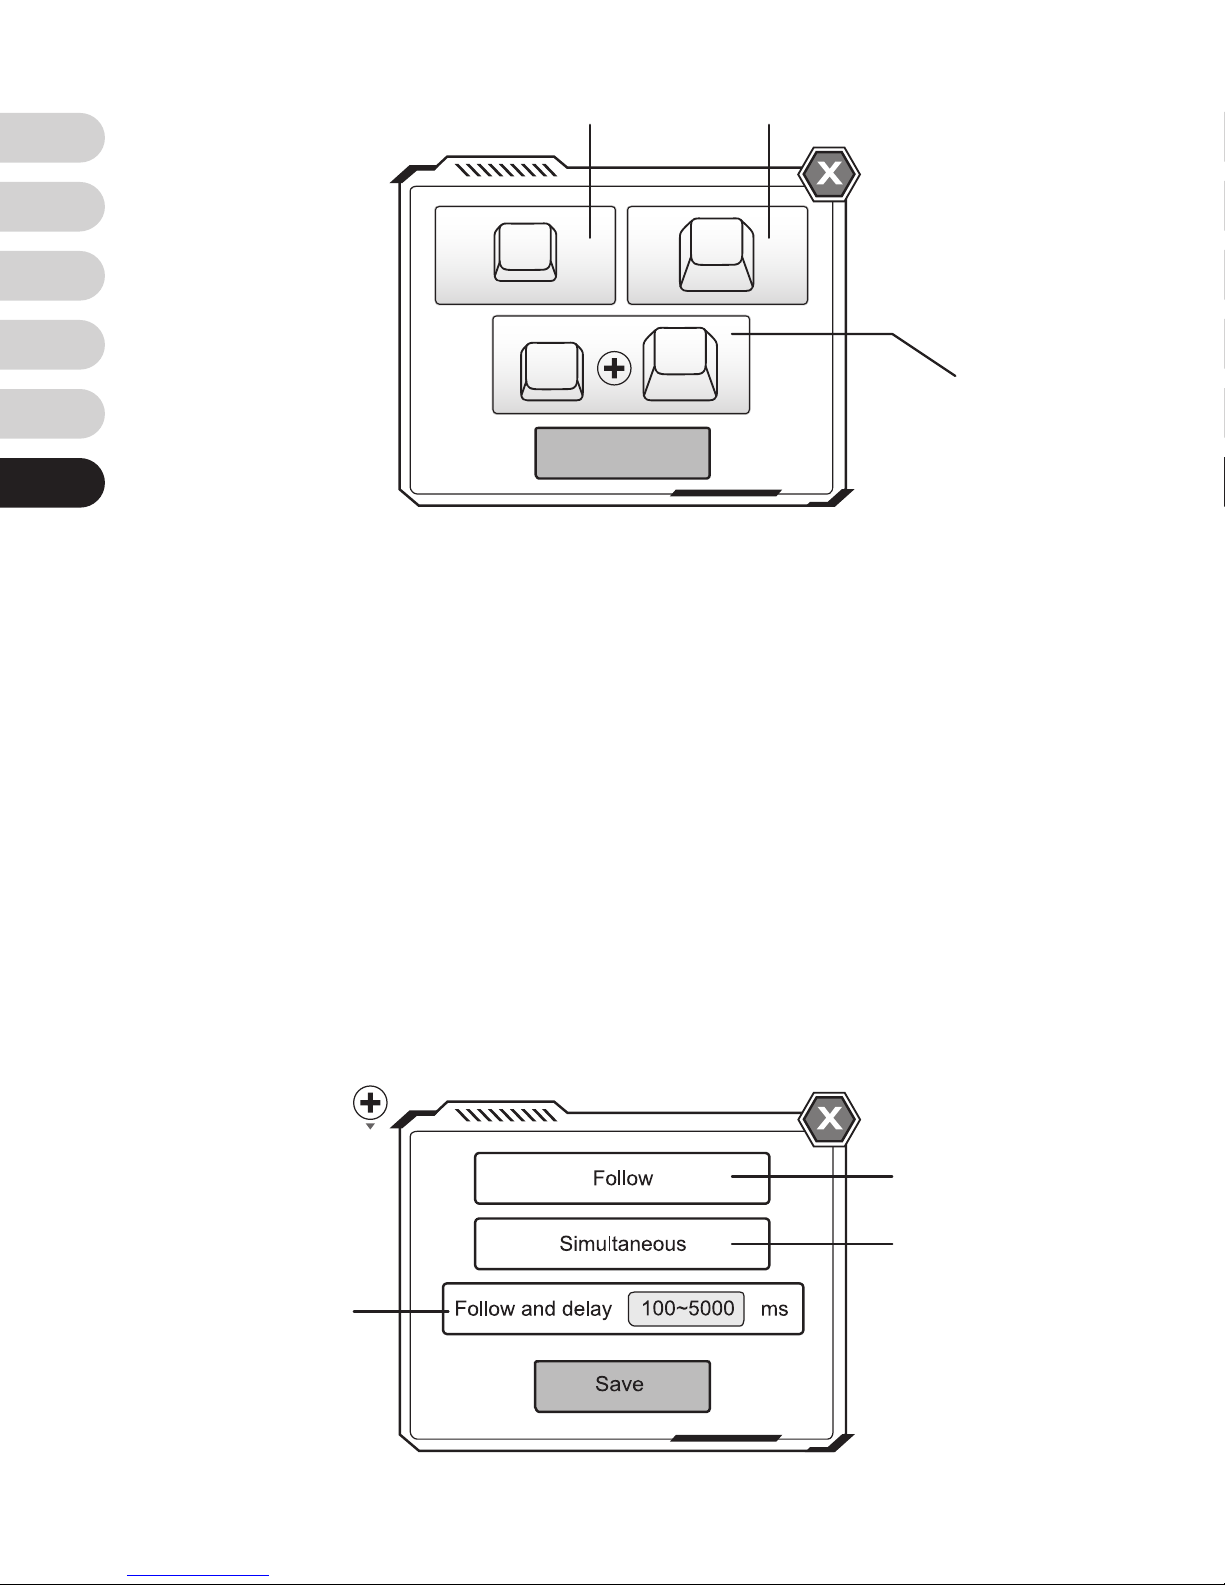
3.
每两个指令框中间会有一个时差设置,点击後
可设置前一个指令和下一个指令的间隔时间,分为
三种
:
接续
:
同步
:
接续且延迟
:
指令执行完毕接着下一个指令
两个指令同时执行
经过延迟的时间後才执行下一
个指令
Save
K
K
K
K
按下
按下+弹起
弹起
接续
同步
接续且延迟
Page 61

EN
FR
DE
ES
TW
CN
61
4.
重复上述步骤来完成一组属於你自己惯用的巨
集吧!透过巨集,相信你会在游戏中更加得心应
手!
这份
Quick Guide
没办法解答你全部的疑问吗?想
知道更多进阶的功能吗?请上我们的产品网站来了
解更多!
www.brookaccessory.com
最後,我们诚挚地邀请您注册
Brook
的会员,在
这里你可以得到产品的第一手消息并获得完整的售
後服务!
Page 62

62
NOTE
This equipment has been tested and found to comply with the limits for a Class B digital
device, pursuant to part 15 of the FCC Rules. These limits are designed to provide
reasonable protection against harmful interference in a residential installation.
This equipment generates, uses and can radiate radio frequency energy and, if not
installed and used in accordance with the instructions, may cause harmful interference to
radio communications. However, there is no guarantee that interference will not occur in a
particular installation.
FCC Statement
This device complies with part 15 of the FCC Rules. Operation is subject to the following
two conditions:
(1) This device may not cause harmful interference, and
(2) this device must accept any interference received, including interference that may
cause undesired operation.
Page 63

63
If this equipment does cause harmful interference to radio or television reception, which
can be determined by turning the equipment off and on, the user is encouraged to try to
correct the interference by one or more of the following measures:
•
Reorient or relocate the receiving antenna.
•
Increase the separation between the equipment and receiver.
•
Connect the equipment into an outlet on a circuit different from that to which the receiver
is connected.
•
Consult the dealer or an experienced radio/TV technician for help.
Changes or modications not expressly approved by the party responsible for compliance
could void the user’s authority to operate the equipment.
Page 64

www.brookaccessory.com
 Loading...