


SD-TOP
Segreteria telefonica digitale
Digital answering machine
Contestador
Répondeur téléphonique
Automatischer Anrufbeantworter
1
IT
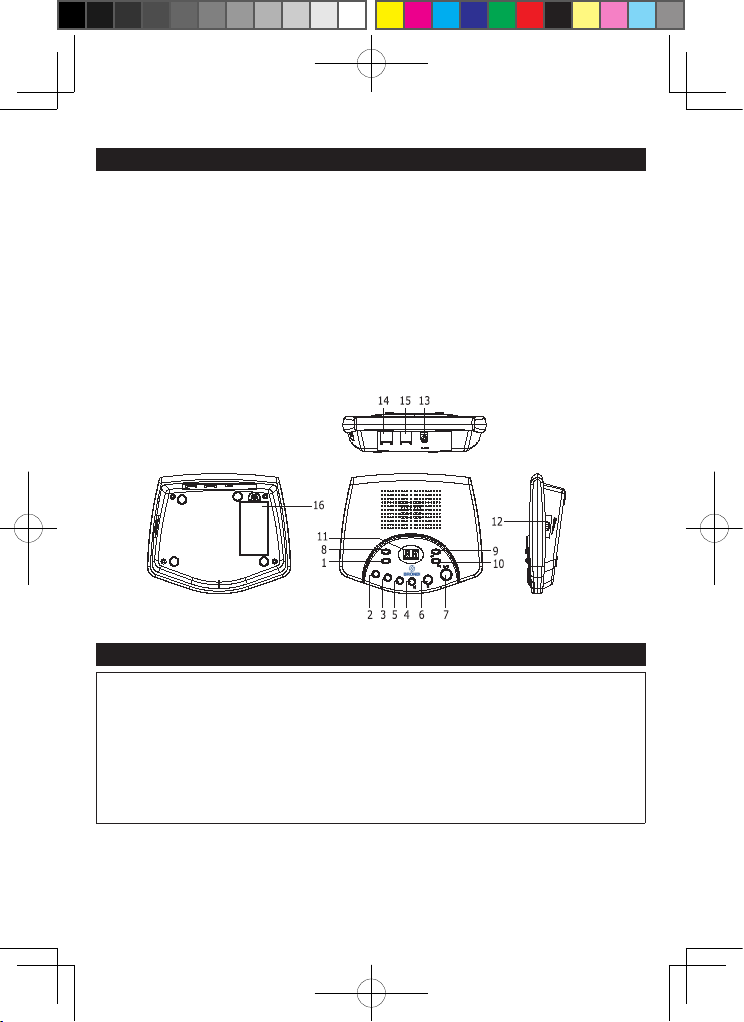
LOCAZIONE DEI COMANDI
FRONTE
1. Tasto ON/OFF 7. Tasto PLAY/Pause
2. Tasto OGM1 (Messaggi in uscita 1) 8. Tasto DELETE
3. Tasto OGM2 (Messaggi in uscita 2) 9. Tasto RING
/◄◄
4. Tasto SPK/MONI 10. Tasto CODE
/►►
5. Tasto MEMO 11. LED Display
6. Tasto STOP
LATO
12. Manopola scorrevole del Volume
RETRO
13. Connettore DC (9V d`entrata) 14. Connettore TO LINE
15.Connettore TO PHONE
16.Comparto batteria(fondo dell’unità)
INSTALLAZIONE
PRECAUZIONI PER LA BATTERIA
Seguite queste precauzioni quando utilizzate le batterie in questo apparecchio:
1. Usate solo batterie da 9 Volt (6LR61 o dello stesso tipo).
2. Assicuratevi di installare la batteria secondo la giusta polarità. Batterie posizionate al contrario
possono danneggiare l’apparecchio.
3. Se l’apparecchio non è utilizzato per un lungo periodo di tempo, rimuovete le batteria al fine di
prevenire danneggiamenti o ferimenti da una possibile fuoriuscita di liquido delle batterie.
4. Non provate a ricaricare batterie non ricaricabili; possono surriscaldarsi ed esplodere (seguite le
istruzioni dei produttori delle batterie.).
Questa sezione e` stata designata per fornire una guida di referenza per l`impostazione della segreteria
telefonica.
1.Collegate un capo del cavo telefonico fornito nell’ingresso TO LINE. Inserite l’altro capo nella presa
telefonica a parete. Potete collegare l’altro telefono a questa segreteria telefonica con un cavo
telefonico corto. Inserite un capo del cavo telefonico corto nell’ingresso TO PHONE, e l’altro nel
ANN1
ANN2
MEMO
ASC
ON/OFF
CANC
PIN/
/SQUIL
TELLINEA
DC 9V

2
IT
connettore++ del telefono.
2.Inserite la piccola spina alla ne dell’adattatore AC nel connettore del DC 9V situato nella parte
posteriore dell’unità. Utilizzate esclusivamente l’adattatore AC con centro positivo fornito con l’unità..
3.Collegate la spina dell’adattatore AC in una presa a muro standard. Una volta collegato, il display
conterà da 0 a 5. Dopo un lungo bip, l’unità mostrerà la scritta “ – “ ad indicare che l’unità è accesa,
ma non è ancora impostata per rispondere, oppure mostrerà “ Lo” ad indicare che la batteria è
completamente esaurita, ha poca carica oppure non è istallata.
4.Durante l’assenza di corrente elettrica AC, la batteria a 9V provvede a fornire energia, così che l’unità
possa mantenere le informazioni in memoria. Tuttavia, l’unità non può rispondere alle chiamate in
arrivo in assenza di corrente elettrica AC.
OPERAZIONE
REGISTRARE UN MESSAGGIO IN USCITA (OGM)
Questa unità può registrare due tipi di messaggi: OGM1 è utilizzato quando si vuole che il chiamante
ascolti l’ OGM e poi lasci un messaggio, l’ OGM2 è utilizzato quando si vuole solo che il chiamante
ascolti il proprio OGM, ma non lasci un messaggio. Il tempo massimo di OGM per ogni messaggio è
30 secondi. Il tempo minimo è 4 secondi. Se non si è registrato un OGM1 e /o un OGM2, la segreteria
telefonica non può essere messa in funzione.
REGISTRARE OGM1 (MESSAGGIO IN USCITA 1)
Premere e tenere premuto il tasto OGM1 approssimativamente per due secondi, finché non viene
prodotto un lungo bip. Il display conteggerà il tempo restante, perciò iniziate a registrare il vostro
messaggio parlando con un tono di voce normale.
Quando nite di registrare, rilasciate il tasto OGM1. Verrà prodotto un breve bip ed il messaggio che
avete appena registrato sarà riprodotto una volta. Assicuratevi che il volume sia al livello che desiderate.
Per registrare un nuovo messaggio, ripetete i passi 1 e 2.
REGISTRARE UN OGM2 (MESSAGGIO IN USCITA 2)
Premere e tenere premuto il tasto OGM2 approssimativamente per due secondi, finché non viene
prodotto un lungo bip. Il display conteggerà il tempo restante, perciò iniziate a registrare il vostro
messaggio parlando con un tono di voce normale.
Quando nite di registrare, rilasciate il tasto OGM2. Verrà prodotto un breve bip ed il messaggio che
avete appena registrato sarà riprodotto una volta. Assicuratevi che il volume sia al livello che desiderate.
Per registrare un nuovo messaggio, ripetete i passi 1 e 2
VERICARE IL MESSAGGIO IN USCITA
Premere e rilasciare i tasti OGM1 o OGM2 ed il Messaggio in uscita selezionato verrà riprodotto. Premere
il tasto STOP per fermare la riproduzione prima che venga raggiunta la ne del messaggio.
NOTE:
Se l’unità rileva un tono di chiamata, silenzio, oppure il segnale di occupato, l’unità riattaccherà e non
registrerà il messaggio.
L’unità si interromperà se verrà alzata la cornetta del telefono.
Quando la memoria è piena, la scritta “ FU “ apparirà sul display.
Quando la batteria è quasi scarica, completamente scarica oppure non installata, la scritta “ LO “
lampeggerà sul display.
Premere il tasto OGM1 o OGM2 per ascoltare i rispettivi messaggi in uscita..
IMPOSTARE L’UNITA’ NELLA MODALITA’ RISPOSTA/REGISTRAZIONE
(I messaggi in entrata saranno registrati)
Assicuratevi che l OGM1 sia registrato. Premete il tasto ON/OFF una volta e l’unità emetterà 2 brevi bip e
successivamente riprodurrà l’ OGM1.
Il contatore messaggi apparirà poi sul display, ad indicare che l’unità è in modalità Risposta/
Registrazione.
IMPOSTARE L’UNITA’ NELLA MODALITA’ SOLO-RISPOSTA (Non verranno registrati

3
IT
messaggi in entrata).
Assicuratevi che l’OGM2 sia registrato.
Premete il tasto ON/OFF una volta (verrà riprodotto l’OGM1 e verranno emessi 2 brevi bip).
Premete di nuovo il tasto ON/OFF e l’unità emetterà 3 brevi bip e successivamente riprodurrà l’OGM2.
Il contatore messaggi e la scritta “ Ao “ si alterneranno poi sul display, ad indicare che l’unità è in
modalità Solo-Risposta.
IMPOSTAZIONE DELL`UNITA` IN MODALITA` DI RISPOSTA
Tenere premuto il pulsante ON/OFF no a quando appare sullo schermo “--” al ne d`impostare l`unita`
per la risposta.
IMPOSTARE GLI SQUILLI
Il numero di volte che il telefono è lasciato squillare prima dell’attivazione della segreteria telefonica
può essere impostato a 2, 3, 4 oppure in modalità “Toll-Saver”- La modalità Toll-saver risponderà
alla chiamata al quarto squillo se non sono stati registrati messaggi nella segreteria, e risponderà al
secondo squillo se sono stati registrati nuovi messaggi; questa funzione è utile quando telefoni per i tuoi
messaggi.
Premere e tenere premuto il tasto RING/◄◄ per 2 secondi; l’unità emetterà un bip e l’indicatore degli
squilli lampeggerà.
Premere e tenere premuto il tasto RING/◄◄ e/o il tasto CODE/►► per cambiare le impostazioni
degli squilli. Quando compare il numero di squilli desiderato, premere il tasto STOP. Per controllare le
impostazioni di squilli attuali, premere e rilasciare il tasto RING/◄◄; il numero di squilli attuali verrà
brevemente mostrato sul display.
Per registrare un memo personale che verrà riprodotto la prossima volta che qualcuno recupera
i messaggi, premere e tenere premuto il tasto MEMO per approssimativamente 2 secondi; verrà
emesso un bip ed apparirà un timer con un conto alla rovescia sul display. Il tempo di registrazione del
messaggio memo deve essere inferiore a 30 secondi e superiore a 3 secondi.
Dopo che il messaggio memo è stato registrato, rilasciate il rasto MEMO per fermare la registrazione. Per
ascoltare il memo,semplicemente
riproducete i messaggi premendo jl tasto Play/Pause.
VISUALIZZARE LE TUE CHIAMATE
Settare il volume con il controllo laterale posto sul lato dell’unità, per ascoltare il chimante premere il
tasto SPK/MONI nché non apparirà “ON“ sul display.
Quando una chiamata viene ricevuta, puoi ascoltare il chiamante che lascia un messaggio in entrata. Se
desideri parlare con il chiamante, semplicemente alza la cornetta del telefono e parla (l’apparecchio si
spegnerà automaticamente).
Per disattivare la visualizzazione delle chiamate, premere il tasto SPKMONI ancora nchè “ OF “ appare
sul display.
RIPRODURRE I MESSAGGI IN ENTRATA (ICM)
Il contatore di messaggi sul display lampeggerà quando l’unità ha registrato nuovi messaggi. Se il
contatore di messaggi non lampeggia, il display indica il numero di messaggi registrati precedentemente
ma non cancellati.
Per ascoltare i messaggi, procedere come segue:
Assicuratevi che il volume è impostato come desiderate.
Se sono stati registrati nuovi messaggi, premere il tasto Play/Pause per ascoltare solo i nuovi messaggi.
Se non sono stati registrati nuovi messaggi, premere il tasto
Play/Pause per ascoltare i messaggi che sono stati precedentemente ascoltati e che non sono stati
cancellati.
Dopo la riproduzione dei messaggi, il contatore dei messaggi sul display mostrerà il totale dei messaggi ricevuti.
Per ripetere un messaggio mentre lo si sta ascoltando, semplicemente premere il tasto RING/
◄◄.
Premere ripetutamente questo tasto per saltare indietro ai precedenti messaggi.
Per saltare un messaggio mentre lo si sta ascoltando, premere il tasto CODE/►►, ed il messaggio
4
IT
registrato successivo verrà riprodotto.
Per mettere in pausa i ICM, premere e rilasciare il tasto Plqy/Pause, l’unità verrà messa in pausa e la
scritta “PA“ lampeggerà sul display.
Per continuare la riproduzione, premere e rilasciare ancora il tasto Play/Pause.
Per fermare la riproduzione, premere il tasto STOP e l’unità salverà i precedenti messaggi.
NOTES:
Dopo la riproduzione dei ICM, l’unità verrà automaticamente resettata per ricevere nuovi messaggi.
Il tempo di registrazione massimo per un ICM (Messaggio in entrata) è 90 secondi.
SE LA MEMORIA E’ PIENA
Se la memoria e piena, l’unità cambierà in modalità Solo-Risposta, riproducendo l’OGM2 e non
consentendo la registrazione dei messaggi.
CANCELLAZIONE DEI MESSAGGI IN ENTRATA O DEI MEMO PERSONALI
Per cancellare un singolo messaggio mentre lo si sta riproducendo, premere il tasto DELETE e l’unità
cancellerà il corrente messaggio e riprodurrà il successivo.
Per cancellare tutti i messaggi, premere e tenere premuto il tasto DELETE mentre si è in modalità di
riposo (non sta riproducendo messaggi).
OPERAZIONE A DISTANZA
CODICE DI SICUREZZA
Questa unità può essere comandata da un qualsiasi telefono con tastiera a toni. Il codice di sicurezza è
pre-impostato a 19. Per cambiare questo codice, seguire le istruzioni seguenti:
Premere e tenere premuto il tasto CODE/◄◄per 2 secondi; verrà emesso un bip e lampeggerà il codice
attuale. Premere il tasto RING/◄◄ e/o il tasto CODE/◄◄per cambiare il codice di sicurezza. Quando
appare l’impostazione del codice, premere il tasto STOP.
Per controllare l’impostazione del codice di sicurezza attuale, premere e rilasciare il tasto CODE/◄◄; il
codice di sicurezza attuale apparirà brevemente sul display.
NOTE:
Se l’alimentazione viene interrotta e la batteria è assente o completamente esaurita, il codice d’accesso
viene resettato a 19.
Se si dimentica il codice d’accesso, disconnettete l’adattatore AC e la batteria, e questo verrà resettato a 19.
OPERAZIONE A DISTANZA
ATTIVARE LA SEGRETERIA TELEFONICA
Chiamare la segreteria telefonica da una linea differente da quella a cui è collegata.
Se l’unità è spenta, risponderà dopo 8 squilli, e l’unità emetterà un bip di 3 secondi.
Inserite il codice di sicurezza entro 10 secondi, e successivamente l’unità si attiverà in modalità
Risposta/Registrazione. Se non si inserisce il codice di sicurezza entro 10 secondi, l’unità si fermerà e si
disconnetterà.
RIPR ODUZIONE A DISTANZA DEI MESSAGGI IN USCIT A (OGM1,OGM2), E
REGISTRAZIONE DI UN NUOVO OGM
Chiamare la segreteria telefonica da una linea differente da quella a cui è collegata.
Durante l’OGM, inserire il codice di sicurezza. Premere il tasto “ 1 “ sulla tastiera del telefono per
riprodurre l’OGM1 oppure il tasto “ 2 “ per riprodurre l’ OGM2.
Chiamare la segreteria telefonica da una linea differente da quella a cui è collegata.
Durante l’OGM, inserire il codice di sicurezza.
OGM1: Premere il tasto “#” e poi il tasto “1” e dopo un lungo bip, registrate il vostro nuovo OGM1.
Quando avete terminato, premete il tasto “9” e successivamente il nuovo OGM1 verrà riprodotto. Se siete

5
IT
soddisfatti, premete il tasto “” per terminare la chiamata o ripetere questo passo e registrare un nuovo
OGM1.
OGM2: Premere il tasto “#“ e poi il tasto “2” e dopo un lungo bip, registrate il vostro nuovo OGM2. Quando
avete terminato, premete il tasto “9” e successivamente il nuovo OGM2 verrà riprodotto. Se siete soddisfatti,
premete il tasto “” per terminare la chiamata o ripetere questo passo e registrare un nuovo OGM2.
OPERAZIONE A DISTANZA
RIPRODURRE A DISTANZA I MESSAGGI IN ENTRATA (ICM)
Chiamare la segreteria telefonica da una linea differente da quella a cui è collegata.
Durante l’OGM, inserire il codice di sicurezza.
Premere il tasto “5” sulla tastiera e l’unità riprodurrà i messaggi.
Premere il tasto “9” sulla tastiera per fermare la riproduzione. Dopo la riproduzione, tutti i messaggi
saranno ancora salvati per quando ritornerete a casa.
Per ripetere la riproduzione del messaggio corrente, premere il tasto “4” sulla tastiera. Per saltare indietro
al precedente messaggio, premere “4” e velocemente premere di nuovo “4”.
Per passare in avanti al messaggio successivo, premere il tasto “6” sulla tastiera.
REGISTRARE UN MEMO
Chiamare la segreteria telefonica da una linea differente da quella a cui è collegata.
Durante l’OGM, inserire il codice di sicurezza. Premere il tasto “#” e successivamente il tasto “3” sulla
tastiera, e dopo un lungo bip registrate il vostro memo.
Premere il tasto “9” quando avete nito.
OPERAZIONE A DISTANZA
CANCELLARE UN MESSAGGIO
Chiamare la segreteria telefonica da una linea differente da quella a cui è collegata.
Durante l’OGM, inserire il codice di sicurezza. Premere il tasto “5” sulla tastiera per ascoltare i messaggi.
Per cancellare a distanza il messaggio che si sta ascoltando, premere il tasto “0” sulla tastiera.
CANCELLARE TUTTI I MESSAGGI
Chiamare la segreteria telefonica da una linea differente da quella a cui è collegata.
Durante l’OGM, inserire il codice di sicurezza. Premere il tasto “5” sulla tastiera per ascoltare i messaggi.
Per cancellare a distanza tutti i messaggi, premere il tasto “#” e successivamente il tasto “ 0” sulla
tastiera.
Chiamare la segreteria telefonica da una linea differente da quella a cui è collegata.
Durante l’OGM, inserire il codice di sicurezza
Premere il tasto “7” sulla tastiera e l’unità monitorerà la situazione per 90 secondi, emetterà un bip e si
fermerà,se volete continuare a monitorare, premete immediatamente di nuovo il tasto “7”.
Per terminare, premere il tasto “9” .
NOTE:
Premendo il tasto “” sulla tastiera si interromperanno tutte le operazioni e si rilascerà la linea.
OPERAZIONE A DISTANZA
IMPOSTARE A DISTANZA L’UNITA’ IN MODALITA’ SOLO-RISPOSTA OPPURE IN
MODALITA’ RISPOSTA/REGISTRAZIONE
Chiamare la segreteria telefonica da una linea differente da quella a cui è collegata.
Durante l’OGM, inserire il codice di sicurezza
Premere il tasto “8” sulla tastiera per variare ciclicamente la modalità (Risposta/Registrazione, SoloRisposta e Nessuna Risposta). Dopo aver premuto il tasto “8”, ascolterete il rispettivo OGM. Se ascoltate
solo un lungo bip, l’unità si è impostata in modalità Nessuna Risposta.
6
IT
Premete il tasto “9” quando avete nito.
FINE CHIAMATA:
Prmere il tasto “” sulla tastiera per interrompere le operazioni a distanza e terminare la chiamata.
GUIDA TROUBLESHOOTING
SINTOMI POSSIBILE CAUSA POSSIBILE SOLUZIONE
Non c’è alimentazione.
L’adattatore AC è connesso.
Connettere l’adattarore AC al c
onnettore DC 9V nell’unità, e l’
adattarore AC ad una presa di corrente.
L’adattatore AC non funziona. Cambiate presa di corrente.
Non c’è l’ OGM.
Il volume è troppo basso. Aumentare il volume.
Il messaggio
registrato è troppo basso.
Registrate un nuovo messaggio
L’unità non
risponde alle telefonate
Il cavo del telefono non
è connesso propriamente.
Collegate il cavo propriamente
L’unità è spenta Accendete l’unità.
La linea teleca ha problemi.
Contattate la compagnia telefonica locale
Non sono stati registrati ICM.
L’unità è spenta Accendete l’unità.
La memoria è priena. Cancellate i vecchi ICM.
L’unità è impostata in
modalità Solo-Risposta.
Impostare l’unità in
modalità Risposta/Registrazione.
Gli ICM sono incompleti.
La memoria è priena. Cancellate i vecchi ICM.
La durata dei ICM
è superiore a 90 secondi.
Assicurarsi che la durata
dei ICM sia inferiore a 90 secondi.
Il chimamante ha registrato
silenzio, segnale di occupato
o tono di chiamata.
Le chiamate che appartengono a
queste categorie vengono tagliate.
L’ ICM è basso. Il volume è troppo basso. Aumentare il volume.
Non c’è audio. Il volume è troppo basso. Aumentare il volume.
La scritta “Lo”
lampeggia sul display
La batteria è quasi
scarica o non è presente.
Inserire una batteria.
Nessuna risposta
al codice d’accesso.
Il telefono non è
provvisto di tastiera a toni.
Utilizzare un telefono
dotato di tastiera a toni.
Codice di accesso incorretto
Inserire ilcodice d’accesso corretto
Uso incorretto di
una tastiera a toni.
Assicurarsi che il telefono sia
capace di trasmettere toni di 2 secondi.
Non posso lasciare
messaggi (ICM)
La memoria è piena.
Quando la memoria è piena,
questa unità passerà automaticamente
alla modalità Solo-Risposta
Codice d`accesso: 19
1
EN
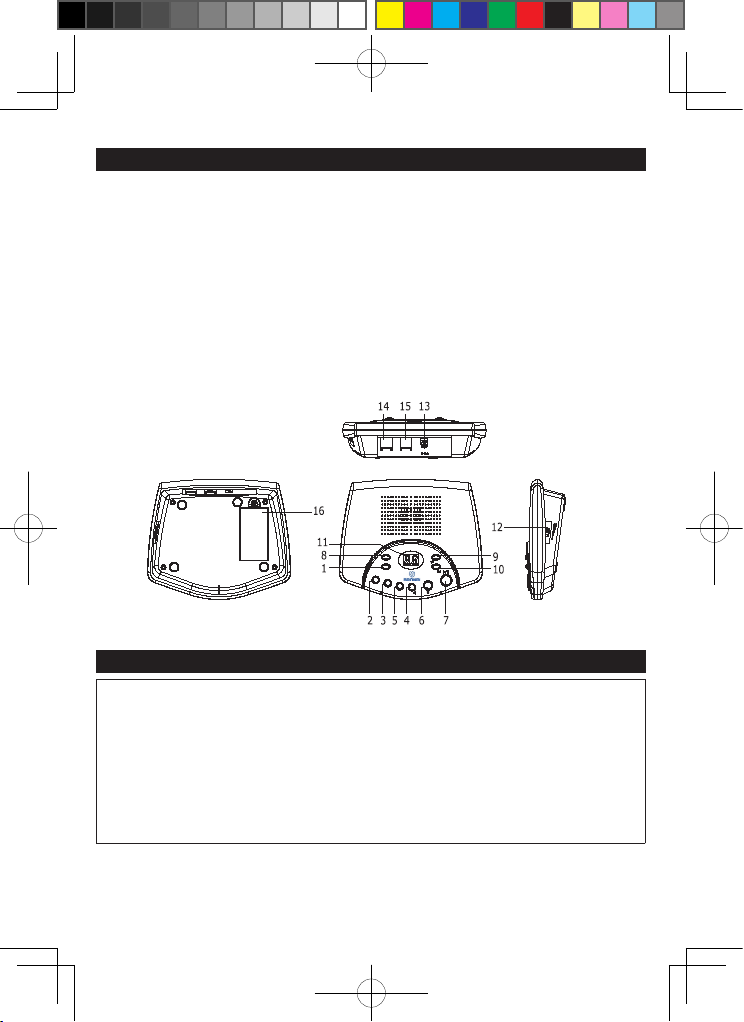
LOCATION OF CONTROLS
TOP
1. ON/OFF Button 7. PLAY/Pause Button
2. OGM1 (Outgoing Message 1) Button 8. DELETE Button
3. OGM2 (Outgoing Message 2) Button 9. RING/Button
4. SPK/MONI Button 10. CODE/
◄◄
Button
5. MEMO Button 11. LED Display
6. STOP Button
SIDE
12. Sliding Volume Knob
REAR
13. DC Jack (9V input) 14. TO LINE Jack
15.TO PHONE Jack 16. Battery Compartment (Bottom of Unit)
BATTERY PRECAUTIONS
BATTERY PRECAUTIONS
Follow these precautions when using batteries in this device:
1. Use only 9V(6LR61 or same type) of battery.
2. Be sure to install the battery in correct polarity. Reversed batteries may
cause damage to the deveice.
3. If the device is not to be used for a long period of time, remove the
battery to prevent damage or injury from possible battery leakage.
4. Do not try to recharge batteries not intended to be recharged; they can
overheat and rupture. (Follow battery manufacture’s directions.)
This section has been designed to provide a reference guide to help set up your answering machine.
1. Connect one end of the provided telephone line cord into the TO LINE jack. Plug the other end
into the telephone wall jack. You can link the other telephone to this answering machine with the
short telephone line cord. Plug one end of the short telephone line cord to the TO PHONE
ANN1
ANN2
MEMO
ASC
ON/OFF
CANC
PIN/
/SQUIL
TELLINEA
DC 9V

2
EN
jack and the other end to the telephone jack++.
2. Insert the small plug on the end of the AC adaptor into the DC 9V power jack located on the
rear of your unit. Use only the Center Positive AC adaptor provided with your unit.
3. Plug the AC adaptor into a standard AC wall outlet. Once plugged in, the display will count up
from 0 to 5. After a long beep, the unit will display " -- "to indicate the unit is on, but not set for
answering messages yet, or “Lo” to indicate the battery is dead, weak, or not installed.
4. During AC power failure, a 9V battery provides battery backup so the unit can maintain the
memory information. However, the unit cannot answer incoming calls without AC power.
OPERATIONN
RECORDING AN OUTGOING MESSAGE (OGM)
This unit can record two kinds of messages: OGM1 is used when you want the caller to hear the
OGM and then leave a message, OGM2 is used when you only want the caller to hear your OGM,
but not leave a message. The maximum OGM for each message is 30 seconds. The minimum time
for an OGM is 4 seconds.If you have not recorded an OGM1 and/or OGM2, the answering machine
cannot be turned on.
RECORDING OGM1 (OUTGOING MESSAGE 1)
Press and hold the OGM1 button for approximately 2 seconds until a long beep is heard. The
display will count down the time left, so begin recording your outgoing message speaking in a
normal tone of voice.
When nished recording, release the OGM1 button. A short beep will sound and the newly recorded
outgoing message will then play once. Make sure the VOLUME control is at a desirable level.
To record a new outgoing message, please repeat steps 1 and 2.
RECORDING OGM2 (OUTGOING MESSAGE 2)
Press and hold the OGM2 button for approximately 2 seconds until a long beep is heard. The
display will count down the time left, so begin recoding your outgoing message speaking in a
normal tone of voice.
When nished recording, release the OGM2 button. A short beep will sound and the newly recorded
outgoing message will then play once. Make sure the VOLUME control is at a desirable level.
To record a new outgoing message, please repeat steps 1 and 2.
VERIFYING THE OUTGOING MESSAGE
Press and release the OGM1 or OGM2 button and the selected Outgoing Message will play. Press
the STOP button to stop playback before the end of the outgoing message is reached.
NOTES:
If the unit detects a dial tone, silence or a busy signal, the unit will hang up and not register the message.
The unit will shut off if a parallel phone is picked up.
When the memory is full, “FU” will appear in the display.
When the battery is low, dead or not installed, “Lo” will blink in the display.
Press the OGM1 or OGM2 button to hear the respective Outgoing Message.
SETTING THE UNIT TO ANSWER/RECORD MODE (Incoming Messages will be recorded)
Make sure the OGM1 is recorded. Press the ON/OFF button once and the unit will emit 2 short
beeps and then play OGM1.
The message counter will then appear in the display indicating the unit is in Answer/Record mode.

3
EN
SETTING THE UNIT TO ANSWER-ONLY MODE (No Incoming Messages will be recorded).
Make sure the OGM2 is recorded. Press the ON/OFF button once (OGM1 will play and 2 short beeps
will be heard). Press the ON/OFF button again and the unit will emit 3 short beeps and then play
OGM2.
The message counter and “Ao” will then alternate in the display indicating the unit is in AnswerOnly mode.
SETTING THE UNIT TO THE ANSWER-OFF MODE
Press ON/OFF button unitl “--” appears in the display to set the unit to the Answer off mode.
SETTING THE RINGS
The amount of times the phone rings before picking up can be set to 2, 3, 4 or Toll-Saver. Toll saver
will answer the call on the fourth ring if no messages have been recorded and it will answer on the
second ring if new messages have been recorded; this feature is useful when phoning in for your
messages.
Press and hold the RING
/
◄◄
button for 2 seconds; the unit will beep and the present.
Press the Ring/◄◄button and/or CODE/◄◄ button to change the ring setting. When the desired
ring setting appears, press the STOP button. To check the current ring setting, press and release
the RING/◄◄ button;
To record a personal memo which will be played the next time somebody retrieves the messages,
press and hold the MEMO button for approximately 2 seconds; a beep will sound and the
countdown timer will appear in the display. The recording time of the memo must be less than 30
seconds and more than 3 seconds.
After the message is recorded, release the MEMO button to stop the recording. To hear the memo,
simply play back the messages by pressing the Play/Pause button.
SCREENING YOUR CALLS
Adjust the VOLUME control on the side of your unit to hear the caller and press the SPKMONI
button until “on” appears in the display.
When a call is received, you may listen to the caller leaving an incoming message. If you wish to
speak with the caller, just pick up the handset to talk (the machine will turn off automatically). Press
the SPKMONI button again until “OF” appears in the display to turn the call screen screening off.
PLAYING BACK INCOMING MESSAGES (ICMS)
The display’s message counter will blink when the unit has recorded new messages. If the message
counter is not blinking, then that is the number of messages that have been recorded previously,
but not deleted.
To hear messages, proceed as follows:
Make sure the VOLUME control is adjusted as desired.
If new messages have been recorded, press the Play/Pause button to hear only the new messages.
If no new messages have been recorded, press the Play/Pause button to hear the previously heard
messages that were not deleted.
After playing the messages, the display’s message counter will show the total messages received.
NOTE: Messages will automatically be saved. To delete messages, see page 9.
To repeat a message while you are listening to it, simply press the RING/◄◄ button. Repeatedly press
this button to skip back to previous messages.
To skip a message while you are listening to it, press the CODE/◄◄ button and the next recorded
message will play.
To pause the ICMS, press and release the Play/Pause button, the unit will pause playback and “PA”

4
EN
will blink in the display. To continue playback, press and release the Play/Pause button again.
To stop playback, press the STOP button and the unit will save the previous messages.
NOTES:
After playing the ICMS, the unit will automatically reset to take new messages.
The maximum recording time for an ICM (Incoming Message) is 90 seconds.
IF MEMORY IS FULL
If the memory is full, the unit will change to Answer-Only mode, play OGM2 and not allow a
message to be recorded.
DELETING INCOMING MESSAGES OR PERSONAL MEMOS
To erase a single message while playing it back, press the DELETE button and the unit will delete
the current message and play the next message.
To delete all the messages, press and hold the DELETE button while in the idle mode (messages not
playing).
REMOTE OPERATION
SECURITY CODE
This unit can be operated from almost any touch-tone phone. The Security Code is preset to 19.
To change this code, follow the instructions below.
Press and hold the CODE/◄◄button for 2 seconds; a beep will sound and the current code will
blink. Press the RING/◄◄ button and/or CODE/◄◄ button to change the security code. When the
code setting appears, press the STOP button.
To check the current security code setting, press and release the CODE/
◄◄
button; the current
security code will briey appear in the display.
NOTES:
If a power failure occurs and there is a dead or no battery, the Access Code resets to 19.
If you forget the Access Code, unplug the AC adaptor and disconnect the battery and it will reset
to 19.
EMOTE OPERATION
TURNING THE ANSERING MACHINE ON
Call the answering machine from a separate line.
If the unit is off, it will answer after 8 rings, the unit will emit a 3 second beep.
Enter your security code within 10 seconds, and then the unit will switch to the Answer/Record
mode. If you do not enter your security code within 10 seconds, the unit will stop and disconnect.
REMOTELY PLAYING OGM1, OGM2 REMOTELY RECORDING A NEW OGM
Call the answering machine from a separate line. During the OGM, enter your security code. Press
the “1” pad to play OGM1 or the “2” pad to play OGM2.
Call the answering machine from a separate line. During the OGM, enter your security code.
OGM1: Press the “#” and then the “1” pad and after the long beep, record your new OGM1. When
nished, press the “9” pad and then the new OGM1 will play back. If satised, press The “” pad
to end the call or repeat this step to record a new OGM1 again.
OGM2: Press the “#” and then the “2” pad and after the long beep, record your new OGM2. When
nished, press the “9” pad and then the new OGM2 will play back. If satised, press the “” pad to

5
EN
end the call or repeat this step to record a new OGM2 again.
REMOTE OPERATION
REMOTELY PLAYING INCOMING MESSAGES (ICM’S)
Call the answering machine from a separate line. During the OGM, enter your security code.
Press the “5” pad and the unit will playback the messages.
Press the “9” pad to stop playback. After Playback, all messages will still be saved for when you
return home.
To repeat the currently playing message, press the “4” pad. To skip backward to previous
messages, press “4” and then quickly press “4” again.
To skip forward to the next message, press the “6” pad.
RECORDING A MEMO
Call the answering machine from a separate line. During the OGM, enter your security code. Press
the “#” and then the “3” pad and after the long beep, record your memo.
Press the “9” pad when nished.
REMOTE OPERATION
ERASING ONE MESSAGE
Call the answering machine from a separate line. During the OGM, enter your security code. Press
the “5” pad to play messages. To remotely erase the currently playing message, press the “0” pad.
ERASING ALL MESSAGES
Call the answering machine from a separate line. During the OGM, enter your security code and
press the “5” pad to play messages. To remotely erase all messages, press the “#” and then the “0”
pad.
This feature will allow you to call in and monitor the room in which the answering machine is
located.
Call the answering machine from a separate line. During the OGM, enter your security code.
Press the “7” pad and the unit will monitor the situation for 90 seconds, beep and then stop, if you
want to continue monitoring, immediately press the “7” pad again.
To stop monitoring, press the “9” pad.
NOTE:
Pressing the “” pad will stop all operations and release the line.
REMOTE OPERATION
REMOTELY SETTING THE UNIT TO ANSWER-ONLY OR ANSER/RECORD MODE
Call the answering machine from a separate line. During the OGM, enter your security code.
Press the “8” pad to cycle through the modes (Answer/Record, Answer-Only and Answer-off). After
pressing the “8” pad, you will hear the respective OGM. If you only hear a long beep, then the unit
is set to the Answer-Off mode.
Press the “9” pad when nished.
END CALL:
Press the “” pad to stop remote operation and end the call.

6
EN
TROUBLESHOOTING GUIDE
SYMPTOM POSSIBLE CAUSE POSSIBLE SOLUTION
No Power.
AC adaptornot connected.
Conncect AC adaptor to DC 9V jack
on unit and AC outlet
AC outlet not working Move to another outlet
No OGM
Volume is too low Increase volume
Message recorded too low. Record message again.
Unit not answering the phone
Line cord(s) are not
connected properly.
Connect line cord(s) securely
Unit is not on. Turn unit on
Phone line problems.
Call local phone compay for service.
No ICM(s) recorded.
Unit is not on Turn unit on.
Memory is full. Delete old ICMs
Unit is set to the
Anser-Only mode.
Set unit to the
Answer/Record mode
ICM is incomplete
Memory is full. Delete old ICMs
ICM was more
than 90 seconds
Make sure ICMs
are less than 90 seconds.
The caller recorded silence,
busy signal or dial tone.
Calls that t these
categorieswill be cut off
ICM is low. Volume is too low. Increase volume
No sound Volume is too low. Increase volume
“Lo” blinks
on the display
The battery is
weak or not installed.
Install new battery
No response to Acess Code.
The phone is not
a touch-tone phone.
Use a touch-tone phone.
Incorrect Access Code
Enter the correct Access Code.
Using incorrect
touch-tone phone
Make sure phone is capable of
transimitting 2 second tones
Can’t leave messages (ICMs) Memory is full
When memory is full,
this unit will automatically
switch to the Answer-Only mode.
Access Code: 19

1
ES
CONTROLES DE LOCARIZACIÓN
CABEZA
1. Botón ON/OFF 7. Botón PLAY/Pause
2. Botón OGM1 (Mensaje salido 1) 8. Botón de DELETE
3. Botón OGM2 (Mensaje salido 2) 9. Botón RING/
◄◄
4. Botón SPK/MONI 10. Botón CODE/
►►
5. Botón MEMO 11. LED Indicador
6. Botón STOP
Lado
12. Botón Deslizante de Volumen Sliding
TRASERO
13. Enchufe hembra de DC (entrada de 9V) 14. Enchufe hembra de TO LINE
15. Enchufe hembra de TO PHONE 16. Compartimento de batería(Fondo de Unidad)
INSTALACIÓN
PRECAUCIONES DE BATERÍA
Siga estas precauciones cuando se usan las baterías en este dispositivo:
1. Sólo use la batería de 9V(6LR61 o tipo similar) .
2. Asegure de instalar la batería con polaridad puesta adecuadamente. Las baterías reversas podrían
causar daño del dispositivo.
3. Si el dispositivo no se usará a plazo largo, desmonte la batería para prevenir daño o lesión por causa
de fuga de batería posible.
4. No intente de recargar las baterías que no sean intentadas para recarga, ya que pueden
sobrecarlentarse y romperse.(Siga las direcciones de manufactura de batería.)
Esta sección se diseña para ofrecer una guía de referencia a ayudar la conguración de su contestador.
1. Conecte un extremo del cable de línea de teléfono ofrecido en el enchufe hembra TO LINE. Enchufe
el otro lado en el enchufe hembre telefónica en pared. Usted puede vincular otro teléfono al presente
contestador con cable de teléfono corto. Enchufe un lado del cable de línea de teléfono corto al enchufe
ANN1
ANN2
MEMO
ASC
ON/OFF
CANC
PIN/
/SQUIL
TELLINEA
DC 9V

2
ES
hembra de TO PHONE y el otro extremo al enchufe hembra ++ de teléfono.
2. Insierte el enchufe pequeño al lado de AC adaptador en el enchufe hembra de potencia de DC 9 V
situado en lo trasero de su unidad. Sólo use el adaptador AC de Centro Positivo ofrecido con su unidad.
3. Enchufe el adaptador AC en tomacorriente AC estándar de pared. Una vez que se enchufe, el indicador
va a contar arriba de 0 a 5. Después de un pitido largo, la unidad indicará " -- " para indicar que la
unidad se inicia, pero todavía no congura ningún mensaje de contestación, o “Lo” para indicar que
la batería se agota, débil o no instalada.
4. Durante el fallo de potencia AC, una batería de 9V ofrece la reserva de batería, por lo que la unidad
puede mantener la información de memoria. Sin embargo, la unidad no puede contestar las llamadas
sin potencia AC.
OPERACIÓN
GRABACIÓN DE MENSAJE SALIDO (OGM)
La unidad puede grabar dos tipos de mensajes: OGM1 se usa cuando usted quiere escuchar OGM y
luego dejar un mensaje, OGM2 se usa cuando usted sólo quiere que el llamador escuche su OGM, pero
no deja un mensaje. El máximo OGM de cada mensaje es 30 segundos. El mínimo tiempo de OGM es 4
segundos. Si usted no tiene OGM1 y/o OGM2 grabados, el contestador no puede iniciar.
GRABACIÓN DE OGM1 (MENSAJE SALIDO 1)
Apriete y mantenga el botón OGM1 apretado por aproximadamente 2 segundos hasta que se oiga un
pitido largo. El indicador va a contar el tiempo restante, entonces empieza a grabar su mensaje salido
que se habla en un tono normal de voz.
Cuando se termina la grabación,libere el botón de OGM1. Y Suena un pitido corto y se pone el mensaje
salido recien grabado una vez. Asegure que el control de VOLUMEN está en nivel deseable.
Para recordar un nuevo mensaje salido, por favor repita paso 1 y 2.
GRABACIÓN DE OGM2 (MENSAJE SALIDO 2)
Apriete y mantenga el botón OGM 2 apretado por aproximadamente 2 segundos hasta que se oiga un
pitido largo. El indicador va a contar el tiempo restante, entonces empieza a grabar su mensaje salido
que se habla en un tono normal de voz.
Cuando se termina la grabación,libere el botón de OGM2. Y Suena un pitido corto y se pone el mensaje
salido recien grabado una vez. Asegure que el control de VOLUMEN está en nivel deseable.
Para recordar un nuevo mensaje salido, por favor repita paso 1 y 2.
VERIFICACIÓN DE MENSAJE SALIDO
Apriete y libere el botón OGM1 o OGM2 y el Mensaje Salido seleccionado se demostrará. Apriete el botón
STOP para parar play-back antes de llegar el n del mensaje salido.
NOTAS:
Si la unidad detecta un tono dial, silencio o señal de ocupación, la unidad va a desconectarse y no
registra el mensaje.
La unidad va a apagarse si el teléfono paralelo es contectado.
Cuando la memoria está llena, “FU” aparece en el display.
Cuando la batería es débil, agotado o no instalado. “Lo” destella en el indicador.
Pulse el bortón OGM1 o OGM2 para escuchar el Mensaje Salido respectivo.
CONFIGURACIÓN DE MODO DE CONTESTACIÓN/GRABACIÓN DE LA UNIDAD(Mensaje
entrado se grabará)
Asegure que OGM1 sea grabado. Pulse el botón ON/OFF una vez que la unidad emitirá 2 pitidos cortos y
luego pondrá OGM1.
El contador de mensaje aparecerá en el indicador después indicando que la unidad esté en modo
Contestación/Grabación.

3
ES
CONFIGURACIÓN DE UIDAD A MODO DE CONTESTACIÓN SÓLO (No Mensaje Entrado se
grabará).
Asegure que OGM2 se grabe. Apriete el botón ON/OFF una vez (OGM1 se pondrá y se oirá 2 pitidos
cortos). Apriete el botón ON/OFF nuevamente, la unidad emitirá 3 pitidos cortos y luego se pone OGM2.
El contador de mensaje y “Ao” alternarán en el indicador indicando que la unidad esté en modo de
Contestación Sólo.
CONFIGURACIÓN DE MODO DE CONTESTACIÓN SÓLO DE UNIDAD
Apriete el botón ON/OFF hasta que “--” aparezca en el indicador para congurar la unidad a modo de
Contestación.
CONFIGURACIÓN DE TIMBRES
La cantidad de veces que suena el teléfono antes de responder puede congurar a 2, 3, 4 o Ahorrador de
Timbre. El ahorrador de timbre va a contestar la llamada al sonar el cuarto timbre si no se ha grabado el
mensaje y responde al sonar el segundo timbre si se han grabado nuevos mensajes. Esta caracterísrica
es útil cuando hay llamada entrada por sus mensajes.
Apriete y mantenga el botón RING/◄◄ por 2 segundos; la unidad se pita y la conguración presente
de timbre destella.
Apriete el botón Ring/◄◄ y/o botón CODE/►► para cambiar la conguración de timbre. Cuando la
conguración del timbre deseada aparezca, apriete el botón STOP. Para revisar la conguración de
timbre actual y libere el botón RING/◄◄ button
Para grabar un memo personal, que se pondrá cuando alguien recupera los mensajes por la segunda
vez, apriete y mentenga el botón MEMO por aprocimadamente 2 segundos. Un pitido sonará y el
temporizador aparecerá en el indicador. El tiempo del meno grabado debe ser menos que 30 segundos y
más que 3 segundos.
Después de que se grabe el mensaje, libere el botón MEMO para parar la grabación. Para oír el memo,
simplemente ponga el mensaje atrás mediante apretar el botón Play/Pause.
EMITIR SUS LLAMADAS
Adjuste el control de VOLUMEN en el lado de su unidad para oír al llamador y apriete el botón SPKMONI
hasta que “on” aparezca en el indicador.
Cuando la llamada se reciba, usted puede escuchar al mensaje entrado dejado por un llamador. Si usted
desea hablar con el llamador, acoja el auricular a hablar(la máquina se apaga automáticamente).Aprite
el botón SPKMONI nuevamente hasta que “OFF” aparezca en el indicador para apagar la emisión de
llamador.
PONER EL MENSAJE ENTRADO ATRÁS(ICMS)
El contador de mensaje del indicador va a destellar cuando la unidad ha grabado nuevos mensajes.
Si el contador de mensaje no está destellando, entoncer es el número de mensaje que se ha grabado
previamente sin eliminar.
Para escuchar mensajes, proceda como lo siguiente:
Asegure que el control de VOLUMEN sea ajustado como lo deseado.
Si el nuevo mensaje se ha recordado, apriete el botón Play/Pause para escuchar sólo nuevos mensajes.
Si no se han recordado mensajes nuevos, apriete el botón Play/Pause para escuchar los mensajes oídos
previamente que no son eliminados.
Después de poner los mensajes, el contador de mensaje del indicador demostrará todos los mensajes
recibidos.
NOTA: Los mensajes se guardan automáticamente. Para eliminar los mensajes, véase en página 9.
Para repetir un mensaje cuando está escuchándolo, simplemente apriete el botón RING/◄◄ button.
Apriete el botón repetidamente para saltar atrás a los mensajes previos.

4
ES
Para saltar un mensaje mientras usted está escuchándolo, apriete el botón de CODE/►► y el mensaje
grabado siguiente se pondrá.
Para detener el ICMS, apriete y libere el botón Play/Pause, la unidad va a detener play-back y “PA” se
destella en el indicador. Para continuar el play-back, apriete y libere el botón Play/Pause. again.
Para parar el play-back, apriete el botón STOP y la unidad va a guardar los mensajes previos.
NOTAS:
Después de poner el ICMS, la unidad va a resetar los nuevos mensajes automáticamente.
El máximo tiempo de grabación para un ICM (Mensaje Entrado) es 90 segundos.
SI LA MEMORIA ESTÁ LLENA
Si la memoria está llena, la unidad va a cambiar el modo de Contestación-Sólo, ponga OGM2 y no
permite que el mensaje se grabe.
ELIMINACIÓN DE MENSAJES ENTRADOS O MEMOS PERSONALES
Para borrar un mensaje singular, mientras se lo pone atrás, apriete el botón DELETE y la unidad va a
eliminar el mensaje corriente y poner el siguiente mensaje.
Para eliminar todos los mensajes, apriete y mantenga el botón DELETE apretado en modo de
ocio(mensajes no transcurrido).
OPERACIÓN EN REMOTE
CÓDIGO DE SEGURIDAD
Se puede operar la unidad desde casi cualquier teléfono de tacto. El Código de Seguridad es presetado a
19. Para cambiar este código, siga las instrucciones a la continuación.
Apriete y mantenga el botón CODE/
◄◄
apretado por 2 segundos; un pitido suena y el código corriente
se destella. Apriete el botón RING/◄◄ y/o el botón CODE/►► para cambiar el código de seguridad.
Cuando aparece la conguración de código, apriete el botón STOP.
Para checar la conguración de código de seguridad corriente, apriete y libere el botón CODE/►►; el
código de seguridad corriente aparece brevemente en el indicador.
NOTAS:
Si ocurre algún fallo de potencia y hay batería agotada o no hay batería, se reseta el Código de Aceso a 19.
Si usted olvida el Código de Aceso, desenchufe el adaptador AC y desconecte la batería, entonces se
resetará a 19
OPERACIÓN EN REMOTE
INICIAR EL CONTESTADOR
Llame al contestador de una línea separada.
Si la unidad se apaga, se responderá después de 8 timbres, la unidad emitirá un pitido de 3 segundos.
Introduzca su código de seguridad dentro de 10 segundos, y luego la unidad se transferirá al modo
Repuestar/Grabación. Si usted no introduce su código de seguridad dentro de 10 segundos, la unidad
parará y se desconectará.
TRANSCURSO EN REMOTE DE OGM1, GRABACIÓN EN REMOTE DE OGM2 GRABACIÓN
DE UN NUEVO OGM
Llame al contestador desde una línea separada. Durante el OGM, introduzca el código de seguridad.
Apriete tecla “1” para poner OGM1 o tecla “2” para poner OGM2.
Llame el contestador de una línea separada. Durante el OGM, introduzca su código de seguridad.
OGM1: Apriete “#” y luego la tecla “1” y después de un pitido largo, grabe su nuevo OGM1. Cuando se

5
ES
termina, apriete la tecla “9” y luego el nuevo OGM1 se pone de nuevo. Si se queda satisfecha, apriete la
tecla “” para terminar la llamada o repita este paso para grabar un nuevo OGM1 nuevamente.
OGM2: Apriete “#” y luego la tecla “2” y después de un pitido largo, grabe su nuevo OGM2. Cuando se
termina, apriete la tecla “9” y luego el nuevo OGM1 se pone de nuevo. Si se queda satisfecha, apriete la
tecla “” para terminar la llamada o repita este paso para grabar un nuevo OGM2 nuevamente.
OPERACIÓN EN REMOTE
TRANSCURSO EN REMOTE DE MENSAJES ENTRADOS (ICM’S)
Llame al contestador desde una línea separada. Durante el OGM, introduzca su código de seguridad.
Apriete la tecla “5” y la unidad va a poner los mensajes nuevamente.
Apriete la tecla“9” para detener el transcurso. Después del Play-back, todos los mensajes también se
guardarán para cuando usted regresa a casa.
Para repetir el mensaje transcurrido corrientemente, apriete la tecla “4”. Para saltar atrás a los mensajes
previos, apriete “4” y luego apriete rápidamente “4” de nuevo.
Para saltar adelante al mensaje siguiente, apriete la tecla “6”.
GRABACIÓN DE UN MEMO
Llame al contestador desde una línea separada. Durante el OGM, introduzca su código de seguridad.
Apriete “#” y luego la tecla “3” y después de un pitido largo, grabe su memo.
Apriete la tecla “9” cuando se termina.
OPERACIÓN EN REMOTE
BORRAR UN MENSAJE
Llame al contestador de una línea separada. Durante el OGM, introduzca su código de seguridad. Apriete
la tecla “5” para poner los mensajes. Para borrar el mensaje transcurrido corrientemente en remote,
apriete la tecla “0”.
BORRAR TODOS LOS MENSAJES
Llame al contestador de una línea separada. Durante el OGM, introduzca su código de seguridad y
apriete la tecla “5” para poner los mensajes. Para borrar en remote todos los mensajes, apriete “#” y
luego la tecla “0”.
REMOTE ROOM MONITORING
Esta función le permite llamar en y vigilar la habitación donde se situa la contestadora.
Llame al contestador de una línea separada. Durante el the OGM, introduzca su código de seguridad.
Apriete la tecla “7” y la unidad va a vigilar la situación por 90 segundos, da un pitido y luego se para.
Si uested queire continuar la vigilancia, apriete la tecla “7” de nuevo inmediatamente. Para detener la
vigilancia, apriete la tecla “9” .
NOTA:
Al apretar la tecla “” va a detener todas las operaciones y libere la línea.
OPERACIÓN EN REMOTE
CONFIGURACIÓN DE UNIDAD A SÓLO CONTESTACIÓN O MODO
CONTESTACIÓN/GRABACIÓN EN REMOTE
Llame al contestador de una línea separada. Durante el the OGM, introduzca su código de seguridad.
Apriete la tecla “8” para navegar por los modos (Contestación/Grabación, Contestación Sólo y
Contestación-off). Después de apretar la tecla “8”, usted va a escuchar el OGM respectivamente. Si usted
sólo escucha un pitido largo, y luego la unidad se pone en modo de Contestación Sólo.
Apriete la tecla “9” cuando se termina.

6
ES
TERMINAR LLAMADA:
Apriete la tecla “” para terminar la operación en remote y terminar la llamada.
GUÍA DE TROUBLESHOOTING
SÍNTOMA CAUSA POSIBLE SOLUCIÓN POSIBLE
No energía
AC adaptador no se conecta.
Concecte el AC adaptador al enchufe hembra
de DC 9V en la unidad y el tomacorriente AC .
AC tomacorriente no trabaja Mueva a otro tomacorriente.
No OGM.
Volumen es demasiado bajo. Incrementar volumen.
Mensaje grabado
es demasiado bajo.
Grabar mensaje de nuevo.
Unidad no contesta el teléfono
Cable(s) de línea no se
conectan adecuadamente.
Conecte cable(s)
de línea seguramente.
Unidad no se pone on Encienda la unidad.
Problemas de línea de teléfono.
Llame la compañía de
teléfono local para servicio.
No ICM(s) grabado.
Unidad no se pone on. Encienda la unidad.
Memoría está llena. Elimine ICMs viejos.
Unidad se pone a
modo de Contestación sólo.
Congure la unidad a modo
Contestación/Grabación.
ICM es incompleto.
Memoría está llena. Elimine ICMs viejos.
ICM es más
que 90 segundos.
Asegure que ICMs son
menos que 90 segundos.
El llamador grabó silencio, señal
de ocupación o tono de dial.
Se desconectará las llamadas
que cumplan con estas categorías.
ICM es bajo. Volumen es demasiado bajo. Incrementar volumen.
No sound Volumen es demasiado bajo. Incrementar volumen.
“Lo” destella en el indicador
La batería es
débil o no se instala.
Instale nueva batería.
No contestación
al código de acceso.
El teléfono es un
teléfono de un tacto.
Use un teléfono de tacto.
Código de Acceso Incorrecto.
Introduzca el Código de Acceso correcto.
Usar teléfono
de tacto incorrecto.
Asegure que el teléfono sea capáz
de transmitir tonos de 2 segundos.
No se puede dejar
] mensajes (ICMs).
Memoria está llena .
Cuando la memoria está llena, la unidad
va a transferir a modo de Contestación
Sólo automáticamente.
Access Code: 19

1
FR
TOUCHES
1. Bouton ON/OFF 7. Bouton PLAY/Pause
2. Bouton OGM1(Message répondeur 1) 1 8. Bouton DELETE
3. Bouton OGM1 (Message répondeur 2)1 9. Bouton RING/
◄◄
4. Bouton SPK/MONI 10. Bouton CODE/
►►
5. Bouton MEMO 11. Ecran
6. Bouton STOP
CÔTE
12. Roulette réglage du volume
ARRIERE
13. prise DC (alimentation de 9V) 14. prise pour connexion à la prise
téléphonique murale (LINE)
15. prise pour connexion au téléphone (PHONE)
16. Compartiment pour piles
INSTALLATION
PRECAUTIONS POUR LES PILES
Suivez ces précautions pour insérer les piles dans l’appareil :
1. Utilisez seulement des piles de 9V (6LR61 ou de même type).
2. Soyez sûr d’installer les piles en respectant la polarité (+/-) correcte. Les
piles à l’envers pourraient endommager l’appareil.
3. Si le téléphone n’est utilisé durant une longue période, enlevez les piles
4. N’essayez pas de recharger les piles qui n’ont pas à être rechargées; elles
peuvent surchauffer et éclater. (Suivez les indications du fabricant des piles
Cette section est permet de vous aider à installer votre répondeur téléphonique
1. Connectez un bout du cable de la ligne téléphonique à la prise 14.(LINE)LINE. Branchez l’autre bout
sur la prise téléphonique murale. Puis connectez le .Branchez l’autre bout sur la prise téléphonique
murale. Puis connectez le répondeur SD-TOP à votre téléphone en utilisant le cordon RJ11 contenu
dans l’emballage. Branchez un bout du cordon sur la prise du répondeur 15. (PHONE) et
l’autre bout sur votre appareil téléphonique
ANN1
ANN2
MEMO
ASC
ON/OFF
CANC
PIN/
/SQUIL
TELLINEA
DC9V

2
FR
2. Connectez ensuite votre adaptateur AC, fourni dans l’emballage, sur la prise
DC9V sur la partie arrière de votre répondeur SD-TOP
3. Branchez ensuite l’adaptateur AC sur une prise de courant 220V standard. Une fois branché, l’écran
affiche les chiffres de 0 à 5. Après un long bip, l’unité affichera " -- " pour indiquer que l’appareil
fonctionne mais n’est pas encore réglé pour la messagerie, ou “Lo” pour indiquer que la batterie est
morte, faible ou non installée.
4. En cas de coupure de courant, la pile 9V permet de maintenir les informations
en de mémoire mais ne permet pas de répondre à des appels téléphoniques arrivants.
OPERATIONN
ENREGISTRER UN MESSAGE DES APPELS TELEPHONIQUES (OGM)
Cette unité peut enregistrer deux sortes de messages: OGM1 est utilisé lorsque vous voulez que la
personne qui appelle entend l’OGM et laisse un message après, OGM2 est utilisé lorsque vous voulez
seulement que la personne qui appelle entend votre OGM, mais qu’il ne laisse pas un message. L’OGM
maximal pour chaque message est 30 secondes. La durée minimale pour un OGM est 4 secondes. Si
vous n’avez pas enregistré un OGM1 et/ou OGM2, le répondeur téléphonique ne peut pas s’allumer.
1
ENREGISTRER OGM1 (MESSAGE DES APPELS TELEPHONIQUES 1)
Appuyez sur la touche OGM1 et maintenez la environ 2 secondes jusqu’à ce qu’un long bip soit entendu.
L’écran affiche le temps restant pour votre message. Commencez à enregistrer votre messages vocal.
Quand votre message est terminé, relâchez le bouton OGM1. Un bip court sonnera et vous entendrez le
message enregistré. Assurez-vous que le commande de VOLUME est à un niveau audible.
Pour effacer ce message et enregistrer un nouveau message, veuillez répéter les étapes 1 et 2.
Sinon le message est automatiquement mémorisé.
ENREGISTRER OGM2 (MESSAGE DES APPELS TELEPHONIQUES 2)
Appuyez sur la touche OGM2 et maintenez la environ 2 secondes jusqu’à ce qu’un long bip soit entendu.
L’écran affiche le temps restant pour votre message. Commencez à enregistrer votre messages vocal.
Quand votre message est terminé, relâchez le bouton OGM1. Un bip court sonnera et vous entendrez le
message enregistré. Assurez-vous que le commande de VOLUME est à un niveau audible.
Pour effacer ce message et enregistrer un nouveau message, veuillez répéter les étapes 1 et 2. Sinon le
message est automatiquement mémorisé.
VERIFIER VOTRE MESSAGE DE REPONDEUR
Appuyez sur OGM1 ou OGM2 et relâchez le bouton pour écouter votre message de répondeur.
Appuyez sur le bouton STOP pour arrêter la lecture du message avant la fin.
NOTES:
Si lors de l’enregistrement le répondeur détecte un son numérique, un long silence ou un signal occupé,
l’appareil n’enregistrera pas le message.
Quand la mémoire est pleine, “FU” s’affiche sur l’écran.
Quand la batterie est faible, “Lo” clignote sur l’écran.
Appuyez sur le bouton OGM1 ou OGM2 pour entendre le message de répondeur
REGLEZ LE REPONDEUR EN MODE REPONDRE/ENREGISTRER (les messages d’entrée seront
enregistrés)
Assurez-vous que le message vocal OGM1 est enregistré.
Appuyez sur le bouton ON/OFF une fois et le répondeur émettra 2 bips courts et répètera le message OGM1.
.
Le compteur de message s’affiche sur l’écran en indiquant que l’unité est en mode Répondre/Enregistrer.
REGLEZ L’UNITE AU MODE REPONSE SANS ENREGISTREMENT (Pas d’enregistrement des messages
de vos correspondants).
Assurez-vous que le message vocal OGM2 est enregistré.
Appuyez sur le bouton ON/OFF une fois pour entendre 2 bips courts suivi du message OGM1.
Appuyez de nouveau sur le bouton ON/OFF pour entendre 3 bips courts puis votre message OGM2.

3
FR
L’écran indique que l’unité est en mode « Réponse sans enregistrement ».
REGLEZ LE REPONDEUR EN MODE « NE PAS REPONDRE » (OFF)
Appuyez sur le bouton ON/OFF jusqu’à ce que “--” s’affiche sur l’écran pour régler le répondeur en
mode «pas de message vocal»
REGLER LES SONNERIES
Votre SD-TOP vous permet de régler le nombre de sonneries avant le déclenchement automatique de votre
message d’absence. 4 choix sont possibles : 2,3,4,ou nombre d’économie. Le nombre d’économie
répondra aux appels à la quatrième sonnerie s’il n’y a pas de message enregistré et il répondra à la
deuxième sonnerie s’il y a un nouveau message enregistré. Cette caractéristique vous permet de savoir
si vous avez des nouveaux messages dans votre messagerie.
Pour régler le nombre de sonneries, appuyez et maintenez le bouton RING/ durant 2 secondes; le
répondeur émet un bip et le réglage du nombre de sonnerie clignote sur l’écran.
Appuyez sur le bouton Ring/ et/ou le bouton CODE/ pour changer le nombre de sonneries.
Quand le réglage de sonneries que vous désirez s’affiche, appuyez sur le bouton STOP pour le valider.
Pour vérifier, appuyez et relâchez le bouton RING/;
Il est possible aussi d’enregistrer un memo vocal. Pour enregistrer un mémo, appuyez et maintenez le
bouton MEMO environ 2 secondes; un bip sera entendu et le compteur de temps s’affiche sur l’écran. La
durée de l’enregistrement doit être de moins de 30 secondes et plus de 3 secondes.
Après avoir enregistré le message, relâchez le bouton MEMO pour arrêter l’enregistrement. Pour vérifier
votre mémo vocal appuyez sur le bouton Play/Pause
FILTRER VOS APPELS
Réglez la commande VOLUME sur le côté de votre unité pour entendre la personne qui appelle.
Appuyez ensuite sur le bouton SPK/MONI jusqu’à ce que “on” s’affiche sur l’écran.
Quand vous recevez un appel, vous pouvez écouter la personne qui appelle laisser un message.
Si vous souhaitez interrompre l’enregistrement et prendre l’appel de votre correspondant prenez
simplement votre combiné de téléphone et parlez (le répondeur SD-TOP a s’éteindra automatiquement).
Appuyez sur le bouton SPK/MONI de nouveau jusqu’à ce que “OF” s’affiche sur l’écran pour éteindre
le filtrage des appels.
ECOUTER LA MESSAGERIE (ICMS)
L’écran affiche clignote quand le répondeur SD-TOP a enregistré un nouveau messages. Si l’écran ne
clignote pas mais est allumé c’est que la messagerie contient en mémoire des messages déjà écoutés.
Pour entendre les messages, procédez selon les étapes suivantes:
Assurez-vous que la commande VOLUME est réglée sur un volume audible.
Si les nouveaux messages sont enregistrés, appuyez sur le bouton Play/Pause pour entendre seulement
les nouveaux messages. S’il n’y a pas de nouveaux messages enregistrés, appuyez sur le bouton
Play/Pause pour entendre les messages mémorisés.
Une fois les nouveaux messages écoutés, le SD-TOP affiche le nombre total de messages reçus.
NOTE: Les messages sont automatiquement sauvegardés en mémoire. Pour supprimer les messages,
voir les paragraphes suivants.
Pour répéter un message que vous êtes en train d’écouter, simplement appuyez sur le bouton RING/
(touche de retour en arrière).
Appuyez sur ce bouton d’une façon répétitive pour choisir les messages précédemment enregistrés
et mémorisés sur votre SD-TOP.
Pour passer au message suivant, appuyez sur le bouton CODE.
Pour interrompre momentanément la consultation de la messagerie, appuyez et relâchez le bouton
Play/Pause et “PA” (pour PAUSE) clignotera sur l’écran. Pour reprendre la consultation des messages

4
FR
appuyez sur le bouton STOP et le répondeur SD-TOP sauvegardera les messages précédents.
NOTES:
Après la consultation des messages, le SD-TOP se remet automatiquement en mode d’enregistrement
des messages.
La durée maximale d’enregistrement pour un message est 90 secondes.
SI LA MESSAGERIE EST PLEINE
Si la mémoire est pleine, le SD-TOP passe automatiquement en mode « Répondre –Seulement » : émission
du message d’absence OGM2 mais pas d’enregistrement des messages entrants.
SUPPRIMER LES MESSAGES D’ENTREE OU LES MEMOS PERSONNELS
Pour supprimer un message lors de la consultation, appuyez sur le bouton 8. DELETE). Le répondeur
supprime le message en cours et passe à la lecture du message suivant.
Pour supprimer tous les messages, appuyez et maintenez le bouton DELETE. Le SD-TOP émet un son
bip et le compteur de message se remet à “00”.
OPERATION A DISTANCE
CODE DE SECURITE
Cet appareil peut être consulté à distance.
Le code de sécurité prédéfini est : 19.
Pour modifier ce code, suivez les instructions ci-dessous.
Appuyez et maintenez le bouton CODE/ pendant 2 secondes; un bip sonne et le code présent clignote.
Appuyez sur le bouton RING/ et/ou le bouton CODE/ pour modifier le code de sécurité. Quand le choix
du code souhaité est affiché, appuyez sur le bouton STOP pour l’enregistrer.
Pour vérifiez le code de sécurité, appuyez et relâchez le bouton CODE/. Le
code de sécurité s’affiche brièvement sur l’écran.
NOTES:
En cas de coupure de courant sans une batterie 9V dans l’appareil, le code de sécurité se remet
automatiquement sur 19.
Si vous oubliez le code d’accès, débranchez l’adaptateur AC et retirez la pile de sauvegarde 9V.
Le code se remet sur 19. Attention, dans ce cas tous les messages mémorisés sont effacés.
OPERATION A DISTANCE
CONSULTER LE REPONDEUR A DISTANCE
Appelez votre numéro de téléphone.
Si le répondeur SD-TOP est éteint, après 8 sonneries vous entendrez un bip de 3 secondes.
Entrez votre code de sécurité dans les 10 secondes, et l’appareil passe alors en mode
« Répondre/Enregistrer ». Si vous n’avez pas entré votre code de sécurité dans les 10 secondes,
le répondeur s’arrête et se déconnecte.
1
ECOUTER LES MESSAGES DE REPONDEUR OGM1, OGM2 A DISTANCE - ENREGISTRER
UN NOUVEL OGM A DISTANCE
Appelez votre numéro de téléphone. Durant l’écoute du message d’absence OGM, entrez votre code de
sécurité. Appuyez sur le bouton “1” pour écouter l’OGM1 ou le bouton “2” pour écouter l’OGM2.
Pour enregistrer un nouveau message d’absence OGM, effectuez les memes opérations précédentes.
Durant l’écoute du message OGM à modifier, entrez votre code de sécurité.
Pour modifier l’OGM1: appuyez sur le bouton “#” puis sur le bouton “1” et après le bip long, enregistrez
votre nouveau message OGM1. Une fois terminé, appuyez sur le bouton “9” pour écouter le nouveau
message OGM1. Si vous en êtes satisfait, appuyez sur le bouton “.” pour terminer l’appel ou répétez cette
étape pour enregistrer un nouveau message OGM1.
Pour modifier l’OGM2: appuyez sur le bouton “#” puis sur le bouton “2” et après le bip long, enregistrez
votre nouveau message OGM2. Une fois terminé, appuyez sur le bouton “9” pour écouter le nouveau

5
FR
message OGM2. Si vous en êtes satisfait, appuyez sur le bouton “.” pour terminer l’appel ou répétez cette
étape pour enregistrer un nouveau OGM2.
OPERATION A DISTANCE
CONSULTER LA MESSAGERIE (ICM) A DISTANCE
Appelez votre numéro de téléphone.
Lorsque vous entendez le message d’absence OGM, entrez votre code de sécurité.
Appuyez sur le bouton “5” pour écouter les messages mémorisés.
Appuyez sur le bouton “9” pour arrêter la consultation des messages. Dans ce cas tous les messages
restent sauvegardés.
Pour répéter le message en cours d’écoute, appuyez sur le bouton “4”.
Pour retourner au message précédent, appuyer 2 fois rapidement sur “4”.
Pour passer au message suivant appuyez sur “6”.
ENREGISTRER UN MEMO A DISTANCE
Appelez votre numéro de téléphone.
Durant le message d’absence OGM, entrez votre code de sécurité.
Appuyez sur le bouton “#” puis sur le bouton “3” et après un bip long, enregistrez votre mémo.
Appuyez sur le bouton “9” une fois terminé.
OPERATION A DISTANCE
SUPPRIMER UN MESSAGE
Appelez votre numéro de téléphone.
Durant le message d’absence OGM, entrez votre code de sécurité.
Appuyez sur le bouton “5” pour écouter les messages.
Pour supprimer à distance le message en cours, appuyez sur le bouton “0”.
ECOUTER A DISTANCE (AUDIO-SURVEILLANCE)
Cette caractéristique vous permet d’appeler et d’écouter les sons dans la pièce où se trouve votre
répondeur SD-TOP.
Appelez votre numéro de téléphone.
Durant le message d’absence OGM, entrez votre code de sécurité.
Appuyez sur le bouton “7” et le répondeur SD-TOP se mettra en mode «surveillance» durant 90
secondes. A la fin des 90 secondes sera émis un bip puis l’appareil se remet en veille
automatiquement. Si vous voulez continuer la surveillance, appuyez de nouveau sur le bouton “7”
immédiatement après le bip.
Pour arrêter la surveillance, appuyez sur le bouton “9”
NOTE:
Appuyez sur le bouton “.” Pour arrêter toutes les opérations et libère la ligne téléphonique.
OPERATION A DISTANCE
REGLER L’UNITE AU MODE REPONDRE-SEULEMENT OU REPONDRE/ENREGISTRER A
DISTANCE DISTANCE
Appelez votre numéro de téléphone.
Durant le message d’absence OGM, entrez votre code de sécurité.
Appuyez sur le bouton “8” pour choisir un des modes entre : Répondre/Enregistrer, Répondre-seulement
et Ne Pas Répondre-Off.
Après avoir appuyé sur le bouton “8”, vous entendrez le message OGM choisi.

6
FR
Si vous n’entendez qu’un long bip, l’unité est réglée sur le mode Répondre-Off.
Appuyez sur le bouton “9” pour valider votre choix.
TERMINER L’APPEL:
Appuyez sur le bouton “.” pour arrêter l’opération à distance et terminer l’appel.
RESOLUTIONS PROBLEMES MAJEURES (FAQ)
SYMPTÔME CAUSE POSSIBLE SOLUTION POSSIBLE
Pas d’alimentation
L’adaptateur AC
n’est pas connecté
Connectez correctement
l’adaptateur AC à la prise murale
La prise de courant
ne fonctionne pas
Effectuez le branchement sur
une autre prise murale 220V
Pas de message vocal OGM
Le volume est trop faible Augmentez le volume
Le message est mal
enregistré
Enregistrez de nouveau le message.
Le SD-TOP ne répond pas
aux appels
Les cordons de ligne ne sont
pas correctement connectés.
Connectez correctement
tous les cordons
L’appareil n’est pas allumée Allumez l’appareil
Problème de
ligne téléphonique
Appelez votre compagnie
de téléphone
Pas de message reçus
enregistrés
L’appareil n’est pas allumée Allumez l’appareil
La mémoire est pleine
Supprimez les anciens messages
enregistrés
L’appareil est réglé en
mode Répondre-seulement
Réglez l’unité au mode
Répondre/Enregistrer.
Un message reçu
(ICM) est incomplet
L’appareil n’est pas allumée Allumez l’appareil
La mémoire est pleine
Supprimez les anciens
messages enregistrés
Le message reçu est plus
de 90 secondes
Les messages vocaux reçus
sur votre répondeur ne
doivent pas dépasser 90 secondes
ICM est faible Le volume est trop faible Augmentez le volume
Pas de son Le volume est trop faible Augmentez le volume
“Lo” se clignote sur l’écran
La batterie est faible
ou n’est pas installée
Installez une nouvelle batterie
Appel à distance Pas de réponse au code d’accès
Le téléphone utilisé
n’est pas compatible
Utilisez un autre téléphone
Code d’accès incorrect
Entrez le code d’accès correct
Appel à distance –
impossible de laisser un
message sur le répondeur
La mémoire est pleine
Quand le mémoire est
plein, le SD-TOP passe
automatiquement en mode
«Répondre seulement»
Code de sécurité de votre SD-TOP : 19

1
DE
ANORDNUNG DER STEUERTASTEN
OBEN
1. EIN-/AUS-Taste 7. Abspiel-/Pause-Taste
2. OGM1 (Ansagetext 1)-Taste 8. Lösch-Taste
3. OGM1 (Ansagetext 2)-Taste 9. RING/Button
4. SPK/MONI-Taste 10. CODE/
◄◄
-Taste
5. MEMO-Taste 11. LED Display
6. STOP-Taste
AN DER SEITE
12. Lautstärke-Schieberegler
HINTEN
13. DC-Buchse (9V-Eingang) 14. Telefon-Zuleitungsbuchse
15. Telefon-Leitung 16. Batterie-Fach (a. d. Unterseite des Gerätes)
INSTALLATION
BATTERIE-WARNHINWEISE
Bitte beachten Sie die Warnhinweise, wenn Sie Batterien in diesem Gerät benutzen:
1. Benutzen Sie ausschliesslich 9V-Batterien (6LR61 oder gleichen Typs).
2. Stellen Sie sicher, dass die Polarität der Batterien beim Einlegen beachtet wurde. Durch falsche
Polarität kann das Gerät beschädigt werden.
3. Wenn Sie das Gerät für eine längere Zeit nicht benutzen, entfernen Sie die Batterien um Schäden
und Verletzungen durch Auslaufen von Batterie-Säure zu vermeiden.
4. Versuchen Sie nicht Batterien zu laden, die dafür nicht geeignet sind; Diese können überhitzen
und explodieren. (Folgen Sie den Anweisungen des Batterie-Herstellers)
Dieses Kapitel wurde geschrieben, um Ihnen ein Nachschlagewerk zumEinstellen Ihres Anrufbeantworters
bereit zu stellen.
1. Verbinden Sie das eine Ende der Telefonleitung mit der Telefon-Anschlussbuchse. Stecken Sie
das andere Ende in die Telefon-Anschlussdose in der Wand. Sie können das andere Telefon unter
Verwendung des kurzen Telefonkabels in die Buchse dieses Anrufbeantworters stecken. Stecken Sie ein
Ende des Telefonkabels in die “Zum Telefon”–Buchse und das andere Ende in die Telefon Buchse ++.
2. Stecken Sie den kleinen Stecker am Ende des Netzteil-Kabels in die 9VDC-Spannungsbuchse auf
ANN1
ANN2
MEMO
ASC
ON/OFF
CANC
PIN/
/SQUIL
TELLINEA
DC 9V

2
DE
der Rückseite des Gerätes. Benutzen Sie ausschließlich das mitgelieferte Wechselstrom-Netzteil mit
positivem Pol in der Mitte.
3. Stecken Sie das Netzteil in eine normale Steckdose. Einmal eingesteckt, wird in der Anzeige von
0 – 5 hochgezählt. Nach einem langen Ton, wird in der Anzeige " -- " erscheinen, um anzuzeigen, dass
das Gerät eingeschaltet ist, aber noch nicht bereit ist, um Gespräche zu beantworten oder “Lo”, um
anzuzeigen, dass die Batterie leer, schwach oder nicht vorhanden ist.
4. Während eines Wechselspannungsausfalls dient die 9V-Batterie als Back-Up, so dass das Gerät
die gespeicherte Information nicht verliert. Allerdings kann das Gerät ohne Wechselspannung keine
eingehenden Gespräche beantworten.
BETRIEBN
EINEN ANSAGETEXT AUFNEHMEN (outgoing message= OGM)
Dieses Gerät kann zwei Arten von Nachrichten aufzeichnen: OGM1 wird benutzt, wenn Sie dem
Anrufer ermöglichen möchten, Ihre Ansage zu hören und eine Nachricht zu hinterlassen. OGM2 wird
benutzt, wenn Sie dem Anrufer ermöglichen möchten, nur Ihre Ansage zu hören, aber keine Nachricht
hinterlassen zu können. Die maximale Aufzeichnungsdauer einer OGM beträgt 30 Sekunden. Die
minimale Aufzeichnungsdauer einer OGM beträgt 4 Sekunden. Wenn Sie keinen Ansagetext OGM1 oder
OGM2 aufgenommen haben, können Sie den Anrufbeantworter nicht in Betrieb nehmen.
AUFZEICHNEN DES ANSAGETEXT1 (OMG1)
Betätigen und halten Sie die Taste OGM1 für ungefähr 2 Sekunden bis ein langer Piepton zu hören ist.
Das Display wird die restliche Zeit herunterzählen, beginnen Sie mit Ihrem Ansagetext, sprechen Sie mit
normaler Stimme.
Wenn Sie Ihren Text aufgesprochen haben, geben Sie die Taste OGM1 wieder frei. Ein kurzer Ton wird
ertönen und Ihre neue Ansage wird einmal abgespielt. Vergewissern Sie sich, dass die Lautstärke auf das
gewünschte Niveau eingestellt ist.
Um eine neue Ansage aufzunehmen, wieder holen Sie die Schritte 1 und 2.
AUFZEICHNUNG DES ANSAGETEXT OGM2 (OUTGOING MESSAGE 2)
Betätigen und halten Sie die Taste OGM2 für ungefähr 2 Sekunden bis ein langer Piepton zu hören ist.
Das Display wird die restliche Zeit herunterzählen, beginnen Sie mit Ihrem Ansagetext, sprechen Sie mit
normaler Stimme.
Wenn Sie Ihren Text aufgesprochen haben, geben Sie die Taste OGM2 wieder frei. Ein kurzer Ton wird
ertönen und Ihre neue Ansage wird einmal abgespielt. Vergewissern Sie sich, dass die Lautstärke auf das
gewünschte Niveau eingestellt ist.
Um eine neue Ansage aufzunehmen, wieder holen Sie die Schritte 1 und 2.
PRÜFEN DER ANSAGETEXTE
Betätigen Sie kurz die OGM1 oder OGM2 Taste, um die gewählte Ansage abzuspielen. Drücken Sie die
“STOPP“-Taste, um die Wiedergabe zu beenden bevor deren Ende erreicht ist.
HINWEISE:
Wenn das Gerät einen Wahlton, eine längere Pause oder ein Besetztzeichen erkennt, wird es auegen
und keine Nachricht aufzeichnen.
Das Gerät wird abschalten, wenn ein parallelgeschaltetes Telefon abgenommen wird.
Wenn der Speicher voll ist, “FU” wird im Display angezeigt.
Wenn die Batterie schwach, leer oder nicht vorhanden ist, wird im Display “LO” angezeigt.
Betätigen Sie die OGM1 oder OGM2–Taste um die entsprechende Ansage zu hören.
EINSTELLEN DES GERÄTES AUF ANRUF-BEANTWORTUNGS-/ AUFZEICHNUNGS-BETRIEBSART
(Eingehende Nachrichten werden aufgezeichnet)
Vergewissern Sie sich, dass OGM1 aufgezeichnet ist. Betätigen Sie die „EIN-„ / „AUS“ – Taste einmal,
das Gerät sendet zwei kurze Signaltöne und danach wird OGM1 abgespielt.
Der Nachrichtenzähler wird im Display eingeblendet, um anzuzeigen, dass sich der Anrufbeantworter im
Beantwortungs- / Aufzeichnungs-Modus bendet.

3
DE
DAS GERÄT AUF DEN “NUR ANSAGE” - MODUS EINSTELLEN(Keine Aufzeichnung von
Nachrichten des Anrufers)
Vergewissern Sie sich, dass OGM2 aufgezeichnet ist, Betätigen Sie „EIN-„ / „AUS“ – Taste einmal, das
Gerät sendet zwei kurze Signaltöne und danach wird OGM1 abgespielt.
Betätigen Sie die „EIN-„ / „AUS“ – Taste nochmals, werden drei Signaltöne gesendet und die Ansage
OGM2 wird abgespielt.
Der Nachrichtenzähler wird im Display eingeblendet und “Ao” wird im Display blinken, um anzuzeigen,
dass sich der Anrufbeantworter im “Nur Ansage” – Betrieb bendet.
DAS GER T AUF "NICHT ANTWORTEN" EINSTELLEN Bet tigen Sie die Ein-/Aus-Taste bis "--"
im Display erscheint, um das Ger t in den "NICHT ANTWORTEN"-Modus zu versetzen.
EINSTELLEN DER TÖNE
Die Anzahl der Ruftöne bevor der Anruf entgegengenommen woird, kann auf 2, 3, 4, oder GebührenSparer eingestellt werden.
Gebühren-Sparer wird Gespräche beim vierten Klingeln entgegennehmen, wenn keine Nachrichten
aufgezeichnet wurden und es wird nach dem zweiten Klingeln annehmen, wenn neue Nachrichten
aufgezeichnet wurden.
Diese Eigenschaft ist nützlich, wenn Sie von extern Ihre Nachrichten abhören möchten.
Betätigen und halten Sie die RING/◄◄-Taste für 2 Sekunden; Das Gerät wird einen Piepton erzeugen
und die aktuelle Klingel-Einstellung wird blinken.
Betätigen Sie die Ring◄◄-Taste und/oder die CODE/◄◄-Taste, um die Klingeleinstellungen
vorzunehmen. Wenn die gewünschten Klingeleinstellungen erscheinen, betätigen Sie die STOP-Taste.
Um die aktuelle Klingeleinstellung zu prüfen, betätigen Sie die RING◄◄ -Taste; der aktuelle Klingelstatus
wird kurz im Display angezeigt.
Um eine persönliche Notiz aufzuzeichnen, die beim nächsten Mal, wenn jemand eine Nachricht abfragt,
abgespielt wird, betätigen und halten Sie die Memo-Taste für ungefähr 2 Sekunden. Ein Klang wird
ertönen und der Abwärtszähler wird im Display erscheinen. Die Aufnahmezeit für die Notiz muss
zwischen 3 und 30 Sekunden liegen
Nach dem die Nachricht aufgenommen wurde, geben Sie die Memo-Taste frei, um die Aufnahme zu
stoppen. Um die Notiz anzuhören, betätigen Sie einfach die Wiedergabe-Taste durch Drücken auf “Play/Pause”.
DURCHSEHEN IHRER NACHRICHTEN
Stellen Sie den Lautstärkenregler an der Geräte-Seite ein, um den Anrufer zu hören und betätigen Sie die
SPKMONI-Taste bis „on“ in der Anzeige erscheint.
Wenn ein Gespräch angenommen wird, können Sie den Anrufer hören, wenn er eine Nachricht
hinterlässt. Wenn Sie mit dem Anrufer sprechen möchten, nehmen Sie einfach das Handteil, um zu
sprechen. (das Gerät wird automatisch abschalten) Drücken Sie die SPKMONI-Taste nochmals bis “OF”
im Display erscheint, um das Durchsehen zu beenden.
WIEDERGABE EINGEHENDER NACHRICHTEN (ICMS)
Der Nachrichtenzähler in der Anzeige wird blinken, wenn das Gerät eine neue Nachricht aufgezeichnet
hat. Wenn der Nachrichtenzähler nicht blinkt, dann zeigt er die Anzahl der Nachrichten an, die vorher
aufgenommen wurden, aber nicht gelöscht wurden.
Um Nachrichten zu hören, verfahren Sie wie folgt:
Vergewissern Sie sich, dass die Lautstärke auf den gewünschten Pegel eingestellt ist.
Wenn neue Nachrichten aufgezeichnet wurden, betätigen Sie die Play/Pause-Taste, um nur die neuen
Nachrichten zu hören. Wenn keine neuen Nachrichten aufgezeichnet wurden, betätigen Sie die Play/
Pause-Taste, um Nachrichten zu hören, die Sie bereits abgehört, aber nicht gelöscht haben.
Nach dem Abspielen der Nachrichten wird der Nachrichtenzähler im Display die Gesamtzahl der
empfangenen Nachrichten anzeigen.
ANMERKUNG: Nachrichten werden automatisch gespeichert. Um Nachrichten zu löschen,
lesen Sie bitte Seite 9.
Um eine Nachricht zu wiederholen, die Sie gerade anhören, betätigen Sie einfach die RING/◄◄ -Taste.
Wiederholtes Betätigen dieser Taste bewirkt das Zurückspringen zu vorherigen Nachrichten.Um eine
Nachricht, die Sie gerade abhören, zu überspringen, betätigen Sie die CODE/◄◄-Taste und die nächste

4
DE
aufgenommene Nachricht wird wiedergegeben.
Um die ICMS zu unterbrechen, betätigen Sie kurz die Play/Pause-Taste, das Gerät wird die Wiedergabe
unterbrechen. “PA” wird im Display blinken. Um fortzufahren betätigen Sie nochmals kurz die Play/Pause-Taste.
Um die Wiedergabe zu stoppen, betätigen Sie die „STOPP“-Taste und das Gerät wird die vorherige
Nachricht speichern.
ANMERKUNG:
Nach dem Abspielen der ICMS wird das Gerät automatisch für die Aufnahme neuer Nachrichten zurückgesetzt.
Die maximale Aufnahmedauer einer ICM (Incoming Message) beträgt 90 Sekunden.
WENN DER SPEICHER VOLL IST
Wenn der Speicher voll ist, wird das Gerät automatisch in „Antwort“-Modus wechseln, OGM2
wiedergeben und nicht erlauben Nachrichten zu hinterlassen.
LÖSCHEN EINGEHENDER NACHRICHTEN ODER PERSÖNLICHER NOTIZEN
Um eine einzelne Nachricht während der Wiedergabe zu löschen, betätigen Sie die "DELETE"-Taste,
daraufhin wird das Gerät die aktuelle Nachricht löschen und die nächste wiedergeben.
Um alle Nachrichten zu löschen, betätigen und halten Sie die “DELETE”-Taste während das Gerät nicht in
Betrieb ist (keine Nachrichten wiedergibt).
FERNGESTEUERTER BETRIEB
SICHERHEITSCODE
Das Gerät kann von nahezu allen Tonwahl-fähigen Telefonen betrieben werden. Der Sicherheitscode ist
auf “19” voreingestellt. Um den Code zu ändern, folgen Sie den untenstehenden Anweisungen:
Betätigen und halten Sie die CODE/◄◄- Taste für 2 Sekunden; ein Ton wird ertönen und der aktuelle
Code wird angezeigt. Betätigen Sie die RING/◄◄-Taste und / oder CODE/◄◄-Taste um den
Sicherheits- code zu ändern. Wenn die Code-Einstellung erscheint, betätigen Sie die „STOPP“-Taste.
Um den aktuellen Sicherheits-Code zu prüfen, betätigen Sie kurz die CODE/◄◄-Taste; Der aktuelle
Sicherheits-Code wird kurz angezeigt.
NOTES:
Wenn ein Spannungsausfall auftritt, die Batterie leer oder nicht vorhanden ist, wird der
Zugriffscode auf “19” zurückgesetzt.
Wenn Sie den Zugriffscode vergessen haben, ziehen Sie den Netzstecker und entnehmen Sie die
Batterie, dadurch wird der Code auf „19“ zurückgesetzt.
FERNGESTEUERTER BETRIEB
SCHALTEN SIE DEN ANRUFBEANTWORTER EIN (WENN SIE VERGESSEN HABEN IHN EINZUSCHALTEN)
Rufen Sie den Anrufbeantworter von einem separaten Telefon an.
Wenn das Gerät aus ist, wird es nach 8-mal Klingeln einen 3 Sekunden langen Ton senden.
Geben Sie Ihren Sicherheitscode innerhalb von 10 Sekunden ein, das Gerät wird in den Antwort-/
Aufzeichnungs-Modus wechseln. Wenn Sie Ihren Sicherheitscode nicht innerhalb von 10 Sekunden
eingeben, wird das Gerät anhalten und die Verbindung unterbrechen.
FERNGESTEUERTE WIEDERGABE DES ANSAGETEXTS 1 ODER 2 (OGM1, OGM2)
FERNGESTEUERTE AUFZEICHNUNG EINER NEUEN ANSAGE (OGM)
Rufen Sie den Anrufbeantworter von einem separaten Telefon an. Während der Wiedergabe der OGM
geben Sie Ihren Sicherheits-Code ein. Betätigen Sie die “1” auf der Fernbedienung (FB), um OGM1 oder
mit “2” um OGM2 wiederzugeben.
Rufen Sie den Anrufbeantworter von einem separaten Telefon an. Während der Wiedergabe der OGM
geben Sie Ihren Sicherheits-Code ein.
OGM1: Betätigen Sie “#” und anschließend die “1” auf der FB, nach einem langen Ton, zeichnen Sie
Ihre neue OGM1 auf. Wenn Sie fertig sind, betätigen Sie die “9” auf der FB und die neue OGM1 wird
abgespielt. Wenn Sie damit zufrieden sind, betätigen Sie die “”-Taste auf der FB, um das Gespräch zu

5
DE
beenden, andernfalls wiederholen Sie die Schritte, um eine neue OMG1 aufzuzeichnen.
OGM2: Betätigen Sie “#” und anschließend die “2” auf der FB, nach einem langen Ton, zeichnen Sie
Ihre neue OGM2 auf. Wenn Sie fertig sind, betätigen Sie die “9” auf der FB und die neue OGM2 wird
abgespielt. Wenn Sie damit zufrieden sind, betätigen Sie die “”-Taste auf der FB, um d as Gespräch zu
beenden, andernfalls wiederholen Sie die Schritte, um eine neue OMG2 aufzuzeichnen.
FERNGESTEUERTER BETRIEB
FERNGESTEUERTE WIEDERGABE EINGEGANGER NACHRICHTEN (ICM’S)
Rufen Sie den Anrufbeantworter von einem separaten Telefon an. Während der Wiedergabe der OGM
geben Sie Ihren Sicherheits-Code ein.
Betätigen Sie die “5” auf der FB wird das Gerät die Nachrichten wiedergeben. Betätigen Sie die “9” auf
der FB, um die Wiedergabe zu stoppen. Nach der Wiedergabe sind trotzdem alle Nachrichten gespeichert
und Sie können Sie, wenn Sie zu Hause sind, nochmals anhören.
Um die aktuelle Nachricht zu wiederholen, betätigen Sie die “4” auf der FB. Um eine vorhergehende
Nachricht abzuspielen, betätigen Sie die die “4” auf der FB und danach schnell noch einmal die “4”.
Um die nächste Nachricht wiederzugeben, betätigen Sie die “6” auf der FB
EINE NOTIZ AUFNEHMEN
Rufen Sie den Anrufbeantworter von einem separaten Telefon an. Während der Wiedergabe der OGM
geben Sie Ihren Sicherheits-Code ein.
Betätigen Sie die “#”-Taste, dann die “3” auf der Fernbedienung und nach dem langen Piepton, können
Sie Ihre Notiz aufzeichnen.
Betätigen Sie die “9” auf der Fernbedienung, wenn Sie Ihre Notiz aufgesprochen haben.
FERNGESTEUERTER BETRIEB
LÖSCHEN EINER NACHRICHT
Rufen Sie den Anrufbeantworter von einem separaten Telefon an. Während der Wiedergabe der OGM
geben Sie Ihren Sicherheits-Code ein.
Betätigen Sie die “5” auf der FB, um Nachrichten abzuspielen. Um die aktuelle Nachrichten ferngesteuert
zu löschen, betätigen Sie die “0” auf der FB.
LÖSCHEN ALLER NACHRICHTEN
Rufen Sie den Anrufbeantworter von einem separaten Telefon an. Während der Wiedergabe der OGM
geben Sie Ihren Sicherheits-Code ein.
Betätigen Sie die “5” auf der FB, um Nachrichten abzuspielen. Um alle Nachrichten ferngesteuert zu
löschen, betätigen Sie das “#” auf der FB.
FERNGESTEUERTE RAUM-ÜBERWACHUNG
Diese Eigenschaft erlaubt es Ihnen zu Hause anzurufen, um den Raum in dem der Anrufbeantworter
steht, zu überwachen.
Rufen Sie den Anrufbeantworter von einem separaten Telefon an. Während der Wiedergabe der OGM
geben Sie Ihren Sicherheits-Code ein.
Betätigen Sie die “7” auf der FB wird das Gerät den Raum für 90 Sekunden abhören, Danach piepen und
stoppen. Wenn Sie länger abhören möchten, betätigen Sie die “7” auf der FB.
Um die Überwachung zu beenden, betätigen Sie die “9” auf der FB.
ANMERKUNG:
Betätigen Sie “” auf der FB werden alle Aktionen und die Verbindung beendet.
FERNGESTEUERTER BETRIEB
FERNGESTEUERTE EINSTELLUNG DES ANRUFBEANTWORTERS AUF “NUR ANTWORTEN”ODER “ANTWORTEN/AUFZEICHNEN”-MODUS
Rufen Sie den Anrufbeantworter von einem separaten Telefon an. Während der Wiedergabe der OGM
geben Sie Ihren Sicherheits-Code ein.

6
DE
Betätigen Sie die “8” auf der FB, um zwischen den Betriebsarten zu wechseln. (Antworten/Aufzeichnen
und „Nur Antworten“). Nach dem Betätigen der “8” auf der FB, können SIE die zugehörige OGM hören.
Wenn Sie nur einen langen Ton hören, dann ist das Gerät auf „NICHT- ANT- WORTEN“ eingestellt.
Betätigen Sie die “9” auf der FB, wenn Sie beenden möchten.
GESPRÄCH BEENDEN:
Betätigen Sie die “”-Taste, um alle ferngesteuerten Aktionen und die Verbindung zu beenden.
FEHLERBESEITIGUNG
SYMPTOM MÖGLICHE URSACHE LÖSUNGSVORSCHLAG
Keine Spannung
Netzteil nicht angeschlossen
Verbinden Sie das Netzteil mit der
9V-Buchse am Gerät und mit einer Steckdose
Steckdose funktioniert nicht Wechseln Sie zu einer anderen Steckdose.
KEINE OGM
Lautstärke ist zu leise. Steigern Sie die Lautstärke
Ansagetexte sind zu leise. Zeichnen Sie die Ansagen nochmals auf
Gerät nimmt keine Gespräche
entgegen
Telefonleitungen sind nicht
korrekt verbunden.
Prüfen Sie die Telefonverbindungen
und korrigieren Sie ggf.
Das Gerät ist nicht eingeschaltet Schalten Sie das Gerät ein.
Telefonleitungsstörungen
Kontaktieren Sie Ihren Telefon-Provider.
Keine ICM(s) aufgezeichnet
Das Gerät ist nicht
eingeschaltet
Schalten Sie das Gerät ein.
Der Speicher it voll Löschen Sie ältere ICMs.
Das Gerät bendet sich
im “Nur Antworten”-Modus.
Stellen Sie das Gerät auf
“Antworten/Aufzeichnen” ein.
ICM ist unvollständig
Speicher ist voll Löschen Sie ältere ICMs
ICM war länger
als 90 Sekunden
Vergewissern Sie sich, dass die
ICMs nicht länger als 90 Sekunden sind.
Der Anrufer unterbrach seine
Aufzeichnung zu lange oder war
zu leise. Es wurde ein Besetzt-
Zeichen erkannt oder ein Wählton.
Anrufe, die diesen Kategorien
entsprechen, werden unterbrochen.
ICM ist zu leise Lautstärke ist zu leise. Steigern Sie die Lautstärke
No sound Lautstärke ist zu leise. Steigern Sie die Lautstärke
“Lo” blinkt im Display
Die Batterie ist schwach oder
nicht vorhanden.
Installieren Sie eine neue Batterie.
Keine Antwort auf Zugriffs-Code
Das Telöefon ist
nicht tonwahlfähig
Benutzen Sie ein
tonwahl-fähiges Telefon.
Falscher Zugriffs-Code
Geben Sie den korrekten Zugriffs-Code ein.
Sie benutzen ein falsches
Tonwahlfähiges telefon.
Vergewissern Sie sich, dass das Telefon
geeignet ist, 2-Sekunden-Töne zu senden.
Sie können keine
Nachrichten hinterlassen.(ICMs)
Der Speicher ist voll.
Wenn der Speicher voll ist,
schaltet das Gerät automatisch
in den „Nur Antworten“-Mode um.
Access Code: 19

BRONDI S.p.A.
www.brondi.it
info@brondi.it
HAI BISOGNO DI ASSISTENZA?
Per qualsiasi informazione o chiarimento
chiama il numero
899.03.20.99
Numero a tariffazione speciale:
52 centesimi di euro al minuto + iva senza scatto
alla risposta; per i gestori mobili il costo varia in
base al piano tariffario.
Version 1 : 18/2/2009
 Loading...