


PMR FX-100 TWIN
PMR 446 2-way radio
Radio transmisor-receptor mod. PMR 446
Radio émetteur-récepteur PMR 446
Funksender - und Empfänger PMR 446
Instruction manual
Manual de instrucciones
Manuel d’instructions
Gebrauchsanleitung

Brondi would like to congratulate you on your purchase of
the brand new FX-100 private
2-way radio.
We recommend that you
carefully read the User manual
for correct use of the handset.
p. 3-26
E
N
G
L
I
S
H
Brondi se congratula con Uds.
para la compra del innovador
transmisor-receptor particular
mod. FX-100.
Les aconsejamos que consulten con cuidado el manual de
uso para el correcto empleo
del aparato.
p. 27-50
Brondi vous félicite d’avoir choisi
l’émetteur-récepteur innovant
privé FX-100.
Nous vous conseillons de lire
attentivement le manuel d’instructions pour une utilisation
correcte de l’appareil.
p. 51-74
Brondi gratuliert Ihnen zum
Kauf des innovativen, privat zu
gebrauchenden Funksender
und-empfängers Modell FX-
100.
Zur korrekten Anwendung des
Gerätes lesen Sie bitte aufmerksam die Gebrauchsanleitung
durch.
s. 75-98
E
S
P
A
Ñ
O
L
F
R
A
N
Ç
A
I
S
E
D
E
U
T
S
C
H
E

ENGLISH INDEX
1. INFORMATION, PRECAUTIONS CARE AND MAINTENANCE .... 4
2. PERFORMANCE, TECHNICAL DATA, SUGGESTIONS FOR USE ... 7
3. PACK CONTENTS ......................................................................... 10
4. HANDSET DESCRIPTION .............................................................. 11
5. INSTALLATION ..............................................................................13
5.1 Fitting the batteries ........................................................... 13
5.2 Using the accessories ........................................................ 15
6. USING THE HANDSET ...................................................................16
6.1 Switching the handset on and off ................................... 16
6.2 Communicating ................................................................. 16
6.3 Communicating: receiving and transmitting ............... 18
6.4 Call function (CALL) .......................................................... 19
6.5 Personalising the call tune ............................................... 19
6.6 Monitoring the channel
(deactivating the automatic squelch) .......................... 19
6.7 Locking the chosen channel ...........................................20
6.8 SCAN function: channel scanning ................................. 20
6.9 Low battery consumption mode .................................... 21
6.10 VOX function: voice activation ....................................... 21
6.11 Transmission over tone (“ROGER BEEP”) ........................ 22
6.12 Button tones ........................................................................ 22
6.13 Monitoring 2 channels at once .......................................23
6.14 Using the stopwatch .......................................................... 24
7. WARRANTY ...................................................................................25
8. CE CONFORMITY DECLARATION ...............................................26
3

1. INFORMATION, PRECAUTIONS CARE AND MAINTENANCE
USING THE HANDSET
On the basis of the current “Code of Electronic Communications”
(Legislative decree 259/03) all PMR 446 handsets are subject to a
declaration of use and an annual contribution: contact the Area
Inspector of reference (Ministry of Communications) to request
the forms and information on how to gain general authorisation
to use the PMR 446 handsets. The handsets may be used after
the necessary forms have been sent off, taking care to keep a
copy.
The use of PMR 446 2-way radios is allowed in Italy and in the
following European countries: France, Spain, Austria, Germany,
Denmark, Holland, Ireland, Great Britain, Sweden, Portugal,
Finland, Belgium, Czech Republic, Norway, Switzerland,
Luxemburg, and Greece. For use in the above-mentioned
countries, seek information on the regulations in the various
States.
RANGE
Your FX-100 has a range of up to 5 Km in wide open spaces. The
atmospheric and environmental conditions may limit the range.
The range may also be reduced if the batteries are not fully
charged. Other factors which might restrict range are: buildings,
thick vegetation (trees, etc.), hills or mountains. The greatest
range is obtained in wide open spaces which are fl at and free
from obstructions. Lastly, the range also depends on the battery
charge and receiving and transmitting features of the handsets
used by those with whom you are communicating.
PRECAUTIONS AND SAFETY STANDARDS
Do not soak in water or other liquids, do not leave in constant
contact with water.
Aerial damage
Do not use radios with a damaged aerial. If a damaged aerial
comes into contact with skin, slight burning may be possible.
4

Batteries
• Do not replace or charge batteries in environments where there
is a risk of explosion.
• Only use 3 rechargeable AA batteries or 3 alkaline AA batteries.
• Ensure that the batteries are properly fi tted, observing the
polarity indicated inside the compartment.
Vehicles with airbag
Do not rest the radio in the area above the airbag or on the
area it occupies when open. When the airbag opens it infl ates
immediately. If the radio is in the area concerned it may be
projected forwards, risking injury to the occupants of the
vehicle.
Environments at risk of explosion
In environments with a risk of explosion it is best to switch off the
radio. The presence of sparks in these areas can cause fi res or
explosions.
Electric detonators and explosive areas
To avoid possible interference with operations in which explosive
material is used, switch off the radio near electric detonators, in
“partially explosive areas” or where there is a signal indicating
the need to switch off radios. Observe all instructions and
indications.
NOTE: Potentially explosive environments are often, but not
always, indicated clearly. These include: refuelling areas
(e.g. on-board boats) or transfer and storage areas
of combustible or chemical substances; environments
containing chemical products of suspended particles,
such as metallic dust or residue.
Electromagnetic compatibility/interference
Switch off the unit in any building where there are signs forbidding
its use. Hospitals or clinics may use equipment which is sensitive
to the electromagnetic emissions of the handset. Switch off the
5

unit on aircraft when its use is expressly forbidden. Any use of the
unit must respect the regulations of the airline or the instructions
given by the crew.
CARE AND MAINTENANCE
• If the handset is dirty, clean using a soft cloth and water. Never
use detergents or solvents, which could ruin the outer casing
and penetrate inside the handset, causing damage.
• Protect the handset from water or other liquids.
6

2. PERFORMANCE, TECHNICAL DATA, SUGGESTIONS FOR USE
SPECIAL PERFORMANCE
• Professional handset, sporty look.
• Built-in stopwatch.
• Illuminated display.
• VOX function: detects the voice and activates transmission.
• Monitoring 2 channels at once.
RANGE & COMMUNICATION
• Up to 5 Km range in a wide open space
1
.
• 8 channels + 38 coded per channel.
• Communication guaranteed in any place2: also works where
mobile phones don’t.
• Communicates with all PMR 446 radios.
• Unlimited number of contacts.
• No time tariff3.
• Suitable for use in 18 European countries.
• Channel monitoring: listen to all communications (even when
very weak).
• SCAN function, automatic scanning of all channels.
OTHER FEATURES
• Also operates with 3 alkaline AA batteries.
• Channel lock.
• Tone activation and deactivation.
1
Depends on conditions of terrain.
2
Within range limits.
3
No time tariff: subject to national provisions for the declaration of use.
7

• Selected channel lock: to avoid accidentally changing
channel.
• Channel monitoring: to listen to all the communications on the
channel (even when very weak).
• Large backlit display.
• Call function: button to call all handsets synchronised on the
same channel.
• Volume control.
TECHNICAL DATA
Standard: PMR 446
Operating range: 446,00625 - 446,09375 MHz
Operating channels: 8
Channel pitch: 12. kHz
Type of modulation: FM
CTCSS codes: 38 for channel
Delivery power: 500 mW erp
Range of action: up to 5 Km in a wide open space
Autonomy: 20 hours (5% transmitting;
5% receiving; 90% in standby)
Batteries: 3 rechargeable AA batteries or
3 alkaline AA batteries
Weight (with batteries): 156 g
8

SUGGESTIONS FOR USE
• Sport:
- bicycle
- skiing
- running
- trekking
- sailing
- fi shing
- golf
• Walking/trips outdoors:
- mountains
- lake
- city
• Outdoor team games
• Holidays with the family or friends:
- camping
- holiday resort
- on the beach
- on a boat
- in theme parks
• Travelling with friends:
- between cars
- in mobile home
• Work:
- in warehouses
- in shopping centres
- on sites
- in discos
- at trade fairs
- sporting events
9

3. PACK CONTENTS
HANDSETS
two two-way radios
2 neck straps
DOCUMENTATION
Instruction manual.
Warranty.
List of service centres.
ACCESSORIES
2 battery chargers
CARRYING ACCESSORIES
2 belt clips
3+3 batteries
2 earpieces
10

HANDSET:
Aerial
PTT button
Radio on/off
CALL button: to
send tones on the
channel to which
the radio is tuned
+ and – buttons
- To regulate
speaker volume
- To select an
option (from the
menu)
4. HANDSET DESCRIPTION
Jack for
earpiece
Torch
Microphone
Socket for
charger
Torch on/off button
Channel lock
button
MENU button:
- Access to
functions menu
- Button lock
(excluding
PTT and call
buttons)
Speaker
11
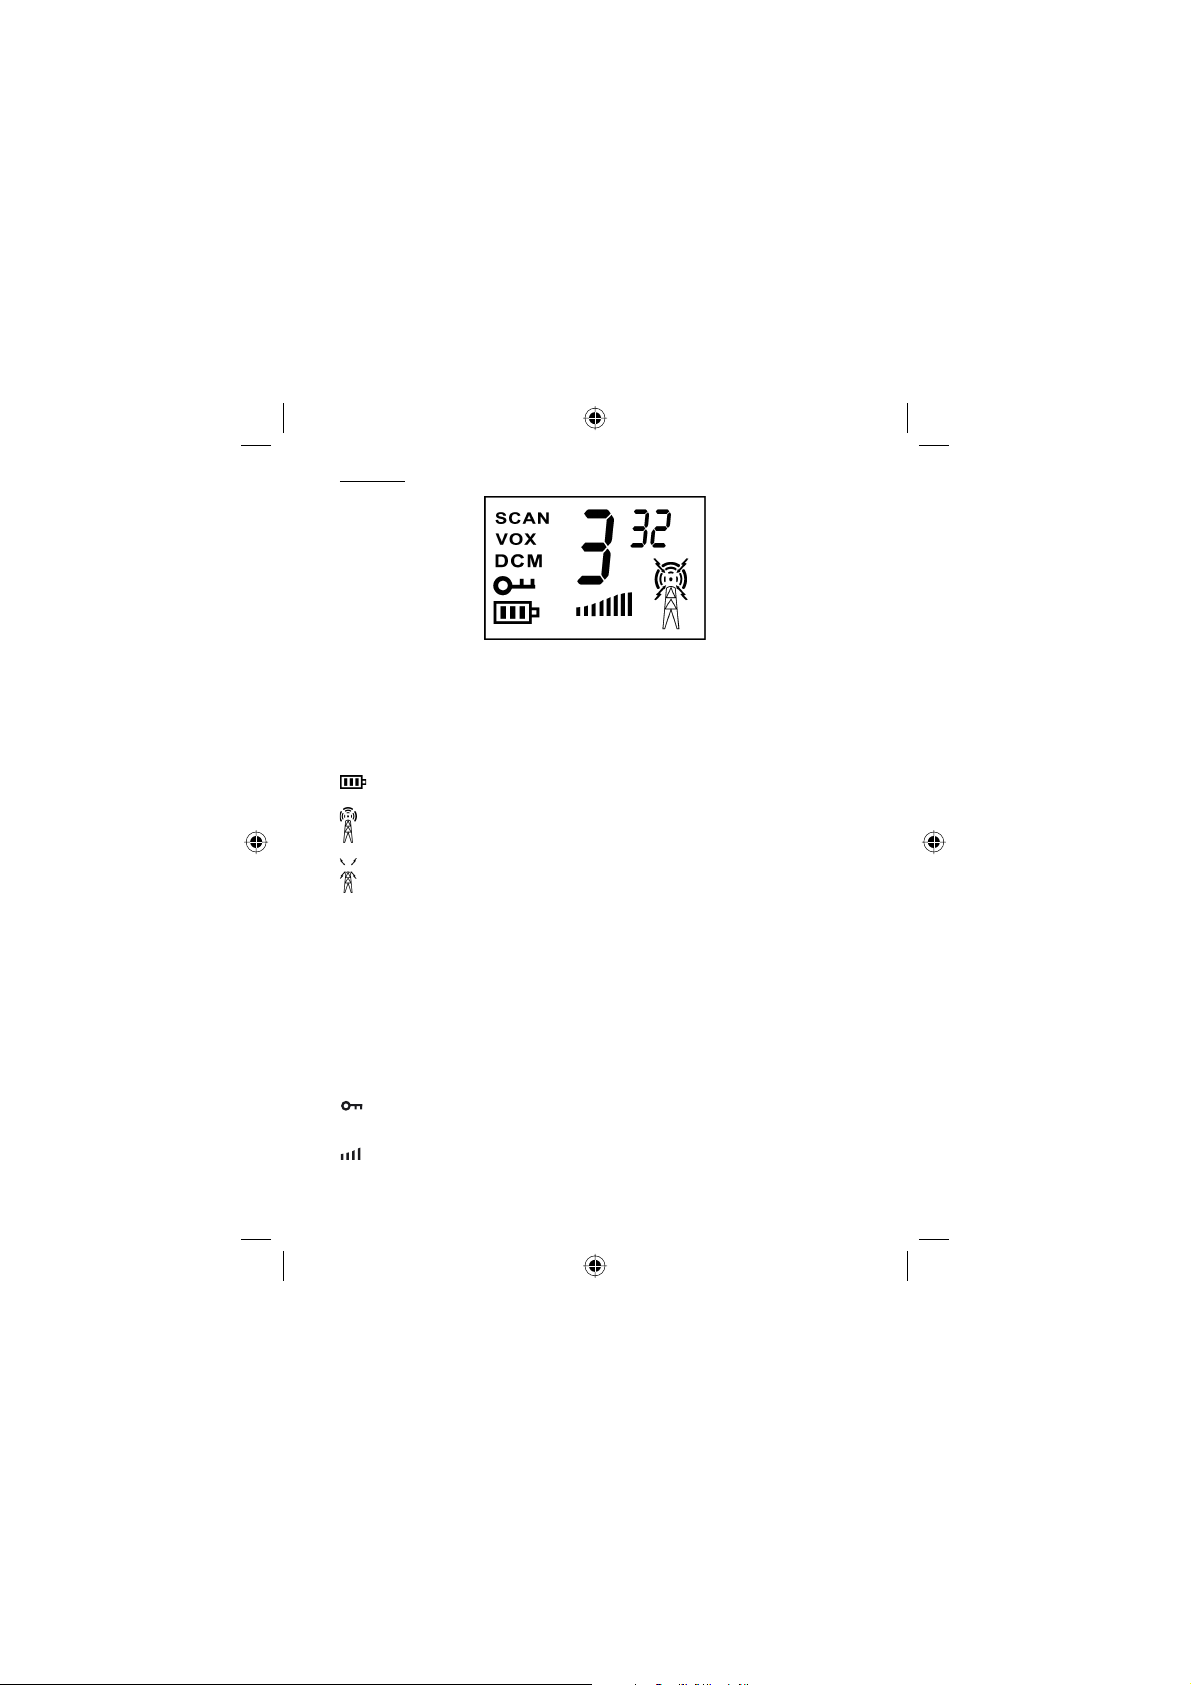
DISPLAY:
Channel (from 1 to 8)
3
32
Code (from 0 to 38)
Battery charge level
Transmission activated
Receiving activated
DCM
Dual channel monitoring activated
VOX
VOX function activated
SC
SCAN function activated
Buttons locked
Speaker volume level
12

5. INSTALLATION
5.1 FITTING THE BATTERIES
To use the handsets it is necessary to fi t 3 rechargeable AA batteries
(like those supplied) or 3 Alkaline batteries in each handset.
Ensure that the batteries are properly fi tted, observing the polarity
indicated inside the compartment.
HOW TO FIT THE BATTERIES
1. Position the radio with the display
facing downwards.
2. Remove the belt clip, lifting the hook
on the back of the clip and sliding it
upwards.
3. Slide down the battery compartment
cover and position the 3 batteries
according to the polarity marking
inside the compartment.
4. Replace the cover and hook the clip
on again.
NOTE 1: It takes about 10 hours to charge
up new rechargeable batteries
before using the handset (see
the paragraph “Recharging the
batteries”).
13

BATTERY METER
When the handset is on, the meter is located in the left corner of
the display. It shows the battery charge level using bars ( ).
When the battery power is insuffi cient, the battery meter fl ashes.
Recharge the batteries immediately, otherwise you will be unable
to use the radio.
NOTE: If the handset is left idle for a long time, remove the
RECHARGING THE BATTERIES
ATTENTION:
Before recharging the batteries, check that the 3 batteries in the
handset are rechargeable.
Every handset can be recharged separately, thanks to the two
battery chargers contained in the pack. Only recharge the
batteries using the battery charger supplied.
1. Switch off the handset, pressing the
2. After raising the rubber guard, plug the battery
3. Plug the battery charger adaptor into the
4. The handset takes about 10 hours to
NOTES:- The handset can be recharged when switched on or off.
batteries to avoid leaking and damage to the inside of
the handset.
button
and holding it down until the handset issues a
beep and the display shows the time only.
charger jack into the socket on the bottom of
the handset.
main power socket.
recharge.
- Discharge the batteries completely at least once a month,
then recharge them, so as to maintain the charge for as
long as possible and extend the life.
14

5.2 USING THE ACCESSORIES
BELT CLIP
To hook on the clip To unhook the clip
NECK STRAP
• Press the two fl aps on the neck
strap and release the two ends of
the accessory.
• Slot the fi ner strap into the hole on
the belt clip (on the upper part)
and make a knot.
• Hook the two ends of the accessory
back together as shown in the
fi gure.
EARPIECE
The handset can be used with the earpiece, microphone and PTT
button supplied.
• Lift the protective rubber guard from the socket in the upper
part of the handset
• Slot the earpiece jack into the socket indicated by the symbol
.
At this point the microphone and the speaker on the handset will
be deactivated at you will be able to listen from the earpiece
and transmit by pressing the PTT transmission button on the
microphone of the accessor y speaking close to the microphone
on the accessory.
15

6. USING THE HANDSET
6.1 SWITCHING THE HANDSET ON AND OFF
When the radio is switched off, the display is switched off. In this
condition no operation can be performed.
IMPORTANT: we recommend that you switch off the handset
when the radio is not in use to prevent the batteries from being
completely discharged.
To switch the handset on, press the
until the handset issues a beep. At this point the display will show
the information related to operation as a 2-way radio. To switch
the handset off, press the button again and hold it down until
the handset issues a beep.
6.2 COMMUNICATING
With your BRONDI FX-100 you can communicate with another
BRONDI FX-100 handset or with any other 2-way radio that uses
the PMR 446 standard. You may communicate with an unlimited
number of PMR 446 handsets in conference.
ATTENTION: All the handsets must be tuned to the same channel
and the same CTCSS code to intercommunicate.
When using the handset, take care when communicating
confi dential information, as another PMR 446 handset near your
FX-100 which is tuned into the same channel may listen to your
conversation. Communication takes place alternately: if another
handset is transmitting, you must wait for the transmission to end
before speaking (pressing the PTT communication button on the
left side of the handset and holding it down) and vice versa.
Selecting the channel and the CTCSS (Continuous Tone Coded
Squelch System) code.
16
button and hold it down

Your handset can communicate on one of the 8 channels
available. For every channel it is possible to set even just one of
the 38 CTCSS codes: you will hear only the conversations of the
PMR 446 handsets tuned to the same channel and CTCSS code. All
other conversations will be fi ltered, If you choose 0 as your CTCSS
code, the CTCSS fi lter will be deactivated and you will only hear
the communications of the channel chosen.
NOTE: If another user on the same channel uses a PMR 446
1. Press the MENU button, the number of the channel on the
2. Press the + and – buttons to choose the channel (from 1 to 8).
3. Press the MENU button again, the number of the CTCSS code
4. Press the + and – buttons to choose the code (from 0 to 38).
5. To return to stand-by, press and immediately release the PTT
without CTCSS codes or with the code deactivated, he
may listen to your transmissions, even though you cannot
listen to his.
display will start fl ashing.
will start fl ashing.
communication button; the parameters set up to now will be
saved.
17

NOTE: If no button is pressed for 6 seconds during programming,
To transmit or receive, all the handsets must be tuned into the
same channel and the same CTCSS code.
RECEIVING
When your handset is on and in stand-by, it is always ready to
receive communications which you will hear through the speaker.
At the end of every reception you will hear a “roger beep” meaning
that your contact is ready to receive your communication. When
receiving, the display will show the receiving symbol
ATTENTION: You cannot receive communications when the PTT
communication or CALL buttons are pressed, even if you are not
speaking.
CONTROLLING THE SPEAKER AND TUNE VOLUME
It is possible to set the speaker volume by pressing the + and buttons:
• press the + button to increase the volume;
• press the - button to decrease the volume.
Every time you select a volume level, the handset will issue a
beep and the display will show the level with a series of bars. The
level set will always be visible on the display.
TRANSMITTING
Transmission can only take place while the PTT communication
button is pressed, unless the VOX function is active.
1. Before starting communication check that channel is free, i.e.:
2. Press the PTT communication button and hold it down and the
3. Speak into the microphone from a distance of 15 centimetres.
the handset will automatically return to stand-by and the
changes will be confi rmed.
6.3 COMMUNICATE: RECEIVING AND TRANSMITTING
.
there is no receiving signal on the display .
transmission symbol will appear on the display.
18

4. At the end of the transmission, release the PTT communication
button the handset will issue a “roger beep”.
6.4 CALL FUNCTION
The CALL button allows you to call all the handsets synchronised on
your channel and CTCSS code and they will ring for two seconds;
others can call your handset in the same way.
6.5 PERSONALISING THE CALL TUNE
Your handset also allows you to personalise the tune with which
the other handsets will ring, using a simple program described
below.
In this way, those called will know that you are calling them.
1. Press the MENU button 4 times. The handset will enter the tune
programming mode and “CA” will appear on the display,
indicating the current setting which fl ashes (OF, 1, 2, 3, 4 or 5).
2. Press the + and – buttons to choose one of the 5 tunes; every
time you choose one, the display will show the corresponding
number and the handset will let you listen to them.
3. To exit this programming procedure, press and immediately
release the PTT communication button; the parameters set
up to now will be saved.
NOTE:
1. If, during programming, you choose “OF”, you will set the
“silencer” function on your handset only. When you call the
other handsets, they will ring with the standard tune.
2. The previous programming does not alter the tune.
6.6 CHANNEL MONITORING
(deactivating the Automatic Squelch)
With this function you can listen to all the signals (even when very
weak) of the channel to which you are tunes, regardless of the
CTCSS code set, if any.
You can use this function to listen to communications at the limit of
the range of action.
19

Press the - and MENU buttons at the same time to activate the
monitoring function; to deactivate it, press and immediately
release the MENU button. When the monitoring function is active,
the display remains illuminated for 5 seconds and the receiving
symbol appears.
NOTE: The monitoring function is automatically deactivated if the
This function is useful to avoid accidentally changing the channel
and CTCSS code set.
LOCKING THE CHANNEL:
Press the
you hear a confi rming beep. The symbol will appear on the
display.
UNLOCKING THE CHANNEL:
Press the button and hold it down for about 3 seconds, until you
hear a confi rming beep. The symbol will disappear from the
display.
This function is particularly useful if the channel has been
accidentally changed by you or your contacts. This function allows
you to check the communications on all 8 channels to identify the
channel used by yours.
If your contacts have set a particular CTCSS code, the scan will
detect the voice and the channel used, but will not detect the
CTCSS code.
1. With the handset in stand-by, press and immediately release
PTT transmission button is pressed.
6.7 LOCKING THE CHOSEN CHANNEL
button and hold it down for about 3 seconds, until
6.8 SCAN FUNCTION: CHANNEL SCANNING
the MENU and + buttons at the same time. The word
appear on the display and the channel number will change
quickly (from 0 to 8).
SCAN will
20

2. When the handset detects any kind of signal (vocal or call)
on one of the 8 channels, the scan pauses and the signal
detected can be heard in the speaker.
3. The scan will automatically restart a few seconds after the end
of the receipt of the signal.
4. To complete the scan, briefl y press the MENU button.
WARNINGS:
Once a signal has been detected you can listen to your contact,
but you can only transmit a communication if the CTCSS code set
on his handset is the same as that set on yours.
6.9 LOW BATTERY CONSUMPTION MODE
The handset will automatically switch to low battery consumption
mode after 4 seconds of inactivity. Despite being in this mode, the
handset will be able to receive communications.
IMPORTANT: when you are not using the handset as a 2-way radio,
we advise you to switch it off (pressing the
down) to optimise the maintenance of the battery charge.
6.10 VOX FUNCTION: VOICE ACTIVATION
This function enables activation with both hands free; with
the function active, your handset will detect your voice and
automatically activate transmission. You can set 3 levels of
sensitivity.
Procedure:
1. From stand-by mode, press the MENU button 3 times. The word
button and holding it
VOX will appear on the display and the current setting of the VOX
function will fl ash.
2. Repeatedly pressing the + or – buttons, you can choose on of
the following settings:
OF Function deactivated
21

1 Function activated with low sensitivity
3. To return to stand-by mode, press and immediately release the
The “Roger Beep” is a tone issued by your handset every time you
release the PTT communication button after transmission.
To activate or deactivate this tone, follow the simple programming
procedure described below:
1. Press the MENU button 5 times. The handset will enter the
2. Press the + or – buttons to deactivate (“Of” on the display) or
3. To exit this programming procedure, press and immediately
Every time you press a button, your handset issues a tone. You
can activate or deactivate this signal by following the simple
programming procedure described below:
1. Press the MENU button 6 times. The handset will enter the button
2 Function activated with medium sensitivity
3 Function activated with high sensitivity
PTT communication button. The parameters set up to now will
be saved. If the VOX function is activated, the word “VOX” will
appear on the display.
6.11 TRANSMISSION OVER TONE (“ROGER BEEP”)
“Roger Beep” programming procedure and the letters “
appear in small print on the display, accompanied by “On” in
big print, fl ashing.
activate (“On” on the display) the tone.
release the PTT communication button; the parameters set up
to now will be saved.
6.12 BUTTON TONES: ACTIVATION/DEACTIVATION
tone programming procedure and the letters “
in small print on the display, accompanied by “On” in big print,
fl ashing.
ACTIVATION/DEACTIVATION
ro” will
to“ will appear
22

2. Press the + or – buttons to deactivate (“of” on the display) or
activate (“On” on the display) the tone.
3. To exit this programming procedure, press and immediately
release the PTT communication button; the parameters set up
to now will be saved.
6.13 MONITORING 2 CHANNELS AT ONCE
This function allows you to monitor two channels at the same time:
during this operation the handset constantly controls the primary
and secondary channels.
As soon as the handset receives a signal on one of the two stations,
it remains tuned to that station for the 5 seconds following the
termination of communication, after which it returns to monitoring
the two channels.
If you press the PTT communication button when receiving, the
handset will transmit on the same channel. If you press the PTT
communication button when no signal is detected, the handset
will transmit on the primary channel. When the function is active,
the letters DCM will appear on the display.
NOTE: The primary channel is that currently set with the standard
Activating the function:
To activate the function it is necessary to set the secondary channel
and the CTCSS code:
1. Press the MENU button 7 times. The “OF” symbol will fl ash on the
2. Choose the channel required using the + or - buttons.
3. Then press the MENU button to change the CTCSS code and
4. Choose the CTCSS code required using the + or - buttons.
5. Press the MENU button to confi rm and exit the mode.
Deactivating the function:
When the function is active,
choice of channels (see paragraph 6.2), the secondary
channel is that which is set using the activation procedure
of the function described below.
display and the letters DCM will appear in small print.
the number “0” in small print on the display will fl ash.
23

1. Press the MENU button 7 times. The second channel and the
CTCSS code will fl ash on the display.
2. Press the + or – buttons until “OF” appears on the display.
3. Press the MENU button to confi rm and exit the mode.
ATTENTION:
The secondary channel must be different from the primary.
Therefore, when attempting to set a secondary channel which is
the same as the primary, the DCM function will be deactivated
(OF).
6.14 USING THE STOPWATCH
You can use the stopwatch to a hundredth of a second in the
following way:
1. Press the MENU button and hold it down for 3 seconds to enter
the stopwatch mode.
2. Press the + button once to start the stopwatch.
3. Press the + button once more to stop the stopwatch.
4. Press the - button to reset the stopwatch.
5. To exit the stopwatch mode, press the MENU button and hold it
down for 3 seconds.
24

7. WARRANTY
Like all Brondi products, FX-100 TWIN has a 12-month warranty.
The packing of the FX-100 TWIN contains a special warranty card
which, to be valid, must be:
- completely fi lled in;
- accompanied by proof of purchase (receipt or invoice, etc.).
To correctly fi ll in the warranty card print the name of the product
purchased (FX-100 TWIN) and the serial number (SN) printed under
the base (if this is not already printed on the warranty card).
It is necessary to collect electric and electronic devices
separately
Brondi reserves the right to change the product specifi cations and performance without
prior notice.
25

8. CE CONFORMITY DECLARATION
Brondi Telefonia S.p.A., with registered offi ce in Str. Caffadio 14 10036 Settimo Torinese (TO) and operating premises in Via Guido
Rossa 3 - 10024 Moncalieri (TO), declares that the FX-100 TWIN
handset conforms to the following standards:
EN300296-2 v.1.1.1 (2001-03), EN301489-5 v1.3.1 (2002-08), EN60065 :2002.
It satisfi es the requirements of European Directive 1999/5/CE
regarding radio and telecommunications terminal equipment. The
conformity to said requirements is expressed with the
Product conforming to Directive 89/336/CEE regarding
electromagnetic compatibility and also conforming to Directive
73/23/CEE (low voltage) regarding safety standards.
26

ESPAGÑOL ÍNDICE
1.
INFORMACIÓN, PRECAUCIONES CUIDADO Y MANTENIMIENTO
2.
PRESTACIONES, DATOS TÉCNICOS, SUGERENCIAS DE EMPLEO
3. CONTENIDO DEL EMBALAJE ........................................................34
4. DESCRIPCIÓN DEL APARATO ......................................................35
5. INSTALACIÓN ............................................................................... 37
5.1 Instalación baterías ............................................................ 37
5.2 Empleo de los accesorios .................................................. 39
6. EMPLEO DEL APARATO ................................................................40
6.1 Encendido y apagamiento del aparato ......................... 40
6.2 Comunicar .......................................................................... 40
6.3 Comunicar: recibir y transmitir ..........................................42
6.4 Función llamada (CALL) .................................................... 43
6.5 Personalización de la melodía para la llamada ............ 43
6.6 Monitorización del canal
(desactivación del squelch automático) .......................44
6.7 Bloqueo del canal elegido ...............................................44
6.8 Función SCAN: barrido de los canales ............................45
6.9 Modalidad de bajo consumo de las baterías ................ 45
6.10 Función VOX: activación vocal ........................................ 46
6.11 Tono de fi n transmisión (“ROGER BEEP”) .......................... 46
6.12 Tonos del teclado ............................................................... 47
6.13 Monitorización contemporánea de 2 canales .............. 47
6.14 Empleo del cronómetro ..................................................... 48
7. GARANTÍA ....................................................................................49
8. DECLARACIÓN DE CONFORMIDAD CE ...................................... 50
.. 28
..31
27

1. INFORMACIÓN, PRECAUCIONES, CUIDADO Y
MANTENIMENTO
EMPLEO DE LOS EQUIPOS
Según el vigente “Código de las Comunicaciones Electrónicas”
(D.Lgs. 259/03) todos los equipos de tipo PMR 446 quedan
sometidos a una declaración de empleo y a una contribución
anual; por consiguiente, contacten la Inspección Territorial
de referencia (Ministerio de las Comunicaciones) para pedir
los formularios y conocer las modalidades para obtener la
autorización general para el empleo de los aparatos PMR 446.
El empleo de los aparatos será permitido después del envío
del expediente pedido, recomendamos guarden copia de los
formularios.
El empleo de los receptores-transmisores mod. PMR 446 está
autorizado, además que en Italia, incluso en los siguientes Países
Europeos: Francia, España, Austria, Alemania, Dinamarca,
Holanda, Irlanda, Gran Bretaña, Suecia, Portugal, Finlandia,
Bélgica, República Checa, Noruega, Suiza, Luxemburgo, Grecia.
Para el empleo en los Países arriba indicados, Les aconsejamos
se informen acerca de las reglamentaciones en vigencia en los
diferentes Estados.
ALCANCE
Su FX-100 tiene un alcance hasta 5 Km en campo abierto. Las
condiciones atmosféricas y medioambientales pueden limitar
dicho alcance. Además, el alcance puede reducirse si las
baterías no están completamente cargadas. Otros factores
que pueden limitar el alcance son: edifi cios, vegetación espesa
(árboles, etc.), colinas o montañas. El alcance mejor se obtendrá
en un terreno abierto, llano y libre de obstáculos. Por último, el
alcance depende también de las condiciones de carga de las
baterías y de las características de recepción y transmisión de
los aparatos de sus interlocutores.
EMPLEO DE LOS APARATOS
PRECAUCIONES Y NORMAS DE SEGURIDAD
No hundan el producto en agua u otros líquidos, no lo dejen en
contacto con el agua de manera continua.
28

Daño de la antena
No utilicen receptores-transmisores con antena dañada. Si
una antena dañada entrara en contacto con la piel, podrían
causarse quemaduras de escasa entidad.
Baterías
• No sustituyan o carguen las baterías en ambientes a riesgo de
explosión.
• Utilicen sólo 3 baterías estilo recargables AA o bien 3 baterías
estilo alcalinas AA.
• Pongan cuidado en la correcta instalación de las baterías,
respetando la polaridad indicada en el interior del alojamiento.
Vehículos con airbag
No apoyen el receptor-transmisor en la zona arriba del airbag
o en la zona de su abertura. El hinchado del airbag, de hecho,
se produce de forma muy enérgica. Si el receptor-transmisor se
encontrara en la zona de abertura del airbag en el momento
en que el mismo se hincha, es posible que el aparato se lance
adelande, con riesgo de lesiones para las personas que ocupan
el vehículo.
Ambientes a riesgo de explosión
En los ambientes a riesgo de explosión es aconsejable apagar
el receptor-transmisor. La emisión de chispas en dichas zonas
puede, en efecto, generar explosiones o incendios.
Detonadores eléctricos y áreas explosivas
Para evitar posibles interferencias con operaciones en las que
se emplea material explosivo, apaguen el receptor-transmisor
cerca de detonadores eléctricos, en “áreas potencialmente
explosivas” o donde se ha expuesto la señal de apagamiento
de los aparatos receptores-transmisores. Cumplan con todas las
indicaciones e instrucciones.
NOTA: Los ambientes potencialmente explosivos son a menudo,
pero no siempre, señalizados de forma clara. Entre éstos
destacan: áreas para reponer carburante (por ejemplo
bajo cubierta en un barco) o bien instalaciones para la
transferencia y el almacenaje de sustancias combustibles
29

o químicas; ambientes que contienen productos químicos
o partículas en suspensión en el aire, como residuos o
polvos metálicos.
Compatibilidad/interferencia electromagnética
Apaguen la unidad en cualquier edifi cio en el que se han
colgado carteles que prohíban su uso. Los hospitales o los institutos
sanitarios pueden utilizar equipos sensibles a las emisiones
electromagnéticas del aparato. Apaguen la unidad a bordo
de aeromotores cuando se prohíba de forma manifi esta el uso.
Cada empleo de la unidad tiene que respetar el reglamiento
de la línea aérea o las instrucciones de la tripulación.
CUIDADO Y MANTENIMIENTO
• Si el equipo resultara sucio, utilicen un trapo suave con agua.
Nunca utilicen detergentes o solventes, que podrían estropear
la carcasa exterior y penetrar al interior del aparato, causando
daños.
• Protegan el equipo del agua u otros líquidos.
30
 Loading...