

Page 1
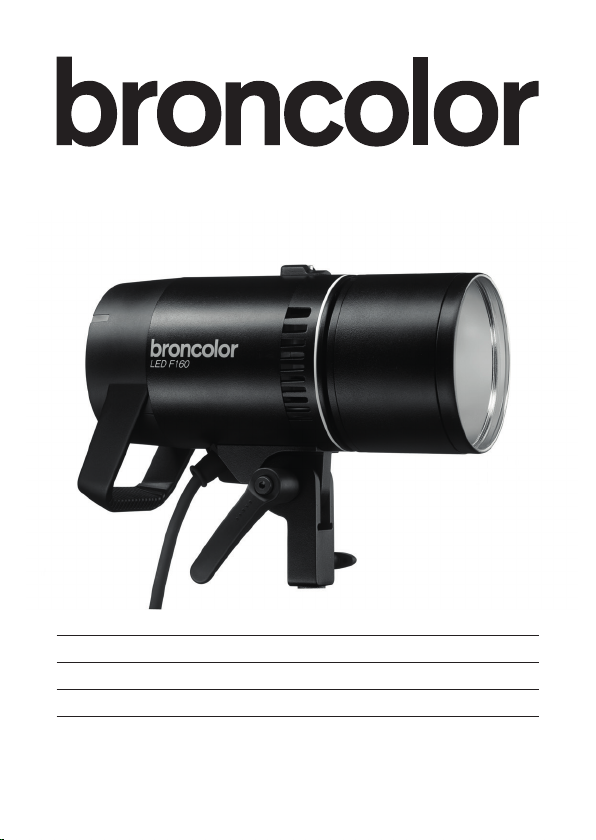
Quick Guide / LED F160
en 2
de 6
fr 10
www.broncolor.swiss
Page 2
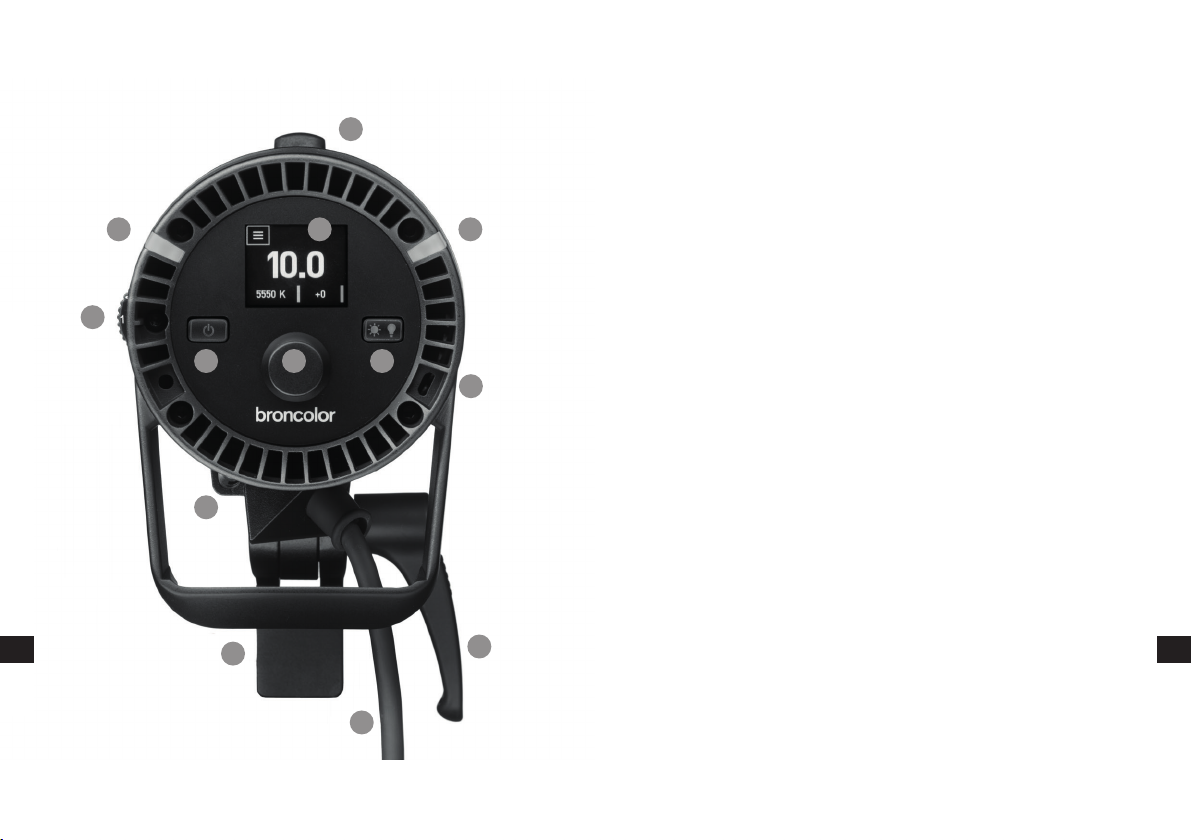
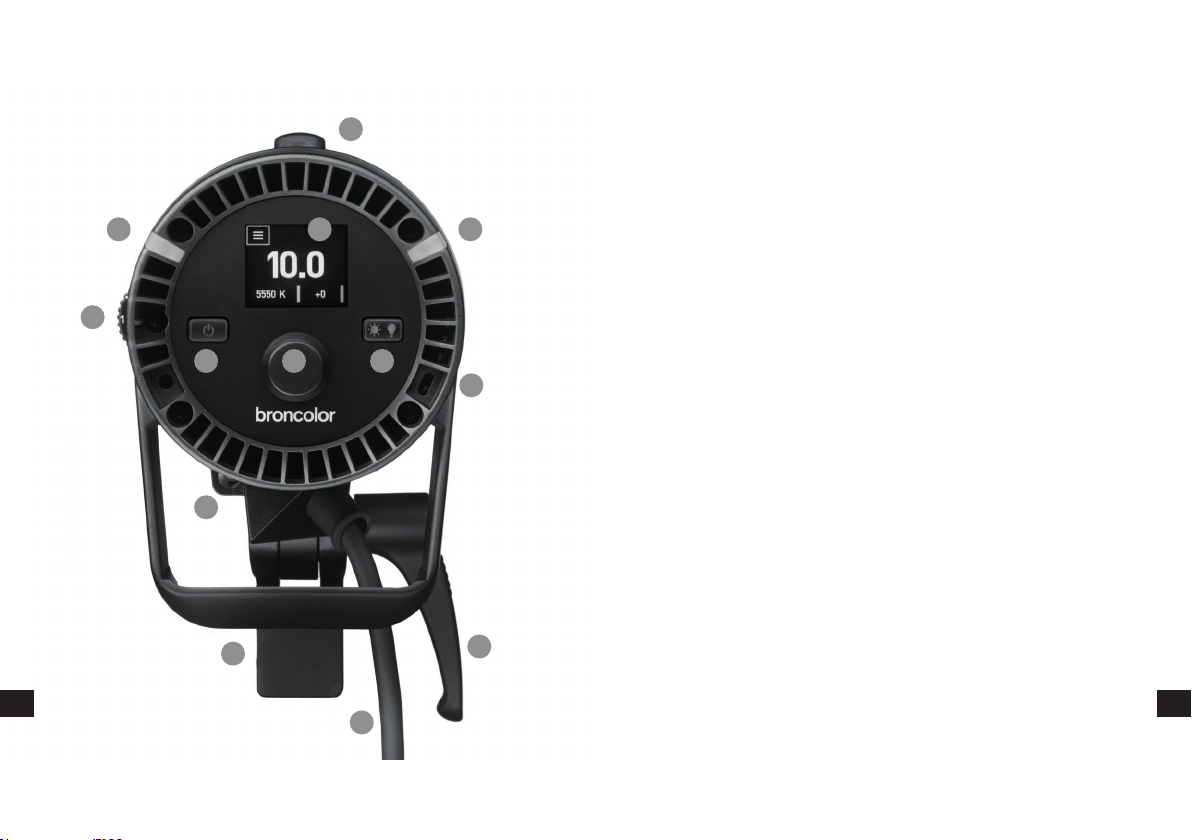
Operational controls
8
ar
da
de
el
en
es
fr
id
ja
nl
en
ru
zh
2
7
1
34
fi
9
it
55
Light on/off
(1)
OLED display
(2)
Switch button daylight (5500 K) and tungsten (3200 K)
(3)
Pressure-/rotary knob
(4)
Cognition light
6
(5)
Micro USB socket
(6)
Manual focusing wheel
(7)
Locking slide for light shapers
(8)
Umbrella holder
(9)
Connection cable for power supply cable
(10)
Tripod mount
(11)
Clamping lever
(12)
ar
da
de
el
en
es
fi
fr
id
it
ja
nl
11
12
en
ru
zh
10
2 3
Page 3
First use
It is imperative to observe the safety instructions supplied!
Remove all transport protection materials and the black protective
cover from the umbrella reflector before switching on the lamp.
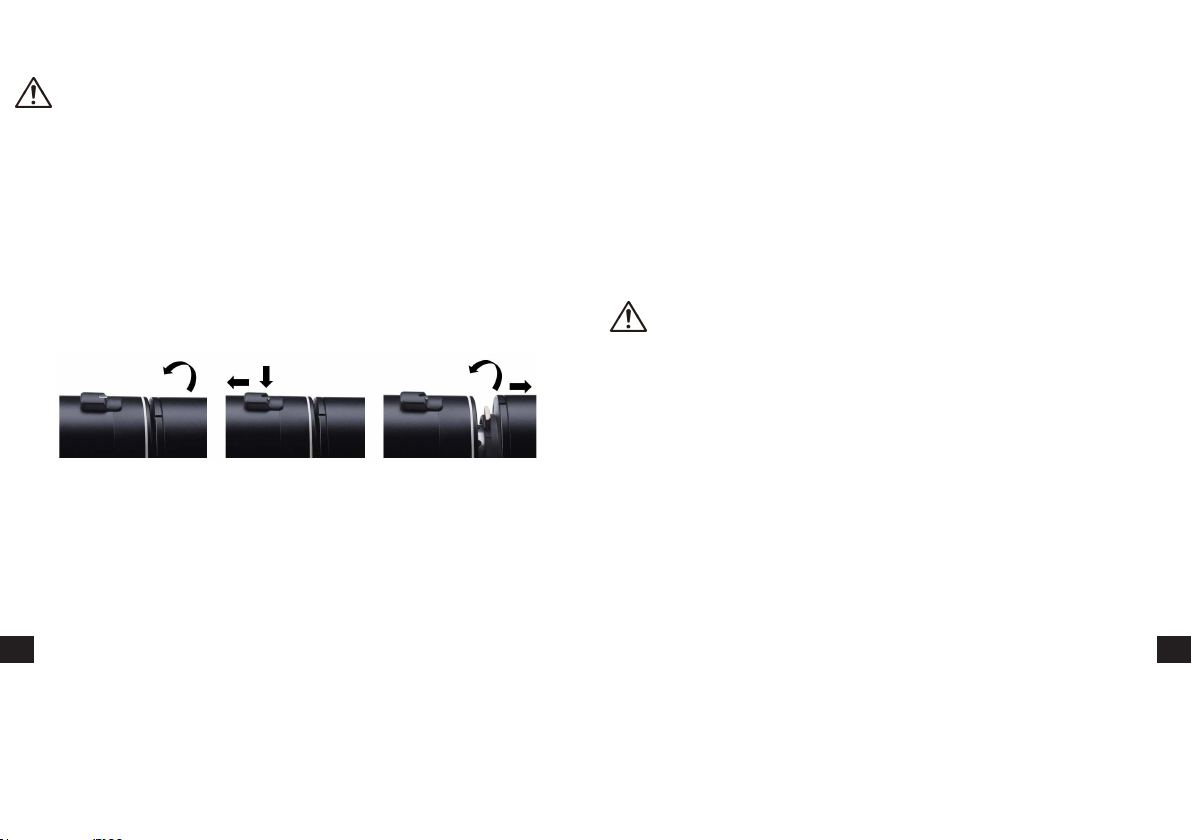
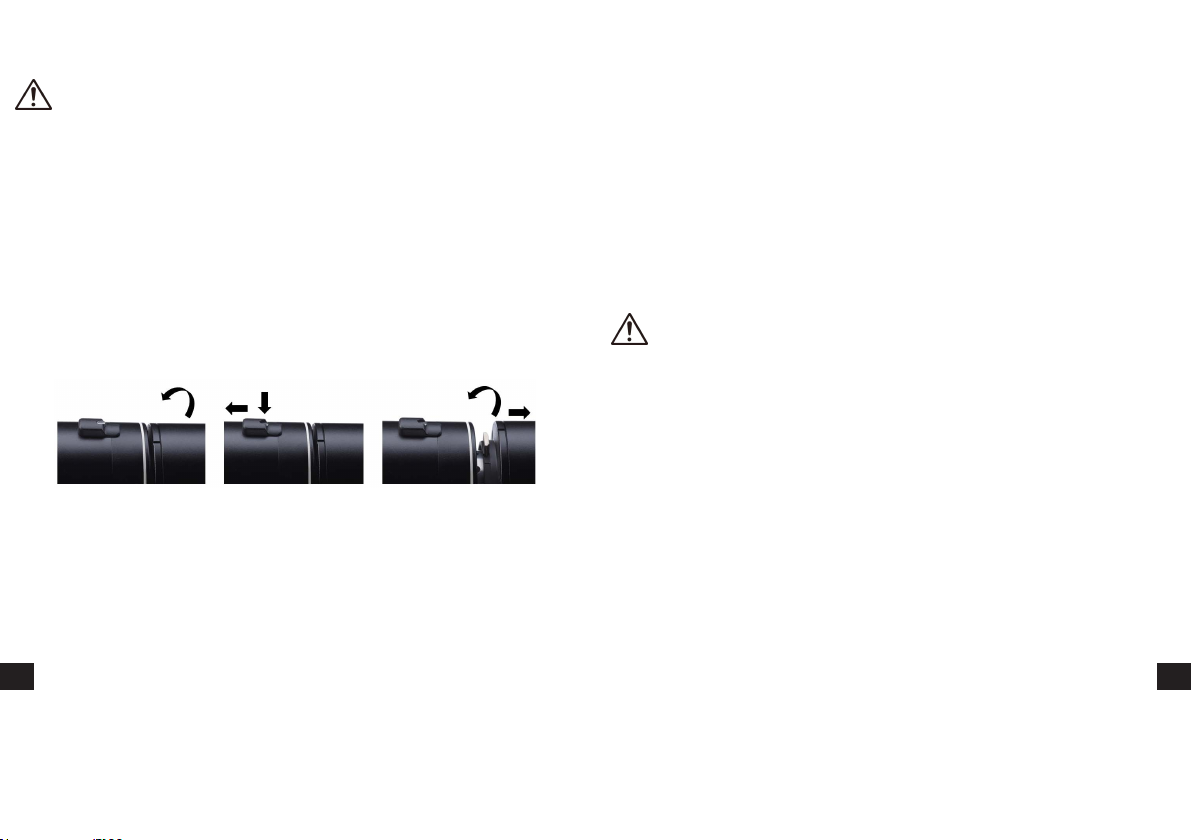
Attach and remove light shapers
To remove, first rotate the light shaper until it stops firmly,
this ensures it is in its ‘pre-release’ position. Pull the locking slide
back with one finger and engage the small silver locking pin on
the slider. Then carefully rotate the light shaper in the same
direction as before until you feel the bayonet disengage. Pull it
away from the lamp taking care not to damage or scratch the
diffusion attachment.
ar
da
de
el
en
es
fi
Attaching is also very easy:
To attach light shapers, align bayonet with the small notch at the
fr
top and large notch at the bottom. Push firmly into the receptacle
id
on the front of the lamp and rotate until you hear the ‘click’ of the
locking mechanism.
it
ja
Mounting an umbrella (not included)
nl
Insert the umbrella shaft into the holder located on the stand mount
en
at the bottom of the lamp.
ru
zh
Use with a light stand
Mount the LED F160 lamp on a suitable light stand. The light stand
mount is located at the bottom of the device.
Switching the lamp on and off
First connect the connection cable of the LED F160 lamp to the cable
permanently attached to the power supply unit. Now connect the
supplied power cable to the power supply unit. Then plug the mains plug
into a suitable socket.
To switch off, please unplug the mains plug from the socket.
The mains plug is used as a disconnect device, the disconnect device
shall remain readily operable.
Control display
The control display identifies three main functions:
- Output Power
- Colour Temperature
- Green / Magenta Correction
To adjust, rotate the main control knob until the desired function is
selected, and press. The main control knob will then allow you to change
the settings of that function. Press it to confirm your setting.
Further information
You can download a complete operating manual and a list of recommended accessories at the following link:
www.broncolor.swiss/LEDF160
ar
da
de
el
en
es
fi
fr
id
it
ja
nl
en
ru
zh
4 5
Page 4
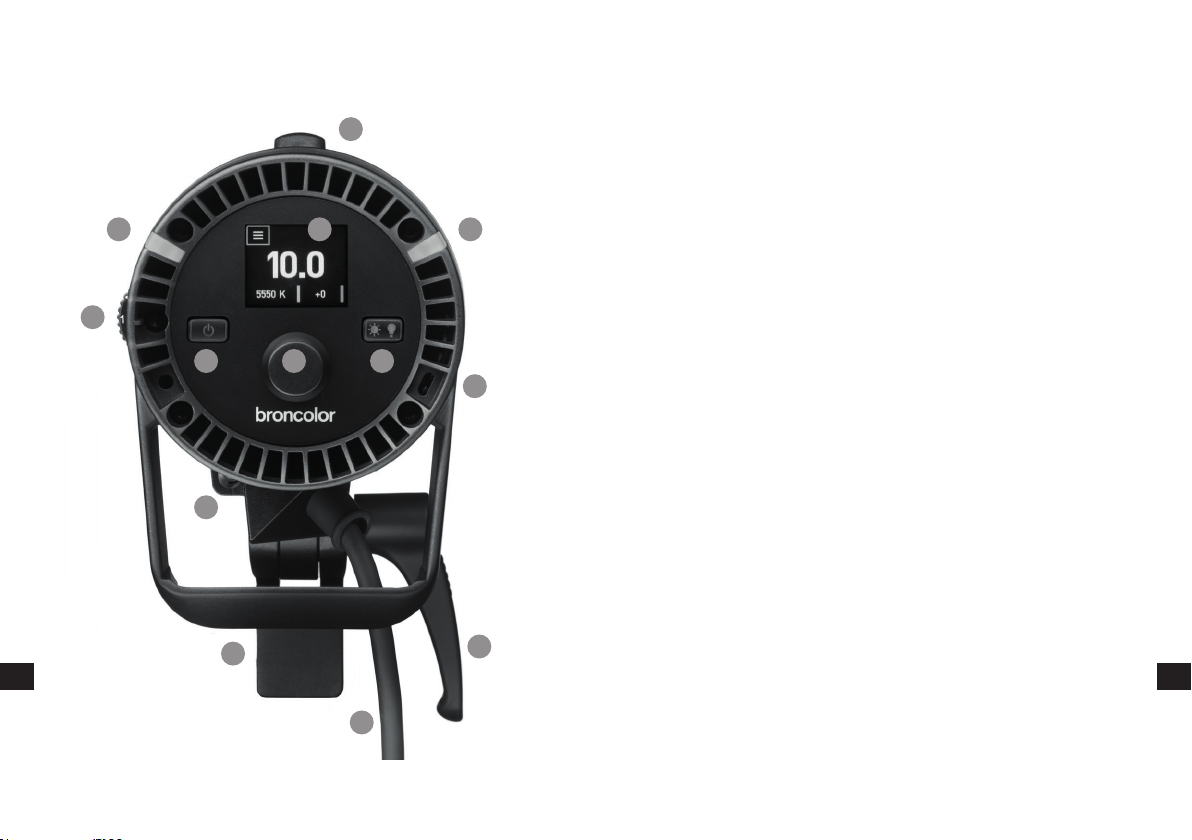
Bedienelemente
8
ar
da
de
el
en
es
fr
id
ja
nl
pt
de
zh
2
7
1
34
fi
9
it
55
(1) Licht ein/aus
(2) OLED Display
(3) Umschalttaste Tageslicht (5500 K) und Tungsten (3200 K)
(4) Druck-/Drehregler
6
(5) Cognition light (Erkennungslicht)
(6) Micro USB Buchse
(7) Manuelles Fokussierrad
(8) Arretierschieber für Lichtformer
(9) Schirmhalterung
(10) Kabelschwanz zu Netzteilkabel
(11) Stativaufnahme
(12) Klemmhebel
ar
da
de
el
en
es
fi
fr
id
it
ja
nl
11
12
pt
de
zh
10
6 7
Page 5
Erste Inbetriebnahme
Die mitgelieferten Sicherheitshinweise müssen zwingend beachtet werden!
Entfernen Sie sämtliche Transportschutzmaterialien sowie den schwarzen
Schutzdeckel vom Schirmreflektor, bevor Sie die Leuchte einschalten.
Entfernen und Befestigen von Lichtformern
Um den Lichtformer zu entfernen, drehen Sie diesen in eine Richtung
bis zum Anschlag. Ziehen Sie den Arretierschieber mit einem
Finger bis zum Anschlag zurück und drücken Sie den kleinen
Sicherungsstift in der hintersten Position nach unten. Der Schieber
wird nun an dieser Stelle verharren. Drehen Sie den Lichtformer
weiter in dieselbe Richtung, bis dieser entriegelt ist. Nun
können Sie ihn vorsichtig herausnehmen. Bitte achten Sie
ar
darauf, den Diffusionsvorsatz nicht zu beschädigen oder zu ver-
da
kratzen.
de
el
en
es
fi
fr
Das Befestigen ist ebenfalls ganz einfach:
Den Lichtformer von vorne an die LED F160 Leuchte heranführen, diesen
id
an den Bajonettaussparungen (klein zu klein und gross zu gross) aus-
it
richten, bis zum Anschlag nach hinten drücken und dann mit einer leichten
Drehung nach links oder rechts das Verriegeln auslösen. Dabei hören
ja
Sie ein «Klicken». Der Lichtformer ist nun sicher befestigt.
nl
pt
Montieren eines Schirms (nicht im Lieferumfang)
de
Führen Sie, falls gewünscht, die Schirmstange in die Schirmhalterung
zh
ein, welche sich an der Stativaufnahme unterhalb der Leuchte befindet.
Verwendung mit einem Stativ
Montieren Sie die LED F160 Leuchte auf einem geeigneten Stativ. Die
Stativaufnahme befindet sich an der Unterseite des Gerätes.
Ein- und Ausschalten der Leuchte
Verbinden Sie zuerst den Kabelschwanz der LED F160 Leuchte mit
dem permanent am Netzteil befestigten Kabel. Verbinden Sie nun
das mitgelieferte Netzkabel mit dem Netzteil. Stecken Sie anschliessend
den Netzstecker in eine geeignete Steckdose.
Zum Ausschalten des Gerätes ziehen Sie bitte den Netzstecker aus der
Steckdose.
Der Netzstecker dient dazu, das Gerät vom Strom zu trennen und sollte
deshalb immer leicht zugänglich bleiben.
Das Hauptmenü
Im Hauptmenü können Sie die Hauptfunktionen direkt bearbeiten:
- LED Leistung
- Farbtemperatur
- Grün / Magenta Korrektur
avigieren Sie zu einer Funktion, indem Sie den Drehregler drehen.
N
Drücken Sie diesen, um in den Bearbeitungsmodus zu gelangen. Wählen
Sie durch Drehen des Drehreglers den gewünschten Wert aus. Ein weiterer
Druck auf den Drehregler bestätigt die Auswahl.
Weiterführende Informati
Eine vollständige Bedienungsanleitung sowie Zubehörempfehlungen können Sie unter folgendem Link herunterladen:
www.broncolor.swiss/LEDF160
onen
ar
da
de
el
en
es
fi
fr
id
it
ja
nl
pt
de
zh
8 9
Page 6
Éléments de commande
8
ar
da
de
el
en
es
fr
id
ja
nl
pt
ru
fr
2
7
1
34
fi
9
it
55
(1) Bouton Marche/Arrêt de la lumière
(2) Affichage OLED
(3) Bouton de commutation Lumière du jour (5500 K) et
Tungstène (3200 K)
(4) Régulateur rotatif
6
(5) Cognition Light (voyant d'identification)
(6) Connecteur micro USB
(7) Molette de focalisation
(8) Curseur de verrouillage
(9) Porte-parapluie
(10) Câble pour cordon d'alimentation
(11) Dispositif de fixation pour trépied
(12) Levier de fixation
ar
da
de
el
en
es
fi
fr
id
it
ja
nl
11
12
pt
ru
fr
10
10 11
Page 7
Première mise en service
Les consignes de sécurité fournies doivent absolument être respectées !
Retirez tous les matériaux de protection de transport et le couvercle de
protection noir du réflecteur parapluie avant d’allumer la lampe.
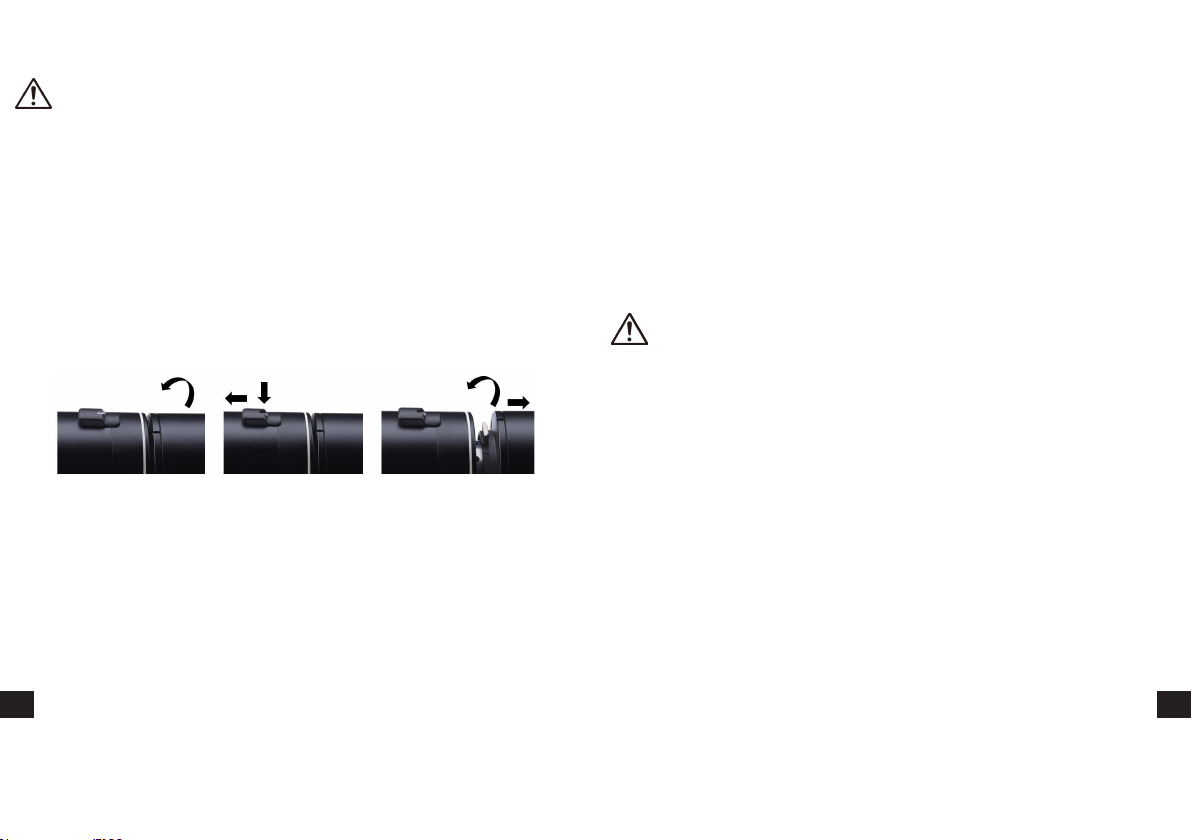
Retrait et montage des modeleurs de lumière
Pour retirer le modeleur de lumière, tournez-le (à gauche ou à droite)
jusqu’à la butée. Faites coulisser le curseur de verrouillage avec un
doigt jusqu’à la butée et poussez le petit bouton de sécurité vers le bas
dans la position la plus reculée. Le curseur restera maintenant
dans cette position. Tournez le modeleur de lumière dans la même
direction jusqu’à ce qu’il soit débloqué. Vous pouvez maintenant le
retirer délicatement. Assurez-vous de ne pas endommager ou rayer
l'adaptateur de diffusion.
ar
da
de
el
en
es
Le montage est également très simple:
fi
Positionnez le modeleur de lumière à
fi
alignez-le avec les encoches à baïonnette (petites avec petites, grandes
avec grandes), poussez-le jusqu’à la butée, puis actionnez le verrou-
id
illage d’une légère rotation vers la gauche ou la droite. Vous
it
entendez alors un « déclic ». Le modeleur de lumière est maintenant
fixé en toute sécurité.
ja
l’avant de la lampe LED F160,
nl
Montage d’un parapluie (non compris dans la livraison)
pt
Vous pouvez insérer la tige de parapluie dans le porte-parapluie situé
fr
sur le dispositif de fixation pour trépied sous la lampe.
zh
Utilisation ave
Vous pouvez monter la lampe LED F160 sur un trépied adapté. Le
dispositif de fixation pour trépied est situé sous l’appareil.
c un trépied
Mise sous tension et hors tension de la lampe
Connectez d’abord le câble de la lampe LED F160 au câble relié en permanence à l’alimentation pour LED F160. Connectez maintenant le cordon
d’alimentation fourni à l'alimentation. Branchez ensuite le cordon d’alimentation dans une prise secteur adaptée.
Pour éteindre l’appareil, débranchez le cordon d'alimentation de la prise
secteur.
Lorsque le cordon d'alimentation est utilisé comme dispositif de déconnexion,
le dispositif de déconnexion doit rester acce
ssible.
Menu principal
Dans le menu principal, vous pouvez utiliser les fonctions directement:
- réglage de la puissance de la lampe LED
- choix de la température de couleur
- correction vert / magenta
N
aviguez vers une fonction à l'aide du bouton rotatif. Appuyez sur le
bouton pour arriver dans le mode de traitement. Choisissez la valeur
demandée en tournant le bouton rotatif. Appuyez sur le bouton à
nouveau pour confirmer le choix.
Informations supplémentaires
Vous pouvez télécharger le mode d’emploi complet et la liste des
accessoires recommandés par le lien suivant :
www.broncolor.swiss/LEDF160
ar
da
de
el
en
es
fi
fr
id
it
ja
nl
pt
fr
zh
12 13
Page 8
14 15
Page 9

BA116.00 | 05 / 19
Bron Elektronik AG
CH-4123 Allschwil / Switzerland
www.broncolor.swiss
 Loading...