

Page 1

1
Single & Double Door
Installation Manual
Page 2

2
Safety Warnings and Cautions
IMPORTANT: Bronco Hardware cannot anticipate every possible circumstance that might involve a potential hazard. Therefore, the warnings and
cautions in this manual are not all inclusive. Use care and good judgment in the installation and operation of the hardware and door(s). Always take
precautions to protect yourself and others. Follow all applicable national, state, local, and industry-specific safety regulations and standards.
Warnings—Failure to follow warnings may result in serious injury or death!
• Read this manual carefully before attempting the installation.
• Do NOT use excessive force or speed when opening or closing the door(s).
• Always properly install the Anti-Jump Pads to the door(s). Anti-Jump Pads are REQUIRED for the safe operation of the door(s). They are
designed to help prevent the door(s) from jumping off the track.
• Always properly install the Door Stoppers on both ends of the track. Door Stoppers are REQUIRED for the safe operation of the door(s). They
are designed to help prevent the door(s) from coming off the track.
• When using power tools, always read and follow instructions in the power tools’ manuals for their safe operation.
• Prior to using power tools, inspect the tool and attachments, such as bits, for damage. Do NOT use if damaged.
• When using power tools, always wear safety glasses and any other appropriate safety items such as hearing protection or gloves.
• When using power tools, take precautions to prevent your hair and clothing from being caught in the tool.
• When using power tools, ensure you have a firm grip on the tool and that you always maintain full control of the tool.
• When drilling, ensure you know the location of live electrical wires. Stay clear of wires, cables, pipes, and any other objects that may endanger
you when drilling.
• When cutting or drilling, do not use excessive force.
• When cutting or drilling a door, always ensure the door is completely immobilized or clamped in place to prevent any movement that may result
in the loss of control of the power tool.
• Always follow proper ladder safety. Read and follow the labels on the ladder. For more details, read about portable ladder safety at the OHSA
Web site
(www.osha.gov).
• Read this manual carefully before attempting the installation.
• Do NOT use excessive force or speed when opening or closing the door(s).
• Always properly install the Anti-Jump Pads to the door(s). Anti-Jump Pads are REQUIRED for the safe operation of the door(s). They are
designed to help prevent the door(s) from jumping off the track.
• Always properly install the Door Stoppers on both ends of the track. Door Stoppers are REQUIRED for the safe operation of the door(s). They
are designed to help prevent the door(s) from coming off the track.
• When using power tools, always read and follow instructions in the power tools’ manuals for their safe operation.
• Prior to using power tools, inspect the tool and attachments, such as bits, for damage. Do NOT use if damaged.
• When using power tools, always wear safety glasses and any other appropriate safety items such as hearing protection or gloves.
• When using power tools, take precautions to prevent your hair and clothing from being caught in the tool.
• When using power tools, ensure you have a firm grip on the tool and that you always maintain full control of the tool.
• When drilling, ensure you know the location of live electrical wires. Stay clear of wires, cables, pipes, and any other objects that may endanger
you when drilling.
• When cutting or drilling, do not use excessive force.
• When cutting or drilling a door, always ensure the door is completely immobilized or clamped in place to prevent any movement that may result
in the loss of control of the power tool.
• Always follow proper ladder safety. Read and follow the labels on the ladder. For more details, read about portable ladder safety at the OHSA
Web site
(www.osha.gov).
Cautions—Failure to follow cautions may result in bodily injury or
damage to items!
• Clear your work area of trip hazards.
• Do NOT try to lift heavy objects, such as the door(s), that are heavier than you can safely lift alone. If needed, have a second person help you
lift.
• When lifting heavy objects, such as the door(s), always use proper lifting techniques. Do NOT use your back muscles, use your leg muscles to
lift.
• When lifting heavy objects, such as the door(s), wear steel-toe safety shoes/boots to help prevent injury if the items are dropped.
• When lifting heavy objects, such as the door(s), ensure you have a secure hold of the object and are properly balanced prior to moving.
• Beware of potential pinch points where you can be injured, such as pulleys. Keep hands and fingers away from moving parts.
• Secure hair and secure or remove loose clothing so they do not get caught in the moving components.
• Always use door handles. Do NOT close the door(s) using your hand on the end of the door—doing so can result in your hand or fingers being
caught between the door(s) or another object such as moulding or the wall.
Disclaimer
All parts mentioned herein are subject to change without notice. We cannot guarantee the accuracy of the measurements provided. Bronco
Hardware assumes no responsibility for any errors that may appear in this document. In no event shall Bronco Hardware be held liable for incidental
or consequential damages arising from the use of this document or the hardware described in this document.
Page 3
3
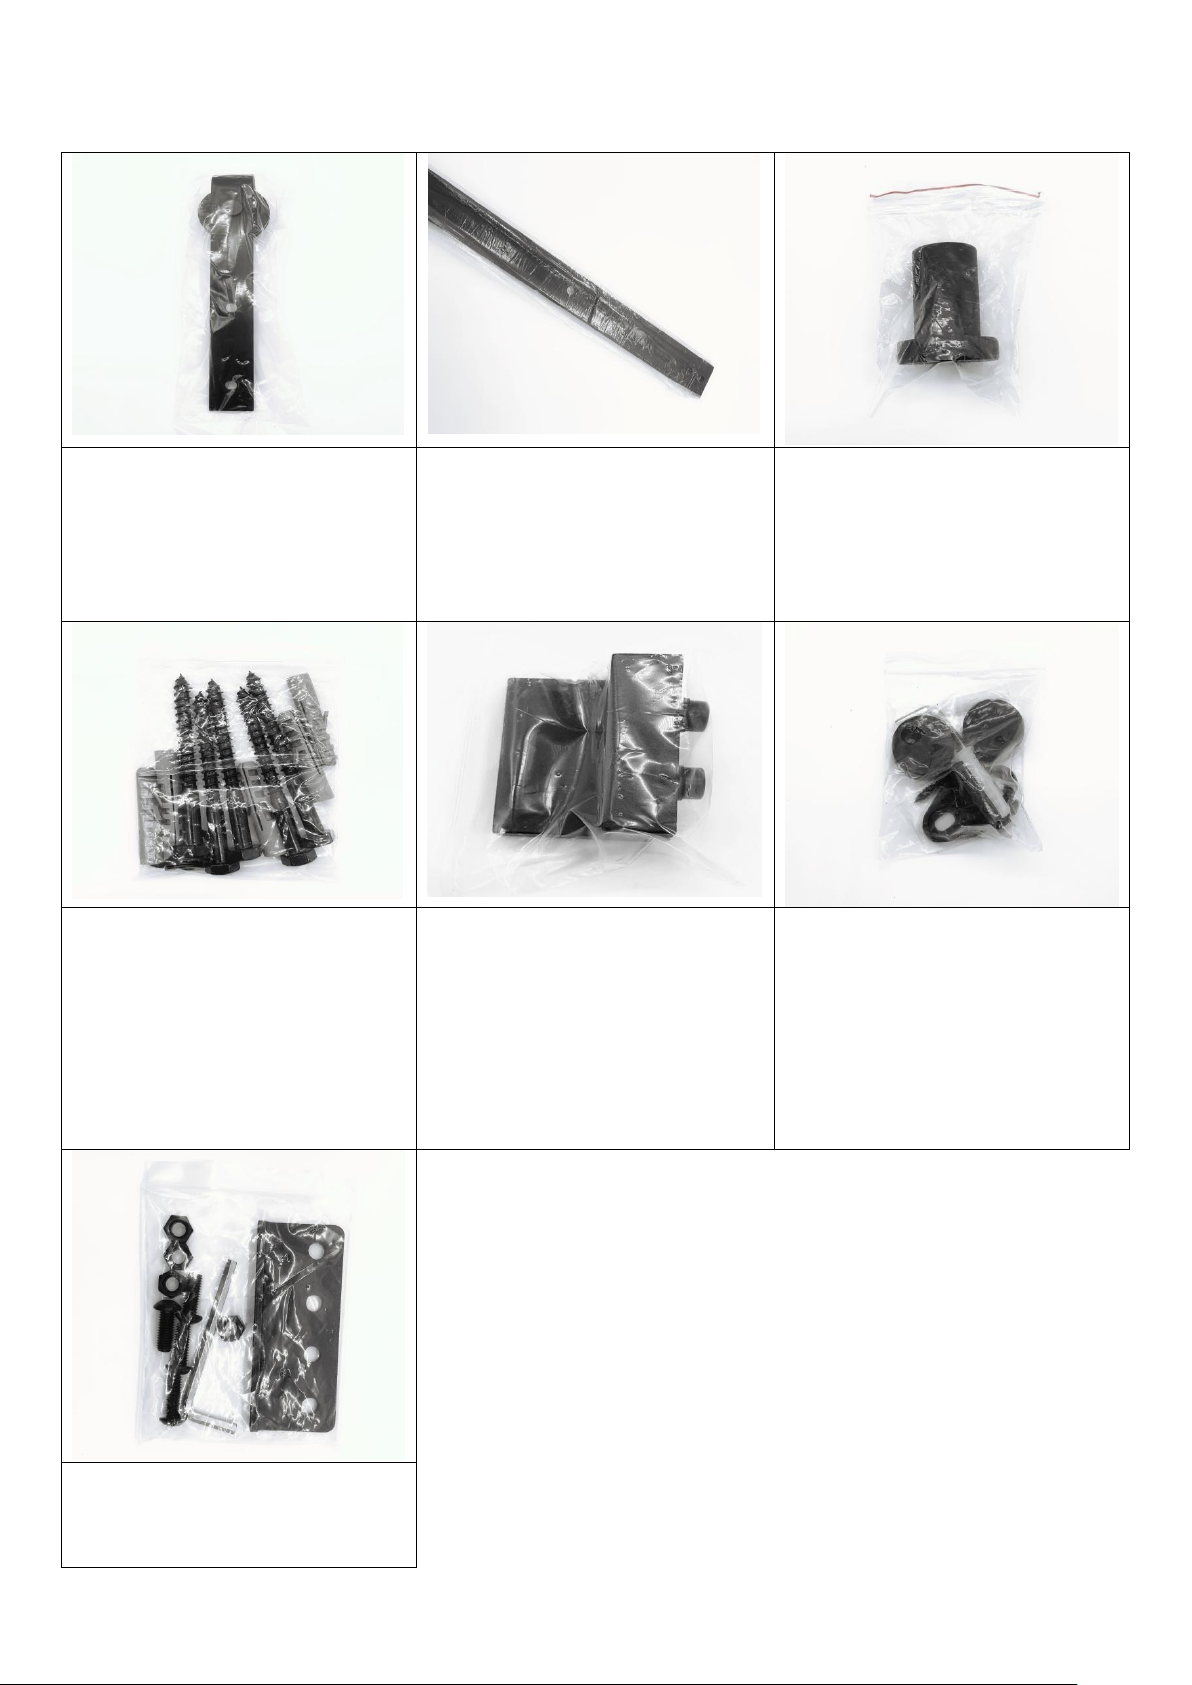
Package Includes
Front-Mounted
Roller/Door Hanger:
Use to hang the door up
Sliding Track: Door
slides on the track
Spacer: Place it
between the sliding track
and wall
Lag Bolts with Anchor:
Go through the spacer
into the wall as the
supporter
Door Stopper: Stop the
door falling off the track
Floor Guides + Anti
Jump Pads: Help
guiding the door in a
straight line and prevents
door jump off the track
Track Connector: Need
it if track size is above
90in (7.5FT)
Page 4
4
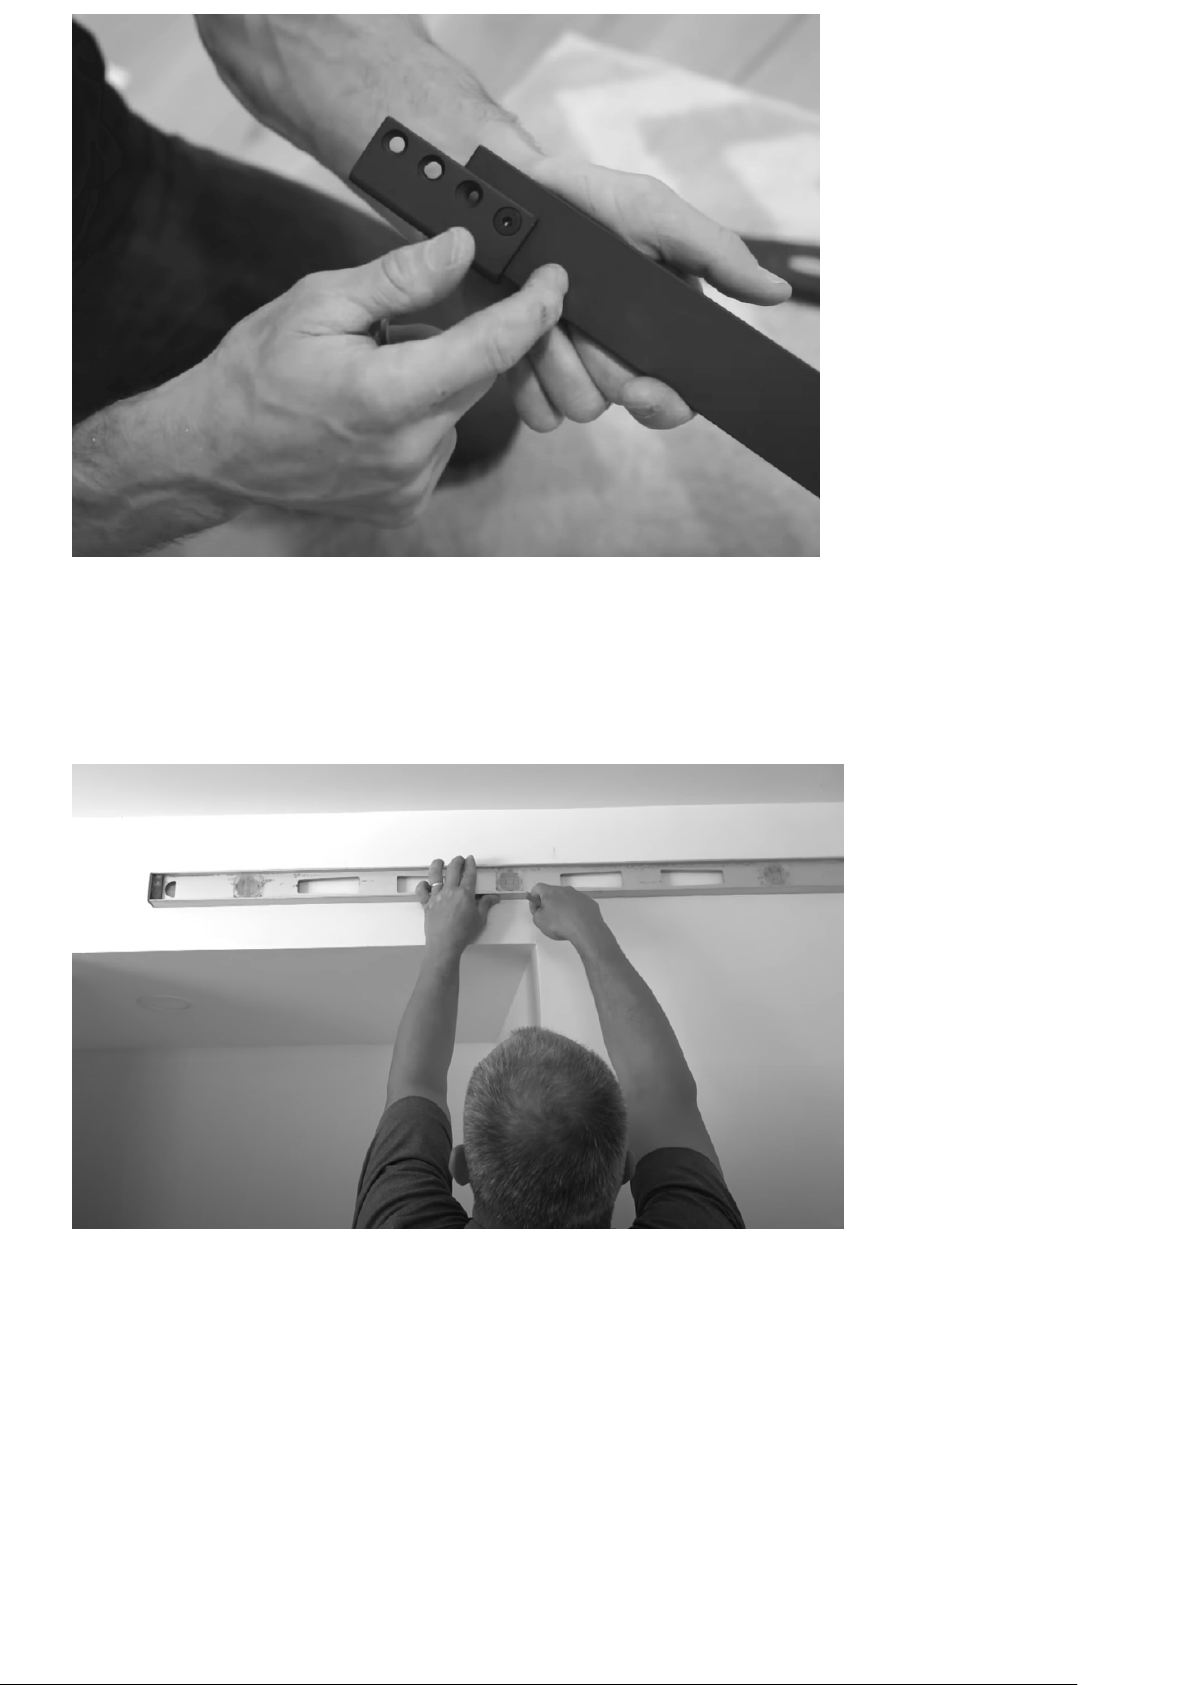
Step 0. (If your track is 7.5FT or under, please skip this step)
Connect the tracks with the track connector like the above diagram. Align the
holes on the track connector with two small holes at the end of the track.
Tighten the screws and nuts.
Step 1.
Use a stud finder to locate the drywall studs and mark them up. Hold the
track up and align with the marked studs to make sure the holes on the track
match the studs on the wall. You can also mount a header-board into the studs
first. You might want to paint the board same color as your door or wall before
the installation.
Page 5
5
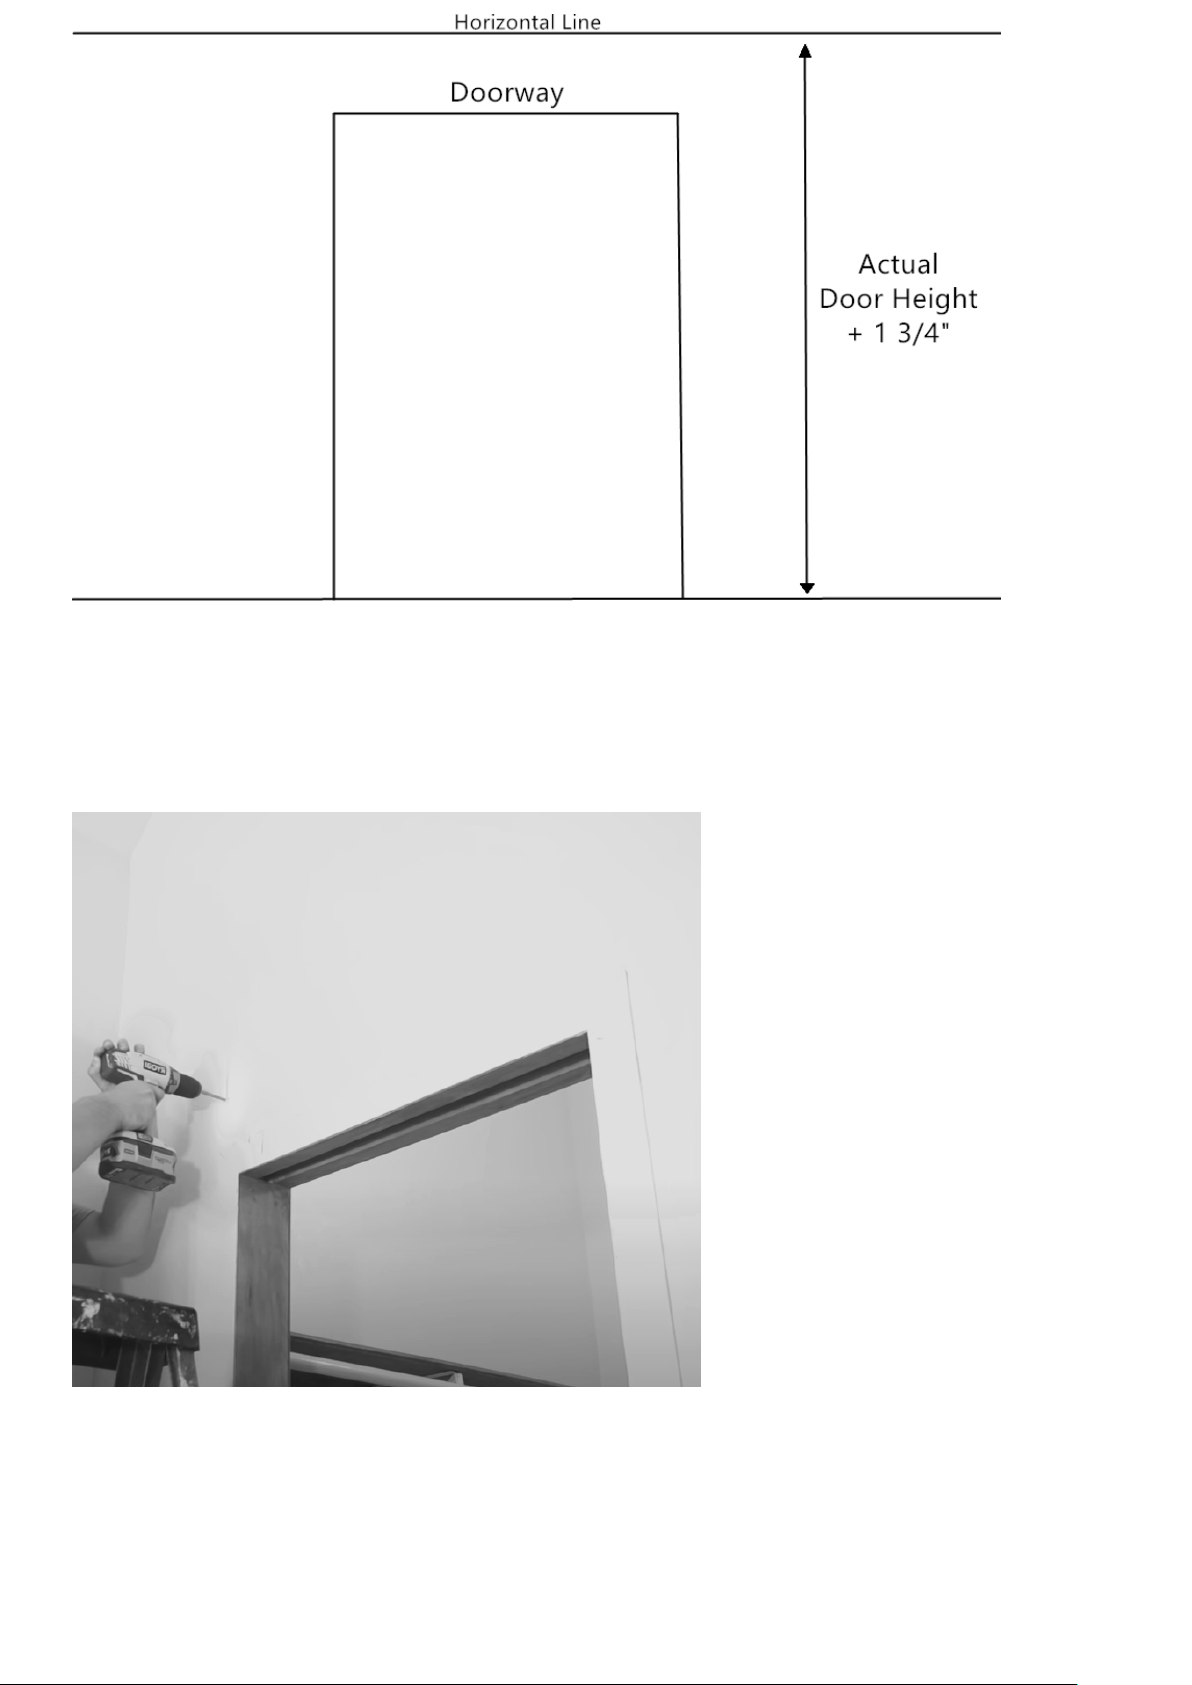
Step 2.
Measure the height of the door and apply the formula above to draw a
horizontal line that is same length as the track. The line has to be level. Next,
you can hold the track up to align with the horizontal line to make sure the line
is at the center of the pre-drilled holes of the track.
Step 3.
Use a drill with 11/64” drill bit and then drill holes on the marks.
Page 6
6
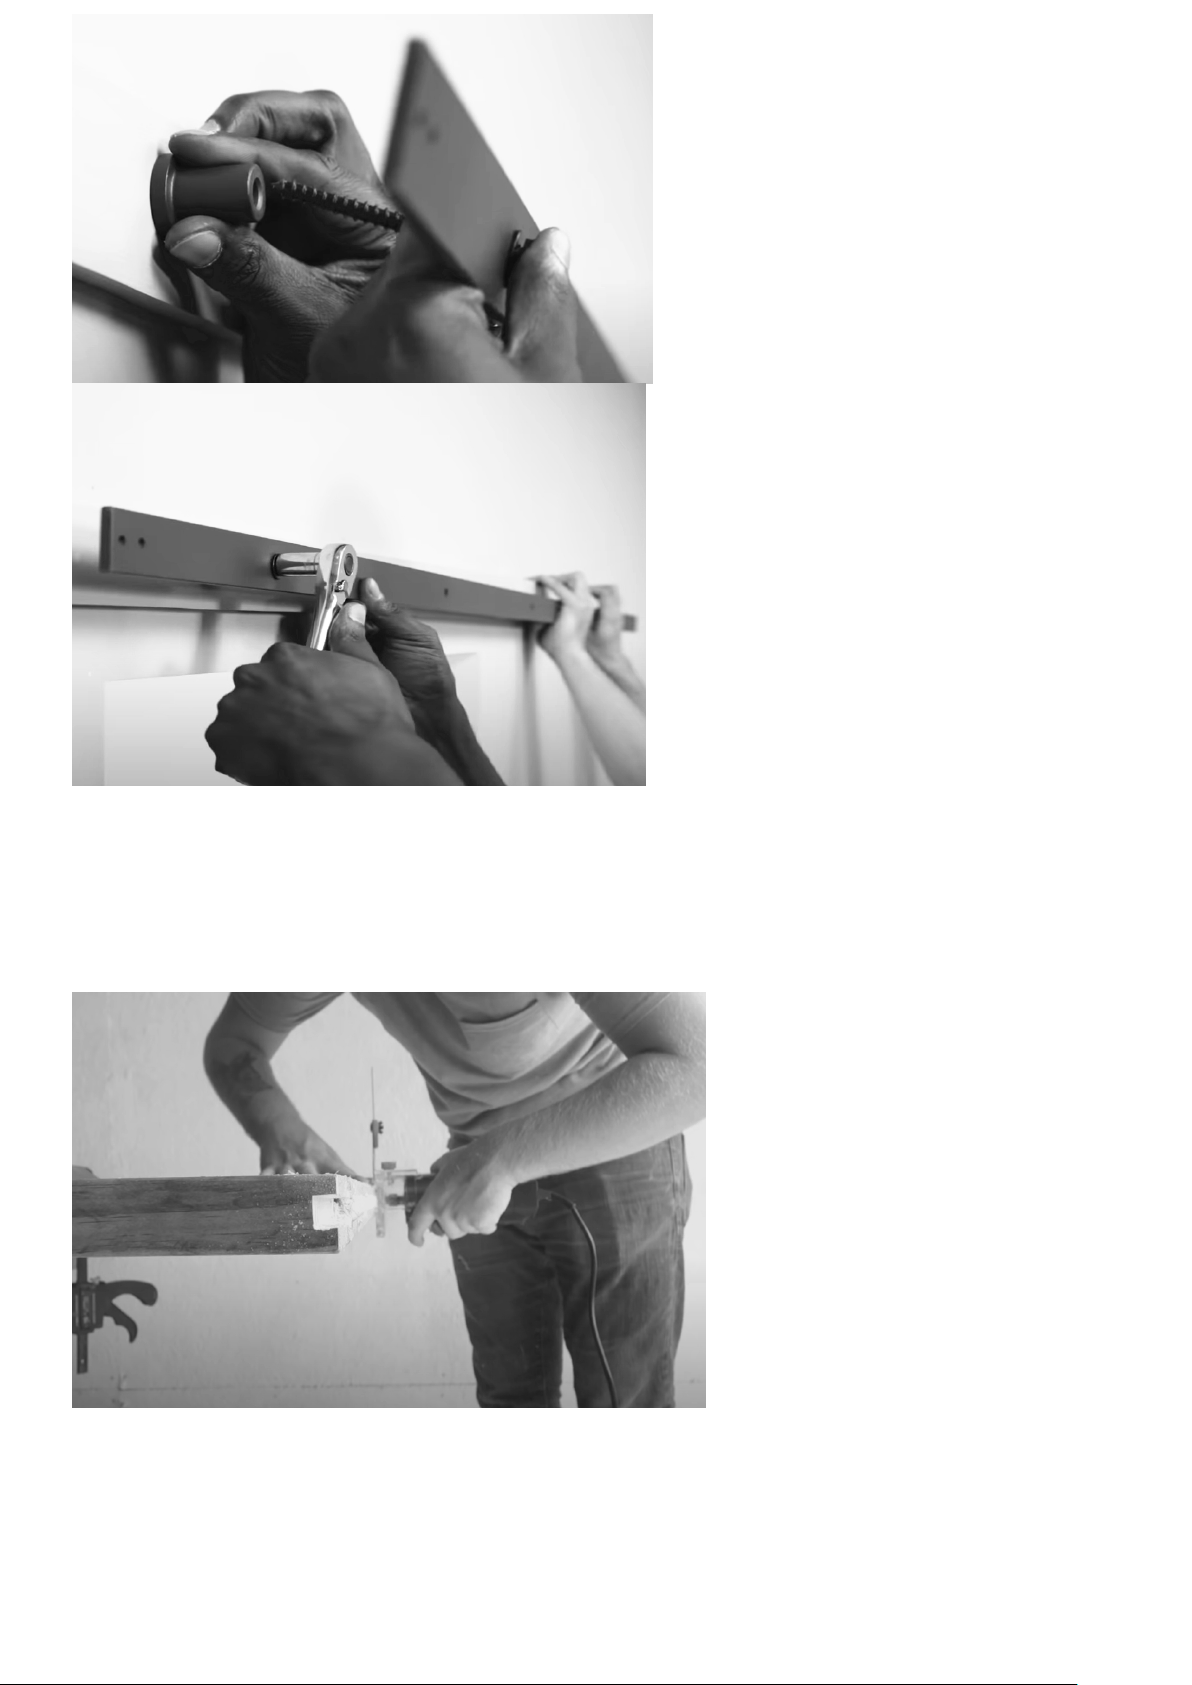
Step 4.
Insert a lag bolt with a washer and then go through the track to a spacer just
like the above picture. Then, line up with the holes that you drilled previously.
Lastly, tighten the bolts with 1/2’’ hand wrench/power socket ranch. Repeat the
steps for the remaining holes.
Step 5.
Cut a slot underneath the door for 1/4” wide and 1” deep by using a router. This
is use for fit in the floor guide. If you are not comfortable cutting the groove or
do not have a router, please visit broncohardwareshop.com for other guide
option purchase.
Page 7
7
Step 6.
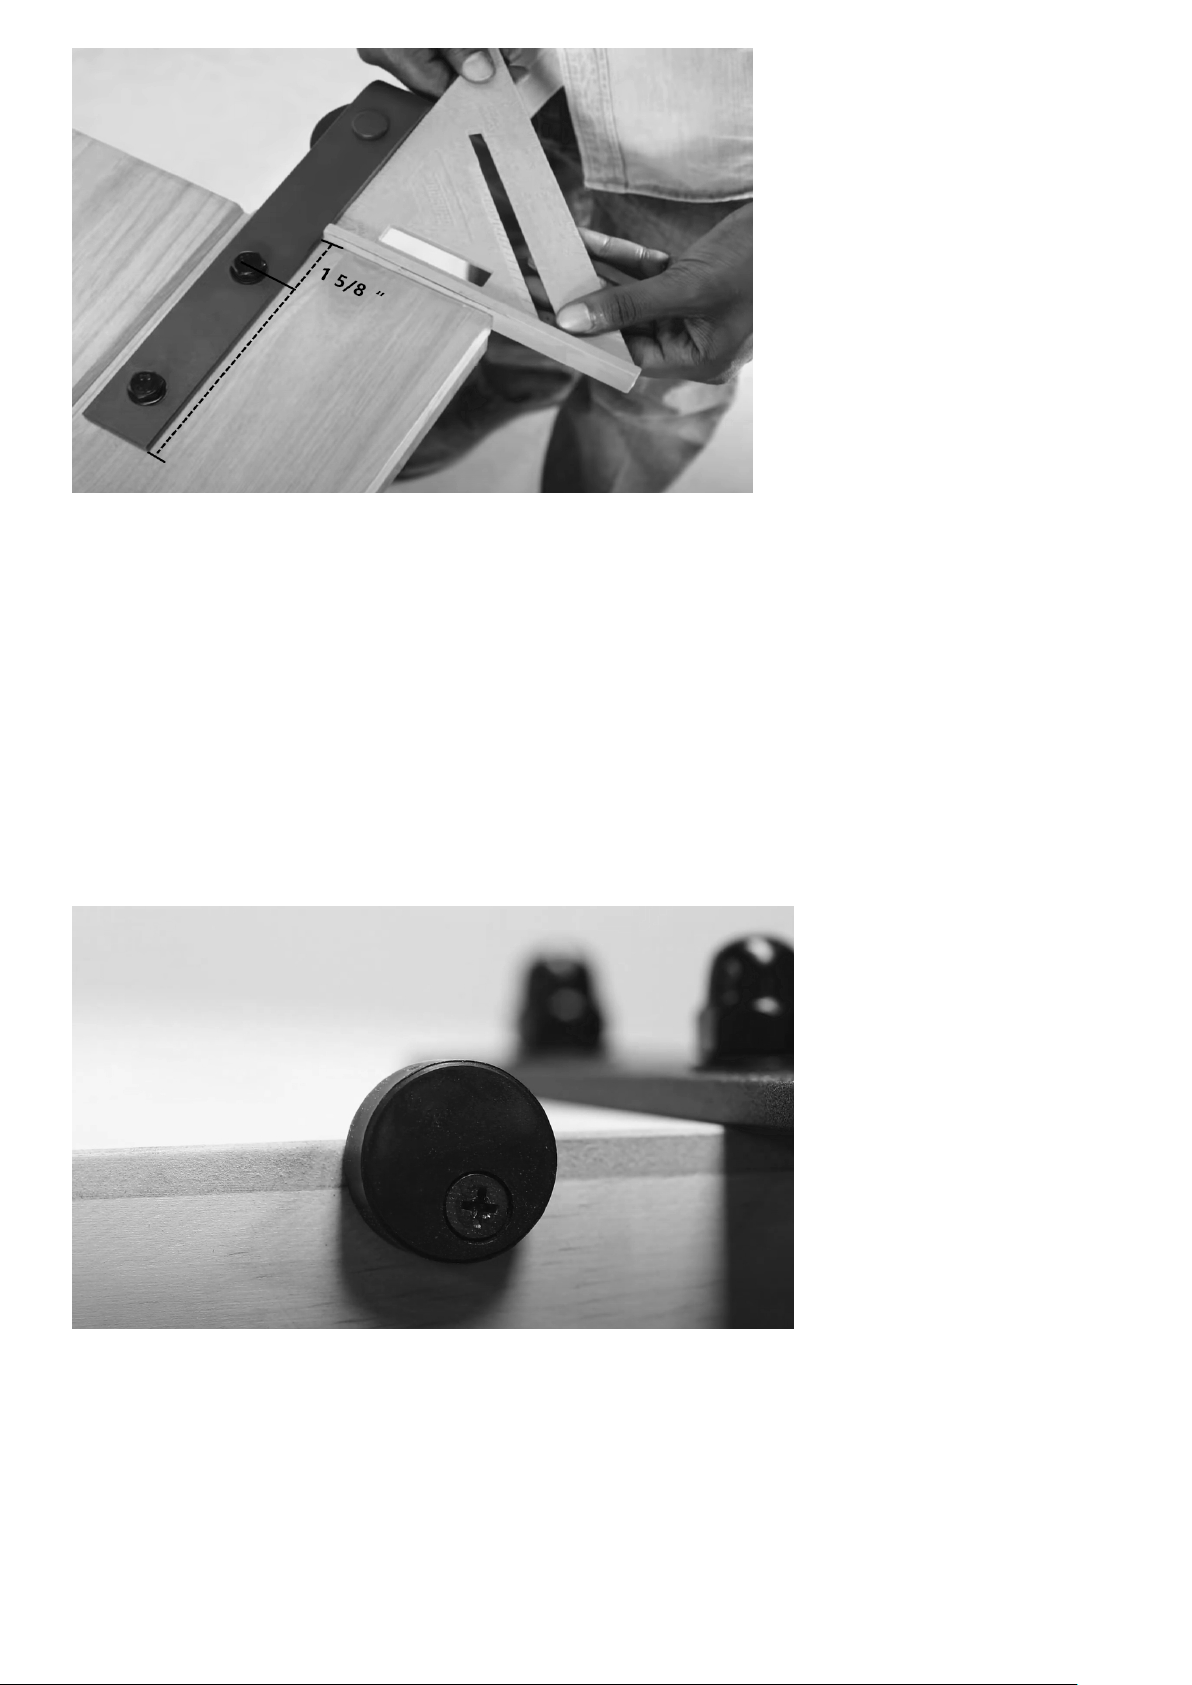
Drill the holes like the above diagram for the door hanger/roller. The distance
from the top of the door to the center of the first hole is 1 5/8”. The distance
from the side door edge and the roller is at your personal preference. However,
it should be at least 1” away from the door edge to prevent any damage to your
door. Lastly, install the hex bolts and the nuts just like in the diagram above. If
you purchased the black wheel door hanger, the measurement are the same.
Step 7.
Use a Phillips screwdriver to install the anti-jump pads on top of the door. Wood
screws are in the bag with the anti-jump pads and you can use the the
screwdriver to tighten it through the hole.
Page 8
8
Step 8.
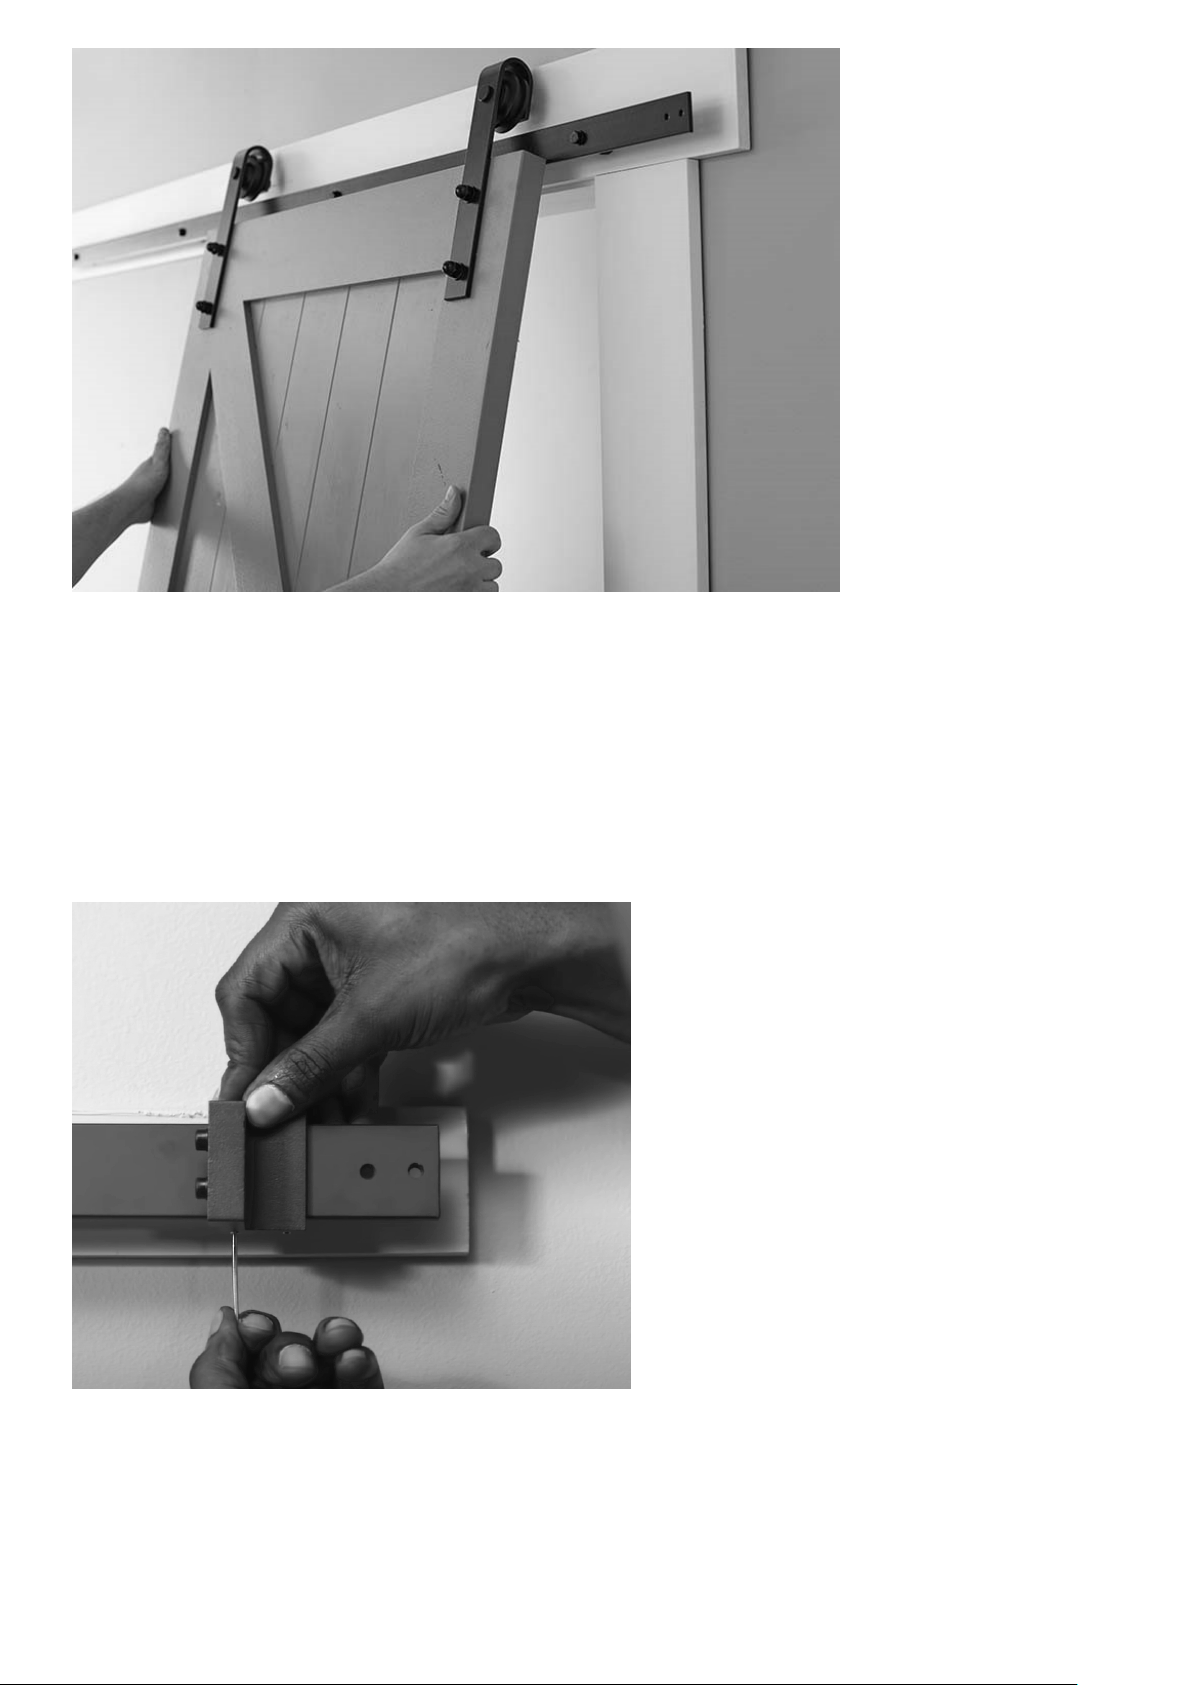
Carry the door near the track and lift the door up with angle so that the door
hanger/roller are over the track. Lower the door so the groove in the roller are
sitting on the track.
Step 9.
Put the door stopper at a desired position and tighten the screw on the door
stopper with hex wrench included in the bag with door stopper.
Page 9
9
Step 10.
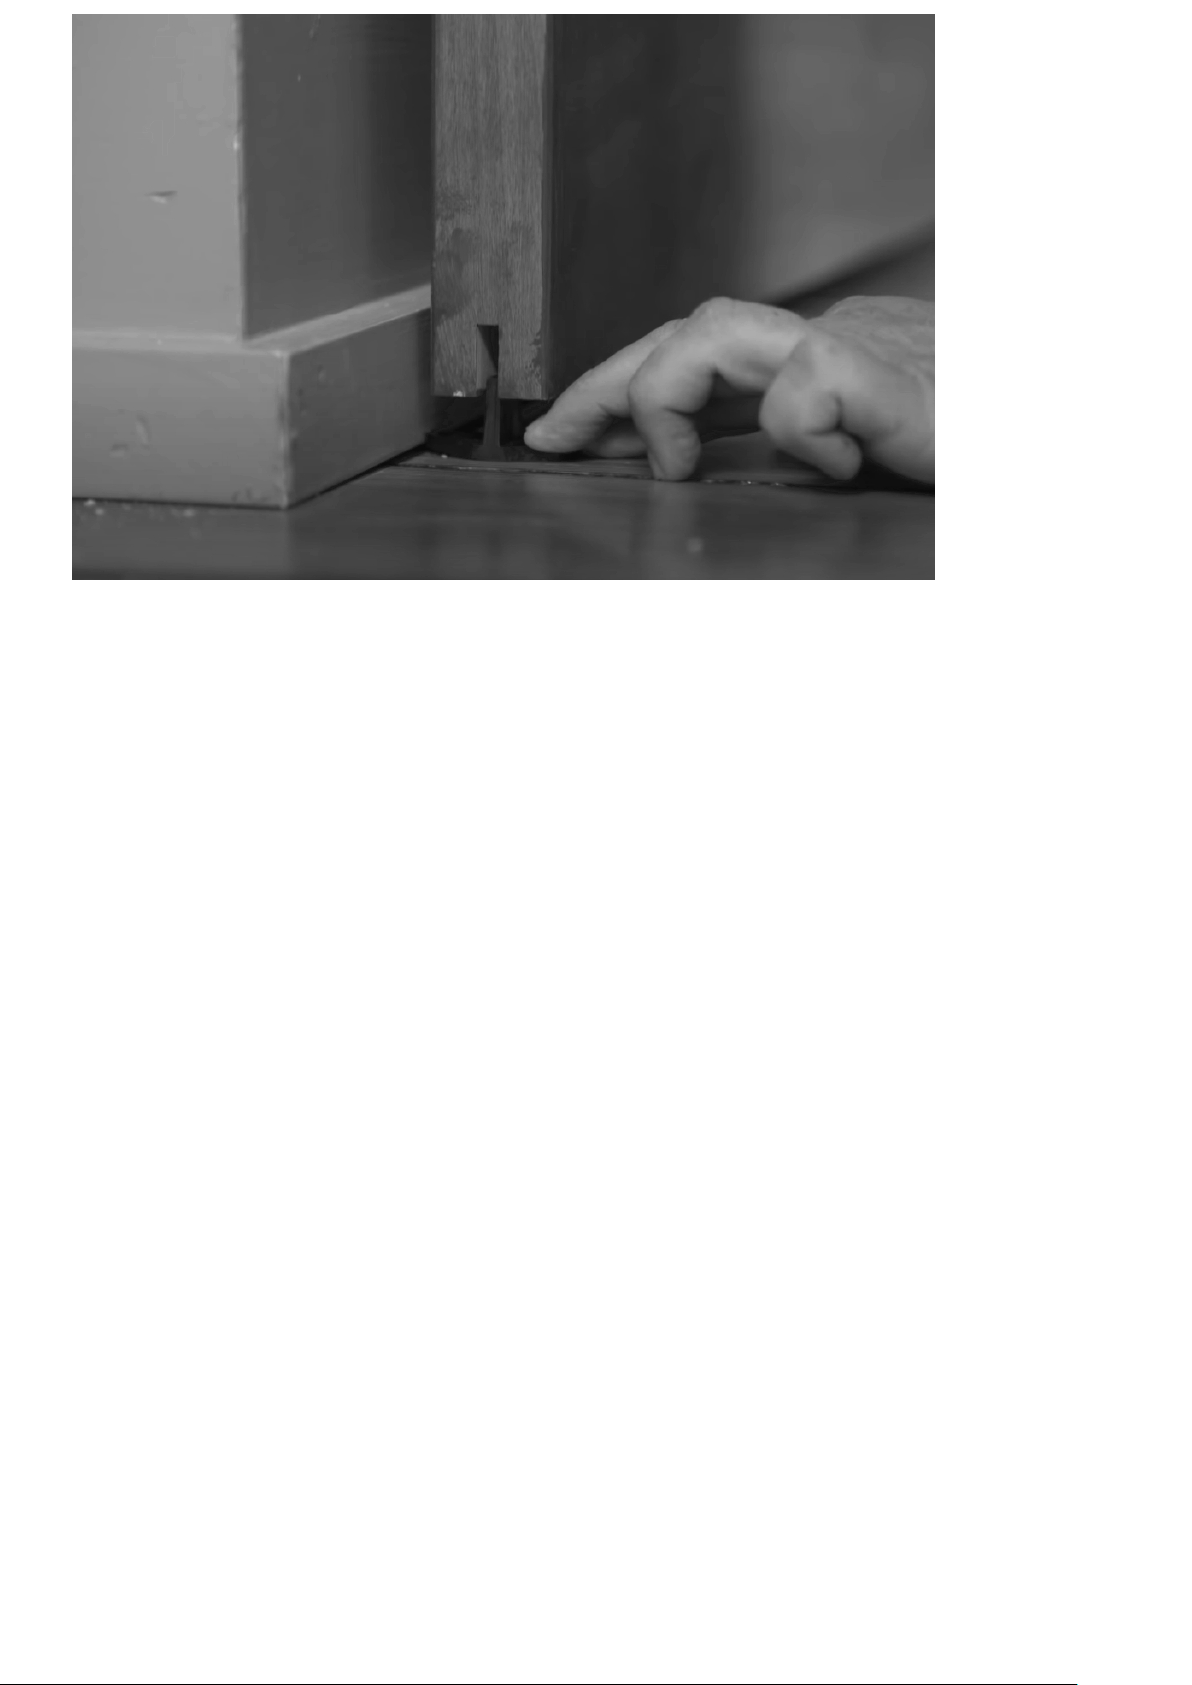
1. Slide the door to the side so the door way is cleared.
2. Position the floor guide at the centered in the channel.
3. Mark the center holes of the floor guide and put it aside.
4. Take a drill with 7/32” drill bit and drill the holes that you marked.
5. Insert the plastic anchors into the holes and then position the floor guide with
the holes. Finally, insert the screw and tighten the screw with a Philips
screwdriver.
Installation Complete!
 Loading...