

GAS-FIRED
PREMIUM GRILLS
R3(N)-1, R3B(N)-1
R3 GRILL HEAD
Page 1

IMPORTANT INFORMATION
IMPORTANT
T
his manual should be read thoroughly by the installer and by anyone who will use
or maintain the grill.
Installer - Write the model number, serial number, and date of installation in the manual.
If available, attach a copy of the receipt. Leave this manual with the grill owner.
Grill Owner - Read and retain this manual. It contains instructions on using and maintaining your grill, plus information on ordering replacements parts. Attach a copy of
your receipt to this manual. Your receipt established the proof of purchase required
for warranty replacement parts.
WARNING
F
ollow the instruction in this manual for proper installation and maintenance of the
grill. Improper installation, adjustment, alteration, service or maintenance can cause
injury or property damage. For assistance or additional information consult a
qualied installer, service agency or the gas supplier.
DANGER: FOR YOUR SAFETY
IF YOU SMELL GAS:
1. Extinguish any open ame.
2. Shut off gas to the appliance.
3. Open the grill lid.
4. If odor continues, keep away from the appliance call
your gas supplier or your re department.
WARNING: FOR YOUR SAFETY
1. Do not store or use gasoline or other ammable vapors or liquids in the vicinity
of this or any appliance.
Only the LP tank connected for use shall be placed in the vicinity of this grill.
2.
CAUTION:
P
arts may have sharp edges. Wear leather work gloves and handle parts carefully
during unpacking, assembly and installation.
WARNING
F
or LP grills, use propane cylinders equipped with an Overll Protection Device (OPD).
An overlled or improperly lled propane cylinder can be dangerous.
B102218-3-0615Page 2

Thank you for purchasing a Broilmaster Infrared Grill.
Broilmaster takes pride in its reputation as the The Most Durable Grill Known to Man.
From its thick aluminum casting to its massive cooking grids, your Broilmaster
is built to last. In fact we still make replacement parts for Broilmaster grills built
more than 30 years ago.
Thank You!
Broilmaster is a registered trademark of
B102218-3-0615 Page 3
Empire Comfort Systems, Inc.
918 Freeburg Ave.
Belleville, Illinois 62220
Telephone 800-851-3153

TABLE OF CONTENTS
Y
ou have chosen the nest grill for your outdoor cooking pleasure.
Please take time to read this entire manual before assembling your Broilmaster Infrared grill.
ASSEMBLY INSTRUCTIONS ........................................................................................................ 5
R3 SERIES PARTS DIAGRAM ...................................................................................................... 6
GRILL HEAD HARDWARE PACK ................................................................................................7
LID STOP HARDWARE PACK ...................................................................................................... 8
UNPACK AND REMOVE LID ........................................................................................................9
WIND DEFLECTOR PLACEMENT ..............................................................................................10
INSERT COLLECTOR BOX (R3B ONLY) ................................................................................... 11
INSERT BURNERS (R3B ONLY) ................................................................................................ 12
INSERT INFRARED BURNERS (R3 ONLY) ............................................................................... 13
INSERT BURNER SHIELD (R3B ONLY) .................................................................................... 14
ATTACH GROUND WIRE (R3 ONLY) .........................................................................................15
CONNECT IGNITER LEADS ....................................................................................................... 16
KNOB AND BATTERY PLACEMENT (R3 SHOWN) ................................................................... 17
INSTALL LID STOP ....................................................................................................................18
HANDLE INSTALLATION ............................................................................................................ 19
REINSTALL LID ........................................................................................................................... 20
INSTALL RACKS .................................................................................................................... 21-22
INSTALL WARMING RACK ........................................................................................................23
PROPANE GAS GRILLS ........................................................................................................ 24-27
CONNECTING PROPANE GAS GRILL ...................................................................................... 28
CONNECTING NATURAL GAS GRILL ....................................................................................... 29
NATURAL GAS GRILLS ............................................................................................................. 30
COMPLETED ASSEMBLY ..........................................................................................................31
OWNER’S MANUAL FOR R3 SERIES GRILLS ....................................................................32-43
INFRARED COOKING ........................................................................................................32-33
OPERATION - PROPANE AND NATURAL GAS GRILLS ...................................................34-35
COOKING TIPS ........................................................................................................................35
MAINTENANCE ..................................................................................................................36-37
TROUBLESHOOTING .............................................................................................................38
IMPORTANT SAFETY INFORMATION ............................................................................... 39-40
WARRANTY TERMS ................................................................................................................ 41
GRILL MAINTENANCE HISTORY ........................................................................................... 42
MASTER PARTS DISTRIBUTOR LIST .................................................................................... 43
HOW TO ORDER REPAIR PARTS .......................................................................................... 43
B102218-3-0615Page 4
ASSEMBLY INSTRUCTIONS
BEFORE YOU BEGIN
This Grill Head requires Broilmaster Mounting (Cart, Post, or a Built-In Kit).
See Mounting Instructions to assemble mounting before Assembling Grill Head.
Compare the parts in the box to the parts list provided in this manual. If any are missing, contact your
Broilmaster dealer before beginning assembly.
All Broilmaster grills require some assembly. For the best results, follow the step-by-step instructions.
For natural gas grills and for permanently mounted LP grills, have your gas supplier run service to the desired
location first.
If you purchased an accessory with your Broilmaster, follow the instructions provided. Assemble your base
options before assembling your Broilmaster grill head. Refer to the Broilmaster Cart, Base, and Post
instructions provided with each accessory for assembly, installations, and mounting procedures.
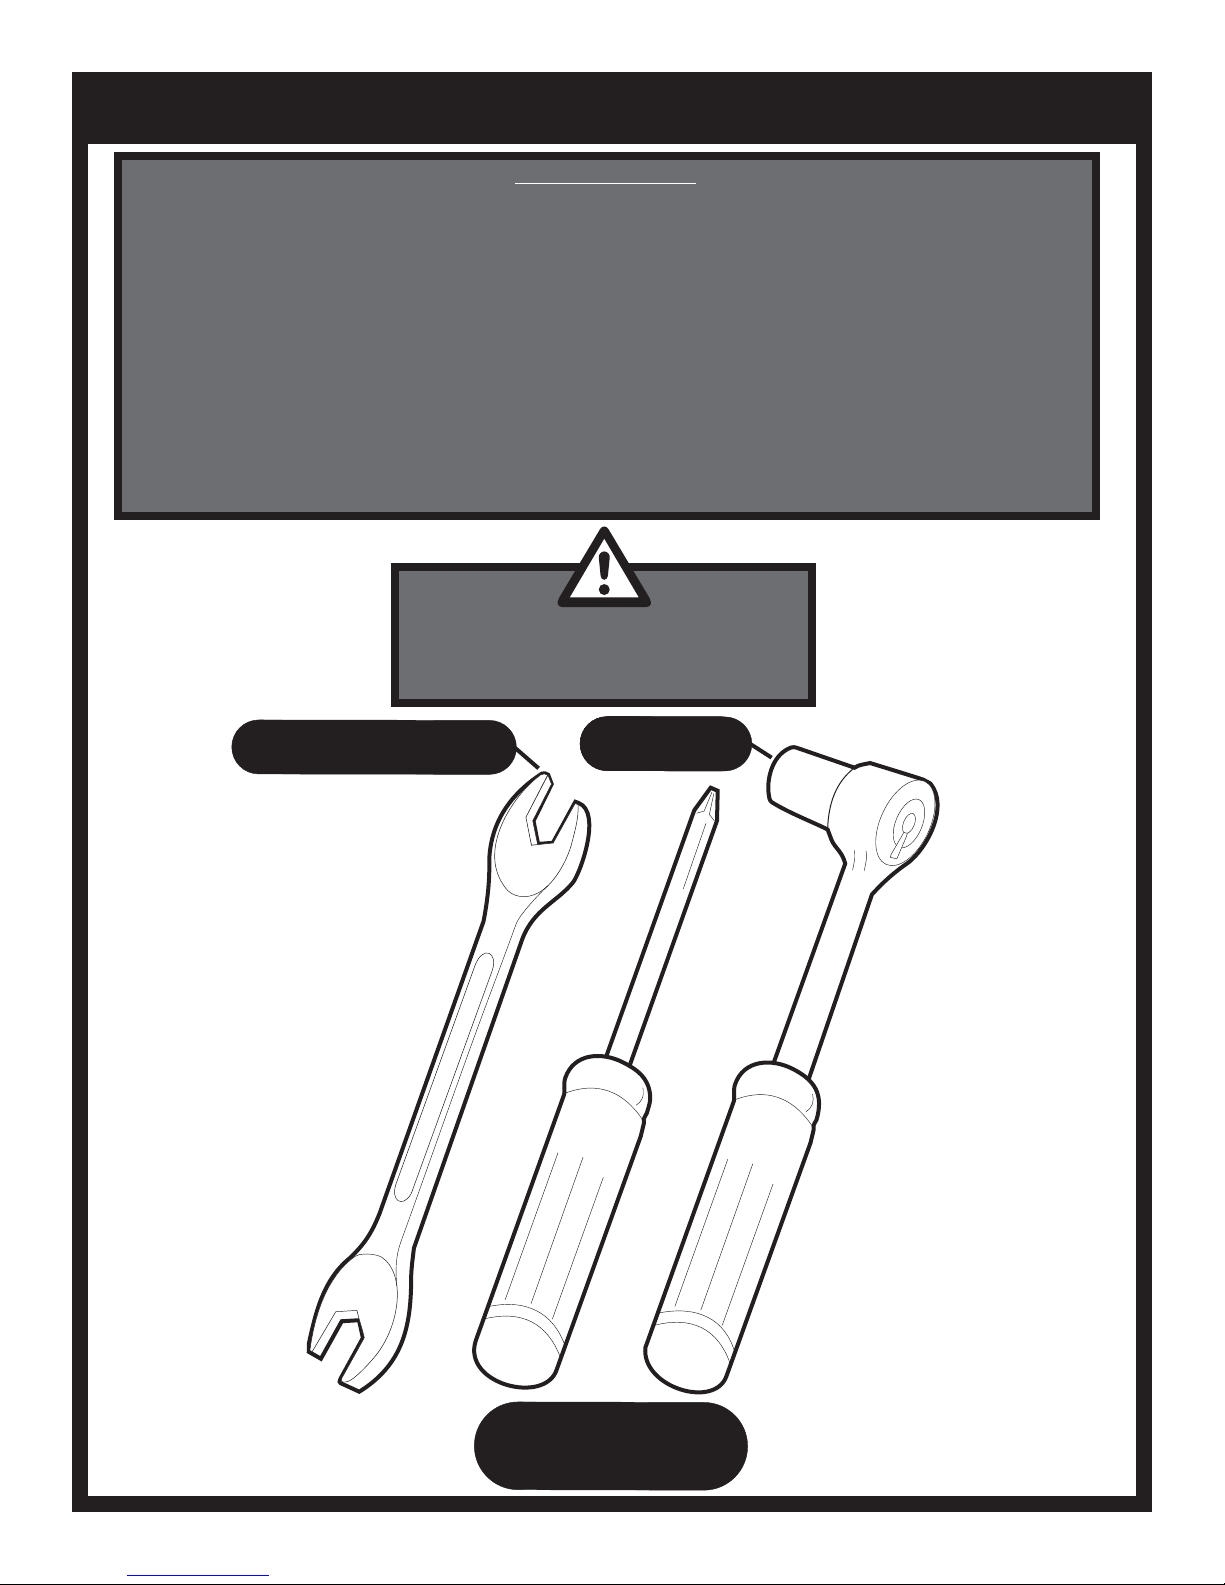
CAUTION:
Parts may have sharp edges. For your safety
wear leather work gloves and handle parts
carefully during unpacking and assembly.
3/8”, 7/16”, 9/16”and 3/4”
REQUIRED
3/8” and 7/16”
3/8” and 7/16”
3/8” and 7/16”
REQUIRED
REQUIRED
REQUIRED
B102218-3-0615 Page 5
TOOLS
REQUIRED
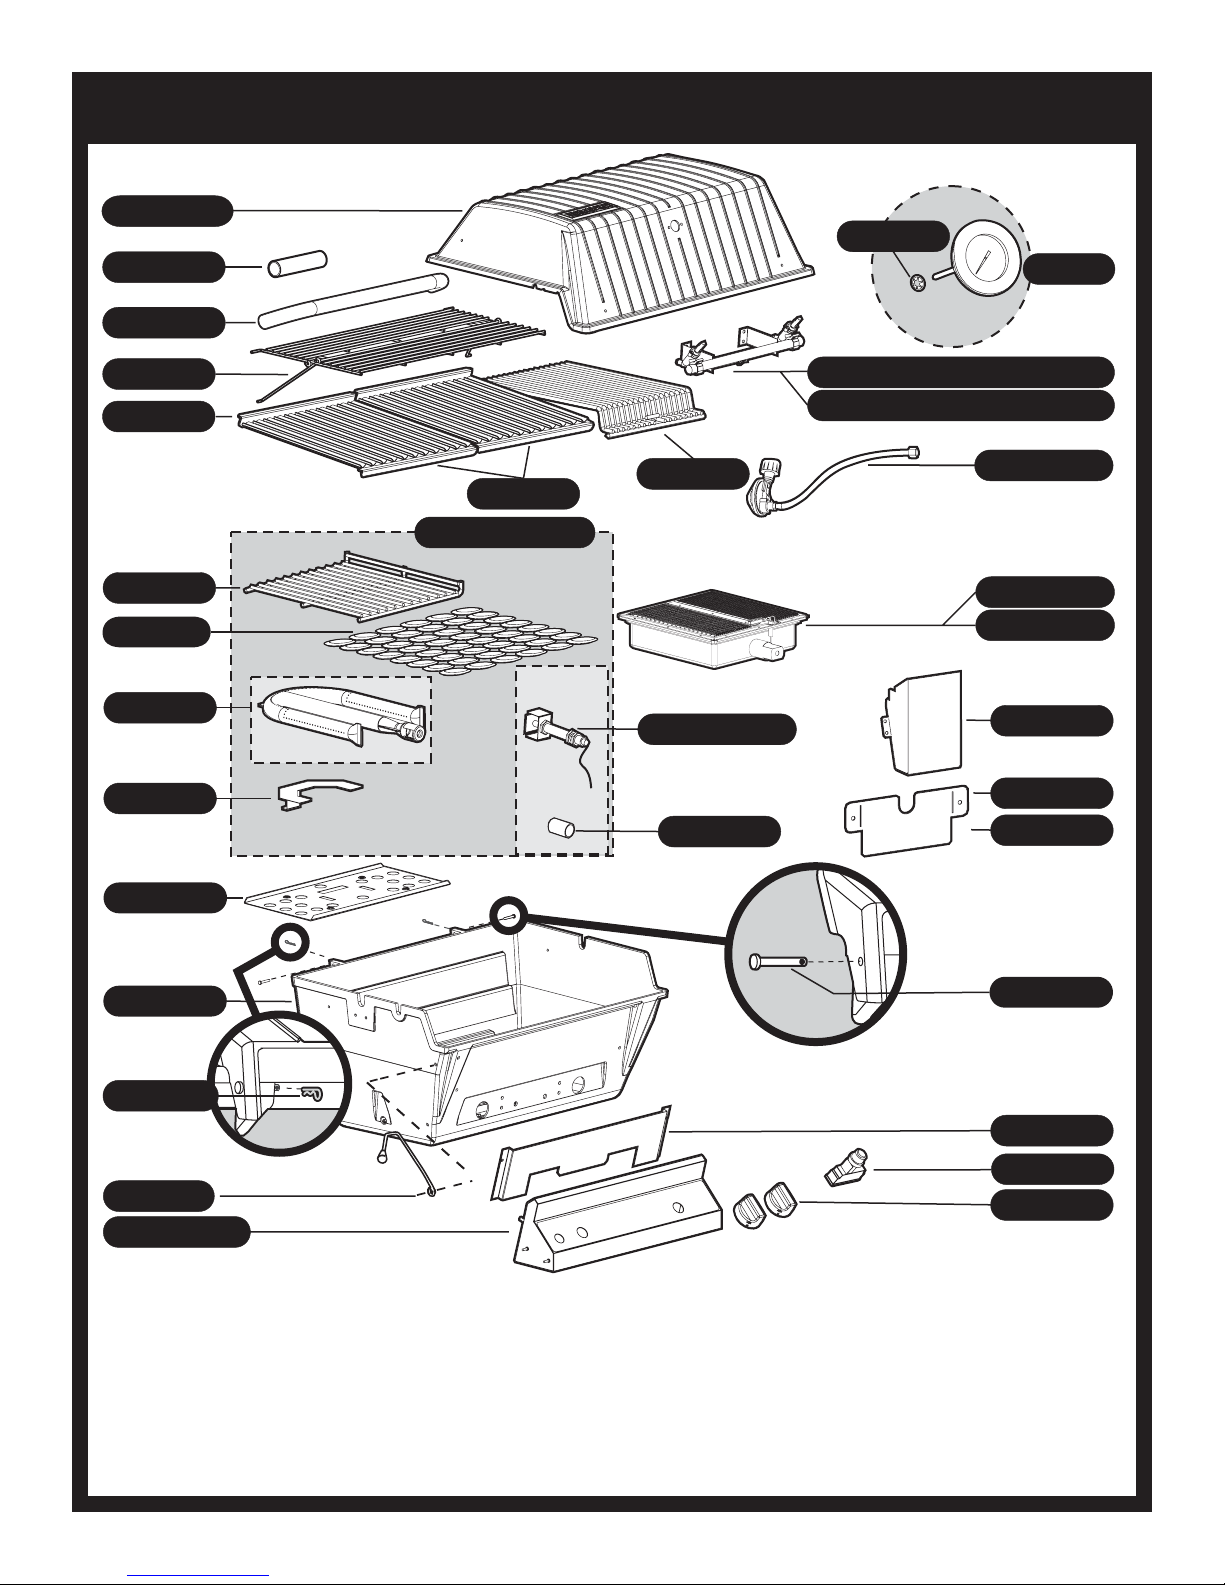
R3 SERIES PARTS DIAGRAM
B100456 (1)
GRILL BODY TOP
B073097 (1)
FOAM GRIP
B070486 (1)
LID HANDLE
B101665 (1)
PUSH NUT
DP119 (1)
HEAT INDICATOR
B072695(1)
RETRACTING RACK
B102143 (1)
V-GRATE (R3B)
B101369 (1)
BRIQUETTE RACK
DPA34 (1)
BRIQUETTE BAG
DPP104 (1)
BURNER ASSEMBLY
B101154 (1)
BURNER SHIELD
DPP106 (1)
WIND DEFLECTOR
DPA121 (1)
V-GRATE (R3 ONLY)
R3B
SERIES ONLY
B101281 (1)
COOKING GRID (R3B)
B101834 (1)
ELECTRODE BRACKET
B101212 (1)
COLLECTIVEBOX ASSEMBLY
B102041 (1)
PROTECTIVESLEEVE
B101212 (1)
B101082 (1)
COLLECTOR BOX ASSEMBLY
SPACER
B101356 (1,LP) OR B101316 (1,NAT )
R3 ONLY MANIFOLD AND VALVEASSEMBLY LPGORNAT URAL
B101314 (1,LP) OR B101317 (1,NAT )
R3B ONLY MANIFOLD AND VALVEASSEMBLY LPGORNAT URAL
B069756 (1)
B069756 (1)
HOSE & LPS REGULATOR
HOSE & LPS REGULATOR
B101269(2)
INFRARED BURNER R3(N)
B101269(1)
INFRARED BURNER R3B(N)
B101121 (1)
CONTROL HOUSING
B101596 (1)
COVER PLATE BLACK
B101597 (1)
COVER PLATE SS
B101879 (1)
GRILL BODY BOTTOM
B057805 (2)
COTTER PIN
DPA106 (1)
LID STOP KIT
B101273 (1)
CONTROLPANELASSEMBLY
B057804 (2)
HINGE PIN
B101046 (1)
CONTROLPANELSHIELD
B072218 (1)
ELECTRIC IGNITER
R3918 (2)
VALVE KNOB
B102218-3-0615Page 6
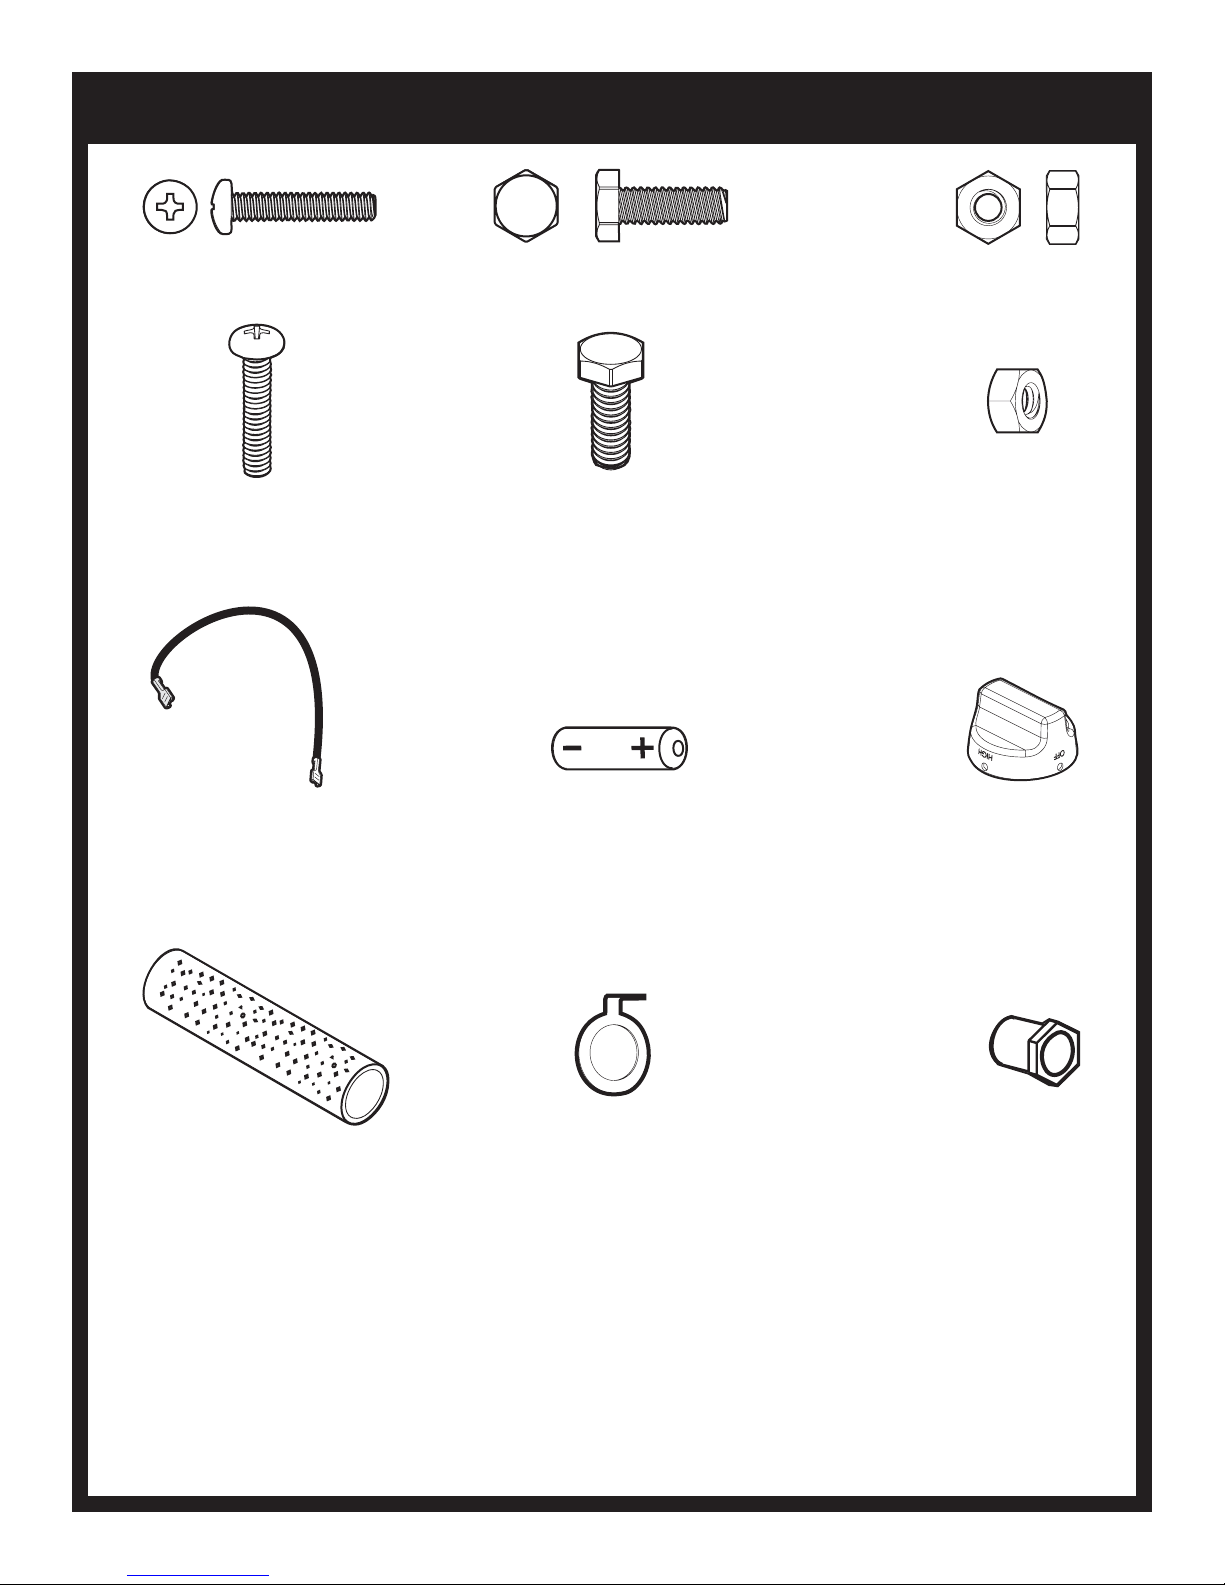
GRILL HEAD HARDWARE PACK - B101274
PHILLIPS PAN HEAD SCREW,
SS,10-24 X 1
B073978
(2)
GROUND
WIRE
B072684
(1)
HEX HEAD BOLT,
SS,1/4-20 X 3/4
B063096
(2)
BATTERY, AA
B076529
(1)
HEX NUT,
SS,1/4-20
B076331
(2)
KNOB
R3918
(2)
FOAM GRIP
B073097
(1)
B102218-3-0615 Page 7
IGNITER GROUND LUG
B069747
(2)
ORIFICE
B101063
(2)

LID STOP HARDWARE PACK - B101097
PHILLIPS TRUSS HEAD SCREW,
10-24 X 3/4
B076522
(1)
KEPS NUT,
SS,10-24
B073967
(1)
FLATWASHER,
1/4 ID X 5/8 OD
B076332
(2)
KNOB,TAPERED
B100098
(1)
SPACER
B662325
(1)
LID, STOP
B076521
(1)
B102218-3-0615Page 8
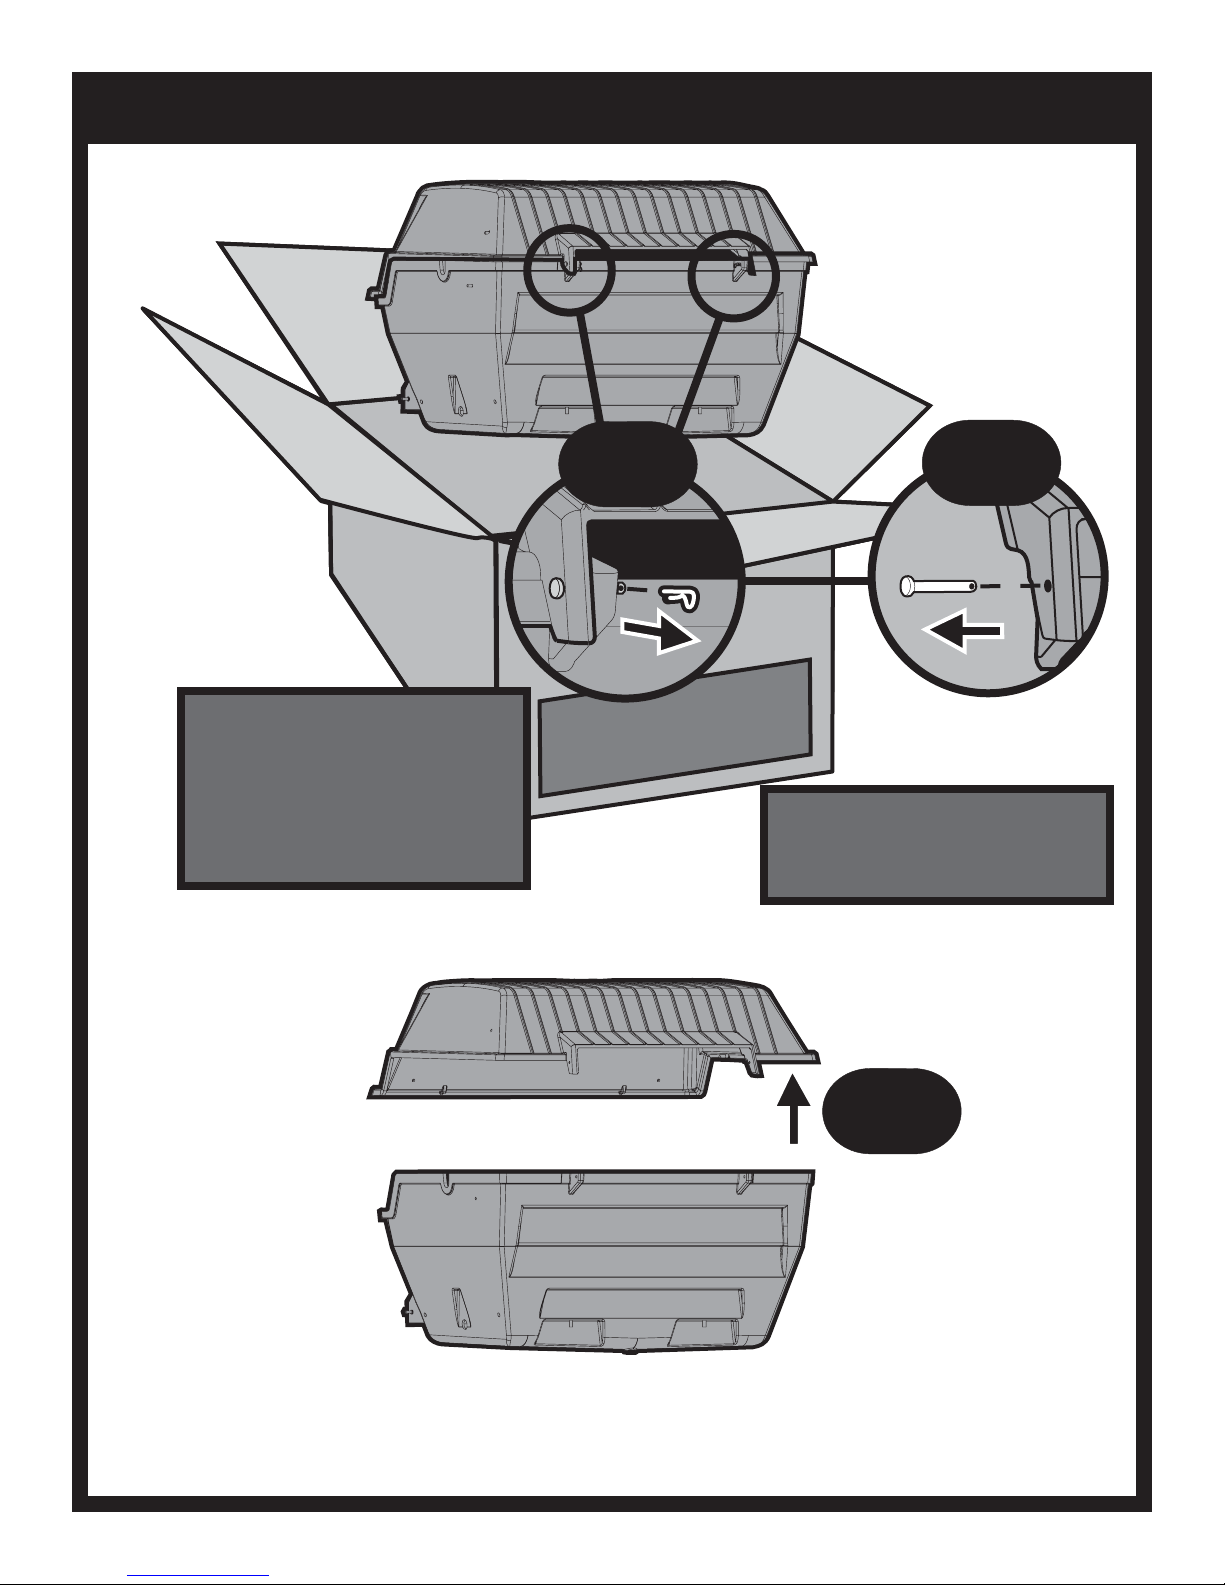
UNPACK AND REMOVE LID
REMOVING LID
To ease assembly, remove Grill Lid
and Warming Rack. Remove Warming
Rack and set aside. Remove the two
Pins and Clips at the rear of the Grill
Lid and set aside. After Pins, Lid and
Warming Rack have been removed,
remove the contents from inside the
Grill.
1
BROILMASTER
PREMIUM GRILLS
assemble Cart or Post mounting first.
provided with your Broilmaster Cart or
2
Prior to assembling Grill Head
Follow Mounting instructions
Post.
B102218-3-0615 Page 9
3
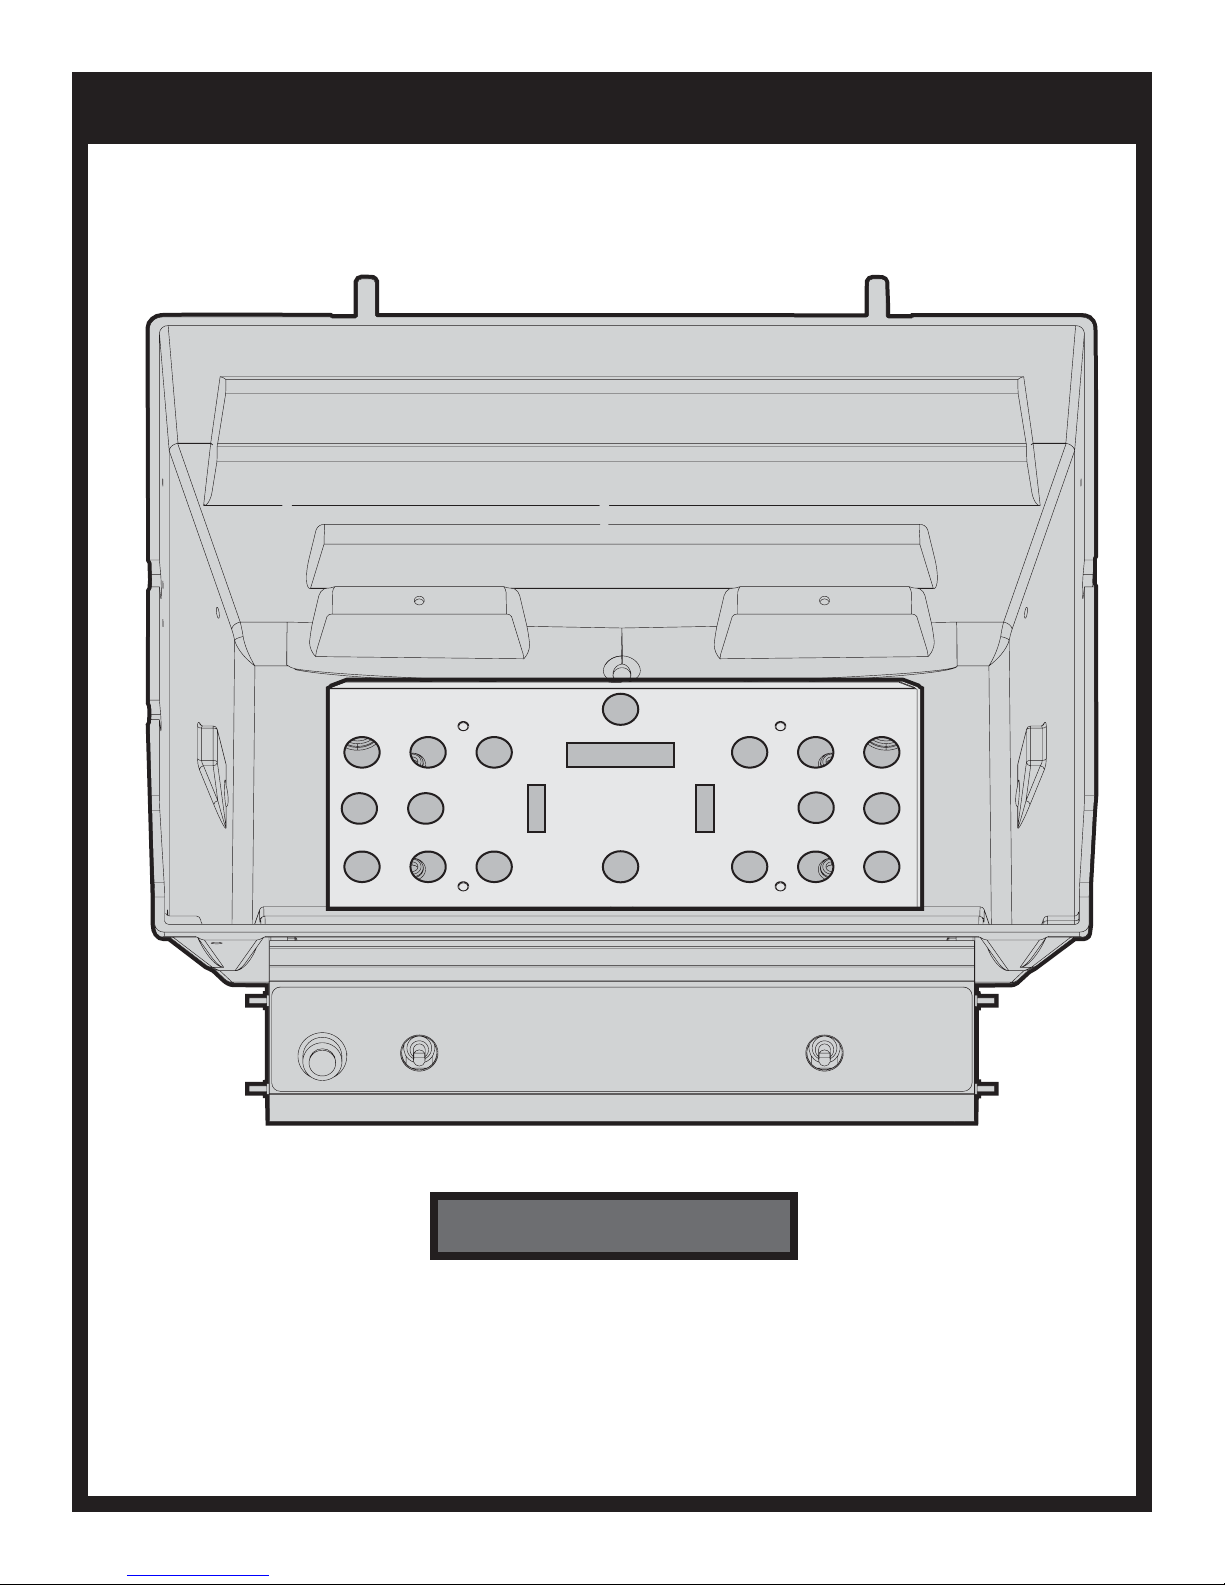
WIND DEFLECTOR PLACEMENT
Place the Wind Deflector in the bottom
Casting.
B102218-3-0615Page 10
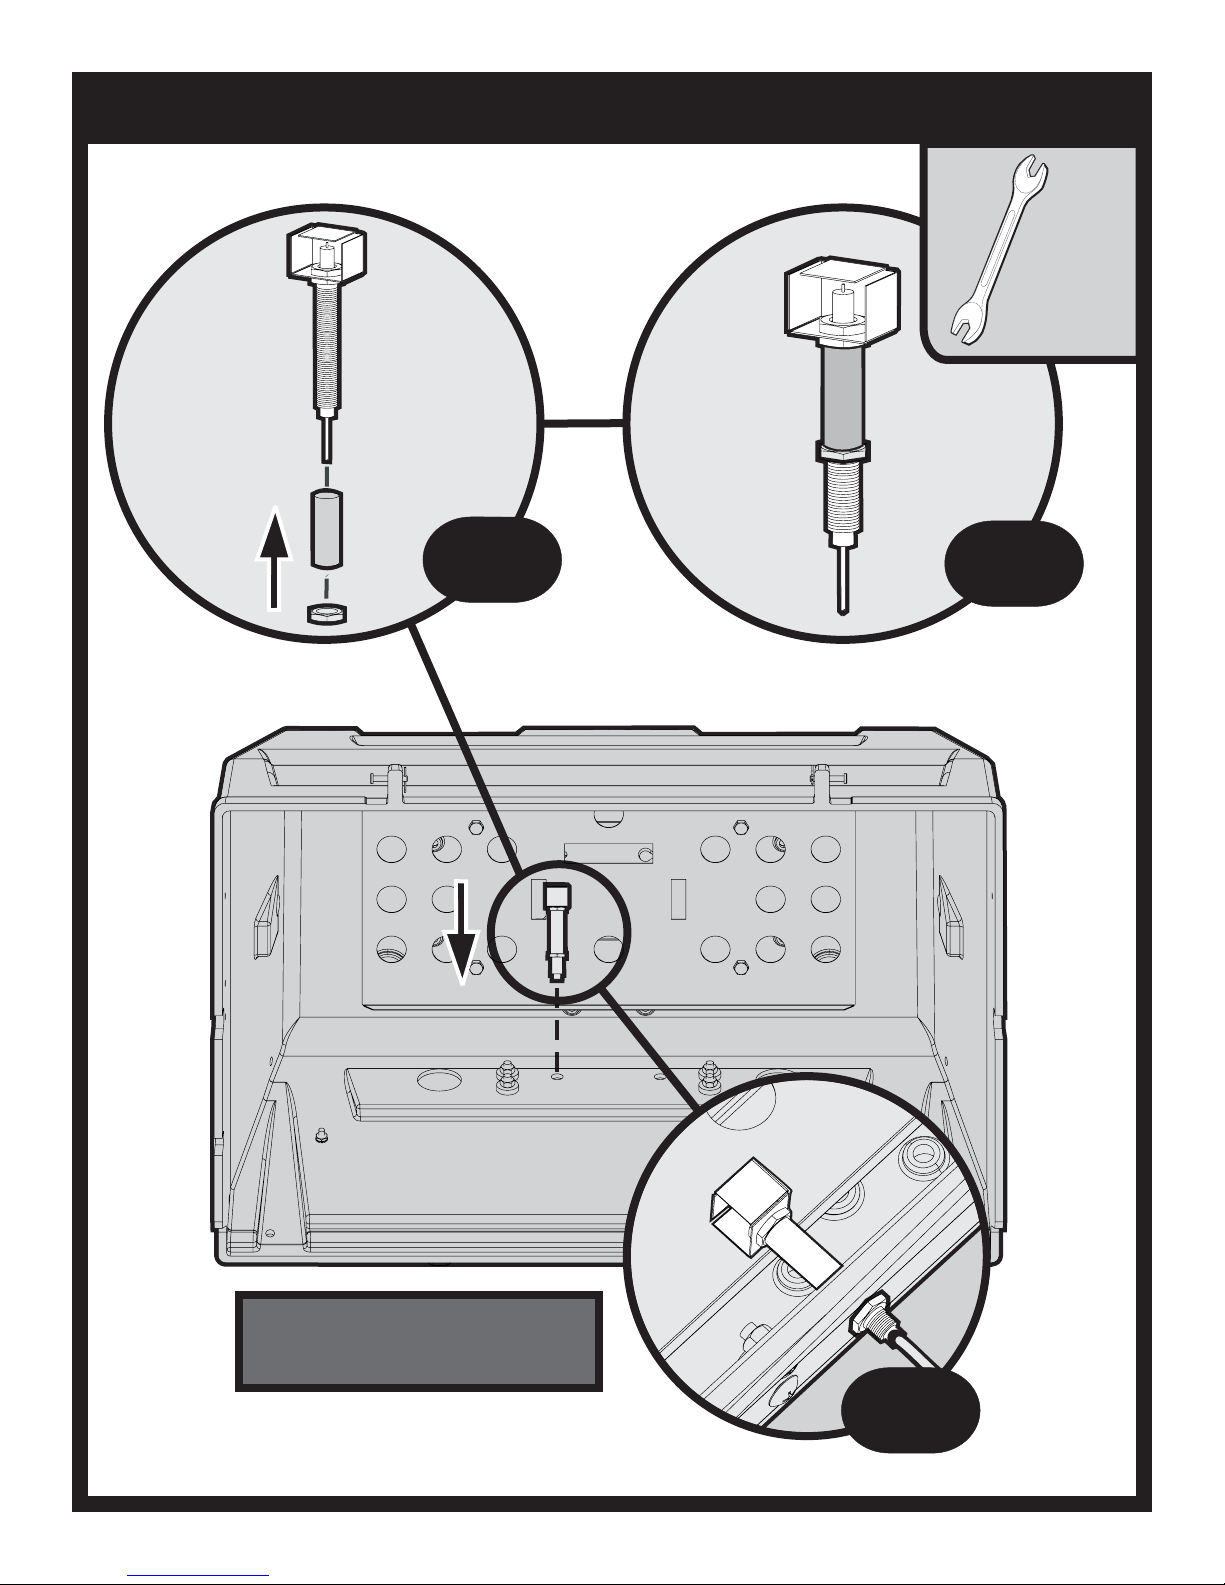
INSERT COLLECTOR BOX (R3B ONLY)
9/16”
1
2
Note: If a side shelf accessory is to be
used, install it at this time. Refer to side
shelf installation instructions for more
information.
B102218-3-0615 Page 11
3
INSERT BURNERS (R3B ONLY)
IGNITER WIRES
B102218-3-0615Page 12
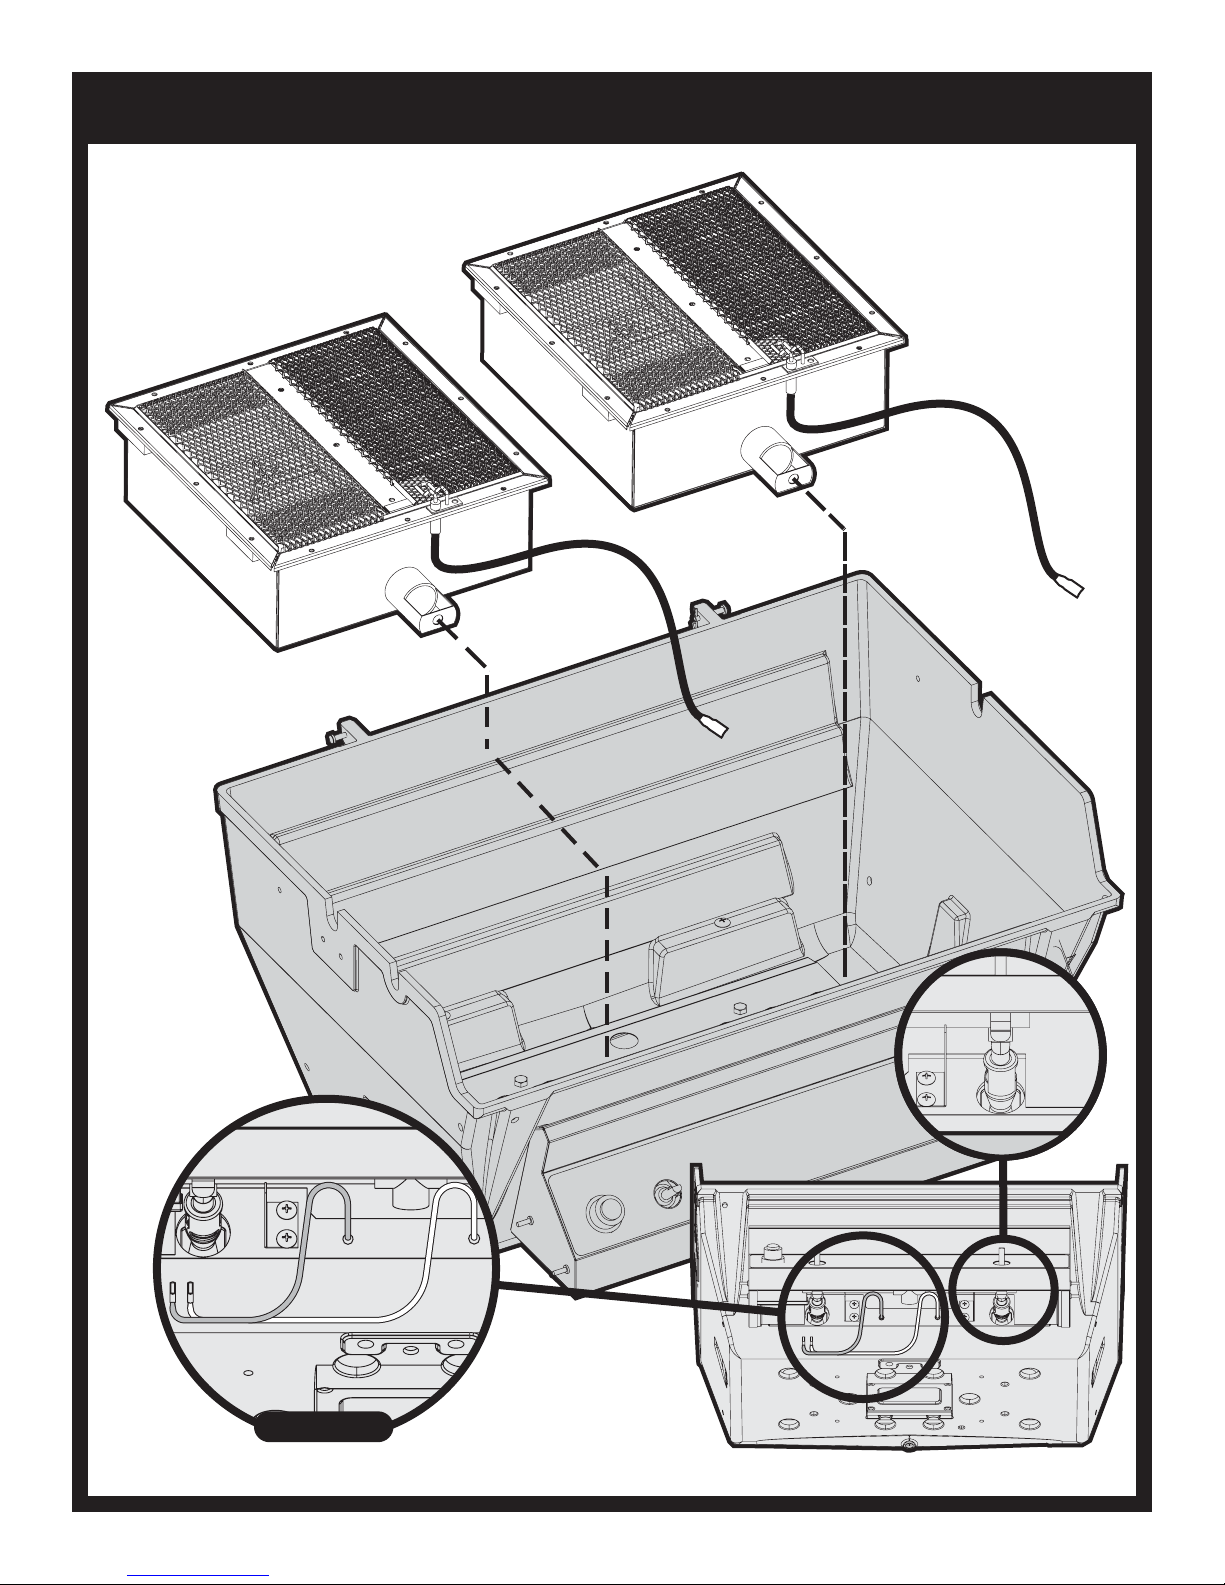
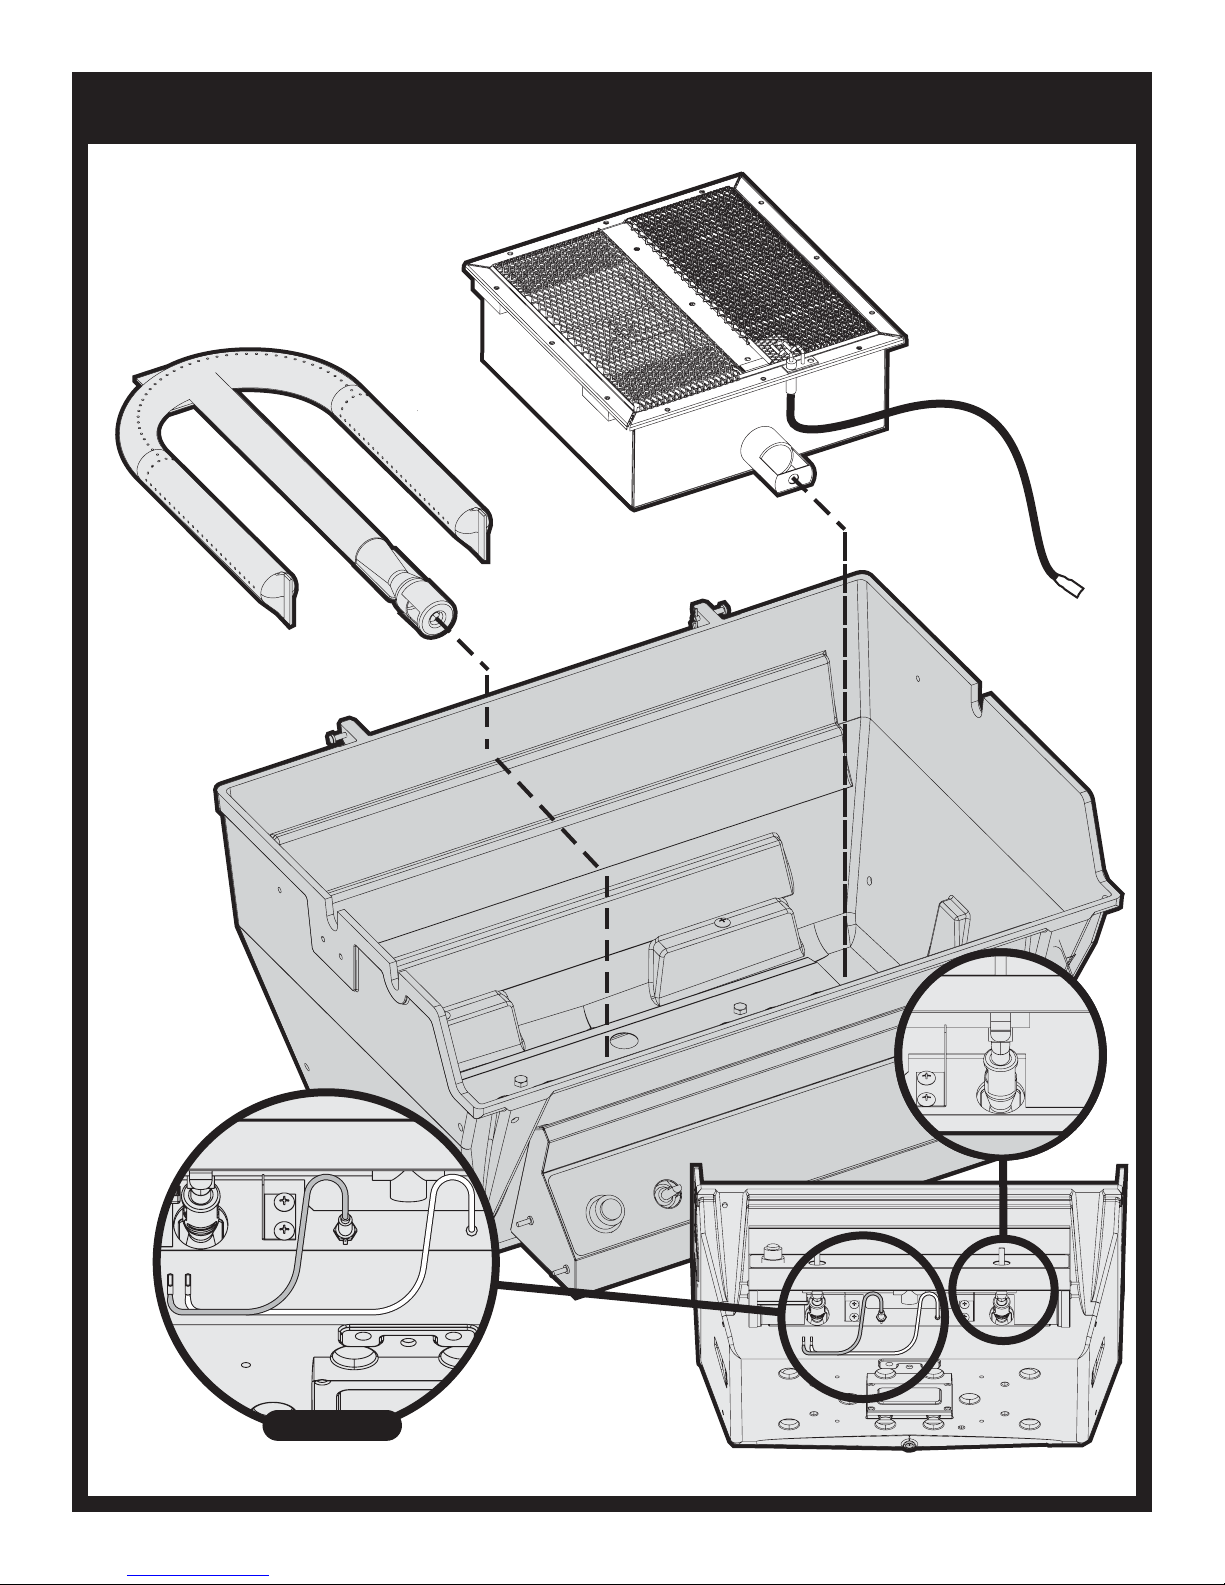
INSERT INFRARED BURNERS (R3 ONLY)
IGNITER WIRES
B102218-3-0615 Page 13
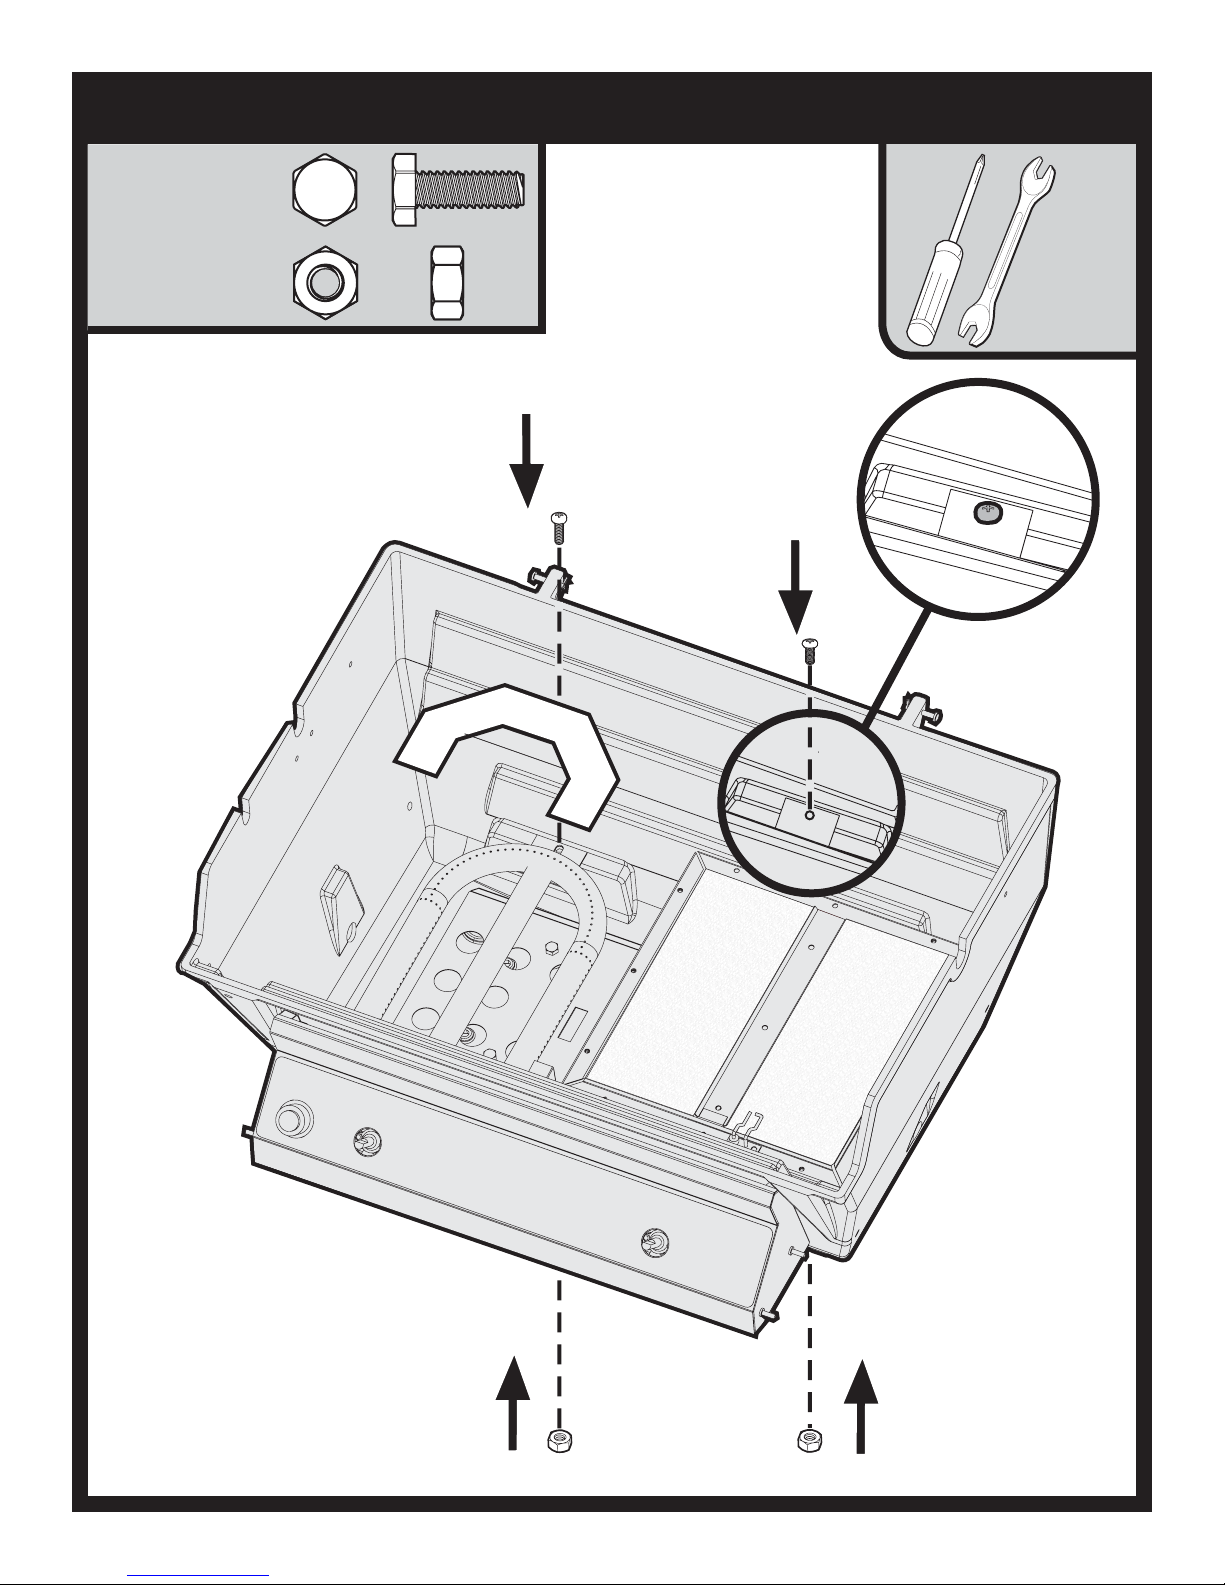
INSERT BURNER SHIELD (R3B ONLY)
HEX HEAD BOLT
SS, 1/4-20 X 3/4
B063096 (2)
HEX NUT,
SS, 1/4-20
B076331 (2)
.
7/16”
B102218-3-0615Page 14
 Loading...