

Broil King P3, P4 Owner's Manual

PREMIUM "P" GAS GRILL
OWNER’S MANUAL
(NATURAL OR PROPANE GAS)
P3, P4 Page 1
OPTIONAL ACCESSORIES SHOWN
P3 AND P4 MODELS
B100024-1-0502

IMPORTANT
THIS MANUAL SHOULD BE READ THOROUGHLY BY THE PERSON INSTALLING THE GRILL AND ALL PERSONS
WILL USE AND MAINTAIN THE GRILL. THE INSTALLER SHOULD BE SURE THE MANUAL IS LEFT IN THE
WHO
POSSESSION
OR CLEANING THE GRILL AND TO PROPERLY IDENTIFY ANY REPAIR PARTS THAT MAY BE REQUIRED.
USING
OF THE USER. THE USER SHOULD RETAIN THIS MANUAL FOR FUTURE REFERENCE WHEN
WARNING
REFERENCE THIS MANUAL FOR PROPER INSTALLATION AND MAINTENANCE INSTRUCTIONS. IMPROPER
INSTALLATION
PROPERTY
SERVICE AGENCY OR THE GAS SUPPLIER.
, ADJUSTMENT, ALTERATION, SERVICE OR MAINTENANCE CAN CAUSE PERSONAL INJURY OR
DAMAGE. FOR ASSISTANCE OR ADDITIONAL INFORMATION CONSULT A QUALIFIED INSTALLER,
CAUTION: FOR YOUR SAFETY
IF YOU SMELL GAS:
1. SHUT OFF GAS TO THE APPLIANCE.
2. EXTINGUISH ANY OPEN FLAME.
3. OPEN THE GRILL LID.
4. IF ODOR CONTINUES, IMMEDIATELY CALL YOUR GAS SUPPLIER OR
DEPARTMENT.
FIRE
5. DO NOT TOUCH ELECTRICAL SWITCHES.
CAUTION: FOR YOUR SAFETY
1. DO NOT STORE OR USE GASOLINE OR OTHER FLAMMABLE VAPORS AND LIQUIDS IN THE VICINITY OF
OR ANY OTHER APPLIANCE.
THIS
2. AN LP CYLINDER NOT CONNECTED FOR USE SHALL NOT BE STORED IN THE VICINITY OF THIS OR ANY
OTHER
APPLIANCE.
CAUTION:
PARTS MAY HAVE SHARP EDGES. WEAR LEATHER WORK GLOVES AND HANDLE PARTS CAREFULLY
DURING
THE UNPACKING, ASSEMBLY AND INSTALLATION.
WARNING
BROILMASTER® GAS GRILLS MUST ONLY USE PROPANE CYLINDERS EQUIPPED WITH AN OVERFILL
PROTECTION DEVICE (OPD). USE ONLY A REPUTABLE PROPANE DEALER WHEN EXCHANGING OR FILLING
CYLINDERS
Page 2 P3, P4
. AN OVERFILLED OR IMPROPERLY FILLED PROPANE CYLINDER CAN BE DANGEROUS.

Congratulations!Congratulations!
Congratulations!
Congratulations!Congratulations!
Welcome to the beauty, durability, and prestige of a
PREMIUM GAS GRILL by BROILMASTER®. With award-winning
excellence built into every feature and durability that
surpasses other premium gas grills, BROILMASTER has
manufactured the ultimate gas grill for discriminating
outdoor chefs for over 30 years.
At Broilmaster, we continually strive to enhance the
performance and quality of our products for your grilling
enjoyment. Every effort will be made to ensure that
Broilmaster continues to be
of the future.
Whether you are at the lake or in the privacy of your own
backyard, the BROILMASTER® PREMIUM GAS GRILL performs
far beyond the ordinary and is designed to provide your
family with years of outdoor cooking pleasure.
Thank You!Thank You!
Thank You!
Thank You!Thank You!
your choice
as the premium grill
P3, P4 Page 3
Broilmaster® is a registered trademark of
Empire Comfort Systems, Inc.
918 Freeburg Ave.
Belleville, Illinois 62220
Telephone 800-851-3153

TABLE OF CONTENTS
CONGRATULATIONS!
You have chosen the finest grill for your outdoor cooking pleasure. Please take time to read
this entire manual before assembling your premium Broilmaster
Parts
Diagram.............................................................................................................................. 5
List......................................................................................................................................
Grill Assembly ............................................................................................................... 7-11
Propane Gas Grills...................................................................................................... 12-14
Gas Conversion ............................................................................................................... 15
Natural Gas Grills............................................................................................................. 16
Operation- Propane & Natural Grills ........................................................................... 17-18
Maintenance........................................................................................................................ 19
®
gas grill.
6
Troubleshooting................................................................................................................... 20
Notes................................................................................................................................... 21
Warranty......................................................................................................................... 22-23
Y our Broilmaster® Premium Gas Grill is identified by model number, serial number, and
gas type. This information is provided on a product identification label located on the
grill’s control panel. For your convenience, complete this section for future reference
when contacting your dealer .
Model No. Dealer
Serial No. Dealer Phone No.
Gas Type: Propane Natural Date of Purchase
Page 4 P3, P4
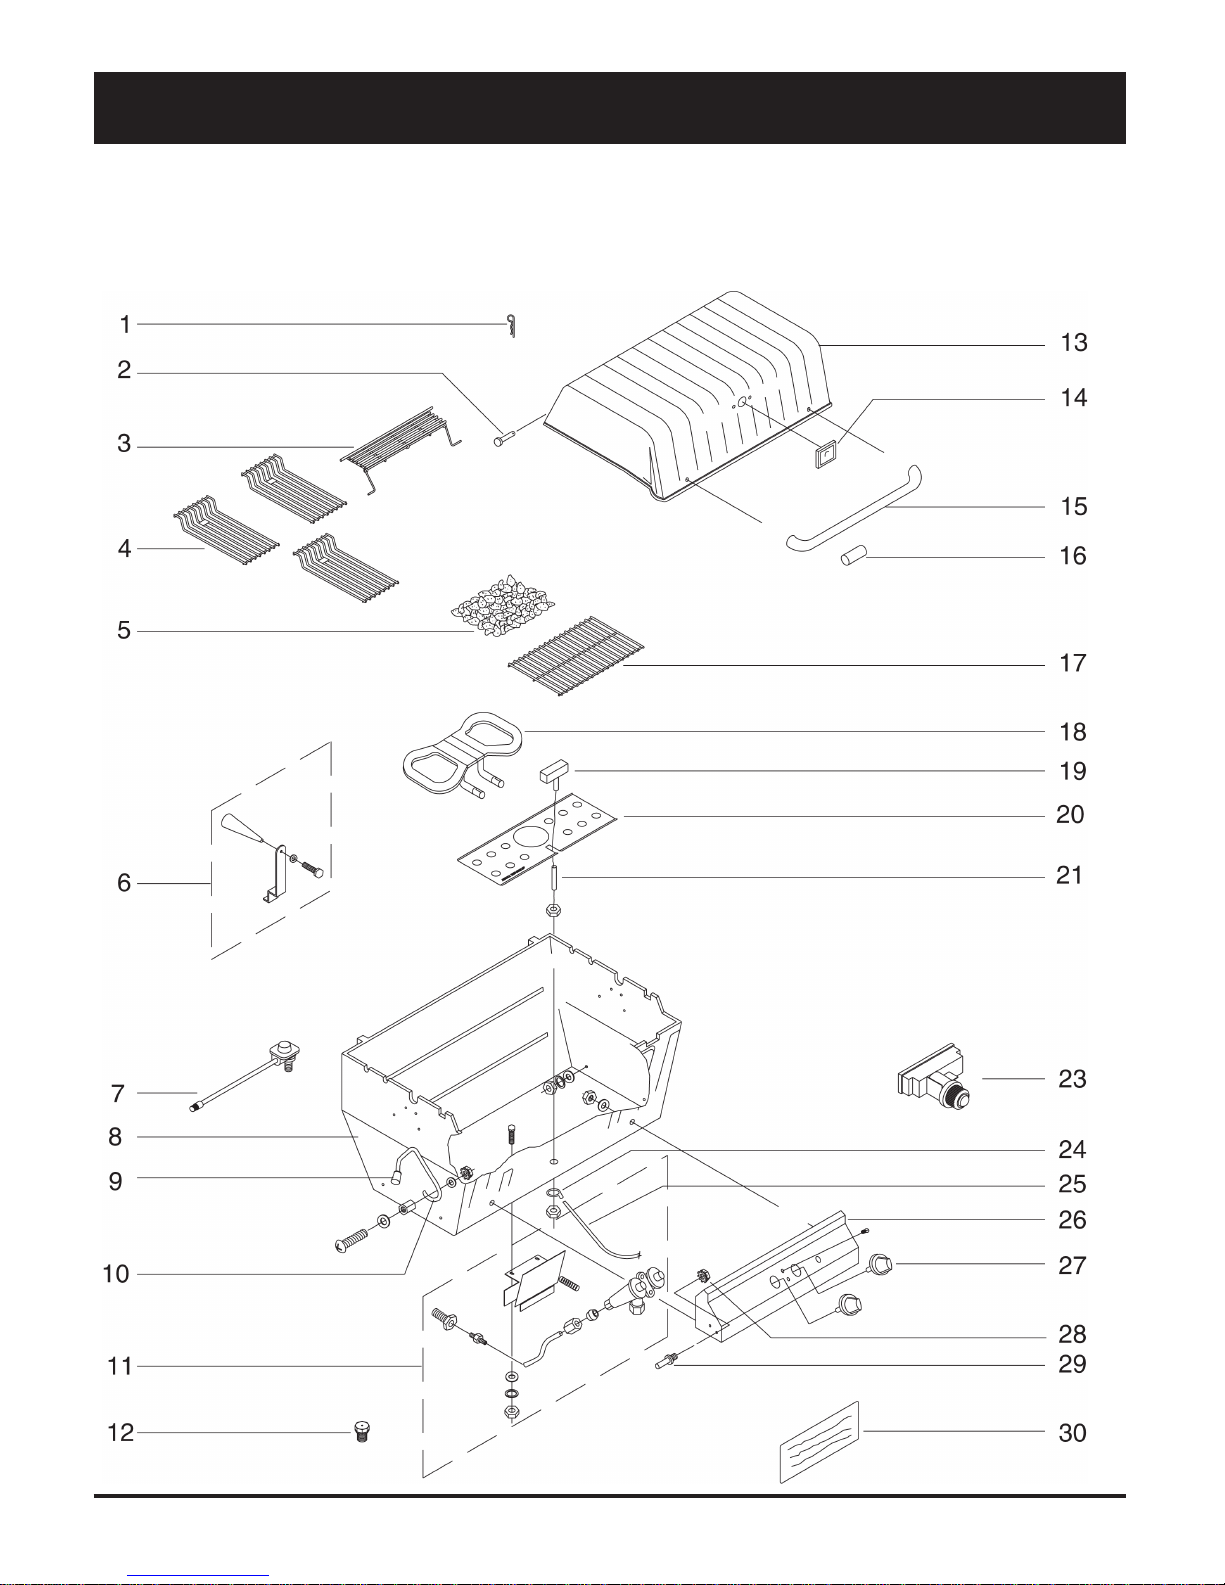
PARTS DIAGRAM
All repair part orders should be placed through your local Broilmaster® dealer . To locate a dealer in
your area, contact Broilmaster Customer Service at 800-851-3153 • WWW.broilmaster .com. T o ensure
prompt and accurate service, please provide the following information when placing a repair part
order: Model Number, Serial Number, Part Name, Part Number, and Quantity of parts needed.
P3, P4 Page 5

PREMIUM "P" SERIES PARTS LIST
KEY P3BL P3HG P3GY P4BL P4HG P4GY
NO.PART NAME PART NO.PART NO.PART NO.PART NO.PART NO.PART NO.
1BRIDGE PIN B057805 B057805 B057805 B057805 B057805 B057805
2HINGE PIN B057804 B057804 B057804 B057804 B057804 B057804
3RETRACT-A-RACK B072695 B072695 B072695 B072696 B072696 B072696
4COOKING GRID B743100 B743100 B743100 B804687 B804687 B804687
5BRIQUETTE BAG B058122 B058122 B058122 B058122 B058122 B058122
6GRID LIFTER ASSEMBLY B064539 B064539 B064539 B064539 B064539 B064539
7HOSE & LP REGULATOR B069756 B069756 B069756 B069756 B069756 B069756
8GRILL BODY BOTTOM B076539 B100146 B100144 B076622 B100150 B100148
9LID STOP KNOB B100098 B100098 B100098 B100098 B100098 B100098
10 LID STOP B076521 B076521 B076521 B076521 B076521 B076521
11 CONTROL VALVE ASSEMBLY (LP) B070501 B070501 B070501 B070501 B070501 B070501
11 CONTROL VALVE ASSEMBLY (NAT) B070502 B070502 B070502 B070502 B070502 B070502
11A VALVE (LP) B076790 B076790 B076790 B076790 B076790 B076790
11A VALVE (NAT) B076789 B076789 B076789 B076789 B076789 B076789
11B MANIFOLD (LP) B069002 B069002 B069002 B069002 B069002 B069002
11B MANIFOLD (NAT) B069003 B069003 B069003 B069003 B069003 B069003
11C MOUNTING PLATE B064787 B064787 B064787 B064787 B064787 B064787
12 NATURAL CAP ORIFICE * B056647 B056647 B056647 B056647 B056647 B056647
13 GRILL BODY TOP B076538 B100147 B100145 B076621 B100151 B100149
14 HEAT INDICATOR B076625 B076625 B076625 B076625 B076625 B076625
15 HANDLE STAINLESS B070282 B070282 B070282 B070486 B070486 B070486
16 FOAM GRIP B073097 B073097 B073097 B073097 B073097 B073097
17 BRIQUETTE RACK B063066 B063066 B063066 B067449 B067449 B067449
18 BURNER ASSEMBLY B878531 B878531 B878531 B814801 B814801 B814801
19 COLLECTOR BOX ASSEMBLY B072701 B072701 B072701 B072701 B072701 B072701
20 RADIATION SHIELD B063065 B063065 B063065 B063065 B063065 B063065
21 COLLECTOR BOX SPACER B069743 B069743 B069743 B069743 B069743 B069743
23 ELECTRONIC IGNITOR B072218 B072218 B072218 B072218 B072218 B072218
24 IGNITOR GROUND LUG B069747 B069747 B069747 B069747 B069747 B069747
25 IGNITOR GROUND WIRE B072684 B072684 B072684 B072684 B072684 B072684
26 CONTROL PANEL ASSEMBLY W/LABEL B100152 B100152 B100152 B100153 B100153 B100153
-CONTROL PANEL LABEL (NOT SHOWN) B072686 B072686 B072686 B072197 B072197 B072197
27 VALVE KNOB B070084 B070084 B070084 B070084 B070084 B070084
28 KEPS NUT B073967 B073967 B073967 B073967 B073967 B073967
29 SHELF PIN B073963 B073963 B073963 B073963 B073963 B073963
30 CONVERSION LABEL * B100033 B100033 B100033 B100033 B100033 B100033
32 SPACER B662325 B662325 B662325 B662325 B662325 B662325
33 9/32 I.D. X 5/8 O.D. FLAT WASHER B076332 B076332 B076332 B076332 B076332 B076332
36 #10-24 X 3/4 SCREW B076522 B076522 B076522 B076522 B076522 B076522
37 3/8-16 X 1 1/2 SCREW B100117 B100117 B100117 B100117 B100117 B100117
38 3/8 STAR WASHER B100135 B100135 B100135 B100135 B100135 B100135
39 #10-24 X 1 SCREW B073978 B073978 B073978 B073978 B073978 B073978
40 STABILIZER ARM ** B906180 B906180 B906180 B906180 B906180 B906180
41 STABILIZER BRACKET ** B905048 B905048 B905048 B905048 B905048 B905048
42 #10-24 X 3/8 SCREW ** B100137 B100137 B100137 B100137 B100137 B100137
43 10-24 WING NUT B100125 B100125 B100125 B100125 B100125 B100125
* INCLUDED WITH PROPANE GRILLS ONLY.
** BURNER STABILIZER KIT IS INCLUDED WITH YOUR CART.
Page 6 P3, P4

GRILL ASSEMBLY
Before You Begin
All Broilmaster grills require some assembly and
installation. Follow all instructions unless noted
to apply only to other specific models.
If you purchased an accessory with your
Broilmaster, follow the instructions provided with
the accessory for assembly and installation. If
an instruction refers to a step that is not required
for your grill model, please continue to the next
step.
Each step of the installation is illustrated. In
each illustration parts are identified with “Key”
numbers. Key numbers appear in parenthesis
after a part name is mentioned for the first time in
the instructions and are labeled on the
illustrations. You can reference each part by its
key number on the Parts List if you need help in
identifying a part.
Compare the parts found in the shipping
container to the parts list provided. If any parts
are missing contact your Broilmaster
before beginning assembly .
®
dealer
Recommended Tools
These items are recommended for the assembly
of your grill:
• Phillips screwdriver
• Adjustable wrench set
• Socket set
• Soapy water solution (to test for leaks)
• Liquid soap (for foam grip)
Grill Mountings
Assemble your base option before assembling
your Broilmaster® grill head.
Refer to the Broilmaster® Cart, Base, and Post
instructions provided with each accessory for
assembly, installation, and mounting procedures.
CAUTION: FOR YOUR SAFETY
PARTS MAY HAVE SHARP EDGES. WEAR LEATHER WORK
GLOVES
UNPACKING
AND HANDLE PARTS CAREFULLY DURING THE
, ASSEMBLY AND INSTALLATION.
P3, P4 Page 7
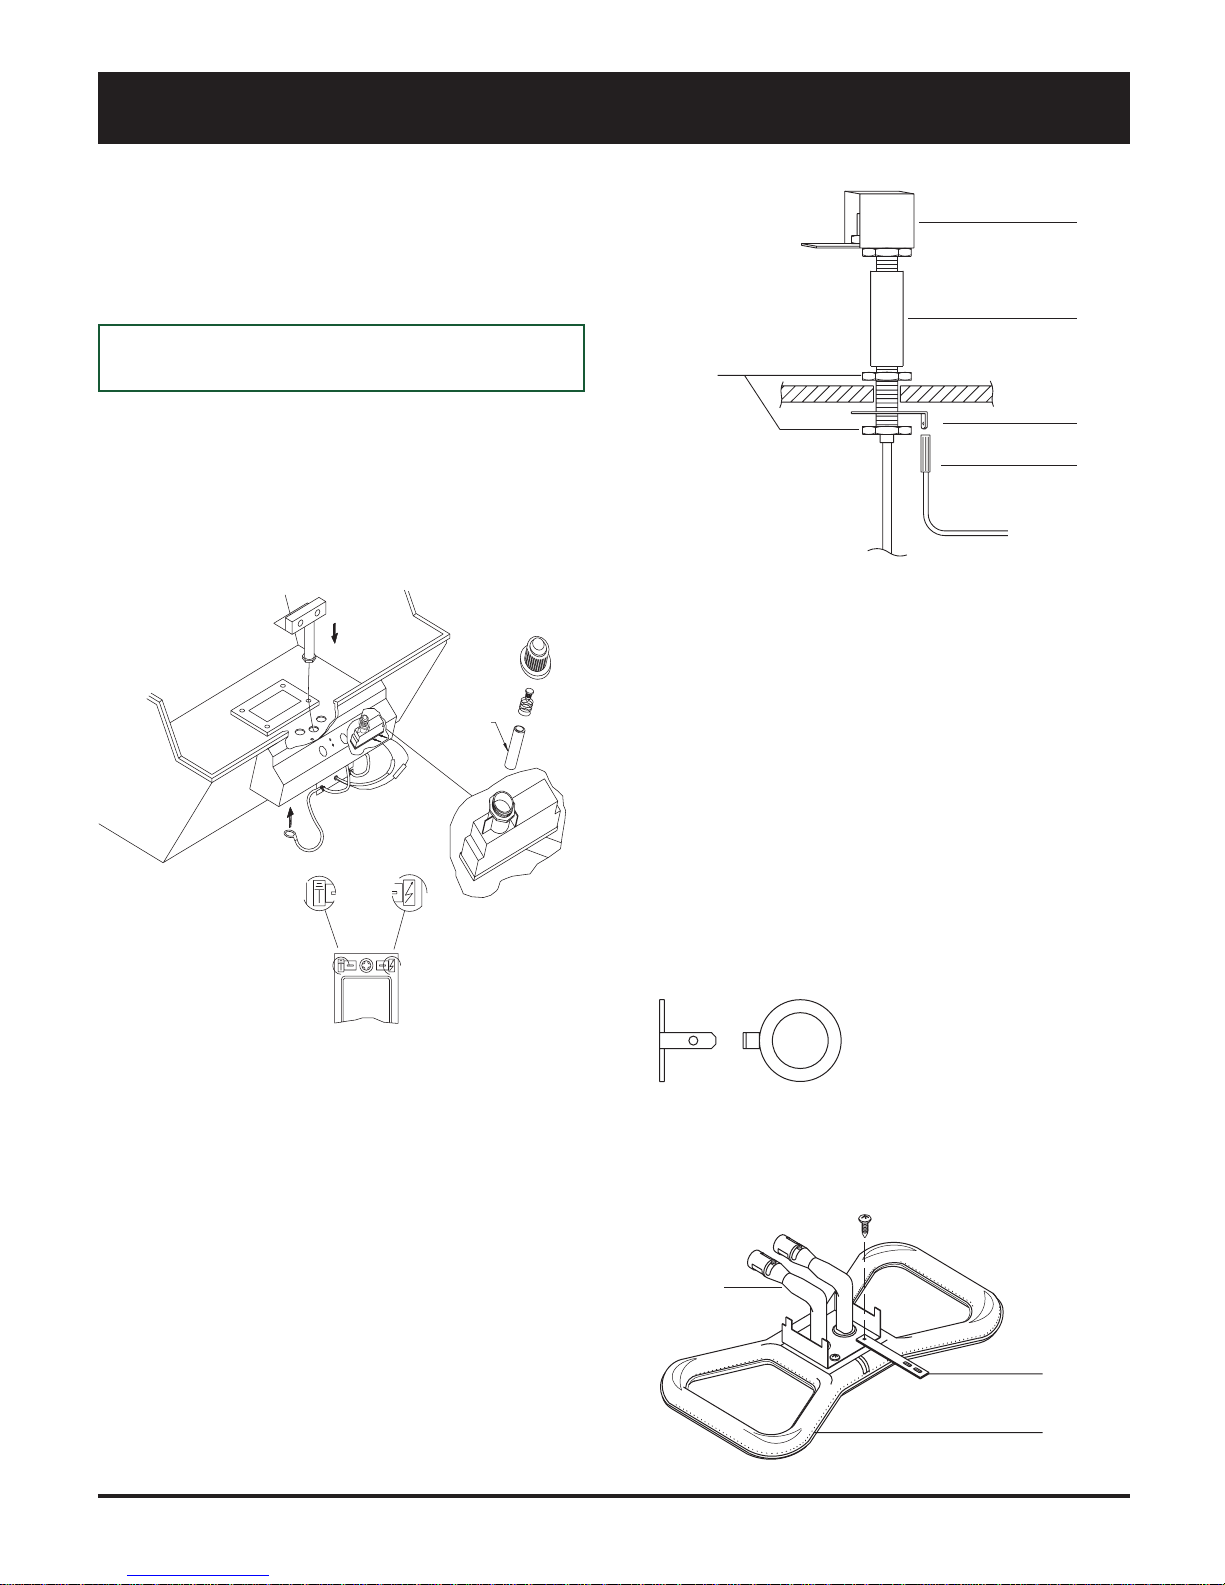
GRILL ASSEMBLY
Nut
25
24
21
19
-
+
Igniter Assembly
Slide the collector box spacer (21) and nut
(provided on assembly) onto the collector box
shaft and tighten. FIGURE 5.
Note: Peel protective film from control panel
before installing igniter.
FIGURE 6
FIGURE 5
Installing the Igniter
AA ALKALINE
BATTERY
GROUND
Battery Installation: Slide the spring onto the negative end of the battery.
Drop the battery and spring into the igniter and replace the button.
Burner Stabilizing Arm
(Portable Cart Models Only)
SPARK
On the burner assembly (18) remove the rear
screw, insert the burner stabilizing arm (40), and
reinstall the screw as shown. FIGURE 7.
Note: Burner Stabilizing Arm, Burner Stabilizing
Bracket, and Securing the Burner sections of this
manual apply only to portable cart models ONLY.
Hardware is packaged with your cart.
CAUTION: DO NOT CUT OR DAMAGE IGNITER WIRE.
Carefully thread the end of the igniter wire
through the center hole in the grill bottom. Slide
the ground lug (24) over the igniter wire and
fasten with nut provided.
Attach one end of the ground wire (25) to the
terminal on the rear of the electronic igniter.
Attach the remaining end to the ground lug.
F
IGURES 5 AND 6.
24
FIGURE 7
Venturi
Tubes
40
18
Page 8 P3, P4
 Loading...