

Broil King INDEPENDENCE C3, INDEPENDENCE C3-1 Series Manual

PREMIUM GRILLS
C3
SERIES
CHARCOAL GRILL
C3-1
C3 GRILL HEAD

IMPORTANT INFORMATION
IMPORTANT
T
his manual should be read thoroughly by the installer and by anyone who will use
or maintain the grill.
Installer - Write the model number, serial number, and date of installation in the manual.
If available, attach a copy of the receipt. Leave this manual with the grill owner.
Grill Owner - Read and retain this manual. It contains instructions on using and maintaining your grill, plus information on ordering replacements parts. Attach a copy of
your receipt to this manual. Your receipt established the proof of purchase required
for warranty replacement parts.
WARNING
F
ollow the instruction in this manual for proper installation and maintenance of the
grill. Improper installation, adjustment, alteration, service or maintenance can cause
injury or property damage. For assistance or additional information consult a
qualied installer, service agency or the gas supplier.
WARNING: FOR YOUR SAFETY
D
o not store or use gasoline or other ammable vapors or liquids in the vicinity of
this or any appliance.
CAUTION:
P
arts may have sharp edges. Wear leather work gloves and handle parts carefully
during unpacking, assembly and installation.
B102097-3-0119Page 2

Thank you for purchasing a Independence Charcoal Grill.
Welcome to the beauty, durability, and prestige of an Independence Charcoal
Grill by Broilmaster. With award-winning excellence built into every feature
and durability that surpasses other Premium charcoal grills, Broilmaster has
manufactured the ultimate grills for discriminating outdoor chefs for over 30 years.
At Broilmaster, we continually strive to enhance the performance and quality
of our products for your grilling enjoyment. Every effort will be made to ensure
that Broilmaster continues to be your choice as the Premium grill of the future.
Visit www.broilmaster.com and click on the Hall of Fame to see a sampling of
our long-time customers. We hope you enjoy years of great meals prepared on
your Broilmaster. And we hope to add your photo to the Hall of Fame one day.
Thank You!
BROILMASTER
is a registered trademark of
Empire Comfort Systems, Inc.
Belleville, Illinois
B102097-3-0119 Page 3

TABLE OF CONTENTS
Y
ou have chosen the nest grill for your outdoor cooking pleasure.
Please take time to read this entire manual before assembling your Premium Broilmaster Grill.
ASSEMBLY INSTRUCTIONS .....................................................................................................
C3 SERIES PARTS DIAGRAM ..................................................................................................
GRILL HEAD HARDWARE PACK - B102165 ...........................................................................
UNPACK AND REMOVE LID .....................................................................................................
RELOCATE CARRIAGE BOLTS ( POST INSTALL ONLY ) ......................................................
REAR SUPPORT BRACKET PLACEMENT ............................................................................
ADJUSTING DOOR LATCHES ................................................................................................
ATTACH TOP SMOKE VENT ASSEMBLY ..........................................................................
12-13
ATTACH UPPER SPARK ARRESTER PLATE ........................................................................
HANDLE INSTALLATION ........................................................................................................
REINSTALL LID ........................................................................................................................
INSTALL CHARCOAL GRATES ..............................................................................................
INSTALL COOKING GRIDS .....................................................................................................
INSTALL ASH PAN ...................................................................................................................
COMPLETED ASSEMBLY .......................................................................................................
OWNER’S MANUAL FOR C3 GRILLS ...............................................................................
OPERATION - CHARCOAL GRILLS ..............................................................................
21-32
21-22
MAINTENANCE ...................................................................................................................
COOKING TIPS ...................................................................................................................
IMPORTANT SAFETY INFORMATION ..........................................................................
25-26
WARRANTY TERMS ...........................................................................................................
GRILL MAINTENANCE HISTORY ..................................................................................
28-30
MASTER PARTS DISTRIBUTOR LIST ...............................................................................
HOW TO ORDER REPAIR PARTS .....................................................................................
5
6
7
8
9
10
11
14
15
16
17
18
19
20
23
24
27
31
31
B102097-3-0119Page 4
ASSEMBLY INSTRUCTIONS
Before You Begin
All Broilmaster grills require some assembly. For the best results, follow the step-by-step instructions.
If you purchased an accessory with your Broilmaster, follow the instructions provided.
Compare the parts in the box to the parts list provided in this manual. If any are missing, contact your
Broilmaster dealer before beginning assembly.
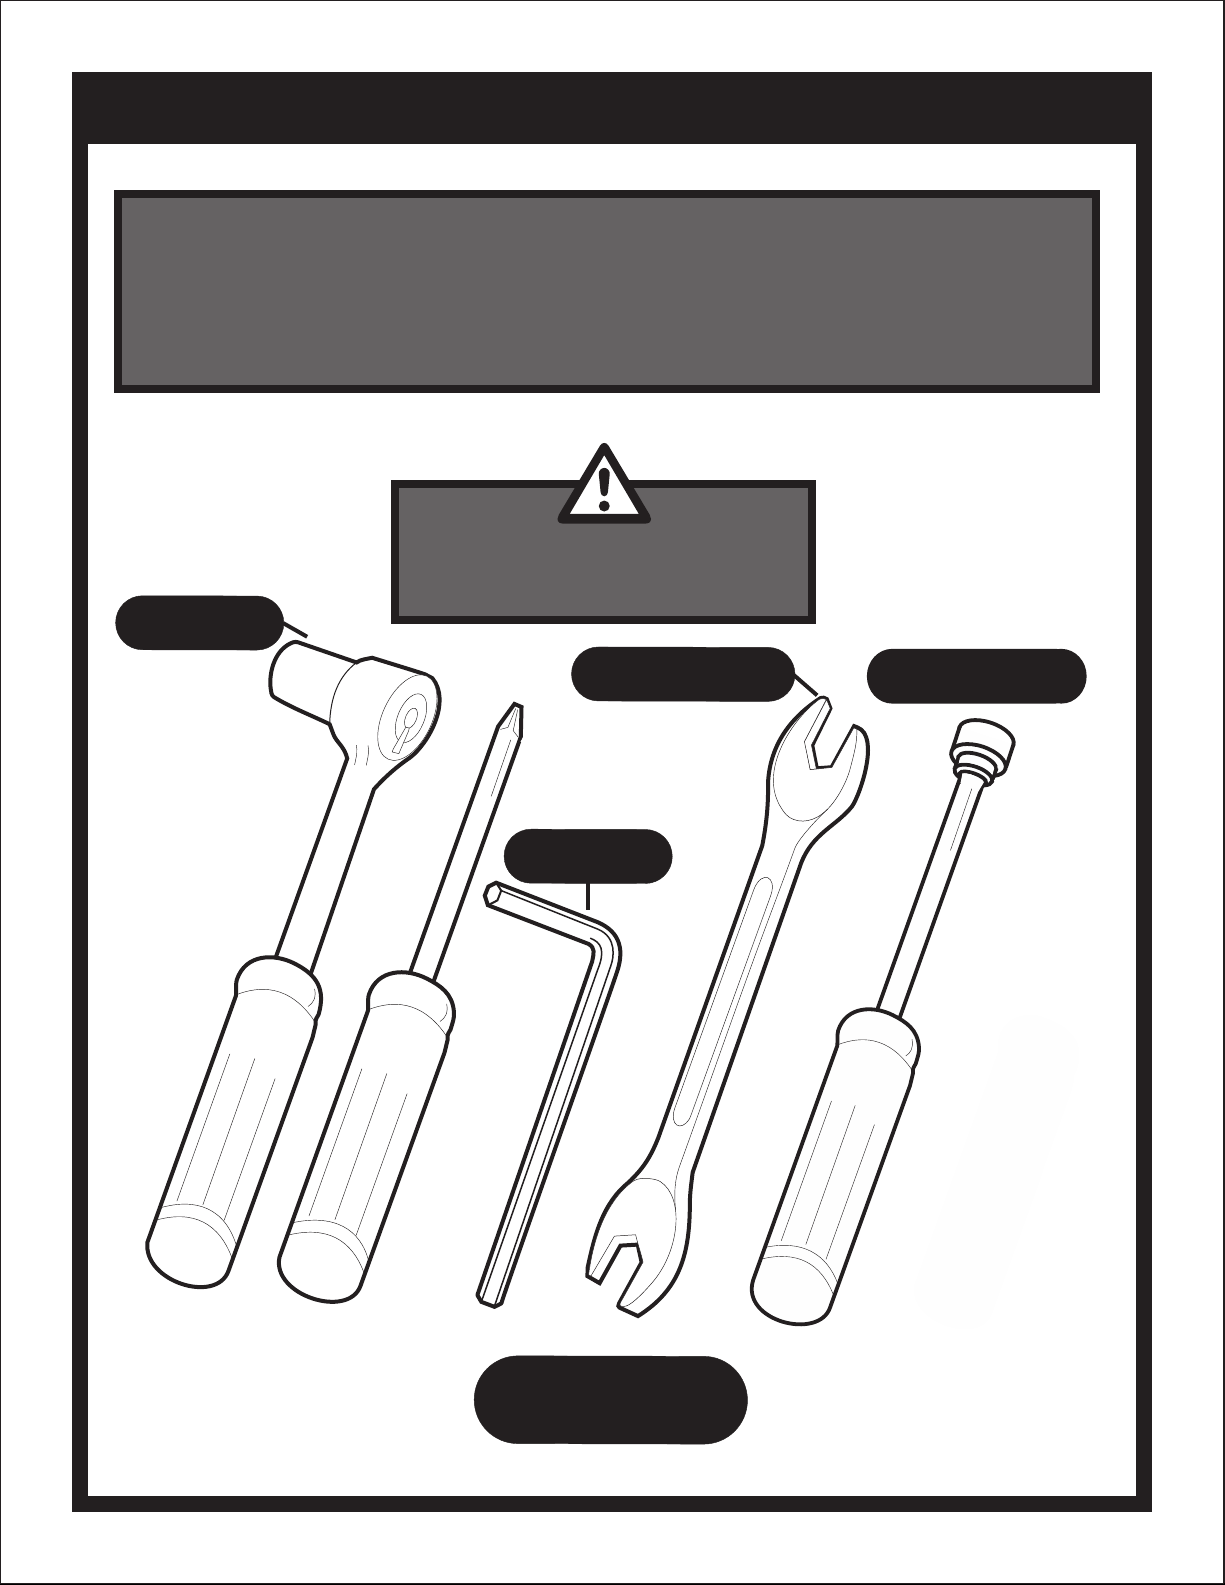
CAUTION:
Parts may have sharp edges. For your safety
wear leather work gloves and handle parts
carefully during unpacking and assembly.
3/8”, and 7/16”
REQUIRED
3/8”and 7/16”
REQUIRED
1/8”
REQUIRED
Before You Begin
If you purchased an accessory with your Broilmaster, follow the instructions provided.
Broilmaster dealer before beginning assembly.
CAUTION:
Parts may have sharp edges. For your safety
wear leather work gloves and handle parts
carefully during unpacking and assembly.
3/8”, and 7/16”
REQUIRED
3/8”and 7/16”
REQUIRED
1/8”
REQUIRED
3/8”, and 7/16”
REQUIRED
1/8”
REQUIRED
3/8”, and 7/16”
REQUIRED
1/8”
REQUIRED
Before You Begin
Broilmaster dealer before beginning assembly.
Before You Begin
Compare the parts in the box to the parts list provided in this manual. If any are missing, contact your
Broilmaster dealer before beginning assembly.
All Broilmaster grills require some assembly. For the best results, follow the step-by-step instructions.
If you purchased an accessory with your Broilmaster, follow the instructions provided.
Parts may have sharp edges. For your safety
wear leather work gloves and handle parts
carefully during unpacking and assembly.
CAUTION:
5/16”
REQUIRED
B102097-3-0119 Page 5
TOOLS
REQUIRED
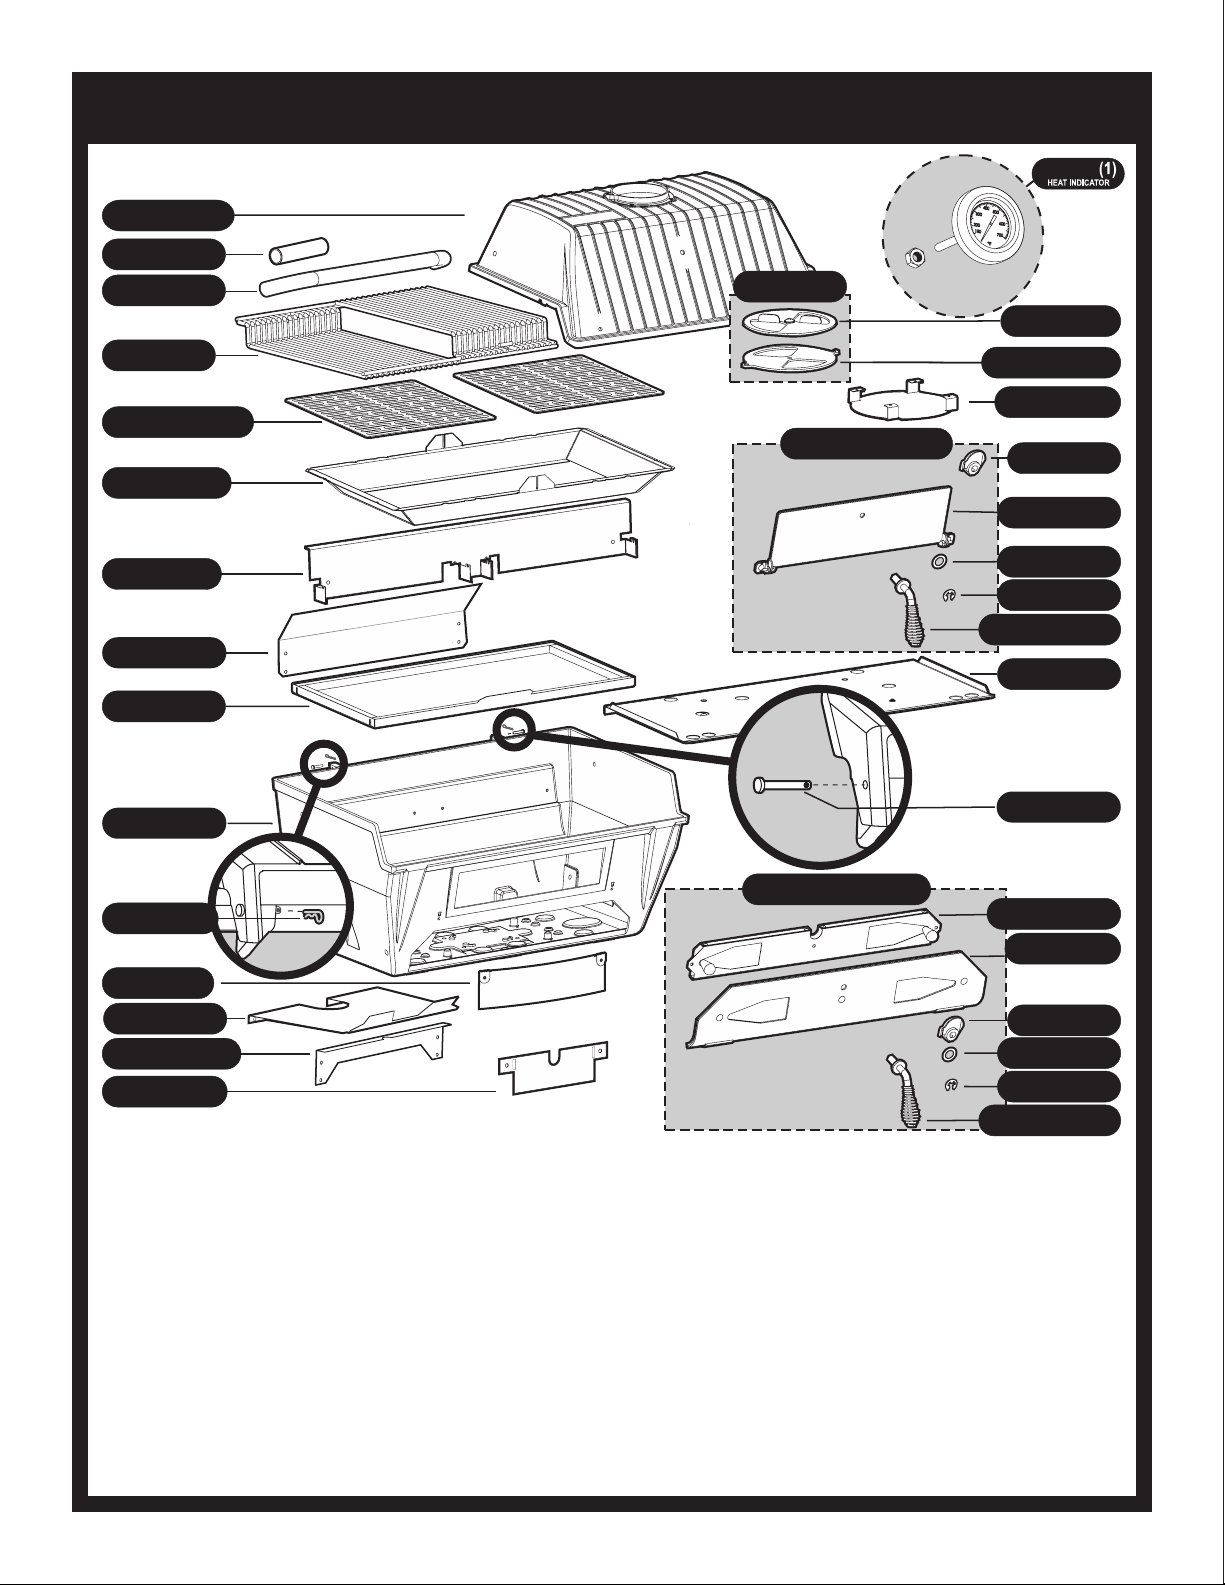
B101882 (1)
B101892 (1)
CHARCOAL TRAY FRAME
B102111 (1)
REAR PIVOT BRACKET
B101875 (2)
CHARCOAL GRATE
B101865(1)
VENT TOP
B101870 (1)
DOOR, ASH PAN
B101988 (1)
WASHER
B101990 (1)
E-CLIP
B101976 (1)
LATCH PAWL
B102144 (1)
LATCH RODASSEMBLY
B101768 (1)
COVER PLATE
B101583 (1)
REAR BRACE
B102109 (1)
ASH PAN DOOR (COMPLETE ASSEMBLY)
B102114 (1)
TOP VENT ASSEMBLY
B069756 (1)
VENT BASE
B102122 (1)
CART SHIELD
DPP155
GRILL BODY TOP
B073097 (1)
FOAM GRIP
B102492 (1)
LID HANDLE (W/SCREWS)
C3 SERIES PARTS DIAGRAM
DPA111 (1)
COOKING GRID (2) PIECES
B102090 (1)
REAR CART COVER
B101737 (1)
ASH PAN
B101878 (1)
GRILL BODY BOTTOM
B057805 (2)
COTTER PIN
B102091 (1)
FRONT CART COVER
B102109 (1)
CHARCOAL LOAD DOOR ASSEMBLY
B069756 (1)
HOSE & LPS REGULATOR
B102112 (1)
SPARK ARRESTOR
B101976 (1)
LATCH PAWL
B101862 (1)
DOOR, CHARCOAL LID
B101988 (1)
WASHER
B101990 (1)
E-CLIP
B102144 (1)
LATCH ROD
ASSEMBL
B102110 (1)
ASH PAN SHELF
B057804 (2)
HINGE PIN
B101861 (1)
BAFFLE TRACK ASSEMBLY
Y
B102097-3-0119Page 6
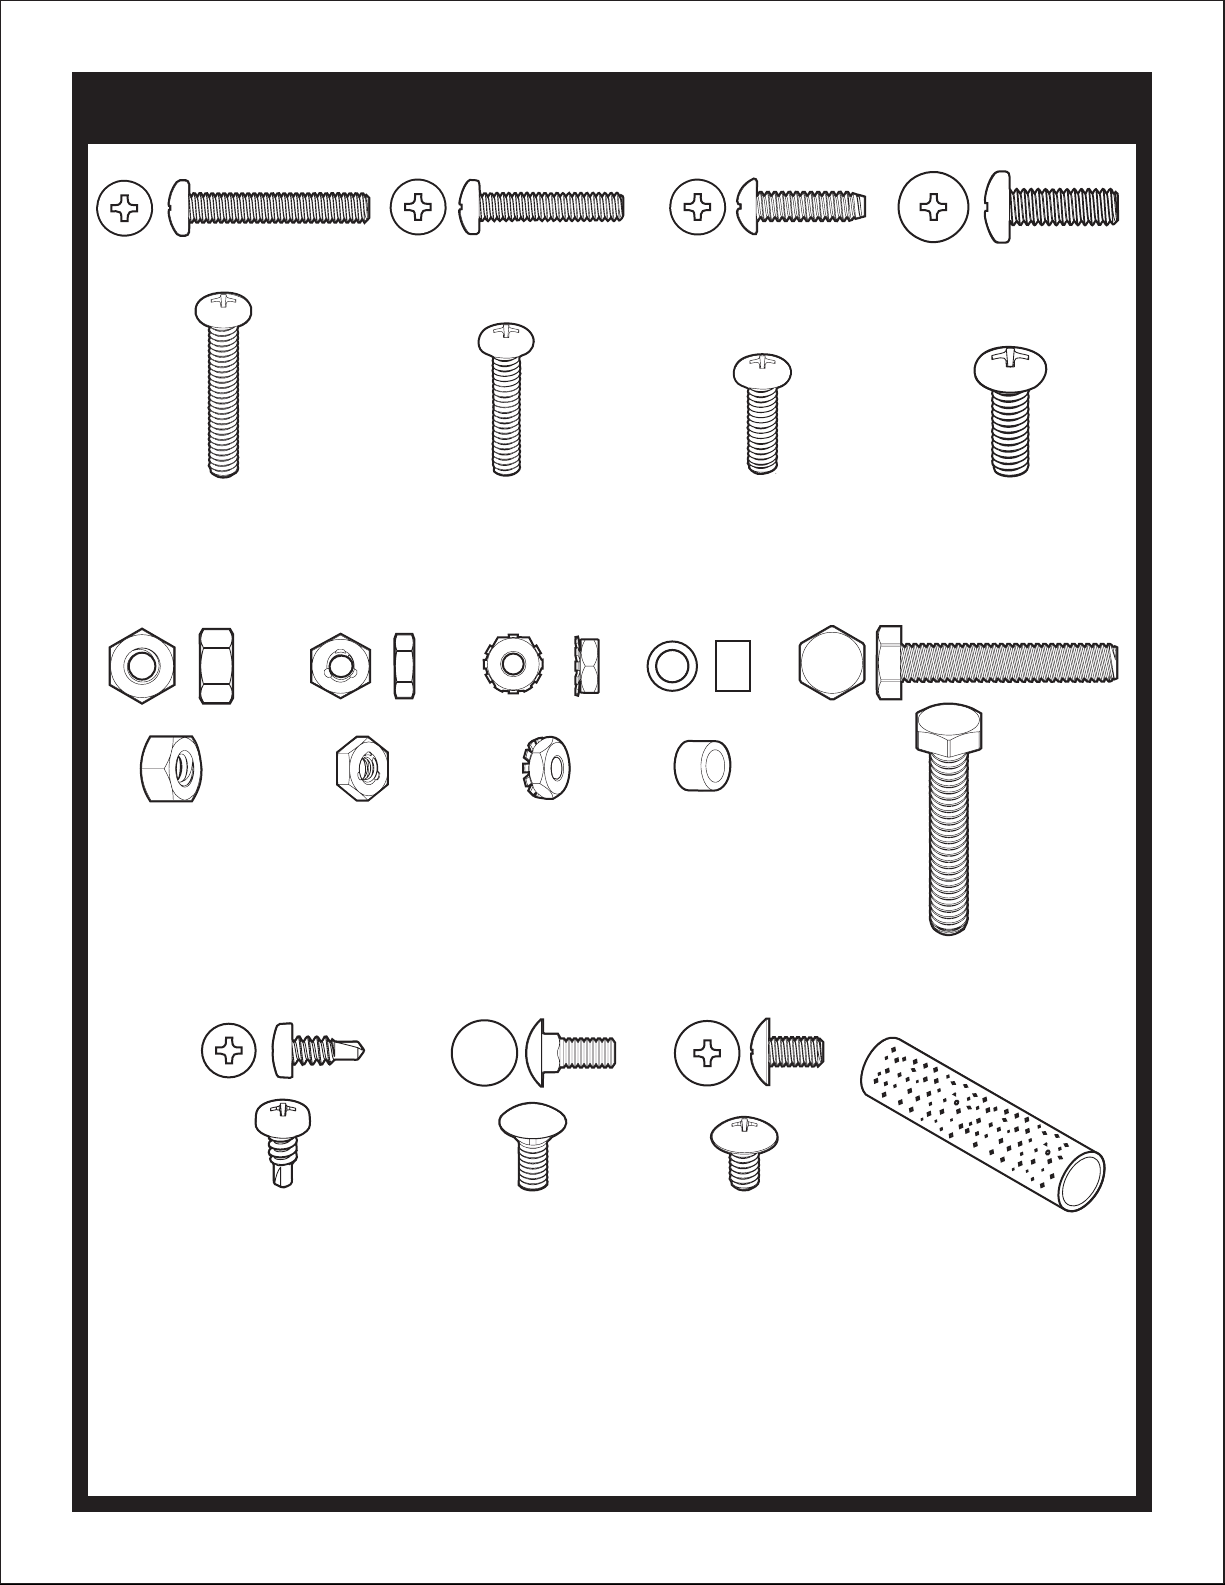
GRILL HEAD HARDWARE PACK - B102165
PHILLIPS PAN HEAD SCREW,
SS,10-24 X 1-1/4
B102117
(2)
HEX NUT,
SS,1/4-20
B076331
(2)
HEX LOCKNUT,
SS,10-24
R4021
(2)
PHILLIPS PAN HEAD SCREW,
SS,10-24 X 1
B073978
(2)
KEPS NUT,
SS,10-24
B073967
(6)
PHILLIPS PAN HEAD SCREW,
SS,10-16 X 3/4
B100563
(4)
SPACER
B662325
(1)
PHILLIPS PAN HEAD SCREW,
SS,1/4-20 X 3/4
B072217
(1)
HEX HEAD BOLT,
SS,1/4-20 X 1-1/2
B102098
(4)
SELF-DRILLING
PHILLIPS PAN HEAD SCREW,
SS,10-16 X 1/2
R4059
(2)
CARRIAGE BOLT
SS,10-24 X 1/2
B101770
(2)
TRUSS-HEAD SCREW
SS,10-24 X 3/8
B100130
(4)
FOAM GRIP
B073097
(1)
Standard hardware items such as bolts, screws, washers, and nuts can be purchased at your local hardware store. Do not order individual pieces of standard hardware. A replacement hardware pack may be
ordered using the hardware pack part number at the top of the page.
B102097-3-0119 Page 7
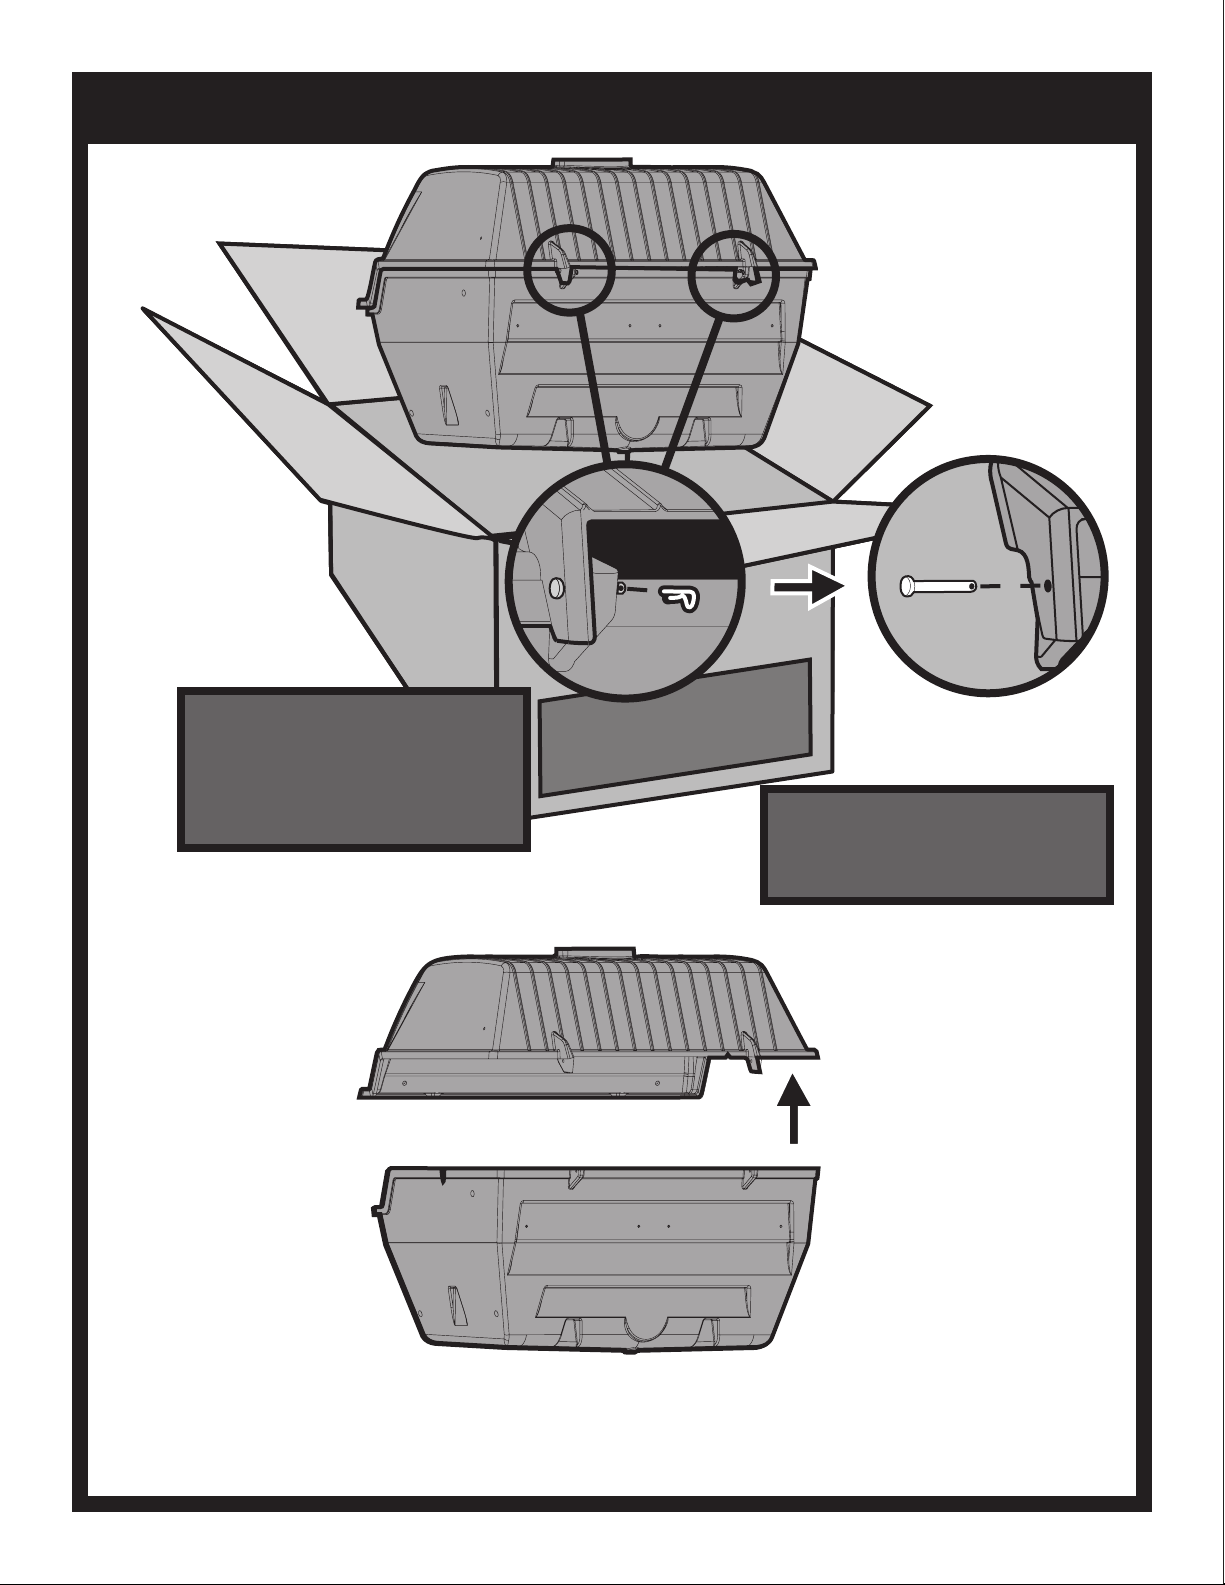
UNPACK AND REMOVE LID
REMOVING LID
To ease assembly, remove Grill Lid.
Remove the two Pins and Clips at the
rear of the Grill Lid and set aside.
After Pins and Lid have been
removed, remove the contents from
inside the Grill.
BROILMASTER
PREMIUM GRILLS
Prior to assembling Grill Head
assemble Cart or Post mounting first.
Follow Mounting instructions
provided with your Broilmaster Cart or
Post.
B102097-3-0119Page 8
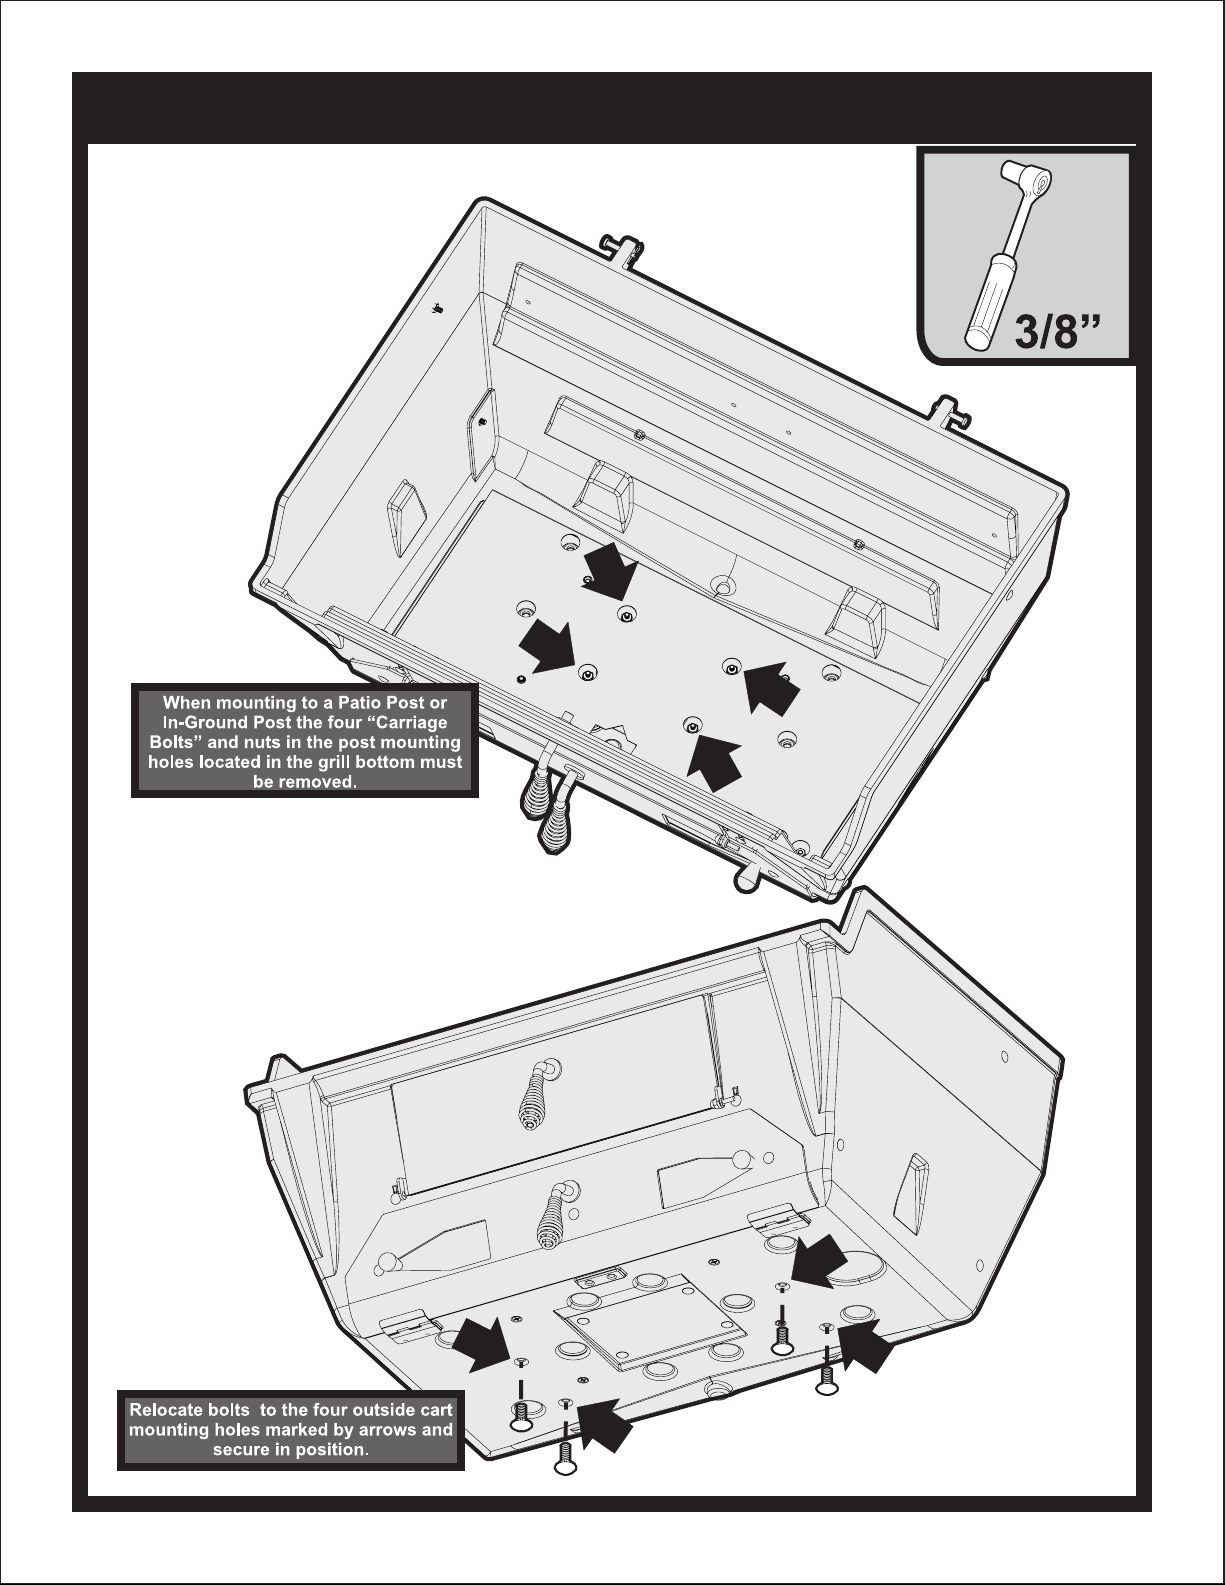
RELOCATE CARRIAGE BOLTS (POST INSTALL ONLY)
B102097-3-0119 Page 9
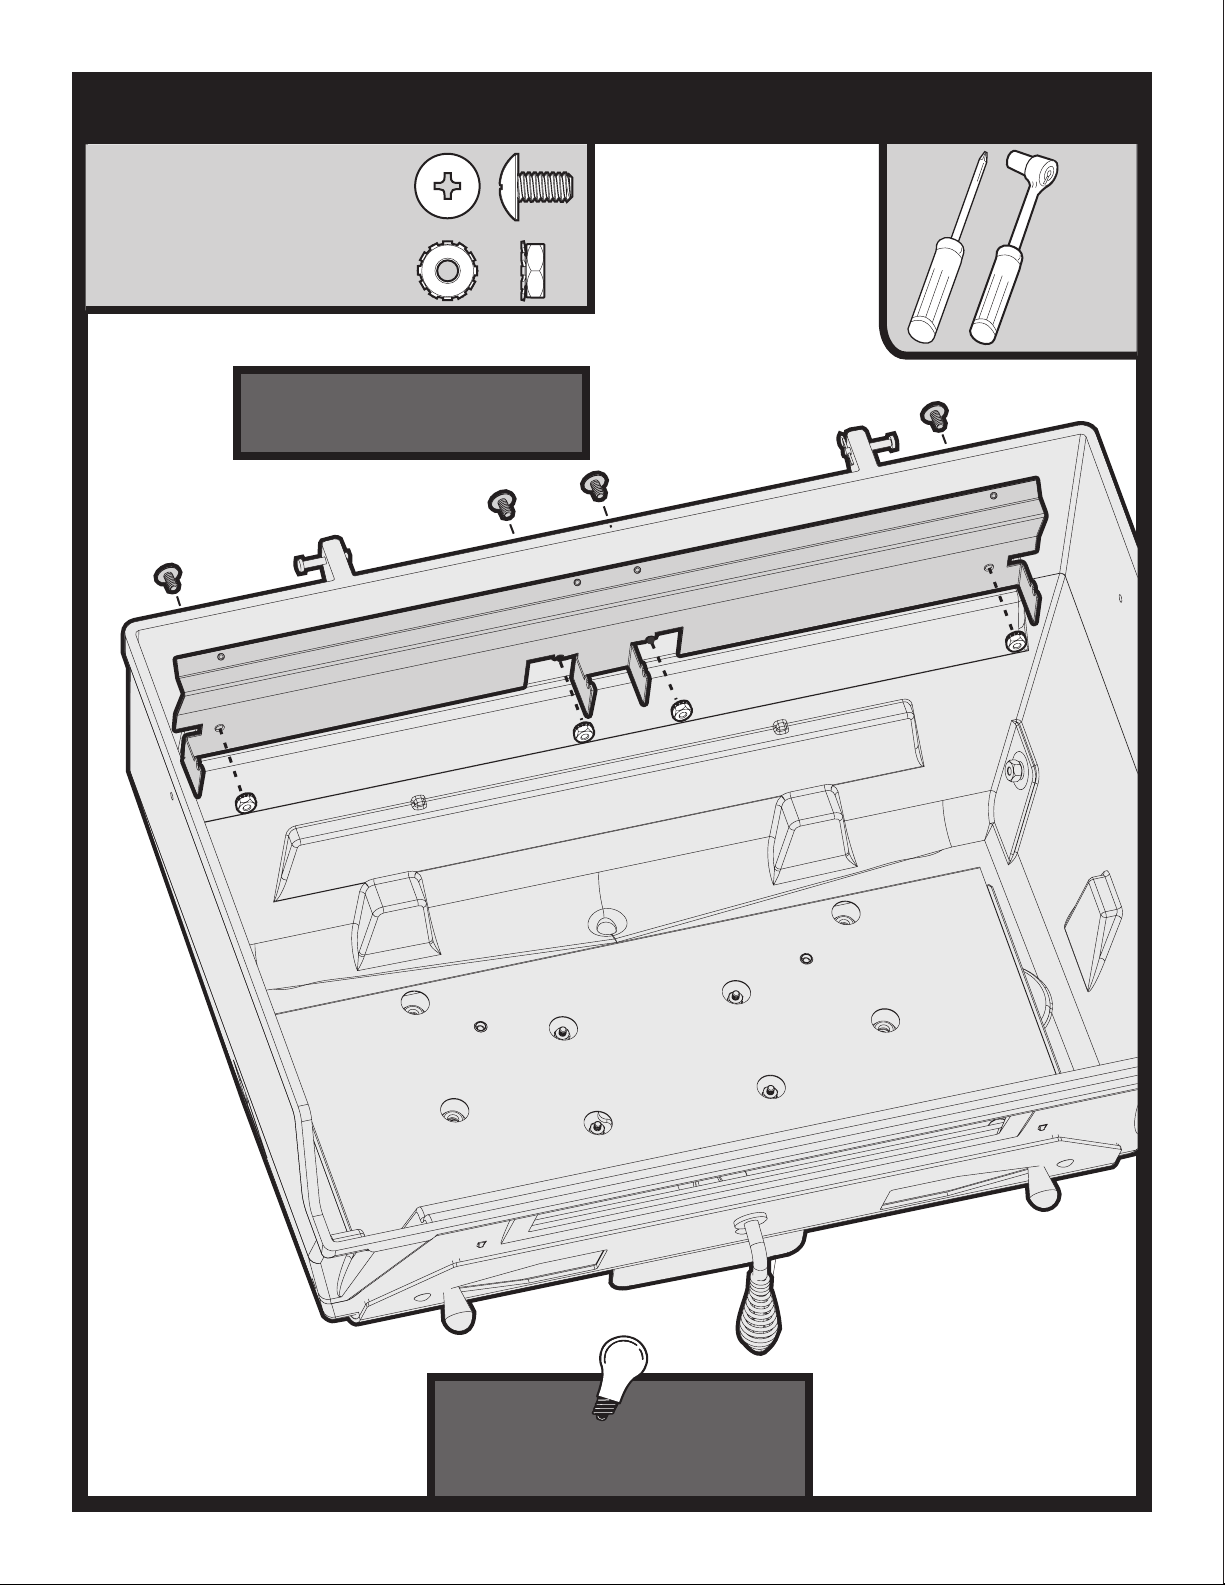
REAR SUPPORT BRACKET PLACEMENT
PHILLIPS TRUSS HEAD SCREW,
SS, 10-24 X 3/8
B100130 (4)
KEPS NUT,
SS, 10-24
B073967(4)
Align the four holes and attach the
Rear Support Bracket to the back
inside of the lower grill body.
3/8”
Note: If Side Shelf Accessory was
purchased install at this time.
Follow Side Shelf instructions.
B102097-3-0119Page 10
 Loading...