

Broil King DPA151 Owner's Manual
PREMIUM GRILLS
RetaIn OwneR’S Manual fOR futuRe RefeRence.
IR SIde BuRneR
NATURAL OR PROPANE
DPA151(N,P)-1
Page 1
IMPORTANT INFORMATION
IMPORTANT
T
his manual should be read thoroughly by the person installing the IR Side Burner
and all persons who will use and maintain the IR Side Burner. The installer should
be sure the manual is left in the possession of the user. The user should retain this
manual for future reference when using or cleaning the IR Side Burner and to properly
identify any repair parts that may be required.
WARNING
F
ollow the instruction in this manual for proper installation and maintenance of
the DPA151 IR Side Burner. Improper installation, adjustment, alteration, service or
maintenance can cause injury or property damage. For assistance or additional
information consult a qualied installer, service agency or the gas supplier.
If YOu SMell GaS:
1. Shut off gas to the appliance.
2. Extinguish any open ame.
3. Open the grill lid.
4. If odor continues, immediately call your gas supplier or re
department.
5. Do not touch electrical switches.
WARNING: FOR YOUR SAFETY
D
o not store or use gasoline or other ammable vapors or liquids in the vicinity of
this or any appliance.
An LP cylinder not connected for use shall not be stored in the vicinity of this or any
other appliance.
CAUTION:
P
arts may have sharp edges. Wear leather work gloves and handle parts carefully
during unpacking, assembly and installation.
WARNING
B
roilmaster IR Side Burners equipped for propane gas must ONLY use propane cyl-
inders equipped with an Overll Protection Device (OPD). Use only a reputable propane dealer when exchanging or lling cylinders. An overlled or improperly lled
propane cylinder can be dangerous.
B102245-1-0415Page 2

Thank you for purchasing a Broilmaster IR Side Burner.
Broilmaster takes pride in its reputation as the The Most Durable Grill Known to Man.
From its thick aluminum casting to its massive cooking grids, your Broilmaster
is built to last. In fact we still make replacement parts for Broilmaster grills built
more than 30 years ago.
Visit www.broilmaster.com and click on the Hall of Fame to see a sampling of
our long-time customers. We hope you enjoy years of great meals prepared on
your Broilmaster. And we hope to add your photo to the Hall of Fame one day.
Thank You!
B102245-1-0415 Page 3
Broilmaster is a registered trademark of
Empire Comfort Systems, Inc.
918 Freeburg Ave.
Belleville, Illinois 62220
Telephone 800-851-3153

TABLE OF CONTENTS
Y
ou have chosen the nest grill for your outdoor cooking pleasure.
Please take time to read this entire manual before assembling your Broilmaster IR Side Burner.
ASSEMBLY INSTRUCTIONS .....................................................................................................
DPA151 IR SIDE BURNER ASSEMBLY ...............................................................................
6-15
DPA151 PARTS DIAGRAM ...................................................................................................
DPA151 HARDWARE PACK - B102087 ................................................................................
REMOVING LID (IF SHELF IS ALREADY INSTALLED) .......................................................
REMOVING FRAMING (IF SHELF IS ALREADY INSTALLED) ............................................
INSTALL IR SIDE BURNER TO FRAME .............................................................................
BATTERY PLACEMENT ......................................................................................................
ATTACHING IR SIDE BURNER TO BRACKET ...................................................................
INSTALL GRATE ..................................................................................................................
ORIENT LIFTER TAB ..........................................................................................................
INSTALL GREASE CUP ......................................................................................................
PROPANE GAS CONNECTION ..........................................................................................
NATURAL GAS CONNECTION ..........................................................................................
16-19
20-21
COMPLETED ASSEMBLY .......................................................................................................
OWNER’S MANUAL FOR DPA151 IR SIDE BURNER ......................................................
23-31
OPERATIONAL - PROPANE AND NATURAL GAS ............................................................
INFRARED COOKING .........................................................................................................
IR SIDE BURNER MAINTENANCE .....................................................................................
IMPORTANT SAFETY INFORMATION ..........................................................................
26-27
COOKING TIPS ...................................................................................................................
WARRANTY TERMS ...........................................................................................................
MASTER PARTS DISTRIBUTOR LIST ...............................................................................
HOW TO ORDER REPAIR PARTS .....................................................................................30
GRILL MAINTENANCE HISTORY .......................................................................................
5
6
7
8
9
10
11
12
13
14
15
22
23
24
25
28
29
30
31
B102245-1-0415Page 4

CAUTION:
Parts may have sharp edges. For your safety
wear leather work gloves and handle parts
carefully during unpacking and assembly.
ASSEMBLY INSTRUCTIONS
Before You Begin
Compare the parts in the box to the parts list provided in this manual. If any are missing, contact your
Broilmaster dealer before beginning assembly.
This Side Burner must be installed into either a DPA152 Built-In Sleeve or a DPA153 Side Shelf.
3/4”
REQUIRED
B102245-1-0415 Page 5
TOOLS
REQUIRED
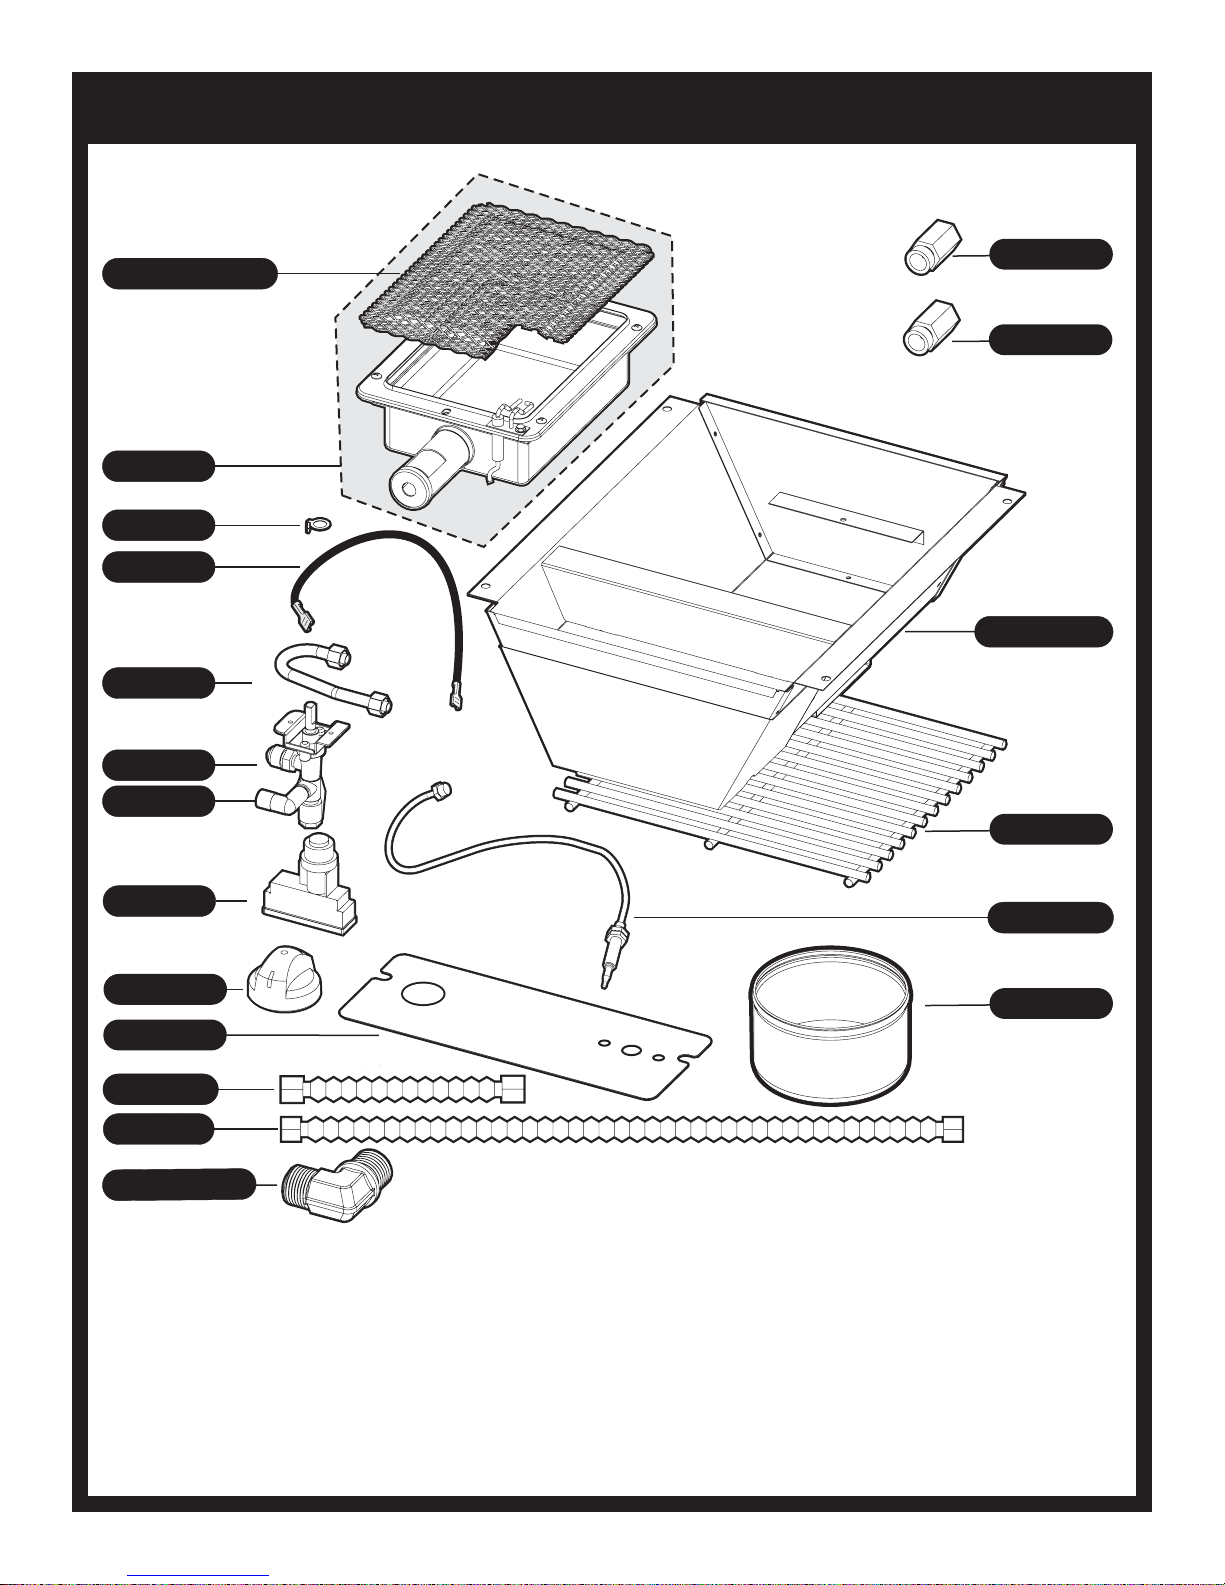
DPA151 IR SIDE BURNER ASSEMBLY
DPA151 PARTS DIAGRAM
B102073 (1)
BURNER SCREEN REPLACEMENT KIT
B101922 (1)
INFRARED BURNER
B069747 (1)
LUG IGNITOR GROUND
B072684 (1)
IGNITOR GROUND WIRE
R11588 (1)
ORIFICE 1.40MM (NAT)
R11587 (1)
ORIFICE 1.00MM (LP)
B069756 (1)
HOSE & LPS REGULATOR
B101924 (1)
TUBE ASSEMBLY
B101918 (1)
GAS VALVE LP
B101917 (1)
GAS VALVE NATURAL
B072218 (1)
IGNITOR, ELECTRONIC
B101848 (1)
KNOB
B101916 (1)
CONTROL PANEL LABEL
B100228 (1)
SS FLEX LINE 10”
DPA106 (1)
LID STOP KIT
R6305 (1)
SS FLEXLINE 34”
P253 (1)
ORIFICEFITTLE RIGHT ANGLE
B102081 (1)
SHEET METALASSEMBLY
B101835 (1)
SIDE SHELF GRATE
B102082 (1)
THERMOCOUPLE
B060337 (1)
GREASE CUP
B102245-1-0415Page 6

DPA151 HARDWARE PACK - B102087
BATTERY, AA
B076529
(1)
FLARE, MALE 3/8”
“TEE”
B070323
(1)
GREASE
CUP
B101473
(1)
Standard hardware items such as bolts, screws, washers, and nuts can be purchased at your local hardware store. Do not order individual pieces of standard hardware. A replacement hardware pack may be
ordered using the hardware pack part number at the top of the page.
B102245-1-0415 Page 7
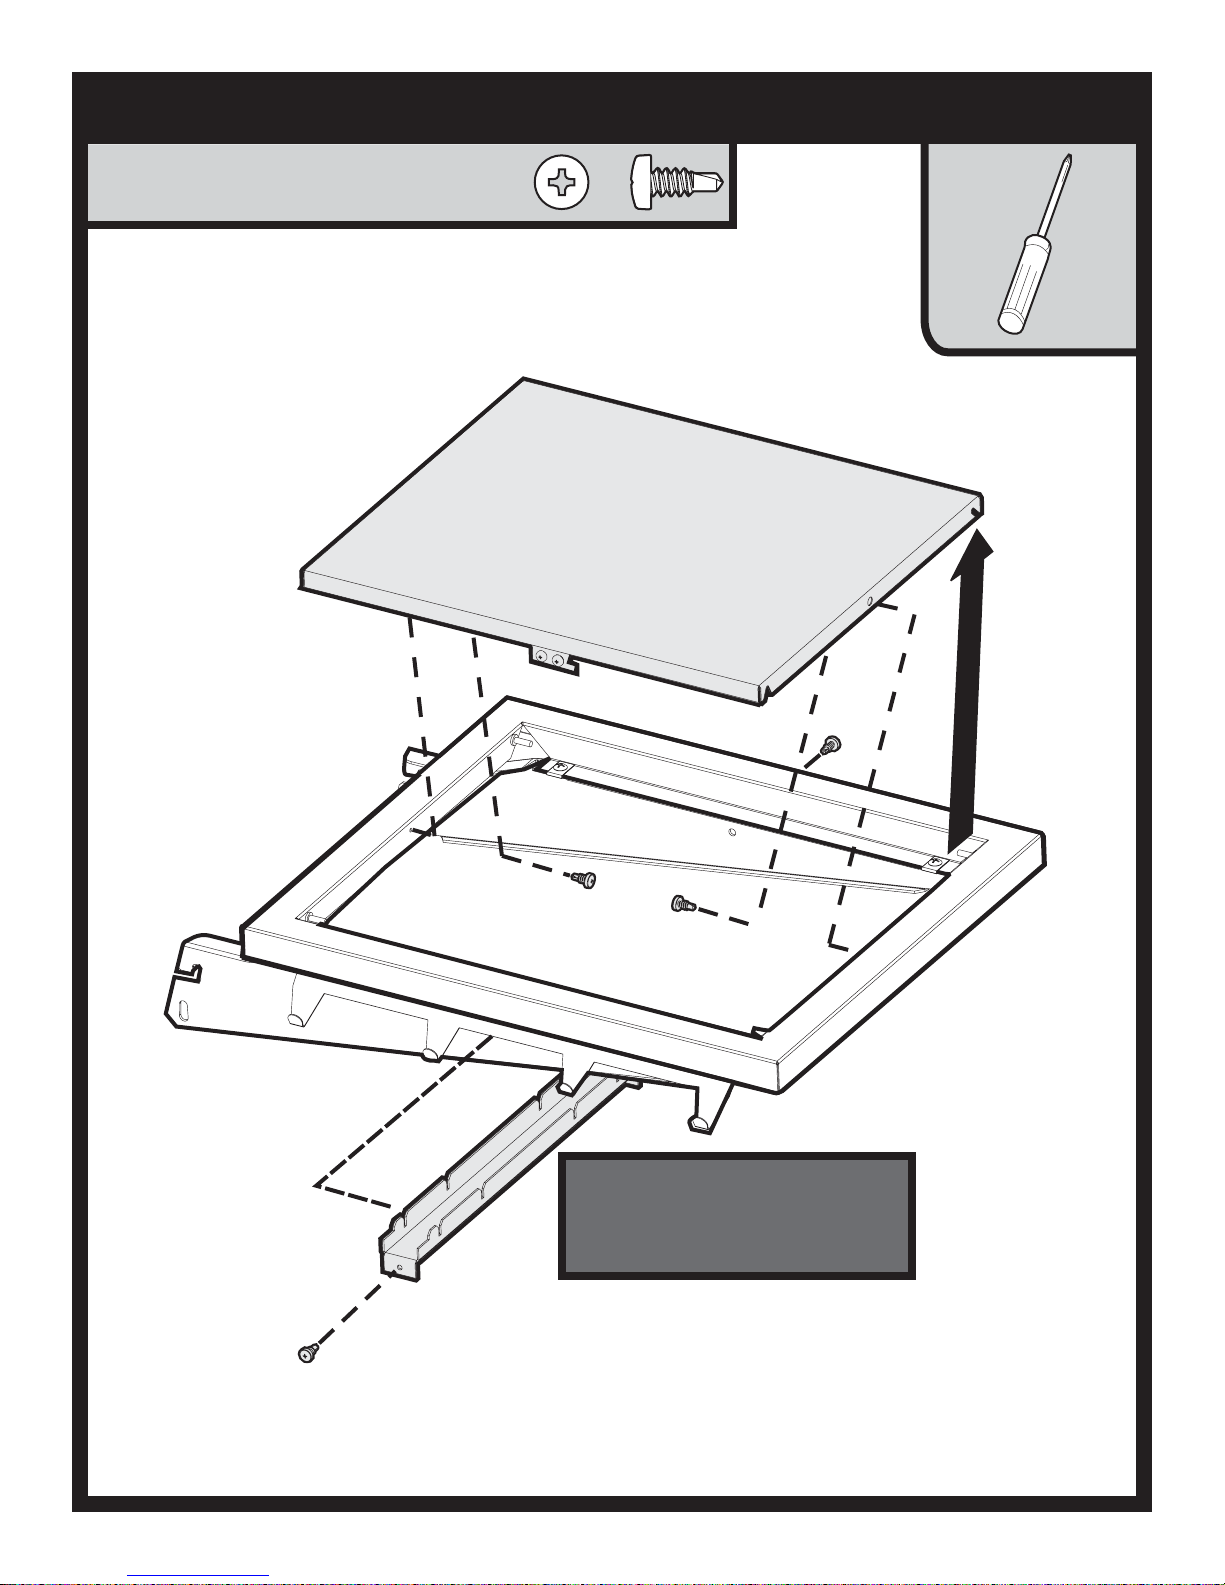
REMOVING LID (IF SHELF IS ALREADY INSTALLED)
SELF-DRILLING PHILLIPS PAN HEAD SCREW,
SS, 10-16 X 1/2
R4059 (2)
Remove two screws holding lid in
place. Remove two screws holding
stiffener in place. Set lid and
Stiffener aside until needed at later
step.
B102245-1-0415Page 8
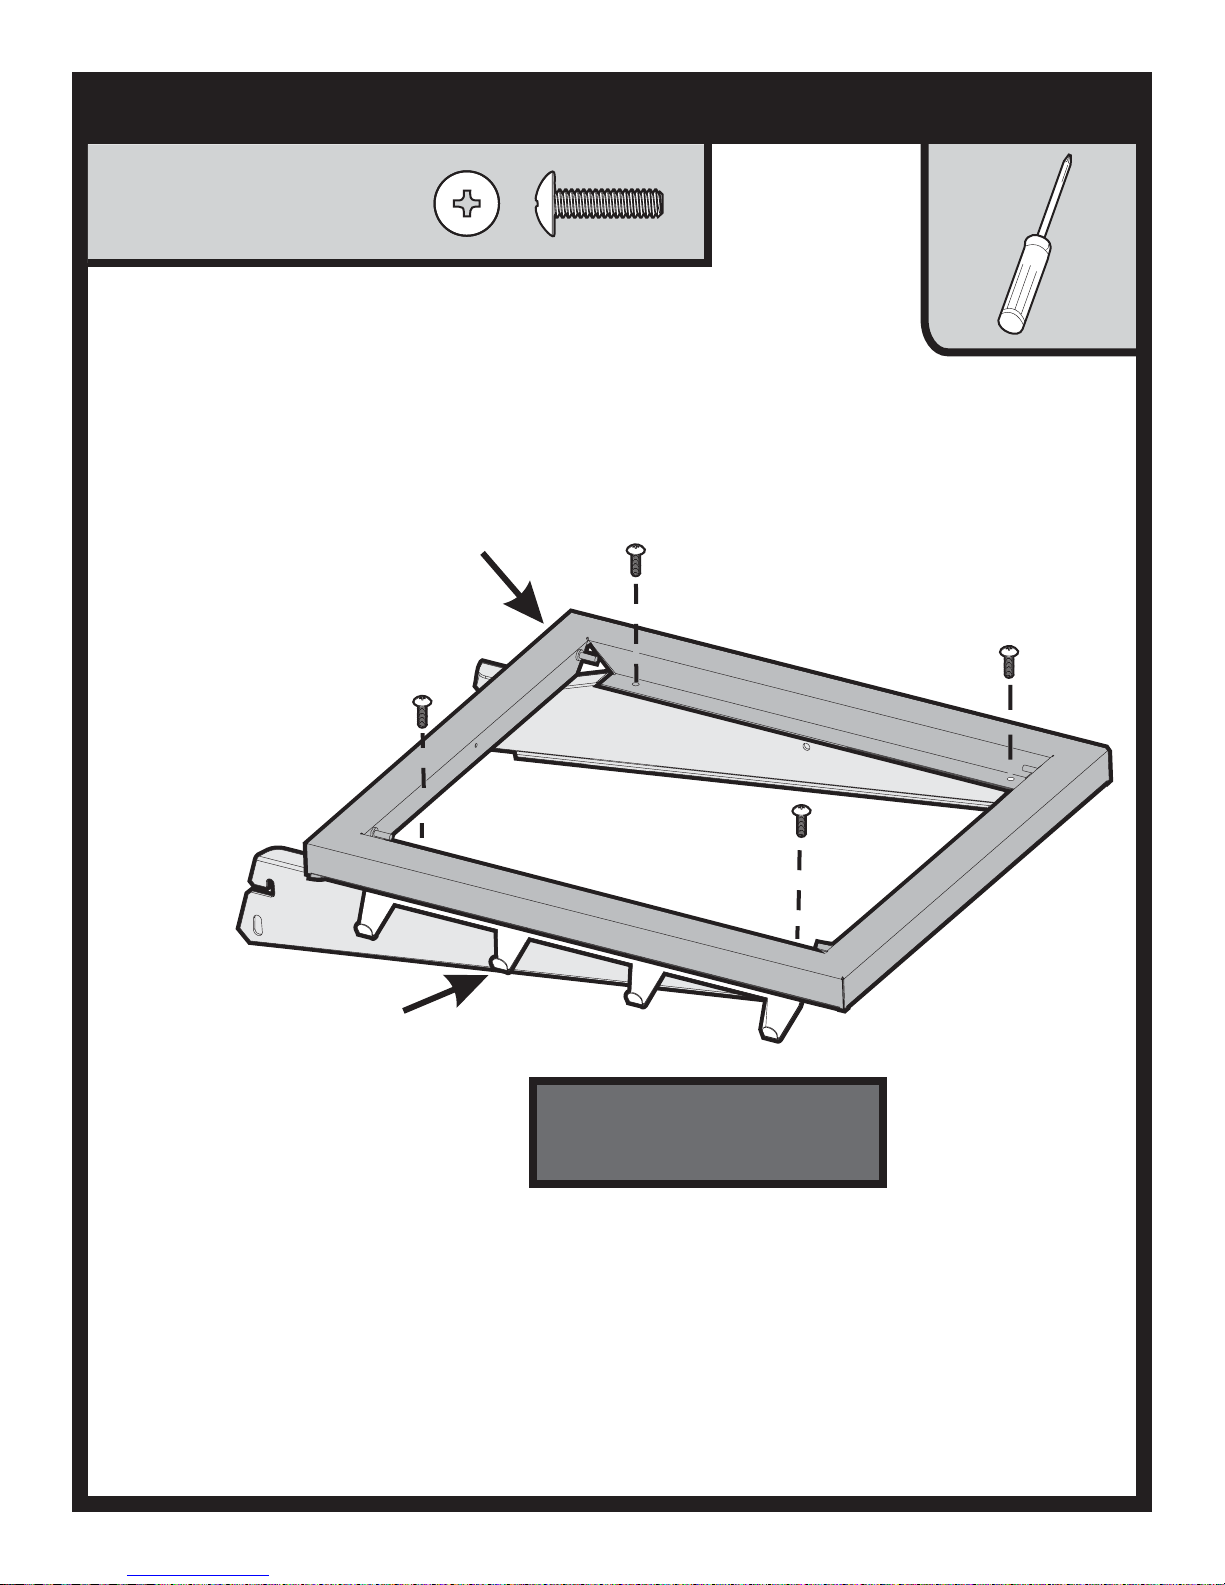
REMOVING FRAMING (IF SHELF IS ALREADY INSTALLED)
PHILLIPS TRUSS HEAD SCREW,
10-24 X 3/4
B076522 (4)
FRAME
TOOL
HOOKS
BAR
B102245-1-0415 Page 9
Remove four screws holding frame
and tool hooks bar in place. Set
frame and tool hooks bar aside until
needed at later step.

Insert the tool hooks bar in front
between the frame and support
bracket, then tighten screws.
INSTALL IR SIDE BURNER TO FRAME
PHILLIPS TRUSS HEAD SCREW,
10-24 X 3/4
B076522 (4)
B102245-1-0415Page 10
 Loading...