

Broil King 9002-13, 9506-53, 9526-53, 9003-13 Owner's Manual
GAS BARBECUES
OWNER'S MANUAL
FOR USE WITH BUTANE OR PROPANE GAS
CATEGORY I
3+(28-30/37)
, CATEGORY I
3B/P(30)
CONTENTS
SAFETY ............................................................. 2
REGULATOR / GAS HOSE .............................. 3
BUTANE ............................................................ 4
PROPANE ......................................................... 5
LEAK TESTING ................................................ 6
VENTURI TUBES .............................................. 7
LIGHTING .......................................................... 8
OPERATION ..................................................... 9
COOKING TECHNIQUES ................................. 9
MAINTENANCE .............................................. 10
TROUBLE SHOOTING ................................... 11
WARRANTY .................................................... 12
READ ALL INSTRUCTIONS CAREFULLY BEFORE OPERATING YOUR GAS BARBECUE
RETAIN THESE INSTRUCTIONS FOR FUTURE REFERENCE
10095-EU REV J 04/16
SAFETY
This appliance is designed in accordance with CE Standards.
Use outdoors only.
Read the instructions before using the appliance.
Warning: accessible parts may be very hot. Keep young
children away.
Do not move the appliance during use.
Use caution when handling or transporting this product.
Metal edges can present a hazard. Use appropriate
gloves when lifting or handling. Before lifting, remove
side shelves and grids and grates.
Turn off the gas supply at the cylinder after use.
Use protective gloves when handling hot components.
The aeration adjustments on the main burners, rear
burner and side burner have been adjusted, set and
sealed at the factory and should not be adjusted or
manipulated.
Any modification of the appliance may be dangerous.
In the event of a gas leak, shut off gas supply.
If you smell gas:
1. Shut off gas to the appliance.
2. Extinguish any open flame.
3. Open lid.
4. If odor continues, immediately call your gas supplier.
LOCATION
Maintain a minimum of 76cm from the appliance to any
combustible construction.
Do not locate under an unprotected combustible ceiling or
cover.
Keep the area around this appliance clear from any
combustible materials, petrol, and other flammable vapors
and liquids.
Do not obstruct the flow of combustion and ventilating air.
SPECIFICATIONS
MODEL
9002-13 4.1kW 298 g/h 0.99mm
9003-13 4.1kW 298 g/h 0.99mm
9506-53 4.1kW 298 g/h 0.99mm
9526-53 6.0kW 486 g/h 0.70mm
TOTAL
HEAT
INPUT
TOTAL
HEAT
INPUT
JET SIZE
MAIN
BURNER
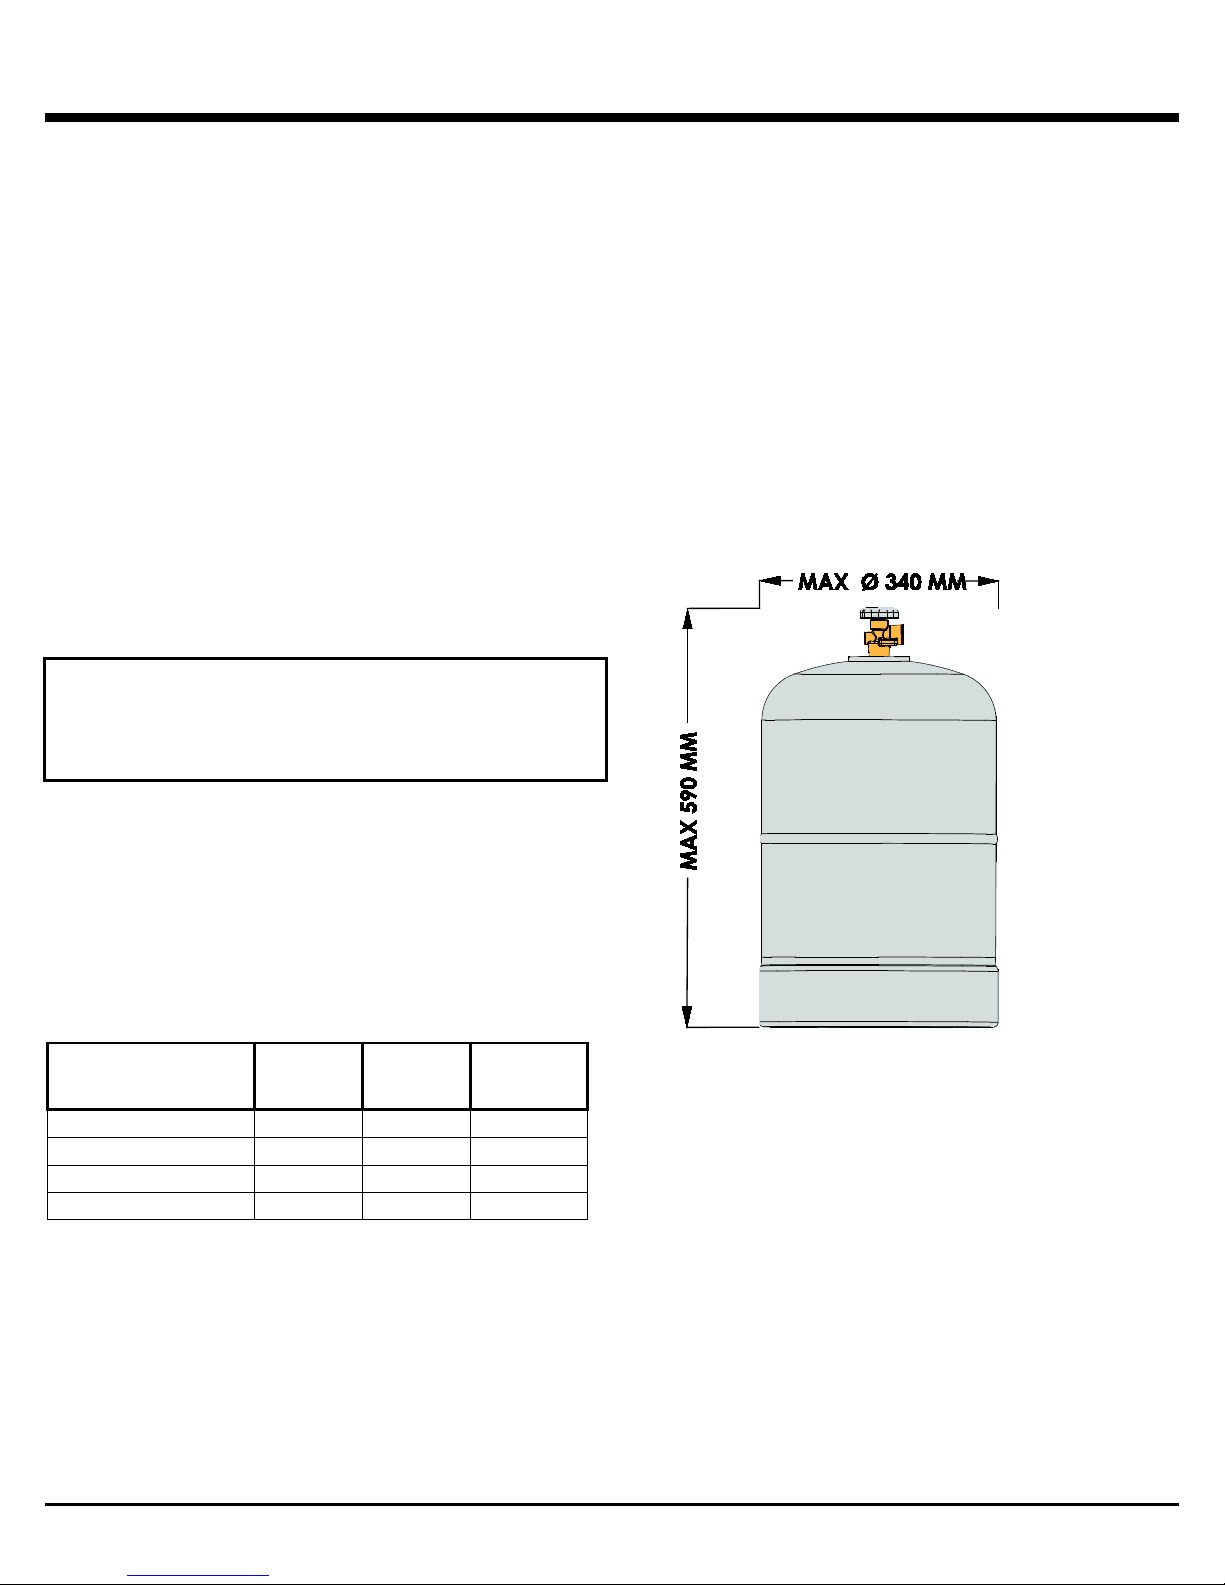
CYLINDER
Cylinders up to and including the 15 kg size may be used.
Do not use cylinders larger than 15 kg.
Always treat a cylinder with care. Never store it on its side
because the valve could become damaged, resulting in a
leak which could be serious. Always use the cylinder upright.
Horizontally, liquid fuel could get into the supply pipes with
damaging results.
Always place the cylinder in an accessible location to
facilitate changing and emergency shut off. Always
disconnect the gas cylinder before moving the appliance.
Never subject a cylinder to heat. The pressure inside the
cylinder could build up and exceed the designed safety limit.
Never store cylinders in cellars, adjacent to open drains and
basement areas or below ground level. Propane is heavier
than air. If there is a leak, the gas will collect at low level and
become dangerous in the presence of a spark or flame.
Never store butane or propane cylinders indoors.
STORAGE
When storing the appliance for long periods of time, remove
the cylinder and cover the barbecue. Store the cylinder
outdoors in a well ventilated place.
SERVICING
This gas appliance should not be altered or interfered with.
Any adjustment or servicing should be carried out by a
qualified engineer. Regular maintenance is recommended.
See maintenance instructions.
2
REGULATOR / GAS HOSE
SUPPLY
BUTANE
SUPPLY
PROPANE
REGULATOR
WITH
LP GAS HOSE
WITH
I
3+(28-30/37)
3+(28-30/37)
NF M 88765 OR
NF M 88776
I
3+(28-30/37)
I
3B/P(30)
I
3B/P(30)
I
3B/P(30)
I
3+(28-30/37)
I
3+(28-30/37)
I
3+(28-30/37)
I
3B/P(30)
I
3B/P(30)
I
3B/P(30)
I
3+(28-30/37)
I
3+(28-30/37)
I
3+(28-30/37)
I
3B/P(30)
I
3B/P(30)
REGULATOR
This appliance must be fitted with a regulator complying with
the local/national standards and/or norms with a nominal
outlet pressure of:
CATEGORY I
3+(28-30/37
Butane 28-30 mbar.
CATEGORY I
NEVER use an unregulated gas supply.
3B/P(30)
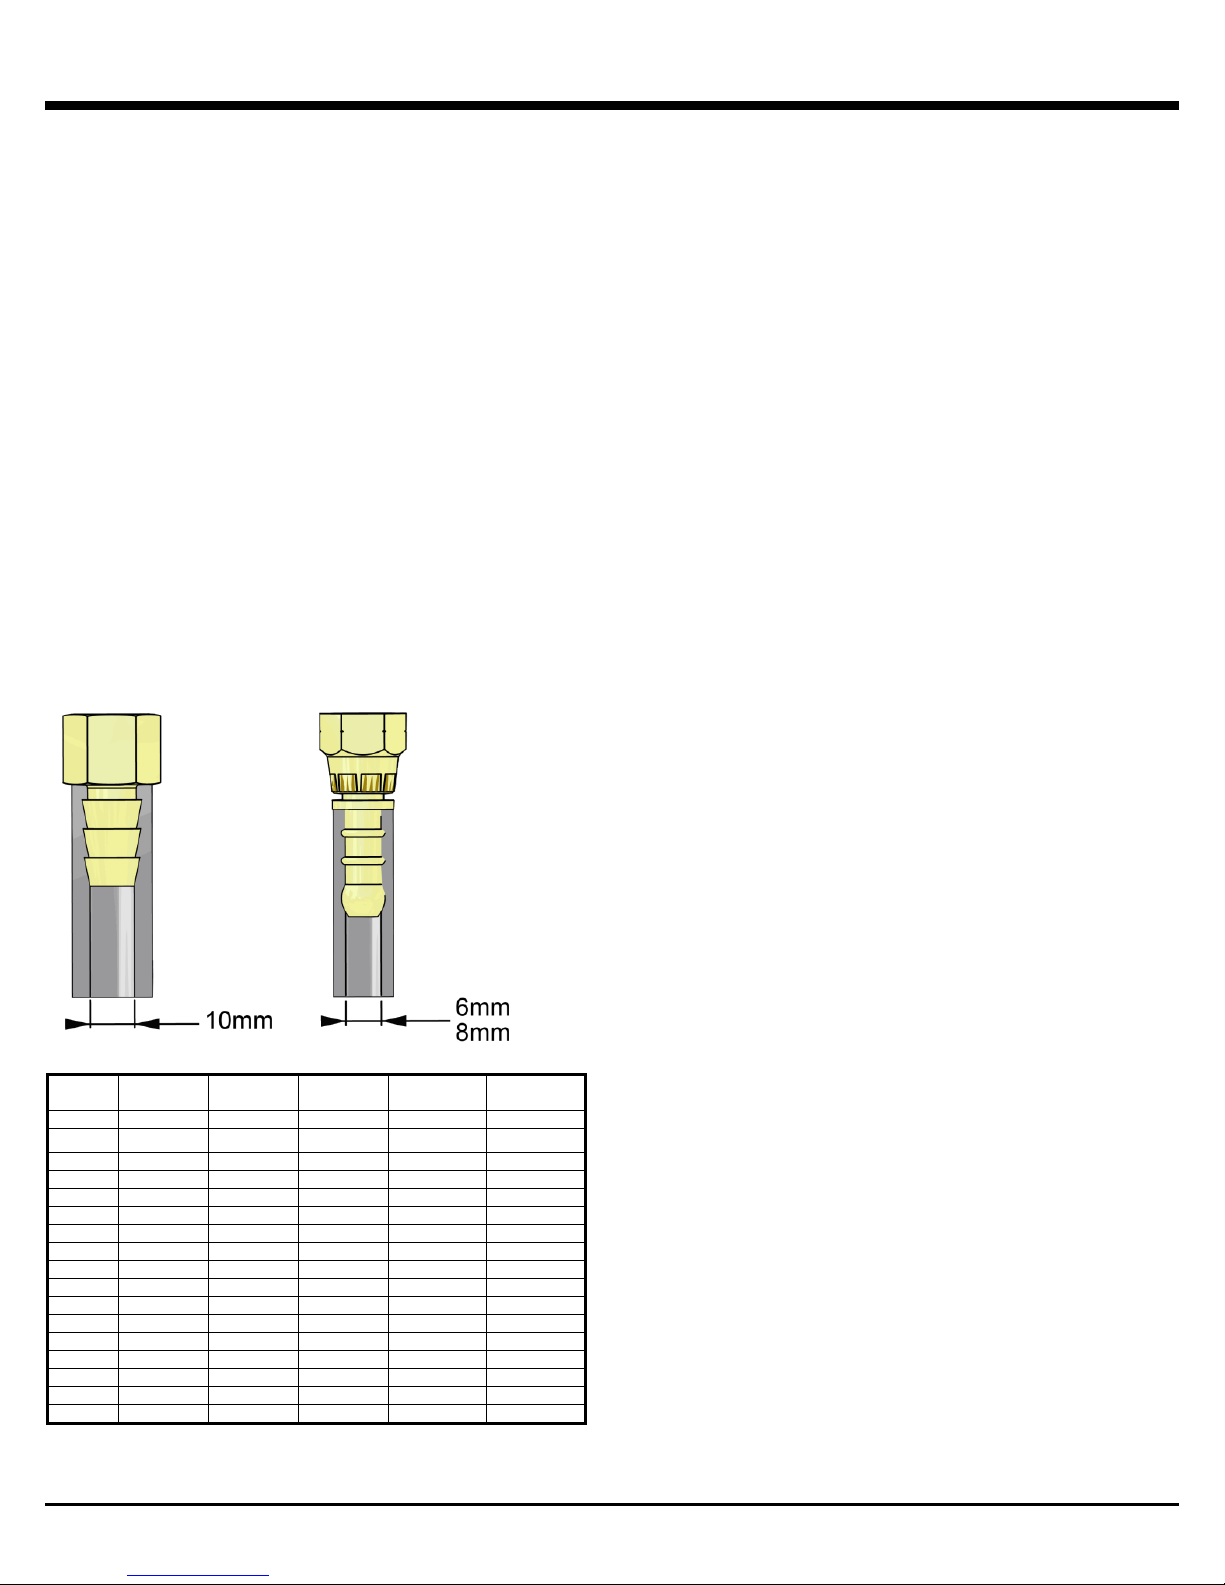
LP GAS HOSE
This appliance must be fitted with an LP Gas hose complying
with local/national standards and/or norms.
The LP Gas hose connecting the appliance to the gas
container should be 600mm long.
Position the LP Gas hose away from any hot surface,
including the bottom of the barbecue.
Be sure the LP Gas hose is not subjected to twisting.
Inspect the LP Gas hose when replacing the gas cylinder or
once per year whichever is more frequent. If the LP Gas
hose is cracked, cut, abraded or damaged in any way, the
appliance must not be operated.
The LP Gas hose must be replaced if damaged and when
national conditions require it. Contact your dealer for
replacement.
SPECIFICATIONS
FOR USE
GB
FR
BE
LU
NL
DK
ES
PT
SE
NO
CH
HU
GR
CATEGORY
IN
I
IT
FI
IE
IS
) Propane 37 mbar.
Propane/Butane 30 mbar.
PRESSURE
28-30 mbar 37 mbar BS3016 BS3212/2/ 8
28-30 mbar 37 mbar
28-30 mbar 37 mbar
30 mbar 30 mbar
30 mbar 30 mbar NEN 5654
30 mbar 30 mbar
28-30 mbar 37 mbar
28-30 mbar 37 mbar
28-30 mbar 37 mbar
30 mbar 30 mbar
30 mbar 30 mbar
30 mbar 30 mbar
28-30 mbar 37 mbar
28-30 mbar 37 mbar
28-30 mbar 37 mbar
30 mbar 30 mbar
30 mbar 30 mbar
PRESSURE
MUST COM PLY
MUST COM PLY
NF D 36107
3
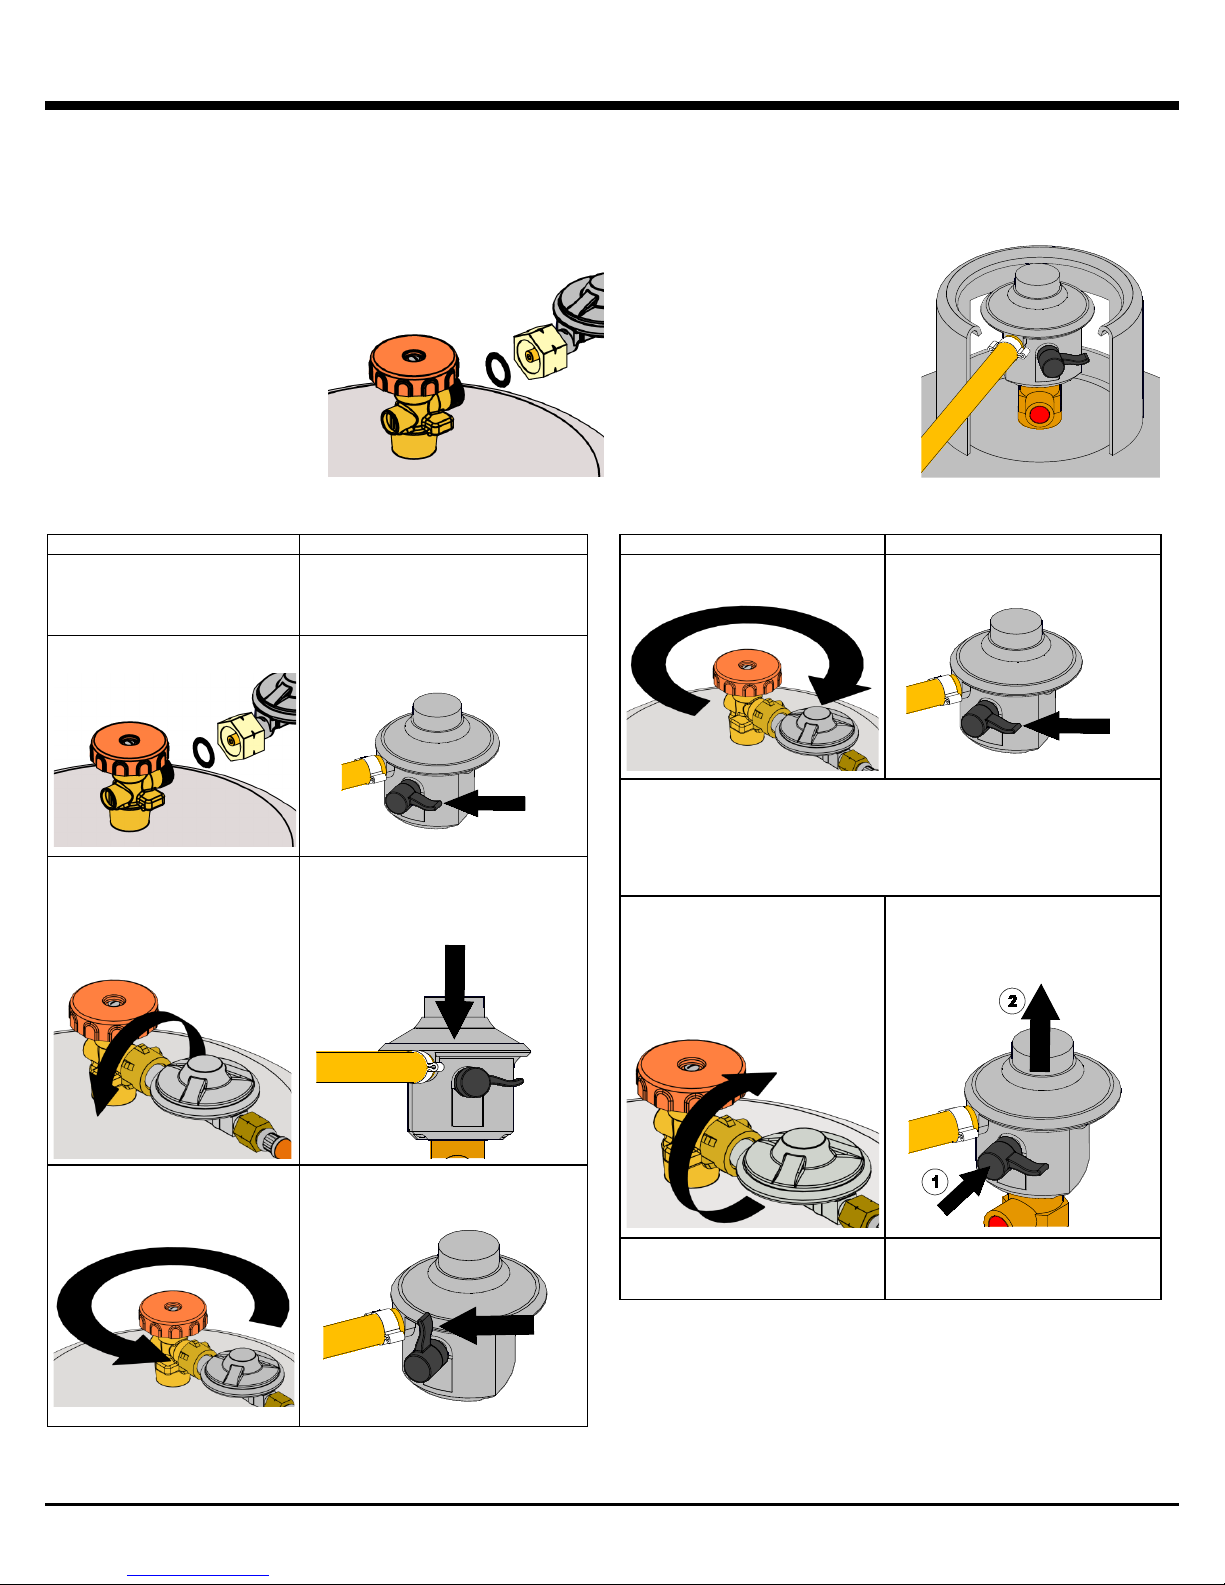
CHANGING A GAS CYLINDER - BUTANE
a) Screw-On Connection.
b) Switch-On Connection.
tools are required for this
type. On/Off control of the gas
the Regulator or on a special
adapter. If you use an adapter
with an old type threaded
union nut is tightened firmly to
Connecting a Cylinder
SCREW-ON CONNECTION
SWITCH-ON CONNECTION
1. Check that the cylinder valve
1. Remove the orange safety cap by
3. Inspect the black washer for
2. Make sure that all taps on the gas
4. Fit the connecting nut to the
3. Place the “Quick On” regulator on
5. When gas is required turn the
4. When gas is required turn the
Disconnecting a Cylinder
SCREW-ON CONNECTION
SWITCH-ON CONNECTION
1. Turn the cylinder valve OFF
1. Turn the switch to the OFF (3
2. Turn off the gas taps on the appliance. WAIT until the burner has gone
3. NEVER REMOVE the regulator
3. Remove the “Quick On” regulator
4. REPLACE the plug or cap onto
4. REPLACE the seal cap onto the
not in use.
This appliance may be used with butane at an operating pressure of 28 - 30 mbar.
NEVER use an unregulated gas supply or a regulator for other operating pressures.
WARNING: Changing a cylinder must be carried out in a flame free environment.
BUTANE cylinders have various types of connections
The most important part is the
black sealing washer. Always
check that it is present and not
damaged when changing
cylinders. Some screw on
connections have a hand wheel
to tighten and some require a
spanner to tighten. Tighten
firmly (left hand thread). When
using a spanner, do not over
tighten as this can damage the
washer.
is OFF by turning clockwise.
2. Remove protective cap and
keep for later use.
damage before connecting.
cylinder, using the correct
spanner or connecting hand
wheel (Left hand thread). Do not
over tighten Butane cylinder
connectors.
pulling the lanyard out, then up. Do
not use tools, leave the cap hanging.
appliance are closed and the switch is
in the off position.
to the valve and push down firmly. A
“click” sound should be heard to
ensure the switch is securely latched.
No
supply is provided by a switch on
regulator, please ensure that the
the adapter with a spanner.
(Clockwise rotation).
out.
IF THE FLAME DOES NOT GO OUT-TURN THE VALVE OR SWITCH
BACK TO ON. LEAVE THE APPLIANCE ALIGHT AND CALL YOUR
GAS SUPPLIER.
(or connecting nut) with the
cylinder valve open.
4. REMOVE the regulator (or
connecting nut) with the spanner or
connecting hand wheel. (Left hand
thread).
o'clock) position.
by pressing horizontally on the
switch (1) and pulling upwards (2) at
the same time.
cylinder valve anti-clockwise.
switch upward to the ON (12 o’clock)
position.
Leak test all connections before operating the appliance.
the empty cylinder or part full
cylinder if not in use.
4
empty cylinder, or part full cylinder if
 Loading...