

Broil King 9202-54 Owner's Manual
PLEASE RECORD YOUR MODEL NUMBER,
HERE.
This information can be found on the silver and black OMC
caution sticker inside the lid of your stove.
Number
Number
/
/
DD
MM
YYYY
OWNER’S MANUAL
FOR USE WITH L.P. (LIQUID PETROLEUM) GAS
IN CANADA, PROPANE GAS
ANSI Z21.72-2016 / CSA 11.2-2016
BROIL KING MODEL #: 9202-54
CONTENTS
SAFETY ................................................................................ 2
INSTALLATION ............................................................ 2
L.P. GAS CYLINDER – 1Lb ................................................. 3
L.P. GAS CYLINDER – 20Lb ............................................... 4
OPD EQUIPPED CYLINDER ............................................... 5
HOSE AND REGULATOR ................................................... 5
LEAK TESTING ................................................................... 6
VENTURI TUBES ................................................................. 7
LIGHTING ............................................................................. 8
TRANSPORTING ................................................................. 9
MAINTENANCE ................................................................... 10
TROUBLESHOOTING ......................................................... 11
WARRANTY ......................................................................... 12
GUIDE DU PROPRIÉTAIRE DE BARBECUE AU
MANUAL DEL USUARIO DE PARRILLA A GAS ............... 25
READ ALL INSTRUCTIONS CAREFULLY BEFORE OPERATING YOUR GAS
RETAIN THESE INSTRUCTIONS FOR FUTURE
FOR ASSEMBLY INSTRUCTION, PLEASE SEE YOUR ASSEMBLY MANUAL.
VISIT www.omcbbq.com TO VIEW OUR ASSEMBLY
1-800-265-2150
info@omcbbq.com
GAZ
...... 13
WARNING
FIRE OR EXPLOSION HAZARD
IF YOU SMELL GAS:
1. DO NOT ATTEMPT TO LIGHT THE
APPLIANCE
2. EXTINGUISH ANY OPEN FLAME
3. DISCONNECT FROM FUEL SUPPLY
4. EVACUATE IMMEDIATELY
5. ALLOW GAS TO DISSIPATE 5 MINUTES
BEFORE RELIGHTING THE APPLIANCE
FAILURE TO FOLLOW THESE INSTRUCTIONS
COULD RESULT IN FIRE OR EXPLOSION,
WHICH COULD CAUSE PROPERTY DAMAGE,
PERSONAL INJURY OR DEATH.
SERIAL NUMBER AND DATE OF PURCHASE
Model
Serial
Date of Purchase
OR
-
-
REFERENCE.
STOVE.
VIDEOS
10095-05LP REV A 01/17
SAFETY INSTALLATION
FOR YOUR SAFETY
this or any other appliance.
DANGER
CARBON MONOXIDE HAZARD
HOME.
Your new OMC gas stove is a safe, convenient appliance
when assembled and used properly. As with all gas-fired
products, however, certain safeguards must be observed.
Failure to follow these safeguards may result in
serious injury or damage. If you have questions
concerning assembly or operation, consult your dealer,
gas appliance specialist, Gas Company or our direct
customer service line at 1-800-265-2150.
info@omcbbq.com
CAUTION
• FOR OUTDOOR USE ONLY.
• IF STORED INDOORS, DETACH AND LEAVE
CYLINDER OUTDOORS.
• THIS APPLIANCE MUST NOT BE OPERATED
UNATTENDED.
• SPECIAL CARE MUST BE TAKEN TO KEEP SMALL
CHILDREN AWAY FROM HEATED SURFACES.
Use caution when handling or transporting this
product. Metal edges can be hazardous. Use
appropriate gloves when lifting or handling. Before
lifting, remove side shelves, grids and grates.
PROPOSITION 65 WARNING
Handling the brass material on this product exposes you to
lead, a chemical known to the state of California to cause
cancer, birth defects or other reproductive harm. WASH
YOUR HANDS AFTER HANDLING THIS PRODUCT.
WARNING
Fuels used in gas or oil-fired appliances, and the produc ts
of combustion of such fuels, contain chemicals known
to the State of California to cause cancer, birth
defects or other reproductive harm. “This warning is
issued pursuant to California Health and Safety Code Sec.
25249.6”
Do not store or use gasoline or other
flammable vapors and liquids in the vicinity of
THIS APPLIANCE CAN
PRODUCE CARBON MONOXIDE
WHICH HAS NO ODOR.
USING IT IN AN ENCLOSED
SPACE CAN KILL YOU.
NEVER USE THIS APPLIANCE IN
AN ENCLOSED SPACE SUCH
AS A CAMPER, TENT, CAR OR
1. In the U.S.A., this appliance must be installed in
accordance with the local code and the rele va nt nati on al
code:
ANSI Z223.1/NFPA 54 - Latest Edition National Fuel
Gas Code and Latest Local Codes where Applicable
2. In Canada, this appliance must be installed in
accordance with the local code and the relevant CSA
standards:
CSA-B149.1 Natural Gas and Propane installation
Code
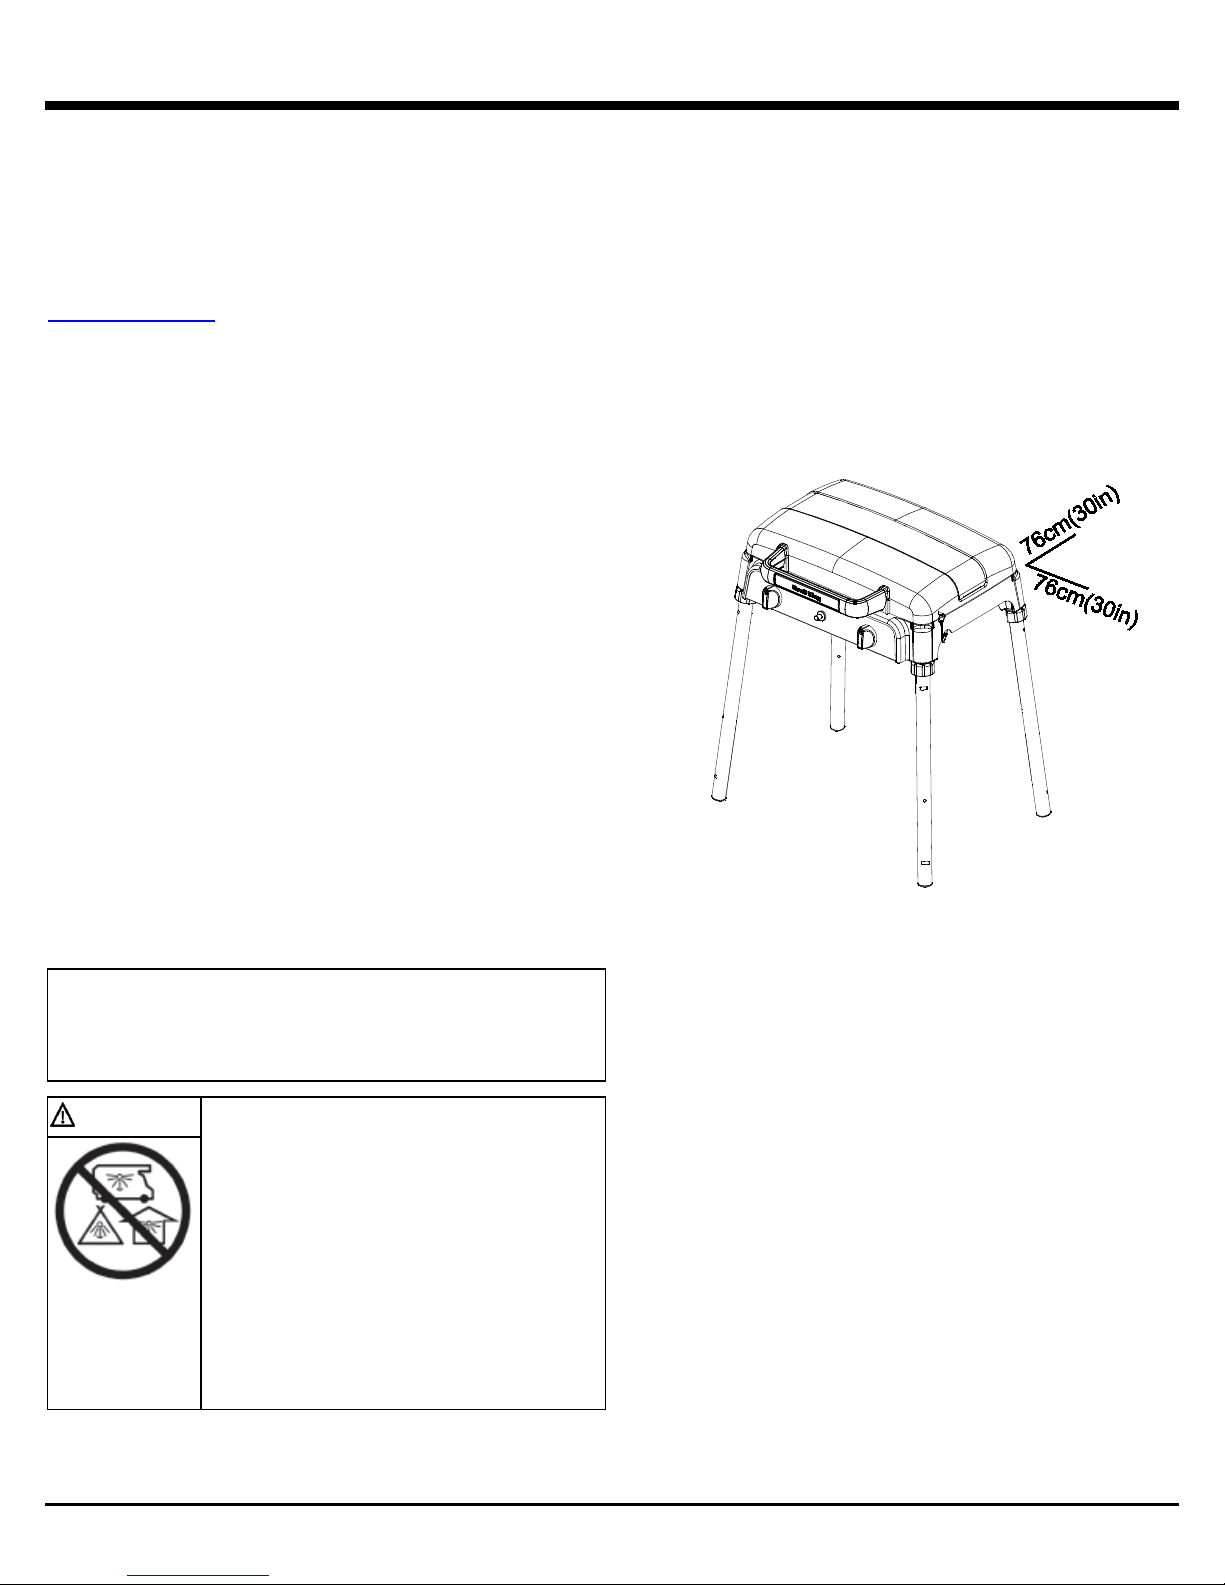
3. The appliance must be located away from combustible
surfaces by at least 76cm / 30” from each side, and
76cm / 30” from the rear.
4. Do not operate this appliance under any overhead
roof construction or foliage.
5. This appliance is for OUTDOOR USE ONLY, DO
NOT operate in garage, shed, balcony or other such
enclosed areas.
6. DO NOT restrict the flow of air to the
appliance.
7. Keep the area surrounding the appliance free
of combustible materials, gasoline, and all flammable
liquids and vapors.
8. This appliance is not intended to be installed in, or
on, recreational vehicles and/or boats.
9. Do not move the appliance while in use.
10. Do not use on tables exceeding 30 in. (76cm) in height
LP GAS CYLINDER PLACEMENT
The instructions below apply to LP models only. LP gas
cylinders must be installed according to assembly
instructions using retainer provided. Do not store a spare
cylinder under or near this appliance. All cylinders used
must be compatible with supplied means of cylinder
retention.
2
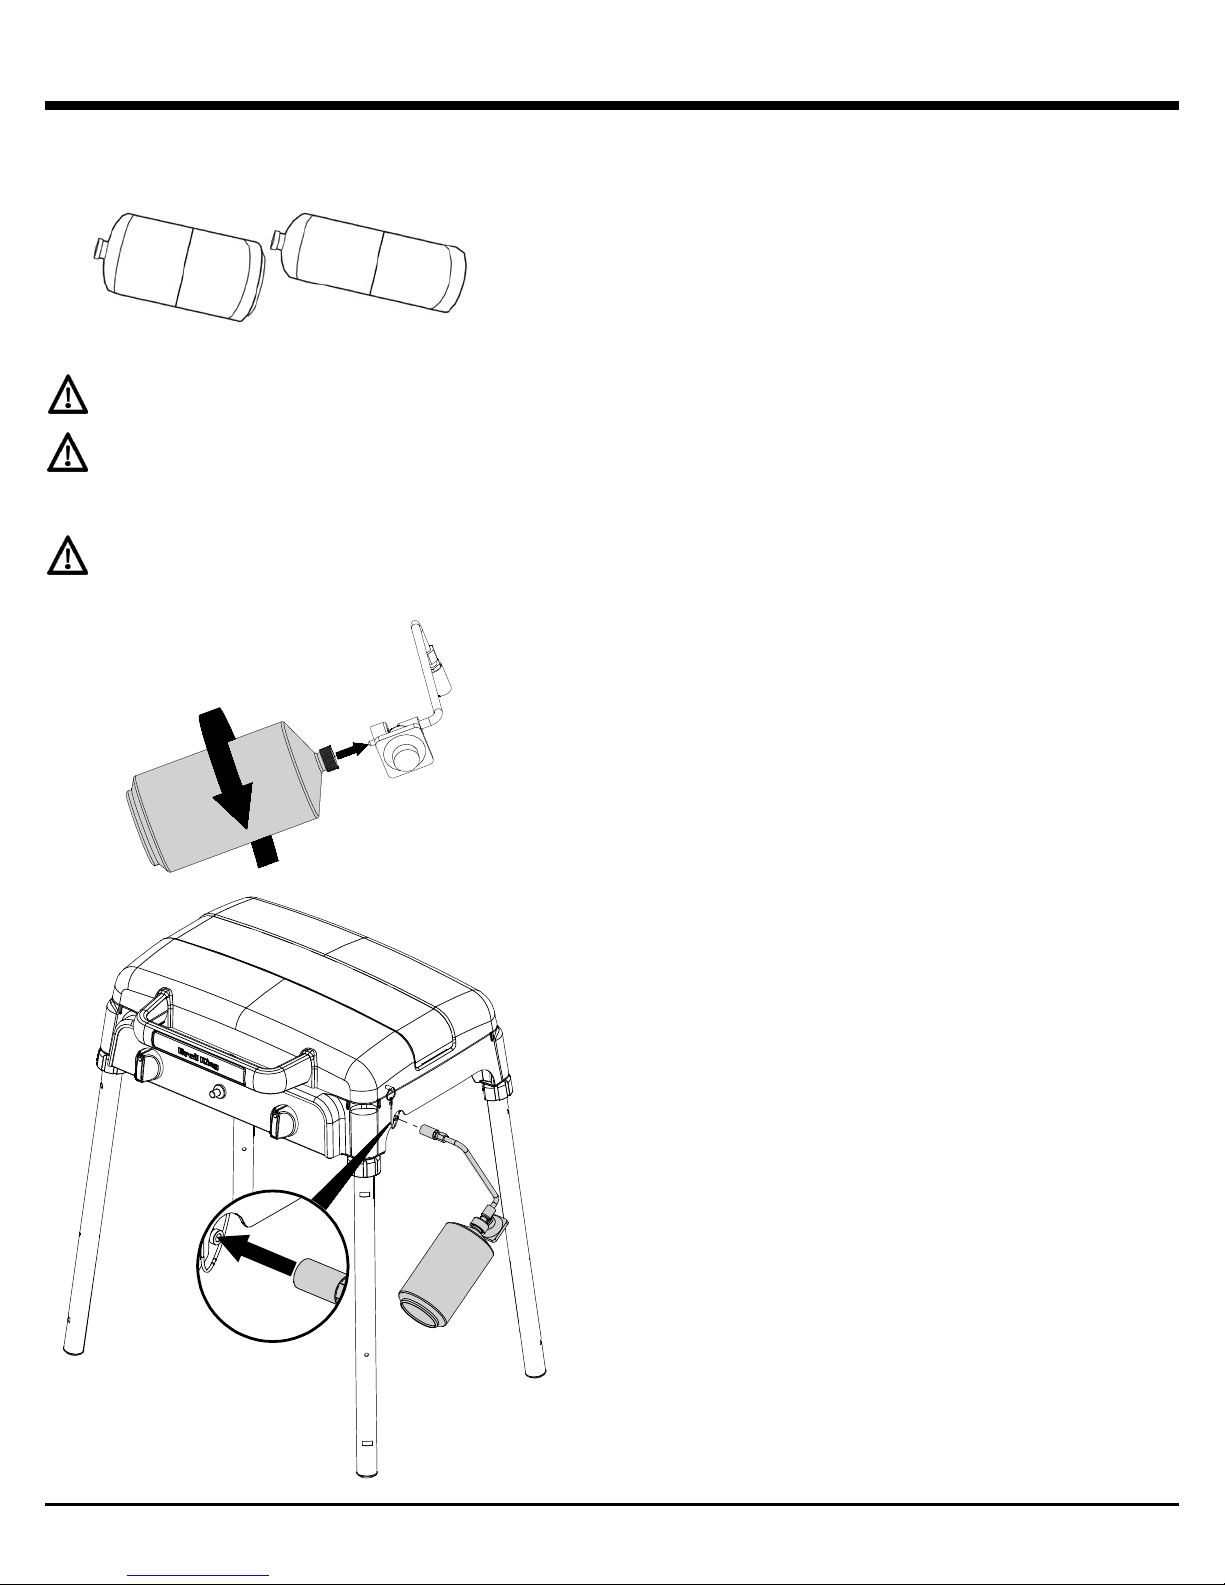
LP GAS CYLINDER – 1Lb
Use propane cylinders with a capacity of 14.1 oz or 16.4 oz.
You can find these tanks in the camping, hardware or
plumbing section of the store you are shopping at.
16.4oz (1.02 lbs.) 14.1oz (0.88 lbs.)
CAUTION: Use cylinders that are marked “propane
fuel” only.
NOTE: Your stove is equipped with a cylinder
supply system designed for vapor withdrawal.
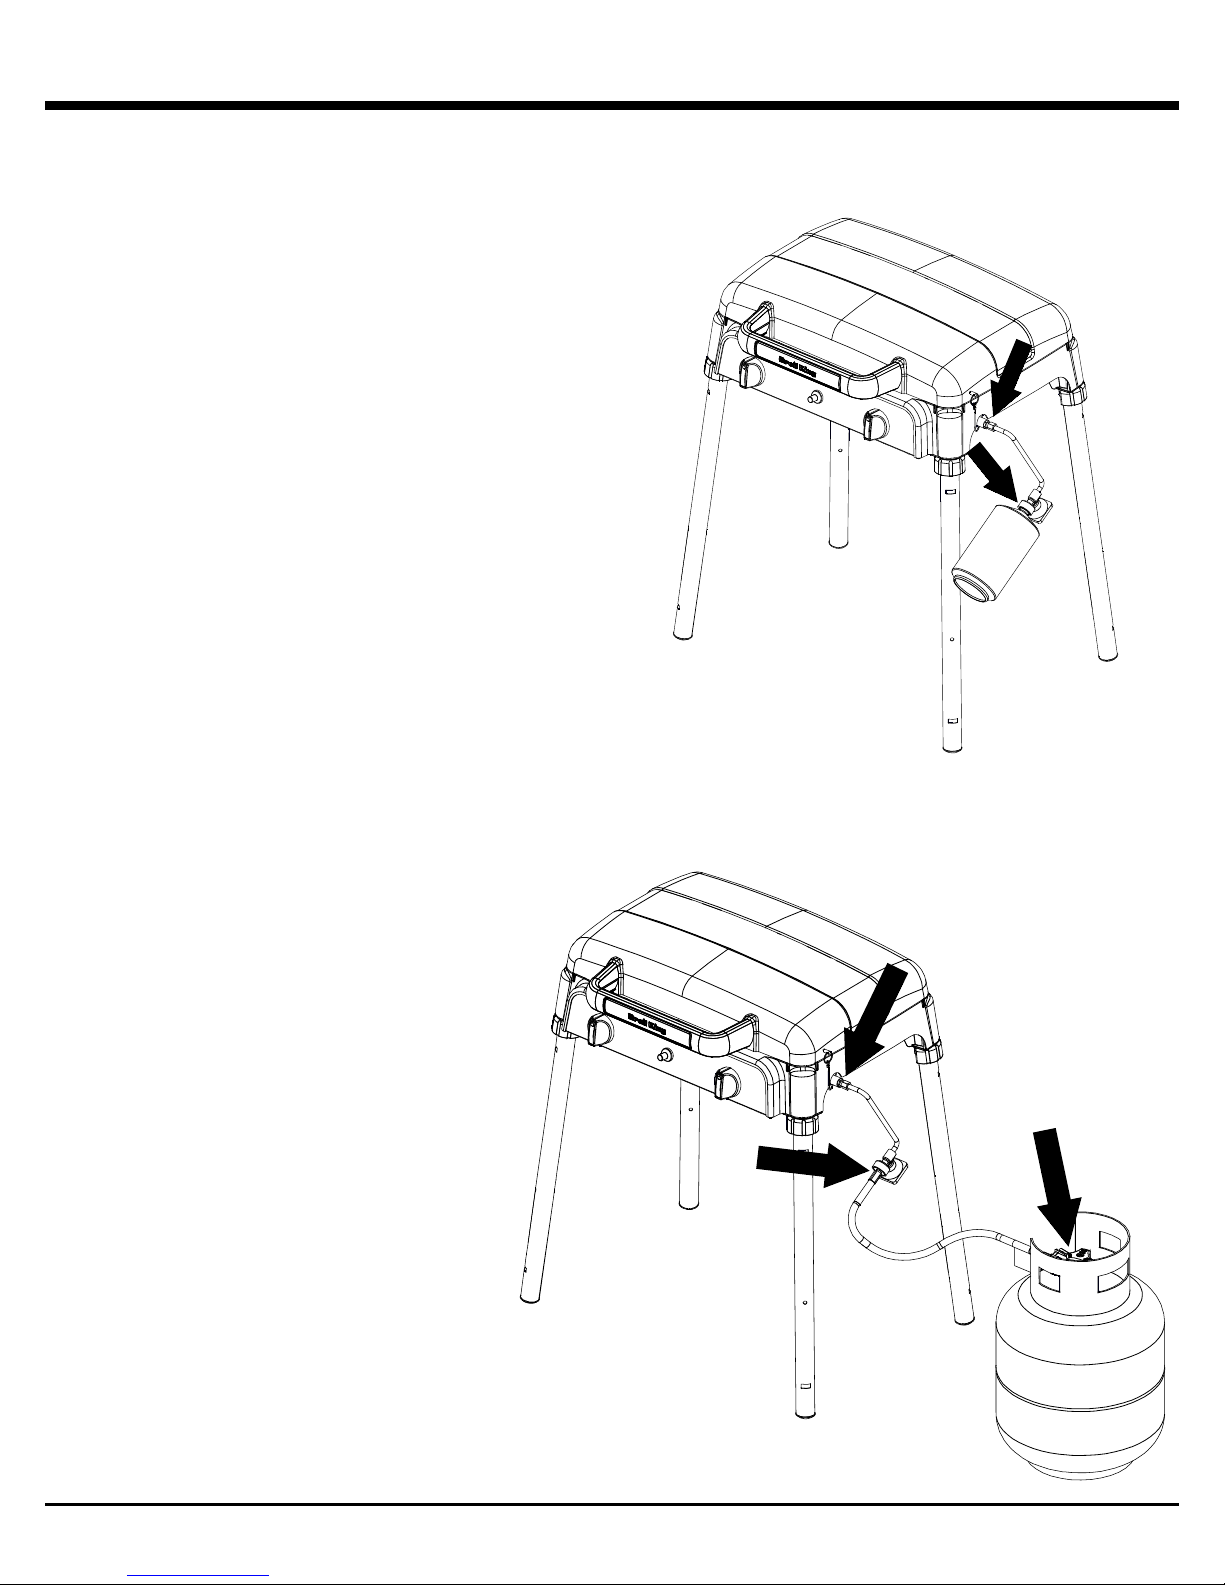
While holding the regulator with one hand, pus h propane
cylinder into regulator and turn clockwise until tight.
WARNING: Do not use a wrench to tighten the
connection. Using a wrench could damage the
regulator coupling and could cause a leak.
SPECIFICATION
1. All LP gas cylinders used with this appliance must
be constructed and marked in accordance with the
Specifications for LP Gas Cylinders of the U.S.
Department of Transportation (D.O.T.) or the National
Standard of Canada, CAN/CSA-B339, Cylinders,
Spheres and Tubes for Transportation of Dangerous
Goods ; and Commission, as applicable.
2. The LP gas cylinder used for this appliance must not have
a capacity larger than 16.4 oz. (.5 kg). Approximately 8”
(20cm) high 3.9” (10cm) diameter.
3. The cylinder must be installed as per assembly
instructions.
STORAGE
1. Store the LP gas cylinder outdoors in a well-ventilated
place.
2. Do not store the LP gas cylinder in direct sunlight, near a
source of heat or combustion.
3. If you intend to store the stove indoors, disconnect and
remove the LP gas cylinder first. Disconnected cylinders
must have a dust cap installed and must not be stored in
a building, garage or any enclosed area.
4. Keep out of the reach of children.
5. When the LP gas cylinder is connected to the gas stove,
the gas stove and LP gas cylinder must be stored outside
in a well-ventilated place.
OPERATION
1. Never connect your gas stove to an LP gas cylinder
without the regulator provided, and NEVER TO AN
UNREGULATED LP GAS SUPPLY. The regulator
supplied with the barbecue must be used.
2. Always leak test the LP gas cylinder to regulator
connection when connecting the LP gas cylinder to the
appliance. See “Leak Testing.”
3. Do not operate appliance if the smell of LP gas is
present. Extinguish all flame and determine source of LP
gas before proceeding. Do not ignite the appliance until
the LP gas leak has been found and sealed.
4. Always shut off LP gas cylinder valve when the appliance
is not in use.
3
LP GAS CYLINDER – 20Lb
QCC®-1 QUICK CLOSING COUPLING
1. All OMC models are designed to be used with an LP gas
cylinder equipped with the QCC®-1 Quick Closing
Coupling system.
2. The QCC®-1 system incorporates safety features required
by the American National Standards Institute (ANSI) and
the Canadian Standards Steering Committee.
• Gas will not flow until a positive connection has been
made.
• A thermal element will shut off the flow of gas between 240°
and 300° F.
• When activated, a Flow Limiting Device will limit the flow of
gas to 10 cubic feet / hour.
3. The LP Gas Cylinder is not included with the Gas
Stove. Be sure to purchase one with the QCC® valve.
This valve is recognized by the external threads on the
inlet port of the valve. QCC® equipped cylinders are
available from your Gas Stove Dealer.
NOTE: Any attempt to connect the regulator, by use of
adapters or any other means, to any other valve could
result in damage, fire or injury and may negate the
important safety features in the QCC®-1 system.
SPECIFICATION
1. All LP gas cylinders used with this appliance must
be constructed and marked in accordance with the
Specifications for LP Gas Cylinders of the U.S.
Department of Transportation (D.O.T.) or the National
Standard of Canada, CAN/CSA-B339, Cylinders,
Spheres and Tubes for Transportation of Dangerous
Goods ; and Commission, as applicable
2. The LP gas cylinder used for this appliance must not
have a capacity exceeding 20 lb. (9 kg).
• Approximately 18” (46cm) high and 12” (31cm)
Diameter.
3. All LP gas cylinders used with this appliance should be
inspected at every filling and re qualified by a licensed
service outlet at the expiry date (10 years), in accordance
with the DOT (USA) and Canadian Transport
Commission (Canada) codes for LP Gas Cylinders.
4. All LP gas cylinders used with this appliance must be
provided with a shutoff valve terminating in a cylinder
valve outlet No. 510, specified in the Standard for
Compressed Gas Cylinder Valve Outlet and Inlet
Connection (USA) ANSI/CGA-V-1-1977 (Canada) CSA
B96.
5. The cylinder supply system must be arranged for vapor
withdrawal.
6. The cylinder must include a collar to protect the cylinder
valve.
7. The cylinder must be installed as per assembly
instructions.
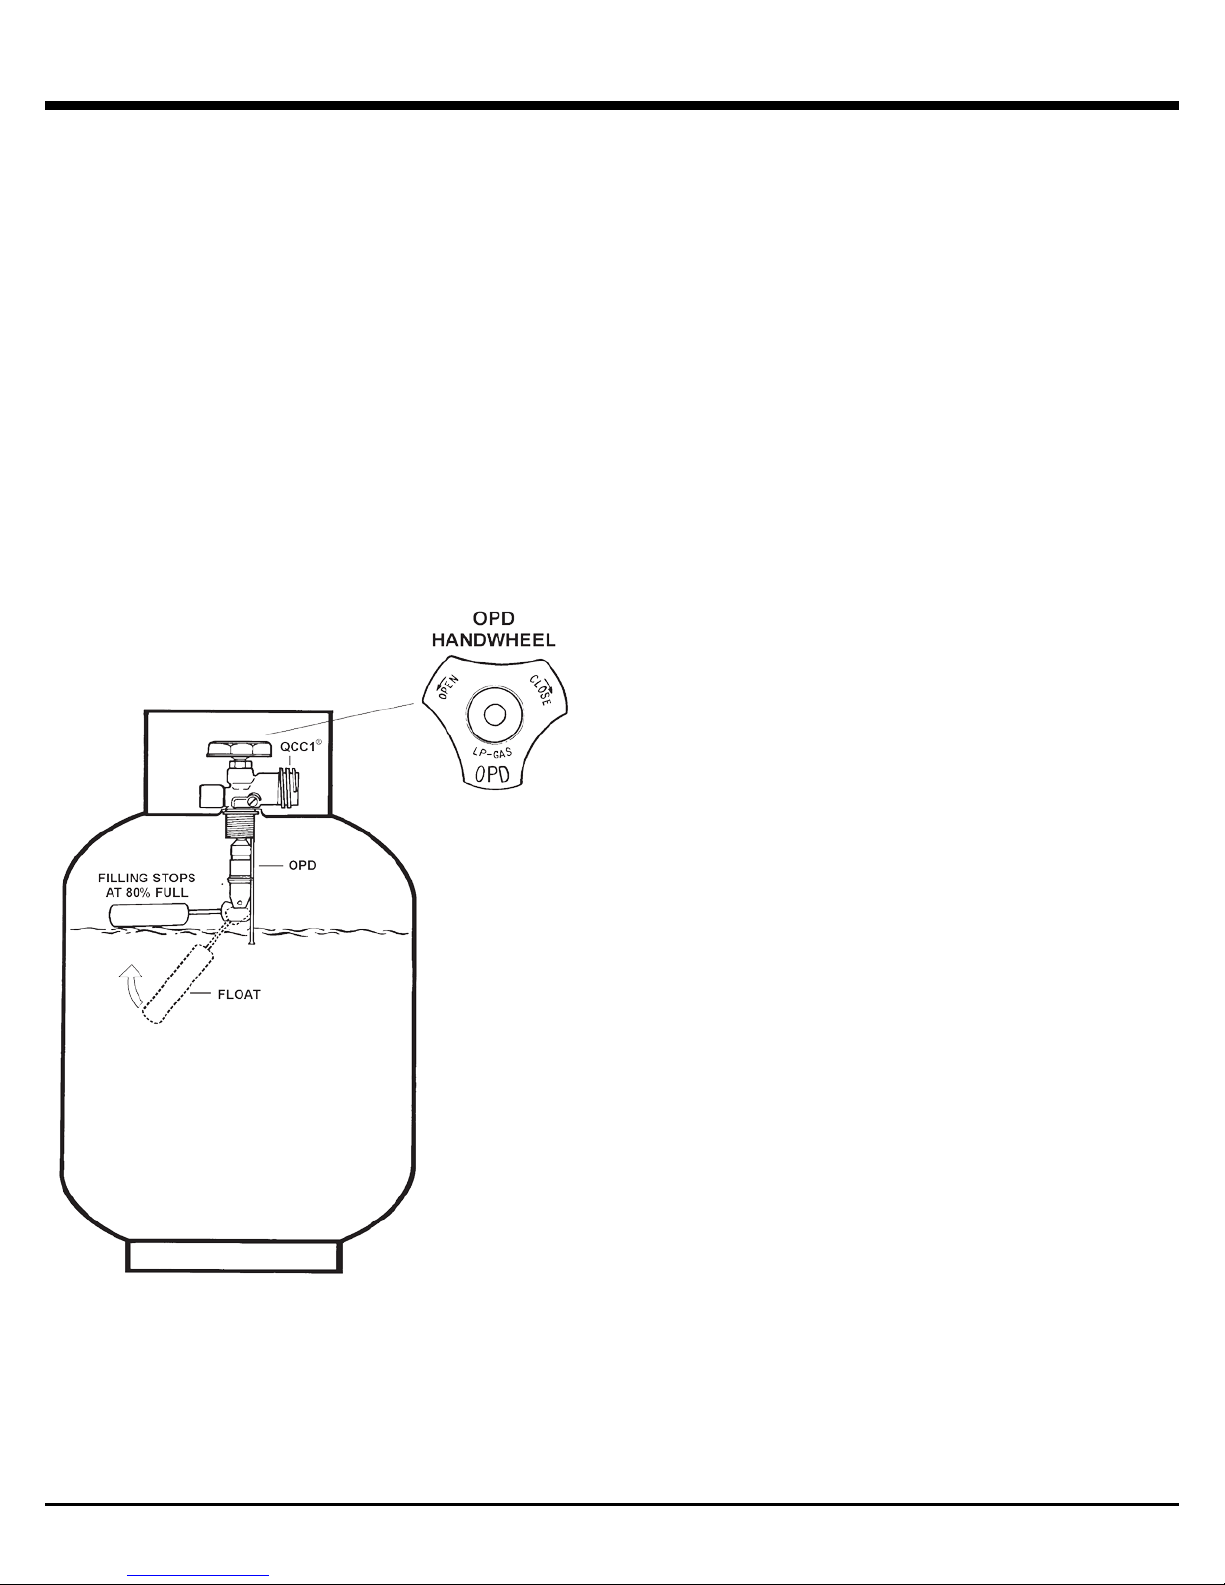
8. Never fill the cylinder beyond 80% full. A fire causing
death or serious injury may occur.
9. The cylinder valve must include a safety relief device
having direct communication with the vapor space of the
cylinder.
HANDLING
1. Government regulations prohibit shipping full LP gas
cylinders. You must take your new cylinder to a LP gas
dealer for filling
2. A filled LP gas cylinder is under ver y high pres sur e.
Always handle carefully and transport in the upright
position. Protect the valve from accidental damage.
3. Do not tip the LP gas cylinder while connecting it to the
regulator. Fasten the cylinder securely during transport,
use and storage.
4. If the cylinder is tipped after it is connected to the
regulator, shut off the gas, disconnect the regulator and
have it checked before using it again.
STORAGE
1. Store the LP gas cylinder outdoors in a well-ventilated
place.
2. Do not store the LP gas cylinder in direct sunlight, near a
source of heat or combustion.
3. If you intend to store the stove indoors, disconnect and
remove the LP gas cylinder first. Disconnected cylinders
must have a dust cap installed and must not be stored in
a building, garage or any enclosed area.
4. Keep out of the reach of children.
5. When the LP gas cylinder is connected to the gas stove,
the gas stove and LP gas cylinder must be stored outside
in a well-ventilated place.
OPERATION
1. Never connect your gas stove to an LP gas cylinder
without the regulator provided, and NEVER TO AN
UNREGULATED LP GAS SUPPLY. The regulator
supplied with the stove must be used.
2. Always leak test the LP gas cylinder to regulator
connection when connecting the LP gas cylinder to the
appliance. See “Leak Testing.” (Page 6)
3. Do not operate appliance if the smell of LP gas is
present. Extinguish all flame and determine source of LP
gas before proceeding. Do not ignite the appliance until
the LP gas leak has been found and sealed.
4. Always shut off LP gas cylinder valve when the appliance
is not in use.
4
OPD EQUIPPED CYLINDER HOSE & REGULATOR
OVERFILL PREVENTION DEVICE
1. The standard for outdoor gas appliances, ANSI Z21.58/
CAN/CGA-1.6, requires that appliances be used with
cylinders equipped with an Overf ill Preve nti on Device
(OPD).
2. The OPD is designed to reduce the potential for the
overfilling of propane cylinders, thus reducing the
possibility of relief valve discharges of raw propane. The
OPD causes a slower purge/fill operation. Some
consumers have been advised by filling stations that these
cylinders are “defective.” This is not a defect. Some
propane filling stations may not be aware of this device and
its effect on the purge/fill operation.
3. New OPDs coming onto the market have technology that
allows for much greater BTU outputs which will decrease
the amount of time it takes to purge a cylinder.
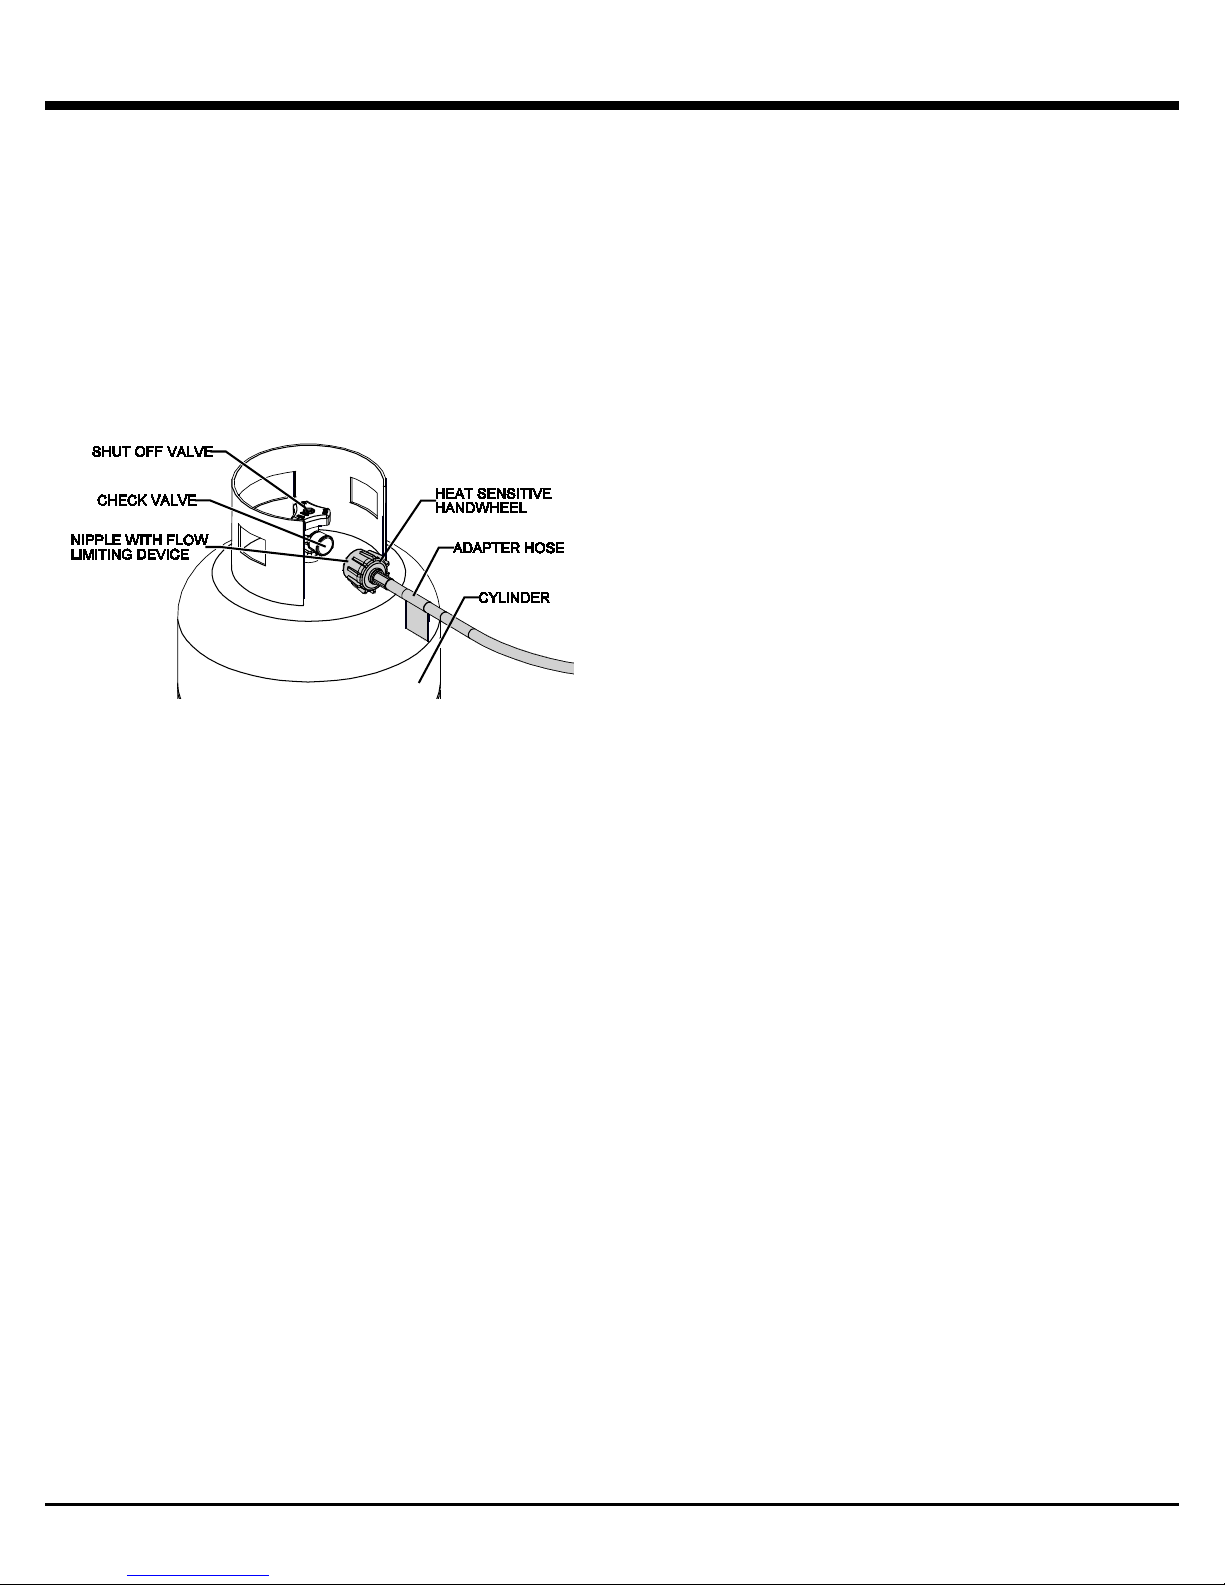
IDENTIFICATION
To identify these cylinders, the OPD hand whe el has been
standardized to the shape shown.
1. All models are equipped with a hose and regulator with a
QCC®-1 Quick Closing Coupling.
2. The QCC® coupling contains a magnetic Flow Limiting
Device which will limit the flow of gas should there be a leak
between the regulator and the appliance valve. This device
will activate if the cylinder valve is opened while the
appliance valves are open. Be sure the appliance valves
are off before the cylinde r valve is opened to prevent
accidental activation.
3. The QCC® coupling incorporates a heat sens itive hand
wheel that will cause the back check module in the QCC®
cylinder valve to close when exposed to temperatures
between 240° and 300°F. Should this occur, do not attempt
to reconnect the hand wheel. Remove hose/regulator
assembly and replace with a new one.
4. The pressure regulator is set at 11 inches WC (water
column) and is for use with LP gas only. The hose and hose
couplings comply with CGA Standard CAN 1.83. No
modifications or substitutions should be attempted.
5. Protect the hose from dripping grease and do not allow the
hose to touch any hot surface, including the base casting
of the stove.
6. Inspect the seal in the QCC® cylinder valve when replacing
the LP gas cylinder or once per year whichever is more
frequent. Replace the seal if there is any indication of cracks,
creases, or abrasion.
7. Inspect the hose before each use. If the hose is cracked, cut,
abraded or damaged in any way, the appliance must not be
operated.
8. For repair or replacement of the hose/regulator assembly,
contact customer service.
CONNECTION
1. Be sure cylinder valve and applianc e valves are “OFF.”
2. Align the small end of the hose with the regulator fitting and
turn clockwise until tight.
3. Center the nipple in the cylinder valve and hold in place.
Using other hand, turn the hand wheel clockwise until there is
a positive stop. Do not use tools. Hand tighten only. When
making the connection, hold the regulator in a parallel
with the cylinder valve, so as not to cross thread the
connection.
4. Leak test connections. See “Leak Testing.” (Page 6)
5. Refer to lighting instructions. To avoid activating the Flow
Limiting Device when lighting, open cylinder valve
slowly with the appliance valves off. If the Flow Limiting
Device is accidentally activated, turn off cylinder valve and
appliance valves, wait 10 seconds to allow the device to
reset, open cylinder valve slowly, then open the appliance
valve.
DISCONNECTION
Always close LP cylinder valve and remove coupling nut before
moving cylinder from specified operation position.
5
LEAK TESTING
All factory-made connections have been rigorously tested
for gas leaks. However, shipping and handling may have
loosened a gas fitting.
AS A SAFETY PRECAUTION:
• Test all fittings for leaks before using your gas grill.
• Test the cylinder valve for leaks each time the
cylinder is filled.
• Test for leaks every time you connect a gas fitting.
• Do not smoke at any time while testing.
• Never test for leaks with a lit match or open flame.
• Test for leaks outdoors.
TO TEST FOR LEAKS:
1. Extinguish any open flame or cigarettes in the area.
2. Be sure that cylinder valve and gas grill valves are
“OFF.”
3. Connect LP gas cylinder. See “Hose and Regulator.”
4. Prepare a soap solution of one part water, one part
liquid detergent.
5. With a full gas cylinder, open cylinder slowly.
6. Brush the soap solution on each connection.
7. A leak is identified by a flow of bubbles from the area of
the leak.
8. If a leak is detected, close the gas cylinder “shut-off”
valve, tighten the connection and retest.
9. If the leak persists, contact your gas grill dealer for
assistance. Do not attempt to operate appliance if a
leak is present.
6
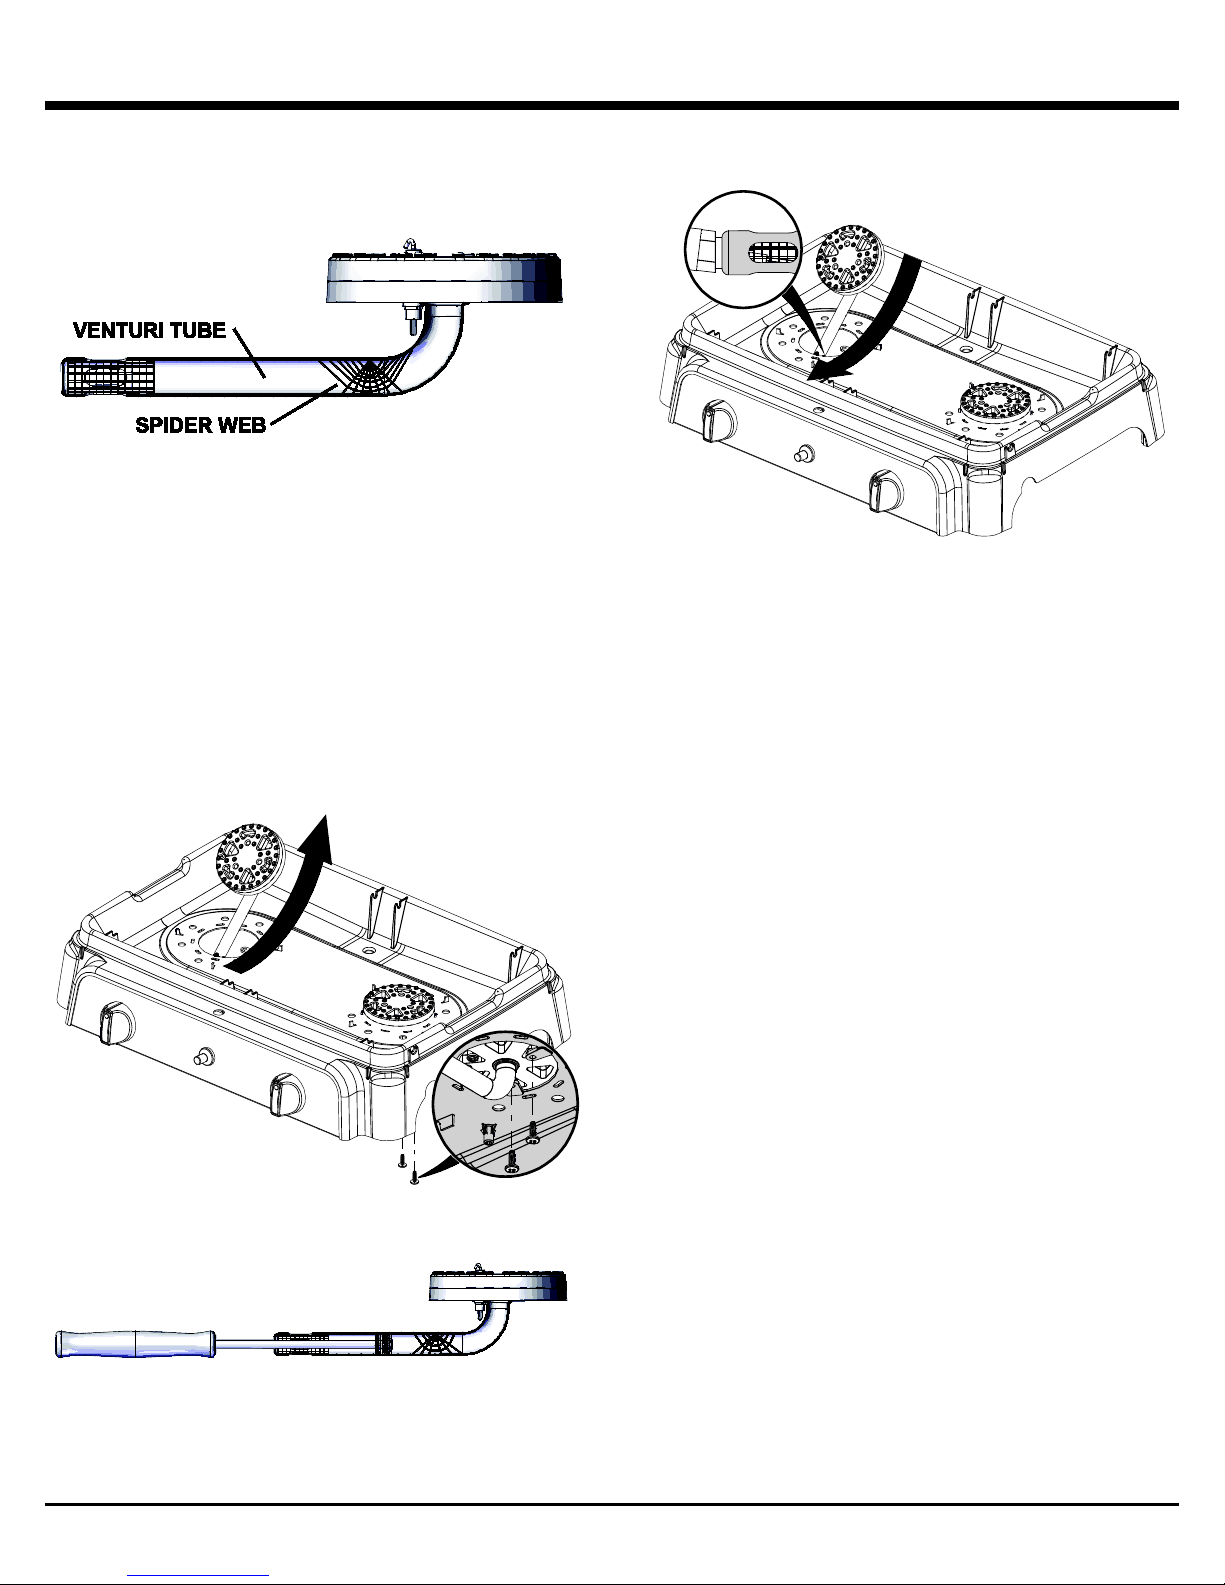
VENTURI TUBES
Always keep venturi tubes clean. Blockages in the venturi
tubes caused by spiders, insects and nests can cause a
flashback fire. In fact, although the gas stove may still
light, the backed up gas can ignite and cause a fire around
the venturi tubes at the control panel.
If a flashback fire occurs, turn off gas at the source
immediately
Inspect and clean the venturi if any of the following
symptoms occur:
1. You smell gas.
2. Your gas stove does not reach temperature.
3. Your gas stove heats unevenly.
4. The burners make popping noises.
INSPECTING & CLEANING
1. Turn off gas by closing the propane cylinder valve
2. When gas stove is cool, remove the burner fasteners.
Proceed to lift the burners from the gas stove housing.
3. Clean the venturi tubes with a pipe cleaner or venturi
cleaning tool (Accessory #77310 or #18270).
4. Lower the burner into position in the gas stove
housing, making sure that the venturi tubes are
correctly aligned and fitted on the orifices.
5. Secure burners with burner fas teners .
7
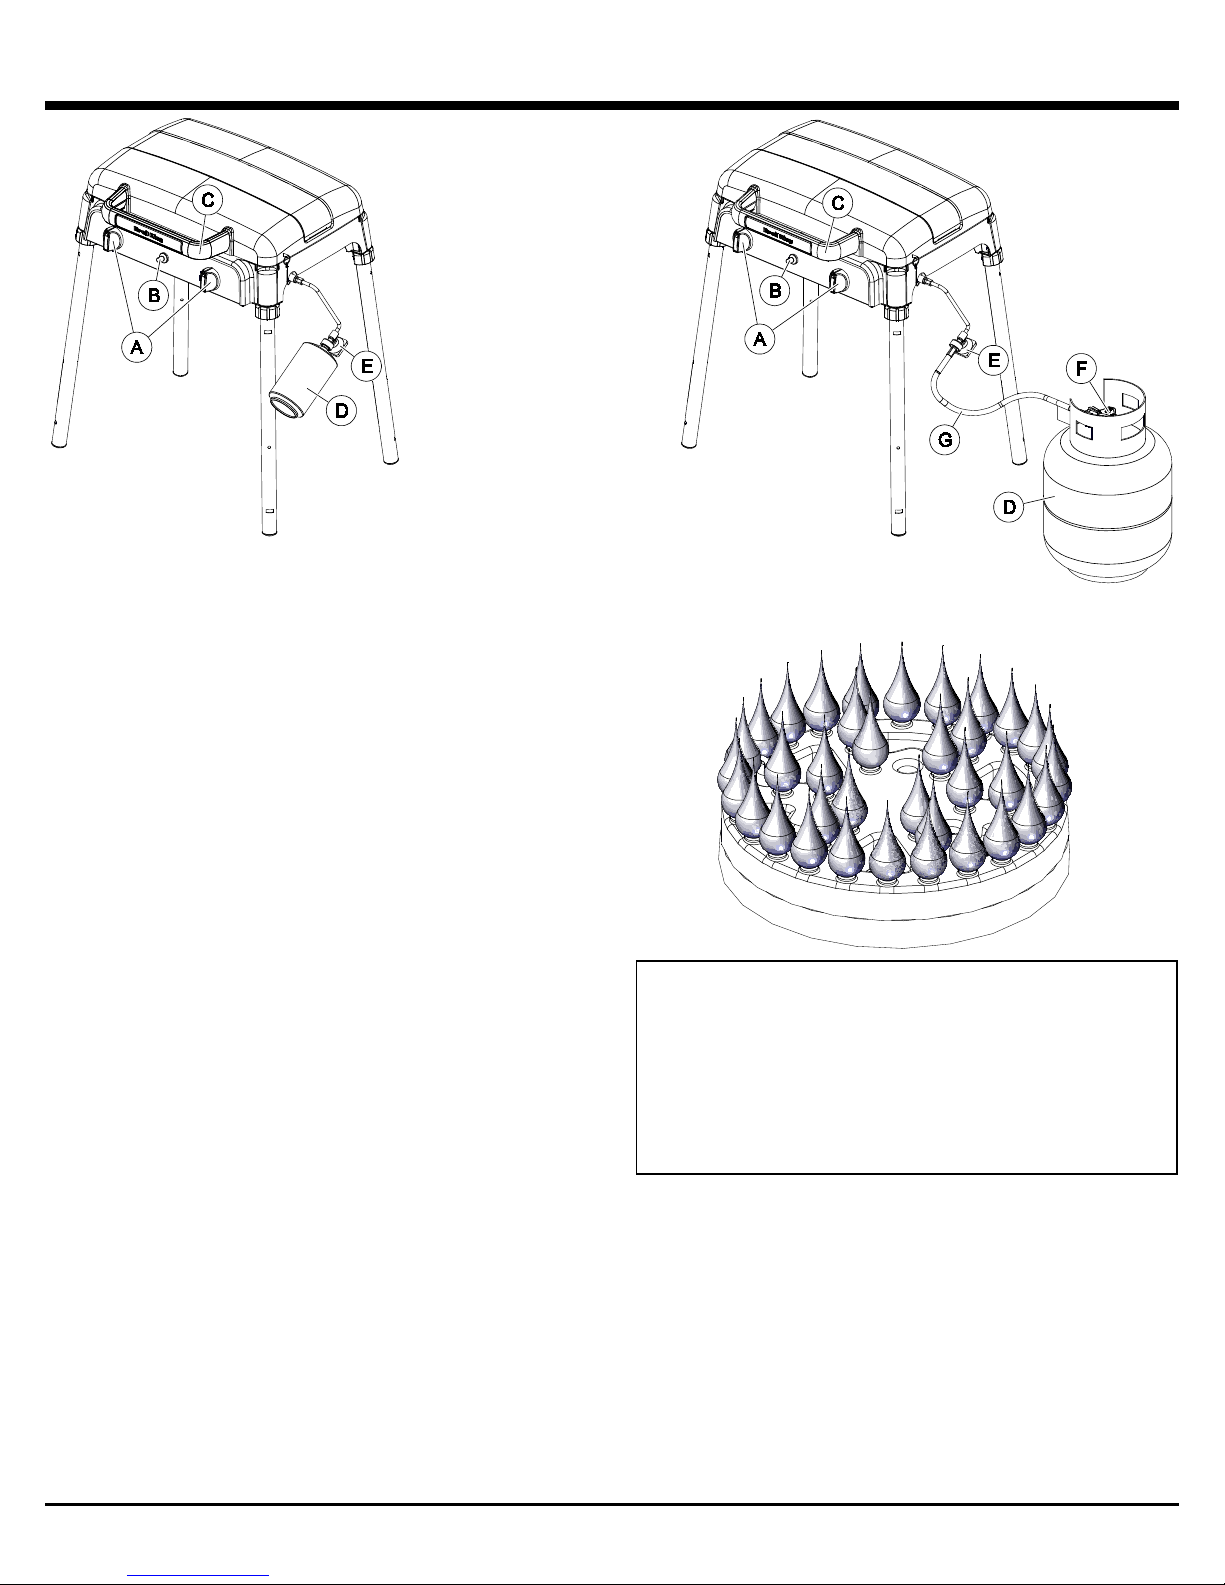
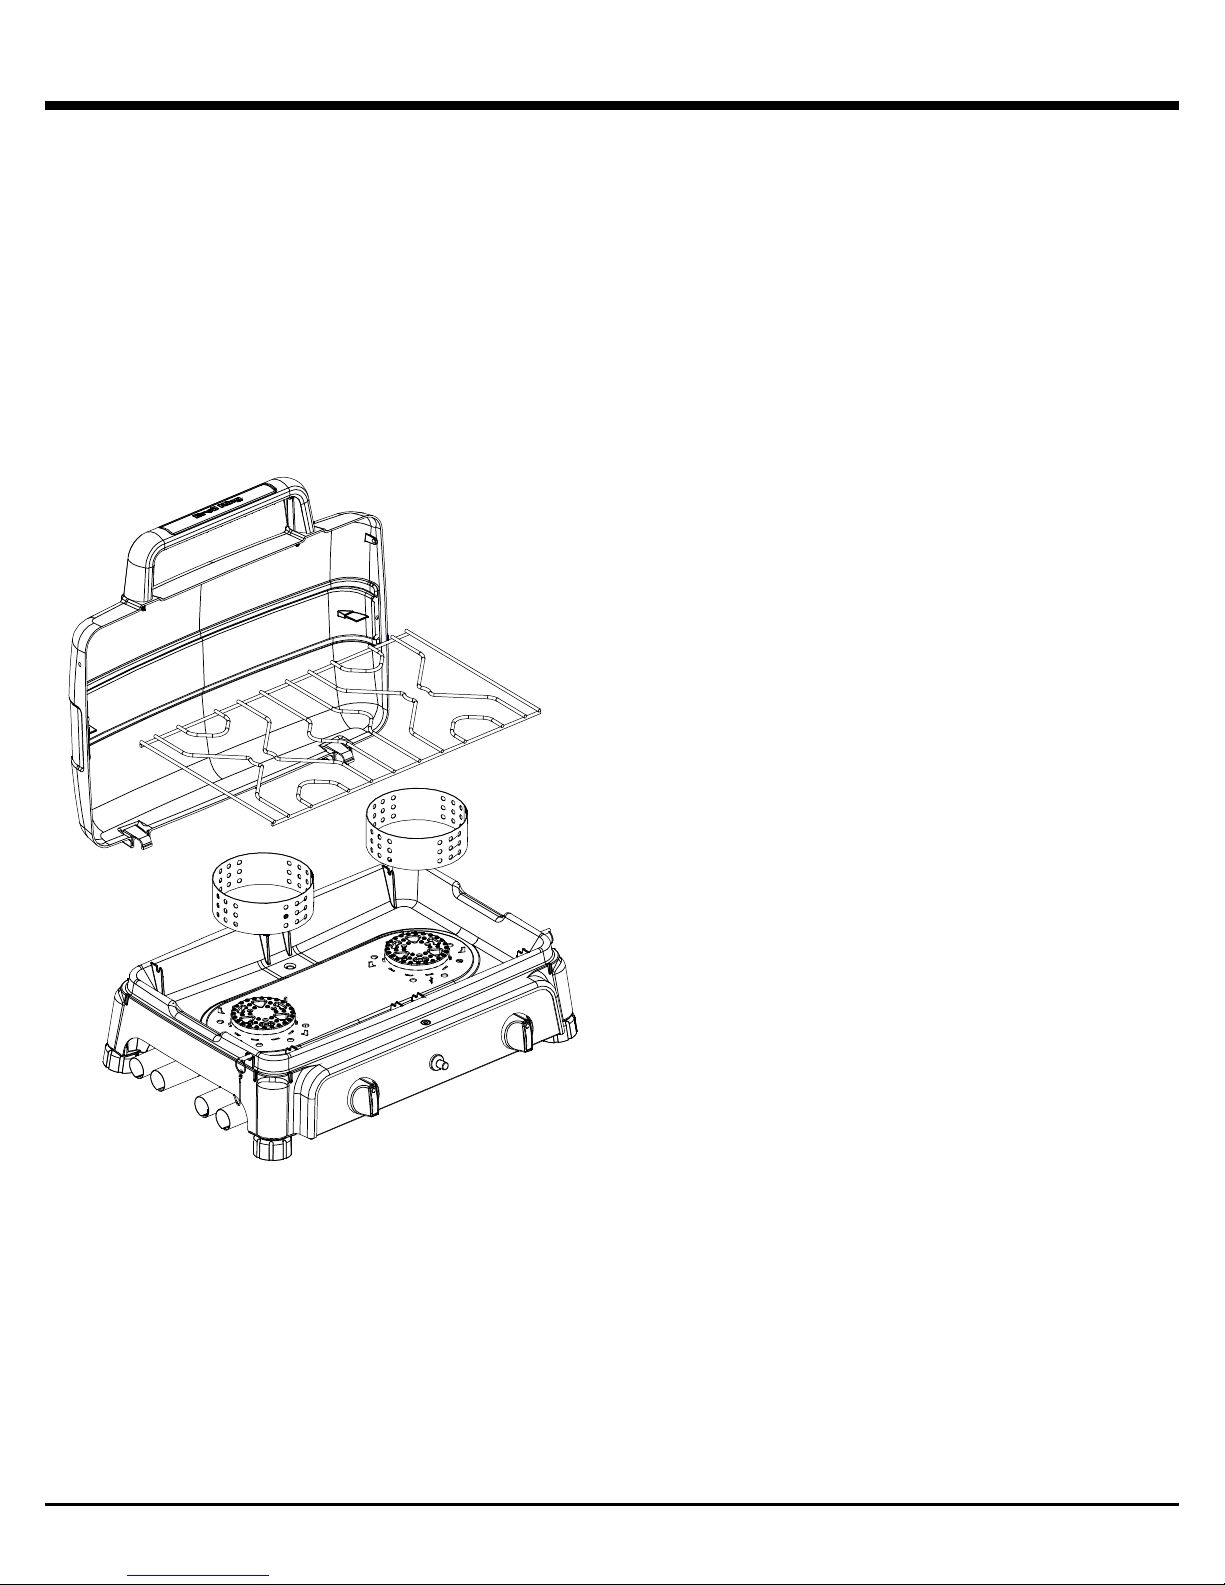
LIGHTING
A. BURNER CONTROL
B. IGNITOR
C. HANDLE
D. CYLINDER
E. REGULATOR
F. CYLINDER VALVE
G. CYLINDER ADAPTER HOSE
LIGHTING INSTRUCTIONS
1. The appliance must be assembled as per the
assembly instructions.
2. Ensure LP cylinder is full and properly connected to
the regulator.
3. Ensure there are no gas leaks in the gas supply
system. See: “Leak Testing.” (Page 6)
4. Ensure that the venturi tubes are properly located
over the gas valve orifices. See “Venturi Tubes.”
(Page 7)
5. Ensure that ignition wires are connec te d.
6. Carefully review all instructions on the information
plate attached to the gas stove.
7. WARNING: Always open lid before lighting and
do not lean over gas stove while lighting.
8. WARNING: Do not close lid when burners are lit
or hot.
9. Do not place food directly on the grid.
10. Set control knobs to “OFF” and turn on the gas supply.
LIGHTING THE BURNER:
a. Open gas stove lid and leave open.
b. Push and turn control knob to “HIGH.”
c. Push ignitor 3 or 4 times or use match to light.
d. Burner should ignite within 5 seconds; turn off gas
source immediately if ignition does not occur in this
timeframe.
CAUTION - Check your gas stove after lighting.
All burner ports should show a 2.5cm / 1” flame on “HIGH.”
If any of the following symptoms occur there is probably a
blockage in the venturi tubes. Shut off gas at once and
clean the venturi tubes. See “Venturi Tubes.” (page 7)
1. You smell gas.
2. A flashback fire occurs.
3. Your gas grill heats unevenly.
4. The burners make popping noises.
IF BURNER DOES NOT IGNITE:
1. Push and turn control knob to “OFF.” Wait 5 minutes
then try again with control knob set at “MEDIUM.”
2. If any burner will not light, see “Troubleshooting” (page
11). If problem persists, do not attempt to operate the
appliance; contact OMC, your dealer or an approved
service center.
SHUTDOWN:
1. Turn off cylinder valve.
2. Turn control knobs to “OFF.”
8
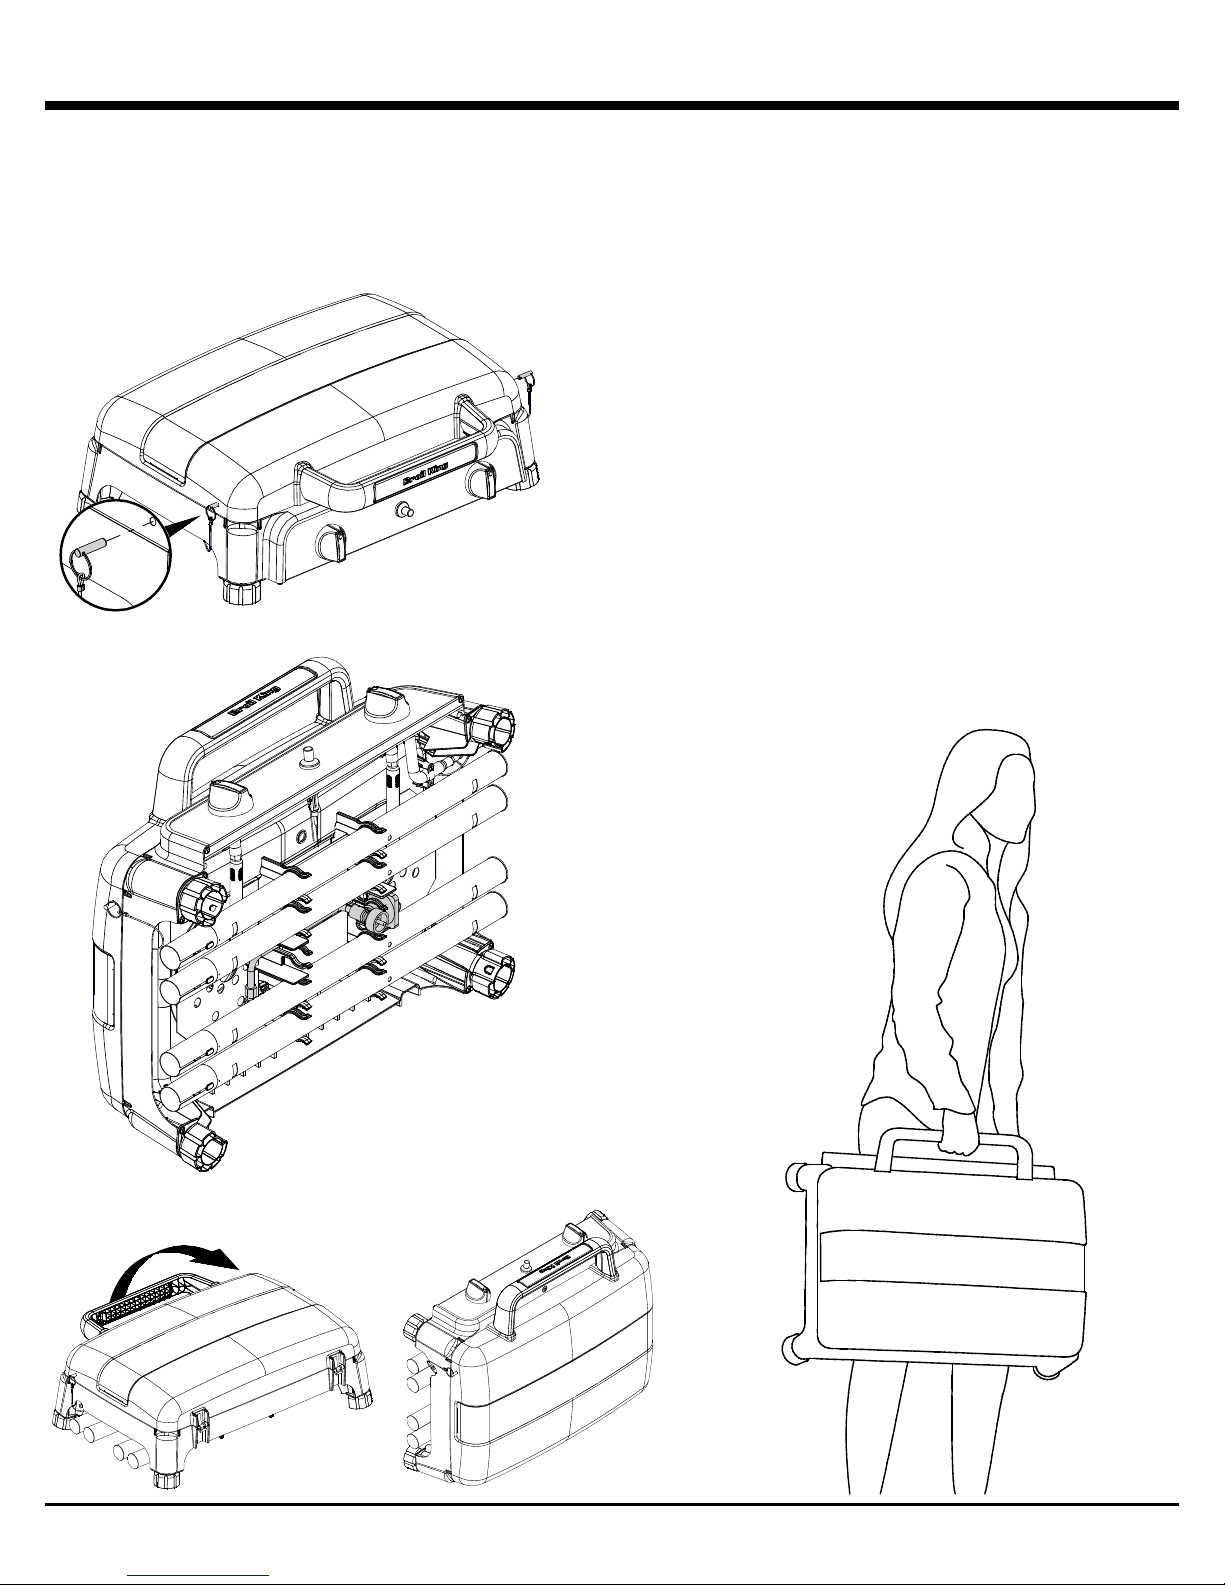
TRANSPORTING
• CAUTION HOT SURFACES
• Let the stove cool completely before cleaning,
maintenance, storage or transportation.
• Remove regulator adapter hose and propane tank
before storage or transportation.
Lock lid in closed position with locking pins.
1.
2. Ensure regulator and legs are secured into leg retainer.
3. Flip stove onto hinges to lift and carry like a suitcase.
9
MAINTENANCE
REGULAR MAINTENANCE
• CAUTION HOT SURFACES
• Let the stove cool completely before cleaning,
maintenance, storage or transportation.
TO CLEAN
1. Move stove away from flame and other ignition
sources.
2. Remove propane cylinder and regulator from stove.
3. Wipe surfaces clean with a damp soft cloth and a mild
dish detergent. DO NOT USE ABRASIVES.
4. You can disassemble some components of the stove
to assist in cleaning.
ANNUAL MAINTENANCE
The following components should be inspected and
cleaned at least once a year or after any period of storage
over 30 days to ensure optimal performance, safety and
efficiency.
BURNERS
Remove burners and inspect for cracks and deterioration.
Clean venturi tubes using a pipe cleaner or venturi brush
to eliminate any blockages. See “Venturi Tubes.” (Page 7)
While the burners are removed, clean the interior of stove
base.
HOSE
Inspect and replace if necessary.
EXTERIOR FINISH
If white oxidation spots appear, wash the outs ide of the
stove with a mild soap and water solution. Rinse the
surfaces thoroughly then wipe them with a cloth dipped in
cooking oil to restore the luster. For repair of paint
scratches and scuffs, use a good quality HIGH
temperature (600°F) spray paint for touch-up.
STAINLESS STEEL
Wash with soap and water. Use stainless steel cleaner to
polish and remove stains or marks. Weathering can cause
stainless steel to turn a tan color. This is discoloration and
is not considered a manufacturing defect.
RESIN COMPONENTS
Wash with soap and water.
REPLACEMENT PARTS
If a problem is found with the regulator, hose, burner, or
control valves, do not attempt repair. See your dealer,
approved service center, or contact the factory for repairs
or replacement parts. To ensure optimum performance,
use only original OMC replacement parts.
LEAK TEST
When reconnecting a gas cylinder on propane models, be
sure to check for leaks. See “Leak Testing.” (Page 6)
GRID
Use a light detergent and water and then rinse and dry
with paper towel; ne ver air dry grid or use a dishwasher.
10
TROUBLESHOOTING
Leak detected at cylinder,
1. Regulator fitting loose.
1. Tighten fitting and “Leak Test.” (Page 6).
Flames Beneath Control
1. Venturi blocked.
1. Remove burner and clean venturi. See “Venturi
Flickering Burner Flame or
1. Excess flow safety device has been
1. Turn LP cylinder valve off then turn all burners to
Burner Not Lighting
1. Out of LP Gas.
1. Refill LP Gas Cylinder.
Ignitor Not Working
1. Ignitor wire(s) not connected
1. Ensure main burner and side burner electrode
Decreasing Heat, “Popping
1. Out of LP Gas.
1. Refill LP Gas Cylinder.
Regulator Humming Noise
1. Cylinder valve opened too quickly.
1. Open cylinder valve slowly.
Yellow Flame
1. Some yellow flame is normal. If it is
1. Remove burner, clean venturi. See “Venturi Tubes”
If troubleshooting fails to solve any of these or any other issues, please visit www.omcbbq.com for more information including
PROBLEM POSSIBLE CAUSE CORRECTIVE ACTION
SMELL OF GAS
regulator or other connection.
Panel (Flashback Fire)
Low Temperatures on HIGH
Setting
SHUT OFF LP CYLINDER VALVE AT ONCE.
DO NOT USE THE APPLIANCE UNTIL LEAK IS SEALED.
2. Gas leak in hose/regulator or control valves.
activated in connection between cylinder and
barbecue.
2. Ignitor issue.
3. Excess flow safety device has been activated.
4. Regulator is not fully connected to the cylinder
valve.
5. A leak in the system causing the excess flow
device to activate.
6. Venturi blocked or misaligned with valve
orifice.
7. Orifice(s) blocked.
8. Hose is twisted.
2. See authorized service center.
Tubes” (Page 7).
OFF position. Disconnect the regulator from the
cylinder. Wait two minutes. Re-attach regulator to
the cylinder. Open the cylinder valve slowly. Wait
one minute. Light grill as per “Lighting” (Page 8).
2. Try manually lighting burner with a match. See
“Lighting” (Page 8). If burner lights successfully, it
is an ignitor issue. See “Ignitor not Working” below
3. Follow “Flickering Flame or Low Temperatures on
HIGH setting” solution above.
4. Tighten the regulator hand wheel.
5. Leak test connections to determine loose fitting.
Tighten fitting. Leak test system.
6. Remove burner, clean venturi and realign with
valve orifice. See page 7 for assistance.
7. Remove burner, clean orifices with a pin or fine
wire. Do not drill orifices.
8. Straighten hose. Keep away from bottom casting.
2. Electrode misaligned on burner
3. Ignitor malfunction
Sound”
2. Venturi blocked.
excessive, the venturi may be blocked.
2. Burner ports blocked.
troubleshooting videos, tricks and tips or call customer service at 1-800-265-2150
wires are all connected
2. Realign electrode and clear any surrounding
debris from area
3. See “Lighting” procedure (Page 8).
2. Remove burner, clean venturi. See “Venturi Tubes”
(Page 7) for assistance.
(page 7) for assistance.
2. Remove burner & clean with soft bristle brush
(e.g. toothbrush).
11
 Loading...