

OWNER'S MANUAL
FOR USE WITH
Broil King® Smoke™ Pellet Grill
For Model(s) 496051, 495051
CERTIFIED TO UL SUBJECT 2728
CERTIFIED TO ULC/ORD C2728
CONTENTS
INTRODUCTION ............................................... 2
SAFETY ............................................................. 2
PELLET GRILL PARTS .................................... 3
DIGITAL CONTROL.......................................... 4
GETTING STARTED ......................................... 5
PELLET GRILL APP ......................................... 6
PELLET FUEL ................................................... 7
COOKING TECHNIQUES ................................. 7
RECIPES ......................................................... 10
MAINTENANCE .............................................. 11
WARRANTY .................................................... 12
GUIDE DE L’UTILISATEUR ........................... 13
MANUAL DEL USUARIO ............................... 25
PLEASE READ THIS ENTIRE MANUAL BEFORE INSTALLATION AND USE OF THIS PELLET-
BURNING APPLIANCE. FAILURE TO FOLLOW THESE INSTRUCTIONS COULD RESULT IN
PROPERTY DAMAGE, BODILY INJURY, OR EVEN DEATH.
CONTACT LOCAL BUILDING OR FIRE OFFICIALS ABOUT RESTRICTIONS AND INSTALLATION
INSPECTION REQUIREMENTS IN YOUR AREA.
SAVE THESE INSTRUCTIONS FOR FUTURE REFERENCE.
1-800-265-2150 EN
info@omcbbq.com
40094-E50 REV H 11/19
SAFTEY INSTALLATION
2
Your new Broil King® Smoke™ Pellet Grill is a safe, convenient
appliance when assembled and used properly. As with all pellet
fuel-burning products, however, certain safeguards must be
observed. Failure to follow these safeguards may result in serious
injury or damage. If you have questions concerning assembly or
operation, consult your dealer, or our direct customer service line
at 1-800-265-2150. / info@omcbbq.com
• Please read this entire manual before installation and use of
this pellet-burning appliance. Failure to follow these
instructions could result in property damage, bodily injury, or
even death.
• Contact local building or fire officials about restrictions and
installation inspection requirements in your area.
• Save these instructions for future reference.
DANGER
• This grill and its accessible parts become HOT during use.
Take care DO NOT touch HOT surfaces without protective
gloves.
• This grill is designed for OUTDOOR USE ONLY. If used
indoors, toxic fumes will accumulate and cause serious
bodily injury or death. Follow these guidelines to prevent this
colorless, odorless gas from poisoning you, your family, or
others.
• Know the symptoms of carbon monoxide poisoning:
headache, dizziness, weakness, nausea, vomiting,
sleepiness, and confusion. Carbon monoxide reduces the
blood’s ability to carry oxygen. Low blood oxygen levels can
result in loss of consciousness and death.
• See a doctor if you or others develop cold- or flu-like
symptoms while cooking or in the vicinity of this appliance.
Carbon monoxide poisoning, which can easily be mistaken
for a cold or flu, is often detected too late.
• Alcohol consumption and drug use increase the effects of
carbon monoxide poisoning.
• Carbon monoxide is especially toxic to mother and child
during pregnancy, infants, the elderly, smokers, and people
with blood or circulatory system problems, such as anemia or
heart disease.
• Never use gasoline, gasoline-type lantern fuel, kerosene,
charcoal lighter fluid, or flammable liquids with this appliance
to start or maintain a fire.
• Never store any combustible material close or under the
appliance
• Do not leave children or pets unattended near a hot grill.
• Do not attempt to move a hot grill.
• Do not use unless grill is fully assembled and all parts are in
place.
• Do not remove ashes until all pellet fuel is completely burned
out and fully extinguished.
• Do not use grill in high winds.
• If a flare up occurs, do not use water to put out fire. Turn
OFF. Unplug power cord and wait for grill to cool.
ELECTRICAL CAUTION
1. This appliance uses an external electrical power source and
must be electrically grounded in accordance with local codes.
In the absence of local codes, the following standards apply:
(U.S.A) ANSI/NFPA No. 70-Latest Edition and (Canada) CSA
C22.1 Canadian Electrical Code.
2. Do not operate unit if the plug receptacle is damaged.
3. Do not cut or remove the grounding prong from the plug.
4. Keep the electrical supply cord away from any heated
surfaces.
PROPOSITION 65 WARNING
Combustion (burning) of this product, produces carbon monoxide
and other substances known by the State of California to cause
cancer and birth defects or other reproductive harm. For more
information go to www.P65warnings.ca.gov/product
A MAJOR CAUSE OF FIRES IS
FAILURE TO MAINTAIN
REQUIRED CLEARANCES (AIR
SPACES) TO COMBUSTIBLE
MATERIALS. IT IS OF UTMOST
IMPORTANCE THAT THIS
PRODUCT BE INSTALLED ONLY
IN ACCORDANCE WITH THESE
INSTRUCTIONS.
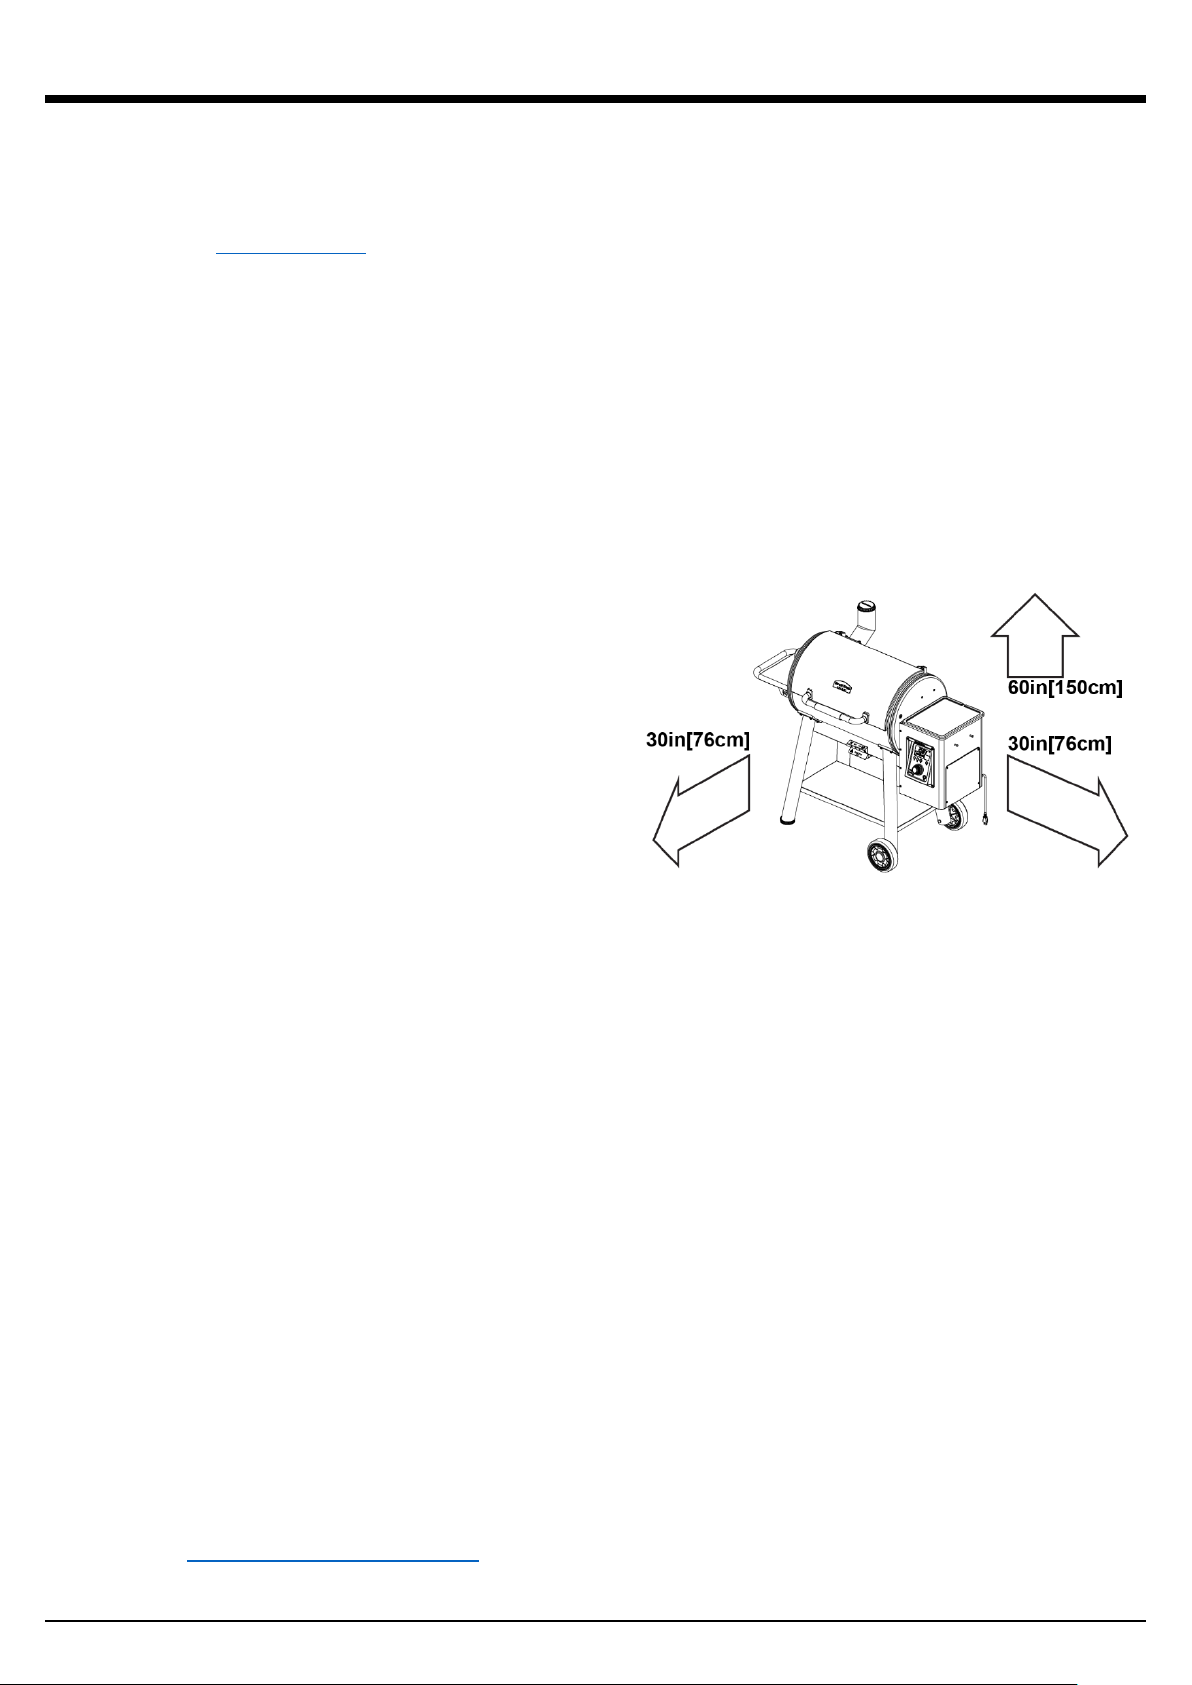
1. The appliance must be installed away from combustible
surfaces by at least 76cm / 30inch from each side, and 76cm
/ 30inch from the rear. There must be 153cm / 60inch of
space between the top of the appliance and any over head
construction.
2. Never install the appliance underneath plants, trees or
foliage.
3. WARNING: Always install the appliance on a noncombustible surface.
4. WARNING: Always install the appliance on a level surface
and keep the appliance level.
5. This appliance is for OUTDOOR USE ONLY, do not operate
in garage, shed, balcony or other such enclosed areas.
6. DO NOT restrict the flow of air to the appliance.
7. Keep the area surrounding the appliance free of combustible
materials,pellets, gasoline, and all flammable liquids and
vapors.
8. This appliance is not intended to be installed in, or on,
recreational vehicles and/or boats.
9. Do not use or install accessories that change or modify
the pellet hopper, auger, burn pot or exhaust systems.
WARNING
• Preheat grill with lid open for first 10 minutes or until white
smoke turns clear.
• Never touch the pellet tray, ash clean out or cooking grate to
see if they are hot.
• Use barbecue mitts or hot pads to protect hands while
cooking or adjusting top damper.
• Use proper barbecuing tools with long, heat-resistant
handles.
• Only use food grade wood pellets. Broil King® Premium
Grilling Pellets are recommended
• Always store wood pellets in a dry location, away from heat-
producing appliances and other fuel containers.
• To extinguish the pellets, turn off the pellet digital control and
close the damper completely. Do not use water.
BROIL KING® SMOKE™ PELLET GRILL PARTS
1. Lid
2. Cook Box
3. Chimney
4. Roto-draft™ Exhaust Damper
5. Side Shelf
6. Leg
7. Warming Rack
8. Cooking Grids
9. Lower Shelf
10. Control Panel
11. Ash Tray
12. Grease Tray Aluminum Liner
13. Grease Tray
14. Agitator
15. Burn Pot
16. Auger
17. Grate
18. Auger Fan
19. Auger Motor
20. Hopper Lid
21. Hopper
22. Hopper Cleanout
23. Power Cord
24. Wheel
25. Access Door
26. Heat Reflector Front / Back
27. Grease Management Channel - Side
28. Grease Management Channel - Main
29. Heat Deflector
30. Heat Shield
31. Thermometer Pass Through
32. Rotisserie Motor
33. Rotisserie Rod
34. Broil King
35. Temperature Probe
®
Grid Lifter
3
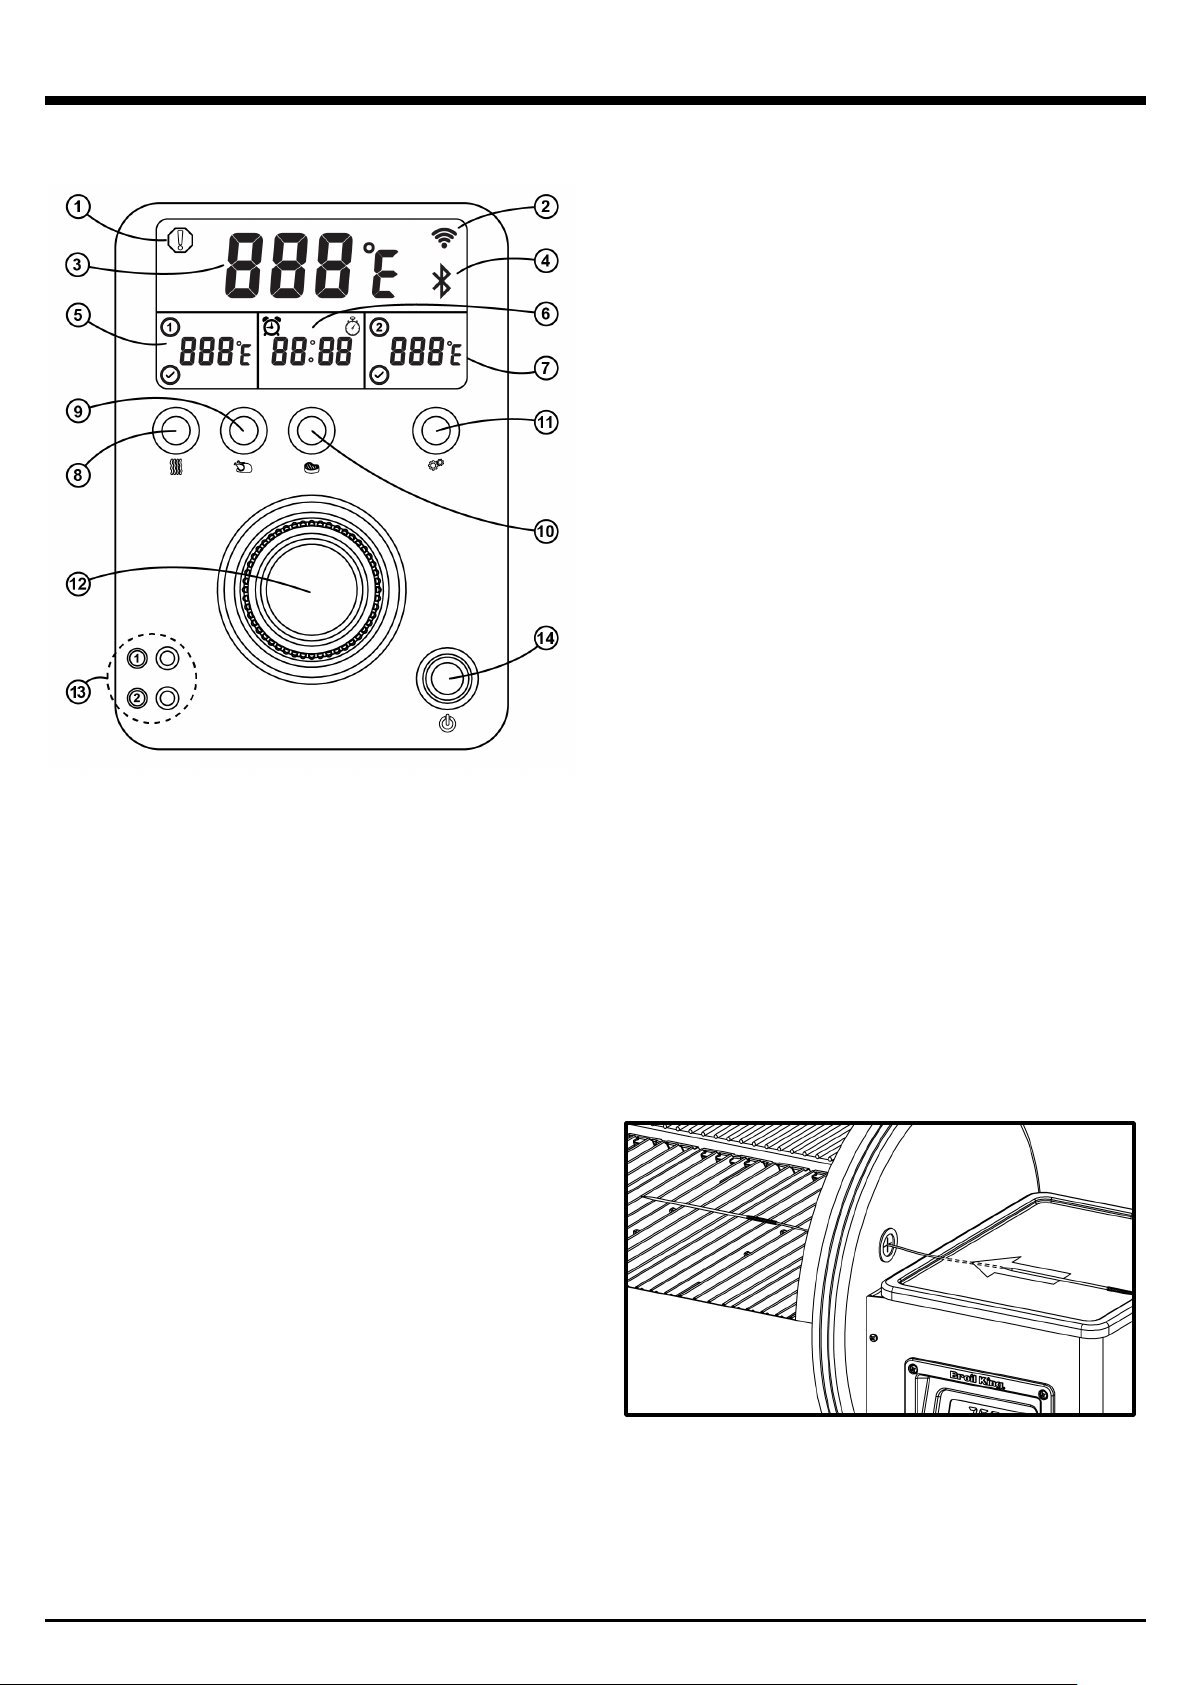
DIGITAL CONTROL
Before using the grill, it is a good idea to familiarize yourself with
the control system.
1. WARNING ICON
Indicates an extreme temperature variance which could
indicate a fire, flame failure due to low fuel, auger disruption
or mechanical failure (open circuit, motor or fan failure).
WHEN ILLUMINATED GO DIRECTLY TO THE APPLIANCE
AND UNPLUG FROM POWER SOURCE IF NECESSARY.
2. WIFI CONNECTED
Illuminated when pellet grill is connected to a WiFi network
(2.4ghz only).
3. MAIN TEMPERATURE
Displays current and set temperature in °F / °C
4. BLUETOOTH CONNECTED
Illuminated when pellet grill is connected to smart device.
ST
5. 1
MEAT PROBE TEMPERATURE*
6. TIMER / STOP WATCH
ND
7. 2
MEAT PROBE TEMPERATURE*
8. SMOKE BUTTON
For low and slow cooking this program will set the
temperature to 225°F / 107°C**
9. ROAST BUTTON
For roasting and baking this program will set the
temperature to 350°F / 176°C**
10. GRILL BUTTON
For direct grilling this program will set the
temperature to 600°F / 315°C**
11. SETTING BUTTON
Push SETTING button according to the number indicated
below to set the following features.
Meat Temperature Probe(s)
- Press SETTING button one time (1) for probe 1, two times (2)
for probe 2.
- Once probe is connected the temperature will appear on
screen.
- To set internal temperature doneness use control dial to set
temperature then push dial once to set.
- Appliance will beep and check mark icon will appear on
screen when internal set temperature is reached.
*Note: When internal set temperature is reached, pellet grill
temperature will reduce and hold a 225°F(107°C)
Timer
- Press SETTING button three times (3).
- Use control dial to set timer then push dial once to set.
Stop Watch
- Press SETTING button four times (4).
- Push control dial once to start.
- Turn control dial “clockwise” to stop.
- Turn control dial “counter-clockwise” to reset.
Display Brightness
- Press SETTING button five times (5).
- Use control dial to set display brightness, then push dial once
to set.
Change Temperature Units °F / °C
- Press and hold SETTING Button for 5 seconds to set pellet
grill to Fahrenheit or Celsius.
12. CONTROL DIAL
Adjust temperature in 10 degree increments using control
dial by rotating knob clockwise/ counterclockwise. Push
control dial once to set.
Adjust temperature in 1 degree increments using the control
dial by pushing knob down while rotating
clockwise/counterclockwise. Push control dial once to set.
Note: Display will return to current temperature in °F/°C.
13. THERMOMETER PORTS 1 AND 2
14. POWER BUTTON
*Note: Illuminated check mark indicates target internal
temperature achieved.
**Note: Expect temperature variance to occur when reaching
and holding desired setting.
Thermometer probe passing through the side of the smoker
4
GETTING STARTED
Remove the cooking grids and grease tray: wash thoroughly in
warm, soapy water. Rinse completely and dry with a soft towel,
do not air dry, and do not put in dishwasher.
SEASONING CAST IRON COOKING GRIDS:
Coat your cast iron cooking grids with high smoke point cooking
oil. Use a paper towel or cloth to coat cover all surfaces.
PRIMING THE GREASE SYSTEM
The grease tray on your Broil King® Smoke™ Pellet Grill helps to
redirect the cold smoke up towards the heat shield and chimney.
To prime the grease tray, add a ½cup [125ml] of water to the
empty grease trap. Note: As you use your grill the water will be
replaced by grease.
INITIAL ‘BURN-IN’
Before you start to cook on your Broil King® Smoke™ Pellet Grill
you must burn off the protective residues from manufacturing.
1. Plug the power cord into an appropriate grounded electrical
outlet.
2. Inspect pellet hopper and auger prior to adding pellets to
ensure there are no foreign objects that could hinder startup.
Ensure the agitator is in the closed position.
3. Add pellets using Broil King
best results. Never use heating fuel pellets.
4. Set the Roto-Draft™ exhaust damper to position 5 (wide
open) to let the maximum amount of air in to fuel the fire.
5. Open the lid during preheat for 10 min or until white smoke
turns clear.
6. Power on the grill to activate the controller. After a few
seconds, the grill will go into startup mode.
7. Set temperature to 500°F (260°C). Note: on initial burn in
the grill will take longer to heat up as the auger will need to
be primed with fuel prior to ignition. When target
temperature is reached – burn for an additional 15-20
minutes. This will burn off any of the protective coating from
manufacturing and begin the process of smoke curing the
internal components of the grill. The more you use your
pellet grill, the better the seasoning will be.
8. When the grill is cool, thoroughly season cooking grids by
spraying or wiping a high smoke point cooking oil on them.
Ensure that the entire surface is generously coated including
the corners. For cast iron cooking grids, light seasoning
should be done before every use.
9. When cooking is complete, use the trap door located on the
back of the pellet hopper to remove any excess fuel and
store fuel in a warm dry place so it is ready for your next
cookout.
10. Clean the grease tray frequently to reduce the possibility of
a grease fire. Please see “Maintenance” for more details.
11. Clean the burn pot using the agitator and remove the ashes
from the ash tray frequently to ensure best performance.
When you are finished cleaning out the burn pot you must
ensure the agitator is in the closed position.
®
brand hardwood pellets for
LIGHTING / START-UP
Open the lid of the smoker and ensure the chimney damper is in
the open position.
Press the illuminated power button on the grill to activate the
controller. After a few seconds, the grill will automatically go into
ignition and preheat cycle.
Preheat to desired cooking temperature by using the control dial.
Set the desired temperature by pushing in the dial. You will hear a
beep and the set temperature will flash for three seconds then
return to the actual temperature. If you prefer to use a preset
temperature, press the SMOKE, ROAST or GRILL button. The lid
must be open during the preheat for the first 10 minutes or until
white smoke turns clear. You can use the Broil King
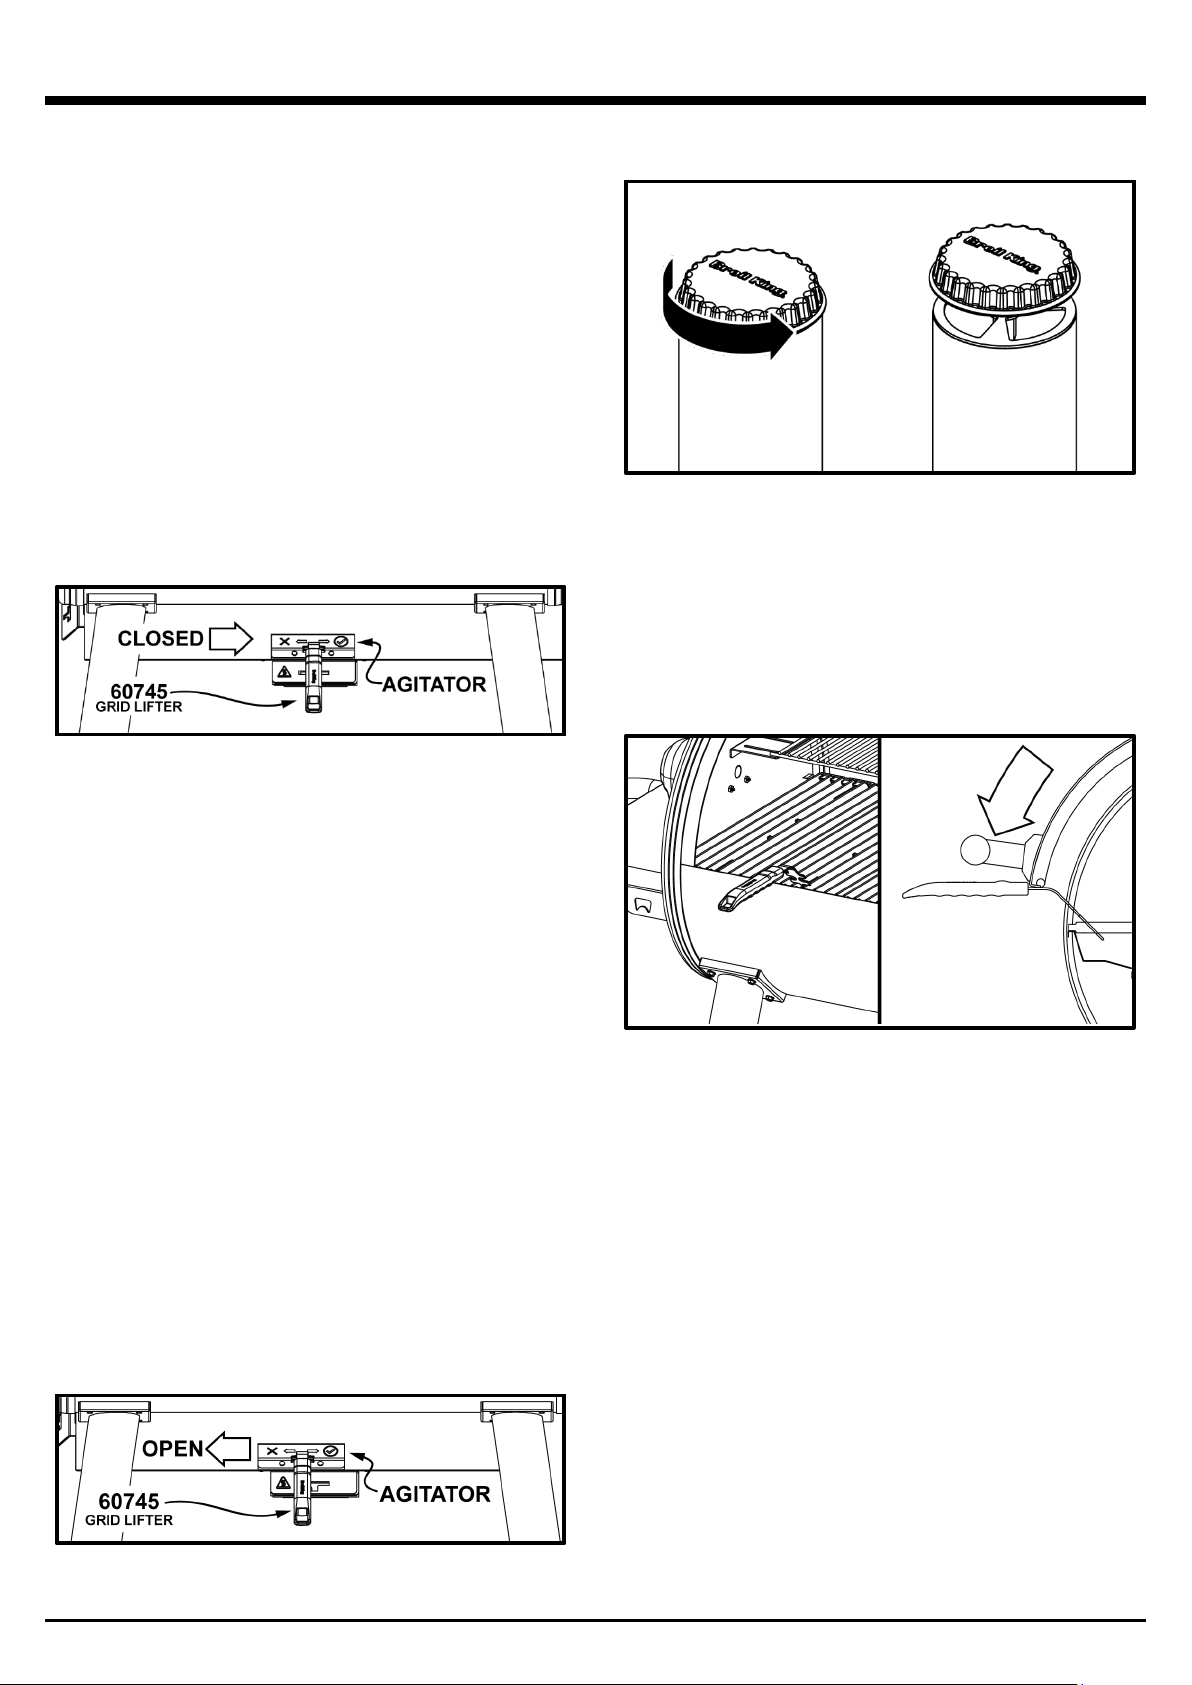
(60745) to hold the lid open at a lower position in case of windy or
rainy conditions.
®
COOKING
Once preheat cycle is complete and the desired temperature is
reached, load food into the grill and close the lid.
While cooking you may add pellets directly into the pellet hopper
as needed.
SHUT-DOWN
Press the illuminated power button on the grill to deactivate the
controller. After a few seconds, the grill will automatically go into
shutdown cycle (15 minutes). Once grill is completely cool, unplug
and remove ash from burn pot using the agitator. Clean the
grease tray. Empty pellet hopper using hopper cleanout. For best
cooking results store pellets in a cool dry place between
cookouts.
grid lifter
12. Note: your grill will always start with an ignition and preheat
cycle and end with a 15-minute shut-down.
5

PELLET APP
Your Broil King® Smoke™ Pellet Grill can be controlled from
your smart device. Connect your smart device to the Pellet Grill
with either Bluetooth or home WIFI network.
SETTING UP THE APP
TURN ON PELLET GRILL
• Plug the power cord into an appropriate grounded electrical
outlet.
• Press the illuminated power button on the grill to activate
the controller.
DOWNLOAD AND INSTALL
• On smart device, download the Broil King Pellet Controller
APP.
SETUP AND ACCOUNT
• When you launch the app for the first time you will be asked
to create an account
• The account provides security for your app and Broil King®
Smoke™ Pellet Grill.
• You can also register using your Facebook or Google+
account.
• You will receive an email once your registration process is
complete.
ADD ZONE
• After creating an account, your next step is to create a
zone. A zone is an area where your grill is located based
on your device GPS. Check the address shown on the
screen for accuracy. Edit if necessary.
• For example, if you have a grill located at your house, you
could name your zone “Home”.
• Enter your zone name and then select “Save Zone”.
PRIVACY POLICY
• Please read Privacy Policy and select Agree or Disagree.
• To continue using the app you will need to agree to the
privacy policy.
• If you select Disagree, you will be re-directed back to the
Zone screen.
CONNECTING TO THE GRILL BLUETOOTH
• Once app is set up, it is time to connect to your grill.
• Ensure your smart device Bluetooth feature is turned on.
• Select the zone by touching the zone name.
• After selecting the zone tap the (+) icon in the top right
corner to add the grill.
• The app will then scan for your grill.
• Each Broil King® Smoke™ Pellet Grill will have a unique
controller code only shown when connecting the grill in the
app.
• Enter a name for your grill.
• Enter the serial number.
• Enter the name of the company where you purchased your
grill (optional).
• Tap (Connect).
• The grill should beep and display the Bluetooth logo on the
grill’s controller screen.
CONNECTING TO THE GRILL WIFI
• Have your WiFi router name and password ready.
• Tap the WiFi settings wheel at the bottom right hand corner
in the app.
• Enter your WiFi name.
• Enter your WiFi password.
• You can select “Show” to see if the password is correct.
• Tap “Connect” to establish the Wifi connection.
• Once you are connected the Wifi icon will apper on the
grill’s controller screen.
Notes:
• Only a single user can be connected to the Broil King®
Smoke™ Pellet Grill at one time.
• If your smart device moves out of the grill’s Bluetooth
range, the grill will continue to operate without the app
connected. The connection will only switch into WiFi mode
if the grill has previously been connected to a WiFi network.
• Manually adjusting the grill will always override app
command functions.
*Software Requirements: IOS® 7 (or above) or Android™ 4.3
(or above)
6
PELLET FUEL COOKING TECHNIQUES
MEAT TEMPERATURE GUIDE
RARE
MED
WELL
BEEF / LAMB / VEAL
130°F(55°C)
146°F(63°C)
160°F(70°C)
PORK
150°F(65°C)
170°F(77°C)
POULTRY
170°F(77°C)
HAMBURGER
160°F(70°C)
FOR BEST RESULTS, USE A MEAT THERMOMETER
Smoking: Less than 275°F (135°C)
This classic form of barbecue involves cooking larger cuts of
meat at low temperatures (less than 275°F 135°C) for a
relatively long time (often 4+ hours). Broil King® premium
grilling pellets will infuse slow cooked meats and other items
with smoky barbecue flavor and yields incredibly tender
results.
Roasting: 350°F to 400°F (176°C to 205°C)
Broil King Premium Grilling Pellets
The perfect barbecue starts with the right kind of fuel.
Broil King
to work with the Broil King Smoke Series Pellet Grills. Our
pellets are 100% natural and contain only premium wood – no
fillers, no oil additives, no binding agents – period. These
pellets burn hotter and more efficiently to provide optimal
cooking performance and flavour.
®
Premium Grilling Pellets are specifically designed
CAUTION
Always store wood pellets in a dry location, away from heatproducing appliances and other fuel containers.
63920 - 100% Hickory Pellets
The most iconic BBQ flavour.
Hickory offers a strong smoke taste, often associated with
bacon or smoked ham.
This robust smoke works well with large cuts of meats.
Try with: Beef, Poultry, Pork, Hearty Vegetables.
Also known as indirect grilling, this is similar setup to smoking;
smoke roasting is an accelerated version of the same
principles. It works well for more conventional roasts, chickens
and items that are frequently oven roasted. The combination of
smoke and cooking time creates great flavor in a shorter time
than true smoking. Rotisserie convection cooking in
conjunction with roasting temperatures creates incredible
results (see page 08).
Direct Grilling: 400°F (205°C) or more
This method is the traditional backyard cook-out or barbecue.
Ideal for smaller items – steaks, chops, burgers, vegetables.
The high heat sears the exterior while cooking the interior.
For more information, visit www.broilkingbbq.com
Premium Blends
Our source woods are mixed before pelletizing, ensuring that
each pellet contains the intended blend. This method allows for
more repeatable cooking performance with a consistent burn
and smoke flavor, compared to a random mix of single species
pellets which can offer inconsistent flavors and cooking
performance. Our premium pellets are a key ingredient to your
next cook out. Check out these pellet varieties:
63930 - Smoke Master’s Pellet Blend
Maple / Hickory / Cherry
A selection of pellets popular with competition BBQ
champions.
This blend offers hints of sweetness combined with a fullbodied hickory smoke.
Adds a well-balanced smoke taste to grilled foods.
Try with: Beef, Poultry, Pork.
63939 - Griller’s Select Pellet Blend
Maple / Oak / Cherry
This pellet blend offers a lighter and slightly sweet smoke,
designed to not over-power natural flavors.
A great choice as an everyday grilling pellet.
Try with: Beef, Poultry, Pork, Fish, Vegetables, Pizza.
Note: While using non Broil King® branded food grade
wood grilling pellets will not void your warranty, the Broil
®
Smoke™ Pellet Grill is specifically calibrated to
King
use Broil King
brands of grill pellets can affect temperature and timing.
®
Premium Grilling Pellets. Using other
7
COOKING TIMES AND TEMPERATURES
COOK
TEMP
Short Ribs
5 hours
190°F(88°C)
Tenderloin
3 to 4 lbs. (1.36 to 1.81 kg)
130°F(54°C) for
Medium Rare
Brisket (Pulled)
8 to 12 lbs. (3.63 to 5.44 kg)
1.5 hrs per lb
(3.3 hrs per kg)
Brisket (Thick Sliced)
8 to 12 lbs. (3.63 to 5.44 kg)
1.5 hrs per lb
(3.3 hrs per kg)
Brisket (Thin Sliced)
8 to 12 lbs. (3.63 to 5.44 kg)
1.5 hrs per lb
(3.3 hrs per kg)
Roast
15 min per lb
(33 min per kg)
130°F(54°C) for
Medium Rare
130°F(54°C) for
Medium Rare
130°F(54°C) for
Medium Rare
Hamburgers*
160°F(71°C)
Chicken (Quarters)
1 to 2 hours
170°F(77°C)
Chicken (Whole)
2.5 to 3.5 lbs. (1.13 to 1.58 kg)
Chicken (Whole)
3.5 to 4.5 lbs. (1.59 to 2.04 kg)
Chicken Breast
5 to 8 oz. (0.14 to 0.23 kg)
Turkey (Whole)
10 to12 lbs. (4.54 to 5.44 kg)
Fish (Whole)
4 to 6 lbs. (1.81 to 2.72 kg)
Ribs (Baby Back)
1.5 to 2.5 lbs. (2.72 to 1.13 kg)
Ribs (Spare Ribs)
2.5 to 3.5 lbs. (1.13 to 1.63 kg)
Pork Butt (Pulled)
6 to 8 lbs. (2.72 to 3.63 kg)
1.5 hrs per lb
(3.3 hrs per kg)
Pork Butt (Sliced)
6 to 8 lbs. (2.72 to 3.63 kg)
1.5 hrs per lb
(3.3 hrs per kg)
1.5 hrs per lb
(3.3 hrs per kg)
Pork Crown Roast
8 to 10 lbs. (3.63 to 4.54 kg)
1.5 hrs per lb
(3.3 hrs per kg)
155°F to 165°F
(68°C to 74°C)
Pork Loin
8 to 10 lbs. (3.63 to 4.54 kg)
Pork Sausage
Dia.
Pork Shoulder (Pulled)
6 to 10 lbs. (2.72 to 4.54 kg)
Pork Shoulder (Sliced)
6 to 10 lbs. (2.72 to 4.54 kg)
Pork Tenderloin
1.5 to 2.5 lbs.(2.72 to 1.13 kg)
1.5 hrs per lb
(3.3 hrs per kg)
DESCRIPTION SETTING
COOK TIME FINAL TEMP
2.5 to 3 hours
225°F
205°F(96°C)
(107°C)
Smoke
195°F(90°C)
185°F(85°C)
Prime Rib Roast
Sirloin Tip Roasts 8 Hours
Steak*
350°F
(176°C)
600°F
Grill
(315°C)
Chicken (Thighs) 1.5 hours 170°F(77°C)
2 to 2.5 hours 170°F(77°C)
350°F
Chicken (Wings) 1.25 hours 170°F(77°C)
Roast
(176°C)
2 to 3 hours 170°F(77°C)
1 to 2 hours 170°F(77°C)
Turkey (Legs) 2 to 3 hours 170°F(77°C)
2.5 to 3 hours 170°F(77°C)
3.5 to 4 hours Until Flaky
225°F
Lobster (Steamed) 15 minutes/lb To Taste
Shrimp (Steamed) 15 minutes/lb To Taste
Smoke
(107°C)
Pork Chops
1.5 to 2.5 inch (3.8 to 6.4 cm)
Ham (Bone In)
5 hours 160°F(71°C)
5 to 7 hours 160°F(71°C)
205°F(96°C)
170°F(77°C)
160°F(71°C)
225°F
Smoke
(107°C)
4 to 6 hours 160°F(71°C)
1 to 3 hours 165°F(74°C)
8 to 12 hours 205°F(96°C)
5 to 8 hours 175°F(79°C)
2.5 to 3 hours 160°F(71°C)
160°F(71°C)
8
COOKING TECHNIQUES
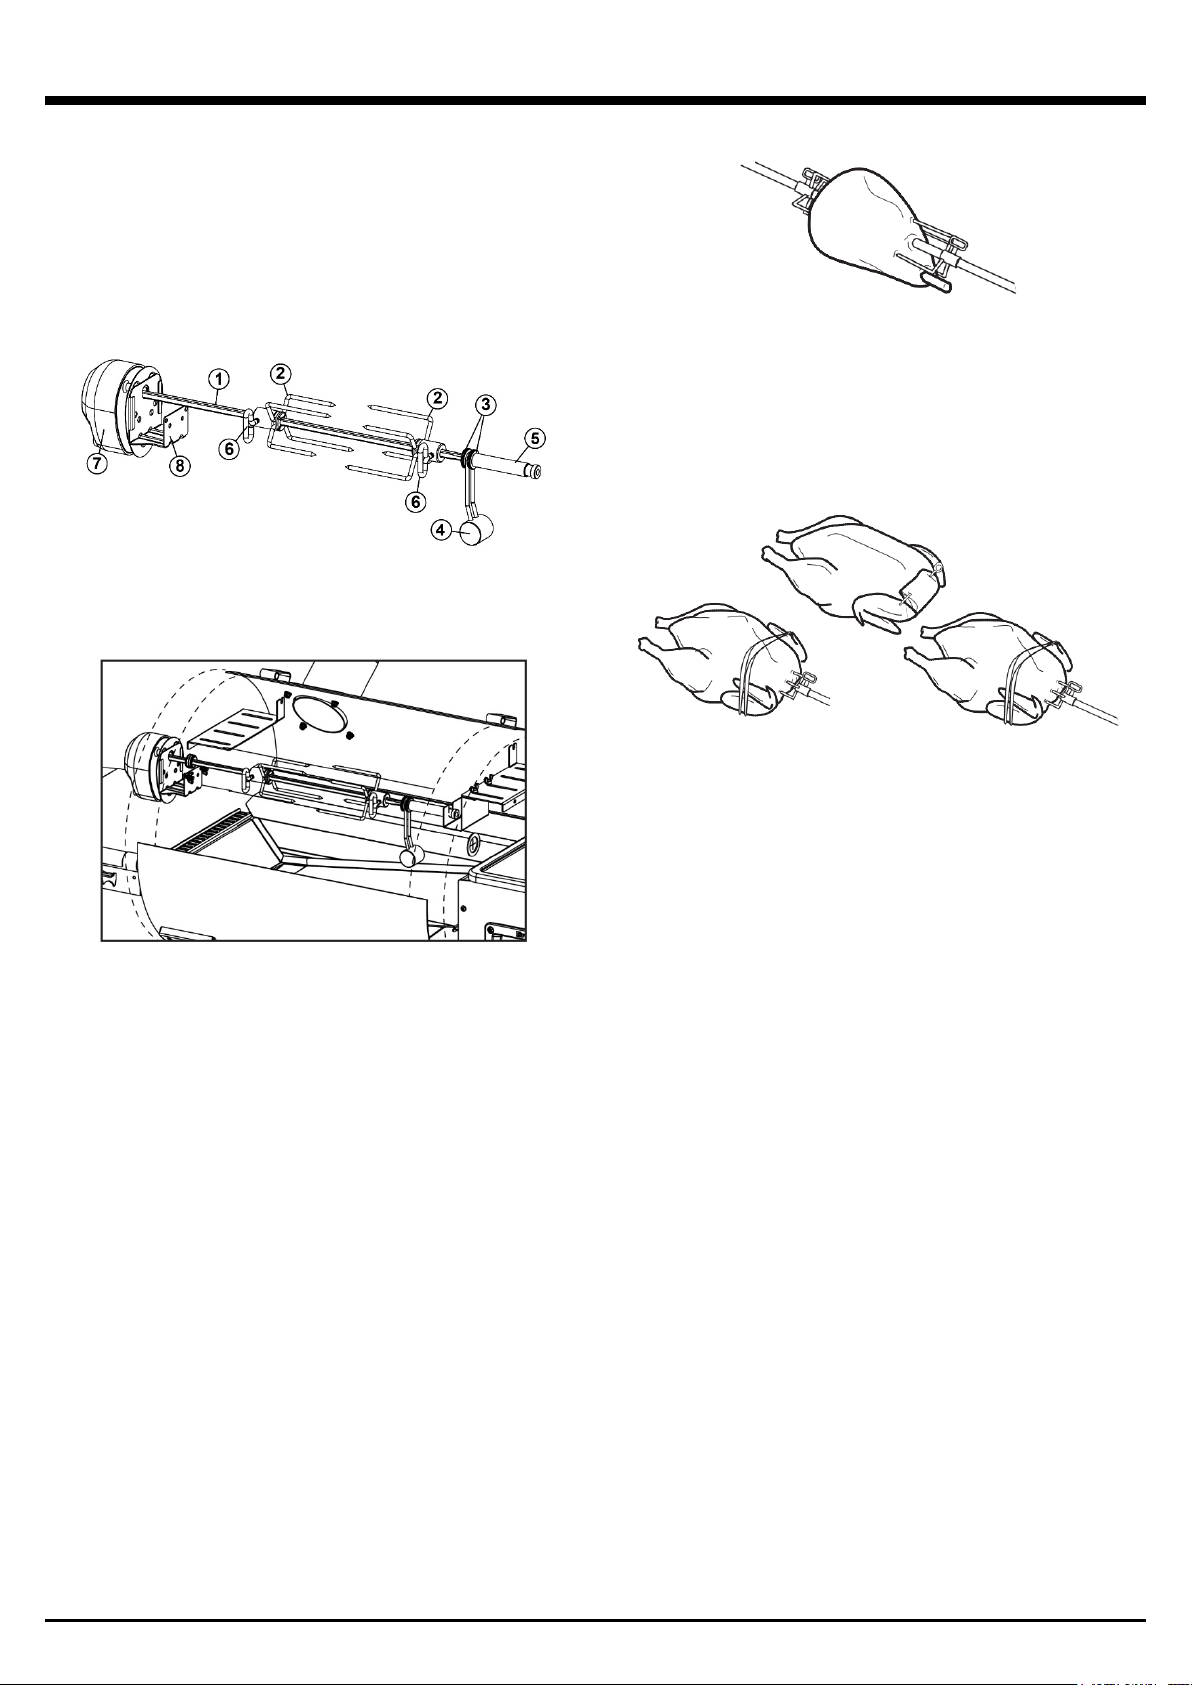
ROTISSERIE CONVECTION COOKING
This method is ideal for cooking large cuts of meat such as roasts
or poultry. The food is cooked by hot air circulating around the
meat.
1. The rotisserie can accommodate up to 15lb (7kg) of meat with
the limiting factor of rotating clearance. For best results the
meat should be centered on the center line of spit to eliminate
an out-of-balance condition.
2. Fasten the meat securely on the spit prior to placing it on the
pellet grill. For poultry, tie the wings and legs in tightly.
1.Rotisserie Rod 2.Rotisserie Fork
3.Rotisserie Washer 4.Rotisserie Balance
5.Rotisserie Bushing 6.Screw Clamp
7.Rotisserie Motor 8.Rotisserie Bracket
USING A SPIT – LEG OF LAMB
1. Have 3” of bone sawed from small end of leg.
2. Leave meat around bone intact to form a flap.
3. Put a spit fork on rod.
4. Fold flap up and run rod through flap and leg.
5. Put second fork on rod and insert forks in each end of leg.
Test for balance. Tighten screws.
USING A SPIT – POULTRY
ROTISSERIE BALANCE
1. Loosen the rod bushing to allow the balance to turn freely.
2. Set the rotisserie rod in the support slots. Let the heaviest
side of the meat rotate to the bottom.
3. Adjust the rotisserie balance to the top of the rod, opposite
the heaviest side of the meat.
4. Tighten the rod bushing. Periodically, check to see if the
meat turns smoothly while cooking. Adjust the rotisserie
balance as necessary.
CAUTION:
Use oven mitt when adjusting rotisserie balance.
1. With breast down, bring neck skin up over cavity.
2. Turn under edges of skin; skewer to back skin.
3. Loop twine around skewer and tie.
4. Turn breast side up; tie or skewer wings to body.
5. Put a spit fork on rod. Insert rod in neck skin parallel to
backbone and exit just above tail.
6. Put second fork on rod and insert forks in breast and tail.
Test for balance. Tighten screws.
7. Tie tail to rod with twine. Cross legs; tie to tail.
9
RECIPES
BBQ RUB*
- 2 tablespoons brown sugar
- 1 teaspoon kosher salt
- 1 teaspoon freshly ground black pepper
- 1 tablespoon cumin
- 2 teaspoons dry mustard
- 2 teaspoons paprika
- 2 tablespoons chili powder
- 1 teaspoon onion salt
- 1 teaspoon celery salt
- 1 teaspoon garlic powder
- 1 tablespoon oregano
*Try the Broil King
The Perfect KC BBQ Rub™ (#50978) for fantastic results.
®
The Perfect BBQ Spice Rub™ (#50975) or
SMOKED CHICKEN
- Preheat pellet grill using the “Smoke” setting
(225°F/107°C).
- 1 whole chicken, separated, or chicken pieces, thighs,
wings, drumsticks.
- Rub chicken pieces with BBQ rub, let stand 30 minutes
- Arrange chicken on cooking grids.
- Cook 1 hours.
- Increase heat in pellet grill using the ROAST setting
(350°F/176°C).
- Cook 1-2hrs until internal temperature reaches
(165°F/74°C).
- Cover, let stand 10 minutes.
- Serve and enjoy
.
RIBS
- Preheat pellet grill using the SMOKE setting (225°F/107°C).
- 4 racks pork ribs.
- Peel membrane from ribs.
- Season liberally with barbecue rub.
- Add water pan with apple juice to smoker (if desired)
- Arrange ribs on cooking grids.
- Cook 4 hours or until desired doneness is achieved.
- If desired, remove ribs from grill, wrap in foil and rest for 30
minutes. Increase heat in pellet grill to (350°F/ 176°C).
- Place ribs back on the grill and apply barbecue sauce at
this time and finish 10 minutes.
- Remove from grill, cover and let stand 10 minutes
- Serve and enjoy.
PULLED PORK
- Preheat pellet grill using the “Smoke” setting (225°F/107°C)
- 4 – 5 lb. Pork Shoulder (Smaller cuts will often be labelled
Boston Butt or picnic shoulder)
- Season liberally with BBQ rub.
- Place pork shoulder on cooking grids
- Cook 1 hour per pound to an internal temperature of at
least (185°F/ 85°C).
- Remove from grill, wrap with foil, let stand 30 minutes
- Pull apart using Broil King® Meat Claws (#64070).
- Apply sauce as desired.
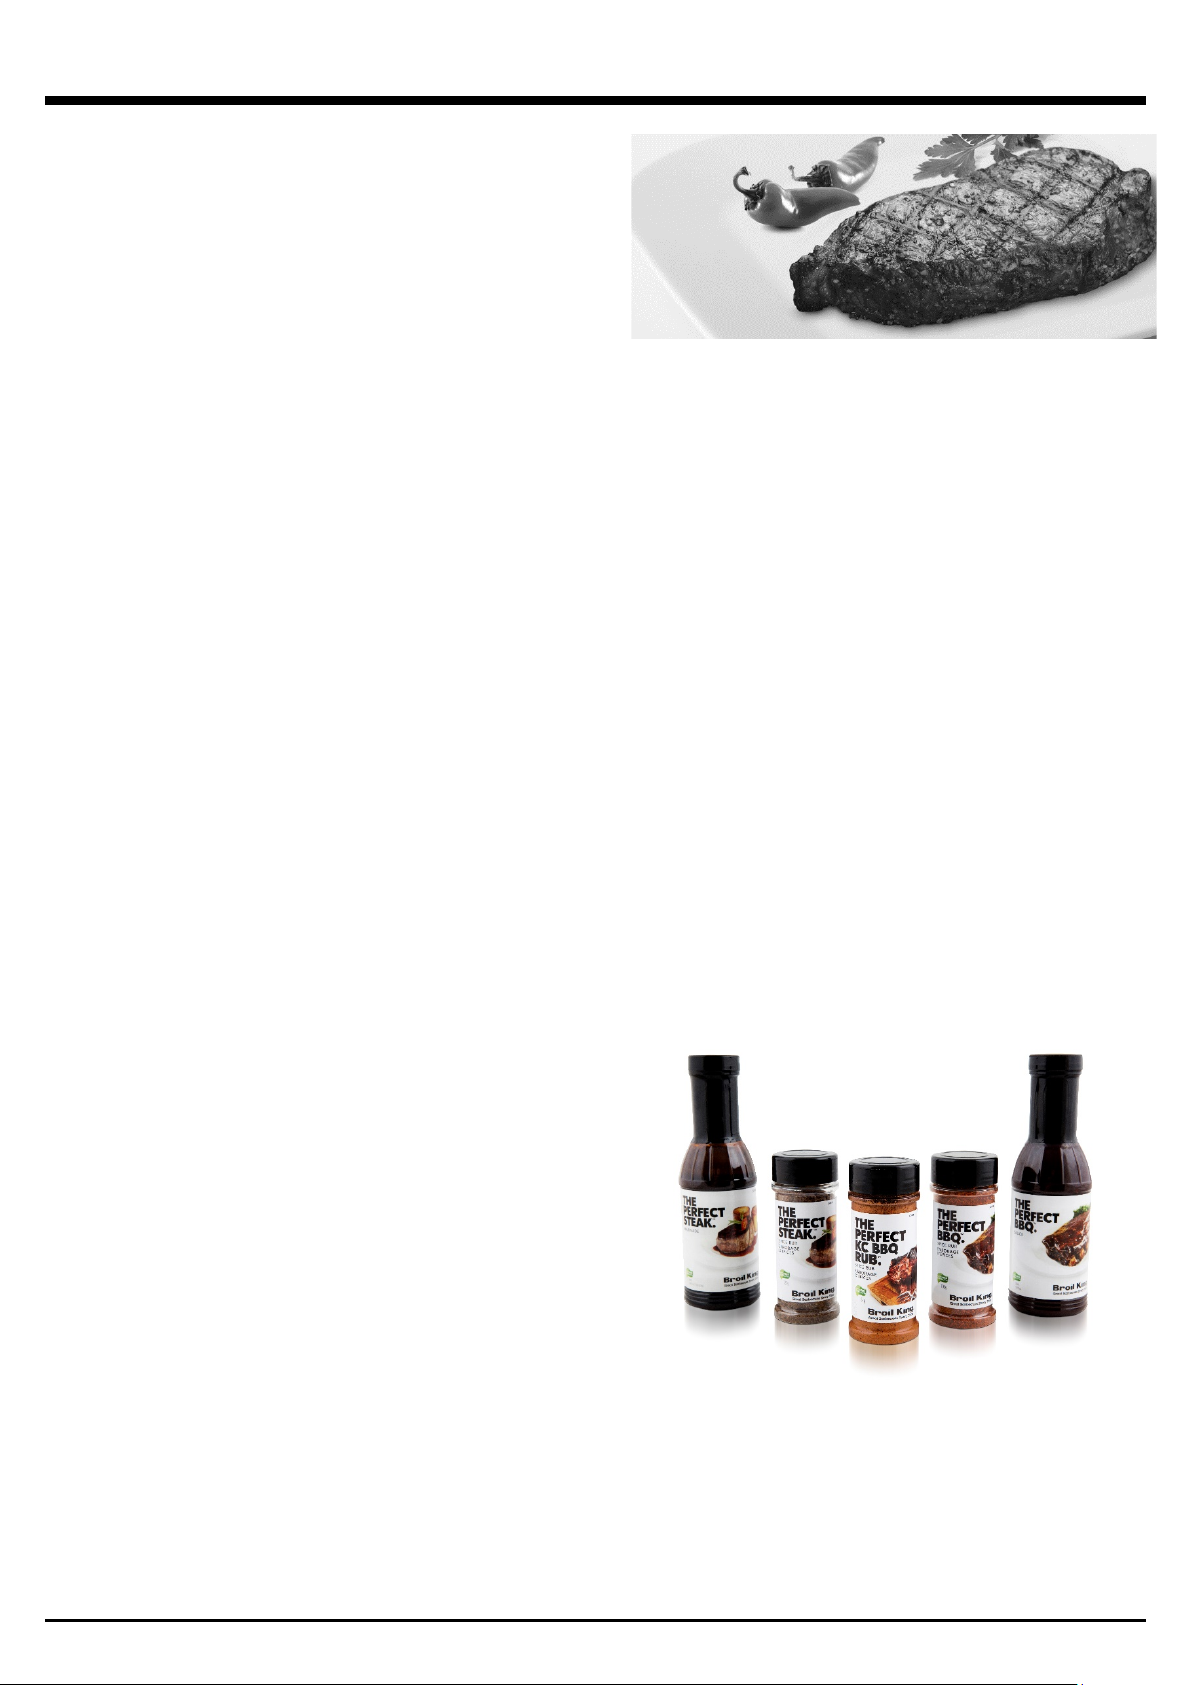
The Perfect Steak Grilling Guide Ingredients*
4 steaks (preferably New York Strip), 1” thick
2 cloves garlic minced or pressed
2 tablespoons of Worcestershire sauce
2 tablespoons balsamic vinegar
2 teaspoons Dijon mustard
2 tablespoons soy sauce
2 tablespoons olive oil
*Try the Broil King® The Perfect Steak™ marinade or The
Perfect BBQ™ (#50990) sauce for fantastic results.
PREPARING THE STEAKS
Trim excess fat from the steaks. In a heavy, resealable plastic
bag combine the remaining ingredients. Marinate the steaks for
1 hour at room temperature or up to 24 hours in the refrigerator.
If refrigerating, bring steaks close to room temperature 1 hour
before grilling for more even cooking.
PERFECT GRILLING TIPS
A. Brush grids with a high smoke point oil and preheat the
pellet grill using the GRILL setting (600°F/315°C). Place
food on the barbecue at a 45° angle and cook according to
the timing on the cooking charts found on page 7.
B. Turn the steak over grilling on the same 45° angle.
C. Turn the steak over and grill on the opposite 45° angle.
D. Finally, turn the steak over and grill on the same 45° angle.
(see the perfect steak grilling guide on page 6)
10

MAINTENANCE
11
PELLET HOPPER CLEAN OUT
Your Broil King® Smoke™ Pellet Grill has a hopper clean out
system designed for easy removal of excess fuel to quickly
change pellet flavors or clean out remaining pellets after use.
GREASE CLEAN OUT
Grease fires are caused by not properly maintaining the grill
and failing to clean the grease management system on a
consistent basis. In the unlikely event of a grease fire while
cooking, turn off / unplug the appliance and keep the lid
closed until the fire is completely out. Never keep the lid
open during a grease fire.
ASH CLEAN OUT
After each cook out wait for the grill to completely cool before
removing and emptying the Ash Tray. First step is to open the
agitator to the unlock position indicated on the cover. You can
slide the Agitator between lock and unlock to help ash fall into
the tray. Only dispose ashes which are completely cool and
extinguished.
Return the Agitator to the closed position before using the grill
again.
DISPOSAL OF ASHES
Ashes should be placed in a metal container with a tight-fitting
lid. The closed container of ashes should be placed on a
noncombustible floor or on the ground, well away from all
combustible materials, pending final disposal. If the ashes are
disposed of by burial in soil or otherwise locally dispersed, they
should be retained in the closed container until all cinders have
thoroughly cooled."
CARE AND MAINTENANCE
The Broil King® Smoke™ Pellet Grill will give you many years of
great service with minimal care. The seasoning process will
help preserve the internal steel components. Use a stainless
steel brush to clean cooking grids and components that are
soiled.
It may be necessary to clean and re-season your cooking grids.
Brush them thoroughly with a Broil King® (#64014) stainless
steel grill brush to remove any debris and apply a thin layer of a
high smoke point oil. Then, place the cooking grids into your
grill, and cook at 400°F (205°C) for 1 hour. Repeat as desired.
This coating of oil will protect your cooking grids and provide
years of trouble free use.
Clean the exterior using warm, soapy water.
To clean the interior, use a Broil King® (#65641) wire-bristle
grill brush to remove any debris from the cook box. The layer
of oils that accumulates inside the smoker – the seasoning – is
protective and does not need to be scrubbed clean with any
frequency.
Always keep your Broil King® Smoke™ Pellet Grill covered
when not in use - use Broil King® grill cover #67069 for the
Regal™ Pellet 500 (Model #496051) or grill cover #67065 for
the Regal™ Pellet 400 (Model #495051)
 Loading...