

Broil King 6695003, 06695012, 6695012 Operator's Manual
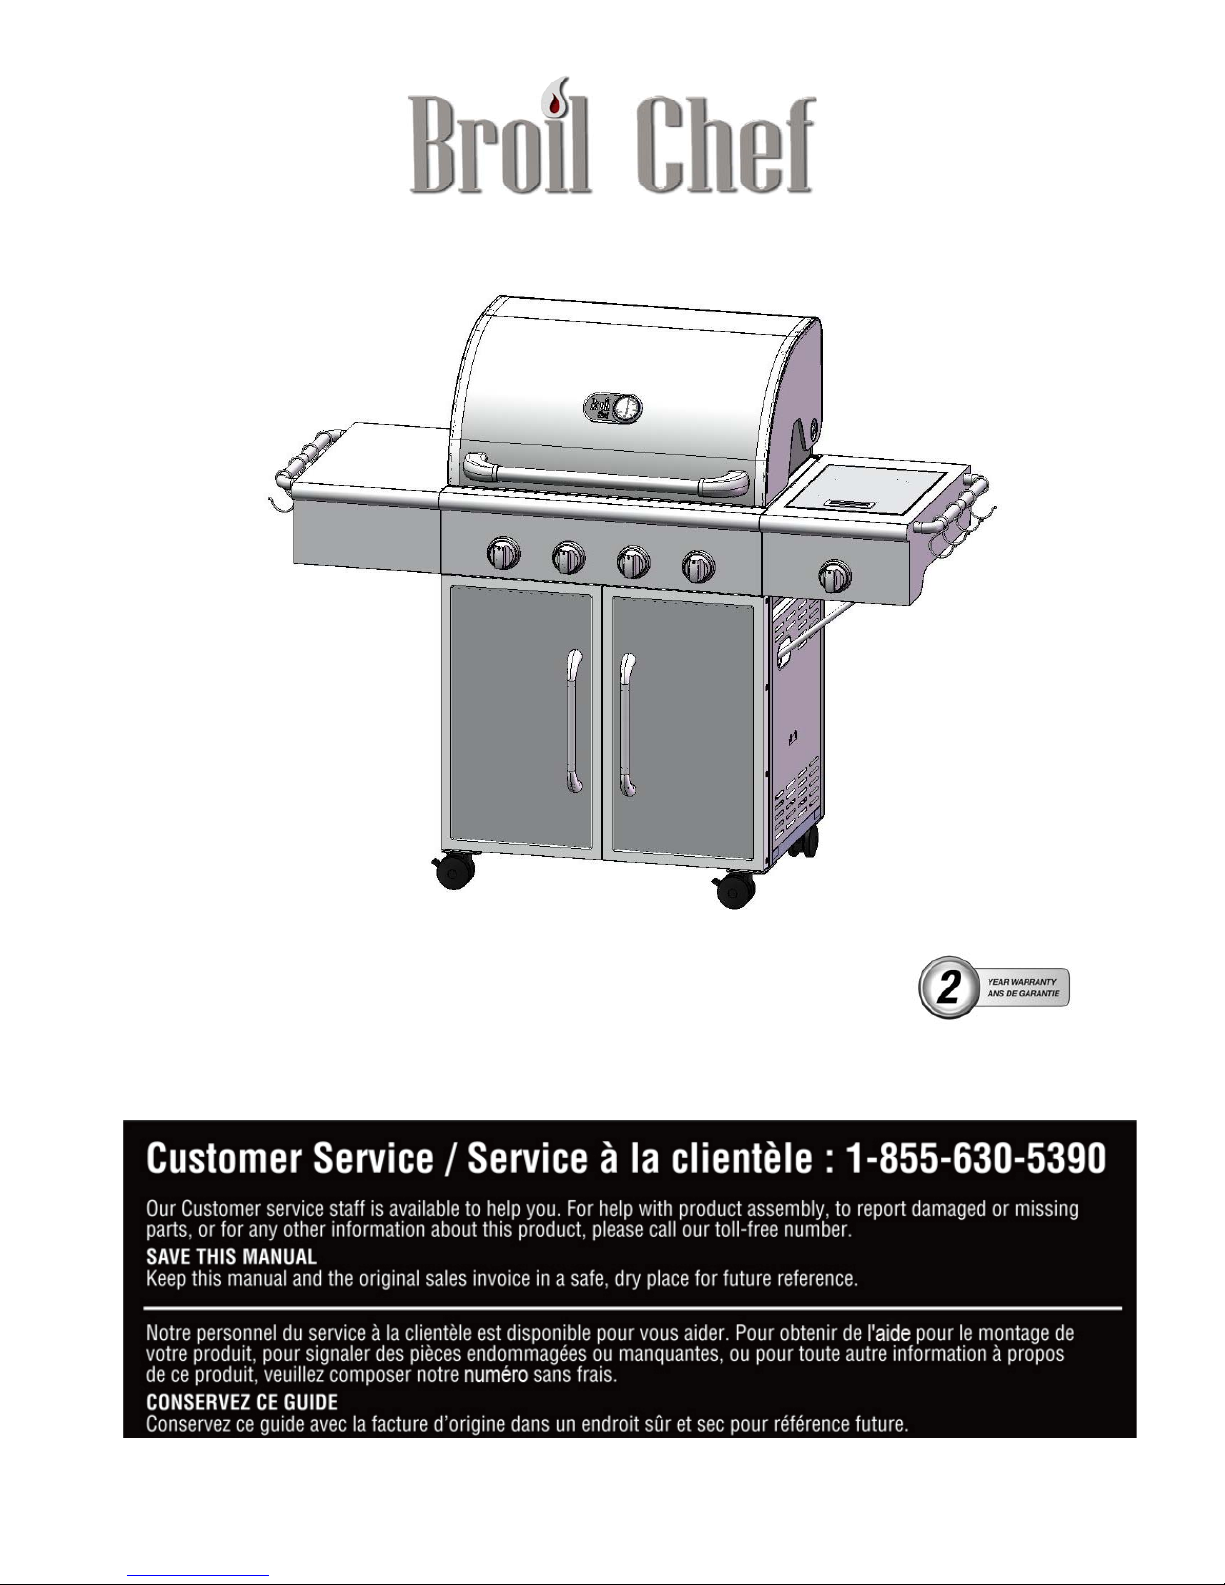
GSF2818KS/GSF2818KS-2
Instruction Manual
Guide d’utilisation
1
Model/Modèle: 06695003/
06695012
Propane Gas Barbecue
Operators’ Manual p.2
Barbecue au gaz propane
Guide de I’utilisateur p.22
GSF2818KS/GSF2818KS-2
Instruction Manual
Guide d’utilisation
2
Grill Operation 1-2-3
Before Grilling
Step 1 Keep your grill a safe distance away from your property.
Step 2 Always perform a leak test on all connections and hoses.
Step 3 Keep children away from the grill.
During Grilling
(To avoid tripping safety valves, please follow these instructions carefully!)
Step 1 First open lid and turn gas tank on slowly.
Step 2 Turn only one knob on at a time when lighting up the grill.
Step 3 Use protective gloves when grill gets hot.
Step 4 Never leave a lit grill unattended.
After Grilling
Step 1 Always burn grill for 10-15 minutes to burn off food residues after use.
Step 2 Wait until the grill is completely cooled before closing lid.
Step 3 Clean up grease build-up to avoid grease fire and cover your grill to prevent rust.
Always read and understand the
WARNINGS
and
INSTRUCTIONS
that are contained in this manual before attempting to use
this gas barbecue grill to prevent possible bodily injury or property damage.
NOTE
:
This grill must be used with propane gas only (propane gas cylinder not included).
Retain this manual for future reference.
WARNING:
1. Do not store or use gasoline or other
flammable
liquids or vapour in the vicinity of
this or any other appliance.
2. An LP cylinder not connected for use shall
not be stored in the vi
cinity of this or any
other appliance.
DANGER:
If you smell gas:
1. Shut off gas to the appliance.
2.
Extinguish any open flame.
3.
Open lid.
4.
If odour continues, keep away from the
appliance and immediately call your gas
supplier or your fire department.
WARNING:
Improper installation,
adjustment , alteration, service
or maintenance can
cause
injury or
property damage.
Read the installation,
operation and maintenance
instructions thoroughly
before installing or
servicing
this equipment.
DANGER:
Failure to follow these
instructions could result
in fire or explosion that
could cause property
damage, personal
injury
or death.
DANGER:
DO NOT use gas grill
for
indoor cooking or
heating. TOXIC
fumes
can
accumulate and
cause asphyxiation.
DO NOT
use in or on
boats
or recreational
vehicles.
WARNING:
FOR YOUR SAFETY:
For Outdoor Use Only
(outside any enclosure)
PROP 65 WARNING:
Chemicals known to
the
state of California
to
cause
many serious
diseases as cancer
are
created by
the
combustion of
natural
gas.

GSF2818KS/GSF2818KS-2
Instruction Manual
Guide d’utilisation
3
Table of Contents
For Your Safety ................................................................................................................ 3
Package Contents............................................................................................................ 6
Hardware Contents
.......................................................................................................... 7
Assembly Instructions..................................................................................................... 8
Operating Your Grill
....................................................................................................... 13
Connecting & Disconnecting The Gas Cylinder.......................................................... 13
Checking
for
Leaks
........................................................................................................ 14
Lighting Your Grill
......................................................................................................... 14
Excess Flow Safety Valve Reset Procedur e
............................................................... 16
Care and Maintenance
.................................................................................................. 17
Trouble shooting............................................................................................................ 18
Replacement parts list.....................................................................................................19
Exploded view..................................................................................................................20
Warranty............................................................................................................................21
For Your Safety
Dear Valued Customer,
Congratulations on your new barbecue grill purchase! You’ve made the right choice. In this manual, you will find assembly
instructions, suggestions for
grilling and helpful hints, as well as guidelines for the safe operation, proper care and use of your
grill. Our expert staff strives to provide
you with an easy-to-assemble product. Should you have any questi ons or p r ob l em s wi th
this product, please call
our customer service department at
1-855-630-5390, 7 A..M. – 16 P.M., EST, Monday- Friday.
NOTE:
The use and installation of this product must conform to local codes. In the absence of local codes, use the National
Fuel Gas Code, ANSI Z223.1/ NFPA54. Reference to Natural Gas and Propane Installation code CSA B149.1 or Propane
Storage and Handling code B149.2
IMPORTANT NOTICE:
READ ALL INSTRUCTIONS PRIOR TO ASSEMBLY AND USE.
Safety First!
Read and understand all warnings and precautions prior to operating your grill.
GSF2818KS/GSF2818KS-2
Instruction Manual
Guide d’utilisation
4
WARNING:
1.
This grill is for outside use only. It should not be used in a building, garage or any other enclosed area.
2.
The use of alcoh o l , pr escripti o n o r non-prescription drugs may impair an individual’s ability to properly assemble or safely
operate this appliance.
3.
Always open the grill lid carefully and slowly as heat and steam trapp ed within the grill could cause severe burns.
4.
Always place your grill on a hard and level surface far away from combustible materials and structures. An asphalt or
blacktop surface may not be acceptable for this purpose.
5.
Do not leave a lit grill unattended.
6.
Keep children and pets away from the grill at all times.
7.
This is not a tabletop grill. Do not place this grill on any type of tabletop surface.
8.
Do not use the grill in high winds.
9.
This grill must be used with propane gas only (propane gas cylinder not included).
10.
Do not attempt to attach this grill t o t h e self-contained prop ane system of a camper, trailer, motor home or house.
11.
Do not use charcoal or lighter fluid.
12.
Do not use ga soline, kerosene or alcohol for lighting. The LP-gas supply cylinder must be constructed and
marked
in
accordance with the specifications for propane gas cylinders of the U.S. Department of Transportation (DOT)
CFR
49.
13.
This outdoor gas appliance is not intended to be installed in or on recreation vehicles and/or boats.
14.
Do not attempt to move the grill while it is lit.
15.
Do not use the grill unless it is COMPLETELY
assembled and all parts are securely fastened and tightened.
16.
Keep combustible items and surfaces at least
50 inches
away from the grill at all times. DO NOT use this gas grill
or any
gas product under any overhead enclosure or near any unprotected combustible constructions.
17.
Do not use in an explosive atmosphere. Keep grill area clear and free from combustible materials ,
gasoline and other flammable vapour and liquid.
18.
Do not attempt to use or assemble with missing or damaged parts. Contact customer service for replacement part.
CAUTION-Prevention of Burns
1.
To avoid burns, do not touch metal parts of the grill until they have completely cooled for at least 45 minutes or unless you
are wearing protective gear such as pot holders, protective gloves or mittens.
2.
Do not alter the grill in any manner.
3.
Clean and inspect the hose before each use. If there is evidence of abrasion, wear, cuts or leaks, the hose must be repl ac ed
prior to
operation. The replacement hose assembly should be in accordance with
the
manufacturer’s specifications.
4.
Move gas hoses as far away as possible from hot surfaces and dripping hot grease.
5. Never keep a filled gas container in a hot car or car trunk. Heat will cause the gas pressure to increase, which could open
the relief valve and allow gas to escape.
6.
Keep any electrical supply cord and the fuel supply hose away from any heated surfaces.
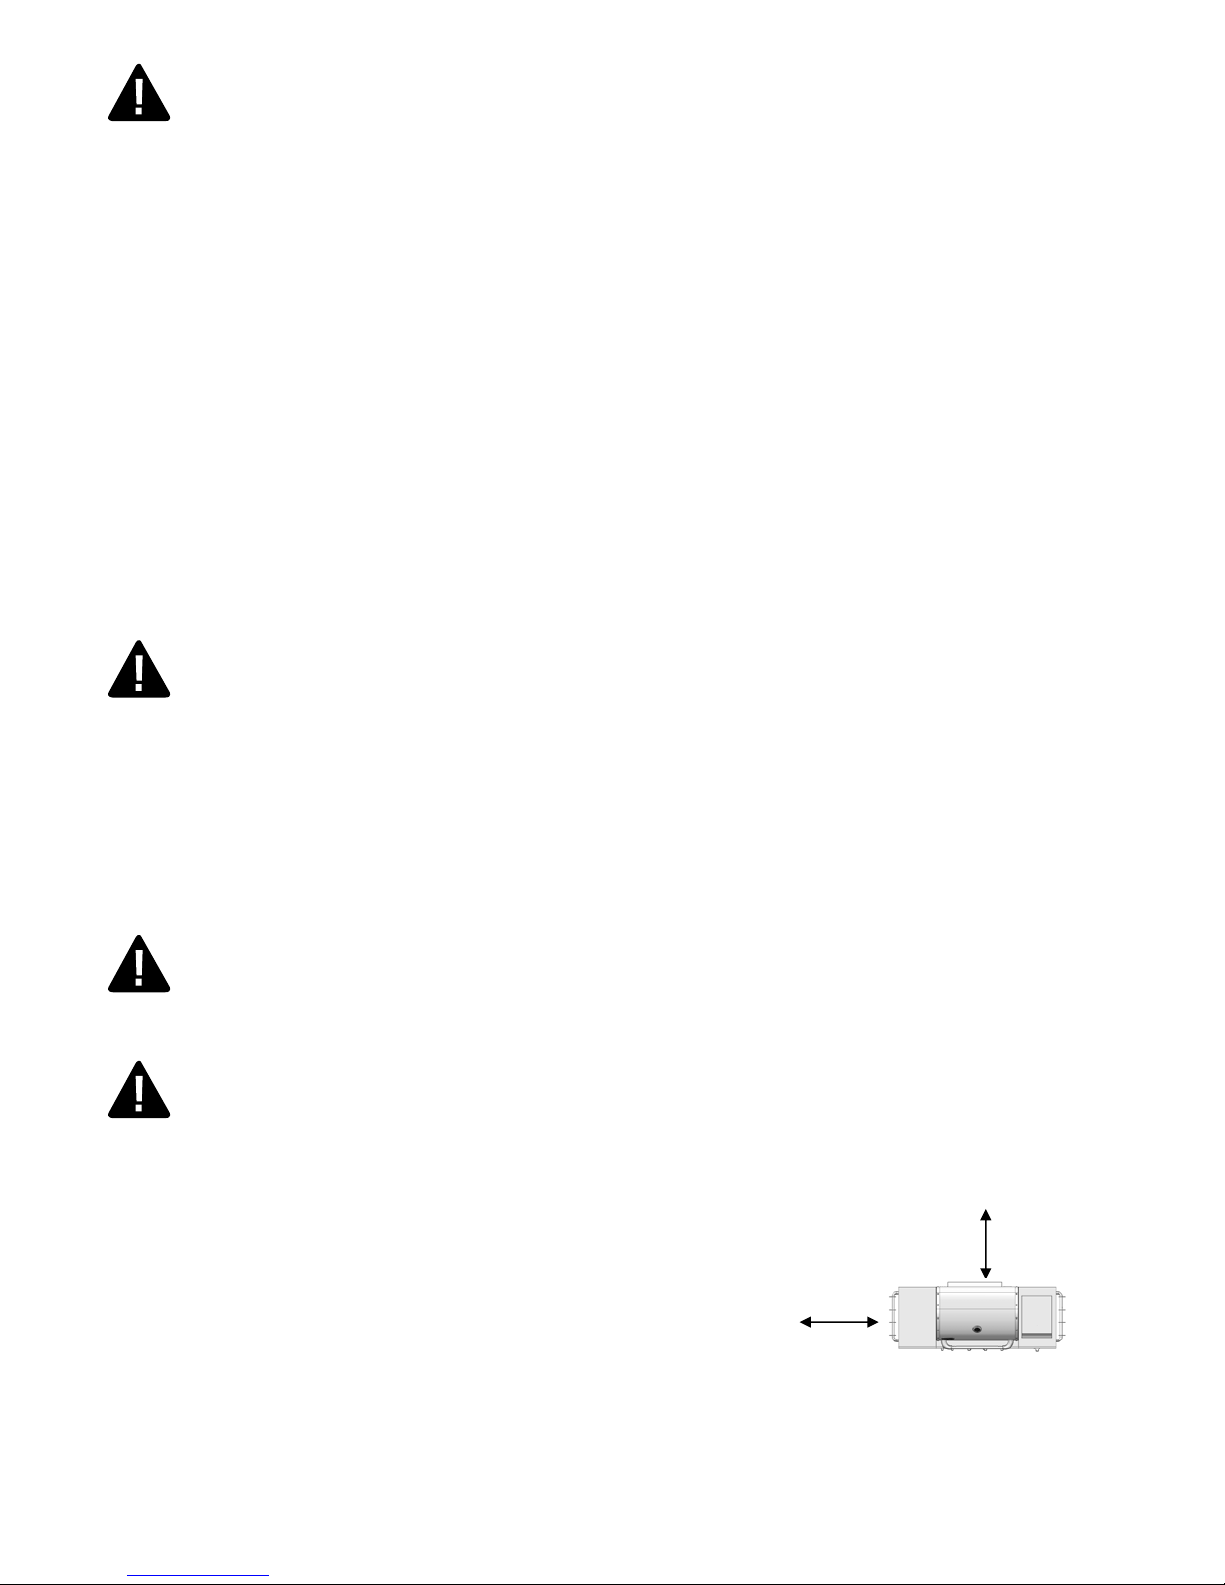
Safe Locations For Use Of This Outdoor Grill
DANGER:
Never use this outdoor grill inside any building, garage, shed or breezeway, or inside any boat, trailer or recreational
vehicle to prevent a possible fire and to prevent the possibility of carbon monoxide poisoning or asphyxiation.
WARNING:
Do not use this appliance under overhead combustible surface or covered area (e.g., awnings, umbrellas, porches or gazeboes).
Always confirm that this grill is not positioned under the overhang of a house, a garage or other structure before lighting it. An
overhang will serve to deflect flare-ups and radiated heat into the structure itself, which could result in a fire.
Always confirm that this grill is positioned more than 50 inches (127cm) away from any
building or combustible materials or surface before lighting it, and that no gasoline
or other volatile substances are stored in the vicinity of this grill.
(See diagram on the right). The temperature of a grease fire or of the radiated heat
might otherwise be sufficient to ignite nearby combustible or volatile substances.
Always locate this grill where there will be ample combustion and ventilation air,
but never position it in the direct path of a strong wind.
Never allow the grill to operate while unattended to prevent uncontrolled grease fires
from erupting.
Never attempt to move this grill while it is in operation or while it is still hot to prevent possible personal injury.
50 inches
50 inches
GSF2818KS/GSF2818KS-2
Instruction Manual
Guide d’utilisation
5
Never store or use gasoline or other flammable or volatile substances in the vicinity of this grill or in the vicinity of any other
heat-generating appliance because of the danger of starting a fire.
Always confirm that the installation of this grill conforms with the requirements of all local codes or, in the absence of applicable
local codes, with either the National Fuel Gas Code, ANSI Z223. NFPA 54 or CAN/CGA-B149.2.
DANGER – Gas Safety
Liquefied propane (LP) gas is flammable and hazardous if handled improperly. Become aware of its characteristics before using
any propane product.
。
Propane Characteristics: Flammable, explosive under pressure, heavier than air and settle s in pools in low areas.
。
In its natural state, propane has no odour. For your safety, an odorant has been added.
。
Contact with propane could burn to the skin.
。
This grill
has been designed to be used with propane gas only.
。
Never use a propane cylinder with a damaged body, valve, collar or footing.
。
Dented or rusted propane cylinders may be hazardous and should be checked by your propane gas supplier.
CAUTION:
。
It is essential to keep the grill’s valve compartment, burners and circulating air passages clean .
。
Inspect the grill before each use
.
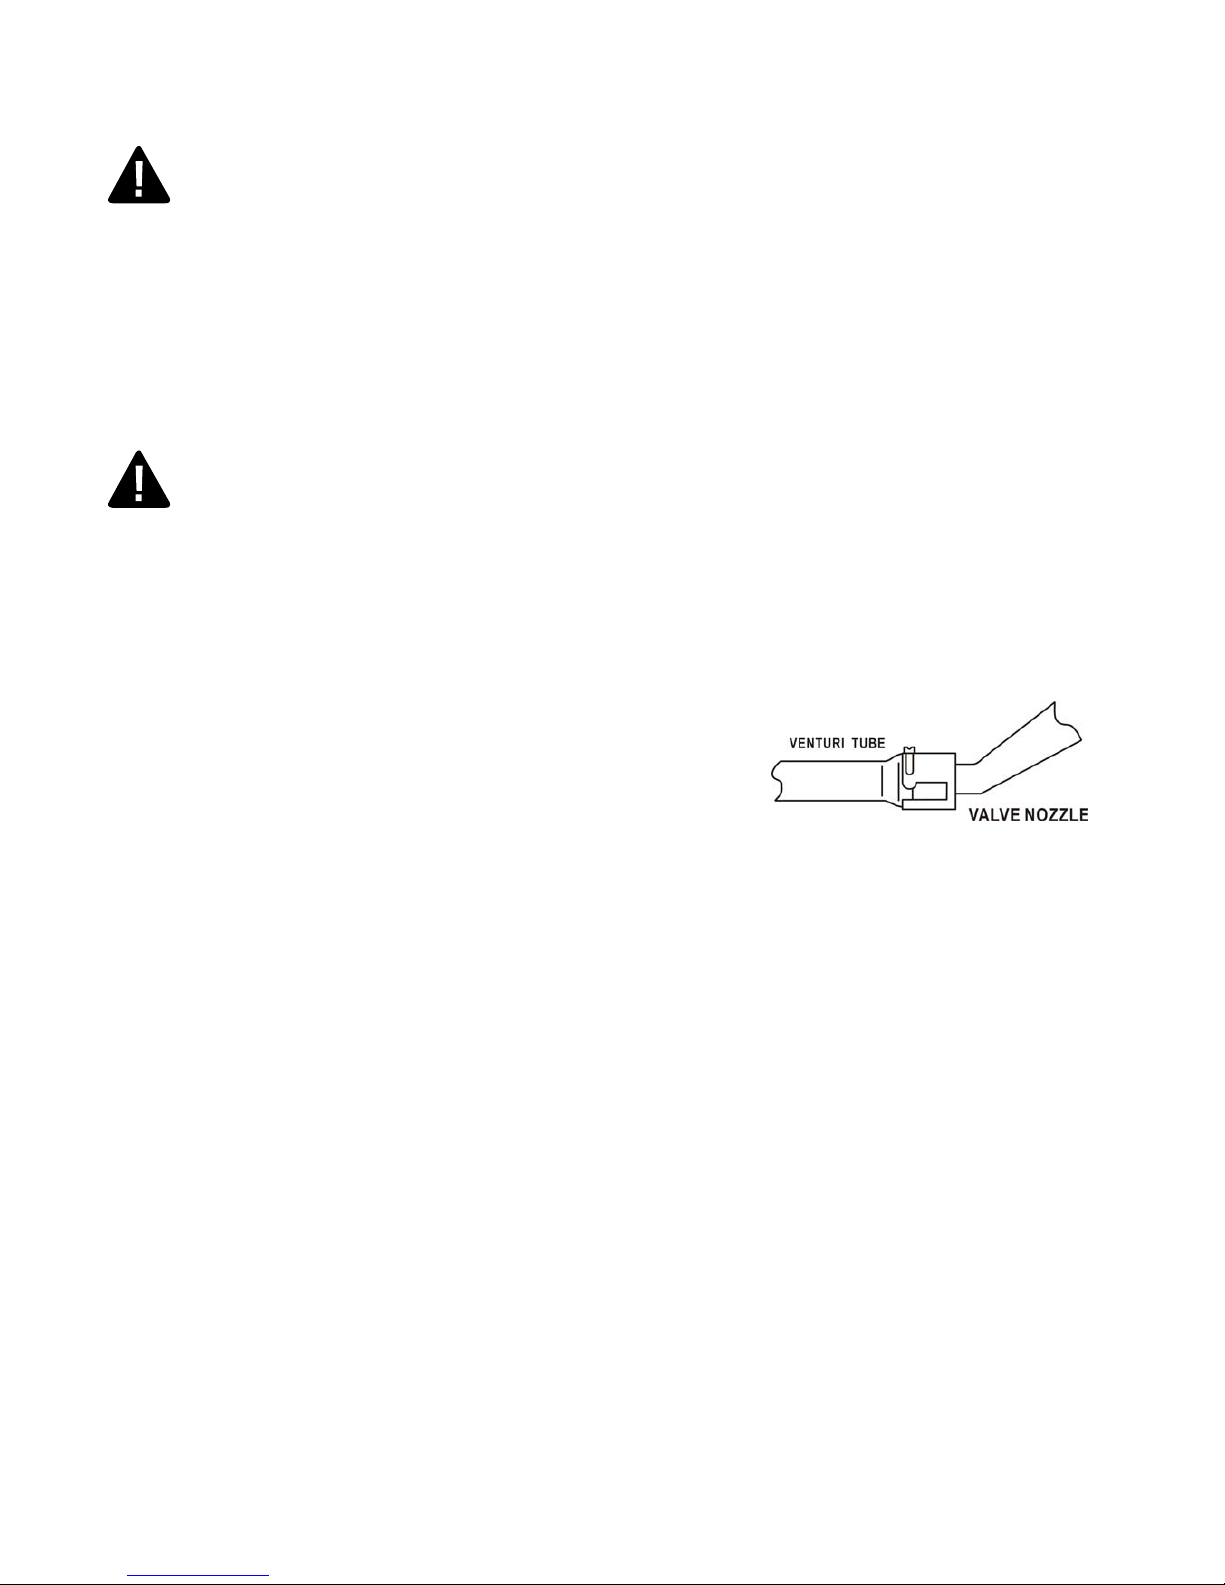
Step 1. Inspect all hoses and connections and make certain they are secure.
Step 2. Check and clean the burner venturi tubes for insects and insect nests by removing the burner and inserting a bottle
brush cleaner into each tube to make sure the passage is clear.
*** A clogged tube can lead to a fire beneath the grill. ***
Step 3. Ensure that the valve nozzle is pointing straight and completely inserted into the venturi tube.
General Information
1.
A propane gas cylinder
is
required for operation.
2.
This gas grill is NOT intended for commercial u
se.
3. Don't obstruct the ventilation opening of the cylinder enclosure.

GSF2818KS/GSF2818KS-2
Instruction Manual
Guide d’utilisation
6
Package Contents
SIDE BAR TOOL HANGER
LEFT SIDE SHELF
HOOK
BODY ASSEMBL Y
HEAT INSULATION PANEL
CAR T LEFT SI DE PANE L
GREASE CUP
GREASE CUP SUPPORT
TANK CLIP
CART BOTTOM PLATE
LEFT DOOR
RIGHT DOOR
WARMING RACK
HEAT SHIELD
COOKING GR ID
SIDE BURNER SUPPORT
SIDE BURNER ASSEMBLY
RIGHT SIDE SHELF
SIDE KNOB SEAT
SIDE KNOB
CART BACK PANEL
CART RIGHT SIDE PANEL
CART FRONT FRAME
TANK SUPPORT
X
SWIVEL CASTER
Y
A
B
C
D
E
F
G
H
I
J
K
L
M
N
O
P
Q
R
S
T
U
V
W
2
8
1
1
1
1
1
1
1
1
1
1
1
QTY(PC)Description
Part
QTY(PC)Description
Part
2
4
1
1
1
1
1
1
1
1
1
2
GSF2818KS/GSF2818KS-2
Instruction Manual
Guide d’utilisation
7
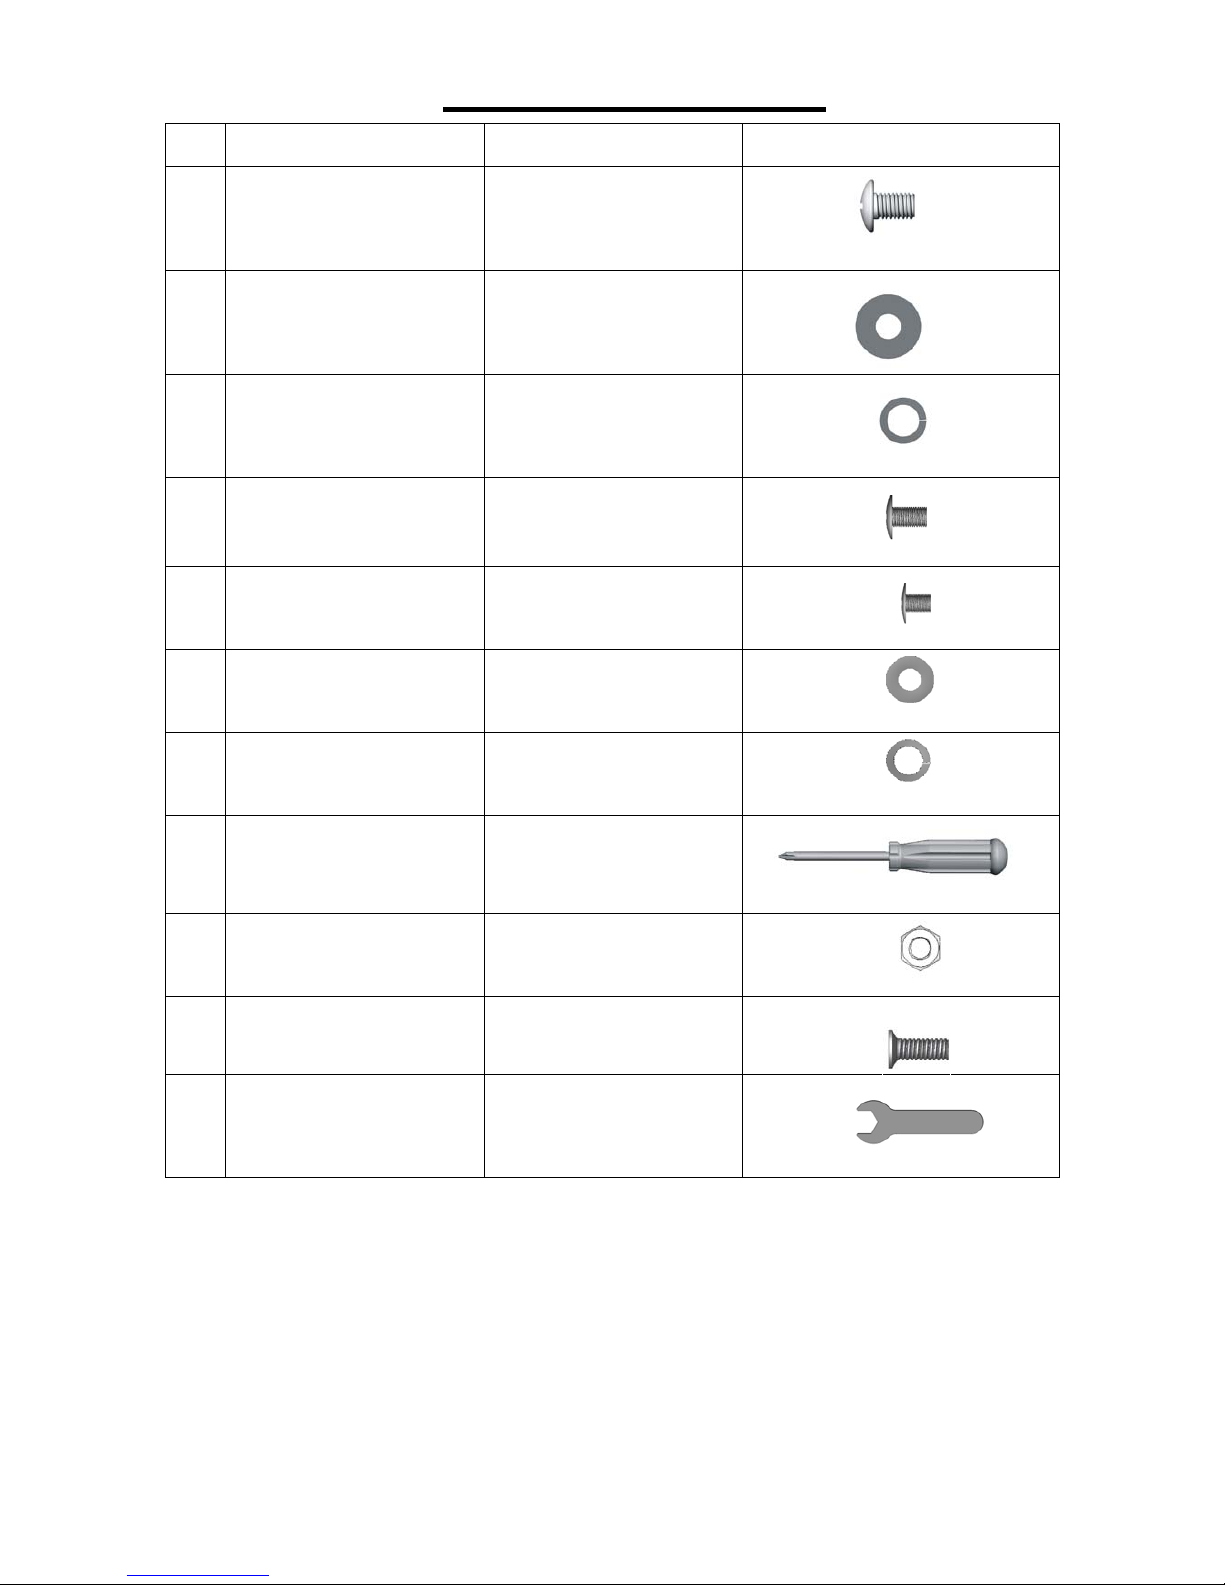
Hardware Contents
Hardware listed above is not scaled to exact size.
(A screwdriver and wrench are required on assembly and are included for your convenience).
Part Description Quantity Picture
AA
M6 x 20 Bolt 28 PCS
BB
M6 Flat Washer 32 PCS
CC
M6 Lock Washer 32 PCS
DD
M4 x 15 Bolt 4 PCS
EE
M4 x 10 Bolt 2 PCS
FF
M4 Flat Washer 6 PCS
GG
M4 Lock Washer 4 PCS
HH
Screwdriver 1 PC
JJ
M6 Nut 4 PCS
KK
M6 x 12 Bolt 4 PCS
LL
Wrench 1 PCS
GSF2818KS/GSF2818KS-2
Instruction Manual
Guide d’utilisation
8
Assembly Instructions
Remove all contents from the packaging. Make sure
all
parts are present before attempting assembly. Once the
grill is fully assembled, go back and check to make certain
all the bolts are secu r e. Tighten again
using the screwdriver
provided if necessary.
Estimated Assembly
Time: 45 minutes.
Step 2
(Cart assembly)
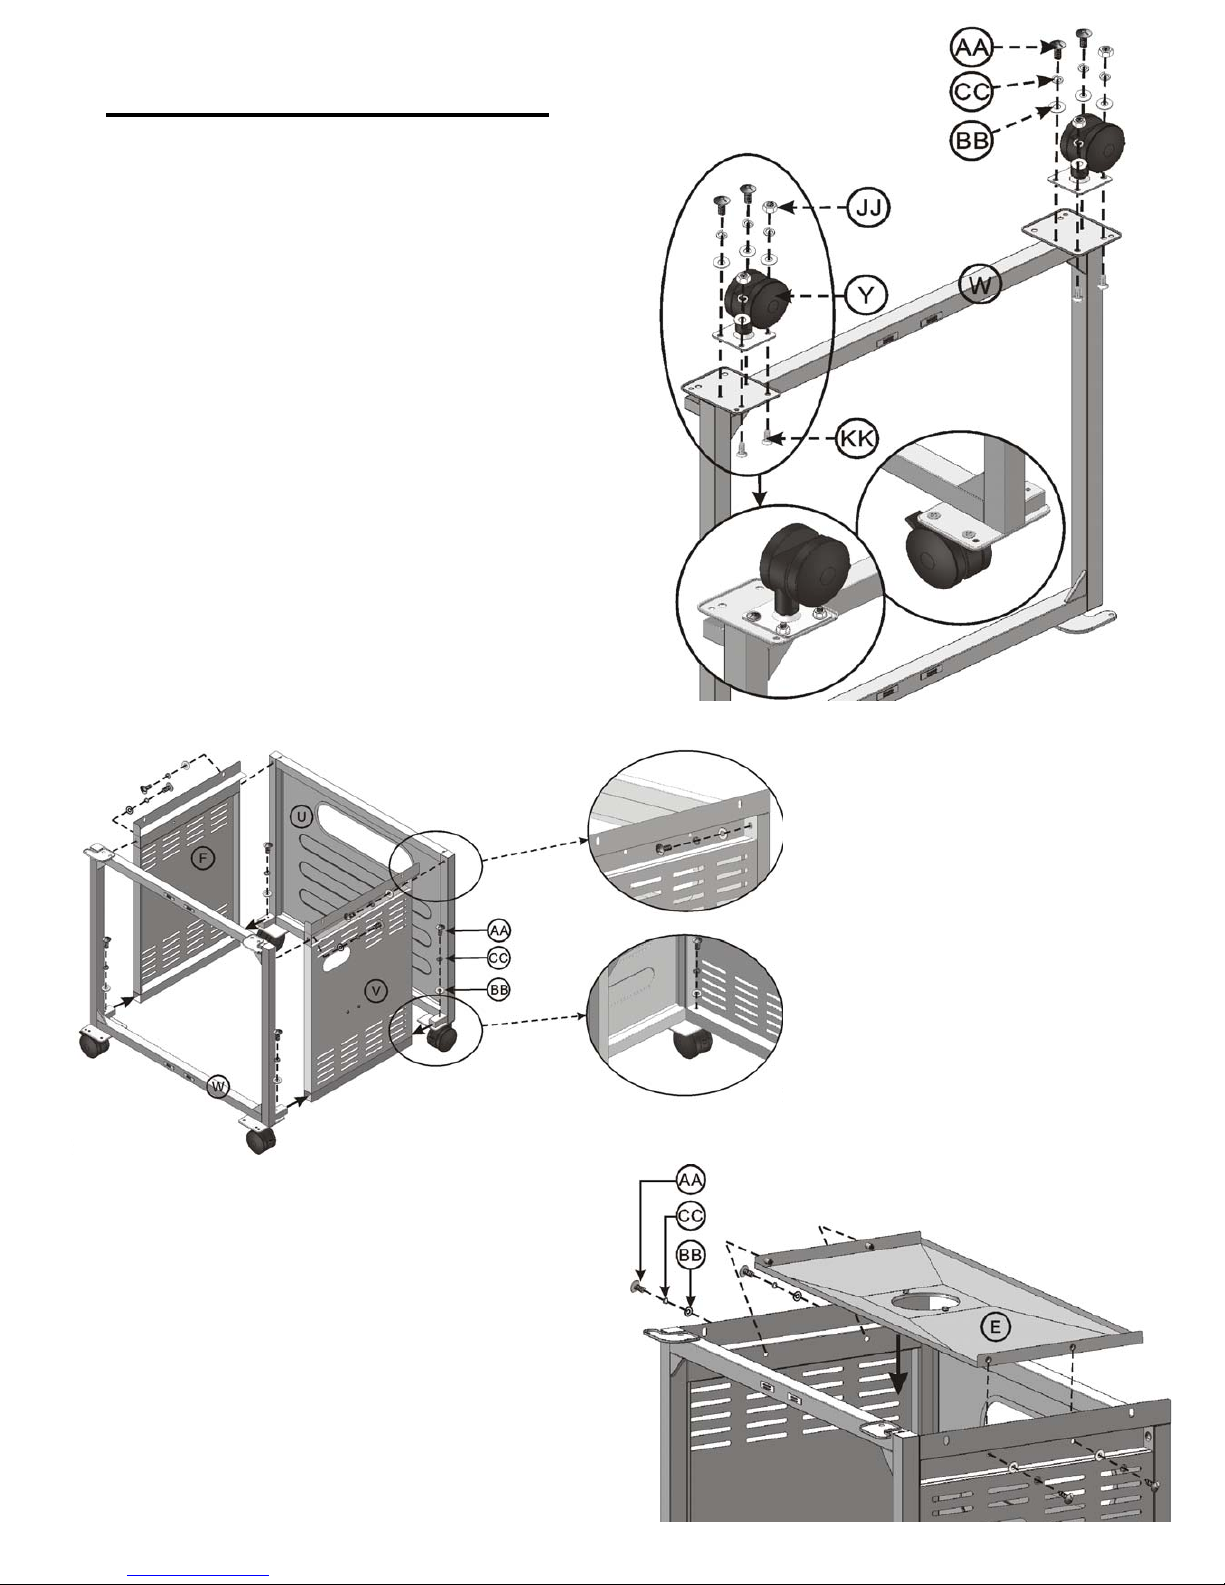
a)
Push the cart front frame (W) and cart
right side panel (V) together and connect
well, then push the cart back panel (U)
and cart right side panel (V) and connect
well. Make certain the connections are
secure.
b) Align the two holes on the cart front
frame (W) with the two holes on cart
right side panel (V). Insert one bolt (AA)
with one lock washer (CC) and one flat
washer (BB) into each pre-drilled hole.
Tighten bolts by hand until secure.
c) Repeat the procedure for the cart right
side panel and cart back panel
assembly.
d) Repeat the procedure for the left side
cart panel (F) assembly.
e) Go back and tighten all bolts using the
screwdriver provided.
Step 3
(Heat insulation panel assembly)
a) Align the two holes on cart left side panel (F) with the
two holes on heat insulation panel (E).
b) Insert one bolt (AA) with one lock washer (CC) and one
flat washer (BB) into each pre-drilled hole. Tighten bolts
by hand until secure.
c) Repeat the procedure for the heat insulation panel and
cart right side panel assembly.
d) Tighten all bolts using the screwdriver provided.
Step 1
(Swivel caster assembly)
Note: Before beginning assembly, make certain the two swivel
casters on the back panel are locked.
a) Align the two holes on swivel caster (Y) with the two holes
on front frame (W).
b) Insert one bolt (AA), one lock washer (CC), one flat washer
(BB), one nut (JJ) and one bolt (KK) into each pre-drilled
hole by hand.
c) Go back and tighten all the bolts using the screwdriver
p
rovided.

GSF2818KS/GSF2818KS-2
Instruction Manual
Guide d’utilisation
9
Step 4
(Cart bottom panel assembly)
a) Place the cart bottom panel (J)
onto the cart bottom frame as
shown, make certain the two
latches of the bottom panel are
under the bottom frame.
Step 5
(Grease cup and support
assembly)
a) Hook the grease cup support (H)
into the two holes on the heat
insulation panel.
b) Place the grease cup (G) onto the
grease cup support.
Step 6
(Tank clip and tank support
assembly)
a) Insert the tank clip (I) into the two holes
on the cart bottom panel as shown.
b) Loosen two pre-installed bolts on the
tank support (X) and leave 1/4 of the
bolt's length extendin
g from tank
support.
c) Hang the two pre-installed bolts on the
hole of right side panel (V) and push
them down to place.
d) Go back and tighten all the bolts using
screwdriver provided.
GSF2818KS/GSF2818KS-2
Instruction Manual
Guide d’utilisation
10
Step 7
(Doors assembly)
a) Insert the bottom pin of left door (K)
into the pre-drilled hole on the cart
bottom panel.
b) Push down the top pin of left door
and
insert it into the pre-drilled hole on
the left end of cart front beam.
c) Repeat the procedure for the right
door (L) assembly.
d) Close both doors.
Step 9
(Assemble the side bar tool hanger to the side shelves)
a) Turn over the left side shelf (C).
b) String four hooks (B) with the side bar tool hanger (A), then align
the holes on the end of side bar tool hanger (A) with the holes on
the left side shelf (C).
c) Insert one bolt (AA), one lock washer (CC) and one flat washer
(BB) into each pre-drilled hole. Tighten bolts by hand until secured.
d) Go back and tighten all bolts using the screwdriver provided.
e) Repeat the procedure for the assembly of right side shelf (R) and
side bar tool hanger.
Step 8
(Assemble the body to the cart)
a) Put the body assembly (D) on the top of cart
assembly.
b) Align the two holes on the top of cart right side
panel with the two holes on the right of body
assembly.
c) Insert one bolt (AA) with one lock washer (CC)
and one flat washer (BB) into each pre-drilled
hole.
d) Tighten bolts by hand until secure.
e) Repeat the procedure for the left end
assembly.
f) Go back and tighten all bolts using the
screwdriver provided.
Attention:
Unpack the regulator/hose
assembly (located underneath the
firebox) prior to assembling the grill body
to the cart, and pull out the
regulator/hose to the cart side panel
before doing the next step.
GSF2818KS/GSF2818KS-2
Instruction Manual
Guide d’utilisation
11
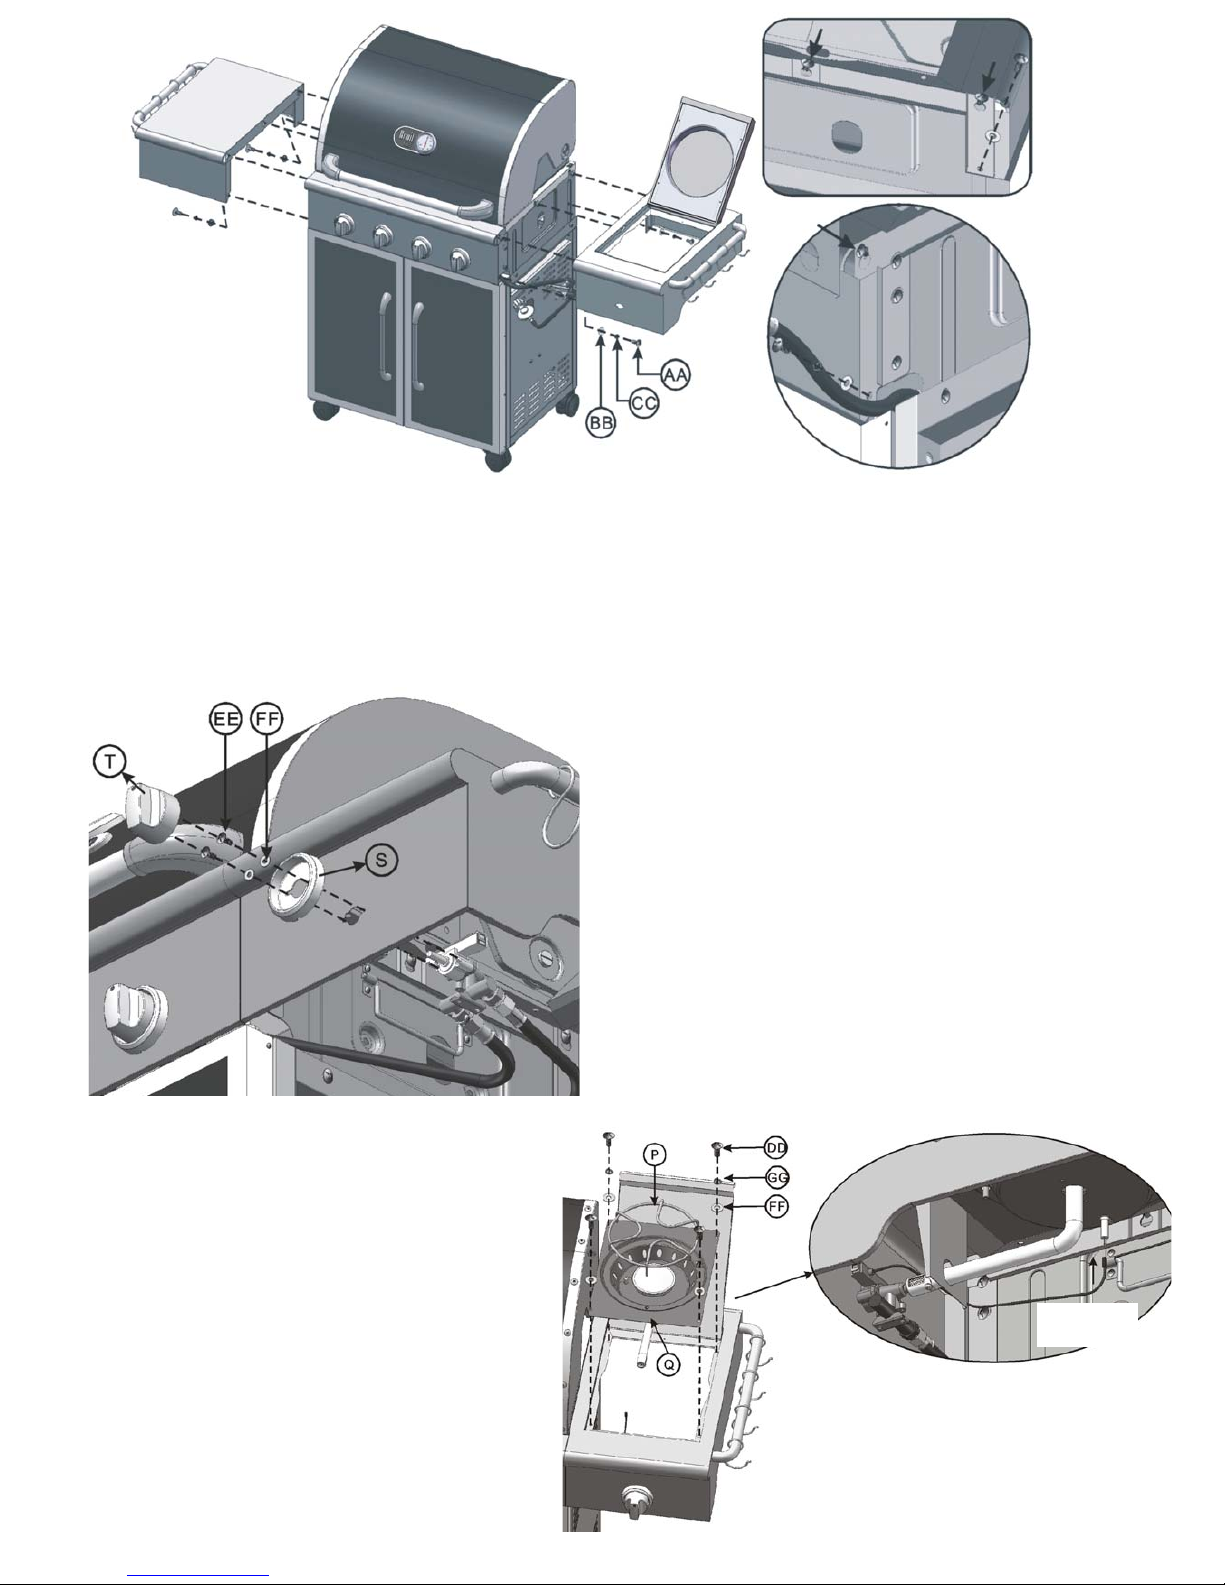
Step 12
(Side burner assembly)
a) Open the side burner lid and place the side burner
assembly (Q) onto the right side shelf. Make certain
the venturi tube is connected properly with valve.
b) Align the four holes on the side burner assembly
(Q) with the four holes on the right side shelf. Insert
one bolt (DD) with one lock washer (GG) and one
flat washer (FF) into each hole, tighten all bolts by
hand.
c) Connect the side burner ignition wire by sliding it
onto the electrode on the side burner assembly (Q).
(See diagram to the right).
d) Go back and tighten all bolts using the screwdriver
provided.
e) Place the side burner support (P) on the side
burner assembl
y (Q)
, then close the side burner lid.
Step 10
(Assemble the side shelves to the body assembly)
a) Loosen the three pre-installed bolts on the right side of body assembly and leave 1/4 of the bolt's length extending from body
assembly.
b) Align the holes on the right side shelf (R) with the bolts extended from the right side of body assembly. Push down the right side
shelf until it locks into place.
c) Align the holes on right side shelf with the holes on the control panel and body assembly.
d) Insert one bolt (AA) with one lock washer (CC) and one flat washer (BB) into each pre-drilled holes.
(See above diagram)
.
Tighten bolts by hand until secure.
e
)
Repeat the procedure for the assembly of left side shelf (C) and body assembly.
Step 11
(Side knob and seat assembly)
a) Align the holes on the side knob seat (S) with the holes on
the right side shelf and the side burner valve. Screw one bolt
(EE) with one flat washer (FF) into each pre-drilled hole by
hand.
b) Tighten the bolts using the screwdriver provided.
c) Insert the side knob (T) onto the valve shaft.
Insert

GSF2818KS/GSF2818KS-2
Instruction Manual
Guide d’utilisation
12
Fully Assembled View
Left Side
Right Side
Step 13
(Heat shield, cooking grates and
warming rack assembly)
a) Place the heat shield (O) onto the heat
shield support.
b) Place the cooking grates (N) upon the
heat shield.
c) Place the warming rack (M) on the
warming rack support as shown.
d) Close the top lid.
Step 14
(Tank connection)
a) Open the cart doors.
b) Place the gas tank on the tank holder and clip it using
the tank clip.
c) Connect the
tank with regulator by screwing the
regulator collar onto the tank valve. (See diagram to
the right)
d) Conduct
the leak test on page 14 to make certain all
connections are
connected securely.
GSF2818KS/GSF2818KS-2
Instruction Manual
Guide d’utilisation
13
Operating Your Grill
CAUTION:
Use only the regulator provided. If a replacement is necessary, call our customer service center. The use of
unauthorized parts
can create an unsafe condition and environment.
The propane gas supply cylinder used
must be constructed and marked in accordance with the Specifications for Propane
Gas Cylinders of the U.S. Department of Transportation (DOT). Only cylinders
with a listed overfill prevention device (OPD)
and marked
“propane” may be used. Cylinders with an OPD will have valve handles with three “lobes” (prongs).
Use only the pressure regulator and hose assembly supplied with your propane barbecue. Replacement pressure regulators and
hose assembly must be those specified by the outdoor cooking gas appliance manufacturer.
Use
only
20-pound cylinders
equipped with a
cylinder connection device compatible with the connection for outdoor cooking appliances. The cylinder must
include
a
collar to protect the cylinder valve.
Do not drop or handle the cylinder roughly.
When the appliance is not in use,
disconnect the cylinder.
Storage
of
the appliance indoors is permissible ONLY if the cylinder is disconnected and removed from the appliance.
Store
cylinder
outdoors and out of the reach of children.
Do not store the cylinder
in a building, garage or other enclosed areas.
Never store your cylinder
where temperatures can reach over 125℉.
Before connecting, make sure there are no
debris caught in the head of the gas cylinder, regulator valve or in the head of the
burner and burner ports. Connect regulator valve and hand tighten firmly. Disconnect the propane cylinder from the regulator
valve when the
grill is not in use. DO NOT obstruct the flow of combustion air or ventilation air to the grill.
Ensure the propane
cylinder has a device for vapour
withdrawal and equipped with a listed overfill prevention device (OPD).
DANGER:
A fire causing death or serious injury may occur if the following is not followed exactly:
Never store or use gasoline or other volatile substances in the vicinity of this grill.
Never store a spare propane cylinder in the vicinity of this grill, or in the vicinity of another potential heat source.
Never fill the propane cy linde r be yond 80% f ull.
This grill is designed to connect to a standard 20 lb L.P. cylinder only, please refer to the Step 13 of assembly instructions for the
installation.
WARNING:
Don’t store spare gas cylinder in or near grill.
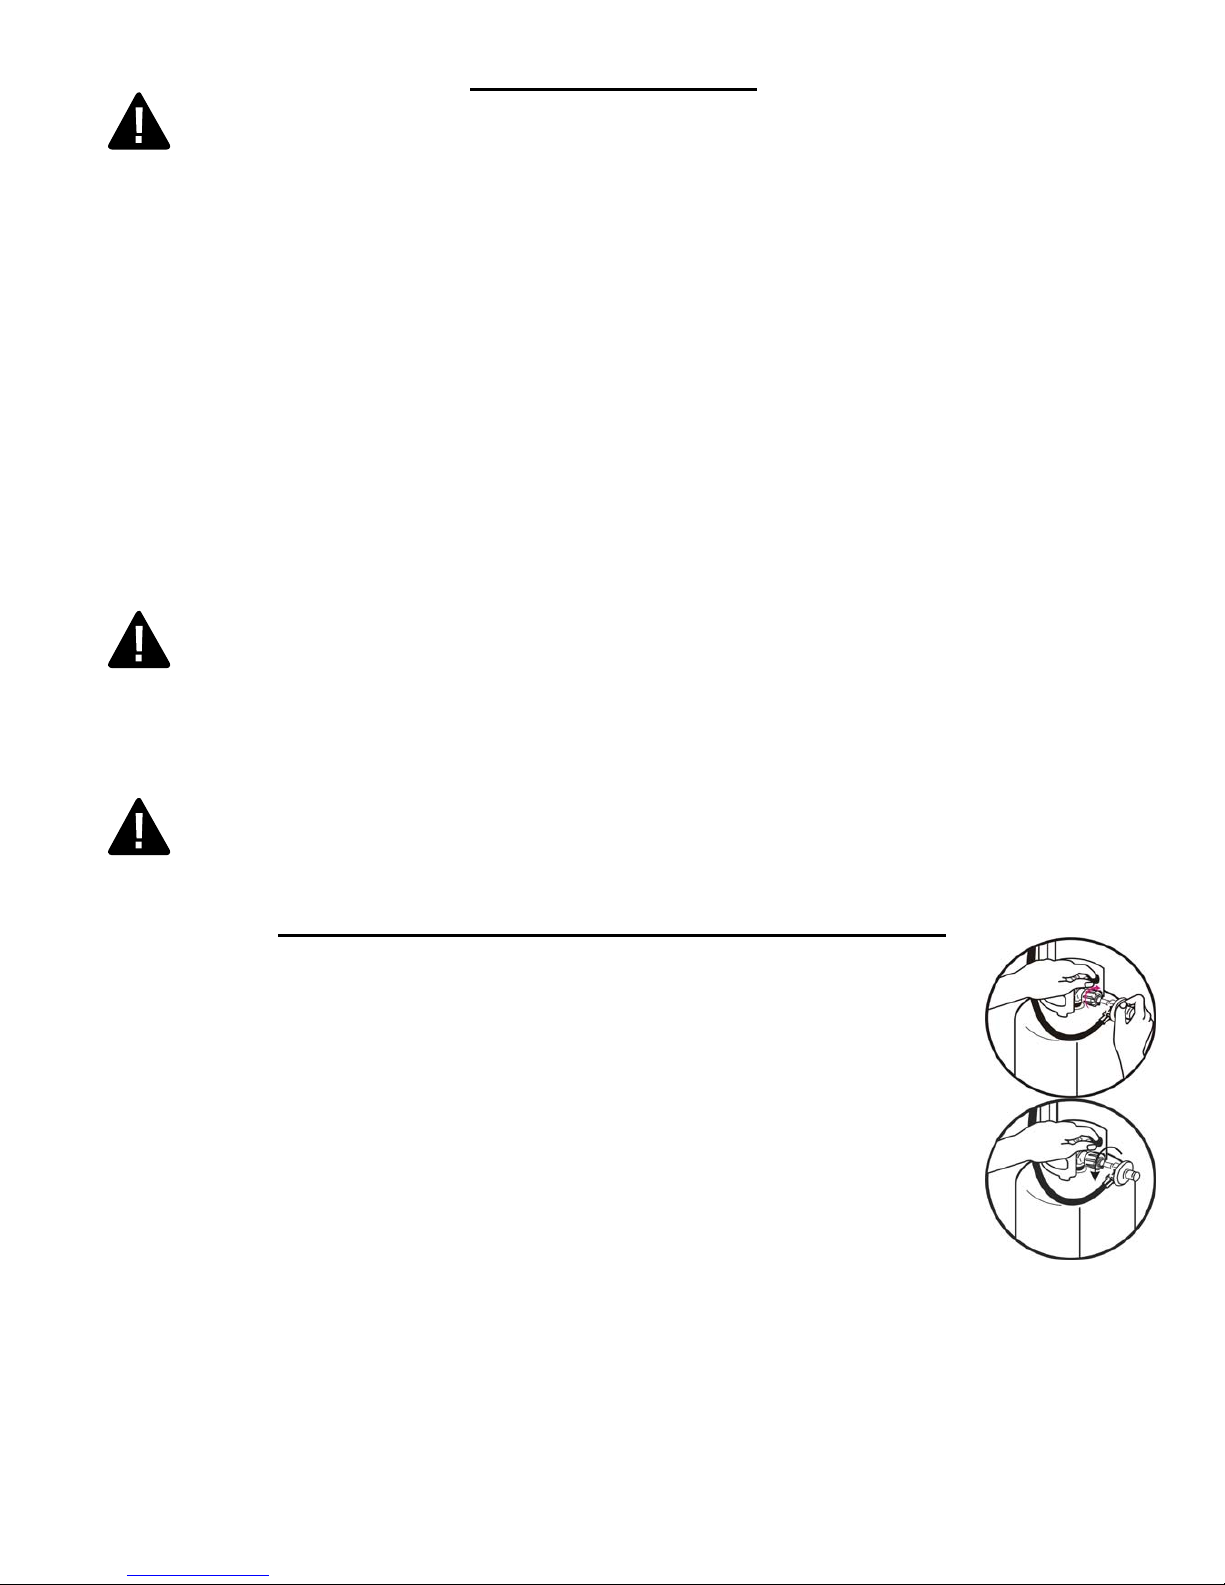
Connecting & Disconnecting The Gas Cylinder
LP (Propane) Gas Supply Connection & Disconnecting
1.
Always place the propane cylinder on the tank holder under the cart.
2.
Always confirm that all burner control knobs are in the OFF position before opening the gas cylinder valve.
3.
Before connection, be sure that there is no debris caught in the head of the gas cylinder, head of
the regulator valve, or in the head of the burner and burner ports.
4.
Always connect the gas supply regulators as follows:
Insert the nipple of the valve coupling into the tank valve and tighten the connection collar
by turning it clockwise with one hand while holding the regulator with the other hand.
(See diagram to right.)
5.
Disconnect the propane cylinder from the regulator valve when the grill is not in use.
6.
Always confirm that all burner control knobs are in the OFF position before disconnecting the gas supply.
7.
Before disconnection, be sure that the tank valve is in OFF position.
8.
Always disconnect the gas supply regulators as follows:
Loosen the connection collar by turning it anti-clockwise with one hand while holding the regulator with the other hand and
take the nipple of the valve out of the tank valve. (See diagram on the right)
Do not obstruct the flow of combustion air and ventilation air to the grill.
Keep ventilation openings of the cylinder enclosure free and clear from debris.
9.
Place dust cap on cylinder valve outlet whenever the cylinder is not in use. Install only the type of dust cap on cylinder valve
outlet that is provided with the cylinder valve. Other types of caps or plugs may result in leakage of propane.
 Loading...