

Brocade Communications Systems ServerIron ADX 10000, ServerIron ADX 8000, ServerIron ADX 4000, ServerIron ADX 1000 Installation Manual
Page 1
DRAFT: BROCADE CONFIDENTIAL
53-1002066-01
25 March 2011
Brocade ServerIron ADX
Installation Guide
Supporting ServerIron ADX 1000, ServerIron ADX 4000,
ServerIron ADX 8000 and ServerIron ADX 10000
Page 2
DRAFT: BROCADE CONFIDENTIAL
Copyright © 2011 Brocade Communications Systems, Inc. All Rights Reserved.
Brocade, the B-wing symbol, BigIron, DCFM, DCX, Fabric OS, FastIron, IronView, NetIron, SAN Health, ServerIron, TurboIron, and
Wingspan are registered trademarks, and Brocade Assurance, Brocade NET Health, Brocade One, Extraordinary Networks,
MyBrocade, VCS, and VDX are trademarks of Brocade Communications Systems, Inc., in the United States and/or in other
countries. Other brands, products, or service names mentioned are or may be trademarks or service marks of their respective
owners.
Notice: This document is for informational purposes only and does not set forth any warranty, expressed or implied, concerning
any equipment, equipment feature, or service offered or to be offered by Brocade. Brocade reserves the right to make changes to
this document at any time, without notice, and assumes no responsibility for its use. This informational document describes
features that may not be currently available. Contact a Brocade sales office for information on feature and product availability.
Export of technical data contained in this document may require an export license from the United States government.
Brocade Communications Systems, Incorporated
Corporate and Latin American Headquarters
Brocade Communications Systems, Inc.
130 Holger Way
San Jose, CA 95134
E-mail: info@brocade.com
European Headquarters
Brocade Communications Switzerland Sàrl
Centre Swissair
Tour B - 4ème étage
29, Route de l'Aéroport
Case Postale 105
CH-1215 Genève 15
Switzerland
Tel: +41 22 799 5640
Fax: +41 22 799 5641
E-mail: emea-info@brocade.com
Asia-Pacific Headquarters
Brocade Communications Systems China HK, Ltd.
No. 1 Guanghua Road
Chao Yang District
Units 2718 and 2818
Beijing 100020, China
Tel: +8610 6588 8888
Fax: +8610 6588 9999
E-mail: china-info@brocade.com
Asia-Pacific Headquarters
Brocade Communications Systems Co., Ltd. (Shenzhen WFOE)
Citic Plaza
No. 233 Tian He Road North
Unit 1308 – 13th Floor
Guangzhou, China
Tel: +8620 3891 2000
Fax: +8620 3891 2111
E-mail: china-info@brocade.com
Document History
Title Publication number Summary of changes Date
Brocade ServerIron ADX Series
Installation Guide
53-1002066-01 New document March 2011
Page 3

Contents
DRAFT: BROCADE CONFIDENTIAL
About This Document
In this chapter . . . . . . . . . . . . . . . . . . . . . . . . . . . . . . . . . . . . . . . . . . . vii
Audience . . . . . . . . . . . . . . . . . . . . . . . . . . . . . . . . . . . . . . . . . . . . . . . vii
Supported hardware and software . . . . . . . . . . . . . . . . . . . . . . . . . . vii
What’s new in this document. . . . . . . . . . . . . . . . . . . . . . . . . . . . . . . vii
Document conventions. . . . . . . . . . . . . . . . . . . . . . . . . . . . . . . . . . . . viii
Text formatting . . . . . . . . . . . . . . . . . . . . . . . . . . . . . . . . . . . . . . . viii
Command syntax conventions . . . . . . . . . . . . . . . . . . . . . . . . . . viii
Notes, cautions, and warnings . . . . . . . . . . . . . . . . . . . . . . . . . . . ix
Getting technical help or reporting errors . . . . . . . . . . . . . . . . . . . . . . ix
Web access . . . . . . . . . . . . . . . . . . . . . . . . . . . . . . . . . . . . . . . . . .ix
E-mail and telephone access . . . . . . . . . . . . . . . . . . . . . . . . . . . . ix
Chapter 1 Product Overview
ServerIron ADX fixed configuration devices . . . . . . . . . . . . . . . . . . . .1
ServerIron ADX 1000. . . . . . . . . . . . . . . . . . . . . . . . . . . . . . . . . . . 1
ServerIron ADX chassis devices. . . . . . . . . . . . . . . . . . . . . . . . . . . . . . 2
ServerIron ADX 4000. . . . . . . . . . . . . . . . . . . . . . . . . . . . . . . . . . . 2
ServerIron ADX 10000 (ADX 10K) chassis. . . . . . . . . . . . . . . . . . 3
ServerIron ADX Chassis device modules. . . . . . . . . . . . . . . . . . . . . . . 4
Ethernet interface modules . . . . . . . . . . . . . . . . . . . . . . . . . . . . . 4
Application Switch Module (ASM) . . . . . . . . . . . . . . . . . . . . . . . . . 5
Management Module (MM). . . . . . . . . . . . . . . . . . . . . . . . . . . . . . 6
Switch Fabric Module (SFM) . . . . . . . . . . . . . . . . . . . . . . . . . . . . . 6
SSL Expansion Module . . . . . . . . . . . . . . . . . . . . . . . . . . . . . . . . . 7
Power supplies . . . . . . . . . . . . . . . . . . . . . . . . . . . . . . . . . . . . . . . . . . .7
ServerIron ADX 1000 power supplies. . . . . . . . . . . . . . . . . . . . . . 8
ServerIron ADX chassis device power supplies . . . . . . . . . . . . . . 8
Cooling systems . . . . . . . . . . . . . . . . . . . . . . . . . . . . . . . . . . . . . . . . . . 8
ServerIron ADX 1000 cooling system . . . . . . . . . . . . . . . . . . . . . . 9
ServerIron ADX 4000 and ServerIron ADX 8000 cooling systems9
ServerIron ADX 10000 cooling systems. . . . . . . . . . . . . . . . . . .10
Rack mounting . . . . . . . . . . . . . . . . . . . . . . . . . . . . . . . . . . . . . . . . . .11
Brocade ServerIron ADX Installation Guide iii
53-1002066-01
Page 4

DRAFT: BROCADE CONFIDENTIAL
Chapter 2 Installing ServerIron ADX
Installation precautions . . . . . . . . . . . . . . . . . . . . . . . . . . . . . . . . . . .13
General precautions . . . . . . . . . . . . . . . . . . . . . . . . . . . . . . . . . .14
Lifting precautions . . . . . . . . . . . . . . . . . . . . . . . . . . . . . . . . . . . . 15
Power precautions . . . . . . . . . . . . . . . . . . . . . . . . . . . . . . . . . . . . 15
Installing ServerIron ADX . . . . . . . . . . . . . . . . . . . . . . . . . . . . . . . . . . 17
Preparing the installation site. . . . . . . . . . . . . . . . . . . . . . . . . . .18
Installing the ServerIron ADX chassis in a rack . . . . . . . . . . . . .18
Installing modules in ServerIron ADX chassis devices . . . . . . . 21
Installing an SSL Expansion module onto a management
module . . . . . . . . . . . . . . . . . . . . . . . . . . . . . . . . . . . . . . . . . . . . . 24
Installing power supplies. . . . . . . . . . . . . . . . . . . . . . . . . . . . . . .26
Connecting AC power . . . . . . . . . . . . . . . . . . . . . . . . . . . . . . . . . . 29
Connecting DC power to a chassis . . . . . . . . . . . . . . . . . . . . . . . 31
Connecting DC power to ServerIron ADX chassis devices. . . . .34
Attaching a management station. . . . . . . . . . . . . . . . . . . . . . . . . . . . 36
Attaching a PC or terminal to the Console port or Ethernet port36
Attaching the management module Ethernet port to a network37
Powering On the power source. . . . . . . . . . . . . . . . . . . . . . . . . . . . . .37
Uninstalling ServerIron ADX modules . . . . . . . . . . . . . . . . . . . . . . . . 38
Uninstalling ServerIron ADX 4000, 8000 & 10000
interface modules . . . . . . . . . . . . . . . . . . . . . . . . . . . . . . . . . . . .38
Uninstalling an Application Switch module . . . . . . . . . . . . . . . .39
Uninstalling a Management module . . . . . . . . . . . . . . . . . . . . .40
Uninstalling a Switch Fabric module . . . . . . . . . . . . . . . . . . . . .40
Uninstalling a Fan module. . . . . . . . . . . . . . . . . . . . . . . . . . . . . .40
Uninstalling a Power Supply . . . . . . . . . . . . . . . . . . . . . . . . . . . . 41
Installing ServerIron ADX modules in a running system. . . . . . . . . . 41
Installing a management module in a running system. . . . . . . 41
Installing an ASM module in a running system . . . . . . . . . . . . .41
Installing an SFM module in a running system . . . . . . . . . . . . . 41
Installing an Interface module in a running system . . . . . . . . .42
Installing an Power Supplies in a running system . . . . . . . . . . . 42
Installing an fan trays in a running system . . . . . . . . . . . . . . . .42
Verifying proper operation . . . . . . . . . . . . . . . . . . . . . . . . . . . . . . . . .42
Observing the LEDs - ServerIron ADX 1000. . . . . . . . . . . . . . . . 42
Matching LEDs to locations on the ServerIron ADX 1000 . . . .44
Observing the LEDs - ServerIron ADX chassis devices . . . . . . .45
Matching LEDs to locations on ServerIron ADX chassis device
modules . . . . . . . . . . . . . . . . . . . . . . . . . . . . . . . . . . . . . . . . . . . . 50
Replacing a Fan Tray. . . . . . . . . . . . . . . . . . . . . . . . . . . . . . . . . . . . . . 51
Replacing the ServerIron ADX 1000 Fan Tray . . . . . . . . . . . . . .52
Replacing the ServerIron ADX 4000 or
ServerIron ADX 8000 Fan Tray . . . . . . . . . . . . . . . . . . . . . . . . . .52
Replacing the ServerIron ADX 10000 Fan Tray . . . . . . . . . . . . . 53
Replacing the air filter in the ServerIron ADX 10000 . . . . . . . .55
iv Brocade ServerIron ADX Installation Guide
53-1002066-01
Page 5

DRAFT: BROCADE CONFIDENTIAL
Appendix A Hardware Specifications
In this appendix. . . . . . . . . . . . . . . . . . . . . . . . . . . . . . . . . . . . . . . . . .57
Hardware specifications . . . . . . . . . . . . . . . . . . . . . . . . . . . . . . . . . . . 57
Power specifications . . . . . . . . . . . . . . . . . . . . . . . . . . . . . . . . . .57
Physical dimensions . . . . . . . . . . . . . . . . . . . . . . . . . . . . . . . . . .58
Operating environment . . . . . . . . . . . . . . . . . . . . . . . . . . . . . . . .58
Storage environment . . . . . . . . . . . . . . . . . . . . . . . . . . . . . . . . . .59
Safety agency approvals . . . . . . . . . . . . . . . . . . . . . . . . . . . . . . .59
Electromagnetic approvals . . . . . . . . . . . . . . . . . . . . . . . . . . . . . 59
Port specifications . . . . . . . . . . . . . . . . . . . . . . . . . . . . . . . . . . . . . . .59
Console Port Pin assignments . . . . . . . . . . . . . . . . . . . . . . . . . .60
Management Port Pin assignments . . . . . . . . . . . . . . . . . . . . . .61
Appendix B ServerIron ADX 8000
ServerIron ADX 8000. . . . . . . . . . . . . . . . . . . . . . . . . . . . . . . . . .63
ServerIron ADX 8000 slot assignments . . . . . . . . . . . . . . . . . . .64
Appendix C Regulatory Statements
U.S.A. . . . . . . . . . . . . . . . . . . . . . . . . . . . . . . . . . . . . . . . . . . . . . . . . . .67
Industry Canada statement . . . . . . . . . . . . . . . . . . . . . . . . . . . . . . . .67
Europe and Australia. . . . . . . . . . . . . . . . . . . . . . . . . . . . . . . . . . . . . . 67
Germany. . . . . . . . . . . . . . . . . . . . . . . . . . . . . . . . . . . . . . . . . . . . . . . .67
Japan . . . . . . . . . . . . . . . . . . . . . . . . . . . . . . . . . . . . . . . . . . . . . . . . . . 68
Power cords (Japan Denan) . . . . . . . . . . . . . . . . . . . . . . . . . . . . . . . .68
Korea . . . . . . . . . . . . . . . . . . . . . . . . . . . . . . . . . . . . . . . . . . . . . . . . . .68
Appendix D Cautions and Danger
Cautions. . . . . . . . . . . . . . . . . . . . . . . . . . . . . . . . . . . . . . . . . . . . . . . . 71
Danger . . . . . . . . . . . . . . . . . . . . . . . . . . . . . . . . . . . . . . . . . . . . . . . . . 81
Brocade ServerIron ADX Installation Guide v
53-1002066-01
Page 6

DRAFT: BROCADE CONFIDENTIAL
vi Brocade ServerIron ADX Installation Guide
53-1002066-01
Page 7

About This Document
In this chapter
•Audience. . . . . . . . . . . . . . . . . . . . . . . . . . . . . . . . . . . . . . . . . . . . . . . . . . . . . . vii
•Supported hardware and software. . . . . . . . . . . . . . . . . . . . . . . . . . . . . . . . . vii
•What’s new in this document . . . . . . . . . . . . . . . . . . . . . . . . . . . . . . . . . . . . . vii
•Document conventions . . . . . . . . . . . . . . . . . . . . . . . . . . . . . . . . . . . . . . . . . . viii
•Getting technical help or reporting errors . . . . . . . . . . . . . . . . . . . . . . . . . . . . ix
DRAFT: BROCADE CONFIDENTIAL
Audience
This document is designed for system administrators with a working knowledge of Layer 2 and
Layer 3 switching and routing.
If you are using a Brocade Layer 3 Switch, you should be familiar with the following protocols if
applicable to your network – IP, RIP, OSPF, BGP, ISIS, IGMP, PIM, DVMRP, and VRRP.
Supported hardware and software
In those instances in which procedures or parts of procedures documented here apply to some
switches but not to others, this guide identifies exactly which switches are supported and which are
not.
The following hardware platforms are supported by this release:
• ServerIron ADX 1000
• ServerIron ADX 4000,
• ServerIron ADX 8000
• ServerIron ADX 10000 (ADX 10K)
What’s new in this document
For further information about new features and documentation updates for this release, refer to
the release notes.
Brocade ServerIron ADX Installation Guide vii
53-1002066-01
Page 8

Document conventions
This section describes text formatting conventions and important notice formats used in this
document.
Text formatting
The narrative-text formatting conventions that are used are as follows.
bold text Identifies command names
italic text Provides emphasis
DRAFT: BROCADE CONFIDENTIAL
Identifies the names of user-manipulated GUI elements
Identifies keywords and operands
Identifies text to enter at the GUI or CLI
Identifies variables
Identifies paths and Internet addresses
Identifies document titles
code text Identifies CLI output
Identifies command syntax examples
For readability, command names in the narrative portions of this guide are presented in mixed
lettercase: for example, switchShow. In actual examples, command lettercase is often all
lowercase. Otherwise, this manual specifically notes those cases in which a command is case
sensitive.
Command syntax conventions
Command syntax in this manual follows these conventions:
command Commands are printed in bold.
--option, option Command options are printed in bold.
-argument, arg Arguments.
[ ] Optional element.
variable Variables are printed in italics. In the help pages, values are underlined
enclosed in angled brackets < >.
or
... Repeat the previous element, for example “member[;member...]”
value Fixed values following arguments are printed in plain font. For example,
--show WWN
| Boolean. Elements are exclusive. Example:
viii Brocade ServerIron ADX Installation Guide
--show -mode egress | ingress
53-1002066-01
Page 9
DRAFT: BROCADE CONFIDENTIAL
NOTE
ATTENTION
CAUTION
DANGER
Notes, cautions, and warnings
The following notices and statements are used in this manual. They are listed below in order of
increasing severity of potential hazards.
A note provides a tip, guidance or advice, emphasizes important information, or provides a reference
to related information.
An Attention statement indicates potential damage to hardware or data.
A Caution statement alerts you to situations that can be potentially hazardous to you or cause
damage to hardware, firmware, software, or data.
A Danger statement indicates conditions or situations that can be potentially lethal or extremely
hazardous to you. Safety labels are also attached directly to products to warn of these conditions
or situations.
Getting technical help or reporting errors
Brocade is committed to ensuring that your investment in our products remains cost-effective. If
you need assistance, or find errors in the manuals, contact Brocade using one of the following
options.
Web access
The Knowledge Portal (KP) contains the latest version of this guide and other user guides for the
product. You can also report errors on the KP.
Log in to my.Brocade.com, click the Product Documentation tab, then click on the link to the
Knowledge Portal (KP). Then click on Cases > Create a New Ticket to report an error. Make sure you
specify the document title in the ticket description.
E-mail and telephone access
Go to http://www.brocade.com/services-support/index.page for the latest e-mail and telephone
contact information.
Brocade ServerIron ADX Installation Guide ix
53-1002066-01
Page 10

DRAFT: BROCADE CONFIDENTIAL
x Brocade ServerIron ADX Installation Guide
53-1002066-01
Page 11

DRAFT: BROCADE CONFIDENTIAL
Mgmt
Lnk
Act
Lnk
Act
1
2
3
456
7
8
Con
P1
P2 Fn
12
1
2
IN
OUT
Aux
Con
USB
1
9
10
11
12
13
14
15
16
Aux1 Aux2
Chapter
Product Overview
ServerIron ADX fixed configuration devices
This section describes the ServerIron ADX 1000, ServerIron ADX 4000, ServerIron ADX 8000 and
ServerIron ADX 10000 chassis.
ServerIron ADX 1000
Figure 1 shows the ServerIron ADX 1000 chassis for each model.
FIGURE 1 ServerIron ADX 1000 Chassis
ServerIron ADX 1000 is shipped in one of these base configurations:
1
• 8 x 1 Gigabit Ethernet ports with 1application core
• 16 x 1 Gigabit Ethernet ports with 2 application cores
• 16 x 1 Gigabit Ethernet ports with 4 applications cores
• 16 x 1 Gigabit Ethernet ports and 2 x 10 Gigabit Ethernet ports with 4 Application Cores
• 16 x 1 Gigabit Ethernet ports with 2 application cores and hardware SSL Acceleration
• 16 x 1 Gigabit Ethernet ports with 4 applications cores and hardware SSL Acceleration
• 16 x 1 Gigabit Ethernet ports and 2 x 10 Gigabit Ethernet ports with 4 Application Cores and
hardware SSL Acceleration
Each of these configurations corresponds to a base license. ServerIron ADX provides the ability for
On-Demand Upgrades which allows you to upgrade the features from any of the base license
configurations to the more advanced configurations. This is done by purchasing a license from
Brocade which enables more ServerIron ADX 1000 features.
ServerIron ADX 1000 basics (all models):
• 1 RU form factor
• Two hot-pluggable AC or DC power supplies (one+one redundant)
By default, the system ships with one power supply.
• One hot-pluggable fan tray
• Front-to-back air cooling
Brocade ServerIron ADX Installation Guide 1
53-1002066-01
Page 12
DRAFT: BROCADE CONFIDENTIAL
SI-12GC
SI-SFM
Lnk / Act Lnk / Act
SI-12GC
Lnk / Act Lnk / Act
100-240 VAC
48 VDC
SEE REAR LABEL
PS1 PS2
ASM1
ASM2
MM1
LC1
LC2
SF1
F
A
N
Console
Pwr
SI-MM
Mgmt
USB
Aux1
Aux2
Aux
Console
Act
BP
In
Out
ASM
Console
Pwr
SI-ASM
1 2 3 4 5 6 7 8
Application Switch Module
BP
In
Out
ASM
Console
Pwr
SI-ASM
1 2 3 4 5 6 7 8
Application Switch Module
Pwr
Pwr
Pwr
2
1
12
11
2
1
12
11
ServerIron ADX chassis devices
1
ServerIron ADX chassis devices
This section describes the ServerIron ADX 4000 and ServerIron ADX 10000 chassis devices. The
ServerIron ADX 8000 chassis device has been replaced by the ServerIron ADX 10000 chassis
device. Although no longer available for purchase, it is still supported by Brocade and is described
in Appendix B, “ServerIron ADX 8000”.
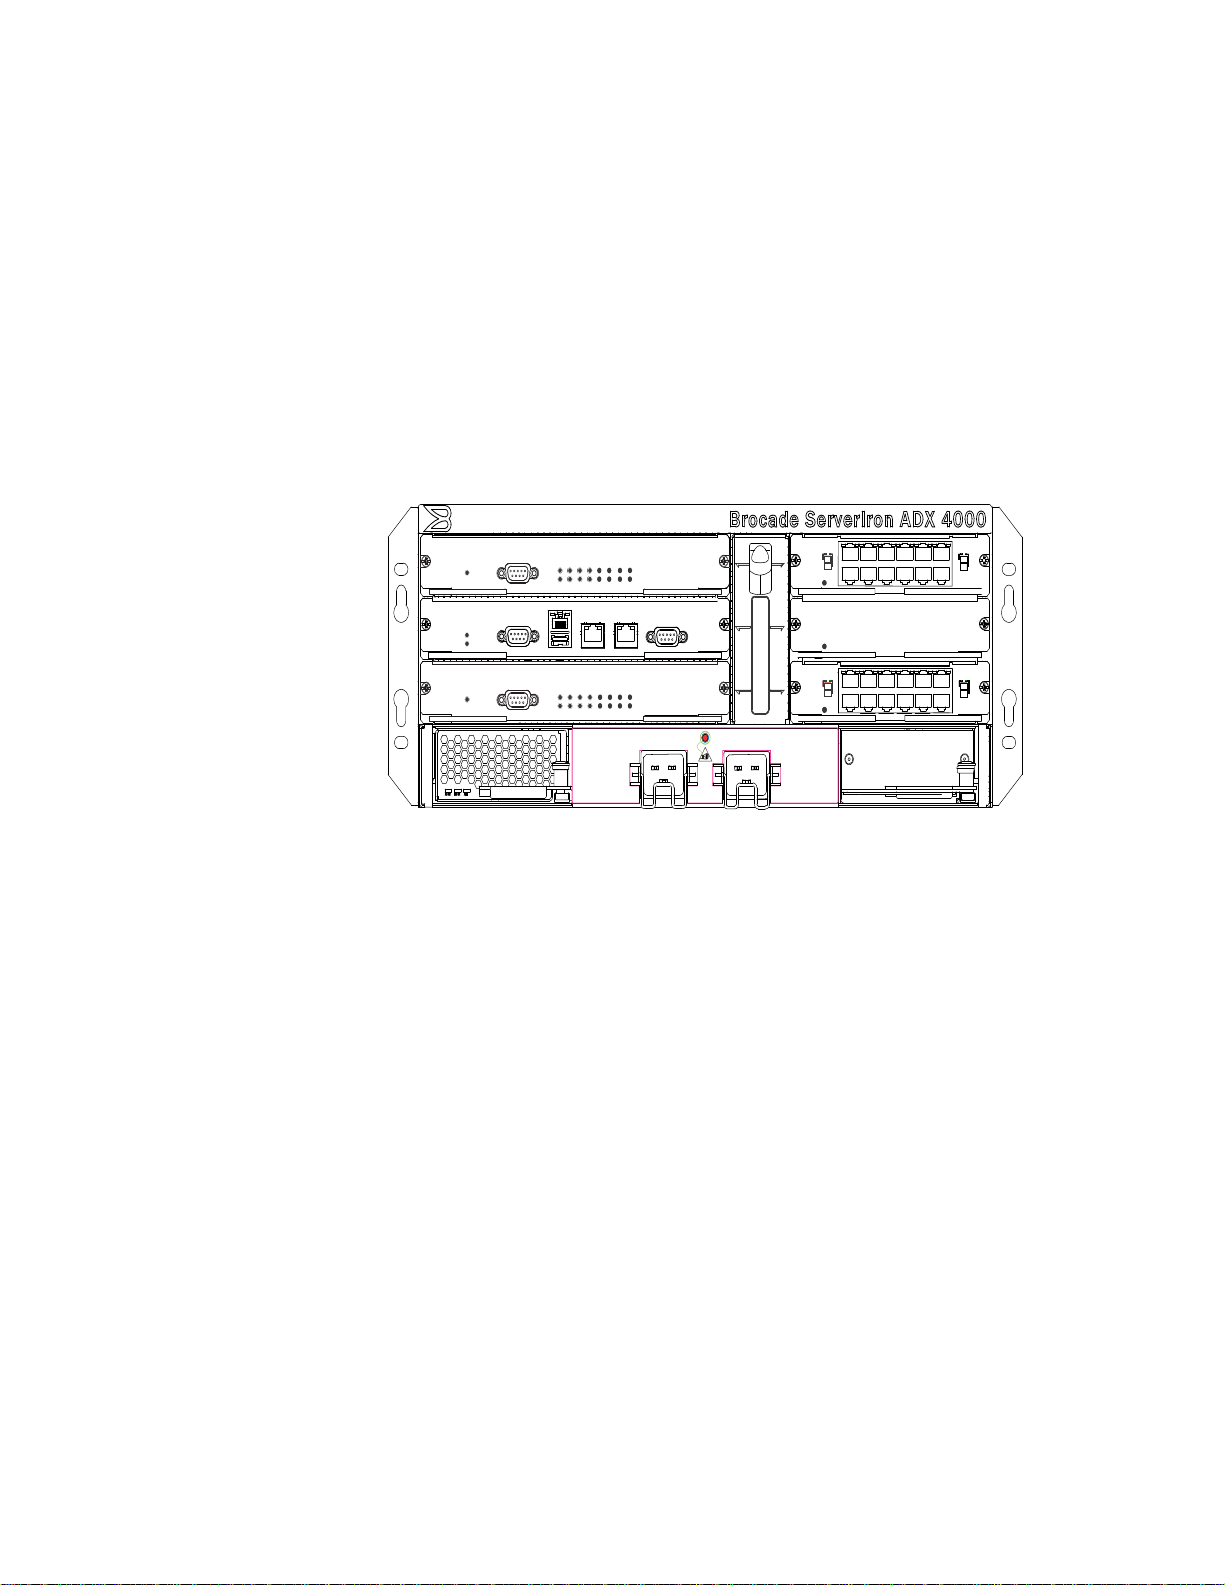
ServerIron ADX 4000
Figure 2 shows the ServerIron ADX 4000 chassis.
FIGURE 2 ServerIron ADX 4000 Chassis
ServerIron ADX 4000 chassis basics:
• 4 RU form factor
• Two hot-pluggable AC or DC power supplies (one+one redundant)
One power supply is required, and one is optional for redundancy. By default, the system ships
with one power supply.
• One hot-pluggable fan tray with three fans
• Side-to-side air cooling - left-to-right
• Card slots to accommodate modules
A fully-loaded ServerIron ADX 4000 can accommodate the following components:
• Two Ethernet Interface Modules
• Two Application Services Modules (ASM)
• One Management Module (MM)
• One Switch Fabric Module (SFM)
2 Brocade ServerIron ADX Installation Guide
• One fan tray
• Two AC or DC power supplies (one required, one redundant)
Slot ordering for ServerIron ADX 4000 is important. Refer to “Installing modules in ServerIron ADX
chassis devices” on page 21.
53-1002066-01
Page 13
DRAFT: BROCADE CONFIDENTIAL
Brocade ServerIron ADX 10000
rwP
elosnoC
MSA
PB
1
2
3
4
5
6
7
8
nI
tuO
eludoM hctiwS noitacilppA
MSA-IS
r w P
e l o s n o C
MSA
PB
1
2
3
4
5
6
7
8
nI
tuO
eludoM hctiwS noitacilppA
MSA-IS
rwP
MSA
PB
1
2
3
4
5
6
7
8
nI
tuO
eludoM hctiwS noitacilppA
MSA-IS
rwP
e l o s n o C
MSA
PB
1
2
3
4
5
6
7
8
nI
tuO
eludoM hctiwS noitacilppA
MSA-IS
MFS-IS
rwP
MFS-IS
rwP
CG21-IS
rwP
/ knLtcA/ knLtcA
1
2
11
21
CG21-IS
rwP
/ knLtcA/ knLtcA
1
2
11
21
CG21-IS
rwP
/ knLtcA
1
2
11
21
CG21-IS
rwP
/ knLtcA
1
2
11
21
AC OK DC OK ALM
SYSTEM
AC OK DC OK ALM
SYSTEM
AC OK DC OK ALM
SYSTEM
AC OK DC OK ALM
SYSTEM
Pwr
Pwr
Pwr
Pwr
Act
Act
SI-MM
Console
Console
Console
USB
Mgmt
Mgmt
USB
Aux1
Aux1
Aux2
Aux2
Aux
Aux
Console
Console
SI-MM
/ knLtcA
/ knLtcA
Console
Console
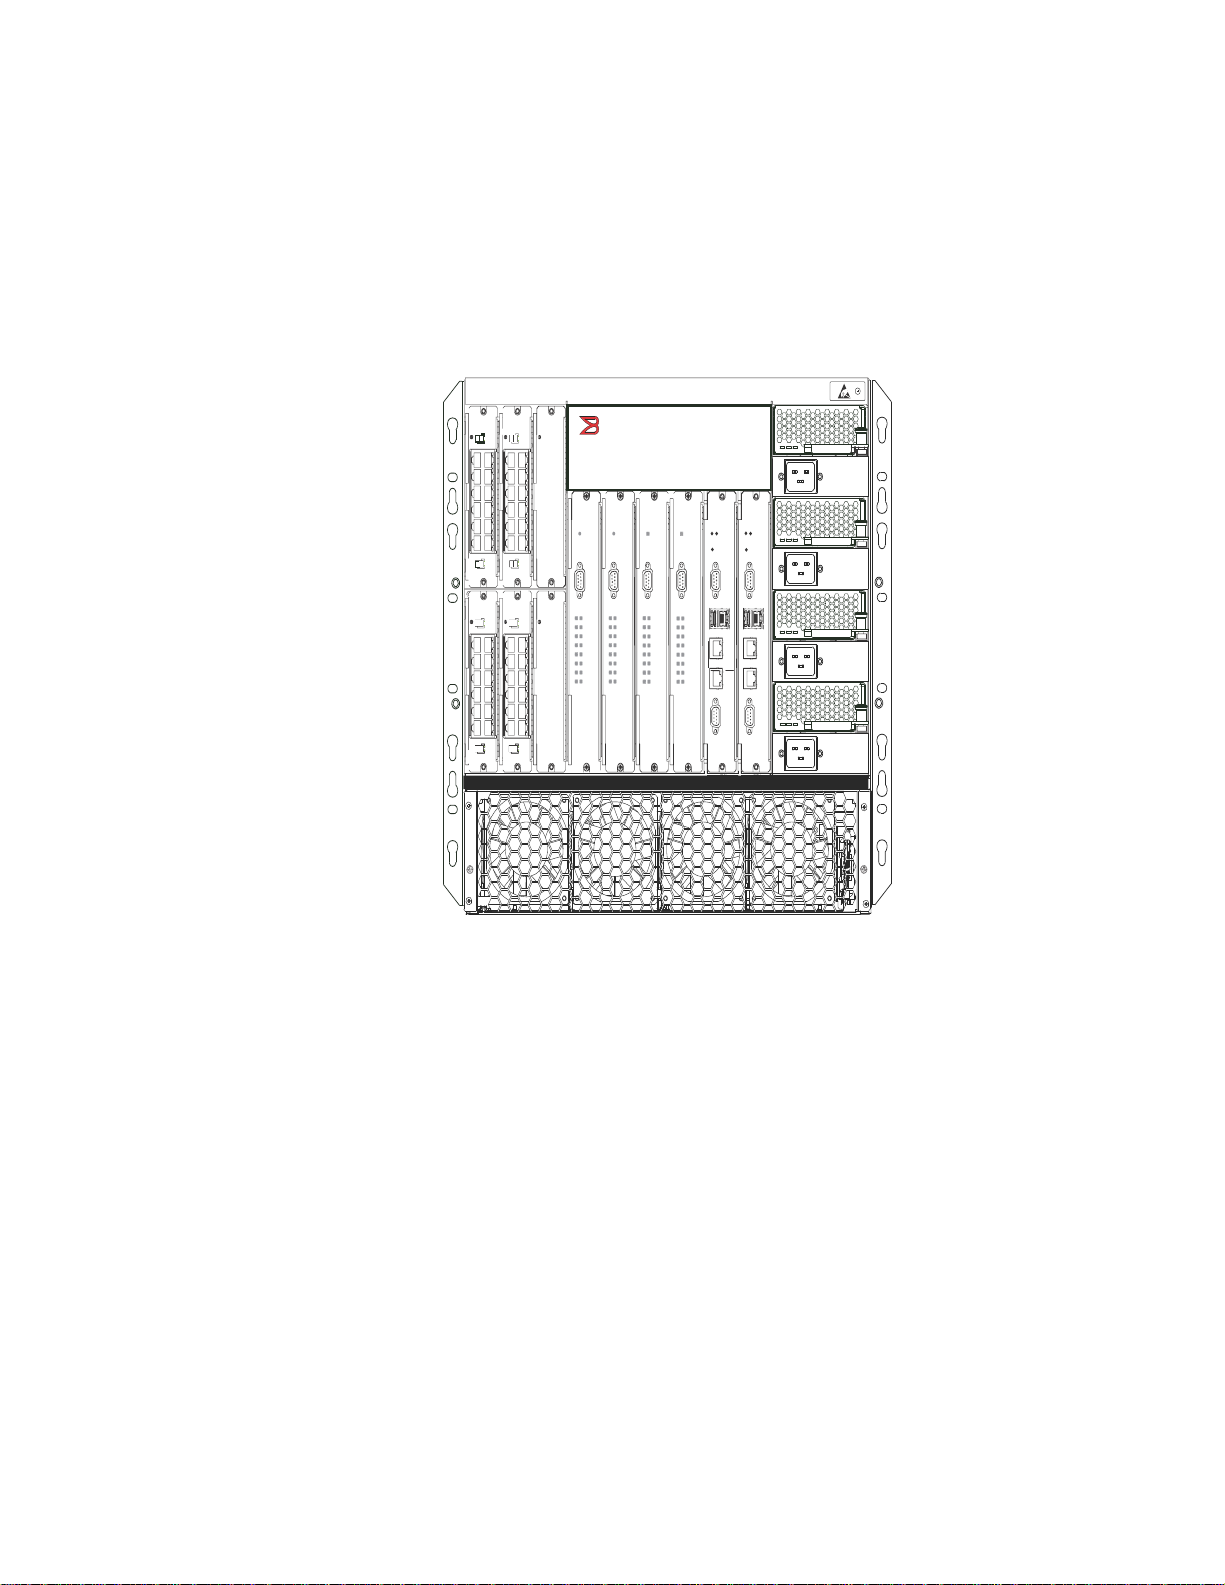
ServerIron ADX 10000 (ADX 10K) chassis
Figure 3 shows the ServerIron ADX 10000 chassis.
FIGURE 3 ServerIron ADX 10000 Chassis
ServerIron ADX chassis devices
1
ServerIron ADX 10000 chassis basics:
• 10RU form factor
• Four hot-pluggable AC or DC power supplies (two+two redundant)
Two power supplies are required, and two are optional for redundancy. By default, the system
ships with two power supplies.
• One hot-pluggable fan tray with six fans
• Front-to-Back air cooling -
• Card slots to accommodate modules
A fully-loaded ServerIron ADX 10000 can accommodate the following components:
• Four Ethernet Interface Modules
• Four Application Services Modules (ASM)
• Two Management Modules (MM)
• Two Switch Fabric Modules (SFM)
• One fan tray
• Four AC or DC power supplies (two required, one or two redundant)
Brocade ServerIron ADX Installation Guide 3
53-1002066-01
Page 14
DRAFT: BROCADE CONFIDENTIAL
ServerIron ADX Chassis device modules
1
Slot ordering for ServerIron ADX 10000 is important. Refer to “Installing modules in ServerIron ADX
chassis devices” on page 21.
ServerIron ADX Chassis device modules
The ServerIron ADX chassis devices accommodate the modules described in this section:
• “Ethernet interface modules”
• “Application Switch Module (ASM)”
• “Management Module (MM)”
• “Switch Fabric Module (SFM)”
Ethernet interface modules
The following Ethernet interface modules are supported:
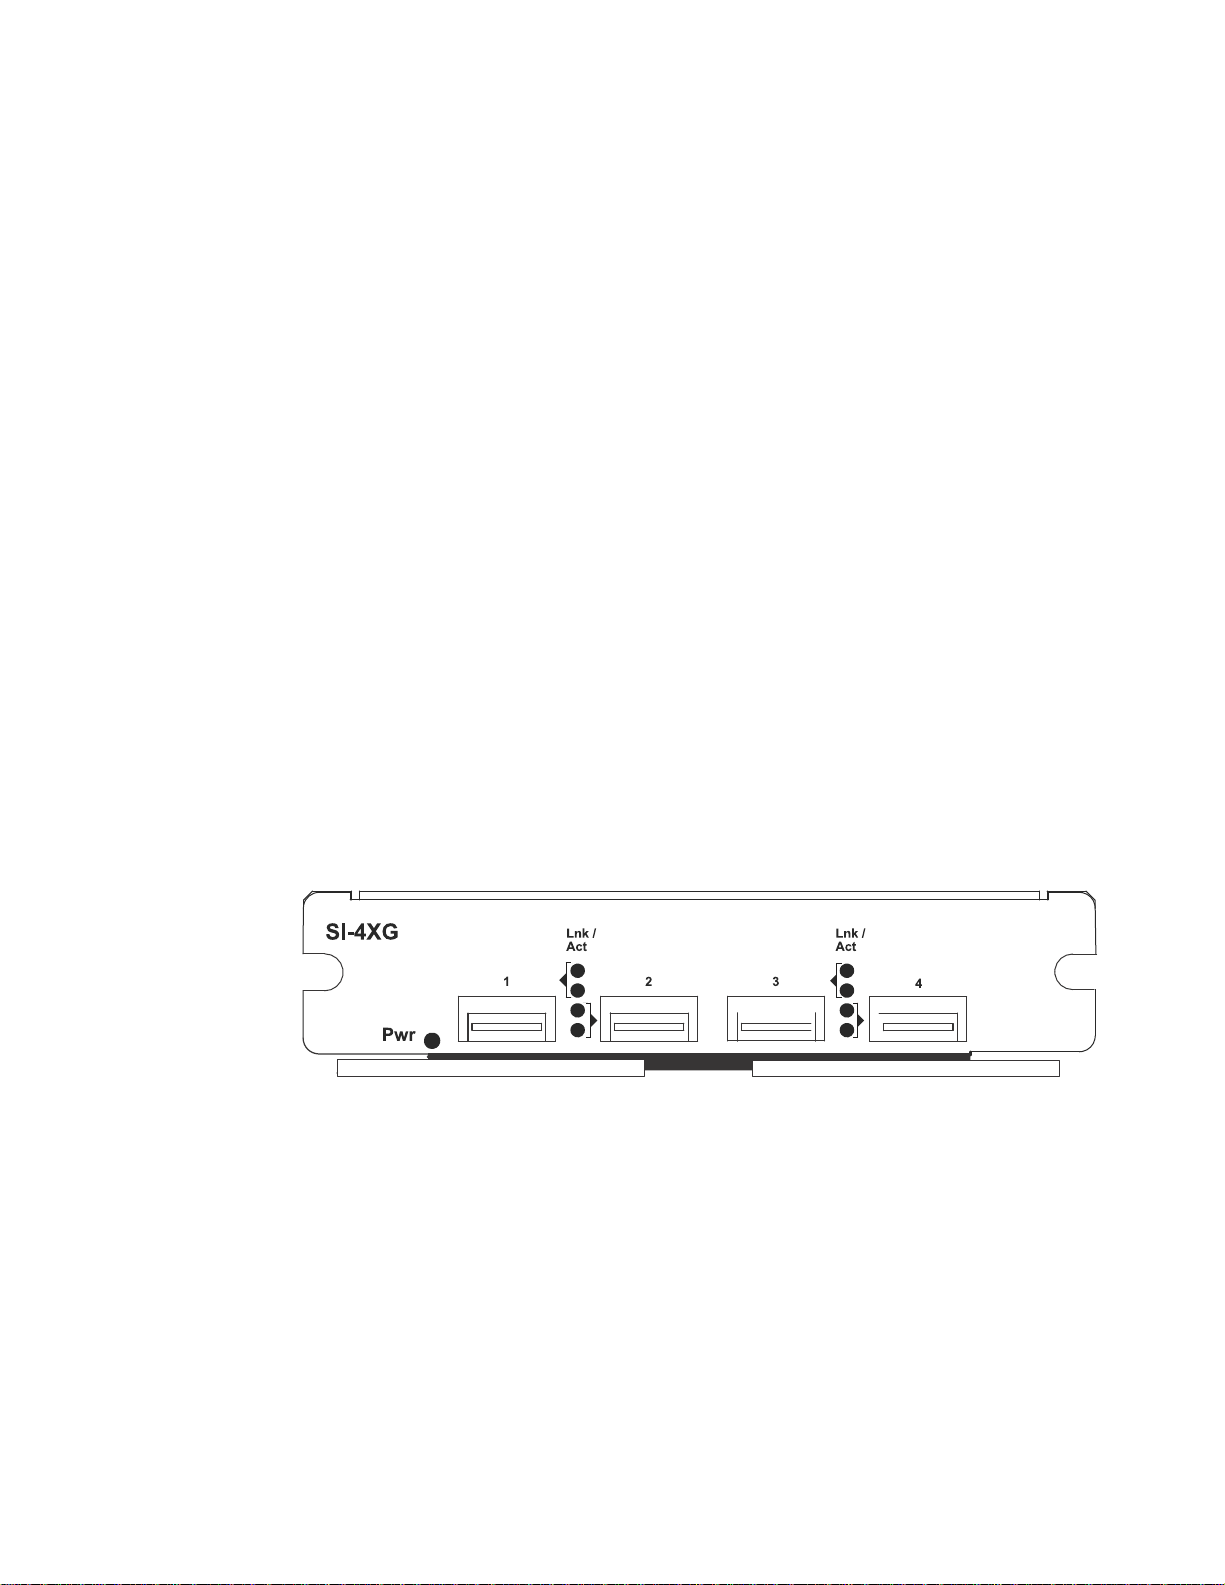
• 4 x 10G XFP fiber
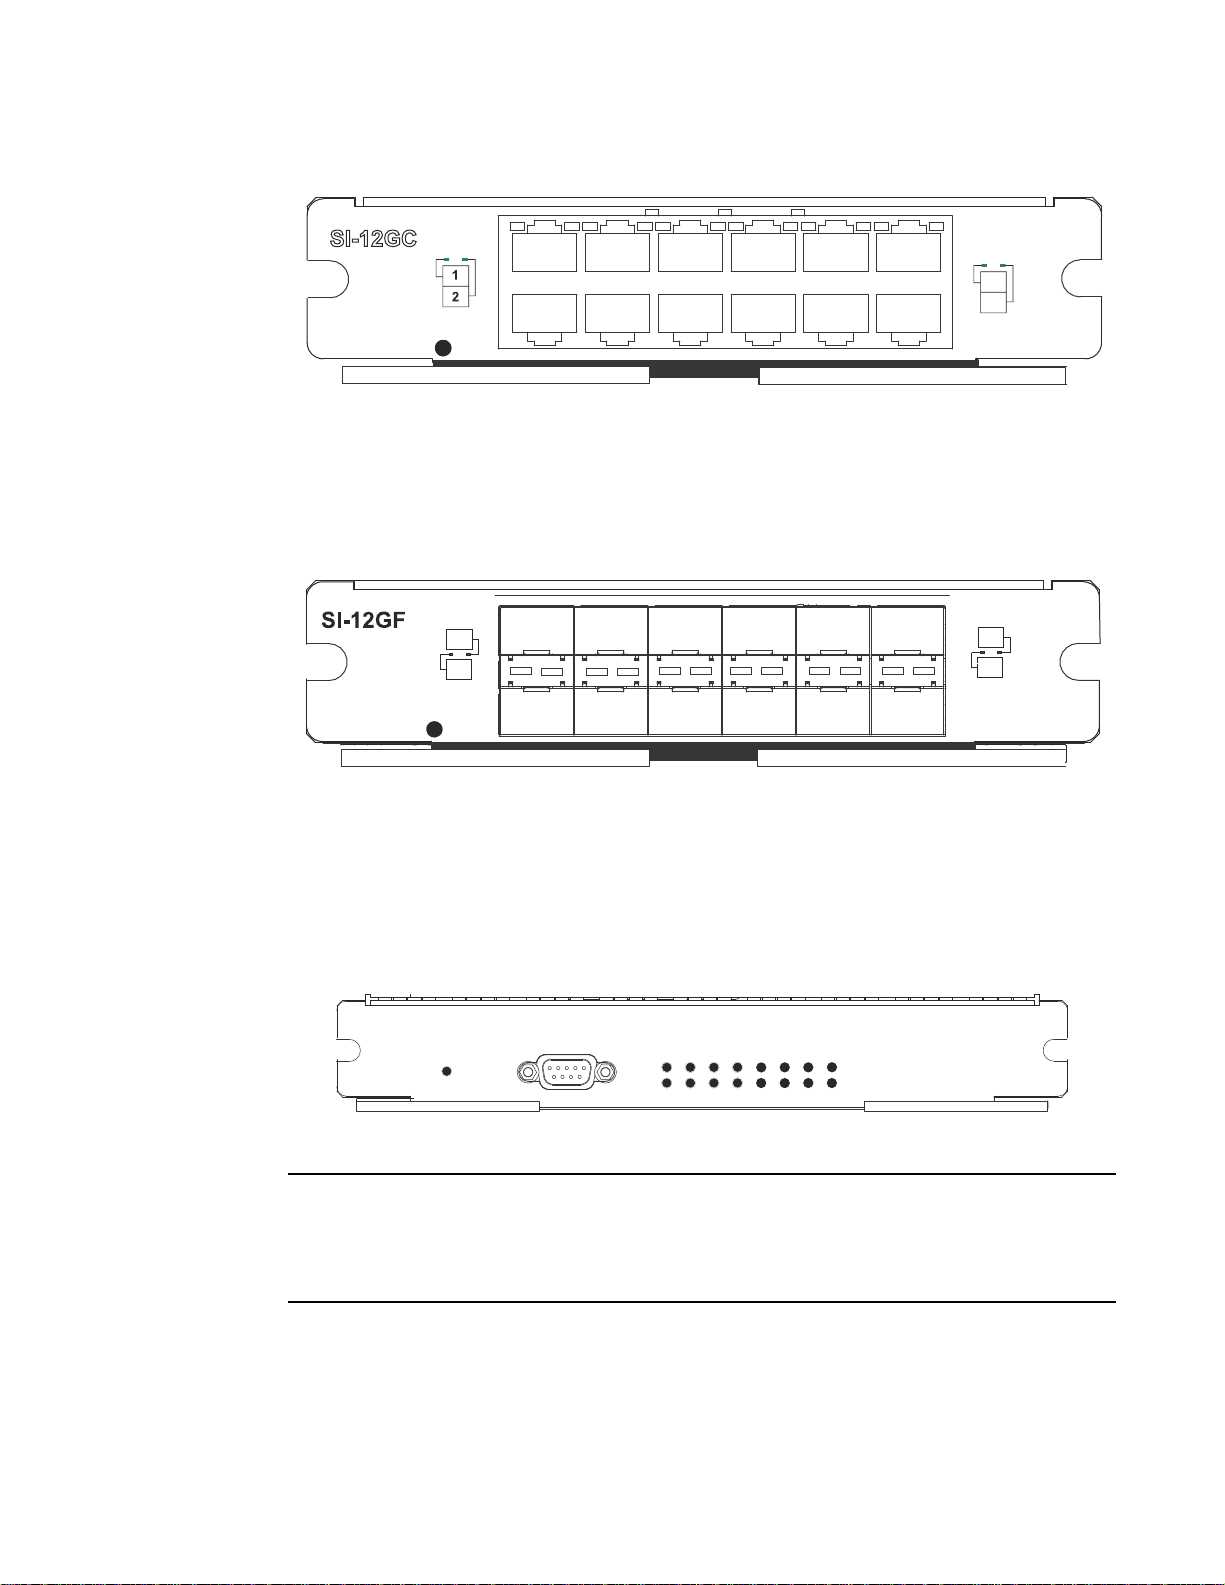
• 12 x 1G copper
• 12 x 1G SFP fiber
4 x 10G XFP Fiber
Figure 4 shows the front panel of the 4 x 10G XFP fiber module.
FIGURE 4 4 x 10G XFP Fiber Modular Ethernet Interface Module
12 x 1G Copper
Figure 5 shows the front panel for the 12 x 1G copper module.
FIGURE 5 12 x 1G Copper Modular Ethernet Interface Module
4 Brocade ServerIron ADX Installation Guide
53-1002066-01
Page 15
DRAFT: BROCADE CONFIDENTIAL
NOTE
SI-12GC
Lnk / Act
Pwr
Lnk / Act
11
12
Lnk / Act
1
2
Lnk / Act
Pwr
11
12
Lnk / Act
BP
In
Out
ASM
Console
Pwr
SI-ASM
1 2 3 4 5 6 7 8
Application Switch Module
ServerIron ADX Chassis device modules
12 x 1G SFP Fiber
Figure 6 shows the front panel for the 12 x 1G SFP fiber module.
FIGURE 6 12 x 1G SFP Fiber Modular Ethernet Interface Module
1
Application Switch Module (ASM)
Figure 7 shows the Application Switch Module (ASM) front panel.
FIGURE 7 ASM Front Panel
Starting with Brocade ServerIron ADX release 12.2.1, the label for the Application Switch Module
(ASM) is changed from 'SI-ASM8' to 'SI-ASM'. Note that both represent the same underlying
hardware. The number of available application cores in the ASM module can be verified from the
output of the show version and the show license commands.
ServerIron ADX 4000 systems accommodate up to two ASMs. ServerIron ADX 8000 and ServerIron
ADX 10000 systems accommodate up to four ASMs. Each ASM has the following features:
• Eight Application Cores (the number of application cores avaialable depends on the license
Brocade ServerIron ADX Installation Guide 5
53-1002066-01
that is bound to the module)
Page 16
ServerIron ADX Chassis device modules
NOTE
Console
Pwr
SI-MM
Mgmt
USB
Aux1
Aux2
Aux
Console
Act
1
• One front-panel DB9 console port for Application Core access
There are two versions of the ASM.
ASM4 – Available only with the ServerIron ADX 4000 bundle, the ASM4 has 4 of the available 8
Application Processors enabled. It will only work in a ServerIron ADX 4000 chassis and only in
a single ASM configuration. If an additional ASM4 module is installed, only the ASM4 module
installed in the ASM 1 slot will be accepted. If an ASM8 module is installed in a system with an
ASM4 module, the ASM4 will be rejected and the ASM8 module will be accepted by the
system. You can purchase an upgrade license to increase the capability of an ASM4 to that of
an ASM8. The ASM4 license is tied to the ASM module and not to the chassis. Consequently, a
license can be purchased to upgrade the ASM4 to use all eight available Application
Processors with all functionality and performance options enabled. With this license installed,
the ASM module functions and is recognized as an ASM8 module
ASM8 – All 8 Application processors are enabled on an ASM8 module. It can be installed in any
ServerIron ADX chassis configuration in any ASM designated slot.
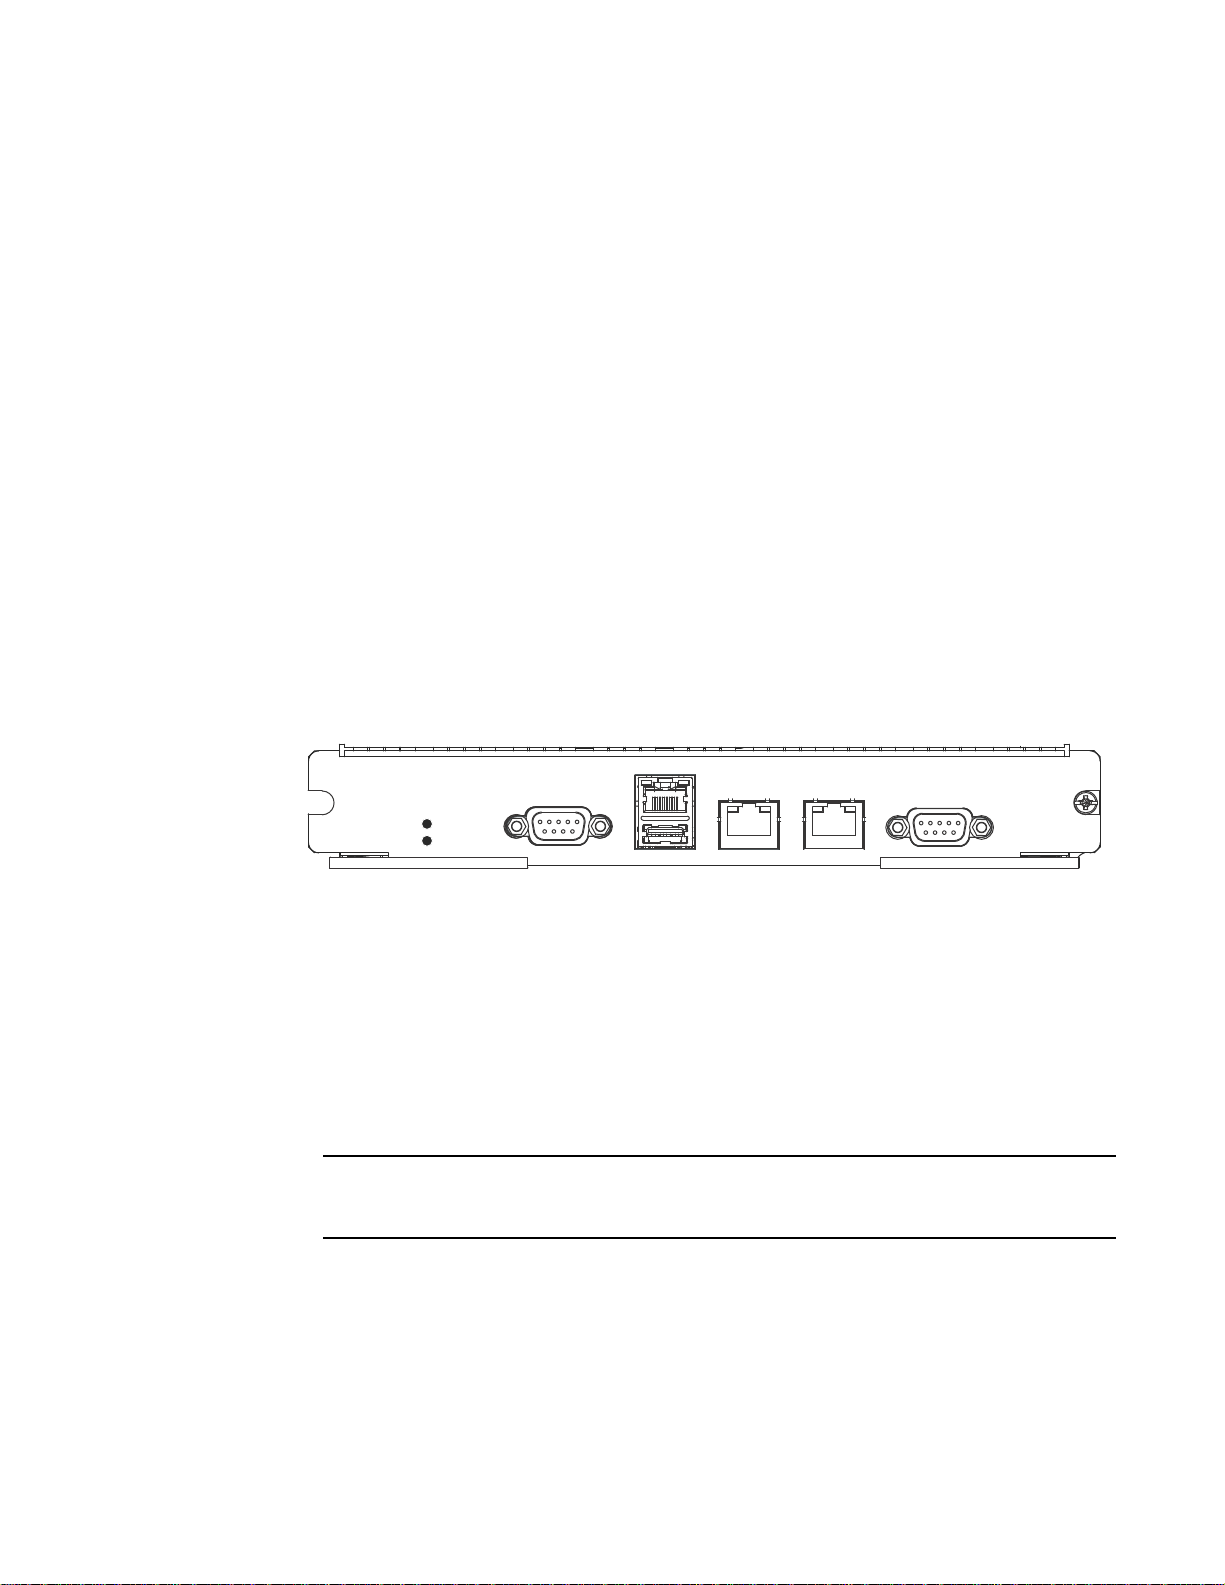
Management Module (MM)
DRAFT: BROCADE CONFIDENTIAL
Figure 8 shows the Management Module (MM) front panel.
FIGURE 8 MM Front Panel
ServerIron ADX 4000 systems accommodate one MM. ServerIron ADX 8000 and ServerIron ADX
10000 systems accommodate up to two MMs. Each MM includes the following:
• Dual core management processor
• One dedicated out-of-band management port (10/100/1000 Ethernet)
• One front-accessible USB port
• One front-panel DB9 console port for access to the MM
• One optional hardware-based SSL processing module
The auxiliary console port on the right and the ethernet ports labeled Aux1 & Aux2 are not
currently available. They are reserved for future use.
Switch Fabric Module (SFM)
Figure 9 shows the Switch Fabric Module (SFM) front panel. One SFM is required for ServerIron ADX
4000. Two are required for ServerIron ADX 8000 and ServerIron ADX 10000.
FIGURE 9 Switch Fabric Module Front Panel
6 Brocade ServerIron ADX Installation Guide
53-1002066-01
Page 17
DRAFT: BROCADE CONFIDENTIAL
DANGER
Pwr
SI-SFM
1
2
Power supplies
The front panel includes a LED that, when lit, indicates that the module is receiving power.
1
SSL Expansion Module
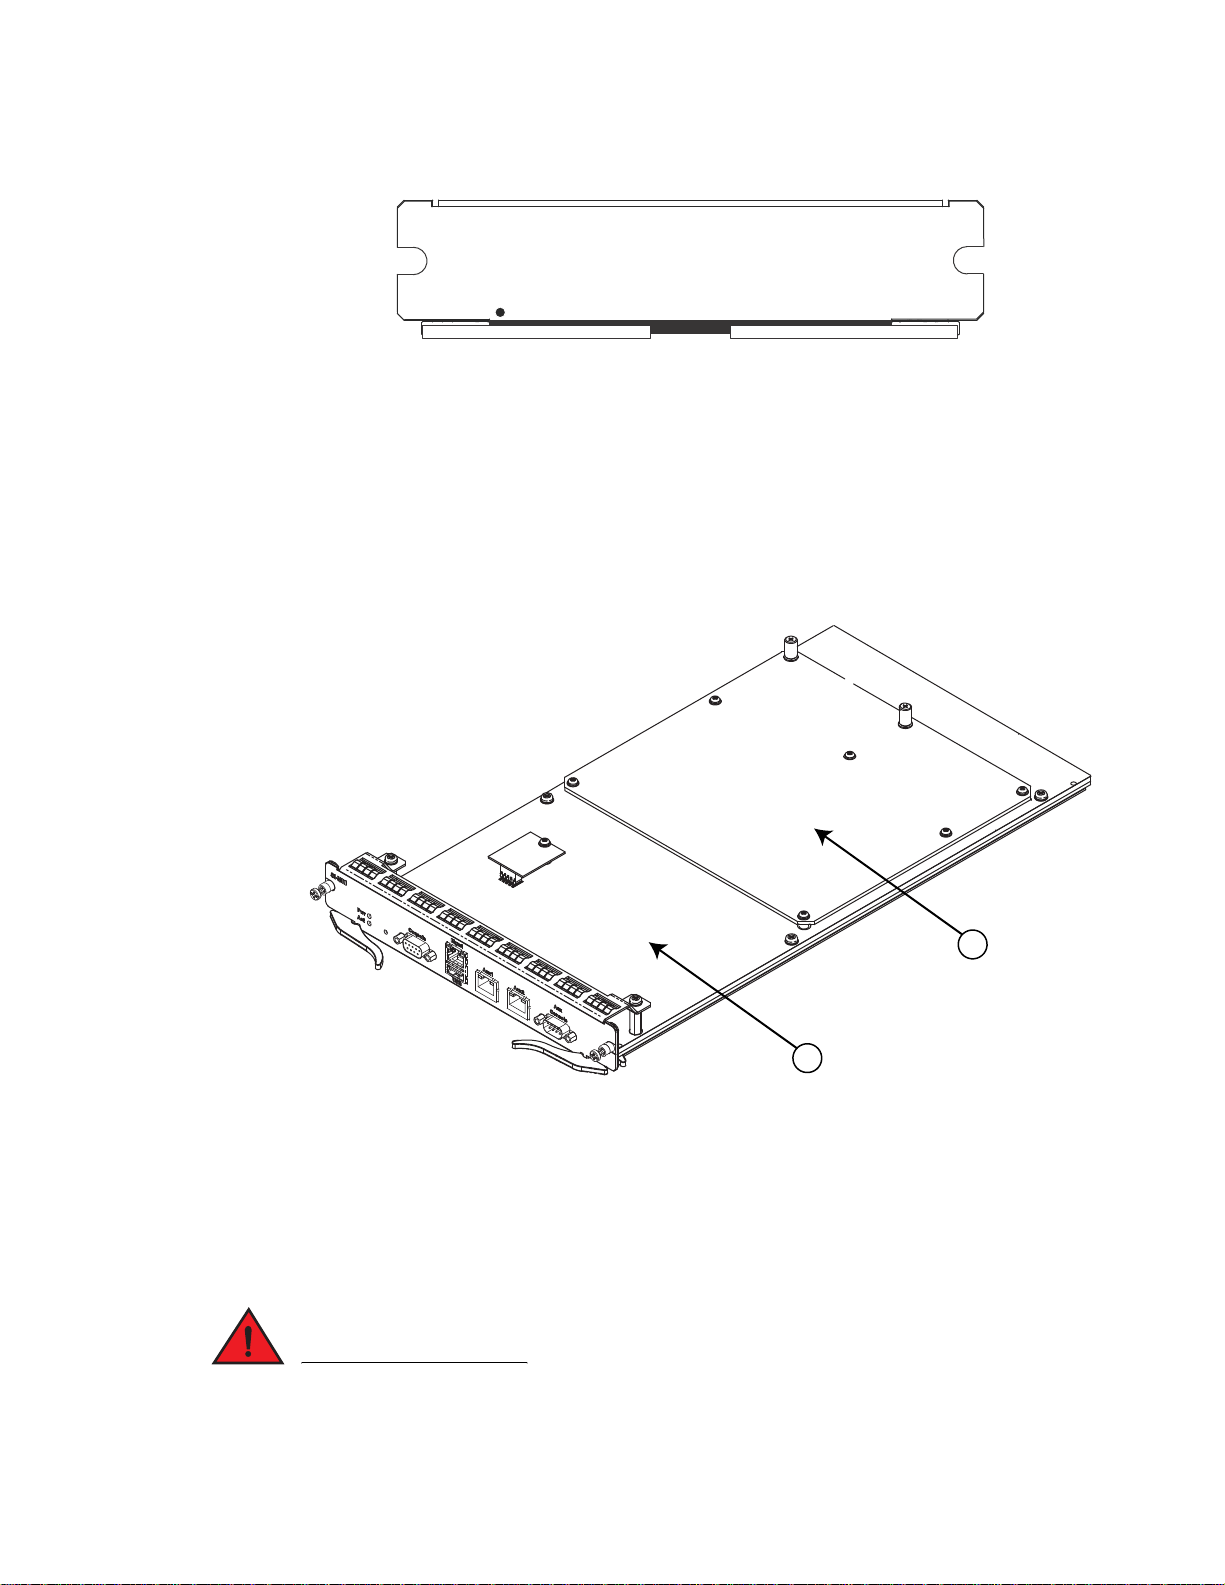
A ServerIron ADX management module can be upgraded to provide hardware-based, SSL
acceleration. This is available through installation of the SSL Expansion Module onto a ServerIron
ADX Management module. Figure 8 shows the Management Module (MM)
FIGURE 10 SSL Expansion module Installed on ServerIron ADX management module
1ServerIron ADX management module 2 SSL Expansion module
Power supplies
This section describes the supported power supply configurations.
The power supplies are hot swappable, which means they can be removed and replaced while
the ServerIron ADX chassis is powered on and running. However, Brocade recommends that you
disconnect a power supply from its power source before removing and replacing the supply. The
Brocade ServerIron ADX Installation Guide 7
53-1002066-01
Page 18

Cooling systems
NOTE
1
DRAFT: BROCADE CONFIDENTIAL
ServerIron ADX 4000, ServerIron ADX 8000 and ServerIron ADX 10000 chassis can be running
while a power supply is removed and replaced, but the power supply itself should not be
connected to a power source.
ServerIron ADX 1000 power supplies
ServerIron ADX 1000 accommodates up to two power supplies (AC or DC) with one required and
one redundant.
You install the power supplies (AC or DC) at the back of the chassis. Each power supply has one
LED on its faceplate to provide status. For more information about operation of the power supply
LED, refer to Table 2 on page 42. For power supply specifications, refer to “Power specifications”
on page 57.
ServerIron ADX chassis device power supplies
ServerIron ADX 4000 accommodates up to two power supplies (AC or DC) with one required and
one redundant.
ServerIron ADX 8000 and ServerIron ADX 10000 accommodate up to four power supplies (AC or
DC) with two required and one or two redundant. Because power is supplied over a common power
bus, any power supply purchased in addition to the two required will provide backup for any supply
that fails. Equipping a ServerIron ADX 8000 or ServerIron ADX 10000 with two additional power
supplies provides full redundancy for both of the required power supplies.
For power supply specifications, refer to “Power specifications” on page 57.
You install the power supplies (AC or DC) in the slots along the bottom of the chassis (ServerIron
ADX 4000 or ServerIron ADX 8000) or along the right side of the chassis (ServerIron ADX 10000).
The installed power supplies provide power to all chassis components, sharing the workload
equally and reporting their status to the Management Module (MM). If the MM detects that one of
these power supplies has failed or overheated, the MM will redistribute the failed power supply
workload to the remaining power supplies.
Each power supply has three LEDs on its faceplate that provide status for the input power, output
power and notification of alarms sent. If the input power and output power LEDs are on (a steady
green), the power supply is providing power to the chassis components. For more information about
operation of the power supply LEDs, see the AC and DC power supply sections in Table 3 on
page 45. The power supplies are hot swappable, which means you can remove and replace them
without powering down the system.
After a power supply is removed from a ServerIron ADX 4000, ServerIron ADX 8000 or ServerIron
ADX 10000 chassis, the software determines if there is enough power to power-on the interface
modules. If it determines that there is not enough power, some interface modules are powered off.
Cooling systems
Upon system startup, the fans in ServerIron ADX run at medium speed, and the speed is changed
to low. The fans switch to high speed only if the temperature sensors detect a need for additional
cooling.
8 Brocade ServerIron ADX Installation Guide
53-1002066-01
Page 19
DRAFT: BROCADE CONFIDENTIAL
Cooling systems
By default, ServerIron ADX polls the temperature sensor on each module every 60 seconds to get a
temperature reading. Depending on the temperature readings for the modules, the system can do
the following:
1
• Leave the fan speed as is
• Increase the fan speed
• Decrease the fan speed
• Shut down a module to prevent damage
If the temperature exceeds specified high temperature thresholds, the system generates a syslog
message and Simple Network Management Protocol (SNMP) trap. The system can also shut a
module down if the temperature exceeds the highest threshold. You can change default low and
high temperature thresholds for modules and fan speeds through software.
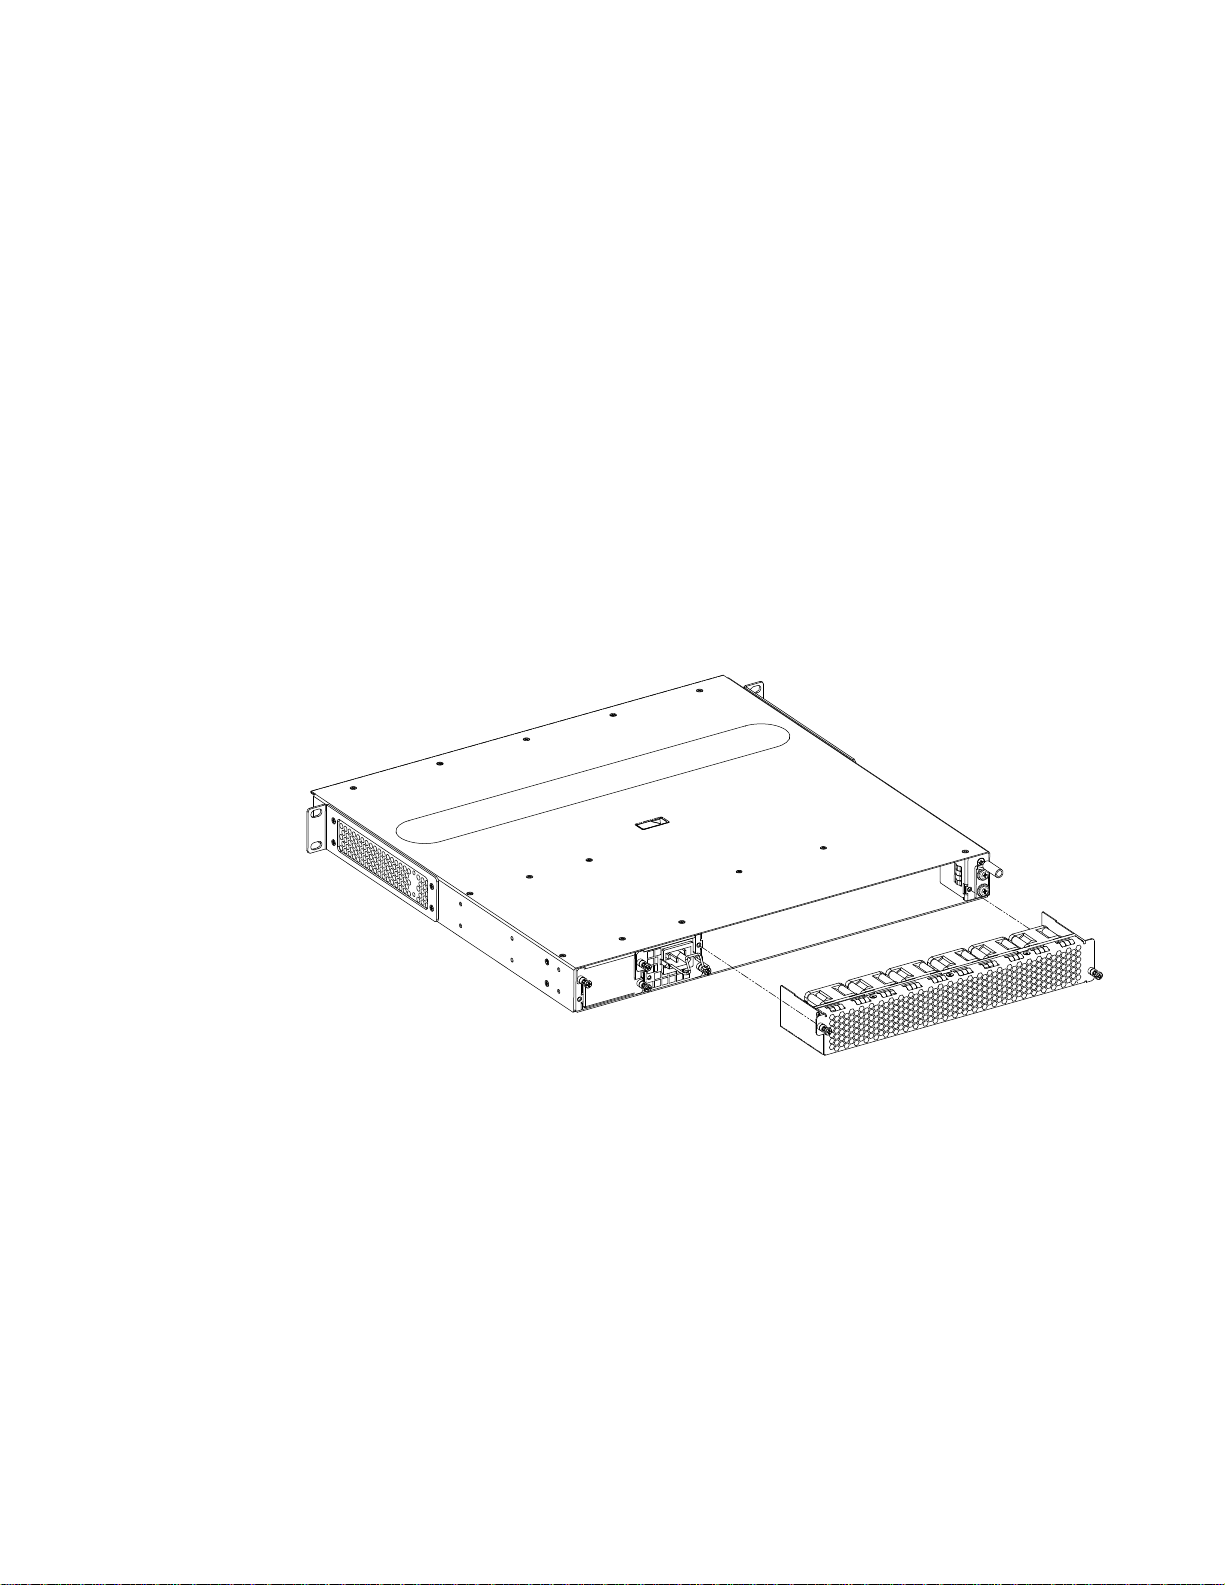
ServerIron ADX 1000 cooling system
ServerIron ADX 1000 is equipped with a fan tray containing variable-speed fans and fan controllers.
Figure 11 shows how the fan assembly slides into the back of the chassis.
FIGURE 11 Fan Tray for the ServerIron ADX 1000
ServerIron ADX 4000 and ServerIron ADX 8000 cooling systems
The ServerIron ADX 4000 and ServerIron ADX 8000 cooling systems are equipped with a fan tray
containing variable-speed fans and six fan controllers to support redundancy. ServerIron ADX 4000
contains three fans and controllers, and ServerIron ADX 8000 contains six fans and controllers.
Refer to Figure 12.
FIGURE 12 Fan Tray Front View for the ServerIron ADX 4000 and ServerIron ADX 8000
Brocade ServerIron ADX Installation Guide 9
53-1002066-01
Page 20
Cooling systems
ASM1
ASM2
MM1
LC1
LC2
SF1
F
A
N
ServerIron ADX 4000
ASM4
ASM3
F
SF1
MM2
MM1
LC1
LC2
LC3
LC4
A
N
SF2
ASM1
ASM2
ServerIron ADX 8000
1
DRAFT: BROCADE CONFIDENTIAL
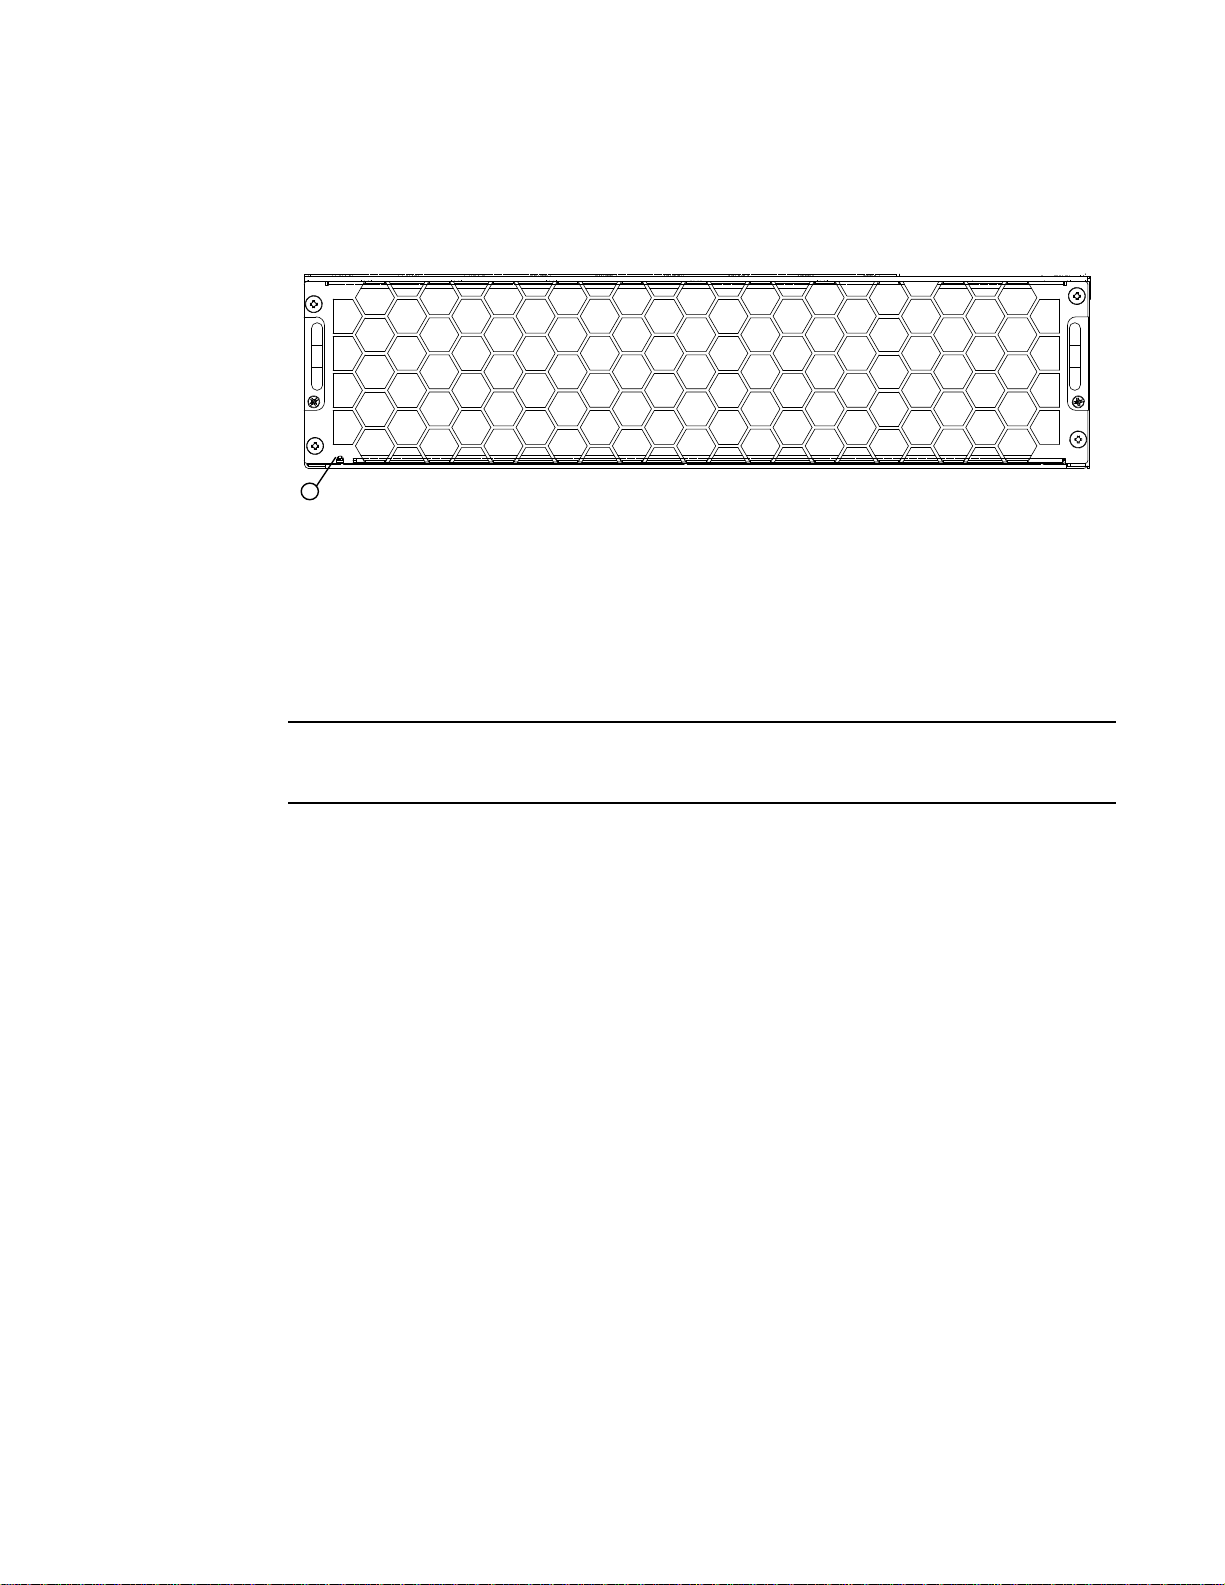
ServerIron ADX 10000 cooling systems
The ServerIron ADX 10000 cooling system provides for front-to-back cooling. It is equipped with a
fan tray containing six variable-speed fans to support redundancy. The fan tray has a fan filter that
can be changed while the ServerIron ADX 10000 is in operation. Refer to Figure 13.
10 Brocade ServerIron ADX Installation Guide
53-1002066-01
Page 21
DRAFT: BROCADE CONFIDENTIAL
NOTE
1
FIGURE 13 Fan Tray Front View for the ServerIron ADX 10000
1 Fan Status LED
Rack mounting
Rack mounting
1
ServerIron ADX systems are shipped equipped for mounting in a standard 19-inch (EIA310-D) rack.
You must supply your own standard #12-24 pan-head screws for attaching the mounting brackets
to your rack.
Brocade ServerIron ADX Installation Guide 11
53-1002066-01
Page 22

Rack mounting
1
DRAFT: BROCADE CONFIDENTIAL
12 Brocade ServerIron ADX Installation Guide
53-1002066-01
Page 23
DRAFT: BROCADE CONFIDENTIAL
DANGER
DANGER
CAUTION
CAUTION
Chapter
Installing ServerIron ADX
Installation precautions
This chapter contains information on how to install a ServerIron ADX. Before proceeding, please
read the cautions and warnings below that apply to the entire ServerIron ADX family.
The procedures in this manual are for qualified service personnel only.
If the installation requires a different power cord than the one supplied with the device, make
sure you use a power cord displaying the mark of the safety agency that defines the regulations
for power cords in your country. The mark is your assurance that the power cord can be used
safely with the device.
2
Product contains ESD sensitive devices, use proper ESD mitigation procedures (such as ESD
grounding wrist straps) before handling.
For NEBS Compliant installations: All devices with AC power supplies are intended for installation
in restricted access areas only. A restricted access area is where access can be gained only by
service personnel through the use of a special tool, lock and key, or other means of security, and
is controlled by the authority responsible for the location. (ADX-1000 only)
The ServerIron ADX is suitable for installation in Network Telecommunications facilities and
locations where the NEC (National Electric Code) apply.
Follow these precautions when installing a ServerIron ADX.
Brocade ServerIron ADX Installation Guide 13
53-1002066-01
Page 24
Installation precautions
CAUTION
DANGER
CAUTION
CAUTION
CAUTION
CAUTION
NOTE
2
DRAFT: BROCADE CONFIDENTIAL
General precautions
Risk of explosion if battery is replaced by an incorrect type. Replace the battery only with the
same or equivalent type recommended by the manufacturer. Lithium battery is a long life battery
and it is very possible that you will never need to replace it. However, should you need to replace
it, do not dispose of the battery along with household waste. Contact your local waste disposal
agency for the address of the nearest battery deposit site.
All fiber-optic interfaces use Class 1 lasers.
Do not install the device in an environment where the operating ambient temperature might
exceed
40 C (104 F).
Make sure the air flow around the front, sides, and back of the device is not restricted.
If you do not install a module in a slot, you must keep the slot blank in place. If you run the
chassis with an uncovered slot, the system may overheat.
Never leave tools inside the chassis.
For safety reasons, the ESD wrist strap should contain a series 1 meg ohm resistor.
14 Brocade ServerIron ADX Installation Guide
53-1002066-01
Page 25
DRAFT: BROCADE CONFIDENTIAL
DANGER
DANGER
CAUTION
CAUTION
DANGER
DANGER
DANGER
Installation precautions
Lifting precautions
Make sure the rack or cabinet housing the device is adequately secured to prevent it from
becoming unstable or falling over.
Mount the devices you install in a rack or cabinet as low as possible. Place the heaviest device at
the bottom and progressively place lighter devices above.
Power precautions
2
Use a separate branch circuit for each AC power cord, which provides redundancy in case one of
the circuits fails.
Ensure that the device does not overload the power circuits, wiring, and over-current protection.
To determine the possibility of overloading the supply circuits, add the ampere (amp) ratings of all
devices installed on the same circuit as the device. Compare this total with the rating limit for the
circuit. The maximum ampere ratings are usually printed on the devices near the input power
connectors.
High Touch Current: Earth connection essential before connecting supply (ServerIron ADX 4000,
8000, 10000)
Disconnect the power cord from all power sources to completely remove power from the device.
Make sure to choose the appropriate circuit device, depending on the number of AC power
supplies installed in the chassis.
Brocade ServerIron ADX Installation Guide 15
53-1002066-01
Page 26
Installation precautions
CAUTION
CAUTION
DANGER
DANGER
CAUTION
CAUTION
2
DRAFT: BROCADE CONFIDENTIAL
Remove the power cord from a power supply before you install it in or remove it from the device.
Otherwise, the power supply or the device could be damaged as a result. (The device can be
running while a power supply is being installed or removed, but the power supply itself should not
be connected to a power source.)
The power supply is designed exclusively for use with the ServerIron devices. The power supply
produces extensive power. Installing the power supply in a device other than a ServerIron will
cause damage to your equipment.
Make sure that the power source circuits are properly grounded, then use the power cord
supplied with the device to connect it to the power source.
Power supplies are hot swappable which means they can be removed and replaced while the
ServerIron ADX chassis is powered on and running, However Brocade recommends that you
disconnect the power supply from AC power before installing or removing the supply. The device
can be running while a power supply is being removed and replaced, but the power supply itself
should not be connected to a power source. Otherwise, you could be injured or the power supply
or other parts of the device could be damaged.
All devices with DC power supplies are intended for installation in restricted access areas only. A
restricted access area is where access can be gained only by service personnel through the use
of a special tool, lock and key, or other means of security, and is controlled by the authority
responsible for the location.
All devices with AC power supplies (ServerIron ADX 4000, 8000, and 10000 only) are intended
for installation in restricted access areas only. A restricted access area is a location where access
can be gained only by service personnel through the use of a special tool, lock and key, or other
means of security.
16 Brocade ServerIron ADX Installation Guide
53-1002066-01
Page 27
DRAFT: BROCADE CONFIDENTIAL
CAUTION
CAUTION
CAUTION
CAUTION
Installing ServerIron ADX
For a DC system, use a grounding wire of at least 6 American Wire Gauge (AWG). The 6 AWG wire
should be attached to an agency-approved crimp connector, crimped with the proper tool
This Caution Applies to the ServerIron ADX 1000
For the DC input circuit to the system, it must be connected to a 20 amp circuit breaker, minimum
-48Vdc, double pole, on the input to the terminal block. The input wiring for connection to the
product should be copper wire, 12 AWG, marked VW-1, and rated minimum 90 degrees Celsius.
This Caution Applies to the ServerIron ADX 4000, ServerIron ADX 8000 and
ServerIron ADX 10000
2
For an AC system, use a ground wire of at least 6 American Wire Gauge (AWG). The ground wire
should have an agency-approved crimped connector (provided with the chassis) attached to one
end, with the other end attached to building ground. The connector must be crimped with the
proper tool, allowing it to be connected to both ground screws on the enclosure.
For the DC input circuit to the system, it must be connected to a 30 amp circuit breaker, minimum
-48Vdc, double pole, on the input to the terminal block. The input wiring for connection to the
product should be copper wire, 8 AWG, marked VW-1, and rated minimum 90 degrees Celsius.
Installing ServerIron ADX
This section describes the steps to install a ServerIron ADX:
• “Preparing the installation site”
• “Installing the ServerIron ADX chassis in a rack”
• “Installing modules in ServerIron ADX chassis devices”
• “Installing power supplies”
• “Connecting AC power”
• “Connecting DC power to a chassis”
• “Attaching a PC or terminal to the Console port or Ethernet port”
• “Attaching a management station”
Brocade ServerIron ADX Installation Guide 17
53-1002066-01
Page 28
Installing ServerIron ADX
DANGER
NOTE
2
DRAFT: BROCADE CONFIDENTIAL
Preparing the installation site
This section describes how to prepare for installation.
Cabling infrastructure
Ensure that the proper cabling is installed at the site.
For information on cabling, refer to “Installing power supplies” on page 26 and “Attaching a
management station” on page 36.
The intra-building port(s) of the equipment or subassembly is suitable for connection to
intra-building or unexposed wiring or cabling only. The intra-building port(s) of the equipment or
subassembly MUST NOT be metallically connected to interfaces that connect to the OSP or its
wiring. These interfaces are designed for use as intra-building interfaces only (Type 2 or Type 4
ports as described in GR-1089-CORE, Issue 4) and require isolation from the exposed OSP
cabling. The addition of Primary Protectors is not sufficient protection in order to connect these
interfaces metallically to OSP wiring.
Installation location
Before installing a ServerIron ADX, plan its location and orientation relative to other devices and
equipment. For cooling purposes, allow a minimum of six inches of space between the sides, front,
and the back of the chassis and walls or other obstructions. If a chassis is installed within a
perforated enclosure, the perforations must have openings of at least 60 percent of the surface.
The ServerIron ADX series are suitable for installation in Network Telecommunications facilities and
locations where the NEC (National Electric Code) apply.
Installing the ServerIron ADX chassis in a rack
This section describes the following tasks:
• “Preparing to mount a ServerIron ADX chassis in a rack”
• “Mounting a ServerIron ADX chassis in a rack”
• “Removing the slot blanks - ServerIron ADX chassis devices”
Preparing to mount a ServerIron ADX chassis in a rack
Due to the weight of a fully loaded chassis device, Brocade recommends mounting a chassis in a
rack before installing additional modules and power supplies.
For each ServerIron ADX chassis that you install in a rack, you must provide four standard #12-24
pan-head screws with which to mount and secure the chassis. Before performing this task, you
should have an assembled rack and a #2 Phillips-head screwdriver.
18 Brocade ServerIron ADX Installation Guide
53-1002066-01
Page 29
DRAFT: BROCADE CONFIDENTIAL
NOTE
C
O
N
S
O
L
E
C
O
N
SO
L
E
1
2
4
3
8
7
10
9
12
11
14
13
16
15
Installing ServerIron ADX
2
Mounting a ServerIron ADX chassis in a rack
While attaching the chassis to the rack, star washers shall be used to provide better grounding of
the chassis to the rack. Additionally if any single hole grounding lugs are used star washers shall be
used as a means to prevent rotation of the lug.
To mount ServerIron ADX in a rack, follow these steps.
1. Determine the position of each chassis in the rack. For example, a ServerIron ADX 4000,
ServerIron ADX 8000 or ServerIron ADX 10000 chassis with the fewest modules should be on
top, a chassis with more modules than the top chassis in the middle, and a fully populated
chassis on the bottom.
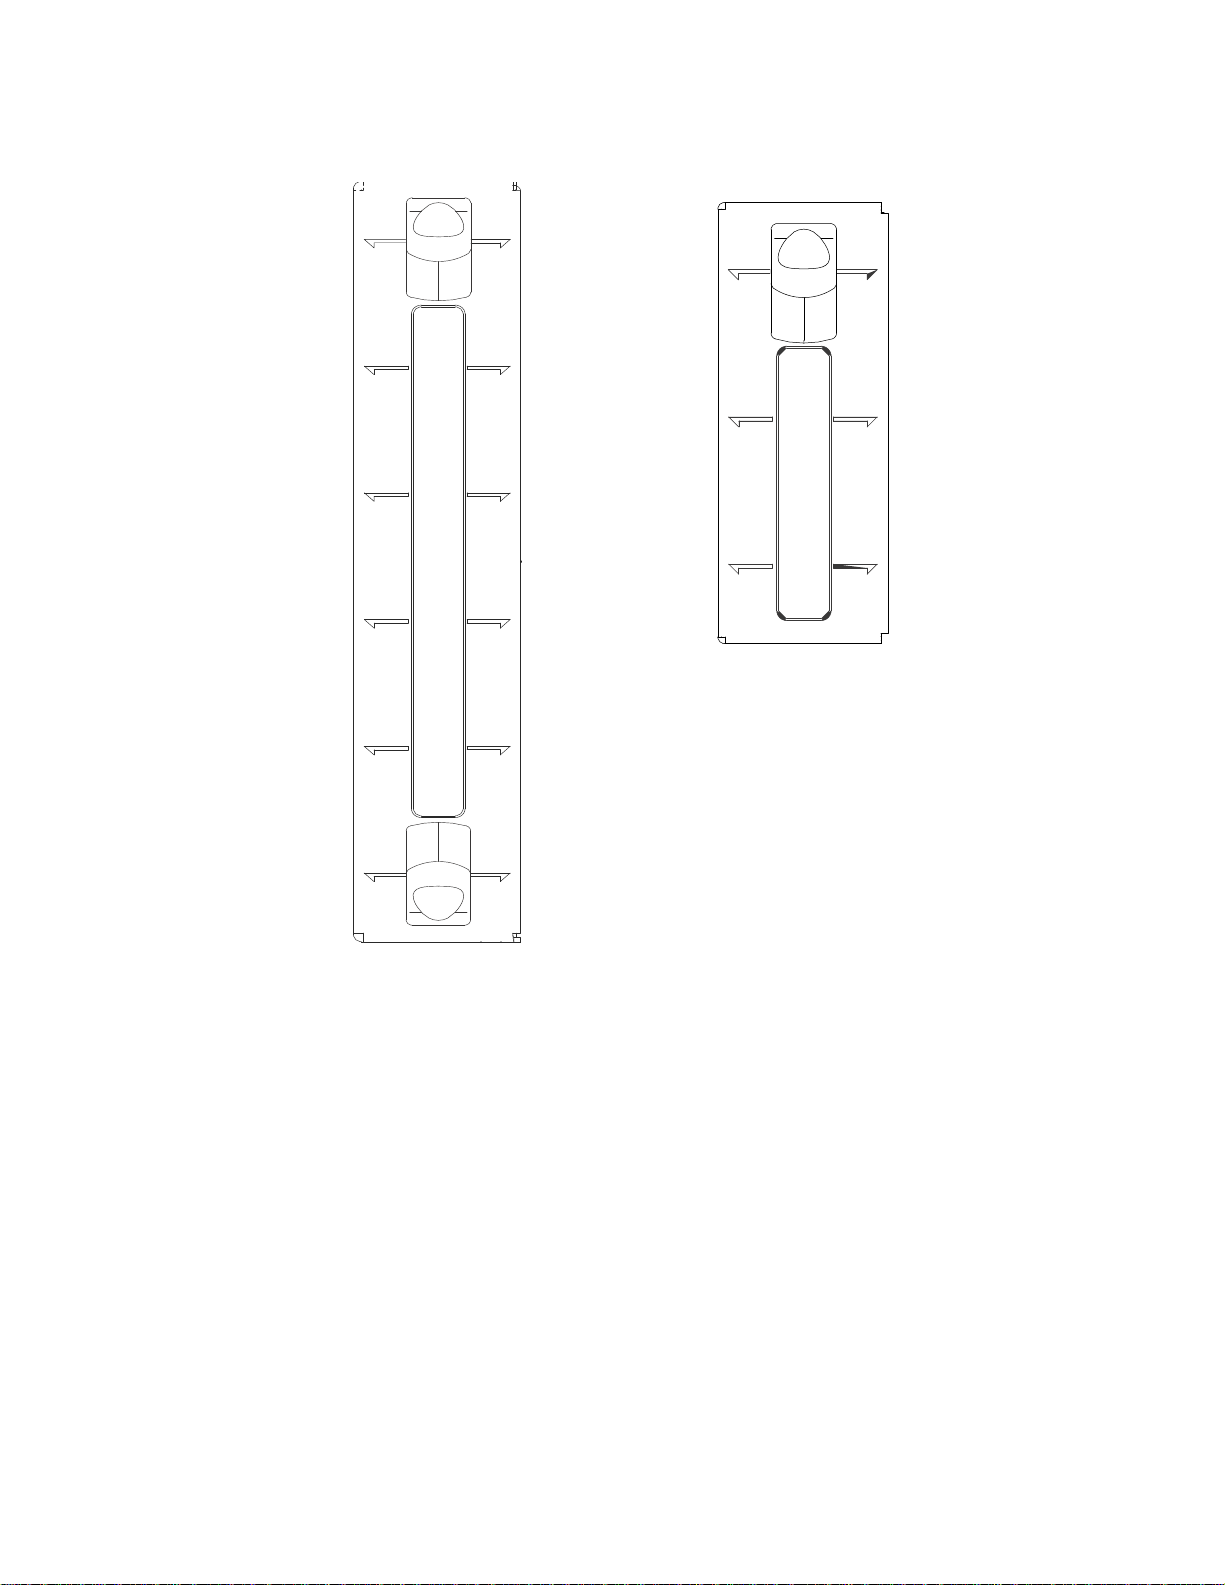
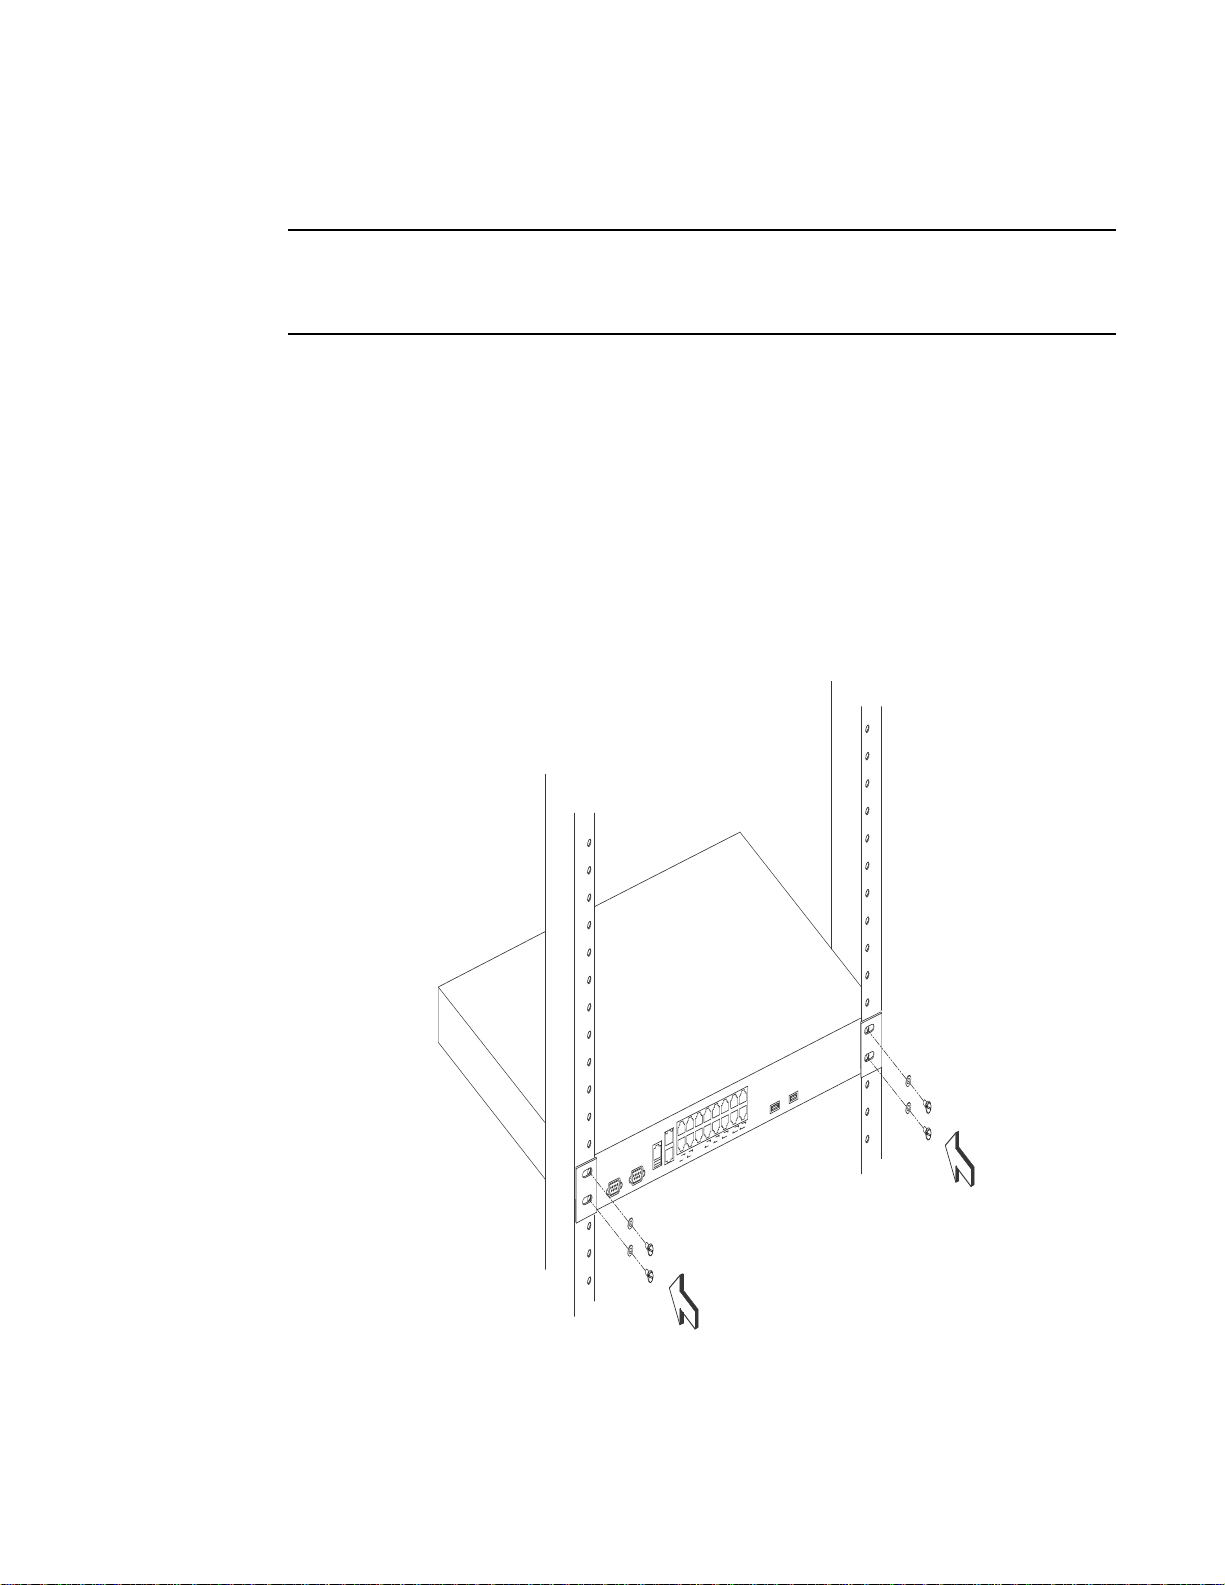
2. Position the four screws for each chassis according to the spacings of the keyhole slots on the
mounting brackets as shown in Figure 14 for the ServerIron ADX 1000 and Figure 15 for the
ServerIron ADX 4000, ServerIron ADX 8000 and ServerIron ADX 10000. Do not secure the
screws completely; leave approximately 1/4 inch of clearance between the back of the screw
head and the rack.
FIGURE 14 Positioning the Screws in a Rack - ServerIron ADX 1000
Brocade ServerIron ADX Installation Guide 19
53-1002066-01
Page 30

Installing ServerIron ADX
NOTE
2
DRAFT: BROCADE CONFIDENTIAL
FIGURE 15 Positioning the Screws in a Rack - ServerIron ADX 4000, ServerIron ADX 8000 and ServerIron ADX
s
10000
3. Starting with the chassis that you want to mount in the lowest position in the rack, mount the
chassis in the rack. Slip the wide portion of each keyhole slot over the corresponding screw in
the rack.
4. For the ServerIron ADX 4000, ServerIron ADX 8000 or ServerIron ADX 10000, slide the chassis
down so that the screw heads are in the narrow portion of the keyhole slots.
5. Tighten the screws to secure the chassis in place.
To provide better grounding of the chassis to the rack, attach the chassis to the rack using star
washers. Additionally, if any single hole grounding lugs are used, star washers shall be used as a
means to prevent rotation of the lug.
6. Repeat step 2 through step 5 to mount each subsequent chassis in the same rack.
Removing the slot blanks - ServerIron ADX chassis devices
The ServerIron ADX 4000, ServerIron ADX 8000 and ServerIron ADX 10000 chassis ships with slot
blanks installed in all module slots. The slot blank covers a slot that does not currently have a
module installed in it, ensuring proper airflow within the chassis. If you plan to install a module in a
particular slot, you must remove the slot blank.
20 Brocade ServerIron ADX Installation Guide
53-1002066-01
Page 31

DRAFT: BROCADE CONFIDENTIAL
CAUTION
DANGER
CAUTION
Installing ServerIron ADX
If you do not install a module in a slot, you must keep the slot blank in place. If you run the
chassis with an uncovered slot, the system may overheat. Tighten the screws that secure the slot
blanks so that they remain in place when removing adjacent panels or modules.
Although the slot blanks are different in size, the procedure for removing them from the chassis is
the same. Therefore, this section provides one procedure that applies to all slot blanks.
You will need a flat-head screwdriver to perform this task.
To remove a slot blank, follow these steps.
1. Loosen the screws on either end of the slot blank by hand or with a flat-head screwdriver.
2. Pull the slot blank out of the chassis, and store it in a safe place for future use.
2
Installing modules in ServerIron ADX chassis devices
This section presents one procedure that applies to all modules for ServerIron ADX chassis devices.
The sequence for installing more than one module is important to ensure proper fit. Start from the
lowest row and move upwards, installing the modules right-to-left.
The intra-building ports of the equipment or subassembly is suitable for connection to
intra-building or unexposed wiring or cabling only. The intra-building ports of the equipment or
subassembly MUST NOT be metallically connected to interfaces that connect to the outside plant
(OSP) or its wiring. These interfaces are designed for use as intra-building interfaces only (Type 2
or Type 4 ports as described in GR-1089-CORE, Issue 4) and require isolation from the exposed
OSP cabling. The addition of Primary Protectors is not sufficient protection in order to connect
these interfaces metallically to OSP wiring.
Slot ordering and type for ServerIron ADX 4000, ServerIron ADX 8000 and ServerIron ADX 10000
is important. Each module is keyed according to type. Do not attempt to force a module into a slot
that is not intended for that module type. Refer to Figure 16 and Figure 17 for correct module
placement.
- Application Switch Modules (ASM) must occupy only slots indicated as ASM slots.
- Management Modules (MM) must occupy only slots that are indicated as MM slot.
- Switch Fabric Modules (SFM) must occupy only slots that are indicated as SFM slots.
- Ethernet Interface Modules must occupy only slots that are indicated as INTERFACE MODULE
slots.
- Power Supplies must be installed only in the slots indicated as PS slots.
All components (Ethernet Interface Module, ASM, MM, SFM, and PS) must be added to
ServerIron ADX 4000, ServerIron ADX 8000 or ServerIron ADX 10000 in the slots designed for
Brocade ServerIron ADX Installation Guide 21
53-1002066-01
Page 32

Installing ServerIron ADX
PS SLOT 1
ServerIron 4000 Front Panel View
ASM 1 INTERFACE MODULE 1
INTERFACE MODULE 2
MM 1
SFM
FAN
PS SLOT 2
ASM 2
2
DRAFT: BROCADE CONFIDENTIAL
them. For example, a MM must be installed in one of the MM slots. Ethernet Interface Modules
must be installed in the slots marked for interface modules.
The ServerIron ADX 4000 chassis ships with the following components installed (see shaded slots
in Figure 16):
• One SFM
• Fan tray
• One power supply
FIGURE 16 Slot Ordering for the ServerIron ADX 4000 Chassis
The ServerIron ADX 10000 chassis ships with the following components installed (see shaded slots
in Figure 17):
• Two SFMs
• Fan tray
• Two power supplies
FIGURE 17 Slot Ordering for the ServerIron ADX 10000 Chassis
22 Brocade ServerIron ADX Installation Guide
53-1002066-01
Page 33

DRAFT: BROCADE CONFIDENTIAL
CAUTION
NOTE
PS SLOT 1
PS SLOT 2
ServerIron ADX 10000
Front Panel View
INTERFACE MODULE 2
SFM 1
PS SLOT 3
PS SLOT 4
FA N
PS SLOT 1
PS SLOT 1
PS SLOT 1
SFM 2
MM 1 MM 2
ASM 1ASM 2ASM 3ASM
4
INTERFACE MODULE 1
INTERFACE MODULE 3INTERFACE MODULE 4
Installing ServerIron ADX
2
Information about the slot locations for the ServerIron ADX 8000 chassis is described in Appendix
B, “ServerIron ADX 8000”.
If you do not install a module in a slot, you must leave the blank slot module installed in the slot.
If you run the chassis with an uncovered slot, the system may overheat.
Before installing a module in a ServerIron ADX 4000, ServerIron ADX 8000 or ServerIron ADX
10000 chassis, have the following on hand:
• An ESD wrist strap with a plug for connection to the ESD connector on the chassis.
• A large flat-head screwdriver.
To install a module in the ServerIron ADX 4000, ServerIron ADX 8000 or ServerIron ADX 10000
chassis, follow these steps.
1. Put on the ESD wrist strap and ground yourself by inserting the plug into the ESD connector on
2. Remove the module from its packaging.
3. With the ejectors in the outward position, insert the module into the appropriate chassis slot
FIGURE 18 Installing a Module in a ServerIron ADX chassis device
For safety reasons, the ESD wrist strap should contain a 1 meg ohm series resistor.
the chassis front.
and slide the card along the card guide until the ejectors on either side of the module move
close to the module front panel.
Brocade ServerIron ADX Installation Guide 23
53-1002066-01
Page 34

Installing ServerIron ADX
NOTE
NOTE
2
DRAFT: BROCADE CONFIDENTIAL
When inserting the module into the chassis, make sure that the faceplate does not overlap
with the faceplate of an adjacent ASM Module.
4. Push the ejectors in until they are flush with the module front panel. This action will fully seat
the module in the backplane. Modules have a snug fit for maximum EMI protection.
The installation instructions for installing modules shown in the following illustrations are
exactly the same for ASM, MM, and SFM, and Ethernet Interface Modules.
5. Tighten the two screws at either end of the module front panel by pushing them in and turning
them clockwise. Then, tighten the screws further using the flat-head screwdriver.
Installing an SSL Expansion module onto a management module
The SSL upgrade kit provides the ability to add hardware-based SSL acceleration to a ServerIron
ADX management module that doesn’t currently have this capability. This following instructions
describe how to install this upgrade kit.
Installation requirements
Allow approximately 1 half-hour to complete this procedure. Your installation site must meet the
following requirements to ensure correct installation and operation:
• You will need a #2 Phillips screwdriver to install the ServerIron ADX SSL Expansion Module
onto a ServerIron ADX Management module.
• The installation must be performed on a flat surface with protection from ESD damage.
• An ESD wrist strap that contains a 1 meg ohm series resistor.
24 Brocade ServerIron ADX Installation Guide
53-1002066-01
Page 35

DRAFT: BROCADE CONFIDENTIAL
1
32
Installing ServerIron ADX
SSL Upgrade Kit contents
Tab le 1 lists the items that are included in your ServerIron ADX SSL Upgrade Kit.
TABLE 1 ServerIron ADX SSL Upgrade Kit contents
Description Quantity
SSL Expansion Module 1
4-40 nuts with Phillips drive 2
4-40 x 3/8 phillips drive pan head screws 6
FIGURE 19 ServerIron ADX SSL Upgrade Kit contents
2
1 SSL Expansion module 2 14-40 nuts with Phillips drive 3 4-40 x 3/8 Phillips drive pan head screw
Installing the SSL Expansion Module onto a ServerIron ADX Management Module
See Tab le 1 for a list of the SSL Upgrade Kit components.
Complete the following steps to attach the SSL Expansion Module onto a ServerIron ADX
Management module.
1. Locate and unpack the ServerIron ADX SSL Upgrade Kit. See Table 1 for a and Figure 19 for a
list and illustration of the kit components.
2. Place the Management module on a table or flat surface.
3. Line up the posts on the Management module with the holes on the SSL Expansion module
and place the module on the posts.
4. Push down firmly on the SSL Expansion module between the two posts to fully mate the
connector to the Management module.
5. Attach the nuts to the posts and secure firmly using a Phillips screwdriver.
Brocade ServerIron ADX Installation Guide 25
53-1002066-01
Page 36

Installing ServerIron ADX
1
2
3
4
1
1
1
2
DRAFT: BROCADE CONFIDENTIAL
FIGURE 20 Securing the nuts to the posts
1 Posts 2 14-40 nuts with Phillips drive 3 SSL Expansion module 4 Management module
6. Locate the 6 mounting holes and using a Phillips screwdriver fasten the SSL Expansion module
to the ServerIron ADX Management Module with the six screws.
FIGURE 21 Installing the six screws
1 4-40 x 3/8 Phillips drive pan head screws
Installing power supplies
This section describes how to install power supplies in the ServerIron ADX chassis.
26 Brocade ServerIron ADX Installation Guide
53-1002066-01
Page 37

DRAFT: BROCADE CONFIDENTIAL
CAUTION
Installing ServerIron ADX
2
ServerIron ADX 1000 power supplies
The ServerIron ADX 1000 chassis accommodates up to two power supplies (AC or DC). It is shipped
with one power supply. You must purchase an additional power supply if you want your ServerIron
ADX 1000 equipped for one+one redundancy.
Before installing a power supply, have a large Phillips-head screwdriver on hand.
To install a power supply in the ServerIron ADX 1000 chassis, follow these steps.
1. Unscrew the blank power supply faceplate on the back of the chassis and expose the empty
power supply slot.
2. Remove the power supply from its packaging.
3. Insert the power supply into the empty power supply slot, using the guides provided on either
side of the slot (Figure 22).
Carefully follow the mechanical guides on each side of the power supply slot and make sure the
power supply is properly inserted in the guides. Never insert the power supply upside down.
FIGURE 22 Installing a Power Supply in a ServerIron ADX 1000 Chassis
4. After the power supply is fully inserted, push the power supply front panel toward the back of
the chassis. This action causes the power supply connector to latch into the backplane
connector.
5. Tighten the screws on the power supply unit so that it is secured to the chassis.
6. For information about connecting power to the chassis, refer to “Connecting AC power” on
page 29, or “Connecting DC power to a chassis” on page 31.
Brocade ServerIron ADX Installation Guide 27
53-1002066-01
Page 38

Installing ServerIron ADX
CAUTION
2
DRAFT: BROCADE CONFIDENTIAL
ServerIron ADX chassis device power supplies
The ServerIron ADX 4000 accommodates up to two power supplies (AC or DC). It is shipped with
one power supply, which is required to run the system.
The ServerIron ADX 8000 chassis accommodates up to four power supplies (AC or DC). It is shipped
with two power supplies, both of which are required to run the system.
The ServerIron ADX 10000 chassis accommodates up to four power supplies (AC or DC). It is
shipped with two power supplies, both of which are required to run the system.
You must purchase additional power supplies if you want your ServerIron ADX chassis device
equipped for redundancy. For the ServerIron ADX 8000 and ServerIron ADX 10000 chassis, you
can plug power supplies into any of the power slots in any order.
To install a power supply in the ServerIron ADX 4000, ServerIron ADX 8000 chassis or ServerIron
ADX 10000, follow these steps.
1. Remove the blank power supply faceplate, and expose the empty power supply slot.
2. Remove the power supply from its packaging.
3. Insert the power supply into the empty power supply slot, using the guides provided on either
side of the slot.
Carefully follow the mechanical guides on each side of the power supply slot and make sure the
power supply is properly inserted in the guides. Never insert the power supply upside down.
FIGURE 23 Installing a Power Supply in a ServerIron ADX 4000, ServerIron ADX 8000 or Ser verIron ADX 10000
Chassis (ServerIron ADX 8000 Shown)
28 Brocade ServerIron ADX Installation Guide
53-1002066-01
Page 39

DRAFT: BROCADE CONFIDENTIAL
NOTE
CAUTION
1
Installing ServerIron ADX
4. Install a blank power supply faceplate into each slot that is empty after all of the power
supplies have been installed.
5. After the power supply is fully inserted, push the power supply front panel toward the back of
the chassis. This action causes the power supply connector to latch into the backplane
connector.
6. Gently pull the handle on the power supply front panel upward and toward the top of the power
supply front panel. This action locks the power supply in place.
7. For information about connecting power to the chassis, refer to “Connecting AC power” on
page 29, or “Connecting DC power to a chassis” on page 31.
2
Connecting AC power
AC power is supplied through an AC power cord. The cord is installed at the back of the ServerIron
ADX 1000 chassis and at the front of the ServerIron ADX 4000, ServerIron ADX 8000 and
ServerIron ADX 10000 chassis.
For the NEBS compliant installation, AC power connections shall use a SPD (surge protection device)
in order to protect the AC power supplies from damage to excessive power line surges.(ADX-1000
only)
AC and DC power supplies can be grounded to a common bonding network or to an isolated
bonding network
To connect AC power, follow these steps.
1. Locate the power receptacle where the power supplies have been installed.
2. Lift the cord-retainer and connect a Brocade-supplied AC power cord to the power supply.
3. Snap the cord-retainer over the power plug to hold it in place.
FIGURE 24 AC Power Connections on the ServerIron ADX 1000 Chassis
1Power Supply Status LED
Brocade ServerIron ADX Installation Guide 29
53-1002066-01
Page 40

Installing ServerIron ADX
100-240 VAC
48 VDC
SEE REAR LABEL
PS1 PS2
PS1
PS2
PS3
PS4
100-240 VAC
48 VDC
SEE REAR LABEL
AC OK
DC OK
ALM
AC OK
DC OK
ALM
AC OK
DC OK
ALM
AC OK
DC OK
ALM
AC OK DC OK ALM
SYSTEM
AC OK DC OK ALM
SYSTEM
AC OK DC OK ALM
SYSTEM
AC OK DC OK ALM
SYSTEM
2
DRAFT: BROCADE CONFIDENTIAL
FIGURE 25 AC Power Connections on the ServerIron ADX 4000 Chassis
FIGURE 26 AC Power Connections on the ServerIron ADX 8000 Chassis
FIGURE 27 AC Power Connections on the ServerIron ADX 10000 Chassis
30 Brocade ServerIron ADX Installation Guide
53-1002066-01
Page 41

DRAFT: BROCADE CONFIDENTIAL
DANGER
CAUTION
CAUTION
CAUTION
CAUTION
Installing ServerIron ADX
If the installation requires a different power cord than the one supplied with the device, make
sure you use a power cord displaying the mark of the safety agency that defines the regulations
for power cords in your country. The mark is your assurance that the power cord can be used
safely with the device.
4. For information about powering on the system, refer to “Powering On the power source” on
page 37.
To insure adequate bonding when attaching the ground lug, a minimum of 20 PSI of torque is
required to be applied to the mounting hardware used to attach the ground lug.
For the NEBS compliant installation of a ServerIron ADX device with AC and DC system use a
ground wire of at least 6 American Wire Gauge (AWG). The ground wire should have an
agency-approved crimped connector (provided with the chassis) attached to one end, with the
other end attached to building ground. The connector must be crimped with the proper tool,
allowing it to be connected to both ground screws on the enclosure. Before crimping the ground
wire into the provided ground lug, (Panduit LCD6-10AF-L), insure the bare copper wire has been
cleaned and antioxidant is applied to the bare wire.(ADX-1000 only)
2
When making the primary ground connection, a star washer must be used for anti-rotation. When
connecting the device to the rack frame, use thread-forming screws and paint-piercing washers.
AC and DC power supplies can be grounded to a common bonding network or to an isolated
bonding network.
Connecting DC power to a chassis
You can use a DC power source for the chassis. This is supported through use of a DC-to-DC power
supply. DC power must be supplied at -48 V and 30 A. The DC-to-DC supply provides the DC power
to the chassis at 12 V and 100 A.
Brocade ServerIron ADX Installation Guide 31
53-1002066-01
Page 42

Installing ServerIron ADX
DANGER
DANGER
2
1
2
DRAFT: BROCADE CONFIDENTIAL
DC return shall be isolated from the chassis ground (DC-I) when connections to the power supply
are made.
The procedure in this section is for qualified service personnel.
Connecting DC Power to ServerIron ADX 1000
To connect a DC power source to the ServerIron ADX 1000, follow these steps.
1. Insert the wires into the DC wiring assembly (Figure 28).
2. Use the wire tightening screws to secure the wires.
FIGURE 28 The ServerIron ADX 1000 DC Power Supply
1 Wire Tightening Screws 2 Assembly Screws
3. Push the DC wiring assembly into the power supply and attach it using the assembly screws.
4. Slide the DC power supply into the ServerIron ADX 1000 chassis and tighten it using the
chassis attachment screws.
The equipment installation shall meet NEC/CEC code requirements. Consult local authorities for
regulations.
32 Brocade ServerIron ADX Installation Guide
53-1002066-01
Page 43

DRAFT: BROCADE CONFIDENTIAL
DANGER
CAUTION
CAUTION
2
1
1
FIGURE 29 Inserting the ServerIron ADX 1000 DC Wiring Assembly
Installing ServerIron ADX
2
1 Chassis Attachment Screws 2 Assembly Screws
5. Connect the wire to your DC power source, making sure to connect the -48V cable to the
negative terminal on the power supply and the 0V cable to the positive terminal as marked on
the power supply.
DC return shall be isolated from the chassis ground (DC-I) when connections to the power supply
are made.
For the NEBS compliant installation of a ServerIron ADX device with AC and DC system use a
ground wire of at least 6 American Wire Gauge (AWG). The ground wire should have an
agency-approved crimped connector (provided with the chassis) attached to one end, with the
other end attached to building ground. The connector must be crimped with the proper tool,
allowing it to be connected to both ground screws on the enclosure. Before crimping the ground
wire into the provided ground lug, (Panduit LCD6-10AF-L), insure the bare copper wire has been
cleaned and antioxidant is applied to the bare wire.(ADX-1000 only)
To insure adequate bonding when attaching the ground lug, a minimum of 20 PSI of torque is
required to be applied to the mounting hardware used to attach the ground lug.
Brocade ServerIron ADX Installation Guide 33
53-1002066-01
Page 44

Installing ServerIron ADX
CAUTION
CAUTION
CAUTION
DC OUT
2
1
ALM
DC IN
2
DRAFT: BROCADE CONFIDENTIAL
When making the primary ground connection, a star washer must be used for anti-rotation. When
connecting the device to the rack frame, use thread-forming screws and paint-piercing washers.
AC and DC power supplies can be grounded to a common bonding network or to an isolated
bonding network.
Connecting DC power to ServerIron ADX chassis devices
To connect a DC power source to the ServerIron ADX 4000, ServerIron ADX 8000 or ServerIron ADX
10000, follow these steps.
1. Use a flat-blade screwdriver to remove the two screws holding the transparent cover over the
power supply lugs.
FIGURE 30 The ServerIron ADX 4000, ServerIron ADX 8000 and ServerIron ADX 10000 DC Power Supply
1 Screws Holding Power Lugs 2 Screws Holding Transparent Cover
2. Use a Phillips head screwdriver to remove each of the power lugs.
3. Crimp #8 AWG power supply wire into the power lugs and reconnect the power lugs to the
power supply unit.
For the NEBS compliant installation of a ServerIron ADX device with AC and DC system use a
ground wire of at least 6 American Wire Gauge (AWG). The ground wire should have an
agency-approved crimped connector (provided with the chassis) attached to one end, with the
other end attached to building ground. The connector must be crimped with the proper tool,
allowing it to be connected to both ground screws on the enclosure. Before crimping the ground
wire into the provided ground lug, (Panduit LCD6-10AF-L), insure the bare copper wire has been
cleaned and antioxidant is applied to the bare wire.(ADX-1000 only)
34 Brocade ServerIron ADX Installation Guide
53-1002066-01
Page 45

DRAFT: BROCADE CONFIDENTIAL
CAUTION
CAUTION
CAUTION
CAUTION
DANGER
1
Installing ServerIron ADX
To insure adequate bonding when attaching the ground lug, a minimum of 20 PSI of torque is
required to be applied to the mounting hardware used to attach the ground lug.
When making the primary ground connection, a star washer must be used for anti-rotation. When
connecting the device to the rack frame, use thread-forming screws and paint-piercing washers.
AC and DC power supplies can be grounded to a common bonding network or to an isolated
bonding network.
FIGURE 31 Crimping the Power Supply Wire in the Lug
2
1 #8 AWG Power Supply Wire
4. Re-attach the transparent cover over the power supply lugs that was removed in Step 1.
5. Connect the wire to your DC power source, making sure to connect the -48V cable to the
negative terminal on the power supply and the 0V cable to the positive terminal as marked on
the power supply.
The equipment installation shall meet NEC/CEC code requirements. Consult local authorities for
regulations.
To insure adequate bonding when attaching the ground lug, a minimum of 20 PSI of torque is
required to be applied to the mounting hardware used to attach the ground lug.
DC return shall be isolated from the chassis ground (DC-I) when connections to the power supply
are made.
Brocade ServerIron ADX Installation Guide 35
53-1002066-01
Page 46

DRAFT: BROCADE CONFIDENTIAL
NOTE
Attaching a management station
2
Attaching a management station
You can manage the ServerIron ADX system in the following ways:
• You can connect a PC or terminal to the Management Module (MM) serial (console) port for a
direct connection. From this interface, you can configure the
10BaseT/100BaseTX/1000BaseTX Ethernet management port with an IP address for Telnet
or SSH access to the system. This enables you to manage the device through the
10BaseT/100BaseTX/1000BaseTX Ethernet (management) port using either Telnet or SSH.
• You can connect ServerIron ADX to your existing management network and control it from a
management station that is connected to the MM Ethernet (management) port.
The existing management network into which you can connect the 10/100/1000 Ethernet port
must be separate and isolated from the network over which user packets are switched and routed.
For information about connecting a PC or terminal to the MM console port or management port,
refer to “Attaching a PC or terminal to the Console port or Ethernet port” on page 36. For
information about connecting a management port, refer to “Attaching the management module
Ethernet port to a network” on page 37.
Attaching a PC or terminal to the Console port or Ethernet port
The Management Module (MM) console port (which has a male DB-9 serial connector), and
10BaseT/100Base TX Ethernet port (which has an RJ-45 UTP connector), allow you to attach a PC
or terminal. From the console port, you can access the ServerIron command line directly or via
reverse Telnet connection.
From the Ethernet port, you can access the ServerIron ADX CLI or Web management interface
directly from the PC or terminal or via a Telnet connection to the PC or terminal.
Before performing this task, you need the following items:
• PC running a terminal emulation application or a terminal.
• If connecting the PC or terminal to the console port, a straight-through EIA/TIA DB-9 serial
cable with one end terminated in a female DB-9 connector and the other end terminated in a
male or female DB-9 or DB-25 connector, depending on the specifications of your PC or
terminal. You can order the serial cable separately from Brocade or build your own cable. If you
prefer to build your own, see the pinout information in “Console Port Pin assignments” on
page 60.
• If connecting the PC or terminal to the Ethernet port, a Category 5 UTP crossover cable, which
you must supply. For information about the management port pin assignments, refer to
“Management Port Pin assignments” on page 61.
To attach a PC or terminal to the console port or Ethernet port, follow these steps.
1. Connect a PC or terminal to the console port or Ethernet port using the appropriate cable.
2. Open the terminal emulation program, and set the session parameters as follows:
• Baud: 9600 bps
• Data bits: 8
• Parity: None
• Stop bits: 1
36 Brocade ServerIron ADX Installation Guide
53-1002066-01
Page 47

DRAFT: BROCADE CONFIDENTIAL
CAUTION
DANGER
CAUTION
NOTE
• Flow control: None
Attaching the management module Ethernet port to a network
The Management Module (MM) 10BaseT/100BaseTX/1000BaseTX Ethernet (management) port
(RJ-45 UTP connector) allows you to connect the management port to a network.
To attach the MM Ethernet port to a network, you need a Category 5 UTP straight-through cable
(not supplied by Foundry). Connect one end of the straight-through cable to the management port
and the other end to the network.
Powering On the power source
To power on the power source after completing installation, follow these steps.
1. Verify that all modules and power supplies are fully and properly installed and that no module
slots are uncovered.
Powering On the power source
2
If you do not install a module in a slot, you must keep the slot blank in place. If you run the
chassis with an uncovered slot, the system may overheat.
2. If you are supplying a DC power source to a ServerIron ADX chassis, attach the power cables to
the DC power supply as described in “Connecting DC power to a chassis” on page 31.
Connect the other end of the cables to the DC power source. Repeat this step for each installed
DC power supply. Then switch on the power source.
3. If your power source is AC, attach one end of a Brocade-supplied AC power cord to the AC
power supply as described in “Connecting AC power” on page 29.
Insert the other end into a 115V/120V wall outlet. Repeat this step for each installed AC power
supply.
If the installation requires a different power cord than the one supplied with the device, make
sure you use a power cord displaying the mark of the safety agency that defines the regulations
for power cords in your country. The mark is your assurance that the power cord can be used
safely with the device.
AC outlet should be appropriate for the AC rating of the power cord plug.
The wall outlet should be installed near the equipment and should be easily accessible.
Brocade ServerIron ADX Installation Guide 37
53-1002066-01
Page 48

DRAFT: BROCADE CONFIDENTIAL
DANGER
Uninstalling ServerIron ADX modules
2
4. Verify that ServerIron ADX has initialized successfully. For information, refer to “Verifying proper
operation” in the next section.
The intra-building port(s) of the equipment or subassembly is suitable for connection to
intra-building or unexposed wiring or cabling only. The intra-building port(s) of the equipment or
subassembly MUST NOT be metallically connected to interfaces that connect to the OSP or its
wiring. These interfaces are designed for use as intra-building interfaces only (Type 2 or Type 4
ports as described in GR-1089-CORE, Issue 4) and require isolation from the exposed OSP
cabling. The addition of Primary Protectors is not sufficient protection in order to connect these
interfaces metallically to OSP wiring.
Uninstalling ServerIron ADX modules
This section describes the steps to uninstall modules from a ServerIron ADX:
• “Uninstalling ServerIron ADX 4000, 8000 & 10000 interface modules”
• “Uninstalling an Application Switch module”
• “Uninstalling a Management module”
• “Uninstalling a Switch Fabric module”
• “Uninstalling a Fan module”
• “Uninstalling a Power Supply”
Uninstalling ServerIron ADX 4000, 8000 & 10000 interface modules
When removing an interface module from an operating ServerIron ADX 4000, ServerIron ADX 8000
or ServerIron ADX 10000 you should perform the following actions in the order shown:
1. Execute the disable module command for the Interface module being removed to allow the
system to gracefully shutdown functions that are related to the module before physically
removing it.
2. Physically remove the module from the chassis.
3. When reinstalling the Interface module, it will automatically be detected and brought online.
4. If you execute the disable module command for a module but do not physically remove it from
the chassis, it can be brought on-line using the enable module command.
Command Syntax
The Syntax for the disable module and enable module commands is described in the following.
Syntax:disable module slot-lc1 | slot-lc2 | slot-lc3 | slot-lc4
• Selecting the slot-lc1 parameter disables the Interface module in slot 1 of the ServerIron ADX
4000, 8000 & 10000 chassis.
• Selecting the slot-lc2 parameter disables the Interface module in slot 2 of the ServerIron ADX
4000, 8000 & 10000 chassis.
38 Brocade ServerIron ADX Installation Guide
53-1002066-01
Page 49

DRAFT: BROCADE CONFIDENTIAL
NOTE
Uninstalling ServerIron ADX modules
2
• Selecting the slot-lc3 parameter disables the Interface module in slot 3 of the ServerIron ADX
8000 & 10000 chassis.
• Selecting the slot-lc4 parameter disables the Interface module in slot 4 of the ServerIron ADX
4000, 8000 & 10000 chassis.
Syntax:enable module slot-lc1 | slot-lc2 | slot-lc3 | slot-lc4
• Selecting the slot-lc1 parameter enables the Interface module in slot 1 of the ServerIron ADX
4000, 8000 & 10000 chassis (if it has previously been disabled.).
• Selecting the slot-lc2 parameter disables the Interface module in slot 2 of the ServerIron ADX
4000, 8000 & 10000 chassis (if it has previously been disabled.).
• Selecting the slot-lc3 parameter disables the Interface module in slot 3 of the ServerIron ADX
8000 & 10000 chassis. (if it has previously been disabled.).
• Selecting the slot-lc4 parameter disables the Interface module in slot 4 of the ServerIron ADX
8000 & 10000 chassis. (if it has previously been disabled.).
Uninstalling an Application Switch module
When removing an Application Switch Module (ASM) from a ServerIron 4000, ServerIron 8000 or
ServerIron 10000 you should perform the following actions in the order shown:
1. Execute the disable module command for the ASM being removed to allow the system to
gracefully shutdown functions that are related to the ASM before physically removing it.
2. Physically remove the module from the chassis.
3. If you execute the disable module command for a module but do not physically remove it from
the chassis you can only bring it back on-line by rebooting the system.
Removing or disabling an ASM module from an operating ServerIron ADX chassis will affect all traffic
that is moving through that module.
Command Syntax
The syntax for the disable module command is described as follows.
Syntax:disable module slot-asm1 | slot-asm2 | slot-asm3 | slot-asm4
• Selecting the slot-asm1 parameter disables the ASM in slot 1 of the ServerIron ADX 4000,
8000 & 10000 chassis.
• Selecting the slot-asm2 parameter disables the ASM in slot 2 of the ServerIron ADX 4000,
8000 & 10000 chassis.
• Selecting the slot-asm3 parameter disables the ASM in slot 3 of the ServerIron ADX 8000 &
10000 chassis.
• Selecting the slot-asm4 parameter disables the ASM in slot 4 of the ServerIron ADX 8000 &
10000 chassis.
Brocade ServerIron ADX Installation Guide 39
53-1002066-01
Page 50

Uninstalling ServerIron ADX modules
NOTE
NOTE
2
Uninstalling a Management module
When removing an Active Management module from a ServerIron ADX 4000, ServerIron ADX 8000
or ServerIron ADX 10000 you must shutdown and power-off the system first. It can then be
physically removed from the chassis.
When removing an Standby Management module from an operating ServerIron ADX 8000 or
ServerIron ADX 10000 you should perform the following actions in the order shown:
1. Execute the disable standby-mgmt-module command to allow the system to gracefully
shutdown functions that are related to the module before physically removing it.
2. Physically remove the Standby Management module from the chassis.
3. If you execute the disable standby-mgmt-module command but do not physically remove it
from the chassis, it can be brought on-line using the enable standby-mgmt-module command.
Because the ServerIron 4000 accommodates only one Management module, it cannot have a
Standby Management module.
DRAFT: BROCADE CONFIDENTIAL
Command Syntax
The Syntax for the disable standby-mgmt-module and enable standby-mgmt-module commands is
described in the following:
Syntax:disable standby-mgmt-module
Syntax:enable standby-mgmt-module
Uninstalling a Switch Fabric module
When removing a Switch Fabric module (SFM) from a ServerIron ADX 4000, ServerIron ADX 8000
or ServerIron ADX 10000 you must shutdown and power-off the system first. It can then be
physically removed from the chassis.
All of the Switch Fabric modules in a ServerIron ADX are required for proper operation. Consequently,
after powering down a ServerIron ADX and removing an SFM, it must be reinstalled before powering
up the system.
Uninstalling a Fan module
It is not generally recommended for the Fan module to be removed while a ServerIron ADX 4000,
ServerIron ADX 8000 or ServerIron ADX 10000 is in operation. With the Fan module removed, a
syslog message indicating that the fan is not present will be sent and the system will rapidly
heat-up. If the ServerIron ADX modules rise above the shutdown thresholds, they are gracefully
shutdown as described in the following:
• Interface modules are shutdown individually as they exceed their threshold temperature which
disrupts any traffic that transits that module.
• When the temperature of the active management module exceeds its threshold, the entire
ServerIron ADX chassis is shutdown.
40 Brocade ServerIron ADX Installation Guide
53-1002066-01
Page 51

DRAFT: BROCADE CONFIDENTIAL
NOTE
Installing ServerIron ADX modules in a running system
2
• When the temperature of a Switch Fabric module is exceeded, it is shutdown which disrupts
operation of the entire ServerIron ADX.
You can however, briefly remove a Fan Tray from an operating ServerIron ADX 4000, ServerIron ADX
8000 or ServerIron ADX 10000 for a few seconds and replace it with a new one before the
shutdown temperature thresholds are reached.
Uninstalling a Power Supply
Power Supplies can be removed while a ServerIron ADX 4000, ServerIron ADX 8000 or ServerIron
ADX 10000 is in operation as long as the minimum number are still installed and active in the
chassis.
• For the ServerIron ADX 4000, one power supply is required and one additional power supply
can be installed to provide a backup.
• For the ServerIron ADX 8000 or ServerIron ADX 10000, two power supplies are required and
two additional power supplies can be installed to provide a backup.
Redundant power supplies can be added during operation.
When a power supply is removed or added during operation, messages are sent to the console and
logged indicating that the supply is present or not present in the system.
Installing ServerIron ADX modules in a running system
This section describes the issues and considerations that you must follow when installing various
module type into a running ServerIron ADX chassis.
Installing a management module in a running system
You can install a Standby Management module in a running system without any service disruption.
When the Standby Management module in inserted in its designated slot, it is automatically
detected and brought online.
This does not apply to the ServerIron ADX 4000 because it does not accommodate a Standby
Management module.
Installing an ASM module in a running system
You can not install an ASM module into a running system. You must first shut down the system,
install the ASM and then reboot the system.
Installing an SFM module in a running system
You can not install a Switch Fabric module (SFM) into a running system. You must first shut down
the system, install the SFM and then reboot the system.
Brocade ServerIron ADX Installation Guide 41
53-1002066-01
Page 52

Verifying proper operation
NOTE
2
DRAFT: BROCADE CONFIDENTIAL
Installing an Interface module in a running system
You can install Interface modules into a running system without any service disruption. When the
Interface module is inserted in its designated slot in the ServerIron ADX chassis, it is automatically
detected and brought online.
You must make certain that there is no configuration mismatch for the Interface module in that slot.
Installing an Power Supplies in a running system
Provided you maintain at least the minimum number of power supplies in a ServerIron ADX, you
can install new power supplies without incurring an impact to operation of the system.
Installing an fan trays in a running system
Fan trays can be installed in a running ServerIron ADX system provided you follow the limitations
described in “Uninstalling a Fan module”
Verifying proper operation
This section describes how to verify proper operation of the ServerIron ADX chassis after power on:
• “Observing the LEDs - ServerIron ADX 1000”
• “Matching LEDs to locations on the ServerIron ADX 1000”
• “Observing the LEDs - ServerIron ADX chassis devices”
• “Matching LEDs to locations on ServerIron ADX chassis device modules”
Observing the LEDs - ServerIron ADX 1000
Tab le 2 outlines the LEDs for the ServerIron ADX 1000, including possible states and meanings.
If a problem persists after taking action described in this table, contact Foundry technical support.
TABLE 2 LED States After System Power On - ServerIron ADX 1000
LED State Meaning
1G Interface Ports
On A link is established with the remote port (no traffic).
NOTE: There is one LED per port. Refer to “Matching LEDs to locations on the ServerIron
ADX 1000” on page 44 for information on matching each LED to the correct port.
Blinking The port is transmitting and receiving packets.
Off A link is not established with the remote port and no traffic is being transmitted or
received.
10G Interface Ports
Link Solid green A link is established with the remote port.
Off A link is not established with the remote port.
42 Brocade ServerIron ADX Installation Guide
53-1002066-01
Page 53

DRAFT: BROCADE CONFIDENTIAL
Verifying proper operation
TABLE 2 LED States After System Power On - ServerIron ADX 1000 (Continued)
LED State Meaning
Act Blinking green A link is established with the remote port and traffic is being passed on the port.
Off for an extended period A link is not established with the remote port or traffic is not being passed on the port.
Barrel Processors (BPs)
In 1 Blinking Packets are currently being received on BP1.
Off No packets are currently being received on BP1.
In 2 Blinking Packets are currently being received on BP2.
Off No packets are currently being received on BP2.
Out 1 Blinking Packets are currently being sent from BP1.
Off No packets are currently being sent from BP1.
Out 2 Blinking Packets are currently being sent from BP2.
Off No packets are currently being sent from BP2.
Power
Pwr1 On The chassis is currently receiving power from power supply 1.
Pwr2 On The chassis is currently receiving power from power supply 2.
Power Supply Status
AC (refer to
Figure 33)
DC (refer to
Figure 34)
Fan Tray
Fn Green (steady) All fans are operating normally.
Fn Off Power is not being applied to the fan tray.
Off No AC input power.
Green blinking Supply has AC input power, but DC output is not enabled.
Green steady Supply has AC input power, is enabled, and has good DC output.
Amber steady Power supply has failed.
Off No DC power. Make sure that the DC power source is -48 VDC @ 20 A (Operating voltage
range is -40 - -60 VDC).
Green blinking Supply has DC power, but output is not enabled.
Green steady Supply has DC power, is enabled, and has good output.
Amber steady Power supply has failed.
2
Brocade ServerIron ADX Installation Guide 43
53-1002066-01
Page 54

Verifying proper operation
1 2
4
Mgmt
Lnk
Act
Lnk
Act
1
2
3
456
7
8
Con
P1
P2 Fn
12
1
2
IN
OUT
Aux
Con
USB
1
9
10
11
12
13
14
15
16
Aux1 Aux2
3
1
1
2
DRAFT: BROCADE CONFIDENTIAL
Matching LEDs to locations on the ServerIron ADX 1000
Figure 32 shows how to match the LEDs to ports on the ServerIron ADX 1000.
FIGURE 32 Interpreting LEDs on the ServerIron ADX 1000
1 LEDs for Power Supplies 3 LEDs for 1G Interface Ports
2 LEDs for Application Cores 4 LEDs for 10G Interface Ports
Figure 33 shows the AC power supply LED on the ServerIron ADX 1000, and Figure 34 shows the
DC LED.
FIGURE 33 AC Power Supply LED - ServerIron ADX 1000
1Power Supply Status LED
FIGURE 34 DC Power Supply LED - ServerIron ADX 1000
1Power Supply Status LED
44 Brocade ServerIron ADX Installation Guide
53-1002066-01
Page 55

DRAFT: BROCADE CONFIDENTIAL
Verifying proper operation
Observing the LEDs - ServerIron ADX chassis devices
After a ServerIron ADX chassis powers on, you can observe its LEDs to verify that it initialized
successfully. Table 3 lists the LEDs for the ServerIron ADX 4000, ServerIron ADX 8000 and
ServerIron ADX 10000, including desired states, meanings, abnormal states, and possible actions
to state to respond to abnormal states.
If a problem persists after taking action described in this table, contact Brocade technical support.
TABLE 3 LED States After System Power On - ServerIron ADX 4000, ServerIron ADX 8000 and ServerIron ADX 10000
LED Desired State Meaning Abnormal State Meaning/Action
Application Switch Module (ASM)
Pwr On The module is receiving
power.
BP In Blinking Activity on Barrel
Processor (BP).
Packets are currently
being received on the
specified BP.
BP Out Blinking Activity on BP.
Packets are currently
being sent from the
specified BP.
Off The module is not receiving power. You
can do the following:
• Make certain that the module is
installed properly. For more
information, refer to “Installing
modules in ServerIron ADX chassis
devices” on page 21.
• Make certain that the module is
receiving enough power. Foundry
recommends installing power
supplies in a fully redundant
configuration as described in
“Installing power supplies” on
page 26.
• Check the Pwr LED on the
Management Module (MM). If it is
on, this module may be holding
the power from the Application
Switch Module (ASM).
• Enter the show chassis command
at any level of the CLI to determine
if the MM recognizes the presence
of all power sources.
• If using AC power supplies, see the
entry for the AC power supply LED
in this table for more information.
Off No packets are currently being received
on the specified BP.
Off No packets are currently being sent
from the specified BP.
2
Brocade ServerIron ADX Installation Guide 45
53-1002066-01
Page 56

DRAFT: BROCADE CONFIDENTIAL
Verifying proper operation
2
TABLE 3 LED States After System Power On - ServerIron ADX 4000, ServerIron ADX 8000 and ServerIron ADX 10000 (Continued)
LED Desired State Meaning Abnormal State Meaning/Action
Switch Fabric Module (SFM)
Pwr On The module is receiving
power.
Off The module is not receiving power. You
can do the following:
• Make certain that the module is
installed properly. For more
information, refer to “Installing
modules in ServerIron ADX chassis
devices” on page 21.
• If using AC power supplies, see the
entry for the AC power supply LED
in this table for more information.
Management Module (MM)
Pwr On The module is receiving
power.
Off The module is not receiving power. You
can do the following:
• Make certain that the module is
installed properly. For more
information, refer to “Installing
modules in ServerIron ADX chassis
devices” on page 21.
• If using AC power supplies, see the
entry for the AC power supply LED
in this table for more information.
Act On The module is functioning
as an MM.
Mgmt
(10/100/1000
Ethernet port)
On (green) A link is established with
the remote port.
Off Neither of the MMs is managing the
Switch Fabric Module (SFM) or
Application Switch Module (ASM).
A problem could have occurred during
initialization. Check your attached PD or
terminal for possible error messages.
Off A link is not established with the remote
port. You can do the following:
• Verify that the connection to the
other device has been made
properly. Also, make certain that
the other device is powered on
and operating correctly.
• Try using a different cable.
Mgmt
(10/100/1000
Ethernet port)
AUX1/AUX2 Not supported in this
On or blinking (yellow) The port is transmitting
release
and receiving packets.
Off for an
extended
period
The port is not transmitting or receiving
packets. You can do the following:
Check the other 10/100/1000
Ethernet port LED to make sure that a
link is established with the remote port.
If not, take the actions described in the
Meaning/Action column for the other
remote port LED.
46 Brocade ServerIron ADX Installation Guide
53-1002066-01
Page 57

DRAFT: BROCADE CONFIDENTIAL
Verifying proper operation
2
TABLE 3 LED States After System Power On - ServerIron ADX 4000, ServerIron ADX 8000 and ServerIron ADX 10000 (Continued)
LED Desired State Meaning Abnormal State Meaning/Action
4 x 10G XFP Fiber Ethernet Interface Module
Pwr On The module is receiving
power.
Off The module is not receiving power. You
can do the following:
• Make certain that the module is
installed properly. For more
information, refer to “Installing
modules in ServerIron ADX chassis
devices” on page 21.
• If using AC power supplies, see the
entry for the AC power supply LED
in this table for more information.
Lnk Solid green A link is established with
the remote port.
Note: There is one LED per
port. Refer to “Matching
LEDs to locations on
ServerIron ADX chassis
device modules” on
page 50 for information
on matching each LED to
the correct port.
Act Blinking green A link is established with
the remote port and traffic
is being passed on the
port.
12 x 1G Copper Ethernet Interface Module
Pwr On The module is receiving
power.
Off A link is not established with the remote
port.
Off for an
extended
period
Off The module is not receiving power. You
A link is not established with the remote
port or traffic is not being passed on
the port.
can do the following:
• Make certain that the module is
installed properly. For more
information, refer to “Installing
modules in ServerIron ADX chassis
devices” on page 21.
• If using AC power supplies, see the
entry for the AC power supply LED
in this table for more information.
Lnk/Act On or blinking On means a link is
established with the
remote port (no traffic).
Blinking means that the
port is transmitting and
receiving packets.
Note: There is one LED per
port. Refer to “Matching
LEDs to locations on
ServerIron ADX chassis
device modules” on
page 50 for information
on matching each LED to
the correct port.
Off A link is not established with the remote
port and no traffic is being transmitted
or received.
Brocade ServerIron ADX Installation Guide 47
53-1002066-01
Page 58

DRAFT: BROCADE CONFIDENTIAL
Verifying proper operation
2
TABLE 3 LED States After System Power On - ServerIron ADX 4000, ServerIron ADX 8000 and ServerIron ADX 10000 (Continued)
LED Desired State Meaning Abnormal State Meaning/Action
12 x 1G SFP Fiber Ethernet Interface Module
Pwr On The module is receiving
power.
Off The module is not receiving power. You
can do the following:
• Make certain that the module is
installed properly. For more
information, refer to “Installing
modules in ServerIron ADX chassis
devices” on page 21.
• If using AC power supplies, see the
entry for the AC power supply LED
in this table for more information.
Lnk/Act On or blinking On means a link is
established with the
remote port (no traffic).
Blinking means that the
port is transmitting and
receiving packets.
Note: There is one LED per
port. Refer to “Matching
LEDs to locations on
ServerIron ADX chassis
device modules” on
page 50 for information
on matching each LED to
the correct port.
Off A link is not established with the remote
port or traffic is not being passed on
the port.
Power Supplies AC
AC OK Green (steady) The power supply is
receiving AC power from
an AC power source.
DC OK Green (steady) The power supply is
providing DC power to the
ServerIron ADX chassis.
ALM ALM The power supply is in
normal operating
condition.
Off The power supply is not receiving power
from an AC power source You can do
the following:
• Make sure that the power supply
cord is connected securely to the
wall outlet and the power supply.
• Make sure that the wall outlet is
rated for 115/120V and 20A. If it
is not, obtain a cable that is
compatibly rated for the outlet.
• Make sure that the wall outlet has
power.
Off The power supply is not supplying
power to the chassis. If the AC OK LED
is lit Green, then there is a problem with
the power supply and it must be
replaced.
Amber The power supply is malfunctioning.
48 Brocade ServerIron ADX Installation Guide
53-1002066-01
Page 59

DRAFT: BROCADE CONFIDENTIAL
Verifying proper operation
2
TABLE 3 LED States After System Power On - ServerIron ADX 4000, ServerIron ADX 8000 and ServerIron ADX 10000 (Continued)
LED Desired State Meaning Abnormal State Meaning/Action
Power Supplies DC
DC IN Green (steady) The power supply is
receiving DC power from a
DC power source.
Off The power supply is not receiving power
from a DC power source You can do the
following:
• Make sure that the power supply
cables are connected securely to
the power source and the power
supply.
• Make sure that the DC power
source is -48 VDC @ 30 A
(Operating voltage range is
-40 - -60VDC).
• Make sure that the power source
has power.
DC OUT Green (steady) The power supply is
providing DC power to the
ServerIron ADX chassis.
ALM Off The power supply is in
normal operating
condition.
Fan Tray (ServerIron ADX 10000 only)
Green (steady) All fans are operating
normally.
Off Power is not being applied
to the fan tray.
Off The power supply is not supplying
power to the chassis. If the DC IN LED is
lit Green, then there is a problem with
the power supply and it must be
replaced.
Amber The power supply is malfunctioning.
Amber One or more fans are operating
abnormally.
Brocade ServerIron ADX Installation Guide 49
53-1002066-01
Page 60

Verifying proper operation
1 3
2 4
SI-12GC
Lnk / Act
Pwr
Lnk / Act
11
12
1
2
2
DRAFT: BROCADE CONFIDENTIAL
Matching LEDs to locations on ServerIron ADX chassis device modules
Figure 35 shows how to match the LEDs to ports on the 4 x 10G XFP Fiber Ethernet Interface
Module.
FIGURE 35 Interpreting LEDs on the 4 x 10G XFP Fiber Ethernet Interface Module
1 LEDs for Port 1 3 LEDs for Port 3
2 LEDs for Port 2 4 LEDs for Port 4
Figure 36 shows how to match the LEDs to ports on the 12 x 1G Copper Ethernet Interface Module.
FIGURE 36 Interpreting LEDs on the 12 x 1G Copper Ethernet Interface Module
1 LED for Upper Port 2 LED for Lower Port
50 Brocade ServerIron ADX Installation Guide
53-1002066-01
Page 61

DRAFT: BROCADE CONFIDENTIAL
NOTE
Lnk / Act
1
2
Lnk / Act
Pwr
11
12
Lnk / Act
1
2
Replacing a Fan Tray
Figure 37 shows how to match the LEDs to ports on the 12 x 1G SFP Fiber Ethernet Interface
Module.
FIGURE 37 Interpreting LEDs on the 12 x 1G SFP Fiber Ethernet Interface Module
1 LED for Upper Port 2 LED for Lower Port
Figure 37 shows how to match the LEDs to ports on the 12 x 1G SFP Fiber Ethernet Interface
Module.
2
Replacing a Fan Tray
You can replace the fan tray in the ServerIron ADX chassis.
Fan trays are hot swappable. Hot swapping fan trays should be done within 5 minutes so the unit
will continue to function correctly without any fans. However, Brocade recommends that you
disconnect the power supply from AC or DC power before installing or removing the fan tray.
Brocade ServerIron ADX Installation Guide 51
53-1002066-01
Page 62

Replacing a Fan Tray
2
DRAFT: BROCADE CONFIDENTIAL
Replacing the ServerIron ADX 1000 Fan Tray
To replace the ServerIron ADX 1000 fan tray, follow these steps.
1. Power down and unplug the chassis.
2. Unscrew the two screws that secure the fan tray to the chassis (Figure 38).
FIGURE 38 Replacing the ServerIron ADX 1000 Fan Tray
3. Slide the fan tray out.
4. Slide the new fan tray in and tighten the screws to secure it to the chassis.
5. Plug the chassis back in and power up.
Replacing the ServerIron ADX 4000 or ServerIron ADX 8000 Fan Tray
To replace the ServerIron ADX 4000 or ServerIron ADX 8000 fan tray, follow these steps.
1. Power down and unplug the chassis.
2. Pull the thumb-lever on the power supply down and pull the fan-tray out by the handle
(Figure 39).
3. Slide the new fan-tray in until it is secure in the chassis.
4. Plug the chassis back in and power up.
FIGURE 39 Replacing a Fan from a ServerIron 4000 or ServerIron 8000
52 Brocade ServerIron ADX Installation Guide
53-1002066-01
Page 63

DRAFT: BROCADE CONFIDENTIAL
Replacing a Fan Tray
2
Replacing the ServerIron ADX 10000 Fan Tray
To replace the ServerIron ADX 10000 fan tray, follow these steps.
1. Power down and unplug the chassis.
2. Use a #2 phillips screwdriver to loosen the captive screws. These are the silver screws.
3. Use the handles to pull the fan tray from the chassis.
4. Slide the new fan-tray in until it is secure in the chassis.
5. Use a #2 phillips screwdriver to tighten the captive screws (silver).
6. Plug the chassis back in and power up.
Brocade ServerIron ADX Installation Guide 53
53-1002066-01
Page 64

Replacing a Fan Tray
Fan Tray
Handle
Handle
Captive Screw
(silver)
Captive Screw
(silver)
2
DRAFT: BROCADE CONFIDENTIAL
FIGURE 40 Replacing a Fan from a ServerIron ADX 10000
54 Brocade ServerIron ADX Installation Guide
53-1002066-01
Page 65

DRAFT: BROCADE CONFIDENTIAL
Fan Filter Retainer
Fan Filter
Fan Assembly
Thumb Screw
Thumb Screw
Replacing a Fan Tray
2
Replacing the air filter in the ServerIron ADX 10000
The fan filter in the ServerIron ADX 10000 can be replaced with the fan assembly installed in the
chassis and in operation as described in the following steps.
1. Loosen the four thumb screws (black) in the front of the filter retainer.
2. Pull the filter retainer away from the fan assembly (shown in Figure 41)
FIGURE 41 Air Filter Removal and Replacement for the ServerIron ADX 10000
3. Pull the fan filter away from the filter retainer.
The fan filter is held in the filter retainer by velcro in each of the four corners.
4. Insert the replacement air filter by pressing it into the filter retainer.
Press down on each of the four corners until the filter is securely fastened to the velcro.
5. Push the filter retainer back into the fan assembly and tighten the four thumb screws (black).
Brocade ServerIron ADX Installation Guide 55
53-1002066-01
Page 66

Replacing a Fan Tray
2
DRAFT: BROCADE CONFIDENTIAL
56 Brocade ServerIron ADX Installation Guide
53-1002066-01
Page 67

DRAFT: BROCADE CONFIDENTIAL
Appendix
Hardware Specifications
In this appendix
•Hardware specifications . . . . . . . . . . . . . . . . . . . . . . . . . . . . . . . . . . . . . . . . . 57
•Port specifications. . . . . . . . . . . . . . . . . . . . . . . . . . . . . . . . . . . . . . . . . . . . . . 59
Hardware specifications
This section contains the following hardware specifications for the ServerIron ADX chassis:
• “Power specifications”
• “Physical dimensions”
• “Operating environment”
• “Storage environment”
• “Safety agency approvals”
A
Power specifications
This section contains the power specifications for the ServerIron ADX chassis.
Tab le 4 provides the maximum power calculations.
TABLE 4 Maximum Power Calculations
ServerIron ADX Chassis Watts
ServerIron ADX 1000 390
ServerIron ADX 4000 952
ServerIron ADX 8000 1920
ServerIron ADX 10000 1920
Tab le 5 lists the maximum power consumption, in watts, for ServerIron ADX 4000, ServerIron ADX
8000 and ServerIron ADX 10000 modules .
.
TABLE 5 Wattage Consumed by Individual Modules
ServerIron ADX Chassis Maximum Power Consumption, in
Watts
Management Module (MM) 45W
Switch Fabric Module (SFM) 50W
Application Switch Module (ASM) 300W
Brocade ServerIron ADX Installation Guide 57
53-1002066-01
Page 68

Hardware specifications
A
DRAFT: BROCADE CONFIDENTIAL
TABLE 5 Wattage Consumed by Individual Modules
ServerIron ADX Chassis Maximum Power Consumption, in
Watts
4-port 10 Gigabit Ethernet interface with
fiber-optic modules installed
12-port Gigabit Ethernet interface with
fiber-optic modules installed
12-port Gigabit Ethernet copper interface 94W
ServerIron ADX 4000 fan tray 69W
ServerIron ADX 8000 fan tray 137W
SSL Expansion module 65W
88W
92W
Tab le 6 lists the operating voltage and current ratings for ServerIron ADX 1000.
.
TABLE 6 ServerIron ADX 1000 operating voltage and current ratings
Power Supply Input Voltage Range Input Current Inrush Current Maximum Output
AC 100-240Vac (85-264Vac) 7A max 30A peak @ 25º C 500W
DC -48Vdc (-40Vdc to -60Vdc) 15A max 25A peak @ 25
º C 500W
Tab le 7 lists the operating voltage and current ratings for ServerIron ADX 4000/8000/10000.
.
TABLE 7 ServerIron ADX 4000/8000/10000 operating voltage and current ratings
Power Supply Input Voltage Range Input Current Inrush Current Maximum Output
AC 100-240Vac (90-264Vac) 16A max 40A peak @ 25º C 1200W
DC -48Vdc (-36Vdc to -72Vdc) <
35A @ -48VDCin 45A peak @ 25º C 1200W
Physical dimensions
Tab le 8 provides the physical dimensions for the ServerIron ADX chassis.
TABLE 8 Physical Dimensions
ServerIron ADX Chassis Height Width Depth Weight (fully-loaded)
ServerIron ADX 1000 1.71 (4.3. cm) 17.45" (44.3 cm) 18.06 (45.8 cm) 37.48 lbs (17.00 kg)
ServerIron ADX 4000 6.96 (17.7 cm) 17.45" (44.3 cm) 17.5" ( 44.5 cm) 53.95 lbs (24.47 kg)
ServerIron ADX 8000 13.96" (35.5 cm) 17.45" (44.3 cm) 17.5" ( 44.5 cm) 92.45 lbs (42 kg)
ServerIron ADX 10000 17.45” (44.3 cm) 17.45" (44.3 cm) 21.971 (55.78 cm) 111.8 lbs (50.71)
Operating environment
Tab le 9 provides the operating environment specifications for the ServerIron ADX chassis.
TABLE 9 Operating Environment
Operating Temperature Relative Humidity Operating Altitude
32× – 104× F (0× – 40× C) 5 to 90%, at 104× F (40× C), non-condensing 0 – 6600 ft (0 – 2012 meters)
58 Brocade ServerIron ADX Installation Guide
53-1002066-01
Page 69

DRAFT: BROCADE CONFIDENTIAL
CAUTION
Port specifications
A
Storage environment
Tab le 10 provides the storage environment specifications for the ServerIron ADX chassis.
TABLE 10 ServerIron ADX Storage Environment
Storage Temperature Storage Humidity Storage Altitude
-13× – 158× F (-25× – 70× C) 95% maximum relative humidity,
non-condensing
0 – 15,000 ft (0 – 4500 meters)
Safety agency approvals
• CAN/CSA-C22.2 No. 60950-1-07/UL60950-1 – Second Edition, Safety of Information
Techno logy Equipment
• EN 60825-1 Safety of Laser Products – Part 1: Equipment Classification, Requirements and
User’s Guide
• EN 60825-2 Safety of Laser Products – Part 2: Safety of Optical Fibre Communications
Systems
• EN 60950-1:2006\IEC 60950-1 –Second Edition, Safety of Information Technology Equipment
Electromagnetic approvals
• FCC Part 15, Subpart B (Class A)
• EN 55022 (CE mark) (Class A)
• EN55024 (CE mark) (Immunity) for Information Technology Equipment
• ICES-003 (Canada) (Class A)
• AS/NZ 55022 (Australia) (Class A)
• VCCI (Japan) (Class A)
• EN 61000-3-2
• EN 61000-3-3
• EN 61000-6-1
Port specifications
This section provides the following pin assignment information:
• “Console Port Pin assignments”
• “Management Port Pin assignments”
The intra-building port(s) of the equipment or subassembly is suitable for connection to
intra-building or unexposed wiring or cabling only. The intra-building port(s) of the equipment or
subassembly MUST NOT be metallically connected to interfaces that connect to the OSP or its
wiring. These interfaces are designed for use as intra-building interfaces only (Type 2 or Type 4
Brocade ServerIron ADX Installation Guide 59
53-1002066-01
Page 70

Port specifications
NOTE
Pin Assignment
DB-9 male
Pin Number
Switch Signal
6
1 Reserved
2 TXD (output)
3 RXD (input)
4 Reserved
5 GND
6 Reserved
7 CTS (input)
8 RTS (output)
9 Reserved
1 5
9
A
DRAFT: BROCADE CONFIDENTIAL
ports as described in GR-1089-CORE, Issue 4) and require isolation from the exposed OSP
cabling. The addition of Primary Protectors is not sufficient protection in order to connect these
interfaces metallically to OSP wiring.
Console Port Pin assignments
The console port is a standard male DB-9 connector, as shown in Figure 42. For information about
how you can use this port, refer to “Attaching a PC or terminal to the Console port or Ethernet port”
on page 36.
FIGURE 42 Console Port Pin and Signalling Details
60 Brocade ServerIron ADX Installation Guide
Most PC serial ports require a cable with a female DB-9 connector. However, terminal connections
will vary, requiring a cable with either a DB-9 or DB-25 connector, male or female.
Serial cable options between the ServerIron ADX chassis and a PC or terminal are shown in
Figure 43.
As indicated in Figure 42 and Figure 43, some of the wires should not be connected. If you do
connect the wires that are labeled “Reserved”, you might get unexpected results with some
terminals.
FIGURE 43 Console Port Pin Assignments Showing Cable Connection Options to a Terminal or PC
53-1002066-01
Page 71

DRAFT: BROCADE CONFIDENTIAL
1
2
3
4
5
6
7
8
9
1
2
3
4
5
6
7
8
9
8
3
2
20
7
6
4
5
22
DB-9 to DB-9
Female Switch
Terminal or PC
Reserved
Reserved
Reserved
Reserved
DB-9 to DB-25
Female Switch
Terminal or PC
1
2
3
4
5
6
7
8
9
Reserved
Reserved
Reserved
Reserved
Port specifications
A
Management Port Pin assignments
The management port is an RJ-45 UTP connector. Table 11 describes the connector pin
assignments. For information about how you can use this port, refer to “Attaching the management
module Ethernet port to a network” on page 37.
TABLE 11 Management Port Pin Assignments
Pin Number MDI-X Ports
1TD+
2TD-
3RD+
4Not used (10BaseT)
CMT (100BaseTX)
5Not used (10BaseT)
CMT (100BaseTX)
6RD-
7Not used (10BaseT)
CMT (100BaseTX)
8Not used (10BaseT)
CMT (100BaseTX)
Brocade ServerIron ADX Installation Guide 61
53-1002066-01
Page 72

Port specifications
A
DRAFT: BROCADE CONFIDENTIAL
62 Brocade ServerIron ADX Installation Guide
53-1002066-01
Page 73

DRAFT: BROCADE CONFIDENTIAL
Lnk / Act
1
2
PS1
PS2
PS3
PS4
100-240 VAC
48 VDC
SEE REAR LABEL
BP
In
Out
ASM
Console
Pwr
SI-ASM
BP
In
Out
ASM
Console
Pwr
SI-ASM
BP
In
Out
ASM
Console
Pwr
SI-ASM
1 2 3 4 5 6 7 8
BP
In
Out
ASM
Console
Pwr
SI-ASM
Console
Aux
Console
Pwr
SI-MM
Mgmt
USB
Aux1
Aux2
Act
Console
Pwr
SI-MM
Mgmt
USB
Aux1
Aux2
Aux
Console
Act
Pwr
Pwr
SI-SFM
Pwr
SI-SFM
1 2 3 4 5 6 7 8
1 2 3 4 5 6 7 8
1 2 3 4 5 6 7 8
Lnk / Act
ASM4
ASM3
F
SF1
MM2
MM1
LC1
LC2
LC3
LC4
A
N
SF2
Application Switch Module
Application Switch Module
Application Switch Module
Application Switch Module
Lnk / Act
Pwr
11
12
Lnk / Act
Pwr
Lnk / Act
11
12
ASM1
ASM2
SI-12GC
AC OK
DC OK
ALM
AC OK
DC OK
ALM
AC OK
DC OK
ALM
AC OK
DC OK
ALM
Appendix
ServerIron ADX 8000
The ServerIron ADX 8000 was replaced with the ServerIron 10000 and is no longer available from
Brocade. It is still supported by Brocade however and it will run all new ServerIron ADX software
releases. This appendix provides all of the ADX 8000 specific features while all installation and
operation details are described in the body of this guide where the ServerIron ADX chassis devices
are described.
ServerIron ADX 8000
Figure 44 shows the ServerIron ADX 8000 chassis.
FIGURE 44 ServerIron ADX 8000 Chassis
B
Brocade ServerIron ADX Installation Guide 63
53-1002066-01
ServerIron ADX 8000 chassis basics:
• 8 RU form factor
• Four hot-pluggable AC or DC power supplies (two+two redundant)
Page 74

ServerIron ADX 8000
PS SLOT 1
PS SLOT 2
ServerIron 8000 Front Panel View
MM 2
ASM 1
ASM 2
MM 1
ASM 3
ASM 4
INTERFACE MODULE 3
INTERFACE MODULE 4
PS SLOT 3
PS SLOT 4
FAN
INTERFACE MODULE 1
INTERFACE MODULE 2
SFM 1
SFM 2
B
DRAFT: BROCADE CONFIDENTIAL
Two power supplies are required, and two are optional for redundancy. By default, the system
ships with two power supplies.
• One hot-pluggable fan tray with six fans
• Side-to-side air cooling - left-to-right
• Card slots to accommodate modules
A fully-loaded ServerIron ADX 8000 can accommodate the following components:
• Four Ethernet Interface Modules
• Four Application Services Modules (ASM)
• Two Management Modules (MM)
• Two Switch Fabric Modules (SFM)
• One fan tray
• Four AC or DC power supplies (two required, one or two redundant)
Slot ordering for ServerIron ADX 8000 is important. Refer to “Installing modules in ServerIron ADX
chassis devices” on page 21.
ServerIron ADX 8000 slot assignments
The ServerIron ADX 8000 chassis ships with the following components installed (see shaded slots
in Figure 45):
• Two SFMs
• Fan tray
• Two power supplies
FIGURE 45 Slot Ordering for the ServerIron ADX 8000 Chassis
64 Brocade ServerIron ADX Installation Guide
53-1002066-01
Page 75

DRAFT: BROCADE CONFIDENTIAL
ServerIron ADX 8000
B
Brocade ServerIron ADX Installation Guide 65
53-1002066-01
Page 76

ServerIron ADX 8000
B
DRAFT: BROCADE CONFIDENTIAL
66 Brocade ServerIron ADX Installation Guide
53-1002066-01
Page 77

DRAFT: BROCADE CONFIDENTIAL
CAUTION
Appendix
Regulatory Statements
U.S.A.
This equipment has been tested and found to comply with the limits for a Class A digital device
pursuant to Part 15 of the FCC Rules. These limits are designed to provide reasonable protection
against harmful interference when the equipment is operated in a commercial environment. This
equipment generates, uses, and can radiate radio frequency energy and, if not installed and used
in accordance with the instruction manual, may cause harmful interference to radio
communications. Operation of this equipment in a residential area is likely to cause harmful
interference in which case the user will be required to correct the interference at his own expense.
Changes or modifications made to this device which are not expressly approved by the party
responsible for compliance could void the user’s authority to operate the equipment.
C
Industry Canada statement
This Class A digital apparatus complies with Canadian ICES-003.
Cet appareil numérique de la classe A est conforme à la norme NMB-003 du Canada.
Europe and Australia
This is a Class A product. In a domestic environment this product may cause radio interference in
which case the user may be required to take adequate measures.
Germany
Machine noise information regulation - 3. GPSGV, the highest sound pressure level value is 60.0
dB(A) in accordance with EN ISO 7779.
Maschinenlärminformations-Verordnung - 3. GPSGV, der höchste Schalldruckpegel beträgt 60.0
dB(A) gemäss EN ISO 7779.
Brocade ServerIron ADX Installation Guide 67
53-1002066-01
Page 78

C
Japan
DRAFT: BROCADE CONFIDENTIAL
Japan
English Translation of above statement
This is Class A product based on the standard of the Voluntary Control Council For Interference by
Information Technology Equipment (VCCI). If this equipment is used in a domestic environment,
radio disturbance may arise. When such trouble occurs, the user may be required to take
corrective actions.
This is Class A product ba sed on the standard of the Volunt ary Control Council For Interferen ce by Information Technology Equ ipment (VCCI). If this equipment is used in a domestic environment, radio disturbance may arise. When such trouble occurs, the user may b e required to take corrective actions.
Power cords (Japan Denan)
English Translation of above statement
ATTENTION: Never use the power cord packed with your equipment for other products.
Korea
68 Brocade ServerIron ADX Installation Guide
53-1002066-01
Page 79

DRAFT: BROCADE CONFIDENTIAL
Korea
English translation of above statement
This apparatus has radio wave acceptability registration as a Class A device, so sellers or users
should be aware of this. If it is sold or purchased incorrectly, it should be exchanged with a home
apparatus (Class B).
C
Brocade ServerIron ADX Installation Guide 69
53-1002066-01
Page 80

C
DRAFT: BROCADE CONFIDENTIAL
Korea
70 Brocade ServerIron ADX Installation Guide
53-1002066-01
Page 81

DRAFT: BROCADE CONFIDENTIAL
Appendix
Cautions and Danger
The cautions and warnings that appear in this manual are listed below in English, German, French,
and Spanish.
D
Cautions
A caution calls your attention to a possible hazard that can damage equipment.
“Vorsicht” weist auf eine mögliche Beschädigung des Geräts hin. Sie finden die folgenden
Vorsichtshinweise in diesem Handbuch.
Une mise en garde attire votre attention sur un risque possible d'endommagement de
l'équipement. Ci-dessous, vous trouverez les mises en garde utilisées dans ce manuel.
Un mensaje de precaución le advierte sobre un posible peligro que pueda dañar el equipo. Las
siguientes son precauciones utilizadas en este manual.
CAUTION All devices with DC power supplies are intended for installation in restricted access areas only. A restricted
access area is where access can be gained only by service personnel through the use of a special tool, lock and
key, or other means of security, and is controlled by the authority responsible for the location.
VORSICHT Alle Geräte mit Direktstromquellen sind nur zur Installation in Sperrbereichen bestimmt. Ein Sperrbereich ist ein
Ort, zu dem nur Wartungspersonal mit einem Spezialwerkzeug, Schloss und Schlüssel oder einer anderen
Schutzvorrichtung Zugang hat. Er unterliegt außerdem der Kontrolle durch die für den Standort verantwortliche
Stelle.
MISE EN GARDE Tous les équipements dotés d'un bloc d'alimentation en courant continu sont conçus pour l'installation dans des
zones à accès réglementé uniquement. Une zone à accès réglementé est un local qui n'est accessible que par le
personnel d'entretien à l'aide d'un outil, verrou ou clé conçus à cet effet, ou de tout autre accessoire de sécurité,
et qui est contrôlé par l'autorité responsable de ce local.
PRECAUCIÓN Todos aquellos dispositivos con fuentes de alimentación de CC están diseñados para su instalación en zonas de
acceso restringido solamente. Una zona de acceso restringido es un lugar al que sólo puede acceder personal
de mantenimiento haciendo uso de una herramienta especial, una llave y un candado, o algún otro medio de
seguridad, y que está controlado por la autoridad responsable.
CAUTION Carefully follow the mechanical guides on each side of the power supply slot and make sure the power supply is
properly inserted in the guides. Never insert the power supply upside down.
VORSICHT Beachten Sie mechanischen Führungen an jeder Seite des Netzteils, das ordnungegemäß in die Führungen
gesteckt werden muss. Das Netzteil darf niemals umgedreht eingesteckt werden.
MISE EN GARDE Suivez attentivement les repères mécaniques de chaque côté du slot du bloc d'alimentation et assurez-vous que
le bloc d'alimentation est bien inséré dans les repères. N'insérez jamais le bloc d'alimentation à l'envers.
PRECAUCIÓN Siga cuidadosamente las guías mecánicas de cada lado de la ranura del suministro de energía y verifique que el
suministro de energía está insertado correctamente en las guías. No inserte nunca el suministro de energía de
manera invertida.
Brocade ServerIron ADX Installation Guide 71
53-1002066-01
Page 82

DRAFT: BROCADE CONFIDENTIAL
Cautions
D
CAUTION Do not add or remove a flash card while a file operation involving the flash card's slot is in progress. Doing so can
result in corruption of the flash card. If this occurs, you may need to reformat the flash card to make it usable
again. Reformatting the card erases all data stored on the card.
VORSICHT Eine Flash-Karte darf nur dann eingesteckt oder herausgenommen werden, wenn keine Dateifunktion läuft, die
der Flash-Karte bedarf. Wenn dies nicht beachtet wird, kann dies zur Korruption der Flash-Karte führen. Die
Karte kann dann erst nach Neuformattierung wieder benutzt werden. Bei Neuformattietung gehen alle auf der
Karte gespeicherten Daten verloren.
MISE EN GARDE N'ajoutez pas ou ne supprimez pas une carte mémoire au cours d'une opération de fichier dans laquelle le slot
de carte mémoire est impliqué. Vous risquez sinon de corrompre la carte mémoire. Si cela se produit, vous
devrez peut-être reformater la carte mémoire pour qu'elle soit à nouveau utilisable. Le reformatage de la carte
efface toutes les données qui y sont stockées.
PRECAUCIÓN No añada ni quite una tarjeta flash mientras una operación de archivo que conlleve el uso de una ranura de
tarjeta flash se encuentre en uso. De hacerlo así se podría dar lugar a la corrupción de la tarjeta flash. Si esto
ocurriera, podría ser necesario que vuelva a formatear la tarjeta flash para hacer que vuelva sea utilizable.
Cuando se formatea la tarjeta se borran todos los datos almacenados en la tarjeta.
CAUTION Do not install the device in an environment where the operating ambient temperature might exceed 40 C (104
F).
VORSICHT Das Gerät darf nicht in einer Umgebung mit einer Umgebungsbetriebstemperatur von über 40 C (104 F)
installiert werden.
MISE EN GARDE N'installez pas le dispositif dans un environnement où la température d'exploitation ambiante risque de
dépasser 40 C (104 F).
PRECAUCIÓN No instale el instrumento en un entorno en el que la temperatura ambiente de operación pueda exceder los 40
C (104 F).
CAUTION Ensure that the device does not overload the power circuits, wiring, and over-current protection. To determine
the possibility of overloading the supply circuits, add the ampere (amp) ratings of all devices installed on the
same circuit as the device. Compare this total with the rating limit for the circuit. The maximum ampere ratings
are usually printed on the devices near the input power connectors.
VORSICHT Stromkreise, Verdrahtung und Überlastschutz dürfen nicht durch das Gerät überbelastet werden. Addieren Sie
die Nennstromleistung (in Ampere) aller Geräte, die am selben Stromkreis wie das Gerät installiert sind. Somit
können Sie feststellen, ob die Gefahr einer Überbelastung der Versorgungsstromkreise vorliegt. Vergleichen Sie
diese Summe mit der Nennstromgrenze des Stromkreises. Die Höchstnennströme (in Ampere) stehen
normalerweise auf der Geräterückseite neben den Eingangsstromanschlüssen.
MISE EN GARDE Assurez-vous que le dispositif ne risque pas de surcharger les circuits d'alimentation, le câblage et la protection
de surintensité. Pour déterminer le risque de surcharge des circuits d'alimentation, additionnez l'intensité
nominale (ampères) de tous les dispositifs installés sur le même circuit que le dispositif en question. Comparez
alors ce total avec la limite de charge du circuit. L'intensité nominale maximum en ampères est généralement
imprimée sur chaque dispositif près des connecteurs d'entrée d'alimentation.
PRECAUCIÓN Verifique que el instrumento no sobrecargue los circuitos de corriente, el cableado y la protección para
sobrecargas. Para determinar la posibilidad de sobrecarga en los circuitos de suministros, añada las
capacidades nominales de corriente (amp) de todos los instrumentos instalados en el mismo circuito que el
instrumento. Compare esta suma con el límite nominal para el circuito. Las capacidades nominales de corriente
máximas están generalmente impresas en los instrumentos, cerca de los conectores de corriente de entrada.
72 Brocade ServerIron ADX Installation Guide
53-1002066-01
Page 83

DRAFT: BROCADE CONFIDENTIAL
Cautions
CAUTION All devices with AC power sources (ServerIron 4000, 8000 only) are intended for installation in restricted access
areas only. A restricted access area is a location where access can be gained only by service personnel through
the use of a special tool, lock and key, or other means of security.
VORSICHT Alle Geräte mit Wechselstromquellen (ServerIron 4000, 8000 nur) sind nur zur Installation in Sperrbereichen
bestimmt. Ein Sperrbereich ist ein Ort, zu dem nur Wartungspersonal mit einem Spezialwerkzeug, Schloss und
Schlüssel oder einer anderen Schutzvorrichtung Zugang hat.
MISE EN GARDE Tous les équipements dotés de sources d'alimentation électrique secteur (ServerIron 4000, 8000 uniquement)
sont destinés à être installés uniquement dans des zones à accès réglementé. Une zone à accès réglementé est
une zone dont l'accès n'est possible qu'au personnel de service utilisant un verrou, une clé ou un outil spécial, ou
d'autres moyens de sécurité.
PRECAUCIÓN Todos aquellos dispositivos con fuentes de alimentación de CA (ServerIron 4000, 8000 solamente) están
diseñados para su instalación en zonas de acceso restringido solamente. Una zona de acceso restringido es un
lugar al que sólo puede acceder personal de mantenimiento haciendo uso de una herramienta especial, una
llave y un candado, o algún otro medio de seguridad.
CAUTION For a DC system, use a grounding wire of at least 6 American Wire Gauge (AWG). The 6 AWG wire should be
attached to an agency-approved crimp connector, crimped with the proper tool.
VORSICHT Für ein Gleichstromsystem (Gleichstromnetzteile mit der Teilenr RPSDC-FGS) ist ein Erdungsdraht (wenigstens 6
AWG) erforderlich. Der 6 AWG-Draht sollte an einen behördlich genehmigten Crimpverbinder angebracht werden,
der mit einem ordnungsgemäßen Werkzeug gecrimpt wurde.
MISE EN GARDE Pour les systèmes C.C. (références du bloc d’alimentation C.C. RPSDC-FGS), utilisez un fil de mise à la terre d’au
moins 6 AWG (American Wire Gauge). Ce fil de 6 AWG doit être relié à un connecteur à sertissage homologué,
serti avec l’outil approprié. Le connecteur à sertissage doit permettre la sécurisation aux deux vis de borne de
terre sur le boîtier.
PRECAUCIÓN Para un sistema de CC (suministro de corriente continua con No. de referencia RPSDC-FGS), utilice un cable de
conexión a tierra de calibre de cable norteamericano (AWG) número 6. El cable 6 AWG deberá acoplarse a un
conector engarzado aprobado, y engarzado con la herramienta apropiada.
D
CAUTION Make sure the air flow around the front, sides, and back of the device is not restricted.
VORSICHT Stellen Sie sicher, dass an der Vorderseite, den Seiten und an der Rückseite der Luftstrom nicht behindert wird.
MISE EN GARDE Vérifiez que rien ne restreint la circulation d'air devant, derrière et sur les côtés du dispositif et qu'elle peut se
faire librement.
PRECAUCIÓN Asegúrese de que el flujo de aire en las inmediaciones de las partes anterior, laterales y posterior del
instrumento no esté restringido.
CAUTION Make sure the flash card is empty or does not contain files you want to keep. Formatting a flash card completely
erases all files on the card.
VORSICHT Stellen Sie sicher, dass die Flash-Karte leer ist oder keine Dateien auf ihr gespeichert sind, die Sie behalten
möchten. Die Formattierung einer Flash-Karte löscht alle Dateien auf der Karte.
MISE EN GARDE Vérifiez que la carte mémoire est vide ou ne contient pas de fichiers que vous voulez conserver. Le reformatage
de la carte mémoire efface tous les fichiers qui s'y trouvent.
PRECAUCIÓN Verifique que la tarjeta flash esté vacía o que no contenga archivos que desee conservar. Al formatear una
tarjeta flash todos los archivos de ésta se borran.
Brocade ServerIron ADX Installation Guide 73
53-1002066-01
Page 84

DRAFT: BROCADE CONFIDENTIAL
Cautions
D
CAUTION Never leave tools inside the chassis.
VORSICHT Lassen Sie keine Werkzeuge im Chassis zurück.
MISE EN GARDE Ne laissez jamais d'outils à l'intérieur du châssis.
PRECAUCIÓN No deje nunca herramientas en el interior del chasis.
CAUTION Once you start the formatting process, you cannot stop it. Even if you enter CTRL-C to stop the CLI output and a
new prompt appears, the formatting continues. Make sure you want to format the card before you enter the
command.
VORSICHT Wenn Sie mit dem Formattieren beginnen, können Sie diesen Prozess nicht anhalten. Selbst wenn zum Anhalten
der CLI-Ausgabe Strg-C drücken und eine neue Aufforderung gezeigt wird, wird mit dem Formattieren
fortgefahren. Stellen Sie sicher, dass Sie die Karte formattieren wollen, bevor Sie den Befehl eingeben.
MISE EN GARDE Une fois le processus de formatage commencé, vous ne pouvez pas l'interrompre. Même si vous appuyez sur
CTRL-C pour arrêter la sortie CLI et si une nouvelle invite apparaît, le formatage continue. Soyez bien sûr de
vouloir formater la carte avant d'entrer la commande.
PRECAUCIÓN Una vez que empiece con el proceso de formateado, no se puede detener. Incluso si pulsa CTRL-C para detener
la salida de CLI y aparece un nuevo indicador, el formateado continuará. Esté seguro que desea formatear la
tarjeta antes de introducir el comando.
CAUTION Use the erase startup-config command only for new systems. If you enter this command on a system you have
already configured, the command erases the configuration. If you accidentally do erase the configuration on a
configured system, enter the write memory command to save the running configuration to the startup-config file.
VORSICHT Verwenden Sie den Befehl "Erase startup-config" (Löschen Startup-Konfig) nur für neue Systeme. Wenn Sie
diesen Befehl in ein bereits konfiguriertes System eingeben, löscht der Befehl die Konfiguration. Falls Sie aus
Versehen die Konfiguration eines bereits konfigurierten Systems löschen, geben Sie den Befehl "Write Memory"
(Speicher schreiben) ein, um die laufende Konfiguration in der Startup-Konfig-Datei zu speichern.
MISE EN GARDE N'utilisez la commande erase startup-config que pour les nouveaux systèmes. Si vous entrez cette commande
sur un système que vous avez déjà configuré, elle efface la configuration. Si vous effacez la configuration par
accident sur un système configuré, entrez la commande write memory pour enregistrer la configuration actuelle
dans le fichier startup-config.
PRECAUCIÓN Use el comando erase startup-config (borrar configuración de inicio) para sistemas nuevos solamente. Si usted
introduce este comando en un sistema que ya ha configurado, el comando borrará la configuración. Si usted
borra accidentalmente la configuración en un sistema ya configurado, introduzca el comando write memory
(escribir memoria) para guardar la configuración en ejecución en el archivo startup-config.
CAUTION Removal of rear fan modules allows access to bus bars and backplane. Avoid contact with these parts. There are
hazardous energy levels at these locations.
VORSICHT Durch die Entfernung der rückwärtigen Ventilatormodule wird der Zugang zu den Sammelschienen und der
Rückwandplatine ermöglicht. Kontakt mit diesen Teilen vermeiden. An diesen Stellen liegen gefährliche
Stromstärken an.
MISE EN GARDE La dépose des modules de ventilation en face arrière permet d'accéder à la distribution électrique et au fond de
panier. Éviter tout contact avec ces éléments, car les tensions électriques dans cette zone sont très élevées.
PRECAUCIÓN El desmontaje de los módulos del ventilador trasero del sistema permite el acceso a las barras del bus y a la
placa posterior. Evite el contacto con estas piezas. Hay niveles peligrosos de energía en tales lugares.
74 Brocade ServerIron ADX Installation Guide
53-1002066-01
Page 85

DRAFT: BROCADE CONFIDENTIAL
Cautions
CAUTION To avoid overheating of the chassis, remove only one fan assembly at a time.
VORSICHT Es darf nur ein Ventilatorblech zur Zeit entfernt werden, um ein Überhitzen des chassis Gehäuses zu vermeiden.
Es dürfen nicht beide Ventilatorbleche auf einmal entfernt werden.
MISE EN GARDE Pour éviter la surchauffe du châssis, n'enlever qu'un seul boîtier de ventilateur à la fois. Ne pas enlever les deux
boîtiers du châssis en même temps.
PRECAUCIÓN Para evitar el sobrecalentamiento del chasis, desmonte solamente una bandeja de ventilador a la vez. No retire
las dos bandejas de ventilador del chasis a la vez.
CAUTION Use a separate branch circuit for each AC power cord, which provides redundancy in case one of the circuits fails.
VORSICHT Es empfiehlt sich die Installation eines separaten Stromkreiszweiges für jede Wechselstrom-Elektroschnur als
Redundanz im Fall des Ausfalls eines Stromkreises.
MISE EN GARDE Utilisez un circuit de dérivation différent pour chaque cordon d’alimentation C.A. Ainsi, il y aura un circuit
redondant en cas de panne d’un des circuits.
PRECAUCIÓN Use un circuito derivado separado para cada cordón de alimentación de CA, con lo que se proporcionará
redundancia en caso de que uno de los circuitos falle.
CAUTION If you do not install a module in a slot, you must keep the slot panel in place. If you run the chassis with an
uncovered slot, the system may overheat.
VORSICHT Falls kein Modul im Steckplatz installiert wird, muss die Steckplatztafel angebracht werden. Wenn ein Steckplatz
nicht abgedeckt wird, läuft das System heiß.
MISE EN GARDE Si vous n’installez pas de module dans un slot, vous devez laisser le panneau du slot en place. Si vous faites
fonctionner le châssis avec un slot découvert, le système surchauffera.
PRECAUCIÓN Si no instala un módulo en la ranura, deberá mantener el panel de ranuras en su lugar. Si pone en
funcionamiento el chasis con una ranura descubierta, el sistema sufrirá sobrecalentamiento.
D
CAUTION Risk of explosion if battery is replaced by an incorrect type. Replace the battery only with the same or equivalent
type recommended by the manufacturer. Lithium battery is a long life battery and it is very possible that you will
never need to replace it. However, should you need to replace it, do not dispose of the battery along with
household waste. Contact your local waste disposal agency for the address of the nearest battery deposit site.
VORSICHT Bei Austausch der Batterie gegen eine Batterie des falschen Typs besteht Explosionsgefahr. Die Batterie darf nur
durch eine Batterie desselben oder eines gleichwertigen Typs gemäß den Empfehlungen des Herstellers
ausgetauscht werden. Lithiumbatterien haben eine lange Lebensdauer und brauchen möglicherweise überhaupt
nicht ausgetauscht zu werden. Sollte jedoch ein Austausch dieser Batterien notwendig sein, dürfen
Lithiumbatterien nicht im normalen Haushaltsmüll entsorgt werden. Die Adresse einer Batterieentsorgungsstelle
in Ihrer Nähe erhalten Sie bei Ihrer lokalen Abfallentsorgungsstelle.
MISE EN GARDE Il existe un risque d'explosion si la pile est remplacée par une autre pile de type incorrect. Remplacer la pile
uniquement par un modèle du même type ou d'un type équivalent recommandé par le fabricant. La pile au
lithium a une durée de vie importante Il est fort possible qu'il ne soit jamais nécessaire de la remplacer.
Toutefois, si le remplacement s'avère nécessaire, ne pas jeter la pile usagée avec les déchets domestiques.
Contacter l'organisme local chargé de la récupération et du traitement des déchets pour connaître l'adresse du
site de dépôt le plus proche.
PRECAUCIÓN Existe riesgo de explosión en caso de sustituir la batería por otra del tipo incorrecto. Cambie la batería sólo por
una igual o equivalente al modelo recomendado por el fabricante. La batería de litio es de larga duración y es
muy probable que nunca tenga que sustituirla. No obstante, si tuviera que cambiarla no deberá desecharla junto
con los demás residuos domésticos. Póngase en contacto con las autoridades competentes en materia de
gestión de residuos para informarse del punto más cercano donde depositar la batería.
Brocade ServerIron ADX Installation Guide 75
53-1002066-01
Page 86

DRAFT: BROCADE CONFIDENTIAL
Cautions
D
This Caution Applies to the ServerIron ADX 1000
CAUTION For the DC input circuit to the system, it must be connected to a 20 amp circuit breaker, minimum -48Vdc, double
pole, on the input to the terminal block. The input wiring for connection to the product should be copper wire, 12
AWG, marked VW-1, and rated minimum 90 degrees celcius.
VORSICHT Für den Eingangs-Gleichstromkreis zum System ist ein 20 A (Minimum), -48 V DC, doppelpolig, am Eingang zur
Reihenklemme zu installieren. Bei der Eingangsverdrahtung zum Anschluss des Produkts sollte es sich um einen
12 AWG-Kupferdraht (VW-1) und einer Mindestnenntemperatur von 32° handeln.
MISE EN GARDE Pour le circuit d'alimentation C.C du système, assurez-vous de la présence d'un disjoncteur de 20 ampères,
minimum -48 V C.C., double coupure, sur l'entrée vers le bloc d'alimentation. Les câbles d'alimentation pour le
produit doivent être en fils de cuivre, 12 AWG (American Wire Gauge), marqués VW-1 et classés 90 degrés
Celsius.
PRECAUCIÓN Para el circuito de entrada de CC al sistema, verifique que existe un cortacircuitos catalogado de 20 amperios,
como mínimo, -48 VCC, bipolar, en la entrada al bloque terminal. El cableado de entrada para la conexión al
producto deberá ser de cable de cobre catalogado, 12 AWG, marcado con VW-1, y tener una capacidad nominal
mínima para 90 grados centígrados.
This Caution Applies to the ServerIron ADX 4000 and ServerIron ADX 8000
CAUTION For the DC input circuit to the system, it must be connected to a 30 amp circuit breaker, minimum -48Vdc, double
pole, on the input to the terminal block. The input wiring for connection to the product should be copper wire, 8
AWG, marked VW-1, and rated minimum 90 degrees celcius.
VORSICHT Für den Eingangs-Gleichstromkreis zum System ist ein 30 A (Minimum), -48 V DC, doppelpolig, am Eingang zur
Reihenklemme zu installieren. Bei der Eingangsverdrahtung zum Anschluss des Produkts sollte es sich um einen
8 AWG-Kupferdraht (VW-1) und einer Mindestnenntemperatur von 32° handeln.
MISE EN GARDE Pour le circuit d'alimentation C.C du système, assurez-vous de la présence d'un disjoncteur de 30 ampères,
minimum -48 V C.C., double coupure, sur l'entrée vers le bloc d'alimentation. Les câbles d'alimentation pour le
produit doivent être en fils de cuivre, 8 AWG (American Wire Gauge), marqués VW-1 et classés 90 degrés Celsius.
PRECAUCIÓN Para el circuito de entrada de CC al sistema, verifique que existe un cortacircuitos catalogado de 30 amperios,
como mínimo, -48 VCC, bipolar, en la entrada al bloque terminal. El cableado de entrada para la conexión al
producto deberá ser de cable de cobre catalogado, 8 AWG, marcado con VW-1, y tener una capacidad nominal
mínima para 90 grados centígrados.
CAUTION For an AC system, use a ground wire of at least 6 American Wire Gauge (AWG). The ground wire should have an
agency-approved crimped connector (provided with the chassis) attached to one end, with the other end attached
to building ground. The connector must be crimped with the proper tool, allowing it to be connected to both
ground screws on the enclosure.
VORSICHT Für ein Wechselstromsystem ist ein Erdleiter von mindestens 6 AWG (amerikanische Norm für Drahtquerschnitte)
zu verwenden. An einem Ende des Erdleiters sollte ein geprüfter gecrimpter Anschluss (mit Chassis bereitgestellt)
angebracht sein. Das andere Ende sollte an der Gebäudeerdung angeschlossen werden. Der Anschluss muss mit
dem richtigen Werkzeug gecrimpt werden, so dass er an beiden Erdungsschrauben am Gehäuse angeschlossen
werden kann.
MISE EN GARDE Pour un système à alimentation secteur, utiliser un câble de mise à la terre de calibre AWG 6 (13 mm²) minimum.
Ce fil de terre doit être équipé d'un côté d'un connecteur à sertir agréé (fourni avec le châssis), et l'autre
extrémité doit être reliée à la terre du bâtiment. Ce connecteur doit être serti à l'aide de l'outil approprié afin
d'être raccordé aux deux vis de mise à la terre du boîtier.
PRECAUCIÓN Para un sistema de CA, utilice un conductor de tierra de al menos 6 CAE (Calibre de Alambre Estadounidense,
American Wire Gauge o AWG en sus siglas en inglés). El conductor de tierra debe tener un conector rizado
homologado (suministrado con el chasis) acoplado a un extremo, y el otro extremo debe estar conectado a la
tierra del edificio. El conector debe rizarse con la herramienta apropiada, de manera que se conecte a los dos
tornillos de tierra del recinto.
76 Brocade ServerIron ADX Installation Guide
53-1002066-01
Page 87

DRAFT: BROCADE CONFIDENTIAL
Cautions
CAUTION Product contains ESD sensitive devices, use proper ESD mitigation procedures (such as ESD grounding wrist
straps) before handling.
VORSICHT Das Produkt enthält ESD-gefährdete Bauteile. Treffen Sie vor der Arbeit geeignete ESD-Schutzvorkehrungen, z.B.
ESD-Erdungsarmbänder.
MISE EN GARDE Le produit contient des composants sensibles aux décharges électrostatiques. Appliquez les procédures
d'atténuation des décharges électrostatiques (port de bracelet antistatique par exemple) avant toute
manipulation.
PRECAUCIÓN El producto contiene dispositivos sensibles a descargas electrostáticas (DE). Utilice procedimientos de
mitigación de DE adecuados (como muñequeras de conexión a tierra DE) antes de manejarlo.
CAUTION The AC outlet should be appropriate for the AC rating of the power cord plug.
VORSICHT Die Wechselstromsteckdose muss für den angegebenen Nennstrom des Steckers am Netzkabel ausgelegt sein.
MISE EN GARDE La prise secteur doit être adaptée aux caractéristiques électriques du cordon d'alimentation.
PRECAUCIÓN La salida de CA debe ser la adecuada según las especificaciones de CA del enchufe del cable de alimentación.
CAUTION For NEBS Compliant installations: All devices with AC power supplies are intended for installation in restricted
access areas only. A restricted access area is where access can be gained only by service personnel through the
use of a special tool, lock and key, or other means of security, and is controlled by the authority responsible for
the location. (ADX-1000 only) The ServerIron ADX is suitable for installation in Network Telecommunications
facilities and locations where the NEC (National Electric Code) apply.
VORSICHT Für NEBS-konforme Installationen: Geräte mit Wechselspannungsversorgung sind nur zur Installation in
Bereichen mit Zugangsbeschränkung bestimmt. Eine Zugangsbeschränkung bedeutet, dass das Servicepersonal
nur mit besonderen Hilfsmitteln, Verriegelungen, Schlüsseln oder anderen Sicherheitseinrichtungen Zugang
erlangen kann und von der für den Standort verantwortlichen Stelle überwacht wird. (Nur ADX-1000) Der
ServerIron ADX ist zur Installation in Netzwerk-Telekommunikationseinrichtungen und an Standorten, die dem
NEC (National Electric Code) unterliegen, geeignet.
MISE EN GARDE Pour garantir la conformité de l'installation à la norme NEBS: tous les périphériques avec blocs d'alimentation CA
sont destinés à être installés dans des zones à accès réglementé uniquement. Une zone à accès réglementé est
réservée au personnel de maintenance, qui peut accéder uniquement en utilisant un verrou, une clé ou un outil
spécial, ou d'autres moyens de sécurité, et qui est contrôlée par les autorités responsables du site. (ADX-1000
uniquement) Le ServerIron ADX peut être installé dans une infrastructure de télécommunications réseau et dans
les endroits préconisés par les normes NEC (National Electric Code).
PRECAUCIÓN Para una instalación en conformidad con el NEBS, todos los dispositivos con suministros de energía de CA están
diseñados únicamente para instalaciones en áreas de acceso restringido. Un área de acceso restringido es una
zona a la que sólo puede acceder el personal de servicio a través de una herramienta, llave o bloqueo
específicos, u otros medios de seguridad, y que se encuentra supervisada por la autoridad responsable de la
ubicación. El ServerIron ADX (ADX-1000 solamente) es adecuado para instalaciones en infraestructuras de
telecomunicaciones y lugares donde se cumplan los requisitos del NEC (Código Nacional de Electricidad).
D
Brocade ServerIron ADX Installation Guide 77
53-1002066-01
Page 88

DRAFT: BROCADE CONFIDENTIAL
Cautions
D
CAUTION Slot ordering and type for ServerIron ADX 4000, ServerIron ADX 8000 and ServerIron ADX 10000 is important.
Each module is keyed according to type. Do not attempt to force a module into a slot that is not intended for that
module type. Refer to Figure 17 and Figure 18 for correct module placement.
- Application Switch Modules (ASM) must occupy only slots indicated as ASM slots.
- Management Modules (MM) must occupy only slots that are indicated as MM slot.
- Switch Fabric Modules (SFM) must occupy only slots that are indicated as SFM slots.
- Ethernet Interface Modules must occupy only slots that are indicated as INTERFACE MODULE slots.
- Power Supplies must be installed only in the slots indicated as PS slots.
All components (Ethernet Interface Module, ASM, MM, SFM, and PS) must be added to ServerIron ADX 4000,
ServerIron ADX 8000 or ServerIron ADX 10000 in the slots designed for them. For example, a MM must be
installed in one of the MM slots. Ethernet Interface Modules must be installed in the slots marked for interface
modules.
VORSICHT Beim ServerIron ADX 4000, ServerIron ADX 8000 und ServerIron ADX 10000 sind Reihenfolge und Typ der
Einschübe wichtig. Jedes Modul ist nach Typ codiert. Versuchen Sie nicht, ein Modul mit Gewalt in einen
Einschub einzusetzen, der nicht für diesen Modultyp vorgesehen ist. Abbildung 17 und Abbildung 18 zeigen die
korrekten Modulpositionen.
- Anwendungs-Switchmodule (ASM) dürfen nur in Einschübe eingesetzt werden, die mit ASM gekennzeichnet
sind.
- Management-Module (MM) dürfen nur in Einschübe eingesetzt werden, die mit MM gekennzeichnet sind.
- Switchumgebungsmodule (SFM) dürfen nur in Einschübe eingesetzt werden, die mit SFM gekennzeichnet sind.
- Ethernet-Schnittstellenmodule dürfen nur in Einschübe eingesetzt werden, die als Einschübe für
Schnittstellenmodule gekennzeichnet sind.
- Netzteile dürfen nur in Einschübe eingesetzt werden, die mit PS gekennzeichnet sind.
Die Komponenten (Ethernet-Schnittstellenmodule, ASM, MM, SFM und PS) dürfen im ServerIron ADX 4000,
ServerIron ADX 8000 und ServerIron ADX 10000 nur in den Einschüben eingesetzt werden, die jeweils dafür
vorgesehen sind. Ein MM muss beispielsweise in einen der MM-Einschübe eingesetzt werden.
Ethernet-Schnittstellenmodule müssen in den Einschüben eingesetzt werden, die als Einschübe für
Schnittstellenmodule gekennzeichnet sind.
MISE EN GARDE L'ordre et le type des emplacements pour le ServerIron ADX 4000, le ServerIron ADX 8000 et le ServerIron ADX
10000 sont importants. Chaque module présente un format d'insertion différent en fonction du type. N'essayez
pas de forcer l'insertion d'un module dans un emplacement qui n'est pas prévu pour ce type de module.
Reportez-vous à la Figure 17 et à la Figure 18 pour vérifier le positionnement des modules.
- Les modules de commutateur d'application (ASM) doivent occuper les emplacements ASM prévus uniquement.
- Les modules de gestion (MM) doivent occuper les emplacements MM prévus uniquement.
- Les commutateurs «Switch Fabric Modules» (SFM) doivent occuper les emplacements SFM prévus
uniquement.
- Les modules d'interface Ethernet doivent occuper les emplacements de modules d'interface prévus
uniquement.
- Les blocs d'alimentation (PS) doivent être installés aux emplacements PS prévus uniquement.
Tous les composants (module d'interface Ethernet, ASM, MM, SFM et PS) doivent être connectés au ServerIron
ADX 4000, au ServerIron ADX 8000 ou au ServerIron ADX 10000 en fonction des emplacements prévus à cet
effet. Par exemple, un MM doit être installé dans l'un des emplacements MM. Les modules d'interface Ethernet
doivent être installés dans les emplacements prévus pour les modules d'interface.
78 Brocade ServerIron ADX Installation Guide
53-1002066-01
Page 89

DRAFT: BROCADE CONFIDENTIAL
Cautions
PRECAUCIÓN Es importante el orden y el tipo de las ranuras de Serverlon ADX 4000, ServerIron ADX 8000 y ServerIron ADX
10000. Cada módulo está marcado según el tipo al que pertenece. No intente introducir a la fuerza un módulo
en una ranura que no haya sido diseñada para ese tipo de módulo. Consulte la Figura 17 y Figura 18 para la
instalación correcta de los módulos.
- Los módulos de conmutadores de aplicación (ASM, por sus siglas en inglés) sólo deben introducirse en las
ranuras marcadas como ranuras ASM.
- Los módulos de administración (MM, por sus siglas en inglés) sólo deben introducirse en las ranuras marcadas
como ranuras MM.
- Los módulos de la estructura de conmutador (SFM, por sus siglas en inglés) sólo deben introducirse en las
ranuras marcadas como ranuras SFM.
- Los módulos de interfaz Ethernet sólo deben introducirse en las ranuras marcadas como ranuras de módulos
de interfaz.
- Los suministros de energía (PS, por sus siglas en inglés) sólo deben instalarse en las ranuras marcadas como
ranuras PS.
Todos los componentes (módulo de interfaz Ethernet, ASM, MM y PS) deben incorporarse a ServerIron ADX
4000, ServerIron ADX 8000 o ServerIron ADX 10000 en las ranuras diseñadas específicamente para ellos. Por
ejemplo, se debe instalar un MM en una de las ranuras MM. Los módulos de interfaz Ethernet deben instalarse
en las ranuras marcadas para los módulos de interfaz.
CAUTION AC and DC power supplies can be grounded to a common bonding network or to an isolated bonding network.
VORSICHT Die Wechsel-und Gleichstromnetzteile können an einem gemeinsamen oder getrennten Potentialausgleich
geerdet werden.
MISE EN GARDE Les blocs d'alimentation CA et CC peuvent être mis à la terre via un réseau commun de liaison équipotentielle ou
un réseau équipotentiel isolé.
PRECAUCIÓN Los suministros de energía de CA y CC pueden conectarse a tierra mediante una red de conexión común o a una
red de conexión aislada.
D
CAUTION To insure adequate bonding when attaching the ground lug, a minimum of 20 PSI of torque is required to be
applied to the mounting hardware used to attach the ground lug.
VORSICHT Mit dem zur Montage der Erdungsöse verwendeten Werkzeug muss ein Drehmoment von mindestens 3,4Nm
ausgeübt werden, um eine ausreichende Verbindung zu erzielen.
MISE EN GARDE Pour assurer la connexion adéquate de la cosse de mise à la terre, il est nécessaire d'appliquer un couple de
3,39Nm à la pièce de montage servant à connecter la cosse.
PRECAUCIÓN Para asegurar una conexión adecuada de la patilla de conexión a tierra, se requiere que se aplique al hardware
que se utiliza para conectar dicha patilla un par de torsión mínimo de 3,39 Nm.
Brocade ServerIron ADX Installation Guide 79
53-1002066-01
Page 90

DRAFT: BROCADE CONFIDENTIAL
Cautions
D
CAUTION For the NEBS compliant installation of a ServerIron ADX device with AC and DC system use a ground wire of at
least 6 American Wire Gauge (AWG). The ground wire should have an agency-approved crimped connector
(provided with the chassis) attached to one end, with the other end attached to building ground. The connector
must be crimped with the proper tool, allowing it to be connected to both ground screws on the enclosure. Before
crimping the ground wire into the provided ground lug, (Panduit LCD6-10AF-L), insure the bare copper wire has
been cleaned and antioxidant is applied to the bare wire.(ADX-1000 only).
VORSICHT Zur NEBS-konformen Installation eines mit Gleich- oder Wechselstrom betriebenen ServerIron ADX muss zur
Erdung ein Kabel der Stärke 6 AWG verwendet werden. Das Erdungskabel muss an einem Ende mit einem
zugelassenen Crimp-Anschluss (im Lieferumfang des Gehäuses) versehen sein und mit dem anderen Ende an
die Gebäude-Erde angeschlossen werden. Der Anschluss muss mit einem geeigneten Werkzeug gecrimpt
werden, damit er mit den beiden Erdungsschrauben auf dem Gehäuse verbunden werden kann. Bevor das
Erdungskabel an die Erdungsöse angeschlossen wird (Panduit LCD6-10AF-L), muss der blanke Kupferdraht
gereinigt und mit einem Antioxidationsmittel behandelt werden (nur ADX-1000).
MISE EN GARDE Pour garantir la conformité de l'installation d'un ServerIron ADX avec une alimentation AC et CC à la norme NEBS,
utilisez un fil de mise à la terre d'au moins 6 AWG (American Wire Gauge). Le fil de mise à la terre doit être muni
d'une cosse sertie homologuée (fournie avec le châssis) à une extrémité, l'autre extrémité étant reliée à la terre.
La cosse doit être sertie avec l'outil adéquat, ce qui permet de la relier aux deux vis de mise à la terre du boîtier.
Avant de sertir le fil de mise à la terre dans la cosse fournie (Panduit LCD6-10AF-L), assurez-vous que le fil de
cuivre dénudé a été nettoyé et qu'un antioxydant a été appliqué (ADX-1000 uniquement).
PRECAUCIÓN Para una instalación conforme al NEBS de un dispositivo Serverlron ADX con un sistema de CA y CC, utilice como
mínimo un cable de conexión a tierra de calibre AWG 6. El cable de conexión a tierra debe disponer de un
conector engarzado homologado (suministrado con el chasis) unido a un extremo, de modo que el otro extremo
se conecte a la toma de tierra. El conector se debe engarzar con la herramienta adecuada, de forma que se
pueda conectar a los dos tornillos de conexión a tierra del compartimento. Antes de engarzar el cable de
conexión a tierra a la patilla de conexión a tierra proporcionada (Panduit LCD6-10AF-L), asegúrese de limpiar y
aplicar antioxidante al alambre pelado de cobre (solamente ADX-1000).
CAUTION When making the primary ground connection, a star washer must be used for anti-rotation. When connecting the
device to the rack frame, use thread-forming screws and paint-piercing washers.
VORSICHT Beim primären Erdungsanschluss muss eine Sternscheibe verwendet werden, um der Drehung
entgegenzuwirken. Beim Anschließen des Geräts am Rackgestell müssen selbstschneidende Schrauben und
Unterlegscheiben verwendet werden, die den Lack durchdringen.
MISE EN GARDE Lors de la connexion à la terre, une rondelle en étoile doit être utilisée pour empêcher la cosse de tourner. Pour la
connexion du périphérique au cadre du châssis, utilisez des vis autotaraudeuses et des rondelles crantées.
PRECAUCIÓN Al realizar la conexión principal a tierra, se debe utilizar una arandela de estrella para evitar que el dispositivo
gire. Al conectar el dispositivo al marco de soporte, utilice tornillos autorroscantes y arandelas pintadas y
dentadas.
CAUTION Remove the power cord from a power supply before you install it in or remove it from the device. Otherwise, the
power supply or the device could be damaged as a result. (The device can be running while a power supply is
being installed or removed, but the power supply itself should not be connected to a power source.)
VORSICHT Trennen Sie das Netzkabel vom Netzteil, bevor Sie dieses im Gerät einbauen oder aus diesem ausbauen.
Andernfalls kann das Netzteil oder das Gerät beschädigt werden. (Das Gerät darf in Betrieb sein, während ein
Netzteil ein- oder ausgebaut wird. Das Netzteil selbst darf jedoch nicht an eine Stromquelle angeschlossen sein.)
MISE EN GARDE Retirez le cordon d'alimentation de l'alimentation avant de l'insérer ou de l'extraire du périphérique. Sinon,
l'alimentation ou le périphérique risque d'être endommagé(e). (Le périphérique peut être en marche pendant
l'installation ou le retrait d'un bloc d'alimentation, mais le bloc lui-même ne doit pas être relié à une source de
courant.)
PRECAUCIÓN Desconecte el cable de alimentación del suministro de energía antes de instalarlo o extraerlo del dispositivo. En
caso contrario, se podría dañar el suministro de energía o el dispositivo. (El dispositivo puede estar en
funcionamiento mientras que se está instalando o extrayendo el suministro de energía, pero el suministro de
energía no debe estar conectado a la fuente de alimentación).
80 Brocade ServerIron ADX Installation Guide
53-1002066-01
Page 91

DRAFT: BROCADE CONFIDENTIAL
Danger
CAUTION The power supply is designed exclusively for use with the ServerIron devices. The power supply produces
extensive power. Installing the power supply in a device other than a ServerIron will cause damage to your
equipment.
VORSICHT Das Netzteil ist nur für die Verwendung mit ServerIron-Geräten ausgelegt. Das Netzteil liefert hohe Strompegel.
Der Einbau des Netzteils in anderen als ServerIron-Geräten führt zu Schaden an den Geräten.
MISE EN GARDE Le bloc d'alimentation est conçu pour être utilisé exclusivement avec des périphériques Serverlron. Le bloc
d'alimentation fournit un courant puissant. L'utilisation du bloc d'alimentation avec tout périphérique autre qu'un
Serverlron risque d'endommager votre équipement.
PRECAUCIÓN El suministro de energía está diseñado para utilizarse exclusivamente con dispositivos Serverlron. El suministro
de energía genera una cantidad de energía importante. Si instala el suministro de energía en un dispositivo que
no sea Serverlron se dañará el equipo.
Danger
A warning calls your attention to a possible hazard that can cause injury or death. The following are
the warnings used in this manual.
"Achtung" weist auf eine mögliche Gefährdung hin, die zu Verletzungen oder Tod führen können.
Sie finden die folgenden Warnhinweise in diesem Handbuch.
D
Un avertissement attire votre attention sur un risque possible de blessure ou de décès. Ci-dessous,
vous trouverez les avertissements utilisés dans ce manuel.
Una advertencia le llama la atención sobre cualquier posible peligro que pueda ocasionar daños
personales o la muerte. A continuación se dan las advertencias utilizadas en este manual.
DANGER Installation and removal of the unit must be carried out by qualified personnel only.
GEFAHR Die Installation und Entfernung der Einheit dürfen nur von qualifiziertem Personal ausgeführt werden.
DANGER L'installation et la dépose de l'unité doivent être confiées uniquement à du personnel qualifié.
PELIGRO La instalación y desinstalación de la unidad debe llevarse a cabo solamente por personal cualificado.
DANGER Before beginning the installation, refer to the precautions in "“Power precautions” on page 15.
GEFAHR Vor der Installation siehe Vorsichtsmaßnahmen unter " Power Precautions " (Vorsichtsmaßnahmen in Bezug auf
elektrische Ablagen) auf den Seiten page 15.
DANGER Avant de commencer l'installation, consultez les précautions décrites dans " Power Precautions " (Précautions
quant à l'alimentation), pages page 15.
PELIGRO Antes de comenzar la instalación, consulte las precauciones en la sección " Power Precautions" (Precauciones
sobre corriente) que se encuentra en las páginas page 15.
DANGER Disconnect the power cord from all power sources to completely remove power from the device.
GEFAHR Ziehen Sie das Stromkabel aus allen Stromquellen, um sicherzustellen, dass dem Gerät kein Strom zugeführt
wird.
DANGER Débranchez le cordon d'alimentation de toutes les sources d'alimentation pour couper complètement
l'alimentation du dispositif.
PELIGRO Para desconectar completamente la corriente del instrumento, desconecte el cordón de corriente de todas las
fuentes de corriente.
Brocade ServerIron ADX Installation Guide 81
53-1002066-01
Page 92

DRAFT: BROCADE CONFIDENTIAL
Danger
D
DANGER If the installation requires a different power cord than the one supplied with the device, make sure you use a
power cord displaying the mark of the safety agency that defines the regulations for power cords in your country.
The mark is your assurance that the power cord can be used safely with the device.
GEFAHR Wenn für die Installation ein anderes als das mitgelieferte Netzstromkabel erforderlich ist, achten Sie darauf,
dass es entsprechend Ihrer nationalen Sicherheitsvorschriften gekennzeichnet ist. Durch die Kennzeichnung ist
sichergestellt, dass das Netzkabel gefahrlos für das Gerät verwendet werden kann.
DANGER Si l'installation nécessite un cordon d'alimentation différent de celui qui est fourni avec le système, assurez-vous
d'utiliser un cordon d'alimentation portant le logo de l'agence de normalisation réglementant l'usage des
cordons d'alimentation de votre pays. Ce logo offre la garantie que le cordon d'alimentation peut être utilisé en
toute sécurité avec le produit.
PELIGRO Si la instalación requiere un cable de alimentación distinto al suministrado con el dispositivo, asegúrese de
utilizar un cable de alimentación que tenga la marca de la agencia de seguridad que define las normativas para
cables de alimentación de su país. La marca le garantiza que puede utilizar el cable de alimentación con el
dispositivo de forma segura.
DANGER Make sure that the power source circuits are properly grounded, then use the power cord supplied with the
device to connect it to the power source.
GEFAHR Stellen Sie sicher, dass die Stromkreise ordnungsgemäß geerdet sind. Benutzen Sie dann das mit dem Gerät
gelieferte Stromkabel, um es an die Srromquelle anzuschließen.
DANGER Vérifiez que les circuits de sources d'alimentation sont bien mis à la terre, puis utilisez le cordon d'alimentation
fourni avec le dispositif pour le connecter à la source d'alimentation.
PELIGRO Verifique que circuitos de la fuente de corriente están conectados a tierra correctamente; luego use el cordón de
potencia suministrado con el instrumento para conectarlo a la fuente de corriente.
DANGER Make sure the rack or cabinet housing the device is adequately secured to prevent it from becoming unstable or
falling over.
GEFAHR Stellen Sie sicher, dass das Gestell oder der Schrank für die Unterbringung des Geräts auf angemessene Weise
gesichert ist, so dass das Gestell oder der Schrank nicht wackeln oder umfallen kann.
DANGER Vérifiez que le bâti ou le support abritant le dispositif est bien fixé afin qu'il ne devienne pas instable ou qu'il ne
risque pas de tomber.
PELIGRO Verifique que el bastidor o armario que alberga el instrumento está asegurado correctamente para evitar que
pueda hacerse inestable o que caiga.
DANGER Mount the devices you install in a rack or cabinet as low as possible. Place the heaviest device at the bottom
and progressively place lighter devices above.
GEFAHR Montieren Sie die Geräte im Gestell oder Schrank so tief wie möglich. Platzieren Sie das schwerste Gerät ganz
unten, während leichtere Geräte je nach Gewicht (je schwerer desto tiefer) darüber untergebracht werden.
DANGER Montez les dispositifs que vous installez dans un bâti ou support aussi bas que possible. Placez le dispositif le
plus lourd en bas et le plus léger en haut, en plaçant tous les dispositifs progressivement de bas en haut du plus
lourd au plus léger.
PELIGRO Monte los instrumentos que instale en un bastidor o armario lo más bajos posible. Ponga el instrumento más
pesado en la parte inferior y los instrumentos progresivamente más livianos más arriba.
82 Brocade ServerIron ADX Installation Guide
53-1002066-01
Page 93

DRAFT: BROCADE CONFIDENTIAL
Danger
DANGER For safety reasons, the ESD wrist strap should contain a series 1 meg ohm resistor.
GEFAHR Aus Sicherheitsgründen sollte ein EGB-Armband zum Schutz von elektronischen gefährdeten Bauelementen mit
einem 1 Megaohm-Reihenwiderstand ausgestattet sein.
DANGER Pour des raisons de sécurité, la dragonne ESD doit contenir une résistance de série 1 méga ohm.
PELIGRO Por razones de seguridad, la correa de muñeca ESD deberá contener un resistor en serie de 1 mega ohmio.
DANGER The power supplies are hot swappable, which means they can be removed and replaced while the ServerIron
ADX chassis is powered on and running. However, Brocade recommends that you disconnect a power supply
from its power source before removing and replacing the supply. The chassis can be running while a power
supply is being removed and replaced, but the power supply itself should not be connected to a power source.
Otherwise, you could be injured or the power supply or other parts of the device could be damaged.
GEFAHR Die Wechselstrom-Netzteile können während des Betriebs des ServerIron ADX-Gehäuse abgenommen und
ausgetauscht werden. Allerdings empfiehlt Brocade, den Stecker des Wechselstrom-Netzteils aus der Steckdose
zu ziehen, bevor das Netzteil abgenommen und ausgetauscht wird. Ein Netzteil kann während des Betriebs des
ServerIron ADX abgenommen und ausgetauscht werden. Allerdings sollte das Netzteil nicht an eine Stromquelle
angeschlossen sein. Bei Nichtbeachtung könnte dies zu Verletzungen des Bedieners oder Beschädigung des
Wechselstrom-Netzteils oder anderer Geräteteile führen.
DANGER Les alimentations électriques sont échangeables à chaud. Elles peuvent être déposées et remplacées pendant
que le châssis ServerIron ADX est allumé et en cours de fonctionnement. Cependant, Brocade recommande de
débrancher le bloc d'alimentation C.A. du secteur avant d'enlever ou de remplacer le bloc d'alimentation. Le
châssis ServerIron ADX peut fonctionner pendant le retrait et le remplacement d'une alimentation électrique,
mais il est important que celle-ci ne soit pas raccordée à la source secteur. Faute de déconnecter l'alimentation
électrique du secteur, le personnel risque d'être blessé ou d'endommager l'alimentation électrique ou d'autres
composants.
PELIGRO Los suministros de corriente alterna pueden desmontarse y reemplazarse cuando el chasis del ServerIron ADX
está activado y en funcionamiento. No obstante, Brocade recomienda que se desconecte el suministro de
corriente alterna del tomacorriente antes de desmontar y reemplazar el suministro. El chasis ServerIron ADX
puede estar en funcionamiento cuando un suministro de corriente esté siendo desmontado y reemplazado, pero
el suministro de corriente en sí no deberá estar conectado a la corriente. De lo contrario, podría sufrir daños
personales o el suministro de corriente alterna u otras partes del dispositivo podrían sufrir desperfectos.
D
DANGER All fiber optic interfaces use Class 1 Lasers.
GEFAHR Alle Glasfaser-Schnittstellen verwenden Laser der Klasse 1.
DANGER Toutes les interfaces en fibres optiques utilisent des lasers de classe 1.
PELIGRO Todas las interfaces de fibra óptica utilizan láser de clase 1.
DANGER The front panel of an AC power supply includes a handle that locks the power supply in the chassis. This handle is
a locking mechanism only and should not be used to lift and carry the power supply. You may sustain physical
injury or harm if you attempt to lift and carry a power supply using the locking handle.
GEFAHR Die Vorderabdeckung eines Wechselstrom-Netzteils verfügt über einen Griff, mit dem das Netzteil im Gehäuse
verriegelt werden kann. Dieser Griff dient nur der Verriegelung. Mit ihm sollte das Netzteil weder angehoben noch
getragen werden. Anheben und Tragen eines Netzteils mit dem Verriegelungsgriff kann zu Verletzungen führen.
DANGER Le panneau avant d’un bloc d’alimentation C.A. comprend une poignée qui permet de verrouiller le bloc
d’alimentation dans le châssis. Cette poignée est un mécanisme de verrouillage uniquement, elle ne doit pas
être utilisée pour soulever et transporter le châssis. Vous risquez d’être blessé si vous essayez de soulever et de
transporter un bloc d’alimentation avec la poignée de verrouillage.
PELIGRO El panel delantero de un suministro de corriente alterna incluye un mango que bloquea el suministro de corriente
al chasis. El mango es un mecanismo de bloqueo solamente y no deberá usarse para alzar ni transportar el
suministro de corriente. De hacerlo así, podría sufrir daños personales.
Brocade ServerIron ADX Installation Guide 83
53-1002066-01
Page 94

DRAFT: BROCADE CONFIDENTIAL
Danger
D
DANGER A fully-populated ServerIron ADX chassis is heavy. TWO OR MORE PEOPLE ARE REQUIRED WHEN LIFTING,
HANDLING, OR MOUNTING THESE DEVICES.
GEFAHR Ein voll bestücktes ServerIron ADX Gehäuse ist schwer. ZUM ANHEBEN, HANDHABEN ODER MONTIEREN DIESER
GERÄTE SIND MINDESTENS ZWEI PERSONEN ERFORDERLICH.
DANGER Un châssis ServerIron ADX entièrement équipé est extrêmement lourd. POUR SOULEVER, MANIPULER OU
MONTER CES ÉQUIPEMENTS, DEUX PERSONNES AU MINIMUM SONT NÉCESSAIRES.
PELIGRO Un chasis ServerIron ADX muy concurrido es muy pesado. SE REQUIEREN DOS O MÁS PERSONAS CUANDO SE
VAYA A ALZAR, MANEJAR O MONTAR ESTE DISPOSITIVO.
DANGER Make sure to choose the appropriate circuit device depending on the number of AC power supplies installed in
the chassis.
GEFAHR Je nach Anzahl der Wechselstrom-Netzteile im Gehäuse muss das passende Stromgerät ausgewählt werden.
DANGER Assurez-vous de choisir le dispositif de circuit approprié selon le nombre de blocs d’alimentation C.A. installés
dans le châssis.
PELIGRO Asegúrese de que elige el dispositivo de circuitos apropiado dependiendo del número de suministros de
corriente alterna instalados en el chasis.
DANGER Be careful not to accidently insert your fingers into the fan tray while removing it from the chassis. The fan may
still be spinning at a high speed.
GEFAHR Die Finger dürfen nicht versehentlich in das Ventilatorblech gesteckt werden, wenn dieses vom Gehäuse
abgenommen wird. Der Ventilator kann sich unter Umständen noch mit hoher Geschwindigkeit drehen.
DANGER Faites attention de ne pas accidentellement insérer vos doigts dans le boîtier du ventilateur lorsque vous
l’enlevez du châssis. Il est possible que le ventilateur tourne encore à grande vitesse.
PELIGRO Procure no insertar los dedos accidentalmente en la bandeja del ventilador cuando esté desmontando el chasis.
El ventilador podría estar girando a gran velocidad.
DANGER To prevent damage to the chassis and components, never attempt to lift the chassis using the fan or power
supply handles. These handles were not designed to support the weight of the chassis.
GEFAHR Alle Geräte mit Wechselstromquellen sind nur zur Installation in Sperrbereichen bestimmt. Ein Sperrbereich ist
ein Ort, zu dem nur Wartungspersonal mit einem Spezialwerkzeug, Schloss und Schlüssel oder einer anderen
Schutzvorrichtung Zugang hat.
DANGER Pour éviter d’endommager le châssis et les composants, ne jamais tenter de soulever le châssis par les
poignées du ventilateur ou de l’alimentation. Ces poignées n’ont pas été conçues pour supporter le poids du
châssis.
PELIGRO Para prevenir daños al chasis y a los componentes, nunca intente levantar el chasis usando las asas de la fuente
de alimentación o del ventilador. Tales asas no han sido diseñadas para soportar el peso del chasis.
DANGER High Touch Current. Earth connection essential before connecting supply (ServerIron 4000. 8000, 10000).
GEFAHR Hoher Ableitstrom. Vor Anschluss ans Netz Schutzerdung herstellen.
DANGER Courant de fuite élevé. Mise à la terre obligatoire avant la connexion de l'alimentation (ServerIron 4000. 8000,
10000).
PELIGRO Alta tensión al tacto. La conexión a tierra es esencial antes de conectar la alimentación (ServerIron 4000. 8000,
10000).
84 Brocade ServerIron ADX Installation Guide
53-1002066-01
Page 95

DRAFT: BROCADE CONFIDENTIAL
Danger
DANGER DC return shall be isolated from the chassis ground (DC-I) when connections to the power supply are made.
GEFAHR Beim Herstellen der Verbindungen mit dem Netzteil muss der Gleichstrom-Rückleiter von der Gehäusemasse
(DC-I) isoliert werden.
DANGER Le retour CC doit être isolé du système de mise à la terre du châssis lors de la connexion du bloc d'alimentation.
PELIGRO El retorno de CC debería aislarse de la toma de tierra del chasis (CC-I) cuando se realicen conexiones al
suministro de energía.
DANGER The procedure in this section is for qualified service personnel.
GEFAHR Die Vorgehensweisen in diesem Abschnitt sind für qualifiziertes Servicepersonal bestimmt.
DANGER La procédure décrite dans cette section doit être effectuée par un personnel de maintenance qualifié.
PELIGRO El procedimiento de esta sección debe llevarlo a cabo personal calificado.
DANGER The intra-building port(s) of the equipment or subassembly is suitable for connection to intra-building or
unexposed wiring or cabling only. The intra-building port(s) of the equipment or subassembly MUST NOT be
metallically connected to interfaces that connect to the OSP or its wiring. These interfaces are designed for use
as intra-building interfaces only (Type 2 or Type 4 ports as described in GR-1089-CORE, Issue 4) and require
isolation from the exposed OSP cabling. The addition of Primary Protectors is not sufficient protection in order to
connect these interfaces metallically to OSP wiring.
GEFAHR Der bzw. die Intra-Building-Ports des Geräts bzw. der Baugruppen sind nur für den Anschluss von
Intra-Building-Kabeln oder -Leitungen (im Innenbereich) bestimmt. Der bzw. die Intra-Building-Ports des Geräts
und der Baugruppen DÜRFEN NICHT metallisch mit Schnittstellen verbunden werden, die an die
Netzinfrastruktur bzw. dessen Verkabelung angeschlossen sind. Die Schnittstellen sind nur als
Intra-Building-Schnittstellen ausgelegt (Typ-2- oder Typ-4-Ports wie in GR-1089-CORE, Ausgabe 4 beschrieben)
und müssen von der Verkabelung der Netzinfrastruktur isoliert werden. Ein Primärschutz allein ist nicht
ausreichend, wenn diese Schnittstellen metallisch mit der Verkabelung der Netzinfrastruktur verbunden werden
sollen.
DANGER Les ports de l'équipement qui se trouvent à l'intérieur du bâtiment peuvent être connectés à des câbles internes
ou non exposés uniquement. Ils ne DOIVENT PAS être reliés par leur partie métallique à des interfaces
connectées au réseau extérieur ou à son câblage. Ces interfaces sont prévues pour être exclusivement utilisées
à l'intérieur d'un bâtiment (les ports type 2 ou type 4 sont décrits dans le document GR-1089-CORE, Issue 4) et
doivent être isolées du câblage à découvert du réseau extérieur. L'ajout de dispositifs de protection primaires
n'est pas suffisant pour pouvoir connecter ces interfaces par leur partie métallique au câblage du réseau
extérieur.
PELIGRO Los puertos integrados del equipo o subconjunto se pueden conectar a los cables integrados o no expuestos, o
simplemente al cableado. Los puertos integrados del equipo o subconjunto NO DEBEN tener conexiones
metálicas con las interfaces conectadas a la planta exterior (OSP) o a su cableado. Estas interfaces están
diseñadas para utilizarlas únicamente como interfaces integradas (puertos de Tipo 2 o Tipo 4, como se describe
en GR-1089-CORE, Tema 4) y deben aislarse del cableado OSP expuesto. El uso de protectores principales
adicionales no aporta la protección suficiente y necesaria para establecer conexiones metálicas entre estas
interfaces y el cableado OSP.
D
Brocade ServerIron ADX Installation Guide 85
53-1002066-01
 Loading...