

Page 1

®
53-1002321-01
13 May 2011
Brocade Network Advisor
Migration Guide
Supporting Network Advisor 11.1.X
Page 2

Copyright © 2010-2011, Brocade Communications Systems, Incorporated.
Brocade, the B-wing symbol, BigIron, DCX, Fabric OS, FastIron, IronPoint, IronShield, IronView, IronWare, JetCore, NetIron, SecureIron, ServerIron,
StorageX, and TurboIron are registered trademarks, and Network Advisor, Extraordinary Networks, and SAN Health are trademarks of Brocade
Communications Systems, Inc., in the United States and/or in other countries. All other brands, products, or service names are or may be
trademarks or service marks of, and are used to identify, products or services of their respective owners.
Notice: This document is for informational purposes only and does not set forth any warranty, expressed or implied, concerning any equipment,
equipment feature, or service offered or to be offered by Brocade. Brocade reserves the right to make changes to this document at any time,
without notice, and assumes no responsibility for its use. This informational document describes features that may not be currently available.
Contact a Brocade sales office for information on feature and product availability. Export of technical data contained in this document may
require an export license from the United States government.
The authors and Brocade Communications Systems, Inc. shall have no liability or responsibility to any person or entity with respect to any loss,
cost, liability, or damages arising from the information contained in this book or the computer programs that accompany it.
The product described by this document may contain “open source” software covered by the GNU General Public License or other open source
license agreements. To find out which open source software is included in Brocade products, view the licensing terms applicable to the open
source software, and obtain a copy of the programming source code, please visit http://www.brocade.com/support/oscd.
Brocade Communications Systems, Incorporated
Corporate and Latin American Headquarters
Brocade Communications Systems, Inc.
1745 Technology Drive
San Jose, CA 95110
Tel: 1-408-333-8000
Fax: 1-408-333-8101
E-mail: info@brocade.com
European Headquarters
Brocade Communications Switzerland Sàrl
Centre Swissair
Tour B - 4ème étage
29, Route de l'Aéroport
Case Postale 105
CH-1215 Genève 15
Switzerland
Tel: +41 22 799 5640
Fax: +41 22 799 5641
E-mail: emea-info@brocade.com
Asia-Pacific Headquarters
Brocade Communications Systems China HK, Ltd.
No. 1 Guanghua Road
Chao Yang District
Units 2718 and 2818
Beijing 100020, China
Tel: +8610 6588 8888
Fax: +8610 6588 9999
E-mail: china-info@brocade.com
Asia-Pacific Headquarters
Brocade Communications Systems Co., Ltd. (Shenzhen WFOE)
Citic Plaza
No. 233 Tian He Road North
Unit 1308 – 13th Floor
Guangzhou, China
Tel: +8620 3891 2000
Fax: +8620 3891 2111
E-mail: china-info@brocade.com
Document History
Title Publication number Summary of changes Date
Brocade Network Advisor Migration Guide 53-1002321-01 New document. May 2011
2 of 82 Brocade Network Advisor Migration Guide
53-1002321-01
Page 3

In this guide
•Feature support . . . . . . . . . . . . . . . . . . . . . . . . . . . . . . . . . . . . . . . . . . . . . . . . . . . . . . . . . . . . . . . . . 3
•Network Advisor packages. . . . . . . . . . . . . . . . . . . . . . . . . . . . . . . . . . . . . . . . . . . . . . . . . . . . . . . . . 8
•Management server and client ports . . . . . . . . . . . . . . . . . . . . . . . . . . . . . . . . . . . . . . . . . . . . . . . . 8
•System requirements . . . . . . . . . . . . . . . . . . . . . . . . . . . . . . . . . . . . . . . . . . . . . . . . . . . . . . . . . . . . 13
•Migration paths . . . . . . . . . . . . . . . . . . . . . . . . . . . . . . . . . . . . . . . . . . . . . . . . . . . . . . . . . . . . . . . . 20
•Pre-migration requirements. . . . . . . . . . . . . . . . . . . . . . . . . . . . . . . . . . . . . . . . . . . . . . . . . . . . . . . 22
•Installing the application . . . . . . . . . . . . . . . . . . . . . . . . . . . . . . . . . . . . . . . . . . . . . . . . . . . . . . . . . 24
•Cross operating system migration. . . . . . . . . . . . . . . . . . . . . . . . . . . . . . . . . . . . . . . . . . . . . . . . . . 25
•DCFM migration . . . . . . . . . . . . . . . . . . . . . . . . . . . . . . . . . . . . . . . . . . . . . . . . . . . . . . . . . . . . . . . . 27
•Network Advisor migration. . . . . . . . . . . . . . . . . . . . . . . . . . . . . . . . . . . . . . . . . . . . . . . . . . . . . . . . 43
•Network Advisor 11.0.X to 11.1.X command mapping . . . . . . . . . . . . . . . . . . . . . . . . . . . . . . . . . 70
•Cross flavor migration . . . . . . . . . . . . . . . . . . . . . . . . . . . . . . . . . . . . . . . . . . . . . . . . . . . . . . . . . . . 73
•Unsupported server migration. . . . . . . . . . . . . . . . . . . . . . . . . . . . . . . . . . . . . . . . . . . . . . . . . . . . . 74
•Configuring an explicit server IP address . . . . . . . . . . . . . . . . . . . . . . . . . . . . . . . . . . . . . . . . . . . . 78
•IPv6 troubleshooting . . . . . . . . . . . . . . . . . . . . . . . . . . . . . . . . . . . . . . . . . . . . . . . . . . . . . . . . . . . . 80
•Syslog troubleshooting. . . . . . . . . . . . . . . . . . . . . . . . . . . . . . . . . . . . . . . . . . . . . . . . . . . . . . . . . . . 80
•Uninstallation . . . . . . . . . . . . . . . . . . . . . . . . . . . . . . . . . . . . . . . . . . . . . . . . . . . . . . . . . . . . . . . . . . 81
In this guide
Feature support
Tab le 1 details whether the SAN features are supported in the Professional, Professional Plus, or Enterprise
versions, or only through the Element Manager of the device.
TABLE 1 SAN features supported
Feature Description Professional Professional
Plus
Access Gateway Management Access Gateway topology display
Firmware download
SupportSave
Performance statistics
Configuration file management
Active Sessions Active sessions Yes Yes Yes
Call Home Support all Call centers
SupportSave for Fabric OS switches
Support last 100 events
Configuration Management Periodic configuration backup and persistence No Yes Yes
Manual backup
Save configuration
Configuration repository management No Yes Yes
Replicate switch configuration No Yes Yes
Yes Yes Yes
No Yes Yes
Yes Yes Yes
Enterprise
Brocade Network Advisor Migration Guide 3 of 82
53-1002321-01
Page 4

Feature support
TABLE 1 SAN features supported (Continued)
Feature Description Professional Professional
Enterprise
Plus
Network Advisor Client
Authentication
Authorization
Auditing
Deployment Manager Yes Yes Yes
Encryption Layer 2 FC support Yes Yes Yes
Encryption configuration and monitoring No Yes Yes
Fabric Binding Fabric Binding No Yes Yes
Fabric Watch All Fabric Watch features Element
Fault Management Show switch events
FCIP Management FCIP configuration wizard
FICON/CUP Cascaded FICON configuration wizard No No Yes
Network Advisor user management No Yes Yes
Access Gateway – Cisco interop suppor t No Yes Yes
Device decommissioning No Yes Yes
Element
Manager
Yes Yes Yes
Show fabric events
Event actions
Pseudo events
Syslog registration and forwarding
SNMP trap registration and forwarding
NOTE: Professional edition does not support
Event actions, Pseudo events, Syslog
forwarding, and SNMP trap forwarding.
Yes Yes Yes
Tro ubl eshoot ing
FCIP performance
FCIP ping
FCIP traceroute
Cascaded FICON Fabric merge wizard No No Yes
PDCM Matrix Element
Manager
Manager
Element
Manager
Element
Manager
Yes
Firmware Management and
SupportSave
HBA Management Discovery Yes Yes Yes
HBA Port/Storage port mapping HBA port/Storage port mapping Yes Yes Yes
High Integrity Fabric High Integrity Fabric No Yes Yes
IPv6 Server - Client support
4 of 82 Brocade Network Advisor Migration Guide
Firmware download Yes Yes Yes
Capture SupportSave Yes Yes Yes
Configuration Yes Yes Yes
Yes Yes Yes
Server - Server support
Server - Switch support
53-1002321-01
Page 5

TABLE 1 SAN features supported (Continued)
Feature support
Feature Description Professional Professional
Enterprise
Plus
Client - Server support
NOTE: Raw IPv6 is not supported for Client -
Server communication (Northbound
address) due to a JBOSS version
limitation.
iS CSI D isc over y Discove r y Yes Yes Yes
License New License Key No Yes Yes
Limited M-EOS fabric support Features that support M-EOS switches
Mixed fabric support
Pure fabric support
Meta-SAN Routing configuration No Yes Yes
Domain ID configuration No Yes Yes
M-EOS Element Manager Switch configuration for M-EOS switches
through Element Manager
Migration Migration from legacy EFCM and Fabric
Manager
Name Server Collection and Views Yes Yes Yes
Open Trunking Support Display trunks on the topology Yes Yes Yes
Display trunks properties Yes Yes Yes
Displ ay m arc hin g ant s Yes Yes Yes
Display connections properties Yes Yes Yes
Performance management Real Time Performance
Collection
Display
Reports
(5-second intervals on selected ports)
Historical Performance
Collection
Display
Reports
(5-minute intervals on selected ports)
Thresholds No Yes Yes
Top talkers No Yes Yes
Marching ants No Yes Yes
Performance aging No Yes Yes
End-to-End monitors No Yes Yes
Policy Monitor Best practice monitoring Yes Yes Yes
Port Administration All Port Administration features Element
Port Fencing Port Fencing policy configuration for M-EOS
switches
No No No
No Yes Yes
No Yes Yes
No No No
Yes Yes Yes
No Yes Yes
Element
Manager
No Yes Yes
Manager
Element
Manager
Brocade Network Advisor Migration Guide 5 of 82
53-1002321-01
Page 6

Feature support
TABLE 1 SAN features supported (Continued)
Feature Description Professional Professional
Enterprise
Plus
RBAC User management No Yes Yes
Reports Generate Yes Yes Yes
View Ye s Yes Ye s
Scalability Up to 1000 port support Yes Yes Yes
Up to 2560 port support No Yes Yes
Up to 9000 port support No No Yes
Security management Replicate switch policy configuration No Yes Yes
SNMP configuration Yes Yes Yes
L2 ACL Yes Yes Yes
SMI Agent Server Profile
Fabric Profile
Indication Sub Profile
Zone Control Sub Profile
Enhanced Zoning and Enhanced Zoning
Control Sub Profile
FDMI (Fabric Device Management Interface)
Sub Profile
Fabrics Virtual Fabrics Sub Profile
Topology View Sub Profile
FC HBA (Fibre Channel Host Bus Adapter)
Profile
Fan, Power Supply, and Sensor Profiles
Inter Fabric Routing (FCR) Profile
Tru nking
CP Blade Sub Profile
CEE (Converged Enhanced Ethernet)
Launch In Context Profile
Switch Profile
Role Based Authorization(CEE ACL) Profile
N port Virtualizer (AG NPIV) Profile
Profile Registration Sub Profile
Object Manager Adapter Sub Profile
Fabric Views Sub Profile
Physical Package Sub Profile
Software Sub Profile
Access Points Sub Profile
Location Sub Profile
Fabric Switch Partitioning Sub Profile
FC Initiator Ports Sub Profile
Fabric and Host discovery
SAN Zoning
Switch configuration management Basic configurations through Element Manager Element
Switch port enable/disable Switch port enable/disable through right-click
menu
No Yes Yes
Yes Yes
Manager
Yes Yes Yes
6 of 82 Brocade Network Advisor Migration Guide
53-1002321-01
Page 7

TABLE 1 SAN features supported (Continued)
Feature support
Feature Description Professional Professional
Enterprise
Plus
Tel net Tel net
NOTE: Telnet through the server is only
supported on Windows systems.
Tool launcher Tool launcher (Setup tools) No Yes Yes
Troubleshooting and Diagnostics Device connectivity troubleshooting wizard Yes Yes Yes
Tra c e Rou te
Ping
Fabric device sharing No Yes Yes
Diagnostic Port Test
Virtual Fabrics Discovery Yes Yes Yes
Configuration No Yes Yes
VM Plugin Support VM Plugin No Yes Yes
Zoning Member selection Yes Yes Yes
Zone editing Yes Yes Yes
Live fabric library scope Yes Yes Yes
Qo S su ppor t Yes Yes Yes
Zone alias support Yes Yes Yes
Delete Zone database No Yes Yes
Impac t an alys is Yes Yes Ye s
Remove offline devices No Yes Yes
TI Zones Yes Yes Yes
Device to Zone / zoneset participation analysis Yes Yes Yes
LSAN Zones No Yes Yes
Rolling back to an activated zone database No Yes Yes
Import or export a zone database No Yes Yes
Yes Yes Yes
Yes Yes Yes
Brocade Network Advisor Migration Guide 7 of 82
53-1002321-01
Page 8

Network Advisor packages
NOTE
Network Advisor packages
Tab le 2 summarizes the packages and available versions for each package.
TABLE 2 Packages and versions
Package Versions
SAN with SMI Agent Licensed Version—Enterprise
• SAN—Support for 24 fabrics, 10,000 devices, and 9,000 switch ports
Licensed Version—Professional Plus
• SAN—Support for 4 fabrics, 4,096 devices, and ,2560 switch ports
Professional
• SAN—Support for 1 fabric and 1,000 ports
NOTE: SMI Agent is not supported on Professional.
SMI Agent only N/A
Management server and client ports
The Management application has two parts: the Server and the Client. The Server is installed on one machine and
stores device-related information; it does not have a user interface. To view information through a user interface, you
must log in to the Server through a Client. The Server and Clients may reside on the same machine, or on separate
machines. If you are running Professional, the server and the client must be on the same machine.
In some cases, a network may utilize virtual private network (VPN) or firewall technology, which can prohibit
communication between Switches and the Servers or Clients. In other words, a Server or Client can find a Switch,
appear to log in, but is immediately logged out because the Switch cannot reach the Server or Client. To resolve this
issue, check to determine if the ports in the table below need to be opened up in the firewall.
Professional edition does not support remote clients.
Tab le 3 lists the ports that need to be opened up in the firewall for Professional.
TABLE 3 Professional ports
Port Number Ports Transport Description Communication Path Open in Firewall
1
20
1, 2
21
1
22
1
23
25 SMTP Server port TCP SMTP Server port for E-mail
49 TACACS+ Authentication port TCP TACACS+ server port for
FTP Port (Control) TCP FTP Control port for internal
FTP server
FTP Port (Data) TCP FTP Data port for internal
FTP server
SSH or Secure Telnet TCP Sectelnet port from server to
switch/client to switch
Telnet TCP Telnet port from server/client
to switch
communication
authentication if TACACS+ is
chosen as an external
authentication
Client–Server
Switch–Server
Client–Server
Switch–Server
Server–Switch
Client–Switch
Server–Switch
Client–Switch
Server–SMTP
Server
Server–TACACS+
Server
No
Yes
No
Yes
Yes
Yes
Yes
Yes
8 of 82 Brocade Network Advisor Migration Guide
53-1002321-01
Page 9

Management server and client ports
TABLE 3 Professional ports (Continued)
Port Number Ports Transport Description Communication Path Open in Firewall
80 jboss.web.http.port TCP Non-SSL HTTP/1.1 connector
Client–Server No
port
3, 4, 5
80
1
161
3
162
6
514
636 LDAP Authentication SSL port TCP LDAP server port for
Switch http TCP Switch non-SSL http port for
http and CAL communication
Server–Switch
Client–Switch
Yes
SNMP Port UDP Default SNMP port Server–Switch Yes
snmp.trap.port UDP Default SNMP trap port Switch–Server Yes
Syslog Port UDP Default Syslog Port Switch–Server Yes
authentication if LDAP is
Server–LDAP
Server
Yes
chosen as an external
authentication and SSL is
enabled
5432 Database port (Enforced during install) TCP Port used by database Server–Database
No
Remote ODBC–
Database
24600 jboss.naming.jnp.port - port 0 TCP Bootstrap JNP service port Client–Server No
24601 jboss.connector.ejb3.port - port 1 TCP EJB3 connector port Client–Server No
24602 jboss.connector.bisocket.port - port 2 TCP Bisocket connector port Client–Server No
24603 jboss.connector.bisocket.secondary.port
- port 3
TCP Bisocket connector secondary
port
Client–Server No
24604 jboss.naming.rmi.port - port 4 TCP RMI naming service port Client–Server No
24605 jboss.jrmp.invoker.port - port 5 TCP RMI/JRMP invoker port Client–Server No
24606 jboss.pooled.invoker.port - port 6 TCP Pooled invoker port Client–Server No
24607 jboss.connector.socket.port - port 7 TCP Socket invoker port Server No
24608 jboss.web.ajp.port - port 8 TCP AJP 1.3 connector port Server No
24609 jboss.web.service.port – port 9 TCP Web service port Server No
Brocade Network Advisor Migration Guide 9 of 82
53-1002321-01
Page 10

Management server and client ports
TABLE 3 Professional ports (Continued)
Port Number Ports Transport Description Communication Path Open in Firewall
24610 connector.bind.port – port 10 TCP Port to listen for requests on Server No
1 Port is not configurable (either in the switch or the Management server).
2 Every FTP session requires an additional port which is randomly picked. If the firewall is enabled then FTP operation (used for firmware
download, technical support, firmware import (from client-server) and so on.) will fail.
3 Ports configurable in the switch and the Management server. Port must be the same for all switches managed by the Management
server.
4 Ports used to launch the Web Tools application for Fabric OS switches from the Management client. This is applicable only when the
Fabric OS version is earlier than 6.1.1.
5 Port 80 is the default web server port number. If you set the web server port number to a port other than the default, you must open that
port in the firewall.
6 The Syslog listening port is configurable in the Management server. The switch always sends syslog messages to port 514. If you have
any other syslog daemon on the Management server machine already listening to 514, then the Management Server can be configured
to listen to a different port. You must manually configure relay in existing syslogd to forward the syslog messages to the Management
Server listening on the configured port.
7 The Management server tries to find a contiguous block of 13 ports from the starting port configured (for example, 24600); if any port in
this range is not available for the Management application, then you must provide a new starting port. Note that Port 1 to Port 12 in
“Ports” column of the table above are not separately configurable and those ports vary based on the starting port number configuration
(specified as Port 0 in the above table). The port numbers mentioned in the table above are the default ports (for example, when 24600
is selected as the starting port number).
Tab le 4 lists the ports that need to be opened up in the firewall for Trial and Licensed Version.
TABLE 4 Trial and Licensed Version ports
Port Number Ports Transport Description Communication Path Open in Firewall
1
20
1, 2
21
1
22
1
23
25 SMTP Server port TCP SMTP Server port for E-mail
49 TACACS+ Authentication port TCP TACACS+ server port for
80 jboss.web.http.port TCP Non-SSL HTTP/1.1 connector
3, 4
80
1
161
3
162
FTP Port (Control) TCP FTP Control port for internal
FTP server
FTP Port (Data) TCP FTP Data port for internal
FTP server
SSH or Secure Telnet TCP Sectelnet port from server to
switch/client to switch
Telnet TCP Telnet port from server/client
to switch
communication
authentication if TACACS+ is
Client–Server
Switch–Server
Client–Server
Switch–Server
Server–Switch
Client–Switch
Server–Switch
Client–Switch
Server–SMTP
Server
Server–TACACS+
Server
Yes
Yes
Yes
Yes
Yes
Yes
Yes
Yes
chosen as an external
authentication
Client–Server Yes
port
Switch http TCP Switch non-SSL http port for
http and CAL communication
Server–Switch
Client–Switch
Yes
SNMP Port UDP Default SNMP port Server–Switch Yes
snmp.trap.port UDP Default SNMP trap port Switch–Server Yes
10 of 82 Brocade Network Advisor Migration Guide
53-1002321-01
Page 11

Management server and client ports
TABLE 4 Trial and Licensed Version ports (Continued)
Port Number Ports Transport Description Communication Path Open in Firewall
389 LDAP Authentication Server Port TCP LDAP server port for
authentication if LDAP is
Server–LDAP
Server
Yes
chosen as an external
authentication
3, 4, 5
443
6
514
636 LDAP Authentication SSL port TCP LDAP server port for
Switch https TCP Switch SSL http port for https
and CAL communication
Server–Switch
Client–Switch
Yes
Syslog Port UDP Default Syslog Port Switch–Server Yes
authentication if LDAP is
Server–LDAP
Server
Yes
chosen as an external
authentication and SSL is
enabled
1, 7
1024
1812 RADIUS Authentication Server Port TCP RADIUS server port for
MPI TCP MPI trap recipient port Switch–Server Yes
authentication if RADIUS is
Server–RADIUS
Server
Yes
chosen as an external
authentication
1, 9
2048
2049
1,5,7,9
MPI TCP MPI discovery NMRU port Server–Switch Yes
MPI TCP MPI discovery NMRU port for
Server–Switch Yes
SSL
2638
8
Database port (Enforced during install) TCP Port used by database Server–Database
Yes
Remote ODBC–
Database
1, 5, 7
4430
5988 SMI Agent port TCP SMI Agent port SMI Agent Server–
MPI TCP XML-RCP port for SSL Server–Switch Yes
Yes
Client
5989 SMI Agent port with SSL enabled TCP SMI Agent port with SSL
enabled
8080
24600
1, 7
MPI TCP XML-RCP port/HTTP port Server–Switch Yes
10
jboss.naming.jnp.port - port 0 TCP Bootstrap JNP service port Client–Server Yes
SMI Agent Server–
Client
Yes
24601 jboss.connector.ejb3.port - port 1 TCP EJB3 connector port Client–Server Yes
24602 jboss.connector.bisocket.port - port 2 TCP Bisocket connector port Client–Server Yes
24603 jboss.connector.bisocket.secondary.port
- port 3
5
24604
24605
jboss.connector.sslbisocket.port - port 4 TCP SSL Bisocket connector port Client–Server Yes
5
jboss.connector.sslbisocket.secondary.p
ort - port 5
TCP Bisocket connector secondary
port
TCP SSL Bisocket connector
secondary port
Client–Server Yes
Client–Server Yes
24606 smp.registry.port - port 6 TCP RMI registry port Client–Server Yes
24607 smp.server.export.port - port 7 TCP RMI export port Client–Server Yes
24608 smp.server.cliProxyListening port - port 8TCP CLI proxy telnet port Client–Server Yes
24609 jboss.naming.rmi.port - port 9 TCP RMI naming service port Client–Server Yes
Brocade Network Advisor Migration Guide 11 of 82
53-1002321-01
Page 12

Management server and client ports
TABLE 4 Trial and Licensed Version ports (Continued)
Port Number Ports Transport Description Communication Path Open in Firewall
24610 jboss.jrmp.invoker.port - port 10 TCP RMI/JRMP invoker port Client–Server Yes
24611 jboss.pooled.invoker.port - port 11 TCP Pooled invoker port Client–Server Yes
24612 jboss.connector.socket.port - port 12 TCP Socket invoker port Server No
24613 jboss.web.ajp.port - port 13 TCP AJP 1.3 connector port Server No
24614 jboss.web.service.port – port 14 TCP Web service port Server No
24615 connector.bind.port – port 15 TCP Port to listen for requests on Server No
10
55555
Client Export Port TCP Client port to which server
55556 Launch in Context (LIC) client hand
shaking port
pushes the M-EOS device
Element Manager updates
TCP Client port used to check if a
Management application client
opened using LIC is running on
the same host
NOTE: If this port is in use, the
application uses the
next available port.
Server–Client Yes
Client No
1 Port is not configurable (either in the switch or the Management server).
2 Every FTP session requires an additional port which is randomly picked. If the firewall is enabled then FTP operation (used for firmware
download, technical support, firmware import (from client-server) and so on.) will fail.
3 Ports configurable in the switch and the Management server. Port must be the same for all switches managed by the Management
server.
4 Ports used to launch the Web Tools application for Fabric OS switches from the Management client. This is applicable only when the
Fabric OS version is earlier than 6.1.1.
5 Port used for SSL communication. If SSL is enabled, you must open 443*, 24604, and 24605 in the firewall. If SSL is not enabled, port
80* must be open in the firewall and 443*, 24604, and 24605 can be closed. An asterisk (*) denotes the default web server port number.
If you set the web server port number to a port other than the default, you must open that port in the firewall.
6 The Syslog listening port is configurable in the Management server. The switch always sends syslog messages to port 514. If you have
any other syslog daemon on the Management server machine already listening to 514, then the Management Server can be configured
to listen to a different port. You must manually configure relay in existing syslogd to forward the syslog messages to the Management
Server listening on the configured port.
7 Ports used for communicating with M-EOSn (M-i10K) directors. M-i10K always uses NMRU over SSL (2049). M-i10K always uses 8080
for http requests (firmware download, configuration backup/ restore, data collection). If M-EOSn firmware version is less than 9.1 the
Management application uses 8080 for XML-RPC requests (discovery and asset collection). If the M-EOSn firmware version is more
than 9.1 then it always uses SSL port (4430) for XML-RPC.
8 Port must be opened in firewall for the server when the remote ODBC client needs to talk to the Management database server (Only for
EE). The same port is used by the Management server to database server (local). This is not used by the Management client.
9 Ports used for communicating with M-EOS (excluding M-i10K) switches (only required when the Management server manages M-EOS
switches).
10 Port should be opened in firewall in the Management client to allow communication between server and client (only applicable for
M-EOS switches). If this port is not opened in the firewall, then the M-EOS element manager does not receive updates. Also if multiple
clients are opened, it will try to use the next available port (55556). So if there are n clients opened in the same machine then you must
open 55555 (configurable) to 55555 + n ports in the firewall.
11 The Management server tries to find a contiguous block of 16 ports from the starting port configured (for example, 24600); if any port in
this range is not available for the Management application, then you must provide a new starting port. Note that Port 1 to Port 15 in
“Ports” column of the table above are not separately configurable and those ports vary based on the starting port number configuration
(specified as Port 0 in the above table). The port numbers mentioned in the table above are the default ports (for example, when 24600
is selected as the starting port number).
12 of 82 Brocade Network Advisor Migration Guide
53-1002321-01
Page 13

System requirements
System requirements
Use the following sections to determine if you have met the requirements for this application.
• “Operating system requirements” on page 13
• “Host requirements” on page 15
• “Memory requirements” on page 15
• “Disk space requirements” on page 16
• “Browser requirements” on page 16
• “Client and server system requirements” on page 17
• “Scalability requirements” on page 17
Operating system requirements
Tab le 5 summarizes the required Operating Systems (OS) for servers and the packages supported by each OS
version.
TABLE 5 Server operating system requirements
Operating system Version Guest OS version Supported packages
Windows
Linux
®
• 2003 Server SP2 (32-bit)
• 2008 Server (32-bit)
SAN with SMI Agent
SMI Agent only
• XP Professional SP3 (32-bit)
• 7 Professional (32-bit)
• 2008 R2 Data Center
Edition (64-bit)
SAN with SMI Agent
SMI Agent only
• 2008 R2 Standard Edition
(64-bit)
• 2008 R2 Enterprise Edition
(64-bit)
®
• RedHat AS 4.8 (32-bit)
• RedHat 5.5 Advanced
Platform (32-bit)
SAN with SMI Agent
SMI Agent only
• SuSE ES 10 SP 1, 11
(32-bit)
• Oracle Enterprise 5.X
(32-bit)
Brocade Network Advisor Migration Guide 13 of 82
53-1002321-01
Page 14

System requirements
TABLE 5 Server operating system requirements (Continued)
Operating system Version Guest OS version Supported packages
VMware • ESX Server 4
• vCenter 4.1
• Windows 2003 Server SP2
(32-bit)
• Windows 2008 Standard
Edition (32-bit)
• ESX Server 4
• vCenter 4.1
• Windows 2008 R2 Data Center
Edition (64-bit)
• Windows 2008 R2 Standard
Edition (64-bit)
• Windows 2008 R2 Enterprise
Edition (64-bit)
• Linux RedHat 5.5 Advanced
Platform (32-bit)
• Linux SuSE ES 10 SP 1, 11
(32-bit)
• Linux Oracle Enterprise 5.X
(32-bit)
Tab le 6 summarizes the required OS for clients.
TABLE 6 Client operating system requirements
Operating system Version Guest OS version
Windows
®
• 2003 Server SP2 (32-bit)
• 2008 Server (32-bit)
• XP Professional SP3 (32-bit)
• 7 Professional (32-bit)
• 2008 R2 Data Center Edition (64-bit)
• 2008 R2 Standard Edition (64-bit)
• 2008 R2 Enterprise Edition (64-bit)
Linux
®
• RedHat AS 4.8 (32-bit)
• RedHat 5.5 Advanced Platform (32-bit)
• SuSE ES 10 SP 1, 11 (32-bit)
• Oracle Enterprise 5.X (32-bit)
VMware
• ESX Server 4
• vCenter 4.1
• ESX Server 4
• vCenter 4.1
• Windows 2003 Server SP2 (32-bit)
• Windows 2008 Standard Edition (32-bit)
• Windows 2008 R2 Data Center Edition (64-bit)
• Windows 2008 R2 Standard Edition (64-bit)
• Windows 2008 R2 Enterprise Edition (64-bit)
• Linux RedHat 5.5 Advanced Platform (32-bit)
• Linux SuSE ES 10 SP 1, 11 (32-bit)
• Linux Oracle Enterprise 5.X (32-bit)
SAN with SMI Agent
SMI Agent only
SAN with SMI Agent
SMI Agent only
14 of 82 Brocade Network Advisor Migration Guide
53-1002321-01
Page 15

System requirements
NOTE
NOTE
Host requirements
Tab le 7 summarizes the minimum required host requirements for running Network Advisor SAN with SMI Agent on
Windows and Linux systems.
TABLE 7 SAN with SMI Agent host requirements
Professional Professional Plus Enterprise
Small Medium Large LAN
Server plus one local
client
Remote client only
Intel Core2 duo
2GHz or equivalent
N/A Intel Core2 duo
Intel Core2 duo
2GHz or equivalent
2GHz or equivalent
Intel Core2 duo
2GHz or equivalent
Intel Core2 duo
2GHz or equivalent
Intel Dual CPU
Core2 duo 2.4 GHz
or equivalent
Intel Core2 duo
2GHz or equivalent
Intel Dual CPU
Core2 duo 2.4 GHz
or equivalent
Intel Core2 duo
2GHz or equivalent
Tab le 8 summarizes the minimum required host requirements for running SMI Agent only on Windows and Linux
systems.
TABLE 8 SMI Agent only host requirements
Enterprise
Small Medium Large
Server plus one local
client
Remote client only
Intel Core2 duo
2GHz or equivalent
Intel Core2 duo
2GHz or equivalent
Intel Dual CPU
Core2 duo 2.4 GHz
or equivalent
Intel Core2 duo
2GHz or equivalent
Intel Dual CPU
Core2 duo 2.4 GHz
or equivalent
Intel Core2 duo
2GHz or equivalent
Memory requirements
Tab le 9 summarizes the minimum required system memory requirements for running Network Advisor SAN with SMI
Agent on Windows and Linux systems.
These requirements are only applicable when no other applications are running on Network Advisor.
Paging space should be equal to or exceed the physical memory size.
TABLE 9 SAN with SMI Agent memory requirements
Server/Client Professional Professional
Server plus 1 local client 2 GB (32-bit)
3 GB (64-bit)
Remote client only N/A 1 GB 1 GB 2 GB 2 GB
Brocade Network Advisor Migration Guide 15 of 82
53-1002321-01
Plus
3 GB (32-bit)
4 GB (64-bit)
Enterprise
Small Medium Large
3 GB (32-bit)
4 GB (64-bit)
4 GB (32-bit)
6 GB (64-bit)
4 GB (32-bit)
6 GB (64-bit)
Page 16

System requirements
NOTE
Tab le 10 summarizes the minimum required system memory requirements for running SMI Agent only on Windows
and Linux systems.
TABLE 10 SMI Agent only memory requirements
Server/Client Enterprise
Small Medium Large
Server plus 1 local client 3 GB 4 GB 4 GB
Remote client only 1 GB 2 GB 2 GB
Disk space requirements
Tab le 11 summarizes the minimum required disk space requirements for running Network Advisor SAN with SMI
Agent on Windows and Linux systems.
TABLE 11 SAN with SMI Agent disk space requirements
Server/Client Professional Professional
Plus
Server plus 1 local client 10 GB 10 GB 20 GB 40 GB 60 GB
Remote client only N/A 1 GB 1 GB 1 GB 1 GB
Enterprise
Small Medium Large
Tab le 12 summarizes the minimum required disk space requirements for running SMI Agent only on Windows and
Linux systems.
TABLE 12 SMI Agent only disk space requirements
Server/Client Enterprise
Small Medium Large
Server plus 1 local client 20 GB 40 GB 60 GB
Remote client only 1 GB 1 GB 1 GB
If you enable periodic supportSave or configure the Network Advisor server as the Upload Failure Data Capture
location for monitored switches, then additional disk space will be required. Each switch supportSave file is
approximately 5 MB and each Upload Failure Data Capture file is approximately 500 KB. To determine the disk space
requirements, multiply the frequency of scheduled supportSave files by 5 MB and the expected Upload Failure Data
Capture files by 500 KB before the planned periodic purge activity.
Browser requirements
The launch of Network Advisor and the launch of Element Manager (Web Tools) from the application are supported
from the following browsers with a Java plug-in:
• Browsers
- Windows Internet Explorer under Windows
- Firefox under Windows or Linux
• Java Plug-ins
- Oracle JRE 1.6.0 update 24 for Network Advisor
- Oracle JRE 1.6.0 update 24 for WebTools
16 of 82 Brocade Network Advisor Migration Guide
53-1002321-01
Page 17

System requirements
Client and server system requirements
Network Advisor has the following client and server system requirements:
• Professional Edition — A single server supports a single client (local client only).
• Professional Plus Trial — A single server supports a maximum of 8 clients (local or remote).
• Professional Plus Licensed Version — A single server supports a maximum of 8 clients (local or remote).
• Enterprise Trial — A single server supports a maximum of 8 clients (local or remote).
• Enterprise Licensed Version — A single server supports a maximum of 8 clients (local or remote).
Scalability requirements
Tab le 13 through Table 18 summarize the scalability limits for support with Network Advisor.
TABLE 13 Enterprise-supported limits by SAN size
Small Medium Large
Number of Fabrics 81624
Number of Domains 20 60 120
Number of Switch Ports 2000 5000 9000
Number of Device Ports 5000 10000 20000
Number of Access Gateways 20 30 40
Performance Monitoring Polling 5 minutes 5 minutes 5 minutes
TABLE 14 Professional Plus-supported limits by SAN size
Values Limits
Number of Fabrics 4
Number of Domains 20
Number of Switch Ports 2560
Number of Device Ports 4096
Number of Access Gateways 20
Performance Monitoring Polling 5 minutes
TABLE 15 Professional-supported limits by SAN size
Values Limits
Number of Fabrics 1
Number of Domains 10
Number of Switch Ports 1000
Number of Device Ports 1000
Number of Access Gateways 5
Performance Monitoring Polling N/A
Brocade Network Advisor Migration Guide 17 of 82
53-1002321-01
Page 18

System requirements
TABLE 16 Supported limits by SAN size for mixed fabrics (Fabric OS and M-EOS fabrics)
Values Small Medium Large
Number of Fabrics 81624
Number of Domains 10 30 60
Number of Switch Ports 1000 2500 5000
Number of Device Ports 2500 5000 10000
Number of Access Gateways 20 30 40
Performance Monitoring Polling 5 minutes 5 minutes 5 minutes
TABLE 17 Supported limits by SAN size for pure M-EOS fabrics
Small Medium Large
Number of Fabrics 81624
Number of Domains 10 30 60
Number of Switch Ports 1000 2500 5000
Number of Device Ports 2500 5000 10000
Number of Access Gateways 20 30 40
Performance Monitoring Polling 5 minutes 5 minutes 5 minutes
TABLE 18 Enterprise-supported limits by SAN size for SMI Agent only on pure Fabric OS fabrics
Small Medium Large
Number of Fabrics 81624
Number of Domains 20 60 120
Number of Switch Ports 2000 5000 9000
Number of Device Ports 5000 10000 20000
Number of Access Gateways 20 30 40
18 of 82 Brocade Network Advisor Migration Guide
53-1002321-01
Page 19

System requirements
TABLE 19 Supported limits by SAN size for SMI Agent only on mixed fabrics (Fabric OS and M-EOS fabrics)
Values Small Medium Large
Number of Fabrics 81624
Number of Domains 10 30 60
Number of Switch Ports 1000 2500 5000
Number of Device Ports 2500 5000 10000
Number of Access Gateways 20 30 40
TABLE 20 Supported limits by SAN size for SMI Agent only on pure M-EOS fabrics
Small Medium Large
Number of Fabrics 81624
Number of Domains 10 30 60
Number of Switch Ports 1000 2500 5000
Number of Device Ports 2500 5000 10000
Number of Access Gateways 20 30 40
Brocade Network Advisor Migration Guide 19 of 82
53-1002321-01
Page 20

Migration paths
NOTE
NOTE
NOTE
Migration paths
You cannot migrate directly from EFCM or Fabric Manager to Network Advisor 11.1.X. To migrate from EFCM or
Fabric Manager, you must first migrate to DCFM 10.3.X, then migrate to DCFM 10.4.X, then migrate to Network
Advisor 11.1.X. For more information about migrating from EFCM or Fabric Manager to DCFM 10.3.X, contact your
customer representative.
You cannot migrate directly from INM to Network Advisor 11.1.X. You must first migrate to Network Advisor 11.0.X,
then migrate to Network Advisor 11.1.X. To migrate from INM to Network Advisor 11.1.X, contact your customer
representative.
You cannot migrate directly from DCFM 10.0.X, DCFM 10.1.X or DCFM 10.3.X to Network Advisor 11.1.X. You must
first migrate to DCFM 10.4.X, then migrate to Network Advisor 11.1.X. To migrate from DCFM 10.0.X, DCFM 10.1.X or
DCFM 10.3.X to DCFM 10.4.X, contact your customer representative.
Tab le 21 shows the migration paths from DCFM. For the step-by-step migration procedures, refer to “DCFM
migration” on page 27.
TABLE 21 DCFM migration paths
Current version Professional version Trial version Licensed Version
Professional
Plus
DCFM 10.4.X Professional Yes Yes Yes Yes Yes
DCFM 10.4.X Professional Plus trial No Yes Yes Yes Yes
DCFM 10.4.X Professional Plus edition No No No Yes Yes
DCFM 10.4.X Enterprise trial No No Yes No Yes
DCFM 10.4.X Enterprise edition No No No No Yes
Enterprise Professional
Plus
Enterprise
Tab le 22 shows the migration paths from SMI Agent only. For the step-by-step migration procedures, refer to “DCFM
SMI Agent migration” on page 40 or “Network Advisor SMI Agent migration” on page 71.
TABLE 22 SMI Agent only migration paths
Current version Professional version Trial version Licensed Version SMI Agent only
Professional
Plus
DCFM 10.4.X SMI Agent only No No No No No Yes
Network Advisor 11.0.X SMI
Agent only
Network Advisor 11.1.X SMI
Agent only
No No No No No Yes
No No No No No Yes
Enterprise Professional
Plus
Enterprise
20 of 82 Brocade Network Advisor Migration Guide
53-1002321-01
Page 21

Migration paths
NOTE
Tab le 23 shows the migration paths from SAN with SMI Agent. For the step-by-step migration procedures, refer to
“Network Advisor migration” on page 43.
TABLE 23 Network Advisor migration paths
Current version Professional version Trial version Licensed Version
Professional
Plus
Network Advisor 11.0.X Professional Yes Yes Yes Yes Yes
Network Advisor 11.0.X Mid-Market trial No Yes Yes Yes Yes
Network Advisor 11.0.X Mid-Market edition No No No Yes Yes
Network Advisor 11.0.X Enterprise trial No No Yes No Yes
Network Advisor 11.0.X Enterprise edition No No No No Yes
Network Advisor 11.1.X Professional Yes Yes Yes Yes Yes
Network Advisor 11.1.X Professional Plus trial No Yes Yes Yes Yes
Network Advisor 11.1.X Professional Plus edition No No No Yes Yes
Network Advisor 11.1.X Enterprise trial No No Yes No Yes
Network Advisor 11.1.X Enterprise edition No No No No Yes
Enterprise Professional
Plus
Enterprise
Tab le 24 shows the migration paths from Brocade and Non-Brocade SAN with SMI Agent. For the migration
procedures, refer to “Cross flavor migration” on page 73.
Cross flavor migration is only supported within the same release and version.
TABLE 24 Cross flavor migration paths
Current version Professional version Trial version Licensed Version
Professional
Plus
11.1.X Professional Yes No No No No
11.1.X Professional Plus trial No Yes No No No
11.1.X Professional Plus edition No No No Yes No
11.1.X Enterprise trial No No Yes No No
11.1.X Enterprise edition No No No No Yes
Brocade Network Advisor Migration Guide 21 of 82
53-1002321-01
Enterprise Professional
Plus
Enterprise
Page 22

Pre-migration requirements
Pre-migration requirements
Before you install Network Advisor, make sure you meet the following pre-migration requirements for each platform.
Pre-migration requirements on Windows systems
Before you migrate from your current software edition, complete the following:
• Make sure all system requirements have been met prior to installation. For specific system requirements, refer
to “System requirements” on page 13.
• Make sure that you fully back up your current Management application data on your management server.
• Make sure you close all instances of the application before migrating.
• Make sure to install Network Advisor on the same system as your current Management application.
• Make sure that the current application services are running.
For DCFM, complete the following steps:
1. Select Start > Programs > DCFM 10.X.X > Server Management Console (where 10.X.X is 10.4.0 or later)
from the DCFM server.
2. Click the Services tab.
The tab lists the DCFM services.
3. Click Start, if necessary.
Pre-migration requirements on UNIX systems
Before you migrate from your current software edition, complete the following:
• Make sure all system requirements have been met prior to installation. For specific system requirements, refer
to “System requirements” on page 13.
• Make sure that you fully back up your current Management application data on your management server.
• Make sure you close all instances of the application before upgrading.
• Make sure to install Network Advisor on the same system as your current Management application.
• Make sure that the current application services are running.
For DCFM, complete the following steps:
1. Go to Install_Home/bin.
2. Execute ./smc or sh smc.
3. Click the Services tab.
The tab lists the DCFM services.
4. Click Start, if necessary.
• Check for and install the latest Java patches for your operating system. Network Advisor requires Oracle
JRE 1.6.0_24. For the website listing patch information, go to
http://www.oracle.com/technetwork/java/javase/downloads/index.html.
• Make sure that an X Server is available for display and is configured to permit X Client applications to display
from the host on which they are installing the Network Advisor Server (typically, this simply requires that the
systems console be present and running with a logged in user on the X Server-based desktop session, such as
KDE, GNOME, and so on).
22 of 82 Brocade Network Advisor Migration Guide
53-1002321-01
Page 23

Pre-migration requirements
• Make sure that the DISPLAY environment variable is correctly defined in the shell with a valid value (for example,
to display to the local console, export DISPLAY=:0.0, or to display to a remote system that has an X Server
running, export DISPLAY=
You may also need to consider a firewall that might block the display to the X Server which listens by default on
TCP port 6000 on the remote host.
To display to a remote system you need to permit the remote display of the X Server by running command xhost
+IP, where IP is the IP address of the Network Advisor server host from the X-based desktop of the remote
system.
Remote_IP_Address:0.0).
• Make sure you test the DISPLAY definition by running the command xterm from the same shell from which you
run
install.bin. A new X terminal window to the destination X Server display should open.
Additional requirements for Professional to Licensed Version migration
Before you migrate from Professional to Licensed Version, complete the following steps.
1. Partially uninstall the application.
a. Choose one of the following options:
• (Windows systems) Select Start > Programs > Network Advisor 11.X.X > Uninstall Network Advisor.
• (UNIX systems) Go to Install_Home/Uninstall_Network_Advisor11_X_X and execute
./Uninstall_Network_Advisor11_X_X.
b. Select Partial Uninstall on the Uninstall Option screen:
c. Click Uninstall.
d. Click Done on the Uninstall Complete screen.
2. Make sure the Professional edition services are running:
a. Select Start > Programs > Network Advisor 11.0.X > Server Management Console from the Network Advisor
server.
b. Click the Services tab.
The tab lists the Network Advisor services.
c. Click Start, if necessary.
Additional trial requirements
• Two versions of the Management application (DCFM, Network Advisor, or INM) cannot reside on the same host
unless there are two guest operating system’s on the same host.
• Data collected during the Trial cannot be migrated back to the Professional software.
• Data collected during Enterprise trial cannot be migrated back to Professional or Professional Plus software.
• Once the Enterprise trial period expires, you must upgrade to a Licensed Version.
• A trial to full software upgrade can also be performed by updating the license key in the License dialog box of
the trial client.
Brocade Network Advisor Migration Guide 23 of 82
53-1002321-01
Page 24

Installing the application
NOTE
Installing the application
Use Tab le 25 to help install the application.
TABLE 25 Management application installation
Operating system Procedures
Windows or UNIX
systems
To install the application, review the following sections:
• “Pre-migration requirements on Windows systems” on page 22
• “Pre-migration requirements on UNIX systems” on page 22
• “Additional requirements for Professional to Licensed Version migration” on page 23
• “Additional trial requirements” on page 23
• “Installing the application” on page 24
Use this procedure to install Network Advisor SAN with SMI Agent or SMI Agent only on both Windows and UNIX
systems.
To install the new application version, complete the following steps.
1. Insert the installation DVD into the DVD-ROM drive.
• For Windows systems, if autorun is enabled, the DVD Index page launches automatically. Click the Install
link.
If autorun is not enabled, open this file: DVD_Drive\Application_Name\windows\install.exe.
• For UNIX systems, open this file: DVD_Drive\Application_Name\UNIX_Platform\install.bin.
2. Click Next on the Introduction screen.
3. Read the agreement on the License Agreement screen, select I accept the terms of the License Agreement, and
click Next.
4. Select the usual location for your system application files (for example, D:\Program Files\Application_Name
11.1.X or opt/Application_Name 11_1_X) on the Select Install Folder screen and click Next.
Do not install to the root directory C:\ (Windows) or / (UNIX).
5. Review the displayed installation summary on the Pre-Installation Summary screen and click Install.
6. Make sure the Launch Configuration check box is selected (default) on the Installation Complete screen, and
click Done.
To migrate data and configure the application, refer to one of the following sections:
• “Cross operating system migration” on page 25
• “DCFM migration” on page 27
• “Network Advisor migration” on page 43
• “Cross flavor migration” on page 73
• “Unsupported server migration” on page 74
24 of 82 Brocade Network Advisor Migration Guide
53-1002321-01
Page 25

Cross operating system migration
NOTE
Cross operating system migration
Network Advisor 11.1.0 is not supported on the Solaris or Windows Vista operating systems. To migrate from DCFM
on Solaris, you must first migrate to a Windows or Linux operating system. To migrate from DCFM on Windows Vista,
you must first migrate to a supported Windows operating system.
•Solaris to Windows migration . . . . . . . . . . . . . . . . . . . . . . . . . . . . . . . . . . . . . . . . . . . . . . . . . . . . . 25
•Solaris to Linux migration . . . . . . . . . . . . . . . . . . . . . . . . . . . . . . . . . . . . . . . . . . . . . . . . . . . . . . . . 26
•Windows Vista to supported Windows migration . . . . . . . . . . . . . . . . . . . . . . . . . . . . . . . . . . . . . . 26
•Unsupported server migration. . . . . . . . . . . . . . . . . . . . . . . . . . . . . . . . . . . . . . . . . . . . . . . . . . . . . 74
Solaris to Windows migration
The Windows operating system version must match the Solaris version.
Migrating DCFM 10.4.X data from Solaris to Windows
To migrate data from DCFM 10.4.X on Solaris to Windows, complete the following steps.
1. Configure the Samba server, if necessary. Refer to “Configuring the Samba server on Solaris” on page 25.
2. Perform a partial uninstall of DCFM 10.4.X. Refer to “Uninstalling from UNIX systems” on page 82
3. Share and copy the partially uninstalled source from Solaris to Windows.
4. Install DCFM 10.4.X on Windows and migrate the DCFM 10.4.X Solaris data to DCFM 10.4.X Windows. Refer to
the DCFM 10.4.X Migration Guide.
5. Install Network Advisor 11.1.X on Windows and migrate from DCFM 10.4.X. Refer to “DCFM migration” on
page 27.
Configuring the Samba server on Solaris
The Samba server running on Solaris allows sharing the file system with Windows. Use the Samba server to migrate
data across operating systems.
If the Samba server is not already configured, complete the following steps.
1. Create a backup copy.
For example, cp -p /etc/sfw/smb.conf /etc/sfw/smb.conf.old.
2. Open the smb.conf file ( /etc/sfw/smb.conf) in a text editor.
3. Go to the line workgroup = WORKGROUP.
4. Change the line workgroup = WORKGROUP to match your Windows workgroup or domain (for example
workgroup = SOMECOMPANY).
5. Go to the following paragraph in the smb.conf file and update the folder to share to Windows.
A publicly accessible directory, read/write to all users. Note that all files created in the directory by users will be
owned by the default user, so any user with access can delete any other user's files. Obviously this directory
must be writable by the default user. Another user could of course be specified, in which case all files would be
owned by that user instead.
[OPT]
Path = /opt (Folder to share to Windows operating system)
Brocade Network Advisor Migration Guide 25 of 82
53-1002321-01
Page 26

Cross operating system migration
Public = yes
Only guest = yes
Writable = yes (if you don’t want to writable, please change as no)
Printable = no
6. Select File > Save to save the smb.conf file.
7. Complete the following commands on the terminal to restart the server.
a. Type
b. Type
/etc/init.d/samba stop and press Enter.
/etc/init.d/samba start and press Enter.
8. If you cannot copy any of the files, use following command to provide full permission to DCFM directory on
Solaris and copy the files.
chmod –fr 777 <source path>
For example, chmod –fr 777 /opt/DCFM10_4_0
Solaris to Linux migration
The Solaris operating system is not supported for Network Advisor 11.1.X. To migrate from DCFM on Solaris, you
must first migrate to a Linux operating system.
Migrating DCFM 10.4.X data from Solaris to Linux
To migrate data from DCFM 10.4.X on Solaris to Linux, complete the following steps.
1. Perform a partial uninstall of DCFM 10.4.X. Refer to “Uninstalling from UNIX systems” on page 82
2. Copy the partially uninstalled source from Solaris to Linux using the following command:
scp –r <System_Username>@<System_IP_Address>:<Source_Folder_Path> <Destination_Path>
For example, scp –r root@172.26.5.90:/opt/DCFM10_4_0 /opt/Tempfolder
3. Install DCFM 10.4.X on Linux and migrate the DCFM 10.4.X Solaris data to DCFM 10.4.X on Linux. Refer to the
DCFM 10.4.X Migration Guide.
4. Install Network Advisor 11.1.X on Linux and migrate from DCFM 10.4.X. Refer to “DCFM migration” on page 27.
Windows Vista to supported Windows migration
Network Advisor 11.1.X is not supported on the Windows Vista operating systems. To migrate from DCFM on
Windows Vista, you must first migrate to a supported Windows operating system. For a list of supported Windows
operating systems, refer to “Operating system requirements” on page 13
Migrating DCFM 10.4.X data from Windows Vista
1. To migrate data from DCFM 10.4.X on Windows Vista, complete the following steps.
2. Perform a partial uninstall of DCFM 10.4.X. Refer to “Uninstalling from Windows systems” on page 81
3. Share and copy the partially uninstalled source from Windows Vista to the supported Windows version.
26 of 82 Brocade Network Advisor Migration Guide
53-1002321-01
Page 27

DCFM migration
NOTE
NOTE
4. Install DCFM 10.4.X on the supported Windows version and migrate the DCFM 10.4.X Windows Vista data to
DCFM 10.4.X on the supported Windows version. Refer to the DCFM 10.4.X Migration Guide.
5. Install Network Advisor 11.1.X on Windows and migrate from DCFM 10.4.X. Refer to “DCFM migration” on
page 27.
DCFM migration
You cannot migrate directly from DCFM 10.0.X, DCFM 10.1.X, or DCFM 10.3.X to Network Advisor 11.1.X. You must
first migrate to DCFM 10.4.X, then migrate to Network Advisor 11.1.X. To migrate from DCFM 10.0.X, DCFM 10.1.X, or
DCFM 10.3.X to DCFM 10.4.X, contact your customer representative.
Use the following procedures to migrate from any of the DCFM 10.4.X editions:
•DCFM Professional edition migration . . . . . . . . . . . . . . . . . . . . . . . . . . . . . . . . . . . . . . . . . . . . . . . 27
•DCFM Professional Plus edition migration . . . . . . . . . . . . . . . . . . . . . . . . . . . . . . . . . . . . . . . . . . . 30
•DCFM Enterprise edition migration. . . . . . . . . . . . . . . . . . . . . . . . . . . . . . . . . . . . . . . . . . . . . . . . . 35
•DCFM SMI Agent migration . . . . . . . . . . . . . . . . . . . . . . . . . . . . . . . . . . . . . . . . . . . . . . . . . . . . . . . 40
DCFM Professional edition migration
If you have not installed the application, refer to “Installing the application” on page 24.
To migrate from Professional edition 10.4.X to Network Advisor SAN Professional, Trial, or Licensed Version 11.1.X,
use the following procedure.
Migrating from DCFM Professional 10.4.X to Network Advisor Professional 11.1.X
Remote migration is not supported for DCFM migration.
1. Click Next on the Welcome screen.
2. Choose one of the following options to migrate data from a previous version.
To migrate data from a previous management application, you must do so now.
• To migrate data from the previous version installed (automatically detected), select Yes, from DCFM or
Network Advisor in the following location.
• To browse to the previous version, select Yes, from Network Advisor installed in this machine and click
Browse to browse to the installation directory.
3. Click Start on the Data Migration screen.
Data migration may take several minutes. When data migration is complete, the previous version is partially
uninstalled.
4. Click Next on the Data Migration screen.
5. Select Network Advisor - Professional on the Installation Type screen and click Next.
Brocade Network Advisor Migration Guide 27 of 82
53-1002321-01
Page 28

DCFM migration
NOTE
6. Select Internal FTP Server or External FTP Server on the FTP Server screen and click Next.
The default selection reflects the previous Professional edition configuration.
If port 21 is busy, a message displays. Click OK to close the message and continue. Once the Management
application is configured make sure port 21 is free and restart the Server to start the FTP service.
If you select to use an FTP Server which is not configured on the same machine as Network Advisor, the
Firmware Repository feature will not be available.
7. Select an address from the Switch - Server IP Configuration Preferred Address list and click Next.
Current selection reflects the previous Professional edition configuration.
If DNS is not configured for your network, do not select the ‘hostname’ option from the Preferred Address list.
Selecting the ‘hostname’ option prevents clients and devices from communicating with the Server.
FIGURE 1 Server IP Configuration screen
8. Complete the following steps on the Server Configuration screen.
FIGURE 2 Server Configuration screen
a. Enter a port number in the Web Server Port Number field (default is 80).
b. Enter a port number in the Database Port # field (default is 5432).
28 of 82 Brocade Network Advisor Migration Guide
53-1002321-01
Page 29

DCFM migration
NOTE
NOTE
c. Enter a port number in the Starting Port # field (default is 24600).
The server requires 13 consecutive free ports beginning with the starting port number.
d. Enter a port number in the Syslog Port # field (default is 514).
If the default syslog port number is already in use, you will not receive any syslog messages from the device.
To find and stop the process currently running on the default Syslog port number, refer to “Syslog
troubleshooting” on page 80.
e. Enter a port number in the SNMP Port # field (default is 162).
f. Click Next.
If you enter a Syslog port number already in use, a message displays. Click OK to close the message. Edit
the Syslog port number and click Next.
If you enter a port number already in use, a Warning displays beneath the associated port number field. Edit
that port number and click Next.
9. Verify your configuration information on the Server Configuration Summary screen and click Next.
10. Select the Start Client check box, if necessary, on the Start Server screen.
Make sure that the Administrative Tools - Services window is closed. If this window is open, the server may fail to
start.
11. Click Finish.
After all of the Network Advisor services are started, the Log In dialog box displays.
12. Enter your user name and password.
The defaults are Administrator and password, respectively. If you migrated from a previous release, your
username and password do not change.
13. Click Login.
14. Click OK on the Network Advisor Login Banner.
To migrate from Professional software to Trial or Licensed Version software, refer to “Network Advisor migration”
on page 43.
Brocade Network Advisor Migration Guide 29 of 82
53-1002321-01
Page 30

DCFM migration
NOTE
NOTE
DCFM Professional Plus edition migration
DCFM Professional Plus trial to Network Advisor Professional software migration is not supported.
The following migration paths are supported:
• DCFM Professional Plus 10.4.X trial edition to Network Advisor 11.1.X Trial
• DCFM Professional Plus 10.4.X trial edition to Network Advisor 11.1.X Licensed Version
• DCFM Professional Plus 10.4.X full edition to Network Advisor 11.1.X Licensed Version
Both Trial and Licensed Version software include the following two SAN packages:
• Professional Plus (2560 switch ports, 4 fabrics and 4096 devices)
• Enterprise (9000 switch ports, 24 fabrics and 10,000 devices)
Required for evaluation of DCX Backbone and FICON management.
Use the following procedure to migrate data from DCFM Professional Plus. If you have not installed the application,
refer to “Installing the application” on page 24.
Migrating from Professional Plus to Network Advisor 11.1.X
Professional Plus full edition to Trial software migration is not supported.
1. Click Next on the Welcome screen.
2. Choose one of the following options and click Next.
• If data is detected on your system (automatically detected), select Yes, from DCFM or Network Advisor in the
following location.
• If data is not detected, the select Yes, from Network Advisor installed in this machine or on network and
click Browse to browse to the installation directory.
3. (Optional) If you do not want to migrate historical performance data, select the Do not migrate historical
performance data check box on the Data Migration screen.
4. Click Start on the Data Migration screen.
Data migration may take several minutes. When data migration is complete, the previous version is partially
uninstalled.
5. Click Next on the Data Migration screen.
30 of 82 Brocade Network Advisor Migration Guide
53-1002321-01
Page 31

DCFM migration
ATTENTION
NOTE
6. Select one of the following options on the Installation Type screen and click Next.
• Network Advisor - 75 days trial
Continue with step 7.
If you choose to install Trial software, once the trial period ends (75 days), you must upgrade to Licensed
Version software.
• Network Advisor - Licensed Version
Go to step 8.
7. (Trial software only) Select one of the following options on the Trial Configuration screen and click Next.
• Enterprise (9000 switch ports, 24 fabrics and 10,000 devices)
Required for evaluation of DCX Backbone and FICON management.
• Professional Plus (2560 switch ports, 4 fabrics and 4096 devices)
Go to step 9.
8. (Licensed Version only) If you are migrating to Licensed Version software, enter the license key (on the Key
Certificate) on the Server License screen or browse to the license file (.xml) and click Next.
The License Key field is not case-sensitive.
9. Select Internal FTP Server or External FTP Server on the FTP Server screen and click Next.
The default selection reflects the previous Professional Plus edition configuration.
If port 21 is busy, a message displays. Click OK to close the message and continue. Once the Management
application is configured make sure port 21 is free and restart the Server to start the FTP service.
If you select to use an FTP Server which is not configured on the same machine as Network Advisor, the
Firmware Repository feature will not be available.
Brocade Network Advisor Migration Guide 31 of 82
53-1002321-01
Page 32

DCFM migration
10. Complete the following steps on the Server IP Configuration screen.
FIGURE 3 Server IP Configuration screen
a. Select an address from the Server IP Configuration list.
b. Select an address from the Switch - Server IP Configuration Preferred Address list.
c. Click Next.
If DNS is not configured for your network, do not select the ‘hostname’ option from either the Server IP
Configuration or Switch - Server IP Configuration Preferred Address list. Selecting the ‘hostname’ option
prevents clients and devices from communicating with the Server.
If you select a specific IP address from the Server IP Configuration screen and the selected IP address
changes, you will not be able to connect to the server. To change the IP address, refer to “Configuring an
explicit server IP address” on page 78.
11. Complete the following steps on the Server Configuration screen.
FIGURE 4 Server Configuration screen
a. Enable SSL by selecting the SSL Enabled check box (default is not selected).
b. Enter a port number in the Web Server Port # field (default is 443 if SSL Enabled is selected; otherwise, the
default is 80).
c. Enter a port number in the Database Port # field (default is 5432).
32 of 82 Brocade Network Advisor Migration Guide
53-1002321-01
Page 33

DCFM migration
NOTE
NOTE
d. Enter a port number in the Starting Port # field (default is 24600).
The server requires 16 consecutive free ports beginning with the starting port number.
e. Enter a port number in the Syslog Port # field (default is 514).
If the default syslog port number is already in use, you will not receive any syslog messages from the device.
To find and stop the process currently running on the default Syslog port number, refer to “Syslog
troubleshooting” on page 80.
f. Enter a port number in the SNMP Port # field (default is 162).
g. Click Next.
If you enter a syslog port number already in use, a message displays. Click No on the message to remain on
the Server Configuration screen and edit the syslog port number. Click Yes to close the message and
continue with step 12.
If you enter a port number already in use, a warning displays next to the associated port number field. Edit
that port number and click Next.
12. Complete the following steps on the SMI Agent Configuration screen.
FIGURE 5 SMI Agent Configuration screen
a. Enable the SMI Agent by selecting the Enable SMI Agent check box.
b. Enable the SLP by selecting the Enable SLP check box, if necessary.
Only enabled after you select the Enable SMI Agent check box.
c. Enable the SSL by selecting the Enable SSL check box, if necessary.
Only enabled after you select the Enable SMI Agent check box.
d. Enter the SMI Agent port number in the SMI Agent Port # field (default is 5989 if SSL Enabled is selected;
otherwise, the default is 5988).
e. Click Next.
Brocade Network Advisor Migration Guide 33 of 82
53-1002321-01
Page 34

DCFM migration
NOTE
13. (SAN with SMI Agent Enterprise) Select one of the following options on the SAN Network Size screen and click
Next:
Port count is equal to the total number of switch ports across all fabrics.
• Small (managing up to 2000 switch ports, 1-20 domains)
• Medium (managing up to 5000 switch ports, 21-60 domains)
• Large (managing up to 9000 switch ports, 61-120 domains)
14. Verify your configuration information on the Server Configuration Summary screen and click Next.
15. Complete the following steps on the Start Server screen.
FIGURE 6 Start Server screen
a. Select the Start SMI Agent check box, if necessary.
Only enabled if you enabled SMI Agent on the SMI Agent Configuration screen.
b. Select the Start SLP check box, if necessary.
Only enabled if you enabled SMI Agent on the SMI Agent Configuration screen.
c. Select the Start Client check box, if necessary.
d. Click Finish.
After all of the services (Server, SLP, SMI Agent and Network Advisor Client) are started, the Log In dialog
box displays.
16. Enter your user name and password.
The defaults are Administrator and password, respectively. If you migrated from a previous release, your
username and password do not change.
17. Click Login.
18. Click OK on the Network Advisor Login Banner.
34 of 82 Brocade Network Advisor Migration Guide
53-1002321-01
Page 35

DCFM migration
NOTE
ATTENTION
DCFM Enterprise edition migration
DCFM Enterprise trial to Professional or Professional Plus license migration is not supported.
The following migration paths are supported:
• DCFM Enterprise 10.4.X trial edition to Network Advisor 11.1.X Trial
• DCFM Enterprise 10.4.X trial edition to Network Advisor 11.1.X Licensed Version
• DCFM Enterprise 10.4.X full edition to Network Advisor 11.1.X Licensed Version
Use the following procedure to migrate data from DCFM Enterprise trial or full edition to Network Advisor Enterprise
software. If you have not installed the application, refer to “Installing the application” on page 24.
Migrating from DCFM Enterprise
1. Click Next on the Welcome screen.
2. Choose one of the following options and click Next.
• If data is detected on your system (automatically detected), select Yes, from DCFM or Network Advisor in the
following location.
• If data is not detected, the select Yes, from Network Advisor installed in this machine or on network and
click Browse to browse to the installation directory.
3. (Optional) If you do not want to migrate historical performance data, select the Do not migrate historical
performance data check box on the Data Migration screen.
4. Click Start on the Data Migration screen.
Data migration may take several minutes. When data migration is complete, the previous version is partially
uninstalled.
5. Click Next on the Data Migration screen.
6. Select one of the following options on the Installation Type screen and click Next.
• Network Advisor - 75 days trial
Continue with step 7.
If you choose to install Trial software, once the trial period ends (75 days), you must upgrade to Licensed
Version software.
• Network Advisor - Licensed Version
Go to step 8.
7. (Trial software only) Click Next on the Trial Configuration screen
The following option is selected by default on the Trial Configuration screen:
Enterprise (9000 switch ports, 24 fabrics and 10,000 devices)
Required for evaluation of DCX Backbone and FICON management.
Go to step 8.
Brocade Network Advisor Migration Guide 35 of 82
53-1002321-01
Page 36

DCFM migration
NOTE
8. (Licensed Version only) If you are migrating to Licensed Version software, enter the license key (on the Key
Certificate) on the Server License screen or browse to the license file (.xml) and click Next.
If you are migrating from a licensed source, the source license information displays in the Server License
screen.
The License Key field is not case-sensitive.
9. Select Internal FTP Server or External FTP Server on the FTP Server screen and click Next.
The default selection reflects the previous edition configuration.
If port 21 is busy, a message displays. Click OK to close the message and continue. Once the Management
application is configured make sure port 21 is free and restart the Server to start the FTP service.
If you select to use an FTP Server which is not configured on the same machine as Network Advisor, the
Firmware Repository feature will not be available.
10. Complete the following steps on the Server IP Configuration screen.
FIGURE 7 Server IP Configuration screen
a. Select an address from the Server IP Configuration list.
b. Select an address from the Switch - Server IP Configuration Preferred Address list.
c. Click Next.
If DNS is not configured for your network, do not select the ‘hostname’ option from either the Server IP
Configuration or Switch - Server IP Configuration Preferred Address list. Selecting the ‘hostname’ option
prevents clients and devices from communicating with the Server.
If you select a specific IP address from the Server IP Configuration screen and the selected IP address
changes, you will not be able to connect to the server. To change the IP address, refer to “Configuring an
explicit server IP address” on page 78.
36 of 82 Brocade Network Advisor Migration Guide
53-1002321-01
Page 37

DCFM migration
NOTE
NOTE
11. Complete the following steps on the Server Configuration screen.
FIGURE 8 Server Configuration screen
a. Enable SSL by selecting the SSL Enabled check box (default is not selected).
b. Enter a port number in the Web Server Port # field (default is 443 if SSL Enabled is selected; otherwise, the
default is 80).
c. Enter a port number in the Database Port # field (default is 5432).
d. Enter a port number in the Starting Port # field (default is 24600).
The server requires 16 consecutive free ports beginning with the starting port number.
e. Enter a port number in the Syslog Port # field (default is 514).
If the default syslog port number is already in use, you will not receive any syslog messages from the device.
To find and stop the process currently running on the default Syslog port number, refer to “Syslog
troubleshooting” on page 80.
f. Enter a port number in the SNMP Port # field (default is 162).
g. Click Next.
If you enter a syslog port number already in use, a message displays. Click No on the message to remain on
the Server Configuration screen and edit the syslog port number. Click Yes to close the message and
continue with step 12.
If you enter a port number already in use, a warning displays next to the associated port number field. Edit
that port number and click Next.
Brocade Network Advisor Migration Guide 37 of 82
53-1002321-01
Page 38
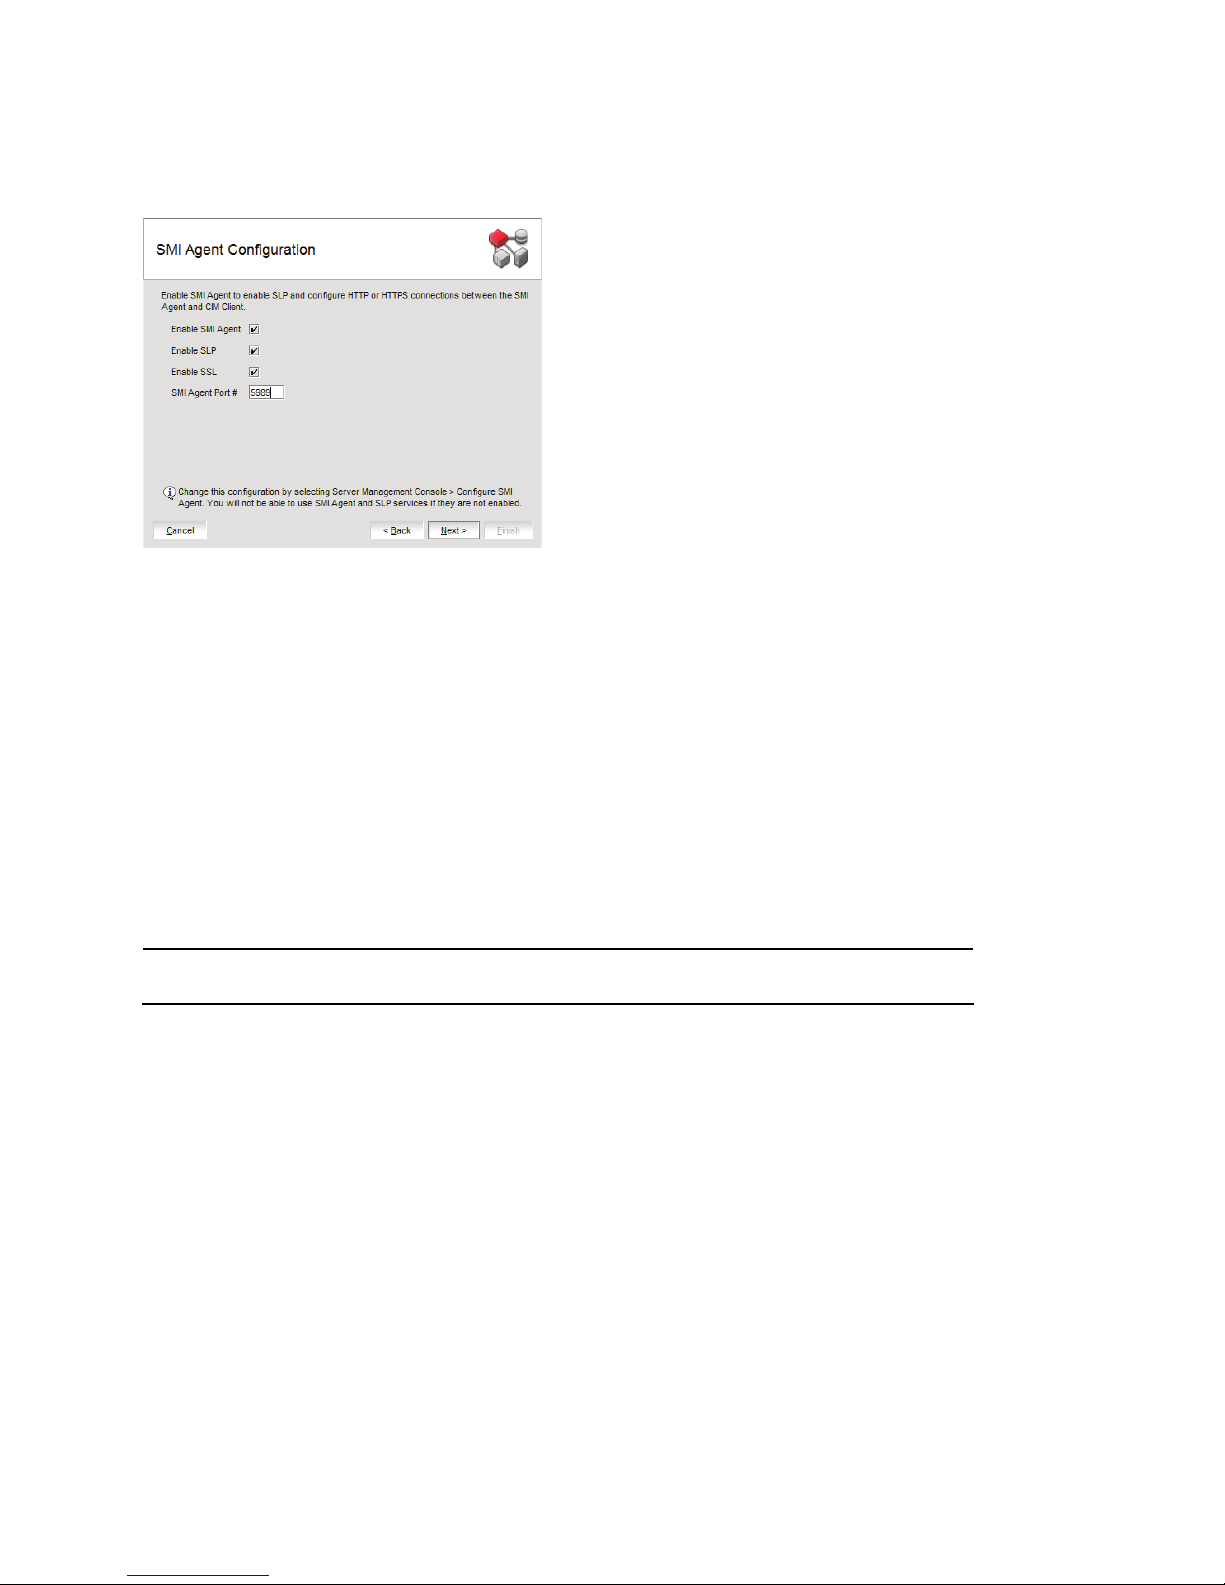
DCFM migration
NOTE
12. Complete the following steps on the SMI Agent Configuration screen.
FIGURE 9 SMI Agent Configuration screen
a. Enable the SMI Agent by selecting the Enable SMI Agent check box.
b. Enable the SLP by selecting the Enable SLP check box, if necessary.
Only enabled after you select the Enable SMI Agent check box.
c. Enable the SSL by selecting the Enable SSL check box, if necessary.
Only enabled after you select the Enable SMI Agent check box.
d. Enter the SMI Agent port number in the SMI Agent Port # field (default is 5989 if SSL Enabled is selected;
otherwise, the default is 5988).
e. Click Next.
13. Select one of the following options on the SAN Network Size screen (for Pure Fabric OS fabrics only) and click
Next:
Port count is equal to the total number of switch ports across all fabrics.
• Small (managing up to 2000 switch ports, 1-20 domains)
• Medium (managing up to 5000 switch ports, 21-60 domains)
• Large (managing up to 9000 switch ports, 61-120 domains)
14. Verify your configuration information on the Server Configuration Summary screen and click Next.
38 of 82 Brocade Network Advisor Migration Guide
53-1002321-01
Page 39

15. Complete the following steps on the Start Server screen.
NOTE
FIGURE 10 Start Server screen
a. Select the Start SMI Agent check box, if necessary.
Only enabled if you enabled SMI Agent on the SMI Agent Configuration screen.
DCFM migration
b. Select the Start SLP check box, if necessary.
Only enabled if you enabled SMI Agent on the SMI Agent Configuration screen.
c. Select the Start Client check box, if necessary.
d. Click Finish.
After all of the services (Server, SLP, SMI Agent and Network Advisor Client) are started, the Log In dialog
box displays.
16. Enter your user name and password.
The defaults are Administrator and password, respectively. If you migrated from a previous release, your
username and password do not change.
17. Click Login.
18. Click OK on the Network Advisor Login Banner.
When migrating from an earlier version of DCFM, you must wait 10 minutes before querying the Network Advisor
SMI Agent because some of the information is not populated until after the next discovery cycle.
Brocade Network Advisor Migration Guide 39 of 82
53-1002321-01
Page 40

DCFM migration
DCFM SMI Agent migration
The following migration paths are supported:
• DCFM SMI Agent 10.4.X to Network Advisor SMI Agent 11.1.X
Use the following procedure to migrate data from DCFM SMI Agent to Network Advisor SMI Agent software.
Migrating from DCFM SMI Agent
1. Click Next on the Welcome screen.
2. Choose one of the following options and click Next.
• If data is detected on your system (automatically detected), select Yes, from DCFM or Network Advisor in the
following location.
• If data is not detected, the select Yes, from Network Advisor installed in this machine or on network and
click Browse to browse to the installation directory.
3. (Optional) If you do not want to migrate historical performance data, select the Do not migrate historical
performance data check box on the Data Migration screen.
4. Click Start on the Data Migration screen.
Data migration may take several minutes. When data migration is complete, the previous version is partially
uninstalled.
5. Click Next on the Data Migration screen.
6. Complete the following steps on the Server IP Configuration screen.
FIGURE 11 Server IP Configuration screen
a. Select an address from the Server IP Configuration list.
b. Select an address from the Switch - Server IP Configuration Preferred Address list.
40 of 82 Brocade Network Advisor Migration Guide
53-1002321-01
Page 41

c. Click Next.
NOTE
NOTE
If DNS is not configured for your network, do not select the ‘hostname’ option from either the Server IP
Configuration or Switch - Server IP Configuration Preferred Address list. Selecting the ‘hostname’ option
prevents clients and devices from communicating with the Server.
If you select a specific IP address from the Server IP Configuration screen and the selected IP address
changes, you will not be able to connect to the server. To change the IP address, refer to “Configuring an
explicit server IP address” on page 78.
7. Complete the following steps on the Server Configuration screen.
DCFM migration
FIGURE 12 Server Configuration screen
a. Enable SSL by selecting the SSL Enabled check box (default is not selected).
b. Enter a port number in the Web Server Port # field (default is 443 if SSL Enabled is selected; otherwise, the
default is 80).
c. Enter a port number in the Database Port # field (default is 5432).
d. Enter a port number in the Starting Port # field (default is 24600).
The server requires 16 consecutive free ports beginning with the starting port number.
e. Enter a port number in the Syslog Port # field (default is 514).
If the default syslog port number is already in use, you will not receive any syslog messages from the device.
To find and stop the process currently running on the default Syslog port number, refer to “Syslog
troubleshooting” on page 80.
f. Enter a port number in the SNMP Port # field (default is 162).
g. Click Next.
If you enter a syslog port number already in use, a message displays. Click No on the message to remain on
the Server Configuration screen and edit the syslog port number. Click Yes to close the message and
continue with step 12.
If you enter a port number already in use, a warning displays next to the associated port number field. Edit
that port number and click Next.
Brocade Network Advisor Migration Guide 41 of 82
53-1002321-01
Page 42

DCFM migration
NOTE
NOTE
8. Complete the following steps on the SMI Agent Configuration screen.
a. Enable the SSL by selecting the Enable SSL check box, if necessary.
b. Enter the SMI Agent port number in the SMI Agent Port # field (default is 5989 if SSL Enabled is selected;
otherwise, the default is 5988).
c. Click Next.
9. Select one of the following options on the SAN Network Size screen (for Pure Fabric OS fabrics only) and click
Next:
Port count is equal to the total number of switch ports across all fabrics.
• Small (managing up to 2000 switch ports, 1-20 domains)
• Medium (managing up to 5000 switch ports, 21-60 domains)
• Large (managing up to 9000 switch ports, 61-120 domains)
10. Verify your configuration information on the Server Configuration Summary screen and click Next.
11. Complete the following steps on the Start Server screen.
a. Select the Start SMI Agent check box, if necessary.
b. Select the Start SLP check box, if necessary.
c. Click Finish.
After all of the services (SLP and SMI Agent) are started, the configuration wizards closes. You can launch
Network Advisor Server Management Console (Start > Programs > Network Advisor 11.1.X > Server
Management Console) to make changes to the SMI Agent configuration.
When migrating from an earlier version of DCFM, you must wait 10 minutes before querying the Network
Advisor SMI Agent because some of the information is not populated until after the next discovery cycle.
42 of 82 Brocade Network Advisor Migration Guide
53-1002321-01
Page 43

Network Advisor migration
Network Advisor migration
The following migration paths are supported:
• Network Advisor 11.X.X Professional to Network Advisor 11.1.X Professional
• Network Advisor 11.X.X Professional to Network Advisor 11.1.X Trial
• Network Advisor 11.X.X Professional to Network Advisor 11.1.X Licensed Version
• Network Advisor 11.X.X SMI Agent Only to Network Advisor 11.1.X SMI Agent Only
• Network Advisor 11.X.X Trial to Network Advisor 11.1.X Trial
• Network Advisor 11.X.X Trial to Network Advisor 11.1.X Licensed Version
• Network Advisor 11.X.X Licensed Version to Network Advisor 11.1.X Licensed Version
Both Trial and Licensed Version software include the following two packages:
• Professional Plus—Support for 2560 switch ports, 4 fabrics and 4096 devices
• Enterprise—Support for 9000 switch ports, 24 fabrics and 10,000 devices. Required for evaluation of DCX
Backbone and FICON management.
Use the following to migrate data from Network Advisor software.
•Upgrading the application . . . . . . . . . . . . . . . . . . . . . . . . . . . . . . . . . . . . . . . . . . . . . . . . . . . . . . . 44
•Network Advisor Professional migration. . . . . . . . . . . . . . . . . . . . . . . . . . . . . . . . . . . . . . . . . . . . . 45
•Network Advisor Trial migration. . . . . . . . . . . . . . . . . . . . . . . . . . . . . . . . . . . . . . . . . . . . . . . . . . . . 55
•Migrating from Licensed Version to Licensed Version. . . . . . . . . . . . . . . . . . . . . . . . . . . . . . . . . . 65
•Network Advisor SMI Agent migration. . . . . . . . . . . . . . . . . . . . . . . . . . . . . . . . . . . . . . . . . . . . . . . 71
•Unsupported server migration. . . . . . . . . . . . . . . . . . . . . . . . . . . . . . . . . . . . . . . . . . . . . . . . . . . . . 74
Pre-migration requirements
If you are migrating within the same release, you must perform a partial uninstall of the current release. For
step-by-step instructions, refer to “Uninstallation” on page 81.
Brocade Network Advisor Migration Guide 43 of 82
53-1002321-01
Page 44

Network Advisor migration
Upgrading the application
The quickest and simplest method of moving from one package to another is to enter the new license information on
the Network Advisor License dialog box. The following table lists the available upgrade paths:
Current Software To Licensed Version
Mid-Market trial
Professional Plus trial
Mid-Market
Professional Plus
Enterprise
Enterprise
Professional Plus
Enterprise trial Enterprise
1. Select Help > License.
The Network Advisor License dialog box displays.
2. Enter the license key (on the Key Certificate).
3. Click Update.
4. Click OK on the Network Advisor License dialog box.
5. Click OK on the message.
The Client closes after updating the license successfully. Restart the Server, Client and Server Management
Console for the changes to take effect.
6. Open the application (double-click the desktop icon or open from the Start menu).
The Log In dialog box displays.
7. Enter your user name and password.
The defaults are Administrator and password, respectively. If you migrated from a previous release, your
username and password do not change.
8. Select or clear the Save password check box to choose whether you want the application to remember your
password the next time you log in.
9. Click Login.
10. Click OK on the Network Advisor Login Banner.
44 of 82 Brocade Network Advisor Migration Guide
53-1002321-01
Page 45

Network Advisor migration
NOTE
Network Advisor Professional migration
You can only migrate from Professional software to Trial or Licensed Version software within the same release. If you
have not installed the application, refer to “Installing the application” on page 24.
Use Tab le 26 to migrate data from Network Advisor Professional software.
TABLE 26 Professional migration paths
Current Software Release To Software Release Migration Procedures
Professional 11.X.X Professional 11.1.X To migrate from Professional 11.X.X to Professional 11.1.X, refer to “Migrating
from Professional to Professional” on page 45.
Professional 11.X.X Trial 11.1.X To migrate from Professional 11.X.X to Trial 11.1.X, refer to “Migrating from
Professional to Trial” on page 48.
Professional 11.X.X Licensed Version 11.1.X To migrate from Professional 11.X.X to Licensed Version 11.1.X, refer to
“Migrating from Professional to Licensed Version” on page 52.
Migrating from Professional to Professional
Use the following procedure to migrate from Professional software to Professional software.
1. Click Next on the Welcome screen.
2. Choose one of the following options:
• If data is detected on your system, one of the following screens display:
A message displays. Click Yes on the message and click Next on the Partial Data Migration screen. Go
to step 10.
The Copy Data and Settings screen displays. To migrate data from the previous version installed
(automatically detected), select Yes, from DCFM or Network Advisor in the following location. Continue
with step 3.
• If data is not detected, the Copy Data and Settings screen displays. Complete the following steps.
a. Select Yes, from Network Advisor installed in this machine or on network and click Browse to browse to
the installation directory.
b. Click Next on the Copy Data and Settings screen. Continue with step 3.
3. Click Start on the Data Migration screen.
Data migration may take several minutes.
4. Click Next on the Data Migration screen.
5. Select Network Advisor - Professional on the Installation Type screen and click Next.
6. Select Internal FTP Server or External FTP Server on the FTP Server screen and click Next.
The default selection reflects the previous Professional edition configuration.
If port 21 is busy, a message displays. Click OK to close the message and continue. Once the Management
application is configured make sure port 21 is free and restart the Server to start the FTP service.
If you select to use an FTP Server which is not configured on the same machine as Network Advisor, the
Firmware Repository feature will not be available.
Brocade Network Advisor Migration Guide 45 of 82
53-1002321-01
Page 46

Network Advisor migration
7. Complete the following steps on the Server IP Configuration screen.
FIGURE 13 Server IP Configuration screen
a. Select an address from the Server IP Configuration list.
b. Select an address from the Switch - Server IP Configuration Preferred Address list.
c. Click Next.
If DNS is not configured for your network, do not select the ‘hostname’ option from either the Server IP
Configuration or Switch - Server IP Configuration Preferred Address list. Selecting the ‘hostname’ option
prevents clients and devices from communicating with the Server.
If you select a specific IP address from the Server IP Configuration screen and the selected IP address
changes, you will not be able to connect to the server. To change the IP address, refer to “Configuring an
explicit server IP address” on page 78.
8. Complete the following steps on the Server Configuration screen.
FIGURE 14 Server Configuration screen
a. Enter a port number in the Web Server Port # field (default is 443 if SSL Enabled is selected; otherwise, the
default is 80).
b. Enter a port number in the Database Port # field (default is 5432).
46 of 82 Brocade Network Advisor Migration Guide
53-1002321-01
Page 47

Network Advisor migration
Brocade Network Advisor Migration Guide 47 of 82
53-1002321-01
Page 48

Network Advisor migration
NOTE
NOTE
NOTE
c. Enter a port number in the Starting Port # field (default is 24600).
The server requires 16 consecutive free ports beginning with the starting port number.
d. Enter a port number in the Syslog Port # field (default is 514).
If the default syslog port number is already in use, you will not receive any syslog messages from the device.
To find and stop the process currently running on the default Syslog port number, refer to “Syslog
troubleshooting” on page 80.
e. Enter a port number in the SNMP Port # field (default is 162).
f. Click Next.
If you enter a syslog port number already in use, a message displays. Click No on the message to remain on
the Server Configuration screen and edit the syslog port number. Click Yes to close the message and
continue with step 10.
If you enter a port number already in use, a warning displays next to the associated port number field. Edit
that port number and click Next.
9. Verify your configuration information on the Server Configuration Summary screen and click Next.
10. Select the Start Client check box, if necessary, on the Start Server screen and click Finish.
After all of the Network Advisor services are started, the Log In dialog box displays.
11. Enter your user name and password.
The defaults are Administrator and password, respectively. If you migrated from a previous release, your
username and password do not change.
12. Click Login.
13. Click OK on the Network Advisor Login Banner.
Migrating from Professional to Trial
Trial to Professional migration is not supported.
Use the following procedure to migrate from Professional software to Trial software.
1. Click Next on the Welcome screen.
2. Choose one of the following options:
• If data is detected on your system, a message displays. Click Yes on the message and click Next on the
Partial Data Migration screen. Go to step 13.
• If data is not detected, the Copy Data and Settings screen displays. Complete the following steps.
a. Select Yes, from Network Advisor installed in this machine or on network and click Browse to browse to
the installation directory.
b. Click Next on the Copy Data and Settings screen. Continue with step 3.
3. Click Start on the Data Migration screen.
Data migration may take several minutes.
48 of 82 Brocade Network Advisor Migration Guide
53-1002321-01
Page 49

Network Advisor migration
ATTENTION
NOTE
4. Click Next on the Data Migration screen.
5. Select Network Advisor - 75 days trial on the Installation Type screen and click Next.
If you choose to install Trial software, once the trial period ends (75 days), you must upgrade to Licensed Version
package.
6. Complete the following steps on the Trial Configuration screen.
a. (SAN with SMI Agent) Select one of the following from the SAN with SMI Agent options:
- Enterprise (9000 switch ports, 24 fabrics and 10,000 devices)
Required for evaluation of DCX Backbone and FICON management.
- Professional Plus (2560 switch ports, 4 fabrics and 4096 devices)
b. Click Next.
7. Se l e c t Internal FTP Server or External FTP Server on the FTP Server screen and click Next.
The default selection reflects the previous Professional edition configuration.
If port 21 is busy, a message displays. Click OK to close the message and continue. Once the Management
application is configured make sure port 21 is free and restart the Server to start the FTP service.
If you select to use an FTP Server which is not configured on the same machine as Network Advisor, the
Firmware Repository feature will not be available.
8. Complete the following steps on the Server IP Configuration screen.
FIGURE 15 Server IP Configuration screen
a. Select an address from the Server IP Configuration list.
b. Select an address from the Switch - Server IP Configuration Preferred Address list.
Brocade Network Advisor Migration Guide 49 of 82
53-1002321-01
Page 50

Network Advisor migration
NOTE
NOTE
c. Click Next.
If DNS is not configured for your network, do not select the ‘hostname’ option from either the Server IP
Configuration or Switch - Server IP Configuration Preferred Address list. Selecting the ‘hostname’ option
prevents clients and devices from communicating with the Server.
If you select a specific IP address from the Server IP Configuration screen and the selected IP address
changes, you will not be able to connect to the server. To change the IP address, refer to “Configuring an
explicit server IP address” on page 78.
9. Complete the following steps on the Server Configuration screen.
FIGURE 16 Server Configuration screen
a. Enable SSL by selecting the SSL Enabled check box (default is not selected).
b. Enter a port number in the Web Server Port # field (default is 443 if SSL Enabled is selected; otherwise, the
default is 80).
c. Enter a port number in the Database Port # field (default is 5432).
d. Enter a port number in the Starting Port # field (default is 24600).
The server requires 16 consecutive free ports beginning with the starting port number.
e. Enter a port number in the Syslog Port # field (default is 514).
If the default syslog port number is already in use, you will not receive any syslog messages from the device.
To find and stop the process currently running on the default Syslog port number, refer to “Syslog
troubleshooting” on page 80.
f. Enter a port number in the SNMP Port # field (default is 162).
g. Click Next.
If you enter a syslog port number already in use, a message displays. Click No on the message to remain on
the Server Configuration screen and edit the syslog port number. Click Yes to close the message and
continue with step 10.
If you enter a port number already in use, a warning displays next to the associated port number field. Edit
that port number and click Next.
50 of 82 Brocade Network Advisor Migration Guide
53-1002321-01
Page 51

Network Advisor migration
NOTE
10. Complete the following steps on the SMI Agent Configuration screen (Figure 17).
FIGURE 17 SMI Agent Configuration screen
a. Enable the SMI Agent by selecting the Enable SMI Agent check box.
b. Enable the SLP by selecting the Enable SLP check box, if necessary.
Only enabled after you select the Enable SMI Agent check box.
c. Enable the SSL by selecting the Enable SSL check box, if necessary.
Only enabled after you select the Enable SMI Agent check box.
d. Enter the SMI Agent port number in the SMI Agent Port # field (default is 5989 if SSL Enabled is selected;
otherwise, the default is 5988).
e. Click Next.
11. (SAN Enterprise only) Select one of the following options on the SAN Network Size screen and click Next:
Port count is equal to the total number of switch ports across all fabrics.
• Small (managing up to 2000 switch ports, 1-20 domains)
• Medium (managing up to 5000 switch ports, 21-60 domains)
• Large (managing up to 9000 switch ports, 61-120 domains)
12. Verify your configuration information on the Server Configuration Summary screen and click Next.
13. Complete the following steps on the Start Server screen.
a. Select the Start SMI Agent check box, if necessary.
b. Select the Start SLP check box, if necessary.
c. Select the Start Client check box, if necessary.
d. Click Finish.
After all of the services (Server, SLP, and SMI Agent) are started, you can access the Server Management
Console.
After all of the selected services are started, the Log In dialog box displays.
Brocade Network Advisor Migration Guide 51 of 82
53-1002321-01
Page 52

Network Advisor migration
NOTE
NOTE
14. Enter your user name and password.
The defaults are Administrator and password, respectively. If you migrated from a previous release, your
username and password do not change.
15. Click Login.
16. Click OK on the Network Advisor Login Banner.
Migrating from Professional to Licensed Version
Licensed Version to Professional migration is not supported.
Use the following procedure to migrate from Professional software to Licensed Version software.
1. Click Next on the Welcome screen.
2. Choose one of the following options:
• If data is detected on your system, one of the following screens display:
A message displays. Click Yes on the message and click Next on the Partial Data Migration screen. Go
to step 13.
The Copy Data and Settings screen displays. To migrate data from the previous version installed
(automatically detected), select Yes, from DCFM or Network Advisor in the following location. Continue
with step 3.
• If data is not detected, the Copy Data and Settings screen displays. Complete the following steps.
a. Select Yes, from Network Advisor installed in this machine or on network and click Browse to browse to
the installation directory.
b. Click Next on the Copy Data and Settings screen. Continue with step 3.
3. Click Start on the Data Migration screen.
Data migration may take several minutes. When data migration is complete, the previous version is partially
uninstalled.
4. Click Next on the Data Migration screen.
5. Select Network Advisor - Licensed Version on the Installation Type screen and click Next.
6. If you are installing a licensed edition, enter the license key (on the Key Certificate) on the Server License screen
or browse to the license file (.xml) and click Next.
The License Key field is not case-sensitive.
7. Se l e c t Internal FTP Server or External FTP Server on the FTP Server screen and click Next.
The default selection reflects the previous Professional edition configuration.
If port 21 is busy, a message displays. Click OK to close the message and continue. Once the Management
application is configured make sure port 21 is free and restart the Server to start the FTP service.
If you select to use an FTP Server which is not configured on the same machine as Network Advisor, the
Firmware Repository feature will not be available.
52 of 82 Brocade Network Advisor Migration Guide
53-1002321-01
Page 53

8. Complete the following steps on the Server IP Configuration screen.
FIGURE 18 Server IP Configuration screen
a. Select an address from the Server IP Configuration list.
b. Select an address from the Switch - Server IP Configuration Preferred Address list.
Network Advisor migration
c. Click Next.
If DNS is not configured for your network, do not select the ‘hostname’ option from either the Server IP
Configuration or Switch - Server IP Configuration Preferred Address list. Selecting the ‘hostname’ option
prevents clients and devices from communicating with the Server.
If you select a specific IP address from the Server IP Configuration screen and the selected IP address
changes, you will not be able to connect to the server. To change the IP address, refer to “Configuring an
explicit server IP address” on page 78.
9. Complete the following steps on the Server Configuration screen.
FIGURE 19 Server Configuration screen
a. Enable SSL by selecting the SSL Enabled check box (default is not selected).
b. Enter a port number in the Web Server Port # field (default is 443 if SSL Enabled is selected; otherwise, the
default is 80).
c. Enter a port number in the Database Port # field (default is 5432).
Brocade Network Advisor Migration Guide 53 of 82
53-1002321-01
Page 54

Network Advisor migration
NOTE
NOTE
d. Enter a port number in the Starting Port # field (default is 24600).
The server requires 16 consecutive free ports beginning with the starting port number.
e. Enter a port number in the Syslog Port # field (default is 514).
If the default syslog port number is already in use, you will not receive any syslog messages from the device.
To find and stop the process currently running on the default Syslog port number, refer to “Syslog
troubleshooting” on page 80.
f. Enter a port number in the SNMP Port # field (default is 162).
g. Click Next.
If you enter a syslog port number already in use, a message displays. Click No on the message to remain on
the Server Configuration screen and edit the syslog port number. Click Yes to close the message and
continue with step 10.
If you enter a port number already in use, a warning displays next to the associated port number field. Edit
that port number and click Next.
10. Complete the following steps on the SMI Agent Configuration screen (Figure 20).
FIGURE 20 SMI Agent Configuration screen
a. Enable the SMI Agent by selecting the Enable SMI Agent check box.
b. Enable the SLP by selecting the Enable SLP check box, if necessary.
Only enabled after you select the Enable SMI Agent check box.
c. Enable the SSL by selecting the Enable SSL check box, if necessary.
Only enabled after you select the Enable SMI Agent check box.
d. Enter the SMI Agent port number in the SMI Agent Port # field (default is 5989 if SSL Enabled is selected;
otherwise, the default is 5988).
e. Click Next.
54 of 82 Brocade Network Advisor Migration Guide
53-1002321-01
Page 55

Network Advisor migration
NOTE
NOTE
11. (SAN Enterprise only) Select one of the following options on the SAN Network Size screen and click Next:
Port count is equal to the total number of switch ports across all fabrics.
• Small (managing up to 2000 switch ports, 1-20 domains)
• Medium (managing up to 5000 switch ports, 21-60 domains)
• Large (managing up to 9000 switch ports, 61-120 domains)
12. Verify your configuration information on the Server Configuration Summary screen and click Next.
13. Complete the following steps on the Start Server screen.
a. Select the Start SMI Agent check box, if necessary.
b. Select the Start SLP check box, if necessary.
c. Select the Start Client check box, if necessary.
d. Click Finish.
After all of the services (Server, SLP, and SMI Agent) are started, you can access the Server Management
Console.
After all of the selected services are started, the Log In dialog box displays.
14. Enter your user name and password.
The defaults are Administrator and password, respectively. If you migrated from a previous release, your
username and password do not change.
15. Click Login.
16. Click OK on the Network Advisor Login Banner.
Network Advisor Trial migration
Trial to Professional software migration is not supported.
Both Trial and Licensed Version software include the following options:
• Enterprise (9000 switch ports, 24 fabrics and 10,000 devices)
Required for evaluation of DCX Backbone and FICON management.
• Professional Plus (2560 switch ports, 4 fabrics and 4096 devices)
The following migration paths are supported:
• Mid-Market Trial software to Professional Plus Trial software
• Mid-Market Trial software to Professional Plus Licensed Version software
• Mid-Market Trial software to Enterprise Licensed Version software
• Mid-Market Trial software to Enterprise Trial software
• Enterprise Trial software to Enterprise Trial software
• Enterprise Trial software to Enterprise Licensed Version software
Brocade Network Advisor Migration Guide 55 of 82
53-1002321-01
Page 56

Network Advisor migration
ATTENTION
Use Tab le 27 to migrate data from Trial software. If you have not installed the application, refer to “Installing the
application” on page 24
TABLE 27 Network Advisor trial migration paths
Current Software Release To Software Release Migration Procedures
Trial 11.X.X Trial 11.1.X To migrate from Trial to Trial, refer to “Migrating from Trial to Trial” on
page 56.
Trial 11.X.X Licensed Version 11.1.X To migrate from Trial to Licensed Version, refer to “Migrating from
Trial to Licensed Version” on page 61.
Migrating from Trial to Trial
Use the following procedure to migrate from trial to trial.
1. Click Next on the Welcome screen.
2. Choose one of the following options:
• If data is detected on your system, one of the following screens display:
A message displays. Click Yes on the message and click Next on the Partial Data Migration screen. Go
to step 13.
The Copy Data and Settings screen displays. To migrate data from the previous version installed
(automatically detected), select Yes, from DCFM or Network Advisor in the following location. Continue
with step 3.
• If data is not detected, the Copy Data and Settings screen displays. Complete the following steps:
a. Select Yes, from Network Advisor installed in this machine or on network and click Browse to browse to
the installation directory.
b. Click Next on the Copy Data and Settings screen. Continue with step 3.
3. Click Start on the Data Migration screen.
Data migration may take several minutes. When data migration is complete, the previous version is partially
uninstalled.
4. Click Next on the Data Migration screen.
5. Select Network Advisor - 75 days trial on the Installation Type screen and click Next.
If you choose to install Trial software, once the trial period ends (75 days), you must upgrade to Licensed Version
software.
6. Complete the following steps on the Trial Configuration screen.
a. (SAN with SMI Agent) Select one of the following from the SAN with SMI Agent options:
- Enterprise (9000 switch ports, 24 fabrics and 10,000 devices)
Required for evaluation of DCX Backbone and FICON management.
- Professional Plus (2560 switch ports, 4 fabrics and 4096 devices)
b. Click Next.
56 of 82 Brocade Network Advisor Migration Guide
53-1002321-01
Page 57

Network Advisor migration
NOTE
7. Se l e c t Internal FTP Server or External FTP Server on the FTP Server screen and click Next.
The default selection reflects the previous Professional Plus edition configuration.
If port 21 is busy, a message displays. Click OK to close the message and continue. Once the Management
application is configured make sure port 21 is free and restart the Server to start the FTP service.
If you select to use an FTP Server which is not configured on the same machine as Network Advisor, the
Firmware Repository feature will not be available.
8. Complete the following steps on the Server IP Configuration screen.
FIGURE 21 Server IP Configuration screen
a. Select an address from the Server IP Configuration list.
b. Select an address from the Switch - Server IP Configuration Preferred Address list.
c. Click Next.
If DNS is not configured for your network, do not select the ‘hostname’ option from either the Server IP
Configuration or Switch - Server IP Configuration Preferred Address list. Selecting the ‘hostname’ option
prevents clients and devices from communicating with the Server.
If you select a specific IP address from the Server IP Configuration screen and the selected IP address
changes, you will not be able to connect to the server. To change the IP address, refer to “Configuring an
explicit server IP address” on page 78.
Brocade Network Advisor Migration Guide 57 of 82
53-1002321-01
Page 58

Network Advisor migration
NOTE
NOTE
9. Complete the following steps on the Server Configuration screen.
FIGURE 22 Server Configuration screen
a. Enable SSL by selecting the SSL Enabled check box (default is not selected).
b. Enter a port number in the Web Server Port # field (default is 443 if SSL Enabled is selected; otherwise, the
default is 80).
c. Enter a port number in the Database Port # field (default is 5432).
d. Enter a port number in the Starting Port # field (default is 24600).
The server requires 16 consecutive free ports beginning with the starting port number.
e. Enter a port number in the Syslog Port # field (default is 514).
If the default syslog port number is already in use, you will not receive any syslog messages from the device.
To find and stop the process currently running on the default Syslog port number, refer to “Syslog
troubleshooting” on page 80.
f. Enter a port number in the SNMP Port # field (default is 162).
g. Click Next.
If you enter a syslog port number already in use, a message displays. Click No on the message to remain on
the Server Configuration screen and edit the syslog port number. Click Yes to close the message and
continue with step 12.
If you enter a port number already in use, a warning displays next to the associated port number field. Edit
that port number and click Next.
58 of 82 Brocade Network Advisor Migration Guide
53-1002321-01
Page 59

10. Complete the following steps on the SMI Agent Configuration screen.
NOTE
FIGURE 23 SMI Agent Configuration screen
a. Enable the SMI Agent by selecting the Enable SMI Agent check box.
b. Enable the SLP by selecting the Enable SLP check box, if necessary.
Network Advisor migration
Only enabled after you select the Enable SMI Agent check box.
c. Enable the SSL by selecting the Enable SSL check box, if necessary.
Only enabled after you select the Enable SMI Agent check box.
d. Enter the SMI Agent port number in the SMI Agent Port # field (default is 5989 if SSL Enabled is selected;
otherwise, the default is 5988).
e. Click Next.
11. (SAN Enterprise only) Select one of the following options on the SAN Network Size screen and click Next:
Port count is equal to the total number of switch ports across all fabrics.
• Small (managing up to 2000 switch ports, 1-20 domains)
• Medium (managing up to 5000 switch ports, 21-60 domains)
• Large (managing up to 9000 switch ports, 61-120 domains)
12. Verify your configuration information on the Server Configuration Summary screen and click Next.
Brocade Network Advisor Migration Guide 59 of 82
53-1002321-01
Page 60

Network Advisor migration
13. Complete the following steps on the Start Server screen.
FIGURE 24 Start Server screen
a. Select the Start SMI Agent check box, if necessary.
Only enabled if you enabled SMI Agent on the SMI Agent Configuration screen.
b. Select the Start SLP check box, if necessary.
Only enabled if you enabled SMI Agent on the SMI Agent Configuration screen.
c. Select the Start Client check box, if necessary.
d. Click Finish.
After all of the services (Server, SLP, SMI Agent and Client) are started, the Log In dialog box displays.
14. Enter your user name and password.
The defaults are Administrator and password, respectively. If you migrated from a previous release, your
username and password do not change.
15. Click Login.
16. Click OK on the Network Advisor Login Banner.
60 of 82 Brocade Network Advisor Migration Guide
53-1002321-01
Page 61

Network Advisor migration
NOTE
NOTE
Migrating from Trial to Licensed Version
Licensed Version software to Trial software migration is not supported.
Use the following procedure to migrate from Trial to Licensed Version.
1. Click Next on the Welcome screen.
2. Choose one of the following options:
• If data is detected on your system, one of the following screens display:
A message displays. Click Yes on the message and click Next on the Partial Data Migration screen. Go
to step 12.
The Copy Data and Settings screen displays. To migrate data from the previous version installed
(automatically detected), select Yes, from DCFM or Network Advisor in the following location. Continue
with step 3.
• If data is not detected, the Copy Data and Settings screen displays. Complete the following steps:
a. Select Yes, from Network Advisor installed in this machine or on network and click Browse to browse to
the installation directory.
b. Click Next on the Copy Data and Settings screen. Continue with step 3.
3. Click Start on the Data Migration screen.
Data migration may take several minutes. When data migration is complete, the previous version is partially
uninstalled.
4. Click Next on the Data Migration screen.
5. Select Network Advisor - Licensed Version on the Installation Type screen and click Next.
6. If you are migrating to Licensed Version software, enter the license key (on the Key Certificate) on the Server
License screen or browse to the license file (.xml) and click Next.
The License Key field is not case-sensitive.
7. Se l e c t Internal FTP Server or External FTP Server on the FTP Server screen and click Next.
The default selection reflects the previous Professional Plus edition configuration.
If port 21 is busy, a message displays. Click OK to close the message and continue. Once the Management
application is configured make sure port 21 is free and restart the Server to start the FTP service.
If you select to use an FTP Server which is not configured on the same machine as Network Advisor, the
Firmware Repository feature will not be available.
Brocade Network Advisor Migration Guide 61 of 82
53-1002321-01
Page 62

Network Advisor migration
8. Complete the following steps on the Server IP Configuration screen.
FIGURE 25 Server IP Configuration screen
a. Select an address from the Server IP Configuration list.
b. Select an address from the Switch - Server IP Configuration Preferred Address list.
c. Click Next.
If DNS is not configured for your network, do not select the ‘hostname’ option from either the Server IP
Configuration or Switch - Server IP Configuration Preferred Address list. Selecting the ‘hostname’ option
prevents clients and devices from communicating with the Server.
If you select a specific IP address from the Server IP Configuration screen and the selected IP address
changes, you will not be able to connect to the server. To change the IP address, refer to “Configuring an
explicit server IP address” on page 78.
9. Complete the following steps on the Server Configuration screen.
FIGURE 26 Server Configuration screen
a. Enable SSL by selecting the SSL Enabled check box (default is not selected).
b. Enter a port number in the Web Server Port # field (default is 443 if SSL Enabled is selected; otherwise, the
default is 80).
c. Enter a port number in the Database Port # field (default is 5432).
62 of 82 Brocade Network Advisor Migration Guide
53-1002321-01
Page 63

Network Advisor migration
NOTE
NOTE
d. Enter a port number in the Starting Port # field (default is 24600).
The server requires 16 consecutive free ports beginning with the starting port number.
e. Enter a port number in the Syslog Port # field (default is 514).
If the default syslog port number is already in use, you will not receive any syslog messages from the device.
To find and stop the process currently running on the default Syslog port number, refer to “Syslog
troubleshooting” on page 80.
f. Enter a port number in the SNMP Port # field (default is 162).
g. Click Next.
If you enter a syslog port number already in use, a message displays. Click No on the message to remain on
the Server Configuration screen and edit the syslog port number. Click Yes to close the message and
continue with step 12.
If you enter a port number already in use, a warning displays next to the associated port number field. Edit
that port number and click Next.
10. Complete the following steps on the SMI Agent Configuration screen.
FIGURE 27 SMI Agent Configuration screen
a. Enable the SMI Agent by selecting the Enable SMI Agent check box.
b. Enable the SLP by selecting the Enable SLP check box, if necessary.
Only enabled after you select the Enable SMI Agent check box.
c. Enable the SSL by selecting the Enable SSL check box, if necessary.
Only enabled after you select the Enable SMI Agent check box.
d. Enter the SMI Agent port number in the SMI Agent Port # field (default is 5989 if SSL Enabled is selected;
otherwise, the default is 5988).
e. Click Next.
Brocade Network Advisor Migration Guide 63 of 82
53-1002321-01
Page 64

Network Advisor migration
NOTE
11. (SAN Enterprise only) Select one of the following options on the SAN Network Size screen and click Next:
Port count is equal to the total number of switch ports across all fabrics.
• Small (managing up to 2000 switch ports, 1-20 domains)
• Medium (managing up to 5000 switch ports, 21-60 domains)
• Large (managing up to 9000 switch ports, 61-120 domains)
12. Verify your configuration information on the Server Configuration Summary screen and click Next.
13. Complete the following steps on the Start Server screen.
FIGURE 28 Start Server screen
a. Select the Start SMI Agent check box, if necessary.
Only enabled if you enabled SMI Agent on the SMI Agent Configuration screen.
b. Select the Start SLP check box, if necessary.
Only enabled if you enabled SMI Agent on the SMI Agent Configuration screen.
c. Select the Start Client check box, if necessary.
d. Click Finish.
After all of the services (Server, SLP, SMI Agent and Client) are started, the Log In dialog box displays.
14. Enter your user name and password.
The defaults are Administrator and password, respectively. If you migrated from a previous release, your
username and password do not change.
15. Click Login.
16. Click OK on the Network Advisor Login Banner.
64 of 82 Brocade Network Advisor Migration Guide
53-1002321-01
Page 65

Network Advisor migration
NOTE
NOTE
Migrating from Licensed Version to Licensed Version
The quickest and simplest method of moving from one package to another is to enter the new license information on
the Network Advisor License dialog box. To upgrade from a previous release, refer to “Upgrading the application” on
page 44.
Licensed Version software to Trial software migration is not supported.
Enterprise software to Professional Plus software migration is not supported.
Use the following procedure to migrate from Licensed Version to Licensed Version.
1. Click Next on the Welcome screen.
2. Choose one of the following options:
• If data is detected on your system, one of the following screens display:
A message displays. Click Yes on the message and click Next on the Partial Data Migration screen. Go
to step 12.
The Copy Data and Settings screen displays. To migrate data from the previous version installed
(automatically detected), select Yes, from DCFM or Network Advisor in the following location. Continue
with step 3.
• If data is not detected, the Copy Data and Settings screen displays. Complete the following steps:
a. Select Yes, from Network Advisor installed in this machine or on network and click Browse to browse to
the installation directory.
b. Click Next on the Copy Data and Settings screen. Continue with step 3.
3. Click Start on the Data Migration screen.
Data migration may take several minutes. When data migration is complete, the previous version is partially
uninstalled.
4. Click Next on the Data Migration screen. Go to step 6.
5. If you are migrating to Licensed Version software, enter the license key (on the Key Certificate) on the Server
License screen or browse to the license file (.xml) and click Next.
If you are migrating from a licensed source, the source license information displays in the Server License
screen.
The License Key field is not case-sensitive.
Brocade Network Advisor Migration Guide 65 of 82
53-1002321-01
Page 66

Network Advisor migration
NOTE
6. (SAN with SMI Agent) Select Internal FTP Server or External FTP Server on the FTP Server screen and click Next.
The default selection reflects the previous edition configuration.
If port 21 is busy, a message displays. Click OK to close the message and continue. Once the Management
application is configured make sure port 21 is free and restart the Server to start the FTP service.
If you select to use an FTP Server which is not configured on the same machine as Network Advisor, the
Firmware Repository feature will not be available.
7. Complete the following steps on the Server IP Configuration screen.
FIGURE 29 Server IP Configuration screen
a. Select an address from the Server IP Configuration list.
b. Select an address from the Switch - Server IP Configuration Preferred Address list.
c. Click Next.
If DNS is not configured for your network, do not select the ‘hostname’ option from either the Server IP
Configuration or Switch - Server IP Configuration Preferred Address list. Selecting the ‘hostname’ option
prevents clients and devices from communicating with the Server.
If you select a specific IP address from the Server IP Configuration screen and the selected IP address
changes, you will not be able to connect to the server. To change the IP address, refer to “Configuring an
explicit server IP address” on page 78.
66 of 82 Brocade Network Advisor Migration Guide
53-1002321-01
Page 67

Network Advisor migration
NOTE
NOTE
8. Complete the following steps on the Server Configuration screen.
FIGURE 30 Server Configuration screen
a. Enable SSL by selecting the SSL Enabled check box (default is not selected).
b. Enter a port number in the Web Server Port # field (default is 443 if SSL Enabled is selected; otherwise, the
default is 80).
c. Enter a port number in the Database Port # field (default is 5432).
d. Enter a port number in the Starting Port # field (default is 24600).
The server requires 16 consecutive free ports beginning with the starting port number.
e. Enter a port number in the Syslog Port # field (default is 514).
If the default syslog port number is already in use, you will not receive any syslog messages from the device.
To find and stop the process currently running on the default Syslog port number, refer to “Syslog
troubleshooting” on page 80.
f. Enter a port number in the SNMP Port # field (default is 162).
g. Click Next.
If you enter a syslog port number already in use, a message displays. Click No on the message to remain on
the Server Configuration screen and edit the syslog port number. Click Yes to close the message and
continue with step 12.
If you enter a port number already in use, a warning displays next to the associated port number field. Edit
that port number and click Next.
Brocade Network Advisor Migration Guide 67 of 82
53-1002321-01
Page 68

Network Advisor migration
NOTE
9. (SAN with SMI Agent) Complete the following steps on the SMI Agent Configuration screen.
FIGURE 31 SMI Agent Configuration screen
a. Enable the SMI Agent by selecting the Enable SMI Agent check box.
b. Enable the SLP by selecting the Enable SLP check box, if necessary.
Only enabled after you select the Enable SMI Agent check box.
c. Enable the SSL by selecting the Enable SSL check box, if necessary.
Only enabled after you select the Enable SMI Agent check box.
d. Enter the SMI Agent port number in the SMI Agent Port # field (default is 5989 if SSL Enabled is selected;
otherwise, the default is 5988).
e. Click Next.
10. (SAN Enterprise only) Select one of the following options on the SAN Network Size screen and click Next:
Port count is equal to the total number of switch ports across all fabrics.
• Small (managing up to 2000 switch ports, 1-20 domains)
• Medium (managing up to 5000 switch ports, 21-60 domains)
• Large (managing up to 9000 switch ports, 61-120 domains)
11. Verify your configuration information on the Server Configuration Summary screen and click Next.
68 of 82 Brocade Network Advisor Migration Guide
53-1002321-01
Page 69

12. Complete the following steps on the Start Server screen.
NOTE
FIGURE 32 Start Server screen
a. (SAN with SMI Agent) Select the Start SMI Agent check box, if necessary.
b. (SAN with SMI Agent) Select the Start SLP check box, if necessary.
Network Advisor migration
c. Select the Start Client check box, if necessary.
d. Click Finish.
After all of the services (Server, SLP, SMI Agent and Client) are started, the Log In dialog box displays.
13. Enter your user name and password.
The defaults are Administrator and password, respectively. If you migrated from a previous release, your
username and password do not change.
14. Click Login.
15. Click OK on the Network Advisor Login Banner.
For ESX hosts discovered in 10.4.X or 11.0.X, the VM properties of those ESX hosts are purged upon migration
to 11.1.X.
Brocade Network Advisor Migration Guide 69 of 82
53-1002321-01
Page 70

Network Advisor 11.0.X to 11.1.X command mapping
Network Advisor 11.0.X to 11.1.X command mapping
Tab le 28 details the changes in the SAN tab menu command mapping between Network Advisor 11.0.X and 11.1.X.
For a list of all menus and commands, refer to the Brocade Network Advisor User Manual or online help.
TABLE 28 SAN tab command mapping
Network Advisor 11.0.X command mapping Network Advisor 11.1.X command mapping
Discover > Setup Discover > Fabrics
Discover > Host Adapters
Configure > Port Fencing Monitor > Fabric Watch > Port Fencing
Configure > IP Troubleshooting > Ping Configure > FCIP Troubleshooting > Ping
Configure > IP Troubleshooting > Trace Route Configure > FCIP Troubleshooting > Trace Route
Configure > IP Troubleshooting > Performance Configure > FCIP Troubleshooting > Performance
Configure > Switch > Save Configure > Configuration > Save
Configure > Switch > Save Running to Startup Configure > Configuration > Save Running to Startup.
Configure > Switch > Restore Configure > Configuration > Restore
Configure > Switch > CEE Configure > DCB
Configure > Switch > FCoE Configure > FCoE
Configure > Switch > Configuration Repository Configure > Configuration > Configuration Repository
Configure > Switch > Schedule Backup Configure > Configuration > Schedule Backup
Configure > Switch > Replicate > Configuration Configure > Configuration > Replicate > Configuration
Configure > Switch > Replicate > Security Configure > Configuration > Replicate > Security
Configure > Switch > Swap Blades Configure > Configuration > Swap Blades
Configure > Logical Switches Configure > Virtual Fabric > Logical Switches
Configure > List Zone Members Configure > Zoning > List Zone Members
Monitor > Performance > Configure Thresholds Monitor > Fabric Watch > Performance Thresholds
70 of 82 Brocade Network Advisor Migration Guide
53-1002321-01
Page 71

Network Advisor 11.0.X to 11.1.X command mapping
Network Advisor SMI Agent migration
The following migration paths are supported:
• Network Advisor SMI Agent 11.0.X to Network Advisor SMI Agent 11.1.X
Use the following procedure to migrate data from Network Advisor SMI Agent to Network Advisor SMI Agent software.
Migrating from Network Advisor SMI Agent
1. Click Next on the Welcome screen.
2. Choose one of the following options and click Next.
• If data is detected on your system (automatically detected), select Yes, from Network Advisor in the following
location.
• If data is not detected, the select Yes, from Network Advisor installed in this machine or on network and
click Browse to browse to the installation directory.
3. Click Start on the Data Migration screen.
Data migration may take several minutes. When data migration is complete, the previous version is partially
uninstalled.
4. Click Next on the Data Migration screen.
5. Complete the following steps on the Server IP Configuration screen.
FIGURE 33 Server IP Configuration screen
a. Select an address from the Server IP Configuration list.
b. Select an address from the Switch - Server IP Configuration Preferred Address list.
Brocade Network Advisor Migration Guide 71 of 82
53-1002321-01
Page 72

Network Advisor 11.0.X to 11.1.X command mapping
NOTE
NOTE
c. Click Next.
If DNS is not configured for your network, do not select the ‘hostname’ option from either the Server IP
Configuration or Switch - Server IP Configuration Preferred Address list. Selecting the ‘hostname’ option
prevents clients and devices from communicating with the Server.
If you select a specific IP address from the Server IP Configuration screen and the selected IP address
changes, you will not be able to connect to the server. To change the IP address, refer to “Configuring an
explicit server IP address” on page 78.
6. Complete the following steps on the Server Configuration screen.
FIGURE 34 Server Configuration screen
a. Enable SSL by selecting the SSL Enabled check box (default is not selected).
b. Enter a port number in the Web Server Port # field (default is 443 if SSL Enabled is selected; otherwise, the
default is 80).
c. Enter a port number in the Database Port # field (default is 5432).
d. Enter a port number in the Starting Port # field (default is 24600).
The server requires 16 consecutive free ports beginning with the starting port number.
e. Enter a port number in the Syslog Port # field (default is 514).
If the default syslog port number is already in use, you will not receive any syslog messages from the device.
To find and stop the process currently running on the default Syslog port number, refer to “Syslog
troubleshooting” on page 80.
f. Enter a port number in the SNMP Port # field (default is 162).
g. Click Next.
If you enter a syslog port number already in use, a message displays. Click No on the message to remain on
the Server Configuration screen and edit the syslog port number. Click Yes to close the message and
continue with step 12.
If you enter a port number already in use, a warning displays next to the associated port number field. Edit
that port number and click Next.
72 of 82 Brocade Network Advisor Migration Guide
53-1002321-01
Page 73

Cross flavor migration
NOTE
NOTE
7. Complete the following steps on the SMI Agent Configuration screen.
a. Enable the SSL by selecting the Enable SSL check box, if necessary.
b. Enter the SMI Agent port number in the SMI Agent Port # field (default is 5989 if SSL Enabled is selected;
otherwise, the default is 5988).
c. Click Next.
8. Select one of the following options on the SAN Network Size screen (for Pure Fabric OS fabrics only) and click
Next:
Port count is equal to the total number of switch ports across all fabrics.
• Small (managing up to 2000 switch ports, 1-20 domains)
• Medium (managing up to 5000 switch ports, 21-60 domains)
• Large (managing up to 9000 switch ports, 61-120 domains)
9. Verify your configuration information on the Server Configuration Summary screen and click Next.
10. Complete the following steps on the Start Server screen.
a. Select the Start SMI Agent check box, if necessary.
b. Select the Start SLP check box, if necessary.
c. Click Finish.
After all of the services (SLP and SMI Agent) are started, the configuration wizards closes. You can launch
Network Advisor Server Management Console (Start > Programs > Network Advisor 11.1.X > Server
Management Console) to make changes to the SMI Agent configuration.
Cross flavor migration
Cross flavor migration is only supported within the same release and software version.
To migrate from Brocade Network Advisor 11.0.X to a Non-Brocade Network Advisor 11.1.X, complete the following
steps.
1. Install Brocade Network Advisor 11.1.X (refer to “Installing the application” on page 24).
2. Migrate from Brocade Network Advisor 11.0.X to Brocade Network Advisor 11.1.X (refer to “Network Advisor
migration” on page 43).
3. Perform a partial uninstallation of Brocade Network Advisor 11.1.X (refer to “Uninstallation” on page 81).
4. Install Non-Brocade Network Advisor 11.1.X (refer to “Installing the application” on page 24).
5. Migrate the partially uninstalled data (refer to “Network Advisor migration” on page 43) to the Non-Brocade
Network Advisor 11.1.X by browsing to the Brocade Network Advisor 11.1.X location on the Copy Data and
Setting screen.
Brocade Network Advisor Migration Guide 73 of 82
53-1002321-01
Page 74

Unsupported server migration
NOTE
NOTE
Unsupported server migration
If the server that you installed Network Advisor on does not meet the system requirements (refer to “System
requirements” on page 13), use the following procedure to migrate from your current server to a new server.
Migrating to a new server
1. Perform a partial uninstall of Network Advisor (refer to “Uninstallation” on page 81) on the current server.
If the Source version is fully installed on the remote server, stop services from the Server Management Console
dialog box.
2. Install Network Advisor (refer to “Installing the application” on page 24) on the new server.
3. Click Next on the Welcome screen.
4. Select Yes, from Network Advisor installed in this machine or on network and click Browse to browse to the
installation directory where you partially uninstalled the application.
5. Click Next on the Copy Data and Settings screen.
6. Click Start on the Data Migration screen.
Data migration may take several minutes. When data migration is complete, the previous version is partially
uninstalled.
7. Cl i c k Next on the Data Migration screen.
8. Select the source edit type on the Installation Type screen and click Next.
9. If you are migrating to Licensed Version software, enter the license key (on the Key Certificate) on the Server
License screen or browse to the license file (.xml) and click Next.
The License Key field is not case-sensitive.
10. (SAN with SMI Agent) Select Internal FTP Server or External FTP Server on the FTP Server screen and click Next.
The default selection reflects the previous Professional Plus edition configuration.
If port 21 is busy, a message displays. Click OK to close the message and continue. Once the Management
application is configured make sure port 21 is free and restart the Server to start the FTP service.
If you select to use an FTP Server which is not configured on the same machine as Network Advisor, the
Firmware Repository feature will not be available.
74 of 82 Brocade Network Advisor Migration Guide
53-1002321-01
Page 75

Unsupported server migration
11. Complete the following steps on the Server IP Configuration screen.
FIGURE 35 Server IP Configuration screen
a. Select an address from the Server IP Configuration list.
b. Select an address from the Switch - Server IP Configuration Preferred Address list.
c. Click Next.
If DNS is not configured for your network, do not select the ‘hostname’ option from either the Server IP
Configuration or Switch - Server IP Configuration Preferred Address list. Selecting the ‘hostname’ option
prevents clients and devices from communicating with the Server.
If you select a specific IP address from the Server IP Configuration screen and the selected IP address
changes, you will not be able to connect to the server. To change the IP address, refer to “Configuring an
explicit server IP address” on page 78.
12. Complete the following steps on the Server Configuration screen.
FIGURE 36 Server Configuration screen
a. Enable SSL by selecting the SSL Enabled check box (default is not selected).
b. Enter a port number in the Web Server Port # field (default is 443 if SSL Enabled is selected; otherwise, the
default is 80).
c. Enter a port number in the Database Port # field (default is 5432).
Brocade Network Advisor Migration Guide 75 of 82
53-1002321-01
Page 76

Unsupported server migration
NOTE
NOTE
d. Enter a port number in the Starting Port # field (default is 24600).
The server requires 16 consecutive free ports beginning with the starting port number.
e. Enter a port number in the Syslog Port # field (default is 514).
If the default syslog port number is already in use, you will not receive any syslog messages from the device.
To find and stop the process currently running on the default Syslog port number, refer to “Syslog
troubleshooting” on page 80.
f. Enter a port number in the SNMP Port # field (default is 162).
g. Click Next.
If you enter a syslog port number already in use, a message displays. Click No on the message to remain on
the Server Configuration screen and edit the syslog port number. Click Yes to close the message and
continue with step 12.
If you enter a port number already in use, a warning displays next to the associated port number field. Edit
that port number and click Next.
13. (SAN with SMI Agent) Complete the following steps on the SMI Agent Configuration screen.
FIGURE 37 SMI Agent Configuration screen
a. Enable the SMI Agent by selecting the Enable SMI Agent check box.
b. Enable the SLP by selecting the Enable SLP check box, if necessary.
Only enabled after you select the Enable SMI Agent check box.
c. Enable the SSL by selecting the Enable SSL check box, if necessary.
Only enabled after you select the Enable SMI Agent check box.
d. Enter the SMI Agent port number in the SMI Agent Port # field (default is 5989 if SSL Enabled is selected;
otherwise, the default is 5988).
e. Click Next.
76 of 82 Brocade Network Advisor Migration Guide
53-1002321-01
Page 77

Unsupported server migration
NOTE
14. (SAN Enterprise only) Select one of the following options on the SAN Network Size screen and click Next:
Port count is equal to the total number of switch ports across all fabrics.
• Small (managing up to 2000 switch ports, 1-20 domains)
• Medium (managing up to 5000 switch ports, 21-60 domains)
• Large (managing up to 9000 switch ports, 61-120 domains)
15. Verify your configuration information on the Server Configuration Summary screen and click Next.
16. Complete the following steps on the Start Server screen.
FIGURE 38 Start Server screen
a. (SAN with SMI Agent) Select the Start SMI Agent check box, if necessary.
b. (SAN with SMI Agent) Select the Start SLP check box, if necessary.
c. Select the Start Client check box, if necessary.
d. Click Finish.
After all of the services (Server, SLP, SMI Agent and Client) are started, the Log In dialog box displays.
17. Enter your user name and password.
The defaults are Administrator and password, respectively. If you migrated from a previous release, your
username and password do not change.
18. Click Login.
19. Click OK on the Network Advisor Login Banner.
Brocade Network Advisor Migration Guide 77 of 82
53-1002321-01
Page 78

Configuring an explicit server IP address
Migrating DCFM 10.4.X from a 32-bit server
If you are migrating data from a 32- bit server to a 64-bit server, complete the following steps.
1. Partially uninstall the source DCFM 10.4.X (refer to “Uninstallation” on page 81) on the 32-bit server.
2. Install Network Advisor 11.1.X (refer to “Installing the application” on page 24) on the 32-bit server and perform
auto-detected migration through the Copy Data and Setting screen (refer to “DCFM migration” on page 27).
3. Install Network Advisor 11.1.X (refer to “Installing the application” on page 24) on the 64-bit server and on the
Copy Data and Setting screen browse to the Network Advisor 11.1.X (32-bit server) location.
Migrating Network Advisor 11.0.X from a 32-bit server
If you are migrating data from a 32- bit server to a 64-bit server, complete the following steps to migrate.
1. Install Network Advisor 11.0.X (refer to “Installing the application” on page 24) on the 32-bit server.
2. Install Network Advisor 11.1.X (refer to “Installing the application” on page 24) on the 64-bit server
3. Migrate from the 32-bit server to the 64-bit server (refer to “Network Advisor migration” on page 43) and browse
to the Network Advisor 11.0.X (32-bit server) location on the Copy Data and Setting screen.
Migrating Network Advisor 11.1.X from a 32-bit server
If you are migrating data from a 32- bit server to a 64-bit server, complete the following steps to migrate.
1. Install Network Advisor 11.1.X (refer to “Installing the application” on page 24) on the 32-bit server.
2. Install Network Advisor 11.1.X (refer to “Installing the application” on page 24) on the 64-bit server
3. Migrate from the 32-bit server to the 64-bit server (refer to “Network Advisor migration” on page 43) and browse
to the Network Advisor 11.1.X (32-bit server) location on the Copy Data and Setting screen.
Configuring an explicit server IP address
If you selected a specific IP address from the Server IP Configuration screen during installation and the selected IP
address changes, you will not be able to connect to the server. To connect to the new IP address, you must manually
update the IP address information.
To change the IP address, complete the following steps.
1. Choose one of the following options:
• On Windows systems, select Start > Programs > Network Advisor 11.X.X > Network Advisor Configuration.
• On UNIX systems, execute sh Install_Home/bin/configwizard in terminal.
2. Click Next on the Welcome screen.
3. Click Yes on the confirmation message.
4. Click Next on the FTP Server screen.
78 of 82 Brocade Network Advisor Migration Guide
53-1002321-01
Page 79

Configuring an explicit server IP address
5. Complete the following steps on the Server IP Configuration screen.
FIGURE 39 Server IP Configuration screen
a. Select an address from the Server IP Configuration list.
b. Select an address from the Switch - Server IP Configuration Preferred Address list.
If DNS is not configured for your network, do not select the “hostname” option from either the Server IP
Configuration or Switch - Server IP Configuration Preferred Address list. Selecting the “hostname” option
prevents clients and devices from communicating with the server.
c. Click Next.
6. Click Next on the Server Configuration screen.
7. (SAN with SMI Agent) Click Next on the SMI Agent Configuration screen.
8. Verify your configuration information on the Server Configuration Summary screen and click Next.
9. Click Finish on the Start Server screen.
10. Click Yes on the restart server confirmation message.
11. Enter your user name and password.
The defaults are Administrator and password, respectively.
12. Click Login.
13. Click OK on the Login Banner.
Brocade Network Advisor Migration Guide 79 of 82
53-1002321-01
Page 80

IPv6 troubleshooting
IPv6 troubleshooting
If IPv6 is enabled or disabled on the server after installation, complete the following steps.
1. Open the pg_hba.conf file (located in the Install_Home\data\databases\ directory).
2. Go to this line: # IPv6 local connections.
3. Choose one of the following options:
• If IPv6 is enabled, make sure the following line is not commented out:
host all all ::1/128 md5
• If IPv6 is disabled, comment out the following line:
# host all all ::1/128 md5
4. Open this file: Install_Home\bin\dbsvc.bat to load the changes in the database.
Syslog troubleshooting
If the default syslog port number is already in use, you will not receive any syslog messages from the device. Use one
of the following procedures (depending on your operating system), to determine which process is running on the
syslog port and to stop the process.
Windows operating system
Finding the process
1. Open a command window.
2. Type netstat –anb | find /i “514” and press Enter.
The process running on port 514 displays.
Example output: UDP 127:0:0:1:514 *:* 3328.
Stopping the process
Typ e
taskkill /F /PID “<PID>” and press Enter.
For example, taskkill /F /PID "<3328>".
OR
1. Select Ctrl + Shift + Esc to open Windows Task Manager.
2. Click the Processes tab.
3. Click the PID column header to sort the processes by PID.
4. Select the process you want to stop and click End Process.
80 of 82 Brocade Network Advisor Migration Guide
53-1002321-01
Page 81

Uninstallation
NOTE
Linux operating system
Finding the process
1. Open a command window.
2. Type netstat –nap | grep 514 and press Enter.
The process running on port 514 displays.
Example output: UDP 0 0 ::ffff:127:0:0:1:514 :::* 27397.
Stopping the process
Type kill -9 “<PID>” and press Enter.
For example, kill -9 “<27397>”.
Uninstallation
This section provides step-by-step instructions to uninstall Network Advisor and SMI Agent from both Windows and
UNIX systems.
Network Adviso r is inst alled on a separate dire ctory from your p revio us vers ion; the refore, you d o not need to unin stall
the previous version immediately. However, you cannot run both versions simultaneously.
Uninstalling from Windows systems
Follow these instructions to uninstall the Network Advisor and SMI Agent from your Windows system.
1. Select Start > Programs > Network Advisor 11.X.X > Uninstall Network Advisor.
2. Select one of the following options on the Uninstall Option screen:
• Partial Uninstall—Configuration and performance data is retained to be re-used by the new installation.
• Full Uninstall—All data is removed.
3. Click Uninstall.
4. Click Done on the Uninstall Complete screen.
Brocade Network Advisor Migration Guide 81 of 82
53-1002321-01
Page 82

Uninstallation
NOTE
Uninstalling from UNIX systems
Follow these instructions to uninstall the Network Advisor and SMI Agent from your UNIX system.
The Uninstall folder is retained.
1. Go to Install_Home/Uninstall_Network_Advisor11_X_X.
2. Execute ./Uninstall_Network_Advisor11_X_X.
3. Select one of the following options on the Uninstall Option screen:
• Partial Uninstall—Configuration and performance data is retained to be re-used by the new installation.
• Full Uninstall—All data is removed.
4. Click Uninstall.
5. Click Done on the Uninstall Complete screen.
Uninstalling from UNIX systems (headless uninstall)
If the application was installed using the headless installation, complete the following steps to uninstall Network
Advisor and SMI Agent from your UNIX server.
1. Go to Install_Home/Uninstall_Network_Advisor11_X_X.
2. Choose one of the following options:
• To partially uninstall Network Advisor (configuration and performance data is retained to be re-used by the
new installation), execute Uninstall_Network_Advisor 11_X_X –f <absolute path of partial uninstall property
file>.
• To fully uninstall Network Advisor (all data is removed), execute \Uninstall_Network_Advisor 11_X_X –f
<absolute path of full uninstall property file>.
When uninstallation is complete, an “Uninstallation complete” message displays. You must manually delete the
Install_Home/silent folder.
82 of 82 Brocade Network Advisor Migration Guide
53-1002321-01
 Loading...