

Page 1
Wireless Door Chime
Battery Models
PRODUCT FEATURES
• Adjustable volume control (except Model RC520).
• Channels are selectable to allow more than one door chime set in same home.
• Sounds different tunes for front, second, and third doors.
• Optional Transmitter Model C521T available for second and third doors.
QUICK START
1. Insert Battery into button.
2. Insert “C” Batteries into chime receiver.
3. Place Chime where you would like it.
4. Hold button where you would like to mount it. Push button and if chime works,
mount button. If not, read detail that follows.
INSTALLATION
Regulatory Information
The user is cautioned that changes or modifications not expressly approved
by the party responsible for regulatory compliance could void the user's
authority to operate this equipment.
1. Open the chime button case by inserting a flat blade screwdriver into
the notch on the bottom and push to
open. Lift the front of the button up
and away from the back.
2. Insert the A23 battery into the button. The + side of the battery goes
up.
Chime
Button
3. Insert “C” batteries into chime receiver. On Model RC520, pull white
face of chime off to insert batteries.
Test operation by pressing button.
Battery+
If chime doesn’t operate, see troubleshooting section.
Before mounting the button outside,
hold it where you wish it to be and test
the operation. If it works, mount it there.
If it doesn’t work, see the troubleshooting section. If mounting to a metallic or
concrete surface, use a 1/8” to 1/4”
wood spacer between the back of the
button and the surface to increase the
range.
Wireless chime range can vary from 20
to 125 feet depending on the construction of your home. Wood or vinyl siding
are ideal. Steel, aluminum, brick or
stucco decrease the range.
Page 2
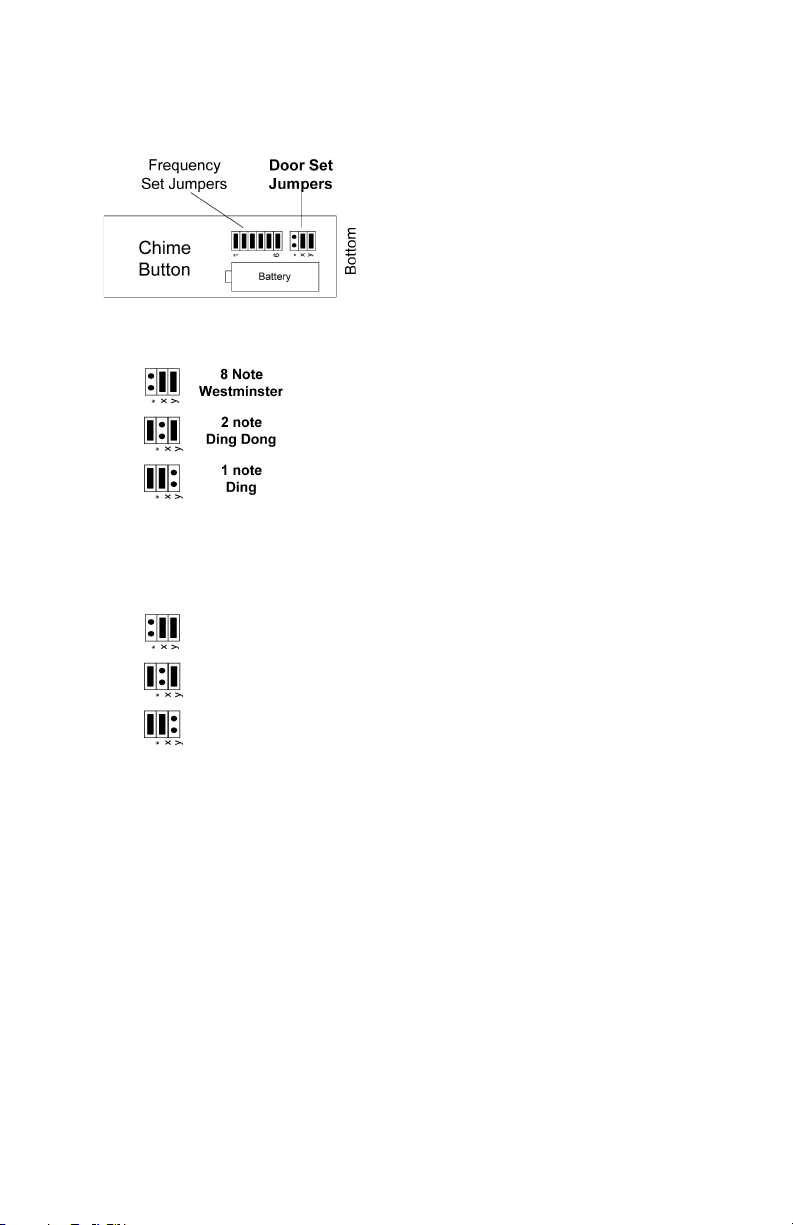
4. Set each button to ring a different
tune for each door. Change door set
jumpers on the button.
Door Set Jumpers – RC516
5. Some models have volume controls.
Set the chime volume by gently turning the volume control with a small
screwdriver.
6. Some models have a slide switch
that changes the tone of your chime.
Choose the sound you like best.
7. Mount the button by using the two
holes in the back of the case. Mount
so the long hook is on the bottom. If
mounting to a metallic or concrete
surface, use 1/8” to 1/4” wood
spacers between the back of the
button and the surface to increase range. Snap the button on
the back case.
OPERATION
Jumpers on pins * and x for Westminster chime.
Jumpers on pins * and y for 2-note chime.
Door Set Jumpers – RC520
1 note
Ding
3 note
Ding Dong Dong
2 note
Ding Dong
Press the door chime button to verify
that the button and chime work properly. When the button is pressed, the
chime should sound. If it doesn’t, check
that the frequency codes are set the
same and that the alkaline batteries are
fresh.
BUTTON BATTERY
REPLACEMENT
Open button case (see step #2).
Replace with one 12 volt alkaline type
A23 (Broan Model RCA23) or MN21
battery. Close button case.
2
Page 3
FREQUENCY
SWITCH VS.
CODES
If you are adding a second chime receiver to another area of your home,
you’ll want to make sure the frequency
codes on the additional receivers are
set the same. That way, they’ll all ring
when a button is pushed.
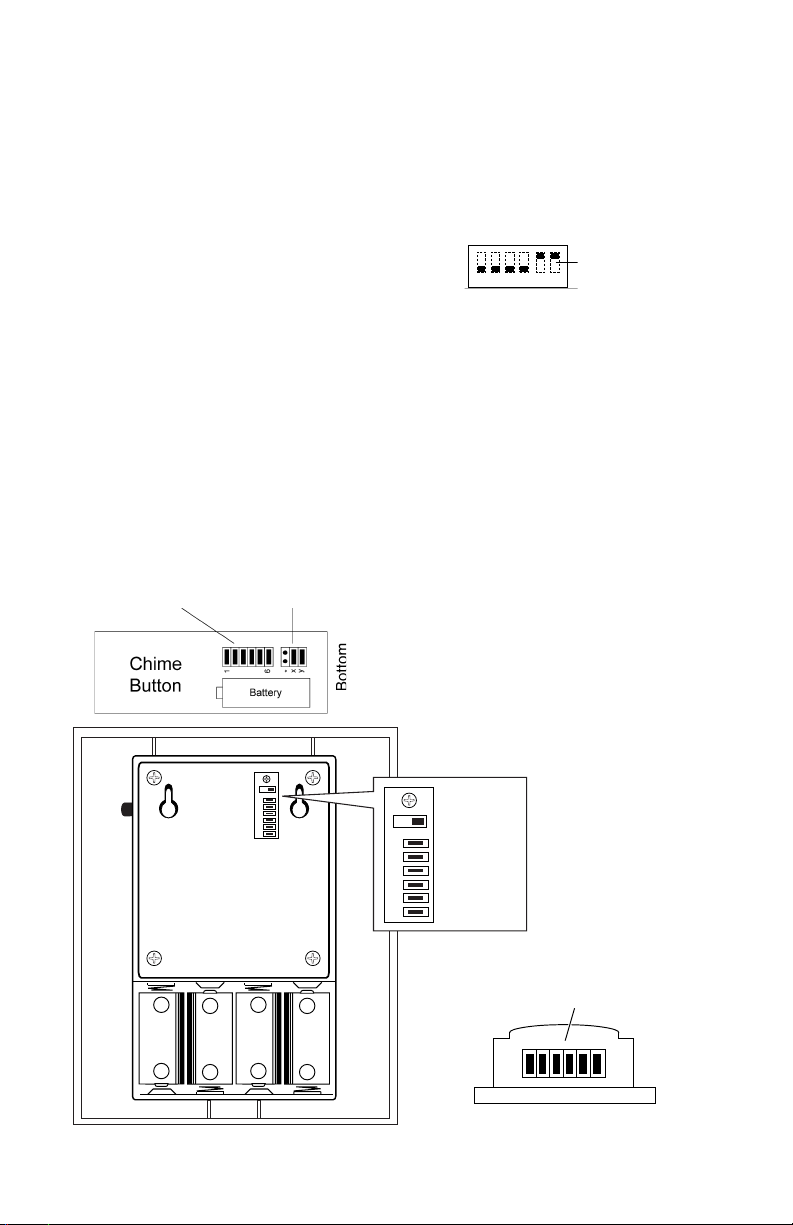
The first six pins on the chime and button change the frequency code. Remove the exact same one or two pins
from the chime and button. After making your changes make sure the jumpers on the first 6 pins match on both the
chime and button.
If your chime goes off by itself, it may
be experiencing interference from a
neighbor’s wireless chime. You can stop
this from happening by changing the frequency code of your chime.
Frequency
Set Jumpers
Door Set
Jumpers
JUMPER
Some models use a DIP switch instead
of jumpers, setting the switch to “ON” is
the same as a jumper being installed.
ON
1 2 3 4 5 6
DIP Slide Switch
(5 and 6 are “on”)
ADDITIONAL
DOOR CHIMES
When installing other wireless Door
Chime sets, remember to set frequency
codes to different settings to avoid interference. If you want them to all ring
at the same time, set them to the same
frequency code.
6
5
4
3
2
1
+
-
-
+
+
+
-
-
6
5
4
3
2
1
Volume Control
Tone Switch
(Melody or Bell)
Frequency
Set Jumpers
Frequency Set
Jumpers
16
Back view of RC516 Top View of RC520
3
Page 4

TROUBLESHOOTING
The range of the door chime depends
on location, temperature and battery
condition. If you are having problems
with this product, please try the solutions listed below.
Chime rings on its own:
• A neighbor may have a wireless
chime set with the same frequency
jumper settings. Change the chime
and button frequency jumpers.
Chime doesn't sound:
• Make sure the button and the chime
jumpers are set the same.
• Replace the button battery. Also check
chime batteries. On plug-in models,
make sure there is electricity to the
outlet the chime is plugged into.
Questions on this product?
Call 1-800-637-1453 7:30 AM to 6:00 PM Central Time, Weekdays
Batteries are OK, but chime does not
work when installed:
• Mounting the chime or button directly
on metal, concrete or near metal
studs reduces the range. Use 1/4" to
1/2" wood shims to move the chime
or doorbell button off of the surface.
• Do not mount the chime too close to
ground level concrete slabs which
may also reduce the range. Mount the
chime away from the floor.
• Try different locations for the chime
closer to the button. Also, try to orient
the chime at a different angle to increase the range. Range is most effective to the sides of the button.
WARRANTY
BROAN ONE YEAR LIMITED WARRANTY
Broan warrants to the original consumer purchaser of its products that such products will
be free from defects in materials or workmanship for a period of one year from date of
original purchase. THERE ARE NO OTHER WARRANTIES, EXPRESSED OR IMPLIED,
INCLUDING, BUT NOT LIMITED TO, IMPLIED WARRANTIES OR MERCHANTABILITY
OR FITNESS FOR A PARTICULAR PURPOSE.
During this one-year period, Broan will, at its option, repair or replace, without charge, any
product or part which is found to be defective under normal use and service.
THIS WARRANTY DOES NOT EXTEND TO FLUORESCENT LAMP STARTERS AND
TUBES. This warranty does not cover (a) normal maintenance and service or (b) any
products or parts which have been subject to misuse, negligence, accident, improper maintenance or repair (other than by Broan), faulty installation or installation contrary to recommended installation instructions.
The duration of any implied warranty is limited to the one-year period as specified for the
express warranty. Some states do not allow limitation on how long an implied warranty
lasts, so the above limitation may not apply to you.
BROAN'S OBLIGATION TO REPAIR OR REPLACE, AT BROAN'S OPTION, SHALL BE
THE PURCHASER'S SOLE AND EXCLUSIVE REMEDY UNDER THIS WARRANTY. Broan
SHALL NOT BE LIABLE FOR INCIDENTAL, CONSEQUENTIAL OR SPECIAL DAMAGES
ARISING OUT OF OR IN CONNECTION WITH PRODUCT USE OR PERFORMANCE.
Some states do not allow the exclusion or limitation of incidental or consequential damages, so the above limitations or exclusion may not apply to you.
This warranty gives you specific legal rights, and you may also have other rights, which
vary from state to state. This warranty supersedes all prior warranties.
To qualify for warranty service, you must (a) notify Broan at the address stated below or
telephone 1-800-637-1453, (b) give the model number and part identification and (c) Describe the nature of any defect in the product or part. At the time of requesting warranty
service, you must present evidence of the original purchase date.
Broan-NuTone LLC, 926 West State Street, Hartford, WI 53027
99523612C
 Loading...