

Page 1

Jupiter Series
USB Hub KVM Switch
User Manual
Rev 1.0
Page 2

Jupiter Series User Manual
Table of Contents
Table of Contents ................................................................................................ I
1. Introduction .................................................................................................. 1
1.1 Features ............................................................................................. 2
1.2 Package Contents .............................................................................. 3
1.3 Combined KVM Cable ........................................................................ 3
1.3 Technical Specifications ..................................................................... 4
1.4 System Requirements ........................................................................ 6
1.5 Cable Diagrams .................................................................................. 8
2. Hardware Installation .................................................................................. 9
2.1 Rack Mount Installation ...................................................................... 9
2.2 Computer / Server Installation .......................................................... 12
2.3 Cascading / Daisy Chaining of multiple KVM Switch ........................ 14
2.4 Operation ......................................................................................... 14
2.5 Password Security ............................................................................ 14
2.6 Hot plug Support .............................................................................. 15
3. Usage ........................................................................................................ 16
3.1 Buttons (Stand Alone KVM Switch Only) .......................................... 16
3.2 Front Panel PC Port LED Indicator (Stand Alone KVM Switch Only) 16
3.3 Computer / Port Selection ................................................................. 16
3.3.1 Illuminated Port LED Button and LED front Display ....................... 17
3.3.2 Front panel push button selection .................................................. 17
4. Hotkey ....................................................................................................... 18
5. OSD (On Screen Display) ......................................................................... 20
5.1 Further main OSD functions: ............................................................ 21
5.1.1 SPACE SPACE: ............................................................................ 21
5.1.2 CHANGE HOT KEYS: ................................................................... 21
5.1.3 CHANGE SCAN TIME: .................................................................. 22
5.1.4 CHANGE TITELBAR: .................................................................... 22
5.1.5 FIRMWARE INFORMATION: ........................................................ 23
5.1.6 CONSOLE DISABLE TIMER: ........................................................ 23
5.1.7 USB HUB LOCK/UNLOCK: ........................................................... 24
I
Page 3

Jupiter Series User Manual
1. Introduction
Thank you for purchasing this Jupiter KVM Switches. Please read this manual
carefully to understand the functions and features of your new switch.
Using the Jupiter KVM Switches you can save on the additional cost of multiple
keyboards, monitors and mice. You will also save on rack space and eliminate
the problems of using the wrong keyboard or mouse. The system administrator
can control the complete installation and access any connected PC from one
centralized location.
The Jupiter KVM Switches allow direct access to up to 16 PCs using a single
KVM (Keyboard, Video, and Mouse) console.
The Jupiter KVM Switches can be easily daisy chained to administrate a larger
number of PCs. The dedicated daisy chain port allows a total number of 8 KVM
Switches to be connected together, to control up to 128 PCs. None of the PC
ports are lost by cascading.
Keyboard and mouse connectors are supported. You can connect a USB or
PS/2 mouse and USB or PS/2 keyboard ports of any computers.
The Jupiter KVM Switches support three methods of switching between the
connected computers: by pressing the KVM switch front panel push buttons; by
using keyboard hotkeys; or via OSD (On Screen Display). The keyboard and
mouse connections of all connected PCs and servers are emulated at all times.
This prevents error messages when switching between connected PCs.
1
Page 4

Jupiter Series User Manual
1.1 Features
Combo console OSD 8/16 port KVM switch in a 1U, 19” Rack mount size
design.
Some advanced features and proprietary functions of any mice and
keyboards with non-standard Microsoft® drivers may not be supported
Supports all commonly used operating systems
Supports USB computers.
Hot Plug Support - Add PCs or remove connected PCs for maintenance
without powering down the KVM switch or the PCs.
Very High Video Quality – Supports display resolutions of up to
1920x1440.
No Software Required - easy PC selection via On Screen Display Menu,
Push Buttons or Keyboard Hot Keys.
Computers can be individually named in OSD.
Eight character password protection per each single computer / server
port.
Auto Scan Mode for monitoring computers and adjustable scan time by
four type.
Keyboard status is restored when switching PCs.
LED illuminated port switch buttons for easy status monitoring
1 digit LED front display to show selected Bank layer.
8/16 ports model uses special cables with 15 Way Hi-Density connectors
at the KVM Switch end.
Built-in daisy chain port prevents the loss of any PC port when cascading.
Permanent keyboard and mouse emulation.
Auto detect daisy chain layer.
Support USB 2.0 hub link to USB device.
2
Page 5
Jupiter Series User Manual
1.2 Package Contents
Jupiter 8 / 16 Series:
KVM Switch Unit 1 PCS
Daisy Chain Cable 1 PCS
12V DC Power Adapter 1 PCS
Rack Mount Kit 1 SET
Table 1-1. Package Contents
1.3 Combined KVM Cable
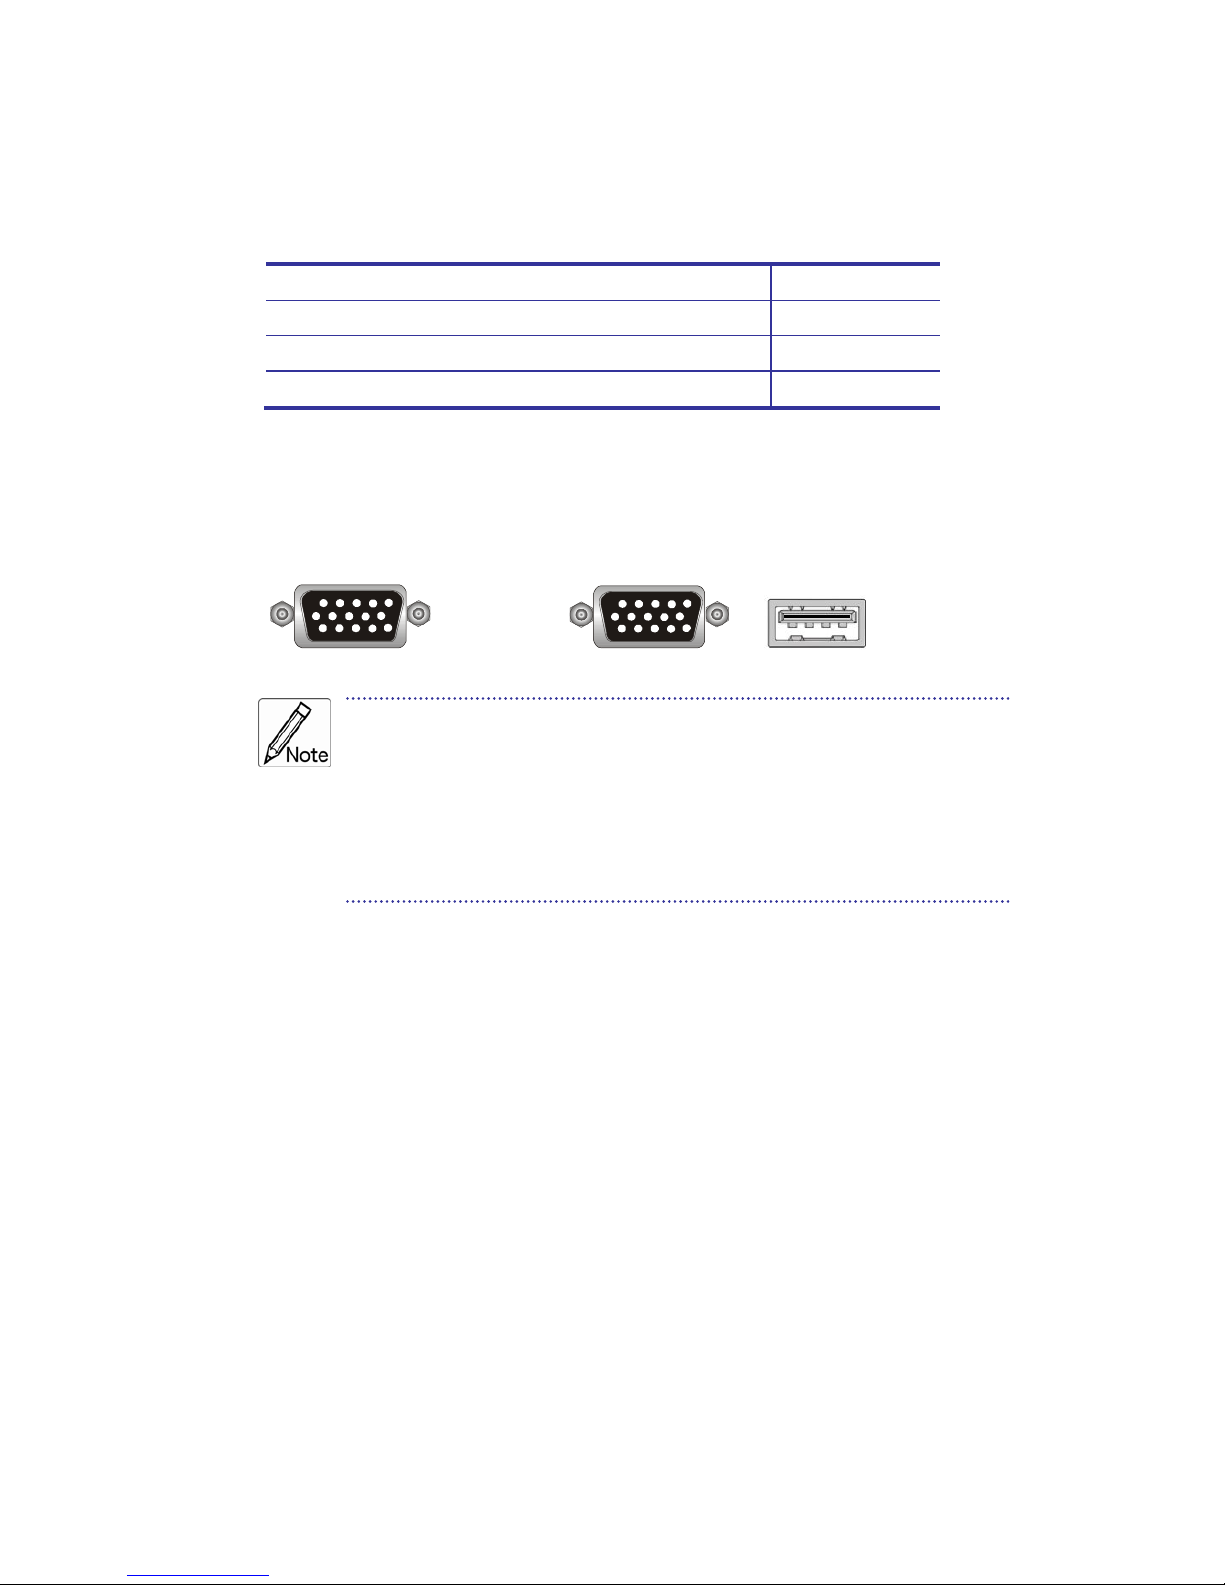
15 Way HD Male to 15 Way HD Male and 4 Pin USB Male special cables
→
If some cables are not long enough we recommend that the
complete cable is replaced with a longer length rather than using
extension cables. Extension cables introduce additional plug to
socket connections, which can adversely affect the signal quality.
Please bear this in mind when using high resolutions or long
distances.
3
Page 6

Jupiter Series User Manual
1.3 Technical Specifications
Jupiter Series:
Feature Specification
PC Ports 8 / 16
Console Ports 1
Daisy Chain Port 1
PC Port Connector
(All Female Types)
VGA HDDB 15-pin
Console Port Connector
(All Female Types)
PS/2 Keyboard mini Din 6-pin
PS/2 Mouse Mini Din 6-pin
USB A type for Keyboard
USB A type for Mouse
USB A type for full 2.0 device
VGA HDDB 15-pin
Daisy Chain Port Connector
(All Female Types)
VGA HDDB 15-pin
PC port selection
On Screen Display (OSD) Menu, Hot Key,
Push Button
7 segment LED One Bank LED,
PC port LED
On Line LED for each PC port button
Power on LED for PC link status
USB Hub link status
On Screen Display (OSD)
Control
Yes
Scan Intervals 5~255 Sec.
Keyboard Emulation USB
Mouse Emulation USB
VGA Resolution 1920X1440/60Hz
DDC Support DDC2
Bandwidth 200MHz
Daisy Chain MAX Level 8 levels
MAX PC Connection 128
Housing Metal
Power 12V/1A
4
Page 7
Jupiter Series User Manual
Operation Temperature 0~50℃
Storage Temperature -20 ~ 60 ℃
Humidity 0 ~ 95%, Non-Condensing
Mechanical 19” Rack mount / 1U
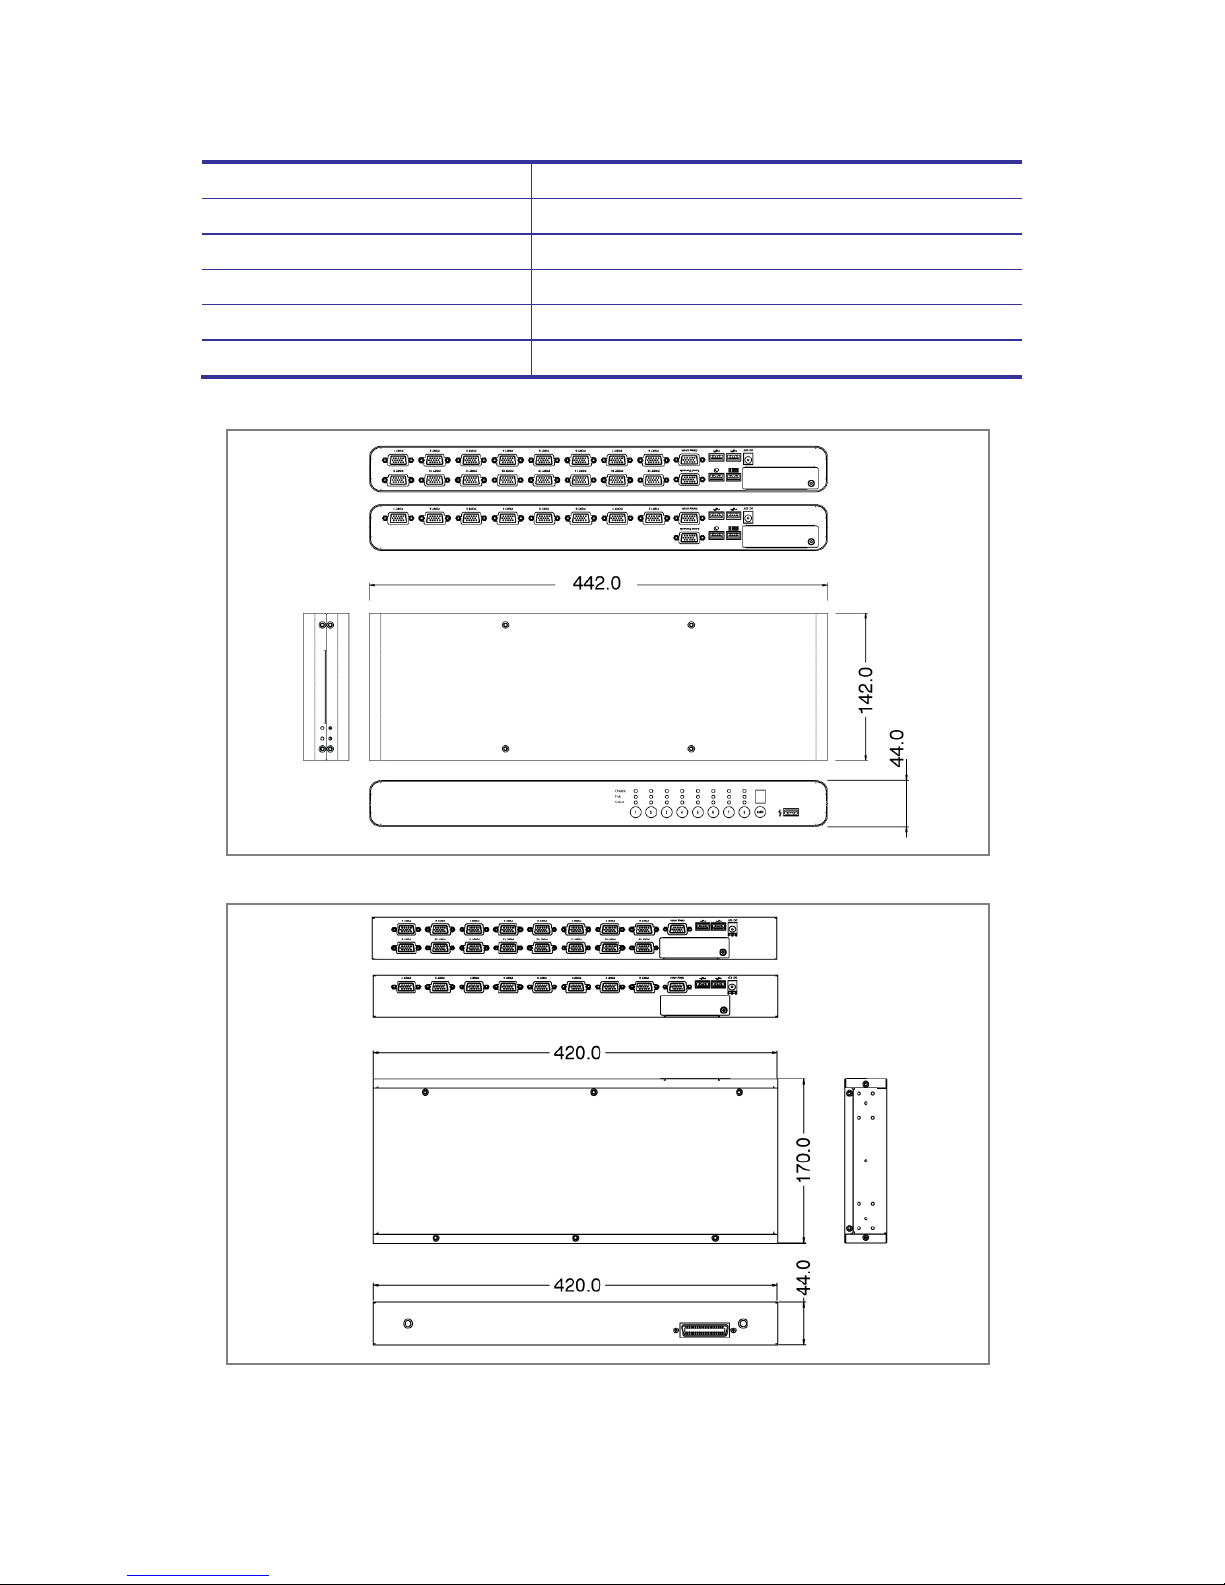
Dimension 442 x 142 x 44 mm / 17.4 x 5.9 x 1.7 inches
Net Weight 2.0 Kg / 4.4 lbs
Table 1-2. Technical Specifications
Figure 1-1. Jupiter 8 / 16 Series Dimensions
Figure 1-2. Jupiter 8D / 16D Series Dimensions
5
Page 8

Jupiter Series User Manual
1.4 System Requirements
Stand Alone USB Hub KVM Switch:
Model No. Jupiter 8 Series
Local Console side One VGA Monitor
One USB Keyboard
One USB Mouse
Computer side 8 x HDDB-15 pin male to one HDDB-15 pin
with one USB A type male connector
IP module One CAT5 cable
Network access environment
CAT5 module One CAT5 cable
R-Box (CAT5 KVM extender receiver)
One VGA Monitor
One USB Keyboard
One USB Mouse
Optional computer
Table 1-3. System Requirements
Model No. Jupiter 16 Series
Console side One VGA Monitor
One USB Keyboard
One USB Mouse
Computer side 16 x HDDB-15 pin male to one HDDB-15 pin
with one USB A type male connector
IP module One CAT5 cable
Network access environment
CAT5 module One CAT5 cable
R-Box (CAT5 KVM extender receiver)
One VGA Monitor
One USB Keyboard
One USB Mouse
Optional computer
Table 1-4. System Requirements
6
Page 9

Jupiter Series User Manual
Modular USB Hub KVM Switch:
Model No. Jupiter 8D Series
Computer side 8 x HDDB-15 pin male to one HDDB-15 pin
with one USB A type male connector
IP module One CAT5 cable
Network access environment
CAT5 module One CAT5 cable
R-Box (CAT5 KVM extender receiver)
One VGA Monitor
One USB Keyboard
One USB Mouse
Optional computer
Table 1-5. System Requirements
Model No. Jupiter 16D Series
Computer side 16 x HDDB-15 pin male to one HDDB-15 pin
with one USB A type male connector
IP module One CAT5 cable
Network access environment
CAT5 module One CAT5 cable
R-Box (CAT5 KVM extender receiver)
One VGA Monitor
One USB Keyboard
One USB Mouse
Optional computer
Table 1-6. System Requirements
7
Page 10
Jupiter Series User Manual
1.5 Cable Diagrams
PC Port Special Cable:
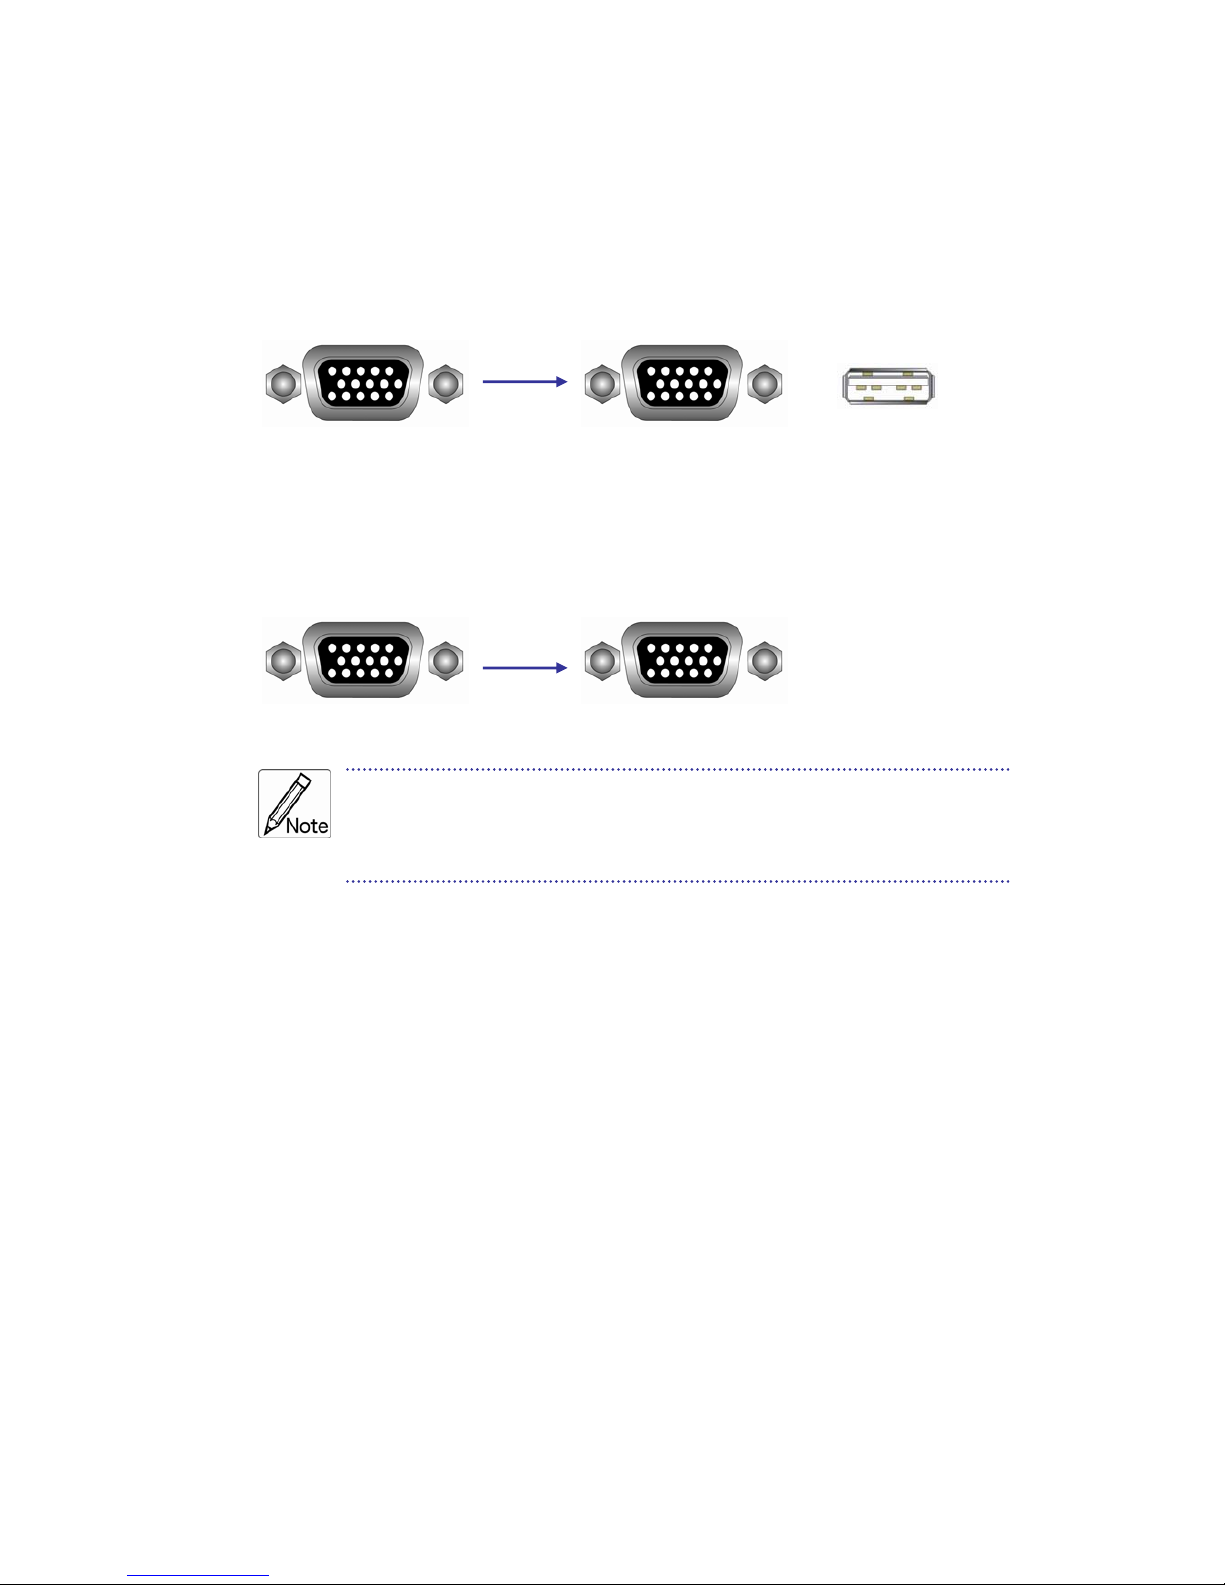
HDDB-15 pin male to one HDDB-15 pin male with two Mini Din 6 pin and one
USB adapter
Figure 1-3. HDDB-15 / VGA + PS/2 x 2 (1.8M)
Daisy Chain Cable:
VGA Cable:
HDDB-15 pin Male to Male
Figure 1-4. Daisy Chain Cable
Daisy chain needs the cable all 15 lines connected. This is a
special VGA cable, normal VGA cable has unconnected lines.
Do not use other VGA cable for daisy chain.
8
Page 11

Jupiter Series User Manual
2. Hardware Installation
Before installation, please make sure all of peripherals and computers have
been turned off.
2.1 Rack Mount Installation
Stand Alone KVM Switch:
Before you start please verify that all parts are included according to the
package contents.
Please prepare the required amount of KVM cables to connect your computers /
servers. If you want to install the KVM Switch in a 19” server rack please attach
the enclosed 19” Rack mount brackets using the included screws.
In addition to the PCs/Servers to be connected you will need a USB keyboard,
monitor and USB mouse to use as a local console. You will also need combined
2-in-1 KVM connection cables (as described on page 3) to connect the
computers/Servers to the KVM Switch.
1. Switch off all the computers to be attached.
2. Connect the keyboard, monitor and mouse directly to the ports of the KVM
Switch labeled Console Port.
3. Now connect the servers and PCs to the ports labeled 1 to 8/16.
4. Attach the power supply to the KVM Switch. Switch on your monitor.
Always plug in the power supply. Although the PCs connected to
the KVM Switch are able to supply enough power to the unit, the
power adapter is needed to daisy chain more KVM Switches. If you
do not plug in the power adapter unexpected/erratic operation may
occur.
9
Page 12
Jupiter Series User Manual
Stand Alone KVM Switch:
Find a convenient place to put your KVM Switch. The 19” rack mount form factor
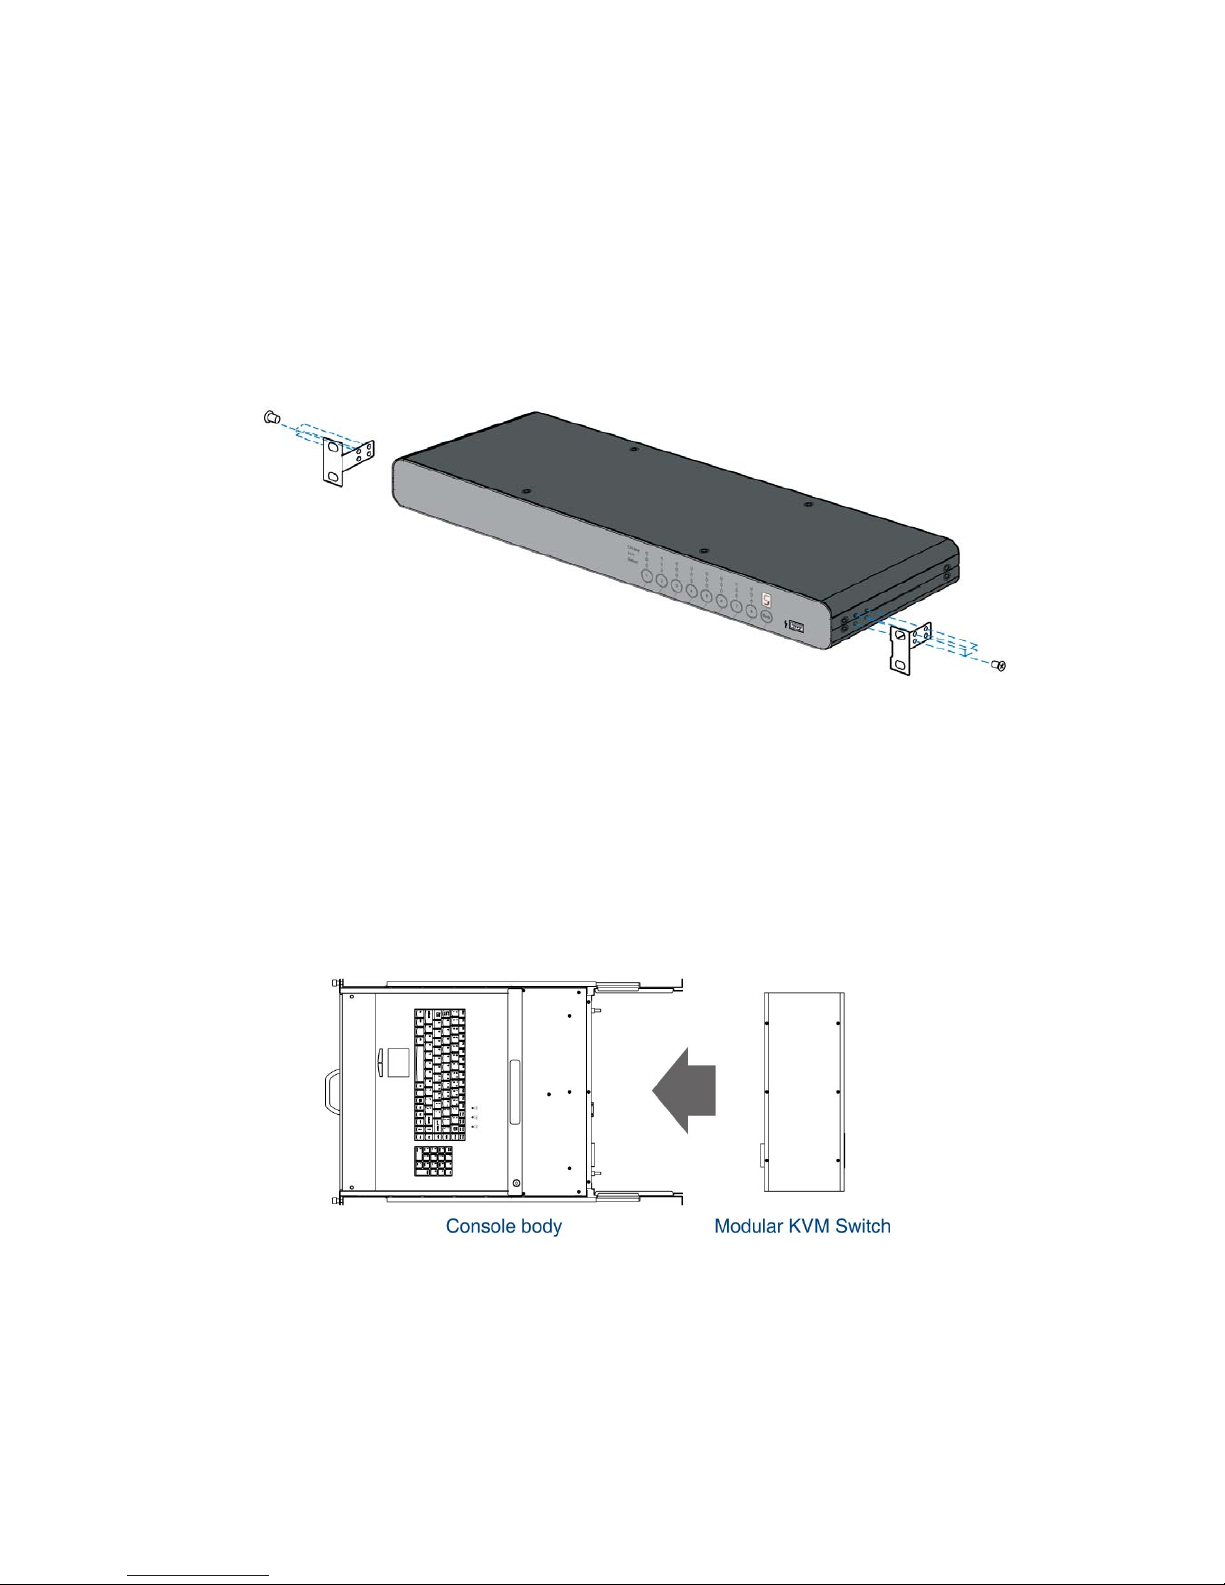
makes it ideally mountable on a 19” rack. When mounting to a rack, attach the
included brackets to the sides of the KVM Switch. Take note of the length of your
cables so that your computers, KVM Switch, keyboard, mouse and monitor are
distanced properly.
Figure 2-1. Rack Mount Installation
Modular KVM Switch:
Please open the package carefully and take out all required accessories to
prepare fluent installation. The modular KVM switch is for Gemini and Unicorn
use, please install the brackets with thumb screw. Please measure the suitable
distance between KVM switch and computer, keyboard, monitor and mouse
before installation.
Figure 2-2. Modular KVM Switch Usage Diagram
10
Page 13
Jupiter Series User Manual
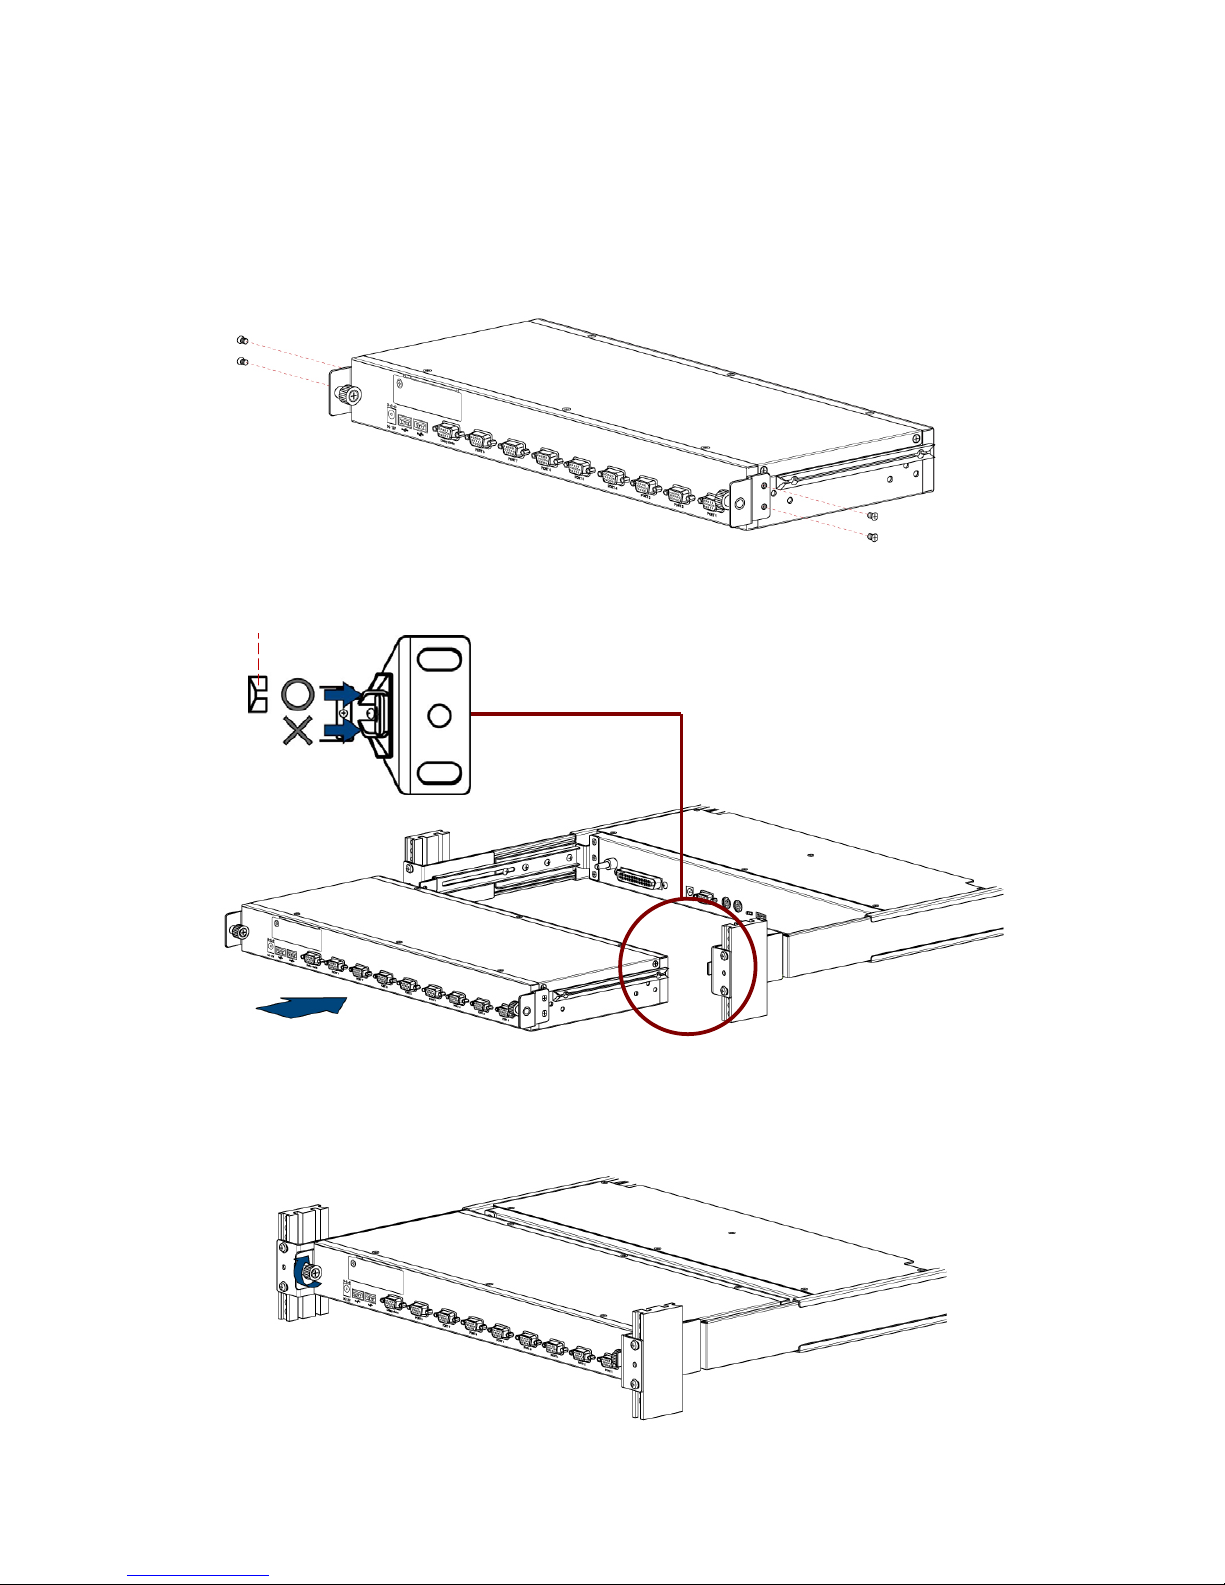
Install Modular KVM Switch Steps:
1. Install two screws (length = 6 mm) to combine bracket and KVM switch.
(Both sides)
2. Push KVM switch into the rails from rear of console.
Rear view of rail
Plastic rail of KVM switch
3. Tight thumb screw of bracket up to fix KVM switch in console (Both sides) and
finish installation.
11
Page 14
Jupiter Series User Manual
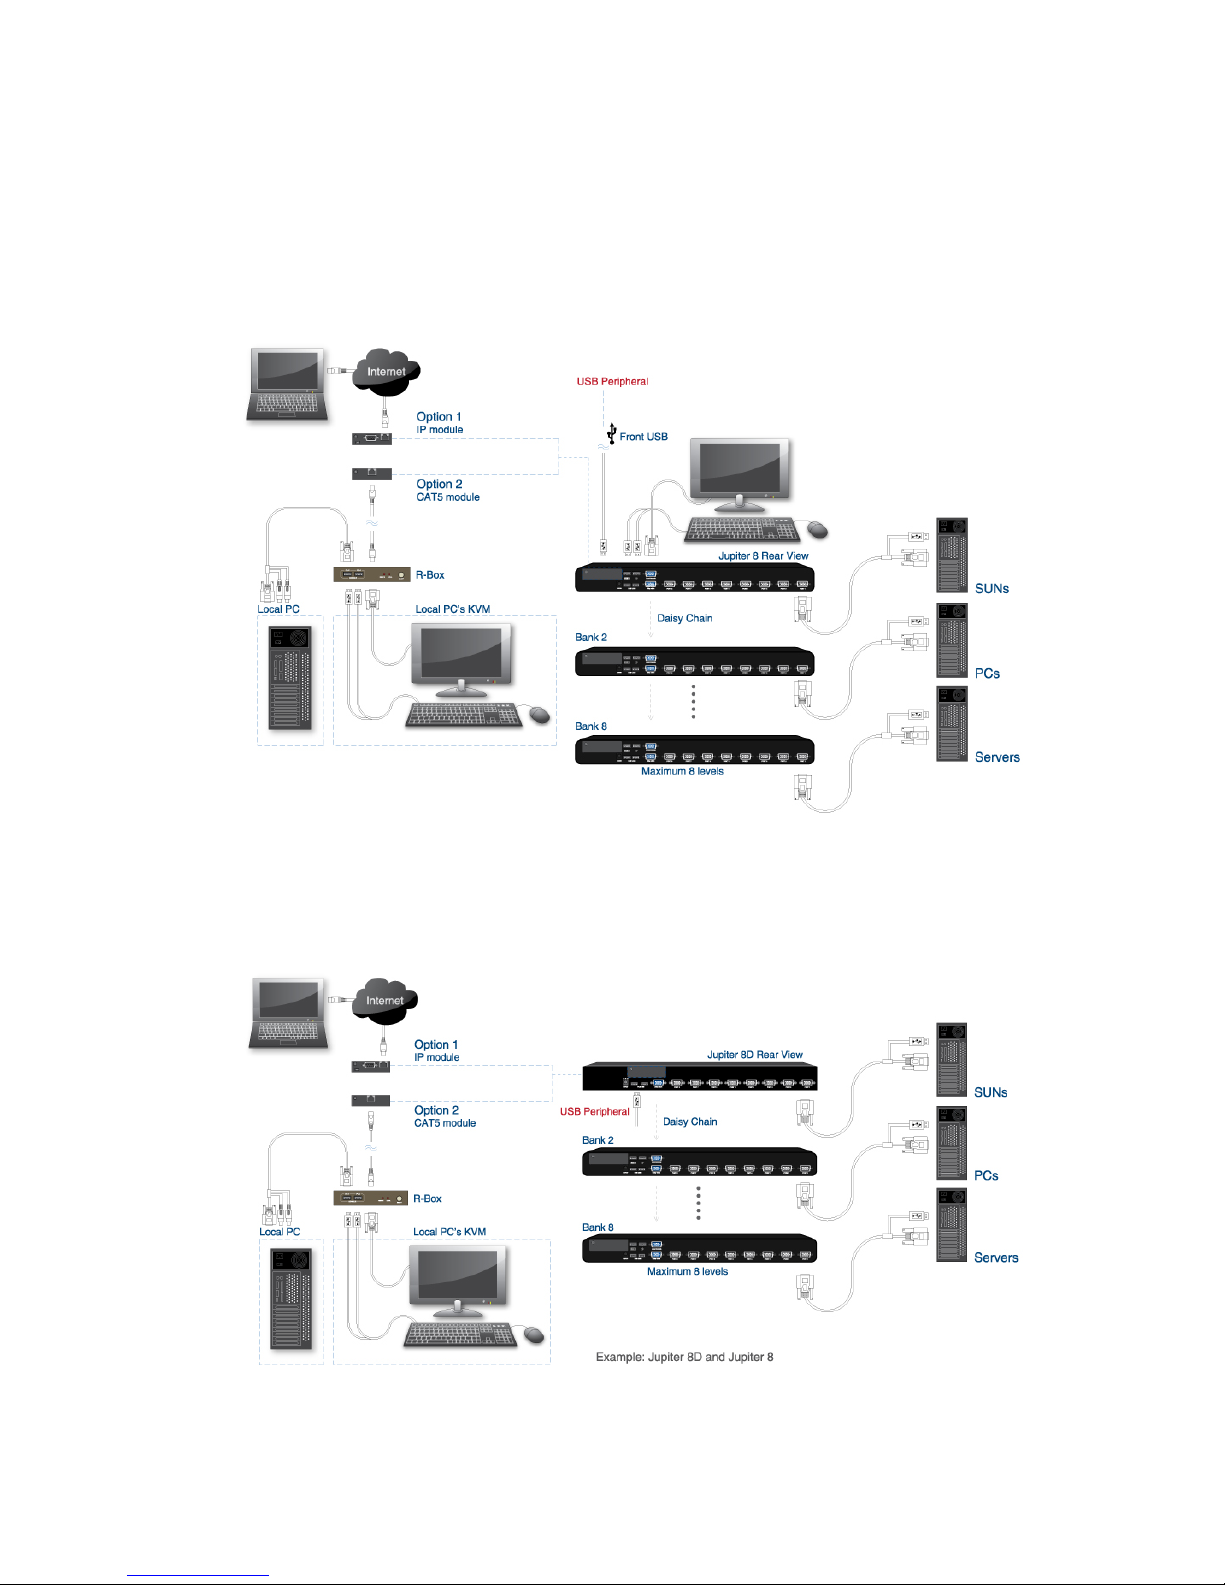
2.2 Computer / Server Installation
Stand Alone KVM Switch:
Modular Design KVM Switch:
12
Page 15
Jupiter Series User Manual
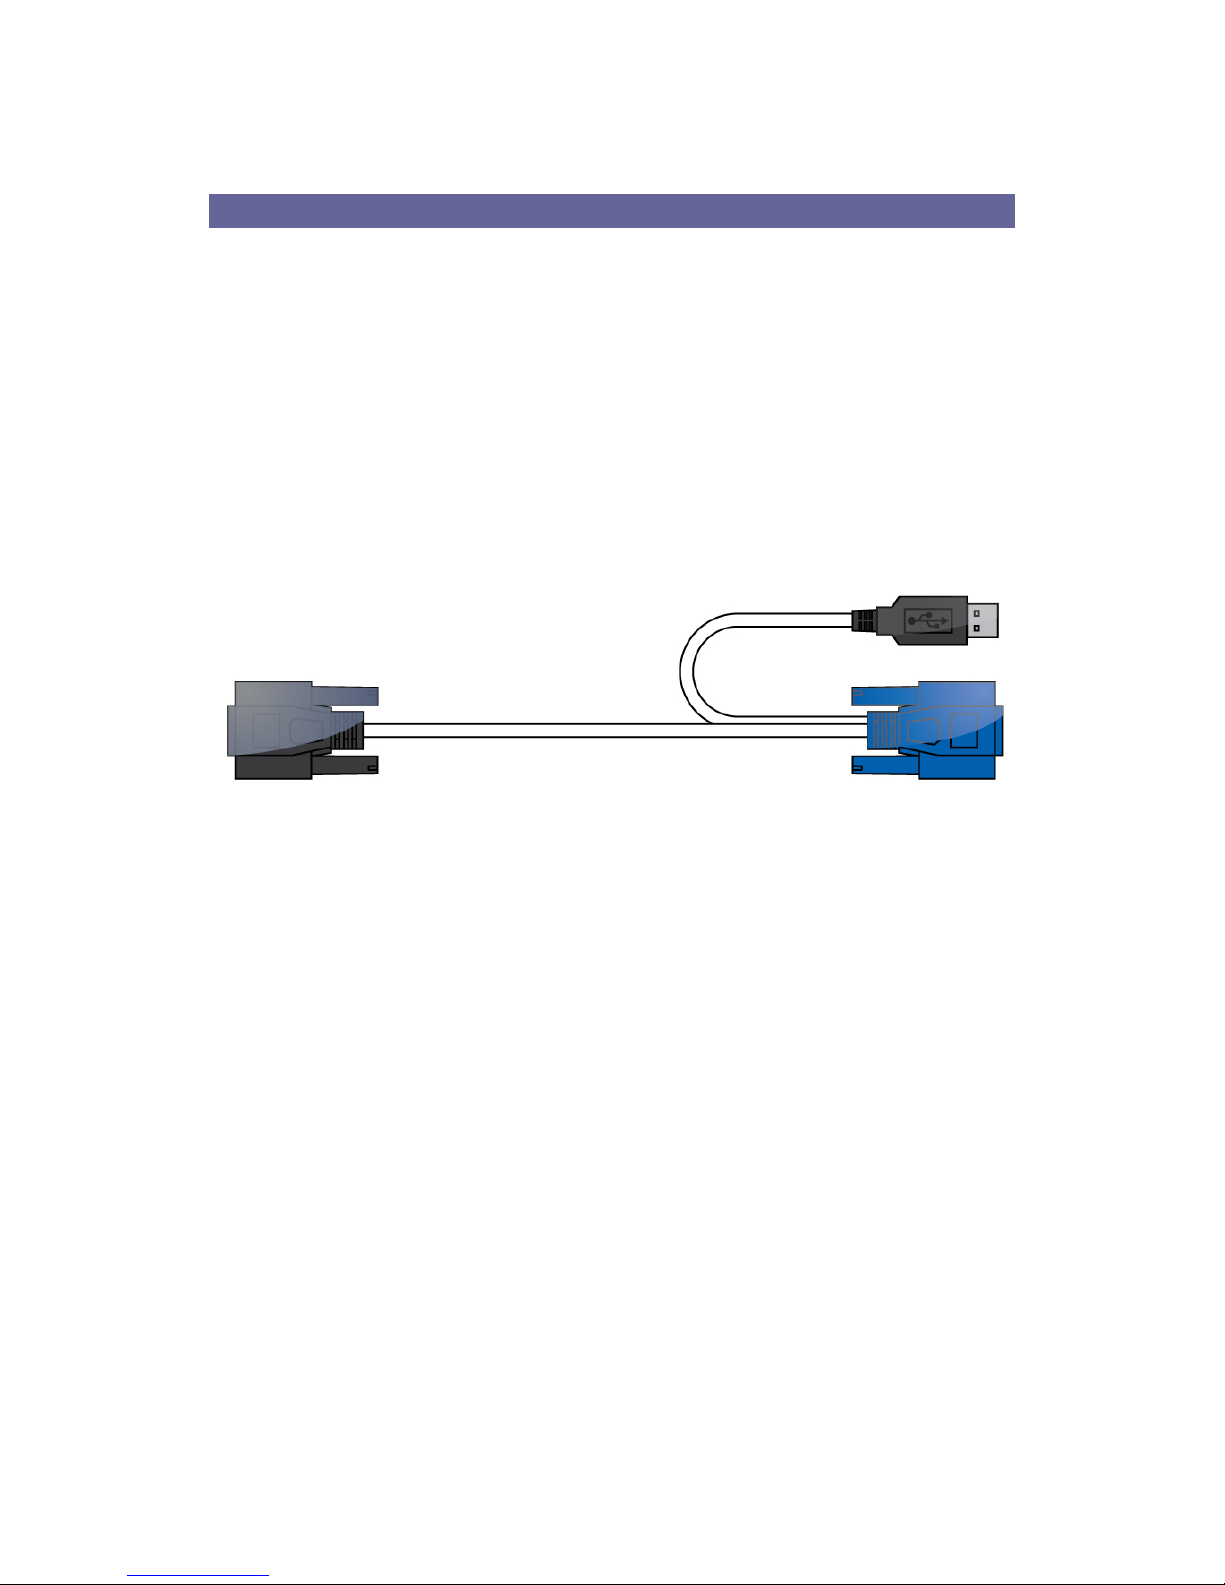
2-in-1 HDDB-15 Cable Installation
Each computer port connector is HDDB-15 type. Inspect the 2-in-1 DB15 cable.
It will have a HDDB-15 male connector at one end. Plug it into computer port on
the rear of KVM switch. The other end of input cable has two connectors: a
HDDB-15 male type for computer video, a USB A type for keyboard / mouse.
Plug these three connectors into the respective ports of computer. Repeat the
same procedure for all other computers.
USB computer - Plug USB connector to computer USB connector. This single
USB connector can handle both keyboard and mouse data.
Figure 2-4. 2-in-1 HDDB-15 Daisy Chain Cable (KC-1501J)
13
Page 16

Jupiter Series User Manual
2.3 Cascading / Daisy Chaining of multiple KVM Switch
You can integrate up to 8 KVM Switches in one KVM daisy chained installation.
Using the KVM Switch Classic 16 OSD, this gives a maximum of 128 attached
computers.
To connect an additional KVM Switch to the MASTER (or previous) KVM Switch
use a standard VGA cable, with all male connectors.
1. First cascaded unit - Use a VGA cable to connect the daisy chain in port of
the MASTER KVM Switch to the daisy chain out port of the first SLAVE
KVM Switch.
2. Further cascaded units - Repeat the previous step to daisy chain more KVM
Switches. Each individual switch in the chain represents a different Bank.
The MASTER switch is Bank 1 and each cascaded SLAVE follows on as
Bank 2, 3, 4 etc. to a maximum of eight banks/switches.
3. The KVM Switch(MASTER) just auto detect your daisy chain KVM Switch
(SLAVE),Please wait for the trifle time, You can control those KVM Switch.
2.4 Operation
Your monitor will only display one PC signal at any one time. All
keyboard and mouse commands are sent to this PC only.
When a PC is connected to the currently selected port but it is not
switched on, or is in sleep mode, the monitor will not display any signal.
2.5 Password Security
When you power on the KVM Switch the default password setting is ON,
Please key in eight words by “00000000”.
14
Page 17

Jupiter Series User Manual
2.6 Hot plug Support
The KVM Switch supports a “Hot Plug” function for easy addition or removal of
PCs. The user can arrange or maintain the PCs as follows:
a. A PC can be disconnected and reconnected to the same or different port of
the KVM switch without having to power it off as long as it is not currently
connected to or in use by the console.
b. You can unplug your mouse or keyboard from the console port and plug it
back in at any time. If you need to swap to a different type of mouse then you
may need to reboot the console and certain computers.
c. A SLAVE KVM switch can be added or removed at any time, You DO NOT
need to reboot the computers.
Some Operating Systems such as certain UNIX versions are
unable to support the “Hot Plugging” function. If you Hot Plug
when using this kind of O.S., it may cause unpredictable
operation or may shut down the computer. Before attempting to
use the Hot Plugging feature, please make sure your O.S. and
mouse software driver support this feature.
15
Page 18
Jupiter Series User Manual
3. Usage
When you power on KVM switch, it will prompt a Login window waiting for user
name and password. Please refer to “Hotkeys and OSD manual” for details.
3.1 Buttons (Stand Alone KVM Switch Only)
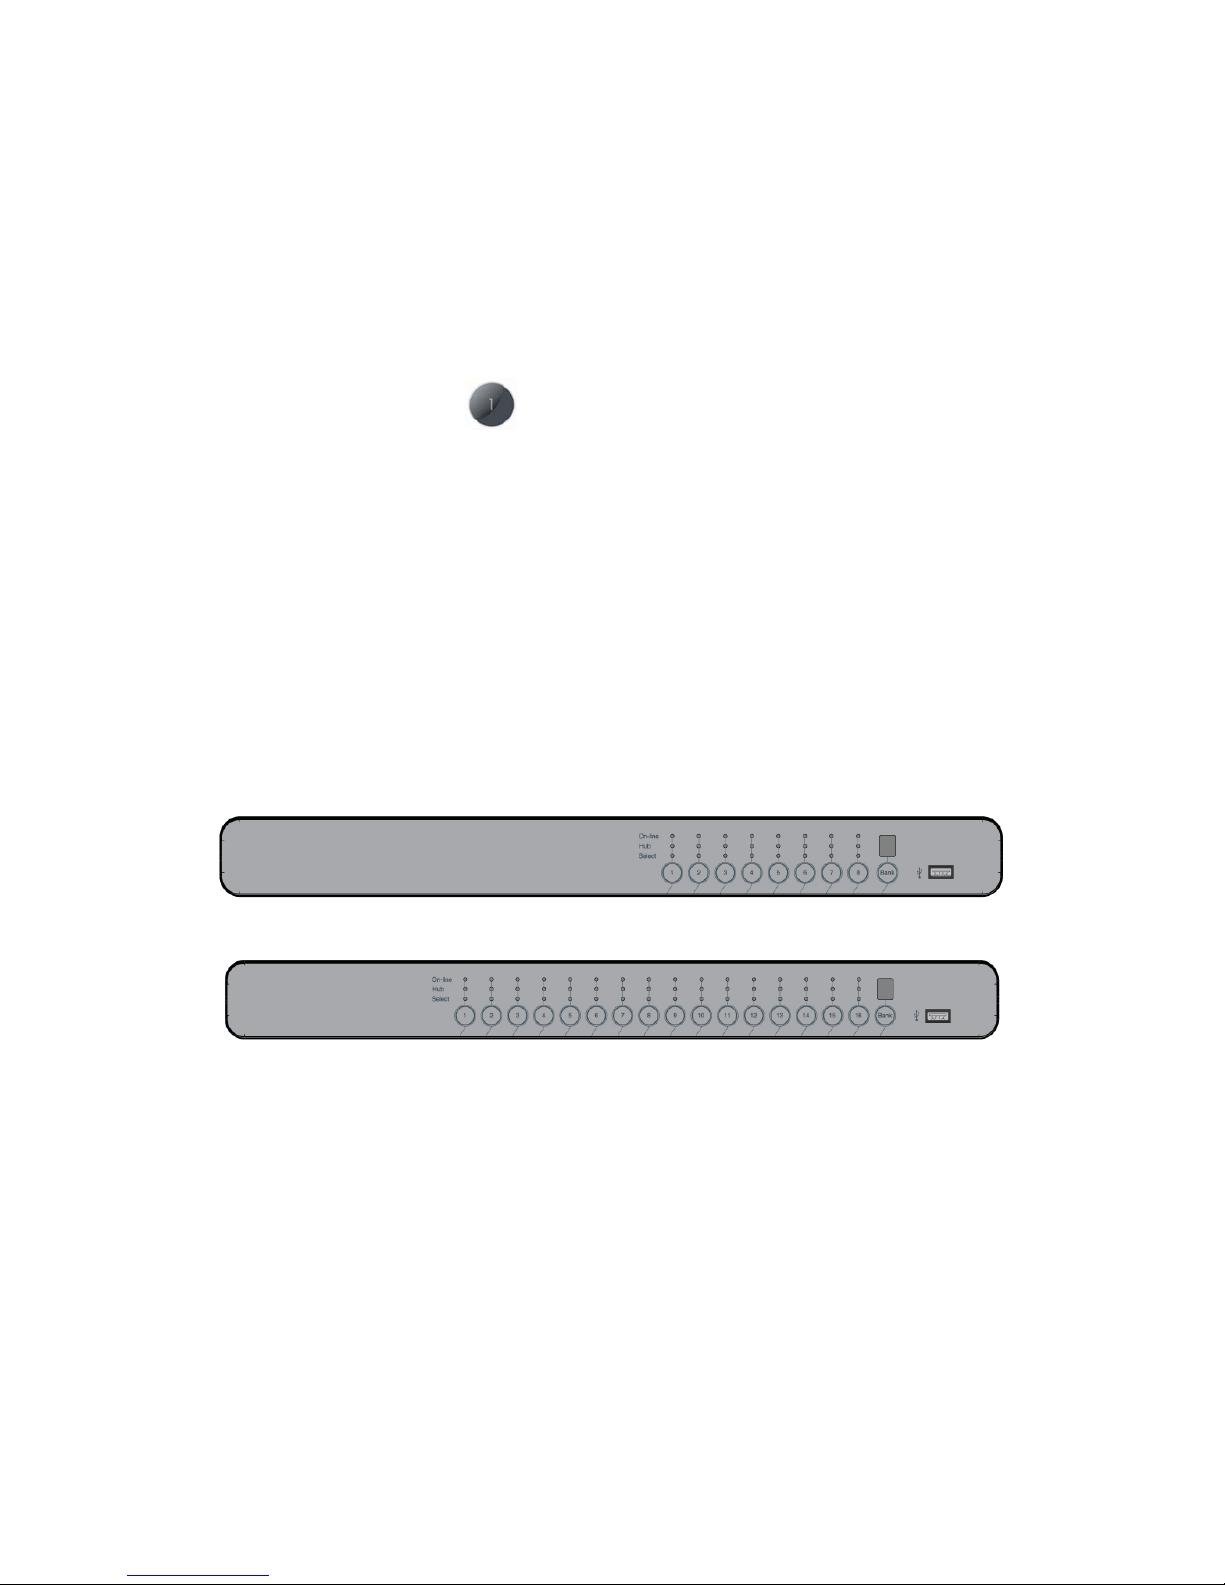
The push Buttons 1~16 :
You can simply switch to a port by pressing the corresponding button. For 16
ports KVM Switch, please press button 1 ~ 16 directly to select the port you
want.
After power on the KVM switch, all of console ports (Local or Remote consoles)
will be linked to Computer port 1.
3.2 Front Panel PC Port LED Indicator (Stand Alone KVM Switch
Only)
8 Ports
16 Ports
Figure 3-1. Front Panel PC Port LED Indication
3.3 Computer / Port Selection
You can select the computer you want to access in three different ways:
Front panel push button selection
Keyboard hotkey selection
On screen display menu selection
16
Page 19

Jupiter Series User Manual
3.3.1 Illuminated Port LED Button and LED front Display
Each port switch button on the front panel of the KVM Switch has two integrated
LEDs.
When the switch button is illuminated White:
This hub port is selected and connected to the console.
When the switch button is illuminated Green:
A computer is attached to this port and has 5V present at its USB ports.
When the switch button is illuminated Blue:
This port is selected and connected to the console.
This does not necessarily mean that the computer is fully powered up but also
can be in sleep or soft power off mode with 5V still present at the USB ports. If
the LED is not lit then there is either no computer connected, or the computer is
fully powered down.
The LED front display shows 1 digit when the KVM is powered up. This one digit
refers to the BANK number (1-8).
3.3.2 Front panel push button selection
1. Port button: You can select a computer by pressing the appropriate Port
button to change port.
2. Reset KVM button: Please pressing the BANK button and port button in the
same time, The KVM Switch will reboot it.
3. BANK button: You can select a computer by pressing the appropriate Bank
push button to switch between the various banks/KVM Switches.
17
Page 20

Jupiter Series User Manual
4. Hotkey
You can also conveniently select the computer to be accessed/displayed by
switching the ports through simple keyboard key sequences referred to as
Hotkeys or by OSD (On Screen Display) switching.
To use either keyboard hotkey or OSD switching you have to enter into the KVM
Switch command mode first. To do so and to send commands to the KVM switch,
the SCROLL LOCK key must be pressed twice within 2 seconds.
Once you have pressed Scroll Lock twice the OSD Menu will pop up on the
screen and you can decide whether to use further hotkeys or the OSD based
selection options, using the keyboard (Mouse input is disabled in OSD mode).
Scroll
Lock
Scroll
Lock
Space Ba r
Figure 4-1. Hotkey
Command Function
[01~16] Switch port (no Chain)
[01~08]+ [01~16] Switch port (Slave Live)
[K]+ [ScrLK] / [CapS] / [Num] / [F12] Change Hotkey
[S] Scan Mode start
[B] Buzzer On / Off
[↑] Switch to next port
[↓] Switch to previous port
PgUp Switch to next bank
PgDn Switch to previous bank
[Home] Switch to Bank1-port1
[P] Into password mode ,disable kb/ms
[U] Password mode On / Off
[R] Change password
[Space] Open OSD.
[H] USB Hub Lock / Unlock
[C] Send DDC data to slave
[K] Change Hot-key
Table 4-1. Hotkey list
18
Page 21
Jupiter Series User Manual
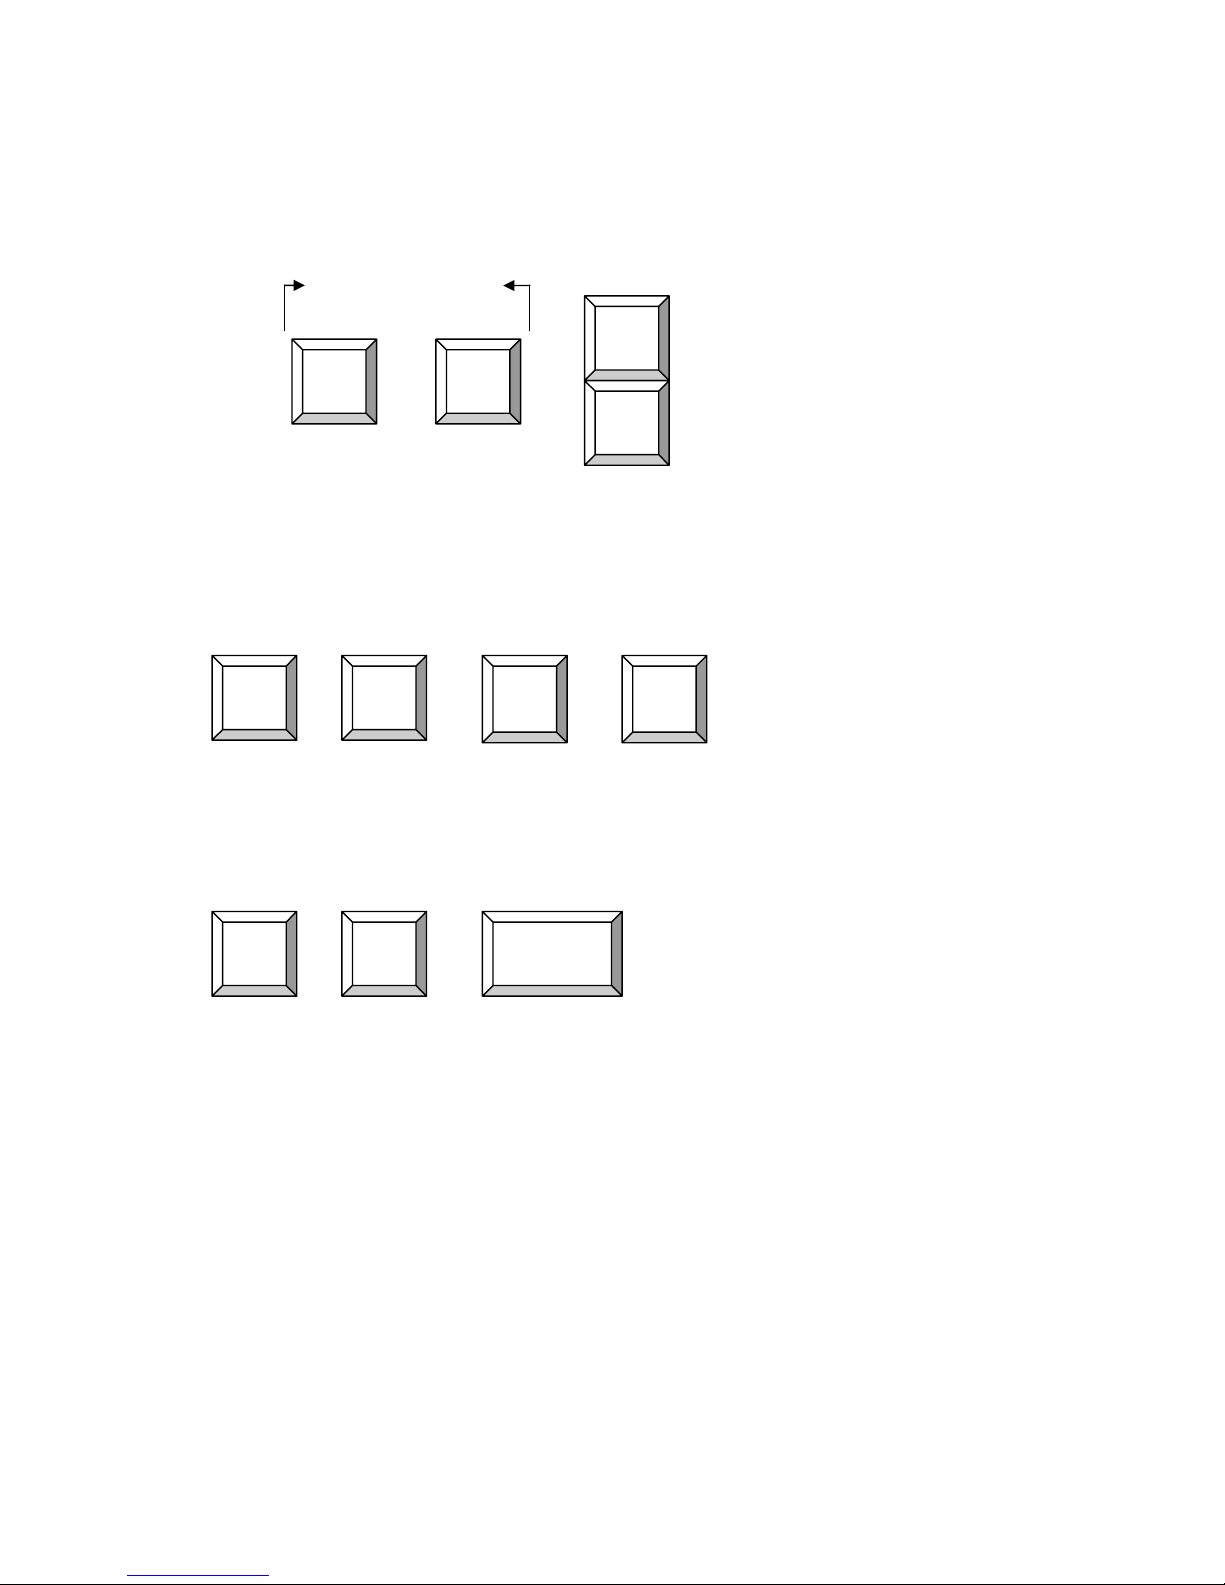
Example:
Within 2 seconds
↑
= Previous Port
= Next Port
Scroll
Lock
Scroll
Lock
+
↓
+
Figure 4-1. Hotkey Example
To access ports 1-8 of the KVM Switch directly you may use the following hotkey
sequence:
To use hotkey switching to access another cascaded KVM Switch / Bank:
Page Up or
Page Down
Scroll
+
Scroll
Lock
+
Lock
Scroll
Scroll
Lock
0
+ + +
Lock
7
= for Port 7 (For other ports
replace Key “6” with the
corresponding Key 01-16)
= Previous Bank (Up) or Next Bank (Down)
19
Page 22
Jupiter Series User Manual
5. OSD (On Screen Display)
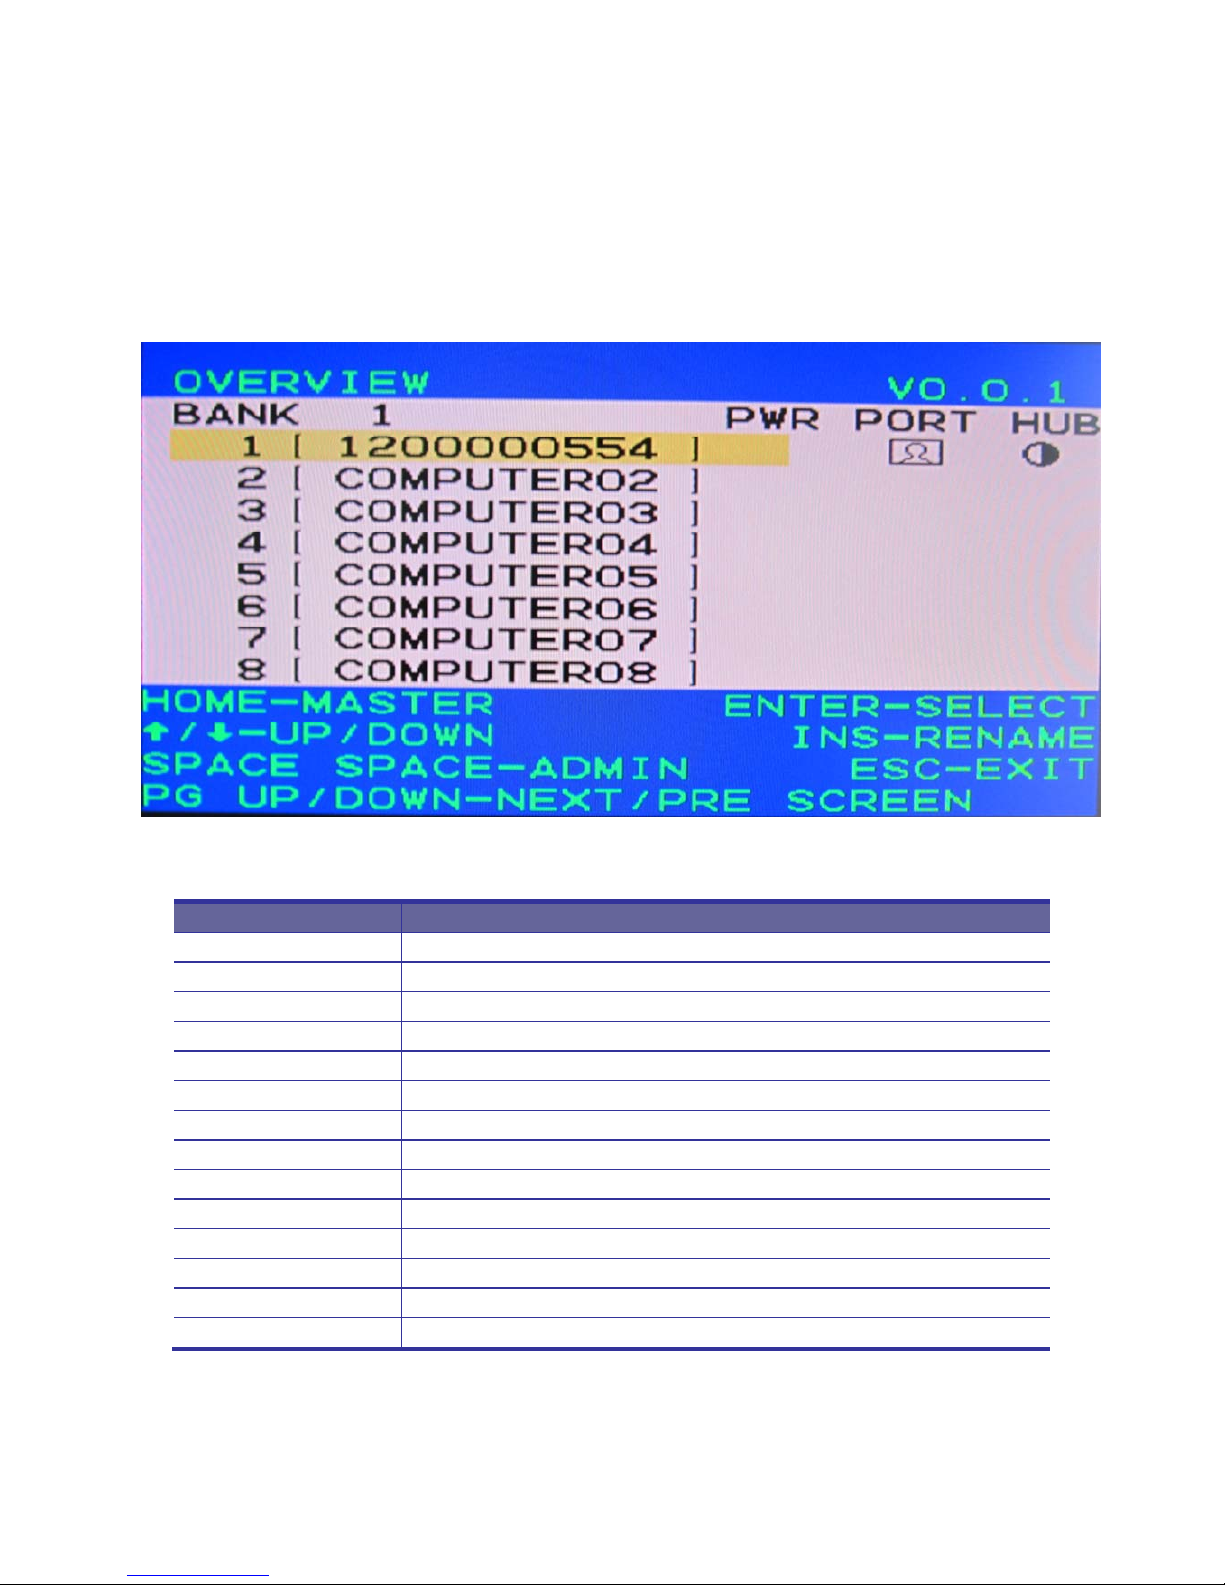
The OSD Main Screen is divided into left side for port / server selection functions
and right side for KVM configuration and administration functions.
The following OSD function key table lists the indicators and their meaning.
Command Function
Bank 1~8 Indicates the BANK level.
Computer01~08~16 Port number (factory default setting).
PWR Indicates that a computer is connected to this port .
PORT Indicates that an operating control computer port site status.
HUB Indicates that an operating hub link to computer port site status.
Home Go back to Master BANK.
SPACE SPACE Press SPACE twice the OSD Menu will into admin control page.
↑ Select the computer at the previous port.
↓ Select the computer at the next port.
PgUp Select the previous bank of KVM switches.
PgDn Select the next bank of KVM switches.
Enter Confirm select key.
INS Change Computer name.
ESC Exit OSD.
Table 5-1. OSD function key list
20
Page 23
Jupiter Series User Manual
5.1 Further main OSD functions:
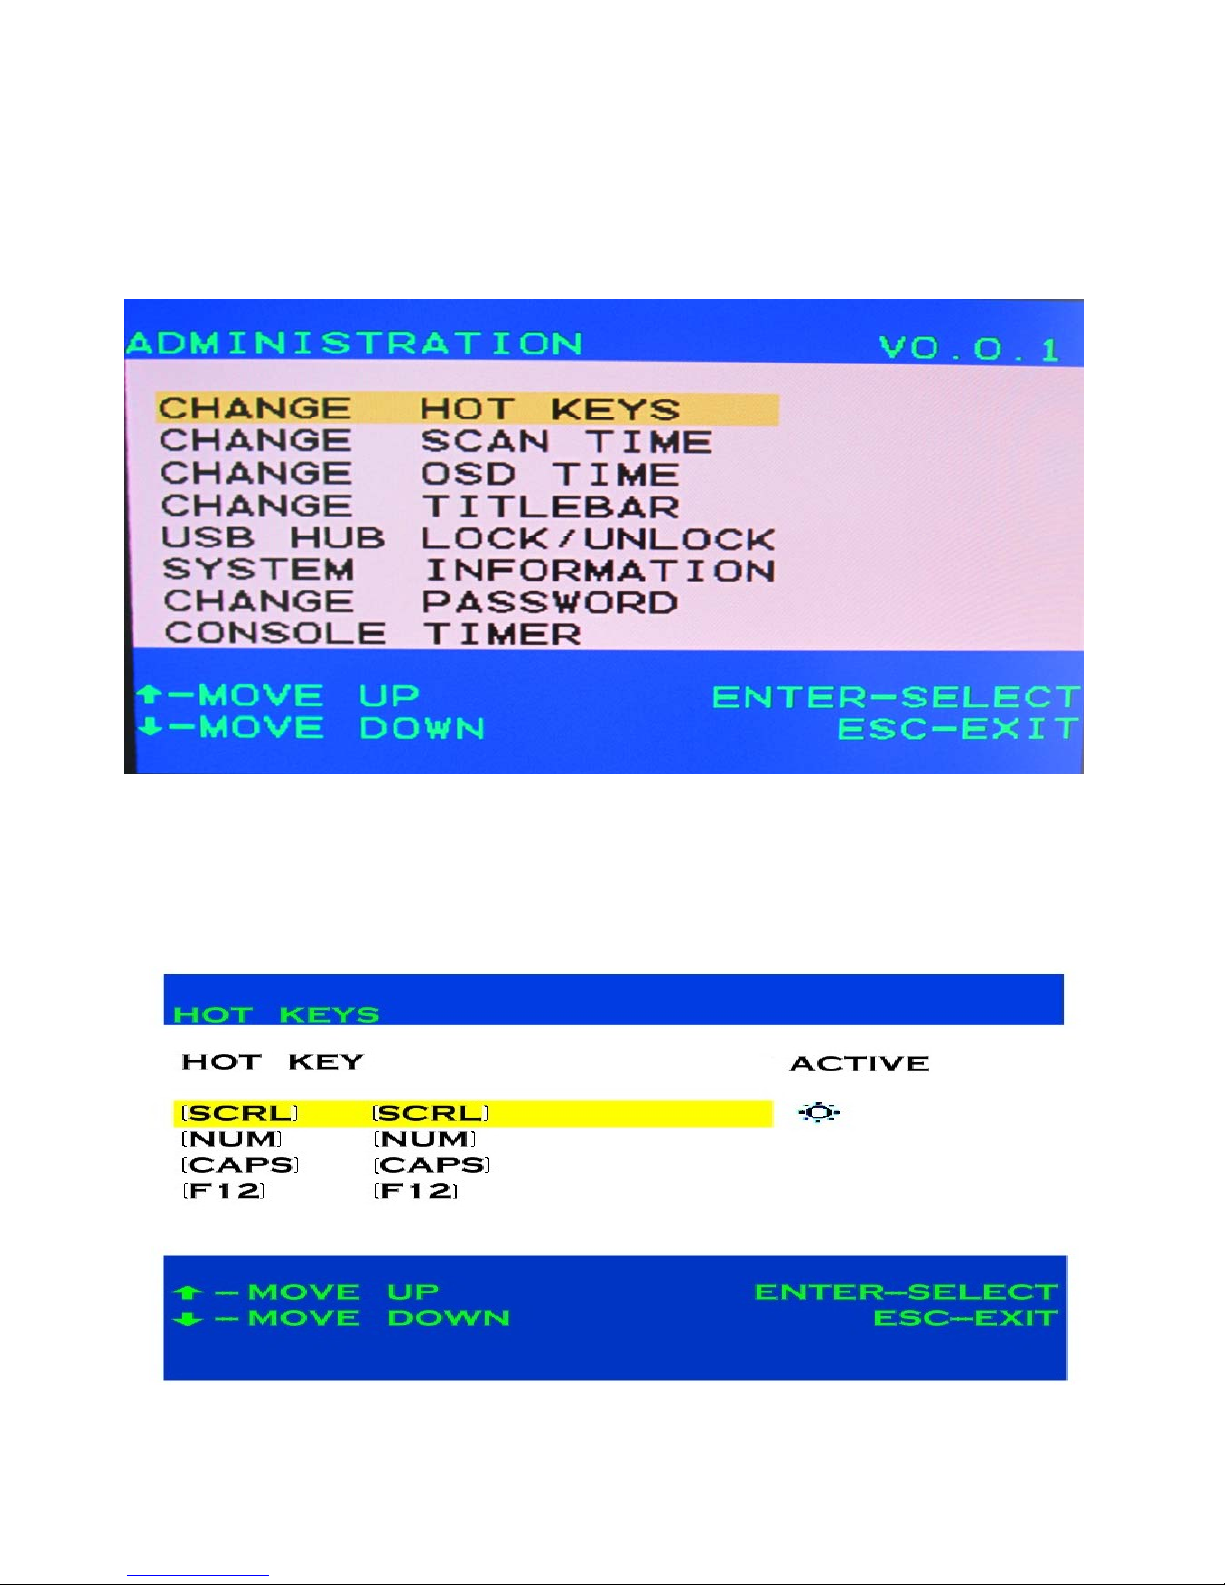
5.1.1 SPACE SPACE:
This function is Admin control list.
Figure 5-1. Admin control list
5.1.2 CHANGE HOT KEYS:
This main function is control HOT KEY status, you can press ENTER into
change your hot key status, and you have four types (SCRL/NUM/CAPS/F12) to
change it.
Figure 5-2. Change Hot Keys
21
Page 24
Jupiter Series User Manual
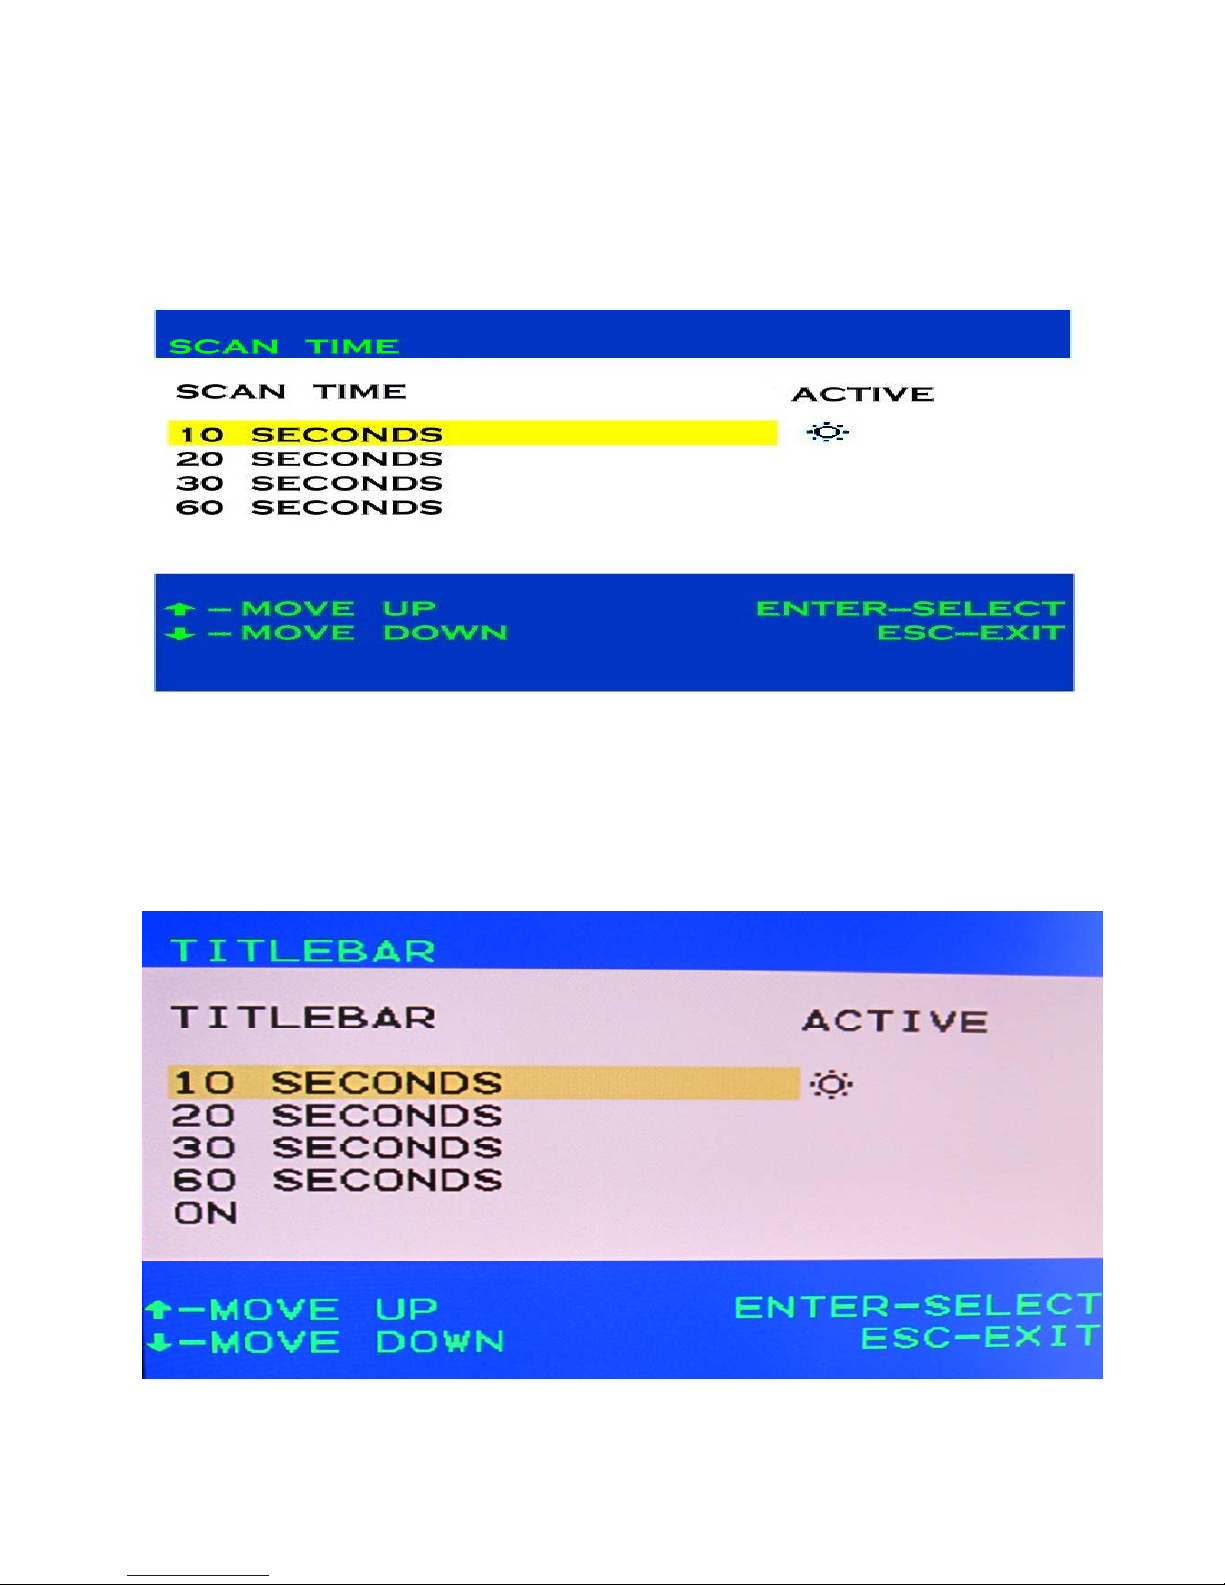
5.1.3 CHANGE SCAN TIME:
This main function is control KVM SCAN TIME. You can select to this bar and
press ENTER into change your SCAN TIME.
Figure 5-3. Change Scan Time
5.1.4 CHANGE TITELBAR:
This main function is control OSD TITELBAR ON/OFF and position; you can
select to this bar and press ENTER into change your OSD TITELBAR.
Figure 5-4. Change Titlebr
22
Page 25
Jupiter Series User Manual
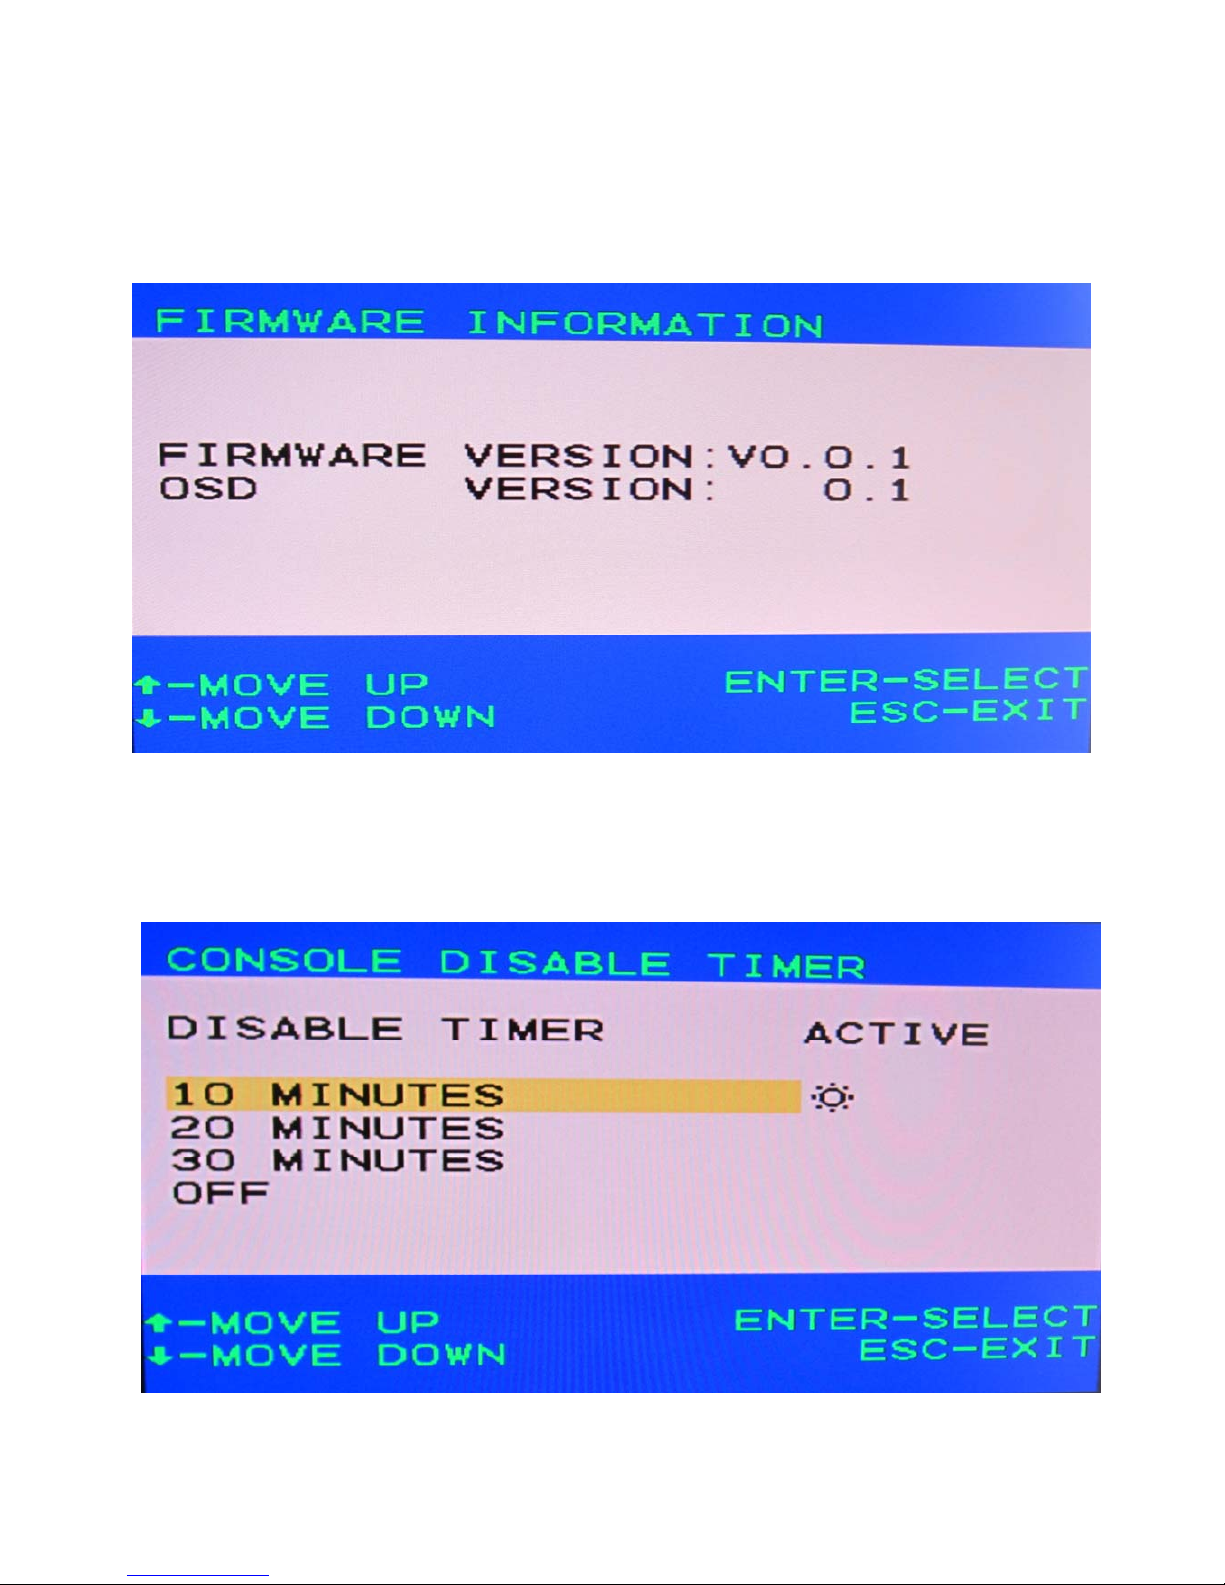
5.1.5 FIRMWARE INFORMATION:
This main function is display this product firmware information, you can select to
this bar and press ENTER into check this product firmware status.
Figure 5-5. Firmware Information
5.1.6 CONSOLE DISABLE TIMER:
This main function is control password on/off and monitors console status.
Figure 5-6. Console Disable Timer
23
Page 26
Jupiter Series User Manual
24
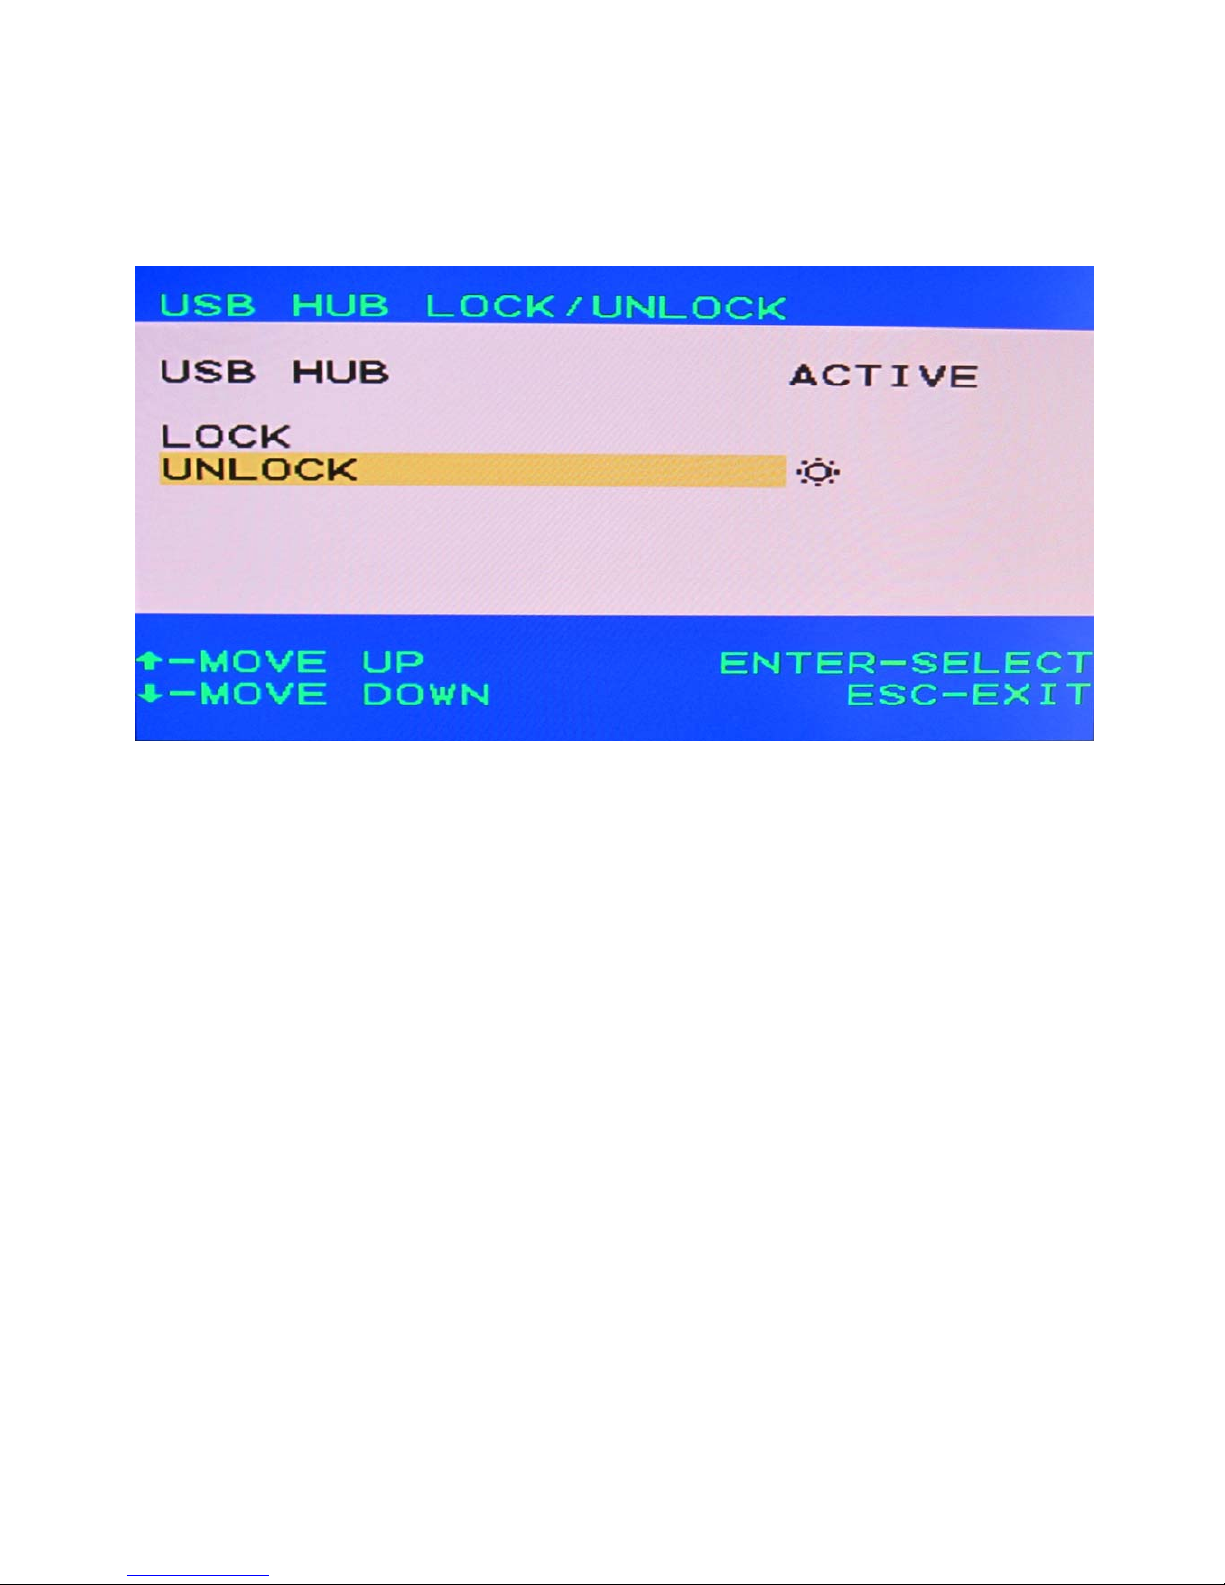
5.1.7 USB HUB LOCK/UNLOCK:
This main function is control HUB setting by switches or locks to select port.
Figure 5-7. USB Hub Lock / Unlock
 Loading...