


348376-B22.book Page i Friday, June 25, 2004 8:35 AM
Installation Guide
WLAN Mini PCI Card
Installation Guide (GR)
Installation Guide (LA)
Installation Guide (FR)
Installation Guide (IT)
Installation Guide (JP)
Installation Guide (KR)
Installation Guide (CH)
Installation Guide (TW)
Document Part Number: 348376-B22
July 2004

348376-B22.book Page iii Friday, June 25, 2004 8:35 AM
© Copyright 2003, 2004 Hewlett-Packard Development Company, L.P.
Microsoft and Windows are U.S. registered trademarks of Microsoft
Corporation. Intel is a trademark or registered trademark of Intel
Corporation or its subsidiaries in the United States and other countries.
The information contained herein is subject to change without notice. The
only warranties for HP products and services are set forth in the express
warranty statements accompanying such products and services. Nothing
herein should be construed as constituting an additional warranty. HP shall
not be liable for technical or editorial errors or omissions contained herein.
Installation Guide
WLAN Mini PCI Card
Second Edition July 2004
First Edition July 2004
Document Part Number: 348376-B22
348376-B22.book Page v Friday, June 25, 2004 8:35 AM
English
Before You Begin . . . . . . . . . . . . . . . . . . . . . . . . . . . . . . . . 1
Installing the WLAN Mini PCI Card . . . . . . . . . . . . . . . . . . 2
Installing the WLAN Mini PCI Card Software . . . . . . . . . . 5
Removing a WLAN Mini PCI Card. . . . . . . . . . . . . . . . . . . 6
Information and Updates . . . . . . . . . . . . . . . . . . . . . . . . . . . 8
Contents
German
Before You Begin . . . . . . . . . . . . . . . . . . . . . . . . . . . . . . . . 9
Installing the WLAN Mini PCI Card . . . . . . . . . . . . . . . . . 10
Installing the WLAN Mini PCI Card Software . . . . . . . . . 13
Removing a WLAN Mini PCI Card. . . . . . . . . . . . . . . . . . 14
Information and Updates . . . . . . . . . . . . . . . . . . . . . . . . . . 16
Spanish (Latin American)
Before You Begin . . . . . . . . . . . . . . . . . . . . . . . . . . . . . . . 17
Installing the WLAN Mini PCI Card . . . . . . . . . . . . . . . . . 18
Installing the WLAN Mini PCI Card Software . . . . . . . . . 21
Removing a WLAN Mini PCI Card. . . . . . . . . . . . . . . . . . 22
Information and Updates . . . . . . . . . . . . . . . . . . . . . . . . . . 24
Installation Guide v

348376-B22.book Page vi Friday, June 25, 2004 8:35 AM
Contents
French
Before You Begin . . . . . . . . . . . . . . . . . . . . . . . . . . . . . . . 25
Installing the WLAN Mini PCI Card . . . . . . . . . . . . . . . . . 26
Installing the WLAN Mini PCI Card Software . . . . . . . . . 29
Removing a WLAN Mini PCI Card. . . . . . . . . . . . . . . . . . 30
Information and Updates . . . . . . . . . . . . . . . . . . . . . . . . . . 32
Italian
Before You Begin . . . . . . . . . . . . . . . . . . . . . . . . . . . . . . . 33
Installing the WLAN Mini PCI Card . . . . . . . . . . . . . . . . . 34
Installing the WLAN Mini PCI Card Software . . . . . . . . . 37
Removing a WLAN Mini PCI Card. . . . . . . . . . . . . . . . . . 38
Information and Updates . . . . . . . . . . . . . . . . . . . . . . . . . . 40
Japanese
Before You Begin . . . . . . . . . . . . . . . . . . . . . . . . . . . . . . . 41
Installing the WLAN Mini PCI Card . . . . . . . . . . . . . . . . . 42
Installing the WLAN Mini PCI Card Software . . . . . . . . . 45
Removing a WLAN Mini PCI Card. . . . . . . . . . . . . . . . . . 46
Information and Updates . . . . . . . . . . . . . . . . . . . . . . . . . . 48
Korean
Before You Begin . . . . . . . . . . . . . . . . . . . . . . . . . . . . . . . 49
Installing the WLAN Mini PCI Card . . . . . . . . . . . . . . . . . 50
Installing the WLAN Mini PCI Card Software . . . . . . . . . 53
Removing a WLAN Mini PCI Card. . . . . . . . . . . . . . . . . . 54
Information and Updates . . . . . . . . . . . . . . . . . . . . . . . . . . 56
vi Installation Guide

348376-B22.book Page vii Friday, June 25, 2004 8:35 AM
S Chinese
Before You Begin . . . . . . . . . . . . . . . . . . . . . . . . . . . . . . . 57
Installing the WLAN Mini PCI Card . . . . . . . . . . . . . . . . . 58
Installing the WLAN Mini PCI Card Software . . . . . . . . . 61
Removing a WLAN Mini PCI Card. . . . . . . . . . . . . . . . . . 62
Information and Updates . . . . . . . . . . . . . . . . . . . . . . . . . . 64
T Chinese
Before You Begin . . . . . . . . . . . . . . . . . . . . . . . . . . . . . . . 65
Installing the WLAN Mini PCI Card . . . . . . . . . . . . . . . . . 66
Installing the WLAN Mini PCI Card Software . . . . . . . . . 69
Removing a WLAN Mini PCI Card. . . . . . . . . . . . . . . . . . 70
Information and Updates . . . . . . . . . . . . . . . . . . . . . . . . . . 72
Contents
Regulatory Notices
Installation Guide vii

348376-B22.book Page viii Friday, June 25, 2004 8:35 AM

348376-B22.book Page 1 Friday, June 25, 2004 8:35 AM
Before You Begin
CAUTION: To prevent an unresponsive system and the display of a
Ä
warning message, install only a Mini PCI device authorized for use in
your computer by the governmental agency that regulates wireless
devices in your country. If you install a device and then receive a
warning message, remove the device to restore computer functionality.
Then contact Customer Care. For information about contacting Customer
Care, refer to the printed Help and Support Guide included with your
computer.
English
Before you begin any installation or removal procedures:
1. Save your work, exit all applications, and shut down the
computer. If you are not sure whether the computer is off or
in Hibernation, turn the computer on, and then shut it down
through the operating system.
2. Disconnect all external devices connected to the computer.
3. Disconnect the power cord.
4. Remove the battery pack.
5. Refer to the documentation included with your computer to
❏ Identify the Mini PCI slot location.
❏ Access the Mini PCI slot. The Mini PCI slot can usually
be accessed via a panel on the bottom of the computer but
sometimes it is located beneath the keyboard.
Installation Guide 1

348376-B22.book Page 2 Friday, June 25, 2004 8:35 AM
English
Installing the WLAN Mini PCI Card
CAUTION: To prevent electrostatic discharge from damaging electronic
Ä
components, discharge yourself of static electricity by touching a
grounded metal object.
If your computer has a WLAN Mini PCI card currently
✎
installed, you must remove it before installing the new card.
Refer to the “Removing a WLAN Mini PCI Card” section.
1. Follow the procedures in the “Before You Begin” section.
2. Remove the plastic covers (if applicable) from the 2 antenna
connector cables in the system.
2 Installation Guide

348376-B22.book Page 3 Friday, June 25, 2004 8:35 AM
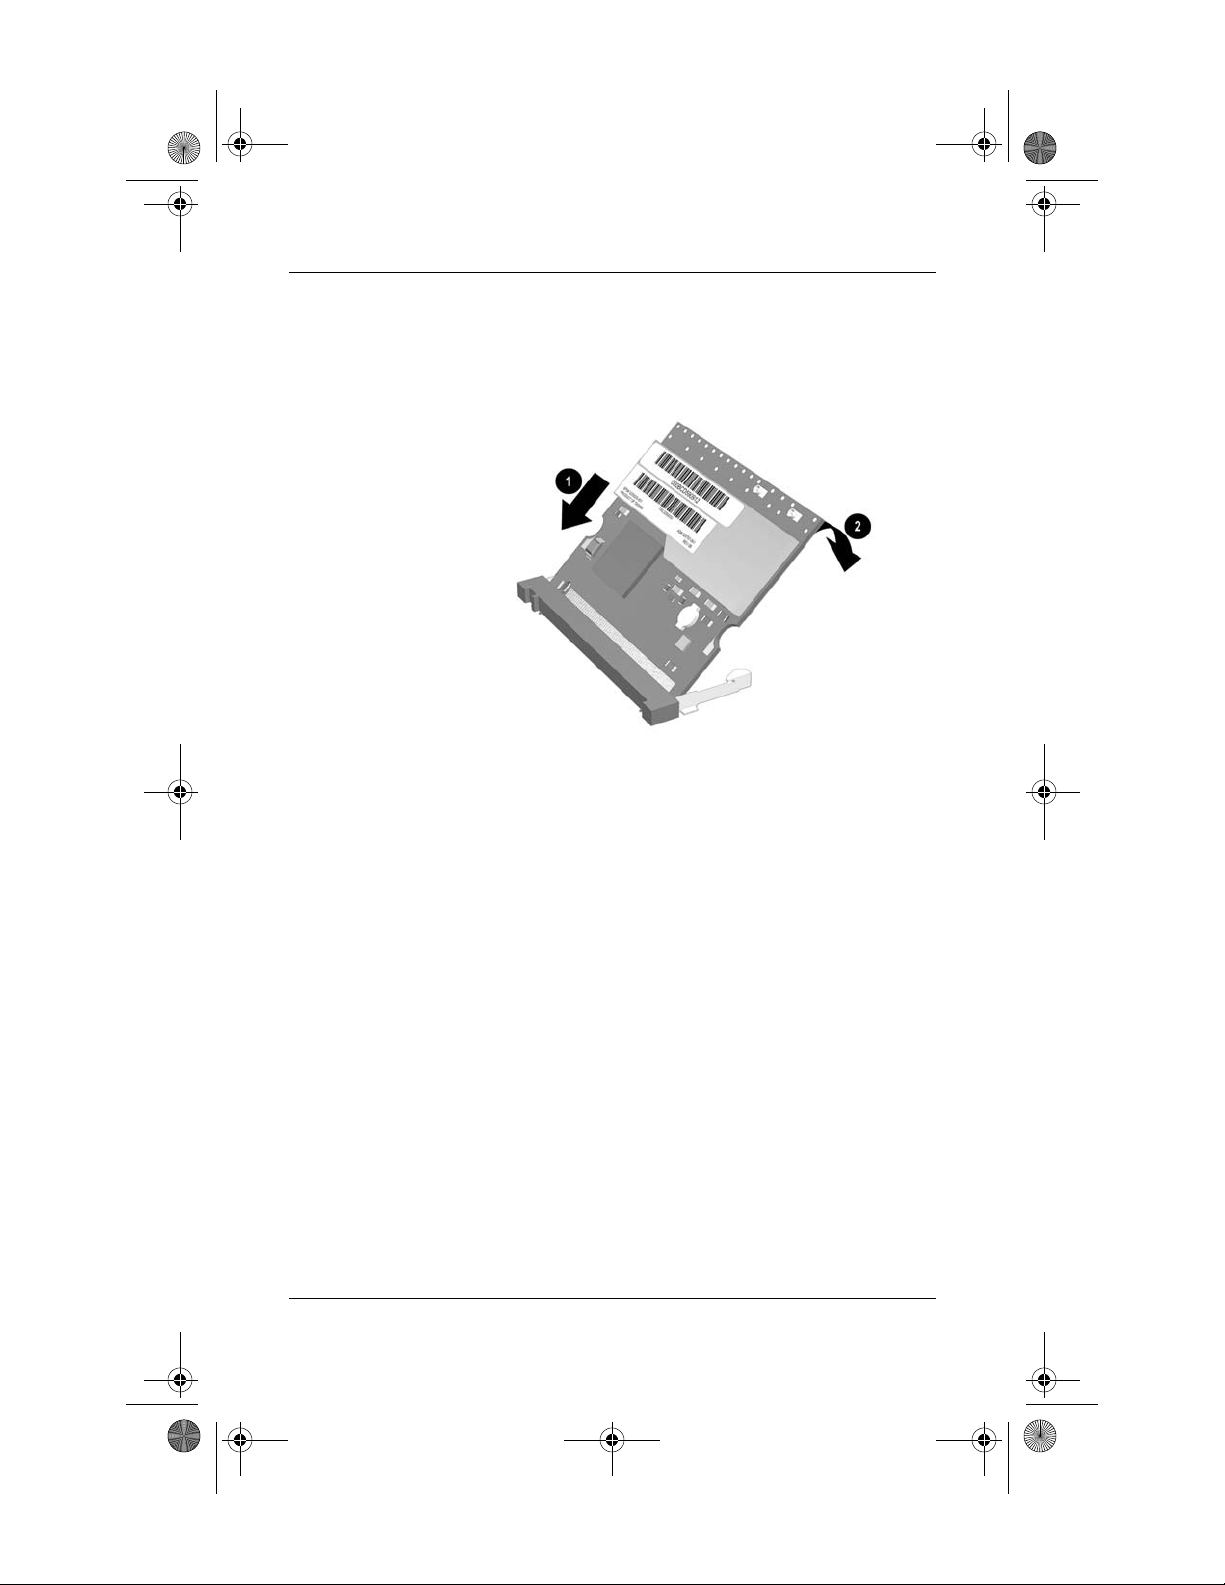
3. Insert the card into the slot at an angle 1 and press the
Mini PCI card down 2 until the side latches snap into place.
English
Installation Guide 3
348376-B22.book Page 4 Friday, June 25, 2004 8:35 AM
English
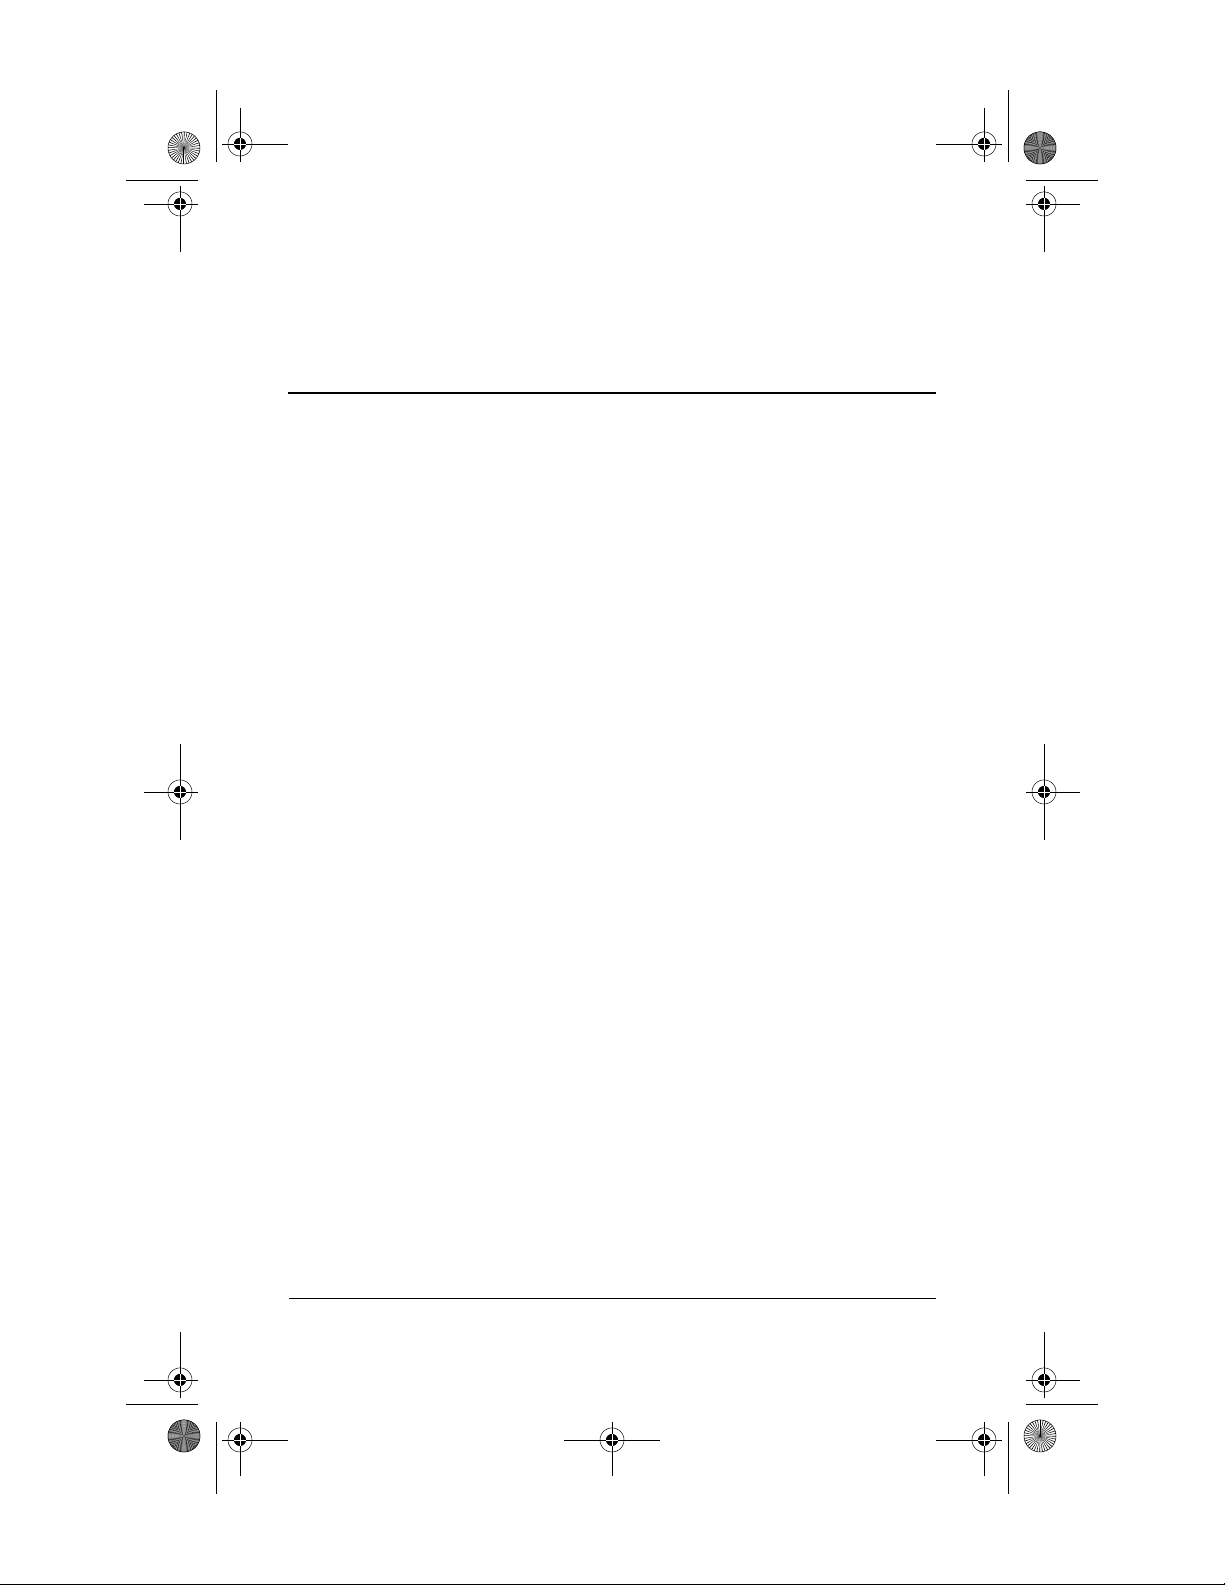
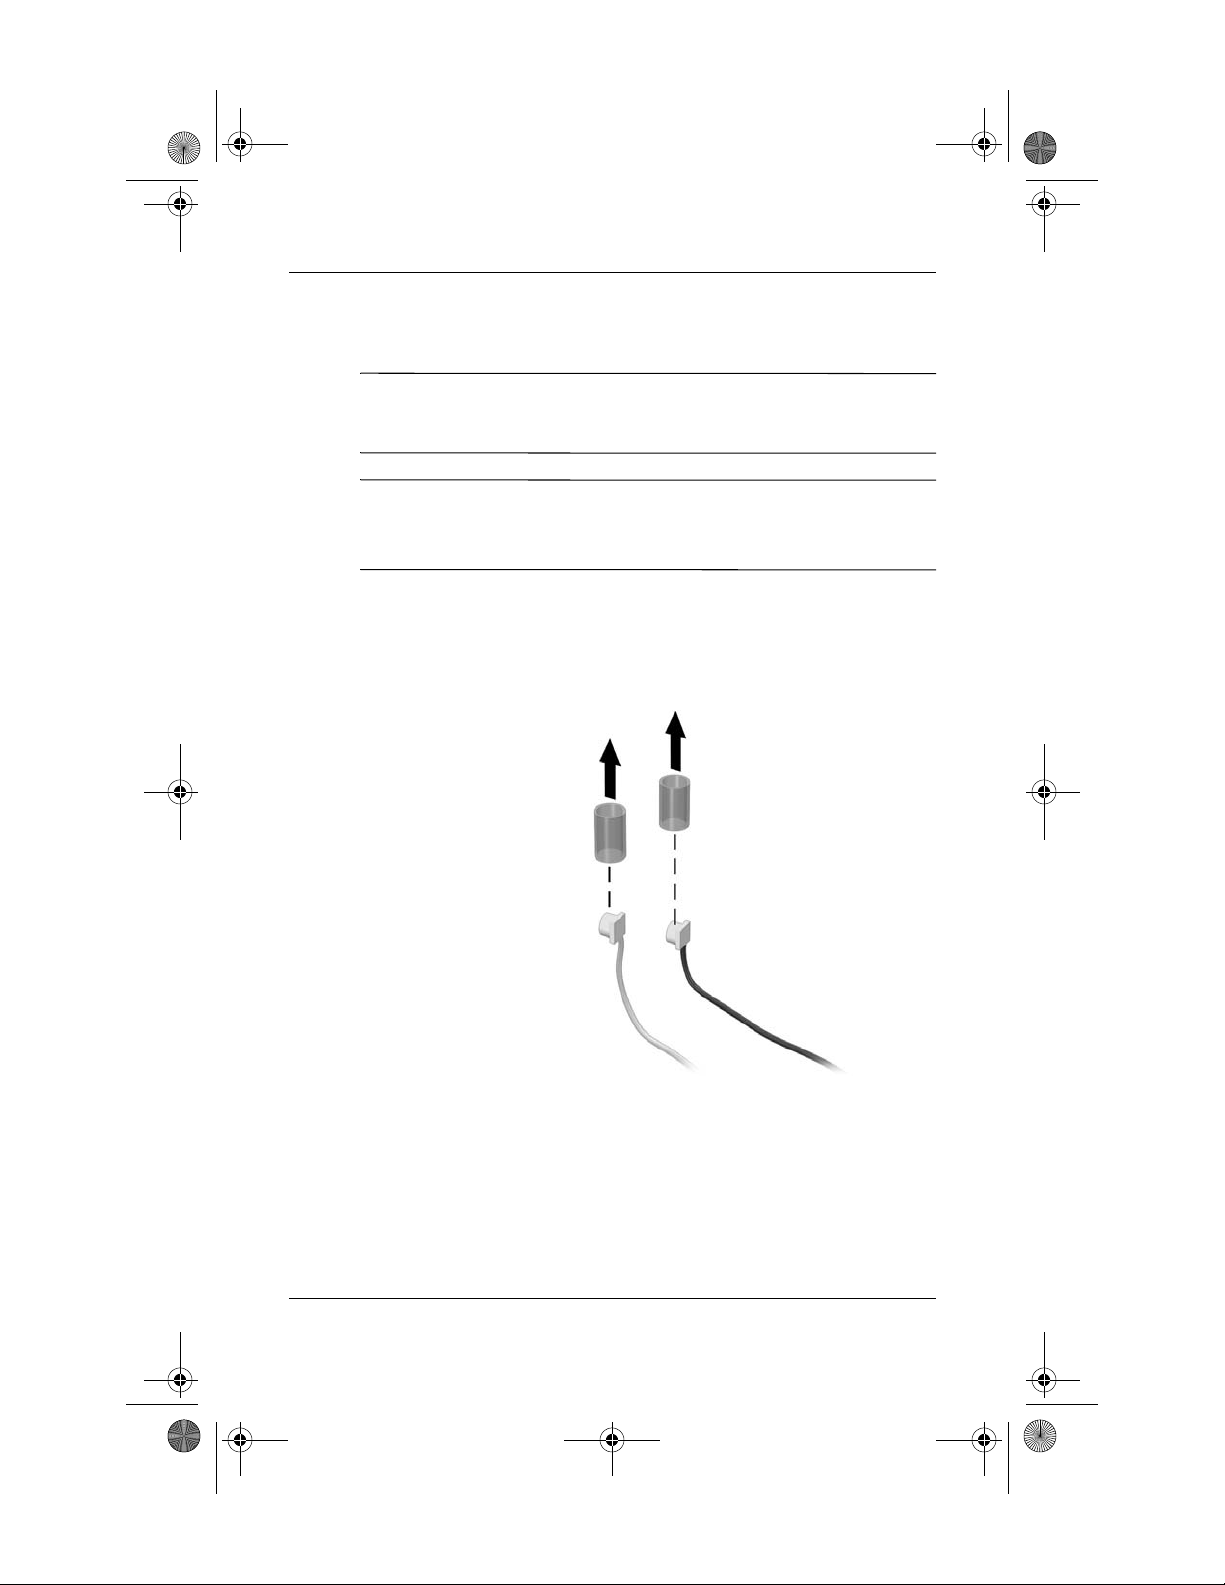
4. Connect the 2 antenna cables to the Mini PCI card. The gray
(aux) cable connects to the antenna connector closest to the
edge of the Mini PCI card, and the black (main) cable
connects to the antenna connector closer to the center of
the card, as shown in the following illustration.
When connecting the antenna cables, be sure to connect the
Ä
cables straight down and press firmly until they are fully
seated. If antenna cable is inserted into connector at an angle,
the center pin of the antenna connector could be damaged.
5. To complete the procedure, reverse the steps in the “Before
You Begin” section.
Be careful not to pinch the cables or damage the
✎
connectors. This could reduce wireless performance or
cause the Mini PCI device to function improperly. Tuck
any excess cable inside the system enclosure.
4 Installation Guide
348376-B22.book Page 5 Friday, June 25, 2004 8:35 AM
Installing the WLAN Mini PCI Card
Software
The installation CD included in this option kit contains the
necessary WLAN software and drivers for the Mini PCI card. To
install the WLAN software:
Updates to the software contained on the CD may be available.
✎
Refer to the “Information and Updates” section of this guide
for instructions on downloading and installing the updated
software.
1. Turn on the computer.
2. Log on to the system. (The Found New Hardware wizard is
displayed.)
English
3. Insert the WLAN software CD included with this option kit
into the optical drive of the computer. (The Found New
Hardware wizard installs the device driver from the CD.)
If the Found New Hardware wizard does not automatically
✎
load the driver from the CD, follow the prompts to point the
wizard to the CD drive to install the device driver)
Installation of the device driver is complete.
If you are using Microsoft® Windows® 2000, or if your
✎
wireless network requires Cisco Client Extensions (such as
LEAP), you must also install the appropriate Wireless LAN
utility (Atheros Client Utility or Intel® ProSET) to configure
the WLAN device correctly. Both Wireless LAN utilities
are located on the WLAN Software CD included with your
option kit.
If you have problems with the installation, contact your
✎
network administrator for assistance.
Installation Guide 5

348376-B22.book Page 6 Friday, June 25, 2004 8:35 AM
English
Removing a WLAN Mini PCI Card
CAUTION: To prevent electrostatic discharge from damaging electronic
Ä
components, discharge yourself of static electricity by touching a
grounded metal object.
1. Follow the procedures in the “Before You Begin” section.
2. Carefully disconnect the 2 antenna cables from the Mini PCI
card by lifting the cable connector with a fingernail or small
screwdriver.
CAUTION: Do not pull on the antenna cable to remove it. Grip and
Ä
pull only on the connector itself. Pulling on the cable can damage or
break off the connector.
6 Installation Guide
348376-B22.book Page 7 Friday, June 25, 2004 8:35 AM
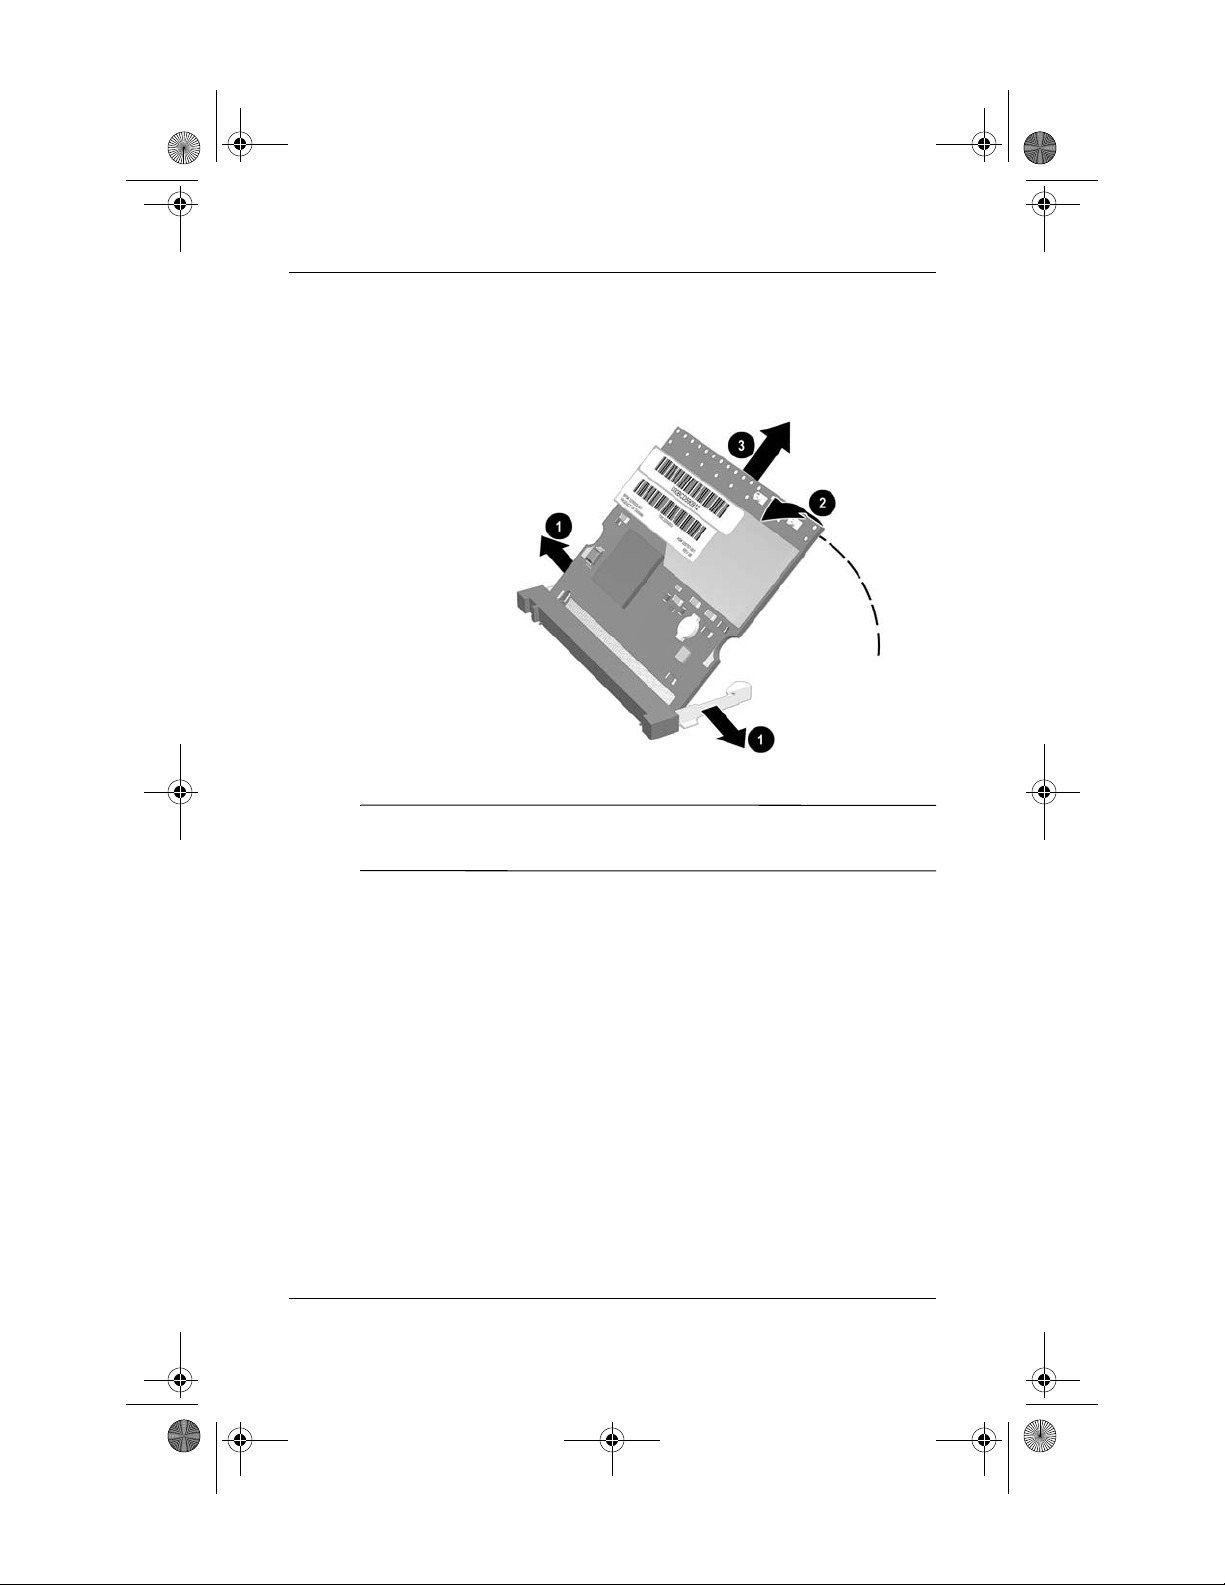
3. Pull the release latches 1 in the direction shown and pull the
WLAN Mini PCI card up 2 and out 3 at an angle.
English
If you have problems with the removal, contact your network
✎
administrator for assistance.
Installation Guide 7

348376-B22.book Page 8 Friday, June 25, 2004 8:35 AM
English
Information and Updates
HP strongly recommends that you install any software upgrades
that are available from HP for your WLAN Mini PCI card. Most
software at the HP Web site is packaged in a compressed file
called a Softpaq. You will download the Softpaq and save it to
your hard drive.
To obtain software upgrades:
1. Visit the HP Web site at
2. Follow the on-screen instructions to identify your country or
region.
3. Select the download drivers and software radio button, and
then enter the product information for your computer series
name and device.
Refer to the Notebook Documentation CD or Tablet PC
Documentation CD for further product details.
www.hp.com/support.
8 Installation Guide

348376-B22.book Page 9 Friday, June 25, 2004 8:35 AM
Before You Begin
CAUTION: To prevent an unresponsive system and the display of a
Ä
warning message, install only a Mini PCI device authorized for use in
your computer by the governmental agency that regulates wireless
devices in your country. If you install a device and then receive a
warning message, remove the device to restore computer functionality.
Then contact Customer Care. For information about contacting Customer
Care, refer to the printed Help and Support Guide included with your
computer.
German
Before you begin any installation or removal procedures:
1. Save your work, exit all applications, and shut down the
computer. If you are not sure whether the computer is off or
in Hibernation, turn the computer on, and then shut it down
through the operating system.
2. Disconnect all external devices connected to the computer.
3. Disconnect the power cord.
4. Remove the battery pack.
5. Refer to the documentation included with your computer to
❏ Identify the Mini PCI slot location.
❏ Access the Mini PCI slot. The Mini PCI slot can usually
be accessed via a panel on the bottom of the computer but
sometimes it is located beneath the keyboard.
Installation Guide 9

348376-B22.book Page 10 Friday, June 25, 2004 8:35 AM
German
Installing the WLAN Mini PCI Card
CAUTION: To prevent electrostatic discharge from damaging electronic
Ä
components, discharge yourself of static electricity by touching a
grounded metal object.
If your computer has a WLAN Mini PCI card currently
✎
installed, you must remove it before installing the new card.
Refer to the “Removing a WLAN Mini PCI Card” section.
1. Follow the procedures in the “Before You Begin” section.
2. Remove the plastic covers (if applicable) from the 2 antenna
connector cables in the system.
10 Installation Guide
348376-B22.book Page 11 Friday, June 25, 2004 8:35 AM
3. Insert the card into the slot at an angle 1 and press the
Mini PCI card down 2 until the side latches snap into place.
German
Installation Guide 11

348376-B22.book Page 12 Friday, June 25, 2004 8:35 AM
German
4. Connect the 2 antenna cables to the Mini PCI card. The gray
(aux) cable connects to the antenna connector closest to the
edge of the Mini PCI card, and the black (main) cable
connects to the antenna connector closer to the center of
the card, as shown in the following illustration.
When connecting the antenna cables, be sure to connect the
Ä
cables straight down and press firmly until they are fully
seated. If antenna cable is inserted into connector at an angle,
the center pin of the antenna connector could be damaged.
5. To complete the procedure, reverse the steps in the “Before
You Begin” section.
Be careful not to pinch the cables or damage the
✎
connectors. This could reduce wireless performance or
cause the Mini PCI device to function improperly. Tuck
any excess cable inside the system enclosure.
12 Installation Guide

348376-B22.book Page 13 Friday, June 25, 2004 8:35 AM
Installing the WLAN Mini PCI Card
Software
The installation CD included in this option kit contains the
necessary WLAN software and drivers for the Mini PCI card. To
install the WLAN software:
Updates to the software contained on the CD may be available.
✎
Refer to the “Information and Updates” section of this guide
for instructions on downloading and installing the updated
software.
1. Turn on the computer.
2. Log on to the system. (The Found New Hardware wizard is
displayed.)
German
3. Insert the WLAN software CD included with this option kit
into the optical drive of the computer. (The Found New
Hardware wizard installs the device driver from the CD.)
If the Found New Hardware wizard does not automatically
✎
load the driver from the CD, follow the prompts to point the
wizard to the CD drive to install the device driver)
Installation of the device driver is complete.
If you are using Microsoft® Windows® 2000, or if your
✎
wireless network requires Cisco Client Extensions (such as
LEAP), you must also install the appropriate Wireless LAN
utility (Atheros Client Utility or Intel® ProSET) to configure
the WLAN device correctly. Both Wireless LAN utilities
are located on the WLAN Software CD included with your
option kit.
If you have problems with the installation, contact your
✎
network administrator for assistance.
Installation Guide 13

348376-B22.book Page 14 Friday, June 25, 2004 8:35 AM
German
Removing a WLAN Mini PCI Card
CAUTION: To prevent electrostatic discharge from damaging electronic
Ä
components, discharge yourself of static electricity by touching a
grounded metal object.
1. Follow the procedures in the “Before You Begin” section.
2. Carefully disconnect the 2 antenna cables from the Mini PCI
card by lifting the cable connector with a fingernail or small
screwdriver.
CAUTION: Do not pull on the antenna cable to remove it. Grip and
Ä
pull only on the connector itself. Pulling on the cable can damage or
break off the connector.
14 Installation Guide

348376-B22.book Page 15 Friday, June 25, 2004 8:35 AM
3. Pull the release latches 1 in the direction shown and pull the
WLAN Mini PCI card up 2 and out 3 at an angle.
German
If you have problems with the removal, contact your network
✎
administrator for assistance.
Installation Guide 15
348376-B22.book Page 16 Friday, June 25, 2004 8:35 AM
German
Information and Updates
HP strongly recommends that you install any software upgrades
that are available from HP for your WLAN Mini PCI card. Most
software at the HP Web site is packaged in a compressed file
called a Softpaq. You will download the Softpaq and save it to
your hard drive.
To obtain software upgrades:
1. Visit the HP Web site at
2. Follow the on-screen instructions to identify your country or
region.
3. Select the download drivers and software radio button, and
then enter the product information for your computer series
name and device.
Refer to the Notebook Documentation CD or Tablet PC
Documentation CD for further product details.
www.hp.com/support.
16 Installation Guide

348376-B22.book Page 17 Friday, June 25, 2004 8:35 AM
Spanish (Latin American)
Before You Begin
CAUTION: To prevent an unresponsive system and the display of a
Ä
warning message, install only a Mini PCI device authorized for use in
your computer by the governmental agency that regulates wireless
devices in your country. If you install a device and then receive a
warning message, remove the device to restore computer functionality.
Then contact Customer Care. For information about contacting Customer
Care, refer to the printed Help and Support Guide included with your
computer.
Before you begin any installation or removal procedures:
1. Save your work, exit all applications, and shut down the
computer. If you are not sure whether the computer is off or
in Hibernation, turn the computer on, and then shut it down
through the operating system.
2. Disconnect all external devices connected to the computer.
3. Disconnect the power cord.
4. Remove the battery pack.
5. Refer to the documentation included with your computer to
❏ Identify the Mini PCI slot location.
❏ Access the Mini PCI slot. The Mini PCI slot can usually
be accessed via a panel on the bottom of the computer but
sometimes it is located beneath the keyboard.
Installation Guide 17
348376-B22.book Page 18 Friday, June 25, 2004 8:35 AM
Spanish (Latin American)
Installing the WLAN Mini PCI Card
CAUTION: To prevent electrostatic discharge from damaging electronic
Ä
components, discharge yourself of static electricity by touching a
grounded metal object.
If your computer has a WLAN Mini PCI card currently
✎
installed, you must remove it before installing the new card.
Refer to the “Removing a WLAN Mini PCI Card” section.
1. Follow the procedures in the “Before You Begin” section.
2. Remove the plastic covers (if applicable) from the 2 antenna
connector cables in the system.
18 Installation Guide

348376-B22.book Page 19 Friday, June 25, 2004 8:35 AM
3. Insert the card into the slot at an angle 1 and press the
Mini PCI card down 2 until the side latches snap into place.
Spanish (Latin American)
Installation Guide 19

348376-B22.book Page 20 Friday, June 25, 2004 8:35 AM
Spanish (Latin American)
4. Connect the 2 antenna cables to the Mini PCI card. The gray
(aux) cable connects to the antenna connector closest to the
edge of the Mini PCI card, and the black (main) cable
connects to the antenna connector closer to the center of
the card, as shown in the following illustration.
When connecting the antenna cables, be sure to connect the
Ä
cables straight down and press firmly until they are fully
seated. If antenna cable is inserted into connector at an angle,
the center pin of the antenna connector could be damaged.
5. To complete the procedure, reverse the steps in the “Before
You Begin” section.
Be careful not to pinch the cables or damage the
✎
connectors. This could reduce wireless performance or
cause the Mini PCI device to function improperly. Tuck
any excess cable inside the system enclosure.
20 Installation Guide

348376-B22.book Page 21 Friday, June 25, 2004 8:35 AM
Spanish (Latin American)
Installing the WLAN Mini PCI Card
Software
The installation CD included in this option kit contains the
necessary WLAN software and drivers for the Mini PCI card. To
install the WLAN software:
Updates to the software contained on the CD may be available.
✎
Refer to the “Information and Updates” section of this guide
for instructions on downloading and installing the updated
software.
1. Turn on the computer.
2. Log on to the system. (The Found New Hardware wizard is
displayed.)
3. Insert the WLAN software CD included with this option kit
into the optical drive of the computer. (The Found New
Hardware wizard installs the device driver from the CD.)
If the Found New Hardware wizard does not automatically
✎
load the driver from the CD, follow the prompts to point the
wizard to the CD drive to install the device driver)
Installation of the device driver is complete.
If you are using Microsoft® Windows® 2000, or if your
✎
wireless network requires Cisco Client Extensions (such as
LEAP), you must also install the appropriate Wireless LAN
utility (Atheros Client Utility or Intel® ProSET) to configure
the WLAN device correctly. Both Wireless LAN utilities
are located on the WLAN Software CD included with your
option kit.
If you have problems with the installation, contact your
✎
network administrator for assistance.
Installation Guide 21

348376-B22.book Page 22 Friday, June 25, 2004 8:35 AM
Spanish (Latin American)
Removing a WLAN Mini PCI Card
CAUTION: To prevent electrostatic discharge from damaging electronic
Ä
components, discharge yourself of static electricity by touching a
grounded metal object.
1. Follow the procedures in the “Before You Begin” section.
2. Carefully disconnect the 2 antenna cables from the Mini PCI
card by lifting the cable connector with a fingernail or small
screwdriver.
CAUTION: Do not pull on the antenna cable to remove it. Grip and
Ä
pull only on the connector itself. Pulling on the cable can damage or
break off the connector.
22 Installation Guide

348376-B22.book Page 23 Friday, June 25, 2004 8:35 AM
3. Pull the release latches 1 in the direction shown and pull the
WLAN Mini PCI card up 2 and out 3 at an angle.
Spanish (Latin American)
If you have problems with the removal, contact your network
✎
administrator for assistance.
Installation Guide 23

348376-B22.book Page 24 Friday, June 25, 2004 8:35 AM
Spanish (Latin American)
Information and Updates
HP strongly recommends that you install any software upgrades
that are available from HP for your WLAN Mini PCI card. Most
software at the HP Web site is packaged in a compressed file
called a Softpaq. You will download the Softpaq and save it to
your hard drive.
To obtain software upgrades:
1. Visit the HP Web site at
2. Follow the on-screen instructions to identify your country or
region.
3. Select the download drivers and software radio button, and
then enter the product information for your computer series
name and device.
Refer to the Notebook Documentation CD or Tablet PC
Documentation CD for further product details.
www.hp.com/support.
24 Installation Guide

348376-B22.book Page 25 Friday, June 25, 2004 8:35 AM
Before You Begin
CAUTION: To prevent an unresponsive system and the display of a
Ä
warning message, install only a Mini PCI device authorized for use in
your computer by the governmental agency that regulates wireless
devices in your country. If you install a device and then receive a
warning message, remove the device to restore computer functionality.
Then contact Customer Care. For information about contacting Customer
Care, refer to the printed Help and Support Guide included with your
computer.
French
Before you begin any installation or removal procedures:
1. Save your work, exit all applications, and shut down the
computer. If you are not sure whether the computer is off or
in Hibernation, turn the computer on, and then shut it down
through the operating system.
2. Disconnect all external devices connected to the computer.
3. Disconnect the power cord.
4. Remove the battery pack.
5. Refer to the documentation included with your computer to
❏ Identify the Mini PCI slot location.
❏ Access the Mini PCI slot. The Mini PCI slot can usually
be accessed via a panel on the bottom of the computer but
sometimes it is located beneath the keyboard.
Installation Guide 25

348376-B22.book Page 26 Friday, June 25, 2004 8:35 AM
French
Installing the WLAN Mini PCI Card
CAUTION: To prevent electrostatic discharge from damaging electronic
Ä
components, discharge yourself of static electricity by touching a
grounded metal object.
If your computer has a WLAN Mini PCI card currently
✎
installed, you must remove it before installing the new card.
Refer to the “Removing a WLAN Mini PCI Card” section.
1. Follow the procedures in the “Before You Begin” section.
2. Remove the plastic covers (if applicable) from the 2 antenna
connector cables in the system.
26 Installation Guide

348376-B22.book Page 27 Friday, June 25, 2004 8:35 AM
3. Insert the card into the slot at an angle 1 and press the
Mini PCI card down 2 until the side latches snap into place.
French
Installation Guide 27

348376-B22.book Page 28 Friday, June 25, 2004 8:35 AM
French
4. Connect the 2 antenna cables to the Mini PCI card. The gray
(aux) cable connects to the antenna connector closest to the
edge of the Mini PCI card, and the black (main) cable
connects to the antenna connector closer to the center of
the card, as shown in the following illustration.
When connecting the antenna cables, be sure to connect the
Ä
cables straight down and press firmly until they are fully
seated. If antenna cable is inserted into connector at an angle,
the center pin of the antenna connector could be damaged.
5. To complete the procedure, reverse the steps in the “Before
You Begin” section.
Be careful not to pinch the cables or damage the
✎
connectors. This could reduce wireless performance or
cause the Mini PCI device to function improperly. Tuck
any excess cable inside the system enclosure.
28 Installation Guide

348376-B22.book Page 29 Friday, June 25, 2004 8:35 AM
Installing the WLAN Mini PCI Card
Software
The installation CD included in this option kit contains the
necessary WLAN software and drivers for the Mini PCI card. To
install the WLAN software:
Updates to the software contained on the CD may be available.
✎
Refer to the “Information and Updates” section of this guide
for instructions on downloading and installing the updated
software.
1. Turn on the computer.
2. Log on to the system. (The Found New Hardware wizard is
displayed.)
French
3. Insert the WLAN software CD included with this option kit
into the optical drive of the computer. (The Found New
Hardware wizard installs the device driver from the CD.)
If the Found New Hardware wizard does not automatically
✎
load the driver from the CD, follow the prompts to point the
wizard to the CD drive to install the device driver)
Installation of the device driver is complete.
If you are using Microsoft® Windows® 2000, or if your
✎
wireless network requires Cisco Client Extensions (such as
LEAP), you must also install the appropriate Wireless LAN
utility (Atheros Client Utility or Intel® ProSET) to configure
the WLAN device correctly. Both Wireless LAN utilities
are located on the WLAN Software CD included with your
option kit.
If you have problems with the installation, contact your
✎
network administrator for assistance.
Installation Guide 29

348376-B22.book Page 30 Friday, June 25, 2004 8:35 AM
French
Removing a WLAN Mini PCI Card
CAUTION: To prevent electrostatic discharge from damaging electronic
Ä
components, discharge yourself of static electricity by touching a
grounded metal object.
1. Follow the procedures in the “Before You Begin” section.
2. Carefully disconnect the 2 antenna cables from the Mini PCI
card by lifting the cable connector with a fingernail or small
screwdriver.
CAUTION: Do not pull on the antenna cable to remove it. Grip and
Ä
pull only on the connector itself. Pulling on the cable can damage or
break off the connector.
30 Installation Guide

348376-B22.book Page 31 Friday, June 25, 2004 8:35 AM
3. Pull the release latches 1 in the direction shown and pull the
WLAN Mini PCI card up 2 and out 3 at an angle.
French
If you have problems with the removal, contact your network
✎
administrator for assistance.
Installation Guide 31

348376-B22.book Page 32 Friday, June 25, 2004 8:35 AM
French
Information and Updates
HP strongly recommends that you install any software upgrades
that are available from HP for your WLAN Mini PCI card. Most
software at the HP Web site is packaged in a compressed file
called a Softpaq. You will download the Softpaq and save it to
your hard drive.
To obtain software upgrades:
1. Visit the HP Web site at
2. Follow the on-screen instructions to identify your country or
region.
3. Select the download drivers and software radio button, and
then enter the product information for your computer series
name and device.
Refer to the Notebook Documentation CD or Tablet PC
Documentation CD for further product details.
www.hp.com/support.
32 Installation Guide

348376-B22.book Page 33 Friday, June 25, 2004 8:35 AM
Before You Begin
CAUTION: To prevent an unresponsive system and the display of a
Ä
warning message, install only a Mini PCI device authorized for use in
your computer by the governmental agency that regulates wireless
devices in your country. If you install a device and then receive a
warning message, remove the device to restore computer functionality.
Then contact Customer Care. For information about contacting Customer
Care, refer to the printed Help and Support Guide included with your
computer.
Italian
Before you begin any installation or removal procedures:
1. Save your work, exit all applications, and shut down the
computer. If you are not sure whether the computer is off or
in Hibernation, turn the computer on, and then shut it down
through the operating system.
2. Disconnect all external devices connected to the computer.
3. Disconnect the power cord.
4. Remove the battery pack.
5. Refer to the documentation included with your computer to
❏ Identify the Mini PCI slot location.
❏ Access the Mini PCI slot. The Mini PCI slot can usually
be accessed via a panel on the bottom of the computer but
sometimes it is located beneath the keyboard.
Installation Guide 33

348376-B22.book Page 34 Friday, June 25, 2004 8:35 AM
Italian
Installing the WLAN Mini PCI Card
CAUTION: To prevent electrostatic discharge from damaging electronic
Ä
components, discharge yourself of static electricity by touching a
grounded metal object.
If your computer has a WLAN Mini PCI card currently
✎
installed, you must remove it before installing the new card.
Refer to the “Removing a WLAN Mini PCI Card” section.
1. Follow the procedures in the “Before You Begin” section.
2. Remove the plastic covers (if applicable) from the 2 antenna
connector cables in the system.
34 Installation Guide

348376-B22.book Page 35 Friday, June 25, 2004 8:35 AM
3. Insert the card into the slot at an angle 1 and press the
Mini PCI card down 2 until the side latches snap into place.
Italian
Installation Guide 35

348376-B22.book Page 36 Friday, June 25, 2004 8:35 AM
Italian
4. Connect the 2 antenna cables to the Mini PCI card. The gray
(aux) cable connects to the antenna connector closest to the
edge of the Mini PCI card, and the black (main) cable
connects to the antenna connector closer to the center of
the card, as shown in the following illustration.
When connecting the antenna cables, be sure to connect the
Ä
cables straight down and press firmly until they are fully
seated. If antenna cable is inserted into connector at an angle,
the center pin of the antenna connector could be damaged.
5. To complete the procedure, reverse the steps in the “Before
You Begin” section.
Be careful not to pinch the cables or damage the
✎
connectors. This could reduce wireless performance or
cause the Mini PCI device to function improperly. Tuck
any excess cable inside the system enclosure.
36 Installation Guide

348376-B22.book Page 37 Friday, June 25, 2004 8:35 AM
Installing the WLAN Mini PCI Card
Software
The installation CD included in this option kit contains the
necessary WLAN software and drivers for the Mini PCI card. To
install the WLAN software:
Updates to the software contained on the CD may be available.
✎
Refer to the “Information and Updates” section of this guide
for instructions on downloading and installing the updated
software.
1. Turn on the computer.
2. Log on to the system. (The Found New Hardware wizard is
displayed.)
Italian
3. Insert the WLAN software CD included with this option kit
into the optical drive of the computer. (The Found New
Hardware wizard installs the device driver from the CD.)
If the Found New Hardware wizard does not automatically
✎
load the driver from the CD, follow the prompts to point the
wizard to the CD drive to install the device driver)
Installation of the device driver is complete.
If you are using Microsoft® Windows® 2000, or if your
✎
wireless network requires Cisco Client Extensions (such as
LEAP), you must also install the appropriate Wireless LAN
utility (Atheros Client Utility or Intel® ProSET) to configure
the WLAN device correctly. Both Wireless LAN utilities
are located on the WLAN Software CD included with your
option kit.
If you have problems with the installation, contact your
✎
network administrator for assistance.
Installation Guide 37

348376-B22.book Page 38 Friday, June 25, 2004 8:35 AM
Italian
Removing a WLAN Mini PCI Card
CAUTION: To prevent electrostatic discharge from damaging electronic
Ä
components, discharge yourself of static electricity by touching a
grounded metal object.
1. Follow the procedures in the “Before You Begin” section.
2. Carefully disconnect the 2 antenna cables from the Mini PCI
card by lifting the cable connector with a fingernail or small
screwdriver.
CAUTION: Do not pull on the antenna cable to remove it. Grip and
Ä
pull only on the connector itself. Pulling on the cable can damage or
break off the connector.
38 Installation Guide

348376-B22.book Page 39 Friday, June 25, 2004 8:35 AM
3. Pull the release latches 1 in the direction shown and pull the
WLAN Mini PCI card up 2 and out 3 at an angle.
Italian
If you have problems with the removal, contact your network
✎
administrator for assistance.
Installation Guide 39

348376-B22.book Page 40 Friday, June 25, 2004 8:35 AM
Italian
Information and Updates
HP strongly recommends that you install any software upgrades
that are available from HP for your WLAN Mini PCI card. Most
software at the HP Web site is packaged in a compressed file
called a Softpaq. You will download the Softpaq and save it to
your hard drive.
To obtain software upgrades:
1. Visit the HP Web site at
2. Follow the on-screen instructions to identify your country or
region.
3. Select the download drivers and software radio button, and
then enter the product information for your computer series
name and device.
Refer to the Notebook Documentation CD or Tablet PC
Documentation CD for further product details.
www.hp.com/support.
40 Installation Guide

348376-B22.book Page 41 Friday, June 25, 2004 8:35 AM
Before You Begin
CAUTION: To prevent an unresponsive system and the display of a
Ä
warning message, install only a Mini PCI device authorized for use in
your computer by the governmental agency that regulates wireless
devices in your country. If you install a device and then receive a
warning message, remove the device to restore computer functionality.
Then contact Customer Care. For information about contacting Customer
Care, refer to the printed Help and Support Guide included with your
computer.
Japanese
Before you begin any installation or removal procedures:
1. Save your work, exit all applications, and shut down the
computer. If you are not sure whether the computer is off or
in Hibernation, turn the computer on, and then shut it down
through the operating system.
2. Disconnect all external devices connected to the computer.
3. Disconnect the power cord.
4. Remove the battery pack.
5. Refer to the documentation included with your computer to
❏ Identify the Mini PCI slot location.
❏ Access the Mini PCI slot. The Mini PCI slot can usually
be accessed via a panel on the bottom of the computer but
sometimes it is located beneath the keyboard.
Installation Guide 41

348376-B22.book Page 42 Friday, June 25, 2004 8:35 AM
Japanese
Installing the WLAN Mini PCI Card
CAUTION: To prevent electrostatic discharge from damaging electronic
Ä
components, discharge yourself of static electricity by touching a
grounded metal object.
If your computer has a WLAN Mini PCI card currently
✎
installed, you must remove it before installing the new card.
Refer to the “Removing a WLAN Mini PCI Card” section.
1. Follow the procedures in the “Before You Begin” section.
2. Remove the plastic covers (if applicable) from the 2 antenna
connector cables in the system.
42 Installation Guide

348376-B22.book Page 43 Friday, June 25, 2004 8:35 AM
3. Insert the card into the slot at an angle 1 and press the
Mini PCI card down 2 until the side latches snap into place.
Japanese
Installation Guide 43

348376-B22.book Page 44 Friday, June 25, 2004 8:35 AM
Japanese
4. Connect the 2 antenna cables to the Mini PCI card. The gray
(aux) cable connects to the antenna connector closest to the
edge of the Mini PCI card, and the black (main) cable
connects to the antenna connector closer to the center of
the card, as shown in the following illustration.
When connecting the antenna cables, be sure to connect the
Ä
cables straight down and press firmly until they are fully
seated. If antenna cable is inserted into connector at an angle,
the center pin of the antenna connector could be damaged.
5. To complete the procedure, reverse the steps in the “Before
You Begin” section.
Be careful not to pinch the cables or damage the
✎
connectors. This could reduce wireless performance or
cause the Mini PCI device to function improperly. Tuck
any excess cable inside the system enclosure.
44 Installation Guide

348376-B22.book Page 45 Friday, June 25, 2004 8:35 AM
Installing the WLAN Mini PCI Card
Software
The installation CD included in this option kit contains the
necessary WLAN software and drivers for the Mini PCI card. To
install the WLAN software:
Updates to the software contained on the CD may be available.
✎
Refer to the “Information and Updates” section of this guide
for instructions on downloading and installing the updated
software.
1. Turn on the computer.
2. Log on to the system. (The Found New Hardware wizard is
displayed.)
Japanese
3. Insert the WLAN software CD included with this option kit
into the optical drive of the computer. (The Found New
Hardware wizard installs the device driver from the CD.)
If the Found New Hardware wizard does not automatically
✎
load the driver from the CD, follow the prompts to point the
wizard to the CD drive to install the device driver)
Installation of the device driver is complete.
If you are using Microsoft® Windows® 2000, or if your
✎
wireless network requires Cisco Client Extensions (such as
LEAP), you must also install the appropriate Wireless LAN
utility (Atheros Client Utility or Intel® ProSET) to configure
the WLAN device correctly. Both Wireless LAN utilities
are located on the WLAN Software CD included with your
option kit.
If you have problems with the installation, contact your
✎
network administrator for assistance.
Installation Guide 45

348376-B22.book Page 46 Friday, June 25, 2004 8:35 AM
Japanese
Removing a WLAN Mini PCI Card
CAUTION: To prevent electrostatic discharge from damaging electronic
Ä
components, discharge yourself of static electricity by touching a
grounded metal object.
1. Follow the procedures in the “Before You Begin” section.
2. Carefully disconnect the 2 antenna cables from the Mini PCI
card by lifting the cable connector with a fingernail or small
screwdriver.
CAUTION: Do not pull on the antenna cable to remove it. Grip and
Ä
pull only on the connector itself. Pulling on the cable can damage or
break off the connector.
46 Installation Guide

348376-B22.book Page 47 Friday, June 25, 2004 8:35 AM
3. Pull the release latches 1 in the direction shown and pull the
WLAN Mini PCI card up 2 and out 3 at an angle.
Japanese
If you have problems with the removal, contact your network
✎
administrator for assistance.
Installation Guide 47

348376-B22.book Page 48 Friday, June 25, 2004 8:35 AM
Japanese
Information and Updates
HP strongly recommends that you install any software upgrades
that are available from HP for your WLAN Mini PCI card. Most
software at the HP Web site is packaged in a compressed file
called a Softpaq. You will download the Softpaq and save it to
your hard drive.
To obtain software upgrades:
1. Visit the HP Web site at
2. Follow the on-screen instructions to identify your country or
region.
3. Select the download drivers and software radio button, and
then enter the product information for your computer series
name and device.
Refer to the Notebook Documentation CD or Tablet PC
Documentation CD for further product details.
www.hp.com/support.
48 Installation Guide

348376-B22.book Page 49 Friday, June 25, 2004 8:35 AM
Before You Begin
CAUTION: To prevent an unresponsive system and the display of a
Ä
warning message, install only a Mini PCI device authorized for use in
your computer by the governmental agency that regulates wireless
devices in your country. If you install a device and then receive a
warning message, remove the device to restore computer functionality.
Then contact Customer Care. For information about contacting Customer
Care, refer to the printed Help and Support Guide included with your
computer.
Korean
Before you begin any installation or removal procedures:
1. Save your work, exit all applications, and shut down the
computer. If you are not sure whether the computer is off or
in Hibernation, turn the computer on, and then shut it down
through the operating system.
2. Disconnect all external devices connected to the computer.
3. Disconnect the power cord.
4. Remove the battery pack.
5. Refer to the documentation included with your computer to
❏ Identify the Mini PCI slot location.
❏ Access the Mini PCI slot. The Mini PCI slot can usually
be accessed via a panel on the bottom of the computer but
sometimes it is located beneath the keyboard.
Installation Guide 49

348376-B22.book Page 50 Friday, June 25, 2004 8:35 AM
Korean
Installing the WLAN Mini PCI Card
CAUTION: To prevent electrostatic discharge from damaging electronic
Ä
components, discharge yourself of static electricity by touching a
grounded metal object.
If your computer has a WLAN Mini PCI card currently
✎
installed, you must remove it before installing the new card.
Refer to the “Removing a WLAN Mini PCI Card” section.
1. Follow the procedures in the “Before You Begin” section.
2. Remove the plastic covers (if applicable) from the 2 antenna
connector cables in the system.
50 Installation Guide

348376-B22.book Page 51 Friday, June 25, 2004 8:35 AM
3. Insert the card into the slot at an angle 1 and press the
Mini PCI card down 2 until the side latches snap into place.
Korean
Installation Guide 51

348376-B22.book Page 52 Friday, June 25, 2004 8:35 AM
Korean
4. Connect the 2 antenna cables to the Mini PCI card. The gray
(aux) cable connects to the antenna connector closest to the
edge of the Mini PCI card, and the black (main) cable
connects to the antenna connector closer to the center of
the card, as shown in the following illustration.
When connecting the antenna cables, be sure to connect the
Ä
cables straight down and press firmly until they are fully
seated. If antenna cable is inserted into connector at an angle,
the center pin of the antenna connector could be damaged.
5. To complete the procedure, reverse the steps in the “Before
You Begin” section.
Be careful not to pinch the cables or damage the
✎
connectors. This could reduce wireless performance or
cause the Mini PCI device to function improperly. Tuck
any excess cable inside the system enclosure.
52 Installation Guide

348376-B22.book Page 53 Friday, June 25, 2004 8:35 AM
Installing the WLAN Mini PCI Card
Software
The installation CD included in this option kit contains the
necessary WLAN software and drivers for the Mini PCI card. To
install the WLAN software:
Updates to the software contained on the CD may be available.
✎
Refer to the “Information and Updates” section of this guide
for instructions on downloading and installing the updated
software.
1. Turn on the computer.
2. Log on to the system. (The Found New Hardware wizard is
displayed.)
Korean
3. Insert the WLAN software CD included with this option kit
into the optical drive of the computer. (The Found New
Hardware wizard installs the device driver from the CD.)
If the Found New Hardware wizard does not automatically
✎
load the driver from the CD, follow the prompts to point the
wizard to the CD drive to install the device driver)
Installation of the device driver is complete.
If you are using Microsoft® Windows® 2000, or if your
✎
wireless network requires Cisco Client Extensions (such as
LEAP), you must also install the appropriate Wireless LAN
utility (Atheros Client Utility or Intel® ProSET) to configure
the WLAN device correctly. Both Wireless LAN utilities
are located on the WLAN Software CD included with your
option kit.
If you have problems with the installation, contact your
✎
network administrator for assistance.
Installation Guide 53

348376-B22.book Page 54 Friday, June 25, 2004 8:35 AM
Korean
Removing a WLAN Mini PCI Card
CAUTION: To prevent electrostatic discharge from damaging electronic
Ä
components, discharge yourself of static electricity by touching a
grounded metal object.
1. Follow the procedures in the “Before You Begin” section.
2. Carefully disconnect the 2 antenna cables from the Mini PCI
card by lifting the cable connector with a fingernail or small
screwdriver.
CAUTION: Do not pull on the antenna cable to remove it. Grip and
Ä
pull only on the connector itself. Pulling on the cable can damage or
break off the connector.
54 Installation Guide

348376-B22.book Page 55 Friday, June 25, 2004 8:35 AM
3. Pull the release latches 1 in the direction shown and pull the
WLAN Mini PCI card up 2 and out 3 at an angle.
Korean
If you have problems with the removal, contact your network
✎
administrator for assistance.
Installation Guide 55

348376-B22.book Page 56 Friday, June 25, 2004 8:35 AM
Korean
Information and Updates
HP strongly recommends that you install any software upgrades
that are available from HP for your WLAN Mini PCI card. Most
software at the HP Web site is packaged in a compressed file
called a Softpaq. You will download the Softpaq and save it to
your hard drive.
To obtain software upgrades:
1. Visit the HP Web site at
2. Follow the on-screen instructions to identify your country or
region.
3. Select the download drivers and software radio button, and
then enter the product information for your computer series
name and device.
Refer to the Notebook Documentation CD or Tablet PC
Documentation CD for further product details.
www.hp.com/support.
56 Installation Guide

348376-B22.book Page 57 Friday, June 25, 2004 8:35 AM
Before You Begin
CAUTION: To prevent an unresponsive system and the display of a
Ä
warning message, install only a Mini PCI device authorized for use in
your computer by the governmental agency that regulates wireless
devices in your country. If you install a device and then receive a
warning message, remove the device to restore computer functionality.
Then contact Customer Care. For information about contacting Customer
Care, refer to the printed Help and Support Guide included with your
computer.
S Chinese
Before you begin any installation or removal procedures:
1. Save your work, exit all applications, and shut down the
computer. If you are not sure whether the computer is off or
in Hibernation, turn the computer on, and then shut it down
through the operating system.
2. Disconnect all external devices connected to the computer.
3. Disconnect the power cord.
4. Remove the battery pack.
5. Refer to the documentation included with your computer to
❏ Identify the Mini PCI slot location.
❏ Access the Mini PCI slot. The Mini PCI slot can usually
be accessed via a panel on the bottom of the computer but
sometimes it is located beneath the keyboard.
Installation Guide 57

348376-B22.book Page 58 Friday, June 25, 2004 8:35 AM
S Chinese
Installing the WLAN Mini PCI Card
CAUTION: To prevent electrostatic discharge from damaging electronic
Ä
components, discharge yourself of static electricity by touching a
grounded metal object.
If your computer has a WLAN Mini PCI card currently
✎
installed, you must remove it before installing the new card.
Refer to the “Removing a WLAN Mini PCI Card” section.
1. Follow the procedures in the “Before You Begin” section.
2. Remove the plastic covers (if applicable) from the 2 antenna
connector cables in the system.
58 Installation Guide

348376-B22.book Page 59 Friday, June 25, 2004 8:35 AM
3. Insert the card into the slot at an angle 1 and press the
Mini PCI card down 2 until the side latches snap into place.
S Chinese
Installation Guide 59

348376-B22.book Page 60 Friday, June 25, 2004 8:35 AM
S Chinese
4. Connect the 2 antenna cables to the Mini PCI card. The gray
(aux) cable connects to the antenna connector closest to the
edge of the Mini PCI card, and the black (main) cable
connects to the antenna connector closer to the center of
the card, as shown in the following illustration.
When connecting the antenna cables, be sure to connect the
Ä
cables straight down and press firmly until they are fully
seated. If antenna cable is inserted into connector at an angle,
the center pin of the antenna connector could be damaged.
5. To complete the procedure, reverse the steps in the “Before
You Begin” section.
Be careful not to pinch the cables or damage the
✎
connectors. This could reduce wireless performance or
cause the Mini PCI device to function improperly. Tuck
any excess cable inside the system enclosure.
60 Installation Guide

348376-B22.book Page 61 Friday, June 25, 2004 8:35 AM
Installing the WLAN Mini PCI Card
Software
The installation CD included in this option kit contains the
necessary WLAN software and drivers for the Mini PCI card. To
install the WLAN software:
Updates to the software contained on the CD may be available.
✎
Refer to the “Information and Updates” section of this guide
for instructions on downloading and installing the updated
software.
1. Turn on the computer.
2. Log on to the system. (The Found New Hardware wizard is
displayed.)
S Chinese
3. Insert the WLAN software CD included with this option kit
into the optical drive of the computer. (The Found New
Hardware wizard installs the device driver from the CD.)
If the Found New Hardware wizard does not automatically
✎
load the driver from the CD, follow the prompts to point the
wizard to the CD drive to install the device driver)
Installation of the device driver is complete.
If you are using Microsoft® Windows® 2000, or if your
✎
wireless network requires Cisco Client Extensions (such as
LEAP), you must also install the appropriate Wireless LAN
utility (Atheros Client Utility or Intel® ProSET) to configure
the WLAN device correctly. Both Wireless LAN utilities
are located on the WLAN Software CD included with your
option kit.
If you have problems with the installation, contact your
✎
network administrator for assistance.
Installation Guide 61

348376-B22.book Page 62 Friday, June 25, 2004 8:35 AM
S Chinese
Removing a WLAN Mini PCI Card
CAUTION: To prevent electrostatic discharge from damaging electronic
Ä
components, discharge yourself of static electricity by touching a
grounded metal object.
1. Follow the procedures in the “Before You Begin” section.
2. Carefully disconnect the 2 antenna cables from the Mini PCI
card by lifting the cable connector with a fingernail or small
screwdriver.
CAUTION: Do not pull on the antenna cable to remove it. Grip and
Ä
pull only on the connector itself. Pulling on the cable can damage or
break off the connector.
62 Installation Guide

348376-B22.book Page 63 Friday, June 25, 2004 8:35 AM
3. Pull the release latches 1 in the direction shown and pull the
WLAN Mini PCI card up 2 and out 3 at an angle.
S Chinese
If you have problems with the removal, contact your network
✎
administrator for assistance.
Installation Guide 63

348376-B22.book Page 64 Friday, June 25, 2004 8:35 AM
S Chinese
Information and Updates
HP strongly recommends that you install any software upgrades
that are available from HP for your WLAN Mini PCI card. Most
software at the HP Web site is packaged in a compressed file
called a Softpaq. You will download the Softpaq and save it to
your hard drive.
To obtain software upgrades:
1. Visit the HP Web site at
2. Follow the on-screen instructions to identify your country or
region.
3. Select the download drivers and software radio button, and
then enter the product information for your computer series
name and device.
Refer to the Notebook Documentation CD or Tablet PC
Documentation CD for further product details.
www.hp.com/support.
64 Installation Guide

348376-B22.book Page 65 Friday, June 25, 2004 8:35 AM
Before You Begin
CAUTION: To prevent an unresponsive system and the display of a
Ä
warning message, install only a Mini PCI device authorized for use in
your computer by the governmental agency that regulates wireless
devices in your country. If you install a device and then receive a
warning message, remove the device to restore computer functionality.
Then contact Customer Care. For information about contacting Customer
Care, refer to the printed Help and Support Guide included with your
computer.
T Chinese
Before you begin any installation or removal procedures:
1. Save your work, exit all applications, and shut down the
computer. If you are not sure whether the computer is off or
in Hibernation, turn the computer on, and then shut it down
through the operating system.
2. Disconnect all external devices connected to the computer.
3. Disconnect the power cord.
4. Remove the battery pack.
5. Refer to the documentation included with your computer to
❏ Identify the Mini PCI slot location.
❏ Access the Mini PCI slot. The Mini PCI slot can usually
be accessed via a panel on the bottom of the computer but
sometimes it is located beneath the keyboard.
Installation Guide 65

348376-B22.book Page 66 Friday, June 25, 2004 8:35 AM
T Chinese
Installing the WLAN Mini PCI Card
CAUTION: To prevent electrostatic discharge from damaging electronic
Ä
components, discharge yourself of static electricity by touching a
grounded metal object.
If your computer has a WLAN Mini PCI card currently
✎
installed, you must remove it before installing the new card.
Refer to the “Removing a WLAN Mini PCI Card” section.
1. Follow the procedures in the “Before You Begin” section.
2. Remove the plastic covers (if applicable) from the 2 antenna
connector cables in the system.
66 Installation Guide

348376-B22.book Page 67 Friday, June 25, 2004 8:35 AM
3. Insert the card into the slot at an angle 1 and press the
Mini PCI card down 2 until the side latches snap into place.
T Chinese
Installation Guide 67

348376-B22.book Page 68 Friday, June 25, 2004 8:35 AM
T Chinese
4. Connect the 2 antenna cables to the Mini PCI card. The gray
(aux) cable connects to the antenna connector closest to the
edge of the Mini PCI card, and the black (main) cable
connects to the antenna connector closer to the center of
the card, as shown in the following illustration.
When connecting the antenna cables, be sure to connect the
Ä
cables straight down and press firmly until they are fully
seated. If antenna cable is inserted into connector at an angle,
the center pin of the antenna connector could be damaged.
5. To complete the procedure, reverse the steps in the “Before
You Begin” section.
Be careful not to pinch the cables or damage the
✎
connectors. This could reduce wireless performance or
cause the Mini PCI device to function improperly. Tuck
any excess cable inside the system enclosure.
68 Installation Guide

348376-B22.book Page 69 Friday, June 25, 2004 8:35 AM
Installing the WLAN Mini PCI Card
Software
The installation CD included in this option kit contains the
necessary WLAN software and drivers for the Mini PCI card. To
install the WLAN software:
Updates to the software contained on the CD may be available.
✎
Refer to the “Information and Updates” section of this guide
for instructions on downloading and installing the updated
software.
1. Turn on the computer.
2. Log on to the system. (The Found New Hardware wizard is
displayed.)
T Chinese
3. Insert the WLAN software CD included with this option kit
into the optical drive of the computer. (The Found New
Hardware wizard installs the device driver from the CD.)
If the Found New Hardware wizard does not automatically
✎
load the driver from the CD, follow the prompts to point the
wizard to the CD drive to install the device driver)
Installation of the device driver is complete.
If you are using Microsoft® Windows® 2000, or if your
✎
wireless network requires Cisco Client Extensions (such as
LEAP), you must also install the appropriate Wireless LAN
utility (Atheros Client Utility or Intel® ProSET) to configure
the WLAN device correctly. Both Wireless LAN utilities
are located on the WLAN Software CD included with your
option kit.
If you have problems with the installation, contact your
✎
network administrator for assistance.
Installation Guide 69

348376-B22.book Page 70 Friday, June 25, 2004 8:35 AM
T Chinese
Removing a WLAN Mini PCI Card
CAUTION: To prevent electrostatic discharge from damaging electronic
Ä
components, discharge yourself of static electricity by touching a
grounded metal object.
1. Follow the procedures in the “Before You Begin” section.
2. Carefully disconnect the 2 antenna cables from the Mini PCI
card by lifting the cable connector with a fingernail or small
screwdriver.
CAUTION: Do not pull on the antenna cable to remove it. Grip and
Ä
pull only on the connector itself. Pulling on the cable can damage or
break off the connector.
70 Installation Guide

348376-B22.book Page 71 Friday, June 25, 2004 8:35 AM
3. Pull the release latches 1 in the direction shown and pull the
WLAN Mini PCI card up 2 and out 3 at an angle.
T Chinese
If you have problems with the removal, contact your network
✎
administrator for assistance.
Installation Guide 71

348376-B22.book Page 72 Friday, June 25, 2004 8:35 AM
T Chinese
Information and Updates
HP strongly recommends that you install any software upgrades
that are available from HP for your WLAN Mini PCI card. Most
software at the HP Web site is packaged in a compressed file
called a Softpaq. You will download the Softpaq and save it to
your hard drive.
To obtain software upgrades:
1. Visit the HP Web site at
2. Follow the on-screen instructions to identify your country or
region.
3. Select the download drivers and software radio button, and
then enter the product information for your computer series
name and device.
Refer to the Notebook Documentation CD or Tablet PC
Documentation CD for further product details.
www.hp.com/support.
72 Installation Guide

348376-B22.book Page 73 Friday, June 25, 2004 8:35 AM
Regulatory Notices
In some environments, the use of wireless devices may be
restricted. Such restrictions may apply aboard airplanes, in
hospitals, near explosives, in hazardous locations, etc. If you
are uncertain of the policy that applies to the use of this device,
please ask for authorization to use it prior to turning it on.
U.S. Wireless Notice
WARNING: Exposure to Radio Frequency Radiation
Å
The radiated output power of this device is below the FCC radio
frequency exposure limits. Nevertheless, the device should be used in
such a manner that the potential for human contact during normal
operation is minimized. To avoid the possibility of exceeding the
FCC radio frequency exposure limits, human proximity to the antenna
should not be less than 20 cm (8 inches) during normal operation,
including when the computer display is closed.
CAUTION: When using IEEE 802.11a wireless LAN, this product is
Ä
restricted to indoor use due to its operation in the 5.15- to 5.25-GHz
frequency range. The FCC requires this product to be used indoors
for frequency range 5.15- to 5.25-GHz to reduce the potential for
harmful interference to co-channel Mobile Satellite systems. High power
radar is allocated as the primary user of the 5.25- to 5.35-GHz and
5.65- to 5.85-GHz bands. These radar stations can cause interference
with and/or damage this device.
Installation Guide 73

348376-B22.book Page 74 Friday, June 25, 2004 8:35 AM
Regulatory Notices
Canadian Wireless Notice
Operation is subject to the following 2 conditions: (1) this device
may not cause interference, and (2) this device must accept any
interference, including interference that may cause undesired
operation of the device.
European Union Wireless Notice
This notice is for wireless LAN radio products that will be used
indoors, specifically in the home and office environment
operating in the 2.4-GHz and 5.0-GHz band.
0336
0682
0984
74 Installation Guide

348376-B22.book Page 75 Friday, June 25, 2004 8:35 AM
Declaration of Conformity
This product complies with the following EU directives:
■ Low Voltage Directive (72/73/EEC)
■ EMC Directive (89/336/EEC)
■ R&TTE Directive (1999/5/EC)
CE compliance of this equipment is valid only if powered with
a CE-marked AC adapter provided by HP.
Compliance with these directives implies conformity to the
following European Norms (in parentheses are the equivalent
international standards and regulations):
■ EN 55022 (CISPR 22)—Electromagnetic interference
■ EN 55024 (IEC 61000-4-2, 3, 4, 5, 6, 8, 11)—
Electromagnetic immunity
■ EN 61000-3-2 (IEC 61000-3-2)—Power line harmonics
Regulatory Notices
■ EN 61000-3-3 (IEC 61000-3-3)—Power line flicker
■ EN 60950 (IEC 60950)—Product safety
■ EN 300 328-2—Data transmission equipment operating in
the 2.4-GHz ISM band and using 2.4-GHz radio equipment
using spread spectrum techniques
■ EN 301 489-1, -17—General EMC requirements for radio
equipment
■ EN 301 893—Broadband Radio Access Networks (BRAN);
5-GHz high performance RLAN
The 2.4-GHz and 5.0-GHz radio functionality of this product may
be used in the following EU, EU candidate, and EFTA countries:
Austria, Belgium, Cyprus, Czech Republic, Denmark, Estonia,
Finland, France, Germany, Greece, Hungary, Iceland, Ireland,
Italy, Latvia, Liechtenstein, Lithuania, Luxembourg, Malta,
Netherlands, Norway, Poland, Portugal, Slovak Republic,
Slovenia, Spain, Sweden, Switzerland, and United Kingdom.
Installation Guide 75

348376-B22.book Page 76 Friday, June 25, 2004 8:35 AM
Regulatory Notices
France
L’utilisation de cet equipement (2.4GHz Wireless LAN) est
soumise à certaines restrictions : cet equipement peut être utilisé
à l’interieur d’un batiment en utilisant toutes les frequences
de 2400 a 2483.5MHz (Chaine 1-13). Pour une utilisation en
environnement exterieur, vous devez utiliser les frequences
comprises entre 2454 a 2483.5MHz (Chaine 10-13). Pour les
dernières restrictions, voir
Italy
E’necessaria una concessione ministeriale anche per l’uso del
prodotto. Verifici per favore con il proprio distributore o
direttamente presso la Direzione Generale Pianificazione e
Gestione Frequenze. License required for use.
http://www.art-telecom.fr.
Verify with your dealer or directly with General Direction for
Frequency Planning and Management (Direzione Generale
Pianificazione e Gestione Frequenze).
Indian Wireless Notice
The India Telegraph Act of 1885 requires that an IEEE 802.11a or
IEEE 802.11g wireless LAN end user obtain a license. To obtain
this license, please contact The Wireless Planning &
Coordination Wing, Ministry of Communications, Sanchar
Ghavan New Delhi.
Brazilian Wireless Notice
Este equipamento opera em caráter secundário, isto é, não tem
direito a proteção contra interferência prejudicial, mesmo de
estações do mesmo tipo, e não pode causar interferência a
sistemas operando em caráter primário.
76 Installation Guide

348376-B22.book Page 77 Friday, June 25, 2004 8:35 AM
Japanese Wireless Notice
Regulatory Notices
Installation Guide 77

348376-B22.book Page 78 Friday, June 25, 2004 8:35 AM
Regulatory Notices
Federal Communications Commission Notice
This equipment has been tested and found to comply with
the limits for a Class B digital device, pursuant to Part 15 of the
FCC Rules. These limits are designed to provide reasonable
protection against harmful interference in a residential
installation. This equipment generates, uses, and can radiate radio
frequency energy and, if not installed and used in accordance
with the instructions, may cause harmful interference to radio
communications. However, there is no guarantee that interference
will not occur in a particular installation. If this equipment does
cause harmful interference to radio or television reception, which
can be determined by turning the equipment off and on, the user
is encouraged to try to correct the interference by one or more of
the following measures:
■ Reorient or relocate the receiving antenna.
■ Increase the separation between the equipment and receiver.
■ Connect the equipment to an outlet on a circuit different from
that to which the receiver is connected.
■ Consult the dealer or an experienced radio or television
technician for help.
Modifications
The FCC requires the user to be notified that any changes or
modifications made to this device that are not expressly approved
by Hewlett-Packard Company may void the user’s authority to
operate the equipment.
78 Installation Guide

348376-B22.book Page 79 Friday, June 25, 2004 8:35 AM
Regulatory Notices
Declaration of Conformity for Products Marked
with the FCC Logo (United States Only)
This device complies with Part 15 of the FCC Rules. Operation is
subject to the following 2 conditions: (1) this device may not
cause harmful interference, and (2) this device must accept any
interference received, including interference that may cause
undesired operation.
For questions regarding your product that are not related to this
declaration, write to:
Hewlett-Packard Company
P. O. Box 692000, Mail Stop 530113
Houston, TX 77269-2000
For questions regarding this declaration, write to:
Hewlett-Packard Company
P.O. Box 692000, Mail Stop 510101
Houston, TX 77269-2000
Or call 281-514-3333.
To identify your product, refer to the part, series, or model
number found on the product.
Canadian Notice (Avis Canadien)
This Class B digital apparatus meets all requirements of the
Canadian Interference-Causing Equipment Regulations. Cet
appareil numérique de la classe B respecte toutes les exigences du
Règlement sur le matériel brouilleur du Canada.
Installation Guide 79

348376-B22.book Page 80 Friday, June 25, 2004 8:35 AM
 Loading...