

Page 1
HP-323140-001.book Page 11 Tuesday, April 1, 2003 4:20 PM
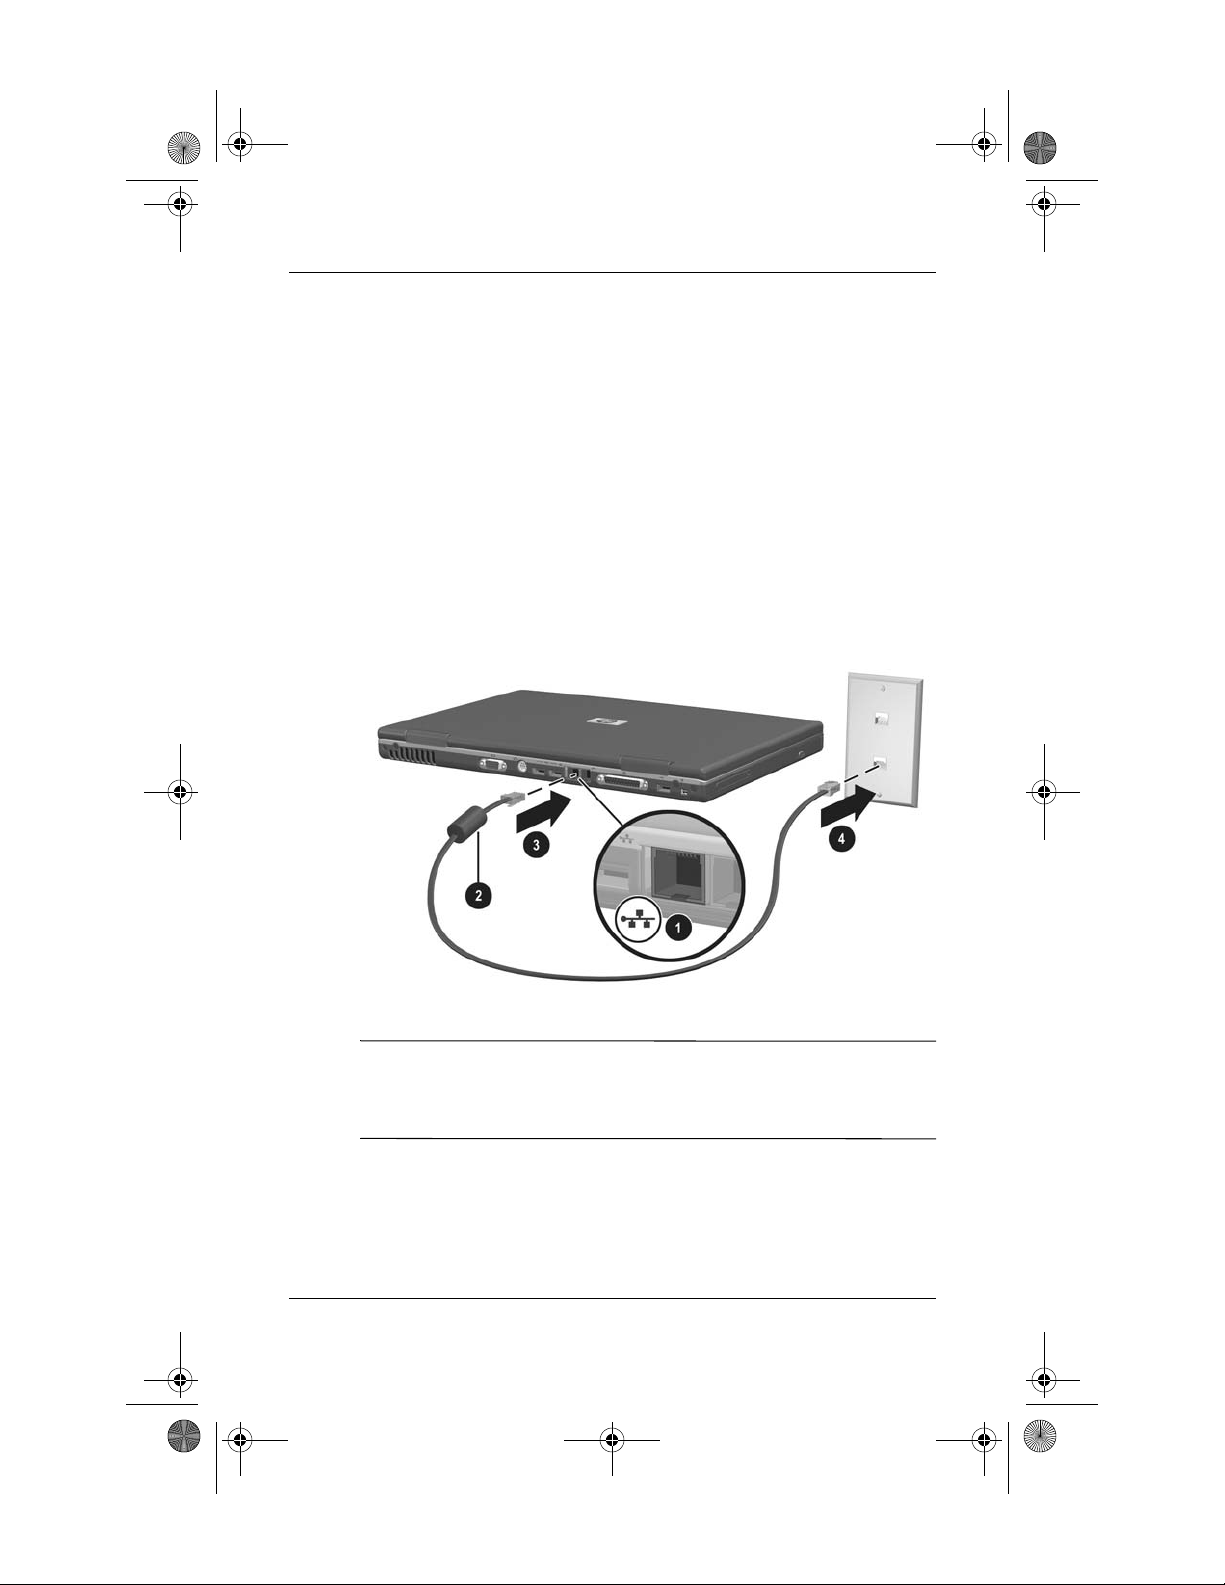
Connecting the Network Cable
A network cable has an 8-pin RJ-45 network connector at each
end and may contain noise suppression circuitry, which prevents
interference with TV and radio reception. To connect the cable:
1. Identify the RJ-45 network jack 1 on the notebook.
2. Orient the end of a network cable with noise suppression
circuitry 2 toward the notebook.
3. Plug the network cable into the notebook RJ-45
network jack 3.
4. Plug the other end of the cable into the network
RJ-45 jack 4.
Communications
Connecting a network cable
WARNING: To reduce the risk of electric shock, disconnect the
Å
network cable before accessing an internal compartment of the
notebook. Internal compartments include the memory compartment
and the battery and hard drive bays.
Startup and Reference Guide—Part 2 7–11
Page 2

HP-323140-001.book Page 12 Tuesday, April 1, 2003 4:20 PM
Communications
Turning a Network Connection Off and On
To conserve power, turn off a network connection you are not
using.
■ To turn off a network connection, log off the network, then
disconnect the network cable.
■ To turn on a network connection, connect the network cable,
then log on to the network.
Accessing the Network at Startup
To connect the notebook to a PXE (Preboot eXecution
Environment) server during startup, you must enable the internal
NIC for startup, then respond to the Network Service Boot
prompt each time you want to connect to the server.
■ To enable the NIC for startup and set the notebook to display
the Network Service Boot prompt each time the notebook is
started or restarted, set your preferences in the Setup utility.
The Setup utility is not a Windows utility and does not
support the TouchPad. For more information about using the
Setup utility, refer to the “Using the Setup Utility” section in
Chapter 9 of this guide.
■ To respond to the Network Service Boot prompt, press F12
while the prompt F12 = Boot from LAN appears very briefly
in the lower left corner of the screen before Windows loads.
Infrared
The notebook is IrDA-compliant and can communicate with
another infrared-equipped device that is also IrDA-compliant.
The IrDA connection speed standard is 4 megabits per second
(Mbps).
The infrared port supports low-speed connections up to
115 kilobits per second (Kbps) as well as high-speed connections
up to 4 Mbps.
7–12 Startup and Reference Guide—Part 2
Page 3
HP-323140-001.book Page 13 Tuesday, April 1, 2003 4:20 PM
Infrared signals are sent through an invisible beam of infrared
light and must have an unobstructed line of sight. Infrared
performance may vary with the performance of infrared
peripherals, the distance and angle between infrared devices, and
the applications being used.
Communications
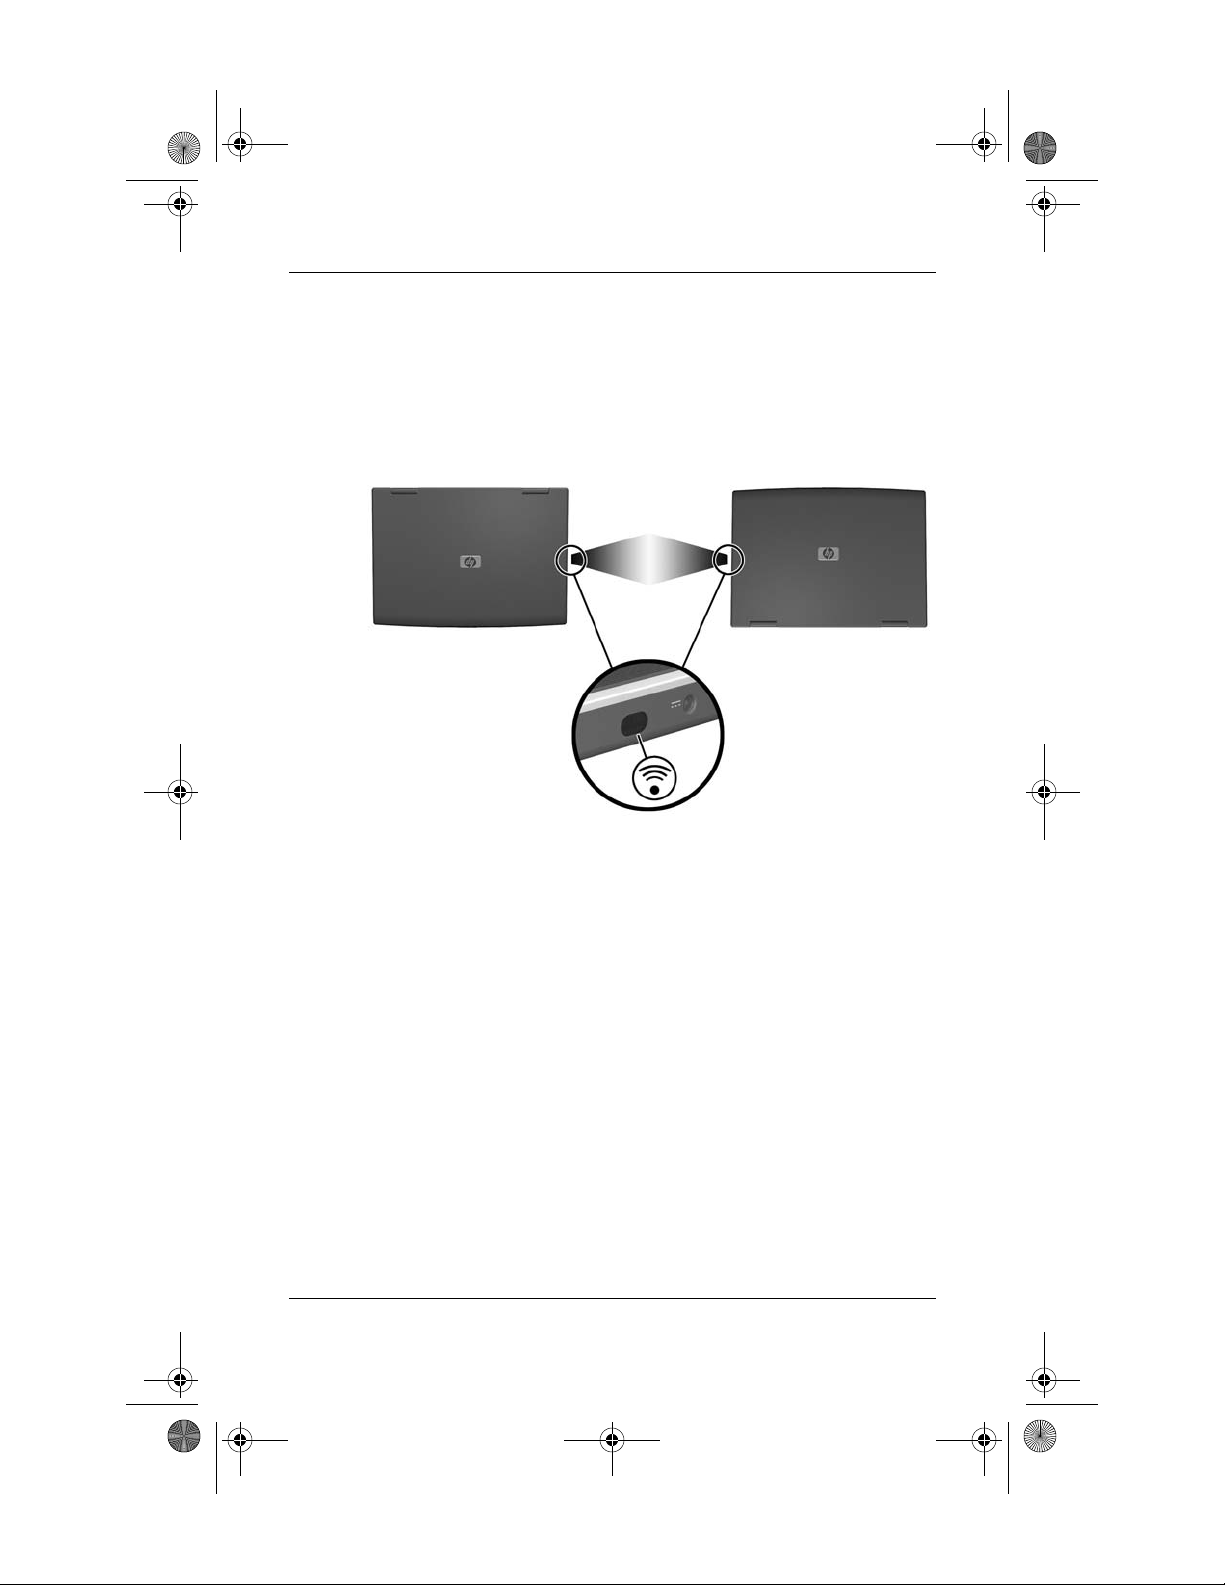
Linking to an infrared device
Setting Up an Infrared Transmission
For information about using infrared software and enabling or
disabling infrared ports, refer to the operating system Help files
and to the documentation included with the external infrared
device.
To set up 2 infrared devices, such as the notebook and an optional
printer, for optimal transmission:
■ Position the devices so that their infrared ports face each
other at a distance of no more than 3.3 feet (1 meter).
■ Position the ports so that they face each other directly. The
maximum capture angle is 30 degrees, so the ports must be
aligned no more than 15 degrees off center vertically or
horizontally.
Startup and Reference Guide—Part 2 7–13
Page 4

HP-323140-001.book Page 14 Tuesday, April 1, 2003 4:20 PM
Communications
■ Shield the ports from direct sunlight, flashing incandescent
light, and fluorescent light.
■ Be sure that signals from a remote control or other wireless
device (such as a cell phone, a headset, or an audio device)
do not aim at either port.
■ During the transmission, do not move either device and
do not allow objects or movement to disrupt the beam.
Avoiding Standby While Using Infrared
Standby is not compatible with infrared transmission. If the
notebook is in Standby, an infrared transmission cannot be
initiated.
If Standby initiates during an infrared transmission, the
transmission stops. To resume from Standby, briefly press
the power button. The transmission resumes when the notebook
resumes from Standby.
7–14 Startup and Reference Guide—Part 2
Page 5

HP-323140-001.book Page 1 Tuesday, April 1, 2003 4:20 PM
Hardware Options and
Contents
Connecting a Powered Device . . . . . . . . . . . . . . . . . . . . . 8–2
Connecting a USB Device . . . . . . . . . . . . . . . . . . . . . . . . 8–2
Using a PC Card. . . . . . . . . . . . . . . . . . . . . . . . . . . . . . . . 8–3
Selecting a PC Card. . . . . . . . . . . . . . . . . . . . . . . . . . 8–3
Configuring a PC Card . . . . . . . . . . . . . . . . . . . . . . . 8–4
Inserting a PC Card . . . . . . . . . . . . . . . . . . . . . . . . . . 8–4
Stopping and Removing a PC Card. . . . . . . . . . . . . . 8–5
Using an SD Card or MMC . . . . . . . . . . . . . . . . . . . . . . . 8–6
Using the SD Card Light . . . . . . . . . . . . . . . . . . . . . . 8–6
Inserting an SD Card or MMC . . . . . . . . . . . . . . . . . 8–7
Removing an SD Card or MMC . . . . . . . . . . . . . . . . 8–8
Disabling or Restarting an SD Card or MMC . . . . . . 8–8
Increasing Memory . . . . . . . . . . . . . . . . . . . . . . . . . . . . . 8–9
Displaying Memory Information. . . . . . . . . . . . . . . . 8–9
Removing or Inserting a Memory Module . . . . . . . 8–10
Connecting an Optional Cable Lock . . . . . . . . . . . . . . . 8–15
8
Upgrades
Startup and Reference Guide—Part 2 8–1
Page 6

HP-323140-001.book Page 2 Tuesday, April 1, 2003 4:20 PM
Hardware Options and Upgrades
Connecting a Powered Device
To connect the notebook to an optional external device that has a
power cord:
1. Be sure the device is turned off.
2. Connect the device to the jack or connector on the notebook
specified by the device manufacturer.
3. Plug the device power cord into a grounded electrical outlet.
4. Turn on the device.
If a properly connected external monitor or other display device
✎
does not display an image, try pressing the
switch the image to the new device.
To disconnect a powered external device from the notebook:
1. Turn off the device.
2. Disconnect the device from the notebook.
Fn+F4 hotkeys to
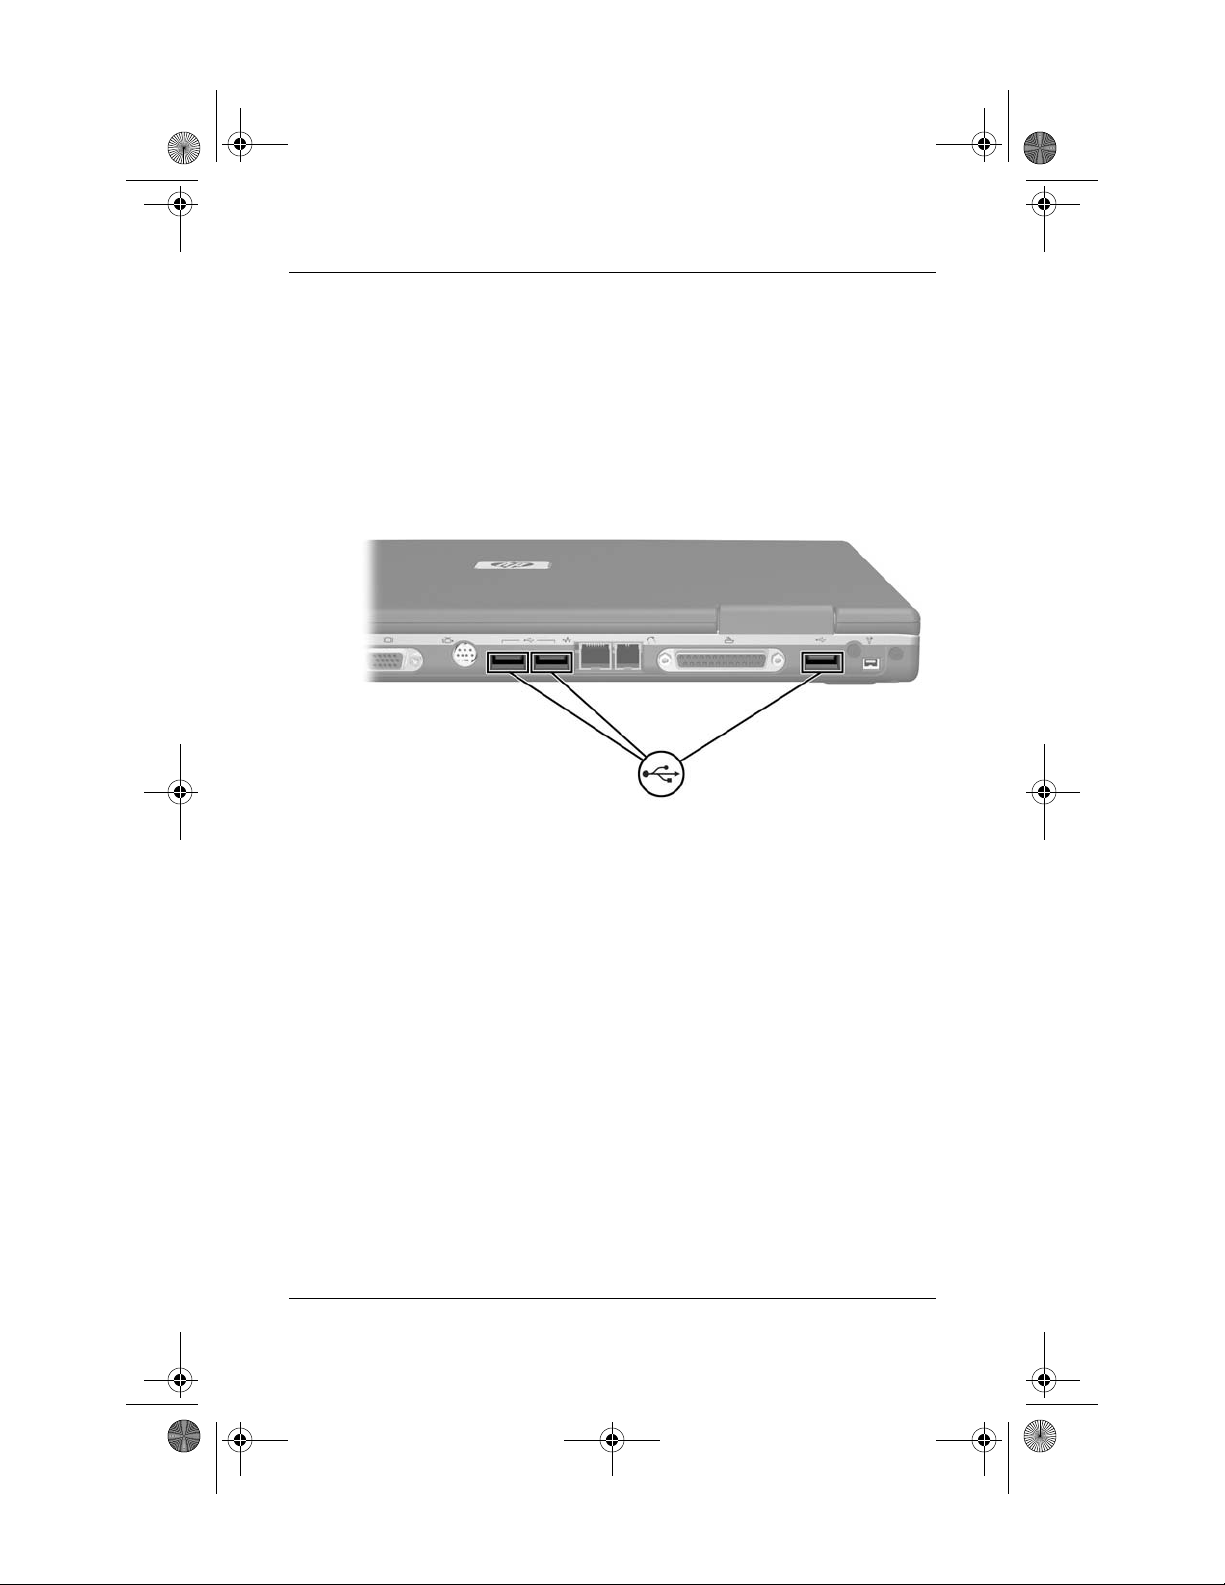
Connecting a USB Device
USB (universal serial bus) is a hardware interface that can be
used to connect external devices such as a USB keyboard, mouse,
drive, printer, scanner, or hub to the notebook.
A hub is a connecting device that can be either powered or
unpowered. USB hubs can be connected to a USB connector on
the notebook or to other USB devices. Hubs support varying
numbers of USB devices and are used to increase the number of
USB devices in the system.
■ Powered hubs must be connected to external power.
■ Unpowered hubs must be connected either to a USB
connector on the notebook or to a port on a powered hub.
The USB connectors on the notebook support USB 2.0- and
1.1-compliant devices.
8–2 Startup and Reference Guide—Part 2
Page 7
HP-323140-001.book Page 3 Tuesday, April 1, 2003 4:20 PM
By default, USB devices function only while the operating
system is loaded. To use a USB keyboard or hub connected to a
USB connector on the notebook during startup (before Windows
loads) or in a non-Windows application or utility, enable USB
legacy support in the Setup utility. For more information about
using the Setup utility, see the “Using the Setup Utility” section
in Chapter 9.
Hardware Options and Upgrades
Identifying the 3 USB connectors on the notebook
Using a PC Card
A PC Card is a credit card–sized accessory designed to conform
to the standard specifications of the Personal Computer Memory
Card International Association (PCMCIA). The notebook
PC Card slot supports both 32-bit CardBus and 16-bit PC Cards.
PC Cards can be used to add modem, sound, storage, wireless
communication, or digital camera functions to the notebook.
Selecting a PC Card
A Type I or Type II PC Card can be used. Zoomed video cards are
not supported.
Startup and Reference Guide—Part 2 8–3
Page 8
HP-323140-001.book Page 4 Tuesday, April 1, 2003 4:20 PM
Hardware Options and Upgrades
Configuring a PC Card
CAUTION: If you install all of the software or any of the enablers
Ä
provided by a PC Card manufacturer, you may not be able to use other
PC Cards. If you are instructed by the documentation included with
your PC Card to install device drivers:
■ Install only the device drivers for your operating system.
■ Do not install other software, such as card services, socket services,
or enablers, that may also be supplied by the PC Card
manufacturer.
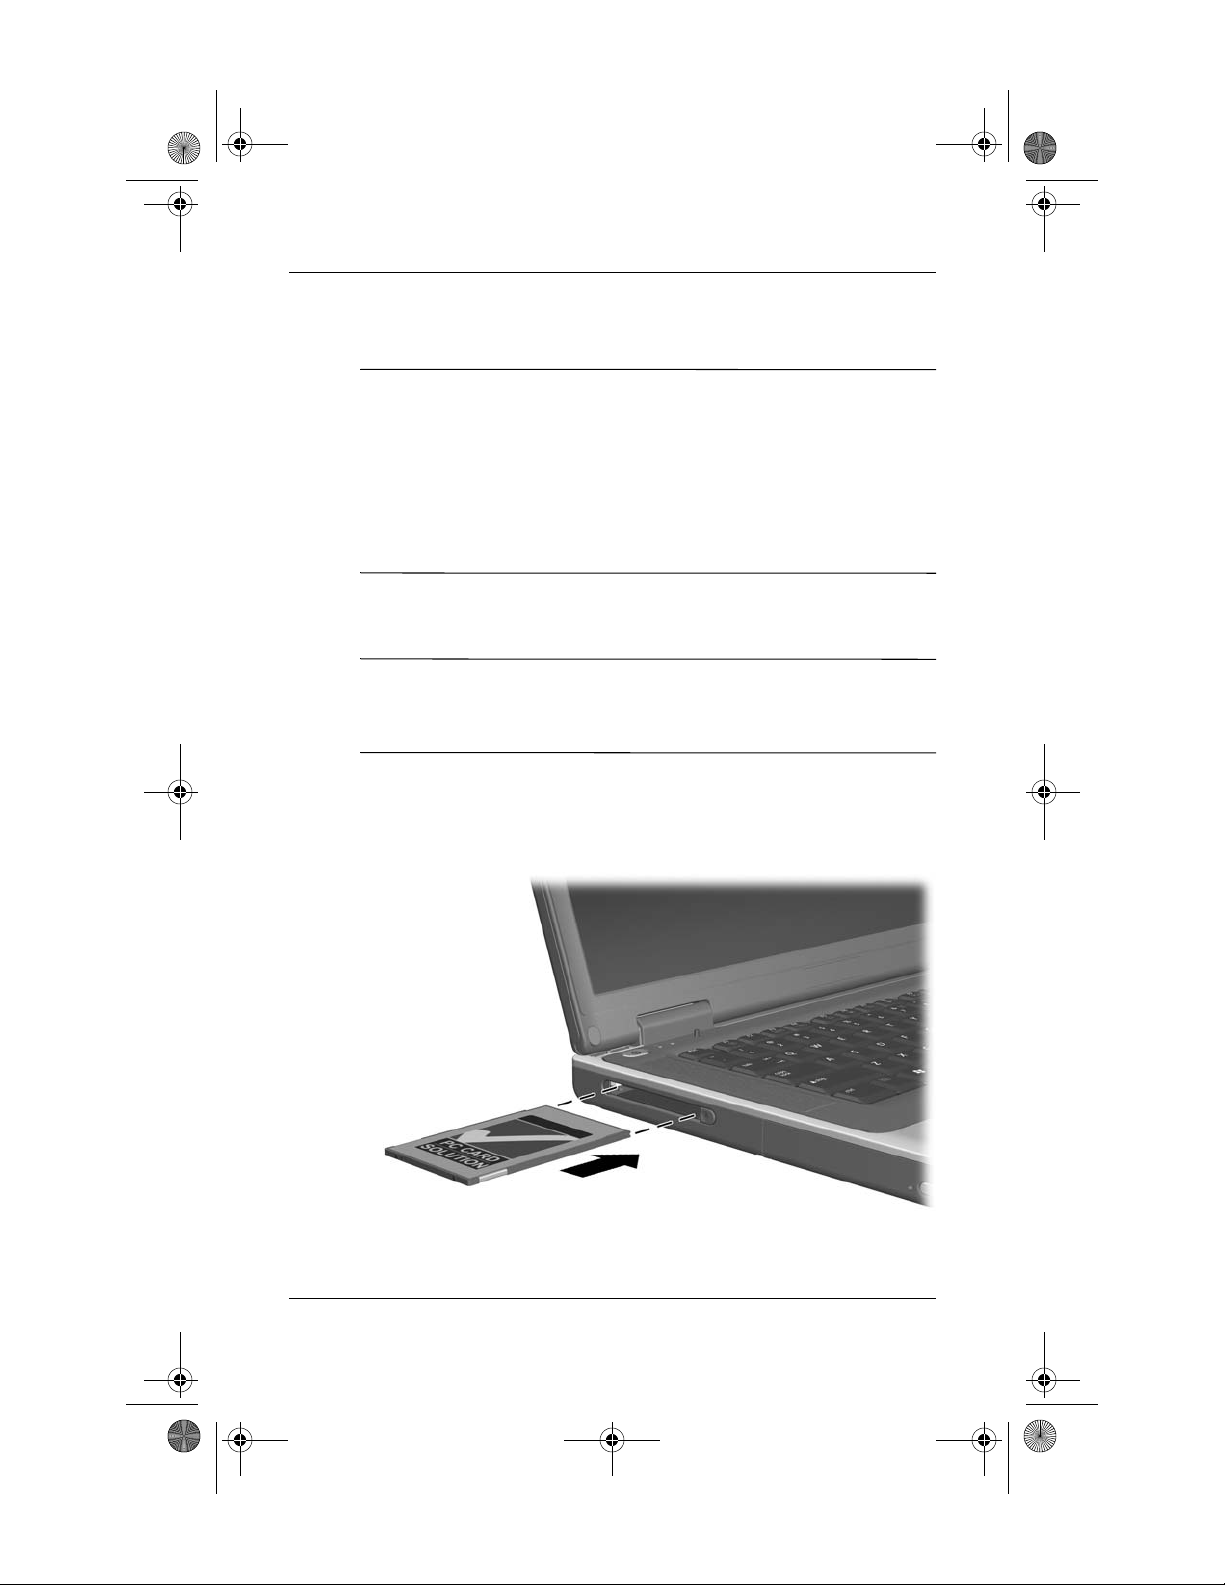
Inserting a PC Card
CAUTION: To prevent damage to the PC Card connectors:
Ä
■ Use minimal force when inserting a PC Card into a PC Card slot.
■ Do not move or transport the notebook while a PC Card is inserted.
1. Hold the PC Card label-side up with the connectors facing
the notebook.
2. Gently push the card into the slot until the card is seated.
Inserting a PC Card
8–4 Startup and Reference Guide—Part 2
Page 9
HP-323140-001.book Page 5 Tuesday, April 1, 2003 4:20 PM
Hardware Options and Upgrades
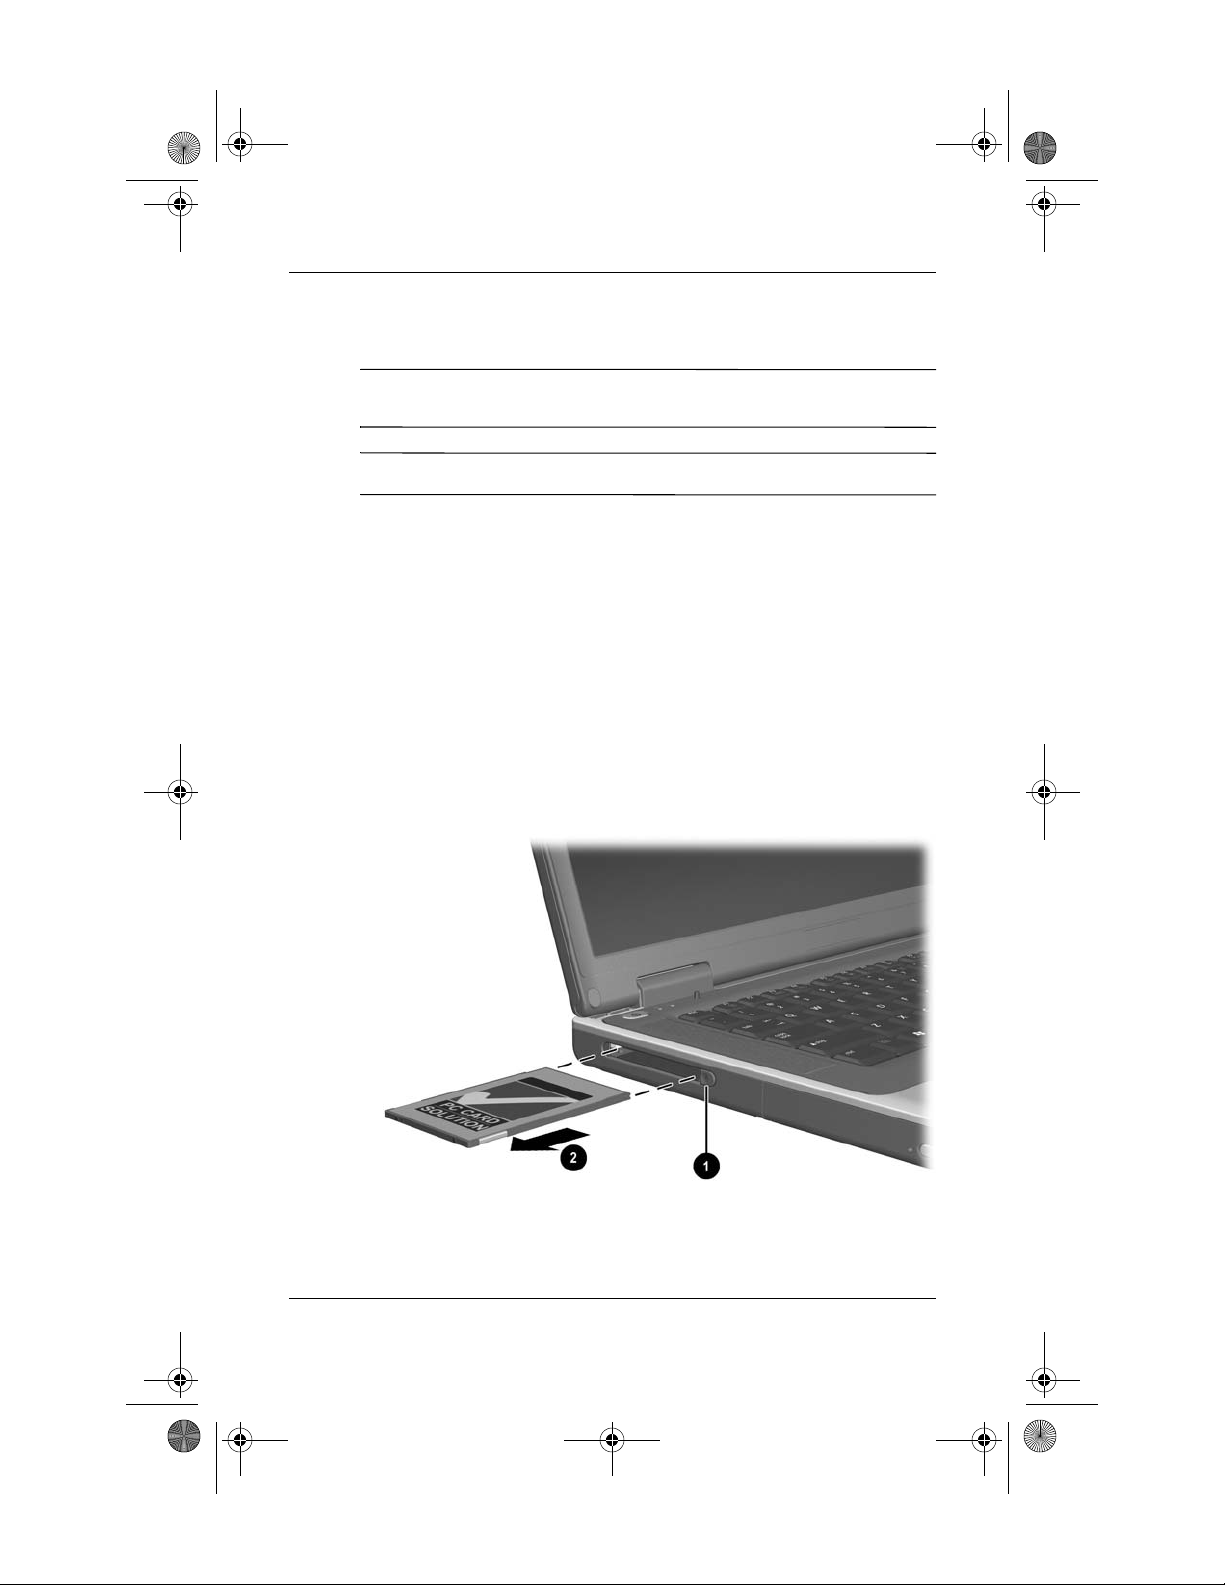
Stopping and Removing a PC Card
CAUTION: To prevent loss of work or an unresponsive system, stop the
Ä
PC Card before removing it.
Stopping a PC Card, even if it is not in use, conserves power.
✎
1. Close all applications and complete all activities that are
supported by the PC Card.
2. To stop a PC Card, select the Safely Remove Hardware icon
on the taskbar, then select the PC Card. (To display the Safely
Remove Hardware icon, select in the taskbar the icon for
Show Hidden Icons.)
3. To release the PC Card, press the PC Card eject button 1. (If
the PC Card button does not extend while a PC Card is in the
PC Card slot, press the button once to extend the button, then
press the button again to release the PC Card.)
4. Gently pull out the PC Card 2.
Removing a PC Card
Startup and Reference Guide—Part 2 8–5
Page 10
HP-323140-001.book Page 6 Tuesday, April 1, 2003 4:20 PM
Hardware Options and Upgrades
Using an SD Card or MMC
CAUTION: To prevent damage to the SD Card connectors:
Ä
■ Use minimal force when inserting an SD Card or MMC into an
SD Card slot.
■ Do not move or transport the notebook while an SD Card or MMC
is inserted.
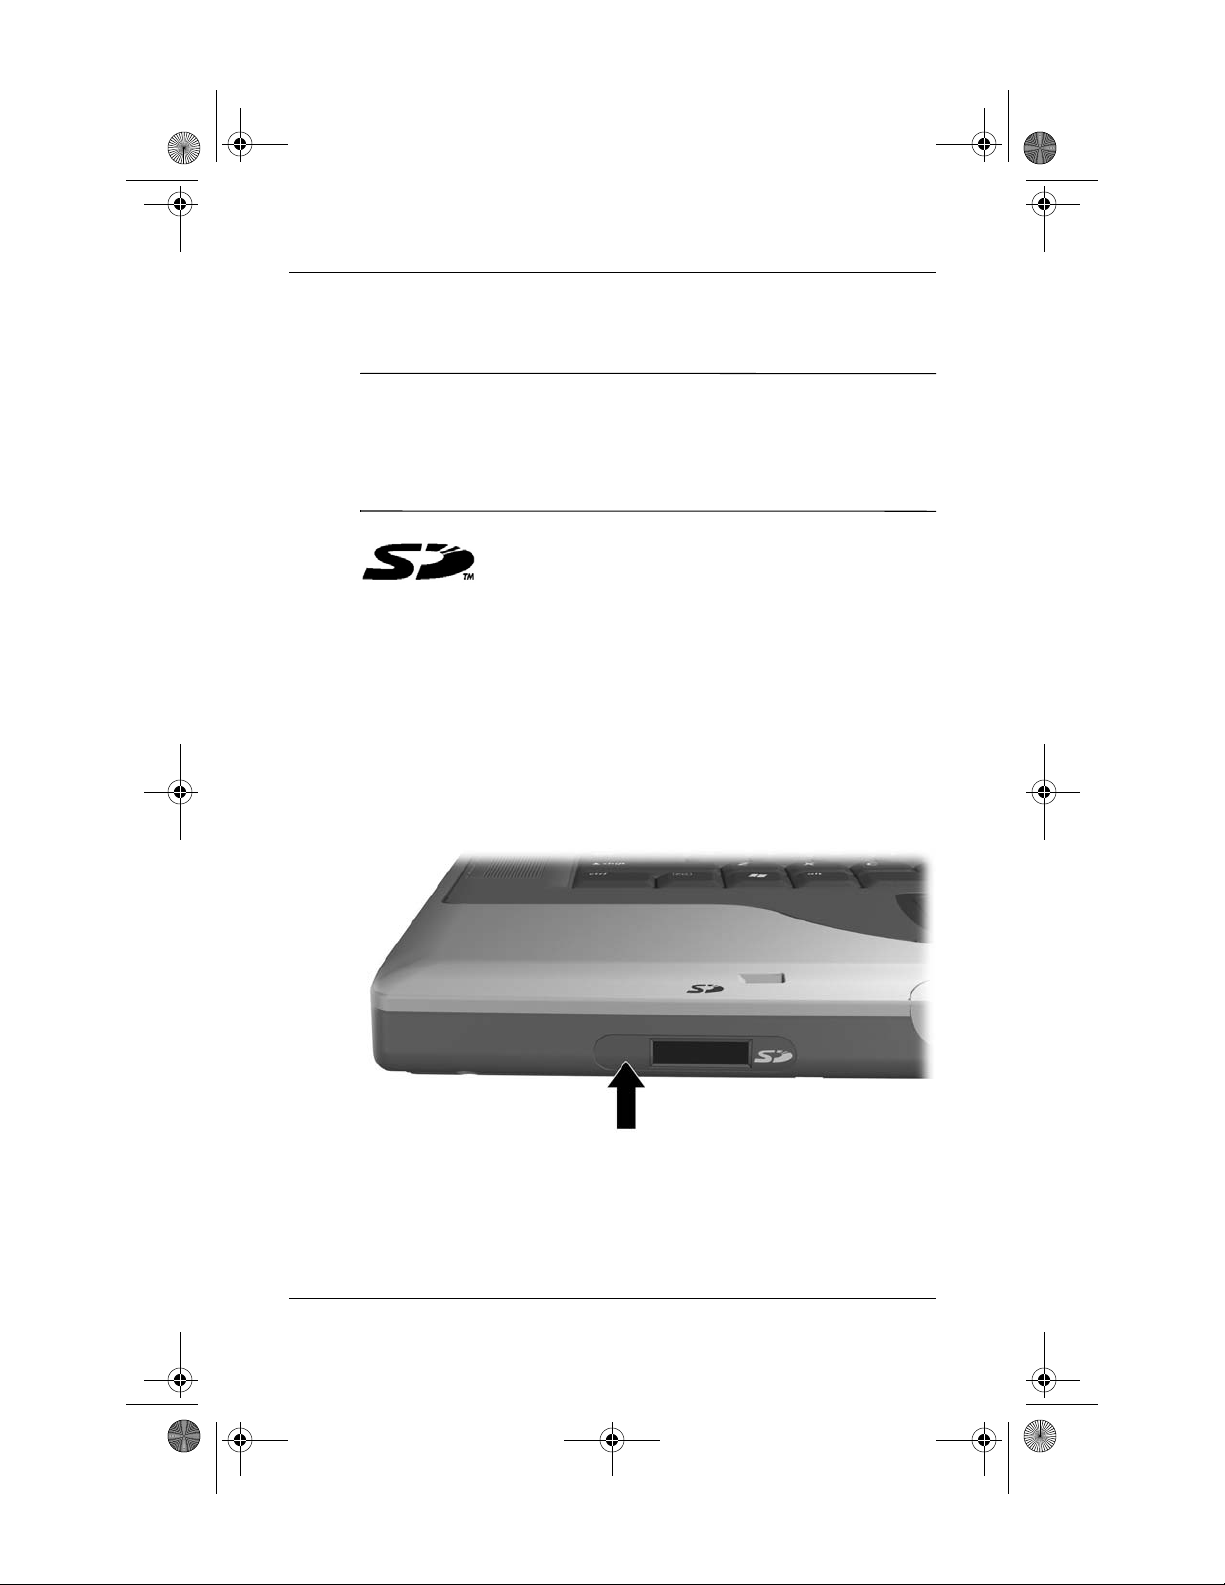
SD (Secure Digital) Cards and MMCs
(multimedia cards) are flash memory cards that
provide secure data storage and convenient data
sharing. These cards are often used with SD-equipped cameras
and PDAs as well as notebooks. The SD Card features on the
notebook support both SD Cards and MMCs.
Using the SD Card Light
The SD Card light turns on when an inserted SD Card or MMC is
being accessed. The SD Card light turns off when an inserted SD
Card or MMC is inactive or when the SD Card slot is empty.
Identifying the SD Card light
8–6 Startup and Reference Guide—Part 2
Page 11
HP-323140-001.book Page 7 Tuesday, April 1, 2003 4:20 PM
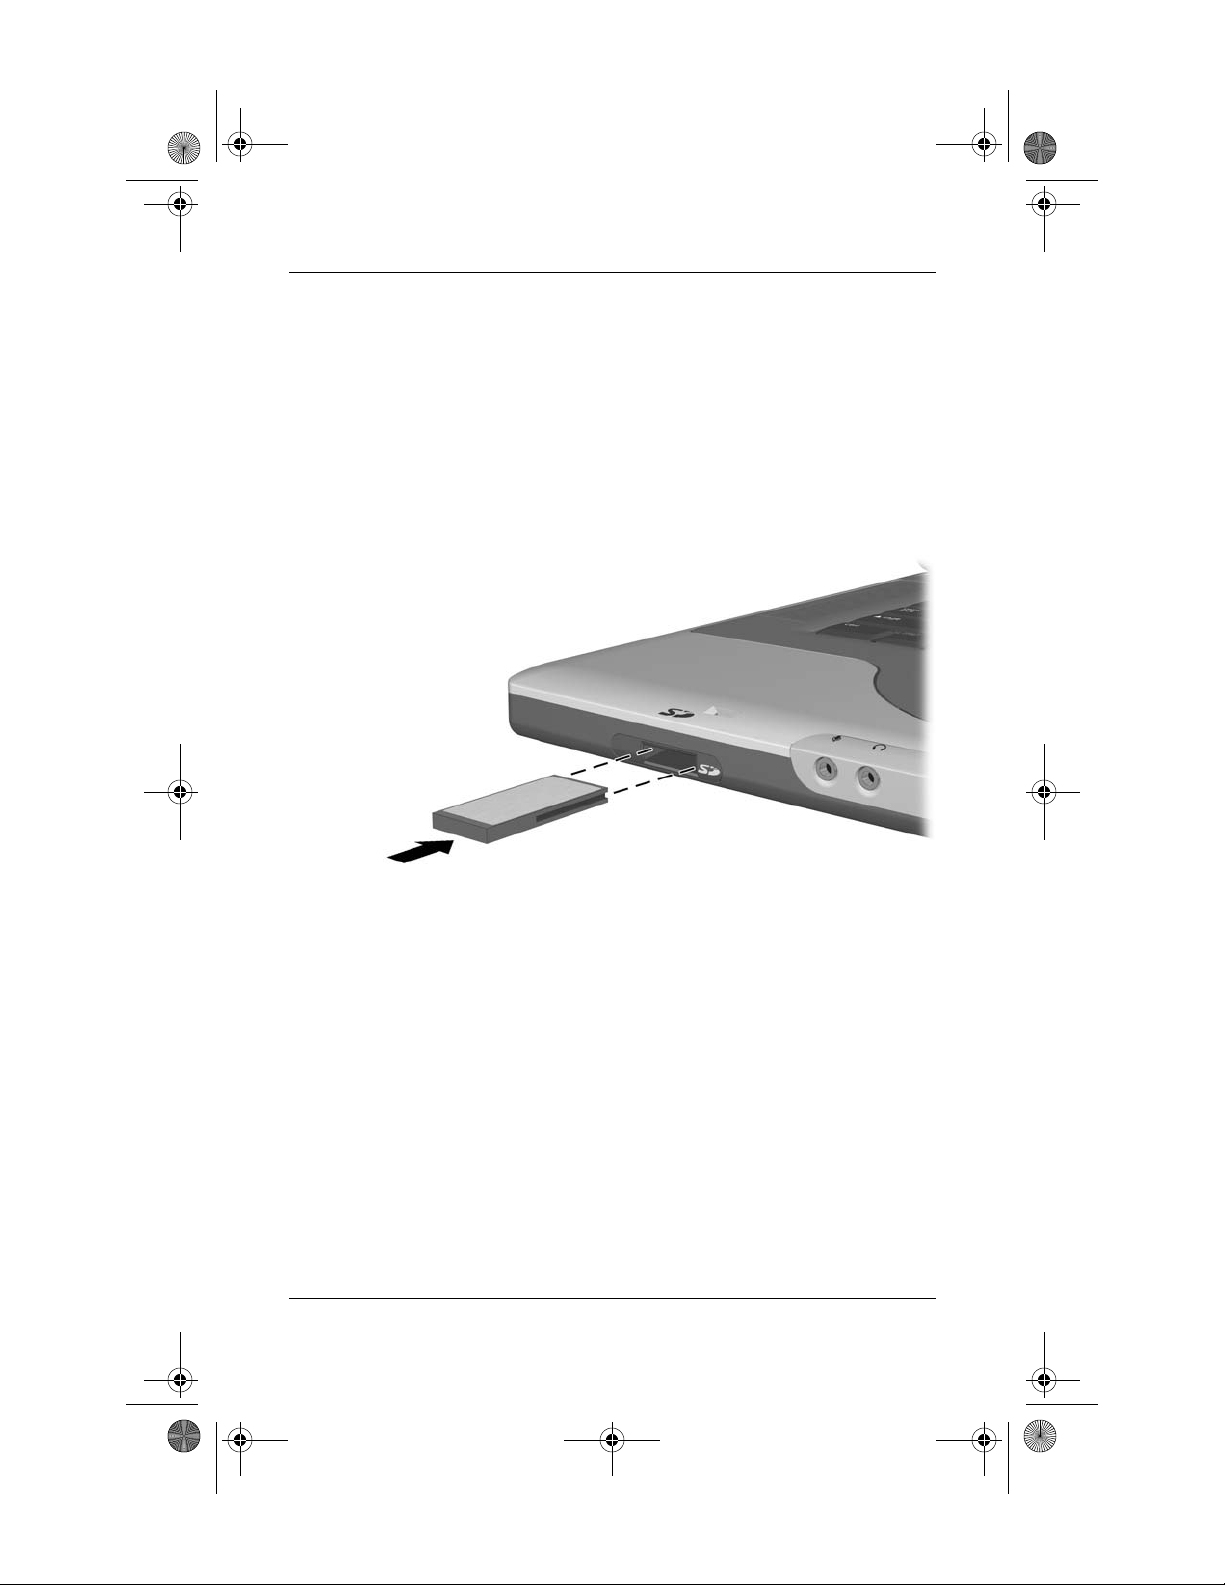
Inserting an SD Card or MMC
To insert an SD Card or MMC:
1. Hold the card label-side up with the connectors facing
the notebook.
2. Gently push the card into the SD Card slot until the card is
seated. (The card will extend outward slightly beyond the
notebook.)
Hardware Options and Upgrades
Inserting an SD Card or MMC
Startup and Reference Guide—Part 2 8–7
Page 12
HP-323140-001.book Page 8 Tuesday, April 1, 2003 4:20 PM
Hardware Options and Upgrades
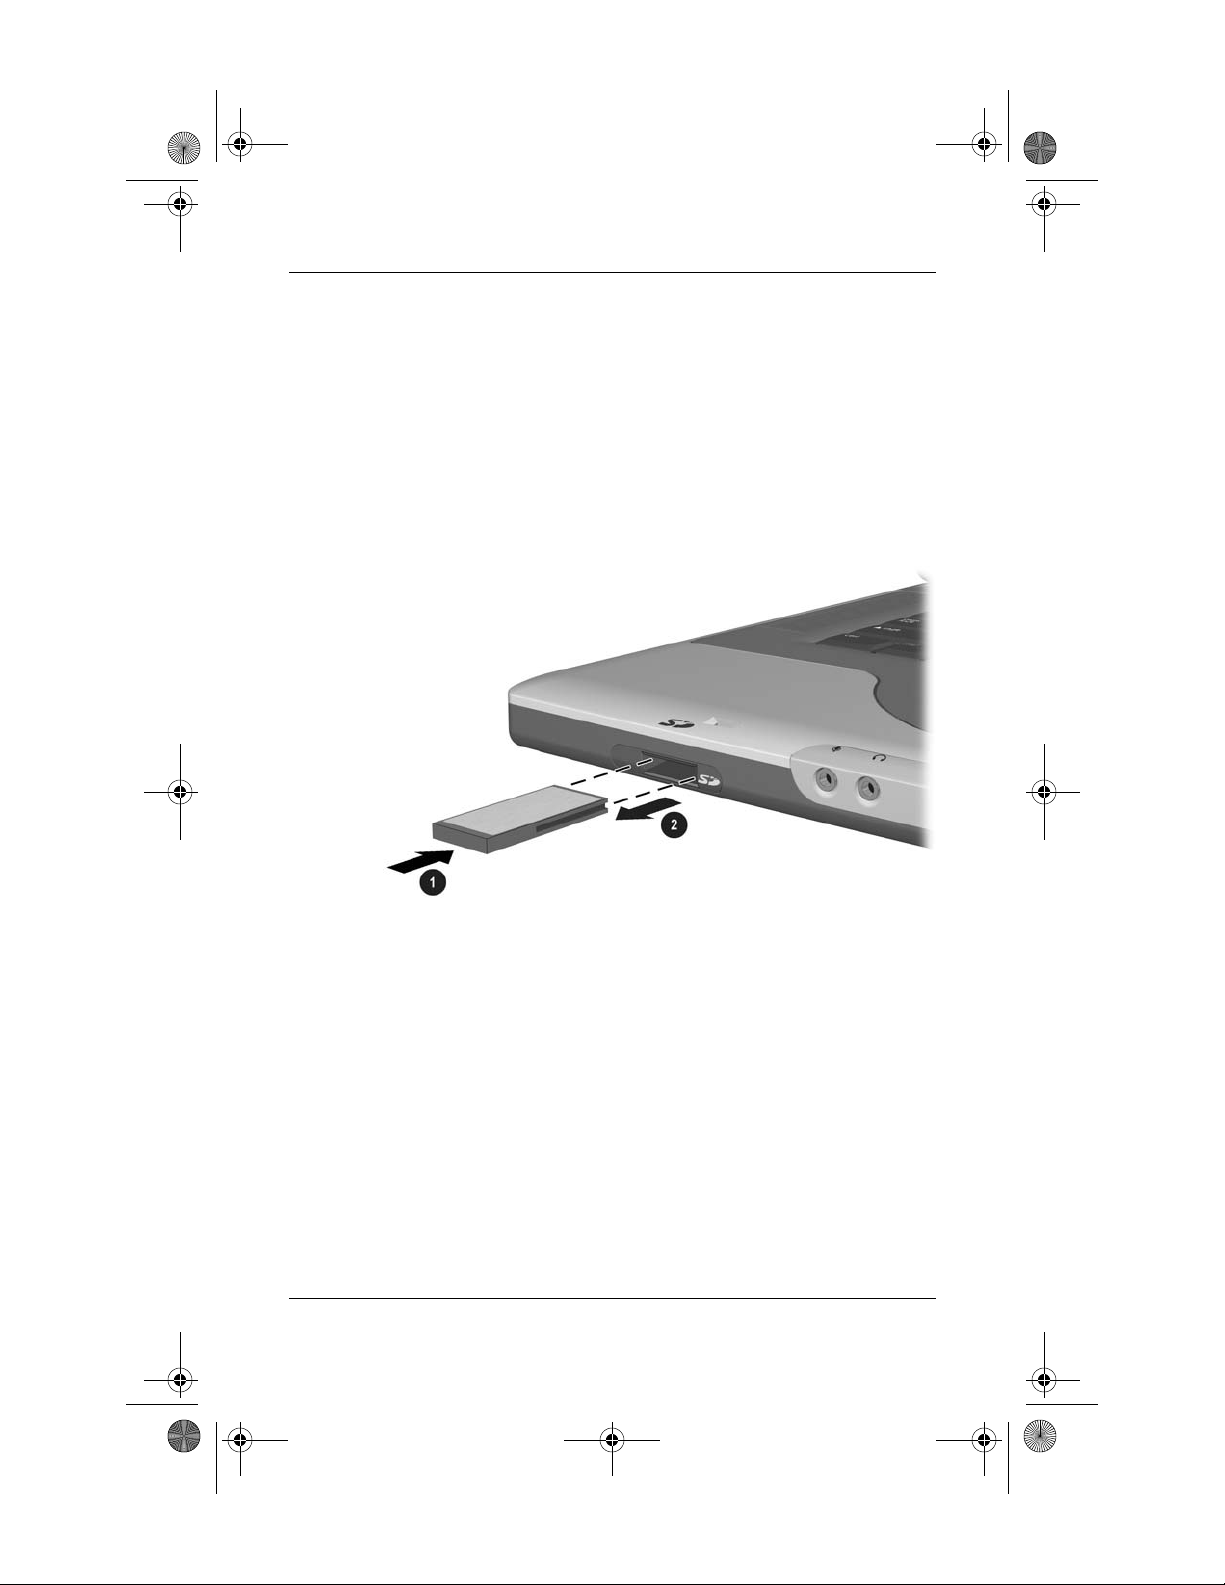
Removing an SD Card or MMC
To remove an SD Card or MMC:
1. Close all applications and complete all activities that are
supported by the card. (To stop a data transfer, select the
cancel button in the operating system Copying window.)
2. Push the card inward until it is released 1.
3. Pull the card out of the slot 2.
Releasing and removing an SD Card or MMC
Disabling or Restarting an SD Card or MMC
An inserted SD Card or MMC uses power even when the card is
not in use. Disabling the card conserves power.
To disable an inserted SD Card or MMC, double-click the My
Computer icon on the Windows Desktop, right-click the drive
assigned to the card, then select Eject. (The card is stopped but is
not released from the SD Card slot.)
8–8 Startup and Reference Guide—Part 2
Page 13

HP-323140-001.book Page 9 Tuesday, April 1, 2003 4:20 PM
Hardware Options and Upgrades
To restart the card, remove, then reinsert, the card. For
instructions, see “Inserting an SD Card or MMC” and “Removing
an SD Card or MMC” in this chapter.
Increasing Memory
You can increase the amount of RAM (random access memory)
in the notebook with an optional HP-approved memory module.
The notebook memory slot supports one 128-MB, 256-MB,
512-MB, or 1024-MB memory module.
Some notebook models ship with a vacant memory slot. On other
models the memory slot contains a preinstalled memory module
that can be replaced at any time.
Displaying Memory Information
When RAM is increased, the operating system increases the hard
drive space reserved for the hibernation file.
If you experience problems with Hibernation after increasing
RAM, verify that your hard drive has enough free space for the
larger hibernation file.
■ To display the amount of RAM in the system:
Select Start > Control Panel > Performance and
Maintenance icon > System icon > General tab.
■ To display both the amount of free space on your hard drive
and the amount of space required by the hibernation file:
Select Start > Control Panel > Performance and
Maintenance icon > Power Options icon > Hibernate tab.
Startup and Reference Guide—Part 2 8–9
Page 14

HP-323140-001.book Page 10 Tuesday, April 1, 2003 4:20 PM
Hardware Options and Upgrades
Removing or Inserting a Memory Module
WARNING: To prevent exposure to electrical shock, access only the
memory compartment during this procedure. The memory compartment
Å
and the battery and hard drive bays are the only user-accessible internal
compartments on the notebook. All other areas that require a tool to
access should be opened only by an HP authorized service provider.
WARNING: To prevent exposure to electrical shock and damage to
Å
the notebook, shut down the notebook, unplug the power cord, and
remove the battery pack before installing a memory module.
CAUTION: To prevent electrostatic discharge from damaging electronic
components: before beginning this procedure, discharge yourself of
Ä
static electricity by touching a grounded metal object. For more
information about preventing electrostatic damage, refer on the
Documentation Library CD to the Regulatory and Safety Notices guide,
“Electrostatic Discharge” chapter.
1. Save your work and shut down the notebook. If you are not
sure whether the notebook is off or in Hibernation, briefly
press the power button. If your work returns to the screen,
save your work, exit all applications, then shut down
the notebook.
2. Disconnect all external devices connected to the notebook.
3. Disconnect the power cord.
4. Remove the battery pack.
8–10 Startup and Reference Guide—Part 2
Page 15
HP-323140-001.book Page 11 Tuesday, April 1, 2003 4:20 PM
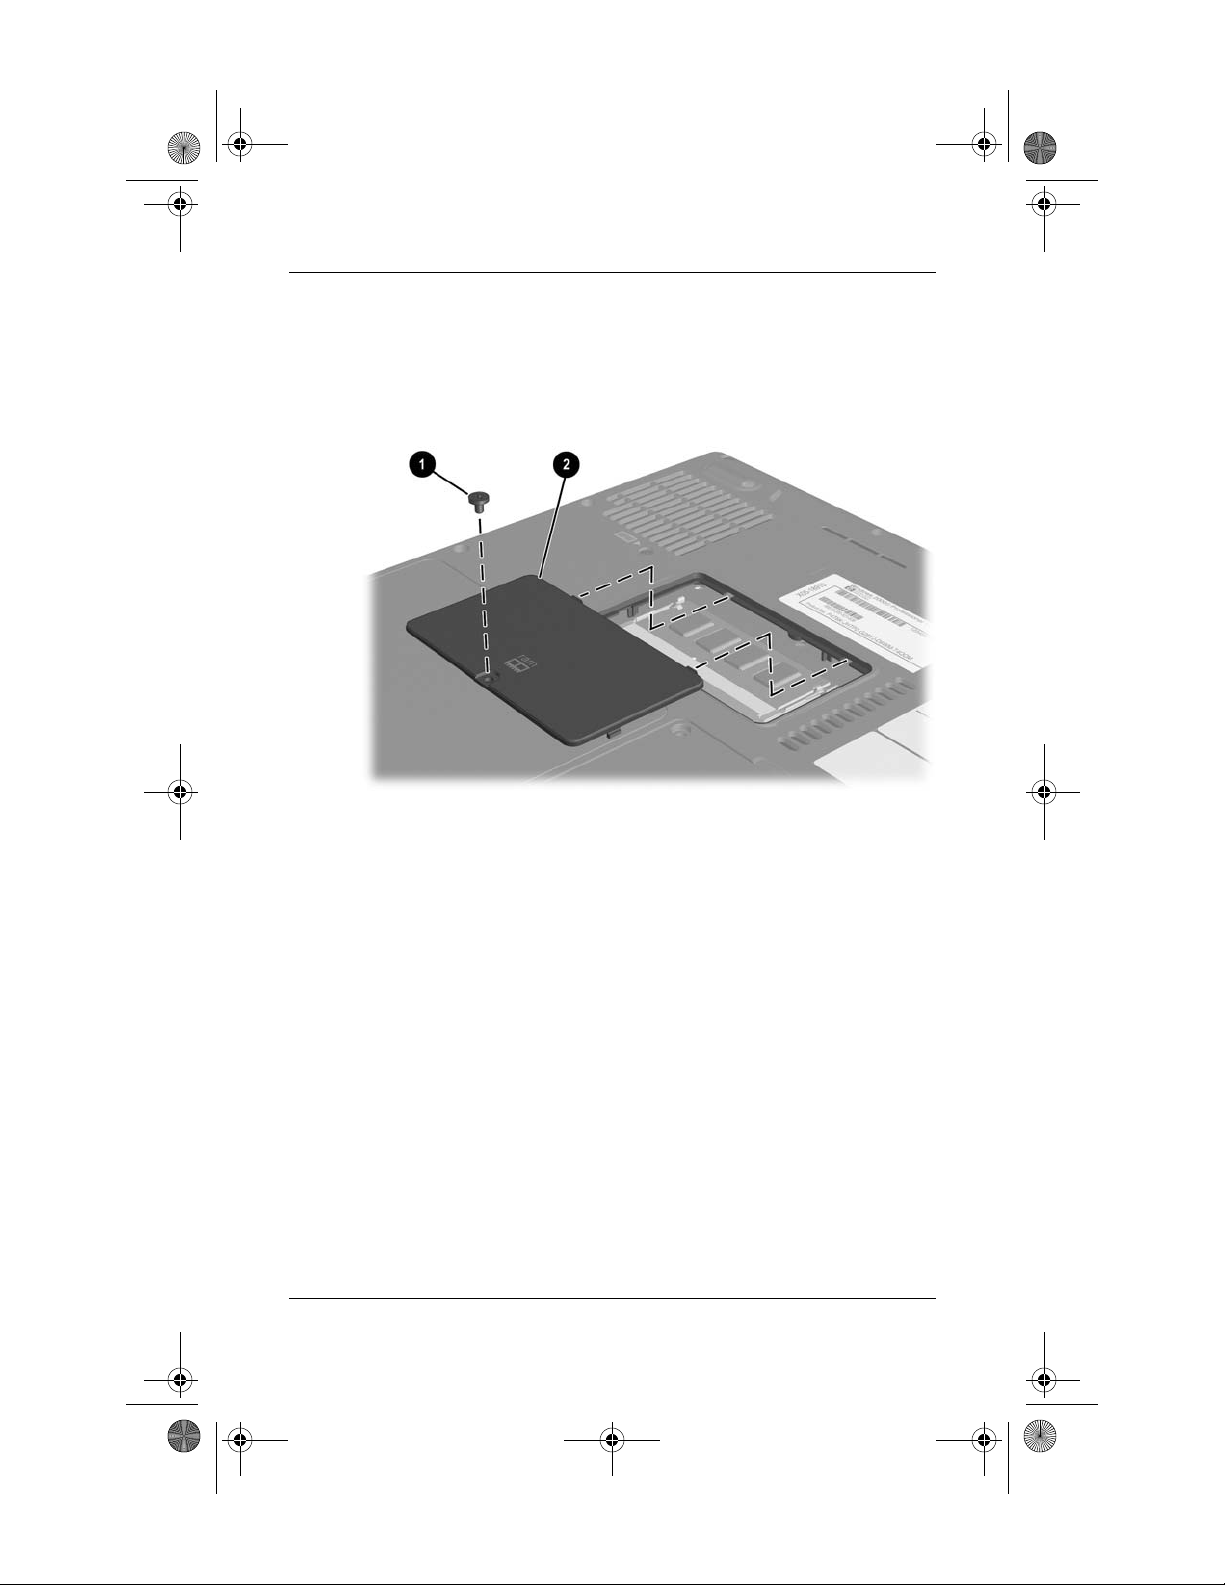
5. Turn the notebook underside up.
6. Remove the memory compartment screw 1, then lift up and
remove the memory compartment cover 2.
Hardware Options and Upgrades
Opening the memory compartment
Startup and Reference Guide—Part 2 8–11
Page 16
HP-323140-001.book Page 12 Tuesday, April 1, 2003 4:20 PM
Hardware Options and Upgrades
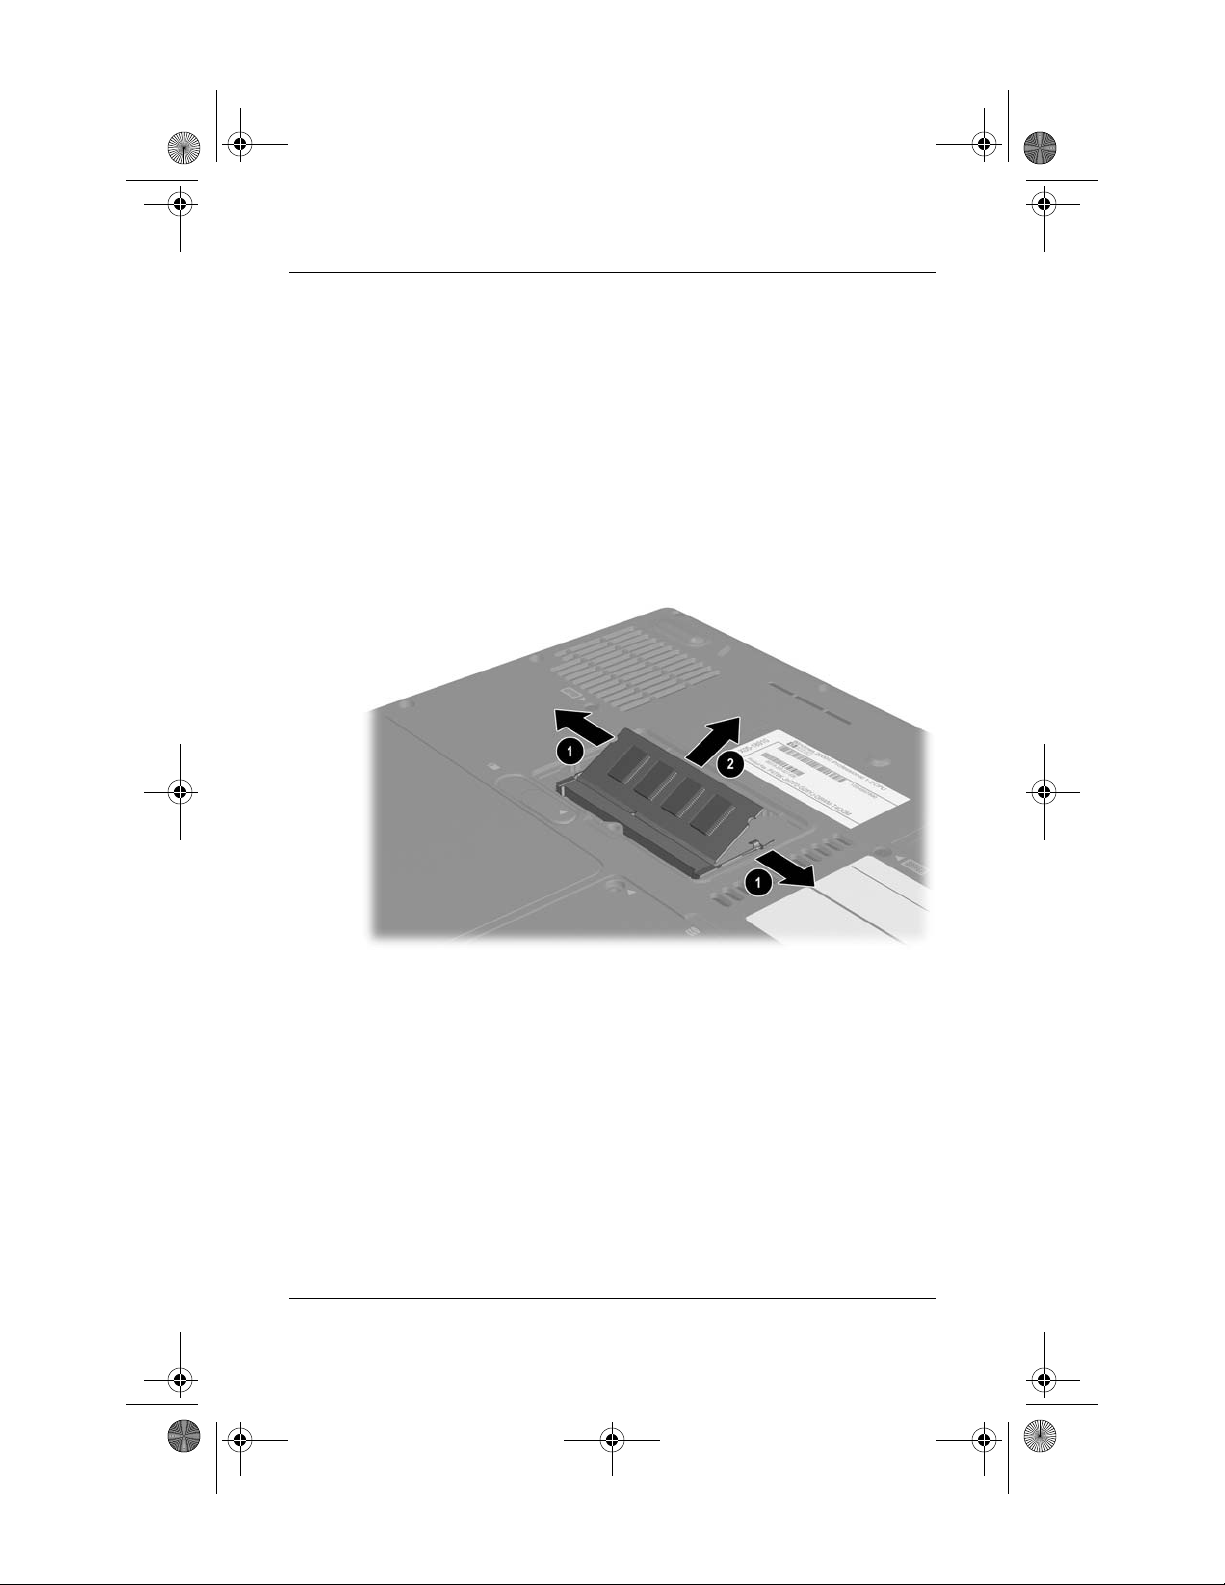
7. Remove or insert the memory module.
To remove a memory module:
a. Pull away the retention clips on each side of the
module 1. (The module tilts upward.)
b. Grasp the edges of the module and gently pull the module
out of the memory slot 2.
c. To protect a memory module after removal, place it in an
electrostatic-safe container.
Removing a memory module
8–12 Startup and Reference Guide—Part 2
Page 17

HP-323140-001.book Page 13 Tuesday, April 1, 2003 4:20 PM
To insert a memory module:
a. Align the keyed (notched) edge of the module with the
keyed area in the memory slot 1.
b. With the module at a 45-degree angle from the surface
of the memory compartment, press the module into the
memory slot until it is seated 2.
c. Push the module downward until the retention clips snap
into place 3.
Hardware Options and Upgrades
Inserting a memory module
Startup and Reference Guide—Part 2 8–13
Page 18

HP-323140-001.book Page 14 Tuesday, April 1, 2003 4:20 PM
Hardware Options and Upgrades
8. Align the tabs on the memory compartment cover with the
cover slots on the notebook, then tilt the cover downward
until it is seated 1.
9. Reinsert and tighten the memory compartment screw 2.
10. Replace the battery pack (if you removed a battery pack at the
beginning of this procedure), reconnect the notebook to
external power, then restart the notebook.
Closing the memory compartment
8–14 Startup and Reference Guide—Part 2
Page 19
HP-323140-001.book Page 15 Tuesday, April 1, 2003 4:20 PM
Hardware Options and Upgrades
Connecting an Optional Cable Lock
The purpose of security solutions is to act as a deterrent. These
✎
solutions do not prevent the product from being mishandled or
stolen.
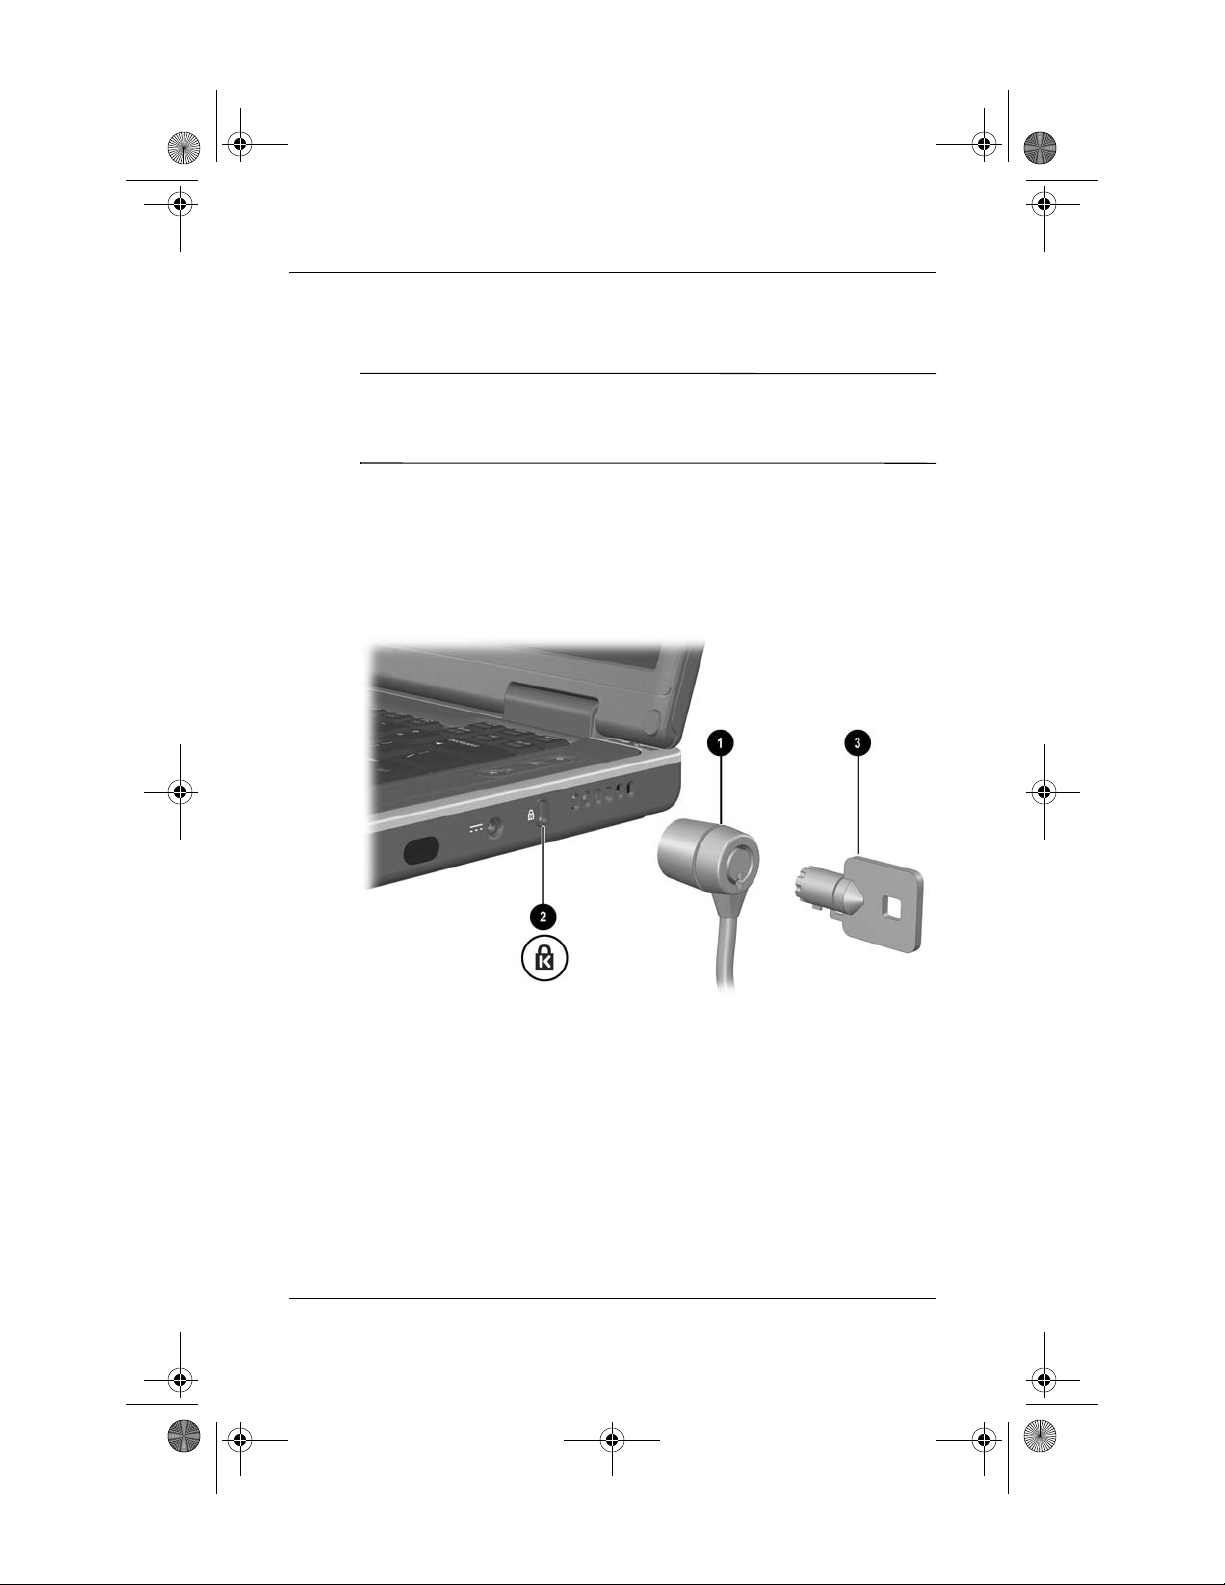
An optional cable lock is a security device that prevents
unauthorized removal of the notebook.
Loop the cable around a secure object, then insert the cable
lock 1 into the security cable slot 2 and lock it with the
cable lock key 3.
Connecting an optional cable lock
Startup and Reference Guide—Part 2 8–15
Page 20

HP-323140-001.book Page 16 Tuesday, April 1, 2003 4:20 PM
Hardware Options and Upgrades
8–16 Startup and Reference Guide—Part 2
Page 21

HP-323140-001.book Page 1 Tuesday, April 1, 2003 4:20 PM
Software Updates,
Restorations and Utilities
Contents
Updating Software . . . . . . . . . . . . . . . . . . . . . . . . . . . . . . 9–2
Preparing for a Software Update . . . . . . . . . . . . . . . . 9–2
Downloading and Installing an Update . . . . . . . . . . . 9–4
Backing Up and Restoring Data. . . . . . . . . . . . . . . . . . . . 9–7
Setting a System Restore Point . . . . . . . . . . . . . . . . . 9–7
Restoring to a System Restore Point . . . . . . . . . . . . . 9–7
Repairing or Reinstalling the Operating System . . . . . . . 9–8
Repairing the Operating System . . . . . . . . . . . . . . . . 9–8
Reinstalling the Operating System . . . . . . . . . . . . . . 9–9
Reinstalling Device Drivers and Other
Software. . . . . . . . . . . . . . . . . . . . . . . . . . . . . . . . . . 9–10
Installing a Retail Version of an Operating System. . . . 9–11
Using the Setup Utility. . . . . . . . . . . . . . . . . . . . . . . . . . 9–11
Opening the Setup Utility . . . . . . . . . . . . . . . . . . . . 9–11
Navigating and Selecting in the Setup Utility . . . . . 9–12
Restoring Setup Utility Default Settings . . . . . . . . . 9–12
Exiting the Setup Utility . . . . . . . . . . . . . . . . . . . . . 9–12
Using the Support Utilities. . . . . . . . . . . . . . . . . . . . . . . 9–13
Using the Help and Support Window . . . . . . . . . . . 9–13
Using Support Telephone Numbers . . . . . . . . . . . . 9–14
9
Startup and Reference Guide—Part 2 9–1
Page 22

HP-323140-001.book Page 2 Tuesday, April 1, 2003 4:20 PM
Software Updates, Restorations and Utilities
Updating Software
For optimal notebook performance and to make sure your
notebook remains compatible with changing technologies, install
the latest versions of the software provided with your notebook as
they become available.
To update notebook software:
1. Prepare for any update by identifying your notebook type,
series or family, and model.
Prepare for a ROM (read-only memory) update by identifying
the ROM version currently installed on the notebook.
2. Access the updates at the HP Web site.
3. Download and install the updates.
The notebook ROM stores the BIOS (basic input-output system).
✎
The BIOS determines how the notebook hardware interacts with
the operating system and external devices and also supports such
notebook services as time and date.
Preparing for a Software Update
If your notebook connects to a network, consult with your
network administrator before installing any software updates,
particularly a ROM update.
Accessing Notebook Product Information
To access the updates for your notebook, you will need the
following information:
■ The product category is Notebook.
■ The product family name and series number are printed on
the display bezel.
■ More complete model information is provided on the serial
number label on the underside of the notebook.
9–2 Startup and Reference Guide—Part 2
Page 23

HP-323140-001.book Page 3 Tuesday, April 1, 2003 4:20 PM
Software Updates, Restorations and Utilities
The product name, notebook model, and notebook serial number
are also displayed in the same section of the Setup utility that
displays ROM information, as described in the next section.
Accessing Notebook ROM Information
To determine whether an available ROM update is a later
ROM version than the ROM version currently installed on the
notebook, you need to know the version of the currently
installed ROM.
ROM information is displayed in the Setup utility. The Setup
utility is a non-Windows utility that does not support the
TouchPad. For complete information about using the Setup
utility, see the “Using the Setup Utility” section in Chapter 9.
1. To open the Setup utility, turn on or restart the notebook.
2. Before Windows opens and while the F10 = ROM Based
Setup prompt is displayed in the lower left section of the
screen, press
3. Use the arrow keys to select the File menu, then press enter.
4. Use the down arrow key to select System Info, then press
enter. (The ROM version and date are displayed in the System
BIOS Version field.)
5. To close the System Info window and exit the Setup utility
without changing any settings:
F10.
a. Press
esc to close the window.
b. Use the arrow keys to select the File menu, then
press
enter.
c. Use the arrow keys to select Ignore changes and exit, then
enter.
press
Startup and Reference Guide—Part 2 9–3
Page 24

HP-323140-001.book Page 4 Tuesday, April 1, 2003 4:20 PM
Software Updates, Restorations and Utilities
Downloading and Installing an Update
Most software at the HP Web site is packaged in a compressed
file called a SoftPaq. Some ROM updates may be packaged in a
compressed file called a RomPaq. Other ROM updates may be
provided as a CPQFlash SoftPaq.
Most download packages contain a file named Readme.txt. A
Readme.txt file contains detailed descriptive, installation, and
troubleshooting information about the download. The Readme.txt
files included with RomPaqs are English only.
The following sections provide instructions for downloading and
installing:
■ A ROM update.
■ A SoftPaq containing an update other than a ROM update.
Downloading and Installing a ROM Update
CAUTION: To prevent serious damage to the notebook or an unsuccessful
Ä
installation, download and install a ROM update only while the notebook
is connected to reliable external power using the AC adapter or a DC
cable. (Do not download or install a ROM update while the notebook is
docked or running on battery power.) During the download and
installation:
■ Do not unplug the notebook from the electrical outlet.
■ Do not shut down the notebook or initiate Standby or Hibernation.
■ Do not insert, remove, connect, or disconnect any device, cable,
or cord.
Downloading a ROM Update:
1. Access the page at the HP Web site that provides software for
your notebook: Select Start > Help and Support, then select a
software update link. Or, visit the HP Web Site at:
http://www.hp.com/support
2. Follow the instructions on the screen to identify your
notebook and access the ROM update you want to download.
9–4 Startup and Reference Guide—Part 2
Page 25

HP-323140-001.book Page 5 Tuesday, April 1, 2003 4:20 PM
Software Updates, Restorations and Utilities
3. At the download area:
a. Record the date, name, or other identifier of any ROM
update that is later than the ROM currently installed on
your notebook. (You may need to identify the update
later, after it has been downloaded to the hard drive.)
b. Record the path to the default or custom location on the
hard drive to which the ROM package will download.
(You may need to access the ROM package after it has
been downloaded.)
c. Follow the online instructions to download your selection
to the hard drive.
Installing a ROM Update
ROM installation procedures vary. Follow any instructions that
are displayed on the screen after the download is complete. If no
instructions are displayed:
1. Open Windows Explorer. To open Windows Explorer from
the Start button, select Start > All Programs > Accessories >
Windows Explorer.
2. In the left pane of the Windows Explorer window, select My
Computer > your hard drive designation. (The hard drive
designation is typically Local Disk C.) Then follow the path
you recorded earlier to the folder on your hard drive
containing the update.
3. To begin the installation, open the folder, then double-click
the file with an .exe extension, for example, Filename.exe.
(The ROM update installation begins.)
4. To complete the installation, follow the instructions on the
screen.
After a message on the screen reports a successful installation,
✎
you can delete the downloaded file from the destination folder.
Startup and Reference Guide—Part 2 9–5
Page 26

HP-323140-001.book Page 6 Tuesday, April 1, 2003 4:20 PM
Software Updates, Restorations and Utilities
Downloading and Installing a Non-ROM SoftPaq
To update software other than a ROM update:
1. Access the page at the HP Web site that provides software for
your notebook: Select Start > Help and Support, then select a
software update link. Or, visit the HP Web site at:
http://www.hp.com/support
2. Follow the instructions on the screen to identify your
notebook and access the SoftPaq you want to download.
3. At the download area:
a. Write down the date, name, or other identifier of the
SoftPaq you plan to download. (You will need to identify
the update later, after it has been downloaded to the hard
drive.)
b. Follow the online instructions to download the SoftPaq to
the hard drive.
4. When the download is complete, open Windows Explorer. To
open Windows Explorer from the Start button, select Start >
All Programs > Accessories > Windows Explorer.
5. In the left pane of the Windows Explorer window, select My
Computer > your hard drive designation, which is typically
Local Disk C > HP.
6. In the HP folder, select the name or number of the software
package you have downloaded.
7. Select the file that includes an .exe extension, for example,
Filename.exe. (The installation begins.)
8. To complete the installation, follow the instructions on the
screen.
After a message on the screen reports a successful installation,
✎
you can delete the downloaded file from the HP folder.
9–6 Startup and Reference Guide—Part 2
Page 27

HP-323140-001.book Page 7 Tuesday, April 1, 2003 4:20 PM
Software Updates, Restorations and Utilities
Backing Up and Restoring Data
The System Restore utility enables you to safeguard your system
files and functional configurations by using System Restore
points.
System Restore points are restorable, benchmark “snapshots” of
your system. The notebook may set System Restore points
whenever you change personal settings or add software or
hardware. Setting System Restore points manually provides
additional protection for your system files and settings. HP
recommends that you set System Restore points:
■ Before you add or extensively modify software or hardware.
■ Periodically, whenever the system is performing optimally.
Setting a System Restore Point
To set a System Restore point manually:
1. Select Start > Help & Support > Tools. (Notebook and
diagnostic information is displayed.)
2. Select System Restore, then follow the on-screen instructions
for setting a Restore Point.
Restoring to a System Restore Point
To restore the notebook to a System Restore point:
1. Select Start > Help & Support > Tools. (Notebook and
diagnostic information is displayed.)
2. Select System Restore, then follow the on-screen instructions
for restoring the notebook to a Restore Point.
Startup and Reference Guide—Part 2 9–7
Page 28

HP-323140-001.book Page 8 Tuesday, April 1, 2003 4:20 PM
Software Updates, Restorations and Utilities
Repairing or Reinstalling the
Operating System
The OS CD included with your notebook can be used to repair or
reinstall the operating system. Both operations may take 1 to
2 hours to complete.
■ Repairing the operating system preserves your data and
settings.
■ Reinstalling the operating system deletes all files on the
notebook. After the operating system has been reinstalled, all
device drivers must also be reinstalled.
HP recommends that you try to restore your system by using the
System Restore utility before you consider repairing or
reinstalling your operating system. For restoration instructions,
see “Backing Up and Restoring Data” earlier in this chapter.
If a System Restore restoration fails to restore functionality, first
try to repair the operating system. If the repair procedure does not
restore functionality, you may need to reinstall the operating
system.
Repairing the Operating System
To repair the operating system without deleting your
personal data:
1. Connect the notebook to external power and turn on the
notebook.
2. Immediately insert the OS CD (included with the notebook)
into the optical drive.
3. Press and hold the power button for 5 seconds to turn off the
notebook.
4. Briefly press the power button to start the notebook.
5. When prompted, press any key to boot from CD. (After a few
minutes, the Welcome to Setup screen is displayed.)
9–8 Startup and Reference Guide—Part 2
Page 29

HP-323140-001.book Page 9 Tuesday, April 1, 2003 4:20 PM
Software Updates, Restorations and Utilities
6. Press enter to continue. (A Licensing Agreement screen is
displayed.)
7. Press
8. Press
After the repair process is complete, which may take up to
2 hours, the notebook restarts in Windows.
F8 to accept the agreement and continue. (The Setup
window is displayed.)
R to repair the selected Windows installation. (The
repair process begins.)
Reinstalling the Operating System
If the System Recovery and operating system repair procedures
did not restore functionality to your notebook, it may be
necessary to reinstall the operating system.
CAUTION: Personal data and any software you have installed on the
notebook will be lost during the operating system reinstallation
Ä
procedure described in this section. To protect your data, back up your
My Documents folder before beginning the procedure. For back up
information and instructions, select Start > Help and Support. Also see
“Backing Up and Restoring Data” earlier in this section.
During the reinstallation, you may be prompted for your product
✎
key. The product key is displayed on the Microsoft Certificate of
Authenticity label affixed to the underside of the notebook.
To reinstall the operating system using the OS CD included with
the notebook:
1. Connect the notebook to external power and turn on the
notebook.
2. Immediately insert the OS CD into the optical drive.
3. Press and hold the power button for 5 seconds to turn off the
notebook.
4. Briefly press the power button to start the notebook.
5. When prompted, press any key to boot from CD. (After a few
minutes, the Welcome to Setup screen is displayed.)
Startup and Reference Guide—Part 2 9–9
Page 30

HP-323140-001.book Page 10 Tuesday, April 1, 2003 4:20 PM
Software Updates, Restorations and Utilities
6. Press enter to continue. (A Licensing Agreement screen is
displayed.)
7. Press
F8 to accept the agreement and continue. (The Setup
window is displayed.)
8. Press
esc to continue installing a fresh copy of the operating
system.
9. Press
10. Press
enter to set up the operating system.
C to continue setup using this partition.
11. Select Format the partition using the NTFS file system
(Quick), then press enter. (A caution is displayed. The
caution explains that formatting this drive will delete all
current files.)
12. Press F to format the drive. (The reinstallation process begins.)
After the repair process is complete, which may take up to
2 hours, the notebook restarts in Windows, and you can begin
to reinstall device drivers.
Reinstalling Device Drivers and Other
Software
After the installation process is complete, you must reinstall
drivers.
To reinstall drivers using the Driver Recovery CD included with
the notebook:
1. While running Windows, insert the Driver Recovery CD into
the optical drive.
If the CD does not open within several seconds, select Start >
Run. Then type
indicates the optical drive).
2. Follow the on-screen instructions for installing drivers.
After the drivers are reinstalled, you must reinstall any software
you added to the notebook. Reinstallation instructions are usually
provided on the software CD, in the CD package, or at the
manufacturer’s Web site.
9–10 Startup and Reference Guide—Part 2
D:\SWSETUP\APPINSTL\SETUP.EXE (where D
Page 31

HP-323140-001.book Page 11 Tuesday, April 1, 2003 4:20 PM
Software Updates, Restorations and Utilities
Installing a Retail Version of an
Operating System
The Windows operating system provided on the notebook or
on a restoration CD is enhanced by HP. The HP enhancements
add power and security features and provide supplementary
support for external devices such as drives and PC Cards.
CAUTION: Replacing an operating system enhanced by HP with a
Ä
retail version of an operating system will result in the loss of all HP
enhancements. In some cases, the loss of these enhancements may result
in an unresponsive system or the loss of complete USB support.
Using the Setup Utility
The Setup utility is a preinstalled, ROM-based information and
customization utility that can be used even when your operating
system is not working or will not load.
The utility reports information about the notebook and provides
settings for startup, password, port, Setup utility appearance, and
other preferences.
Opening the Setup Utility
To access most settings:
1. Start up or restart the notebook.
2. Before Windows opens and while the F10 = ROM Based
Setup prompt is displayed in the lower left corner of the
screen, press
On some models, you must start up (not restart) the notebook to
access the settings for a hard drive password.
Startup and Reference Guide—Part 2 9–11
F10.
Page 32

HP-323140-001.book Page 12 Tuesday, April 1, 2003 4:20 PM
Software Updates, Restorations and Utilities
Navigating and Selecting in the Setup Utility
Because the Setup utility is not Windows-based, it does not
support the TouchPad. Navigation and selection are by keystroke.
■ To navigate, use the up and down arrow keys or tab.
■ To select an item, use the arrow keys to select the item, then
enter.
press
■ To close a display but remain in the Setup utility, press esc.
An on-screen guide to navigation and selection is displayed at the
lower edge of most Setup utility submenu screens. To minimize
keystrokes by using the <Alt> Key Activates Accelerators
feature:
1. Press and hold
is highlighted.)
2. Press the keyboard key corresponding to the highlighted
letter or number in the item you want to select.
For example, to select an on-screen OK button, press
When the “O” in OK is highlighted, press O.
alt. (A letter or number in most on-screen items
alt.
Restoring Setup Utility Default Settings
To return all Setup utility settings to default values, select File
menu > Restore Defaults. (Identification information, including
ROM version information, is retained.)
Exiting the Setup Utility
The Setup Utility exit options are on the File menu. When you
select either option, Windows opens after the Setup utility closes.
■ To close the utility and save your changes from the current
session, select Save changes and exit.
■ To close the utility without saving changes from the current
session, select Ignore changes and exit.
9–12 Startup and Reference Guide—Part 2
Page 33

HP-323140-001.book Page 13 Tuesday, April 1, 2003 4:20 PM
Software Updates, Restorations and Utilities
Using the Support Utilities
If you cannot solve a notebook problem by using this guide or the
supplementary information, including the Troubleshooting guide,
on the Documentation Library CD, you may need to contact HP.
Using the Help and Support Window
Select Start > Help and Support or press the Fn+F1 hotkeys.
The Help and Support window provides access to information
about using your operating system and to support areas of the
HP Web site.
Most of the support areas are available in several languages, but
some links may be unavailable in some regions. You can use the
links in the Help and Support window to:
■ Initiate an online service event with a support specialist.
■ Download the latest drivers, utilities, and software updates
for your notebook.
■ Obtain information about your notebook such as
specifications, white papers, customer advisories, and all
documentation included with your notebook.
Startup and Reference Guide—Part 2 9–13
Page 34

HP-323140-001.book Page 14 Tuesday, April 1, 2003 4:20 PM
Software Updates, Restorations and Utilities
Using Support Telephone Numbers
Obtaining Support Telephone Numbers
To obtain a list of worldwide customer support telephone
numbers, use either of the following methods:
■ Select Start > Control Panel > Performance and Maintenance
icon > System icon. Then, near the lower edge of the System
Properties window, select the Support Information button.
■ Refer to the Worldwide Telephone Numbers booklet (English
only) included with your notebook to contact an HP
Customer Care Center.
Preparing to Call Technical Support
To provide the fastest possible resolution of your problem, have
the notebook and the following information available when
you call:
■ Serial number and model description, which are provided on
labels affixed to the notebook.
■ Purchase date on the invoice.
■ Conditions under which the problem occurred.
■ Error messages that have been displayed.
■ Operating system version number and registration number.
■ To display the operating system version number and
registration number, select Start > Control Panel >
Performance and Maintenance icon > System icon >
General tab.
■ Brand and model of an optional printer.
9–14 Startup and Reference Guide—Part 2
Page 35

HP-323140-001.book Page 1 Tuesday, April 1, 2003 4:20 PM
The information in this appendix may be helpful if you plan to
use or transport the notebook internationally or in extreme
environments.
Notebook Dimensions
Dimension U.S. Metric
Height 1.24 inches 3.15 cm
A
Specifications
Width 14.06 inches 35.7 cm
Depth 10 inches 25.4 cm
Operating Environment
Factor U.S. Metric
Temperature
Operating 50° to 95° F 10° to 35° C
Nonoperating -4° to 140° F -20° to 60° C
Relative humidity (noncondensing)
Operating 10% to 90% 10% to 90%
Nonoperating 5% to 95% 5% to 95%
Maximum altitude (unpressurized)
Operating 10,000 ft 3,048 m
Nonoperating 30,000 ft 9,144 m
Startup and Reference Guide—Part 2 A–1
Page 36

HP-323140-001.book Page 2 Tuesday, April 1, 2003 4:20 PM
Specifications
Rated Input Power
The notebook operates on DC power, which can be supplied by
an AC or a DC power source. Although the notebook can be
powered from a stand-alone DC power source, HP strongly
recommends that the notebook be powered only with an
AC adapter or DC cable supplied or approved by HP.
An AC adapter provided by
capable of accepting AC power within the following
specifications:
Input Power Rating
Operating voltage 100–240V AC @1.7A - 50–60Hz
Operating current 1.5A rms
Operating frequency range 50 to 60Hz
HP
for use with this notebook is
The notebook is capable of accepting DC power within the
following specifications:
Input Power Rating
Operating voltage 18.5V DC @3.5A- 65W
Operating current 4.9A
This product is designed for IT power systems in Norway with
phase-to-phase voltage not exceeding 240 Vrms.
A–2 Startup and Reference Guide—Part 2
Page 37

HP-323140-001.book Page 3 Tuesday, April 1, 2003 4:20 PM
Finding More Environmental
Information
The specifications in this appendix contain information about
exposing the notebook to environmental extremes.
■ For similar information about storing battery packs, see the
“Storing a Battery Pack” section in Chapter 4.
■ For information about exposing the notebook to sunlight,
ultraviolet light, x-rays, or magnetic fields, refer on the
Documentation Library CD to the Maintenance, Shipping
and Travel guide.
Specifications
Startup and Reference Guide—Part 2 A–3
Page 38

HP-323140-001.book Page 4 Tuesday, April 1, 2003 4:20 PM
Specifications
A–4 Startup and Reference Guide—Part 2
Page 39

HP-323140-001.book Page 1 Tuesday, April 1, 2003 4:20 PM
Index
1394 connector 2–9
A
AC adapter 4–11
connecting 1–5
disconnecting 4–11
identifying 2–17
power connector 2–12
AC power 1–12
adapter
AC 1–5
country-specific modem 2–17
Japan-specific outlet 2–17
Agere modem AT commands 7–9
airport security devices 5–3
altitude specifications A–1
antivirus software 1–11
applications key 2–4
applications. See software;
software updates
AT commands 2–18
audio CD. See CD(s)
audio-out jack
connecting 6–4
identifying 2–8
AutoPlay 5–8
, 2–17, 4–11
7–3, 7–5
, 4–11
, 4–11
, 7–9
B
backup, system 9–7
battery bay
identifying 2–13
inserting battery pack 1–3
removing battery pack 4–18
battery light 2–6
battery pack
calibrating 4–14
causing CD or DVD write
,
corruption 6–10
charging 1–2
inserting 1–3
monitoring charge 4–12
removing 4–18
storing 4–16
when to remove 4–3
battery power
conserving 4–17
low-battery conditions 4–13
running notebook on 4–11
switching to and from 4–11
when to use 1–11
BIOS (basic input output system)
9–2
boot order 5–10
, 1–6, 4–11
, 4–4
Startup and Reference Guide Index–1
Page 40

HP-323140-001.book Page 2 Tuesday, April 1, 2003 4:20 PM
Index
button(s)
PC Card eject 2–11
power 2–5
TouchPad 2–3
volume 2–7
wireless device 2–8
See also key; latch; switch,
display
, 6–2
, 8–5
, 3–3
C
cable
AC adapter 1–5
audio 6–5
DC 2–12
modem 2–9
network 2–16
S-Video 6–5
See also cord, power
cable lock, connecting 8–15
calibration, battery 4–14
caps lock light 2–6
card and socket services, PC Card
8–4
card. See memory, modules
supported; PC Card; SD Card
CD drive. See drives
CD(s)
CD-R vs. CD-RW
copying 6–9
creating 6–9
playing, with Windows Media
Player 6–7
playing, with WinDVD 6–7
starting from 5–10
See also drive media
, 2–16, 7–2
, 7–11
6–10
Certificate of Authenticity label
, 9–9
2–15
commands, AT 2–18
compartment, memory 2–13
connector(s)
1394 2–9
docking 2–14
drive 5–3
external monitor 2–9
infrared port 2–12
modem 2–9
network 2–9
parallel 2–9
power 2–12
USB 2–9
conservation, power 4–17
cord, power
connecting 1–5
identifying 2–16
surge protection 1–11
See also cable
country-specific modem adapter
connecting 7–5
identifying 2–17
when to use 7–3
critical low-battery condition 4–13
currency formats, setting 1–10
customer support 2–18
, 8–2
, 7–9
, 8–9
, 7–12
, 7–3
, 7–10
, 9–13
D
data compression algorithm 7–2
date, setting the 1–10
DC cable 1–8
designation, drive 5–2
device drivers, reinstalling 9–10
dialing mode 7–7
, 2–12
Index–2 Startup and Reference Guide
Page 41

HP-323140-001.book Page 3 Tuesday, April 1, 2003 4:20 PM
Index
dimensions, notebook A–1
disc, diskette. See drive media
display release latch 2–2
display switch 2–5
function, changing 4–9
function, default 4–6
identifying 4–5
display, internal
brightness 3–7
opening 1–4
switching image 3–6
docking connector, cover 2–14
drive designation 5–2
drive media
affected by airport security 5–3
cancelling AutoPlay on 5–8
caring for 5–3
displaying contents of 5–8
inserting, removing CD or
DVD 5–5
types and terms 5–2
drivers, reinstalling 9–10
drives
adding to system 5–4
affected by airport security 5–3
avoiding Standby and
Hibernation while using
optical 5–9
IDE drive light 5–4
inserting, removing media 5–5
shipping 5–3
starting from 5–10
types and terms 5–2
USB 8–2
See also hard drive, internal
DVD drive. See drives
DVD(s)
playing, with WinDVD
6–7
region settings 6–8
starting from 5–10
See also drive media
E
Easy CD Creator
CD Copier, when to use 6–9
DirectCD, when to use 6–9
features 6–9
formats 6–11
obtaining 6–9
preparing to use 6–10
prompt, UDF 6–10
settings 6–11
source drive vs. destination
drive 6–10
eject button
optical drive 5–6
PC Card 8–5
electric shock warning 1–12
electrical storm, safety issues 1–11
electrostatic discharge (ESD) 5–3
8–10
emergency shutdown procedures
, 4–6
1–10
enablers, PC Card 8–4
End User License Agreement 1–8
environmental specifications A–1
error message
No Dial Tone 7–8
Playback Of Content From This
Region Not Permitted 6–7
ESD (electrostatic discharge) 5–3
8–10
,
,
Startup and Reference Guide Index–3
Page 42

HP-323140-001.book Page 4 Tuesday, April 1, 2003 4:20 PM
Index
exhaust vent 2–10
external monitor
connecting 8–2
connector 2–9
switching image 3–6
F
fan, vents 2–10, 2–14
FCC notice 1–12
FDD (floppy disk drive) 5–2
flash memory card 8–6
flash RAM card 8–6
Fn key
changing Standby function 4–9
hotkeys function 3–4
identifying 2–4
keypad functions 3–9
Standby function 4–5
video device function 6–6
function keys 2–4
, 3–4
H
hard drive bay
identifying 2–13
replacing hard drive 5–10
hard drive, internal
defined 5–2
displaying amount of free space
on 8–9
replacing 5–10
retaining screws 5–11
space on, required for
Hibernation file 8–9
See also drives
headphones 6–4
Help and Support window 3–6
9–13
, 5–14
Hibernation
avoiding when playing media
5–9
changing configuration during
4–2
controls and indicators 4–5
defined 4–2
identifying 5–10
initiated during critical
low-battery condition 4–13
initiating 2–5
resuming from 4–8
setting preferences 4–9
when to use 4–2
hotkeys
changing function of Fn+F5
4–9
identifying 3–4
procedures 3–5
Quick Reference 3–5
hotkeys commands
access Help and Support 3–6
display brightness 3–7
initiate QuickLock 3–7
initiate Standby 3–6
media commands 3–7
Open Internet Explorer 3–6
Quick Reference 3–5
switch image 3–6
hub, USB 8–2
humidity specifications A–1
, 4–8
, 4–7
I
IDE (Integrated Drive Electronics)
,
light 5–4
identifying components
Index–4 Startup and Reference Guide
Page 43

HP-323140-001.book Page 5 Tuesday, April 1, 2003 4:20 PM
Index
additional 2–16
display 2–2
IEC 60950 compliance 1–12
infrared port 2–12
International Telecommunications
Union (ITU) 7–2
InterVideo WinDVD
error message 6–7
managing region settings 6–8
playing video CDs and DVDs
6–7
ITU (International
Telecommunications Union) 7–2
, 7–12
J
jack
audio-out 2–8
microphone 2–8
RJ-11 2–9
RJ-45 2–9
S-Video 2–8
Japan-specific modem adapter
2–17
, 6–4
, 6–4
, 7–3
, 7–11
, 2–9, 6–5
K
key
applications 2–4
Fn 2–4
function (F1, F2, etc.) 2–4
hotkeys 3–4
keypad 2–4
Microsoft logo 2–4
num lock 3–9
See also button; latch; switch,
display
keyboard language 1–10
, 3–8
L
label
Microsoft Certificate of
Authenticity 2–15
modem approvals 2–15
product identification 2–15
system 2–15
wireless certification 2–15
language
choosing during setup 1–8
selecting keyboard 1–10
latch
battery pack locking 4–19
battery pack release 2–13
display release 2–2
See also button; switch, display
light
battery 2–6
caps lock 2–6
IDE drive 5–4
num lock 3–9
power/standby 2–6
light(s)
hard drive 2–6
mute 2–6
wireless device 2–6
line-out jack 2–8
lock, security cable 8–15
locked system
emergency shutdown
procedures 1–10
locking latches, battery pack 4–19
lock-up, system 2–5
low-battery conditions
identifying 4–13
, 9–9
, 6–4
, 4–6
Startup and Reference Guide Index–5
Page 44

HP-323140-001.book Page 6 Tuesday, April 1, 2003 4:20 PM
Index
Lucent modem AT commands 7–9
Lucent/Agere Command Set
(Advanced Users Only) guide
2–18
M
Maintenance, Shipping and Travel
guide 2–18
media hotkeys 3–7
Media Player, Windows 6–7
media, drive
affected by airport security 5–3
cancelling AutoPlay on 5–8
caring for 5–3
displaying contents of 5–8
inserting, removing CD or
DVD 5–5
types and terms 5–2
See also drives
memory
compartment 2–13
displaying amount of 8–9
increasing RAM 8–9
module, removing or inserting
8–10
modules supported 8–9
microphone jack 2–8
microphone, connecting 6–4
Microsoft Certificate of
Authenticity label 2–15
Microsoft logo key 2–4
mode, dialing 7–7
model, identifying notebook 9–2
modem
approvals label 2–15
cable 2–16
, 8–2
connecting 7–3
country configurations 7–6
country-specific adapter 2–17
Lucent/Agere Command Set
(Advanced Users Only) guide
2–18
Modem Command Guidelines
(Advanced Users Only) guide
2–18
specifications 7–2
speed 7–2
troubleshooting travel
connections 7–7
virus protection 1–11
monitor, external
connecting 8–2
external monitor connector 2–9
switching display 3–6
mouse, external
connecting 8–2
USB connectors 2–9
multimedia card 8–6
N
network
cable 2–16
connecting 7–11
RJ-45 jack 2–9
specifications 7–10
speed 7–10
No Dial Tone error message 7–8
Norton AntiVirus 2003 1–11
notebook model, family, type, and
serial number 9–2
NTSC television format 6–6
Index–6 Startup and Reference Guide
Page 45

HP-323140-001.book Page 7 Tuesday, April 1, 2003 4:20 PM
Index
num lock
key 3–9
light 2–6
number
Product Key 2–15
serial 2–15
numeric keypad 3–8
O
opening the notebook 1–4
Opens 2–2
operating environment
specifications A–1
operating system
installing retail version of 9–11
loading 4–6
Microsoft Certificate of
Authenticity label 2–15
Product Key number 2–15
reinstalling 9–8
repairing 9–8
shutting down 4–6
optical disc. See CD(s); DVD(s)
optical drive
avoiding Standby and
Hibernation while using 5–9
boot order 5–10
identifying 2–11
See also drives
P
PAL, PAL-M television formats
6–6
parallel connector 2–9
passwords 9–11
PC Card
configuring 8–4
functions 8–3
inserting, removing 8–4
stopping 8–5
types available 8–3
PC Card eject button 2–11
pointing device 3–3
port, infrared 2–12
, 7–12
power
button 2–5
connecting the notebook to
external 1–5
conservation 4–2
, 4–17
controls 4–5
cord 2–16
emergency shutdown
procedures 4–6
Hibernation procedures 4–6
low-battery conditions 4–13
power connector 2–12
power/standby light 2–6
rated input A–2
setting preferences 4–9
shutting down the notebook
1–10
Standby procedures 4–7
surge protection 1–11
switching between AC and
battery 4–11
turning on the notebook 1–7
See also battery pack
power button
function, changing 4–9
identifying 4–5
resetting with 4–6
Startup and Reference Guide Index–7
Page 46

HP-323140-001.book Page 8 Tuesday, April 1, 2003 4:20 PM
Index
power connector
connecting 1–5
identifying 2–12
power cord
connecting 1–5
surge protection 1–11
Power Meter 4–12
power, AC 1–12
power/standby light 4–5
Preboot eXecution Environment
(PXE) 7–12
preloaded utilities
displaying descriptions 1–9
Product Key number 2–15
projector
connecting 2–9
, 8–2
switching display 3–6
PXE (Preboot eXecution
Environment) 7–12
R
RAM (Random Access Memory)
8–9
recovery CD 2–18
region settings
currency, date, language, time
1–10
DVD 6–8
modem 7–6
Regulatory and Safety Notices
guide 2–18
regulatory information
modem approvals label 2–15
notices 1–12
Regulatory and Safety Notices
guide 2–18
system label 2–15
wireless certification label
2–15
release latch
battery pack 2–13
display 2–2
repairing the operating system 9–8
reset (emergency shutdown
procedures) 1–10
, 4–6
resolution, screen 1–10
restoring software 2–18
RJ-11 telephone jack
connecting 7–3
identifying 2–9
modem cable 2–16
RJ-45 network jack
connecting 7–11
identifying 2–9
network cable 2–16
ROM
defined 9–2
determining current version of
9–3
downloading and installing 9–4
obtaining updates 9–4
RomPaq, downloading 9–4
S
Safety & Comfort Guide 1–12,
2–18
SD Card
inserting, removing 8–6
security cable
lock, connecting 8–15
slot 2–12
serial number, notebook 2–15
, 9–2
Index–8 Startup and Reference Guide
Page 47

HP-323140-001.book Page 9 Tuesday, April 1, 2003 4:20 PM
Index
series, notebook 9–2
Setup utility 9–11
shutdown procedures 1–10
sleep button 3–7
, 4–9
, 4–6
Sleep. See Standby
slot
memory 8–9
PC Card 2–11
SD Card 8–6
security cable 2–12
socket services, PC Card 8–4
SoftPaq
described 9–4
downloading and installing 9–6
software
antivirus protection 1–11
AutoPlay 5–8
Easy CD Creator 6–9
Help and Support window 9–13
infrared 7–12
installing optional 1–9
modem 7–6
network 7–12
Norton AntiVirus 2003 1–11
Power Meter 4–12
regional settings 1–10
reinstalling 9–8
, 9–10
repairing 9–8
restoring 2–18
RomPaq 9–4
Setup utility 9–11
SoftPaq 9–4
UDF Reader 6–10
updating preloaded software
9–2
Windows Media Player 6–7
WinDVD 6–7
software updates
downloading and installing
, 9–6
9–4
obtaining 9–4
preparing for 9–2
speakers, external 6–4
speakers, internal 6–3
specifications
dimensions A–1
modem 7–2
network 7–10
operating environment A–1
rated input power A–2
Standby
avoiding when playing media
5–9
avoiding when using infrared
7–14
controls and indicators 4–5
initiated during critical
low-battery condition 4–13
initiating 3–6
, 4–7
power/standby light 2–6
resuming from 4–7
setting preferences 4–9
S-Video
connections 6–5
jack 2–9
switch, display 2–5
system label 2–15
Startup and Reference Guide Index–9
Page 48

HP-323140-001.book Page 10 Tuesday, April 1, 2003 4:20 PM
Index
T
technical support 9–13
notebook documentation 2–18
telephone (RJ-11) jack
connecting 7–3
identifying 2–9
modem cable 2–16
telephone numbers, service and
support 9–13
television
changing color format 6–6
connecting audio 6–4
connecting video 6–5
temperature
notebook surface 1–12
specifications A–1
storage, battery pack 4–16
1394 connector 2–9
time, settting the 1–10
TouchPad
components 3–3
setting preferences 3–3
traveling with notebook
battery pack temperature
considerations 4–16
environmental specifications
A–1
modem approvals label 2–15
serial number 2–15
wireless certification label
2–15
traveling with the notebook
modem country configurations
7–6
regional settings 1–10
troubleshooting
modem travel connections 7–7
Troubleshooting guide 2–18
turning off notebook 1–10
turning on notebook 1–7
, 4–6
, 4–6
U
UDF Reader 6–10
unresponsive system, emergency
shutdown procedures 1–10
, 4–6
USB
connectors, identifying 2–9
devices, connecting 8–2
utilities, preloaded
displaying descriptions 1–9
installing 1–9
See also software
V
VCR
audio-out jack
function 6–4
connecting 6–5
vents, fan 2–10
video CDs, DVDs. See CD(s);
DVD(s)
video device
connecting audio
S-Video jack 6–5
turning on and off 6–6
, 2–14
6–5
Index–10 Startup and Reference Guide
Page 49

HP-323140-001.book Page 11 Tuesday, April 1, 2003 4:20 PM
Index
viruses, computer 1–11
volume, adjusting 6–2
W
Windows applications key 2–4
Windows Media Player
accessing with Digital Audio
button 6–7
using with audio CDs
WinDVD
error message 6–7
managing region settings 6–8
playing video CDs and DVDs
6–7
wireless device
button 2–8
certification label 2–15
Startup and Reference Guide Index–11
Page 50

HP-323140-001.book Page 12 Tuesday, April 1, 2003 4:20 PM
Index
Index–12 Startup and Reference Guide
Page 51

HP-323140-001.book Page 14 Tuesday, April 1, 2003 4:20 PM
© 2003 Hewlett-Packard Development Company, L.P.
Microsoft and Windows are trademarks of Microsoft Corporation in the
U.S. and/or other countries. Intel, Centrino, and Pentium are trademarks of
Intel Corporation in the U.S. and/or other countries. SD Logo is a
trademark.
HP shall not be liable for technical or editorial errors or omissions
contained herein or for incidental or consequential damages in connection
with the furnishing, performance, or use of this material. The information
in this document is provided “as is” without warranty of any kind, and is
subject to change without notice. The warranties for HP products are set
forth in the express limited warranty statements accompanying such
products. Nothing herein should be construed as constituting an additional
warranty.
Startup and Reference Guide
HP Compaq Notebook Series
First Edition June 2003
Reference Number: nx7000
Document Part Number: 323140-001
Page 52

HP-323140-001.book Page 13 Tuesday, April 1, 2003 4:20 PM
 Loading...