


User Guide
HP Integrated Wireless LAN 54g Network Adapter-Quick Start
Document Part Number: xxxxxx-xxx
February 2003-Draft
Review Copy

Review Copy

TABLE OF CONTENTS
Introduction..........................................................................................................................1
The Integrated 54g Solution........................................................................................................................ 1
Enterprise Users ..................................................................................................................................... 1
Home Users ............................................................................................................................................ 2
Using the Integrated 54g Enabled Notebook............................................................................................. 2
Features and Requirements........................................................................................................................ 2
Completing the Setup..........................................................................................................3
Modes of Operation ..................................................................................................................................... 3
Infrastructure Mode ................................................................................................................................. 3
Characteristics ................................................................................................................................. 3
Advantages ...................................................................................................................................... 3
Disadvantages ................................................................................................................................. 3
Requirements .................................................................................................................................. 3
Ad Hoc Mode .......................................................................................................................................... 4
Characteristics ................................................................................................................................. 4
Advantages ...................................................................................................................................... 4
Disadvantages ................................................................................................................................. 4
Requirements .................................................................................................................................. 4
Configuring a Network Profile..................................................................................................................... 4
Configuring a Profile for a Listed Network That Does Not Require a WEP Key ..................................... 5
Configuring a Profile for a Listed Network That Requires a WEP Key.................................................... 7
Configuring a Profile for a Network That Is Not Listed and Does Not Require a WEP Key .................... 9
Configuring a Profile for a Network That Is Not Listed and Requires a WEP Key ................................ 11
Review Copy
Specifications.....................................................................................................................14
Physical Characteristics............................................................................................................................ 14
Temperature and Humidity Limitations.................................................................................................... 14
Power Characteristics ............................................................................................................................... 14
Networking Characteristics....................................................................................................................... 14
Radio Characteristics ................................................................................................................................15
Regulatory Information .....................................................................................................16
Operational Information ............................................................................................................................ 16
User Guide Page i

Wireless Interoperability ........................................................................................................................ 16
Safety .................................................................................................................................................... 16
Regulatory Information .............................................................................................................................. 16
Canada—Industry Canada (IC) ............................................................................................................. 16
Europe—EU Declaration of Conformity................................................................................................. 17
France ...................................................................................................................................................17
Guidelines for Public WLAN Experimentation ................................................................................18
Metropolitan Departments .............................................................................................................. 19
USA—Federal Communications Commission (FCC) ............................................................................ 20
Interference Statement ...................................................................................................................21
Radio Approvals .................................................................................................................................... 21
Troubleshooting................................................................................................................ 22
Cannot Connect to the Network ................................................................................................................ 22
Performance and Connectivity Problems ................................................................................................ 22
Glossary............................................................................................................................. 24
Review Copy
Page ii User Guide
Introduction
THE INTEGRATED 54g SOLUTION
The Integrated 54g solution accesses wireless local area networks (WLANs), enables the sharing of a local
printer and files with others in the network, enables Internet connection sharing, and enables roaming about
the office—wire free. This wireless LAN solution is designed for both the home user and small businesses—
and it is scalable so that users can be added and new network features can be enabled as networking needs
grow.
The WEP (Wired Equivalent Privacy) protocol is a security protocol for wireless local area networks (defined
in IEEE Std 802.11, 1999 Edition) that encrypts data sent over radio waves. The use of the WEP key is optional
and can be enabled or disabled. If the network being connecting to has enabled WEP, WEP must also be
enabled in the network profile and the WEP key in the computer must be set to match the WEP key used by
the network. Otherwise, it is impossible to connect to the network.
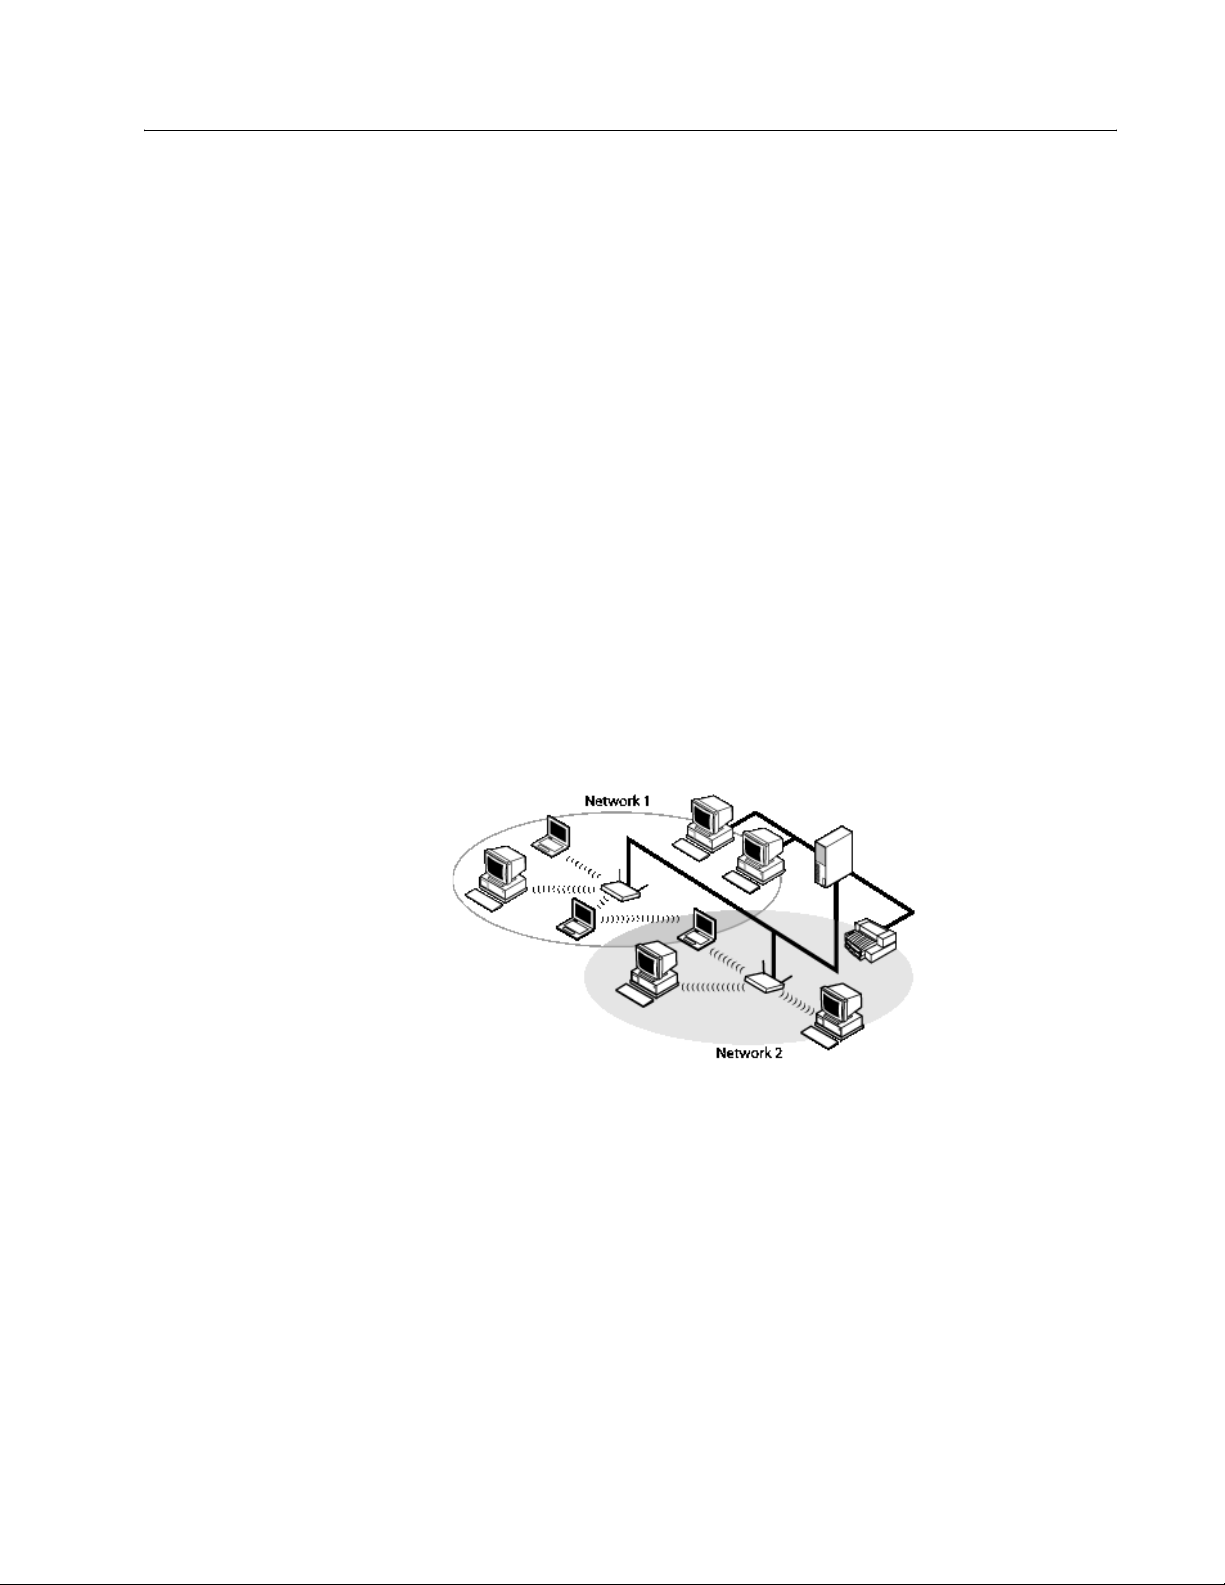
The Integrated 54g enabled notebook makes a wireless connection to a network, as illustrated on the
following figure. Upon startup, the Integrated 54g enabled notebook detects certain WLANs (wireless
networks) that are within range. Before connecting to these and other wireless networks, a user must configure
a profile for each network. See "Completing the Setup" on page 3.
Networks 1 and 2 are infrastructure types of networks. The two notebook computers connected by radio waves
form an ad hoc type of network.
Review Copy
Figure 1: Types of Networks
ENTERPRISE USERS
Obtain the following information from the network administrator:
• Network names (SSID) of the specific wireless networks to connect to
• WEP (Wired Equivalent Privacy) key information (if any) for the networks to connect to
• For Microsoft Windows networking, the customer name and workgroup name
• For a network account, a user name and password
• An IP address (if not using a DHCP server)
• If any of the networks are connected to an authentication server
User Guide Page 1

Introduction
HOME USERS
The AP (access point) that communicates with the Integrated 54g enabled notebook has a preassigned
network name (SSID) that the notebook recognizes upon startup. To enable WEP, use any string of numbers
for the WEP key.
USING THE INTEGRATED 54g ENABLED NOTEBOOK
The Integrated 54g enabled notebook is an IEEE 802.11g based wireless LAN device. A LAN is composed
of two or more computers that are connected to each other to share files or common equipment such as a
printer or an Internet connection. A wireless LAN provides the same functionality of a wired network, but it
eliminates the need to install networking cables and other networking equipment. Not only is a wireless LAN
easier to deploy, but it also allows for roaming. For example, when using the Integrated 54g enabled
notebook, it is possible to roam from one room in the house to another, or from a conference room to an office
without being disconnected from the network.
FEATURES AND REQUIREMENTS
The Integrated 54g solution is an IEEE 802.11 based wireless LAN that includes the following features:
• Support for IEEE 802.11g draft specification
• Support for IEEE 802.11b standard
• 2.4-GHz band operation
• Network data rate of up to 54 Mbit/s
• Wired Equivalent Privacy (WEP) encryption
The following items are needed for participating in a wireless LAN:
• Integrated 54g enabled notebook computer running on a Microsoft Windows XP operating system
• Software drivers, software reference guide, and Help file
The Integrated 54g enabled notebook works with any IEEE 802.11b Wi-Fi CERTIFIED or IEEE 802.11g
access point or wireless client network adapter.
Review Copy
Page 2 User Guide

Completing the Setup
NOTE—Before starting, obtain the required network information from the network administrator or the wireless
access point installer (see “The Integrated 54g Solution” on page 1).
MODES OF OPERATION
A wireless LAN can be configured for two different modes of operation: infrastructure mode and ad hoc mode
(an ad hoc network is also known as a peer-to-peer network or a computer-to-computer network). Whereas
each mode has its advantages, one mode may be more appropriate than the other, depending on the location
and type of network connection.
INFRASTRUCTURE MODE
The key difference between the infrastructure type of network and an ad hoc network is that the infrastructure
network includes a base station (host) computer that has a built-in wireless network adapter and is connected
to a wireless access point (AP). This functionality allows computers on the infrastructure wireless LAN to
access the resources and tools of the wired LAN, including Internet access, e-mail, file sharing, and printer
sharing.
Characteristics
Networked computers communicate with each other through a dedicated AP. All data transmitted between the
computers on this wireless LAN passes through the AP.
Advantages
• Extended range. The access point extends the range of the wireless LAN. Each computer can
communicate with other computers equipped by wireless networks that are within the range of the access
point.
• Roaming. As the user moves around the home or office, the Integrated 54g enabled notebook
determines the best access point to use to ensure continuous communication with the network.
• Network connectivity. An access point can provide wireless LAN access to an existing wired network by
bridging the two networks together. This gives users of the wireless LAN access to all the functions of a
wired network—from file server access to access to e-mail and the Internet.
Disadvantages
Because the infrastructure mode offers more features, it requires additional components and setup time to
deploy.
Requirements
• A base station computer having a wired connection to the Internet
• A wireless network adapter
• A connection to an AP (access point)
Review Copy
User Guide Page 3

Completing the Setup
AD HOC MODE
An ad hoc network is the easiest to deploy and is ideal for home use or in small offices. This mode allows the
sharing of files with other employees, printing to a shared office printer, and access to the Internet through a
shared modem. With ad hoc networking, however, the computer is only able to communicate with other
wireless networks that are within a certain range and are in the same wireless workgroup.
Characteristics
Networked computers send data directly to each other without the need of an access point.
Advantages
• Simple setup
• Cost efficiency
Disadvantages
• Communication is limited to those who are located within a certain range.
• IEEE 802.1x security is not available.
Requirements
There are no other equipment requirements for operating in the ad hoc mode besides 2 WLAN enabled
notebooks or desktop PCs.
CONFIGURING A NETWORK PROFILE
To connect to a wireless network, a network profile for that network must be configured on the Integrated 54g
enabled notebook. If the Integrated 54g enabled notebook computer came with the Integrated 54g network
adapter already installed and set up at the factory, follow the network profile configuration instructions provided
below.
NOTE—For more information on how to configure a network profile and IEEE 802.1x authentication, click
Learn about setting up wireless network configuration on the Wireless Networks tab of Wireless
Network Connection Properties.
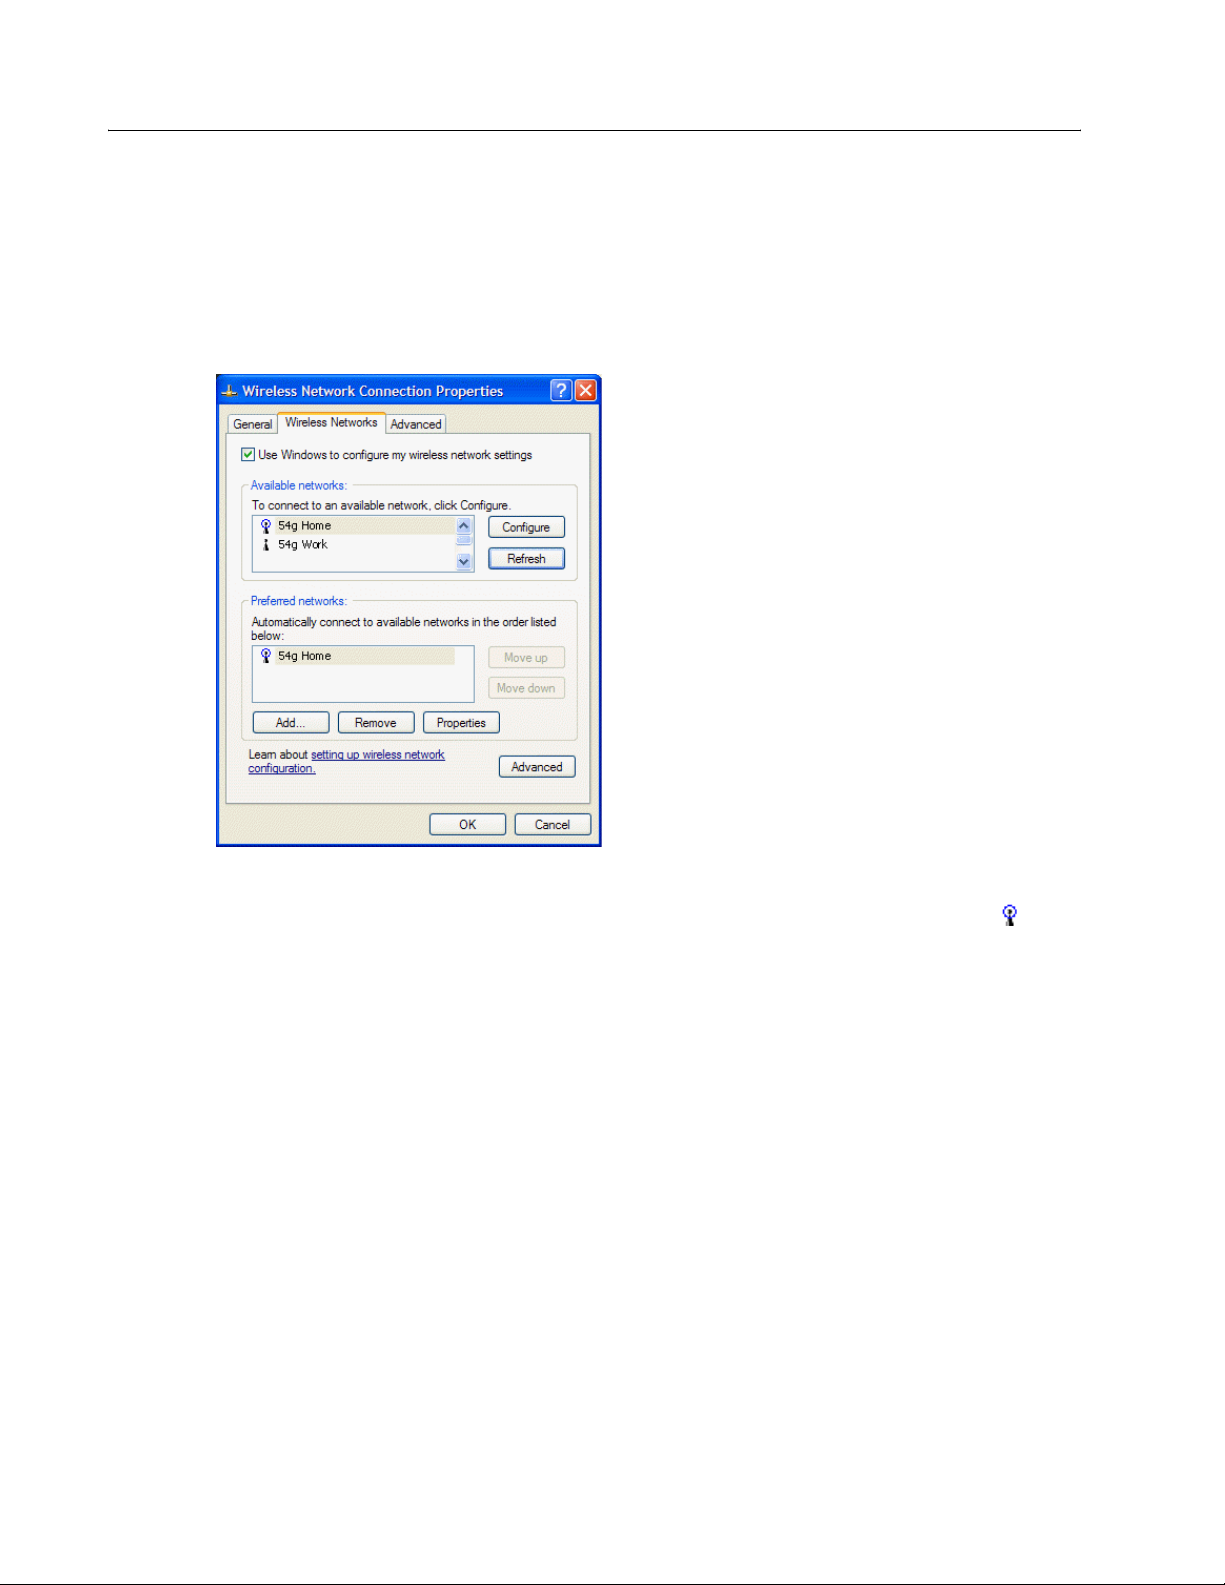
You can configure a network profile for networks that are listed under Available networks as well as those
that are not listed. When you have completed configuring a network profile, the network name and icon appear
at the top of the list under Preferred networks. The computer automatically connects to the network at the top
of the list. Follow the applicable instruction set below, based on whether or not the network is listed, whether
or not the network requires a WEP key, and whether or not the network is connected to an authentication
server (check with the network administrator to see if a WEP key is required and if the network is connected
to an authentication server).
NOTE—Both the network name and the network key are case-sensitive.
Review Copy
• “Configuring a Profile for a Listed Network That Does Not Require a WEP Key” on page 5
• “Configuring a Profile for a Listed Network That Requires a WEP Key” on page 7
• “Configuring a Profile for a Network That Is Not Listed and Does Not Require a WEP Key” on page 9
• “Configuring a Profile for a Network That Is Not Listed and Requires a WEP Key” on page 11
Page 4 User Guide
Completing the Setup
CONFIGURING A PROFILE FOR A LISTED NETWORK THAT DOES NOT REQUIRE A WEP KEY
1 Click Start, then click Control Panel (Category View).
2 Click Network and Internet Connections.
3 Click Network Connections.
4 Right-click Wireless Network Connection, and then click Properties.
5 Click the Wireless Networks tab.
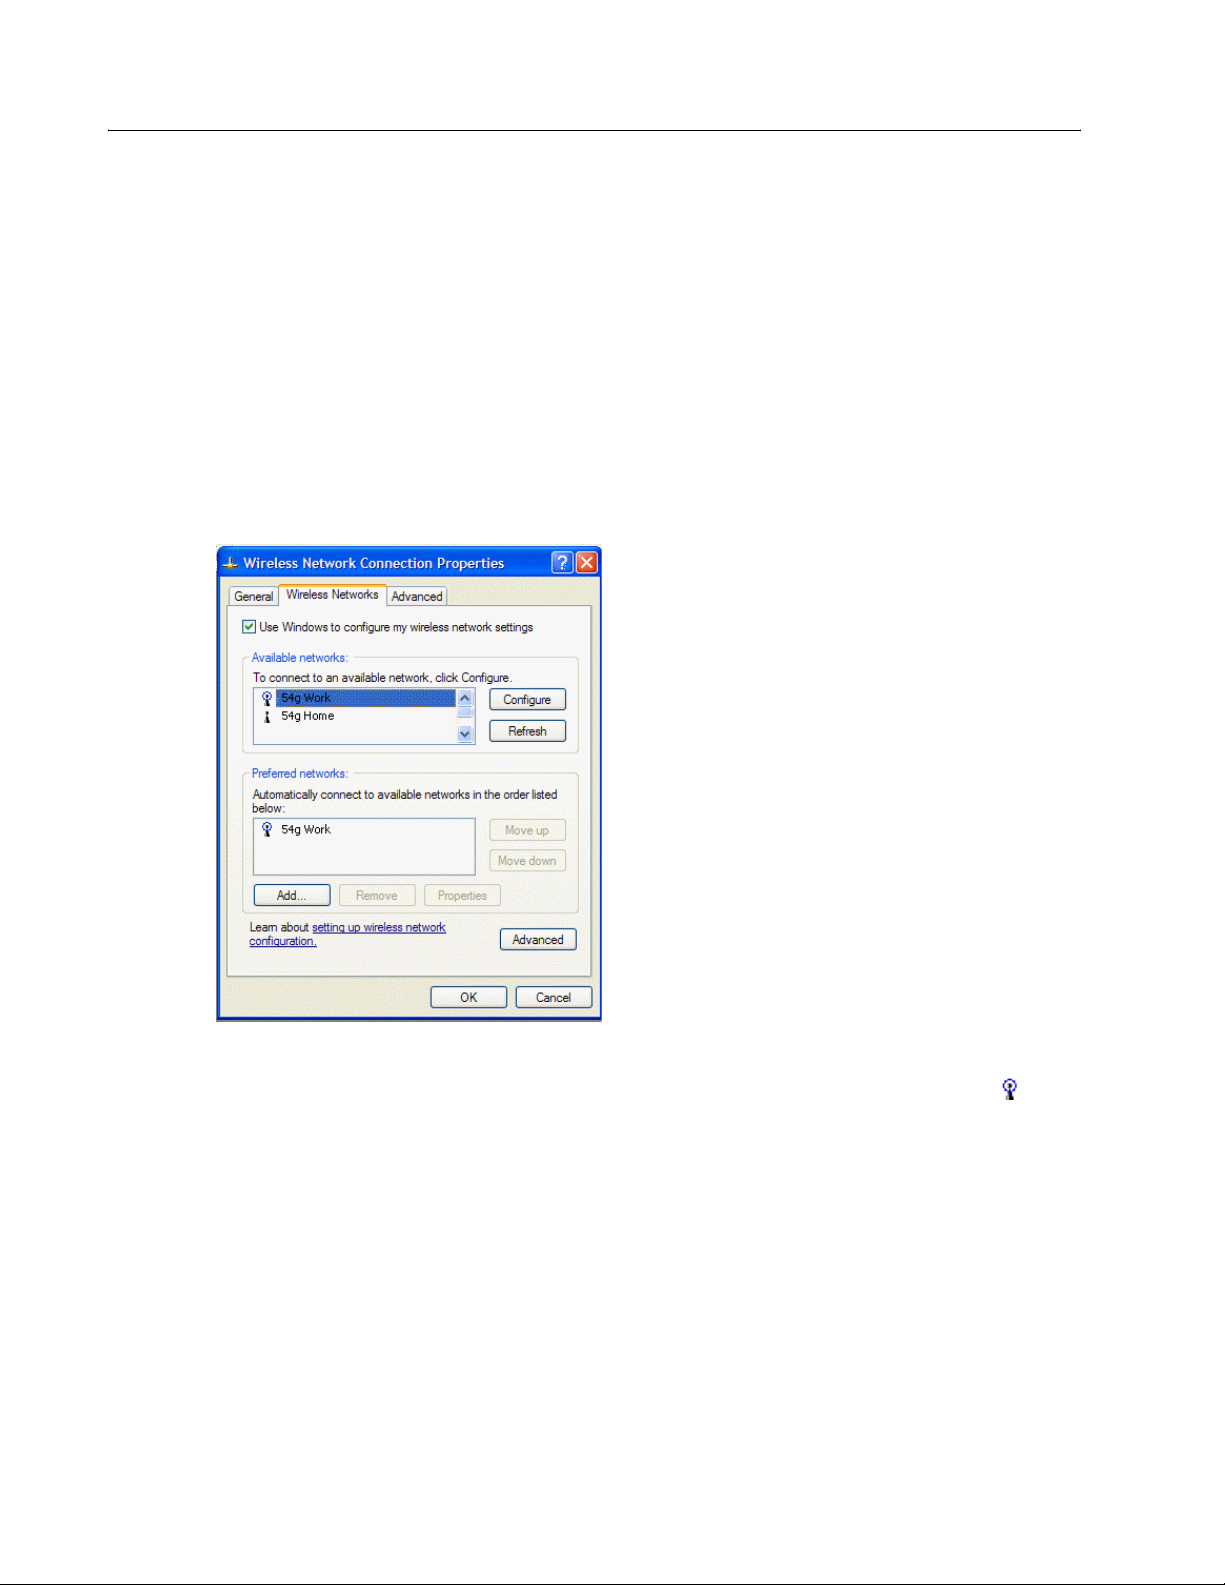
6 Under Available networks, click the network name, and then click Configure.
Review Copy
User Guide Page 5
Completing the Setup
7 The default settings in Microsoft Windows XP Service Pack 1 require IEEE 802.1x authentication. With IEEE
802.1x authentication enabled, connecting to a network requires a connection with an authentication server. If
the network has no authentication server, the connection is disabled every 3 minutes. Therefore, when
connecting to a network that has no authentication server, disable IEEE 802.1x authentication by doing the
following (if the network does have an authentication server, ignore this step):
• Click the Authentication tab.
• Clear the Enable network access control using IEEE 802.1x check box.
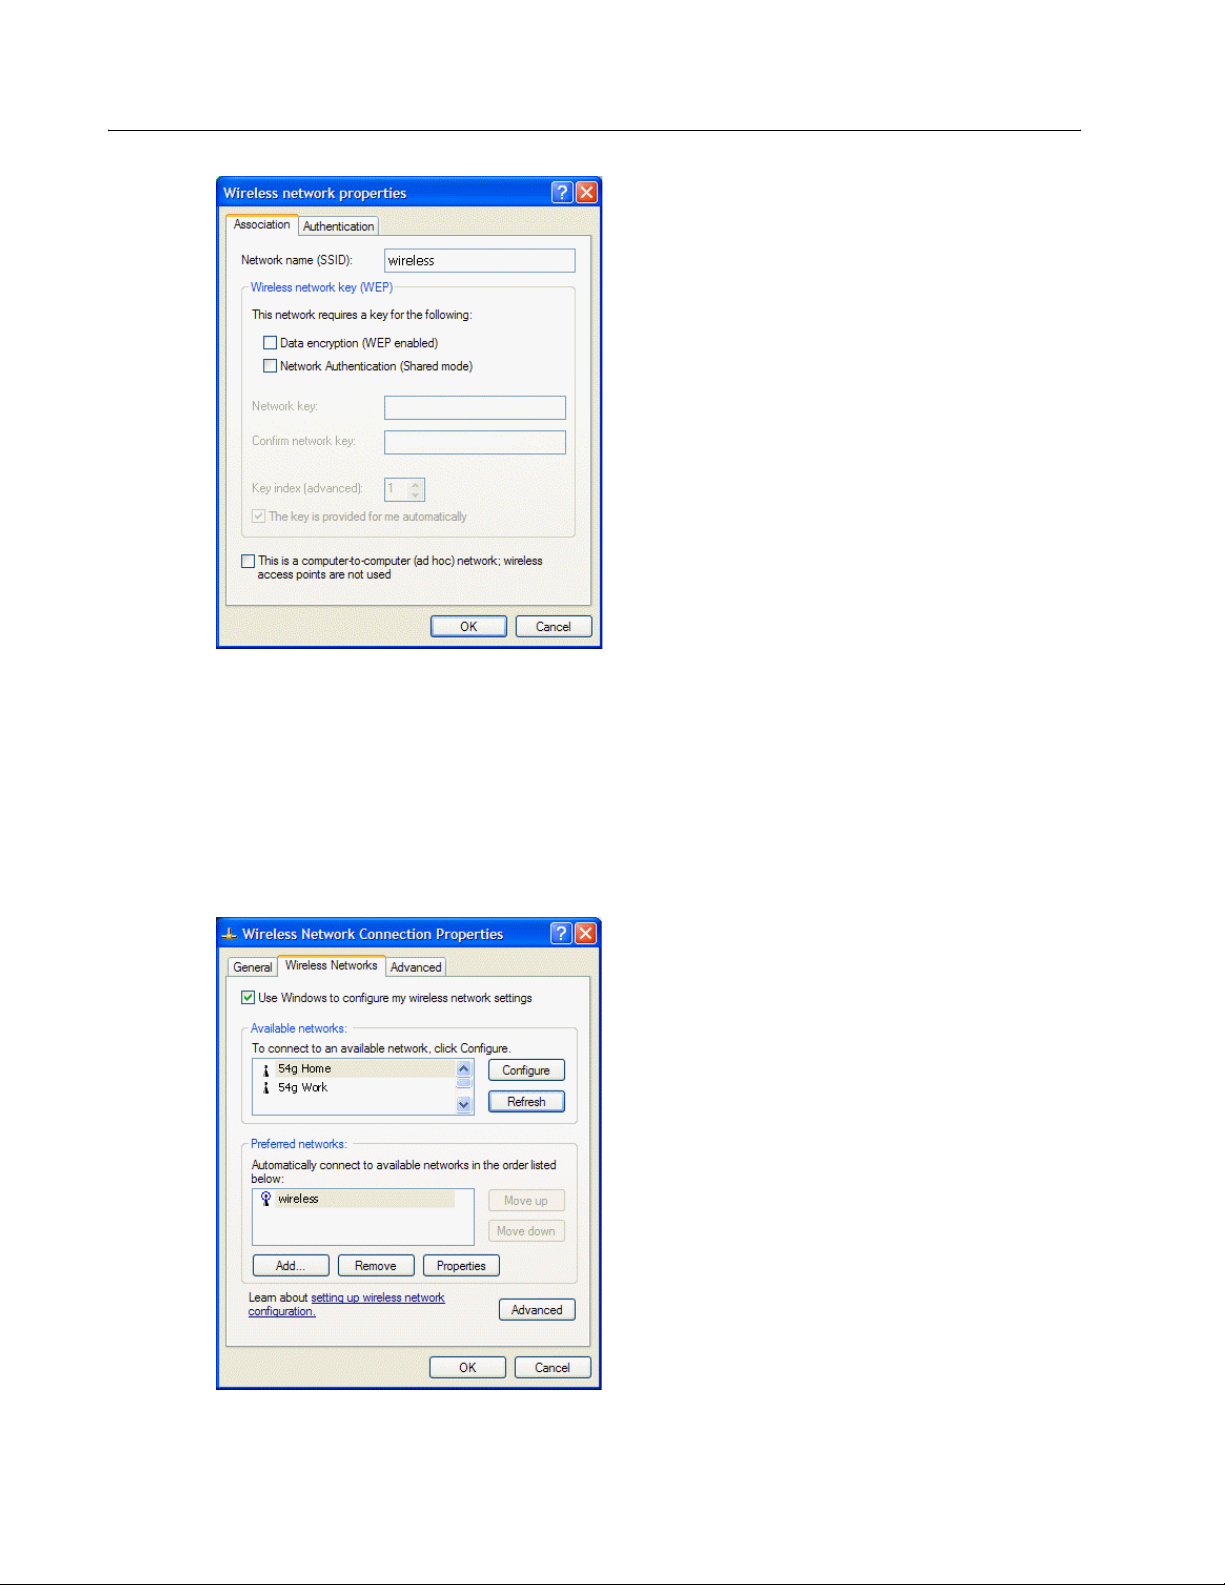
8 Click OK. The network name and icon appear at the top of the list under Preferred networks.
9 Click OK to activate the network connection. To verify that the network connection has been made, reopen
Wireless Network Connection Properties for that wireless network and click the Wireless Networks tab.
The computer is connected to the selected network when a blue bubble appears on top of the icon for that
network. If the bubble does not appear, click Refresh. If it still does not appear, try to access a Web page to
verify that an Internet connection exists.
Review Copy
Page 6 User Guide
Completing the Setup
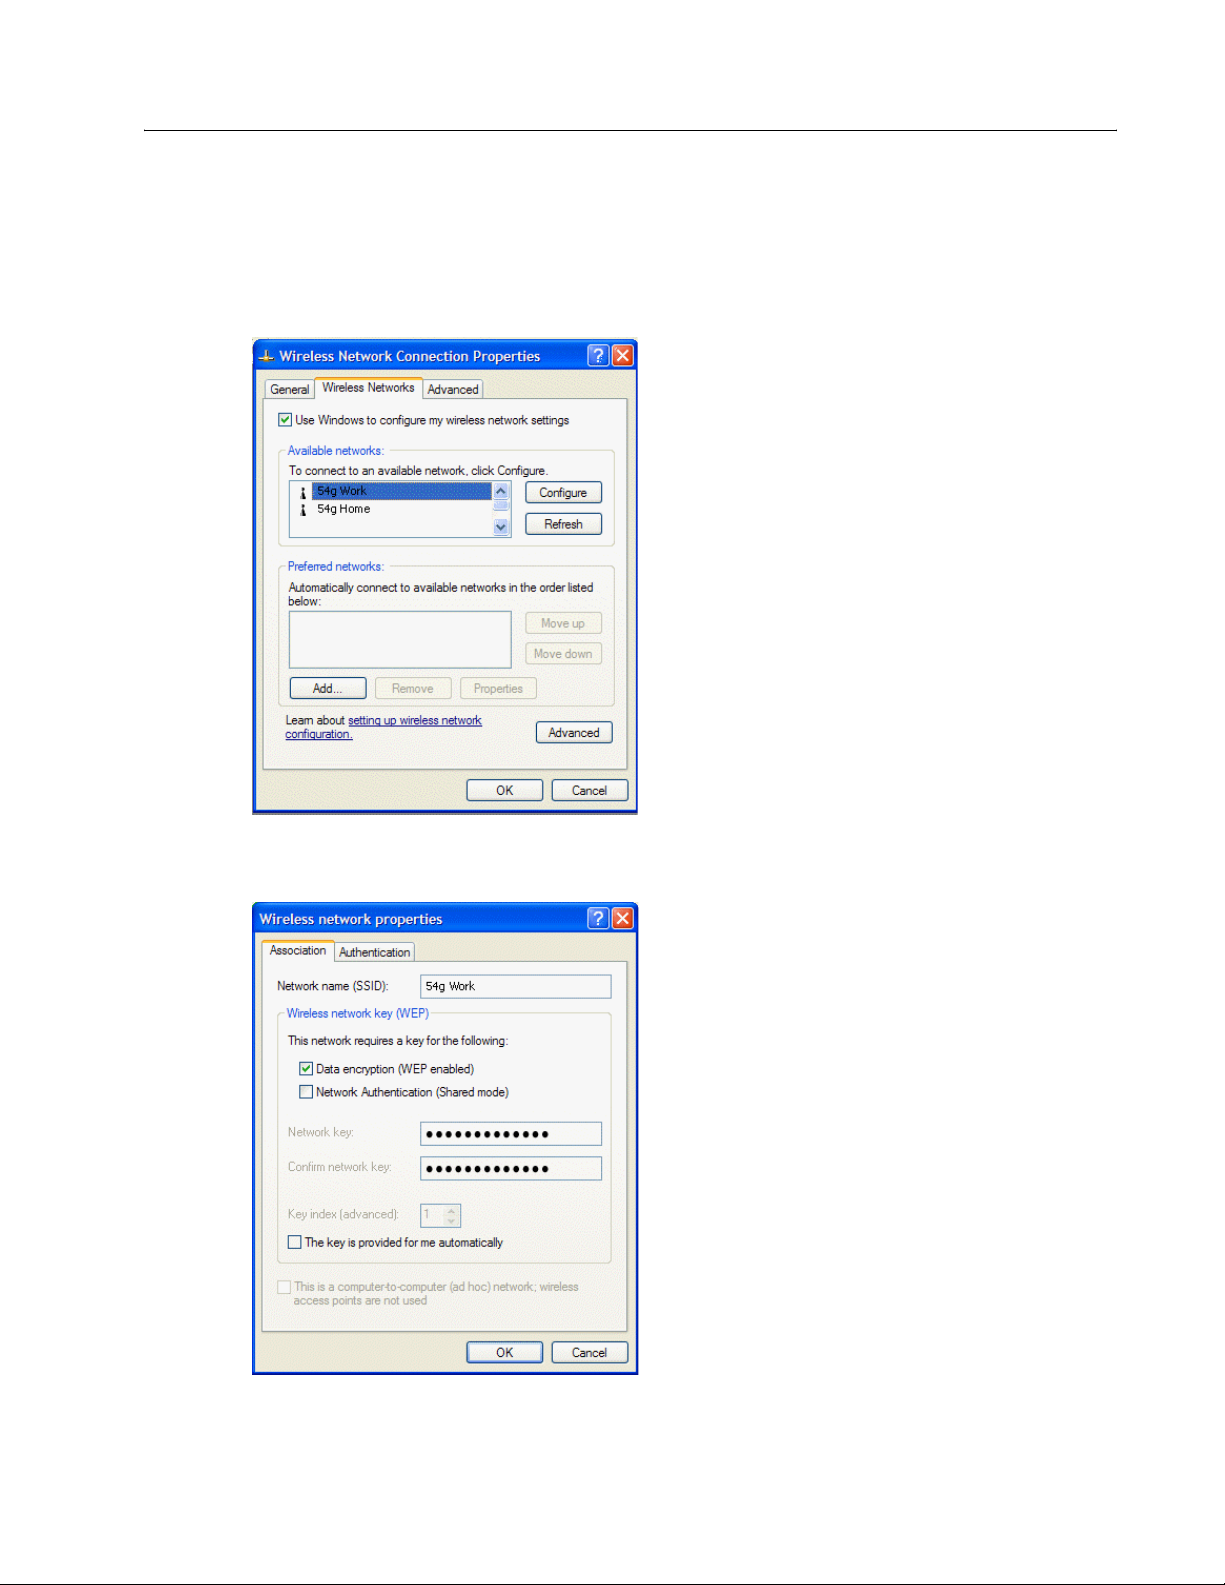
CONFIGURING A PROFILE FOR A LISTED NETWORK THAT REQUIRES A WEP KEY
1 Click Start, then click Control Panel (Category View).
2 Click Network and Internet Connections.
3 Click Network Connections.
4 Right-click Wireless Network Connection, and then click Properties.
5 Click the Wireless Networks tab.
6 Under Available networks, click the network name, and then click Configure.
Review Copy
User Guide Page 7
Completing the Setup
7 Select the Data encryption (WEP enabled) check box.
8 Clear the The key is provided for me automatically check box.
9 Type the network key in the Network key box and again in the Confirm network key box.
NOTE—It is not necessary to select the Key format or the Key length before typing the network key. These
settings automatically change to the appropriate setting as the network key is typed.
10 The default settings in Microsoft Windows XP Service Pack 1 require IEEE 802.1x authentication. With IEEE
802.1x authentication enabled, connecting to a network requires a connection with an authentication server. If
the network has no authentication server, the connection is disabled every 3 minutes. Therefore, when
connecting to a network that has no authentication server, disable IEEE 802.1x authentication by doing the
following (if the network does have an authentication server, ignore this step):
• Click the Authentication tab.
• Clear the Enable network access control using IEEE 802.1x check box.
11 Click OK. The network name and icon appear at the top of the list under Preferred networks.
Review Copy
12 Click OK to activate the network connection. To verify that the network connection has been made, reopen
Wireless Network Connection Properties for that wireless network and click the Wireless Networks tab.
The computer is connected to the selected network when a blue bubble appears on top of the icon for that
network. If the bubble does not appear, click Refresh. If it still does not appear, try to access a Web page to
verify that an Internet connection exists.
Page 8 User Guide

Completing the Setup
CONFIGURING A PROFILE FOR A NETWORK THAT IS NOT LISTED AND DOES NOT REQUIRE A WEP KEY
1 Click Start, then click Control Panel (Category View).
2 Click Network and Internet Connections.
3 Click Network Connections.
4 Right-click Wireless Network Connection, and then click Properties.
5 Click the Wireless Networks tab.
6 Click Add.
Review Copy
User Guide Page 9
Completing the Setup
7 Type the network name in the Network name (SSID) box.
8 The default settings in Microsoft Windows XP Service Pack 1 require IEEE 802.1x authentication. With IEEE
802.1x authentication enabled, connecting to a network requires a connection with an authentication server. If
the network has no authentication server, the connection is disabled every 3 minutes. Therefore, when
connecting to a network that has no authentication server, disable IEEE 802.1x authentication by doing the
following (if the network does have an authentication server, ignore this step):
• Click the Authentication tab.
• Clear the Enable network access control using IEEE 802.1x check box.
9 Click OK. The network name and icon appear at the top of the list under Preferred networks.
Review Copy
Page 10 User Guide

Completing the Setup
10 Click OK to activate the network connection. To verify that the network connection has been made, reopen
Wireless Network Connection Properties for that network and click the Wireless Networks tab. The
computer is connected to the selected network when a blue bubble appears on top of the icon for that
network. If the bubble does not appear, click Refresh. If it still does not appear, try to access a Web page to
verify that an Internet connection exists.
CONFIGURING A PROFILE FOR A NETWORK THAT IS NOT LISTED AND REQUIRES A
WEP K
1 Click Start, then click Control Panel (Category View).
2 Click Network and Internet Connections.
3 Click Network Connections.
4 Right-click Wireless Network Connection, and then click Properties.
EY
5 Click the Wireless Networks tab.
6 Click Add.
User Guide Page 11
Review Copy

Completing the Setup
7 Type the network name in the Network name (SSID) box.
8 Select the Data encryption (WEP enabled) check box.
9 Clear the The key is provided for me automatically check box.
10 Type the network key in the Network key box and again in the Confirm network key box.
NOTE—It is not necessary to select the Key format or the Key length before typing the network key. These
settings automatically change to the appropriate setting as the network key is typed.
11 The default settings in Microsoft Windows XP Service Pack 1 require IEEE 802.1x authentication. With IEEE
802.1x authentication enabled, connecting to a network requires a connection with an authentication server. If
the network has no authentication server, the connection is disabled every 3 minutes. Therefore, when
connecting to a network that has no authentication server, disable IEEE 802.1x authentication by doing the
following (if the network does have an authentication server, ignore this step):
• Click the Authentication tab.
• Clear the Enable network access control using IEEE 802.1x check box.
12 Click OK. The network name and icon appear at the top of the list under Preferred networks.
Review Copy
Page 12 User Guide

13 Click OK to activate the network connection. To verify that the network connection has been made, reopen
Wireless Network Connection Properties for that wireless network and click the Wireless Networks tab.
The computer is connected to the selected network when a blue bubble appears on top of the icon for that
network. If the bubble does not appear, click Refresh. If it still does not appear, try to access a Web page to
verify that an Internet connection exists.
Review Copy
User Guide Page 13

Specifications
Specifications
PHYSICAL CHARACTERISTICS
Characteristic Description
Form Factor Mini PCI specification, May 2002. Type IIIA form factor
Dimensions (length, width) 59.6 mm × 50.95 mm
TEMPERATURE AND HUMIDITY LIMITATIONS
Condition Description
Operating Temperature 0 to 70°C
Operating Humidity 95% maximum (no condensation allowed)
Storage Temperature –40 to 90°C
Storage Humidity 95% maximum (no condensation allowed)
POWER CHARACTERISTICS
Values
Characteristic
Doze Mode 40 mA 40 mA
Receive Mode 400 mA 220 mA
Transmit Mode 600 mA 330 mA
Power Supply 3.3 V 3.3 V
IEEE 802.11g Operation IEEE 802.11b Operation
NETWORKING CHARACTERISTICS
Review Copy
Characteristic Description
Compatibility IEEE Std 802.11b and IEEE Draft Std 802.11g for wireless LAN
Network Operating System Microsoft Windows Networking
Host Operating System Microsoft Windows XP
Medium Access Protocol CSMA/CA (collision avoidance) with acknowledgment (ACK)
Data Rate (Mbit/s)
a The Integrated 54g solution uses an automated rate select mechanism
a
• IEEE Draft Std 802.11g: 1, 2, 5.5, 6, 11, 12, 18, 24, 36, 48, 54
• IEEE Std 802.11b: 1, 2, 5.5, 11
Page 14 User Guide

RADIO CHARACTERISTICS
Specifications
Characteristic
Frequency Band 2.4 GHz (IEEE 802.11b, IEEE Draft Std 802.11g)
Modulation Technique Direct sequence spread spectrum (DSSS)
Spreading 11-chip Barker sequence
Bit Error Rate (BER)
Nominal Output Power • IEEE Std 802.11b: 14 dBm
a See "Regulatory Information" on page 16 for country-specific performance characteristics and use restrictions.
a
Description
• CCK for high and medium transmit rate
• DQPSK for standard transmit rate
• DBPSK for low transmit rate
Orthogonal frequency division multiplexing (OFDM)
• 52 subcarriers with BPSK, QPSK, 16-QAM or 64-QAM
• Forward error correction convolutional coding rate: 1/2, 2/3, 3/4
–5
Better than 10
• IEEE Draft Std 802.11g: 15 dBm
ppm
Review Copy
User Guide Page 15

Regulatory Information
Regulatory Information
OPERATIONAL INFORMATION
WIRELESS INTEROPERABILITY
The Integrated 54g enabled notebook is designed to be interoperable with any wireless LAN product that is
based on direct sequence spread spectrum (DSSS) and orthogonal frequency division multiplexing (OFDM)
radio technology and to comply with the following standards:
• IEEE Std 802.11b-1999. Standard on 2.4 GHz Wireless LAN
• IEEE Std 802.11g-2002. Draft standard on 2.4 GHz Wireless LAN
SAFETY
The Integrated 54g enabled notebook, like other radio devices, emits radio frequency electromagnetic energy.
The level of energy emitted by this devices, however, is less than the electromagnetic energy emitted by other
wireless devices such as mobile phones. The Integrated 54g enabled notebook operates within the guidelines
found in radio frequency safety standards and recommendations. These standards and recommendations
reflect the consensus of the scientific community and result from deliberations of panels and committees of
scientists who continually review and interpret the extensive research literature. In some situations or
environments, the use of a Integrated 54g enabled notebook may be restricted by the proprietor of the building
or responsible representatives of the applicable organization. Examples of such situations include the
following:
• Using the Integrated 54g enabled notebook onboard airplanes, or
• Using the Integrated 54g enabled notebook in any other environment where the risk of interference with
other devices or services is perceived or identified as being harmful.
If uncertain of the policy that applies to the use of wireless devices in a specific organization or environment
(in an airplane, for example), ask for authorization to use the Integrated 54g enabled notebook before turning
it on.
Review Copy
REGULATORY INFORMATION
The Integrated 54g enabled notebook must be used in strict accordance with this manual. For country-specific
approvals, see “Radio Approvals” on page 21. The computer manufacturer is not responsible for any radio or
television interference caused by unauthorized modification of the devices included with this Integrated 54g
enabled notebook kit, or the substitution or attachment of connecting cables and equipment other than that
specified by the computer manufacturer. The correction of interference caused by such unauthorized
modification, substitution, or attachment is the responsibility of the user. The computer manufacturer and its
authorized resellers or distributors are not liable for any damage or violation of government regulations that
may arise from the user's failing to comply with these guidelines.
CANADA—INDUSTRY CANADA (IC)
This device complies with RSS210 of Industry Canada.
Page 16 User Guide

Regulatory Information
EUROPE—EU DECLARATION OF CONFORMITY
This equipment complies with the essential requirements of the European Union directive 1999/5/EC.
Cet équipement est conforme aux principales caractéristiques définies dans la Directive européenne RTTE
1999/5/CE.
Die Geräte erfüllen die grundlegenden Anforderungen der RTTE-Richtlinie 1999/5/EG.
Questa apparecchiatura è conforme ai requisiti essenziali della Direttiva Europea R&TTE 1999/5/CE.
Este equipo cumple los requisitos principales de la Directiva 1999/5/CE de la UE, "Equipos de Terminales de
Radio y Telecomunicaciones".
Este equipamento cumpre os requisitos essenciais da Directiva 1999/5/CE do Parlamento Europeu e do
Conselho (Directiva RTT).
O exoplismos autos plhroi tis basikes apaits ths koinotikhs odhgias EU R&TTE 1999/5/E.
Deze apparatuur voldoet aan de noodzakelijke vereisten van EU-richtlijn betreffende radioapparatuur en
telecommunicatie-eindapparatuur 1999/5/EG.
Dette udstyr opfylder de Væsentlige krav i EU's direktiv 1999/5/EC om Radio- og teleterminaludstyr.
Dette utstyret er i overensstemmelse med hovedkravene i R&TTE-direktivet (1999/5/EC) fra EU.
Utrustningen uppfyller kraven för EU-direktivet 1999/5/EC om ansluten teleutrustning och ömsesidigt
erkännande av utrustningens överensstämmelse (R&TTE).
Tämä laite vastaa EU:n radio- ja telepäätelaitedirektiivin (EU R&TTE Directive 1999/5/EC) vaatimuksia.
This product is intended to be used in all countries of the European Economic Area when operating in IEEE
802.11b and/or IEEE 802.11g mode at 2.4 GHz (see “France” below).
Review Copy
FRANCE
Some areas of France have a restricted frequency band for operation in the IEEE 802.11b mode and the IEEE
802.11g mode at 2.4 GHz. The following information describes this restriction. Please check ART's Web site
(http://www.art-telecom.fr) for more up-to-date information.
Autorité de régulation des télecommunications (ART) has made decisions that will allow users to install WLAN
(wireless LAN) systems to provide high-speed Internet services primarily in high-traffic areas (called hot spots).
ART recently released guidelines that establish the conditions for experimenting with the installation of public
WLANs, such as for high-speed Internet access in locations that are currently being poorly served by existing
networks. Such public WLANs would operate in the 2.4-GHz frequency band. This series of measures answers
many of the concerns expressed during Art's public consultation on this topic.
User Guide Page 17

Regulatory Information
Decisions allowing the installation of wireless terminals in hot spots (train stations, airports, business centers,
and the like): In agreement with the Ministry of Defense, ART has made two decisions setting the conditions
for using wireless LANs in the 2.4-GHz band. One of these decisions has been submitted to the Minister of
Telecommunications for approval. These decisions will allow the installation of WLAN access points to provide
public services in high-traffic public places. This will allow service providers and licensed operators to install
access points using 2.4 GHz band technologies without authorization, under the following technical conditions:
• In 38 départements (see “Metropolitan Departments” on page 19 for listing):
• The 2400–2454 MHz band can be used both indoors and outdoors using systems (access points and
devices) with less than 300 milliwatts (mW) of power.
• The 2454–2483.5 MHz band can be used indoors using devices with less than 100 mW of power and
can be used outdoors using devices with less than 10 mW of power. When the devices are being used
outdoors on private property, the power may be increased to 100 mW after approval from the Ministry
of Defense.
• For the time being, in all other metropolitan départements, the conditions remain unchanged. The list of
the first 38 départements will be progressively added to after 1 January 2003.
• For the overseas départements (DOM), as well as Saint Pierre and Miquelon and Mayotte, the entire
2400–2483.5 MHz band may be used indoors and outdoors using devices with less than 100 mW of
power, except for the Reunion Islands and Guyana, where the 2420–2483.5 MHz band may be used only
outdoors using devices with less than 100 mW of power. ART reminds operators that these frequencies
are used with no guarantee of nondisruption, and that the installations must respect all measures applying
to radio installations (such as urban planning regulations). These decisions also allow the development of
private uses. In particular, private networks (such as indoor corporate networks) can be established using
these technologies.
These conditions are tabulated in Table 2 on page 20.
Guidelines for Public WLAN Experimentation
• Networks using WLAN technology will be granted a free authorization for up to 18 months under article
L.33-1 of the Post and Telecommunications Code. These networks may use systems with 100 mW of
power (effective isotropic radiated power (EIRP)) on the entire band, indoors and outdoors. Moreover, in
the 2.4 GHz band (and providing this power limit is respected), fixed point-to-point links can be
established for these networks needs, or frequencies can be requested in other ad hoc bands.
• Private and public persons may submit applications to ART, provided that legislation and regulations allow
them to do so.
• Applications will be processed in a simplified way, in the spirit of the new "Authorization" Directive.
• ART will send completed applications to the Ministry of Defense. The Ministry will then check that the
projects are not located near any sensitive area and that they are not likely to cause disruptions to military
equipment. For each application, ART will then submit its report and the draft authorization to the Minister
of Telecommunications.
• Applications can be sent from 12 November 2002 so that the first experiments may be launched as soon
as early 2003. Full reviews are to be sent to ART at the end of the temporary authorizations to determine
whether the technology guarantees quality and security to users.
Review Copy
Page 18 User Guide

Regulatory Information
Metropolitan Departments
Table 1 lists the 38 metropolitan départements that permit the use of WLAN systems using less than 100 mW
of power (EIRP) indoors across the entire 2400–2483.5 MHz band and outdoors on the 2400–2454 MHz band.
Table 1: 38 Metropolitan Départements
01 Ain Orientales 36 Indre 66 Pyrénées
02 Aisne 37 Indre et Loire 67 Bas Rhin
03 Allier 41 Loir et Cher 68 Haut Rhin
05 Hautes Alpes 42 Loire 70 Haute Saône
08 Ardennes 45 Loiret 71 Saône et Loire
09 Ariège 50 Manche 75 Paris
11 Aude 55 Meuse 82 Rarn et Garonne
12 Aveyron 58 Nièvre 84 Vaucluse
16 Charente 59 Nord 88 Vosges
24 Dordogne 60 Cise 89 Yonne
25 Doubs 61 Orne 90 Territoire de Belfort
26 Drôme 63 Puy du Dôme 94 Val de Marne
32 Gers 64 Pyrénées Atlantique
Conditions of use for WLANs in hot spots in these 38 départements:
• The 2400–2454 MHz band may be used both indoors and outdoors using devices with power (EIRP) of
less than 100 milliwatts (mW).
• The 2454–2483.5 MHz band may be used indoors using devices with power (EIRP) of less than 100 mW
and outdoors using devices with power of less than 10 mW. On private property outdoors, the power may
be 100 mW with the approval of the Ministry of Defense.
Conditions of use for WLANs in hot spots in other metropolitan départements: The conditions of use currently
remain unchanged, that is,
• The 2400–2446.5 MHz band may be used indoors using devices with power (EIRP) of less than 10 mW.
Review Copy
User Guide Page 19

Regulatory Information
• The 2446.5–2483.5 MHz band may be used indoors using devices with power (EIRP) of less than 100
mW. On private property outdoors, the power may be 100 mW with the approval of the Ministry of
Defense.
In the 38 Départements
Frequency (MHz)
2400 100 100 100
2454
248305 10 and 100 on private property with
In Other Metropolitan Départements
Frequency (MHz)
2400 10 Not permitted 100 with Ministry of Defense approval
2454
248305 100 100 on private property with Ministry of
In Guadeloupe, Martinique, St. Pierre, and Miquelon and Mayotte
Table 2: Authorized EIRP
Indoors Outdoors: Decisions
Ministry of Defense approval
Indoors Outdoors: Decisions
Defense approval
Authorized EIRP (mW)
a
Authorized EIRP (mW)
*
Outdoors: Guidelines
100 with Ministry of Defense approval
Outdoors: Guidelines
b
**
Authorized EIRP (mW)
Frequency (MHz)
2400 100 100
2483.5
In Reunion Islands and Guyana
Frequency (MHz)
a Concernent les réseaux indépendants et les hot spots
b Concernent les éxperimentations de réseaux ouverts au public
Indoors Outdoors: Decisions and Guidelines
Authorized EIRP (mW)
Indoors Outdoors: Decisions
100 Not permitted 100 with Ministry of Defense approval
Review Copy
100 100
*
Outdoors: Guidelines
**
NOTE—The Integrated 54g enabled notebook transmits less than 100 mW of power, but more than 10 mW.
USA—FEDERAL COMMUNICATIONS COMMISSION (FCC)
ThIs device complies with Part 15 of the FCC Rules. Operation of the device is subject to the following two
conditions:
• The device may not cause harmful interference.
• The device must accept any interference that may cause undesired operation.
NOTE—The radiated output power of the Integrated 54g enabled notebook is far below the FCC radio
frequency exposure limits. Nevertheless, the Integrated 54g enabled notebook should be used in such a
Page 20 User Guide

Regulatory Information
manner that the potential for human contact during normal operation is minimized. To avoid the possibility of
exceeding the FCC radio frequency exposure limits, keep a distance of at least 0.5 cm between the user (or
any other person in the vicinity) and the antenna that is built into the computer. To determine the location of
the antenna within the notebook, refer to the operating manual for the Integrated 54g enabled notebook.
Interference Statement
This equipment has been tested and found to comply with the limits for a Class B digital device, pursuant to
Part 15 of the FCC Rules. These limits are designed to provide reasonable protection against harmful
interference in a residential installation. This equipment generates, uses, and can radiate radio frequency
energy. If the equipment is not installed and used in accordance with the instructions, the equipment may
cause harmful interference to radio communications. There is no guarantee, however, that such interference
will not occur in a particular installation. If this equipment does cause harmful interference to radio or television
reception (which can be determined by turning the equipment off and on), the user is encouraged to try to
correct the interference by taking one or more of the following measures:
• Reorient or relocate the receiving antenna.
• Increase the distance between the equipment and the receiver.
• Connect the equipment to an outlet on a circuit different from that to which the receiver is connected.
• Consult the dealer or an experienced radio/TV technician for help.
NOTE—This Integrated 54g enabled notebook must be used in strict accordance with the computer
manufacturer's instructions. Any other installation or use violates FCC Part 15 regulations. Modifications not
expressly approved by the computer manufacturer could void the user's authority to operate the equipment.
RADIO APPROVALS
Only use this radio device in countries where the device is approved for use.
Review Copy
User Guide Page 21

Troubleshooting
Troubleshooting
CANNOT CONNECT TO THE NETWORK
If the Integrated 54g enabled notebook appears to be functioning properly but does not connect to the
network, the problem may be that there is a mismatch between the Network name (SSID) and Wireless
network key (WEP) settings in Wireless Network Properties and the name and WEP key of the network it
is trying to connect to. As explained in "Completing the Setup" on page 3, the network name and WEP key are
case sensitive. Verify that the spelling and case of these parameters are correct and that the settings are
exactly the same on all computers on the network.
If the spelling and case of these parameters are correct and the settings are exactly the same on all computers
on the network, and the computer is still unable to connect to the network, see “Performance and Connectivity
Problems”.
PERFORMANCE AND CONNECTIVITY PROBLEMS
Problem or Symptom Possible Solution
The computers seem to
be communicating, but
they do not appear in
My Computer or in My
Network Places.
Data transfer is
sometimes very slow.
Data transfer is always
very slow.
Computers are not
communicating with the
network.
The network was
enabled, but now it is
disabled.
Verify that
Microwave ovens and some cordless phones operate at the same radio frequency as the
Integrated 54g enabled notebook. When the microwave oven or cordless phone is in use,
it interferes with the operation of the wireless network. Therefore, keep the Integrated 54g
enabled notebook at least 20 feet away from microwave ovens and any cordless telephone
that operates at a frequency of 2.4 GHz.
Some homes and most offices are steel-framed structures. The steel in such buildings may
interfere with the network's radio signals, thus causing a slowdown in the data transmission
Review Copy
rate. Try moving the
to see if performance improves.
If the network has an access point (AP), check all of the cables and make sure the power
LED on the front of the AP is green. Verify that all of the wireless network properties values
are correct. Also, make sure the computer is receiving a good signal from the access point.
The default settings in Microsoft Windows XP Service Pack 1 require IEEE 802.1x
authentication. With IEEE 802.1x authentication enabled, connecting to a network requires
a connection with an authentication server. If the network has no authentication server, the
connection is disabled every 3 minutes. Therefore, when connecting to a network that has
no authentication server, disable IEEE 802.1x authentication by doing the following:
File and Printer Sharing is enabled on all the computers on the network.
1 Click
2 Click
3 Click
4 Right-click
5 On the
1 Click
2 Click
3 Click Network Connections.
4 Right-click
5 Click the
6 Click the network name under
7 Click the
8 Clear the
9 Click
Start, then click Control Panel (Category View).
Network and Internet Connections.
Network Connections.
General tab, under This connection uses the following items, verify that
File and Printer Sharing for Microsoft Networks check box is selected. If the
the
check box is cleared, select it. If this item is not present, click
Network Component Type
Network Service
and click
Start, then click Control Panel (Category View).
Network and Internet Connections.
OK.
Wireless Network Connections, then click Properties.
box, select File and Printer Sharing for Microsoft Networks
box, select Service and click Add. In the Select
OK. In Wireless Network Connection Properties, click OK.
Integrated 54g enabled notebook to different locations in the building
Wireless Network Connection, then click Properties.
Wireless Networks tab.
Preferred networks, then click Properties.
Authentication tab.
Network access control using IEEE 802.1x check box.
Install. In the Select
Page 22 User Guide

Problem or Symptom Possible Solution
In the ad hoc mode, I
am unable to
communicate with
another user on the
same ad hoc network.
By default, Windows XP uses a dynamic IP address in ad hoc mode. If you are not able to
communicate with other users on the same ad hoc network, assigning a static IP address
may correct the problem. Search the
static IP address.
Windows Help Center for instructions on assigning a
Review Copy
User Guide Page 23

Glossary
Glossary
access point A stand-alone wireless hub that allows any computer that has a wireless network
ad hoc network A communication configuration in which every computer has the same capabilities
available network One of the networks listed in the Available networks list under Wireless Network
BER bit error rate. The ratio of errors to the total number of bits being sent in a data
client computer The computer that gets its Internet connection by sharing either the host computer's
dBm Unit of expression of power level in decibels with reference to a power of 1 milliwatt.
DBPSK differential-binary-phase-shift keying.
DQSPK differential-quadrature-phase-shift keying. A compression technique that transmits
DSSS direct sequence spread spectrum. A type of radio transmission technology used in
Dynamic Host Configuration
Protocol (DHCP)
file and printer sharing A capability that allows a number of people to view, modify, and print the same file(s)
GHz gigahertz. A unit of frequency equal to 1 000 000 000 cycles per second.
host computer The computer that is directly connected to the Internet via a modem or network
IEEE Institute of Electrical and Electronics Engineering
IEEE 802.11g The IEEE draft standard for wireless LAN operations in the 2.4 GHz frequency band
IEEE 802.11b The IEEE standard for wireless LAN operations in the 2.4 GHz frequency band with
Internet Protocol (IP) address The address of a computer that is attached to a network. Part of the address
LAN local area network
m meter
Mbit/s megabits per second. Transmission speed of 1 000 000 bits per second.
MHz megahertz. A unit of frequency equal to 1 000 000 cycles per second.
ns nanosecond. 1 billionth (1/1 000 000 000) of a second.
OFDM orthogonal frequency division multiplexing. An emerging signal modulation
peer-to-peer network See
preferred network One of the networks that has been configured. Such networks appear under
Service Set Identifier (SSID) A value that controls access to a wireless network. The SSID for your wireless
Wired Equivalent Privacy
(WEP)
adapter to communicate with another computer and to connect to the Internet.
and any computer can initiate a communication session. Also known as a peer-topeer network or a computer-to-computer network.
Connection Properties
receiving range of the
transmission from one location to another.
connection or the access point's connection.
only the differences between the values of the phase of the sine wave rather than
the full absolute value.
wireless networking and cellular communications.
A mechanism for allocating IP addresses dynamically so that addresses can be
reused when hosts no longer need them.
from different computers.
adapter.
with a maximum data rate of 54 Mbit/s. This draft standard is expected to be finalized
in the summer of 2003.
a maximum data rate of 11 Mbit/s.
designates which network the computer is on, and the other part represents the host
identification.
. Any wireless network that is broadcasting and is within
Integrated 54g enabled notebook appears on the list.
Review Copy
technology for achieving higher data rates in wireless communications.
ad hoc network
Preferred networks on the Wireless Networks tab of Wireless Network
Connection Properties
network card must match the SSID for any access point that you want to connect
with. If the value does not match, you are not granted access to the network. You
can have up to three SSIDs. Each SSID can be up to 32 characters long and is casesensitive.
A form of data encryption. The WEP key information in the client computer must
match the WEP key used by the access point or host computer. The WEP key can
be enabled or disabled. The WEP key is case-sensitive.
. Also known as a computer-to-computer network.
.
Page 24 User Guide

Review Copy
User Guide Page 25

Glossary
Review Copy
Page 26 User Guide

Glossary
Review Copy
User Guide Page 27

Glossary
Review Copy
Page 28 User Guide

Glossary
Review Copy
User Guide Page 29

Glossary
Review Copy
Page 30 User Guide

Review Copy
User Guide Page 31

Glossary
Review Copy
Page 32 User Guide

Review Copy
User Guide Page 33

Glossary
Review Copy
Page 34 User Guide

© 2003 Hewlett-Packard Company
Microsoft and Windows are trademarks of Microsoft corporation in the U.S. and/or other countries. Intel is a
trademark of Intel corporation in the U.S. and/or other countries.
HP shall not be liable for technical or editorial errors or omissions contained herein or for incidental or consequential
damages in connection with the furnishing, performance, or use of this material. The information in this document
is provided "as is" without warranty of any kind, including, but not limited to, the implied warranties of
merchantability and fitness for a particular purpose, and is subject to change without notice. The warranties for HP
products are set forth in the express limited warranty statements accompanying such products. Nothing herein
should be construed as constituting an additional warranty.
This document contains proprietary information that is protected by copyright. No part of this document may be
photocopied, reproduced, or translated to another language without the prior written consent of Hewlett-Packard
Company.
User Guide
54g Wireless LAN
First Edition February 2003
Document Part Number: 330895-001
Review Copy
 Loading...