

Page 1
USER’S MANUAL
AC POWERED STROBE LIGHT
FOR THE HEARING IMPAIRED
Input: 120V AC ~, 60Hz
obe: 177 candela minimum
Str
UL ST
ANDARD 1971
Model SL177
M08-0188-000 J1 05/07 Printed in Mexico
BEFORE YOU INSTALL THIS STROBE LIGHT
TANT!
IMPOR
Strobe Lights”.
This Strobe Light is intended to be interconnected with functioning
smoke, heat or carbon monoxide alarms. It has no means of detection
on it own. It will not operate without AC power
cally designed to wake hearing impaired persons as specified by NFPA
72, Underwriters Laboratories (UL 1971), Americans with Disabilities
Act (ADA) and ANSI 117.1.
This Str
danger
where hearing impaired residents can see it, as described in this manual.
This unit will not sense smoke, carbon monoxide, gas, heat or flame.
It cannot pr
Check Your Local Building Codes
This Str
family or multi-family dwellings and institutional applications including
sleeping areas of hospitals, hotels, motels, nursing homes, long term
health car
dwellings. See “Special Compliance Considerations” for details.
Read “Recommended Placement for Hearing Impair
. Its operation is specifi-
obe Light can ONLY give an early warning of a potentially
ous fire or CO incident if it is installed, maintained and located
event or extinguish fires.
obe Light is designed to be used in typical residential single-
e facilities, day care facilities, dormitories or other similar
ed
TANT! PLEASE READ CAREFULLY AND SAVE.
IMPOR
This user’s manual contains important information about your Strobe
s operation. If you are installing this Strobe Light for use by others,
Light’
you must leave this manual—or a copy of it—with the end user
.
TABLE OF CONTENTS
Introduction . . . . . . . . . . . . . . . . . . . . . . . . . . . . . . . . . . . . . . . . . . . . . .1
Before You Install This Strobe Light . . . . . . . . . . . . . . . . . . . . . . . . . .1
Recommended Placement
Weekly Testing . . . . . . . . . . . . . . . . . . . . . . . . . . . . . . . . . . . . . . . . . . .2
How To Install This Strobe Light . . . . . . . . . . . . . . . . . . . . . . . . . . .2-3
Regular Maintenance . . . . . . . . . . . . . . . . . . . . . . . . . . . . . . . . . . . . . .3
If This Strobe Light Activates . . . . . . . . . . . . . . . . . . . . . . . . . . . . . . .4
If an Interconnected CO Alarm Sounds . . . . . . . . . . . . . . . . . . . . . .4
If an Interconnected Smoke Alarm Sounds . . . . . . . . . . . . . . . . . . .4
If You Suspect A Problem . . . . . . . . . . . . . . . . . . . . . . . . . . . . . . . . . .4
Special Compliance Considerations . . . . . . . . . . . . . . . . . . . . . . . . . .5
Limitations of Strobes . . . . . . . . . . . . . . . . . . . . . . . . . . . . . . . . . . . . .5
Limited Warranty . . . . . . . . . . . . . . . . . . . . . . . . . . . . . . . . . . . . . . . . . .5
© 2007 BRK Brands, Inc., a Jarden Corporation company (NYSE: JAH)
3901 Liberty Street Road, Aurora, IL 60504-8122
All rights reserved.
Consumer Affairs: (800) 323-9005
www.
brkelectronics
For Hearing Impair
.com • www.firstalert.com
ed Strobe Lights . . . . . . . . . . .1-2
INTRODUCTION
Thank you for choosing First Alert for your hearing impaired Strobe
Light needs. Y
designed to pr
of a fire or a carbon monoxide danger when used with smoke, heat or
carbon monoxide alarms. Please take the time to read this manual and
make the Strobe Light an integral part of your family’s safety plan.
Key Featur
Smart Strobe: Separate flash patterns to distinguish smoke/heat or
CO danger. Can be interconnected with First Alert®and BRK®smoke,
CO, smoke/CO combo and heat alarms.
177 Candela Xenon Light: Powerful 177 candela xenon strobe light
provides effective visual warning to awaken hearing impaired residents.
Smart Interconnect: One interconnect wire carries smoke and CO
alarm signals.
Meets ADA Requirements: Meets the requirements of the Americans
with Disabilities Act (ADA).
ou have pur
ovide hearing impaired individuals with a visual warning
es of the SL177 Str
chased a state of the art Str
obe Light:
obe Light
ELECTRICAL SHOCK HAZARD. Turn off power to the area where
you will install this Str
before beginning installation. Failure to turn off the power before
installation may result in serious electrical shock, injury or death.
•
Installation of this Strobe Light must conform to the
electrical codes in your ar
(NEC), NFPA 72, NFPA 101; SBC (SBCCI); UBC (ICBO);
NBC (BOCA); OTFDC (CABO), and any other local or
building codes that may apply
be performed by a licensed electrician. Failur
these guidelines may result in injury or property damage.
•
This
Strobe Light
60Hz circuit. Be sure the circuit cannot be turned off by a
switch, dimmer, or ground fault circuit interrupter. Failure to
connect this
from providing constant protection.
•
It is possible an electrical fire could occur on the circuit
powering this
unit could be cut off and it may fail to activate. Some safety
experts recommend wiring warning devices like this unit on
separate circuits from other appliances, since these circuits
are not as likely to be overloaded. Other safety experts
recommend wiring these units on the same circuits as
appliances so it is more readily apparent if the circuit fails.
•
Never disconnect the power from an AC powered Alarm to
stop an unwanted alarm. Doing so will disable the unit and
remove your protection. In the case of a true unwanted
alarm open a window or fan the smoke away from the interconnected units . The interconnected alarm will reset automatically when it returns to normal operation. Never remove
the batteries from a battery operated Alarm to stop an
unwanted alarm (caused by cooking smoke, etc.). Instead
open a window or fan the smoke away. The Alarm will reset
automatically.
obe Light at the circuit breaker or fuse box
ea; Articles
must be powered by a 24-hour, 120VAC
obe Light
Str
Strobe Light
to a 24-hour cir
. If this happened, power to the
210,
760 of NFP
. Wiring and installation must
e to follow
cuit may prevent it
A 70
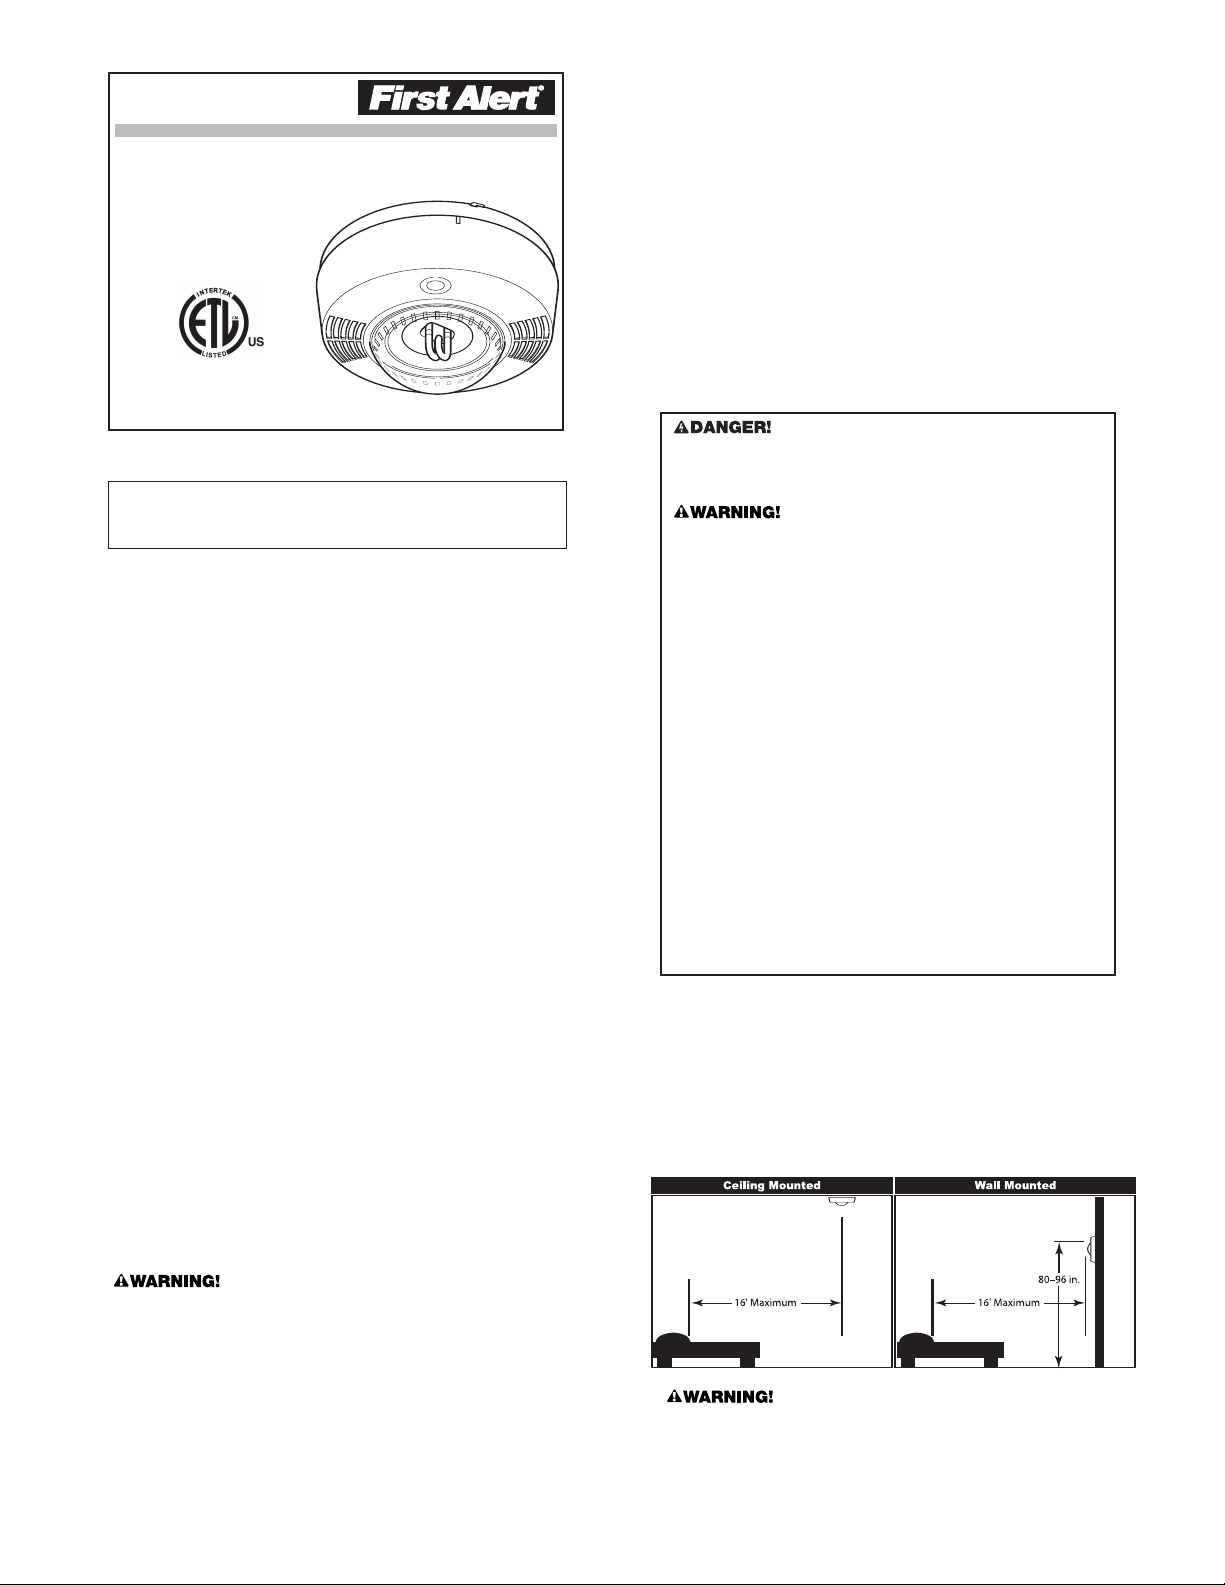
RECOMMENDED PLACEMENT FOR HEARING
IMPAIRED STROBE LIGHTS
According to NFPA 72, at a minimum a strobe should installed within
16 feet (4.9 meters) of the pillow
For wall mounting, the strobe should be between 80 to 96 inches (203
to 244 cm) above the floor
For ceiling mounting: Ideally
center of the room. See diagram.
.
.
obe should be located near the
, the str
This device is not a smoke, heat or carbon monoxide alarm. It must
be interconnected with operating alarms to provide protection.
It will not work without AC power
.
This strobe light must be interconnected with smoke, heat and/or
carbon monoxide alarms either within or nearby the sleeping
rooms to provide protection.
1
Page 2
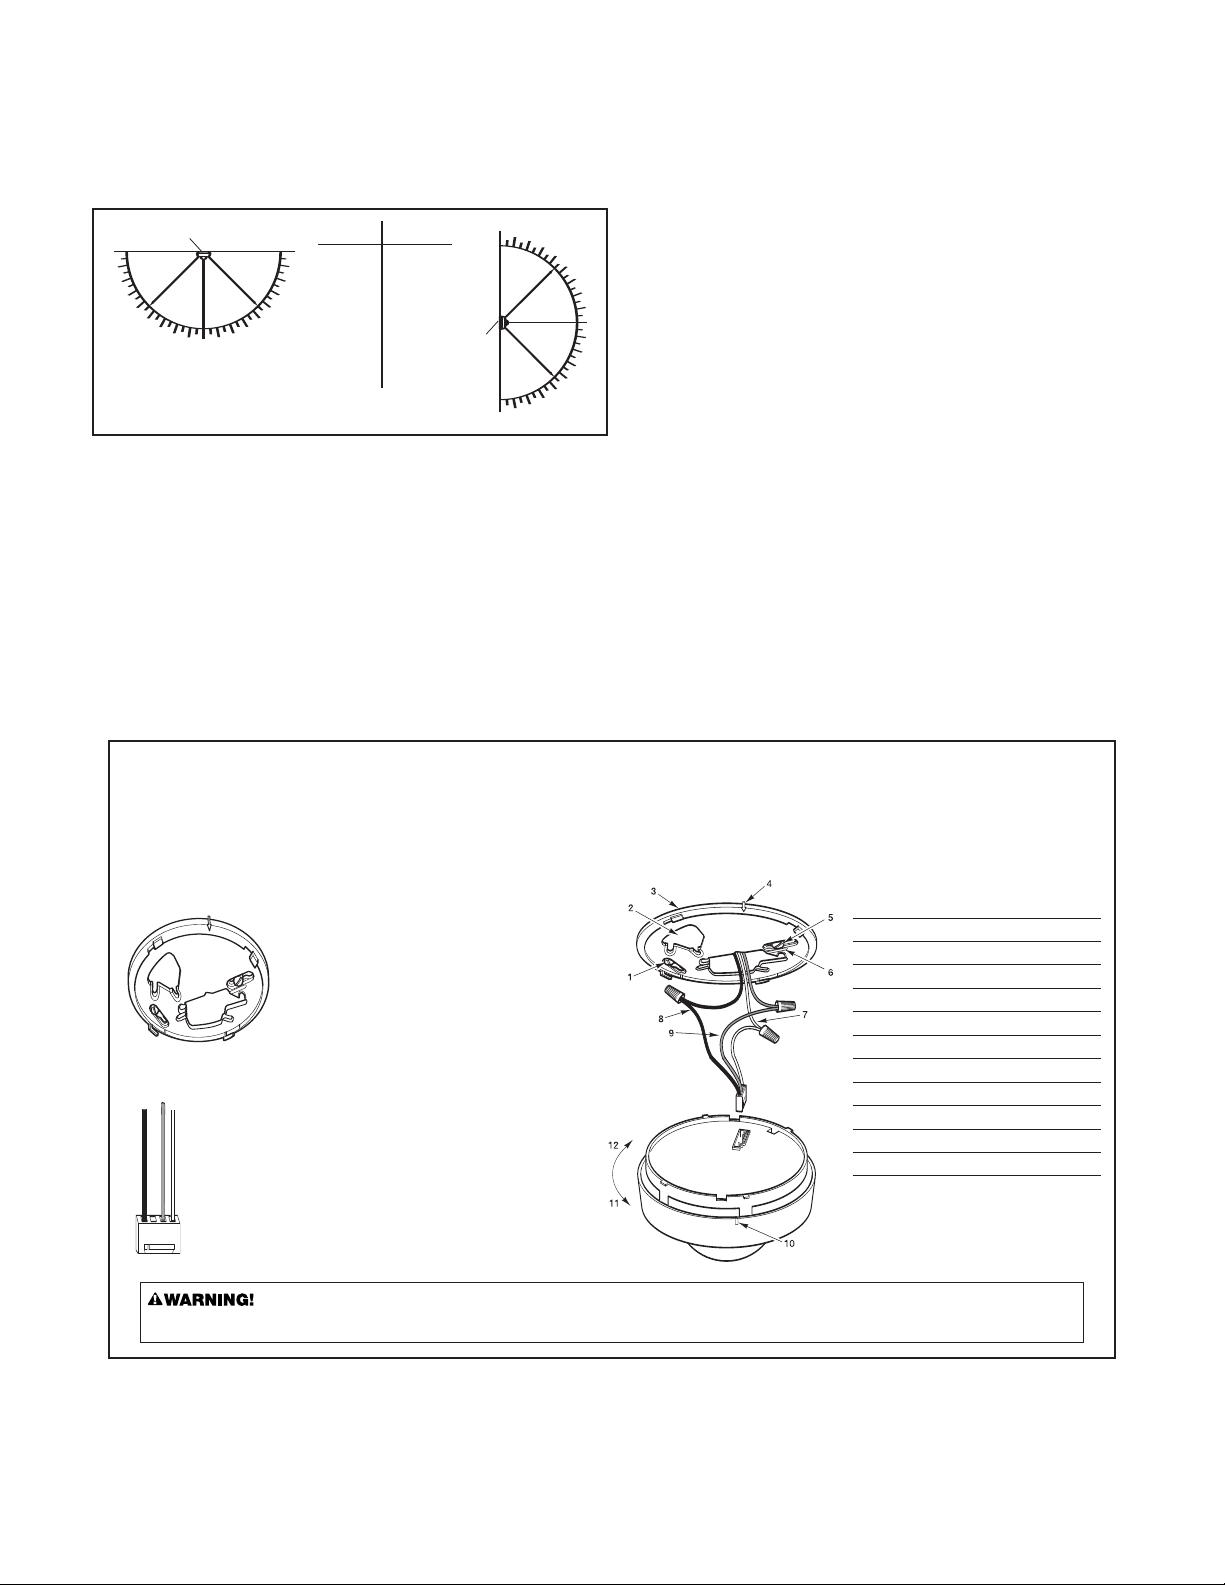
STROBE LIGHT OUTPUT FOR WALL & CEILING
90 90
Angle
(In Degrees)
Per
cent
Light Intensity
0
5-25
30-45
50
55
60
65
70
75
80
85
90
100
90
75
55
45
40
35
35
30
30
25
25
45 45
0
90
90
45
45
0
WALL
LIGHT
LIGHT
CEILING
FIGURE 1: Light Output
for
Ceiling Mount
FIGURE 2: Light Output
for Wall Mount
MOUNTING
The intensity of the str
In other words, the light is brightest directly in front of the strobe light
and is progressively less bright to either side. As required by
Underwriters Laboratories Inc. (UL), the following illustrations show how
the strobe light is dispersed. Use them to help you choose where to
locate units for the hearing impaired.
PHOTOSENSITIVE EPILEPSY AND STROBE FLASH RA
Individuals who ar
an increased probability for seizures with multiple strobe lights flashing
onously. The frequency or speed of flashing light that is most
asynchr
likely to cause seizur
lights most likely to trigger seizures are between the frequency of 5 to
30 flashes per second (Hertz). This str
per second.
Under the Americans with Disabilities Act, most workplaces and places
serving the public, including theaters, restaurants, and recr
are required to have fire alarms, which flash as well as ring so that
people who cannot hear or cannot hear well will know that there is an
gency.
emer
obe light gradually lessens as the angle increases.
TES
e susceptible to photosensitive epilepsy might have
es varies from person to person. Generally, flashing
obe light flashes at about 1 flash
eation areas,
WEEKLY TESTING
o test this strobe light you must activate the test button of each inter-
T
connected, smoke, CO or heat alarm. This will send a signal to the
obe light and cause the unit to begin flashing. Depending on what
str
type of alarms you have connected, the str
patterns.
Smoke/Heat Alar
CO Alarms: Intermittent approximately 1 flash per second for four
flashes, then 5 seconds off. Pattern is repeated.
These dif
distinguish the danger present. The flash patterns approximate the
audible alarm emitted by either a smoke or heat alarm or a carbon
monoxide alarm. Note that a heat alarm will emit the same hor
as a smoke alarm. Make sure all members of your family understand
ferent flash patterns.
the dif
Do not look directly at or touch the lens while the strobe light is
flashing. Doing so can hurt your eyes or burn your fingers.
obe light does not flash during testing and the alarm does not sound,
str
check the fuse or circuit breaker supplying power to the alarm circuit.
If the alarm sounds and the strobe light does not flash, refer to the
installation instructions in this manual to insur
properly. If the strobe light still does not work it should be replaced.
When testing the inter
the unit when the alar
emergency. Exposure to the horn at close range may harm your
hearing.
be tested individually to ensur
test all interconnected alarms every week to make sure they are working
operly. Using the test button is the recommended way to test the
pr
alarms and str
ms:
Constant appr
ferent patterns are to help a hearing impaired person better
connected alarm, do not stand too close to
m is sounding. It is loud to wake you in an
connected alarms connected to this strobe light must
All inter
e proper connections. It is important to
obe light.
obe light will flash different
oximately 1 flash per second.
n pattern
If the
e strobe light is wired
HOW TO INSTALL THIS STROBE LIGHT
This Strobe Light is designed to be mounted on any standard wiring junction box to a 4-inch (10 cm) diagonal size, on either the ceiling or wall (if allowed
by local codes). Read “Recommended Placement for Hearing Impaired Strobe Lights” before you begin installation.
Tools you will need: • Standard Flathead screwdriver • Wire strippers
THE PARTS OF THIS STROBE LIGHT
The Mounting Bracket
Installs onto the junction box.
It has a variety of screw slots to fit most
boxes. If a junction box is not already in
place, install one using standard #12 or
#14 gauge copper wire.
To remove the mounting bracket from
the base, hold the base firmly and twist
mounting bracket counterclockwise.
The Power Connector
The power connector plugs into a power input block
on the Strobe Light and supplies it AC power.
•Black wir
e is “hot.”
•White wire is neutral.
•Orange wire is used for interconnect.
If you need to remove the power connector, turn
POWER OFF first.
ewdriver blade between the power connector and
a flat scr
the security tab inside the power input block. Gently pry
back the tab and pull the connector free.
same circuit, power from a generator or solar power, light dimmer on the same circuit or mounted near fluorescent lighting. Excessively noisy
power may cause damage to your Alarm.
To remove the power connector, insert
Make sur
e the Alarm is not receiving excessively noisy power. Examples of noisy power could be major appliances on the
1 Mounting slot and screw (1 of 2)
2 Junction box
3 Mounting bracket
Mounting Bracket Alignment Arrow
4
5 Mounting slot and screw (1 of 2)
6 Wire strip gauge
7 Neutral (white) AC wire
Hot (black) AC wir
8
e
9 Interconnect wire
10 Alignment Tab On Alarm
11 Turn to attach to bracket
12 Turn to remove from bracket
2
Page 3

FOLLOW THESE INSTALLATION STEPS
}
}
The basic installation of this str
to install one str
This device is not a smoke, heat or CO alar
nected with operating alar
work without AC power.
Things to consider when planning the installation of a hearing impaired
obe light:
str
Location of strobe light is important and must comply with NFPA
•
72 r
impaired person and must be positioned properly for it to be
fective. See Installation Diagram and "Recommended Locations
ef
for Hearing Impair
• Types of other alarms to be interconnected with this strobe light.
This device can be interconnected with smoke, heat, carbon
monoxide alarms or a combination of all thr
usually placed within the sleeping room. A carbon monoxide or
heat alarm is usually placed outside the sleeping area. Follow
ecommendations in each device's installation manual. The inter-
r
connect wir
strobe light to be operational. The strobe light may be positioned
anywher
ELECTRICAL SHOCK HAZARD! T
installation!
Remove the mounting bracket from the base. Install the mounting
1.
bracket to the junction box.
Using wir
2.
wiring as follows:
Strip of
wir
• Connect the white wire on the power connector to the neutral
wir
• Connect the black wire on the power connector to the hot wire
in the junction box.
• Connect the orange wire on the power connector to the inter-
connect wire in the junction box. Repeat for each unit you are
interconnecting. Never connect the hot or neutral wires in the
junction box to the orange interconnect wire.
3. Plug the power connector into the back of the Strobe Light.
4. Line up the alignment tab on the base with the alignment tab on
the mounting bracket. Turn the Strobe Light clockwise (right) until
you hear the unit snap into place.
5. Check all connections.
obe light or multiple strobe lights.
equirements. This device is intended to awaken a hearing
e of all alarms must be properly connected for the
e within the interconnected circuit.
e nuts, connect the power connector to the household
f about 1/2” (12 mm) of the plastic coating on the orange
e on the power connector.
e in the junction box.
obe light is similar whether you want
ms to provide protection. It will not
ed Strobe Lights" for details.
urn off power before starting
m. It must be intercon-
ee. A smoke alarm is
7. To test this strobe light you must activate the test button of each
interconnected, smoke, CO or heat alarm. This will send a signal
obe light and cause the unit to begin flashing.
to the str
Depending on what type of alarms you have connected, the
strobe light will flash different patterns.
Smoke/Heat Alarms: Constant approximately 1 flash per second.
CO Alarms: Intermittent appr
flashes, then 5 seconds off. Pattern is repeated.
These different patterns are to help a hearing impaired person
better distinguish the danger pr
mate the audible alarm emitted by either a smoke/heat alarm or
carbon monoxide alarm.
Do not look dir
flashing.
If any Strobe Light does not flash, TURN OFF POWER and recheck
connections. If any Str
estoring power, replace it immediately.
after r
This Str
and ONELINK®wir
branded Smoke Alarms, Carbon Monoxide Alarms, Combination
Smoke/CO Alarms, Heat Alarms and r
Affairs at 1-800-323-9005, 7:30 AM - 5:00 PM Central Standard Time,
Monday through Friday for specific model information.
connect units within a single family residence only, otherwise all
Inter
households will experience unwanted alarms when you test any unit
in the series. Interconnected units will only work if they are wired to
compatible units and all r
connected units must meet ALL of the following
Inter
requirements:
• A maximum of 18 units total may be interconnected
(Maximum of 12 Smoke Alarms).
• The same fuse or circuit breaker must power all interconnected
Alarms.
• The total length of wire interconnecting the units should be
less than 1000 feet (305 meters). This type of wire is commonly
available at Hardware and Electrical Supply stores.
•
All wiring must conform to all local electrical codes and NFPA 70
(National Electrical Code). Refer to NFPA 72, NFPA 101, and/or
your local building code for further connection requirements.
ectly at or touch the lens while the strobe light is
obe Light still does not flash when you test it
obe Light can be interconnected with all current model hardwired
eless enabled
oximately 1 flash per second for four
esent. The flash patterns approxi-
®
t
First Aler
equirements are met.
and BRK Electr
elays. Call First Alert Consumer
onics
®
Improper wiring of the power connector or the wiring leading to
the power connector will cause damage to the Strobe Light and
may lead to a non-functioning unit.
e installing multiple Strobe Lights, repeat steps 1-5
If you ar
•
for each Strobe Light in the series. When you are finished,
restore power to the junction box.
e power until
ELECTRICAL SHOCK HAZARD! Do not r
all devices are completely installed. Restoring power before
installation is complete may result in serious electrical shock,
injury or death.
e the Strobe Light is receiving AC power. Under normal
Make sur
6.
operation, the green power indicator light will shine continuously.
If the power indicator light does not light, TURN OFF POWER TO
THE JUNCTION BOX and r
tions are correct and the power indicator still does not light when
you restore the power, the unit should be replaced immediately.
echeck all connections. If all connec
estor
A. Unswitched 120VAC
60 Hz source
1A. Strobe Light
1B. Smoke, CO or
-
Heat Alarm
2. Ceiling or Wall
B. To additional units (Smoke, CO and
Heat Alarm); Maximum = 18 total
(Maximum 12 Smoke Alarms)
3. Power Connector
4. Wire Nut
5. Junction Box
6. Neutral Wire (Wht)
7. Interconnect Wire
8. Hot Wire (Blk)
REGULAR MAINTENANCE
This unit has been designed to be as maintenance free as possible, but
e are a few simple things you must do to keep it working properly.
ther
• Test it at least once a week.
• Clean the Strobe Light at least once a month; gently vacuum off
any dust using your household vacuum’s soft brush attachment,
and test the Str
or solvents since they may damage the unit.
obe Light after cleaning. Never use water, cleaners
• If the Strobe Light is loose or broken, the entire unit should be
replaced immediately. Never remove the Strobe Light lens for
any reason. Doing so can permanently damage the unit and
will void your war
• Do no
t paint over the unit. Paint may clog the openings and
event the unit fr
pr
.
ranty
om operating pr
operly
.
3
Page 4

IF THIS STROBE LIGHT ACTIVATES
RESPONDING TO AN ALARM
During an alarm, depending on what type of alarms you have
connected, the str
Smoke/Heat Alar
ms: Intermittent approximately 1 flash per second for four
CO Alar
flashes, then 5 seconds of
These different patterns are to help a hearing impaired person
better distinguish the danger pr
mate the audible alarm emitted by either a smoke/heat alarm or
carbon monoxide alarm.
opriate smoke, CO or heat alarm will also be sounding
The appr
epeating horn patterns:
their r
Smoke or Heat Alarm you will hear 3 beeps, pause, 3 beeps, pause.
Carbon Monoxide danger you will hear 4 fast beeps, pause, 4 fast
beeps, pause.
IF AN INTERCONNECTED CO ALARM SOUNDS
If you hear an interconnected CO alarm horn and the CO red light
is flashing, move ever
Actuation of an inter
carbon monoxide (CO) which can kill you. In other words, when
your CO Alar
INTERCONNECTED CO ALARM SIGNAL SOUNDS:
IF AN
1. Operate the Test/Silence button.
2. Call your emergency services, fire department or 911. Write down
the number of your local emergency service here:
____________________________________________________________
3. Immediately move to fresh air—outdoors or by an open door or
window. Do a head count to check that all persons are accounted
for. Do not re-enter the premises, or move away from the open door
or window until the emergency services responder has arrived, the
premises have been aired out, and your CO Alarm remains in its
normal condition.
4. After following steps 1-3, if your CO Alarm reactivates within a
24-hour period, repeat steps 1-3 and call a qualified appliance
technician to investigate for sources of CO from fuel-burning
equipment and appliances, and inspect for proper operation of this
equipment. If problems are identified during this inspection have the
equipment serviced immediately. Note any combustion equipment
not inspected by the technician, and consult the manufacturers’
instructions, or contact the manufacturers directly, for more information about CO safety and this equipment. Make sure that motor
vehicles are not, and have not, been operating in an attached
garage or adjacent to the residence. Write down the number of a
qualified appliance technician here:
____________________________________________________________
NOTE: A qualified appliance technician is defined as “a person, firm,
corporation, or company that either in person or through a representative,
is engaged in and responsible for the installation, testing, servicing, or
eplacement of heating, ventilation, air conditioning (HV
r
combustion appliances and equipment, and/or gas fireplaces or other
decorative combustion equipment.”
obe light will flash different patterns.
ms: Constant approximately 1 flash per second.
f. Pattern is repeated.
esent. The flash patterns approxi-
“ALARM-MOVE TO FRESH AIR”
DO NOT remove the batteries!
connected CO Alar
m sounds, you must not ignore it!
yone to a source of fresh air.
m indicates the presence of
AC) equipment,
IF AN
INTERCONNECTED SMOKE ALARM SOUNDS
RESPONDING TO AN ALARM
If an interconnected unit alarms and you are not testing the
•
unit, it is war
requires your immediate attention. NEVER ignore any alarm.
Ignoring the alar
Never remove the batteries from a battery operated Smoke/CO
•
Alarm to stop an unwanted alarm (caused by cooking smoke,
etc.). Removing batteries disables the alar
smoke, and removes your protection. Instead open a window
or fan the smoke away from the unit. The alarm will reset automatically
• If the unit alarms get everyone out of the house immediately.
WHAT TO DO IN CASE OF FIRE
Don’t panic; stay calm. Follow your family escape plan.
•
• Get out of the house as quickly as possible. Don’t stop to get
essed or collect anything.
dr
• Feel doors with the back of your hand before opening them.
If a door is cool, open it slowly
doors and windows closed, unless you must escape thr
them.
Cover your nose and mouth with a cloth (preferably damp).
•
Take short, shallow breaths.
Meet at your planned meeting place outside your home,
•
and do a head count to make sure everybody got out safely.
• Call the Fire Department as soon as possible from outside.
Give your addr
Never go back inside a burning building for any reason.
•
• Contact your Fire Department for ideas on making your home
safer.
ning you of a potentially dangerous situation that
m may result in injury or death.
m so it cannot sense
.
. Don’t open a hot door. Keep
ess, then your name.
ough
IF YOU SUSPECT A PROBLEM
If the strobe light lens is loose or broken, the entire unit should be
replaced immediately. Never remove the strobe light lens for any
reason. Doing so can permanently damage the unit and will void
your warranty.
Always discharge the branch circuit before servicing an AC or
AC/DC Alarm. First, turn off the AC power at the circuit breaker
or fuse box. Next, remove the battery from Alarms with battery
back-up. Finally, press and hold the test button for 5-10 seconds
to discharge the branch circuit.
Do not try fixing the device yourself – this will void your warranty!
If the device is still not operating properly, and it is still under warranty,
please see “How to Obtain Warranty Service” in the Limited Warranty.
4
Page 5

SPECIAL COMPLIANCE CONSIDERATIONS
obe Lights along with residential smoke and carbon monoxide
Str
ms alone are not a suitable substitute for complete fire
alar
detection systems in places housing many people—like apar
buildings, condominiums, hotels, motels, dor
m health care facilities, nursing homes, day care facilities,
long-ter
or group homes of any kind—even if they were once single-family
homes. They ar
systems in war
and special-purpose non-residential buildings which require special
e detection and alarm systems, typically in only the sleeping
fir
eas. Depending on the building codes in your area, these devices
ar
may be used to provide additional protection in these facilities.
e not a suitable substitute for complete fire detection
ehouses, industrial facilities, commercial buildings,
mitories, hospitals,
tment
LIMITATIONS OF STROBES
obes and alarms may not waken all individuals.
Str
escape plan at least twice a year
– from kids to grandparents. Allow children to master fire escape
planning and practice befor
sleeping. If childr
signals, or if there are infants or family members with mobility limitations,
make sur
the event of an emer
while family members are sleeping in order to determine their response
while sleeping and to determine whether they may need assistance in
the event of an emer
obe cannot work without AC power.
The str
operate if AC power is cut off for any reason (open fuse or circuit
eaker, failure along a power line or at a power station, electrical
br
e that burns the electrical wires, etc.).
fir
The Str
corresponding alarm.
interconnected smoke, heat or CO alarms.
Strobes may not be seen. Hearing impaired individuals may not see
the visual notification if obstructions such as doors, walls, or bright
lights block the str
impair ones ability to respond to the visual signal.
Strobes are not foolproof. Like any electronic device, strobes are
made of components that can wear out or fail at any time. You must
test the unit weekly to ensure your continued protection. Strobes are
not a substitute for property or life insurance.
Hearing deficits may not be not apparent. If in doubt, consult your
doctor.
Strobes have a limited life. The unit should be replaced immediately
if it is not operating properly. Replace the strobe 10 years from date of
installation.
en or others do not readily waken to audible or visual
e that someone is assigned to assist them in fire drill and in
obe will not operate unless smoke, heat or CO reaches the
gency. It is recommended that you hold a fire drill
gency.
obe light. The use of alcohol or drugs may also
, making sure that everyone is involved
e holding a fire drill at night when they are
Refer to the user’s manuals supplied with the
The str
Practice the
obe will not
LIMITED WARRANTY
fairs
®
d Time,
BRK Brands, Inc., ("BRK") the maker of BRK®brand and First Alert
brand products, warrants that for a period of ten years from the date
chase, this product will be free from defects in material and
of pur
workmanship. BRK, at its option, will r
any component of the product found to be defective during the warranty
period. Replacement will be made with a new or r
oduct or component. If the product is no longer available, replacement
pr
may be made with a similar product of equal or greater value. This is
your exclusive warranty
This warranty is valid for the original r
etail purchase and is not transferable. Keep the original sales
initial r
receipt. Proof of purchase is required to obtain warranty performance.
BRK dealers, service centers, or r
not have the right to alter
conditions of this warranty.
This warranty does not cover normal wear of parts or damage resulting
om any of the following: negligent use or misuse of the product, use on
fr
improper voltage or current, use contrary to the operating instructions,
disassembly, repair or alteration by anyone other than BRK or an
authorized service center
God, such as fire, flood, hurricanes and tornadoes or any batteries that
are included with this unit.
BRK shall not be liable for any incidental or consequential damages
caused by the br
the extent prohibited by applicable law, any implied warranty of
merchantability or fitness for a particular purpose is limited in duration
to the duration of the above warranty
jurisdictions do not allow the exclusion or limitation of incidental or
consequential damages or limitations on how long an implied warranty
lasts, so the above limitations or exclusion may not apply to you. This
warranty gives you specific legal rights, and you may also have other
rights that vary from state to state or province to province.
How to Obtain Warranty Service
Service: If service is required, do not return the product to your retailer.
In order to obtain warranty service, contact the Consumer Af
Division at 1-800-323-9005, 7:30 AM - 5:00 PM Central Standar
Monday thr
model number and date of purchase available when calling.
For Warranty Service return to:
BRK Brands, Inc.
25 Spur Drive, El Paso, TX 79906
ough Friday. To assist us in serving you, please have the
.
, modify or any way change the terms and
. Further, the warranty does not cover Acts of
each of any express or implied warranty. Except to
epair or replace this product or
emanufactured
etail purchaser from the date of
etail stores selling BRK products do
. Some states, provinces or
ed trademark of BRK Brands, Inc.
BRK®is a r
First Alert®is a registered trademark of the First Alert Trust.
5
egister
Printed in Mexico M08-0188-000 J1 05/07
 Loading...