


The Origins of your sea breeze.
Dear owner,
Congratulations on your purchase of a Brivis cooling system.
You've chosen wisely. Fresh-Air Cooling creates the perfect, natural environment in every
room of your house. That's why many of your fellow Australians will applaud your choice.
It's also why Brivis has such a long standing commitment to environmentally friendly and
affordable fuels.
As a family company, established by my father over 40 years ago, Brivis still adheres to his
successful philosophy of providing the best possible customer service, together with a
quality product.
Today, that desire to achieve high standards is reflected in the innovative design, quality
parts and workmanship that have gone into your Brivis Evaporative Cooler.
I know you will enjoy its quiet efficiency and long life.
And as Summer turns into Winter, it's worth remembering that Brivis is also the largest
manufacturer of gas central heating systems in Australia.
If you have any questions or need further information, please do not hesitate to call us.
Yours sincerely,
Tim O'Brien
Managing Director
Brivis Australia Pty. Ltd.
How can a sea breeze be so effective?
Easy, because now it's possible to enjoy the natural cooling effect of your Fresh-Air Cooling
system, in every room of the house.
Of course, nature's sea breeze is free, but your Brivis equivalent costs very little to run,
even over large areas, thanks to its efficient construction and materials, which are amongst
the most advanced in the world.

How cool is cool?
The degree of cooling available from any type of air conditioning, is dependent on the
outside weather conditions. Your Evaporative Cooler works best on hot, dry days. After all,
that's when you require the most relief.
What to do on sultry or humid days.
On days of high humidity, your Evaporative Cooler works best with the Fan on high and the
Pump switch turned OFF.
You'll also feel more comfortable, because the air moving across the surface of your skin,
will increase its natural evaporation.
Just like a constant breath of fresh air.
Unlike refrigerated systems which constantly recycle frigid, stale air, your Brivis Evaporative
Cooler uses 100% fresh air, and expels stale air via open windows or doors.
So it's essential to provide ventilation for the cooling system to function properly.
Helps relieve dust and pollen allergies.
The advantages of your Brivis Evaporative Cooler go on and on.
It will even remove some pollen and dust from the air.
Air is drawn in through the filter pads resulting in clean, fresh invigorating air.
The Evaporative Cooler causes a very light pressurisation of your home and it helps stop
airborne dust wafting in through doors and windows.
Clears the house and your head after a party.
Stale air, cigarette smoke and fumes can be quickly cleared and replaced with fresh,
stimulating air by using the fan in manual mode.
Preparation for Cooling.
Before operating your Brivis Evaporative Cooler, follow these simple steps:
Ensure the "Maintenance" checks have been completed. Please refer to page 8.
Make sure enough window and/or door area is open for the unit to work correctly. The table
below gives a guide to the amount of opening required for each model.
If you wish to concentrate your cooling to a select area, simply concentrate all the required
ventilation within that targeted area. See illustration page 5.MODEL

Start the Cooler Early.
On days when high temperatures are expected, start operating your cooler early, to prevent
a build up of heat within the house.
And if those temperatures bring high winds, ensure that the windows and doors open for
ventilation are on the sheltered side of the house.
Operating your Contour Cooler.
Every Brivis Contour Cooler is controlled by a Network Cooling Module, and the
extraordinary wall-mounted controller called, the Networker.
The Networker.
To operate your Networker, see the Networker Owners Manual in your manuals wallet.
There you will see that the Cooler can be used in Auto mode, where all functions are
performed automatically, to achieve the level of comfort you have selected.
Alternatively, it can be operated in Manual mode, where the Cooler will operate the fan at

the constant level you have selected, and the pump can be turned ON or OFF as required.
Start up.
In either mode, when the cooling is first turned ON, and the Networker is set for the Cooler
to operate, there will be a delay before the cool air will be delivered from the duct outlets.
The unit has pre-programmed function times, to allow time to open the ServoSeal, to fill the
Coolers tank with water and to Pre-Wet the filter pads. This process could take up to 8
minutes, before cool air is expected from the duct outlets.
Shut down.
There is also delay in emptying the Cooler's tank water for a period after the unit is turned
OFF, at the end of use.
Contour models have an additional pre-programmed tank wash cycle. This washes the tank
with clean water, at the end of use, after the ServoSeal has closed.
They are also designed to periodically flush the tank water (Running Refresh) as the Cooler
is used.
Manual Wall Control Operation
A Brivis Manual Wall Control allows you to regulate airflow and cooling levels.
The switch marked Cool will switch the pump ON and OFF.
The switch marked Fan will switch the fan ON and OFF.
The DIAL marked Fan Speed will vary the airflow.
NOTE: On days of high humidity, the fan may be operated without the pump.
Start up Procedure.
• Turn Cool switch ON.
• Pre-soak the filter pads by turning ON the Cool switch, 5-10 minutes before
switching the fan ON.
• This will provide maximum cooling immediately the fan is switched ON.
• Turn the Fan switch ON.
• The fan will start and commence cooling.
Select Fan Speed.
Rotate the Fan Speed dial to the airflow you desire.

Seasonal Maintenance.
The start and end of season maintenance procedures as set out below, will ensure you
obtain the optimum performance and longevity.
Start of Season Maintenance.
Start of season maintenance and any repair work should be carried out by Brivis or an
experienced service technician.
Seasonal Maintenance.
The start and end of season maintenance procedures as set out below, will ensure you
obtain the optimum performance and longevity.
Start of Season Maintenance.
Start of season maintenance and any repair work should be carried out by Brivis or an
experienced service technician.
• Ensure the power supply isolating switch is in the OFF position.
• Check filter pad material for holes or deterioration. The pads will deteriorate over
time and lose their water absorption ability. Replace pads as required.
• Clean the tank and internal surfaces.
• Clean the filter pads and flush water.
• With the filter pads in position, switch ON the power supply isolating switch and
operate the unit.
• Ensure the pump is operating, and visually check the pads externally for even water
distribution.
• Ensure the water inlet is operating correctly.
• Ensure the water system is operating to the minimum and maximum water levels.
• Check that the water supply pressure is sufficient to fill the tank within the allotted
time.
• Check the fan operates, and varies speed between the minimum and maximum
setting on the Wall Control.
• On Contour models, ensure the ServoSeal mechanism is opening and closing
correctly.
End of Season Maintenance.
• Turn OFF the water supply to the unit at the isolating stop tap.
Note for Networker Models:
• Do not turn OFF the power supply to the Cooler for longer than is necessary for
carrying out maintenance.
• If the power supply is turned OFF for too long, the Networker will lose its Time/Day
settings.
• If power must be switched OFF, first make sure the ServoSeal (Contour models
only) is completely closed.
Checklist.
If the system is not cooling adequately.

• Ensure the pump is operating, and visually check the pads externally for even water
distribution to the pads.
• Check if the ventilation within the targeted cooling area is sufficient.
• Selecting the wrong, or insufficient ventilation points, could result in excessive air
movement causing draughts, or inadequate air distribution resulting in poor
performance.
• Check the water supply to the unit is turned ON.
• Ensure the water inlet is operating correctly.
• Ensure the water system is operating to the minimum and maximum water levels.
• Check the fan operates, and that air is discharging from the outlet diffusers.
• Check the filter pads are not damaged, and/or the material hasn't deteriorated.
• If fitted check if the Networker is not displaying an Error Code relating to the units
operation (refer to Brivis Service).
If humidity rises too high.
• Check for sufficient ventilation. (i.e. make sure enough doors and windows are
open).
• If outside humidity is increasing, operate the Cooler without the pump and with fan
only.
If the fan will not start.
• The power supply isolation switch at the unit may not be turned ON.
• The Wall Control may not be turned ON, or set at a comfort level that requires the
Coolers fan to operate.
• The fan may be delayed due to the pre-programmed time to allow time to open the
ServoSeal (Contour models only), fill the Coolers tank with water, and Pre-Wet the
filter pads.
• If fitted the Networker may be in Time Delay mode.
• Check the 10 Amp fuse in the meter box
If the air smells a little different.
• New Celdek pads can give off a mild odour while they are settling in. This is quite
normal, it will dissipate quickly as the new pad is constantly flushed during use.
Commonly Asked Questions, Answered:
1. Can you run evaporative cooling through the same duct work as my Central
Heating?
No, the differing technology between ducted heating and evaporative cooling don't allow the
units to share the same duct work.
2. How much water does an evaporative cooler use?
This is dependant upon the weather conditions, model (size), operation settings and type of
water quality system.
3. How many windows, doors should I have open?
Refer to Page 5 of this manual.
4. Why is moisture building up on my tiles or surfaced areas?
The air stream from the Cooler outlet/s is incorrectly directed to a cool surface. Maximum
Cooling efficiency will be achieved when the air flow is directed over the ceiling, or external
wall surface.

The Networker
Quick Reference Guide.
Page 3 Selecting a Comfort Level.
Page 3 Automatic Operation.
Page 4
Getting Started in Auto.
Page 7 Automatic Pre-Wet.
Page 7 On-Screen Information.
Page 7
Notes on Zoning.
Cooling
Page 8
Shifting into Manual.
Page 10
Using the Timer.

Selecting a Comfort Level.
The key benefit of ducted evaporative cooling is that it is a natural cooling system. It's
based on fresh air, not reprocessed air.
Its goal is to provide a cooler, more comfortable environment inside the house.
That's why the Networker operates to a Set Comfort Level for cooling, not a specific
temperature.
This level can be set to provide a Normal Level (average) of cooling.
Or, if you don't want to be quite that cool, it can be set on a higher level or Warmer Level
than that.
Or, if the normal level isn't cool enough, it can be set at an even Cooler Level, if necessary.
Every location around Australia will have different requirements.
You should, therefore, experiment with various settings until you decide what is the
appropriate Comfort Level in your area.
Automatic Operation.
A program that turns your system on and off at the same times every day is valuable for
heating, but less so for evaporative cooling.
That's why the Networker's Automatic operation for cooling is only based on maintaining a
Comfort Level, and not on fixed timing programs.
The Networker does have Timer functions for cooling, but these are not restricted to
automatic operation. They are available in both automatic and manual. (See the section
entitled "Using the Timer" for more information).
Getting Started in Auto.
Once you have read "The Networker Introduction" manual, operating the cooler in Auto is a
breeze.
Start with the Networker turned OFF [1]. Note that if you have the Networker ON while
switching between units, (if have more than one) you could start the wrong one
inadvertantly.
If you have other appliances on the network then, just press the MODE control key [4] until
it selects "Cooler" [4b].
Then turn the Networker ON [1].
If it's not already in Auto, use the AUTO key [3] to select "Auto" [3a].

The Column Display [17a] in the middle of the screen indicates the cooler's Set Comfort
Level
Now use the ROTARY DIAL [2] to set the Comfort Level you desire.
The Networker then constantly calculates the comfort level in the room and, if it is above
the Set Comfort Level, the Networker will automatically switch on the" Pump" and operate
the "Fan" at the correct speed needed to achieve this target level.
The next time you return to Auto Operation, these steps will not be necessary because the
Networker automatically returns to your previous settings.
Automatic Pre-Wet.
In order to cool effectively, the pads need to be properly wet before the fan starts. The
short time taken to do this is called the Pre-Wet.
This will take a few minutes if the cooler has been off for quite a while, or less if it has only
been off for a short time.
If there is a Dump Valve fitted, and the tank is empty, allow an additional four minutes for it
to fill before the Pre-Wet can begin.
On-Screen Information.
While the cooler is going through its Pre-Wet (and fill if Dump Valve is fitted) the FAN
symbol [17] and the word "Pump" [9a] will flash.
Then, when the fan actually starts, the FAN symbol [17] will begin to rotate.

After Pre-Wet, the word "Pump" [9a] will disappear.
Notes on Zoning.
Some systems may include multiple coolers with each operating in a different zone.
These will have been set up and explained by the installer of the system and can be
operated by either, or both, of the lower two control keys [6 & 7].
Shifting into Manual.
In Automatic, the Networker operates the cooler to maintain the pre-set comfort level. But,
in Manual Operation, you control the FAN, its speed, and the PUMP yourself.
The first time you go into "Manual", just follow these steps.
With the Networker ON, and Cooler selected, press the AUTO control key [3] to select
"Manual" [3b].
You will notice that both the "Fan" [10] and "Pump" [9] control keys are ON, which will be
shown by the indicator panels. Note that the cooler is going through the Pre-Wet, so the fan
is not actually operating.
At this point, you can leave it to complete its Pre-Wet and begin operating, OR, you can set
a new fan speed now if you wish.
To do that, you first need to interrupt the Pre-Wet by turning off the "Pump" [9].
The "Fan" [10] should still be switched on and now the ROTARY DIAL [2] can be used to
select the desired fan speed.
The Column Display [17a] will indicate the fan speed level you have selected.
If you only need the fan, just leave the "Pump" [9] turned off.
Please note that, when the pump is activated, and the Pre-Wet stage begins, the Fan will
stop while the pads are being Pre-Wet
The next time you return to "Manual" these steps will not be necessary because, even in
"Manual", the Networker remembers your previous settings.
You should also remember that, if you had the Pump selected last time, the cooler will begin
with a Pre-Wet.

Using the Timer.
If you wish to drift off to sleep under a gentle breeze, you can.
Whenever the Cooler is ON, you can pre-set a time for the Timer to turn the Cooler OFF.
Or, if you are out for the day and you want the Cooler to come ON and pre-cool the house
before you return, you can.
Whenever the Cooler is turned OFF, you can select a time for the Timer to turn it ON
automatically.
Just remember that, when the Timer turns the Cooler ON, it will operate with the same
settings it had the last time it was ON.
So, if you want the settings to be different, just turn the cooler ON, change the settings and
turn it OFF again. Then you can begin to program the Timer.
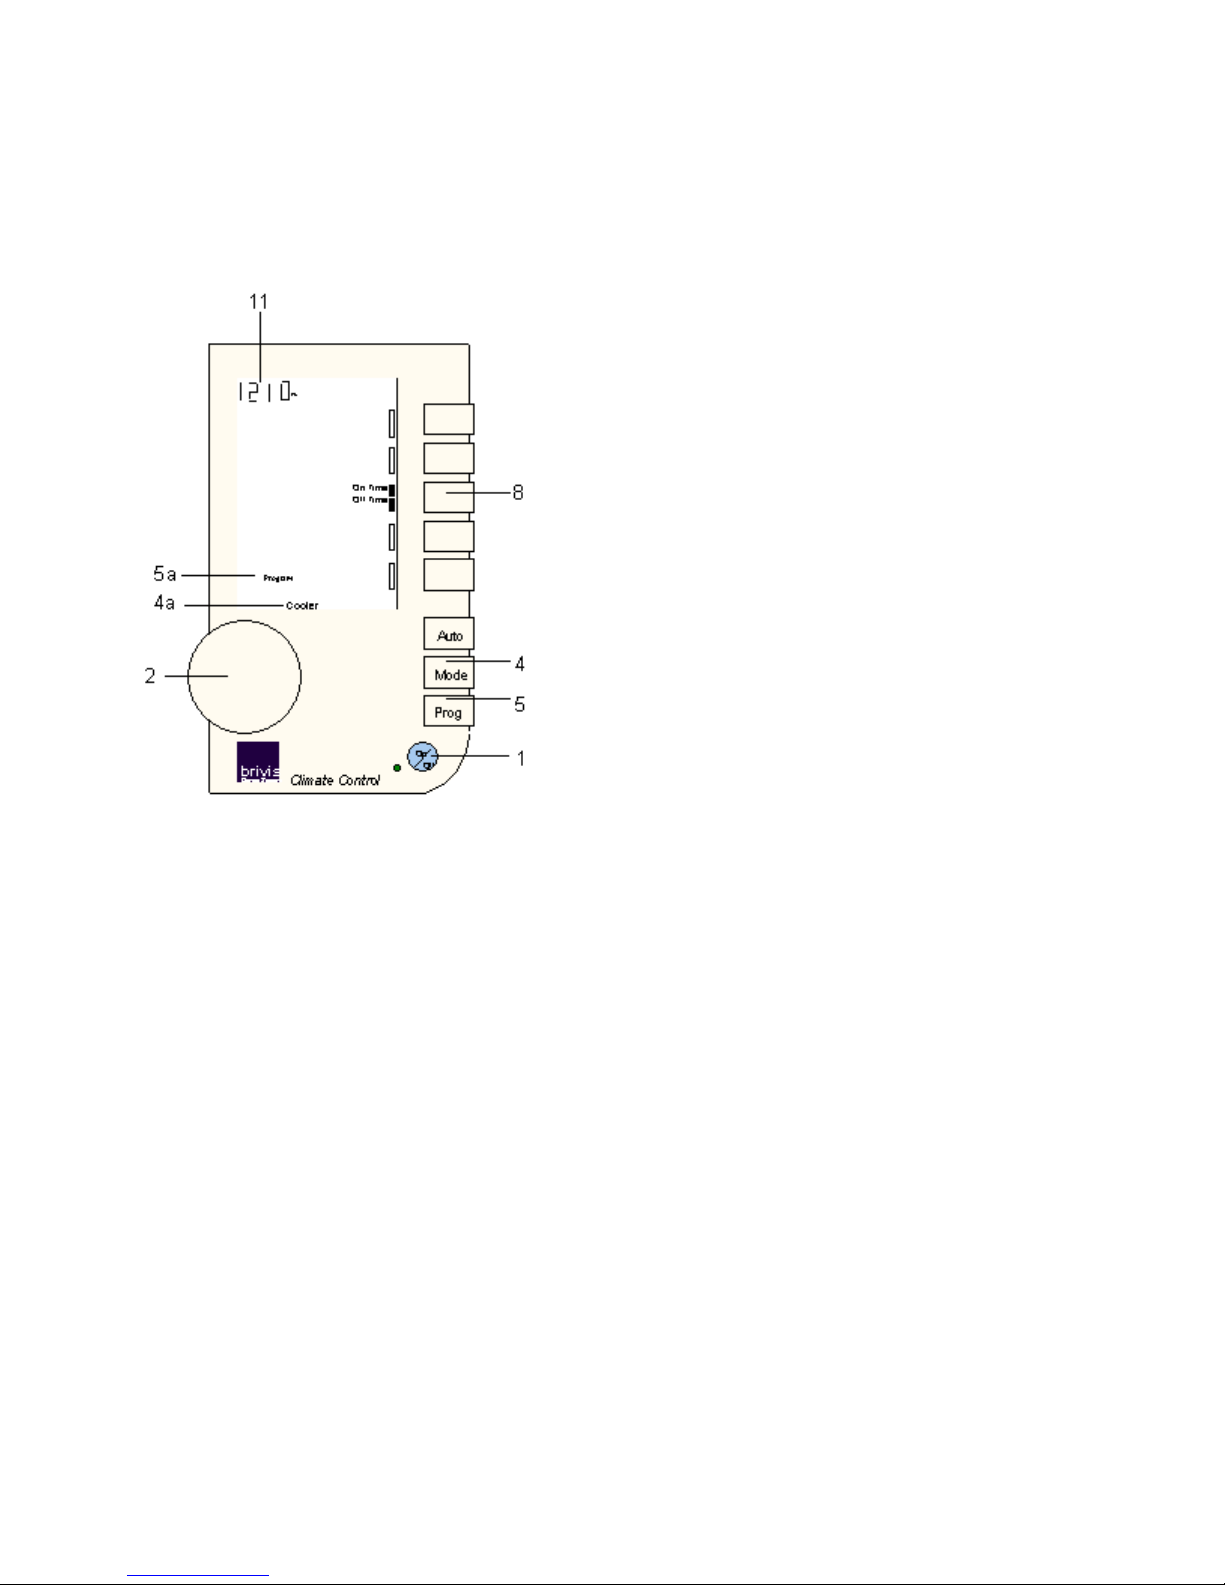
First use the MODE control key [4] to select "Cooler" [4a].
Then press the PROG key [5] and the "Set" Time [11] and the word "Program" [5a] will
flash.
Now you will notice that one of the Control Keys [8] will be either the "On Time" or the "Off
Time" key .
If the Cooler is OFF, press that key [8] to set the "On Time". That is, the time you want it to
come on.
Now use the ROTARY DIAL [2] to set the "On Time".
If the Cooler is ON however, press that key [8] to set the "Off Time". That is, the time at
which you would like it to turn off.
Again, use the ROTARY DIAL [2] to set the "Off Time".
Once you a have selected your "On Time" or "Off Time" then press the PROG key [5] again
to save your setting.
The small Indicator Panel will change and the Title will remain beside the "On Time"/"Off
Time" key [8] to show that the Networker is now holding your pre-set ON or OFF time.
If you want to check what you've done, just press PROG [5] again and the pre-set time will
flash.
If you change your mind and want to cancel the setting just press the "On Time"/Off Time"
key [8] again.
Pressing the ON/OFF button [1] at any time during or after this process will cancel the
Timer settings.
Note: Again the Networker remembers the last setting and, the next time you select the
Timer it will go to that same setting.
Now, with the Networker controlling your Brivis ducted evaporative cooling system, you'll
keep your cool all summer.
 Loading...