

Page 1

BT Cloud Voice
Access Control
Programming guide
Page 2
Hello,
You’ll find programming instructions for both of our Cloud Voice
Access Control units in this guide:
• The basic Access Control unit, for visitors-only.
• The keypad Access Control unit, for both visitors and employees.
1. Basic Access Control unit
– features
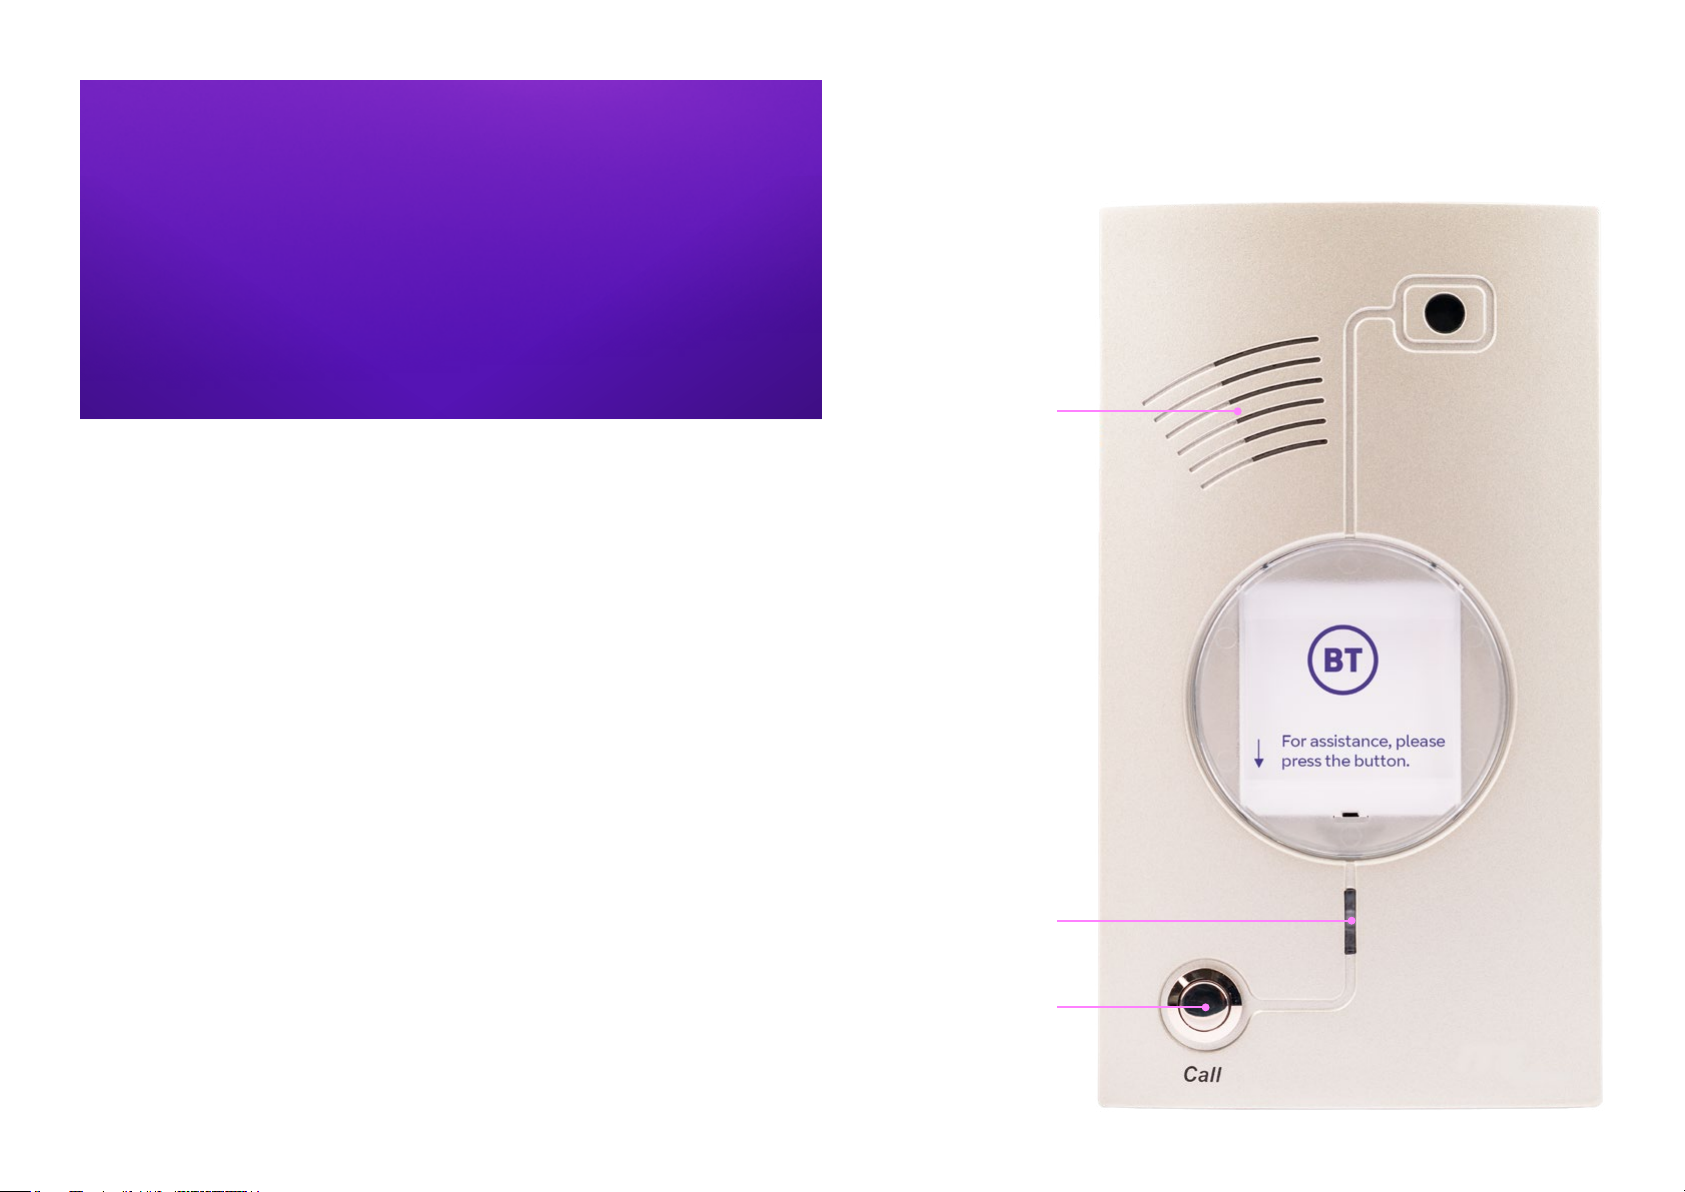
The basic unit is a wall-mounted access control door
phone designed specifically for a visitor entrance.
Speaker
When your visitor presses the Call button the unit dials a pre-defined extension
number. The visitor can then speak to whoever is controlling access to your
premises, who can then remotely open the door for the visitor by pressing
numbers on their touch-tone phone. It’s simple to use and program.
Features
• Dialling to a pre-defined extension
or hunt group.
• Door opening from any extension.
• Programmable day and night
destinations.
• Automatic busy and disconnect
cadence detection.
• High-quality speaker phone with
volume control.
• Outdoor or indoor installation.
Microphone
Call button
2
Page 3
2. Keypad Access Control unit – features
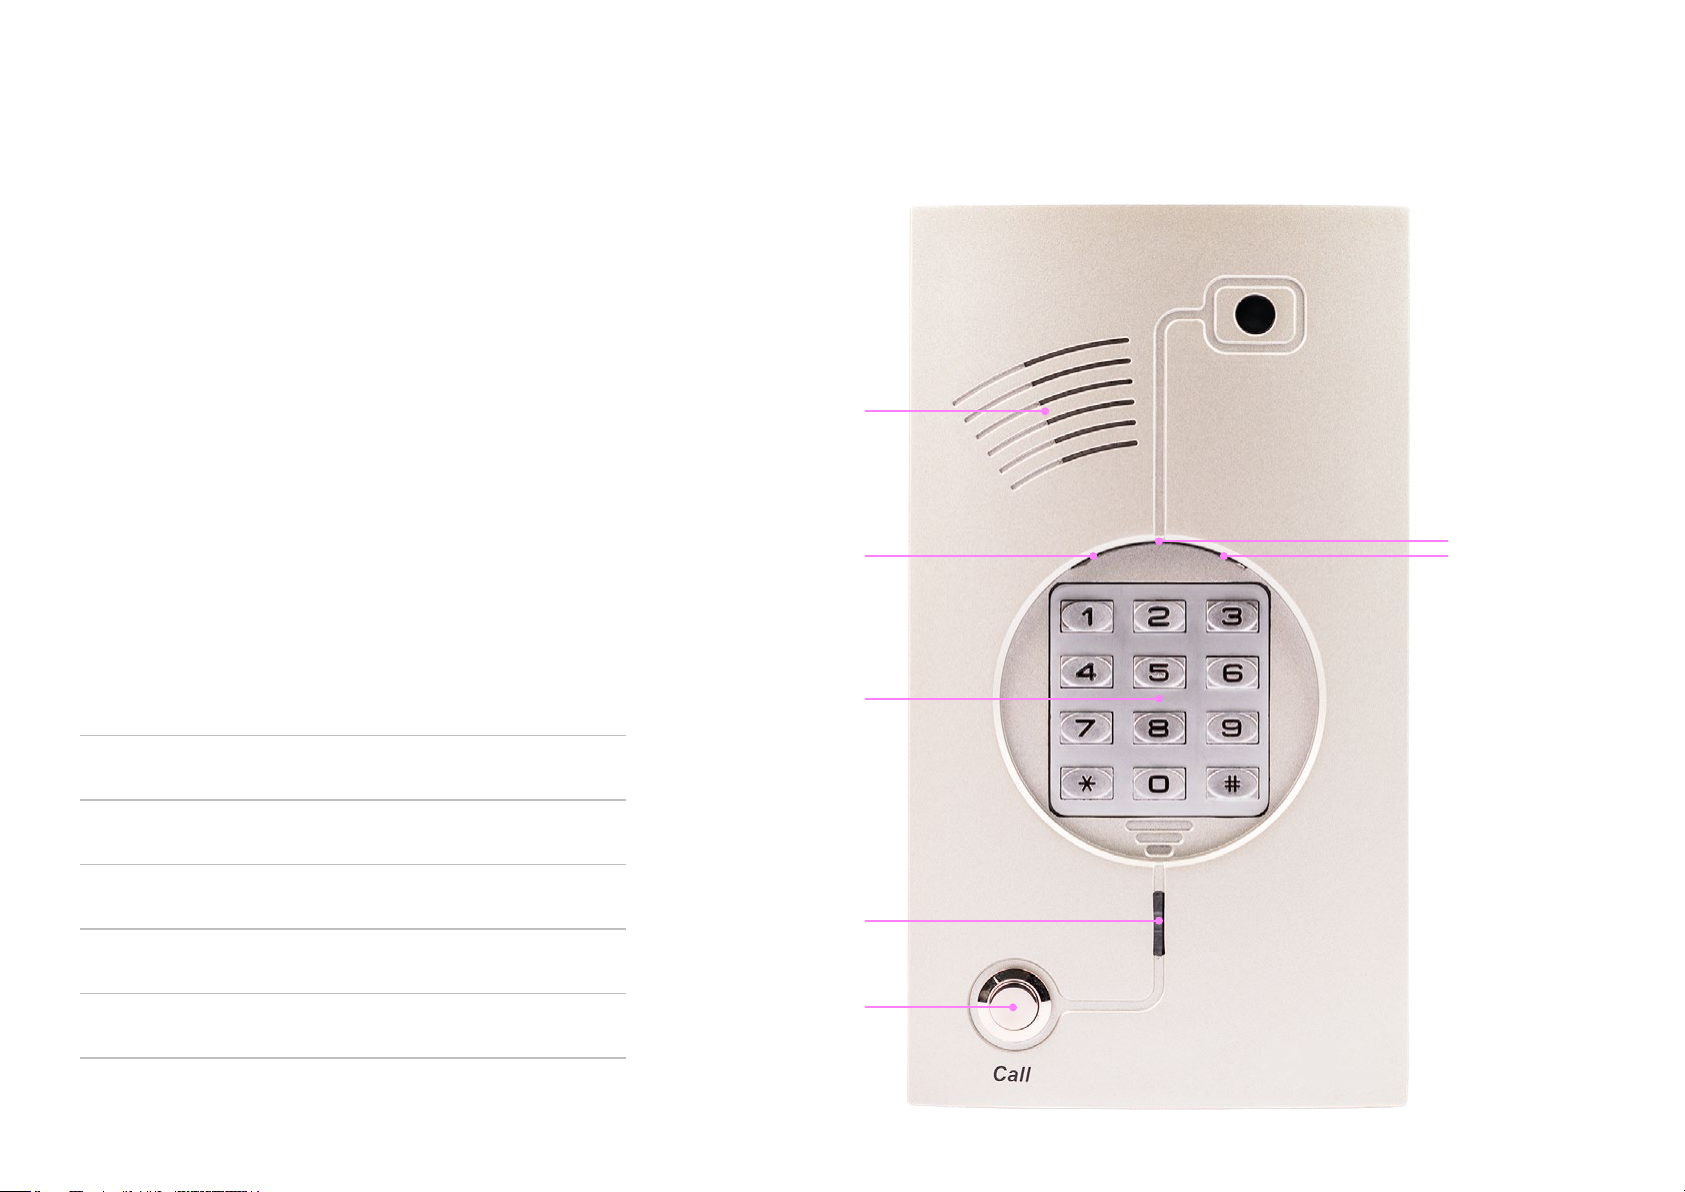
The keypad control unit is a wall-mounted access control
door phone designed for use by the occasional visitor and
the employee needing daily access.
Features
• Direct dialling to any extension or hunt group.
• Entry access code (four different codes).
• Automatic busy and disconnect cadence detection.
• Door opening from any extension.
• Programmable day and night destinations.
• Two different operation modes: standard and speed-dial.
• High-quality speaker phone with volume control.
• Outdoor or indoor installation.
Speaker
LED 1
LED 2
LED 3
The unit has three LEDs indicating status of the unit and door:
Status LED 1 LED 2 LED 3
Idle Off On Off
First touch
on keypad
Code error Fast blink Fast blink Fast blink
Door open Slow blink Slow blink Slow blink
On On On
Key pad
Microphone
Call button
3
Page 4

3. Program the Access Control unit
You can program the unit from any phone on the
Cloud Voice system.
3.1 Putting the unit in programming mode
Before you can program your Access Control unit, you need to put it in
programming mode:
Enter programming mode
1. Dial the unit’s extension number
from a phone on the Cloud Voice
system.
2. When the Access Control unit
answers, dial *900 and wait for a
confirmation beep.
3. Enter the programming access
password (the default is 1234)
and wait for a confirmation beep.
You are now ready to program your
unit from your Cloud Voice phone.
Change the programming
mode password
1. Dial *600.
2. Enter a new four-digit password
Do not use * or # as digits.
3. Press #.
Exit programming mode
1. Dial *900.
If you don’t dial anything within
45 seconds, programming mode
exits automatically.
3.2 Using codes to program the Access Control unit
In this section we show you how to set up and use the unit for various scenarios.
Note: you’ll need to put the unit in programming mode before following any of
the instructions below.
Set the Day, Night, and Error
destination numbers
You can specify which numbers the
unit calls in daytime and night time,
and which number it calls if someone
tries to open the door by entering
three incorrect codes in a row.
1. Dial *360 followed by 1, 2, or 3
depending on which access code
you want to set:
• If you’re setting the Day
number, dial 1.
• If you’re setting the Night
number, dial 2.
• If you’re setting the Error
number, dial 3.
2. Dial your destination number
This can be up to 20 digits,
including a limited range of
special characters .
3. Press #.
Delete a Day, Night, or Error
destination number
1. Dial *360 followed by 1, 2, or 3
depending on which access code
you want to delete:
• If you’re deleting the Day
number, dial 1.
• If you’re deleting the Night
number, dial 2.
• If you’re deleting the Error
number, dial 3.
2. Press #.
Manually change between the
Day and Night modes
1. Dial *80 for Day mode or *81 for
Night mode.
2. Press #.
4
Page 5

Program the prefix digits for
dialling a Cloud Voice extension
You can set the unit to recognise that
destination numbers starting with
these digits (up to a maximum of four)
signify a PBX extension.
1. Dial *170 .
2. Dial the prefix digits
Do not use * or # as prefix digits.
3. Press #.
To cancel this:
1. Dial *170 .
2. Press #.
Set a speed-dial destination
number
You can set any of your destination
numbers on speed-dial so the call
from the Access Control unit gets
through quicker.
For each destination number you
want to set-up on speed-dial:
1. Dial *120 followed by the digit
you want to set as the speed-dial
nu m be r (1-9) .
2. Dial the destination number
(up to 20 digits including * and #).
3. Press #.
Cancel a speed-dial destination
number
1. Dial *120 followed by the speed-
dial digit.
2. Press #.
Set the number on your phone
that opens the door to a visitor
When a visitor presses the buzzer and
your extension rings to let them in,
the default number you press on your
phone is 8. You can change this to any
number up to four digits in length.
1. Dial *4 41.
2. Press the digits (0-9) that you
want to use to open the door.
3. Press #.
Set the access code on the Access
Control unit
You can store up to four access codes,
numbered 1-4.
For each access code you want to store:
1. Dial *4 42 followed by 1, 2, 3 or 4
(depending on which access code
you’re storing) followed by the
new four-digit access code.
• Do not use * or # as prefix digits.
• Note: you cannot begin a code
with any digit programmed as
a prefix digit.
2. Press #.
Note: the default code for access
code 1 is 9876.
Delete a door-opening access code
1. Dial *4 42 followed by 1, 2, 3 or 4
(depending on which access code
you want to delete).
2. Press #.
Set the conversation time limit
1. Dial *4 62.
2. Input the number of seconds
(10-99) you want to set as the
maximum conversation time.
3. Press #.
Note: the default duration is 45
seconds.
Set the length of time that the
door remains unlocked
1. Dial *4 64.
2. Input the number of seconds
you want to set as the time delay
between the door unlocking and
locking again.
3. Press #.
Note: the default duration is 3 seconds.
3.3 Resetting the Access
Control unit
Resetting the unit will wipe any
programming you’ve done to it,
returning the unit to its factory settings:
Reset the unit
1. Enter programming mode
(see section 3.1).
2. Dial *151.
3. Wait for the confirmation beep.
4. Exit programming mode.
Reset the unit in speed-dial mode
1. Enter programming mode (see
section 3.1).
2. Dial *152 .
3. Wait for the confirmation beep.
4. Exit programming mode.
5
Page 6

4. Specifications
Power supply (external) 12V DC 1.6A (supplied with unit)
Line voltage 24 -72V DC
DC leakage
On-hook insulation
(resistance between line
terminal and ground)
Ring capacitor
On-hook impedance @50V DC, 40V AC/25Hz>3000 Ω
Ring detect 27-100 V AC/16-60 Hz
DC resistance (off-hook) 24-66V DC @ 20-100mA/350Ω
Impedance (off-hook) 300-3400Hz 500-700Ω
< 10 μA
0-100V DC > 5MΩ
100-200 V DC > 30 KΩ
500V AC/50Hz > 20KΩ
100V AC/25Hz > 100KΩ
0.47 μF ±10%
Return loss 300-3400Hz > 18dB
Current during break
DTMF transmission frequency tolerance:
frequency level (high)
frequency level (low)
Inter-digit pause time 70-80ms
Relay switching current 2A max
Dimensions outdoor unit 19.4cm x 10.2cm/7.6inch x 4.0inch
Dimensions indoor unit 18.5cm x 9.5cm/7.3inch x 9.5inch
Operating temperature outdoor -20ºC to +50ºC/4ºF to 122ºF
Operating temperature indoor 0ºC to +35ºC/32ºF to 95º
< 700 μA
±1.5% -6 to –8dBm
-8 to –10dBm
Imbalance ratio 300-3400Hz > 46dB
6
Page 7

Offices worldwide
The services described in this publication are subject to availability and may be modified from time to time. Services and equipment are provided subject
to British Telecommunications plc’s respective standard conditions of contract. Nothing in this publication forms any part of any contract.
© Britis h Telecomm unications plc 2 020. Registered o ffice: 81 Newgate Street, London EC1A 7AJ. Reg istered in Engl and No. 18000 00.
December 2020
7
 Loading...