

Page 1
Page 2

Safety Instructions
This product has been engineered and manufactured to assure your
personal safety. However, improper use can result in potential electric
shock or fire hazards. In order not to defeat the safe-guards incorporated
in this instrument and its accessories, please adhere to the following
instructions when installing, operating and servicing.
Power Source Warning
A marking label attached on the rear side of the adapter (supplied)
indicates the correct power source for this equipment. Operate this
product only from an electrical outlet with the voltage and frequency
indicated on the product label. Incorrect power source may result in a
risk of electric shock or fire. If you are uncertain of the typ e of power
supplied to your home, consult your local power company or appliance
dealer.
Only use the power cord and adapter provided by the manufacturer.
Internal component may be damaged if you use a dif ferent adapter to
power this product. To avoid electric shock and fire hazard, match the
plug and outlet connections carefully, then fully inser t. If the p lug fa ils to
fit the outlet, please contact an electrician to update your power outlets.
Do not overload electrical outlets, extension cords, or integral convenience
receptacles as this can result in a risk of fire or electric shock. And to
prevent power cord damage, arrange all power cords so that people
cannot walk on the cords. Do not place objects on the cords.
Place this product in a location that is close enough to an electrical outlet
and where the power cord is easily acce ssible to be disconnected from the
wall outlet.
Page 3

Usage Warning
T o reduce the risk of electric shock, do not remove the cover or attempt to
disassemble this product. There are no user-serviceable parts inside.
Please refer all servicing to qualified service pe rsonnel.
Protect this product from foreign objects. Never push object of any kind
into this product through openings as they may touch dangerous voltage
points or short-out parts that could result in a fire or electric shock.
Do not expose this product to liquids, rain or moisture.
This product has ventilation openings that protect it from overheating.
Never block or cove r these openings. And do not place t his product near
heat sources such as radiators, heat registers, stoves or other products
producing heat.
Before cleaning or wiping this product, make sure your power cord is
already unplugged from the electrical outlet. Only use damp cloth to
clean this product, and never use a liquid cleaner or an aerosol cleaner.
During a thunderstorm, or when this product is unused for long periods of
time, unplug power cord from the wall outlet. This will prevent damage
to the product due to lightning and power-line surges.
Service Warning
Refer all servicing to qualified service personnel. For damage that
requires service, please unplug your pow er cord from the AC outlet f irst,
and contact your dealer or servicing personnel to obtain service for the
following conditions.
If there is damage to the adapter, power cord or plug.
If liquid enters this product.
If you drop this product, a heavy object falls on this product, or
damage occurs to the cover of this product.
If you expose this product to rain or water.
If this product does not operate normally by following the oper a ting
instructions.
If this product exhibits a distinct change in performance.
Page 4

Caution
Risk of explosion if battery is repla ced by an incorrect type. Dispose of used
batteries according to the instructions.
Copyright Notice
No part of this user’s manual may be copied, translated, or reproduced
including electronic form without permission from the copyright owner. We
have made effort to ensure the accuracy and completeness of this document.
However, as ongoing de velo pment is co ntinually im proving the capab ilities of
our products and the content described in this m anual may be changed at any
time, we cannot guarantee the accuracy of the content of this document. We
disclaim liability for errors, omissi ons, or future changes. The information of
this document is subject to change without notice.
This device complies with Part 15 of the FCC Rules. Operation is subject to the
following two conditions:
(1) This device may not cause harmful interference.
(2) This device must accept any interferences received, including interference
that may cause undesired operation.
License Notice and Trademark Acknowledgement
Dolby Digital:
Manufactured under license from Dolby Laboratories. Dolby and the double-D
symbol are trademarks of Dolby Laboratories.
Page 5

Table of Contents
1 Introduction ........................................ ................................. 1
Package Contents ..................................................................... 1
Specification ............................................................................ 3
Front View ............................................................................... 4
Back View ................................................................................ 4
Remote Control ........................................................................ 5
2 Installation ..................................... ..................................... 6
Cable Connections .................................................................... 6
Internet Connections ................................................................ 7
Connect USB Devices ................................................................ 8
Power Cord Connection ............................................................ 8
Switch your TV Input/Source ................................................... 8
3 Network Connections ........................................................... 9
Wired Netwo rk Setup .............................................................. 10
Wireless Netw or k Setu p .......................................................... 11
File sharing (Simple NAS)........................................................ 12
File sharing Configuration ....................................................... 13
4 Play Media ....................................... ................................... 22
Video Pla y b ack ........................................................................ 25
Music Playback ........................................................................ 26
Photo Playback ........................................................................ 27
5 Bonus Features .................................................................. 28
Torrent Download ................................................................... 28
Flickr ....................................................................................... 29
6 File Copy ............................................................................ 30
7 Setup ................................... ........................... ................... 31
Page 6

Audio ...................................................................................... 31
Video ....................................................................................... 32
System .................................................................................... 33
Other ...................................................................................... 33
8 Troubleshooting ................................................................. 34
Page 7

1 Introduction
The Product is a high-definition multimedia player and streamer
connecting to the external USB hard drives and your HD TV , bringing
PC and internet entertain ment to the living room. The Product is
also a BitTorrent downloader with built-in BitTorrent engine. It
downloads media files into the attached USB hard drives
corresponding to the BitTorrent seeds already saved on the USB
drive. Playing and downloading your favorite media files is now
PC-free. It supports most video/audio/image formats so you do not
need to convert downloaded media to another format. You can plug
in your USB devices to the Product to play music, movies and
pictures on TV by following the on-screen display (OSD) menu. The
Product can also access the shared folders on the remote PCs
through the intranet (local area network) and play the digital media
files there on your TV. It supports high-definition media playback
with HDMI output.
Package Contents
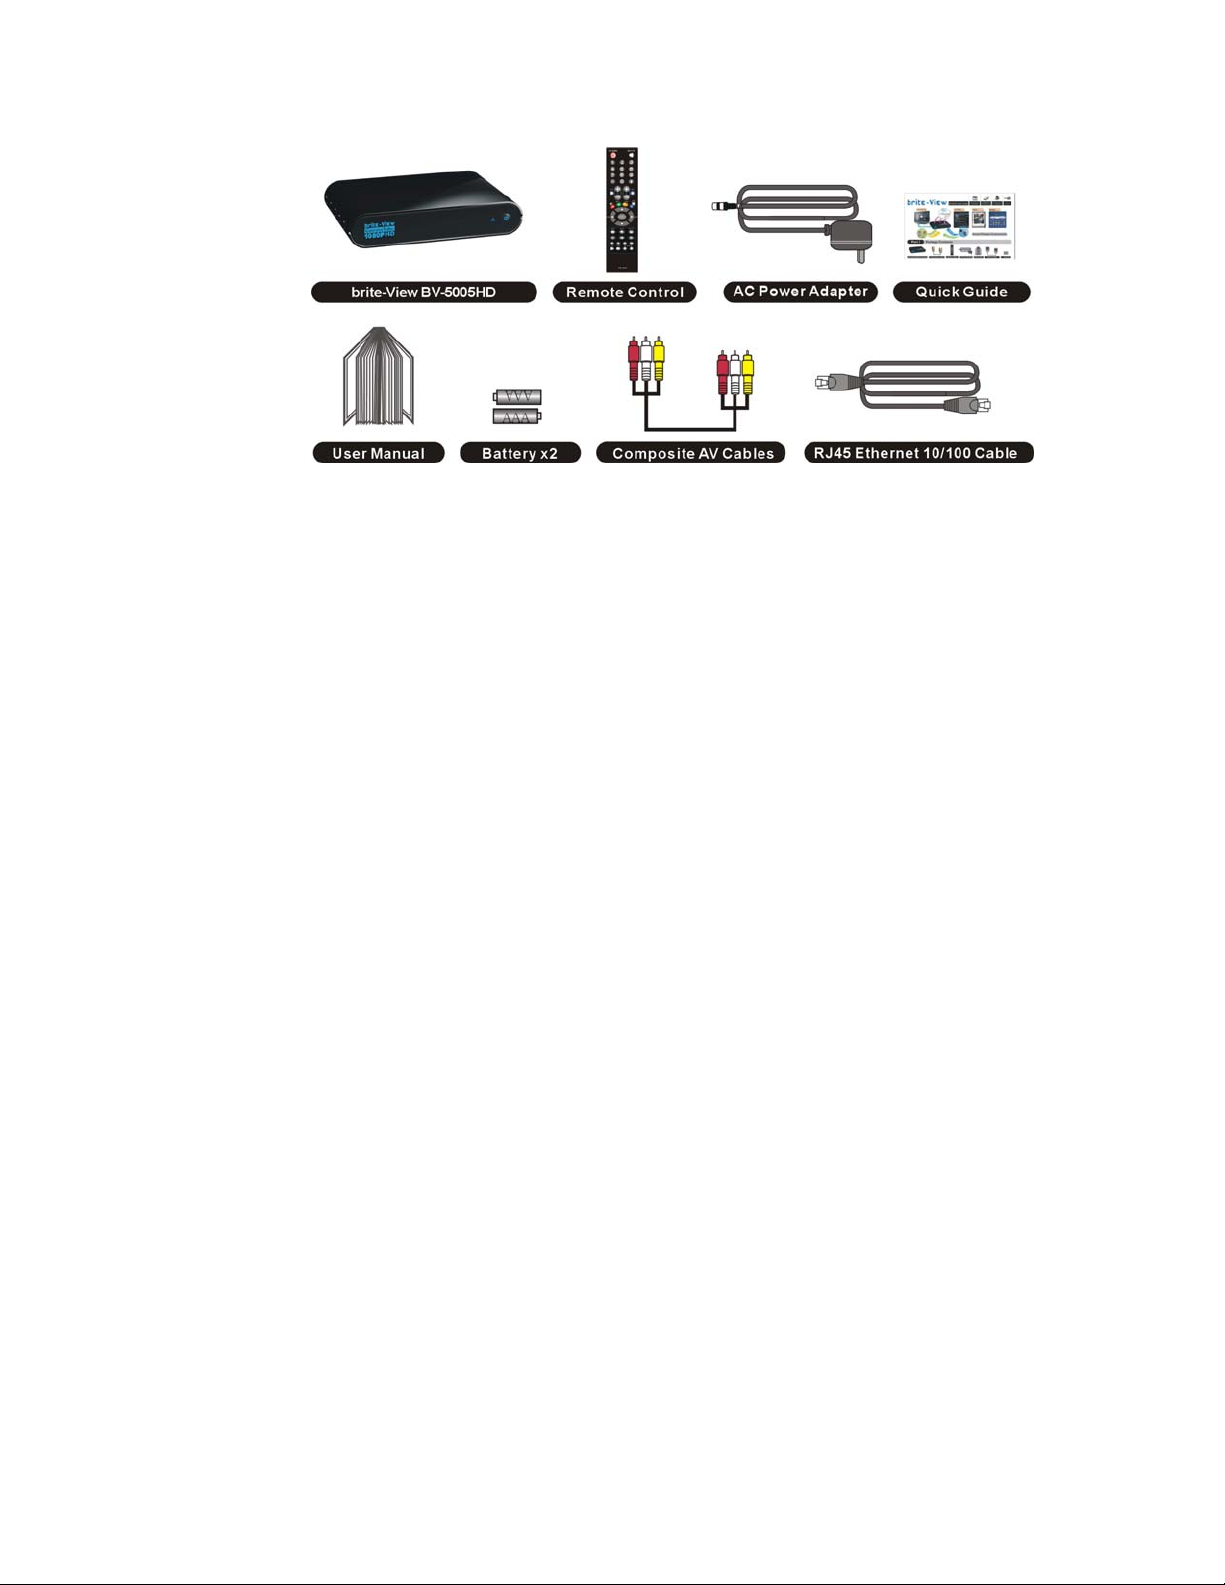
Please make sure the following items are included within your new
The Product package. If any item is missing or damaged, please
email us at [email protected]
compatible with some accessories made by other manufacturers. W e
highly recommend that you use only the specific accessories we
suggest.
1
. The Product might not be
Page 8
2
Page 9

Specification
Interfaces
Video Output
HDMI、YPbPr、Composite Video
Audio Output
Audio L/R、S/P DIF (Optical)
Data Transfer
USB x 2、Ethernet Port
General Specifications
Video
MPEG1 (AVI/MKV/TS/DAT/MPG/MPEG/VOB)
MPEG2
(MKV/DAT/MPG/MPEG/VOB/ISO/IFO/TS/TP)
/M2TS
MPEG4 (AVI/MP4/MKV/MOV/WMV/ASF)
DivX 3/4/5/6、Xvid (AVI/MKV/MP4/MOV)
H.264/AVC
(TS/AVI/MP4/MKV/MOV/FLV)/M2TS
VC-1 (TS/AVI/ASF/WMV)/M2TS
WMV9 (ASF/WMV)
Support Media
Format
Audio
Photo
Subtitle SRT、SMI、SUB、SSA、IDX+SUB
HDD Device
File Systems
Decoding Up to 1080p (RMVB up to 720p)
Real Video 8/9/10 (RM/RMVB)
MP3、MPEG Audio、Dolby Digital、DTS 、
WMA、PCM、LPCM、ADPCM、FLAC、WAV、
AAC、RA、OGG、MKA
HD JPEG、GIF、PNG、BMP、TIF、TIFF
EXT3、NTFS、FAT16/32、HFS+
Output Up to 1080p
Power Supply 100~240V ±10% input voltage/ 12V @ 2A
3
Page 10
Front View
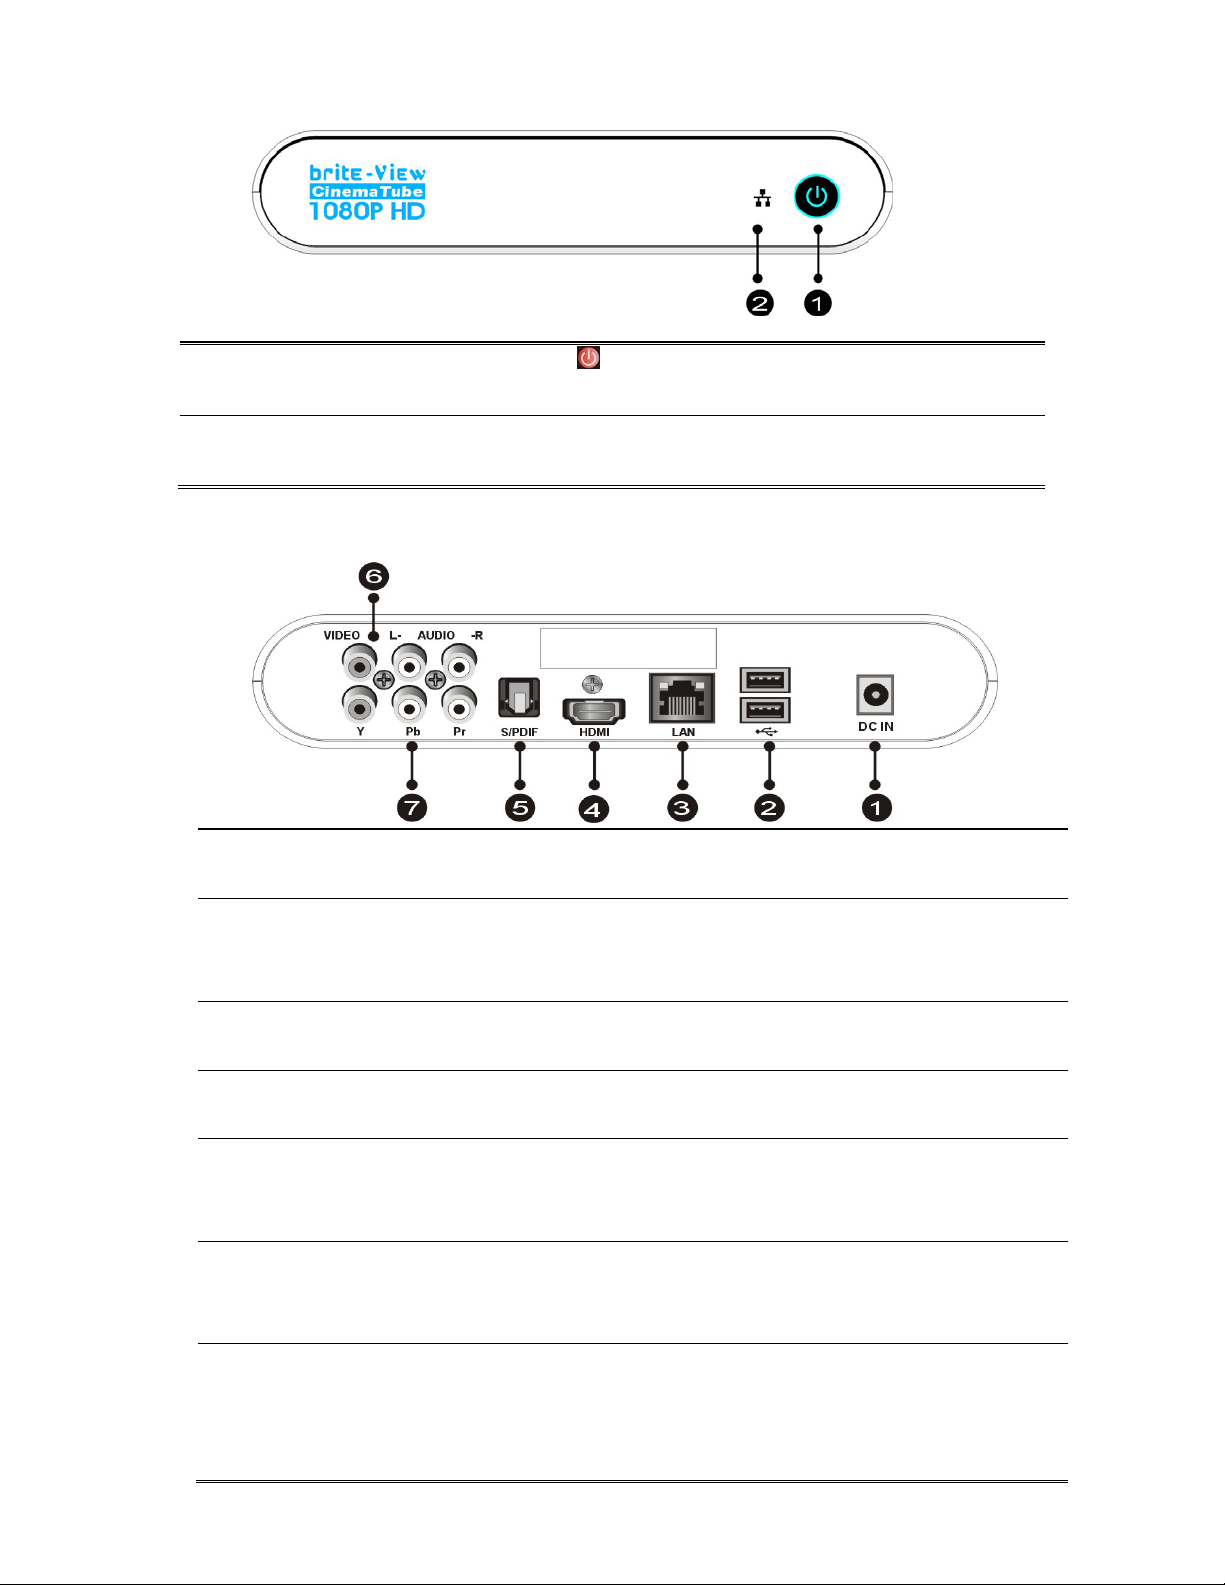
①
Power
Network LED
②
Back View
DC IN
①
USB Port Plug the supported USB devices into USB ports,
②
Press to turn the Product on.
The LED blinks when The Product accesses to
Network.
Connects to the DC output of the power adapter.
such as USB hard drives, cameras, camcorders and
wireless USB dongles.
③
④
⑤
⑥
⑦
LAN Connects to the RJ-45 Ethernet 10/100 based
network. Not compatible with the telephone line.
HDMI OUT Connects to the HDMI jack on the display; a single
cable transmits both audio and video data.
S/PDIF Connects the Product to a display that has an optical
digital audio port, using an optical digital audio (also
called S/PDIF) cable.
AUDIO L/R/ VIDEO Connects to the display with the VIDEO IN/ AUDIO
L/R IN jacks on the display using VIDEO (Yellow)/
AUDIO L (White)/R (Red) cables.
YPbPr Connect to a Y/Pb/Pr-compatible display using
three video (Y/Pb/Pr) and two audio jacks (AUDIO
L/R), through a compo ne nt v ide o cab le with gre en,
blue, and red connectors.
4
Page 11
Remote Control
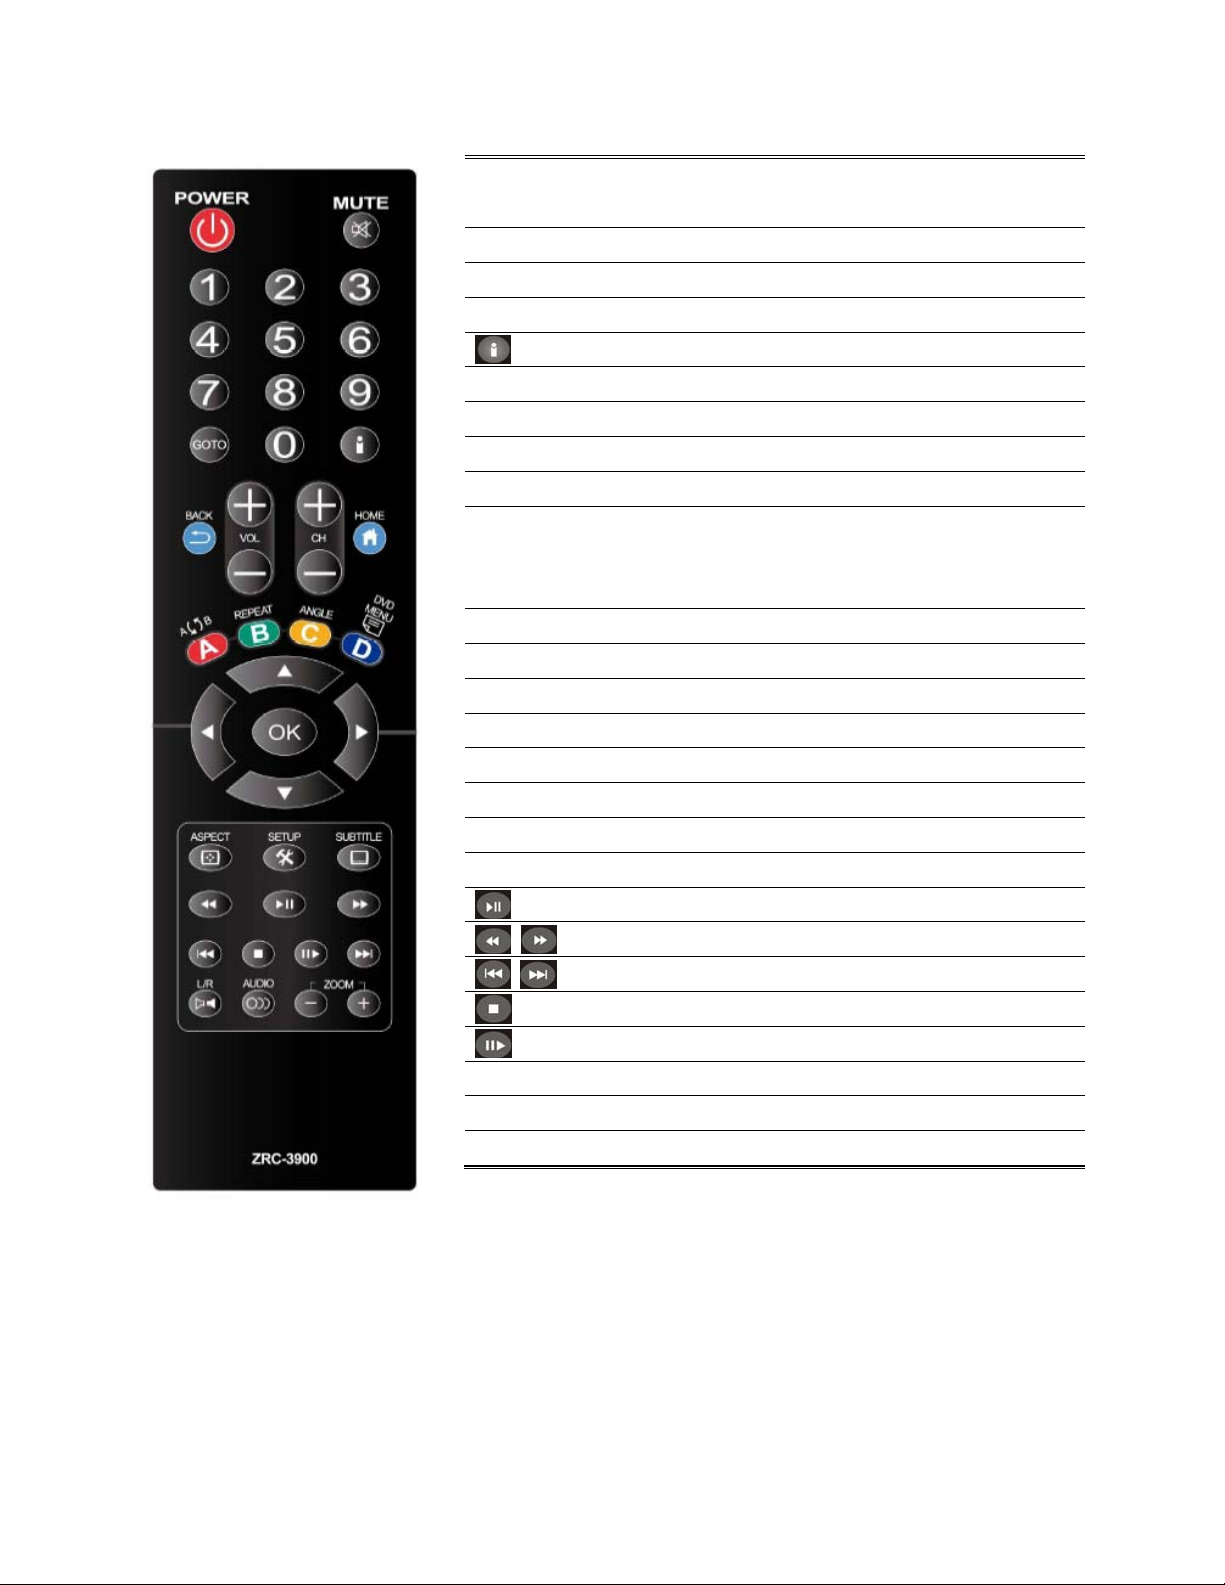
POWER
MUTE Press to mute the sound.
Numeric Buttons 0-9 number keys for selecting desired options.
GOTO Video/movie chapter and time point selection.
BACK Return to the previous display.
VOL + / - Increase/decrease the volume.
CH + / - Reserved keypad for further application.
HOME Hot key to the main OSD menu.
REPEAT A-B
REPEAT Enable/disable repeat of file playback.
ANGLE Switch DVD display angles.
DVD MENU Show DVD Menu.
Press to turn on the Product; press a gain to switch to
stand-by mode.
Display the information of media files while in play mode.
Press once to mark desired repeat point A; press again to
mark desired repeat point B; press yet again to turn this
feature off
Navigate through menu screen or media libraries.
OK Confirm or select.
ASPECT Adjust aspect ratio
SETUP Enter setup menu
SUBTITLE Switch subtitle files.
Play/pause selected file.
MUL TI-FUNCT ION: Ref er to the instru ctions in the screen.
Return to previous file. / Go to next file.
Stop playback and return to the previous screen.
Play films in slow mode.
L/R Enable/disable Left/Right speaker.
AUDIO Switch multilingual outputs.
ZOOM Zoom video or image display on screen.
5
Page 12
2 Installation
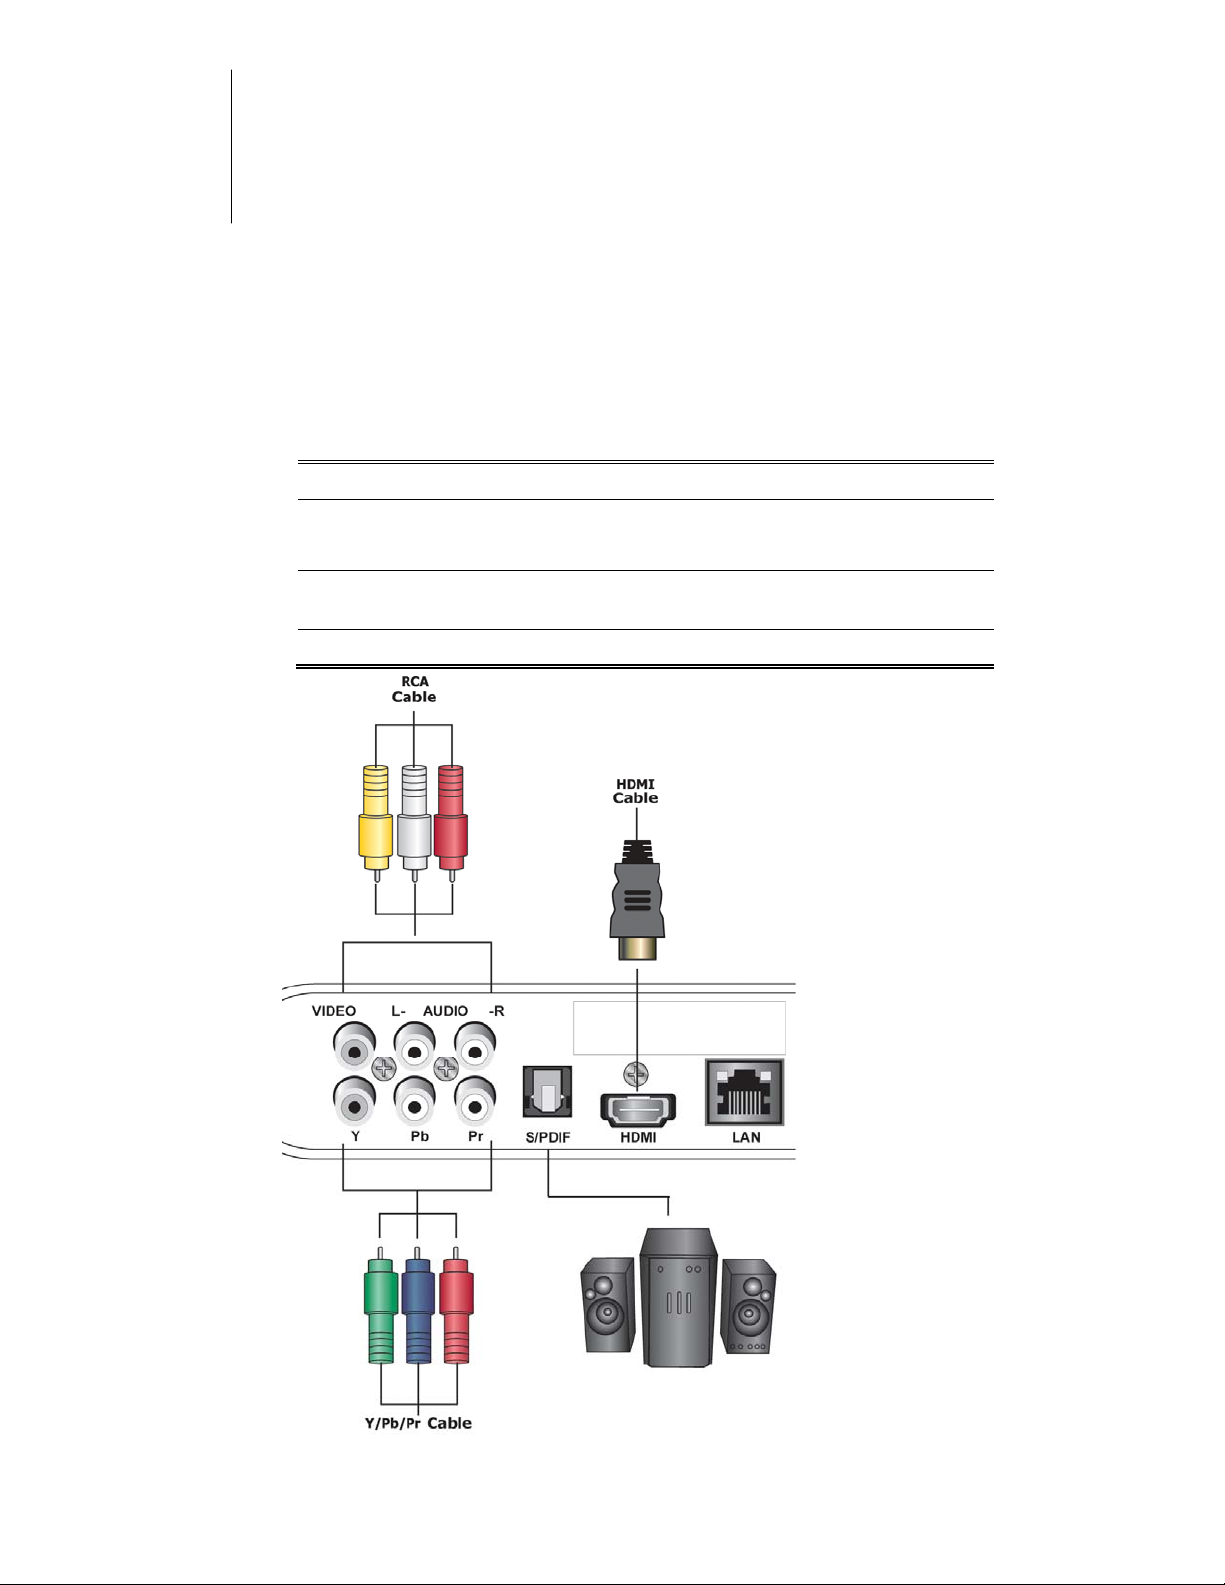
Cable Connections
Match the cables to the connections on your TV or display. Your choices
of connection include:
HDMI For both audio and video output
RCA Cable For composite video (yellow) and stereo
Y/Pb/Pr For component video output
S/PDIF For audio output
audio (white and red)
6
Page 13
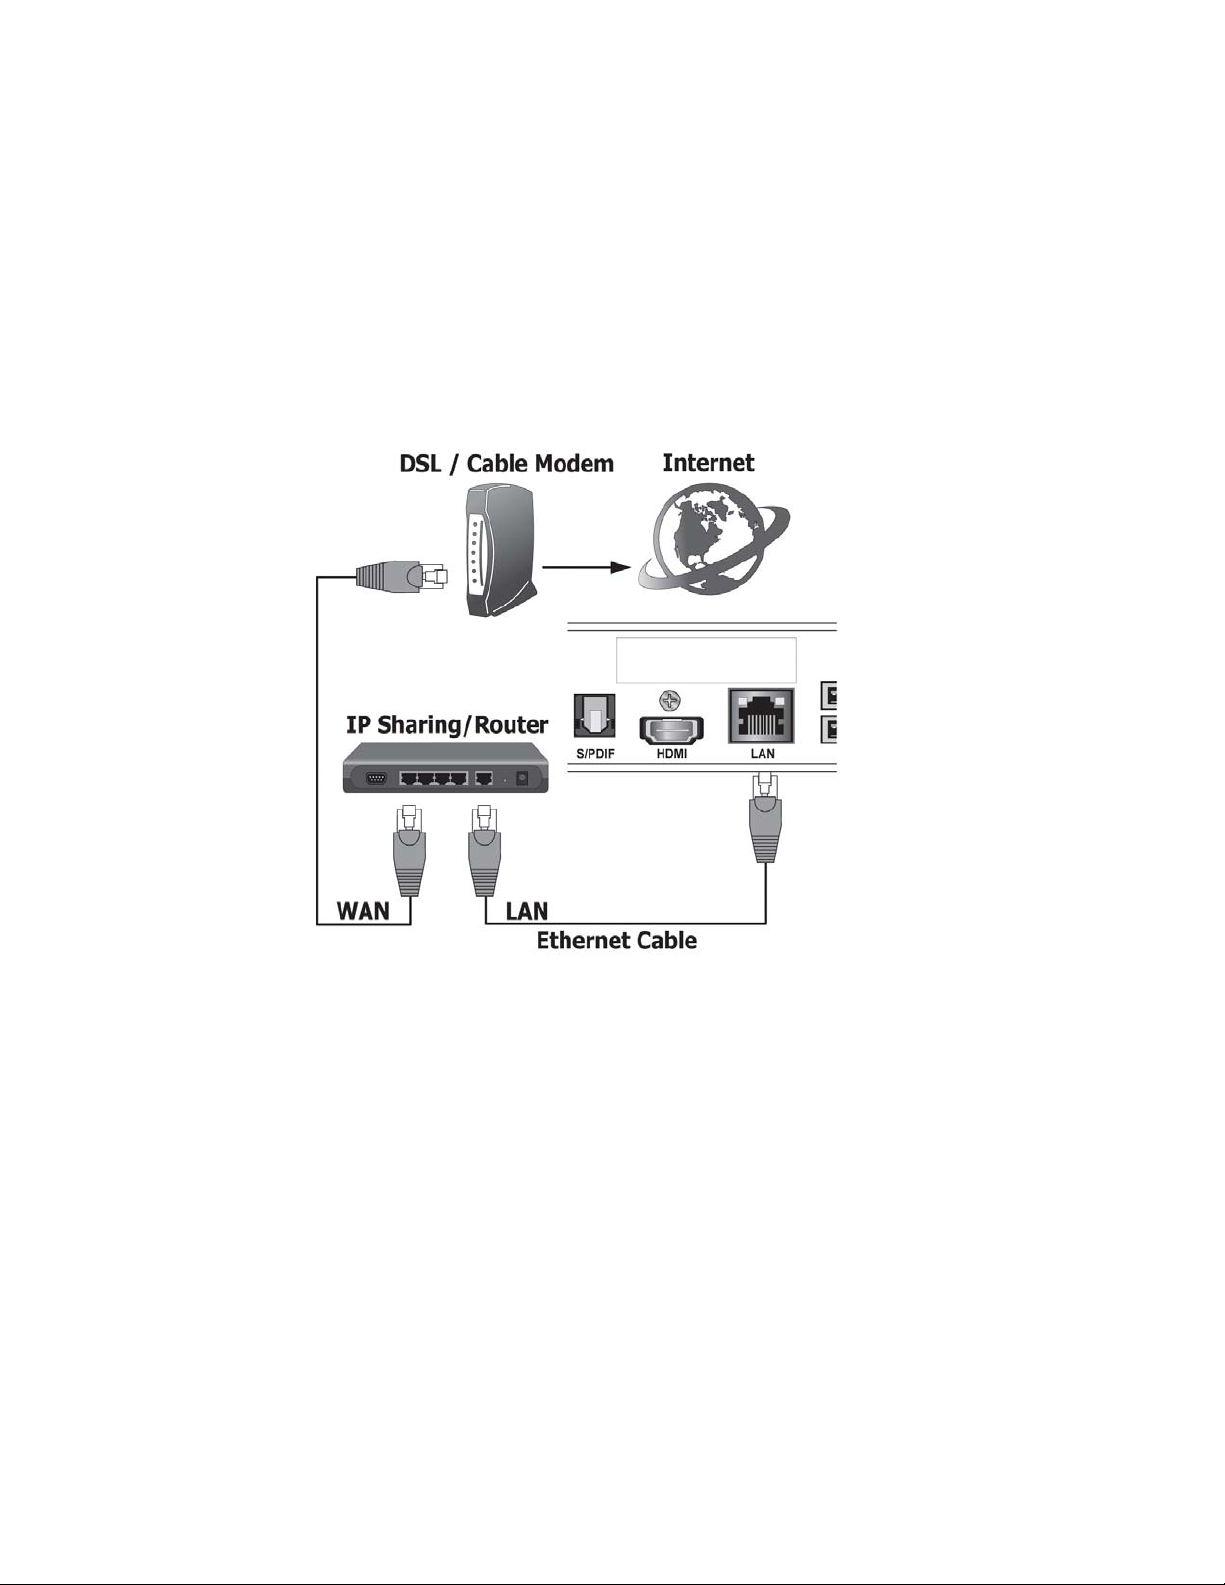
Internet Connections
Connect the Product to the home network through wired LAN
(Option A) or wireless LAN (Wi-Fi 802.11 b/g/n) (Option B)
A. Plug the Ethern et cable to th e “LAN” jack on the rear pa nel of The
Product, for wired Internet connection. The Product will detect
the network automatically.
B. If you have the optional wireless USB dongle we approved, it is
possible to connect The Product to the network wirelessly using
Wi-Fi 802.11 b/g/n. You need to plug the USB dongle into one of
the USB port on the front panel of the Product and connect to the
internet through wireless IP sharing router. You may need to
know your wireless AP , name of the router, and encryption keys in
order to set up correctly.
7
Page 14
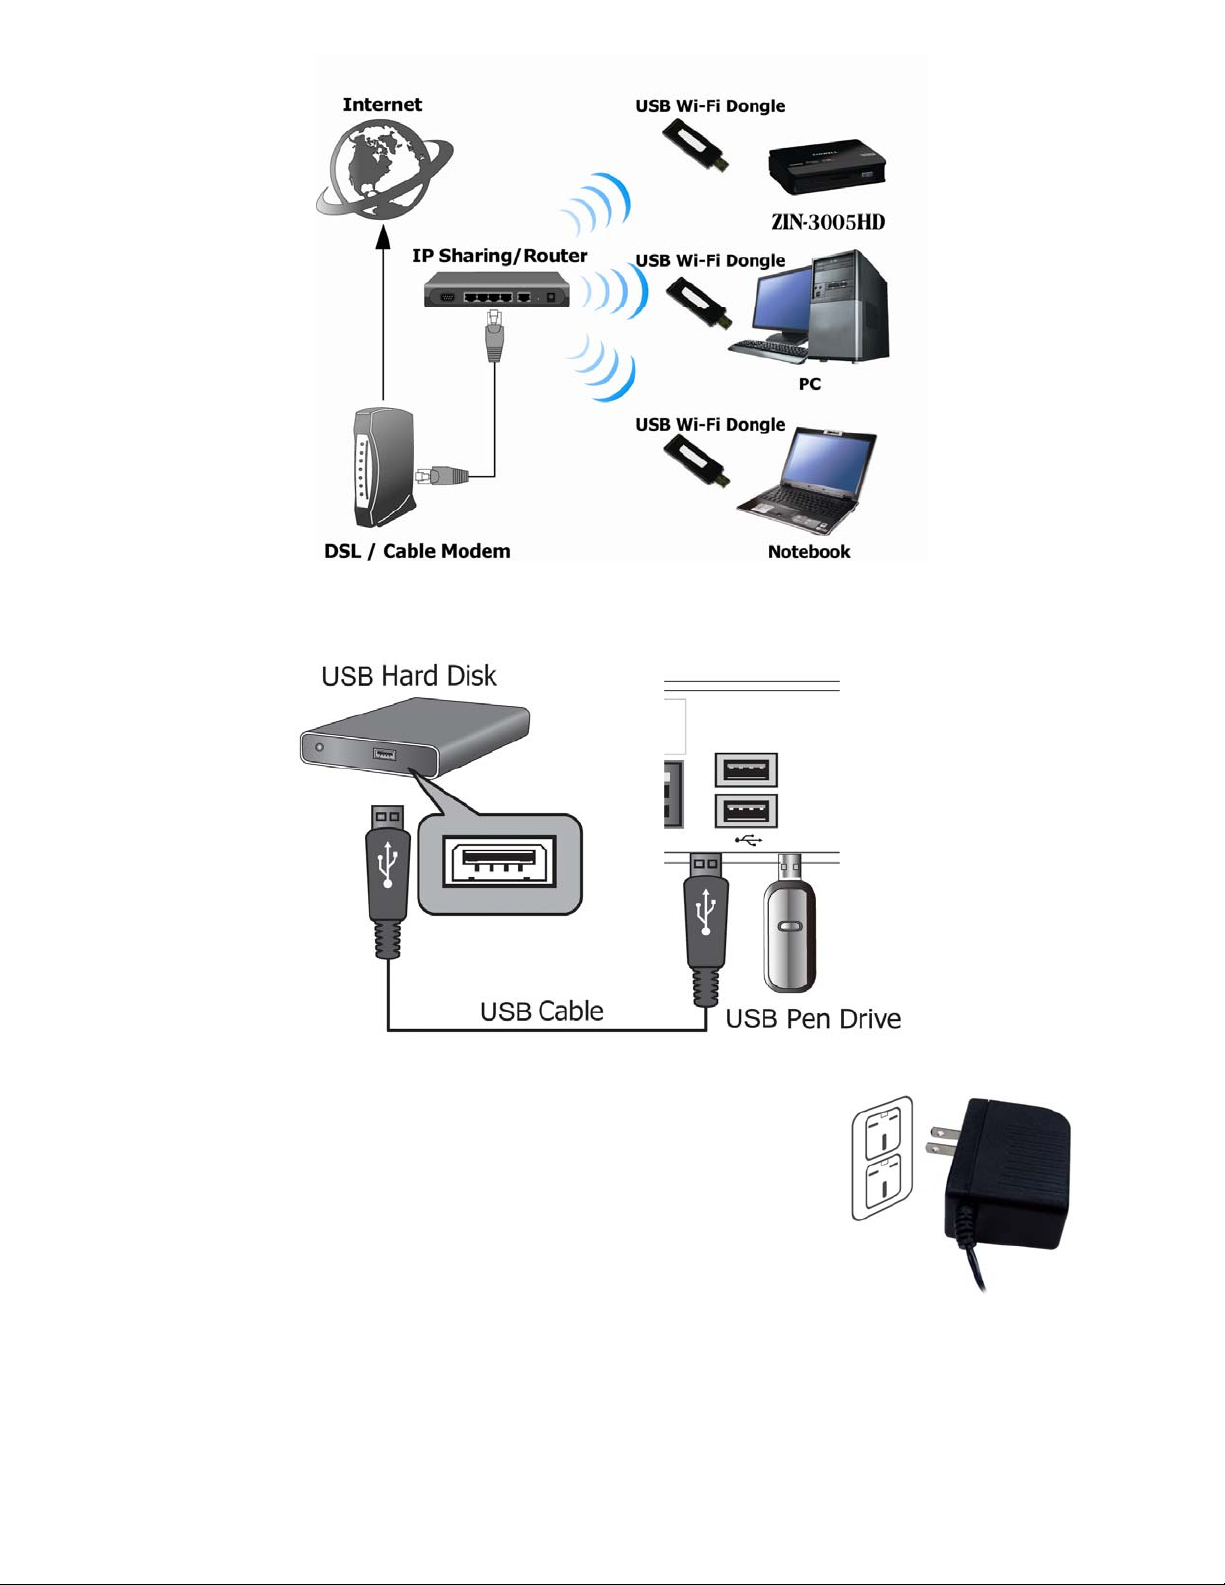
Connect USB Devices
Power Cord Connection
Plug one end of the power cord into the back of
the Product and the other end into a power
outlet. The Product will start automatically
without pressing any other button once the
power is connected.
Switch your TV Input/Source
After choosing the desired video and audio connection, you need to
select appropriate video input mode using the remote control for your
TV/display to switch to the corresp onding video output by pressing the
Input/Source button on the remote control.
8
Page 15
3 Network Connections
▲ Network Connections: needed only when using “PC Media”, and
“Torrent Download ” features.
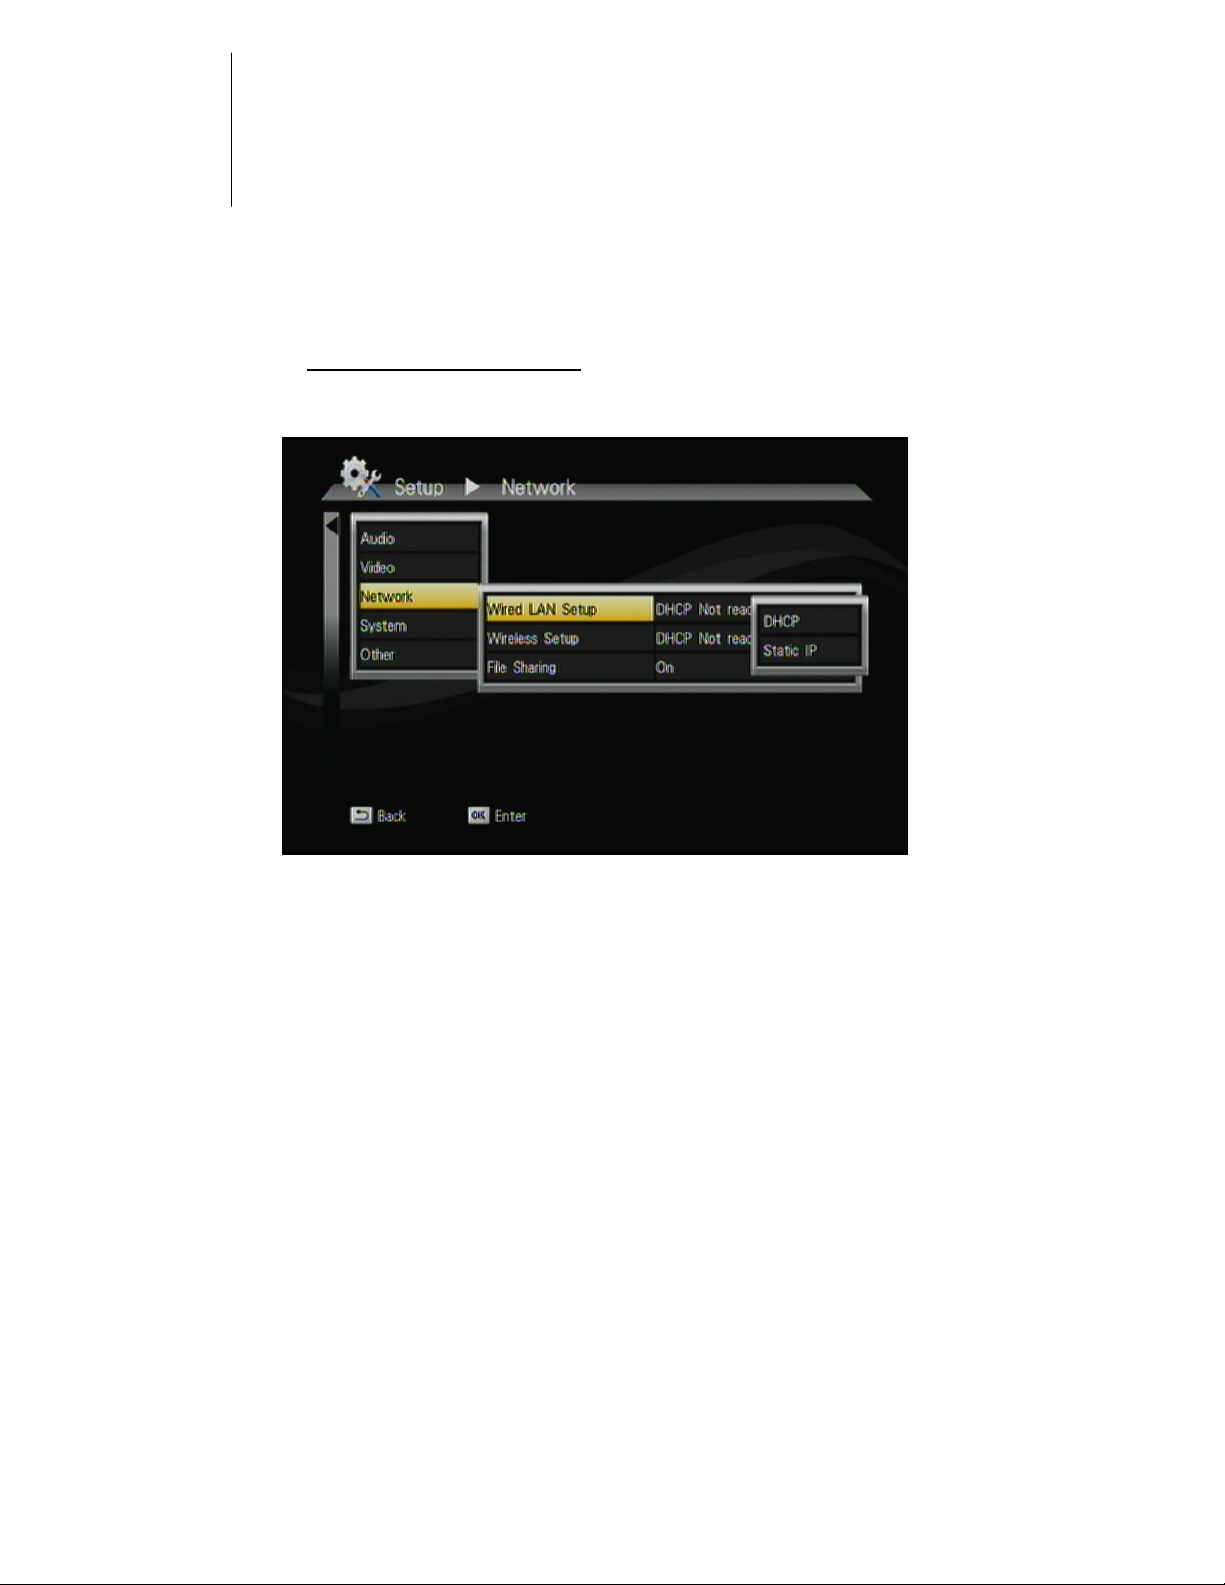
If your wired network equipment such as the IP Sharing router or AP
(Access Point), uses DHCP to assign IP address, by default the Product
will automatically request the IP and other related information to set up
The Product over the network in DHCP mode (und er Setup> Network
>Wired). If your network does not have DHCP server, switch to the
Static IP mode (under Setup> Network >Wired) and set up various
parameters manually. If you have a compatible wireless USB dongle,
and have already set up the wireless router/AP according to the
instructions that come with the dongle, please enter Setup>
Network> Wireless mode to input the WEP or WPA keys.
9
Page 16
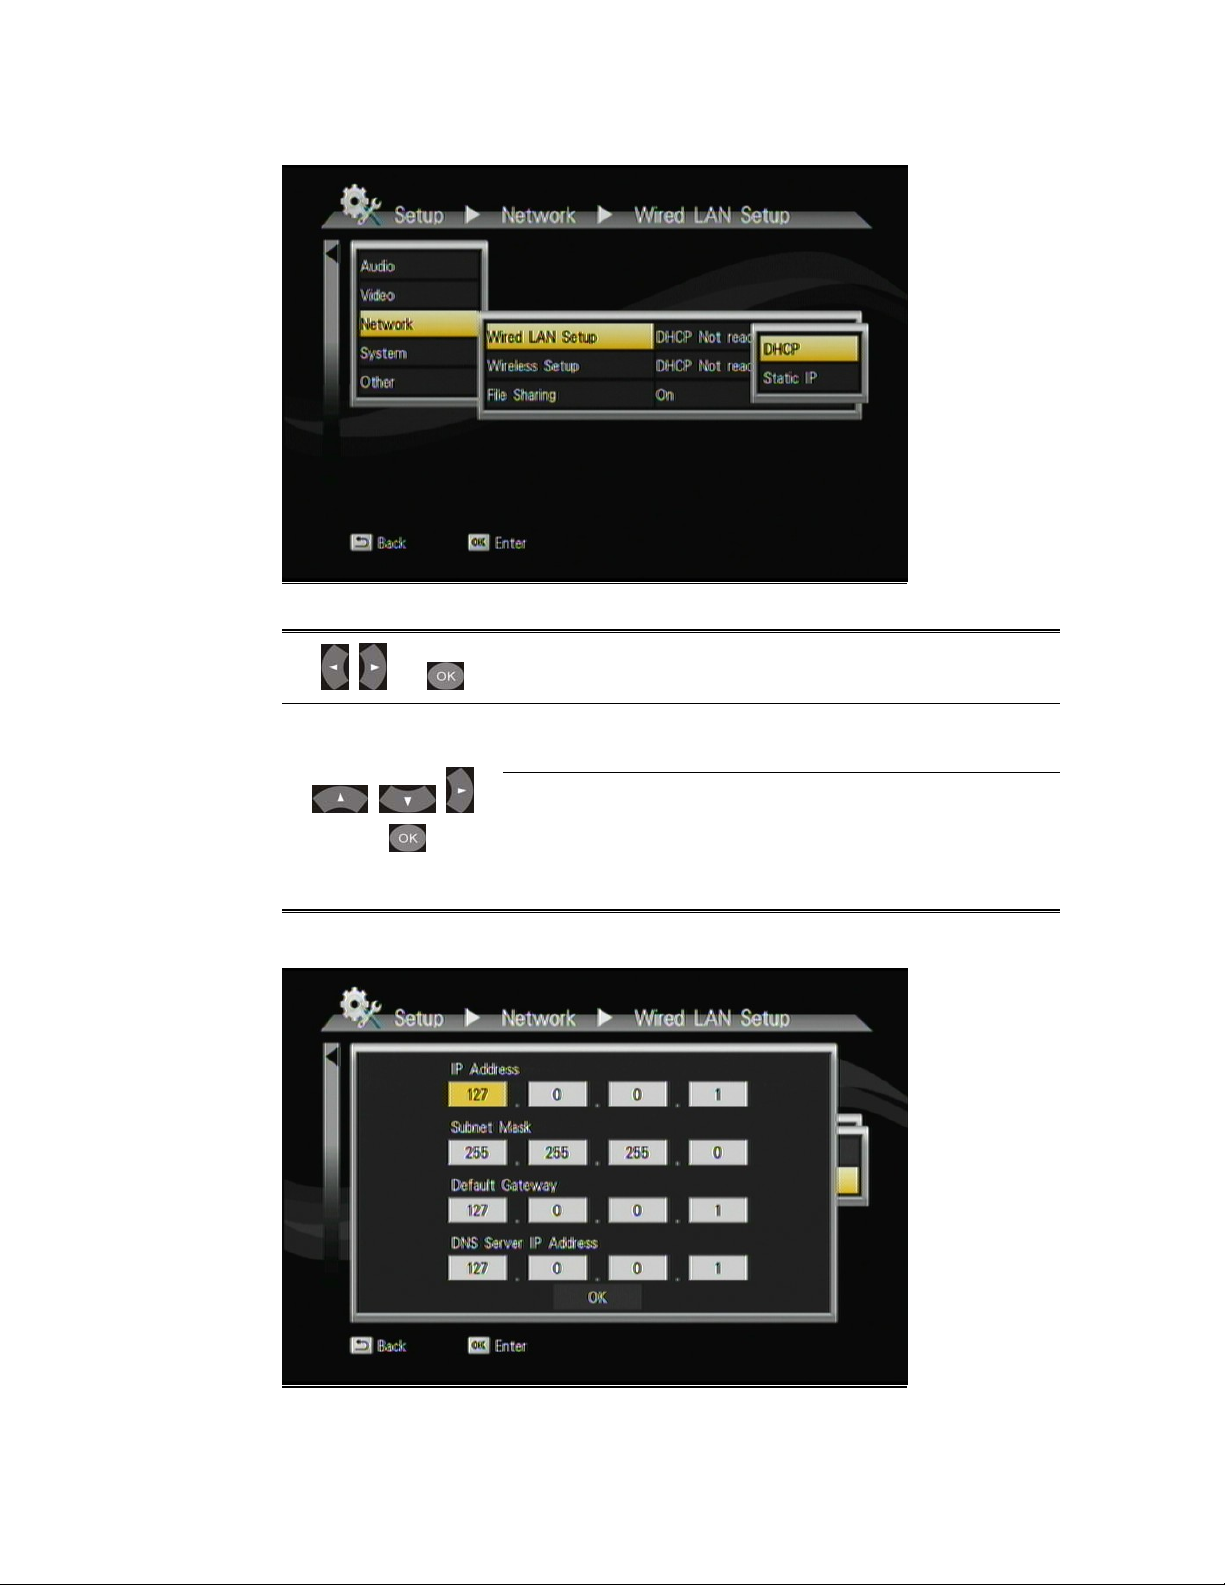
Wired Network Setup
> DHCP
To access “Setup” on the main menu.
+
Select “Network”.
+
> Static IP
Select “Wired” on the Network menu.
Select “DHCP”.
To implement DHCP network setting. The
Product will automatically receive its IP address
from a DHCP sever that is built into the access
point or IP sharing router.
10
Page 17
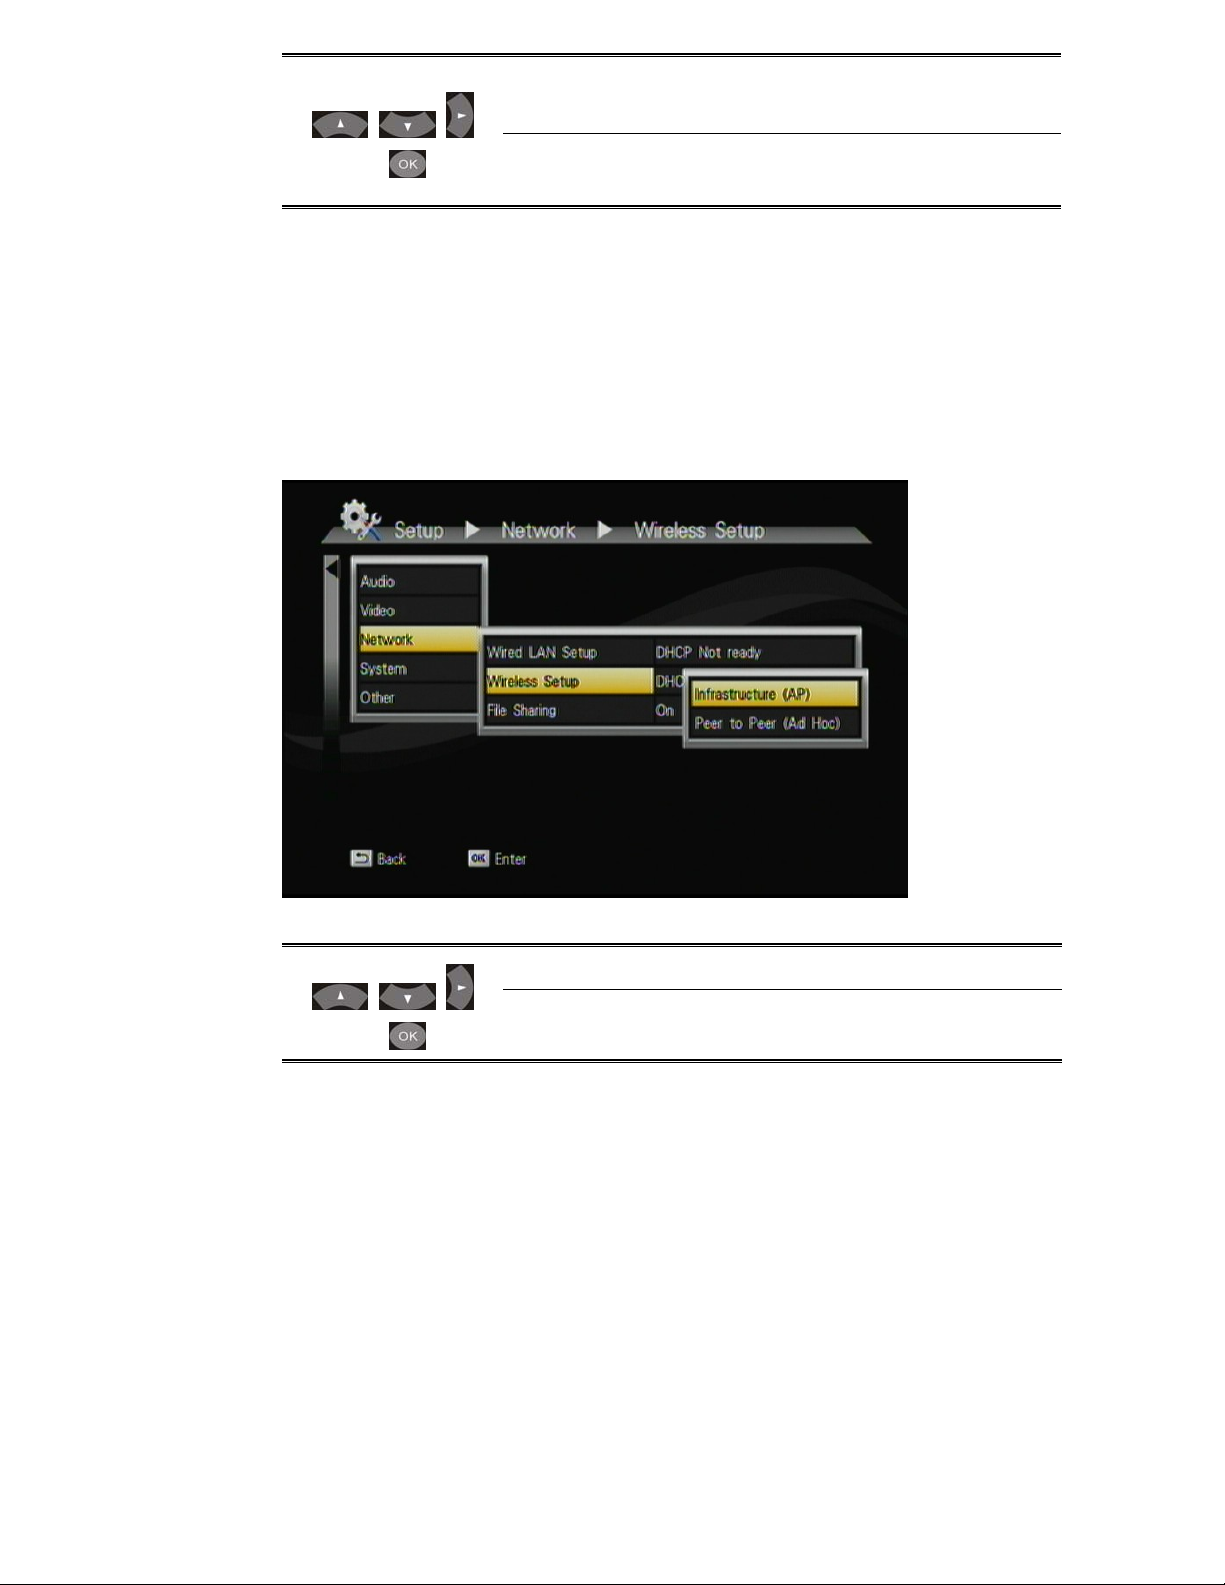
Select “Wired” on the Network menu.
Select “Static IP”.
+
PS: Please acquire informati on of these setting values fr om your ISP(Internet
Input the value IP Address, Subnet mask,
Gateway, and DNS text box respectively.
Service Provider)first.
Wireless Network Setup
Select “Wireless setup” on the Network menu.
Note:
+
The Product supports WEP , WP A-PSK and WPA2-PSK encryption modes
only.
Please use approved WI-FI dongle for wireless connection.
The Product provides you multiple profiles for
use across multiple networks.
11
Page 18
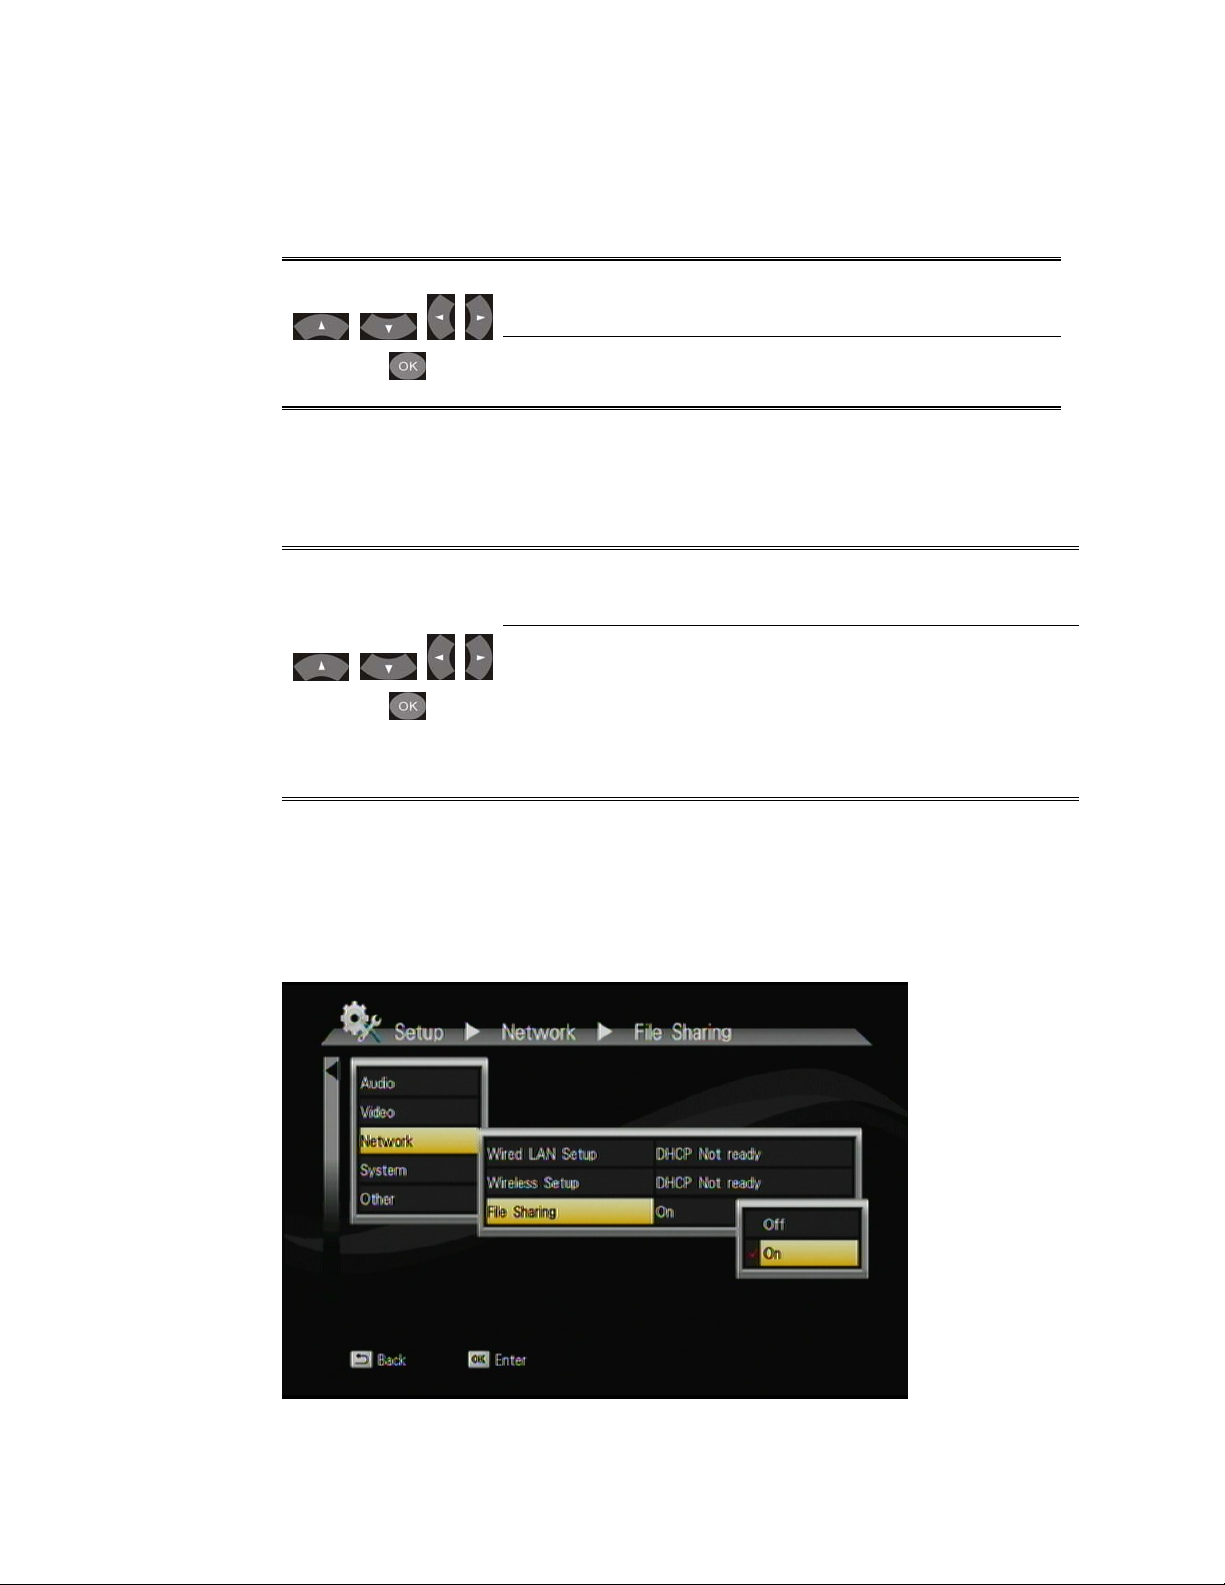
> Infrastructure (AP)
The Product performs a list of current wireless network connections“SSIDs”. Along with its security protocols (WEP/WPA2 key) and
signal strength.
Select your preferred wireless network
connection.
+
If an access key is required for the network
connection, the keyboard will pop up.
Once the wireless network setup is successful, the “SETUP
SUCCESSFUL” screen will appear.
> Ad-Hoc Setup
Rename SSID Rename your wireless
network connection.
Wireless Security Set your wireless network as
+
an open system or have it
protected by WEP key first, in
order to connect the Product
to the network.
File sharing (Simple NAS)
This function allow The Product as a simple NAS device, you can access
folders located on The Product for viewing, renaming, moving and
deleting by networking from your remote computer.
12
Page 19

File sharing Configuration
To activate this feature, please make sure:
The Product is connected to the network;
The network is properly set up . For more information on this part,
please refer to “Step 2” in “Setting up The Product” section, and
“Network” under “Setup Menu”.
To allow the Product to access folders on your computer, you need:
1) The Product already connected to the network
2) to designate the folders/files on your PC as shared resources.
Please refer to Microsoft’s official website:
http://www.microsoft.com/windowsxp/using/networking/setup/home
net.mspx to see the initial and detailed process of Home Network Setup
in Windows XP. Please refer to the following instructions to allow the
Product to access the shared folders on the remote PC.
Step 1: Right click on the folder t o be shar ed and select Sharing and
Security.
Step 2: If this is the first time you intend to share a folder, Windows XP
will prompt a warning message, urging you to use the Network
Setup Wizard for safety purpose. Choose to either run the
Wizard or do it yourself. XP will display another warning. If you
want the f irewall e nabled , select Use the wizard to enable
file sharing. Otherwise, select enable file sharing.
Caution: File sharing may lead to security problems since, by definition, it gives other users
access to the content of a part of the hard drive. As a result, it is essential that yo u share
only folders for which it would not be extremely important if their contents are revealed.
13
Page 20
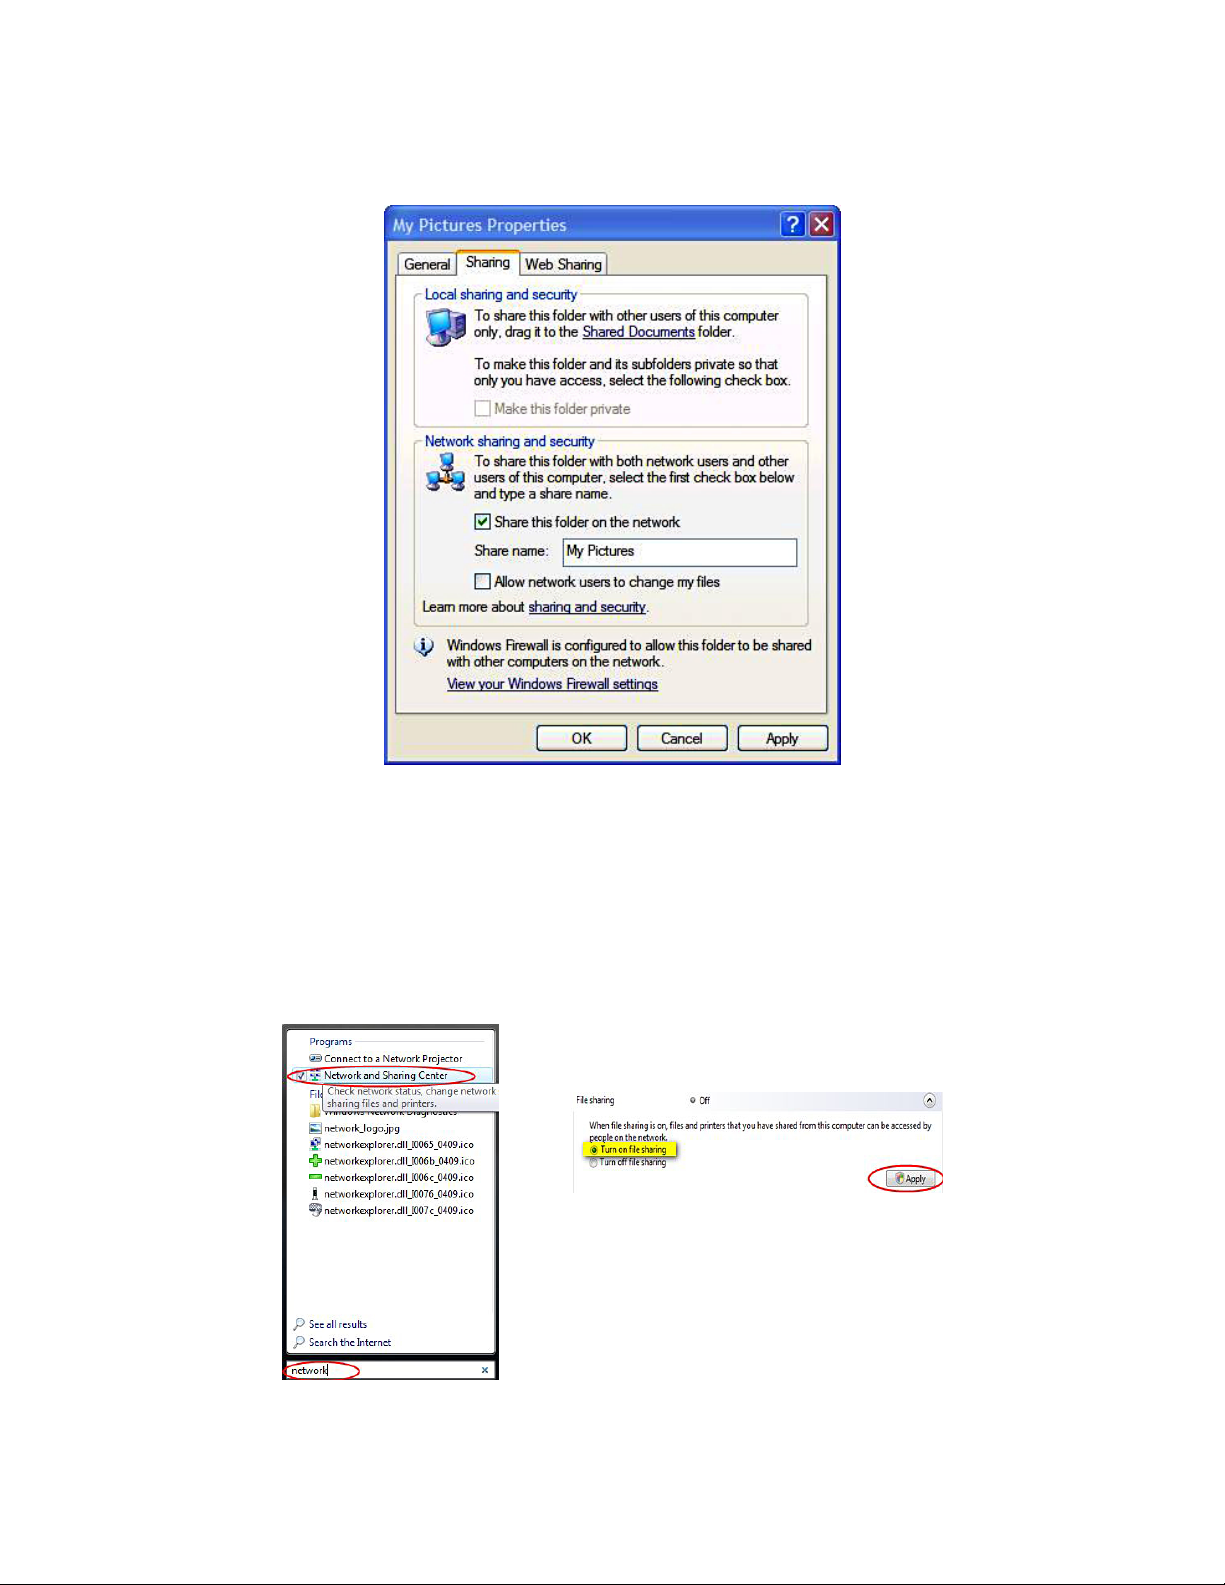
Step 3: Y ou may now specify a “Share Name”, which will be used for
users on the network to access the shared folder. The icon of
the shared folder will be changed to showing a hand holding
the folder.
If your operating system is Windows Vista, please refer to the following
instructions:
(1) Open the Control Pa nel and then open Network and Sharing
Center.
(2) Click the down arrow to the right of File Sharing to expand it.
(3) Click Turn on file sharing and then click Apply.
Y ou may also refer to Setup menu on the OSD screen of The Product to
select wired or wireless connection.
14
Page 21

File Sharing Configurations (With Windows Vista)
File sharing involves making the media content of one or more files /
folders (on your PC) available through the network. By “enabling” this
file sharing, you can view these files / folders (on your PC) to be
accessed / viewed on your The Product (on the same network).
Caution: File sharing may lead to security problems since, by definition,
it gives other users access to the content of a part of the hard drive. As
a result, it is essential that you share only folders for which it would not
be extremely important if their content were revealed (or destroyed),
Furthermore, you are strongly advised against sharing a whole
partition of your hard drive. This op eration is specifically discouraged if
you do not trust the other network users!
Enable “File Sharing” under Windows Vista
On your PC, Click Start, right-click Network, and then click
Properties..
A new Window titled “Network and Sharing Center” pops up.
In the “Sharing and Discovery” section of the Network and Sharing
Center window, click the down arrow next to File sharing.
Within the File sharing settings, click Turn on fi le sharing, and then
click Apply.
To enable public folder sharing, do the following:
In the Sharing and Discovery section of the Network and
Sharing Center window, click the down arrow next to Public
folder sharing.
Within the Public folder sharing settings, click “Turn on sharing
so anyone with network access can open, change, and create
files”.
Click Apply.
Once the “File Sharing” is enabled in Windows-Vista,
Click Start, and then click Computer.
In the Computer window, navigate to the folder containing the
folder that you want to share.
Right-click the folder that you want to share, and then click Share.
The File Sharing window is displayed.
Use the File Sharing window to select the Guest or Everyone
account. This is equivalent to simple file sharing in Windows XP.
When complete, click Share, and then click Done.
15
Page 22
File Sharing in Windows 7
This instruction is based on Windows 7 professional version , the other
versions are similar with this.
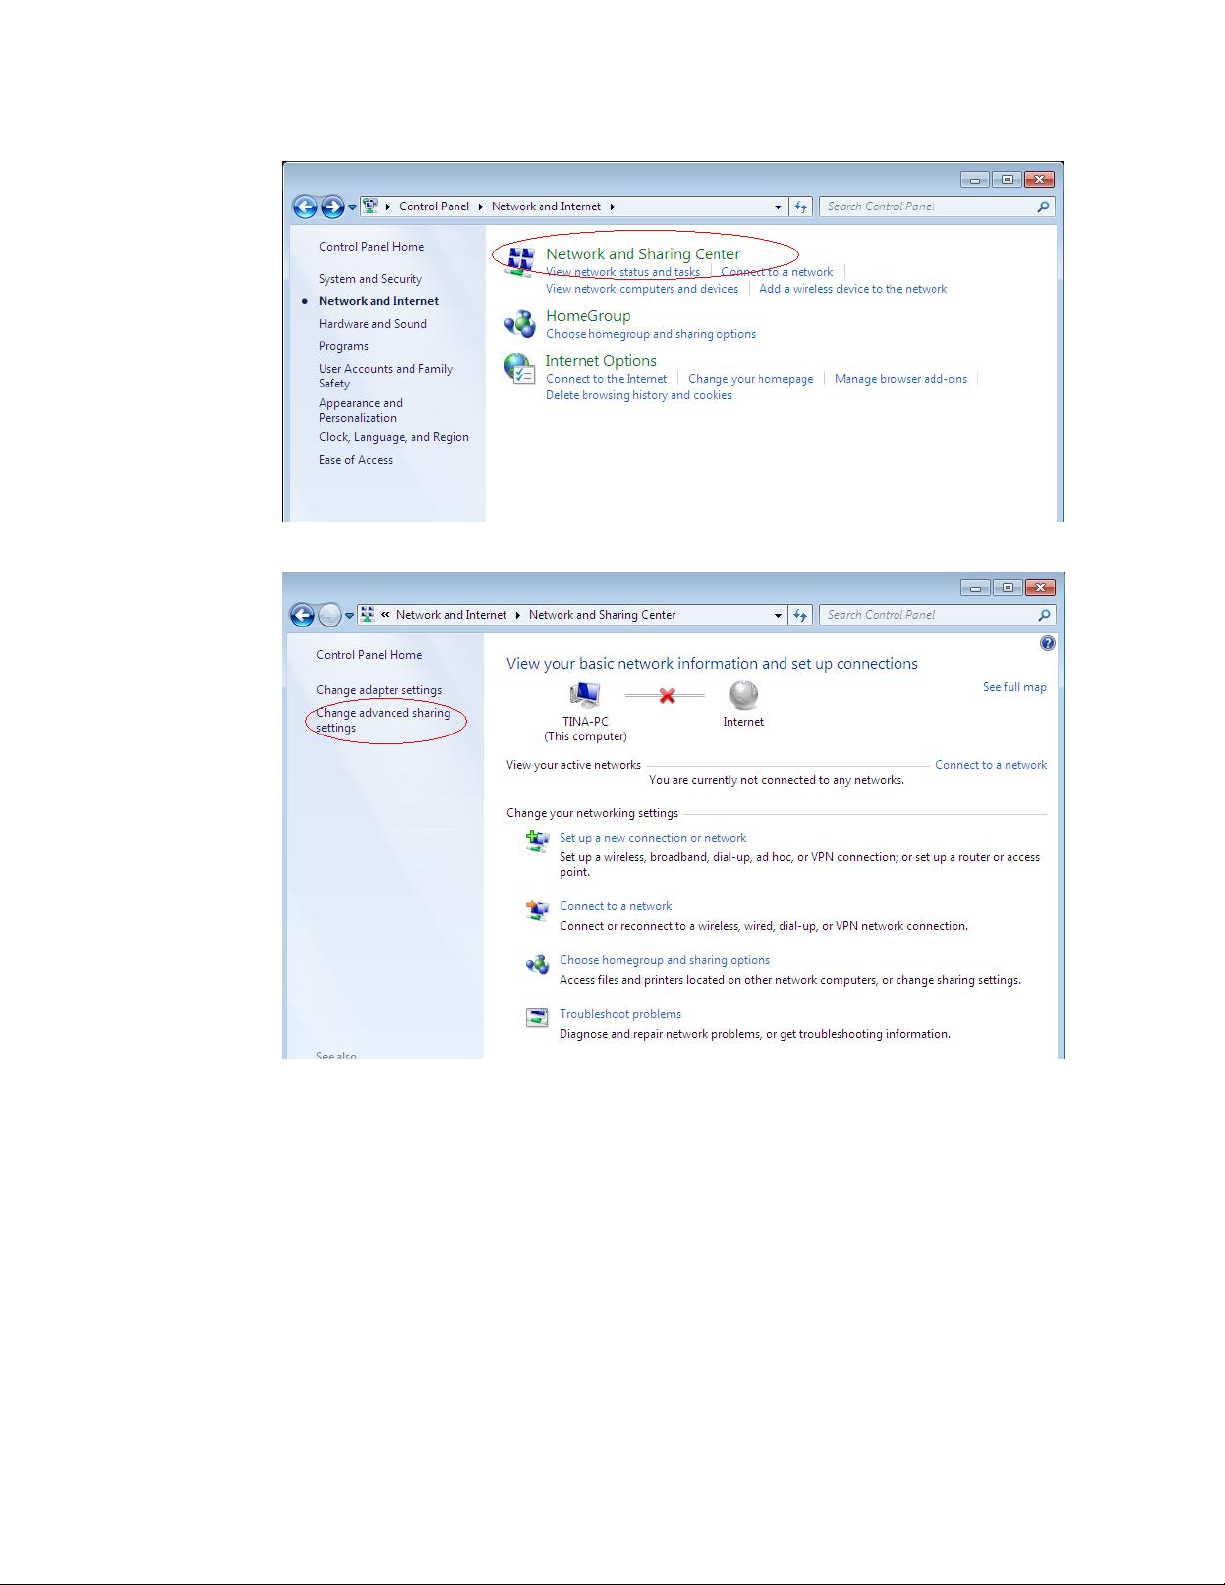
1. Click(Start)->(Control Panel)->(Network and Sharing Center)
16
Page 23
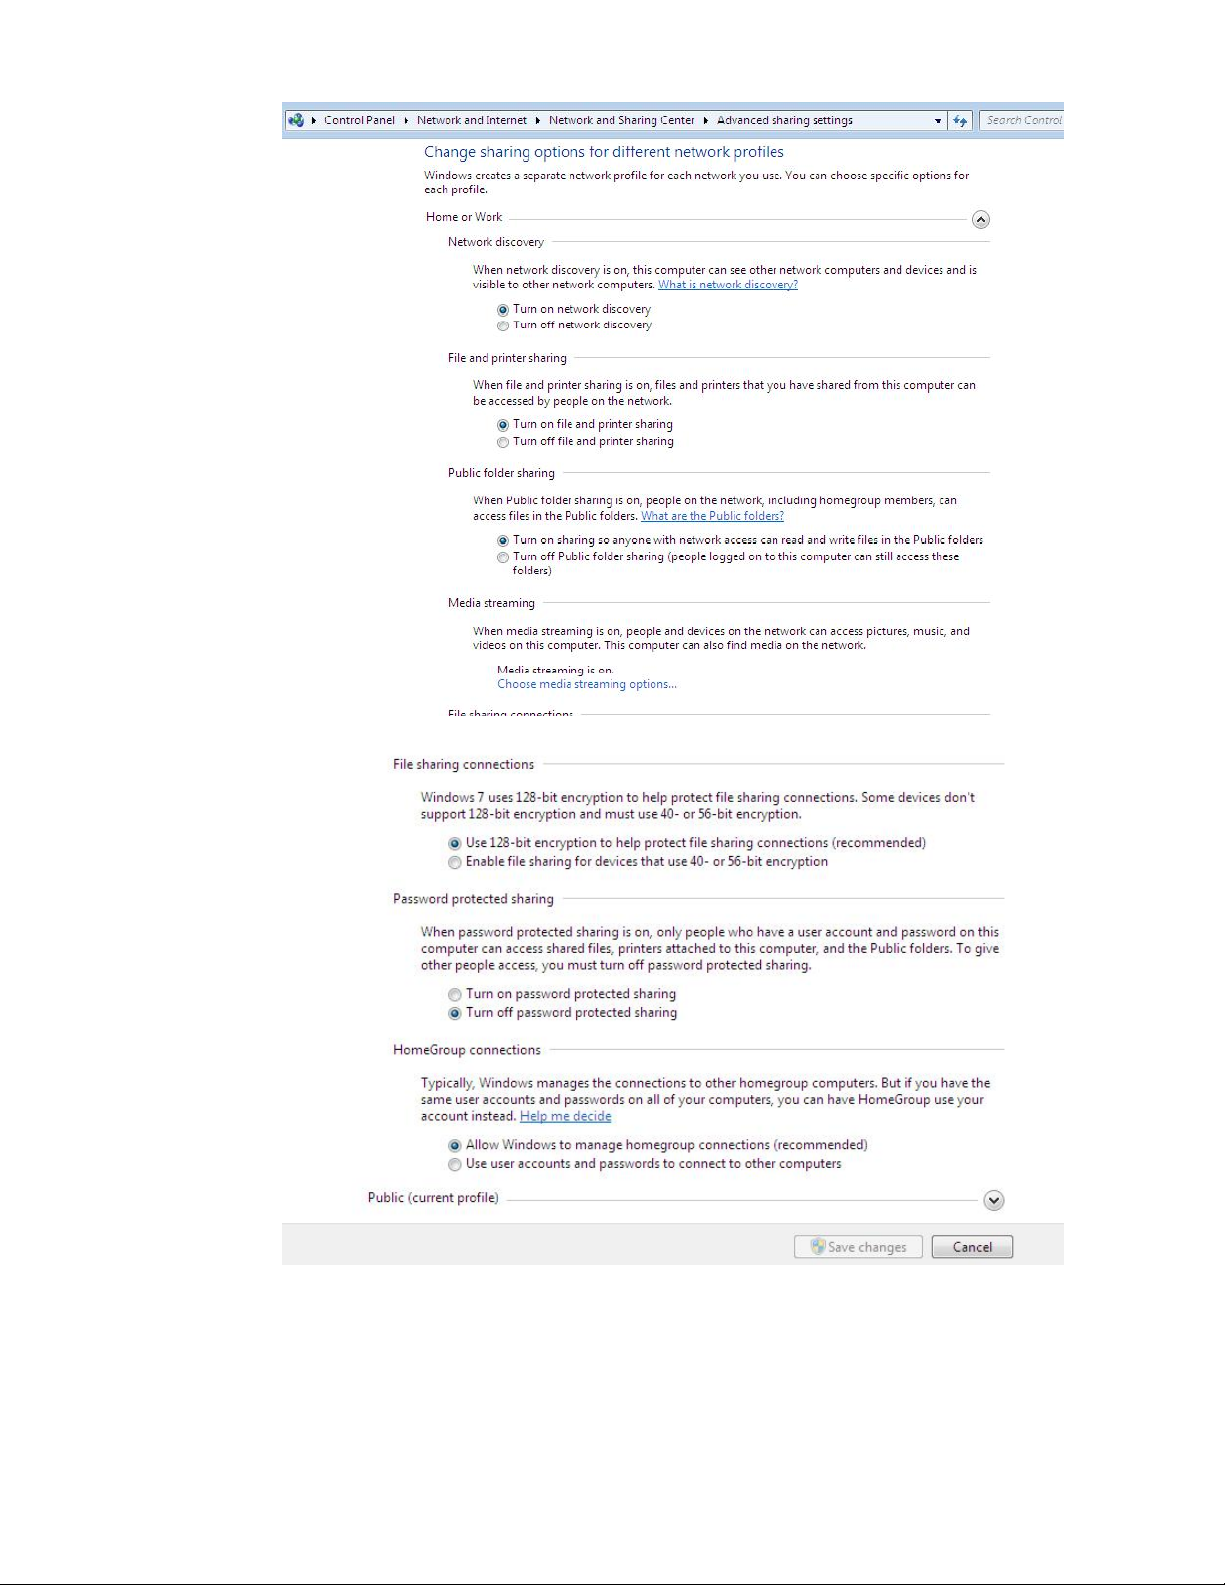
2. Enter “Change advanced sharing setting”
17
Page 24
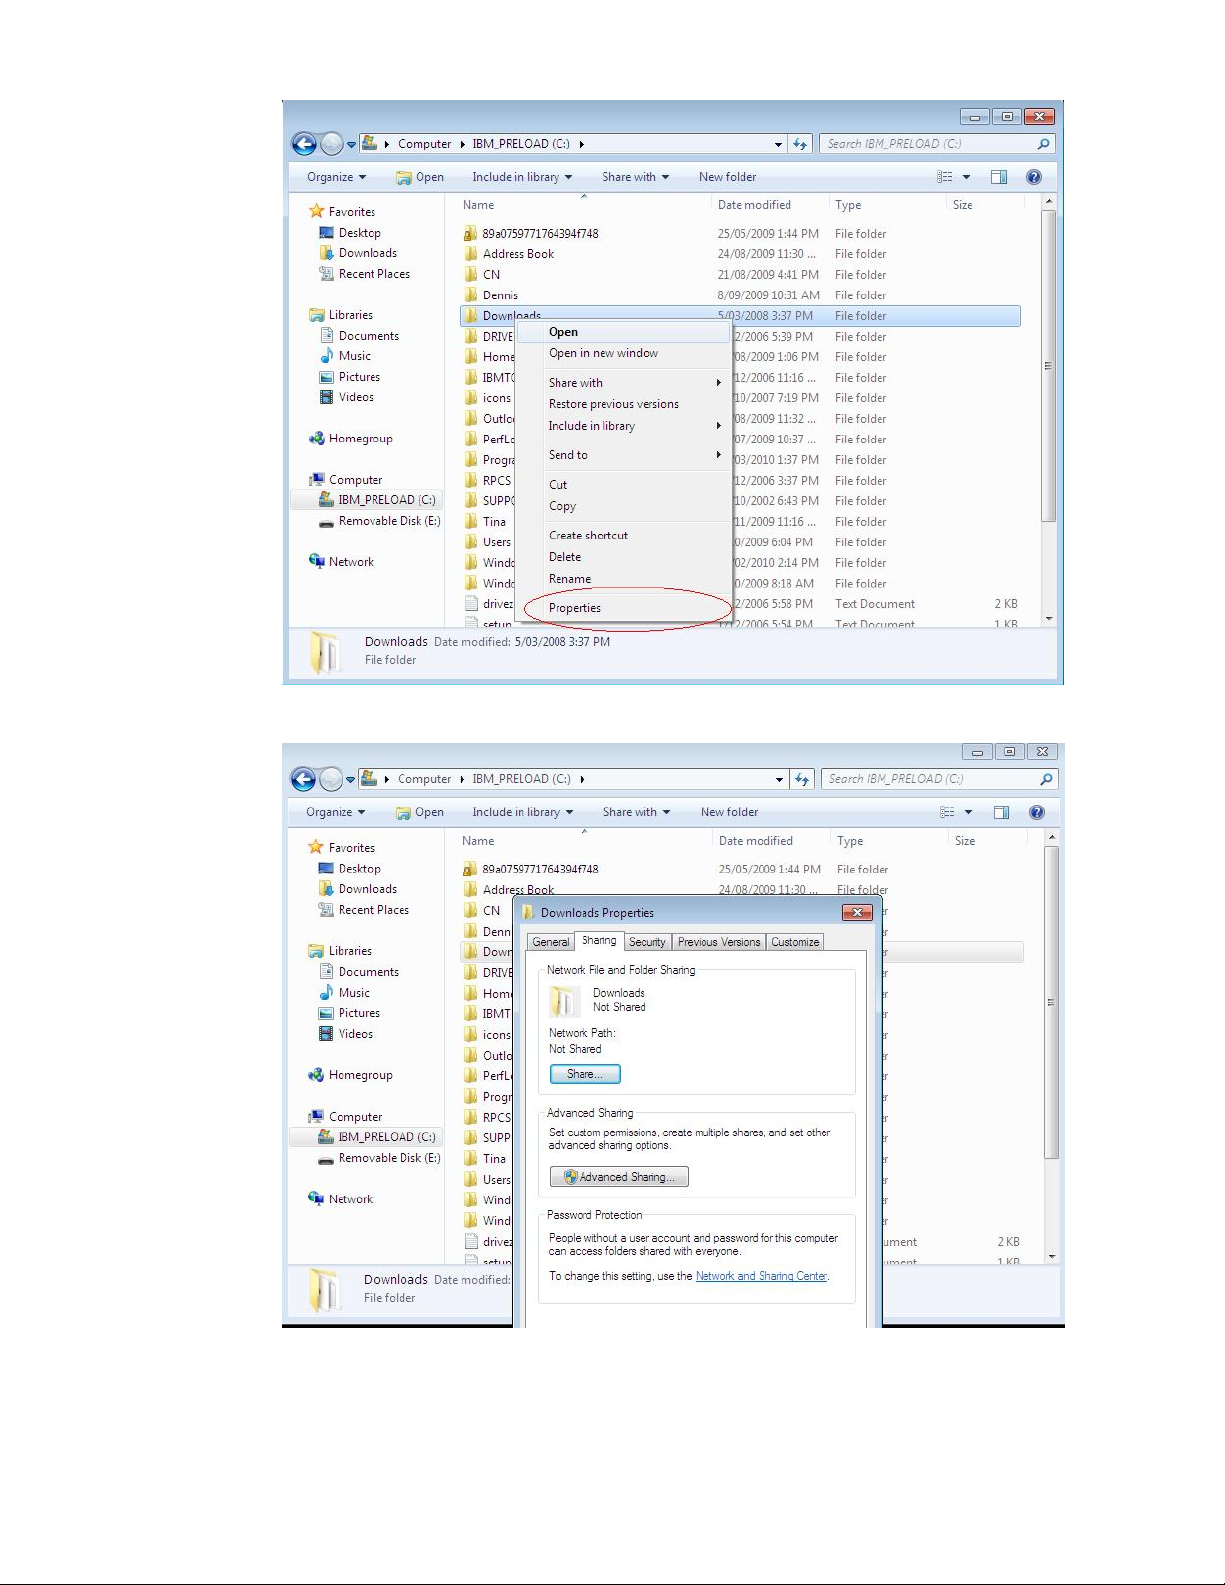
3. Set sharing options as above images.
4. Select a folder which you want to share, click “properties”.
18
Page 25
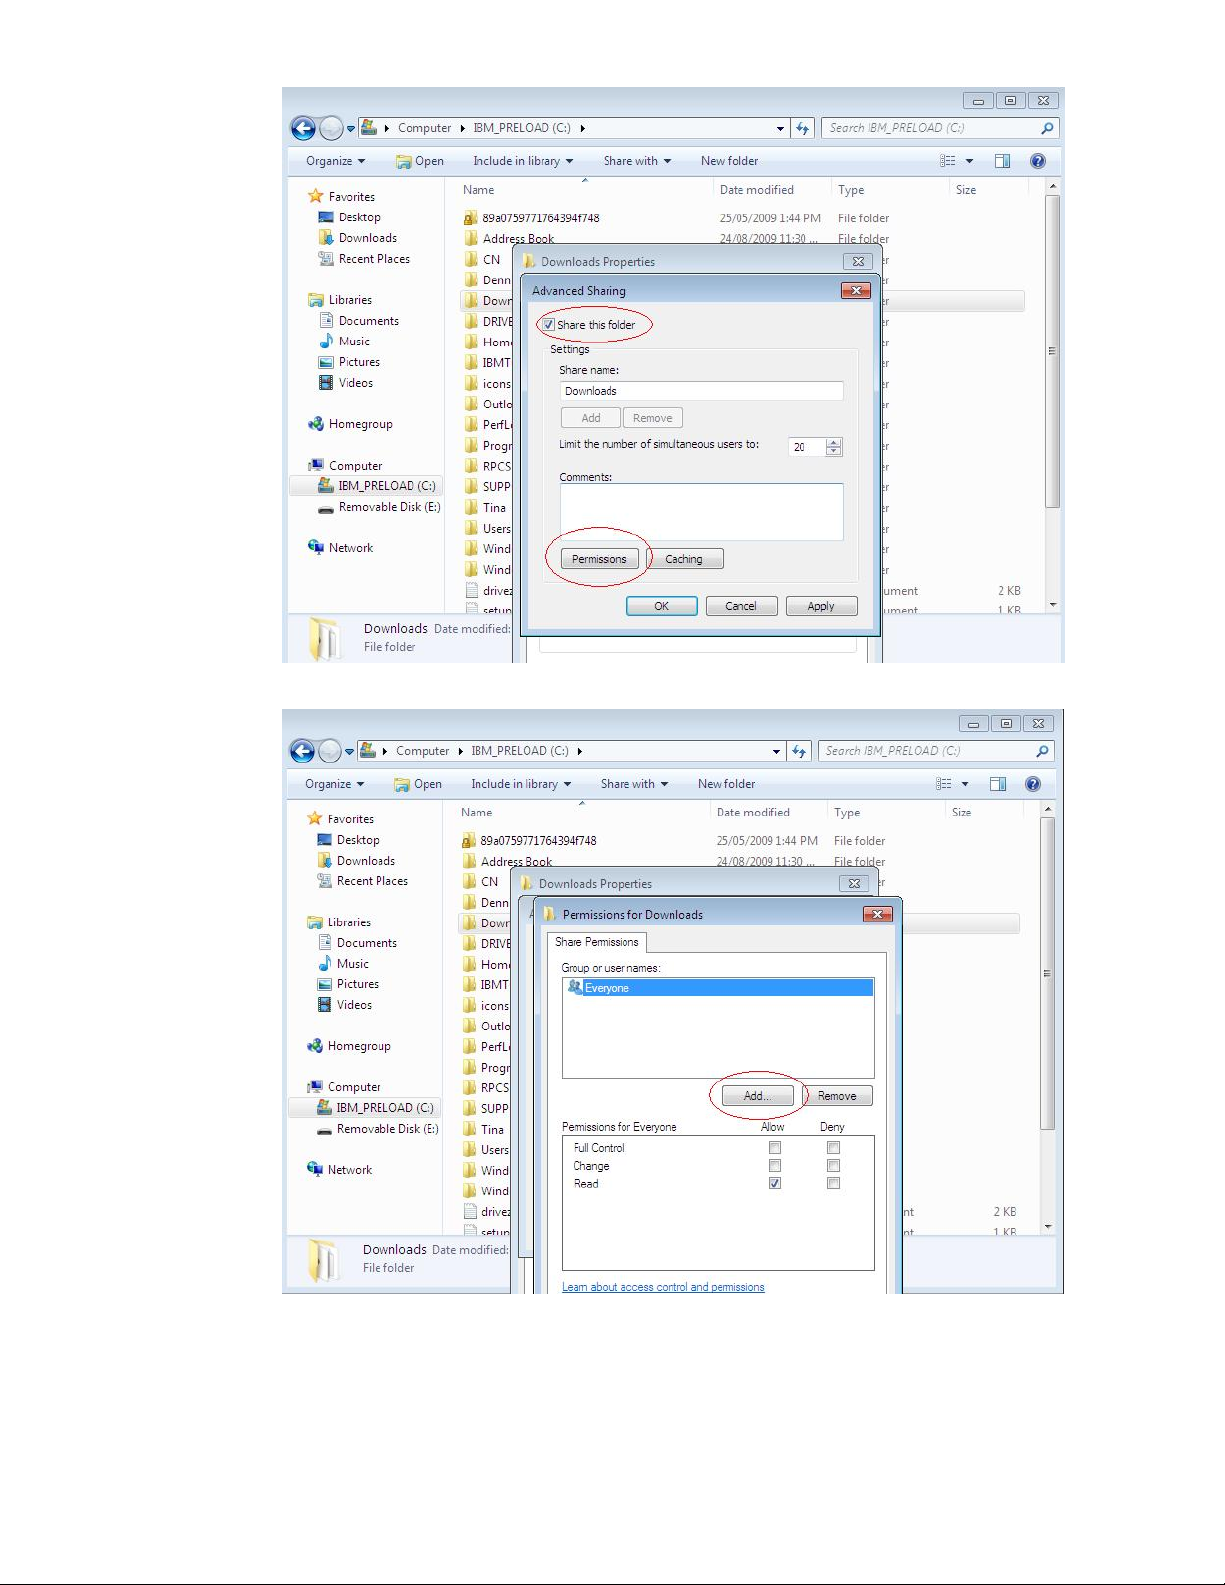
5. Click (Advanced Sharing)
6. Add permission, click “share this folder”.
19
Page 26
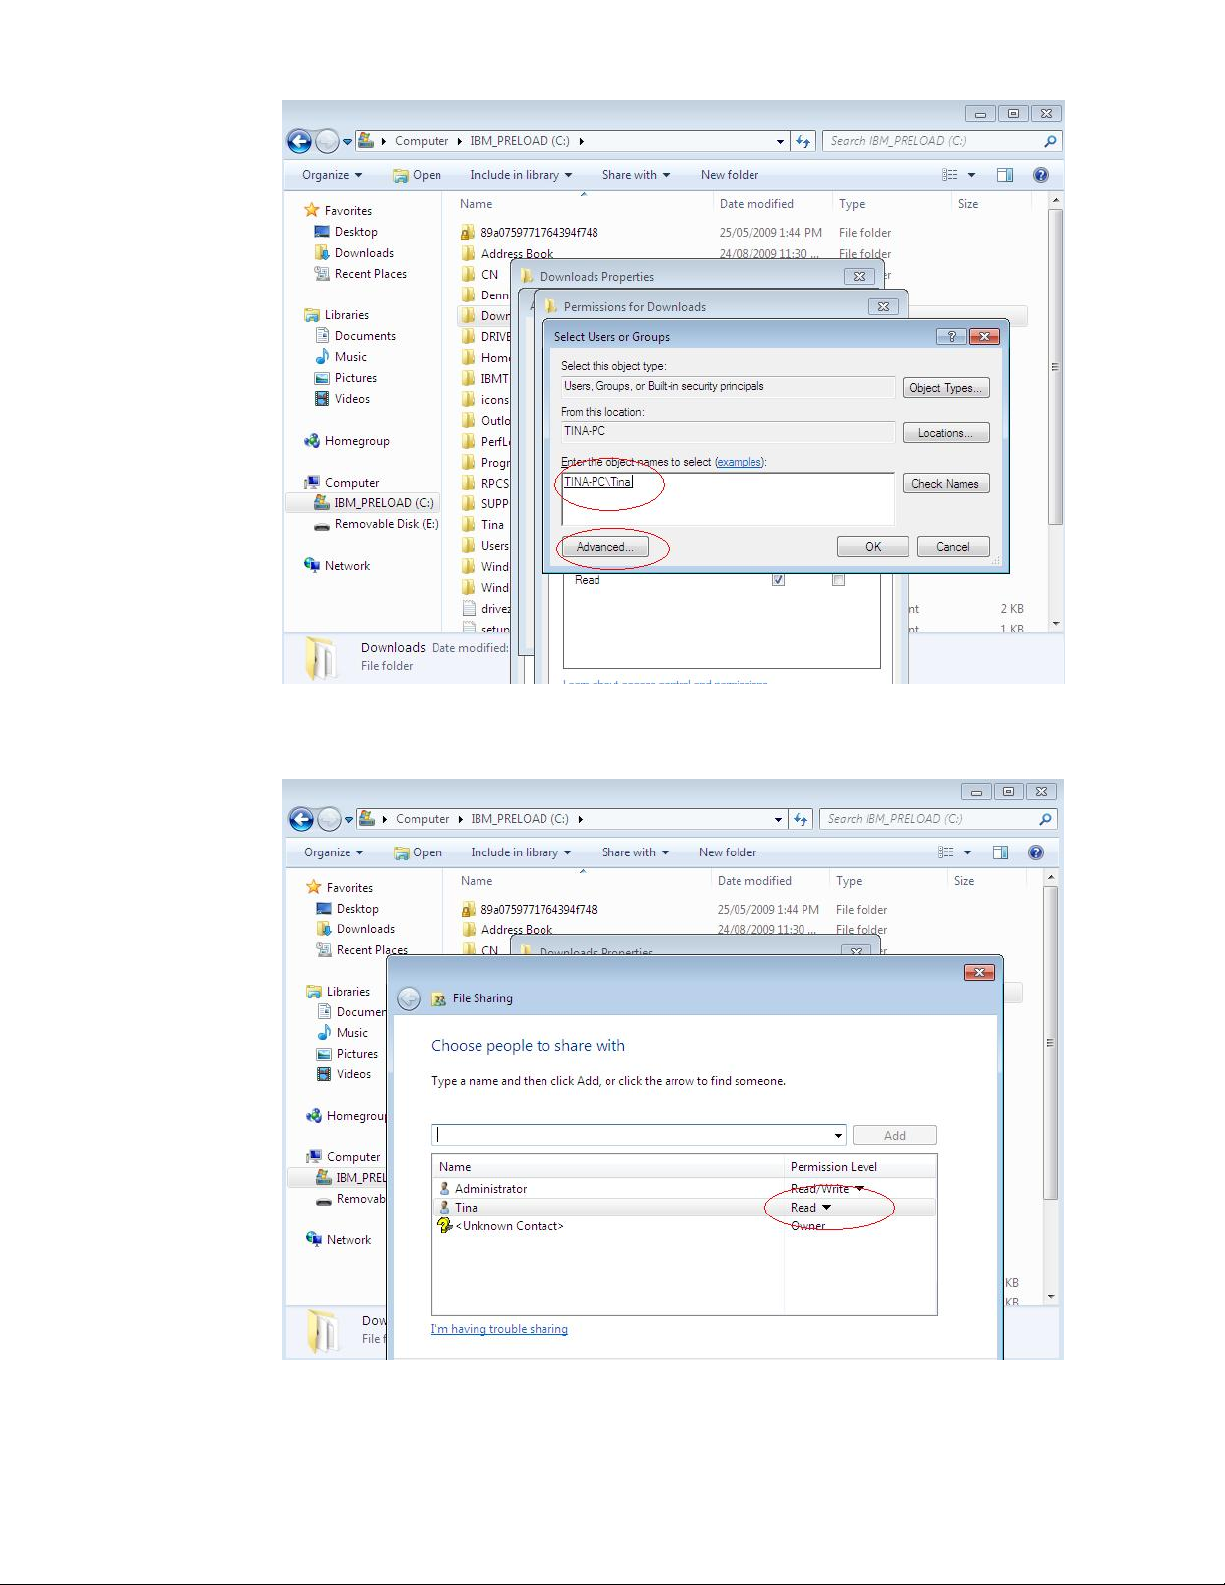
7. Add user’s permission. If necessary, add GUEST in list.
8. Add user account which needs to access this share, if necessary , add
GUEST account.
20
Page 27
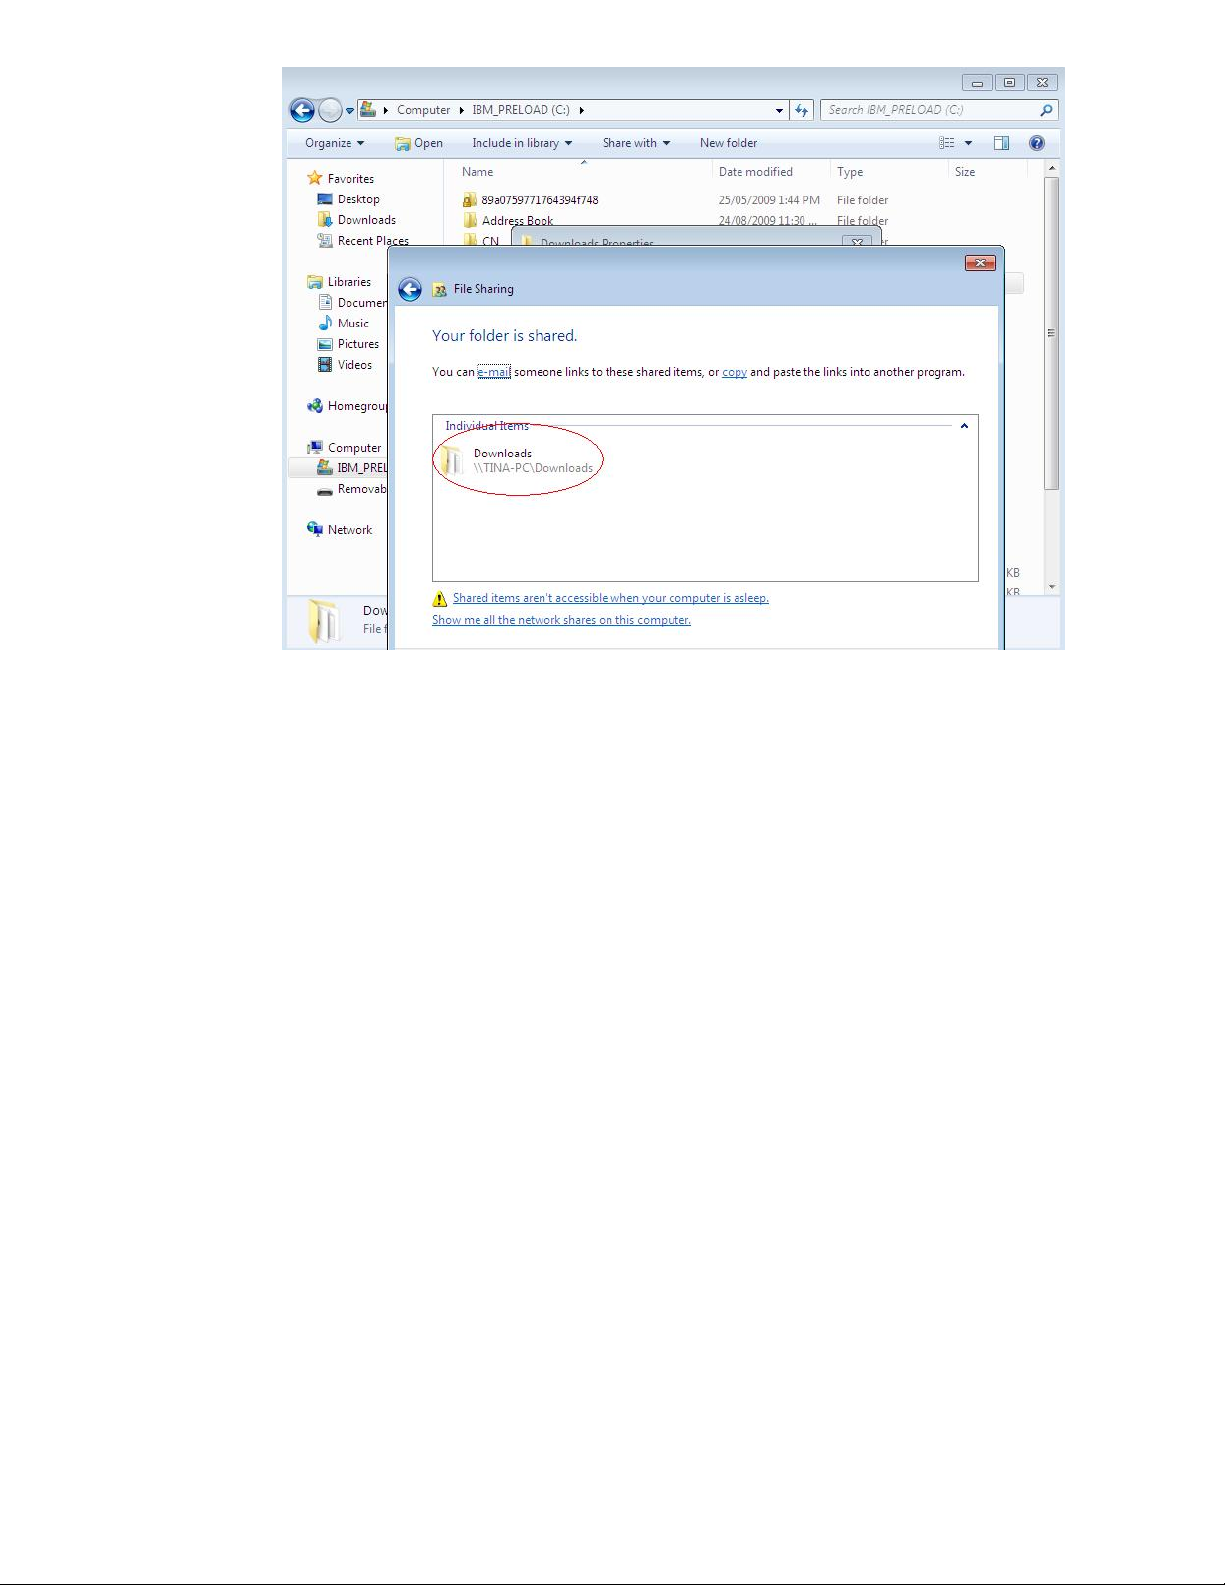
9. Click (Apply) & (OK) and complete setting up.
21
Page 28

4 Play Media
> HDD Media
The Product searches and plays all available images, music and video
files on the external USB device.
Note: Depends on the specification of USB that ea ch USB port provide 0.5A
to USB device, please use with extra power-provided USB device if
the USB device needs more electricity.
> DVD
The Product supports external DVD Drive. (Current version supports
Lite-On DVD Drive)
> PC Media
Connect The Product to your PC using a Ethernet cable. By connecting
your PC to the Local Area Netwo rk, you can play the media files on the
remote PCs. Before you do so, please confirm the network settings
and file-sharing setup has been finished successfully. (See Chapter 3
for more information.)
Note: The limitation on the HD video content playback over the network:
The HD video quality may suffer when the video is streamed over the
network. This is caused by intranet environment limitations. As a
result, users might sometimes experience unsmooth video playback.
Therefore, we recommend a wired Intranet for best playback quality,
although the transmission over WiFi and PLC is supported.
> UPnP
UPnP (Universal Plug and Play) allows you to connect UPnP-enabled
devices (available on the network) and share their content with the
media player. When you enter UPnP application, The Product will
automatically detect the PCs inside LAN. Please make sure that your
PC supports Windows Media Player Version 11 and higher. Due to
compatibility issue, some PCs may not support UPnP.
> Playlist
22
Page 29
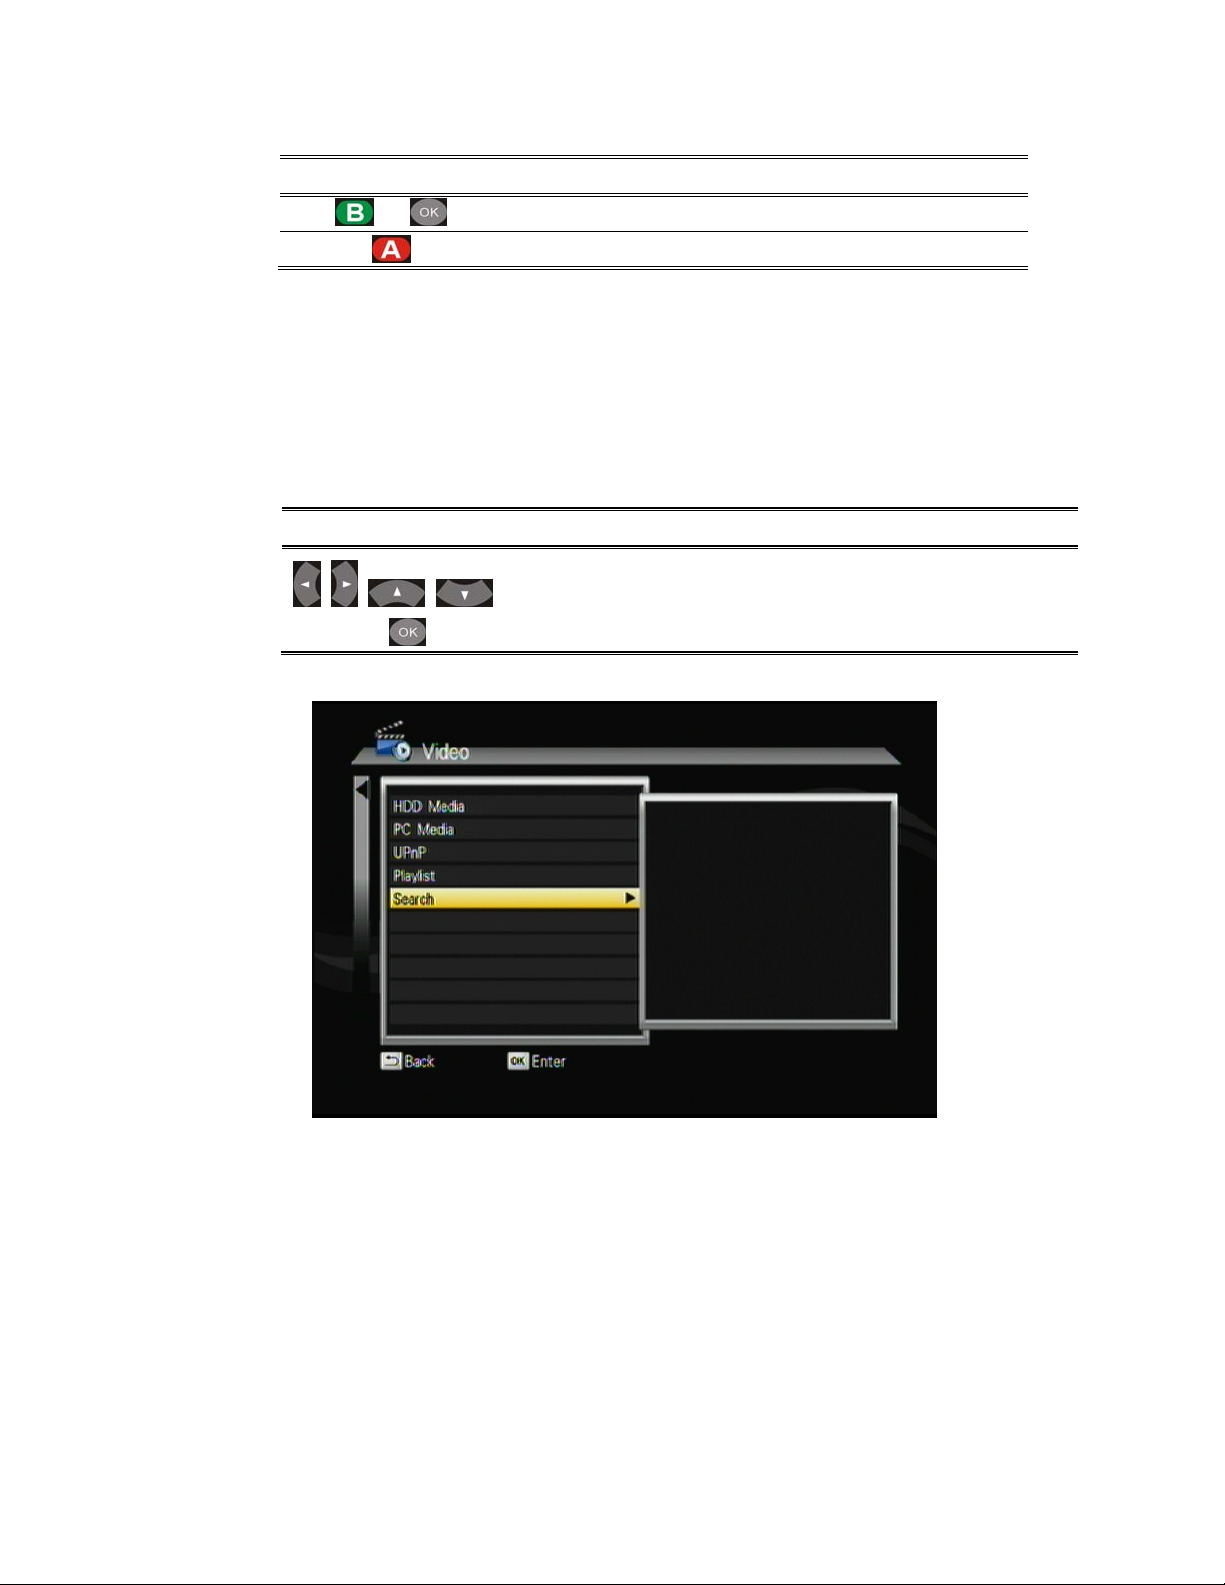
Playlist allows you select a sequence of music, photo and video files
stored on the HDD. You can configure any sequence of music, photos,
and video files to create a playlist.
Remote Description
+
Note: For the files added to the playlist, The Product will categorize the
media files with video/music/photo tags.
Playlist cannot be save except on USB media and do not allo w for
playback of networked media.
Select/cancel the files which will be added.
Rename/delete file.
> File Search
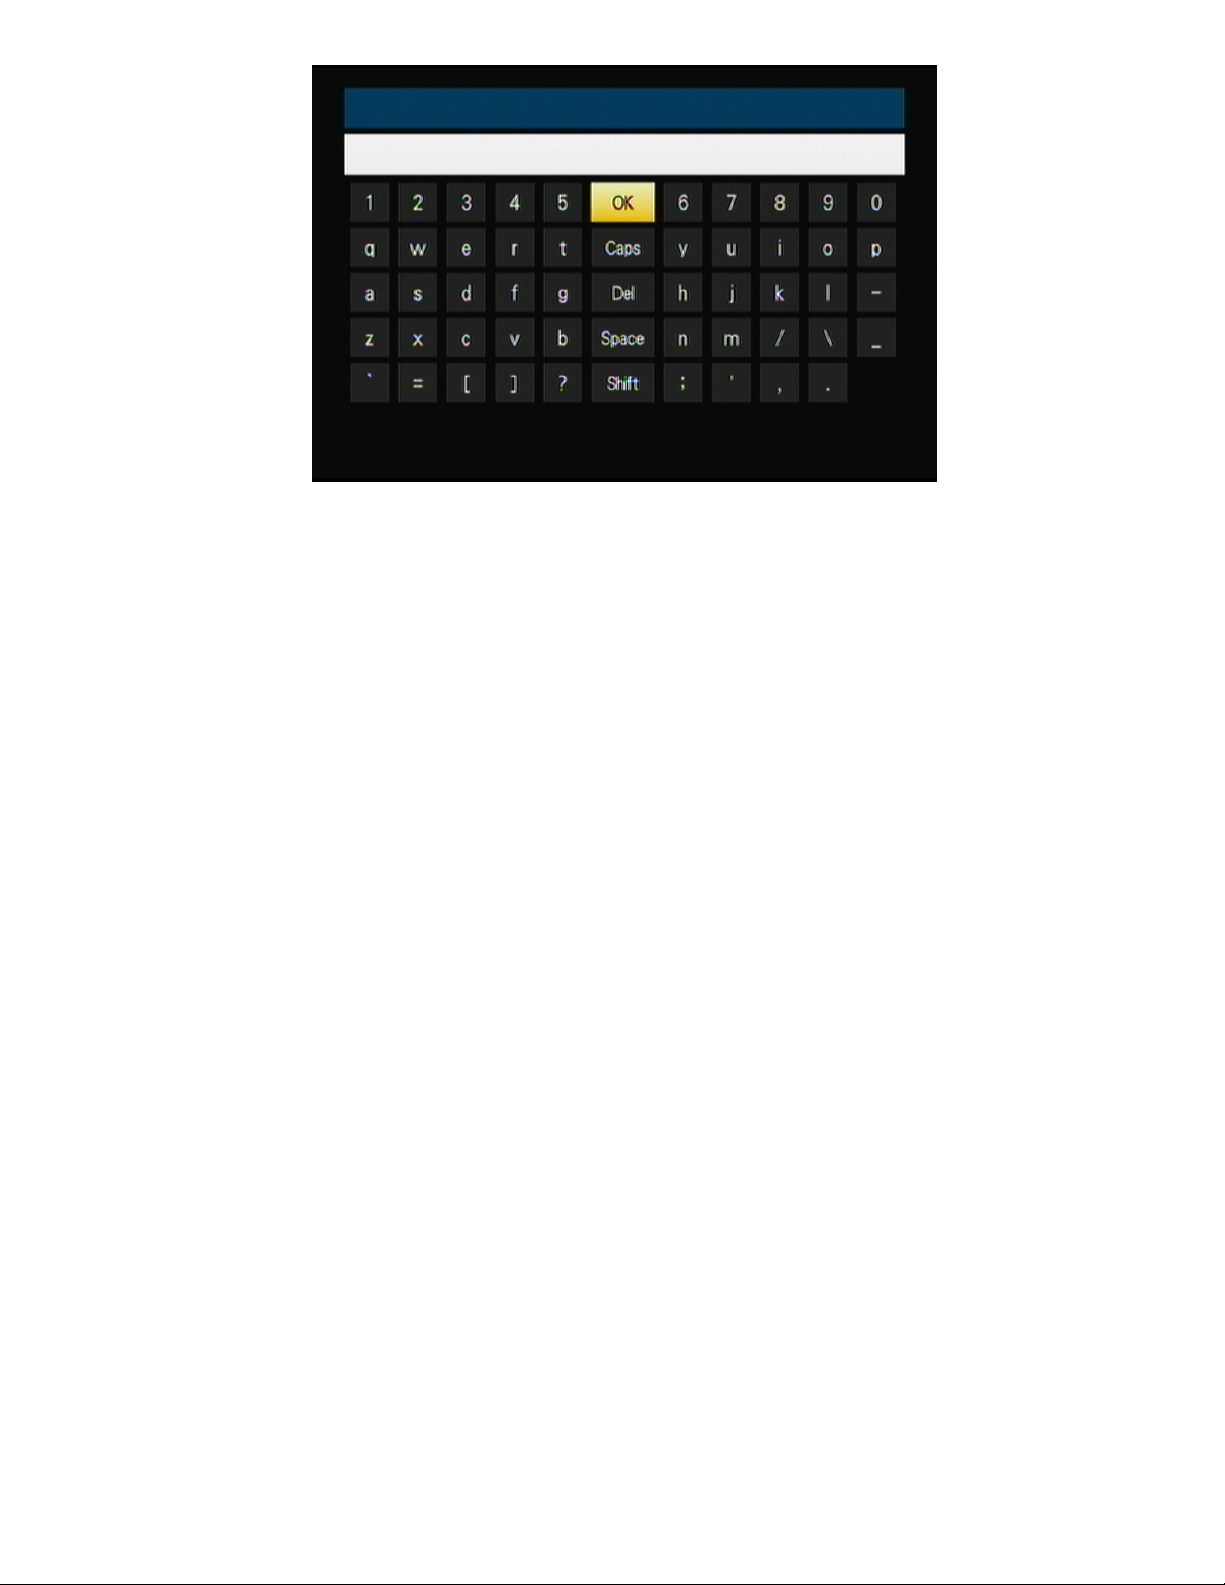
File search allows you to find the file you want by typing related key
word on the screen keyboard.
Remote Description
To access
+
Note: The function is only available for HDD Media.
Type the related keywords on the screen
keyboard for file search.
Video, Audio, Photo on the main menu.
23
Page 30
24
Page 31
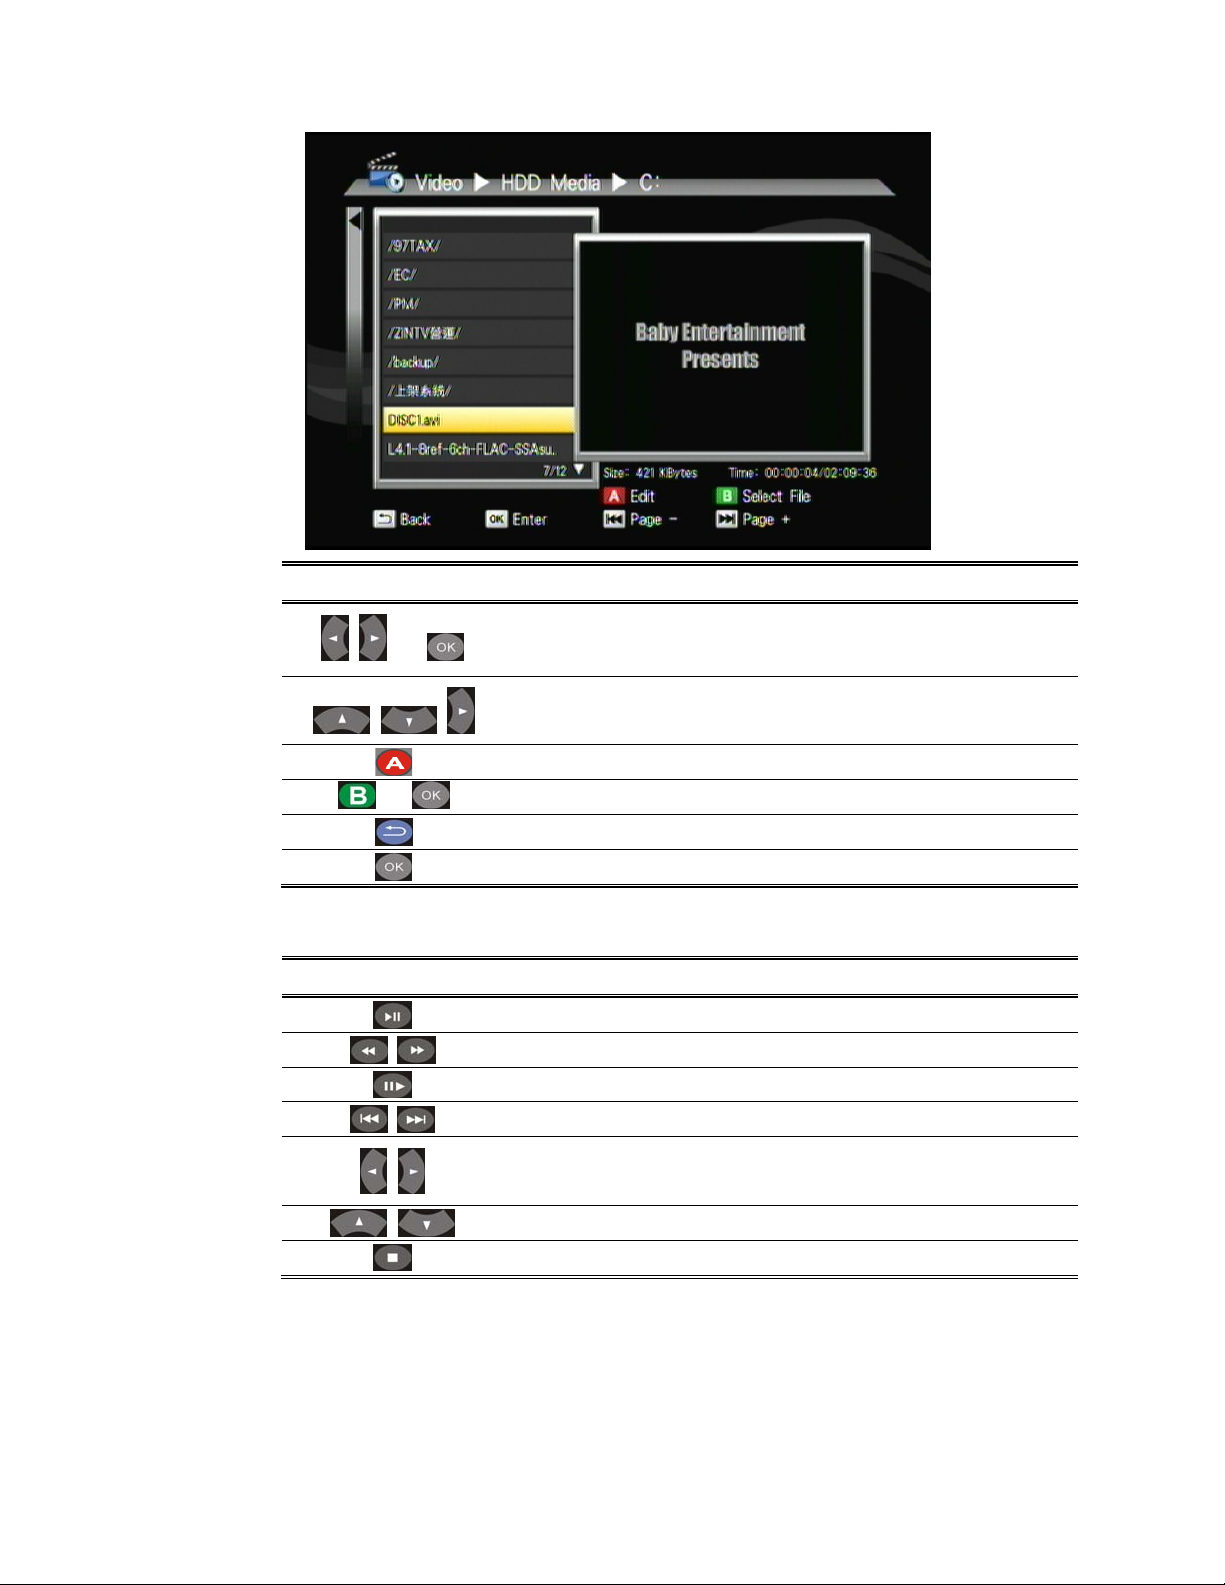
Video Playback
Remote Description
To access
Video on the main menu.
+
Navigate the media file you want to play. The preview
+
window will show the highlighted video.
Rename /Delete file.
Add selected file to Playlist.
Return to previous display.
Full screen mode.
Full Screen Mode
Remote Description
Play/pause selected file.
Rewind/Forward
Slow motion.
Return to previous file. / Go to next file.
To adjust the size of the subtitle.
To move the position of the subtitle
Stop playback and leave full screen mode.
25
Page 32
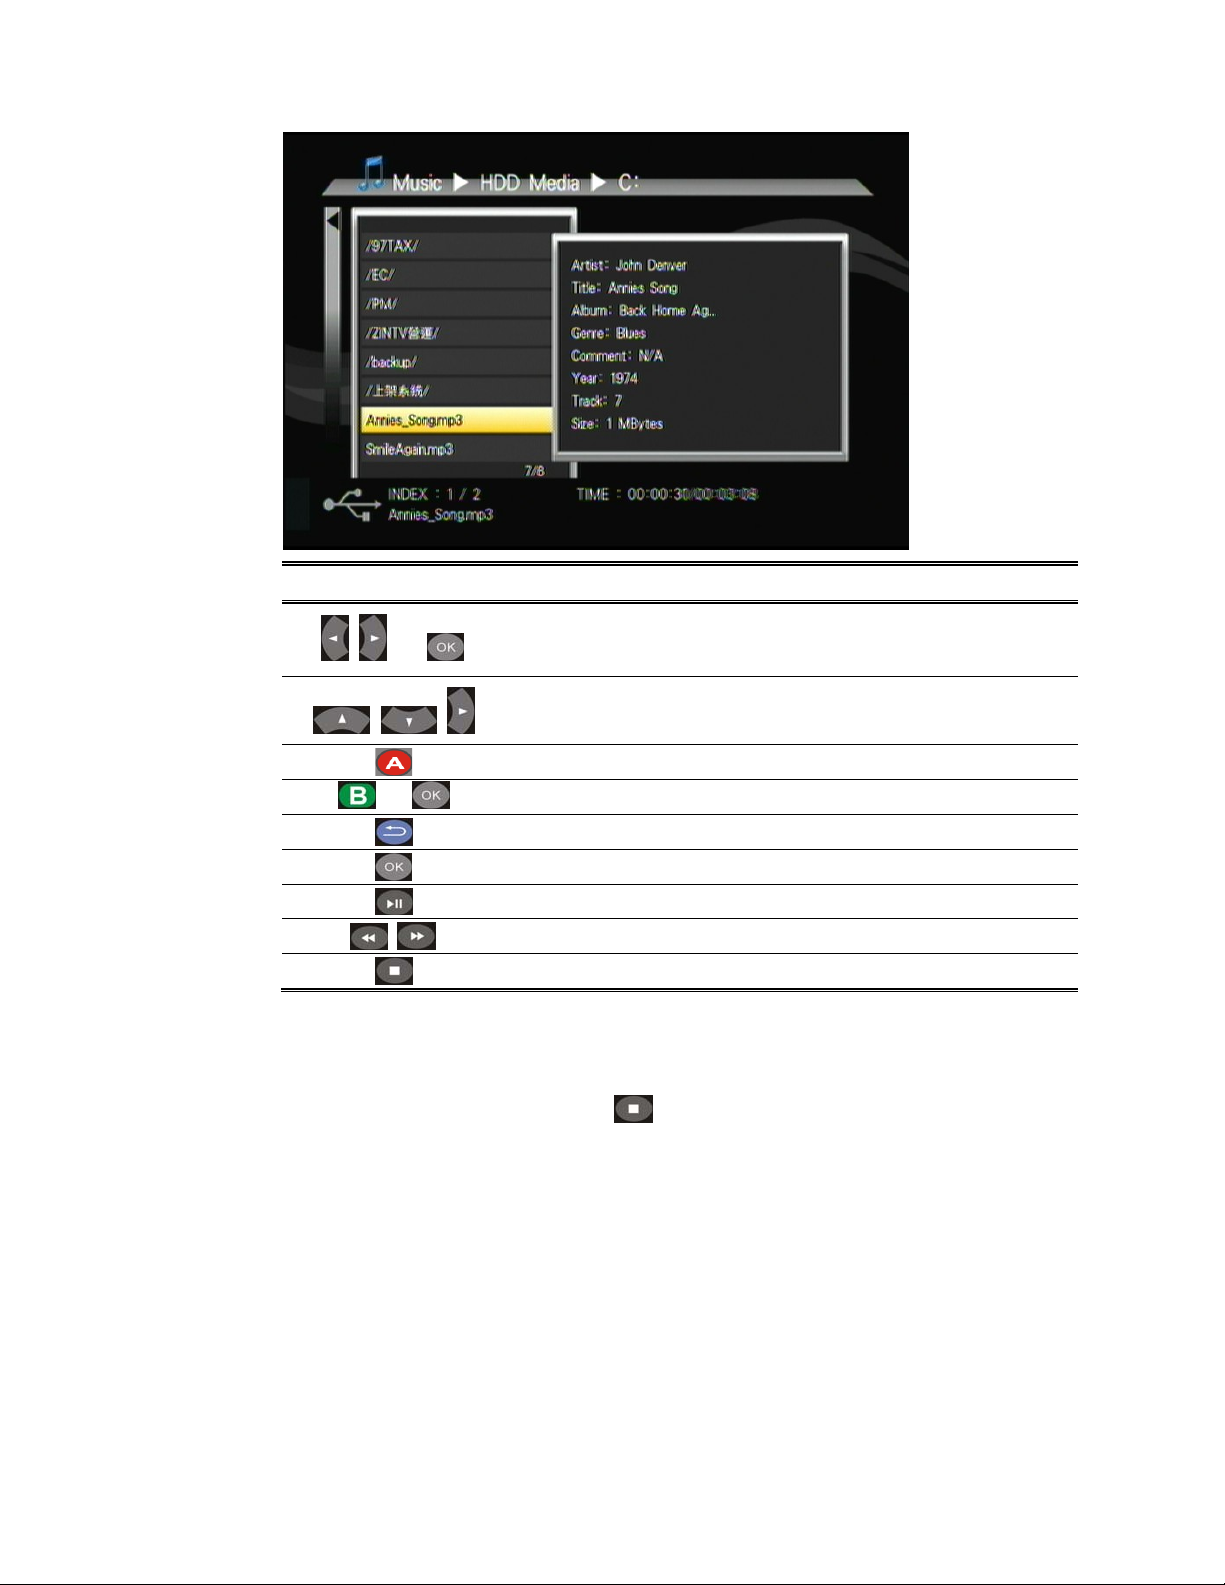
Music Playback
Remote Description
To access
Music on the main menu.
+
Navigate the media file yo u want to play. The preview
+
window will show the file details of highlighted file.
Rename /Delete file.
Add selected file to Playlist.
Return to previous display.
Play selected file.
Play/pause selected file.
Rewind/Forward
Stop playback and return to the previous display
PS Music will continue playing as the background music when you leave
MUSIC PLAYBACK menu. Press
to stop playing.
26
Page 33
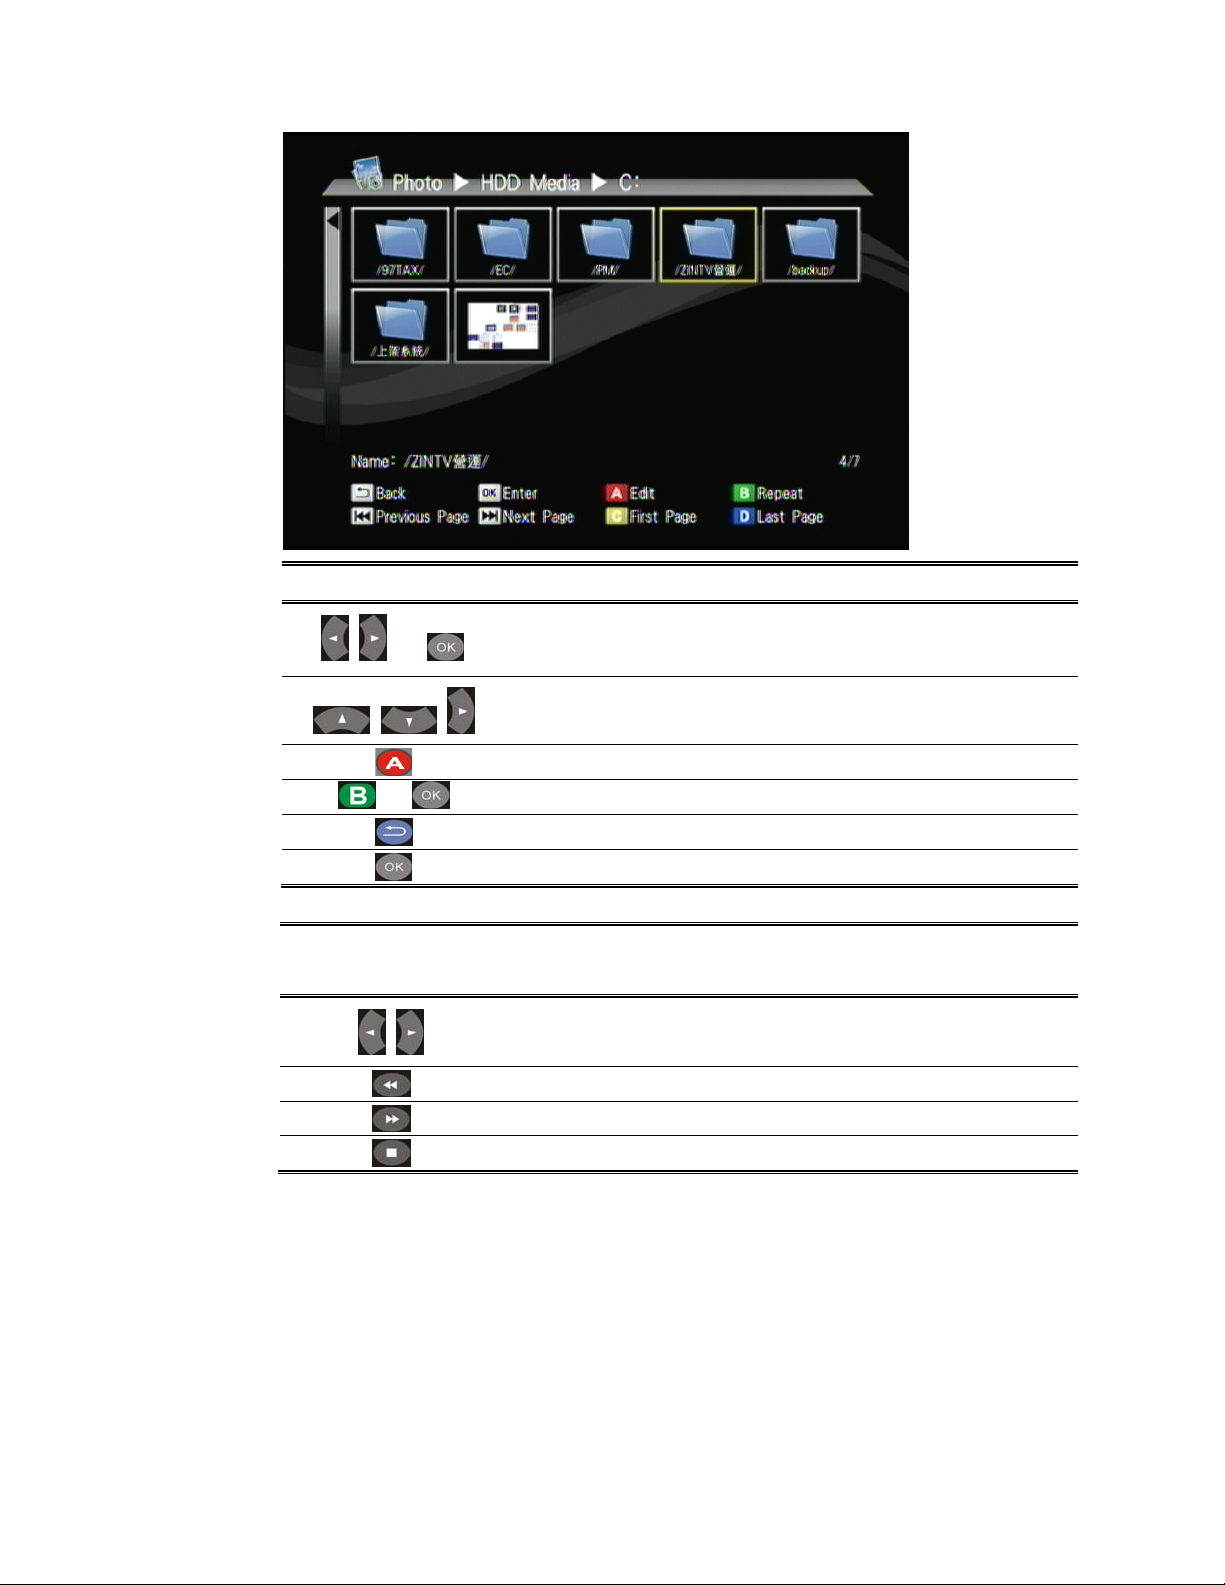
Photo Playback
Remote Description
To access
Photo on the main menu.
+
Navigate the media file yo u want to play. The preview
+
window will show the file details of highlighted file.
Rename /Delete file.
Add selected file to Playlist.
Return to previous display.
Full screen mode.
Full Screen Mode
Remote Description
Previous picture. / Next picture.
PS You can choose the preferre d slide show effects in Setup menu. If you’d
like to turn off the function, please enter Setup > Other> Transition
Effect.
To add background music to the slide show, simply add the music file(s) to
the same photo folder. Otherwise, there will be no background music when
viewing the slideshow.
Rotate the viewing picture counterclockwise
Rotate the viewing picture clockwise.
Leave full screen mode.
27
Page 34
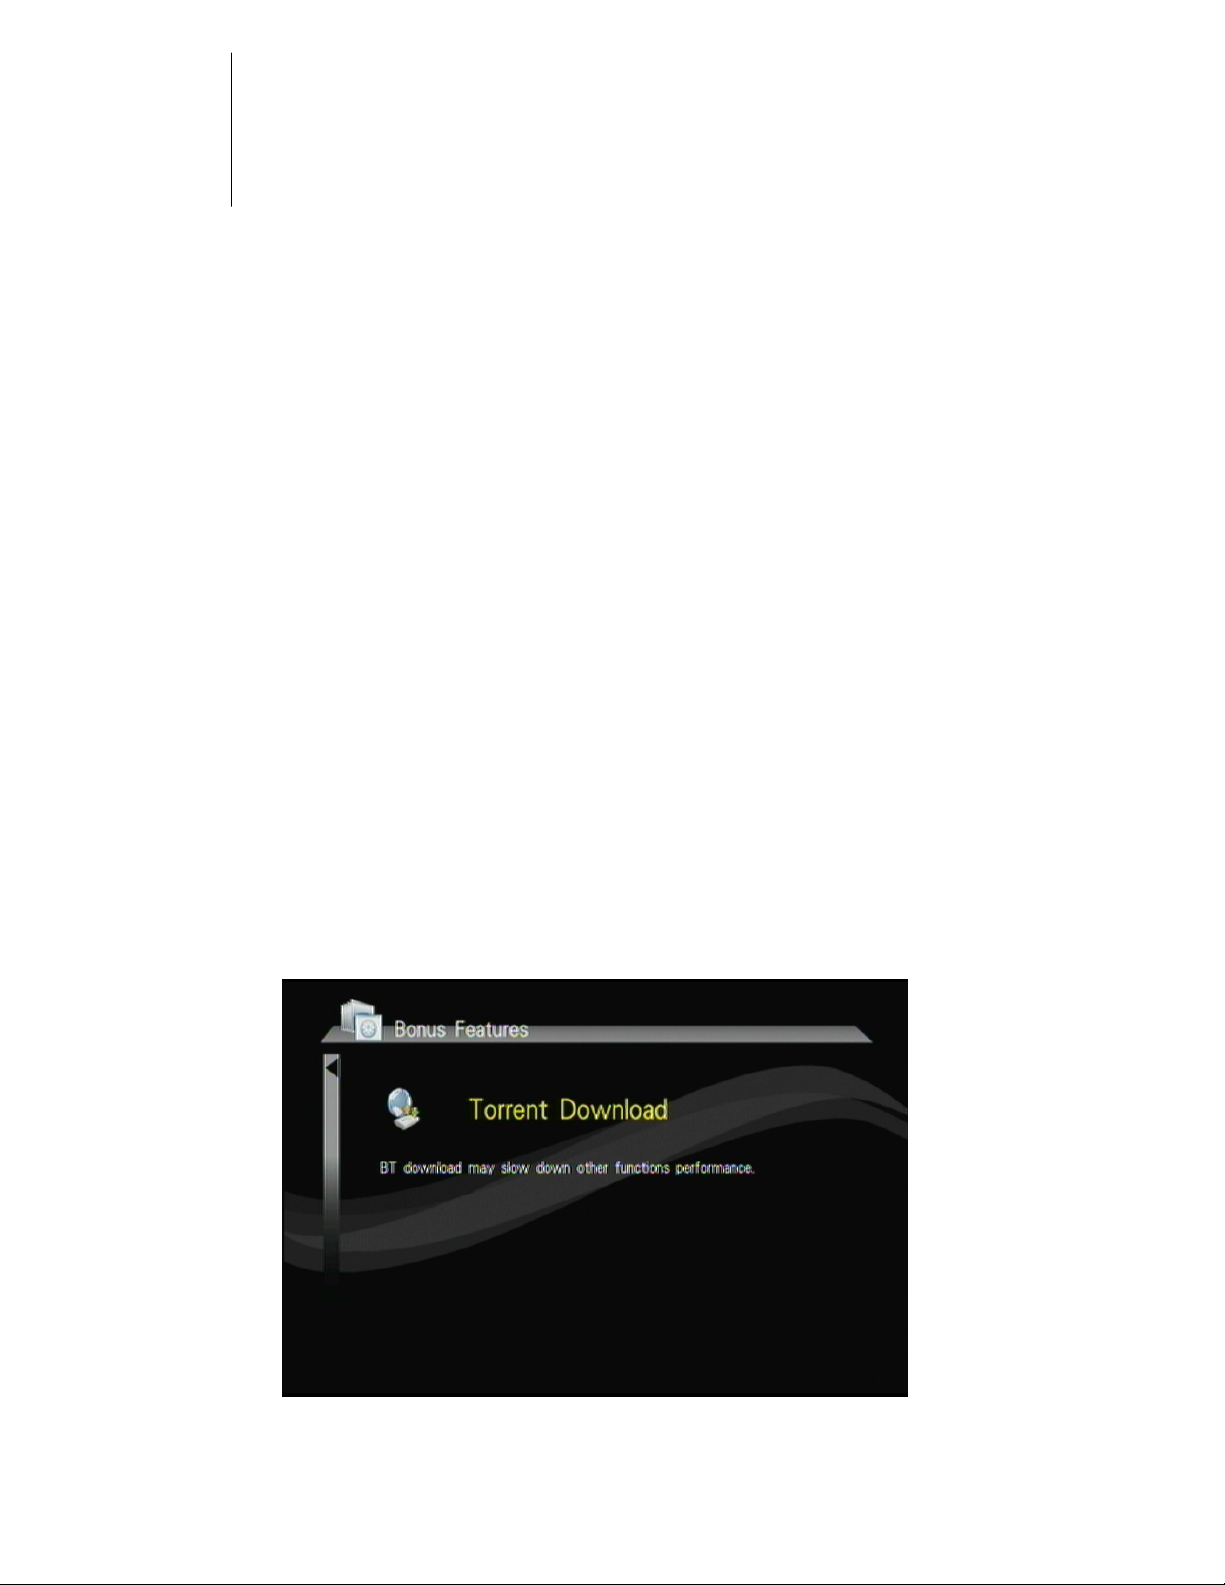
5 Bonus Features
Torrent Download
To activate this feature, please make sure:
The Product is connected to the network;
The network is properly set up. For more information on this part,
please refer to “Internet Connections” in “Installation” section,
and “Network” under “Setup Menu”.
Caution: Please do not download illegal files or contents.
Caution: Strongly suggests to use another HDD for Torrent Download, DO
NOT use the HDD that mixed important inf o rmation.
BitTorrent is the leading and the most common peer-to-peer
file-sharing communications protocol. The Product’ s bu ilt-in BitT orren t
client/engine allows this product to download media files to the
external USB device or to the remote PC. This BT download process is
computer-free. First, you need to prepare at least one USB hard drive
with at least 20GB of free capacity , in the format of NTFS or EXT-3, and
connect it to the USB port on the rear panel of the Product.
Step 1: Connect external hard drive device into The Product USB port.
28
Page 35
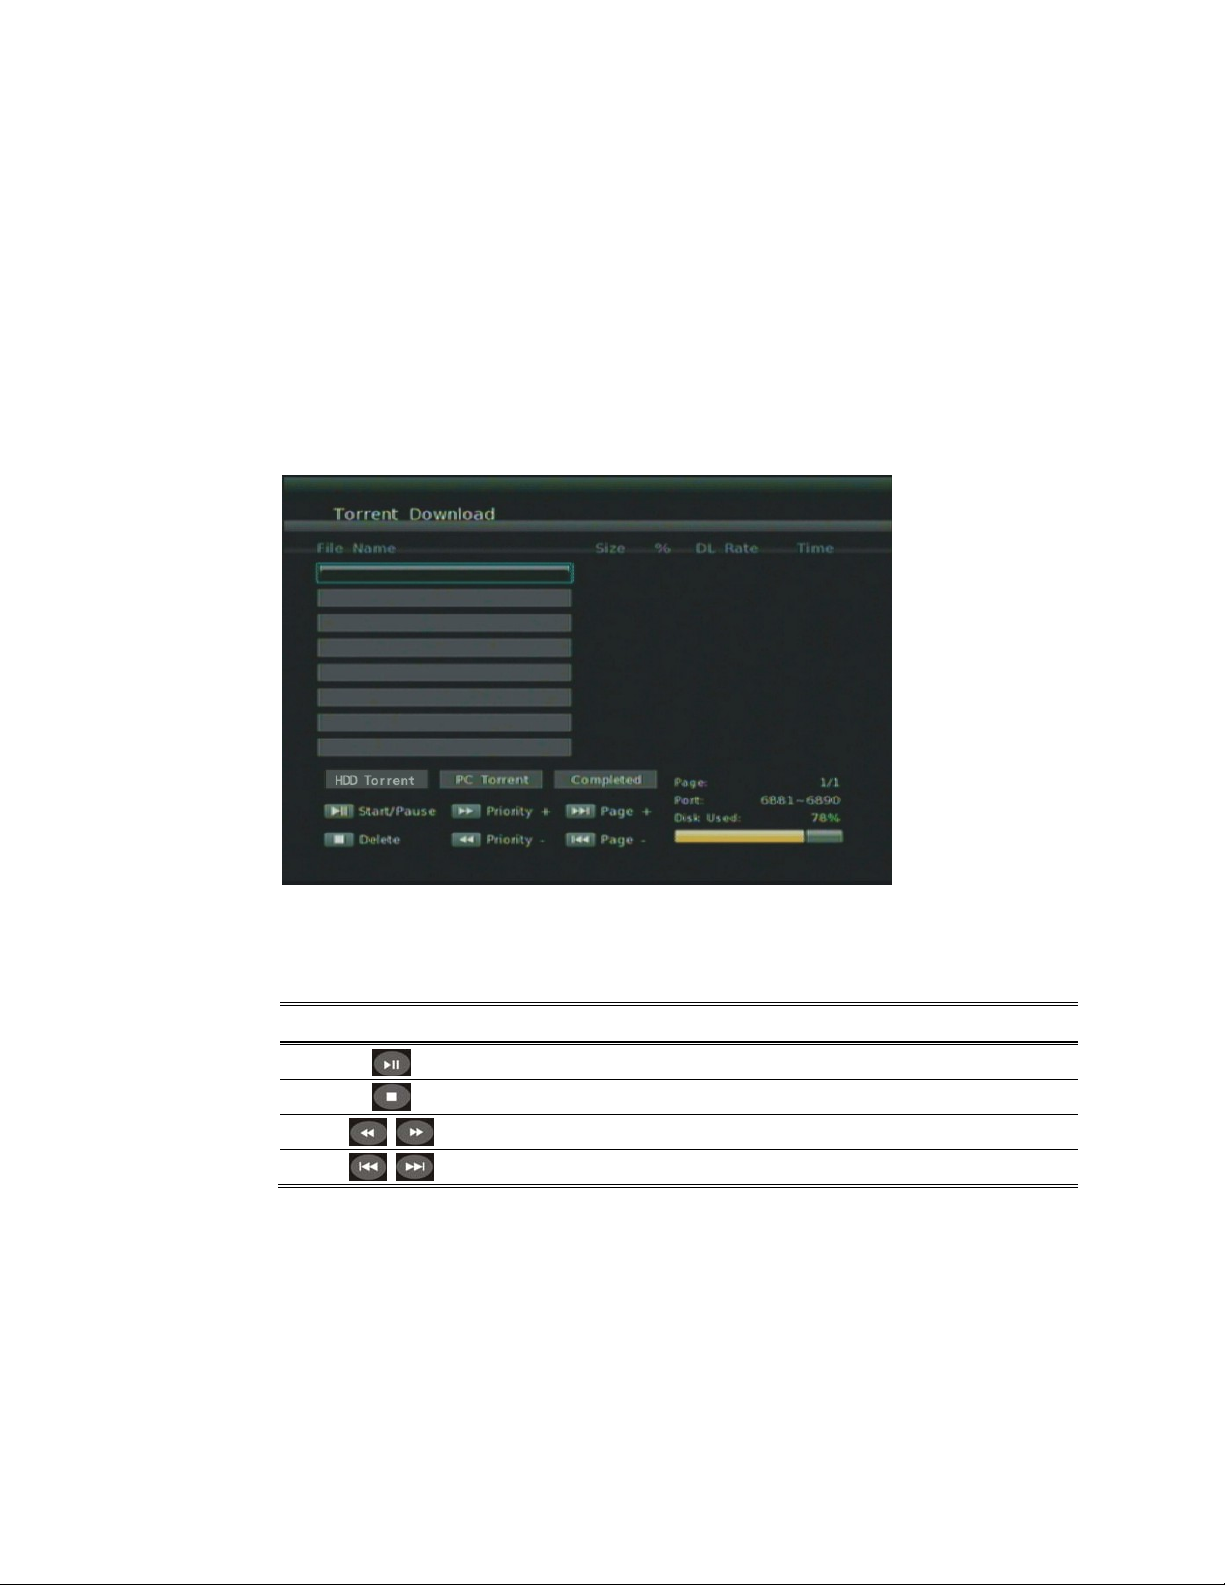
Step 2: Choose either from the external hard drive or the remote PC
that you can search and implant the .torrent seeds.
Note: Please make sure torrent seeds are already imported to the external
hard drive or on the network PC before downloading media files associated
with the .torrent seed s to your PC or USB devices. Files cannot be downloaded
if there is less than 10% of the capacity left on the USB drive.
Step 3: Select .torrent files to download, and then you can see the
download process page. T o ensure the system’s efficiency , only
3 download tasks will take place simultaneously, and
each .torrent file will be downloaded in sequence.
Note: In order to keep the system efficiency, the torrent download would be
suspended while playing media or tur ning on other services.
Remote
Flickr
The product supports Flickr viewing, you also can search photos you
want to see on this function.
Description
Start / Pause torrent files in scheduling.
Delete torrent files in scheduling.
Adjust the priority of torrent files in scheduling.
Previous page. / Next page.
29
Page 36
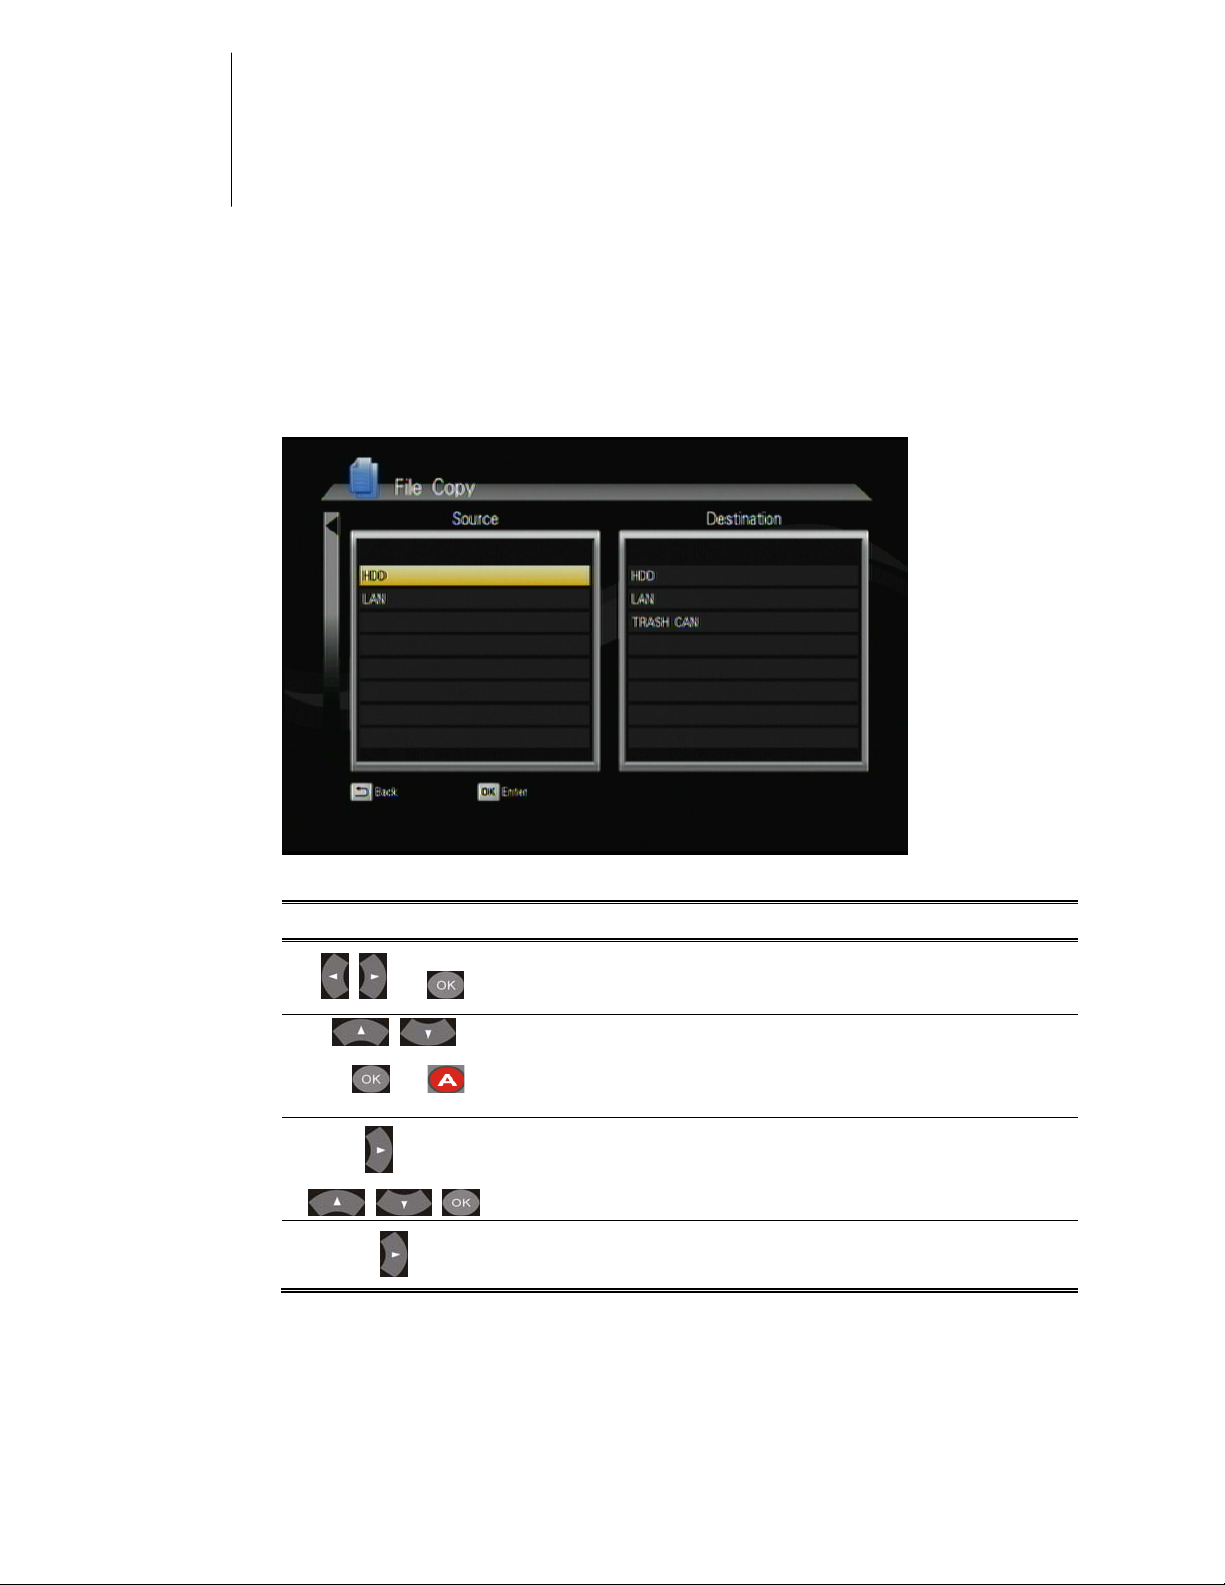
6 File Copy
This function is for files management that allows you to copy and move
files from the HDD device to another one or from the HDD device to
remote PC or from remote PC to the HDD device.
Remote Description
+
+
+
+
To access
To choose the source on source list, and select the
files.
To choose the destination on destination list.
Performing the copy / move function.
File Copy on the main menu.
30
Page 37
7 Setup
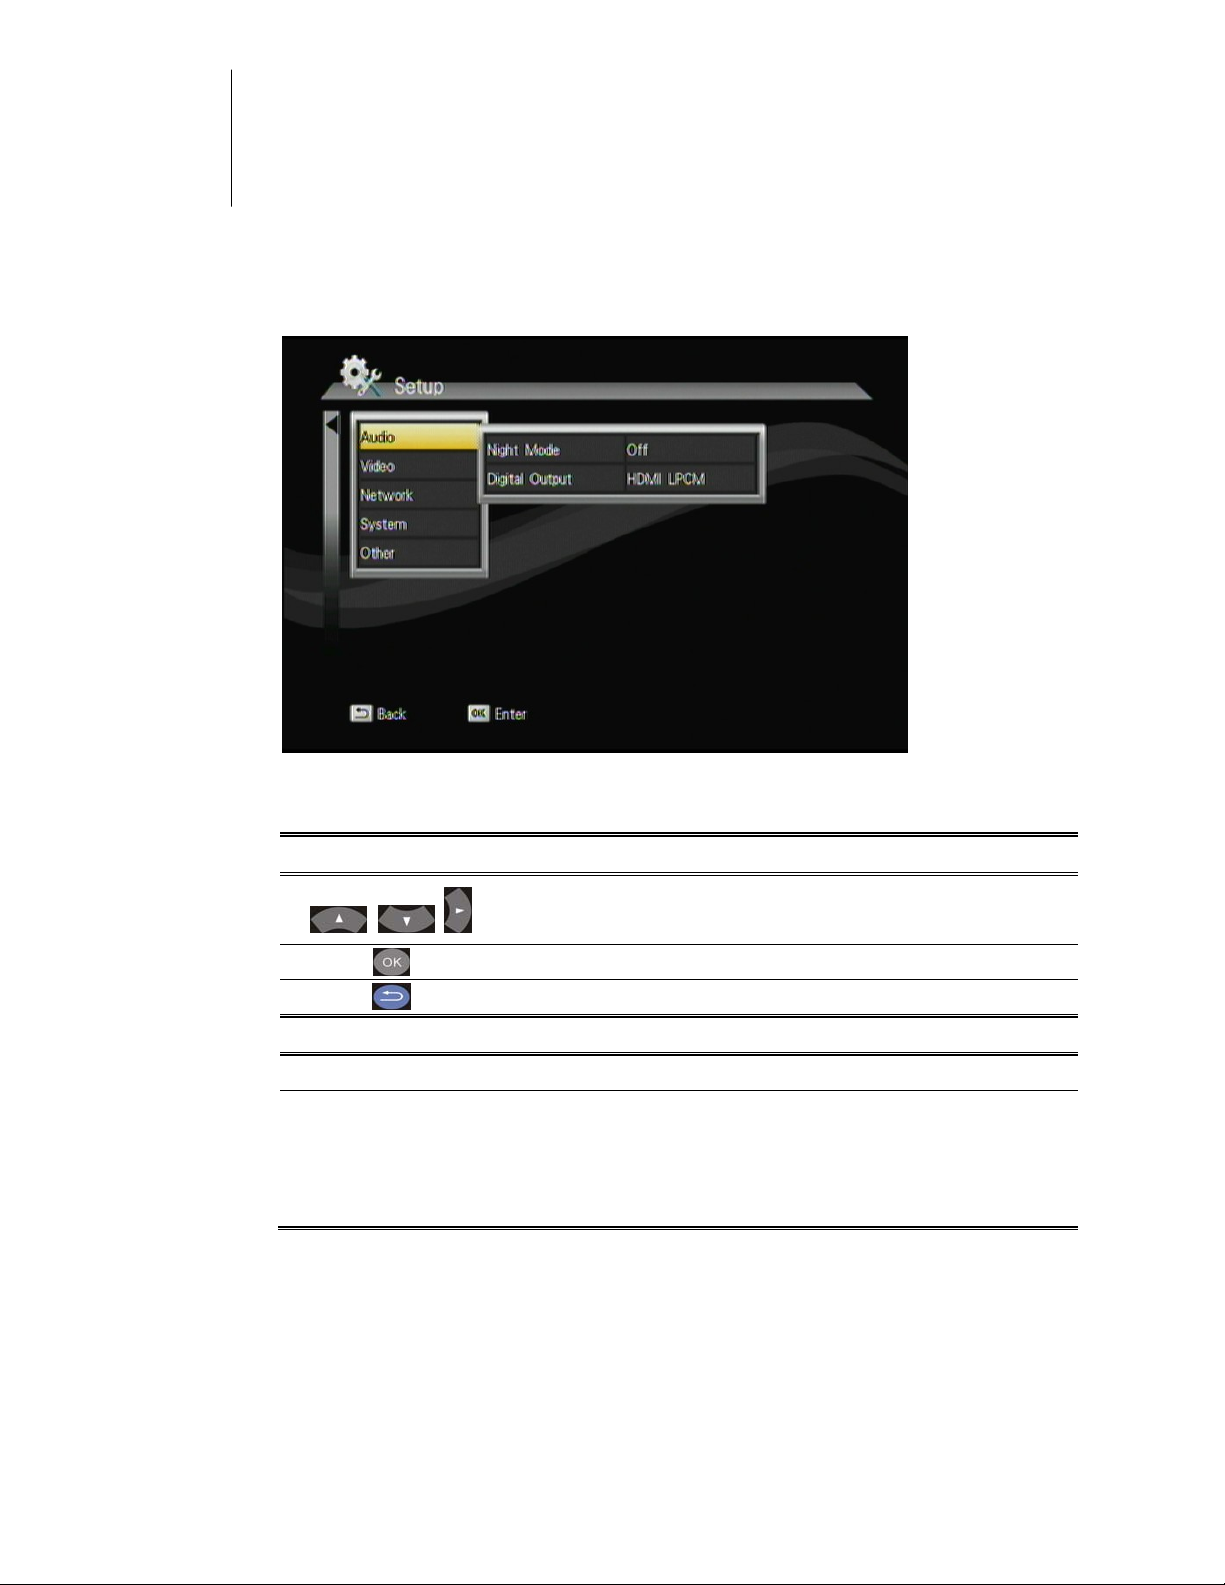
Audio
Remote
Item Options
Night Mode
Digital Output
LPCM / RAW Mode
LPCM mode means decode audio then down-mix to 2 CH output.
RAW mode means no audio decoding, just by pass through to amplifier for
audio decoding.
Description
Enter “Audio” setup menu.
Select the item for adjustment.
Confirm the change.
Return to previous display.
On/Off
HDMI LPCM
HDMI RAW
S/PDIF LPCM
S/PDIF RAW
31
Page 38
AUDIO SETUP-“Night Mode” (ak a Dyn a mic Range Control)
When the Night Mode is enabled the sound level of compatible audio
soundtracks will be dynamically compressed. Dynamic range control (DRC)
increases low-level audio content (such as the dialog in the movies),
making it easier to be heard at low volume levels while reducing the
intensity of higher-level audio content at the same time.
“When you're listening to movie dialogue late at night and have to turn
down the volume during lou d scenes, the dynamic range suffe rs and you may
miss some dialogue and other sounds. With the Night Mode on, you can
reduce the volume but still enjoy proper tonal balance and dynamic ra ng e.”
Video
Remote
Description
Enter “Video” setup menu.
Item Options
Aspect Ratio
Select the item for adjustment.
Confirm the change.
Return to previous display.
Pan Scan 4:3
Letter Box 4:3
Wide Screen 16:9
Full Screen
Resolution
HDMI Auto
480i
576i
480P
576P
720P 50HZ
720P 60HZ
1080i 50HZ
1080i 60HZ
1080P 50HZ
1080P 60HZ
32
Page 39
System
Remote
Description
Enter “System” setup menu.
Item Options
Menu Language
Select the item for adjustment.
Confirm the change.
Return to previous display.
English/ Traditional Chinese/ Japanese/ Spanish/
French/ German/ Italian/ Russian/ Simplified
Chinese/ Swedish / Polish/ Romanian/ Greek/
Thai
Subtitle Encoding
Unicode(UTF8)/ 簡體中文(GBK)/ 繁體中文(BIG5)/
Japanese(S-JIS)/ Western/ Turkish/ Central
European/ Greek/ Cyrillic/ Hebrew/ SE European.
System info
Version/ BOX ID/ Customer ID/ MAC / IP
Address/ Subnet Mask/ Gateway/ DNS
Software Update
Online Update
USB Update
Default Setting
Cancel/OK
Other
Remote
Item Options
Resume Play
Slide Show Timer
Transition Effect
Background Music
Screen Saver
Movie Preview
Description
Enter “Other” setup menu.
Select the item for adjustment.
Confirm the change.
Return to previous display.
Off/On
Off/2,5,10,30 Seconds/1,2 Minutes
Off/Cross Fade/Left to Right/Top to
Bottom/Waterfall/Snake/Dissolve/Strip Left
Down/All Effect Shuffle
Off/On
Off/On
Off/On
33
Page 40

8 Troubleshooting
The following reference list represents situations that you may
encounter, and methods for remedy. Please refer to this checklist prior
to contacting qualified service personnel. You can also visit the FAQ
page on www.brite-View.com
Symptom
No picture is displayed.
Check the power cord connection. Or connect
the power cord to another power outlet.
Are the VIDEO/ AUDIO cables or HDMI Cable
loose or disconnected? Make sure one of
connections is correct.
T ry the “SO URCE” b utton o n the remo te cont rol
of the external display/ TV, to select the correct
input source.
Remedy
When entering “PC Media”
menu, the available PC list is
not displayed.
On “USB Media” menu under
the main menu, no USB
device is searched.
The BT multimedia files can’t
be downloaded.
Check your wired/ wireless connection to make
sure that it’s working properly. Use an Ethernet
LAN cable to connect from the Network jack of
the Product to the network router or Access
Point. Or check the setting between your
external USB wireless dongle and IP sharing.
Check your Network Setting of the Setup menu.
Check the setting on the shared folder/file on
your computer.
Check USB device is already firmly connected.
Check the format of your USB drive: is it in
NTFS/EXT -3 format?
For BitTorrent, users need to set up port
forwarding on the TCP range 6881-6890 of
Access Point or IP sharing.
Your Internet bandwidth will limit BT download
speed
BT is a peer- to-peer download technology. It
requires more people or torrents to share the
files at the same time.
34
Page 41
35
 Loading...