

BriteLyt Rapid 829/500CP 1
\
USER MANUAL / INSTRUCTIONS
Rapid 829/500CP Multi Fuel Lantern
REV 4.3 0801_13
Rapid 829/500CP Multi-Fuel Lantern
Lantern Master Diagram
Spare Parts/Tool Kits
Lantern Parts Diagram
Warranty / Tech. Support
Prior to starting your BriteLyt
Step by Step Lighting Instructions
Shutdown Procedure
Storage Procedure
Tips, Troubleshooting / Warranty Reg.
EZ-Pump Instructions
EZ-Cook Instructions
Mutli-Fuel Operation
2
3
4
6
7
8
12
12
13
14
15
16
For a video tutorial on how to use your lantern
or troubleshooting suggestions visit:
www.BriteLyt.com/howto
BriteLyt Rapid 829/500CP 1
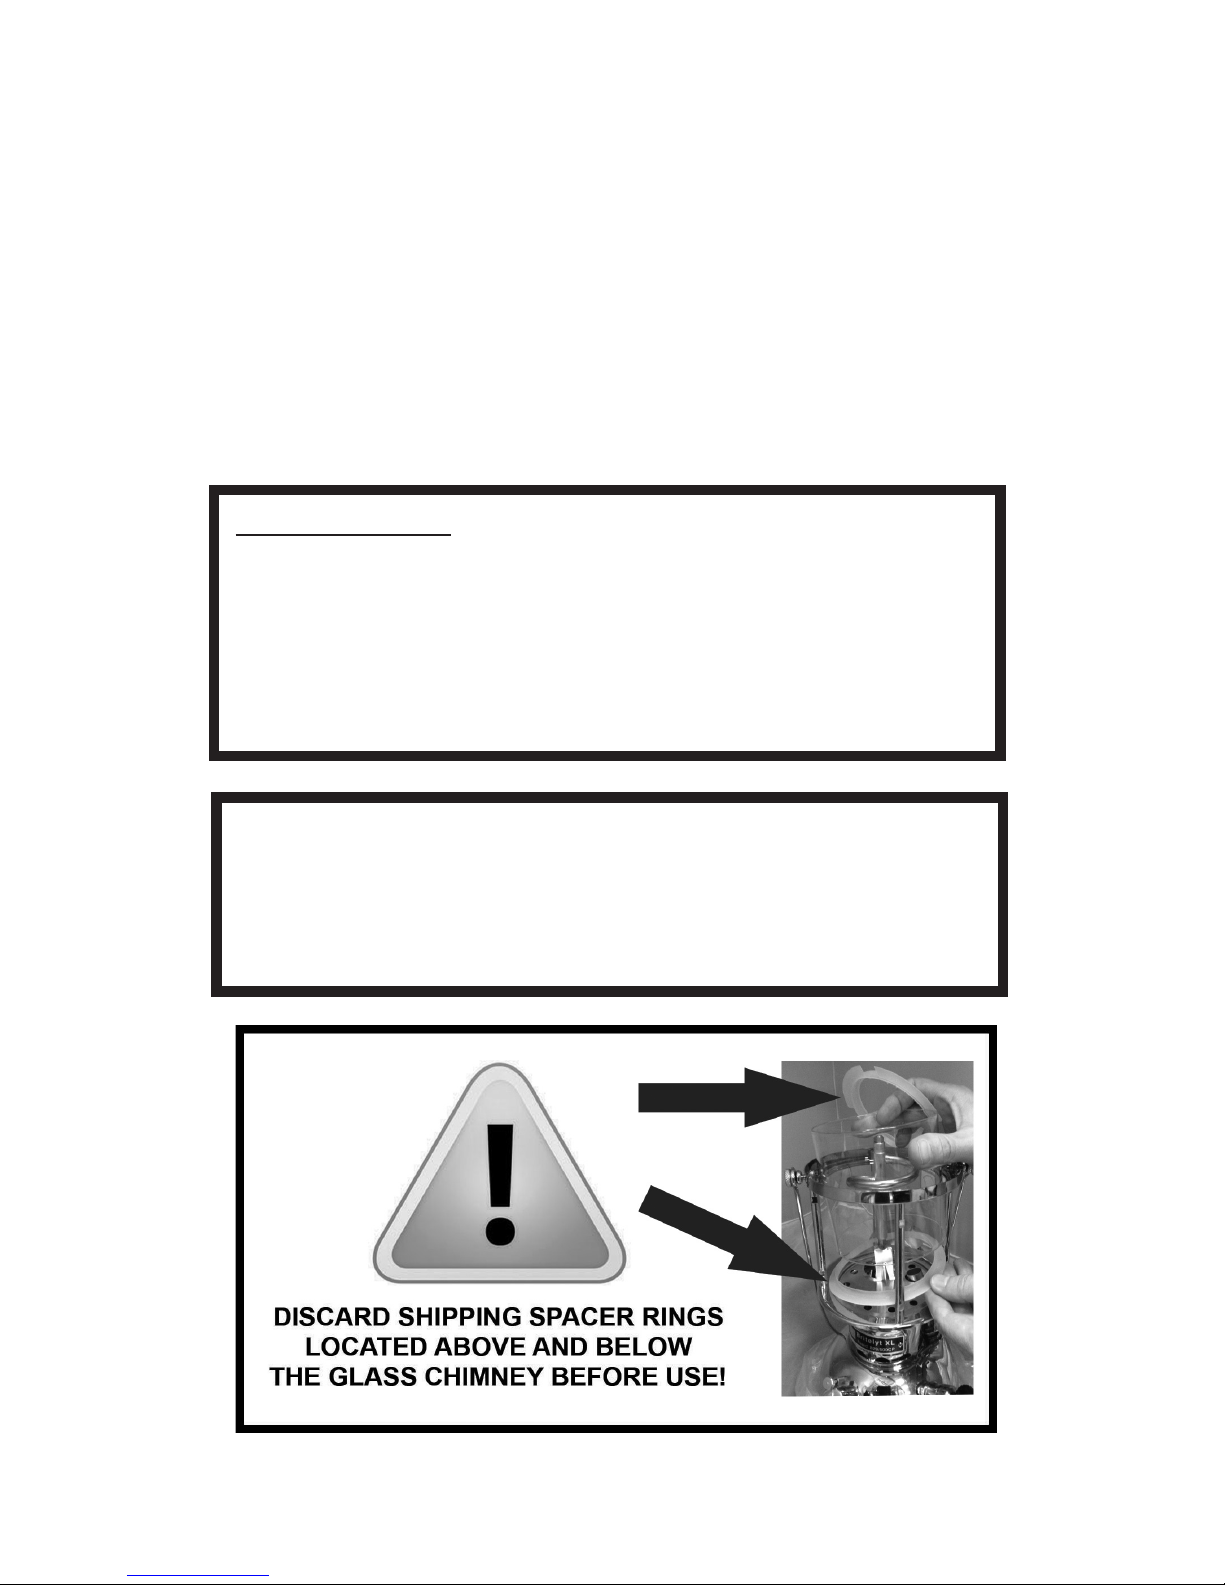
IMPORTANT:
Read this manual in its entirety. BriteLyt assumes no
responsibility for the use of your lantern outside of
normal operating conditions. It is very important that
you understand all topics covered in this manual before attempting operation or fuel use of any kind.
Welcome to the BriteLyt Family!
Some sections of this manual reect optional accessories that are not shipped standard with every lantern. To purchase accessories, visit your local retailer
or www.britelyt.com.
Congratulations, on your choice of the new
BriteLyt, Multi-Fuel Lantern! Many years of passion
and lantern know-how have gone into creating the
most functional pressurized liquid-fuel lantern ever!
On behalf of all of us at BriteLyt congratulations and
we hope you enjoy your new lantern for many years
to come!
2 BriteLyt Rapid 829/500CP
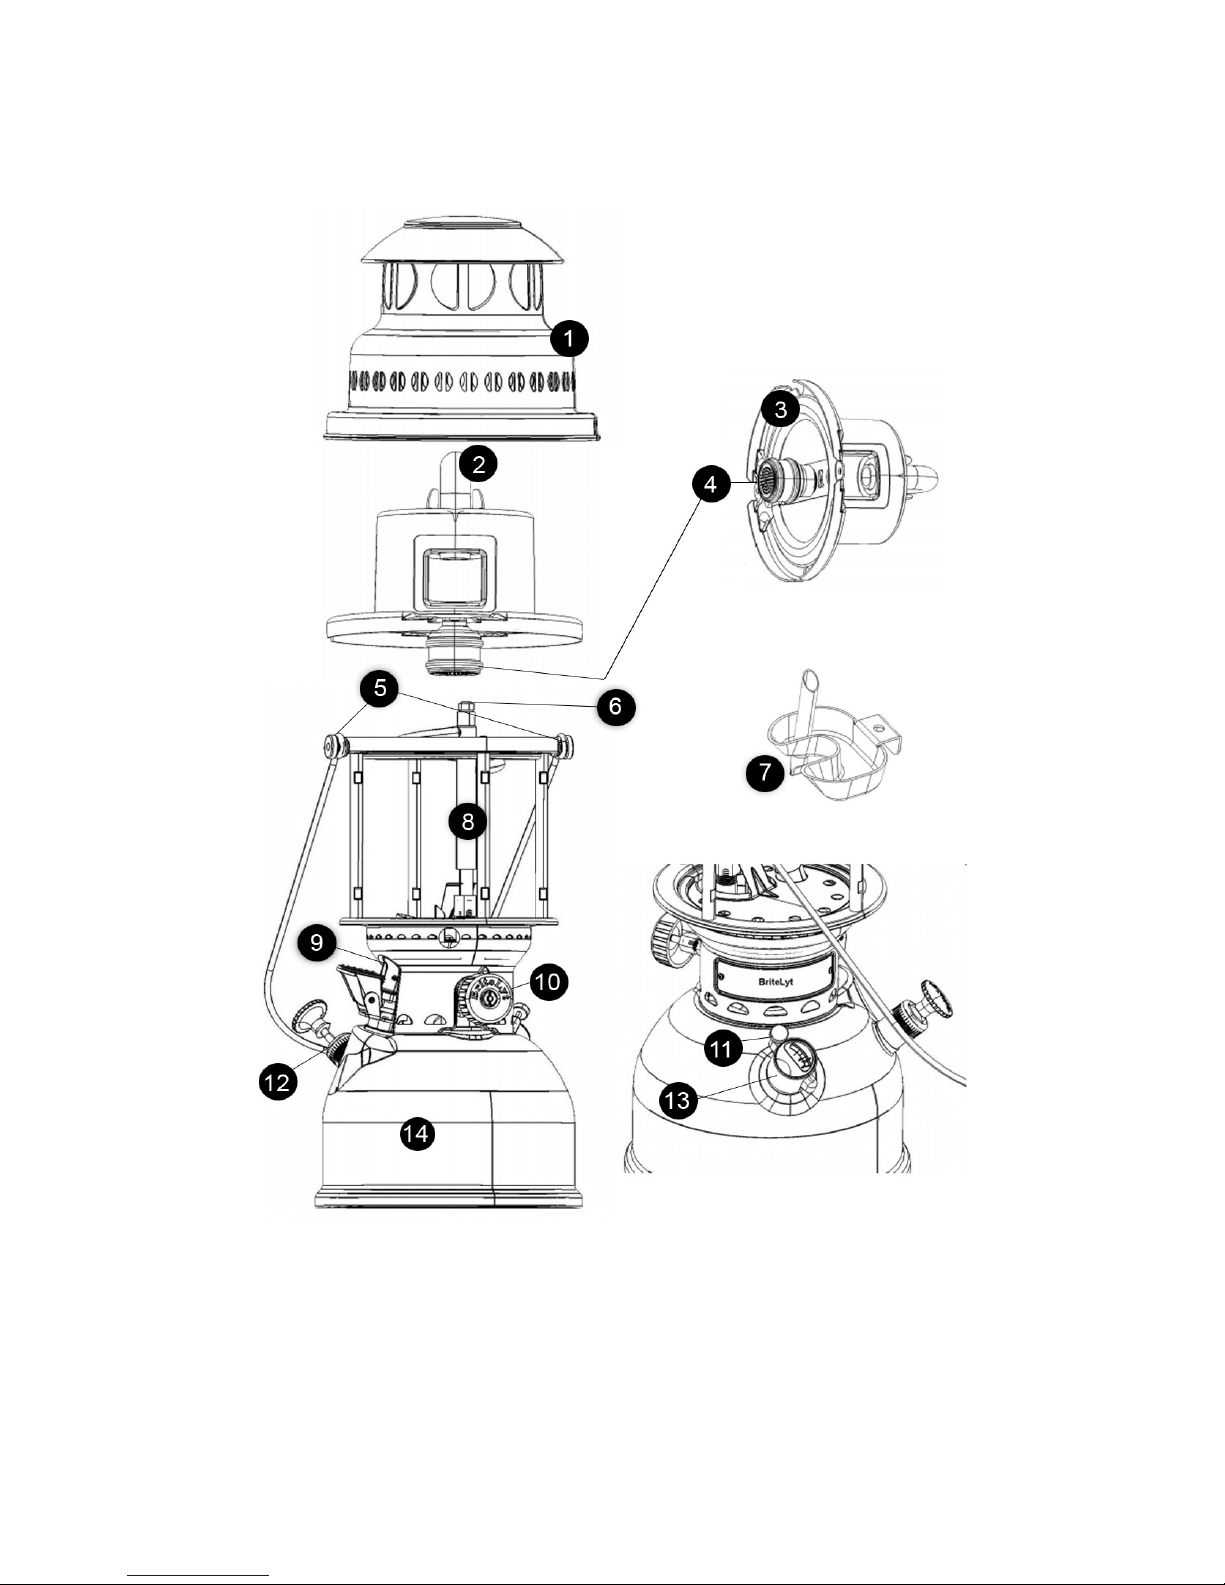
8) Carburetor
9) Rapid Pre-Heater
10) Fuel Dial
11) Bleeder Screw
12) Hand Pump
13) Pressure Gauge
14) Fuel Tank
Lantern Master Diagram
1) Hood/Cover
2) Regulator Screw
3) Hood Inner Casing
4) Non-Ceramic Burner Assembly
5) Handle/Reector Screws
6) Needle and Spray Nozzle
7) Preheat Cup
BriteLyt Rapid 829/500CP 3
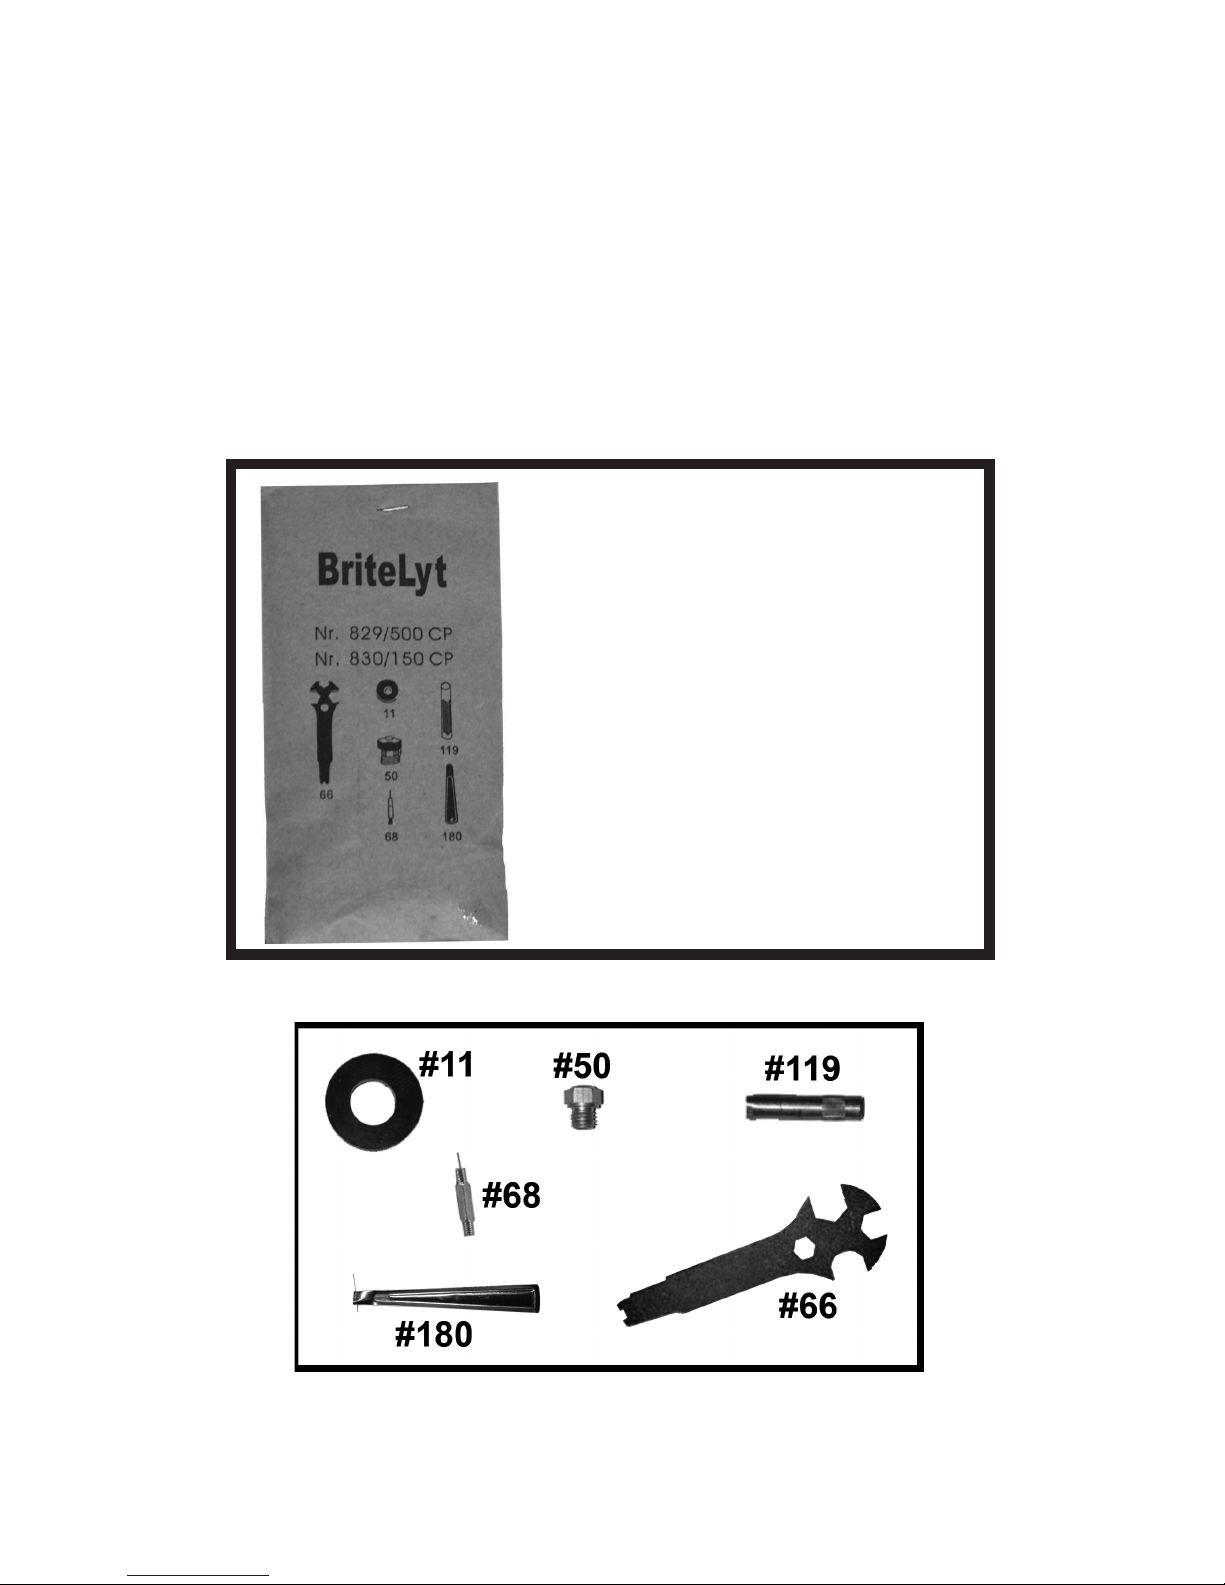
Parts / Tools Packet
#66 Spanner with Gauge
#11 Washer for Filling
#50 Nipple
#68 Needle
#180 Cleaning Needle for
Pre-Heater
#119 Key for Needle
Also included in your lantern
box will be an Alcohol Filling
Bottle #67, Fuel Filling Funnel
#165 and (12) Mantles.
Parts Kits
Your BriteLyt lantern is shipped with a parts/tools kit packet. Be sure
to refer to the lantern parts listing on page 5 for parts descriptions.
These tools and parts will need to be accessible as you begin to set
up your new lantern for its rst use. Should you have any questions
please call us at (727) 451-7020 or visit www.BriteLyt.com.
4 BriteLyt Rapid 829/500CP
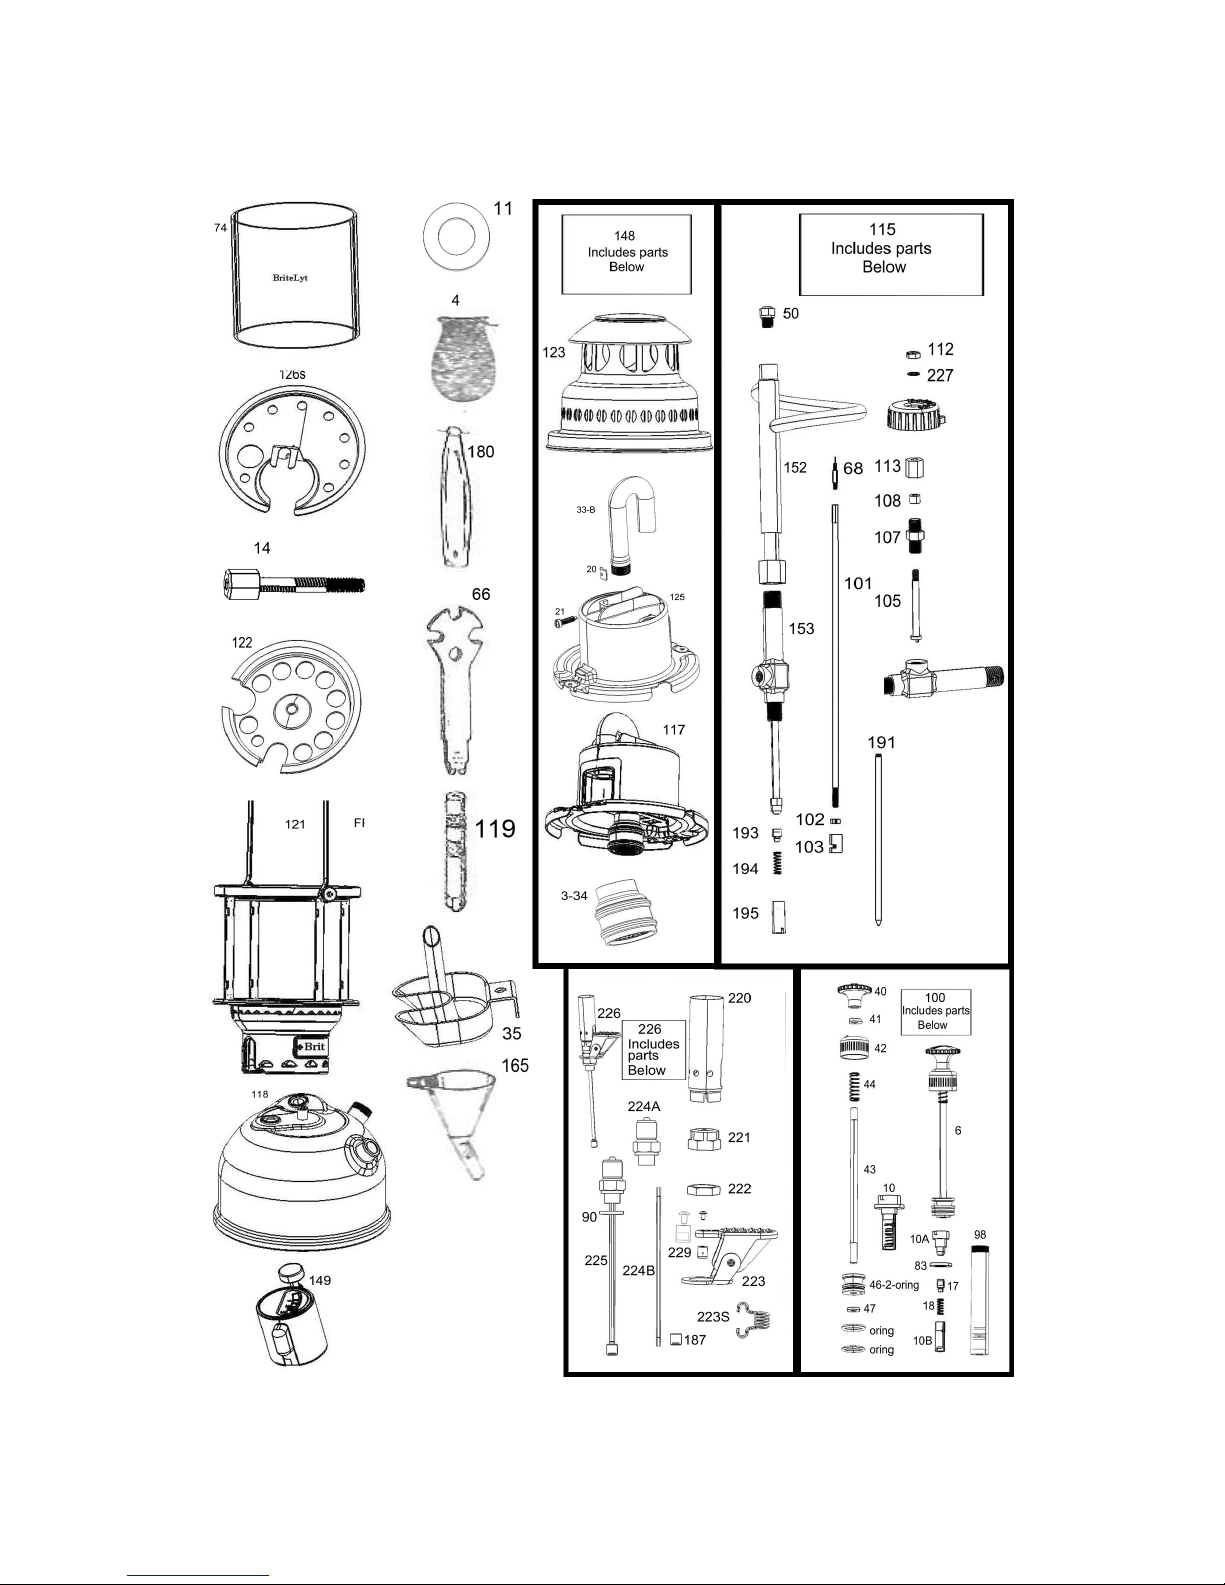
Lantern Parts Diagram

BriteLyt Rapid 829/500CP 5
3-34
4
6-2-O-Ring
10
11
13
14
17
18
20
21
33-B
35
40
41
42
43
44
46-2-O-Ring
47
50
66
67
68
74
83
90
98
100
101
126s
102
103
104
105
107
108
111
112
113
114
115
117
118
119
121
122
123
125
148
149
152
153
165
180
187
191
193
194
196
220
221
222
223
224
225
226
227
229
Stainless Nozzle System
Soft Mantle 1 tie hole
Pump Piston Complete
Pump Valve Complete
Washer for Filling
Bleeder Screw for 149
Screw for 122
Check Valve Cone w/ rubber
Spring for Check Valve
Clip
Screw
Mixing Tube (HP)
Alcohol Heater Cup
Pump Knob
Fixing Disc
Cap for Pump Barrel
Pump Piston-Rod
Spring for Pump Piston
O-Ring Pump System
Pump Piston Nut
Nipple
Spanner with Gauge
Alcohol cup lling bottle
Needle
Glass Chimney/Globe
Valve Washer for 10
Lead Washer for Vaporizer
and preheating device
Pump Barrel
Complete Sys Pump
Conducting Rod
Heat Shield
Counter Nut for Connecting
Rod
Conducting Piece
Conducting Rod Complete
Excentre
Nipple for Wheel
Graphite Packing
Hand Wheel / On & Off Knob
Nut for Wheel
Sleeve Nut for Excentre
Excentre Complete
Vaporize Complete
Inner Casing Complete
Fuel Tank
Key for Needle
Frame with Name Tag
Center Bottom Plate
Hood with Top
Inner Casing
Complete Upper System
Filling Screw Gauge
Vaporizer Upper Part
Vaporizer Lower Part
Plastic Filling Funnel
Cleaning Needle for Rapid
Pre-Heater Device
Sieve for Rapid Pre-Heater
Device
Valve Bar
Valve Washer (Check Valve)
Valve Spring
Vaporizer Valve Complete
Flame Protecting Tube
Nipple for Rapid Pre-Heater
Nut for Nipple
Tip Complete
Connecting Piece for Rapid
Pre-Heater
Connecting Piece for Complete Pre-Heater (224, 90,
187)
Rapid Pre-Heating Device
Complete
Disc for Wheel Part 111 (On
& Off Knob)
Check Packing with Screw
for Rapid Pre-Heater
Lantern Parts Listing

6 BriteLyt Rapid 829/500CP
WARRANTY RETURN FORM
For regular online returns
Please visit www.britelyt.com/returns to get started.
BriteLyt Limited Lifetime Warranty
BriteLyt products are fully warranted to the original owner against defects
in materials and workmanship for the lifetime of the product. If a product
ever fails due to a manufacturing defect, even after extended use, we will
repair the product, without charge, or replace it, at our discretion. This
warranty does not cover damage caused by accident, improper care,
negligence, normal wear and tear, improper use, maintenance, storage,
or the natural breakdown of colors and materials over extended time and
use. Damage not covered under warranty will be repaired for a reasonable rate and a fee will be charged for return shipping.
For warranty evaluation, your product must be returned directly to the
BriteLyt Warranty Department. All shipping to Warranty must be prepaid and insured. BriteLyt cannot be liable for lost in-bound packages.
Products accepted for repair must be clean. Charges will be assessed
if cleaning is necessary. You must obtain authorization in order to have
your lantern processed for warranty repairs. Unauthorized returns to our
facility will be returned to sender.
BriteLyt’s limited lifetime warranty excludes mantles, glass
chimney/globe and if equipped, ceramic nozzles. Springs and
attachments are covered for a period of 12 months from the date of
purchase.
Your BriteLyt warranty requires you to register you lantern. Warranties
begin from the date of purchase, proof of purchase may be required in
addition to the serial number on the base of your fuel tank. Should you
have any questions regarding your lantern warranty call
Monday - Friday 9am-5pm (EDT) (727) 451-7020.
BriteLyt Technical Support
Should you require assistance or have question about your lantern or it’s
operation please feel free to reach out to us!
You can contact our lantern experts by email:
customerservice@britelyt.com or by calling us at (727) 451-7020.

BriteLyt Rapid 829/500CP 7
Prior to Starting Your BriteLyt
• Be sure to set the control knob to the “off” position (12 O’clock) before operating.
• Look lantern over for loose parts that may have shifted during transport.
• Ensure your mantles are not damaged. Damaged mantles must be
replaced prior to starting.
• Make sure that burner and other burning accessories are tightened.
• DO NOT USE INDOORS. Light your lantern in a well ventilated area
away from combustible or heat sensitive material.
• Your lantern has been designed to use multiple fuels. Burning of any
fuel other than kerosene may cause your lantern to burn and/or act
differently. Refer to page 15 for multi-fuel operation.
• Do not tip or turn lantern on its side or any other direction other than
vertical.
• Be sure not to place your lantern on delicate or ammable surfaces.
• Do not let your lantern burn unattended.
• Keep lantern away from children and never let children play with
lantern.
• Do not place anything on top of or over your lantern.
• While lantern is in operation touch only the fuel tank. You risk severely burning and injuring yourself by touching anywhere above the
tank.
• Allow lantern to cool for at least 30 minutes after use before attempting to touch, store or repair.
• Use the bleeder screw to release tank pressure after every use.
• Do not open pressure gauge assembly, add or remove fuel while
lantern is in operation.
• Do not look directly into the burning mantle.
• Do not inhale any exhaust being given off during lantern burning.
• Do not leave lantern in the “on” position when not in use.
• Always empty the fuel tank before storing your lantern.
• Keep Pre-Heater tube clean and clear at all times
• Never burn old or dirty fuel in your lantern.
BriteLyt assumes no responsibility or liability due to
improper use.
Using anything other than BriteLyt brand replacement parts
will result in the expiration and cancellation of your lantern’s
factory warranty.

8 BriteLyt Rapid 829/500CP
Lighting your BriteLyt Lantern
Before lighting your BriteLyt lantern read this manual
through in its entirety. Note all warnings and safety
cautions. Ensure you comprehend all instructions
before beginning. Do not inhale smoke or use lantern
indoors. Refer to diagram on page 2 for parts labels.
Step 1
Unscrew the pressure gauge
and pour fuel in using the
provided funnel. Fill until fuel
reaches the lower edge of
the ller neck.
Do not overll the fuel
tank!
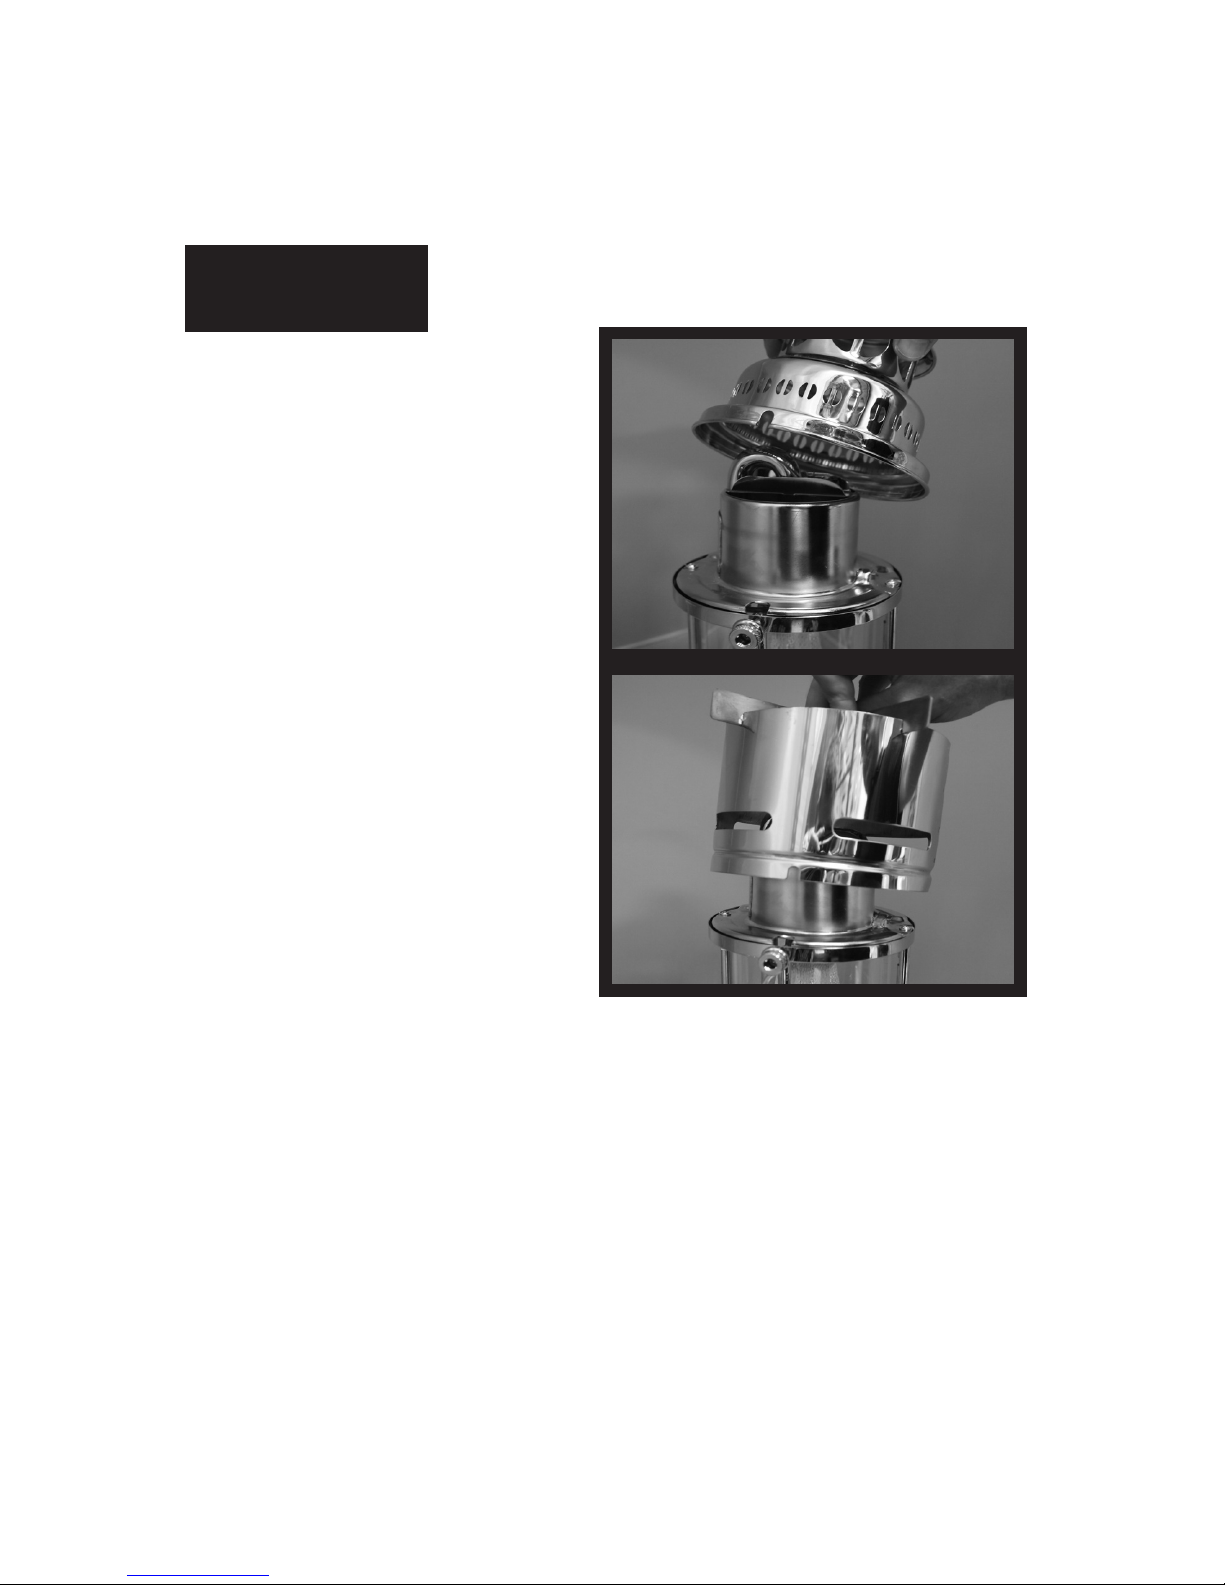
Step 2
Loosen the handle/reector screws and remove the
hood/cover.
To remove the hood and
hood inner casing remove
the two screws holding it to
the lamp.
BriteLyt Rapid 829/500CP 9
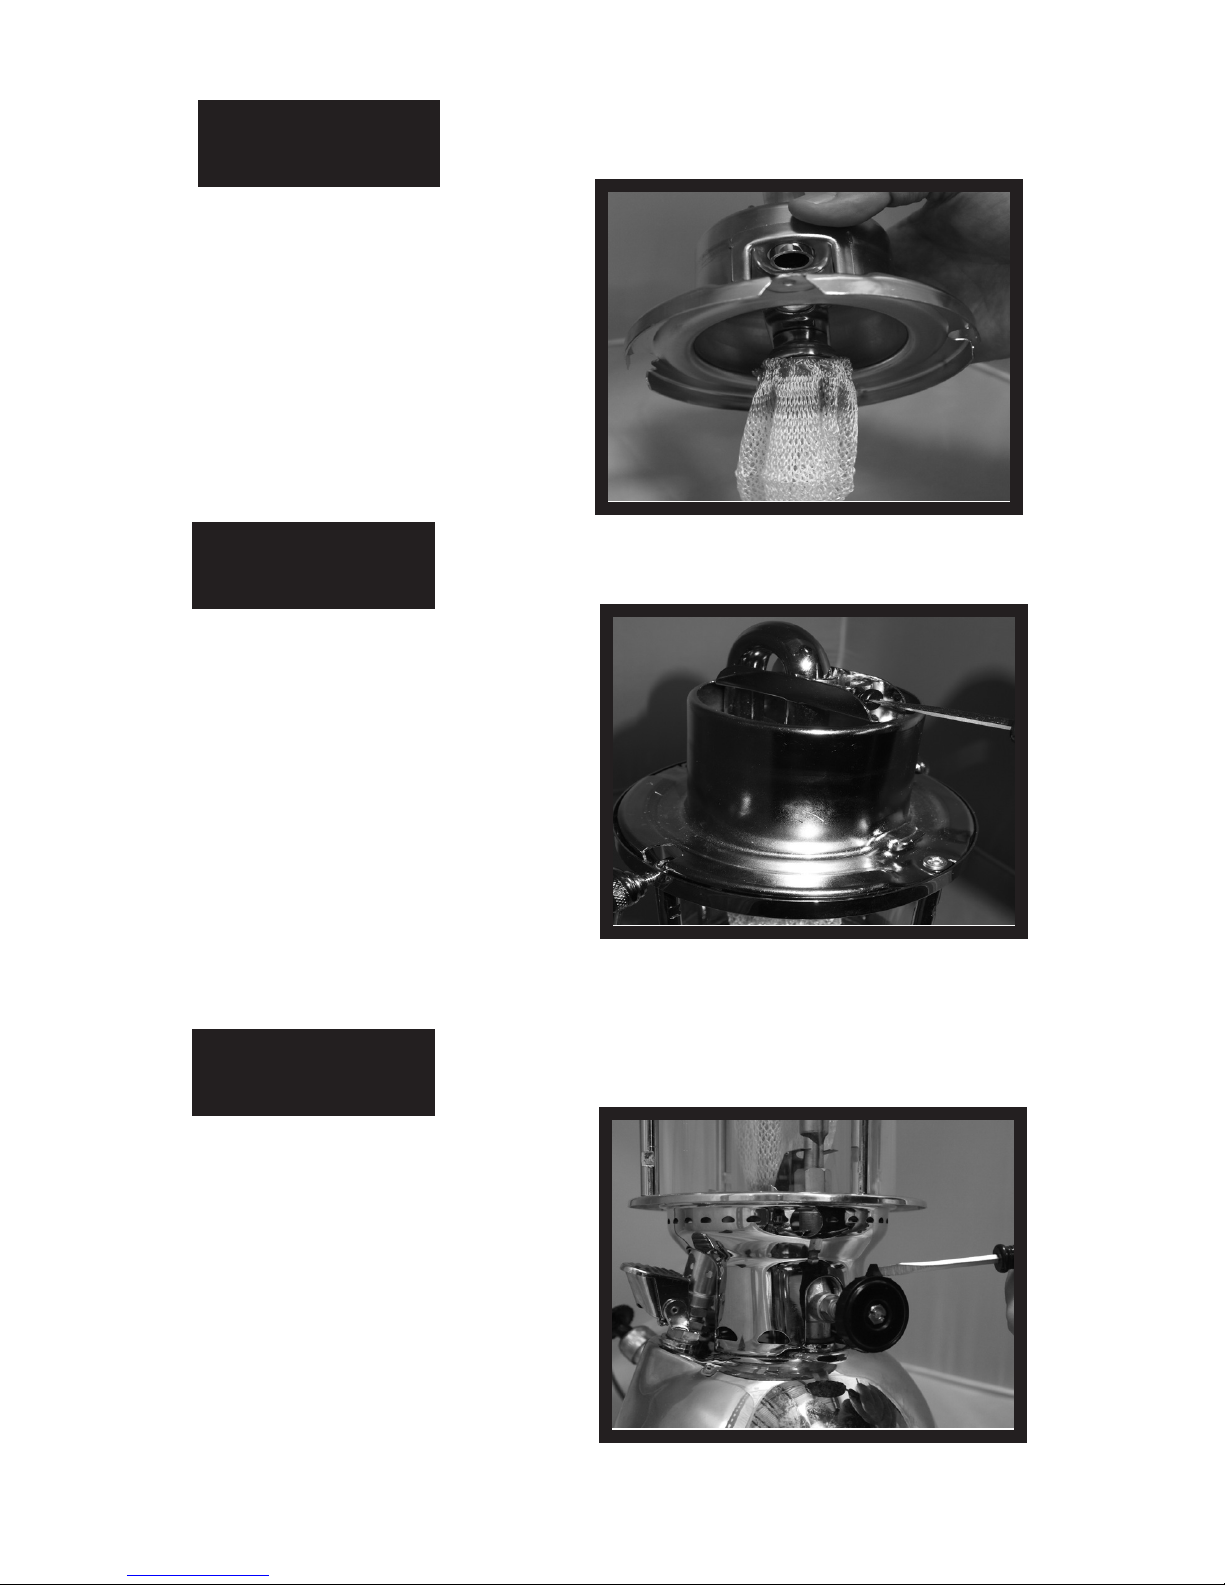
Step 3
Place mantle over spray
nozzle and tie on using a
double knot.
Trim loose threads as short
as possible.
Step 4
Re-Install the hood inner
casing and the hood/cover.
Ensure that the regulator
screw is visible and tightened.
Re-install the two mounting
screws and re-tighten the
handle/reector screws by
hand once hood is replaced.
Step 5
Ensure that the pointer
on the fuel dial is pointing
upright to 12 O’clock (This is
the off position).
Screw the pressure gauge
back onto the tank by hand.

10 BriteLyt Rapid 829/500CP
Step 6
Rotate the hand pump knob
to unlock it.
Plunge the pump in and out
until your pressure gauge
reads between the red line
and 3 on the indicator.
When nished re-lock the
hand pump knob in it’s down
position.
If you are using the EZ-
Pump attachment with
pressurized air see page
12 and disregard step 6.
Step 7
Open the rapid pre-heater
by pushing the lever down
opening the ow of fuel.
Immediately light the now
owing fuel just above the
open lever using a lighter or
match. Lighters are the recommended ignition source.
If needed, unlock hand
pump and again plunge
repeatedly to maintain pressure in tank.

BriteLyt Rapid 829/500CP 11
Step 8
Allow pre-heater to run for
approximately 30 seconds
for Kerosene and Gasoline
(time will differ by fuel and
ambient temperature).
* See “Multi Fuel Operation
on page 15 for additional
information.
Step 9
After you have pre-heated
the carburetor turn the fuel
dial nose down (6 O’clock).
The mantle should light and
glow.
Once the mantle is lit, ip
the pre-heater lever back up
to close it.
Bring the lantern to operating pressure, between 2 and
3 on the pressure gauge.
While pumping, do not
shake or rock the lantern
as you will break the mantle
and need to start over.
If your lantern begins to dim, use the hand pump to in-
crease the tank pressure. Use the fuel dial to control
the level of light output.

12 BriteLyt Rapid 829/500CP
Shutdown of your BriteLyt Lantern
Step 1
To extinguish the lantern
open up the bleeder valve
on the pressure gauge.
Turn the fuel dial to point
vertically (12 O’clock) to cut
off the ow of fuel.
Storage of your BriteLyt Lantern
• Allow lantern to cool for at least 30 minutes before touch-
ing, moving or repairing.
• Do not allow fuel to sit in tank for prolonged periods of
time.
• Empty and clean tank before storing your lantern.
• To avoid scratching and damage keep you lantern and
reector stored in the optional tote bags.
• After 10 uses, use a cap full of carburetor cleaner into
your tank with fuel to clean your burning system and tank.
• After storage ensure that all parts are properly tightened
and cleaned before lighting lantern.

BriteLyt Rapid 829/500CP 13
Tips and Troubleshooting
• If you notice the lantern ickering or darkening, use your hand
pump or EZ-Pump accessory to increase the tank pressure to
approximately 2.5 atmosphere bars.
• If the hand pump plunger does not work properly grease the
O-Ring and re-install.
• If the pre-heater is not igniting or burning improperly, ensure you
have proper pressure in the fuel tank. You should be just below
the red line. If pressure is correct clean the nozzle of the pre heater with the cleaning needle which came with your lantern.
• Do not remove the heat shield (Part #126s) when burning lantern.
• To keep bugs away add citronella oil in a 50/50 ratio with your
fuel and burn normally.
• If using biodiesel when preheating with the Alcohol cup it may
take 6-10 burns before the mantle will light.
• Remove broken mantles as they will break the glass in your
lantern.
• Routinely ush and clean your fuel tank with water or gasoline.
• If you are in an extremely cold area or above 5,000 feet in elevation you may need to add 10% mineral spirits to your fuel tank to
have lantern light faster.
• If the hand pump plunger does not work properly grease the
O-Ring (lightly) and re-install.
• If using biodiesel, when preheating with Alcohol cup, it may take
6-10 burns before the mantle will light (you also need to use the
preheater after the Alcohol cup use). Preheat using the cup rst,
and then, use the preheater, after the alcohol as burned off. This
will help to preheat faster.
Warranty Registration
BriteLyt’s limited lifetime warranty requires the lantern be registered to you. In order to register your warranty, visit us online at
www.britelyt.com/reg to digitally register your lantern.
Be sure you have your original purchase receipt available to
complete the form. You will also need the serial number which is
stamped on the bottom of your lantern.
14 BriteLyt Rapid 829/500CP
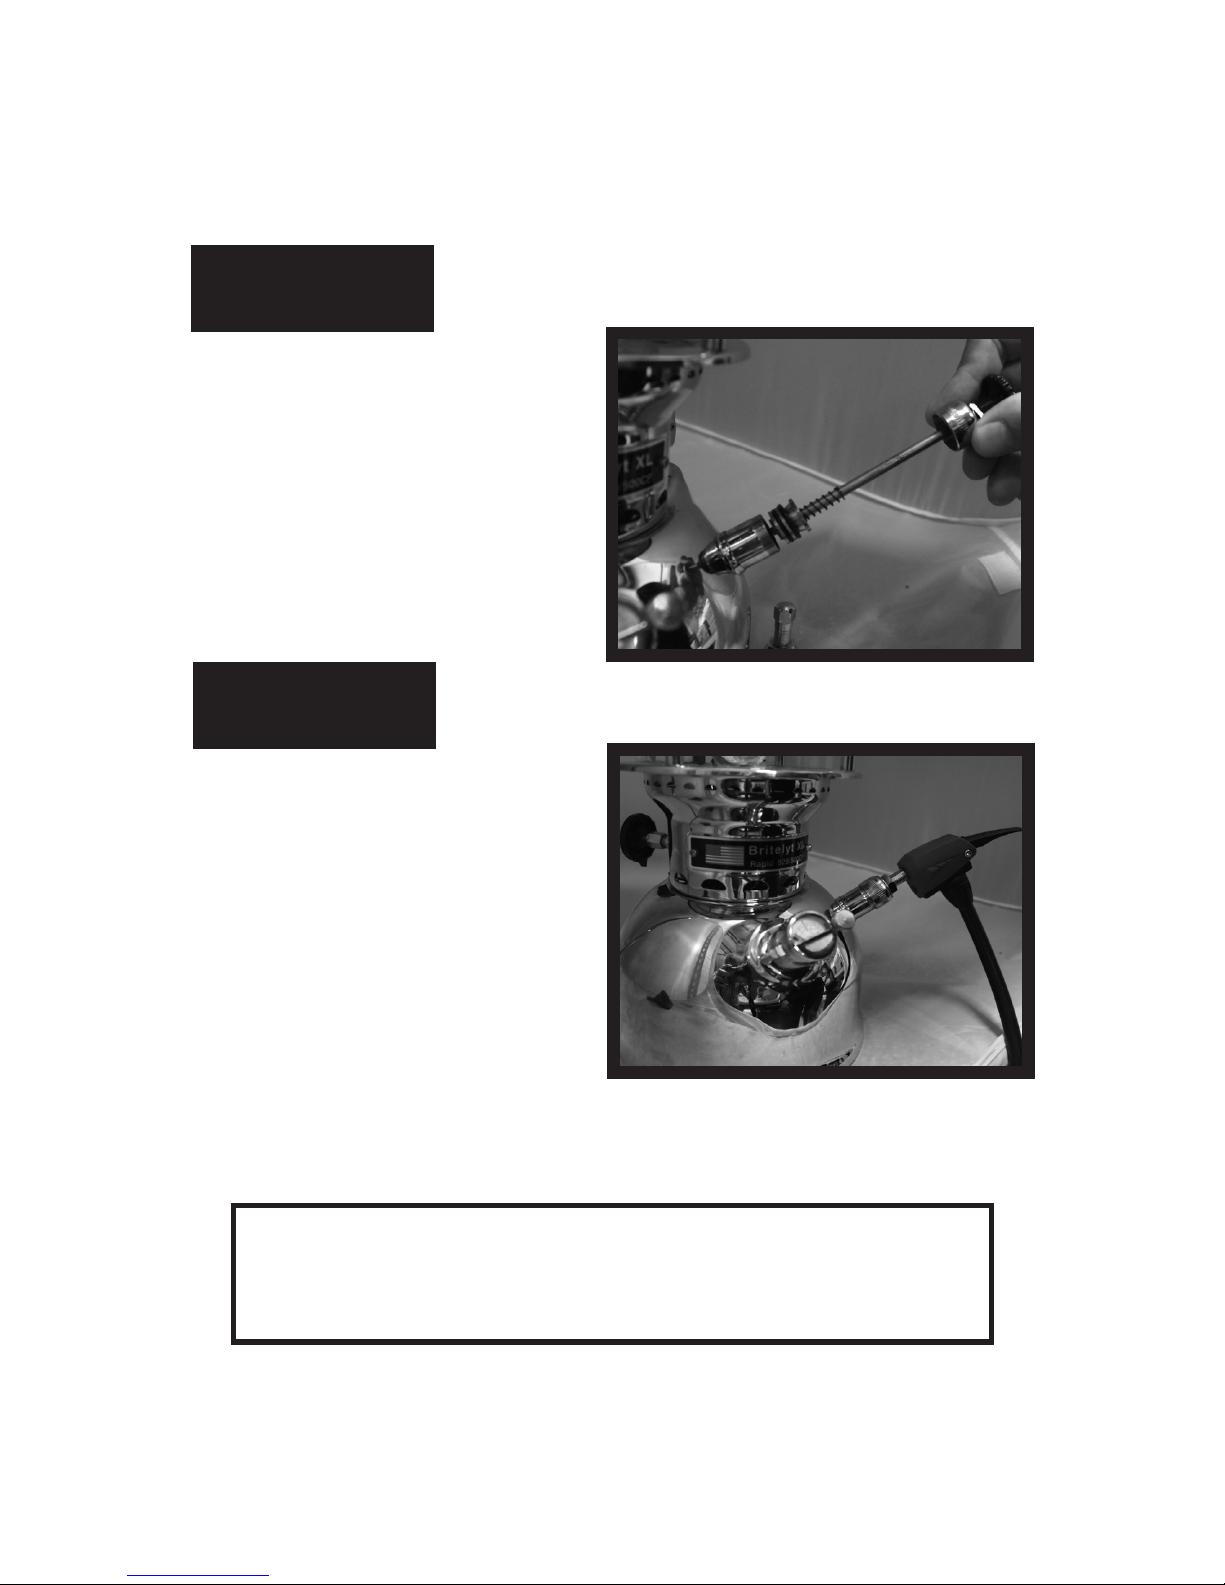
EZ-Pump Accessory Instructions
(Optional Accessory)
Step 1
Unscrew hand pump assembly from the fuel tank. Expect
the plunger to be a little difcult to remove.
Step 2
Screw on the EZ-Pump accessory.
Fill the tank with compressed
air via a tire pump or hand
held CO2 ller. Be sure that
incoming pressure does not
exceed 30psi. Do not use a
CO2 system over 12G.
For a video tutorial on how to use your lantern
or troubleshooting suggestions visit:
www.BriteLyt.com/howto
BriteLyt Rapid 829/500CP 15
EZ-Cook Accessory Instructions
(Optional Accessory)
Step 1
Loosen the handle/reector
screws to remove the hood/
cover from the lantern.
Replace the hood/cover with
the EZ-Cook adapter using
the set grooves as guides.
16 BriteLyt Rapid 829/500CP
Multiple Fuel Operation Guidelines
IMPORTANT:
The preheat times listed are approximate. Variables such as altitude, humidity and temperature
will have an impact.
DO NOT BURN HOMEMADE/CUSTOM FUELS!
Burning fuels that are not listed in this manual
should be done at your own risk. BriteLyt assumes no responsibility for the burning of non
listed fuels.
Burning fuels not listed in this manual can cause
permanent and irreversible damage to your lantern.
Alcohol based fuels (ethanol or methanol),
or pure oil (vegetable, motor, industrial),
should not be burned on their own.
If using any of the fuels listed above you must mix with another fuel, in a 50/50 ratio for your lantern to run properly.
BriteLyt assumes no responsibility for burning these fuels
unmixed.
If you have questions or concerns in regards to burning
particular fuels please contact us at (727) 451-7020 or by
email at customerservice@britelyt.com

BriteLyt Rapid 829/500CP 17
Gasoline Type Fuels
Pre-Heat Time approximately: 10 to 35 seconds
Examples: Coleman Fuel, Gasoline, White Gas, Paint Thinner,
Lighter Fluid, Mineral Spirits without Oil.
Oil Based Fuels
Pre-Heat Time approximately: 15 to 45 sec
Examples: Kerosene, Lamp Oil, JP Fuels, Citronella Oil, Mineral
Spirits with Oil.
Heavy Oil Base Fuels (50/50 Mixture Recommended)
Pre-Heat Time approximately: 45 sec to 2 min.
Examples: Diesel Fuel or Bio-Diesel.
Below are recommendations for mixing fuels in order
to improve efciency and safety. The recommended
mixture is 50/50 but can be adjusted to match your
conditions.
Kerosene and Gasoline Type Fuel
Pre-Heat Time approximately: 15 to 30 sec
Total Run Time Approximately: 10 to 12 hours
Examples: Kerosene mixed with any of the following fuels:
Coleman, Paint Thinner and All Alcohol Fuels.
Diesel and Gasoline Type Fuel
Pre-Heat Time approximately: 20 to 40 sec.
Total Run Time Approximately: 10 to 15 hours.
Examples: Diesel mixed with any of the following fuels: Coleman, Paint Thinner and All Alcohol Fuels.
Biodiesel and Gasoline Type Fuel
Pre-Heat Time approximately: 45 sec to 2 min
Total Run Time Approximately: 10 to 25 hours.
Examples: Diesel mixed with any of the following fuels: Coleman, Paint Thinner and All Alcohol Fuels.
Motor Oil and Gasoline Type Fuel
Pre-Heat Time approximately: 1 1/2 to 3 min and may have to
use Alcohol cup and not preheater (part 35). (Must test preheater if it does not work use heat cup part 35)
20 BriteLyt Rapid 829/500CP
4500 140th Ave N, Ste 101 - Clearwater, FL 33762
(727) 451-7020 Fax: (727) 451-7198
www.BriteLyt.com
 Loading...