

Page 1
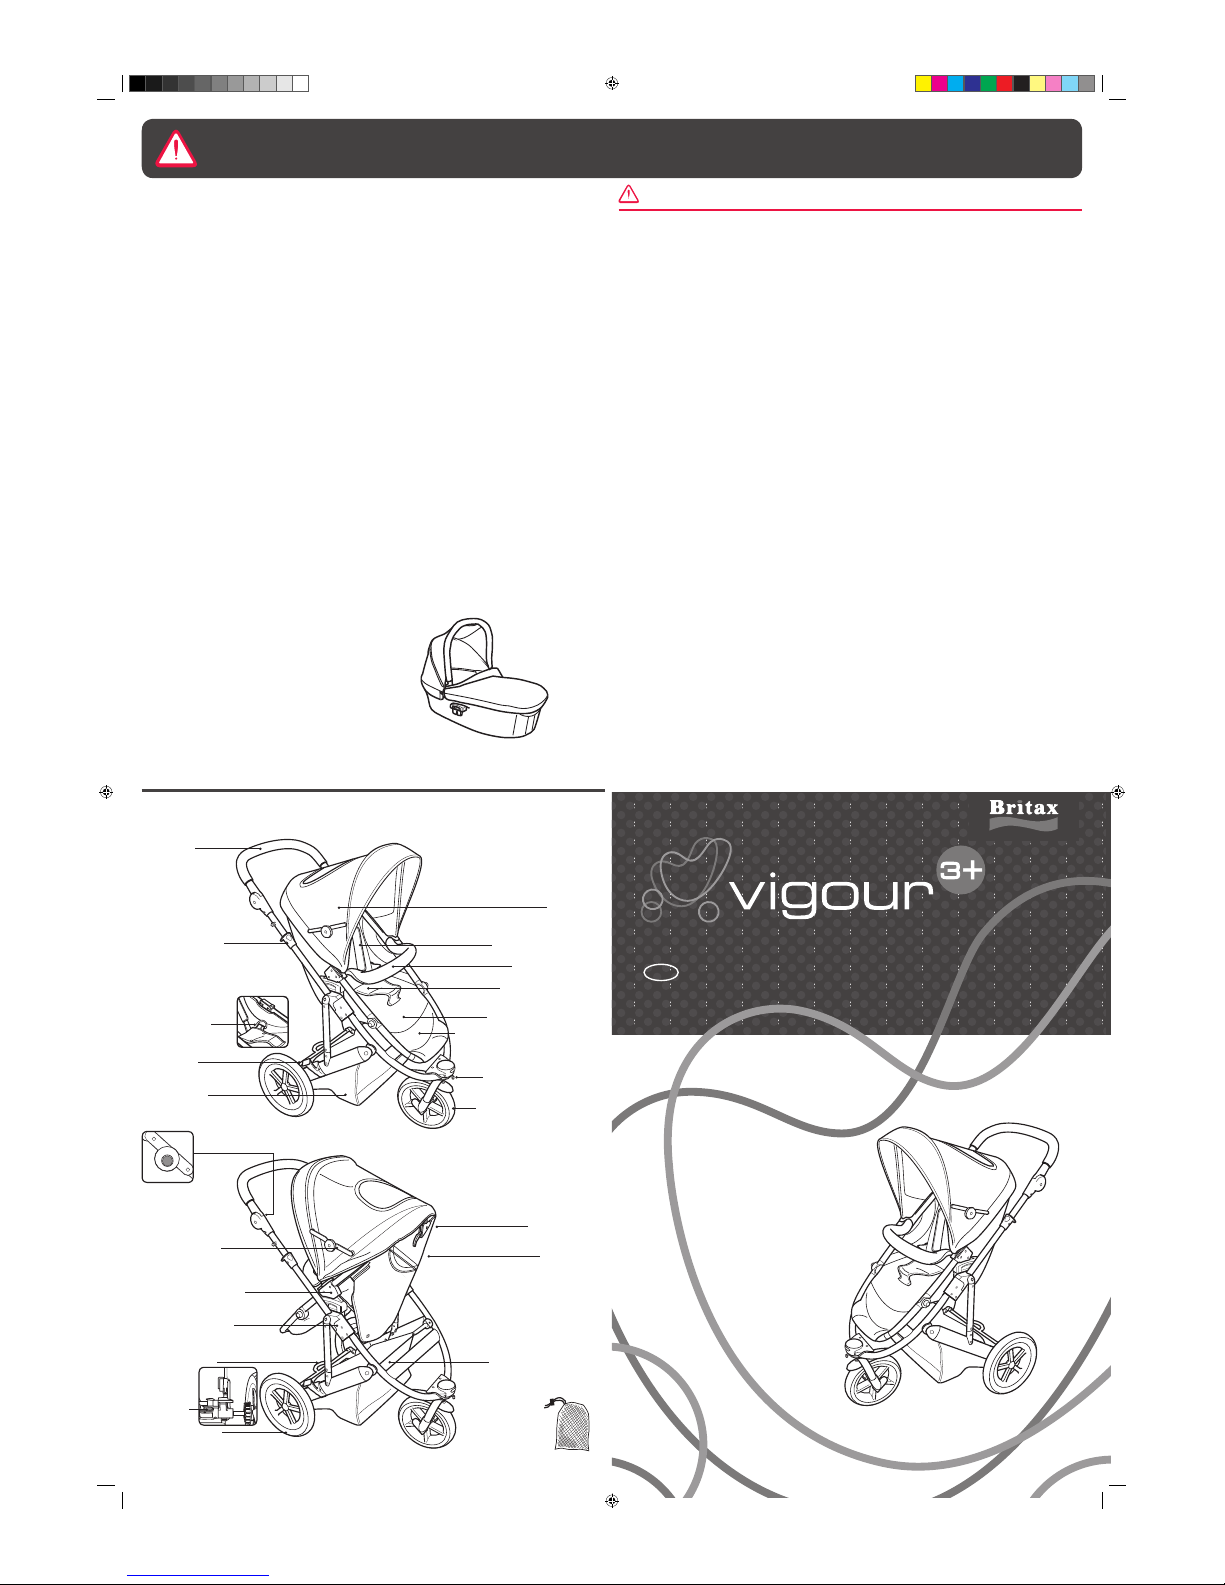
Locking
button
‘D’ ring attachm ent for
use with alternative
harnesses
conforming
to BS 6684.
Department on 01264 38603 4. This product
is not intended for commercial use.
Guarantee
Please be aware that faults caused by failing
to follow the maintenance advice above are
not covered by the product’s warranty.
All Britax products a re carefully designed,
manufactured and tested. However, should
this product prove faulty within six months of
purchase due to a materials or manufacturing
fault please return it to the original place of
purchase. We will then, at our discretion,
repair it free of charge.
For guarantee purposes proof of purchase
will be required. We recommend that you
retain your receipt and attach it to this user
guide. They should be kept in a safe place.
Britax does not accept liabilit y for damage
arising from abuse, misuse or negligence.
This guarantee is not transferable and
therefore does not apply to second-hand
products.
Your statutory rights are not affected by
this guarantee.
Register your strol ler on-line now
It’s quick and easy, and we can update you
with news, advice and safety information.
Visit www.britax.eu/re gistration
Bumper bar
Looking after you r stroller
The stroller and its cover have been carefully
designed, manufactured and tested to high
safety standards.
Regularly inspect and maintain your stroller to
ensure freedom of movement of the locking
devices and security of comp onents. To
prolong the life of your stroller, keep it clean
and do not leave it in direct sunlight
for extended periods of time.
Helpful hints
Regularly clean and lubricate the front swi vel
and wheel units as dirty or dr y units can have
an adverse effect on manoeuvrabilit y
and steering.
When using the stroller on the beach, clean it
completely afterwards to rem ove all the sand
and salt from the mechanisms and wheel
assemblies.
This stroller is not waterproof and is supplied
with a rain cover. Under certain climate
conditions the covers and trims may be
affected by mould and mildew. To help
prevent this occurring, do not fold or store this
stroller if it is wet or damp and always use the
rain cover when necessary. Always store in a
well ventilated area.
Cleaning the cover
The hood, seat covers and trims may be
cleaned using warm water with household
soap or mild detergent. Allow it to dry fully,
away from direct sunlight.
DO NOT dry clean or use bleach or any other
aggressive cleaning agents.
To maintain the safety of your stroller, seek
prompt repairs for bent, torn or broken
parts. Use only those par ts and accessories
approved by Britax. Replacement part s and
accessories are available from your Br itax
stockist or contact Brit ax Customer Service
Shopping
basket
Shoulder straps
Hood
Storage
latch
Brake lever
Release latch
Adjustable
handle buttons
Rear wheels
Handle
Swivel wheel lock
Front swivel wheel
Backrest
adjuster lever
Hood hinge
Pocket
Buckle (under
comfort pad)
Seat unit (V Type)
Rain cover in bag
Storage pockets
WARNING – A CHILD’S SAFETY IS YOUR RESPONSIBILITY
AZ0-0 41
Read these instructions carefully before use and keep them for further reference.
Your child’s safety may be affected if you do not follow these instructions.
IMPORTANT!
Please read this User Guide carefully BEFORE trying to use your stroller
Introducing your new stroller
User Guide
UK
Carry Cot+ (V Type) also available.
Britax Excelsior Limited
1 Churchill Way West
Andover
Hampshire SP10 3UW
United Kingdom
A Britax Childcare company
Customer Service Helpline: 01264 386034
Email: helpline@uk.britaxeurope.com
Switchboard: +44 (0) 1264 333343
Fax: +44 (0) 1264 334146
www.britax.eu
WARNING – Ensure that all locking devices
are engaged before use.
WARNING – Check that the seat unit
attachment devices are correctly engaged
before use.
WARNING – Children must be harnessed at all
times.
WARNING – Overloading, incorrect folding
and the use of non-approved accessories
may damage or break this stroller and make it
unstable for use.
WARNING – Regularly inspect the stroller to
ensure all parts are in full working order.
WARNING – Any load attached to the handle
affects the stability of the pushchair.
WARNING – This seat unit is not suitable for
children under 6 months.
WARNING – Always use the crotch strap in
combination with the waist belt.
WARNING – This product is not suitable for
running or skating.
WARNING – It may be dangerous to leave your
child unattended.
DO NOT leave or place your child in a position
where they are exposed to the sun. The canopy
or hood on this product will not give your child
total protection from the harmful rays of the sun.
DO NOT allow the stroller to remain wet for
prolonged periods of time. If it does get wet,
allow to dry unfolded at room temperature.
DO NOT place more that 4kg in the basket, or
1kg in the canopy pocket (if supplied).
DO NOT allow children to play with or adjust
the stroller.
DO NOT carry more than one child on this
stroller.
DO NOT lift the stroller by the bumper bar –
it may disengage.
DO NOT use accessories that are not approved
by Britax Excelsior Limited.
DO NOT use a PVC rain cover indoors, in a hot
atmosphere or near a direct heat source - your
child might overheat.
DO support the back of the stroller seat when
reclining it.
DO if using an alternative harness, please
ensure it conforms to an appropriate safety
standard i.e. BS6684. ‘D’ ring attachments are
found on each side of the stroller.
DO read the cleaning instructions for the cover.
DO ensure children are clear of moving parts
and locking devices while making adjustments.
DO periodically check that any screws, nuts,
bolts and other fastenings are fully tightened.
DO store the stroller in a safe place when not
in use. Avoid placing heavy objects on top of it
and do not store near direct heat sources, e.g.
radiators, open bar res or in direct sun light as
the cover may fade.
ALWAYS remove the child from the stroller
before going up or down stairs or escalators.
This stroller is designed and manufactured to
comply to EN1888: 2005.
Adjustable calf sup port
Chassis Socket
Seat locking latch
1408.001 - Vigour 3 (UK).indd 1 5/6/07 10:31:27
Page 2
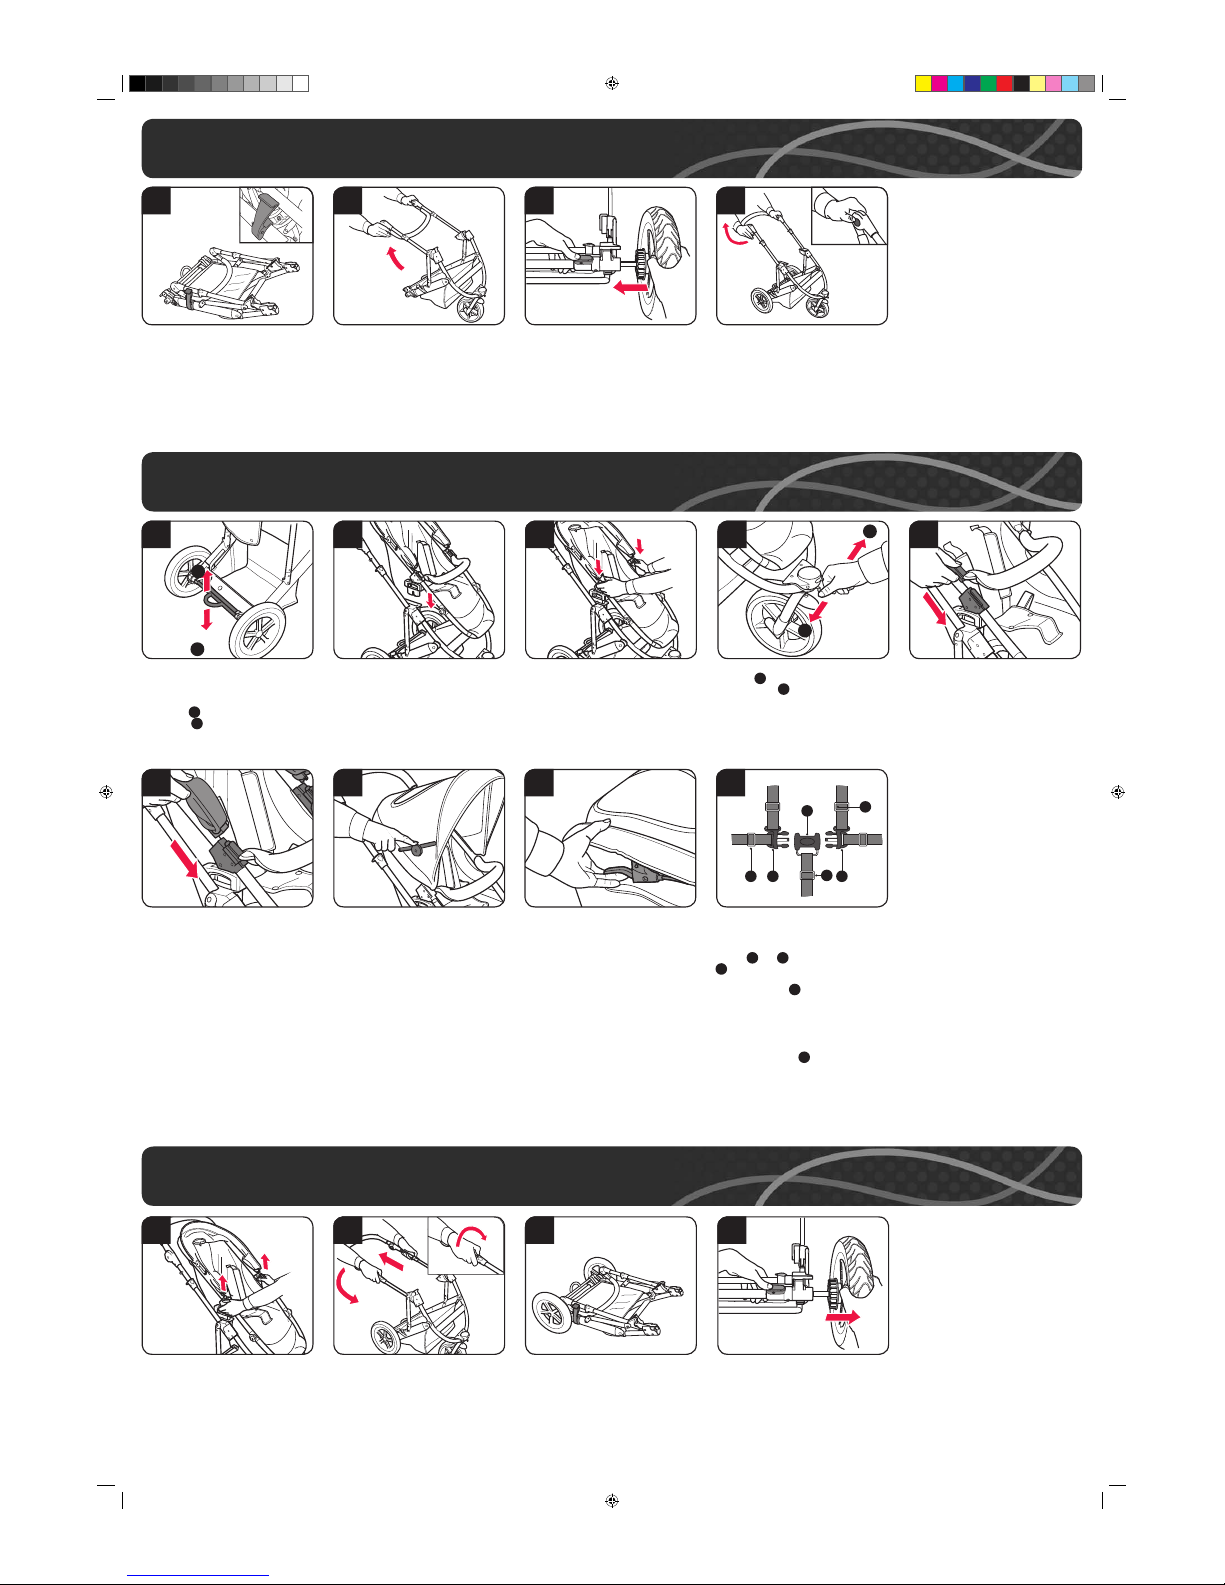
1a
Hold the handle and lift upwards until
the chassis is fully extended and clicks
into position (dia 1b).
1b
Push the rear wheel assembly into the
rear wheel axle (dia 1c). Check the
wheel is correctly t ted by trying to
pull it out. Repeat this process for both
wheels.
1c
Adjust the handle to a comfortable
height by simultaneously pressing the
buttons on the inside of the handle –
on both sides (dia 1d).
Check the chassis is ready for use by
pressing down on the handle – the
chassis should not collapse.
WARNING – Ensure that all locking
devices are engaged before use.
1d
1 Assembling your chassis
IMPORTANT – Always remove
your child from the seat unit prior to
installation, removal or change of seat
direction. The seat unit can be installed
forward or rearward facing.
To install the seat unit, insert the
seat locking latches into both chassis
sockets (dia 2b).
2b
To t the hood align with the xings on
the bumper bar and slide down
(dia 2f) until fully engaged.
The hood can be tted without the
bumper bar by aligning with the xings
on the seat unit and sliding down until
fully engaged.
2f
Push down on the seat until you hear an
audible ‘click’ (dia 2c).
WARNING – Check that the seat
unit attachment devices are correctly
engaged before use by lifting the seat.
2c
To open the hood, pull the front of
the hood forward then push the hood
hinges down on both sides (dia 2g).
To remove the hood, slide the hood off
the xings on the seat unit, or off the
xings on the bumper bar (if tted).
2g
To adjust the backrest, squeeze the
backrest adjuster lever at the top of the
seat unit, then raise or lower the seat
unit to the desired position
(dia 2h).
IMPORTANT – Use the harness at
all times.
IMPORTANT – Do not lift the stroller by
the seat unit.
IMPORTANT – Support the back of the
pushchair seat unit when adjusting the
angle.
2h
Release the storage latch (dia 1a).
To attach the bumper bar (dia 2e),
remove the hood (if tted). Align the
bumper bar mouldings with the xings
then slide both bumper bar mouldings
onto the seat unit until fully engaged.
To remove the bumper bar, remove the
hood (if tted) then slide both bumper
bar mouldings off the seat unit xings.
WARNING! DO NOT lift the stroller
by the bumper bar or hood. It may
disengage or damage your product.
2e
HANDY HINT – You may nd it helpful
to apply the brake when tting the seat
unit.
Push down on the brake lever to lock
the brakes . To release the brake lift
brake lever (dia 2a).
IMPORTANT – Always apply the
brakes when you park the stroller.
2a
A
B
B
A
Unfasten the comfort pad to reveal the
ve-point harness. A ve-point harness
is provided to restrain your child (dia 2i).
To secure the child in the harness, push
buckle A and B into buckle housing
C until the buckle prongs snap into
position. Carefully adjust the harness by
pulling the slider until the desired t is
achieved in the waist belt, shoulder and
crotch straps.
Always adjust the harness when
changing the seating position of the child.
To release the buckle, squeeze the top
and bottom prongs A .
WARNING – Always use the crotch strap
in combination with the waist belt.
WARNING – Fasten the harness when
not in use to prevent it becoming trapped
when folding the stroller.
2i
D
D
D
A
B
C
To lock the swivel wheel, push lock
towards . To unlock swivel wheel,
push towards (dia 2d).
HANDY HINT – The front wheel should
be locked when used on uneven
surfaces or mounting kerbs.
2d
B
A
A
B
A
B
C
D
A
2 Attaching your seat unit and using your stroller
(this vehicle is intended for children from 6 months and up to 15kgs) IMPORTANT - A V-Type seat unit must be used with this V-Type chassis
3 Folding your stroller
IMPORTANT – Always remove
your child from the seat unit prior to
installation, removal, change of seat
direction or folding.
3a
Push the handle down allowing the
chassis to fold until it moves into the
fully folded position. Ensure that the
storage latch is closed (dia 3c).
HANDY HINT – The chassis may also
be folded with the seat unit attached.
3c
HANDY HINT – For a more compact
storage, fold the handle down. Refer
to (dia 1d) for instruction on operating
handle adjustment.
Stand at the rear of the chassis, pull
both release latches and twist the right
hand one in the direction of the arrow
marked on the release latch (dia 3b).
3b
To remove the rear wheels, push
the locking button and pull the
corresponding rear wheel out (dia 3d).
3d
1408.001 - Vigour 3 (UK).indd 2 5/6/07 10:31:30
 Loading...