

Page 1

IMPORTANT: KEEP THIS BOOKLET IN A SAFE PLACE FOR FUTURE REFERENCE.
Note: Second Seat, Bassinet, Infant Carrier & are all sold separately.
Strider
Strider
Steelcraft
Compac t
INSTRUCTION MANUAL
Page 2

INDEX
Stroller Features
.................................................................................
Quick Reference Guide to Compact Single Mode Configurations......
Quick Reference Guide to Compact Double Mode Configurations.....
1 Stroller
............................................................................................
1.1 Stroller Important Notes & Warnings
...........................................
1.2 Manual Handling Techniques
.............................................................
1.3 Stroller Parts
........................................................................................
1.4 Stroller frame opening
........................................................................
1.5 To fit and remove the wheel guards
..................................................
1.6 Rear wheel fitting and removal
..........................................................
1.7 Front wheel fitting and removal
.........................................................
1.8 Swivel/fixed front wheel operation
.....................................................
1.9 To operate the brake
..........................................................................
1.10 To adjust the pivotal handle - 7 positions
.........................................
1.11 To fit the accessory bag
....................................................................
1.12 Fitting the stroller seat to the frame
..................................................
1.13 To fit the arm bar
................................................................................
1.14 Adjusting the backrest
........................................................................
1.15 Stroller seat removal
..........................................................................
1.16 To face the seat in opposite direction
...............................................
1.17 To fit, use and remove the canopy
....................................................
1.18 Harness adjustment
...........................................................................
1.19 Tether strap
.........................................................................................
1.20 Fitting the seat pad
.............................................................................
1.21 To fit the shoulder pads
...................................................................
1.22 Adjusting the leg support
...................................................................
1.23 Fitting the boot cover
..........................................................................
1.24 To use the basket
...............................................................................
1.25 Fitting the mesh cover
........................................................................
1.26 Fitting the rain cover....
.......................................................................
1.27 To use the stroller......
.........................................................................
1.28 To fold/close the Stroller
....................................................................
1.29 To lift and carry the Stroller
................................................................
Notes
................................................................................................... 40
2
4
6
7
8
9 & 10
11
12
13
14
14
15
16
16
17
17 & 18
18 & 19
19 & 20
20 & 21
21
22
23 & 24
25 - 27
28
29
29
30
30
31
31 & 32
33 & 34
35
36 - 39
39
Page 3

INDEX
Optional Accessories (Bassinet, Infant Carrier & Second Seat)
......
2.1 Bassinet Important Notes & Warnings
..........................................
2.2 Bassinet Parts
.....................................................................................
2.3 Bassinet assembly, fitting & removal
.................................................
3.1 Infant Carrier Important Notes & Warnings
..................................
3.2 Infant Carrier fitting and removal
.......................................................
4.1 Second Seat Important Notes & Warnings
...................................
4.2 Second Seat Parts
..............................................................................
4.3 Fitting Second Seat to the stroller
......................................................
4.4 Adjusting the backrest
.........................................................................
4.5 To fit, use and remove the canopy
.....................................................
4.6 Harness adjustment
............................................................................
4.7 Adjusting the head pillow height position
..........................................
4.8 To fit the shoulder pads
......................................................................
4.9 Fitting the Boot Cover
.........................................................................
4.10 Folding the Second Seat with the frame
............................................
4.11 Removing the Second Seat from the frame
.......................................
4.12 To use the adaptors
.............................................................................
4.13 Install the Stroller Seat using the adaptors
........................................
4.14 Install the Infant Carrier using the adaptors
.......................................
4.15 Fitting and removing Soft Goods from the second seat frame
.........
4.16 Fitting and removing Infant Carrier from the second frame
..............
4.17 Refit and remove the soft goods to the Second Seat frame
.............
Stroller Folding Configurations
........................................................
Care & Maintenance
.................................................................... .....
Notes
.................................................................... .............................73
3
41
42
42
43 - 45
46 & 47
47 - 49
49
50
51 & 52
53
54
55 - 57
58
58
59
59 - 61
61 & 62
62 & 63
63
64
65 & 66
67 & 68
69 & 70
71
72
Page 4
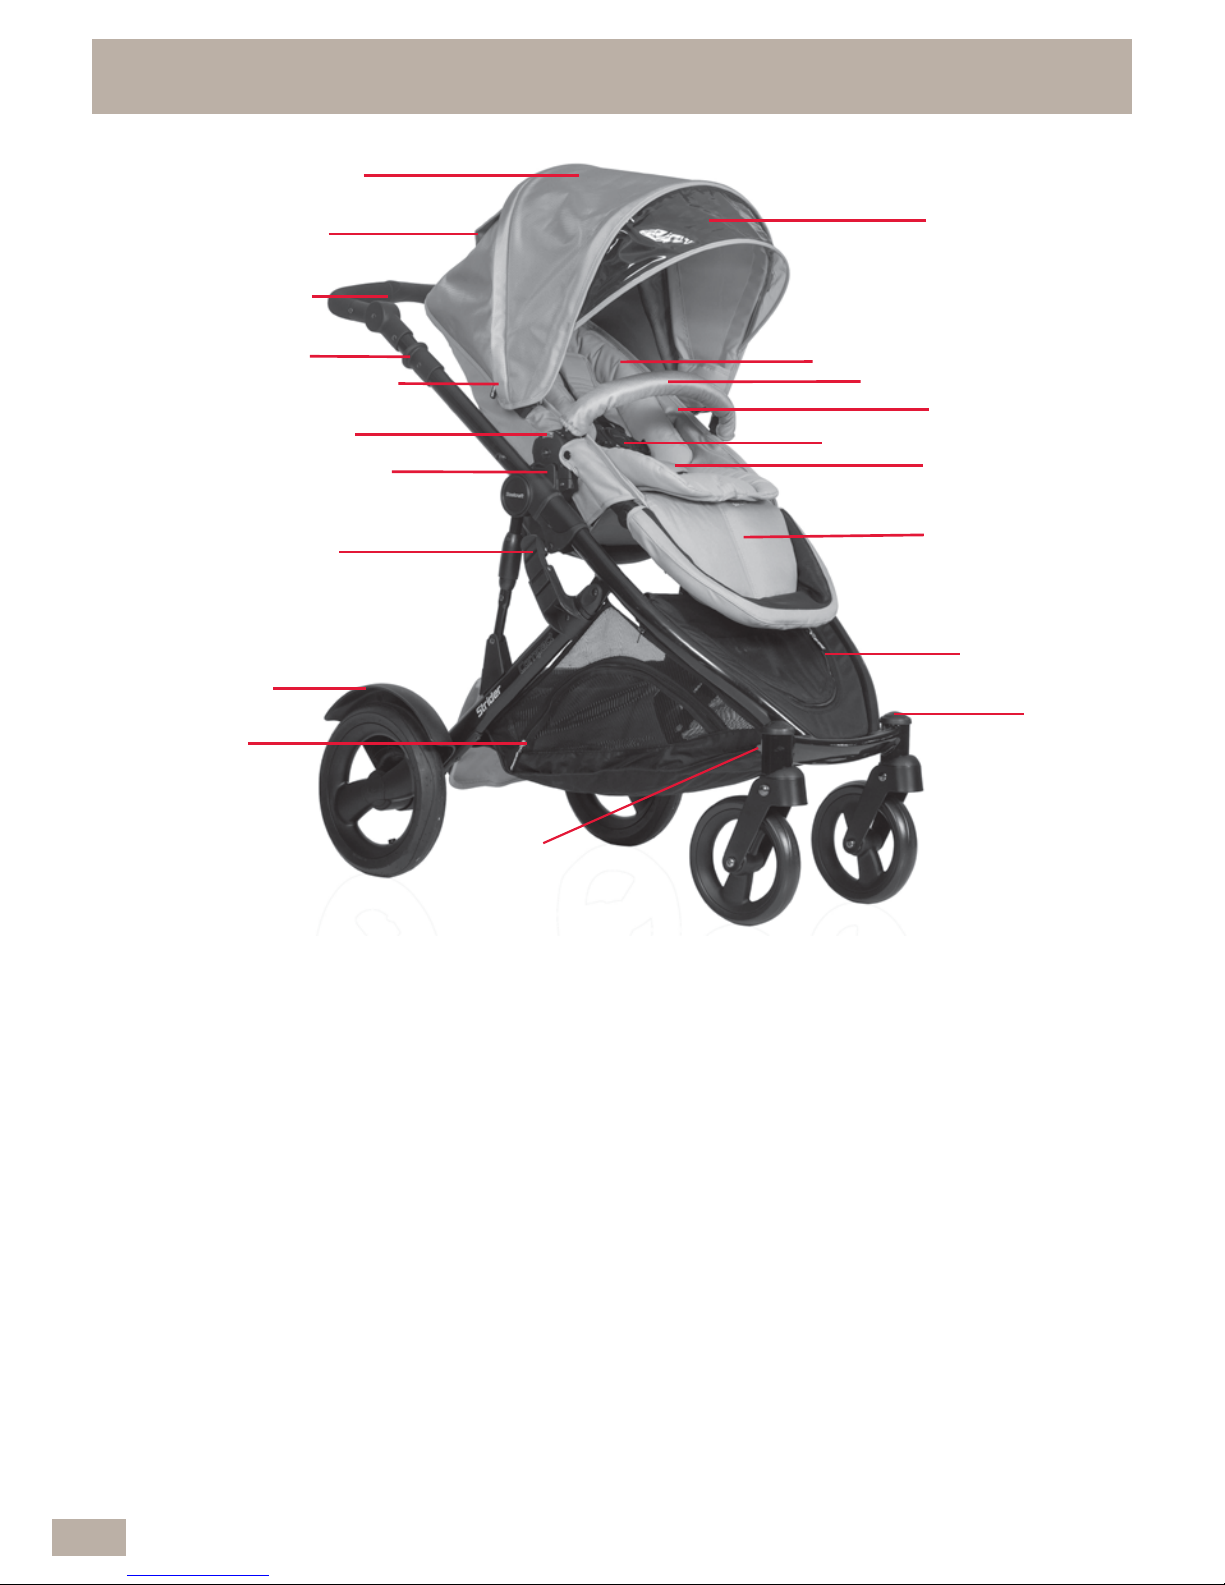
STROLLER FEATURES
S19
S3
S2
S5
S8
S7
S9
S10
S6
S13
S14
S15
S16
S11
S17
S1
S1. Adjustable & removable canopy
S2. Peek a boo window
S3. Pivotal handle
S4. Frame fold mouldings (on both sides)
S5. Canopy mesh (under zip)
S6. Stroller seat release buttons
(on both sides)
S7. Frame sockets (on both sides) accepts
Stroller, seat, Infant Carrier,
bassinet or adaptors.
S8. Frame lock
S9. Wheel guards
S10. Side access zip pocket
(on both sides)
S11. UV Sun Visor
S12. Padded seat insert
S13. Arm bar
S14. Removable & reversible
Stroller Seat
S15. 5 point harness
S16. Crotch pad
S17. Adjustable footrest
S18. Front access zip pocket
S19. Front wheel release
S20. Swivel wheel lock
4
S18
S20
S4
S12
Page 5
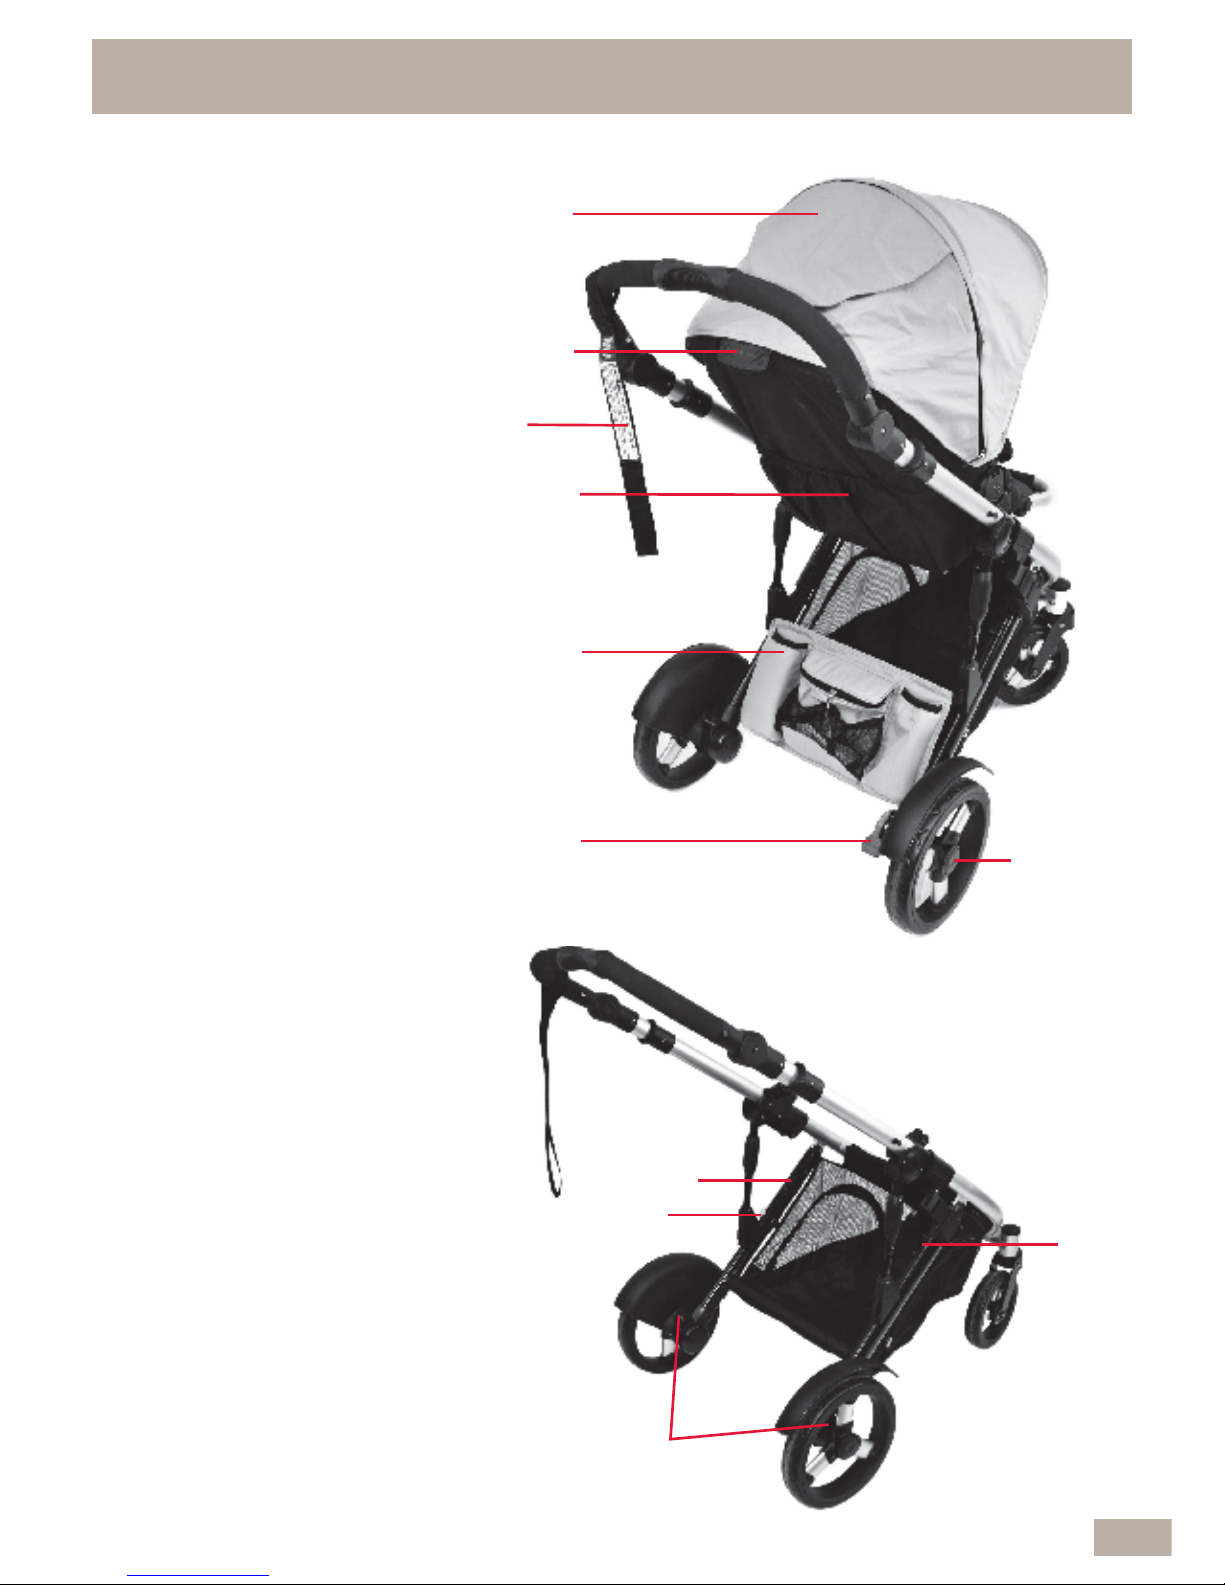
STROLLER FEATURES cont...
S23
S21
S24
S25
S26
S28
S28
S30
*Accessory bag and Stroller seat
have been removed from the
frame shown on the right.
S21. Canopy window
S22. Tether Strap
S23. Backrest recline lever
S24. Back pocket
S25. Accessory bag
S26. Brake
S27. Rear wheel release
S28. Mouldings (for
attachment to
Second seat
connecting pins)
S29. Second lock (for
Second seat)
S30. Lower mouldings
(for attachment to
second seat frame)
S27
S29
5
S22
Page 6

Shown with optional accessories (sold separately)
QUICK REFERENCE GUIDE - SINGLE MODE
Stroller - Rear Facing
Page: 22
Bassinet
Page: 42-45
Infant Carrier - Rearward Facing
Page: 46-49
Stroller - Forward Facing
Page: 18-19
6
Page 7
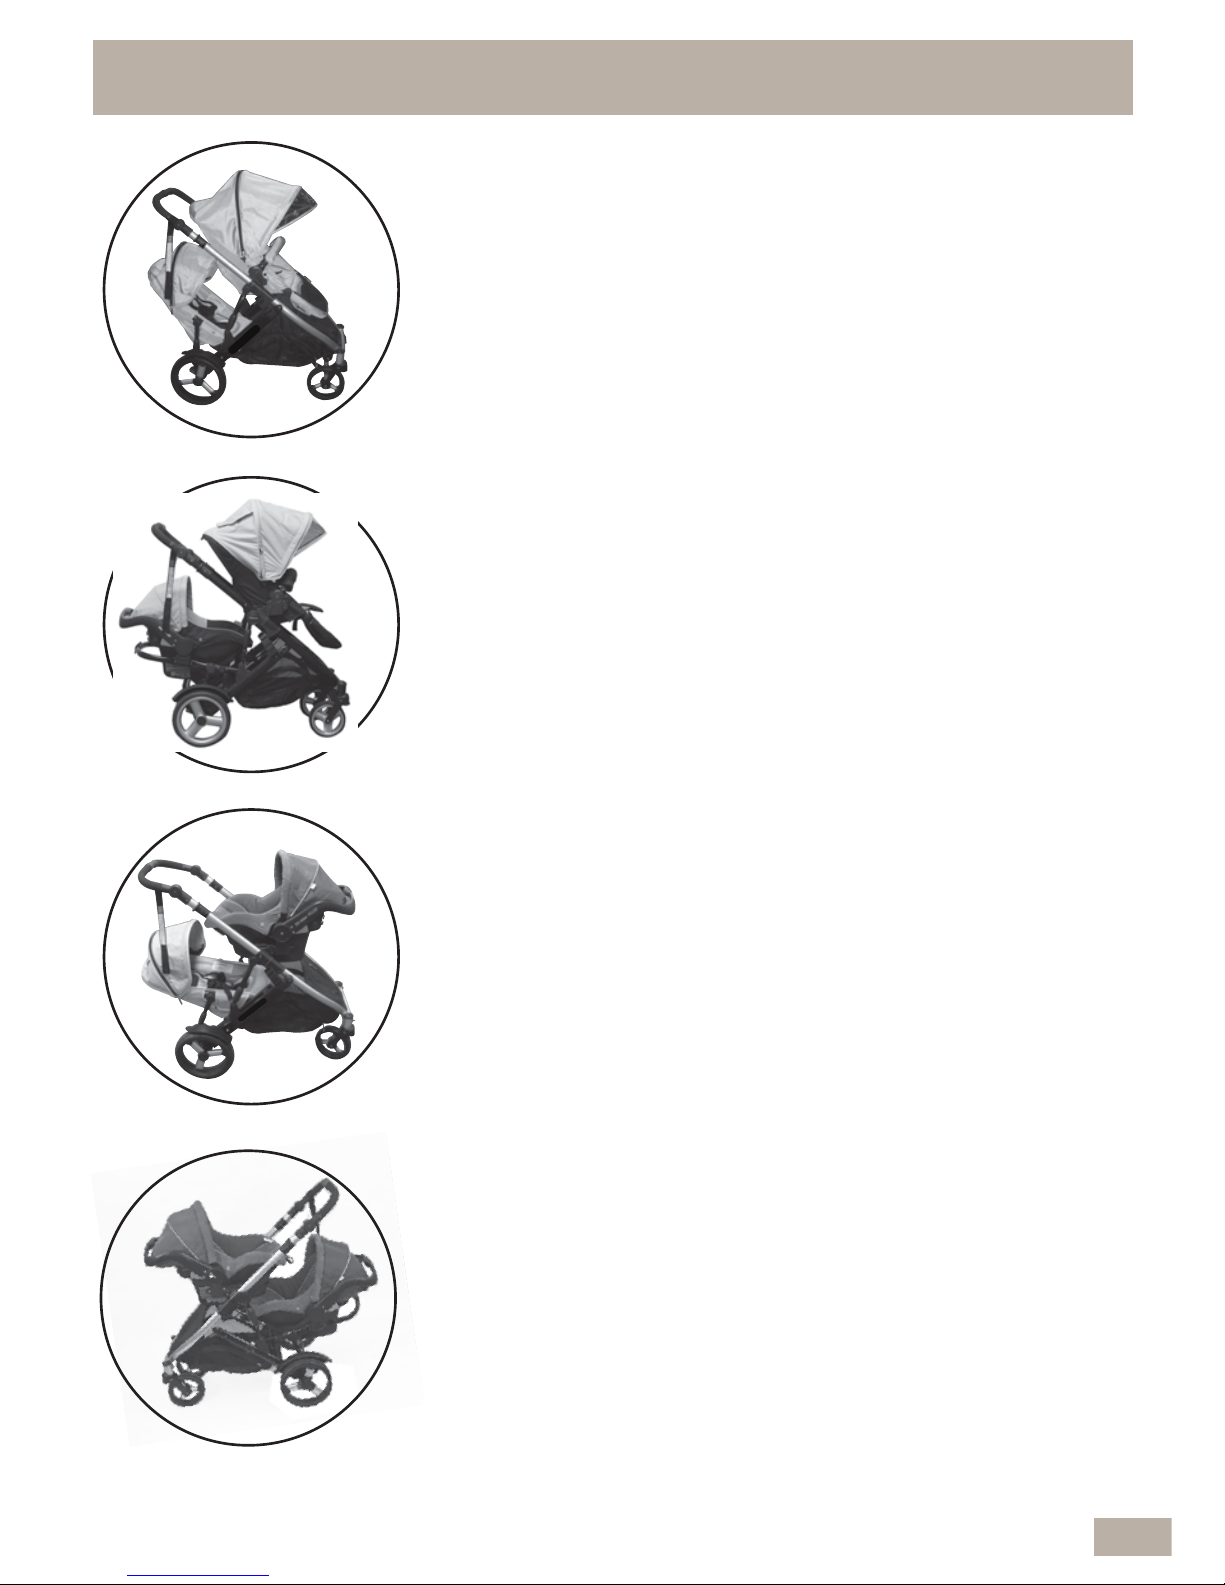
Shown with optional accessories (sold separately)
QUICK REFERENCE GUIDE - DOUBLE MODE
7
Infant Carrier + Infant Carrier
Pages: 46-49 + 65-68
With Adaptors: 62-64
Infant Carrier + Second Seat
Pages: 46-49 + 49-52
With Adaptors: 62-64
Recommended to use the adaptors in this mode
Stroller Forward Facing + Second Seat
Pages: 18-19 + 49-52
With Adaptors: 62 & 63
Stroller Forward Facing + Infant Carrier
Pages: 18-19 + 65-68
With Adaptors: 62-64
Page 8
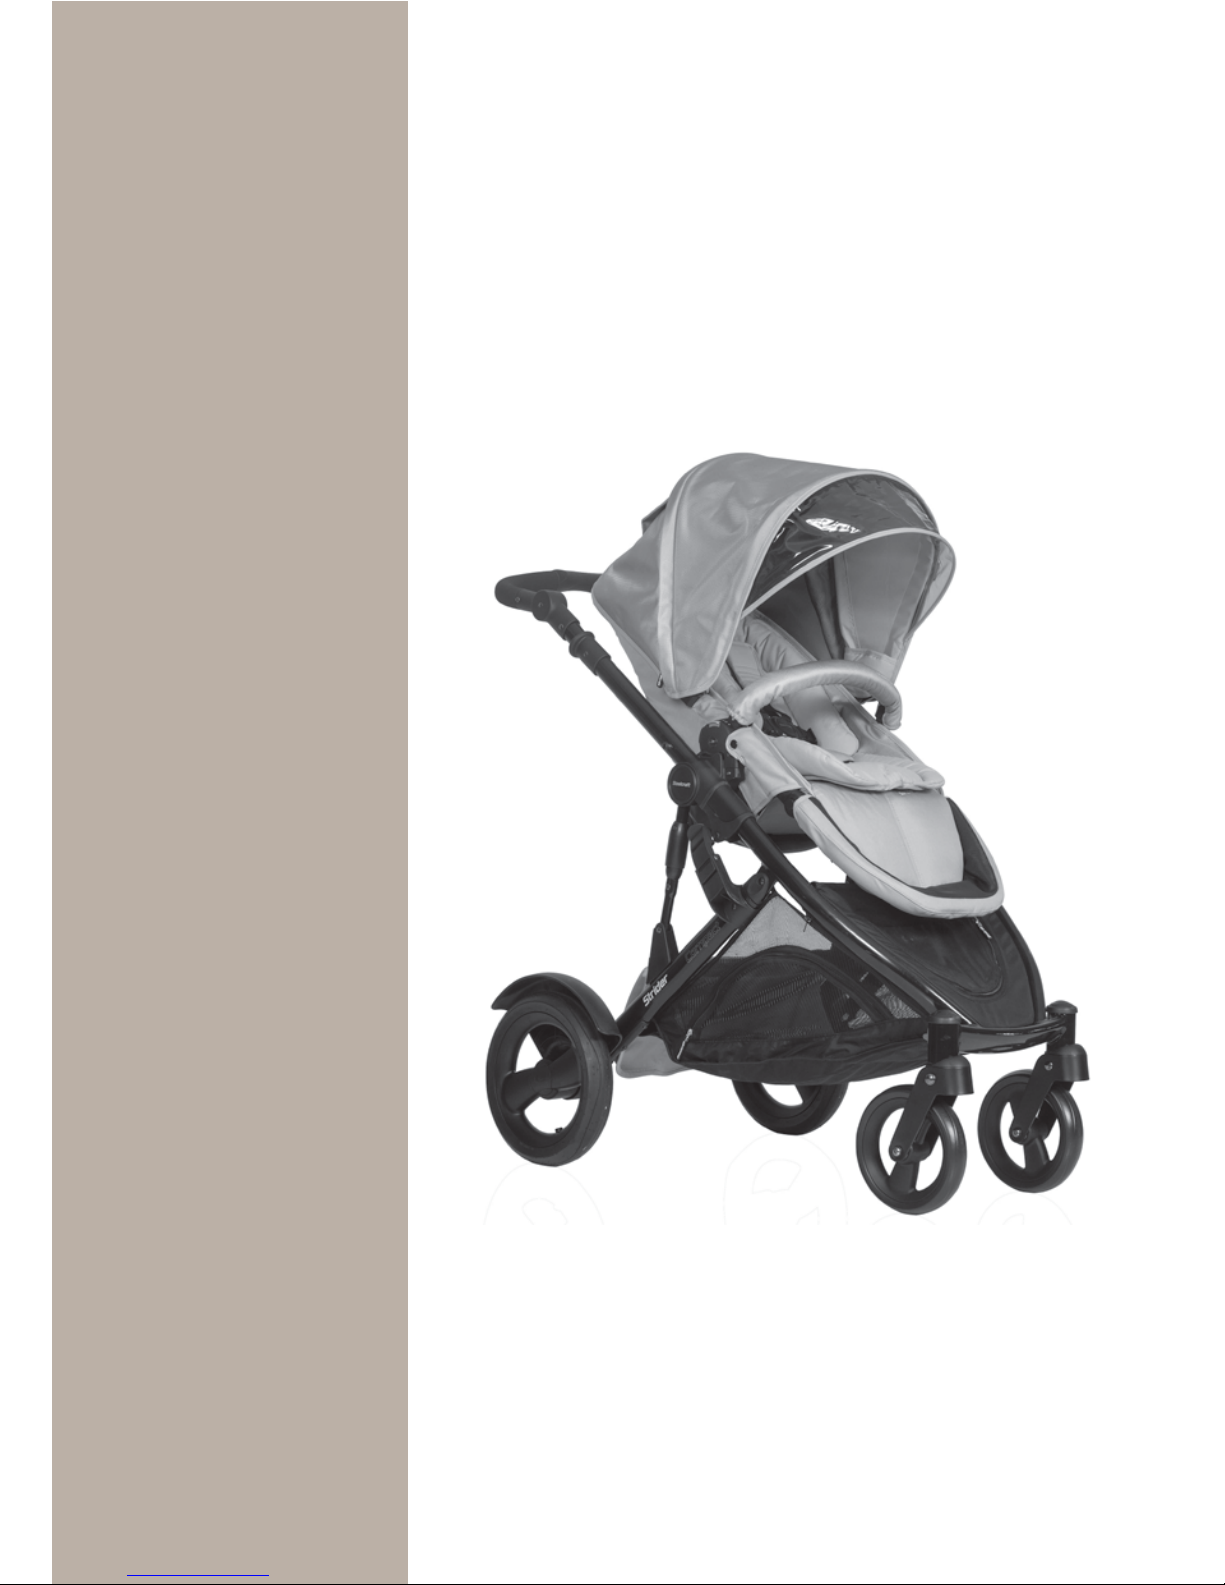
SECTION ONE: STROLLER
8
Page 9

9
1.1 IMPORTANT NOTES & WARNINGS
ALWAYS FOLLOW THE MANUFACTURERS INSTRUCTIONS.
READ ALL INSTRUCTIONS CAREFULLY BEFORE ASSEMBLY AND USE OF THIS
STROLLER.
THE CORRECT USE AND MAINTENANCE OF THIS PRODUCT IS ESSENTIAL.
• USE GREAT CARE WHEN USING THE STROLLER ON STAIRS, ESCALATORS,
TRAVELATORS OR OTHER MOVING SURFACES.
• IT IS RECOMMENDED TO REMOVE THE CHILD FROM THE STROLLER
BEFORE GOING UP OR DOWN STAIRS OR ESCALATORS.
• DO NOT LIFT THE STROLLER BY THE ARM BAR OR TRAY BECAUSE IT MAY
DISENGAGE.
• DO NOT ALLOW CHILDREN TO STAND ON THE SEAT.
• DO NOT HANG BAGS OR GOODS FROM THE HANDLE AS THIS COULD
CAUSE THE STROLLER TO TIP OVER.
• DO NOT LEAVE THE STROLLER AND ITS ACCESSORIES NEAR AN OPEN
FIRE OR EXPOSED FLAME.
• DO NOT PLACE MORE THAN 4 KG IN THE BASKET, 1KG IN THE SEAT
BACK REST POCKET (IF SUPPLIED), 1KG IN THE BASSINET POCKET (IF
SUPPLIED) OR 1KG IN THE ACCESSORY BAG (IF SUPPLIED).
IMPORTANT NOTES:
WARNINGS: TO AVOID INJURY OR DEATH:
• DO NOT LEAVE CHILDREN UNATTENDED.
• SECURE THE CHILD IN THE HARNESS AT ALL TIMES.
• DO NOT CARRY EXTRA CHILDREN OR BAGS ON THIS STROLLER.
• MAKE SURE CHILDREN ARE CLEAR OF ANY MOVING PARTS IF YOU
ADJUST THE STROLLER.
• DO NOT USE ANY ACCESSORIES OTHER THAN THOSE APPROVED FOR
USE WITH THIS STROLLER BY BRITAX.
• IT IS UNSAFE TO USE ACCESSORIES NOT APPROVED FOR USE WITH THIS
STROLLER.
ALWAYS APPLY THE BRAKES WHENEVER THE STROLLER IS STATIONARY.
Page 10

10
1.1 IMPORTANT NOTES & WARNINGS cont...
This CAUTION Symbol is shown at certain steps in this
Instruction Manual to highlight the danger of being
injured by moving parts.
CAUTION
WARNINGS:
• THE MAXIMUM WEIGHT OF THE CHILD USING THIS STROLLER IS NOT TO
EXCEED 20 KG, 9KG FOR THE BASSINET, 9KG FOR THE INFANT CARRIER
OR 17KG FOR THE SECOND SEAT.
FOR IMPORTANT NOTES AND WARNINGS ON ACCESSORIES - REFER TO
THEIR INDIVIDUAL SECTIONS IN THIS BOOK. THE MAXIMUM WEIGHT VARIES
FOR EACH ACCESSORY.
Page 11

1.2 MANUAL HANDLING TECHNIQUES
11
The SMART lifting technique
This technique can be used to pick up small light loads from low levels.
Size up the Load
• Assess the load (size, shape and weight).
• Assess whether the load needs to be moved;
• Where is it going to be placed” Check that there are no obstructions;
• Assess whether mechanical or human assistance is required.
Move the Load as close to the body as possible
• A load is heavier to lift or carry if it is not close to the body.
• The whole hand should be used to ensure a firm grip.
Always bend your knees
• Maintain balance.
• Keep feet apart and in a comfortable position.
• Minimise lower back bending.
• Bend knees preferable at as large an angle as possible but not at a right angle use a semi squat in preference to a full squat.
Raise the load with your legs
• Achieve the lift smoothly and without jerkiness.
• Maintain the normal curvature of the spine to allow the force of the load to be
distributed evenly from the spine to the pelvis.
Turn your feet in the direction that you want to move the load.
• Avoid unnecessary bending, twisting and reaching.
• Change direction by turning your feet and not your back.
• To set the load down, squat down, keep your head up and let
• Let your legs do the work.
Remember to ‘THINK TALL’ chest lifted, shoulders relaxed, chin tucked in and
head level.
Page 12
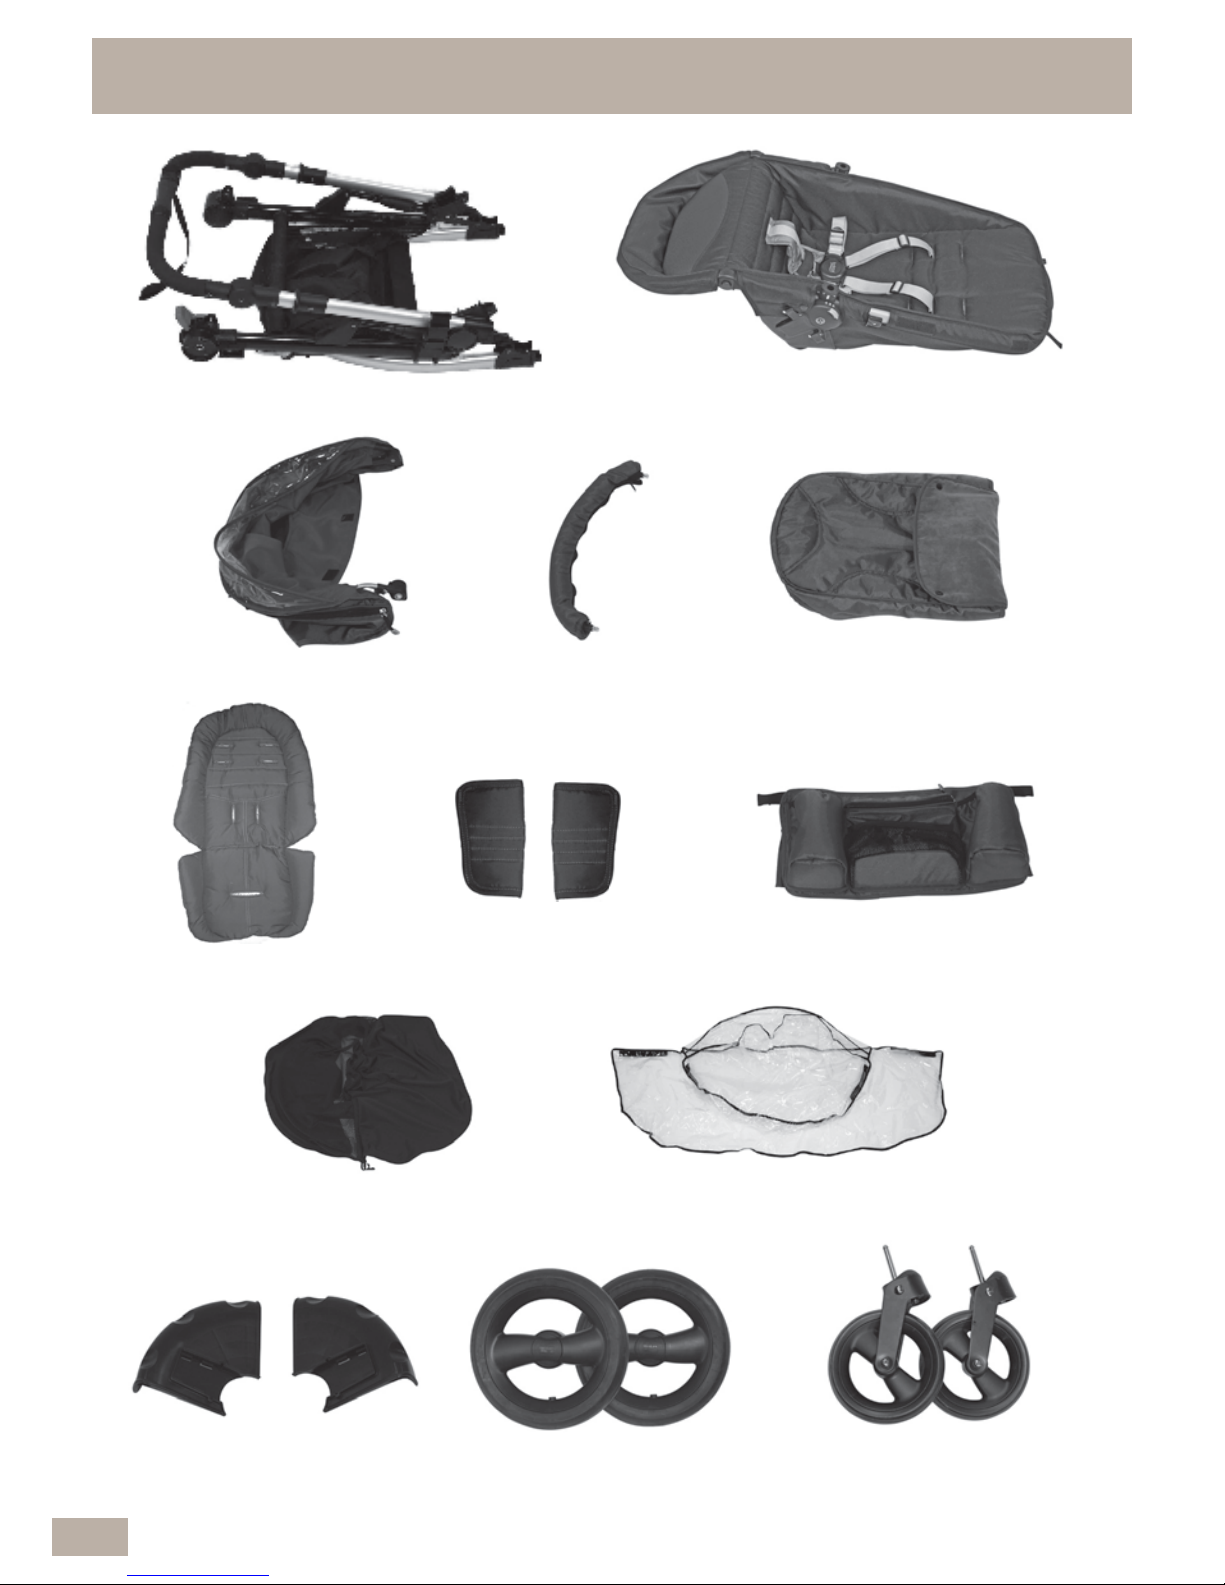
1.3 STROLLER PARTS
Rain coverMesh cover
Stroller frame Stroller seat
Shoulder pads
Seat pad
Accessory bag
Wheel guards Front wheels
(4 wheel model)
Foam filled
Rear wheels
Boot coverCanopy Arm bar
12
Page 13

1.4 STROLLER FRAME OPENING
13
A After carefully removing the contents from
the carton, Lay the frame on a flat surface
and remove any excess packaging.
B With due care, hold the handle with one
hand and with the other hand release the
frame lock. Lift the handle up to partially
open the frame.
C Continue to lift the handle up to open the
frame until the left and right side frame
mouldings engage and lock together.
D Push down on the handle to confirm the
frame is locked open.
IMPORTANT NOTES:
PLEASE REFER TO PAGE 11 FOR SMART LIFTING TECHNIQUES.
• RELEASE THE STORAGE LATCH WITH DUE CARE AND OPEN THE FRAME.
• WHEN OPENING THE STROLLER, BE AWARE OF THE DANGER OF BEING
INJURED BY MOVING PARTS AND LOCKING DEVICES DURING THE
PROCESS. KEEP ALL HANDS AND LIMBS CLEAR OF THESE PARTS.
• THERE IS POTENTIAL FOR FINGERS OR PARTS OF THE BODY TO BE
INJURED WHEN THE STROLLER IS BEING UNFOLDED, DUE CARE SHOULD
BE EXERCISED.
• KEEP CHILDREN CLEAR OF THE STROLLER DURING UNFOLDING OF THE
STROLLER.
• OPEN THE STROLLER SLOWLY AND BE CAREFUL WHERE YOU PLACE
YOUR HANDS. KEEPING YOUR HANDS ON THE HANDLE ISTHE BEST WAY TO
UNFOLD THE STROLLER.
CAUTION
Page 14
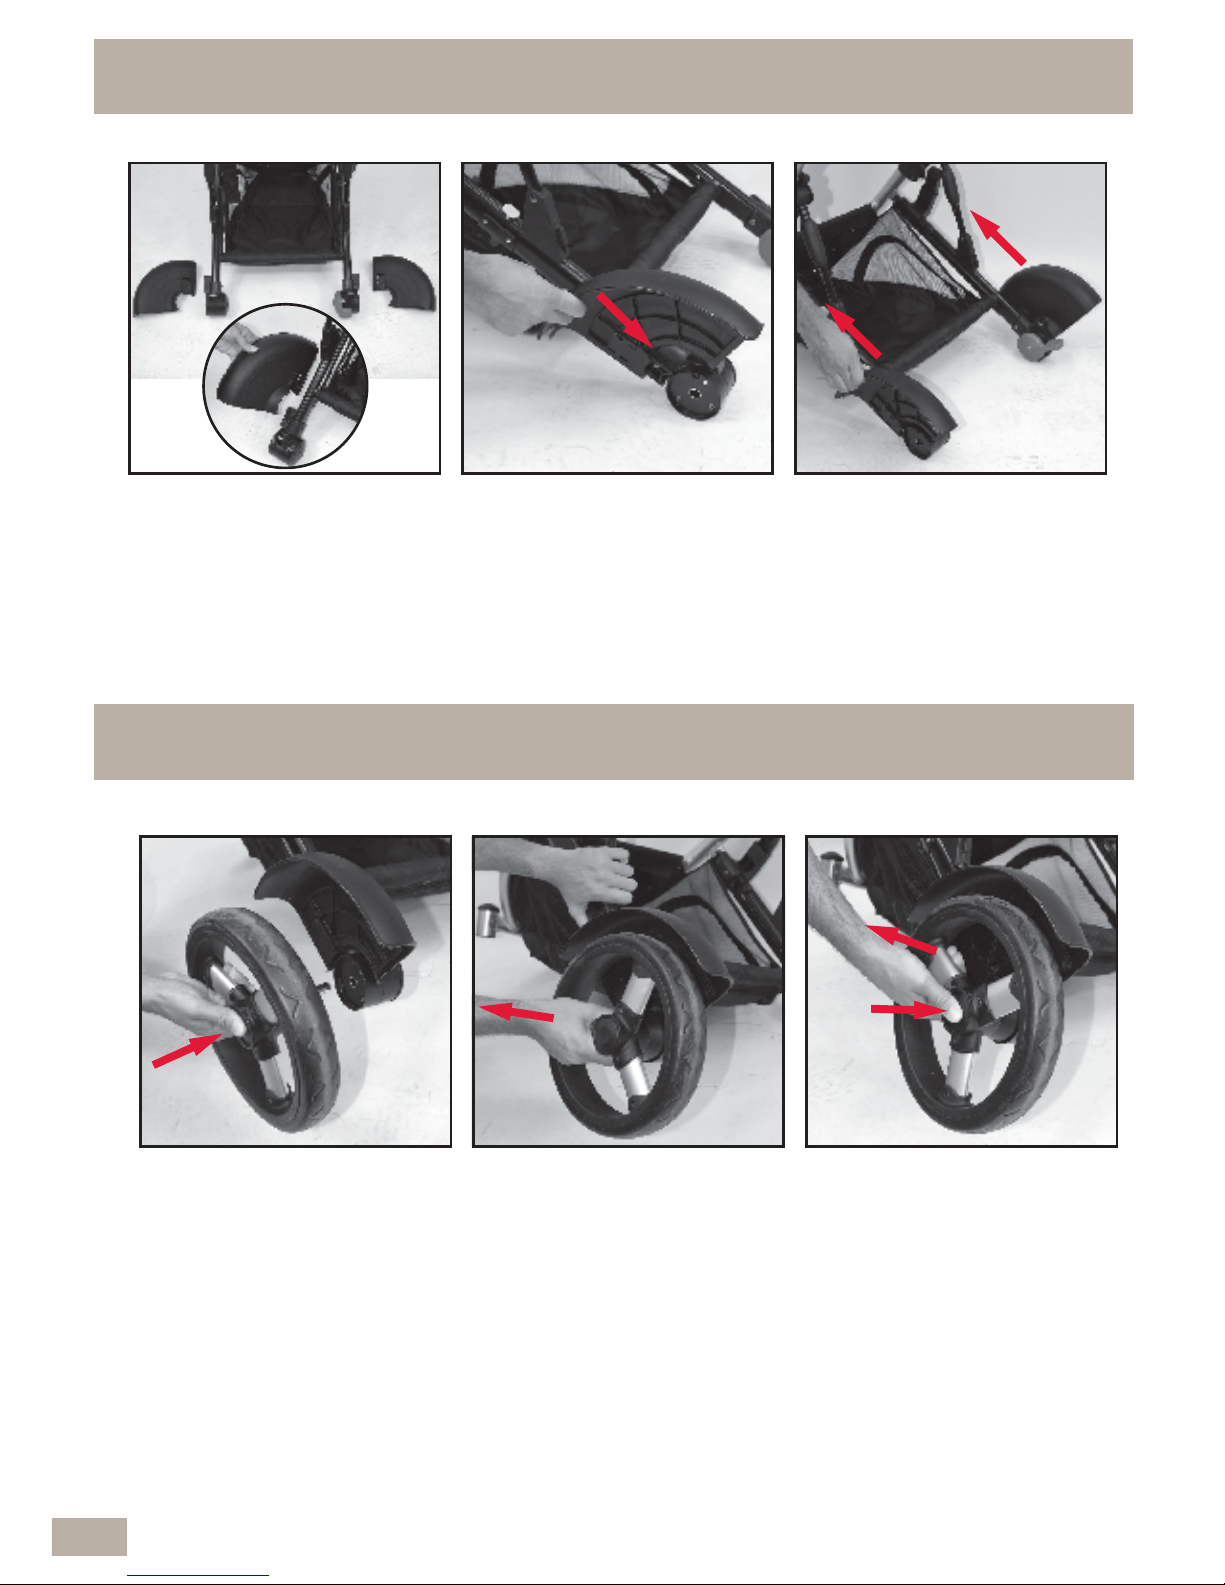
A Position the left and right
guards beside the frame as
shown.
B Fit each guard onto the
moulding at the base of the
leg tubes.
Push down until they
lock into position.
C Pull on each guard in the
direction shown, to make sure
they are locked on correctly.
A To fit the rear wheels,
align the wheel axle/rod
with the hole in the wheel
moulding. Press in and
hold the central button,
then push the rear wheel
fully into the wheel
moulding.
B Release the central
button, then pull on the
rear wheel to make sure
it is locked on. Repeat
steps A & B to fit the
other rear wheel.
C To release the rear
wheels, press in and hold
the central button. Then
slide the wheel out and
remove.
Repeat for the other side.
1.5 FIT & REMOVE THE WHEEL GUARDS
1.6 REAR WHEEL FITTING & REMOVAL
14
Page 15
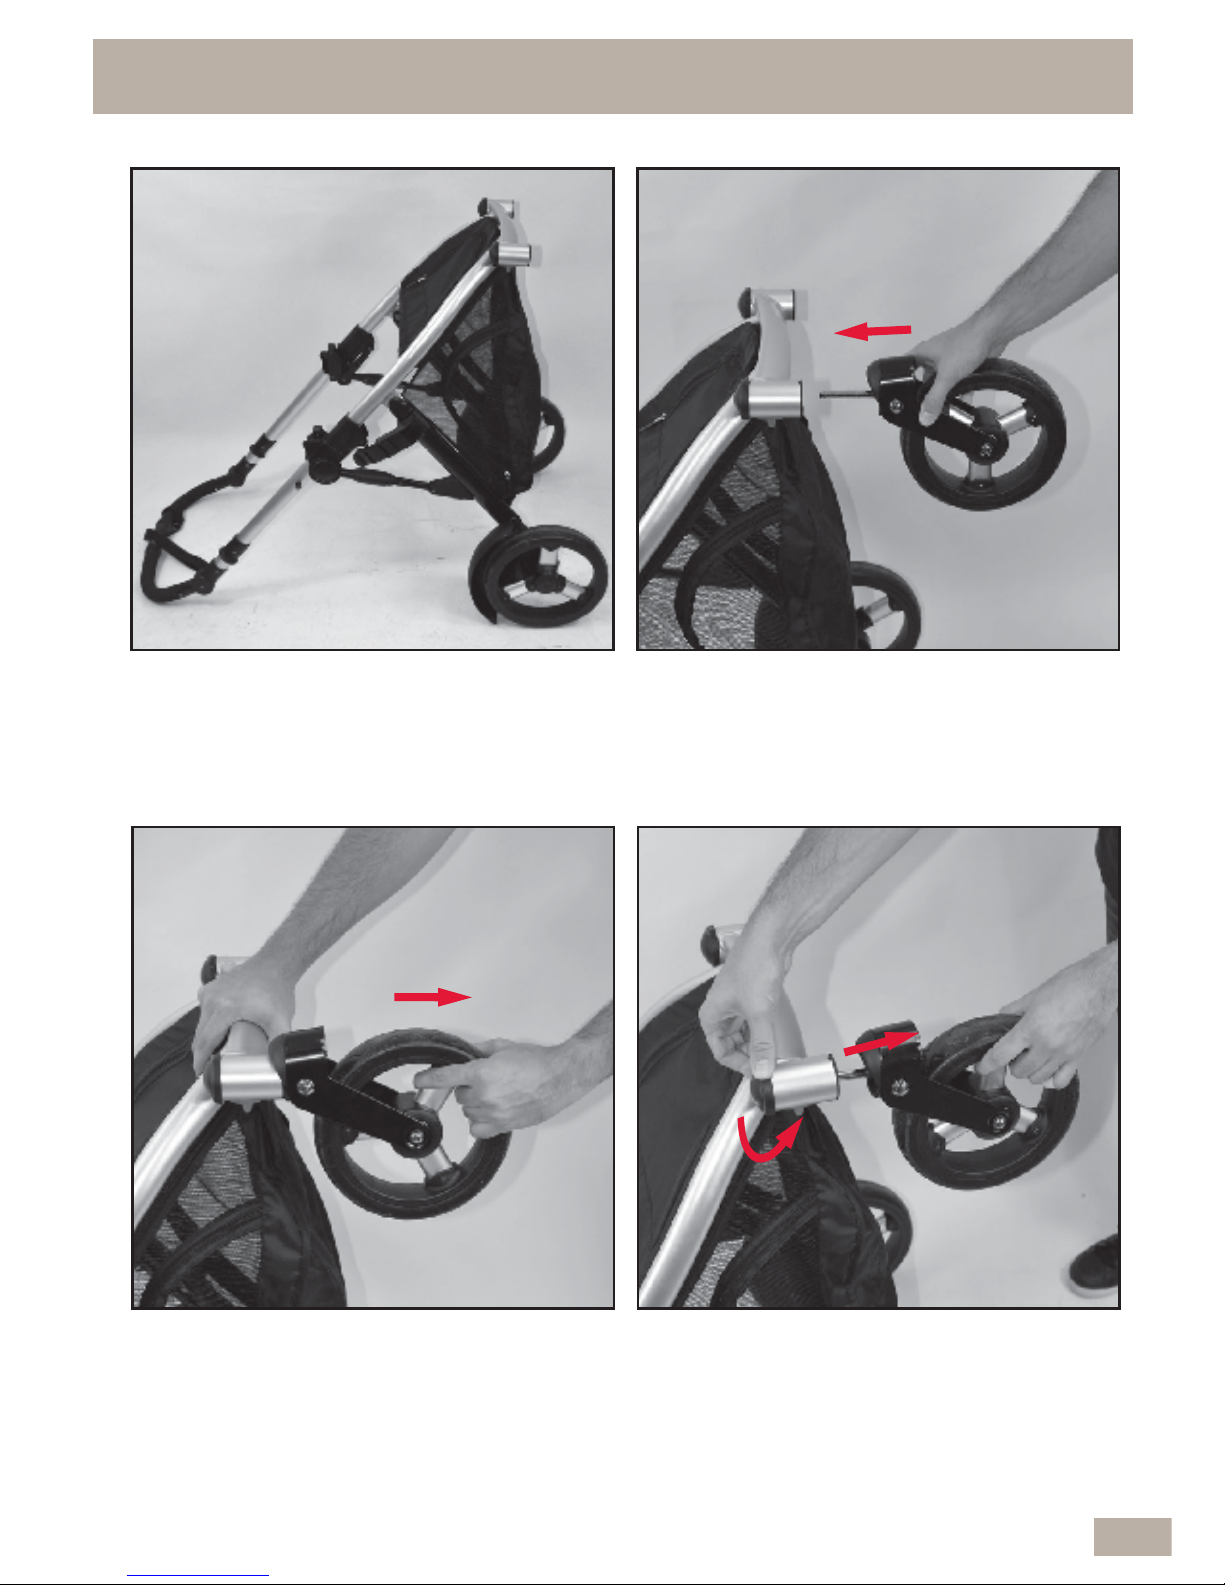
NOTE: Tip the frame backwards for
more convenient assembly.
A Take each front wheel assembly and push
the axle into the wheel housing, until it
locks in.
B Pull on both front wheel sets to make sure
they are locked on.
C To remove the wheel assembly, turn the top
knob to the left to unlock and release the
wheel.
1.7 FRONT WHEEL FITTING & REMOVAL
15
Page 16

A To lock both rear wheels, press the red
brake lever all the way down until you hear
a click. The indicator will change to red.
Push the Stroller back and forth to confirm
the wheels are locked.
1.9 TO OPERATE THE BRAKE
B To unlock both rear wheels, press the red
brake lever all the way down until you
hear a click. The indicator will change to
green.
Indicator
A For swivel wheel mode
slide both red latches up
until they lock it into
position.
B To lock the front wheels
into the fixed position,
slide both red latches down
until they lock.
C The front wheels will
automatically lock into
the fixed position when
you move the stroller
forward by
approximately one metre.
1.8 SWIVEL/FIXED FRONT WHEEL OPERATION
16
NOTE: Always lock the swivel wheels when using the stroller on rough surfaces as this will
minimise wheel wobble.
WARNING: ALWAYS APPLY THE BRAKES WHEN THE
STROLLER IS STATIONARY.
NOTE: It is recommended to leave the brake locked during the remainder of the
stroller and accessory assembly.
Page 17
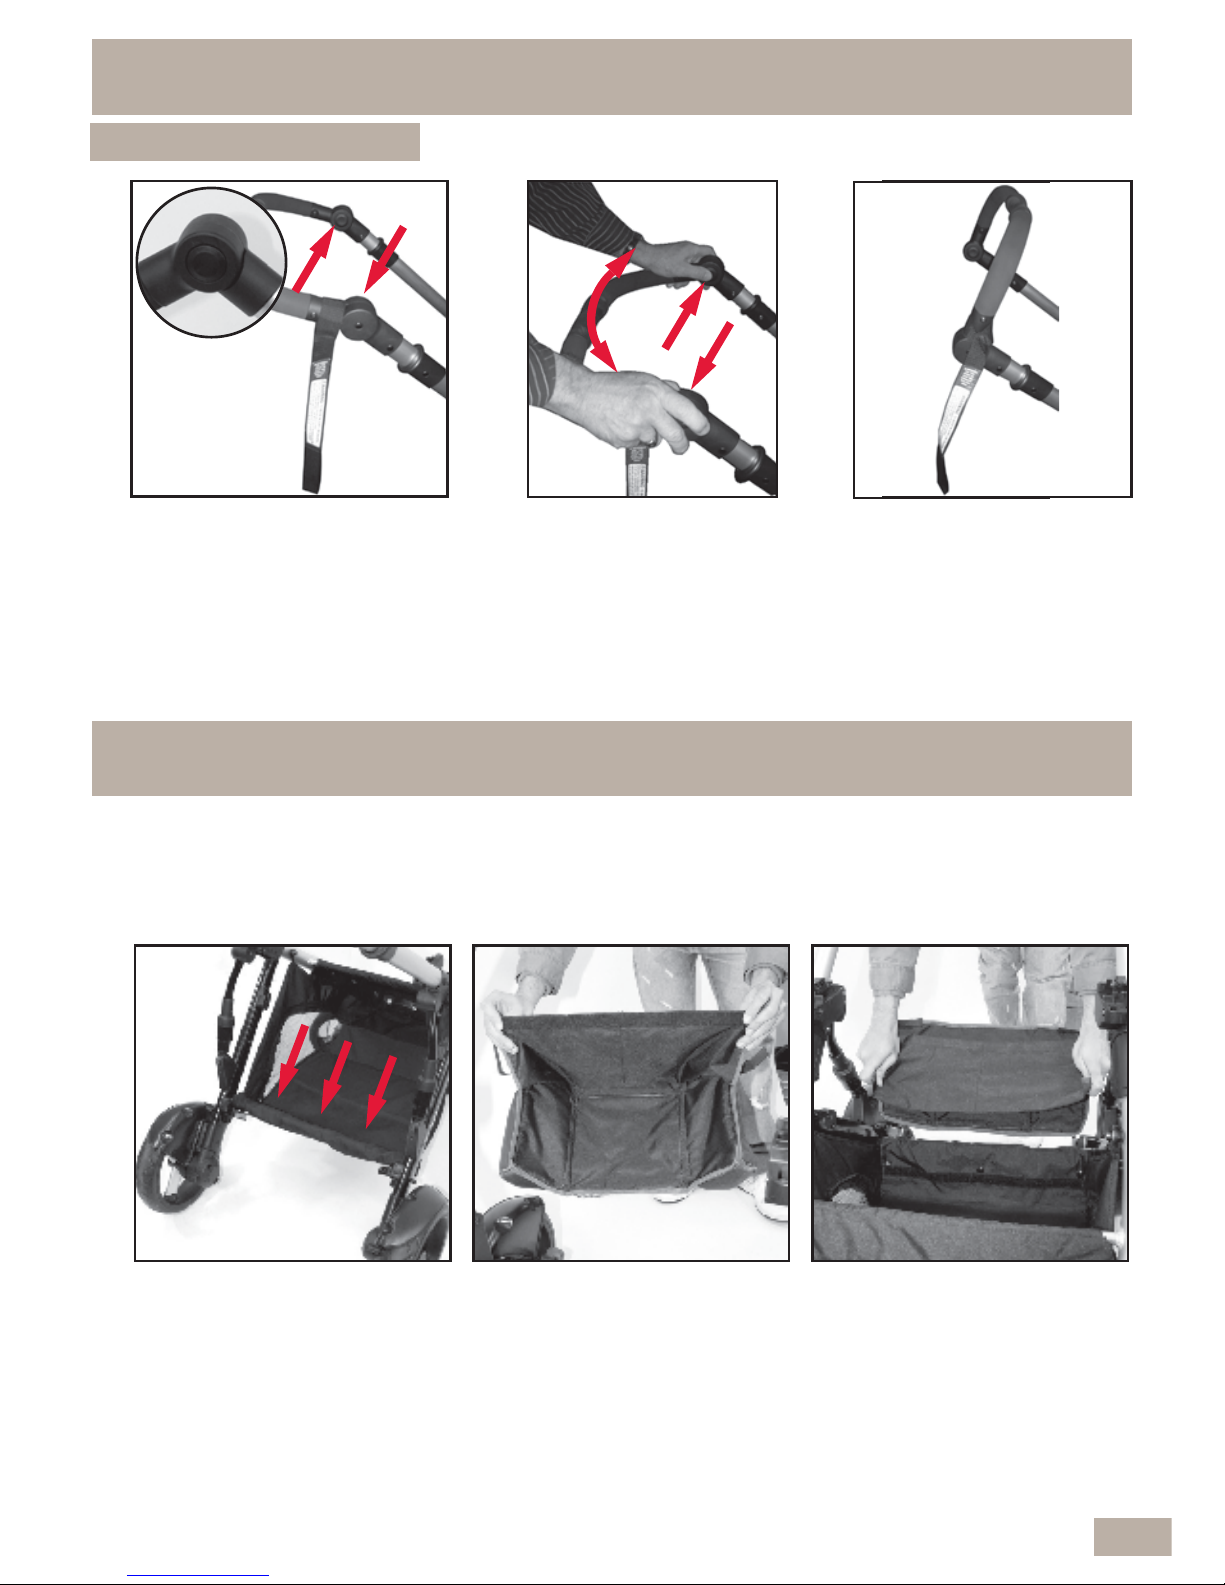
A The bag firstly needs
to be attached to the
hook and loop tab on the
inside of the stroller
basket.
B Hold the bag up by the
black back flap on the
rear side of the bag.
Note: the hook and
loop tab on the edge of
the flap.
C Attach the hook and
loop tab to the hook and
loop tab on the inside of
the basket. This will help
to keep it in place.
Note: this flap also
contains two pockets.
1.11 TO FIT THE ACCESSORY BAG
A There is an adjusting
button on the inside of
each handle moulding.
B Press both buttons in
together and hold.
Now rotate the handle
up or down to the
desired height
position.
1.10 TO ADJUST THE PIVOTAL HANDLE
C When the desired
height position has
been achieved,
release both buttons.
7 POSITIONS
17
IMPORTANT NOTE:
DO NOT PLACE MORE THAN 1KG IN THE ACCESSORY BAG.
Page 18
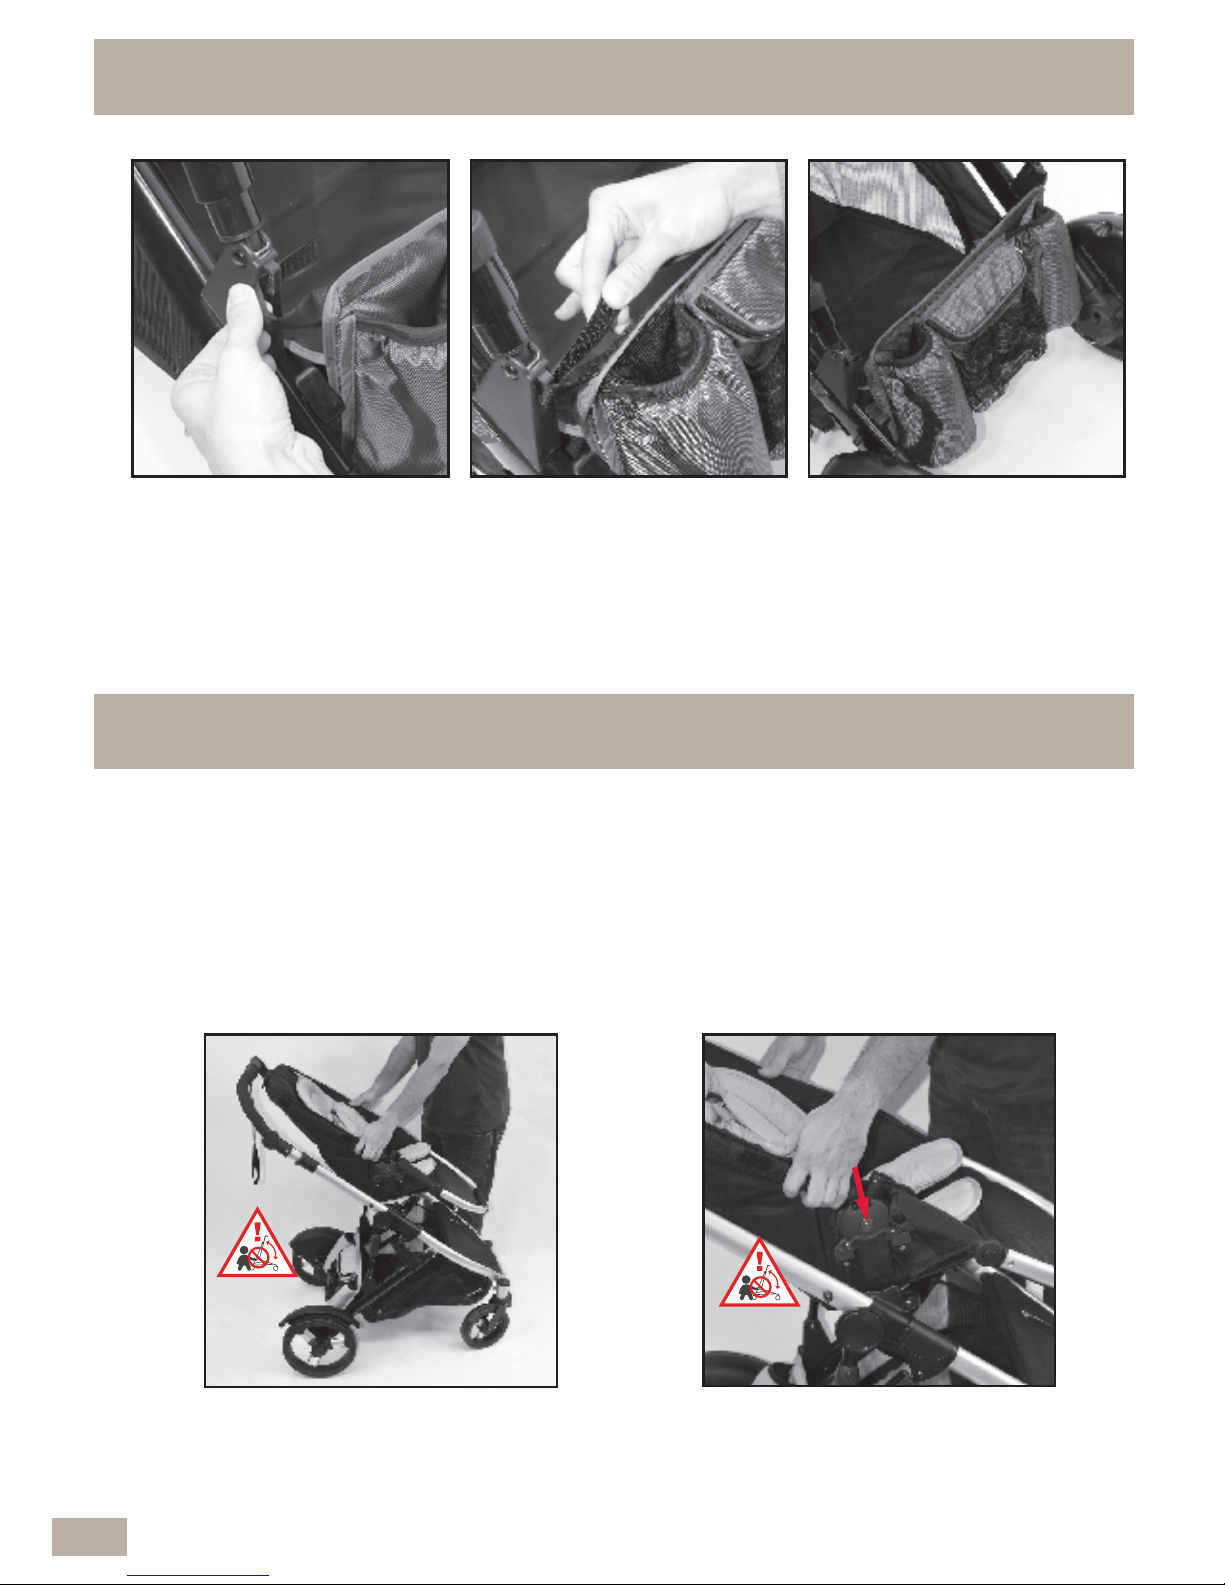
D Now thread each hook
and loop tab through the
frame moulding brackets
as shown.
NOTE: Remove the bag when using the second seat.
E Attach each strap to
the hook and loop tab
sewn onto the bag to
hold in place.
F The accessory bag is now
ready for use.
1.11 TO FIT THE ACCESSORY BAG Cont...
18
1.12 FITTING THE STROLLER SEAT TO THE FRAME
A Hold the Stroller seat over the frame.
B Align the Stroller seat mouldings on
both sides, over the frame connection
sockets located in the middle of the
stroller.
NOTE: The seat is reversible so it can face in either forward or
rearward position.
CAUTION
CAUTION
IMPORTANT NOTE:
ALWAYS REMOVE YOUR CHILD FROM THE STROLLER SEAT BEFORE
INSTALLING, REMOVING OR CHANGING SEAT DIRECTION.
Page 19
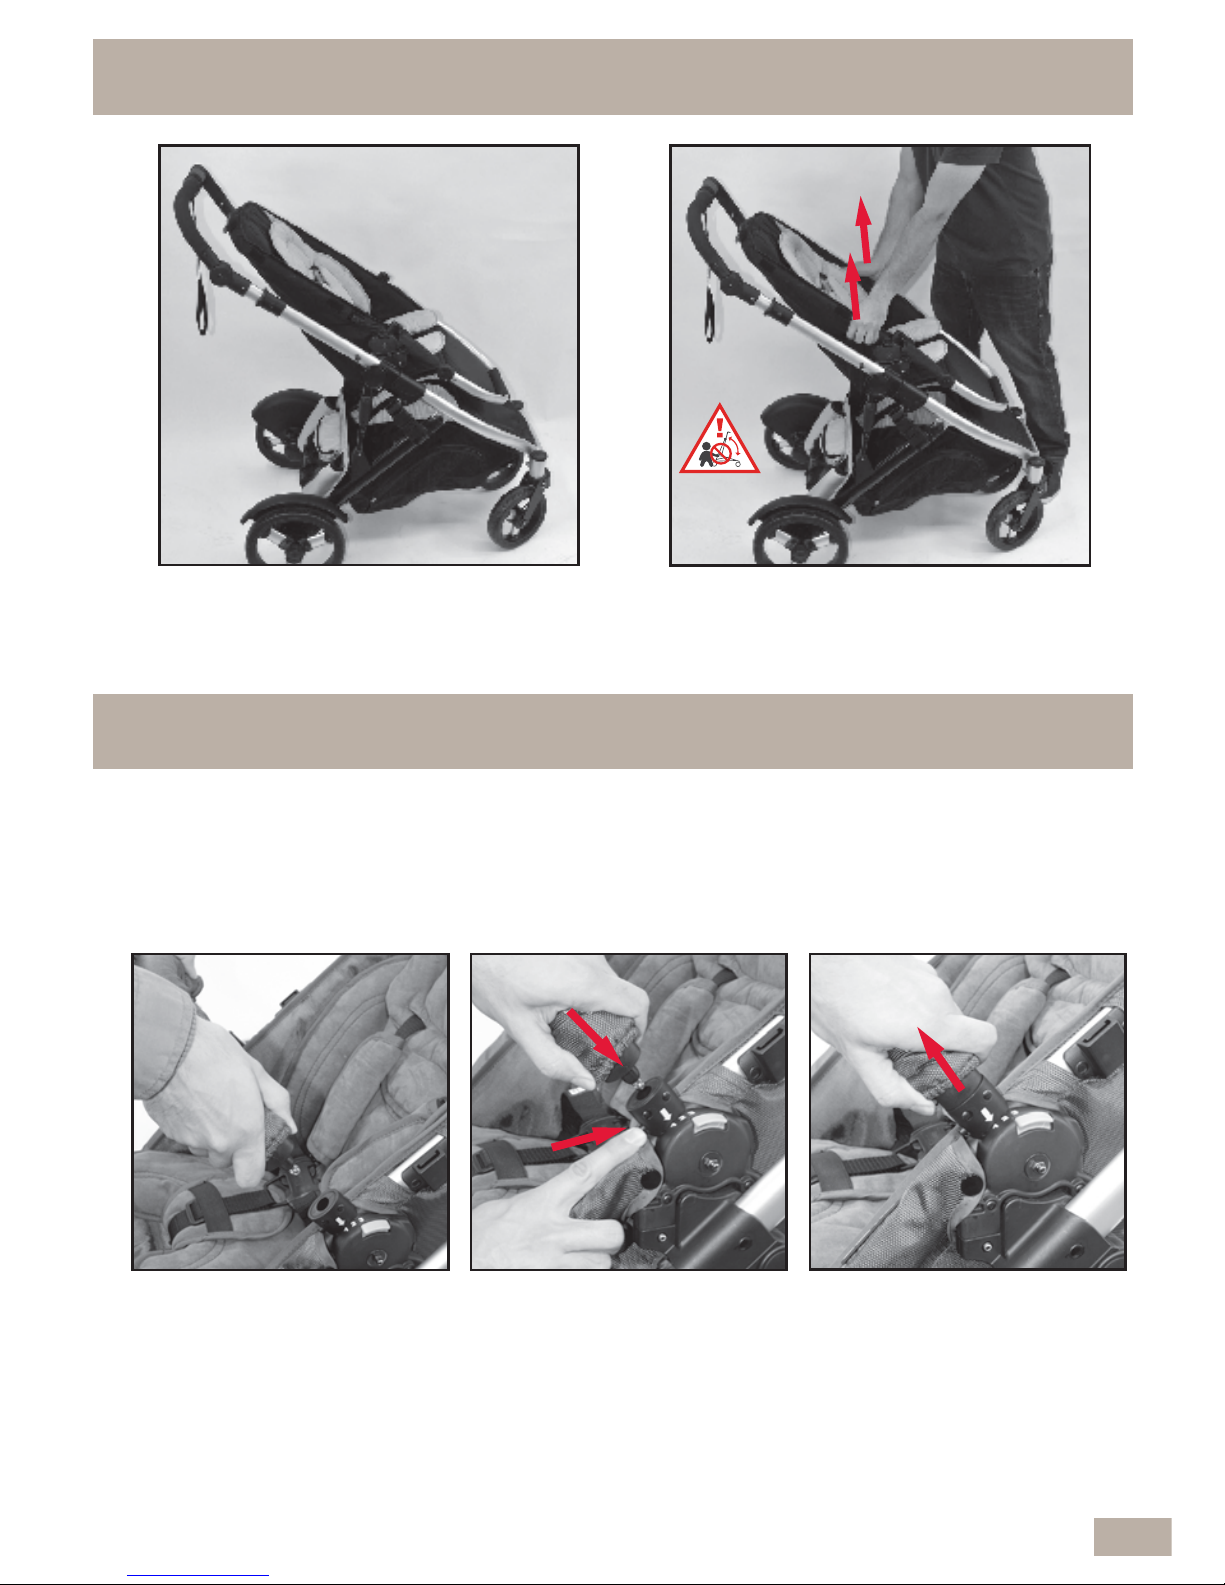
1.12 FITTING THE STROLLER SEAT TO THE FRAME
C Push the Stroller seat down until
both seat mouldings are locked into
the frame sockets.
D Pull up on both sides of the stroller
seat to make sure it is securely
locked into the stroller frame.
19
CAUTION
A One side at a time, align
the arm bar pin with the
frame moulding as shown.
B Press in and hold the
engaging/release button,
then insert the pin all the
way in.
C Release the button, then
pull on the arm bar to
make sure it is engaged.
Repeat steps A, B & C for
the other side.
1.13 TO FIT THE ARM BAR
IMPORTANT NOTE:
WHEN A CHILD IS IN THE STROLLER, KEEP THE ARM BAR ATTACHED AT ALL
TIMES.
Page 20
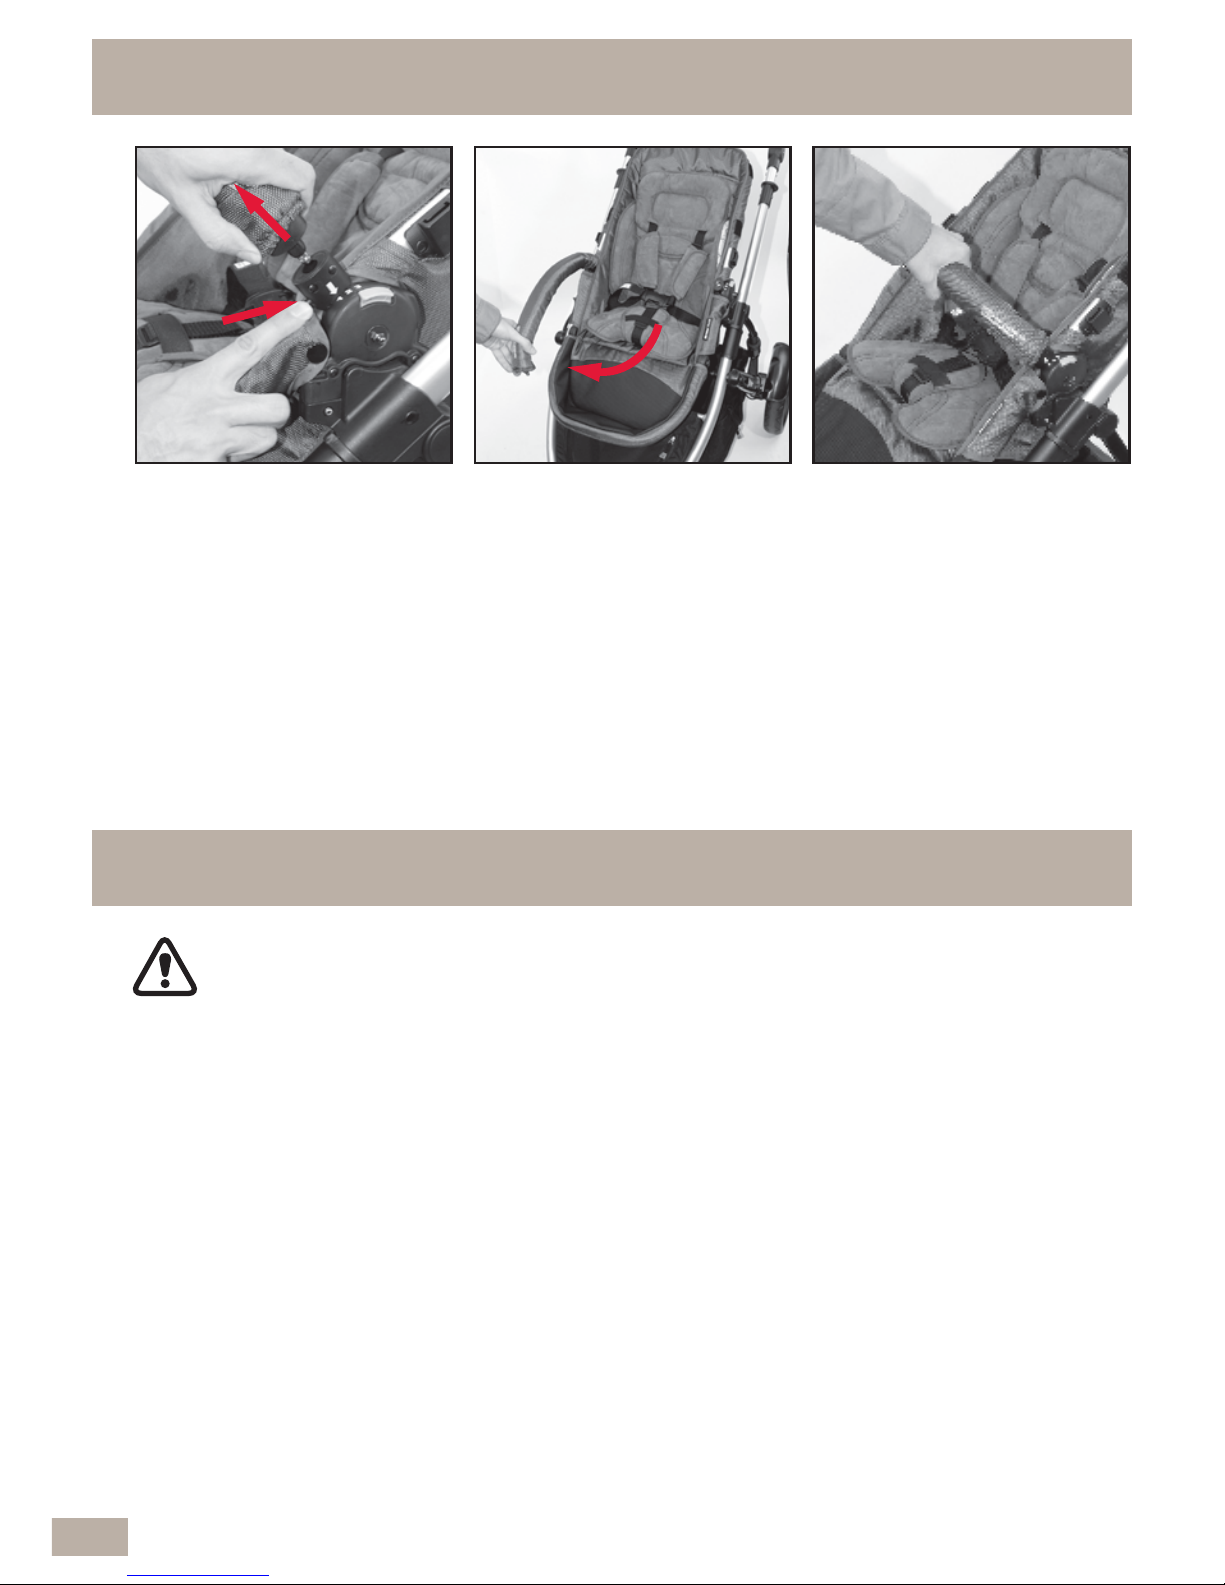
D To release the arm bar,
press in and hold the
release button located
under the arm bar
connector, then pull out
the arm bar.
E Rotate the arm bar clear of
the stroller seat to assist
with putting a child in the
stroller.
1.13 TO FIT THE ARM BAR Cont...
20
F Lock the arm bar back into
position after fastening the
child in the harness.
Ensure the arm bar is
correctly installed.
The ‘Caution’ text must
appear on the right hand
side so it is possible to
read (not upside down).
1.14 ADJUSTING THE BACKREST
WARNINGS:
• THE UPRIGHT POSITIONS ARE NOT SUITABLE FOR USE WITH CHILDREN
LESS THAN 6 MONTHS OLD.
• THE LOWEST RECLINE POSITION SHOULD BE USED TO TRANSPORT
BABIES. THE BACKREST CAN BE ADJUSTED TO A MORE UPRIGHT
POSITION AS THE CHILD GROWS OLDER AND IS ABLE TO SUPPORT ITS
HEAD WITHOUT ASSISTANCE.
NOTE: If the child is sitting in the seat, support the backrest as it reclines.
If you have difficulty adjusting the backrest you may need to remove the child
from the seat to allow you to raise or lower the backrest with ease.
Page 21
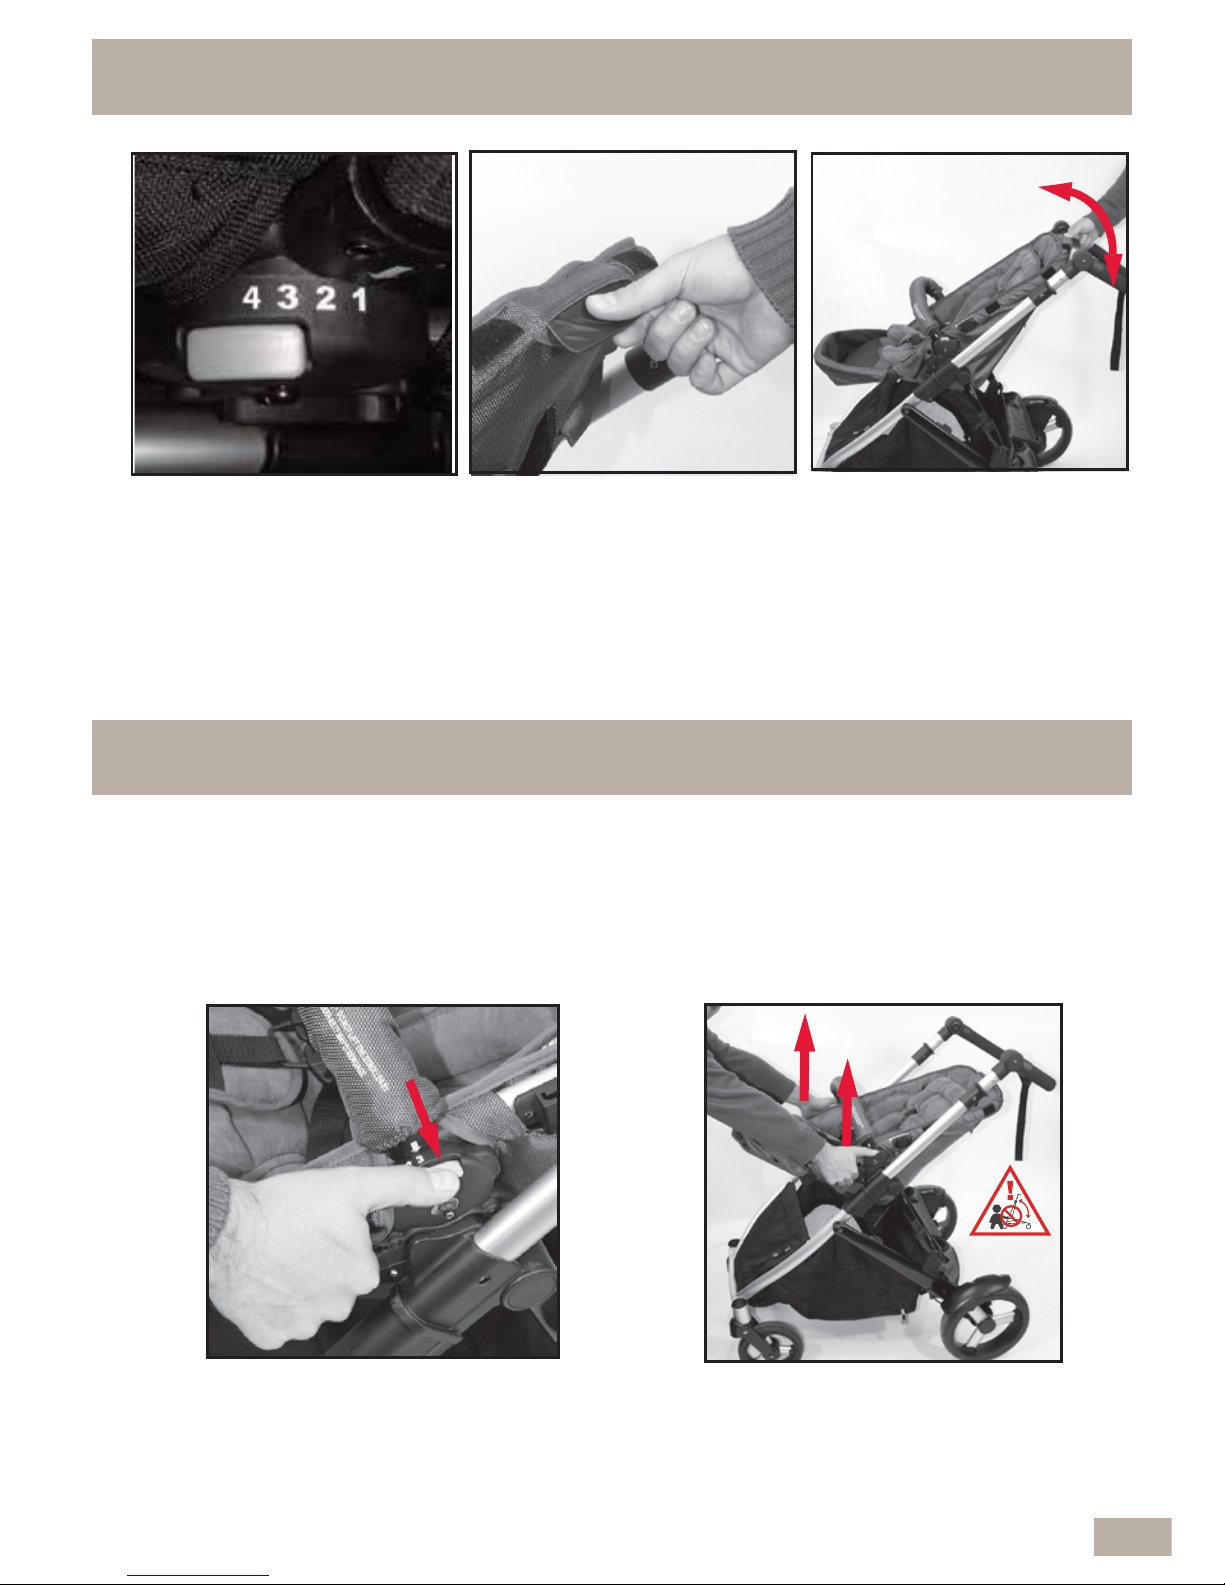
1.14 ADJUSTING THE BACKREST Cont...
1.15 STROLLER SEAT REMOVAL
A Hold the seat or arm bar on both
sides with your hands. Then with
your finger or thumbs, press down
and hold the grey buttons.
B While holding the grey buttons, lift the
seat out of the frame.
21
CAUTION
IMPORTANT NOTE:
ALWAYS REMOVE YOUR CHILD FROM THE STROLLER SEAT BEFORE
INSTALLING, REMOVING OR CHANGING SEAT DIRECTION.
C Continue to hold the lever
up and adjust the seat to
any one of four positions.
A There are 4 indicated seat
positions while the seat is
facing forward or
rearward.
B To adjust up or down,fully
lift the adjusting lever all
the way up.
Page 22
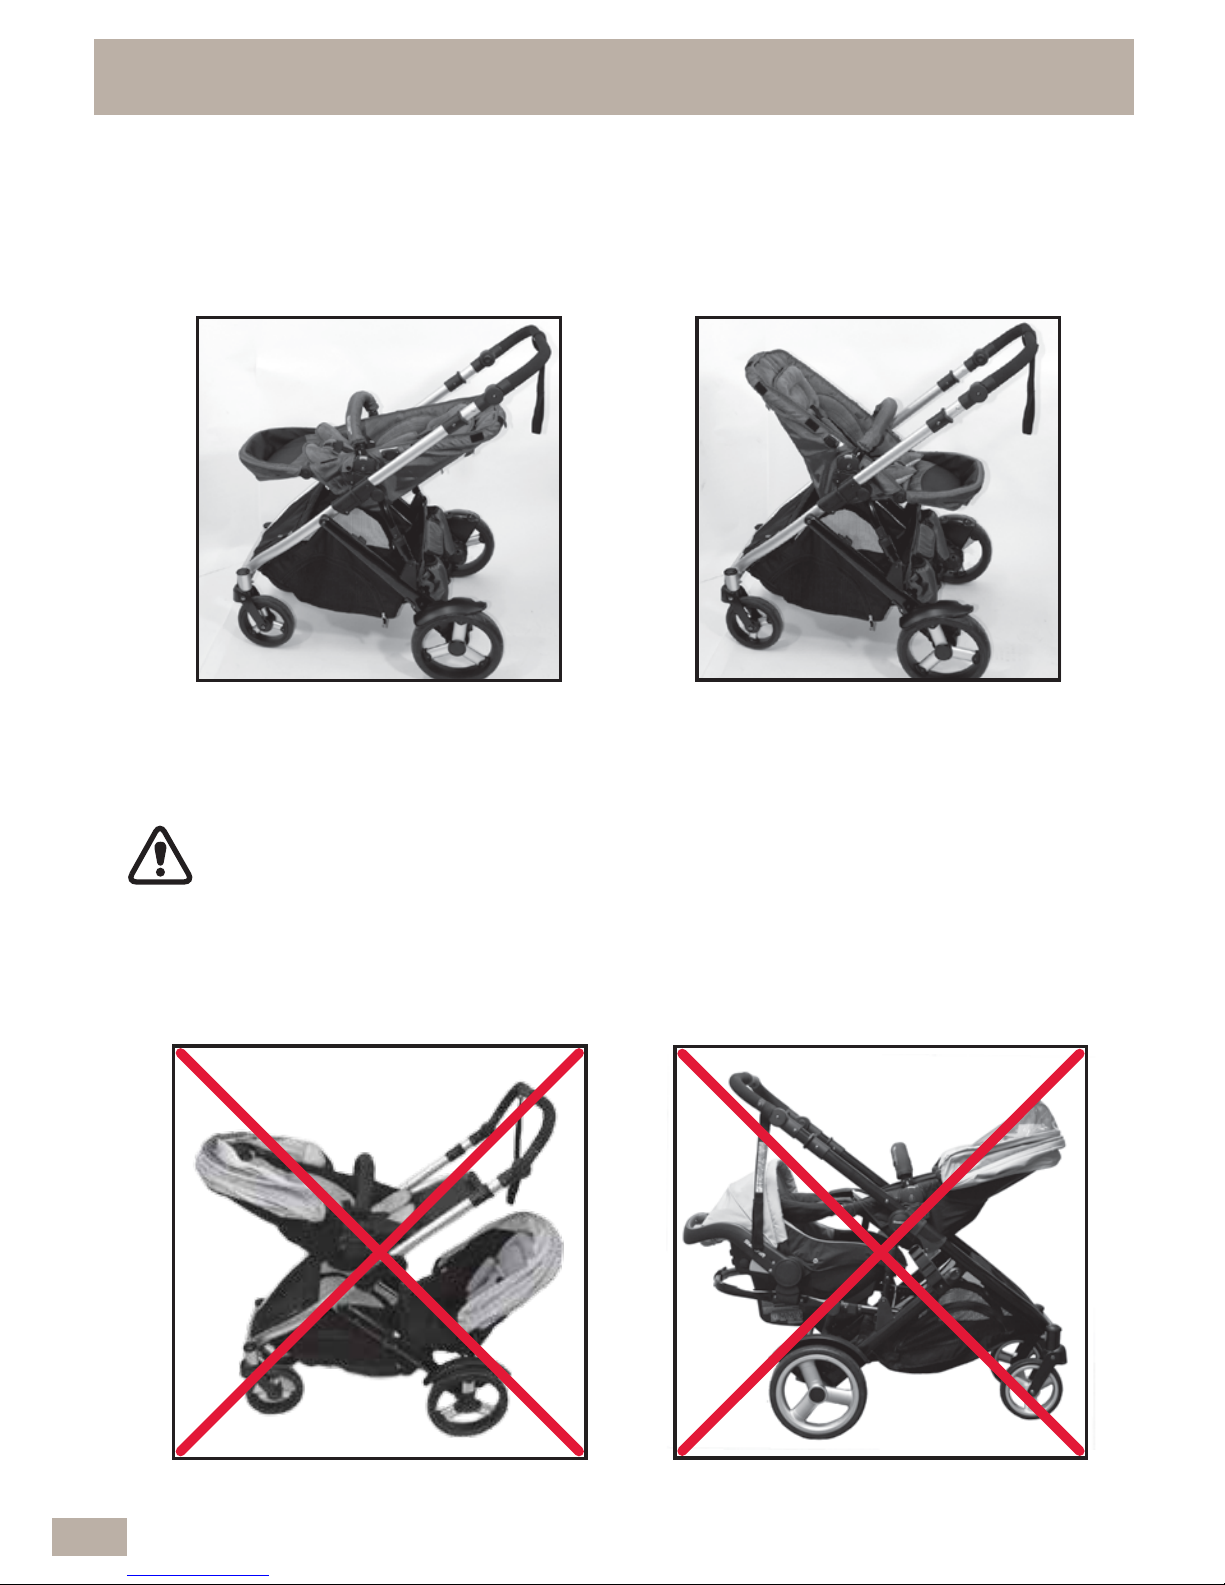
A Refer to section 1.15 for removing the seat
from the frame.
B Turn the Stroller seat around to face
handle. Refer to section 1.12 for fitting
the seat to the frame.
1.16 TO FACE SEAT IN OPPOSITE DIRECTION
22
WARNING - IT IS NOT RECOMMENDED TO USE THE TOP
SEAT FACING IN THIS POSITION IF YOU ARE USING EITHER THE
SECOND SEAT OR THE INFANT CARRIER IN THE LOWER FRAME
POSITION.
IMPORTANT NOTE:
ALWAYS REMOVE YOUR CHILD FROM THE STROLLER SEAT BEFORE
INSTALLING, REMOVING OR CHANGING SEAT DIRECTION.
Page 23
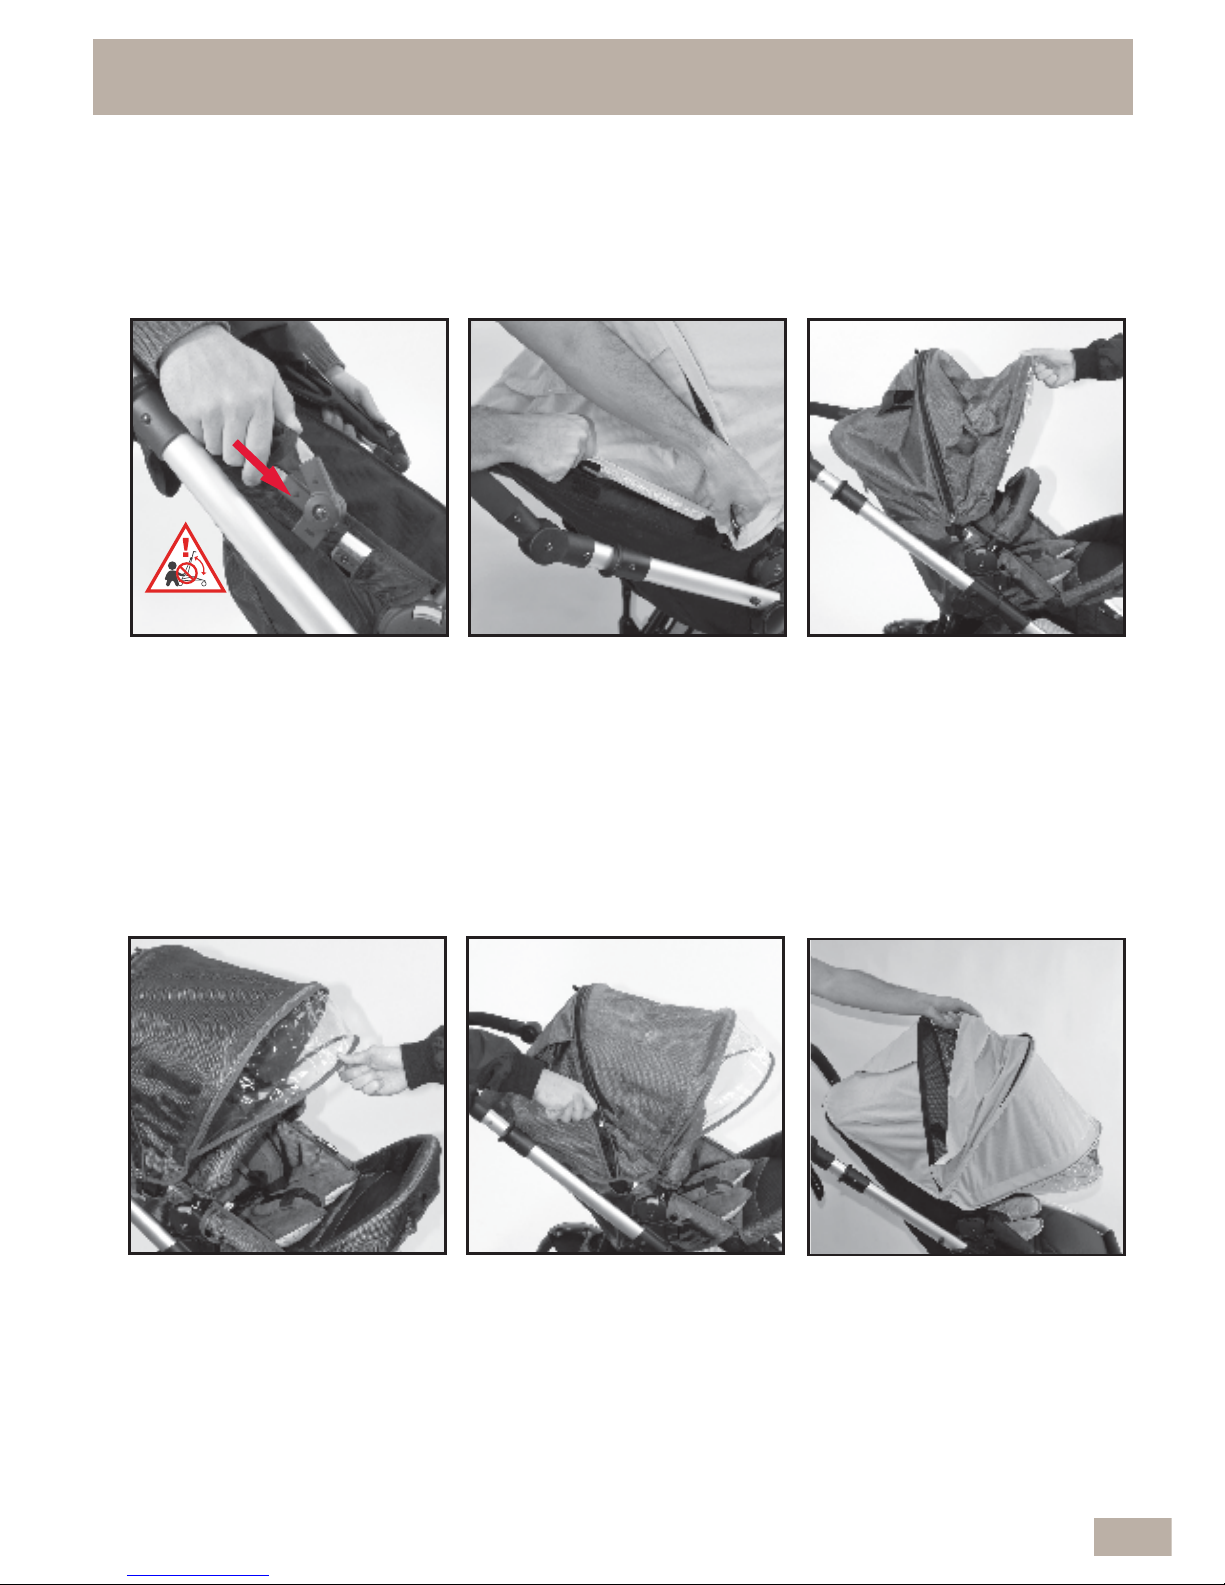
B Attach the canopy hook
strips to the pile strips
around the top and sides
of the frame for a secure
fit.
C To adjust the canopy, open
by pulling forward, or close
by pushing it backward.
1.17 TO FIT, USE & REMOVE THE CANOPY
F The zip should be fully
unzipped to expose the
centre mesh section. Use
the fabric to expose or
enclose the mesh section.
Reverse the above steps to
close the mesh section.
23
The sun is very strong. DO NOT LEAVE YOUR CHILD EXPOSED TO THE SUN. The
canopy or hood on this product will not give your child total protection from the
harmful rays of the sun.
IMPORTANT NOTE:
A To attach the canopy,
adjust the backrest to the
upright position, then slide
the canopy mouldings on
the frame mouldings until
they connect together.
Pull up to confirm they are
locked on.
CAUTION
D For extra protection, pull
visor out from under the
front of canopy.
E To expose the mesh
section of the canopy,
unzip the center section.
Page 24
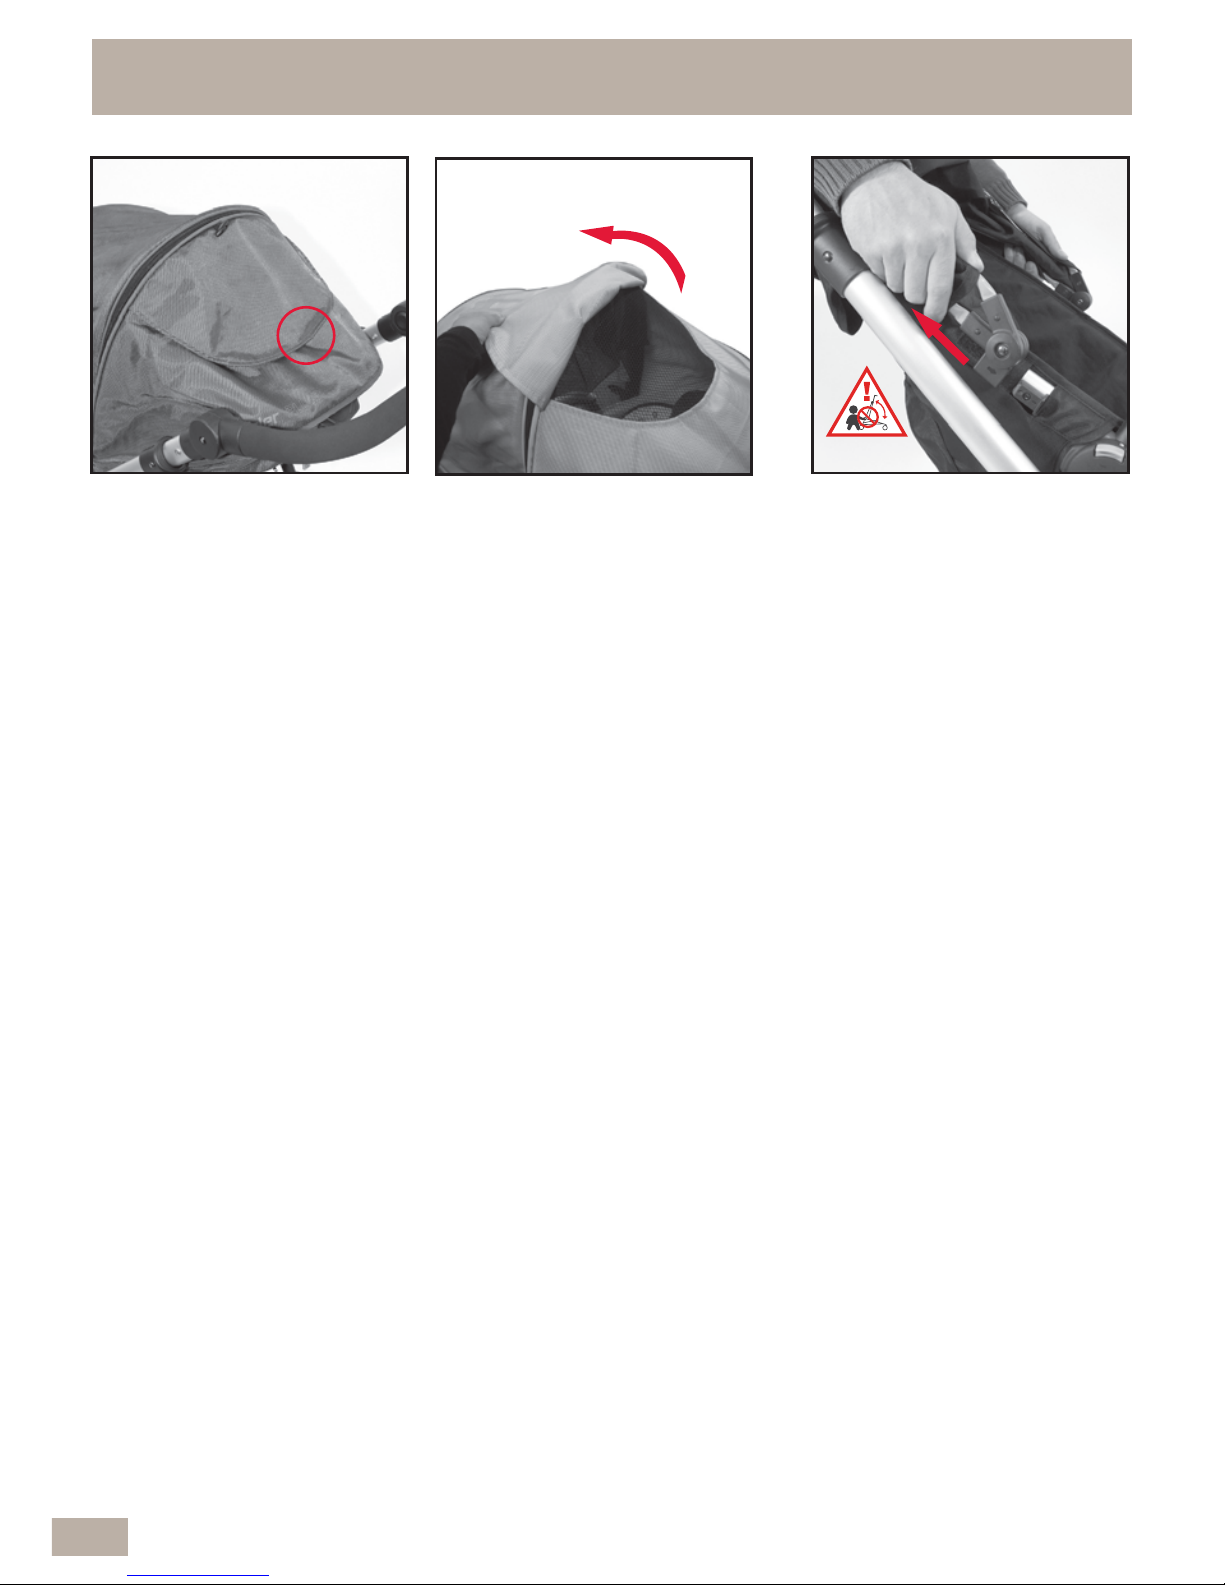
G The window cover is kept
in place by a hidden
magnet located at the
bottom of the window
cover.
H To open the window cover,
simply lift the cover and
place over the centre bow.
I To remove the canopy, pull
the canopy off the frame
mouldings.
1.17 TO FIT, USE & REMOVE THE CANOPY cont...
24
CAUTION
Page 25
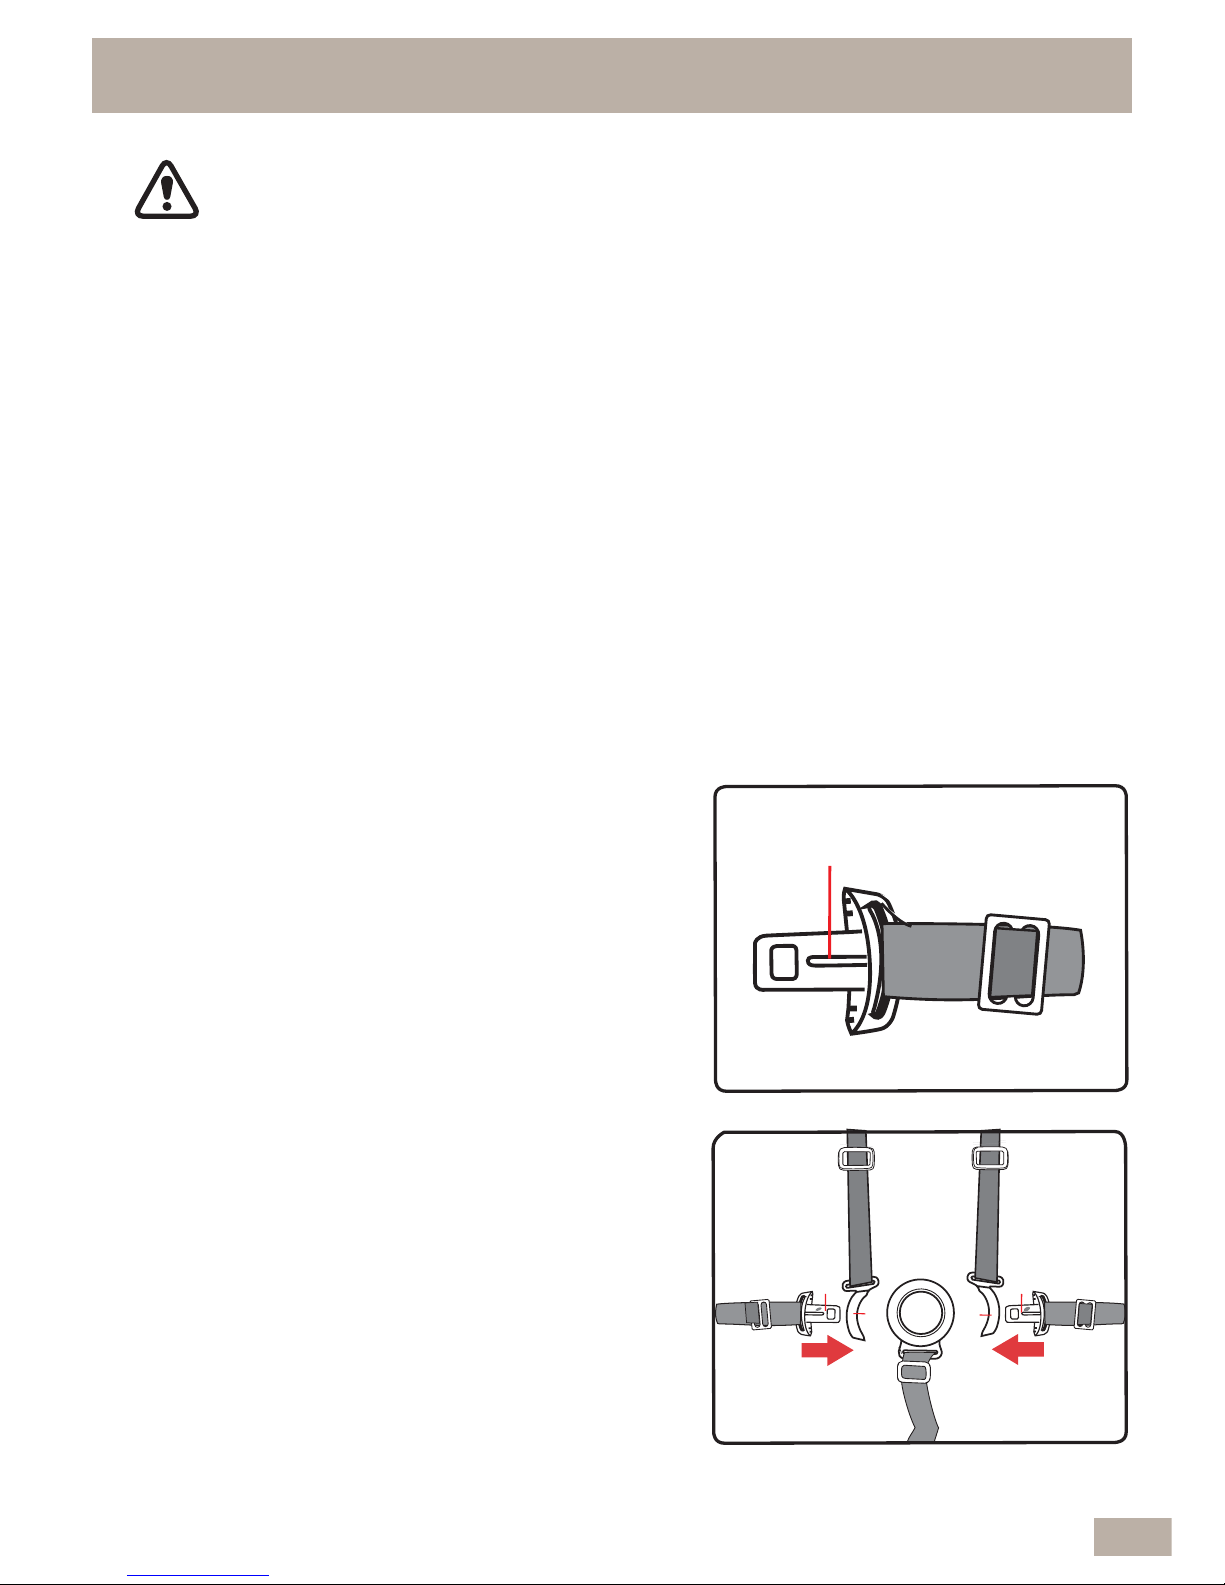
1.18 HARNESS ADJUSTMENT
25
Raised Rib
NOTE: Each waist buckle tongue has a raised rib
on one side and can only be locked into the
buckle assembly with the raised rib facing up.
Shoulder straps
Waist straps
Waist straps
A A
B
B
Crotch strap
Buckle
Assembly
A
Set parking brake. Place child in seat. Slip one
shoulder strap over each shoulder.
Position crotch strap between legs. Push the
buckle tongues (A) on waist straps through the
tongue guides (B) on shoulder straps.
A
• A five point harness is provided to restrain your child.
• Buckle tongues separate for added safety.
• To reconnect buckle tongues and to secure the child in the harness please
follow the steps below carefully.
• ENSURE YOUR CHILD IS SECURED WITH A CORRECTLY ADJUSTED
HARNESS.
• THE ADJUSTED HARNESS SHOULD CLOSELY FIT THE CHILD.
• NEVER LEAVE THE HARNESS BUCKLED WHEN NOT FITTED TO A CHILD IN
THE STROLLER, BECAUSE THE HARNESS CAN FORM LOOPS WHICH MAY
POSE A STRANGULATION HAZARD.
• WHEN HARNESS IS NOT IN USE, DISCONNECT SHOULDER STRAPS FROM
THE WAIST STRAPS AND BUCKLE TO PREVENT STRANGULATION.
WARNING: USE THE HARNESS AT ALL TIMES.
Page 26
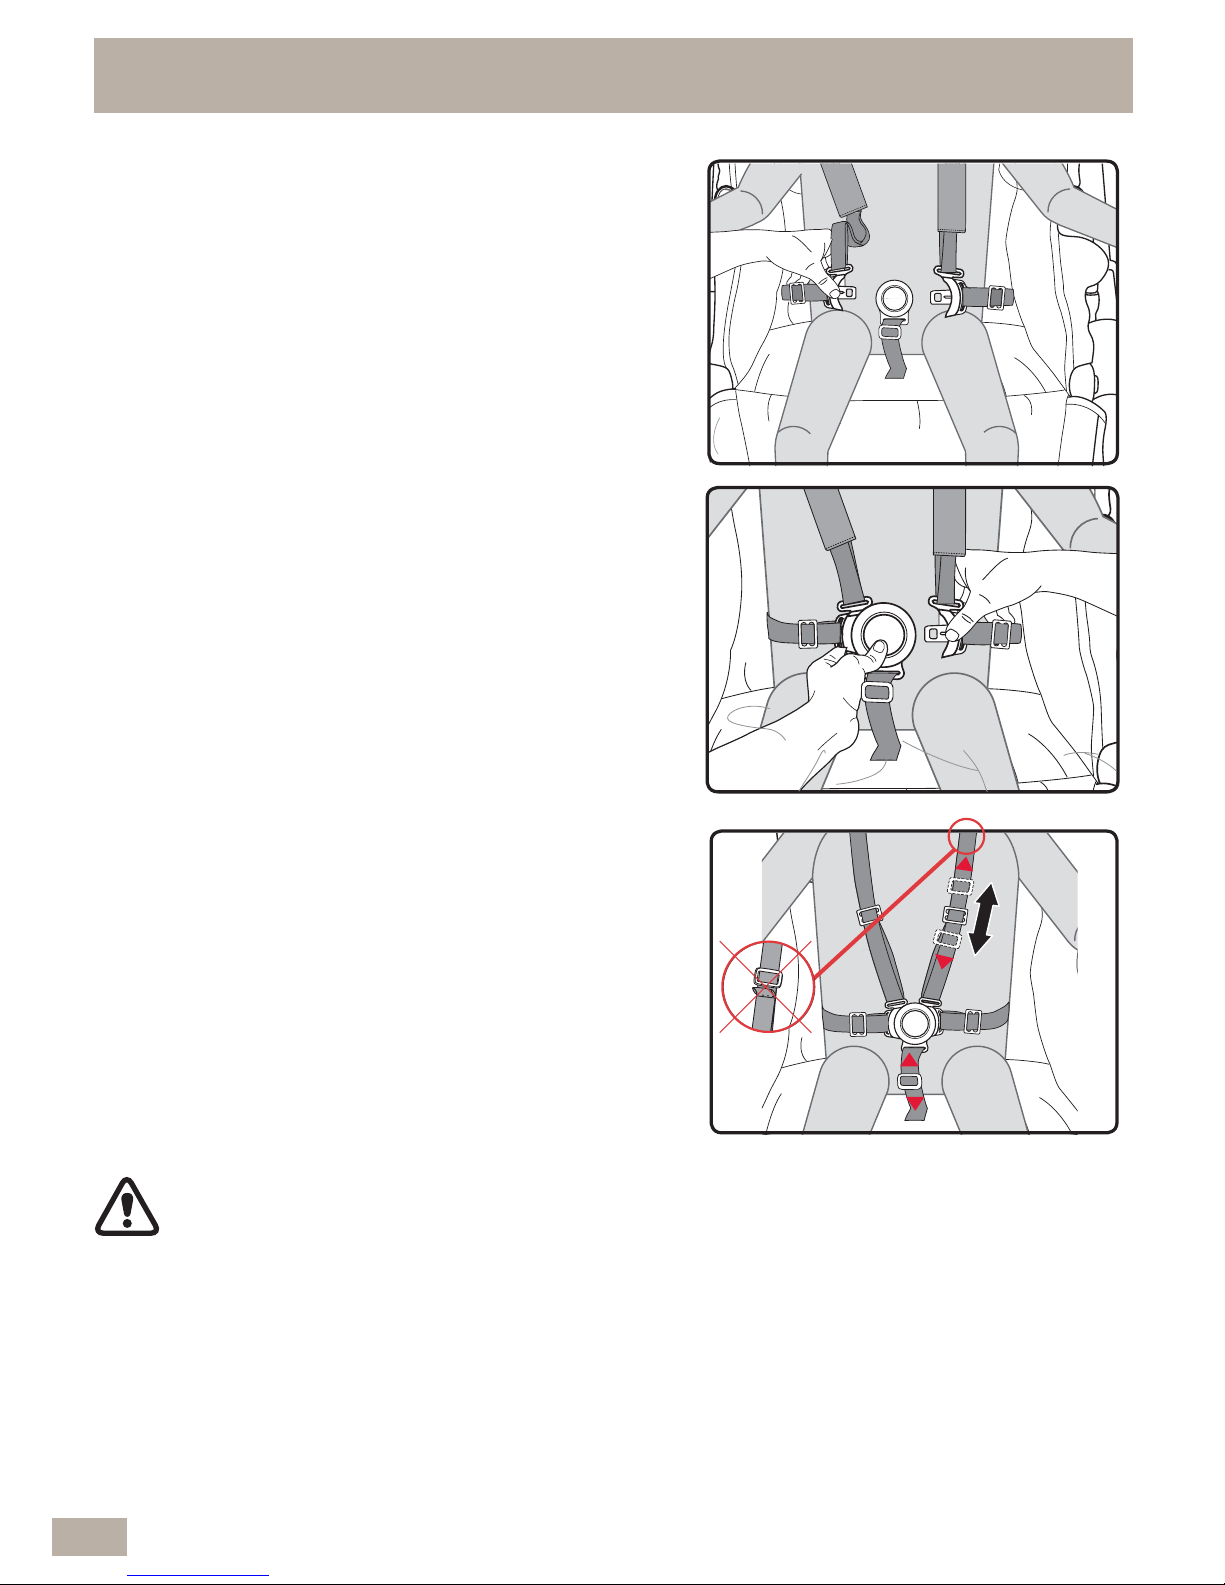
1.18 HARNESS ADJUSTMENT cont...
26
Note: Ensure the straps are not twisted as they
may become uncomfortable for the child.
Hold the buckle tongue (A) on the waist strap &
tongue guides (B) on shoulder straps together.
B
B
B
Press in & hold the centre crotch buckle button
and insert the waist buckle tongues into the crotch
buckle assembly.
IMPORTANT: Pull on each waist buckle tongue
to make sure they are locked into the crotch
buckle assembly. If not, repeat above
procedure.
C Tighten or loosen the shoulder straps and crotch
strap by sliding the 3 bar harness adjuster up or
down.
The crotch strap should be adjusted to a snug fit.
CAUTION: DO NOT SLIDE 3 BAR SLIDER OVER THE SEWN
TAB ON SHOULDER HARNESS
Page 27
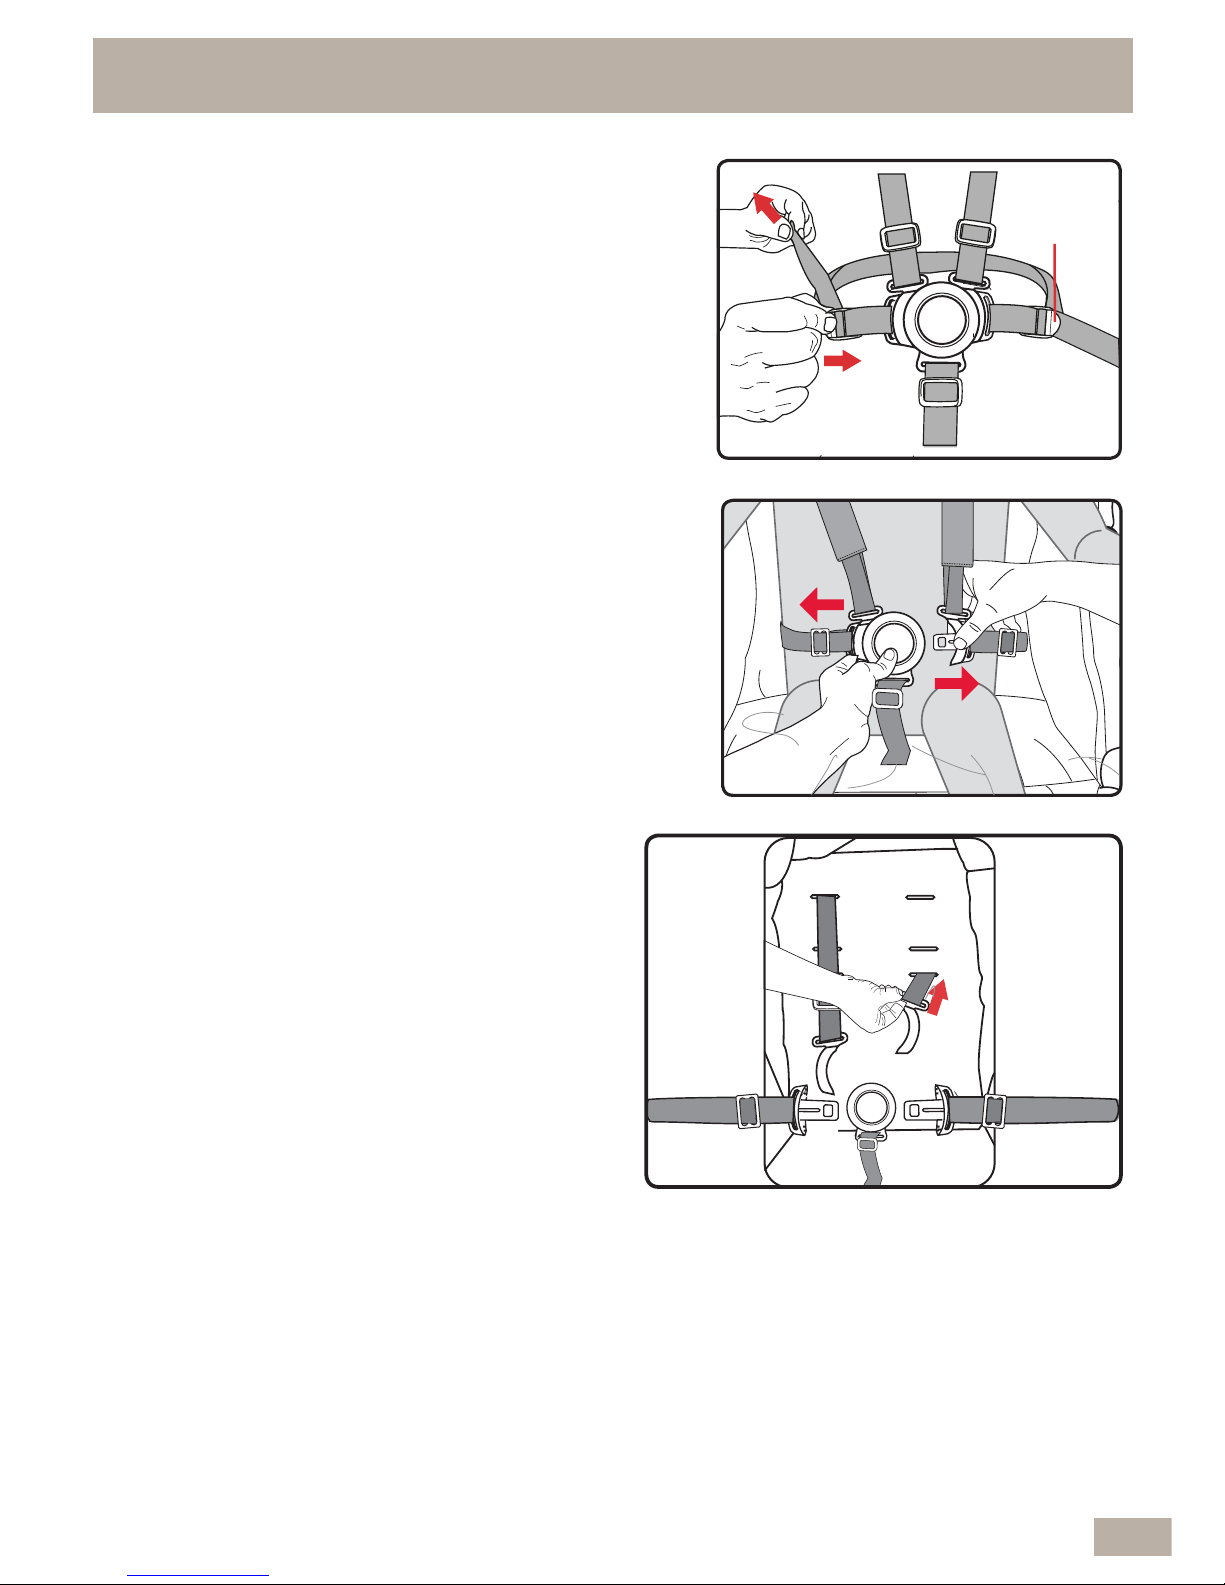
27
E
Release the harness by depressing the button in
the centre of the buckle while pulling the two waist
tongues away from the buckle assembly.
1.18 HARNESS ADJUSTMENT cont...
4 bar
harness
adjuster
D Tighten or loosen the waist straps, hold and lift the
4 bar harness adjuster and pull the harness strap
to adjust to the desired fit.
The waist strap needs to fit firmly around the child.
F
The stroller seat has *2 or 3 sets of harness
slots at different heights to accommodate the
child. To change the shoulder harness height,
position the shoulder straps near the child’s
shoulders then either push the shoulder
harness tongue out of the current harness
slot and through the back of the seat.
*Depending on the model
Page 28
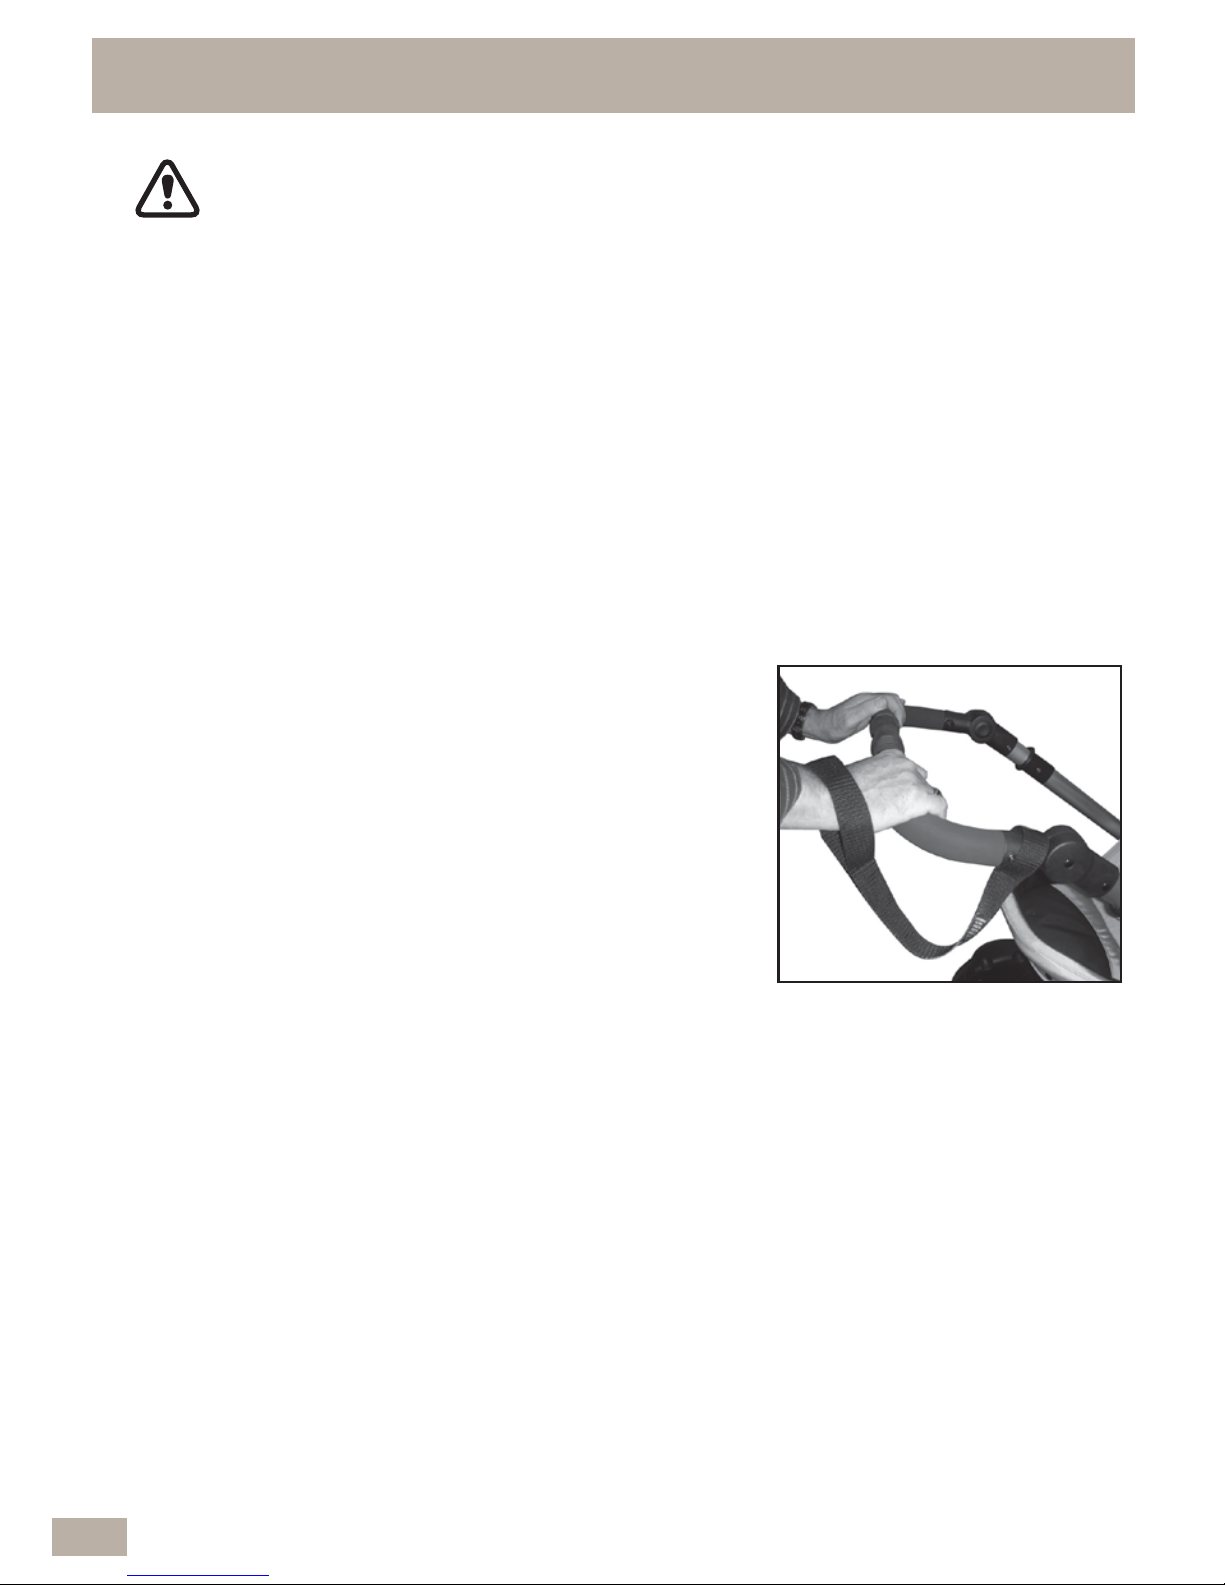
1.19 TETHER STRAP
28
WARNINGS: USE THE TETHER STRAP TO STOP THE
STROLLER ROLLING AWAY.
• THE STROLLER IS DESIGNED FOR USE ON FLAT OR GENTLY SLOPING
SURFACES, AND MAY BE UNSTABLE ON HIGHER SLOPING AND UNEVEN
SURFACES AND USERS SHOULD BE AWARE OF THE POSSIBILITY OF THE
STROLLER ROLLING AWAY OR TIPPING OVER.
• NEVER LET GO OF THE STROLLER WHEN PARKED ON AN INCLINE OR
SLOPING SURFACE BECAUSE IT MAY SLIDE OR TIP OVER. ALWAYS PARK
ON A FLAT SURFACE AND APPLY THE BRAKES.
• ALWAYS APPLY THE BRAKES WHENEVER THE STROLLER IS STATIONARY.
A A wrist tether strap is provided on the handle grip.
Slide your hand through the tether strap loop
whenever you use the stroller.
Only remove your hand from the tether strap loop
when the brakes have been applied to the stroller
wheels.
Page 29
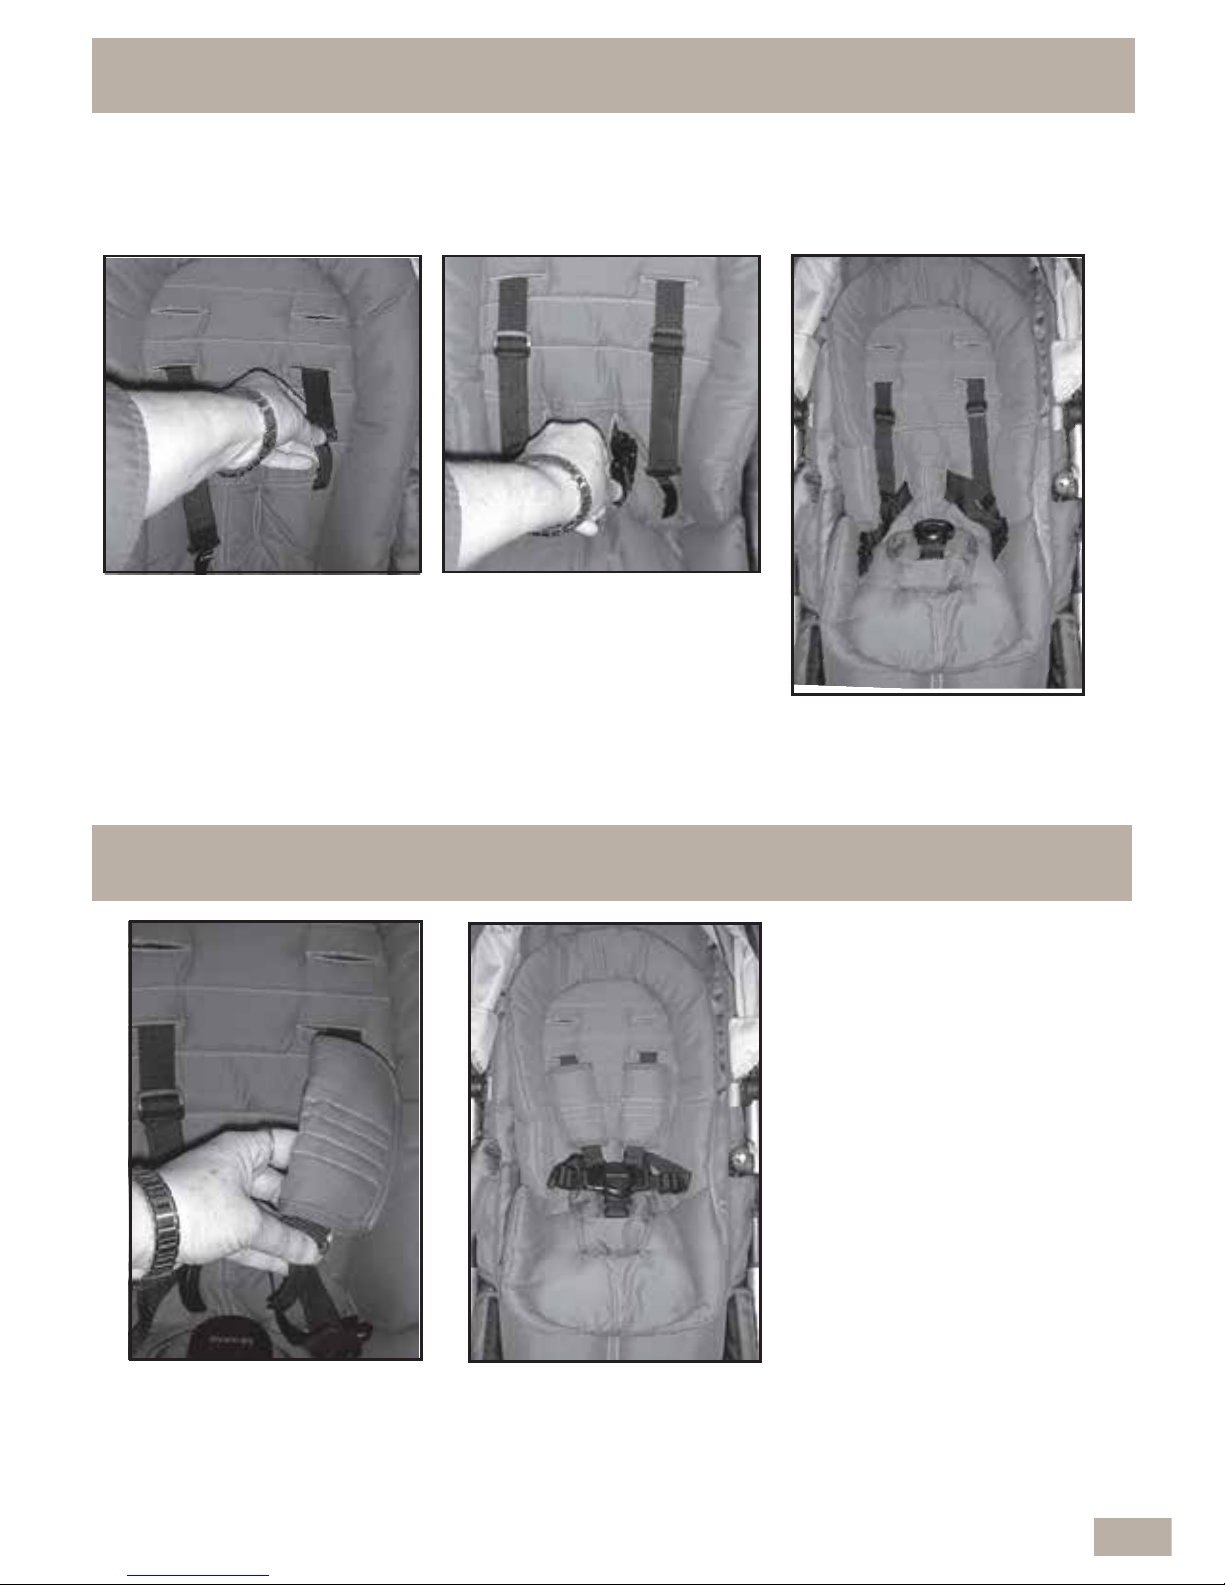
B Repeat for the other
shoulder pad.
1.21 TO FIT THE SHOULDER PADS
A Release the harness
buckles and slide the
shoulder pads onto the
shoulder strap
29
NOTE: To assist with installing, release one side of the arm bar, see
section 1.12 (D) and release the harness buckles.
Do not use this seat pad for children weighing more than 18 kilograms.
1.20 TO FIT THE SEAT PAD
A Ensure the shoulder straps
are fitted through the
appropriate harness slots
to suit your child’s seated
seated height.
B Fit the harness waist straps
through the lower slots in
the back of the seat pad.
C Feed the crotch buckle pad
through the lower slot in the
seat pad.
Page 30

30
1.22 ADJUSTING THE LEG SUPPORT
IMPORTANT NOTE:
• THE LEG SUPPORT FEATURE IS PROVIDED FOR YOUR CHILDS COMFORT.
• THE LEG SUPPORT IS NOT DESIGNED TO SUPPORT EXTRA WEIGHT.
• DO NOT ALLOW CHILDREN TO STAND OR SIT ON THE LEG SUPPORT. IT
WILL DISENGAGE IF EXTRA WEIGHT IS APPLIED. IF LEG SUPPORT
DISENGAGES SIMPLY LIFT UP AGAIN TO RESET LEG SUPPORT MODE.
A Raise the leg support to
the horizontal position.
Hook the boot cover
‘pocket’ under the leg
support.
B Pull the top of the boot
cover under the arm bar
and then back over the
top.
1.23 TO FIT THE BOOT COVER
C Connect the press studs
to keep in place. The
boot cover is now ready
for use.
A To lower or raise the leg
support, press in and hold
both the left and right
buttons.
B While holding both the left
right buttons, tilt the leg
support up or down to the
desired position.
Page 31
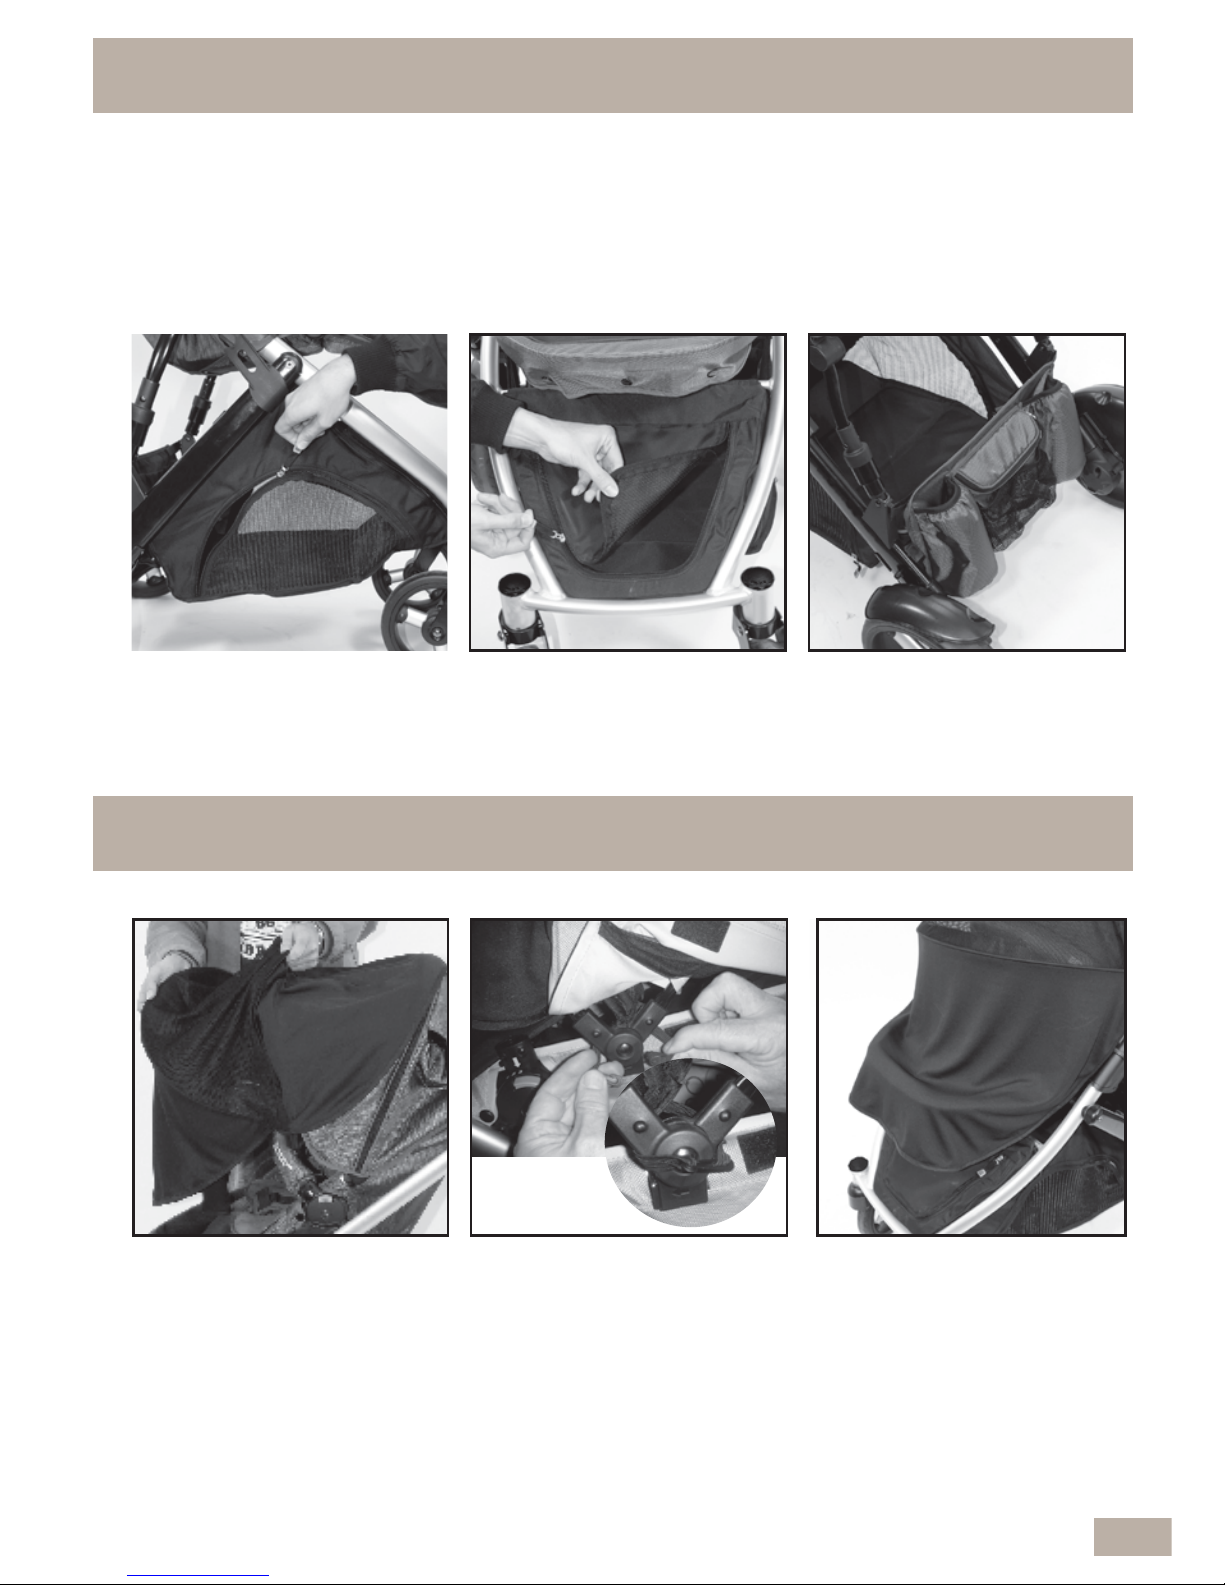
A To fit the mesh cover over
the stroller seat, place the
elastic section of the mesh
cover over the front section
of the canopy.
B Lift up the end of the
canopy and wrap the
elastic loops around the
canopy frame as shown
and attach together using
the clip.
C When fitted to the stroller,
the front section of the
mesh cover will rest on
the leg support.
1.25 TO FIT THE MESH COVER
31
A Access is available from
either side by undoing
the zippers.
B Access is available from
the front by undoing the
zipper.
C Access is available from
the rear of the stroller.
1.24 TO USE THE BASKET
IMPORTANT NOTE:
DO NOT PLACE MORE THAN 4KG IN THE BASKET.
NOTE: When a child is in the Second Seat, basket access is recommended
only from the sides, or from the front.
Page 32
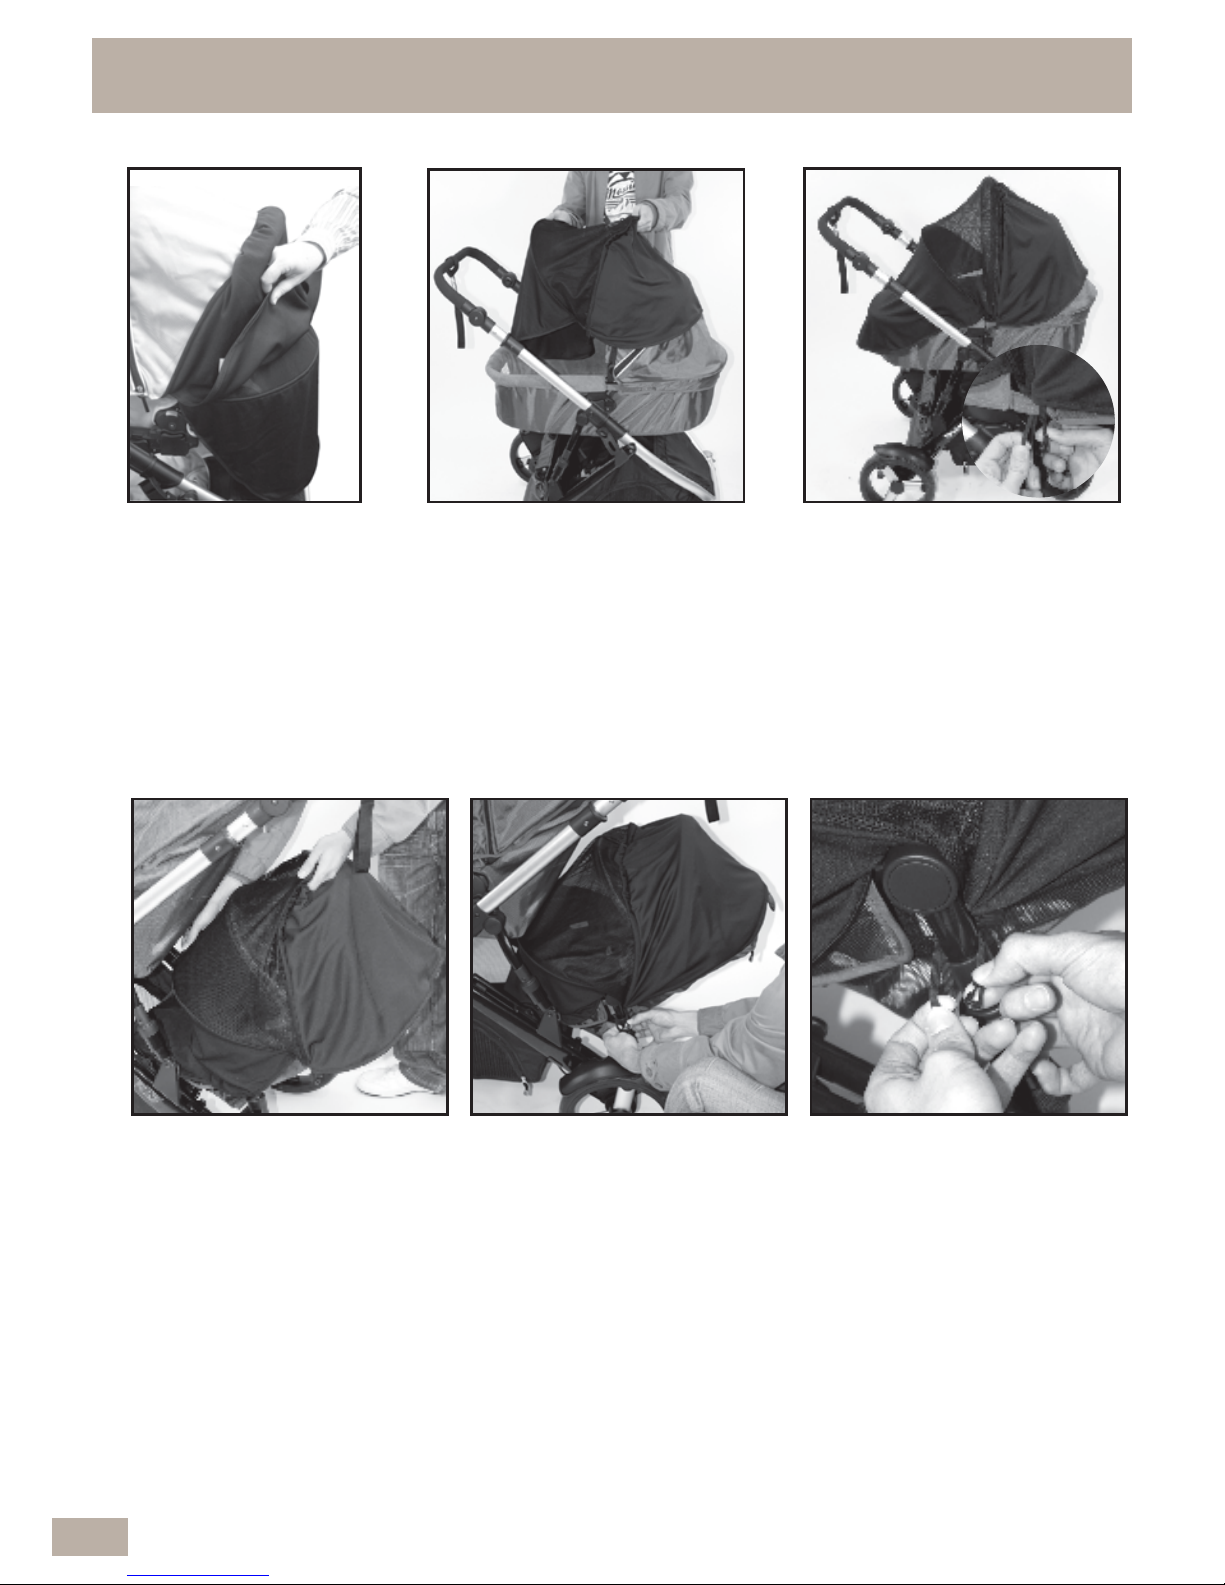
32
G To fit the mesh cover over
the second seat, place the
elastic section of the mesh
cover over the front section
of the canopy.
H Wrap the elastic loops and
clip around the bars at
both sides of the second
seat.
I Attach using the clip.
D Lift the top fabric
cover as require or
lower for most
protection. The
mesh cover can be
used on both seat
directions.
E To fit the mesh cover over
the bassinet, place the
elastic section of the mesh
cover over the front
section of the canopy.
F Wrap the elastic loops and
clips around the hook and
pile strips and attach
together using the clip.
1.25 TO FIT THE MESH COVER cont...
Page 33
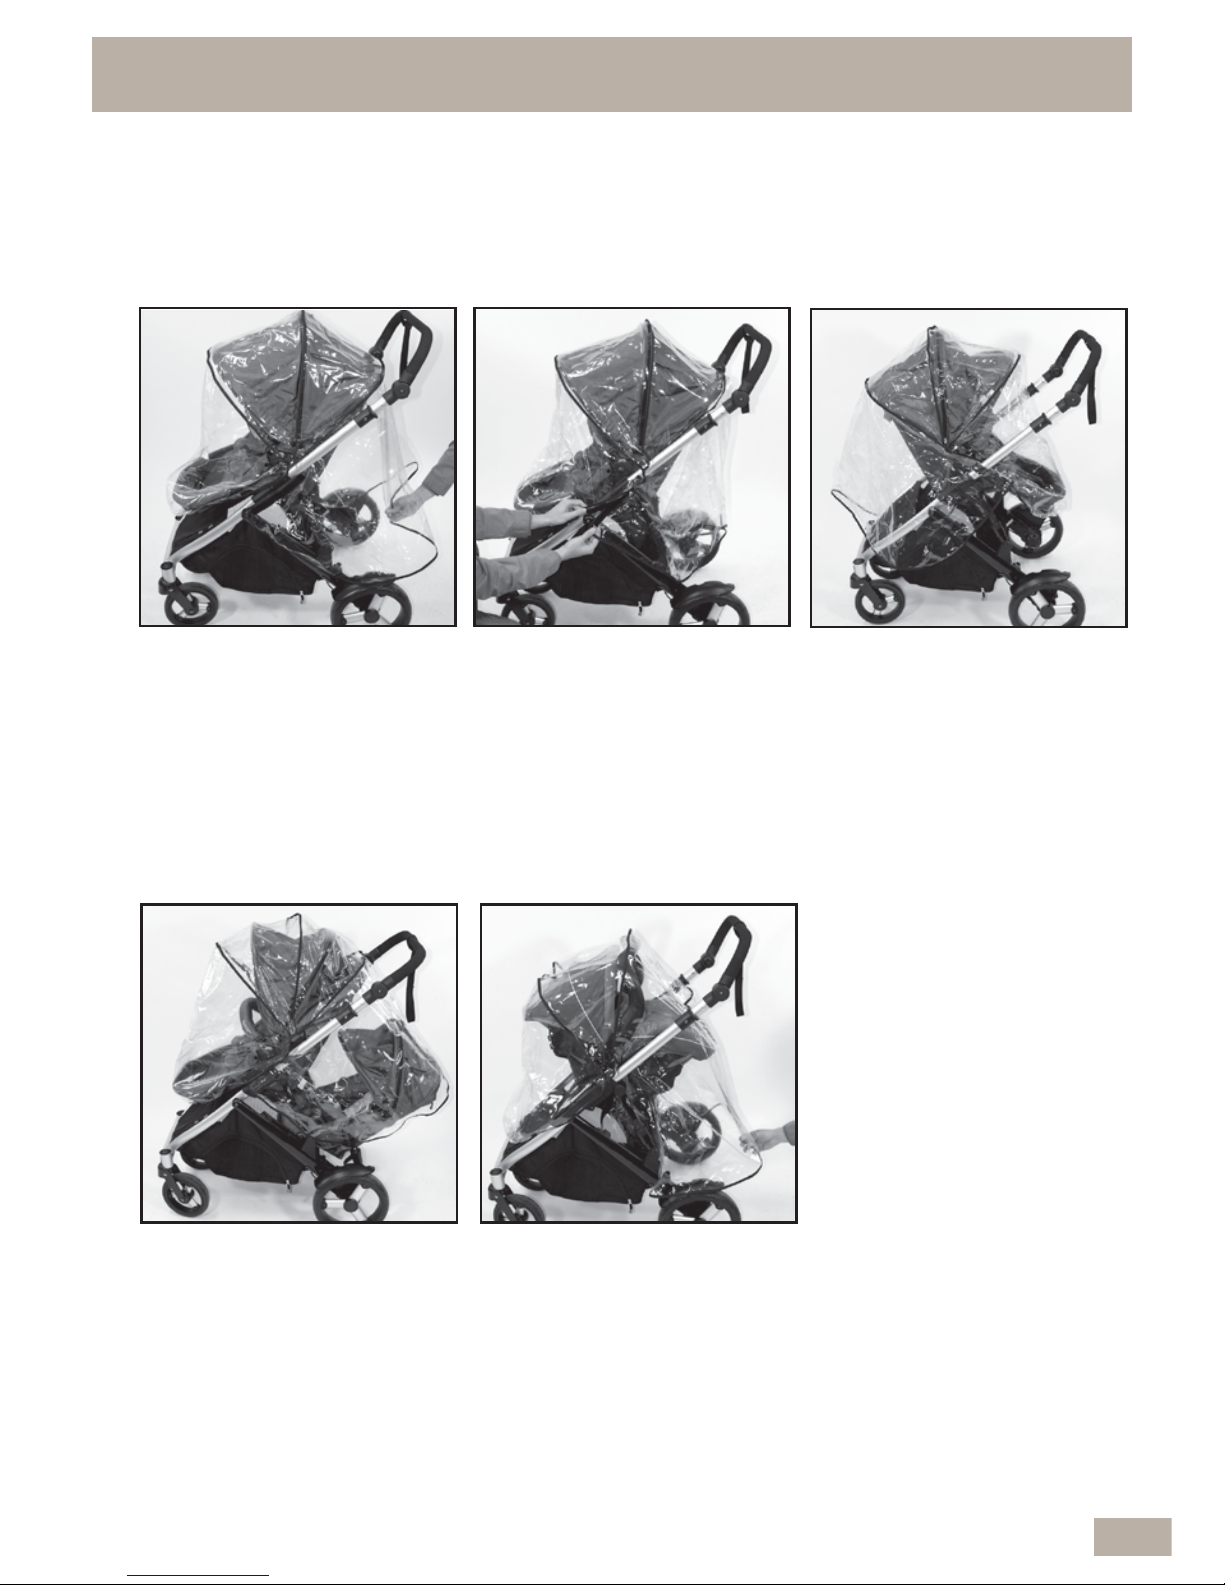
B Join the hook and pile
around the handle tube.
C The rain cover can be
fitted to the stroller seat
when in forward or rear
facing mode.
D To fit the rain cover to the
stroller and second seat Follow step A, then pull the
rear rain cover section
down between the handle
and over the back of the
second seat as shown
above. Attach the hook
and pile as described
in B above.
E To fit the rain cover to the
Infant Carrier - Place over
the Infant Carrier canopy
as shown. The elastic
section will hang over the
front of the stroller, then
pull the rear rain cover
section down between the
handle.
1.26 TO FIT THE RAIN COVER
33
A To fit the rain cover to the
stroller - Place over the
stroller canopy as shown.
Loop the elastic section
over the stroller seat leg
support, then pull the rear
rain cover section down
between the handle.
IMPORTANT NOTE:
ENSURE THE RAIN COVER IS KEPT AWAY FROM THE CHILD’S FACE. REFIT
THE RAIN COVER IF REQUIRED TO ENSURE YOUR CHILD IS SAFE.
Page 34

34
F Join the hook and pile
around the handle tube.
I To fit the rain cover to the
bassinet- Place over the
bassinet canopy as shown.
Loop the elastic over the
front of the bassinet.
J Join the hook and pile
around the handle tube.
1.26 TO FIT THE RAIN COVER cont...
G To fit the rain cover to the
infant carrier and second
seat or second infant
carrier - Follow Step E, but
ensure to pull the rear rain
cover section over the back
of the second seat or lower
infant carrier as shown.
Join the hook and pile
around the handle tube.
H Rain cover fitted over the
two infant carriers.
Page 35

1.27 TO USE THE STROLLER
35
PLEASE REFER TO PAGE 11 FOR LIFTING TECHNIQUES.
• Always ensure you bend your knees where appropriate and take
due care when lifting the frame.
• With your hand through the wrist tether strap loop, push the
stroller holding the handle.
• The stroller can be steered in the desired direction - allowing the
front wheels to swivel will make this easier.
• The front wheels may wobble or oscillate when walking fast.
Locking the front swivel wheels will stop this.
• The stroller can be taken up kerbs by either pressing down on the
handles and raising the front wheels or turning the stroller around
and pulling the stroller up the kerb.
• Caution is required when pushing the stroller on a steep slope as
the stroller may become unstable. Always hold the handles firmly.
• Do not run with the stroller.
• Whenever you stop, always apply the brakes before you leave the
stroller.
• Do not hang bags or goods from the handle. Use the storage basket.
Page 36

1.28 TO FOLD/CLOSE THE STROLLER
36
• Remove the bassinet or infant carrier if connected to the frame prior to folding.
• The second seat can either be removed or folded up prior to folding.
• The rain cover must also be removed if fitted.
NOTE: Stroller seat and wheels can be removed to reduce the total folded
size.
See sections 1.6 & 1.14 for reference. With stroller seat attached, folding
the leg support will also help to reduce the folded size.
IMPORTANT NOTES:
PLEASE REFER TO PAGE 11 FOR LIFTING TECHNIQUES.
• REMOVE THE CHILD FROM THE STROLLER BEFORE COMMENCING
ANY FOLDING OPERATION.
• FOLD THE STROLLER SLOWLY AND BE CAREFUL WHERE YOU PLACE
YOUR HANDS.
• WHEN FOLDING THE STROLLER, BE AWARE OF THE DANGER OF BEING
INJURED BY MOVING PARTS AND LOCKING DEVICES DURING THE
PROCESS. KEEP ALL HANDS AND LIMBS CLEAR OF THESE PARTS.
• THERE IS POTENTIAL FOR FINGERS OR PARTS OF THE BODY TO BE
INJURED WHEN THE STROLLER IS BEING FOLDED, DUE CARE SHOULD BE
EXERCISED.
• KEEP CHILDREN CLEAR OF THE STROLLER DURING FOLDING OF THE
STROLLER.
FOLDING TIPS
1. It is recommended for easier handling, to take the stroller seat off first. Then fold
the frame and put both seat and frame in the car.
2. For smaller cars it may also be convenient to simply remove the rear wheels.
Page 37
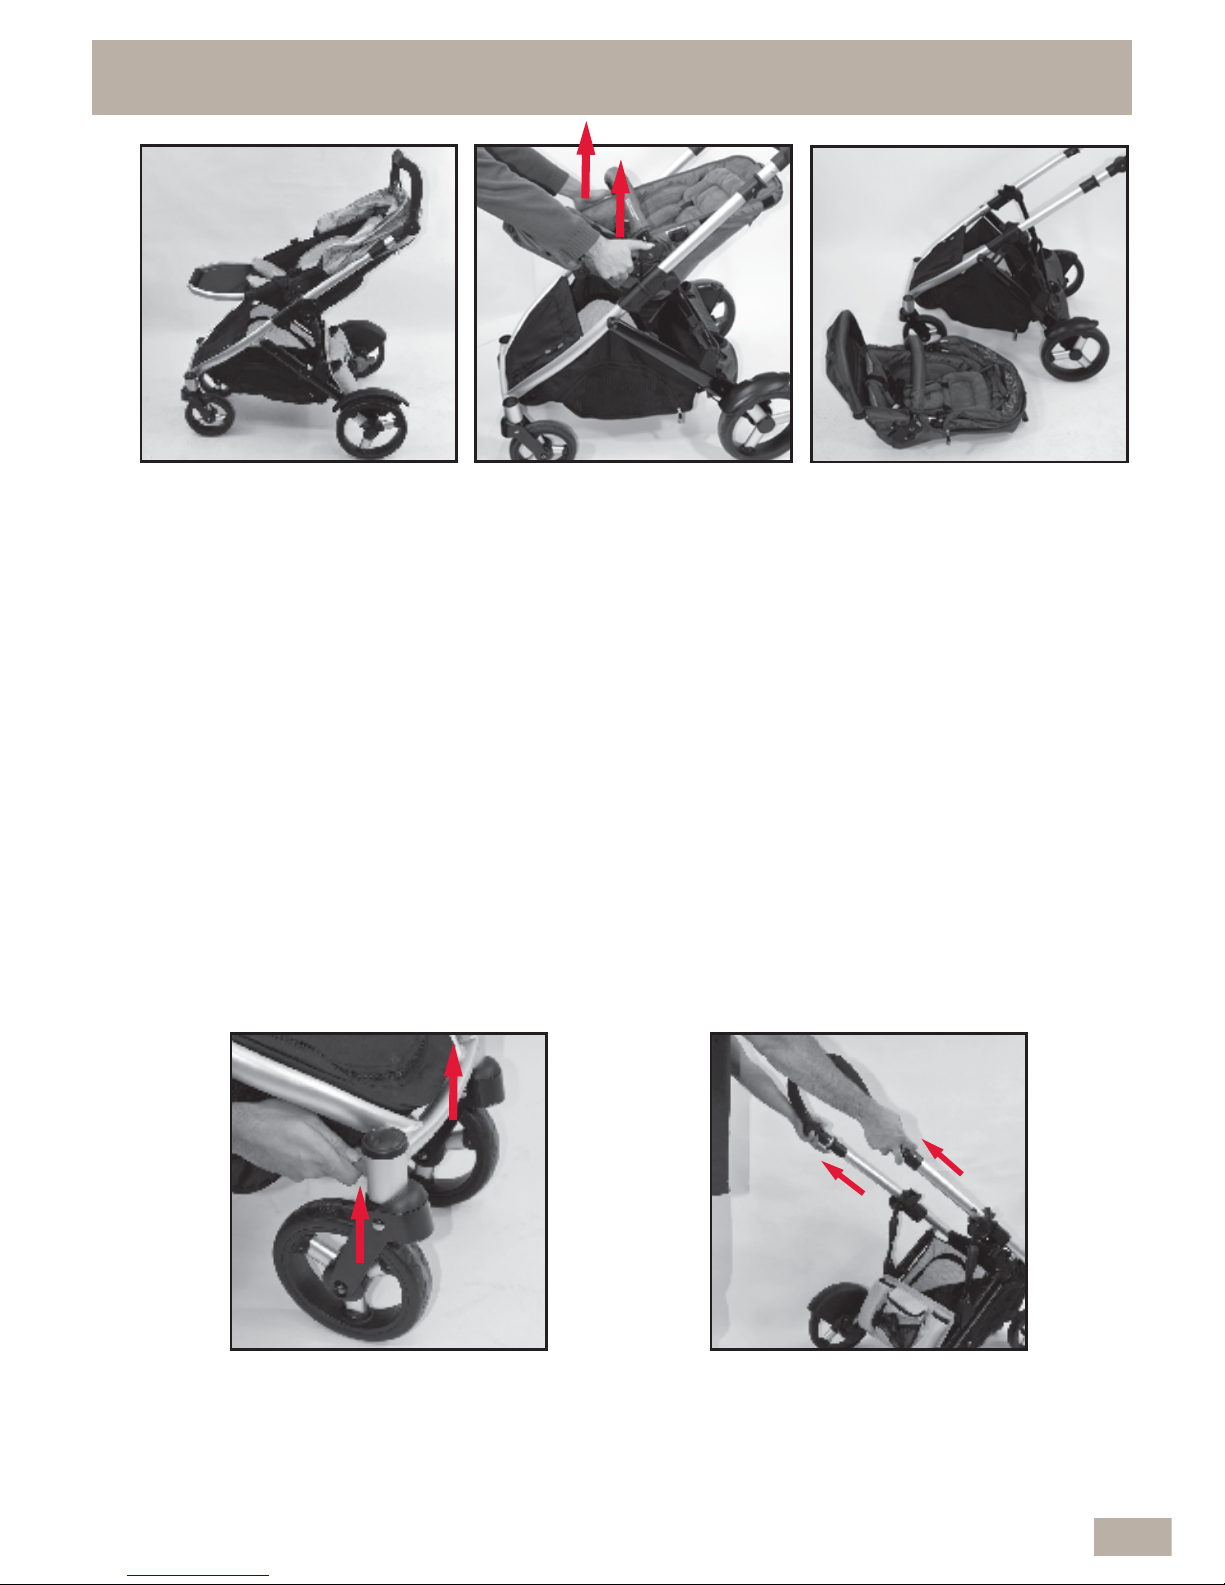
1.28 TO FOLD/CLOSE THE STROLLER cont...
37
A Engage the rear brakes.
Remove all objects from
seat back pocket and
basket and close the
canopy. Raise the handle
up one or two positions
(as shown) to avoid
contact with the wheels
when folded.
B Remove the stroller seat from the frame. Hold the seat or
arm bar on both sides with your hands. Then with your
fingers or thumbs, press down and hold the grey buttons.
While holding the grey buttons, lift the seat off the frame.
IMPORTANT NOTE:
INCORRECT FOLDING MAY CAUSE DAMAGE TO THE STROLLER AND FRAME.
PLEASE FOLLOW THE FOLDING INSTRUCTIONS CAREFULLY.
• Ensure the front wheels are in swivel mode, so the front wheels will automatically
position under the stroller during folding.
1
2
C For swivel wheel mode, lift
the swivel latch up on both
front wheels until they lock
into position.
D Pull release mouldings 1
& 2 all the way up and
hold to release the frame
locks.
Page 38
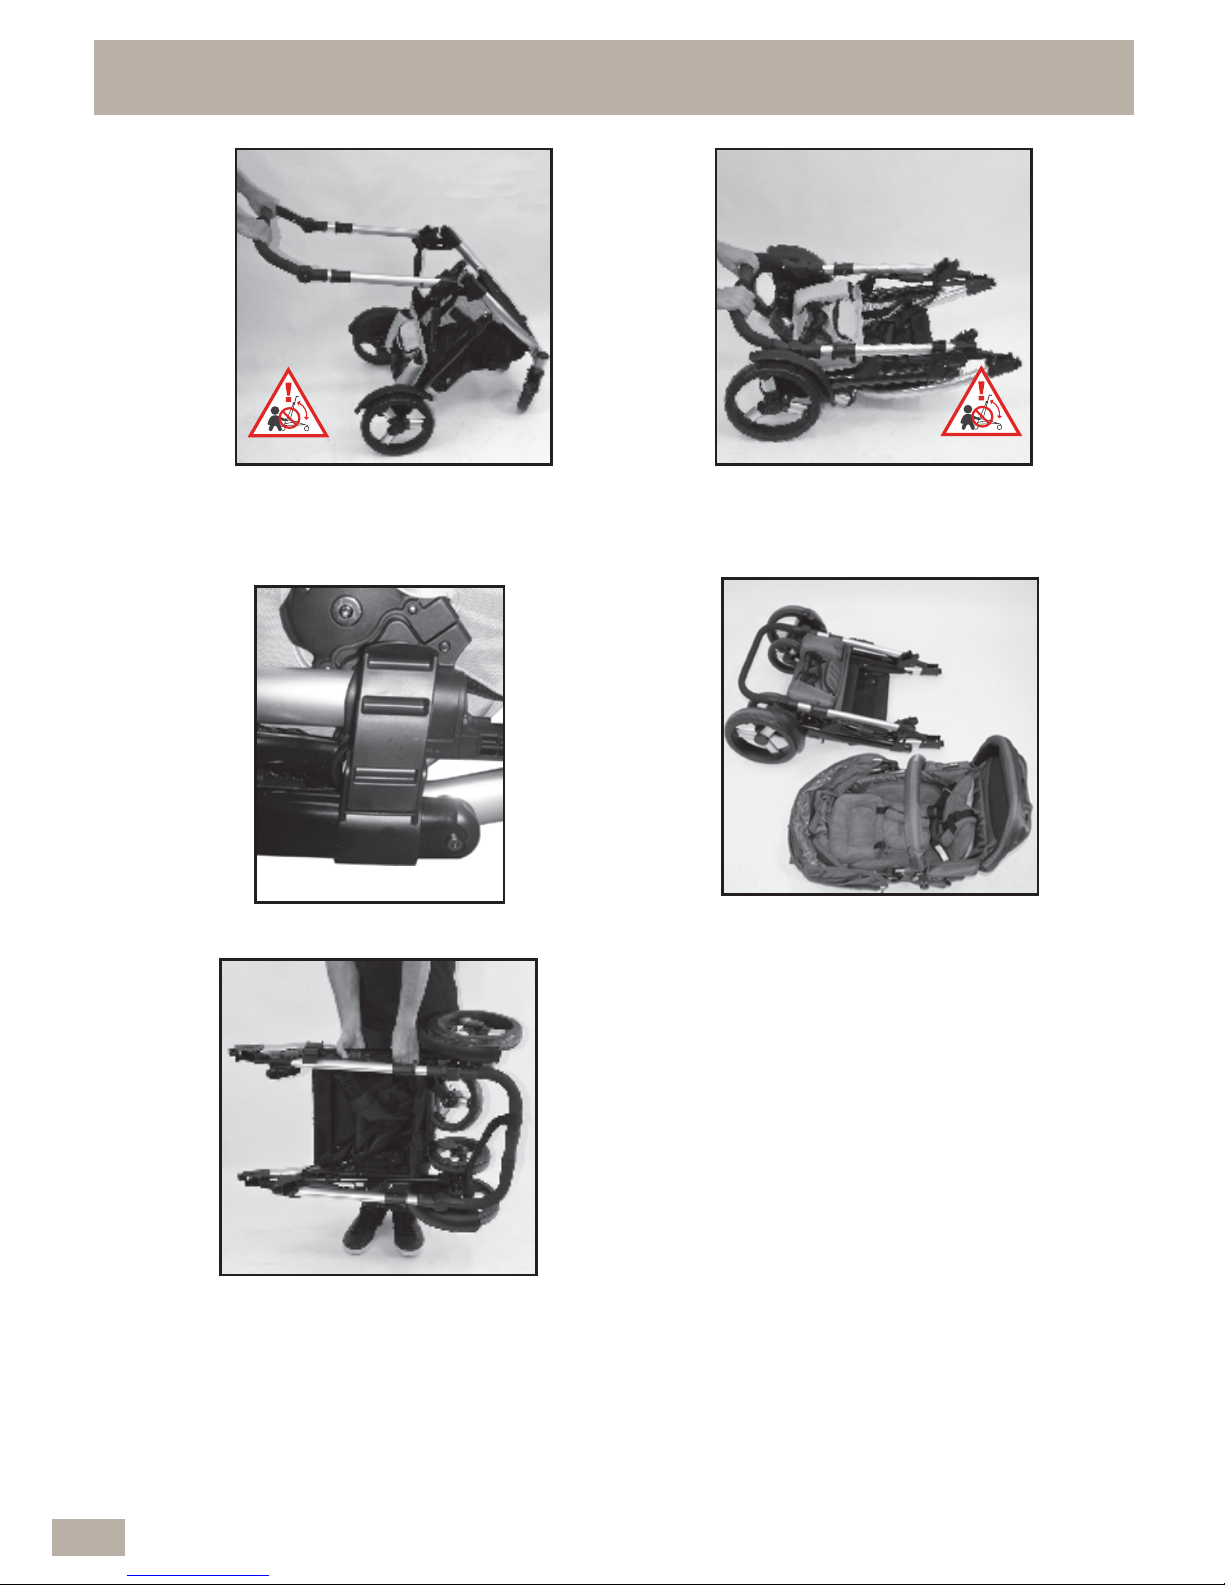
I Separation of the stroller
seat and frame promotes
easier handling and storage.
NOTE: Make sure the
frame lock is engaged
before lifting up and
always bend the knees
when lifting.
38
F Fold all the way down until
the frame lock engages.
E Push down on the handle
and the frame will begin to
fold.
1.28 TO FOLD/CLOSE THE STROLLER cont...
G Frame lock engaged.
H The two separate components
after folding.
CAUTION
CAUTION
Page 39
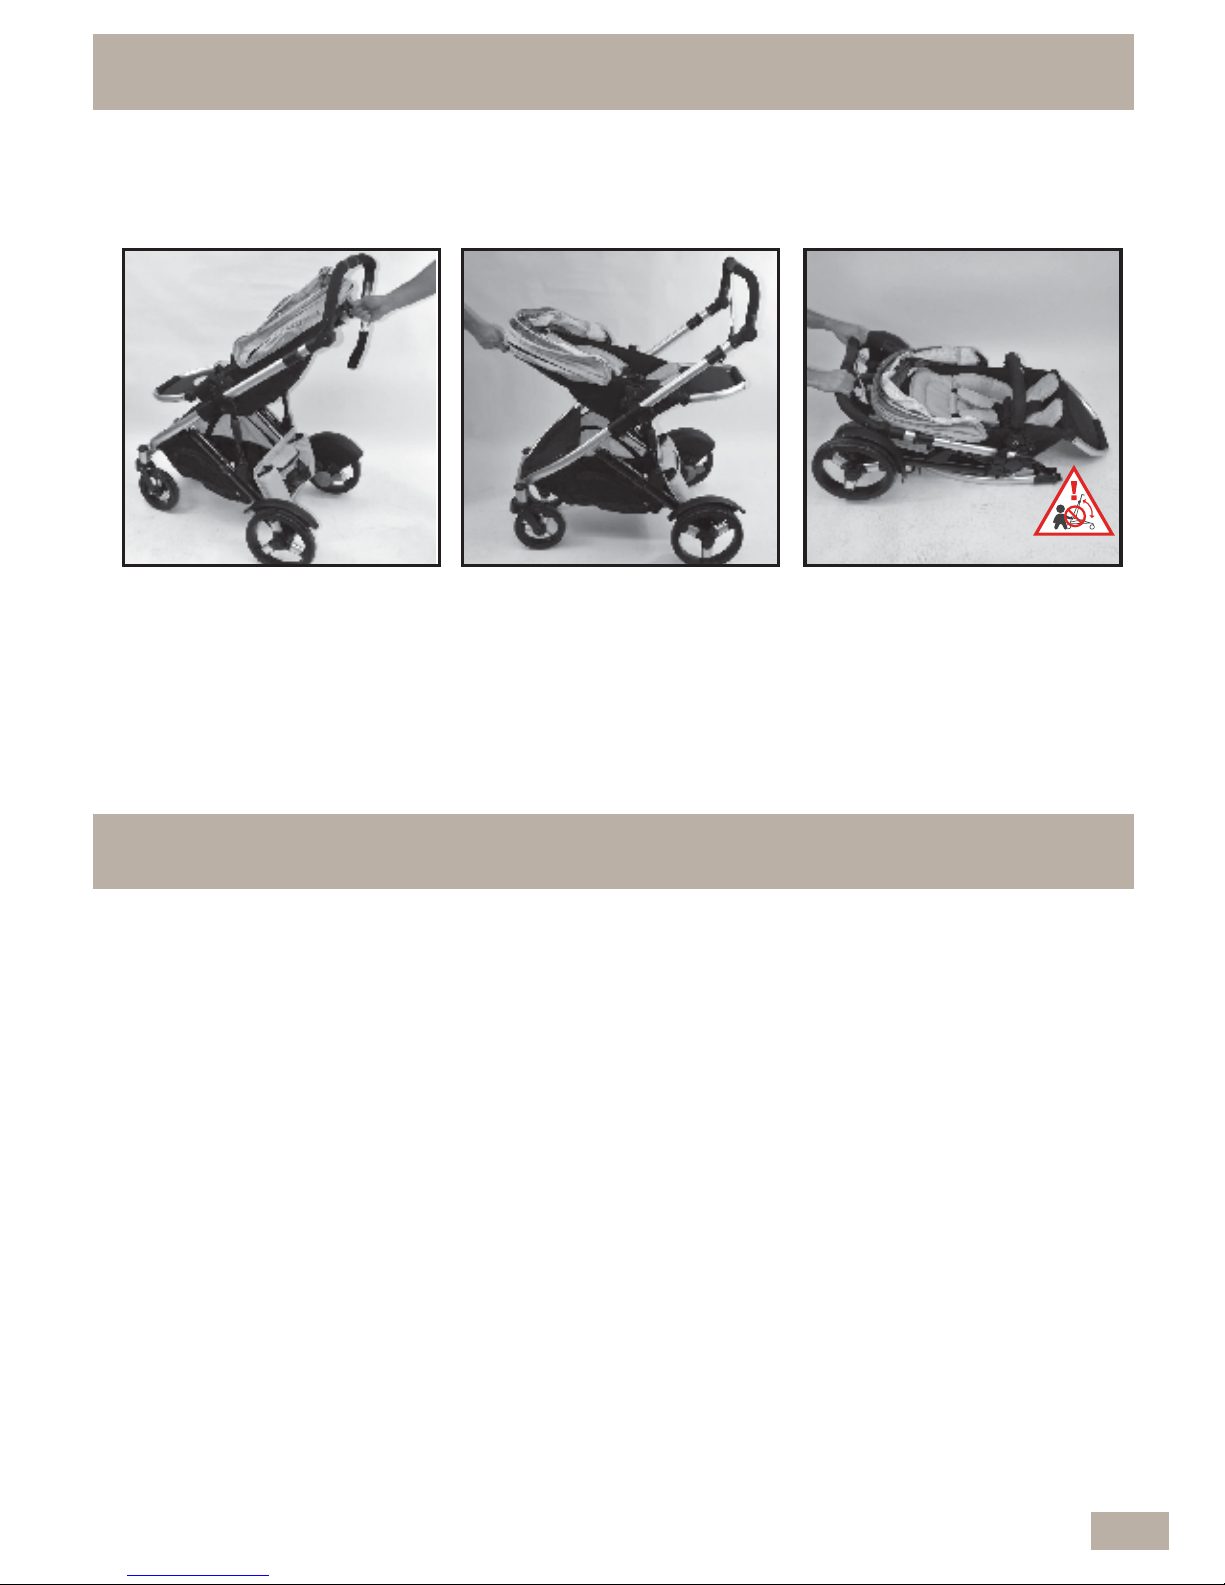
If you have chosen not to remove the Stroller Seat, follow the procedure below.
Note: Ensure the Stroller seat is forward facing. This will achieve a more
compact fold.
J Follow step A. If seat unit
is attached and in child
facing away from parent
mode, then adjust the
backrest to the most
upright position.
K If seat unit is attached
and in child facing parent
mode, then adjust the
backrest to most reclined
position.
L Follow steps C, D & E.
Then fold all the way down
until the frame lock
engages (frame lock shown
in step G).
1.28 TO FOLD/CLOSE THE STROLLER cont...
39
CAUTION
•
TO AVOID INJURY: BEND YOU KNEES WHEN OPENING, LIFTING,
CARRYING, FOLDING, UNFOLDING OR ADJUSTING THE STROLLER OR
ANY ACCESSORIES.
IMPORTANT NOTES:
PLEASE REFER TO PAGE 11 FOR LIFTING TECHNIQUES.
Ensure the storage latch is locked onto the frame before lifting the stroller. To lift the
stroller, grasp the frame halfway along the stroller, so the stroller is balanced.
1.29 TO LIFT AND CARRY THE STROLLER
Page 40

40
NOTES
Page 41

OPTIONAL ACCESSORIES
Section Two: Bassinet
Section Three: Infant Carrier
41
Section Four: Second Seat
Page 42
IMPORTANT NOTES:
• THE STRIDER AND STRIDER PLUS BASSINETS ARE THE ONLY BASSINETS
DESIGNED TO FIT THE COMPACT STROLLER.
• REMOVE THE STROLLER SEAT OR INFANT CARRIER FROM THE FRAME
BEFORE FITTING BASSINET.
• ALWAYS REMOVE YOUR CHILD FROM THE BASSINET BEFORE FITTING OR
REMOVING FROM THE STROLLER FRAME.
• THE BASSINET MUST ALWAYS FACE TOWARDS THE HANDLE.
• THE BASSINET MUST BE REMOVED FROM THE FRAME BEFORE FOLDING.
• DO NOT LIFT THE STROLLER BY THE BASSINET.
WARNINGS:
• DO NOT USE THE BASSINET ONCE THE CHILD CAN SIT UP.
• IT IS UNSAFE TO USE ACCESSORIES NOT APPROVED FOR USE WITH THIS
STROLLER.
• DO NOT USE ANY ACCESSORIES OTHER THAN THOSE APPROVED FOR
USE WITH THIS STROLLER BY BRITAX.
• THE MAXIMUM WEIGHT OF THE CHILD USING THIS PRODUCT IS NOT TO
EXCEED 9KGS.
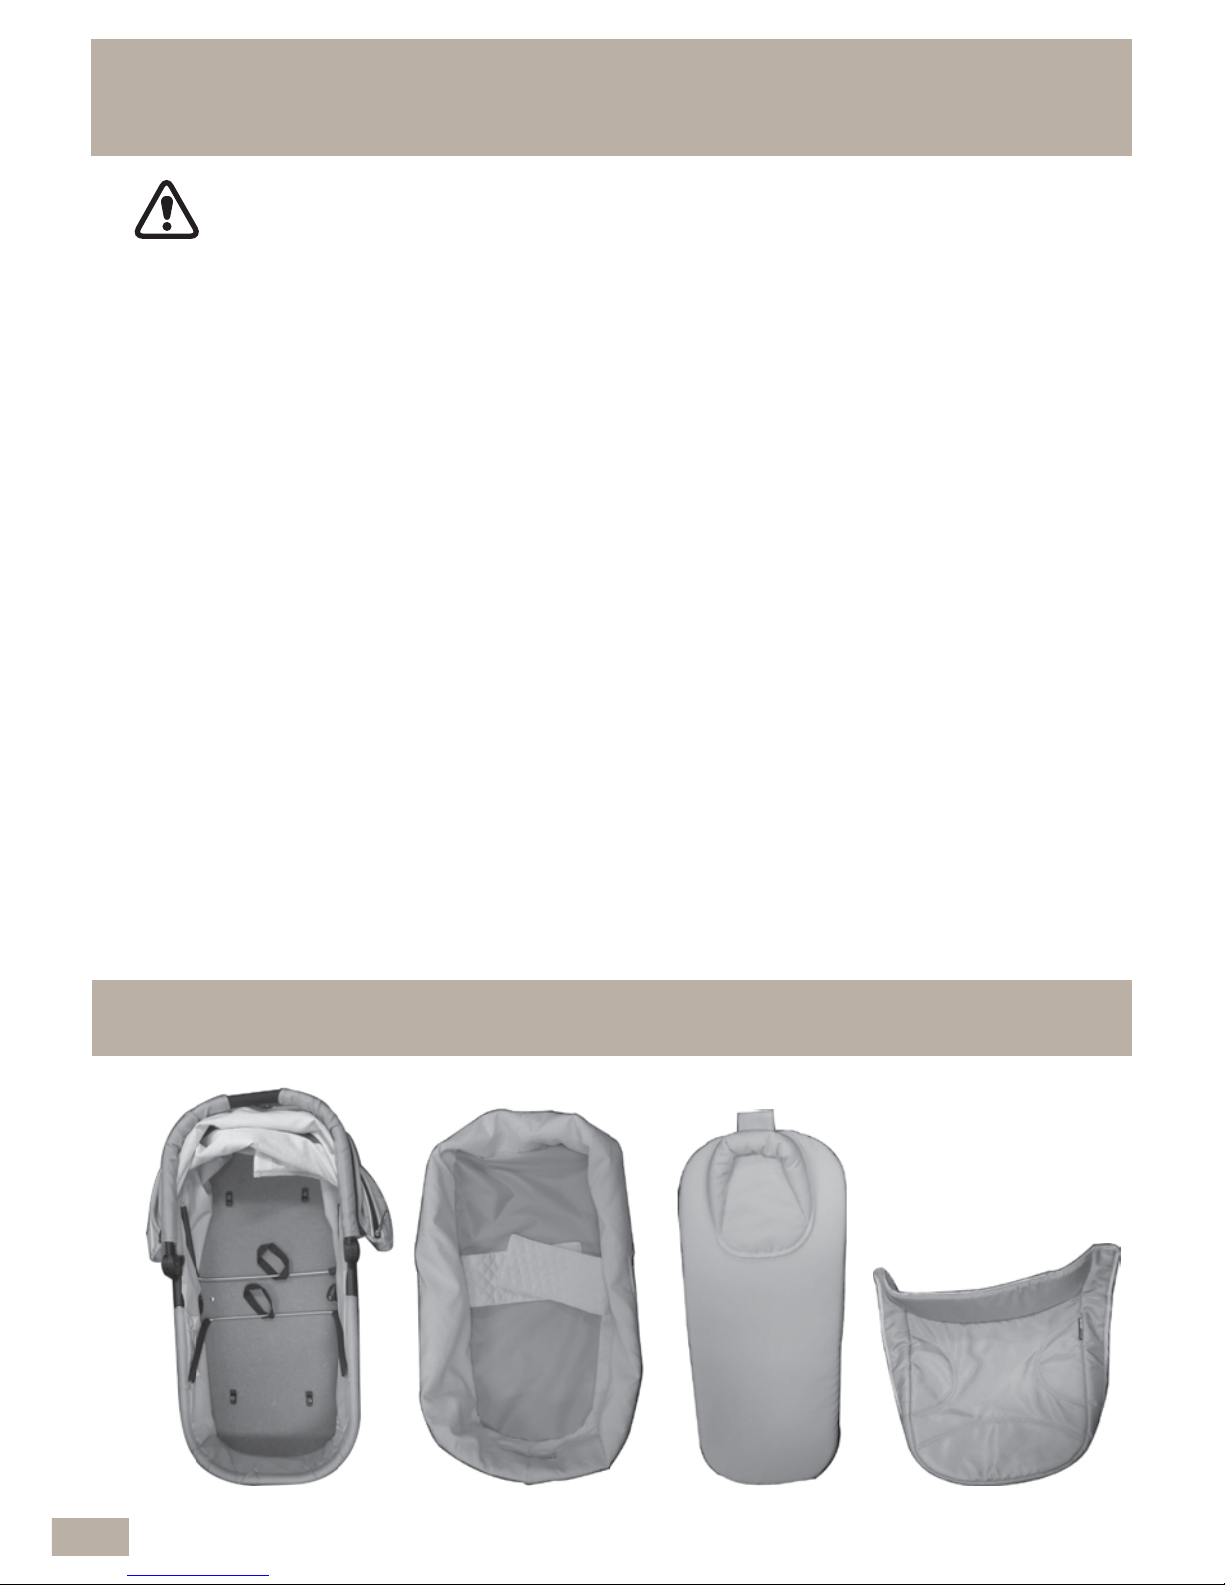
2.2 BASSINET PARTS
Bassinet
Frame
Bassinet
Liner
Bassinet
Mattress
Bassinet
Boot cover
2.1 BASSINET WARNINGS & IMPORTANT NOTES
(Bassinet sold separately)
42
Page 43
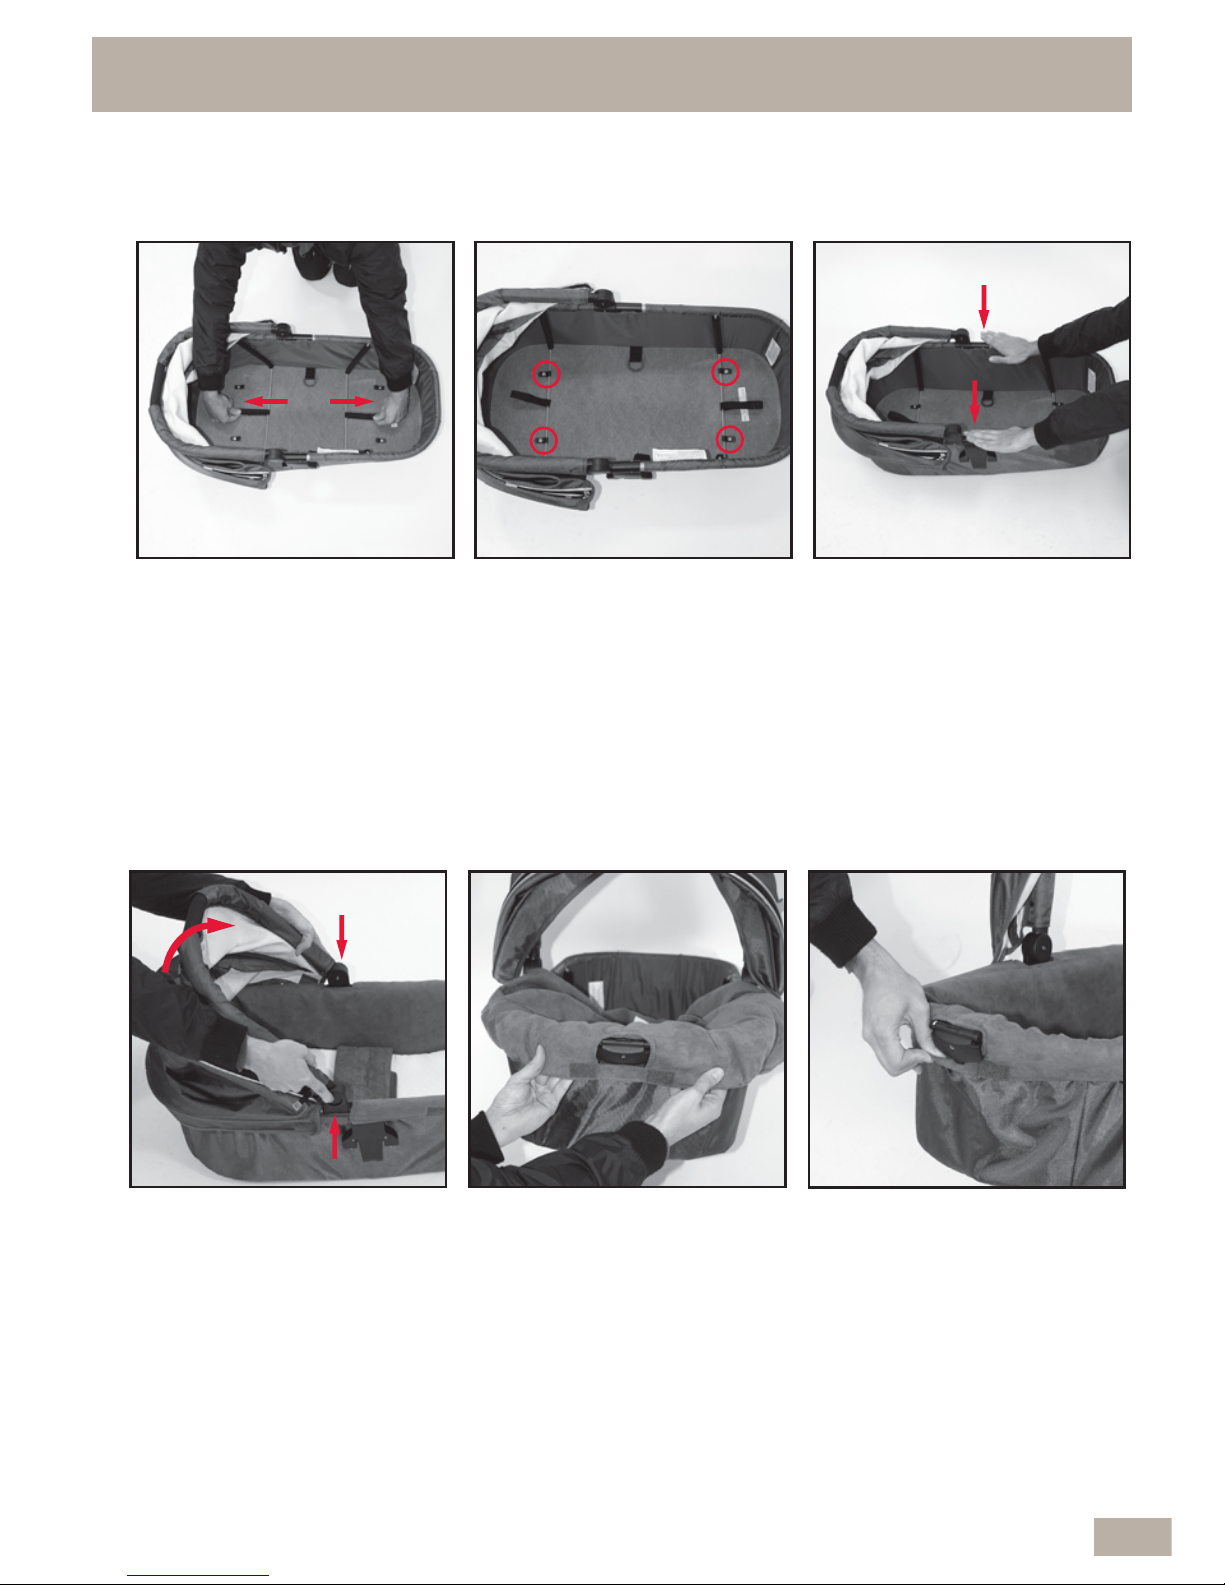
A To assemble bassinet,
locate straps in the centre
of the frame support rods
and pull straps slowly
outwards until each rod
slides and locks under
all 4 clips.
E Fit the liner by aligning the
opening with the main
locking lever and stretching
it over both corners of the
bassinet. Ensure body
band faces upwards.
2.3 BASSINET ASSEMBLY, FITTING & REMOVAL
B Frame support rods are
locked under all four clips.
C Push down lightly on the
top edges of the bassinet
to check that the frame
supports are firmly locked
in place.
F Fasten hook and loop strip
just under the main locking
lever.
D Open canopy by pressing
and holding each button
on the outside of canopy
pivot joint before rotating
carry handle bar to vertical
position.
PLEASE REFER TO PAGE 11 FOR SMART LIFTING TECHNIQUES.
43
Page 44
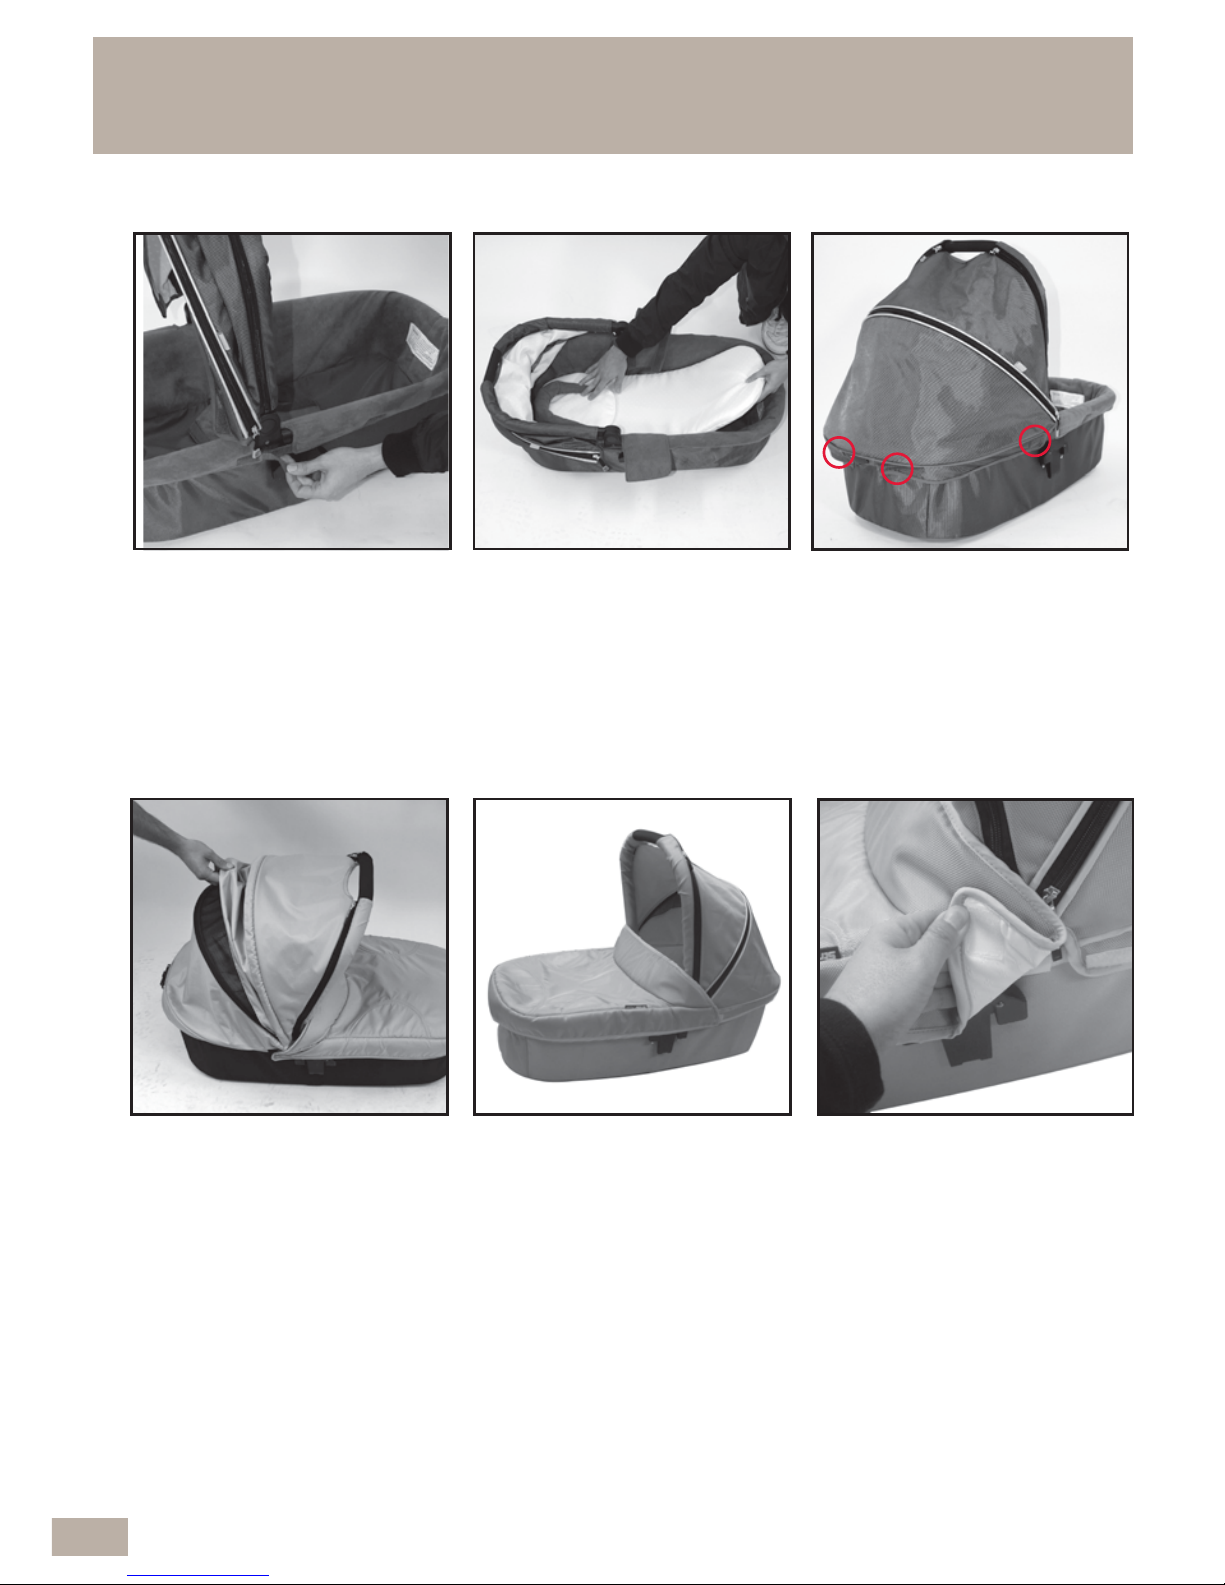
I Attach hook and loop tabs
on canopy to the liner on
both sides and in two places
near the main locking lever.
H Fold canopy down (see
section 2.3 (D)).
Insert the pad into the
bassinet with head rest
located at the canopy end.
G Fasten hook and loop tabs
around the handle
mouldings and stretch the
liner over the other two
corners of the bassinet.
K Place the bassinet boot cover over the bassinet and attach
hook on the each side of the boot cover to loop on the
each side of the canopy as shown.
J To expose the mesh
section of the canopy, fully
unzip the center section.
Use the fabric to expose or
enclose the mesh section.
To close the canopy
reverse the above
procedure.
2.3 BASSINET ASSEMBLY, FITTING & REMOVAL
Cont...
44
Page 45
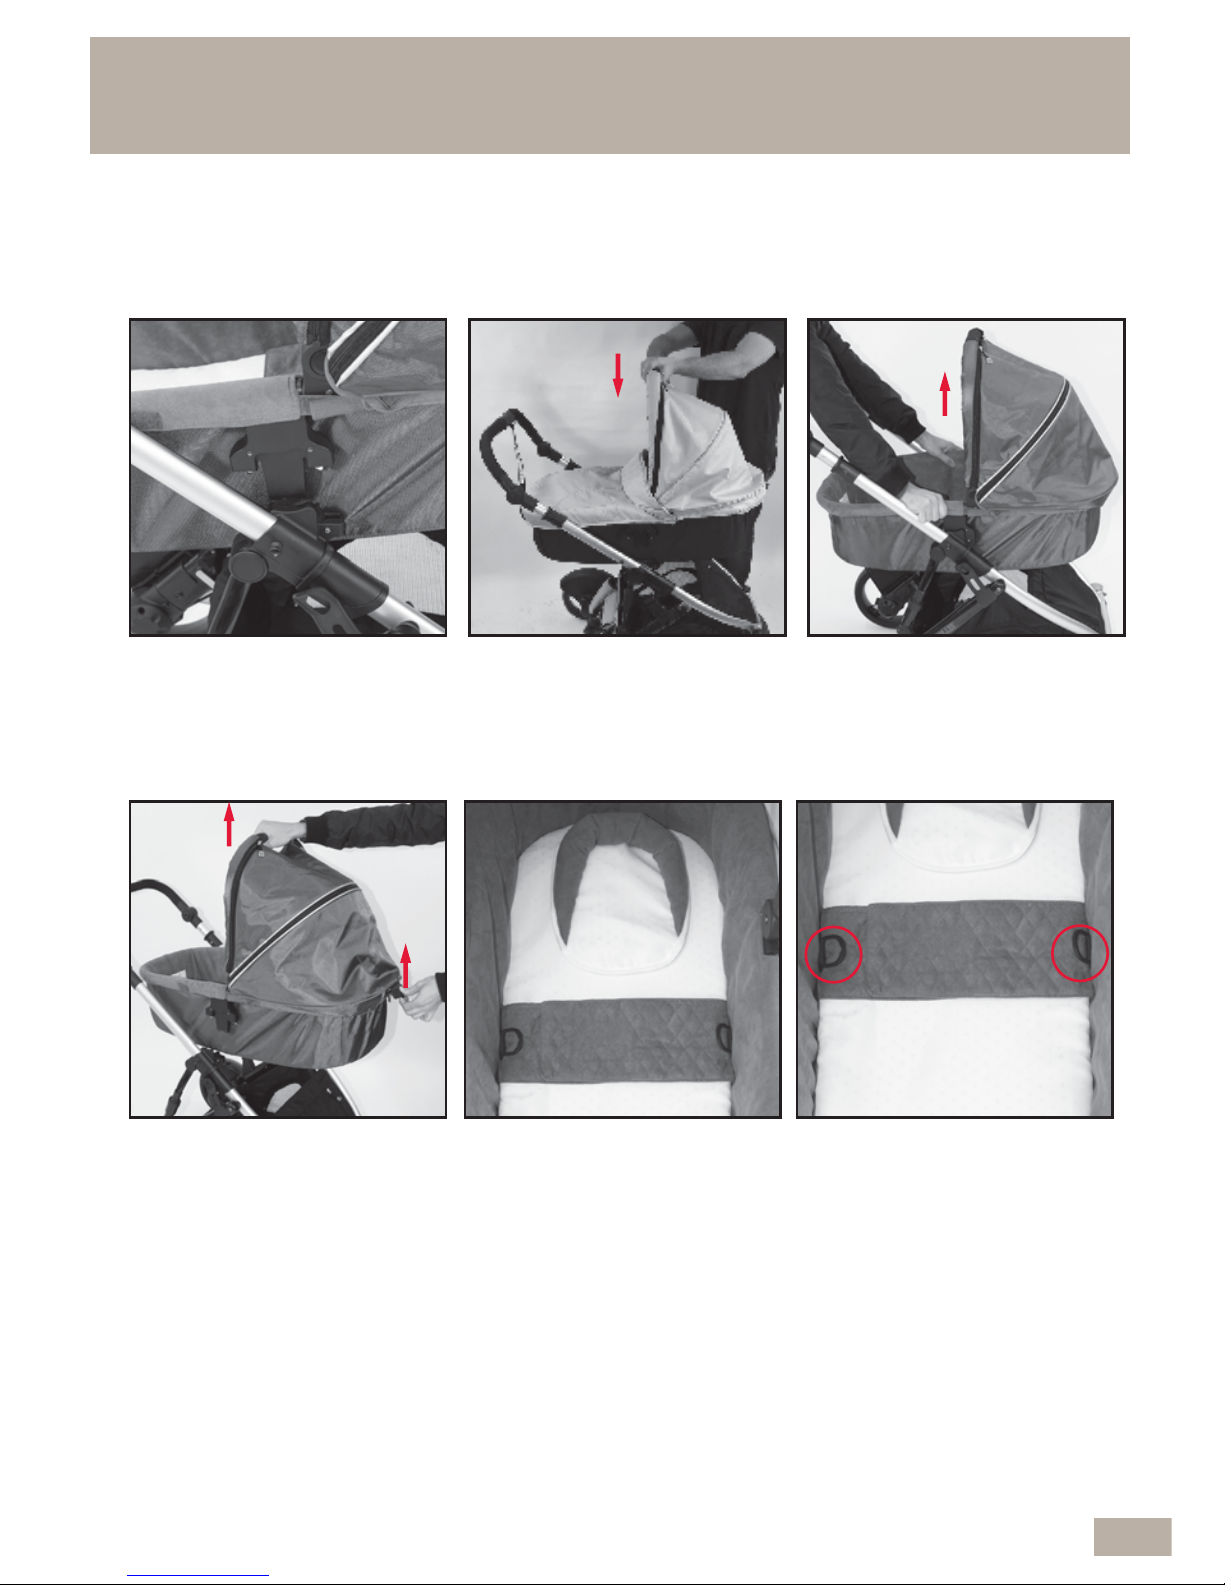
NOTE: A body band is also
installed in the base
of the bassinet for
optional use.
To use the body band,
remove the mattress,
open the body band,
and then place the
mattress back into the
bassinet. When not in
use, store the body
band under the
mattress.
NOTE: D-rings are installed
in the base of the
bassinet for optional
baby harness.
The Baby harness is
not supplied but can
be purchased
separately at an
independent baby
store.
L Line up plastic moulding
on sides of bassinet with
sockets in the middle of the
stroller frame.
M Lower the bassinet all the
way down until it engages
into the sockets on both
sides.
N Ensure Bassinet is
securely locked on by
trying to pull up.
NOTE: The bassinet can only be installed rearward (facing mother position) on
the stroller frame. The frame will not fold with bassinet installed so it must be
removed before folding.
2.3 BASSINET ASSEMBLY, FITTING & REMOVAL
Cont...
O To remove bassinet from
the stroller, firmly lift and
hold the main lever up.
Once released, lift the
bassinet out of the
stroller.
45
Page 46

3.1 INFANT CARRIER WARNINGS & IMPORTANT
NOTES (Infant Carrier sold separately)
• IT IS UNSAFE TO USE ACCESSORIES NOT APPROVED FOR
USE WITH THIS STROLLER.
• DO NOT USE ANY ACCESSORIES OTHER THAN THOSE
APPROVED FOR USE WITH THIS STROLLER BY BRITAX.
• THE MAXIMUM WEIGHT OF THE CHILD USING THIS PRODUCT
IS NOT TO EXCEED 9kg.
• THE STEELCRAFT & STRIDER INFANT CARRIERS ARE THE
ONLY COMPATIBLE INFANT CARRIERS DESIGNED TO FIT THE
COMPACT STROLLER AND SECOND SEAT FRAME.
• THE INFANT CARRIER OR INFANT CARRIERS MUST BE
CORRECTLY FITTED AND LOCKED ONTO THE COMPACT
STROLLER OR SECOND SEAT FRAME.
• WHEN LOCKED ONTO THE STROLLER FRAME, THE INFANT
CARRIER MUST ONLY BE USED IN THE REARWARD FACING
POSITION (FACING THE MOTHER), FITTED FACING TOWARD
THE STROLLER HANDLE.
• WHEN LOCKED ONTO THE SECOND SEAT FRAME, THE
INFANT CARRIER MUST ONLY BE USED IN THE FORWARD
FACING POSITION, FITTED FACING TOWARDS THE FRONT OF
THE STROLLER.
• SECURE EACH CHILD USING THE INFANT CARRIER OR
INFANT CARRIERS HARNESS AT ALL TIMES.
• DO NOT LEAVE CHILDREN IN THE INFANT CARRIERS FOR
EXTENDED PERIODS.
• THE INFANT CARRIERS ARE DESIGNED TO PROVIDE
MOBILITY OUTSIDE OF THE CAR BUT THEY SHOULD NOT BE
USED INSTEAD OF AN APPROPRIATE COT.
• THE INFANT CARRIER/CARRIERS MUST BE REMOVED FROM
THE FRAME BEFORE FOLDING.
WARNINGS:
IMPORTANT NOTES:
46
Page 47
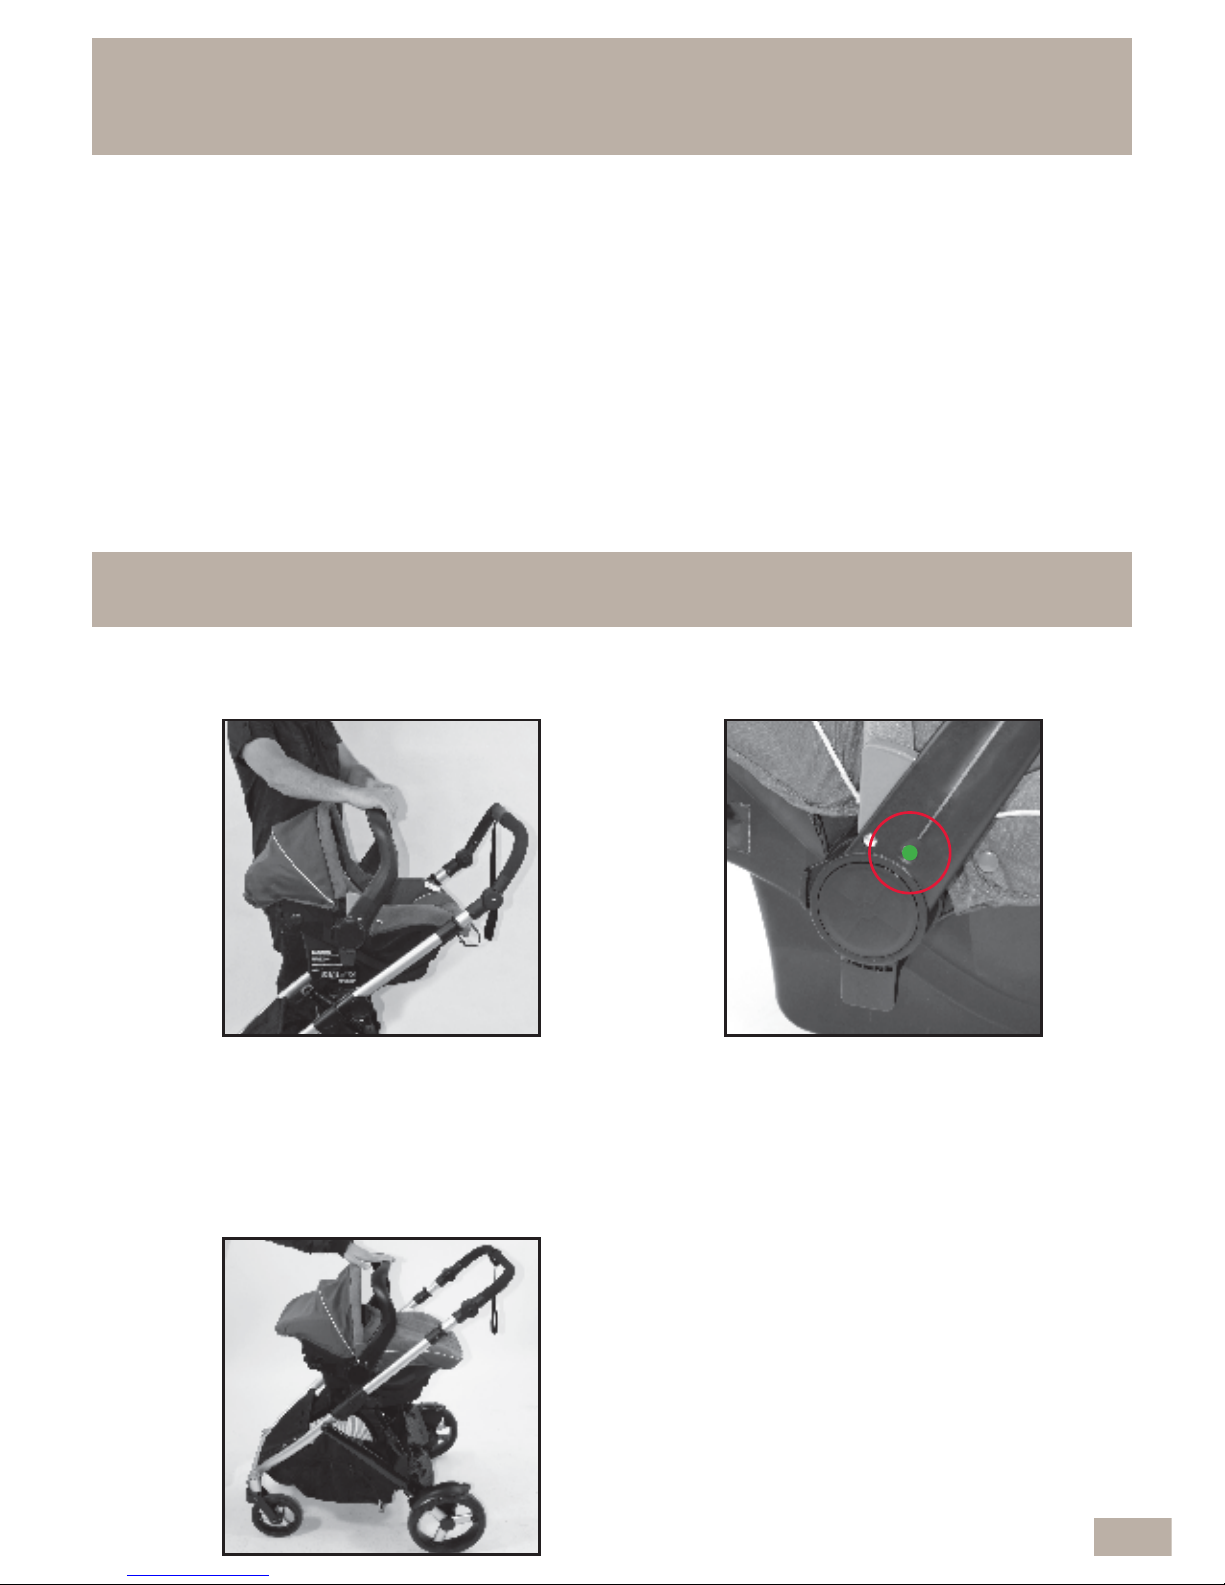
3.2 INFANT CARRIER FITTING & REMOVAL
PLEASE NOTE: FOR PROPER USE OF THE INFANT CARRIER IN
THE CAR, PLEASE FOLLOW THE INSTRUCTION BOOK
PROVIDED WITH THE INFANT CARRIER.
• THE SUN IS VERY STRONG. DO NOT LEAVE YOUR CHILD
EXPOSED TO THE SUN. THE CANOPY OR HOOD ON THIS
PRODUCT WILL NOT GIVE YOUR CHILD TOTAL PROTECTION
FROM THE HARMFUL RAYS OF THE SUN.
A Remove Stroller seat or Bassinet from frame, (See sections 1.15 (B) & 2.3
(O)). The Infant Carrier must face the Stroller handle. With the Infant Carrier
handle in the upright position, locate the infant carrier handle mouldings on
either side, directly over the frame mouldings. Notice the indicator is
GREEN.
B Push down on the infant carrier and make sure it
is located in the frame mouldings. The infant
carrier now needs to be locked securely in frame.
3.1 INFANT CARRIER WARNINGS & IMPORTANT
NOTES Cont... (Purchased Separately)
PLEASE REFER TO PAGE 11 FOR SMART LIFTING TECHNIQUES.
47
Page 48
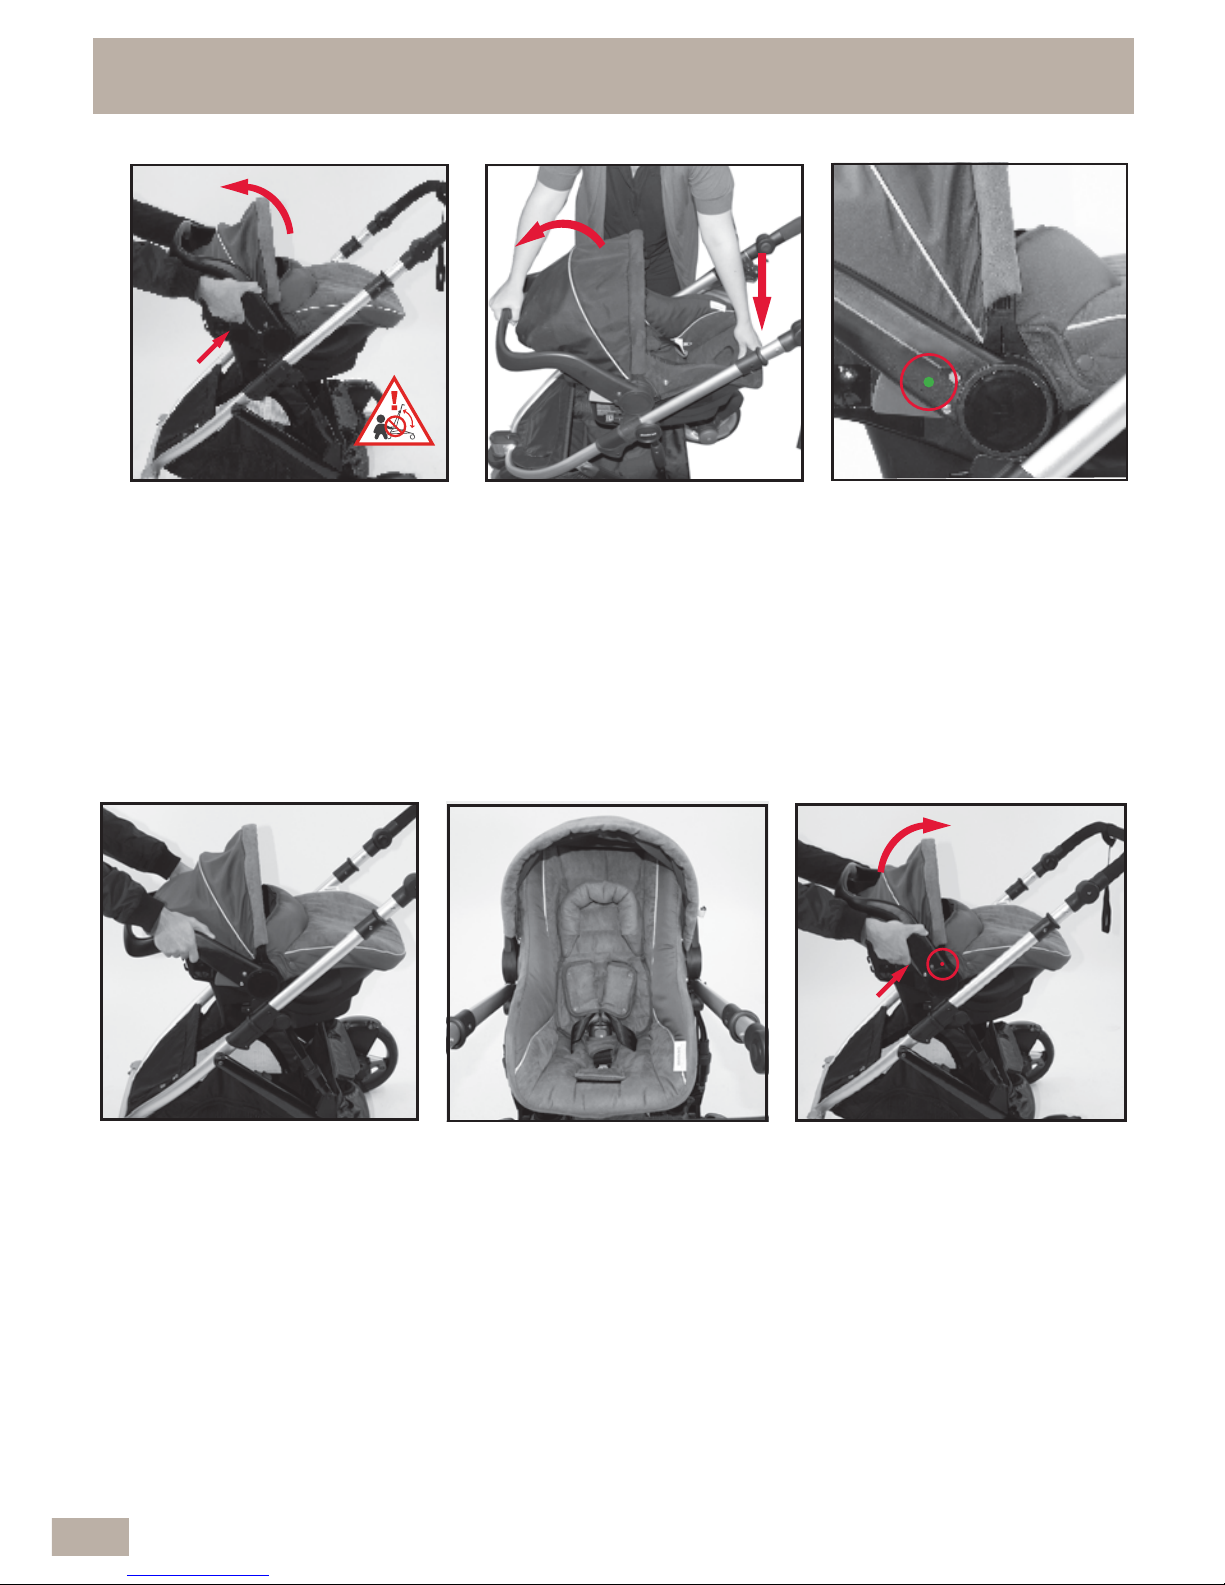
G Secure your baby into the
infant carrier with the
harness provided. (Refer
to instruction manual that
comes with infant carrier).
H To remove the infant carrier,
squeeze both handle
latches in to release the
locks. The indicator will now
be RED.
3.2 INFANT CARRIER FITTING & REMOVAL Cont...
C By squeezing in and
holding the latches on
either side of the handle,
rotate the handle
backwards. The GREEN
indicator will now turn to
RED.
D Release the handle
latches. Then with one
hand holding the front of
the infant carrier, push
the infant carrier handle
all the way down until
you hear it lock into the
frame.
E The handle indicator
should now be GREEN
and the infant carrier
should be locked into
the frame. If indicator is
RED the infant carrier
handle is not in the
locked position, repeat
step D
F Pull up on both sides of the
infant carrier and confirm it
is locked into the frame. If
not locked in on both sides,
repeat steps A to E.
CAUTION
48
Page 49
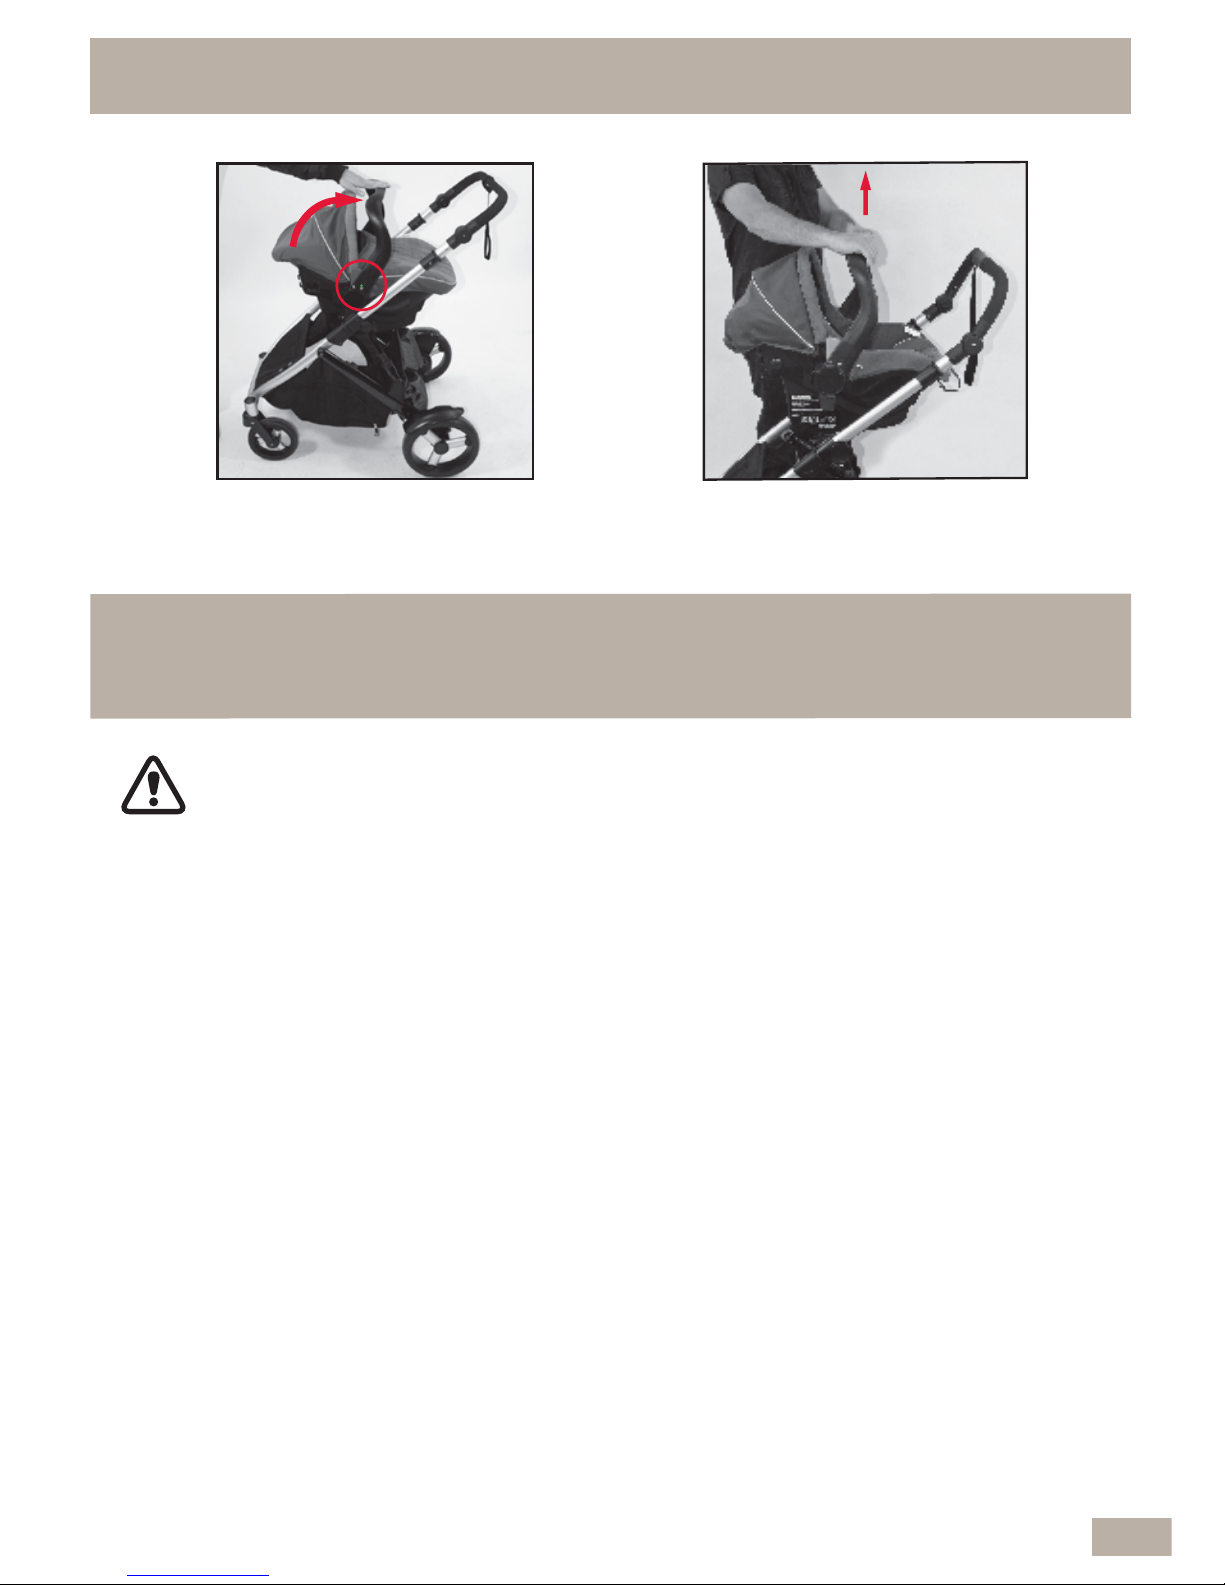
I Continue to rotate the handle forward until it
returns to the upright position. Release the
latches, the indicator should now be GREEN.
4.1 SECOND SEAT WARNINGS & IMPORTANT
NOTES (Second Seat sold separately)
• IT IS UNSAFE TO USE ACCESSORIES NOT APPROVED FOR
USE WITH THIS STROLLER.
• DO NOT USE ANY ACCESSORIES OTHER THAN THOSE
APPROVED FOR USE WITH THIS STROLLER BY BRITAX.
• THE MAXIMUM WEIGHT OF THE CHILD USING THIS PRODUCT
IS NOT TO EXCEED 17kg.
• DO NOT USE THIS SEAT WITH ANY OTHER MODELS OF
STROLLER.
• THE SECOND SEAT MUST BE CORRECTLY FITTED AND
LOCKED ONTO THE SECOND SEAT FRAME.
• THE SECOND SEAT CAN ONLY BE USED IN THE FORWARD
FACING POSITION, CONNECTED TO THE REAR OF THE
STROLLER.
• DO NOT OVERLOAD THE STROLLER. OVERLOADING WILL
CAUSE THE STROLLER TO TIP BACKWARDS.
WARNINGS:
IMPORTANT NOTES:
3.2 INFANT CARRIER FITTING & REMOVAL Cont..
J Lift and remove the infant
carrier away from the
stroller.
49
Page 50

SS1. Second Seat assembly
SS2. Second Seat engaging pins (2)
SS3. One hand, 4 position reclining backrest
SS4. Adjustable /removable canopy
SS5. Canopy Release Buttons
SS6. Receivers (2)
SS7. Head Pillow
SS8. Shoulder pads (2)
SS9. Second Seat leg tube
4.2 SECOND SEAT PARTS
50
SS8
SS2
SS1
SS2
SS3
SS4
SS7
SS5
SS5
SS9
SS9
SS2
SS1
SS2
SS3
SS4
SS6
SS8
SS7
SS5
SS5
SS9
SS9
Page 51
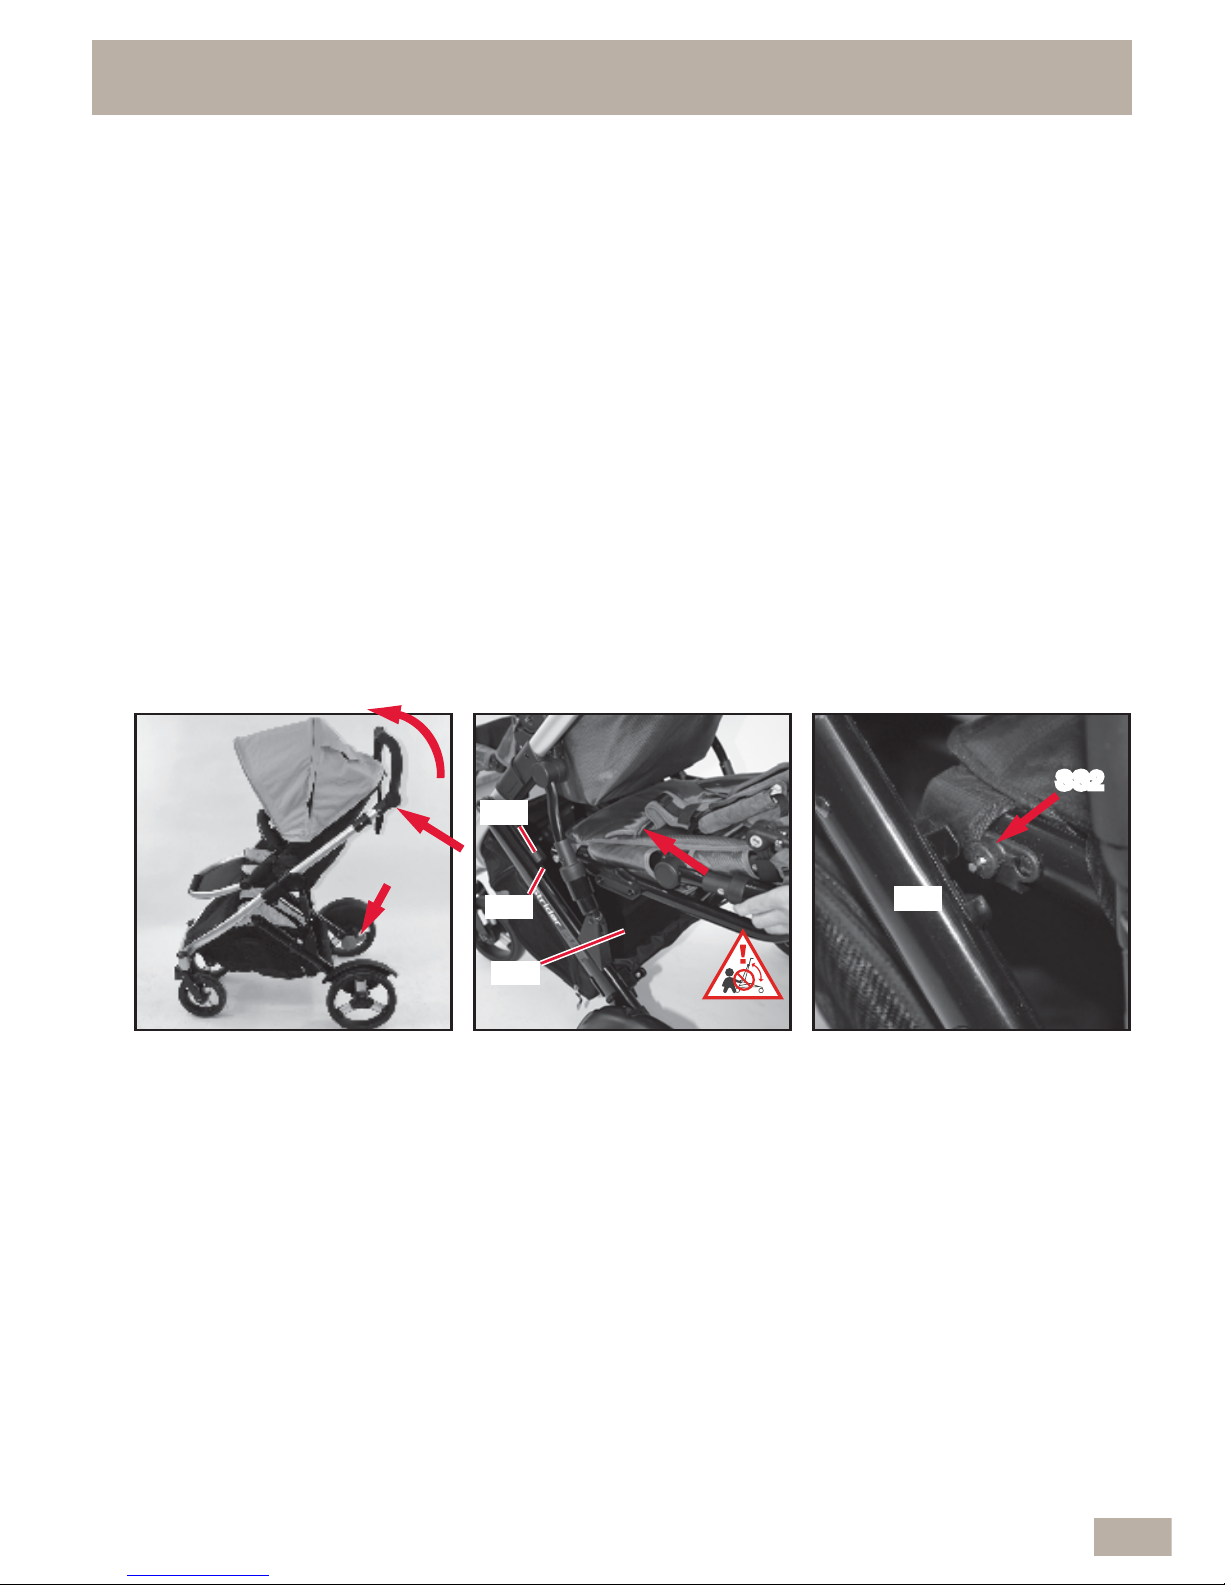
NOTE: For easier installation, rotate the pivotal handle in the most upright
position.
A Remove the accessory
bag if fitted. Apply the
stroller brake, rotate the
pivotal handle up to
create more assembly
space. Adjust the stroller
seat to the most upright
position.
C While holding the second
seat, hook the connecting
pins (SS2) into the frame
mouldings (S28), then pull
downwards.
SS2
4.3 FITTING SECOND SEAT TO THE STROLLER
IMPORTANT NOTES:
PLEASE REFER TO PAGE 11 FOR LIFTING TECHNIQUES.
• WHEN FITTING, OPENING OR FOLDING THE SECOND SEAT, BE AWARE OF
THE DANGER OF BEING INJURED BY MOVING PARTS AND LOCKING
DEVICES DURING THE PROCESS. KEEP ALL HANDS AND LIMBS CLEAR OF
THESE PARTS.
• THERE IS POTENTIAL FOR FINGERS OR PARTS OF THE BODY TO BE
INJURED WHEN THE STROLLER IS BEING FOLDED OR UNFOLDED, DUE
CARE SHOULD BE EXERCISED.
• KEEP CHILDREN CLEAR OF THE STROLLER DURING FOLDING OF THE
STROLLER.
B The second seat
connecting pins (SS2)
need to lock into the frame
mouldings (S28). Hold the
second seat frame so the
leg tube (SS9) is
underneath and facing the
second seat.
CAUTION
51
S28
SS9
SS2
S28
Page 52
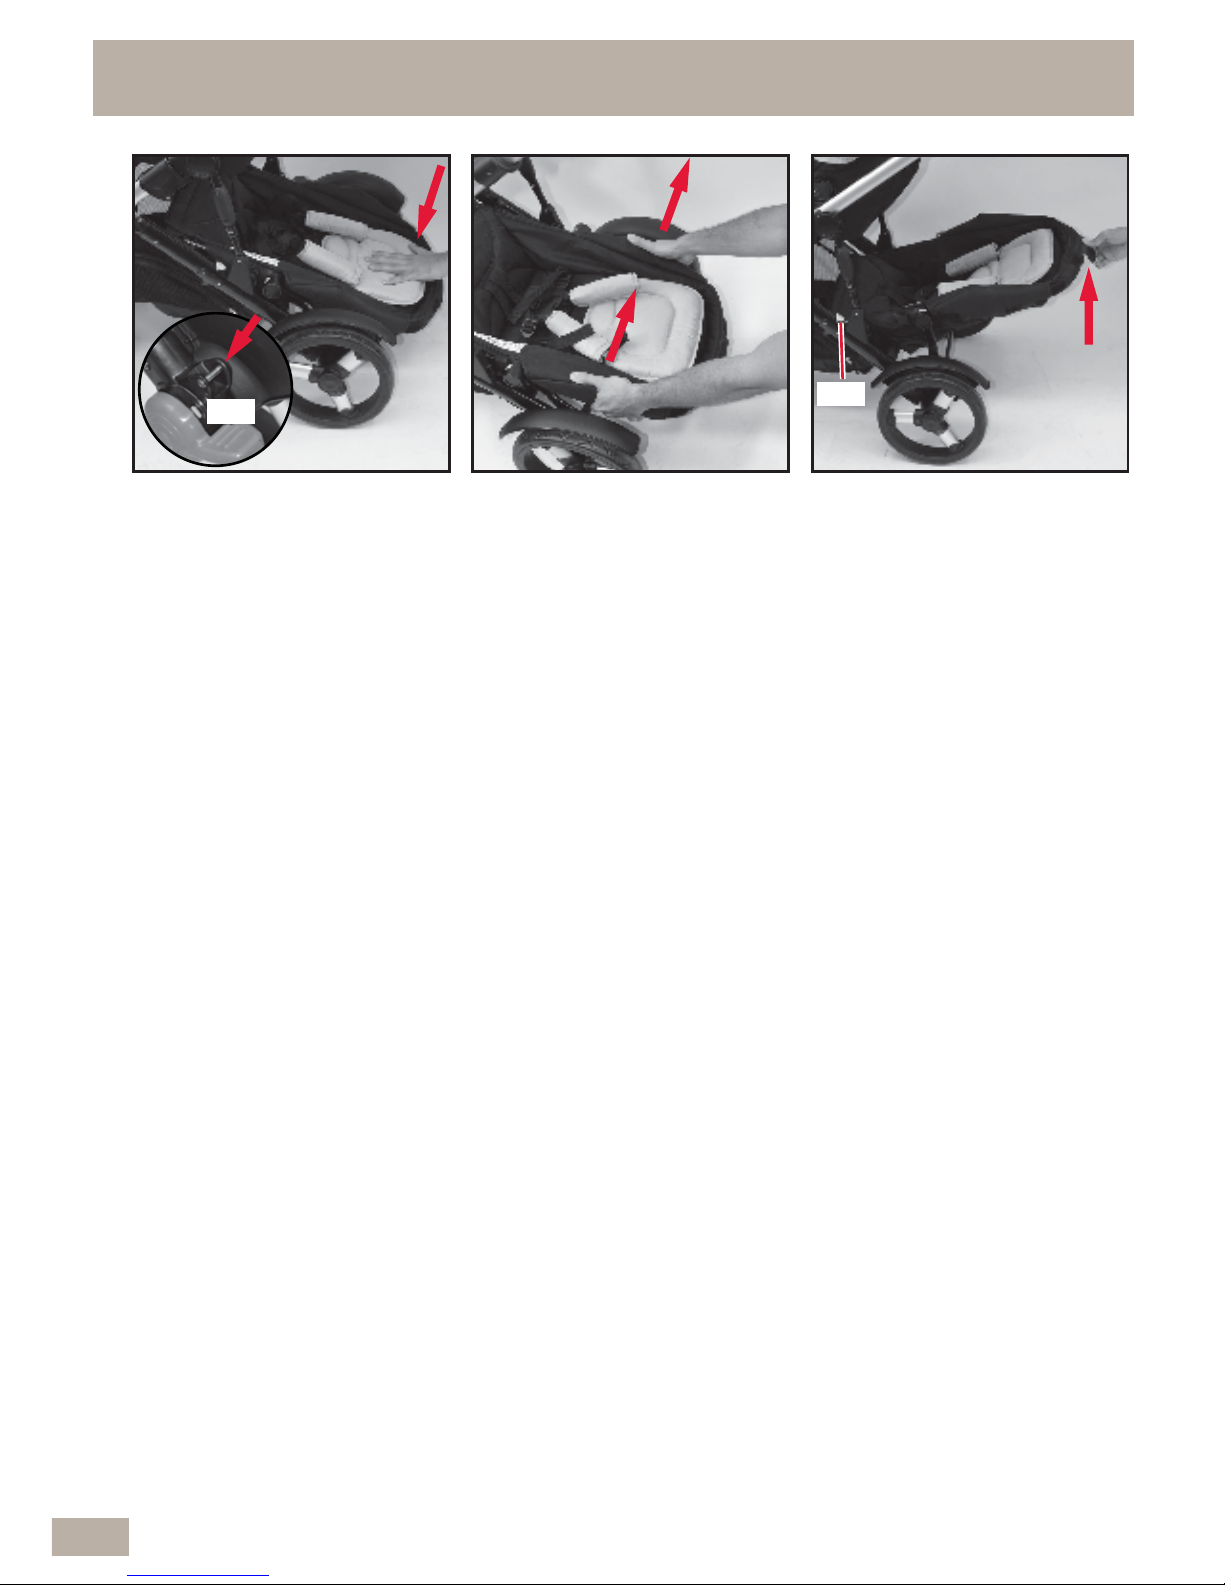
4.3 FITTING SECOND SEAT THE STROLLER
D Lower the second seat
frame and push down to
lock the leg tubes (SS9)
into the lower stroller
frame mouldings (S30).
Repeat step D if the frame
doesn’t lock into place.
E Pull up on the second seat
frame to make sure it is
locked onto the stroller
frame. Ensure to grasp the
second seat frame as
shown above.
F Raise the backrest
adjusting lever and lift the
head end of the second
seat so that the foot end
slides down the stroller
frame and engages into
the second lock (S29)
.
52
S30
S29
Page 53
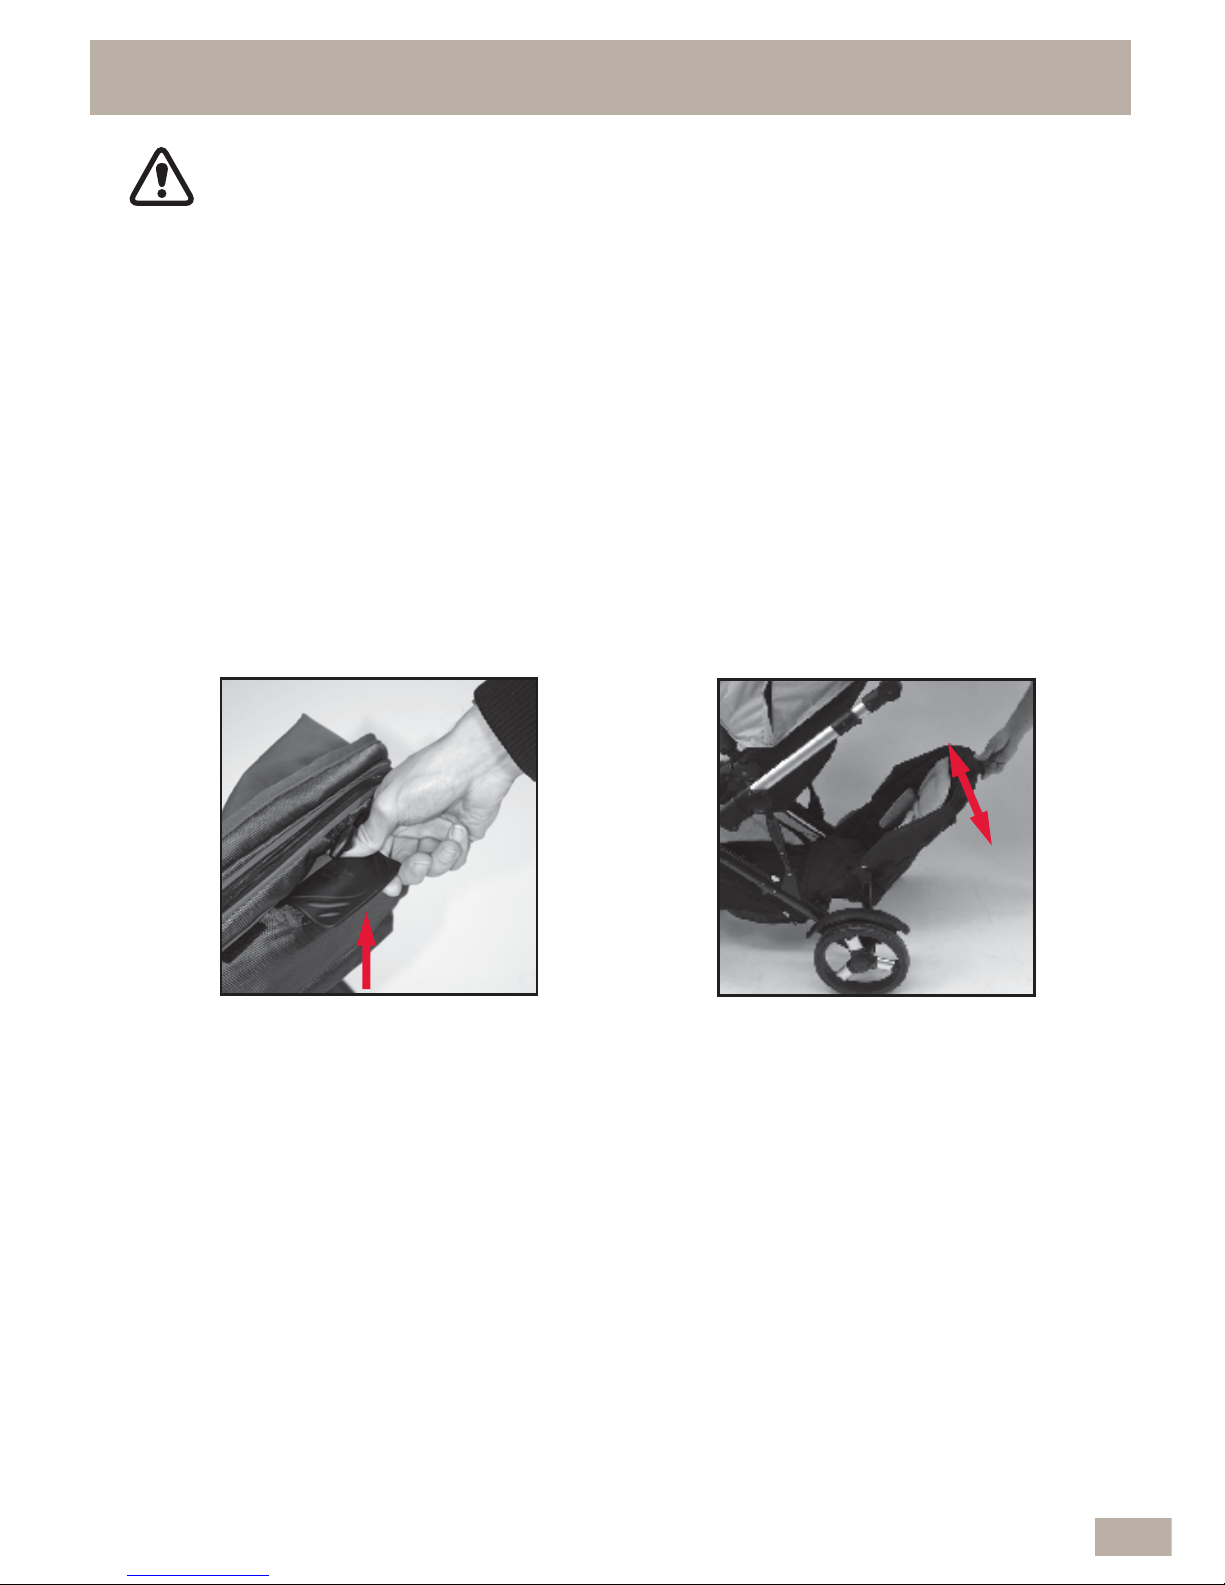
A Adjust to desired seating
position by using the one
hand backrest adjusting
lever. Lift the lever all the
way up and at the same
time, lift up on the seat.
B The seat will slide up and
down the frame. Lock into
any one of 4 seating
positions by releasing the
backrest adjusting lever and
allow the seat to engage at
the desired position.
4.4 ADJUSTING THE BACKREST
WARNINGS:
• THE UPRIGHT POSITIONS ARE NOT SUITABLE FOR USE WITH CHILDREN
LESS THAN 6 MONTHS OLD.
• THE LOWEST RECLINE POSITION SHOULD BE USED TO TRANSPORT
BABIES. THE BACKREST CAN BE ADJUSTED TO A MORE UPRIGHT
POSITION AS THE CHILD GROWS OLDER AND IS ABLE TO SUPPORT ITS
HEAD WITHOUT ASSISTANCE.
NOTE: If the child is sitting in the seat, support the backrest as it reclines.
If you have difficulty adjusting the backrest you may need to remove the child
from the seat to allow you to raise or lower the backrest with ease.
53
Page 54
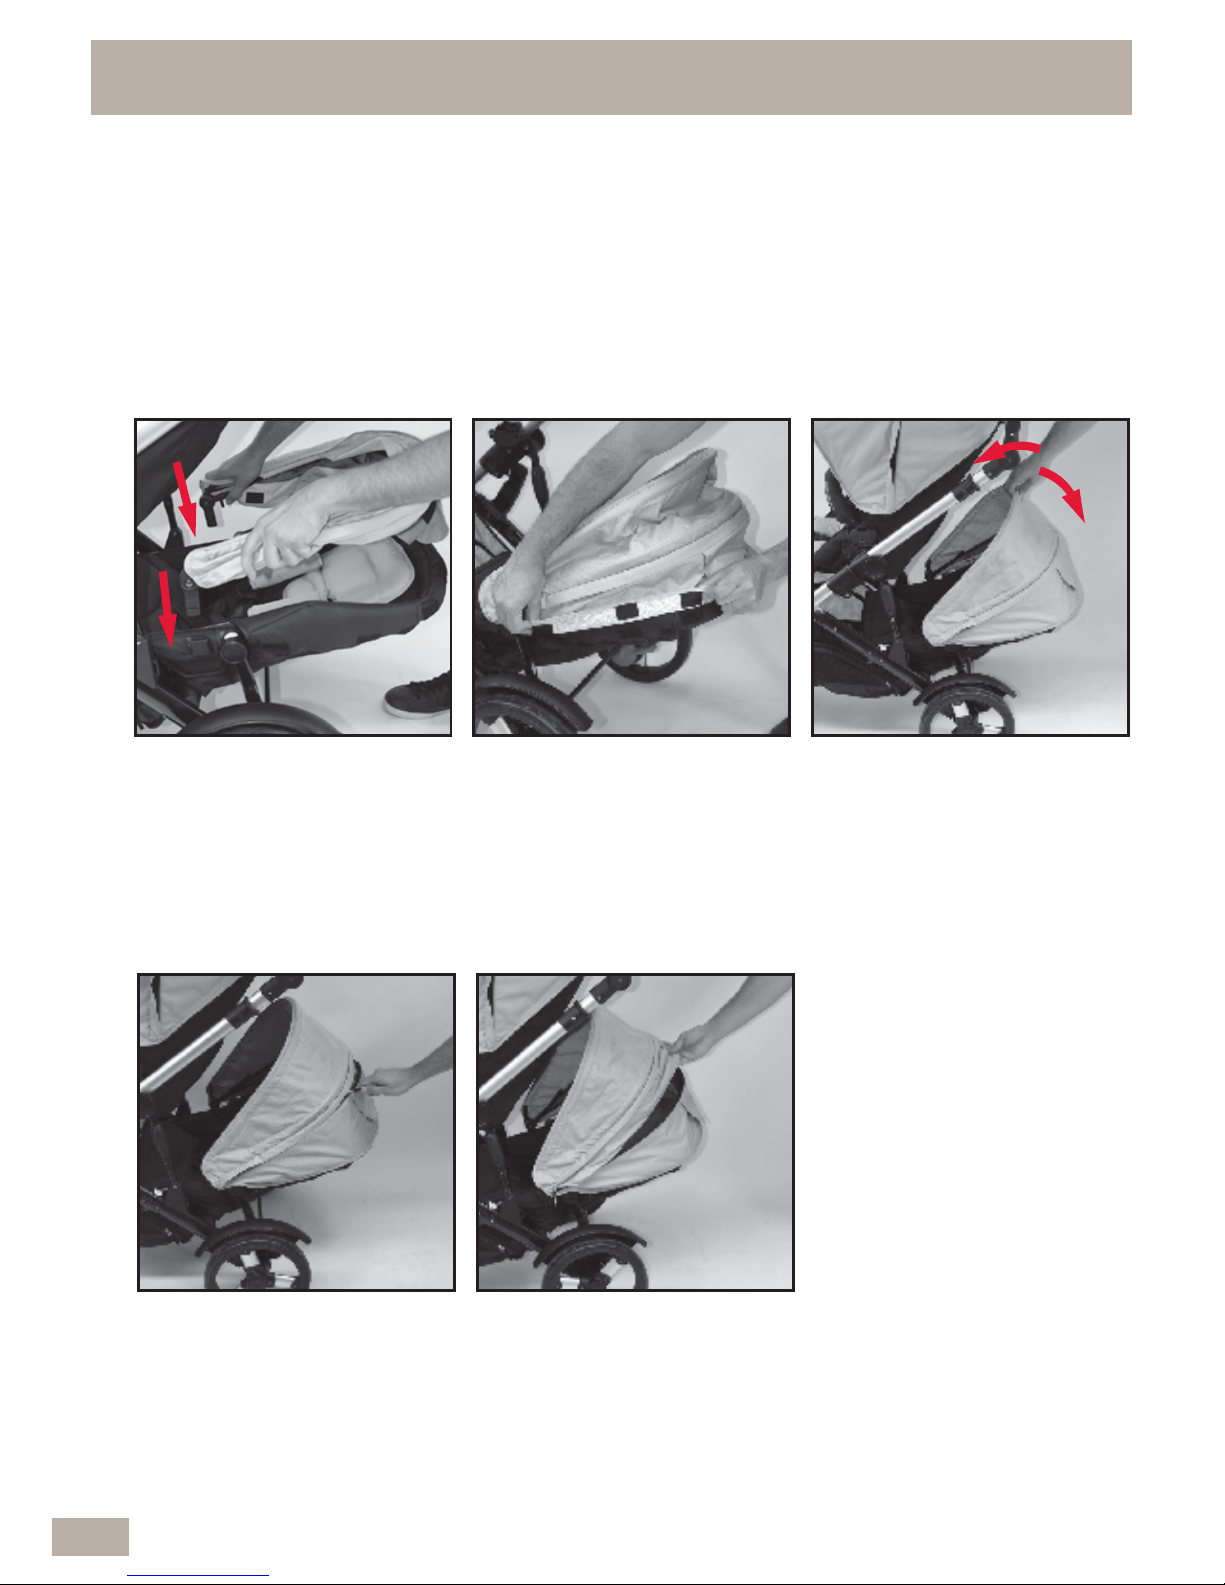
D To expose the mesh
section of the canopy,
unzip the centre section.
E The zip should be fully
unzipped to expose the
centre mesh section. Use
the fabric to expose or
enclose the mesh section.
B Attach the canopy hook
strips to the pile strips
around the top of the
frame for a secure fit.
C To adjust the canopy, open
by pulling forward, or
close by pushing it
backward. To remove the
canopy see section 4.15
(C).
A To attach the canopy,
insert the canopy
mouldings onto the frame
mouldings until they snap
in.
4.5 TO FIT, USE & REMOVE THE CANOPY
• THE SUN IS VERY STRONG. DO NOT LEAVE YOUR CHILD
EXPOSED TO THE SUN. THE CANOPY OR HOOD ON THIS
PRODUCT WILL NOT GIVE YOUR CHILD TOTAL PROTECTION
FROM THE HARMFUL RAYS OF THE SUN.
IMPORTANT NOTE:
54
Page 55
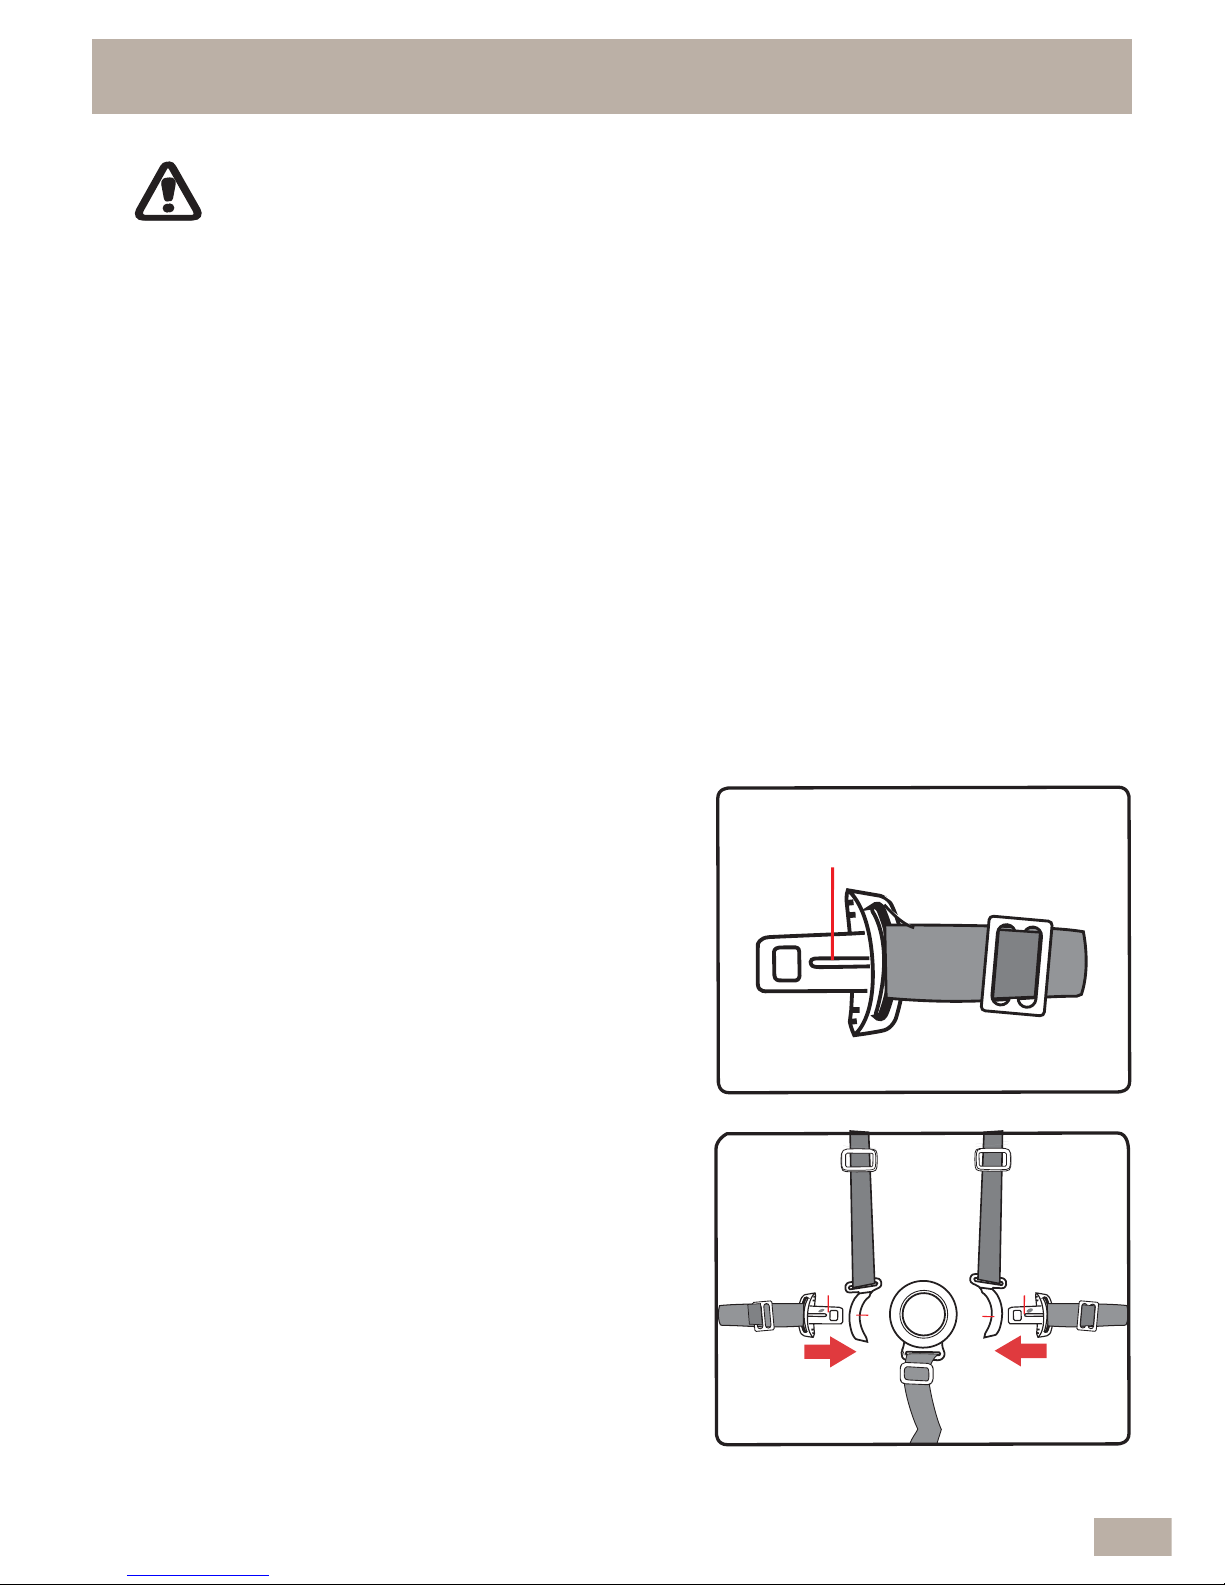
4.6 HARNESS ADJUSTMENT
Raised Rib
NOTE: Each waist buckle tongue has a raised rib
on one side and can only be locked into the
buckle assembly with the raised rib facing up.
Shoulder straps
Waist straps
Waist straps
A A
B
B
Crotch strap
Buckle
Assembly
A
Set parking brake. Place child in seat. Slip one
shoulder strap over each shoulder.
Position crotch strap between legs. Push the
buckle tongues (A) on waist straps through the
tongue guides (B) on shoulder straps.
A
• A five point harness is provided to restrain your child.
• Buckle tongues separate for added safety.
• To reconnect buckle tongues and to secure the child in the harness please
follow the steps below carefully.
• ENSURE YOUR CHILD IS SECURED WITH A CORRECTLY ADJUSTED
HARNESS.
• THE ADJUSTED HARNESS SHOULD CLOSELY FIT THE CHILD.
• NEVER LEAVE THE HARNESS BUCKLED WHEN NOT FITTED TO A CHILD IN
THE STROLLER, BECAUSE THE HARNESS CAN FORM LOOPS WHICH MAY
POSE A STRANGULATION HAZARD.
• WHEN HARNESS IS NOT IN USE, DISCONNECT SHOULDER STRAPS FROM
THE WAIST STRAPS AND BUCKLE TO PREVENT STRANGULATION.
WARNING: USE THE HARNESS AT ALL TIMES.
55
Page 56
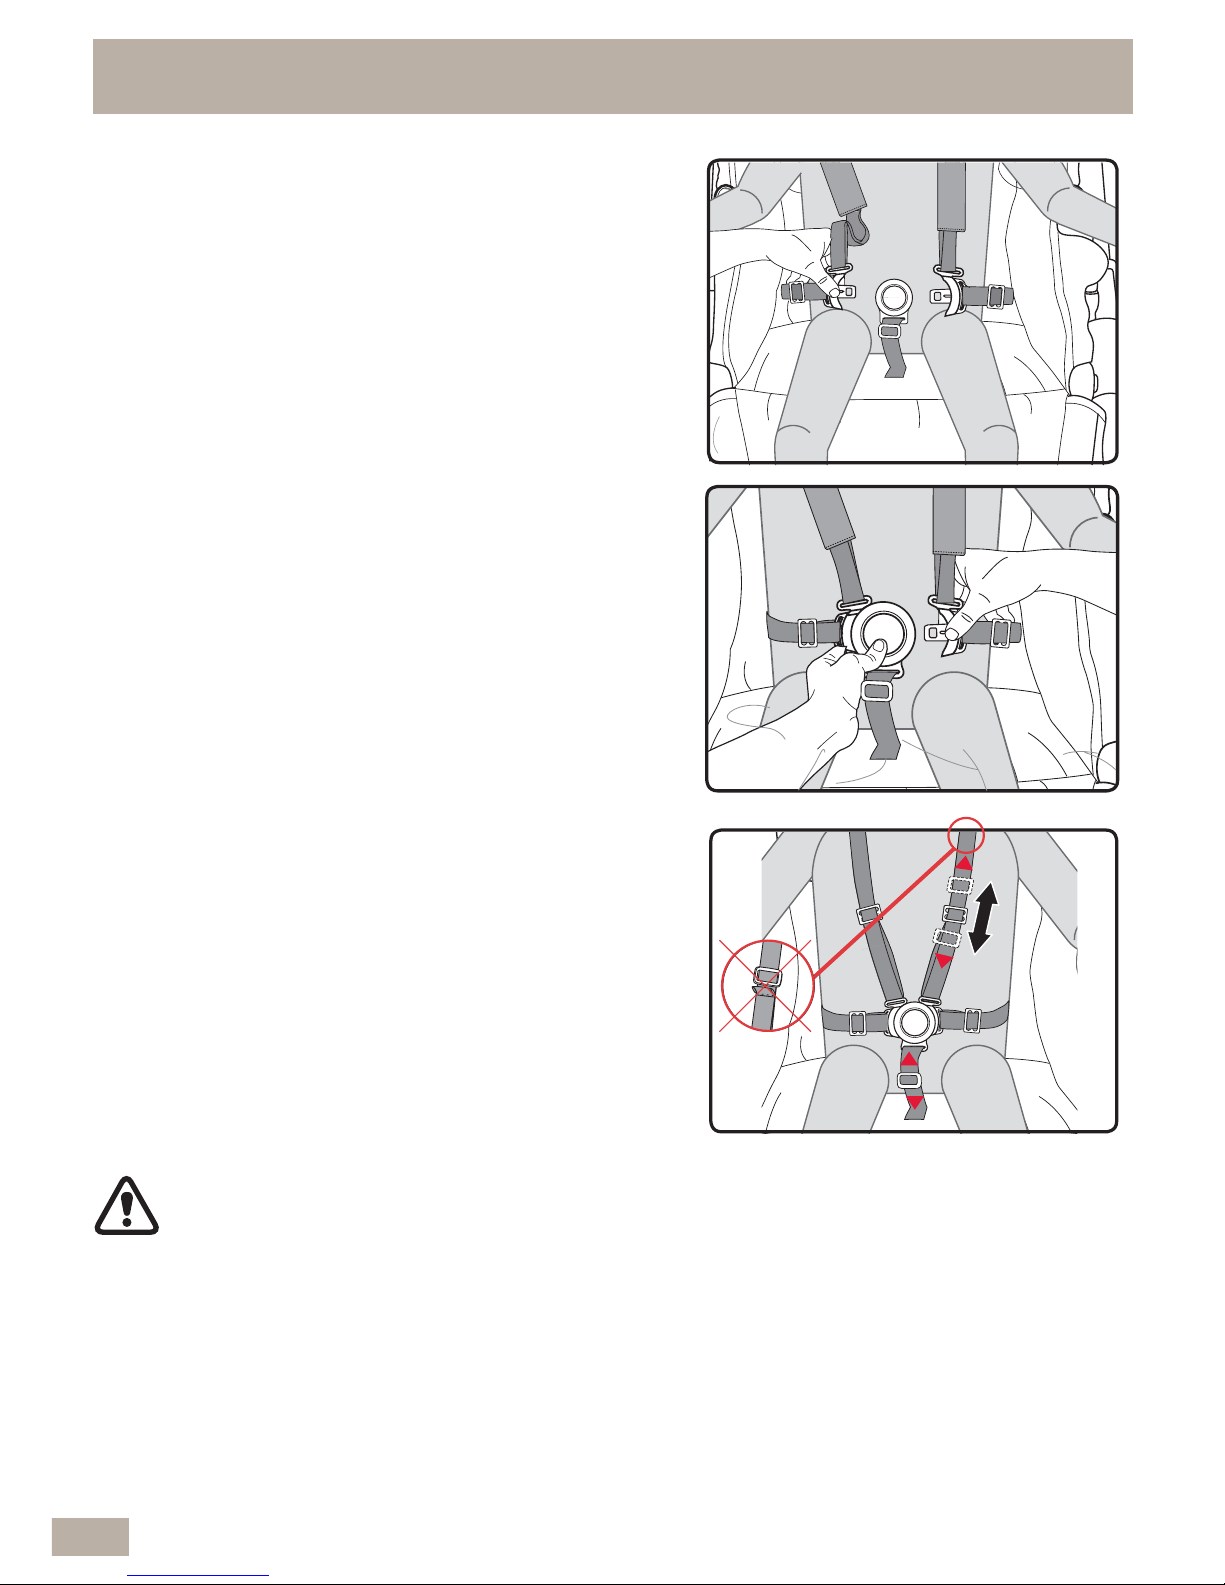
4.6 HARNESS ADJUSTMENT cont...
Note: Ensure the straps are not twisted as they
may become uncomfortable for the child.
Hold the buckle tongue (A) on the waist strap &
tongue guides (B) on shoulder straps together.
B
B
B
Press in & hold the centre crotch buckle button
and insert the waist buckle tongues into the crotch
buckle assembly.
IMPORTANT: Pull on each waist buckle tongue
to make sure they are locked into the crotch
buckle assembly. If not, repeat above
procedure.
C Tighten or loosen the shoulder straps and crotch
strap by sliding the 3 bar harness adjuster up or
down.
The crotch strap should be adjusted to a snug fit.
CAUTION: DO NOT SLIDE 3 BAR SLIDER OVER THE SEWN
TAB ON SHOULDER HARNESS
56
Page 57
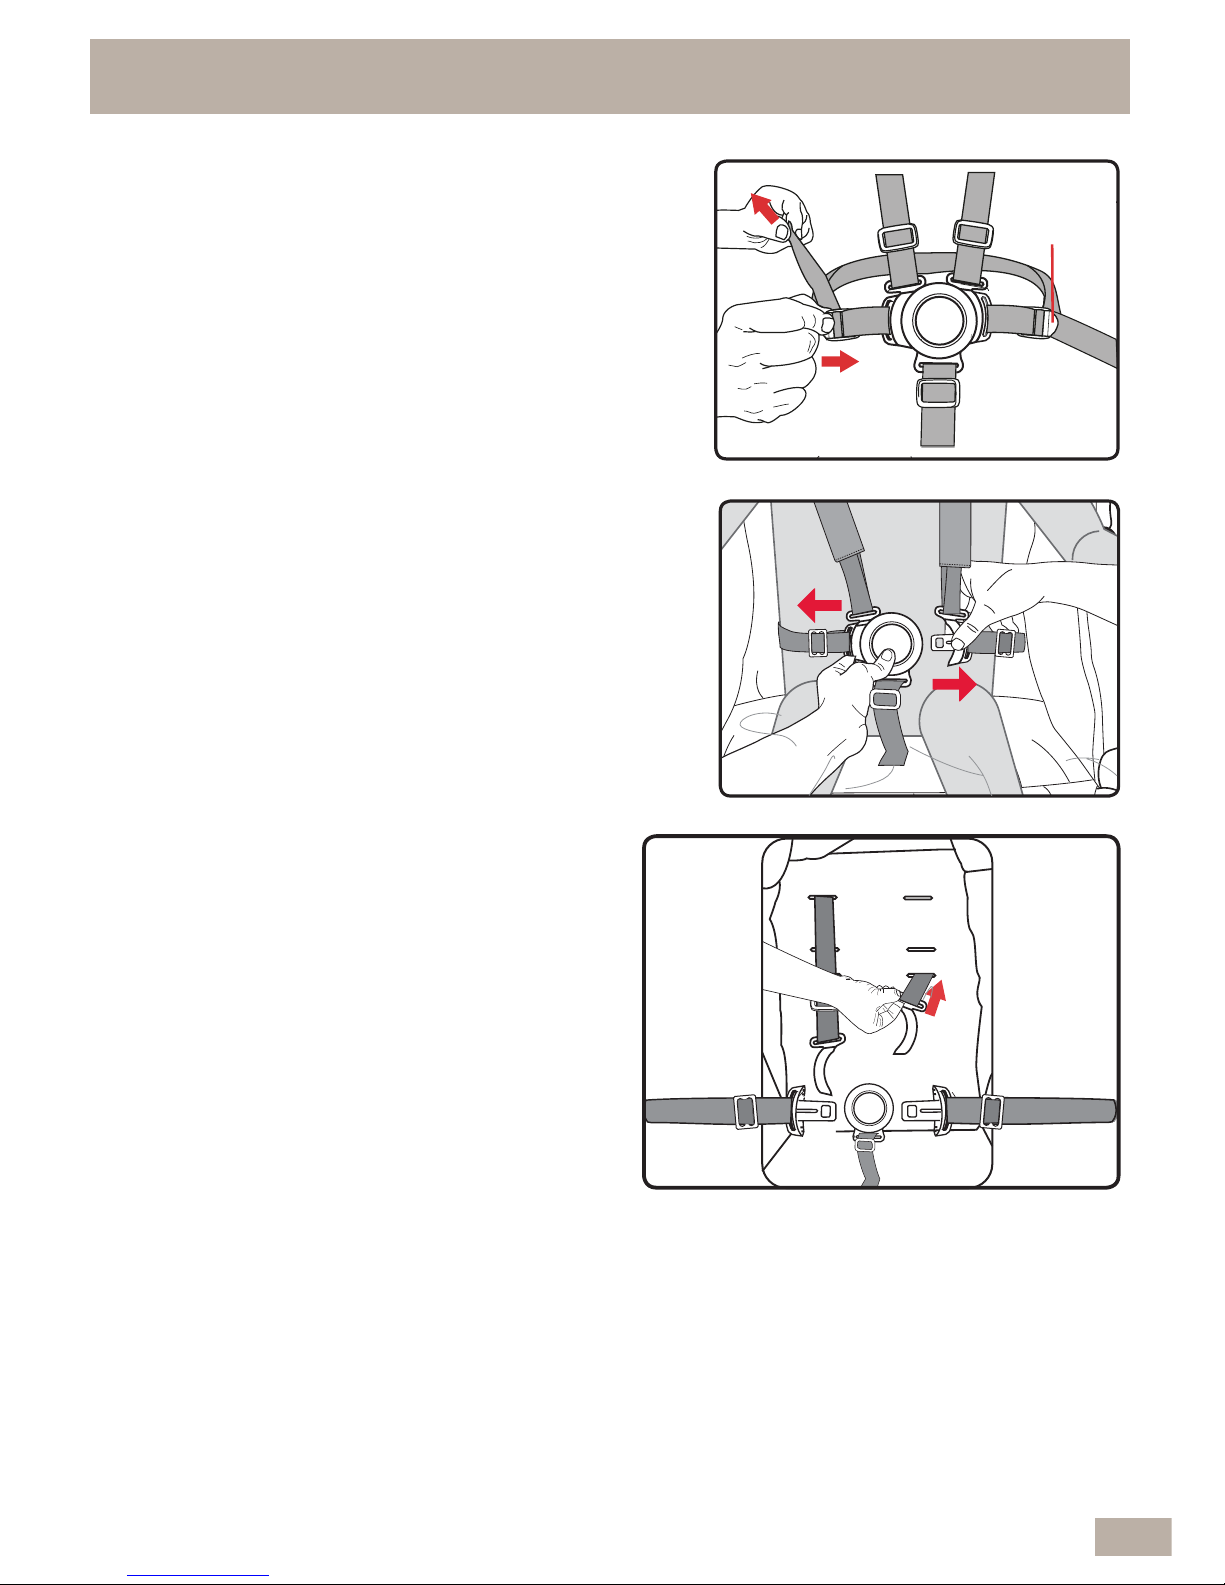
E
Release the harness by depressing the button in
the centre of the buckle while pulling the two waist
tongues away from the buckle assembly.
4.6 HARNESS ADJUSTMENT cont...
4 bar
harness
adjuster
D Tighten or loosen the waist straps, hold and lift the
4 bar harness adjuster and pull the harness strap
to adjust to the desired fit.
The waist strap needs to fit firmly around the child.
F
The stroller seat has *2 or 3 sets of harness
slots at different heights to accommodate the
child. To change the shoulder harness height,
position the shoulder straps near the child’s
shoulders then either push the shoulder
harness tongue out of the current harness
slot and through the back of the seat.
*Depending on the model
57
Page 58

4.8 TO FIT THE SHOULDER PADS
A The head pillow has a small height adjusting range. Attach to the best
suited hook and pile position as required.
4.7 ADJUSTING THE HEAD PILLOW HEIGHT
POSITION
58
A Release the harness
buckles and slide the
shoulder pads onto the
shoulder strap
B Repeat for the other
shoulder pad.
Page 59
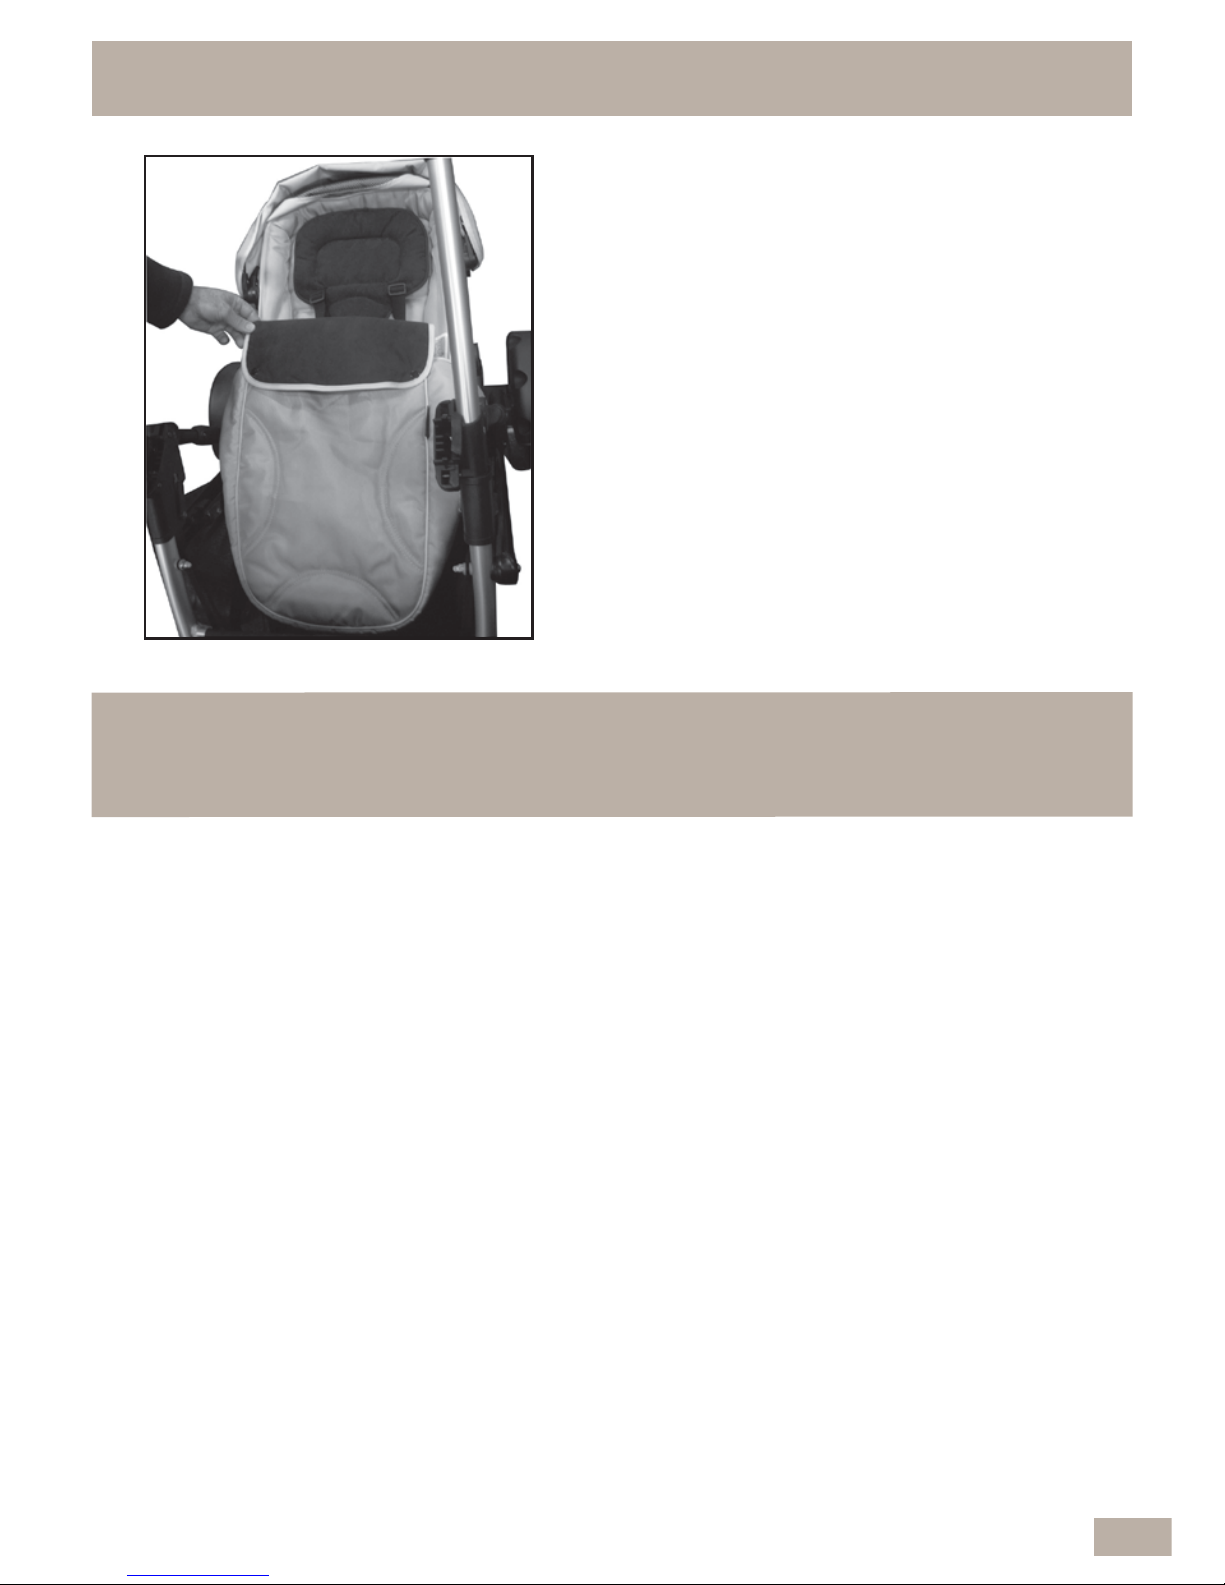
C Fit the boot cover inside the basket over
the bottom part of the second seat.
4.9 TO FIT THE BOOT COVER
IMPORTANT NOTES:
PLEASE REFER TO PAGE 11 FOR LIFTING TECHNIQUES.
• WHEN OPENING OR FOLDING THE SECOND SEAT, BE AWARE OF THE
DANGER OF BEING INJURED BY MOVING PARTS AND LOCKING DEVICES
DURING THE PROCESS. KEEP ALL HANDS AND LIMBS CLEAR OF THESE
PARTS.
• THERE IS POTENTIAL FOR FINGERS OR PARTS OF THE BODY TO BE
INJURED WHEN THE STROLLER IS BEING FOLDED OR UNFOLDED, DUE
CARE SHOULD BE EXERCISED.
• KEEP CHILDREN CLEAR OF THE STROLLER DURING FOLDING OF THE
STROLLER.
4.10 FOLDING THE SECOND SEAT WITH THE
STROLLER FRAME
59
Page 60
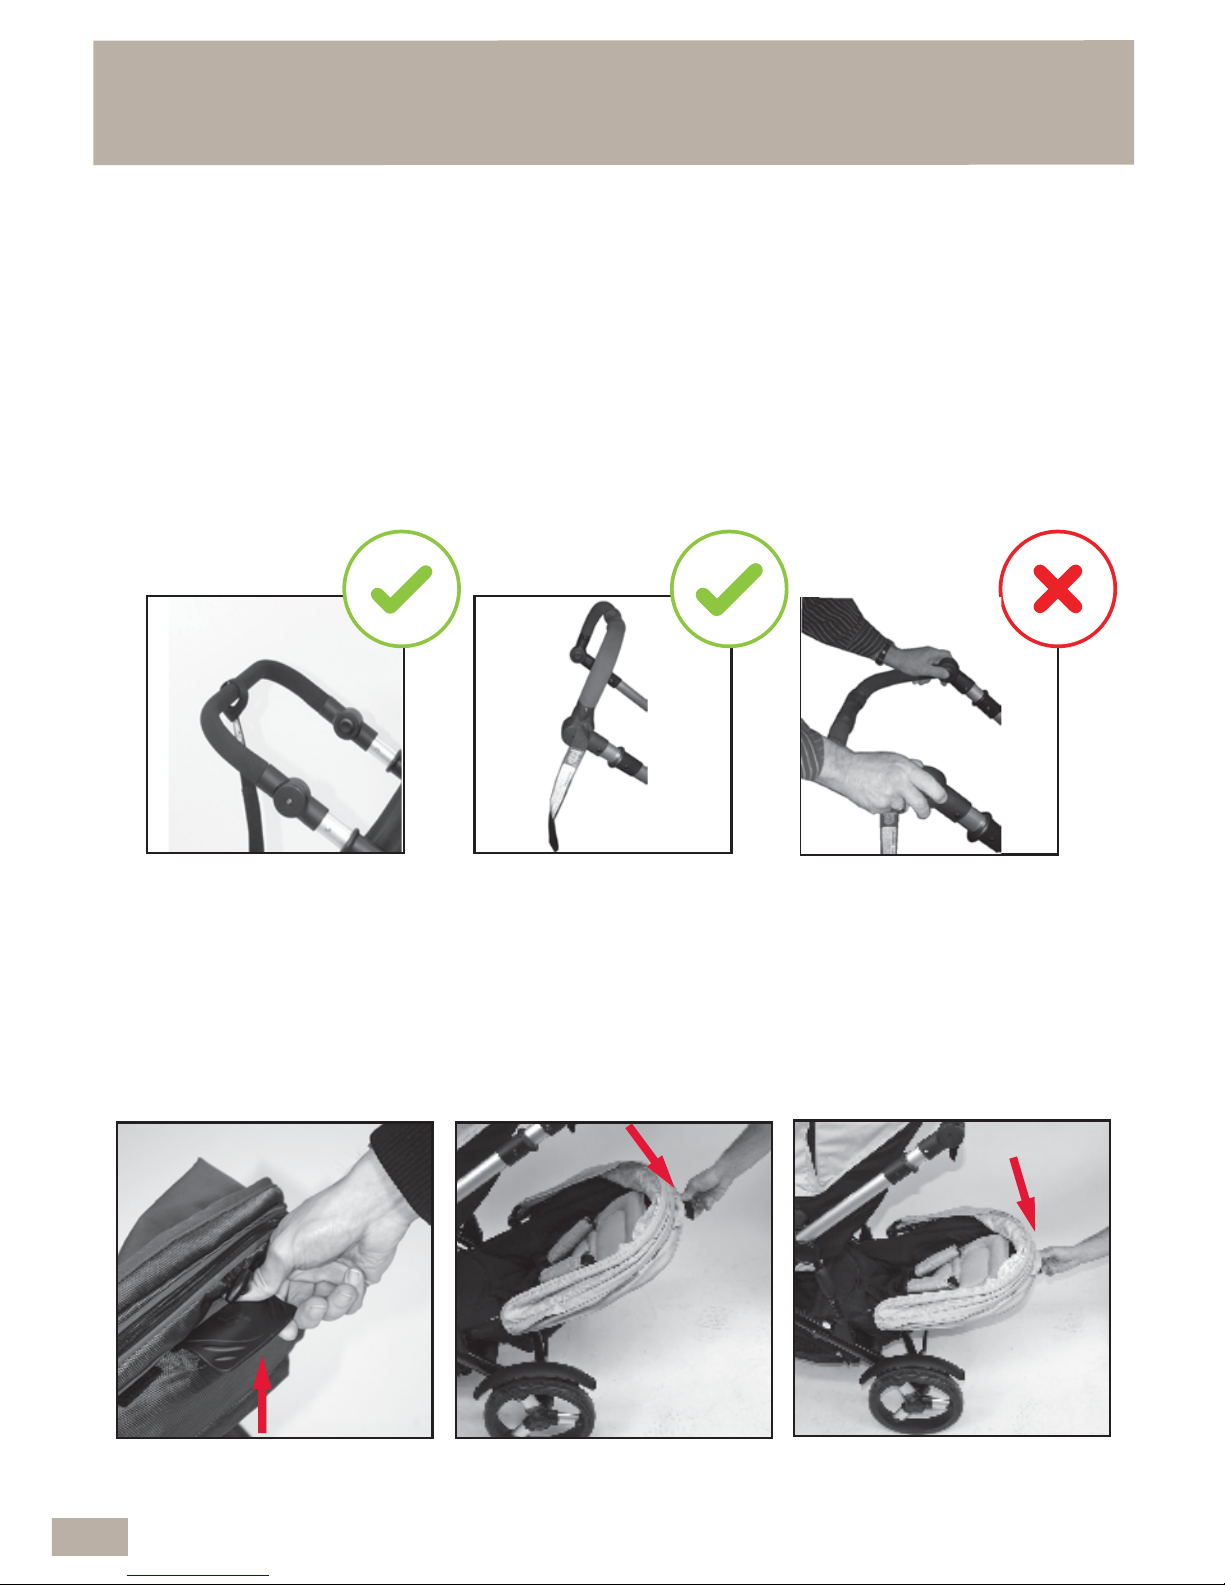
4.10 FOLDING THE SECOND SEAT WITH THE
STROLLER FRAME Cont...
IMPORTANT NOTE:
INCORRECT FOLDING MAY CAUSE DAMAGE TO THE STROLLER AND FRAME.
PLEASE FOLLOW THE FOLDING INSTRUCTIONS CAREFULLY.
NOTE: When folding the stroller with the second seat attached, you must
adjust the stroller pivotal handle to the regular or highest position (see section
1.10), to prevent the handle from coming in contact with the second seat and
causing damage to the stroller.
HIGHEST POINTREGULAR POINT
LOWEST POINT
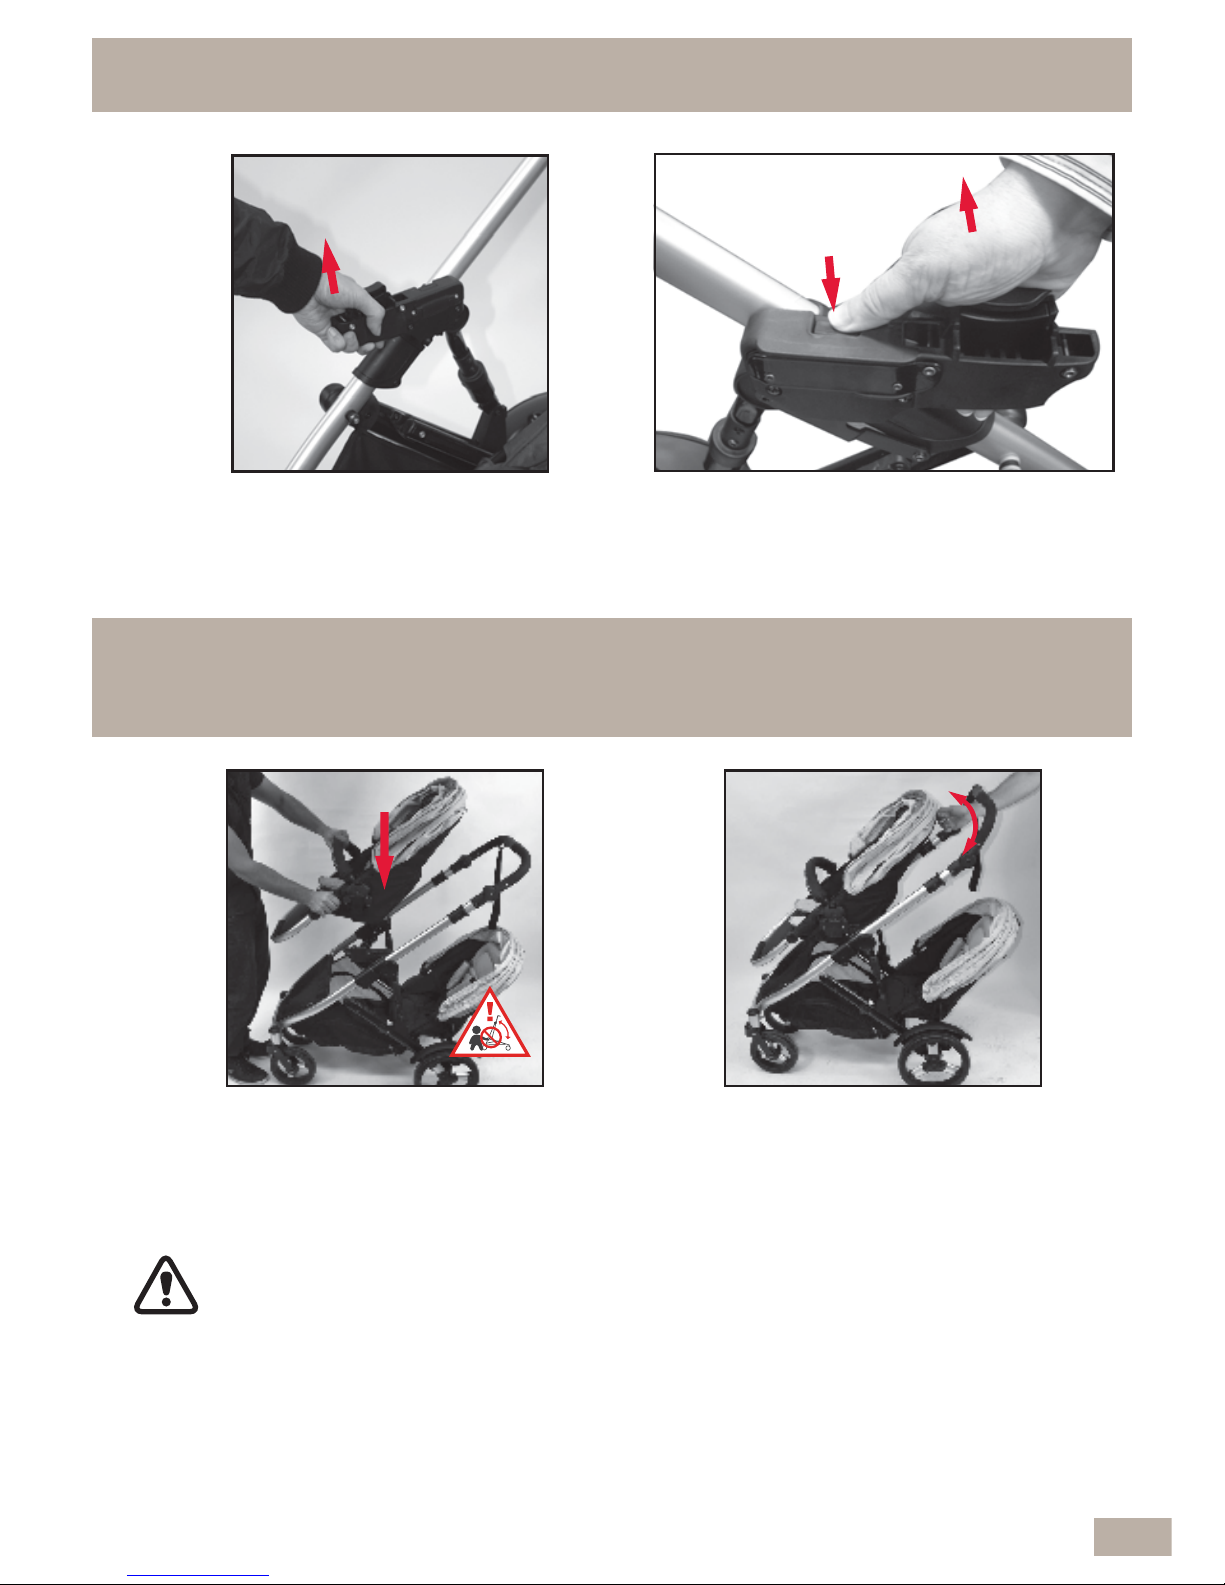
A Fold the canopy back, then fully lift up the backrest adjusting lever and lower the second
seat to the lowest position.
IMPORTANT NOTE:
ALWAYS REMOVE YOUR CHILD FROM THE SECOND SEAT BEFORE FOLDING OR
REMOVING THE SECOND SEAT.
FOLD THE SECOND SEAT BEFORE FOLDING THE STROLLER.
60
Page 61
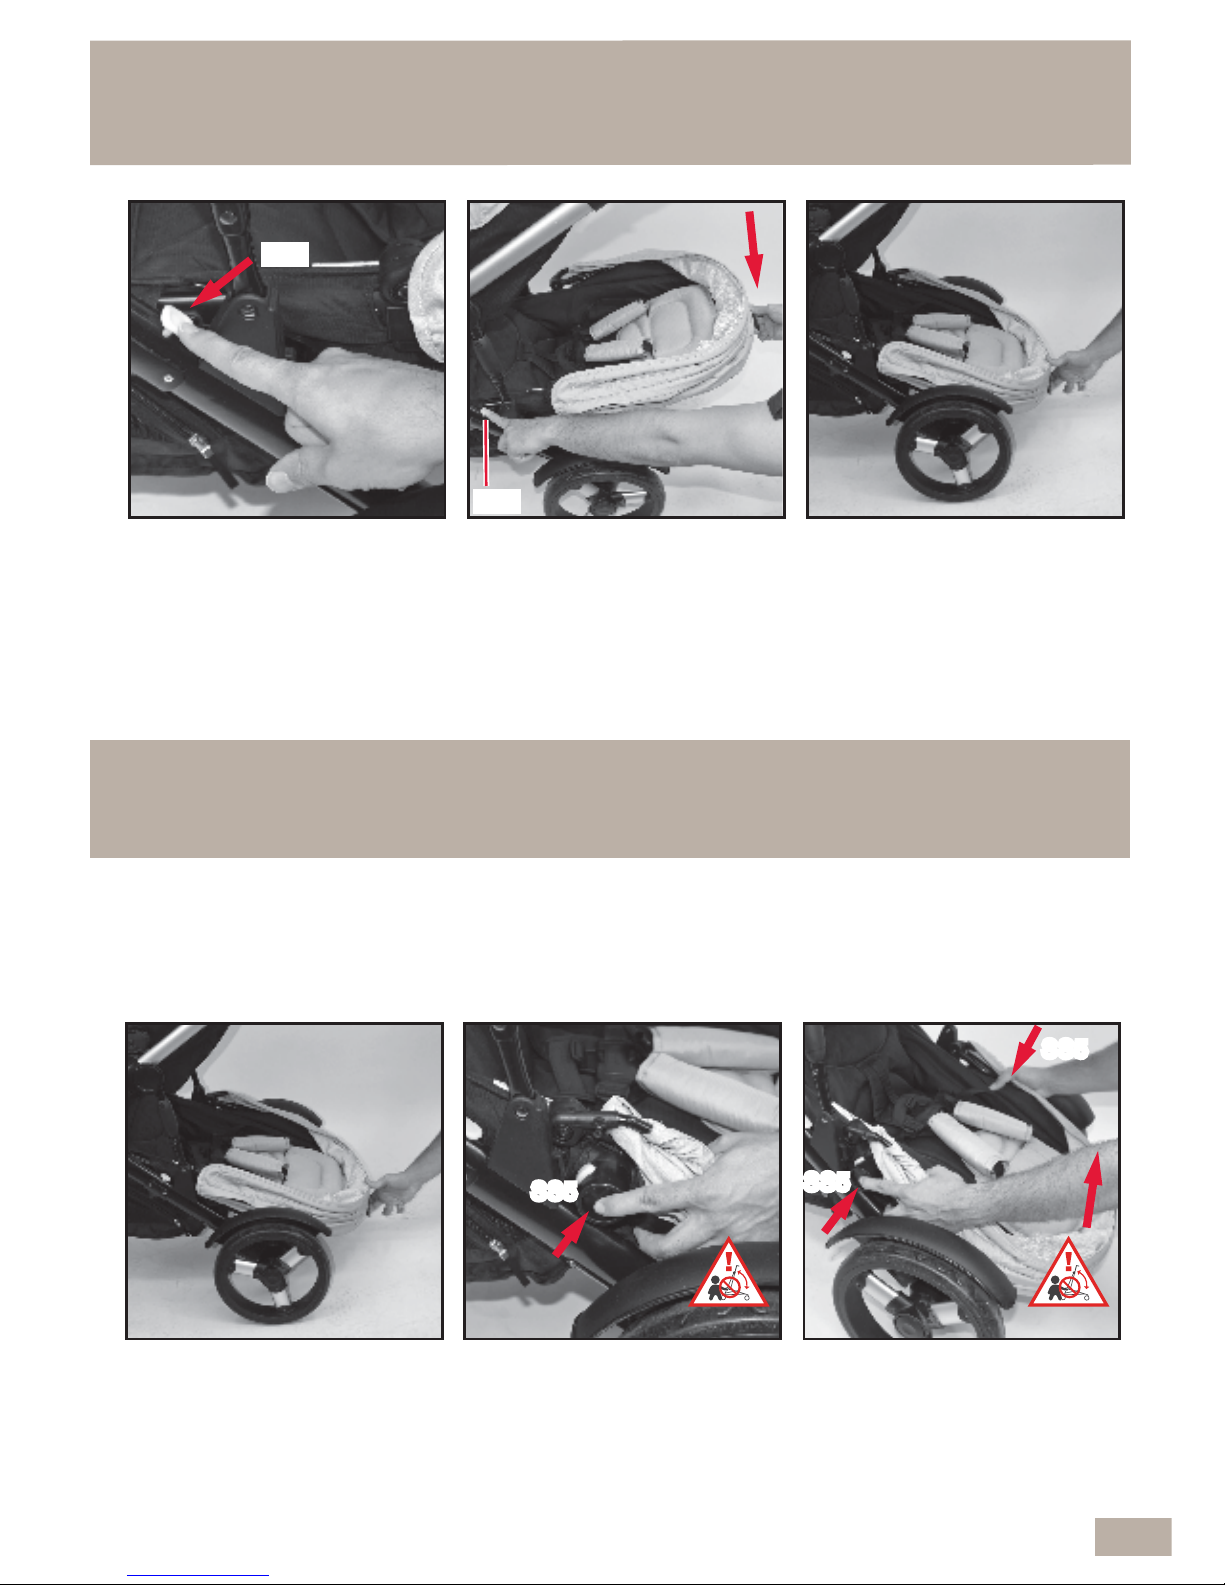
C Continue to lower the
second seat, the foot end
of the second seat will
slide up the frame to the
folded position.
D The second seat is shown
in the fully folded position
above. To fold the stroller
frame see section 1.28.
B While still holding the
backrest adjusting lever
up, press the safety lock
button (S29), and continue
to lower the head end of
the second seat.
A First, fold the second seat
up under the frame - (see
section 4.10).
B With the second seat in
the folded position, locate
the release buttons (SS5)
on the sides of the second
seat frame.
C Wrap your hands around
the second seat frame and
fully depress the release
buttons until you see the
adjacent buttons pop out
of the mouldings.
SS5
SS5
SS5
SS5
SS5
SS5
4.11 REMOVING THE SECOND SEAT FROM THE
STROLLER FRAME
4.10 FOLDING THE SECOND SEAT WITH THE
STROLLER FRAME Cont...
IMPORTANT NOTE:
ALWAYS REMOVE YOUR CHILD FROM THE STROLLER SEAT BEFORE
FOLDING OR REMOVING THE SECOND SEAT.
CAUTION
CAUTION
61
S29
S29
Page 62
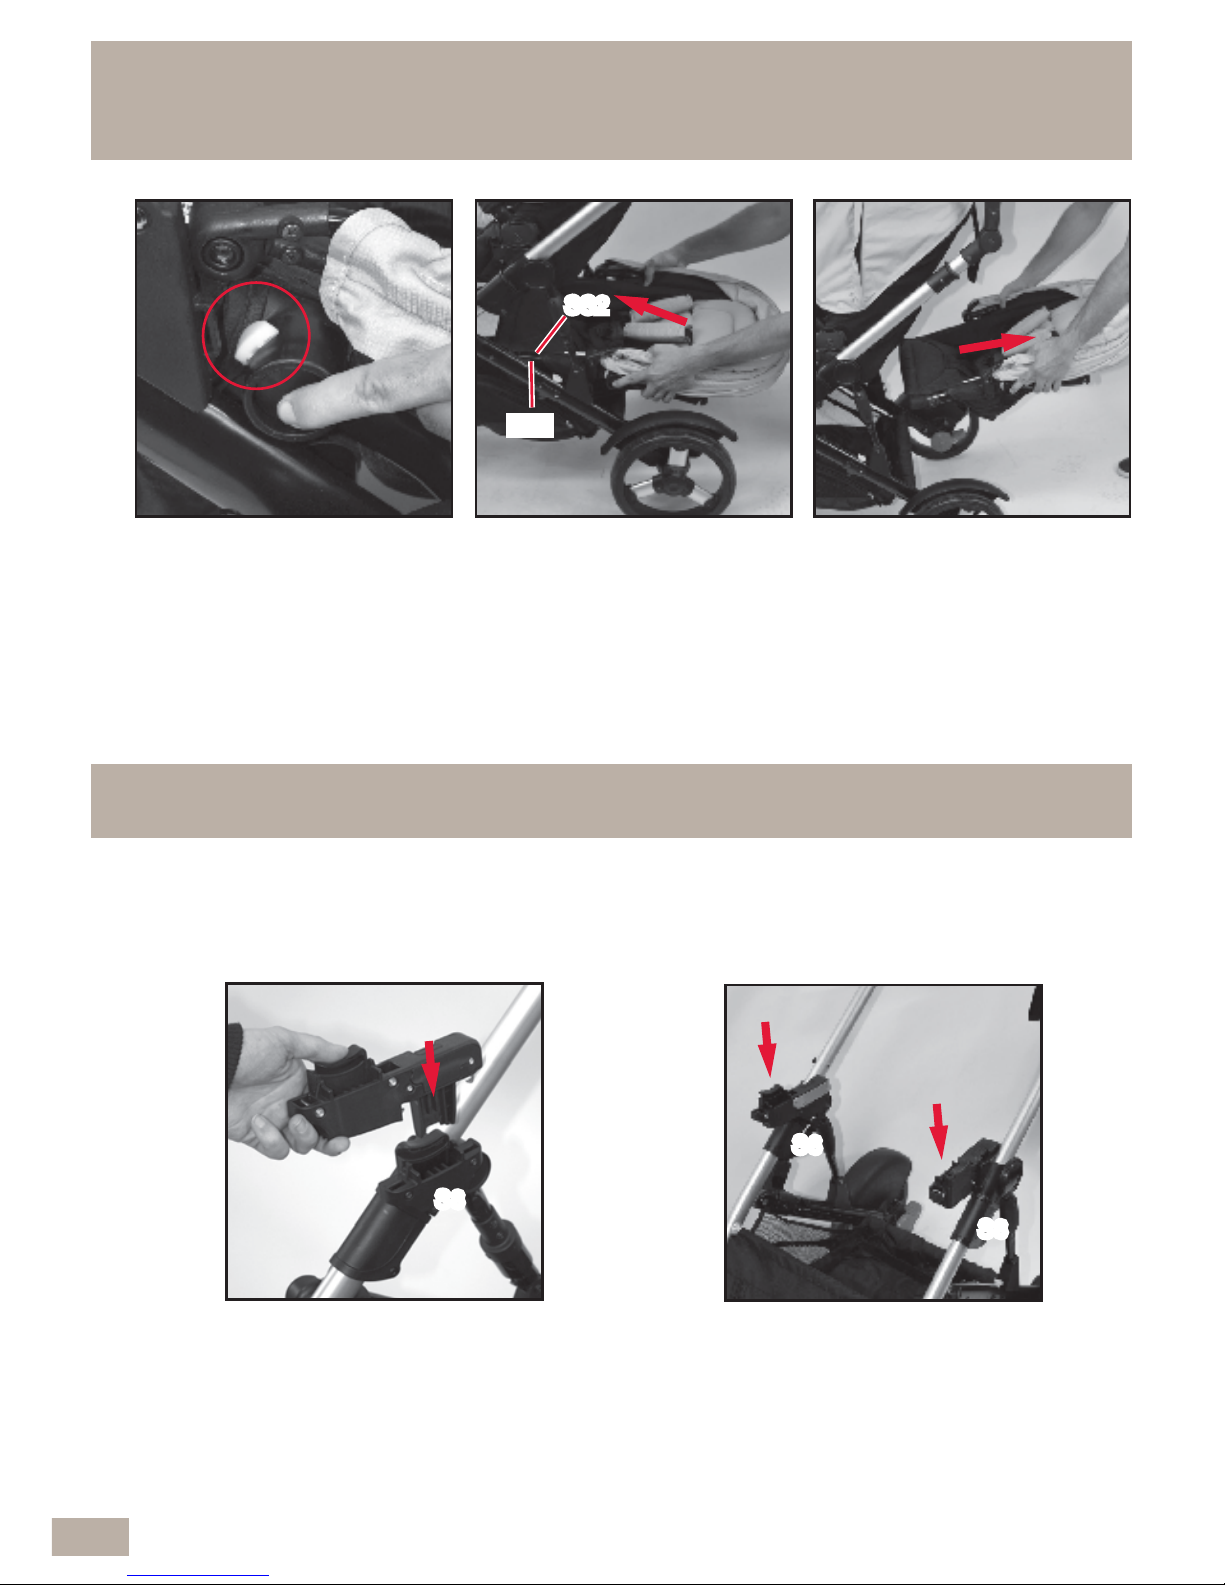
E A gentle upward, then
forward motion (as
indicated by the arrow) will
be required to release the
second seat connecting
pins (SS2) out of the frame
mouldings (S28).
F Lift the second seat out
and away from the frame.
SS2
D The adjacent buttons pop
out of the mouldings when
the release buttons are
fully depressed.
NOTE: Adaptors are supplied to create more space if required, when using the
scond seat or infant carrier on second seat frame.
B Press down on the
adaptors to lock into the
stroller frame mouldings
(S8).
A Align the adaptor with the
stroller frame mouldings as
the adaptor extends
towards the front of the
stroller and the ribbed
section of the mouldings
face inwards.
S8
S8
S8
S8
S8
S8
4.12 TO USE THE ADAPTORS
4.11 REMOVING THE SECOND SEAT FROM THE
STROLLER FRAME Cont...
62
S28
Page 63
C Pull up on the adaptors to
make sure they are locked
on.
D To remove the adaptors, push down and
hold the button, then pull the adaptor up
and out of the moulding.
4.12 TO USE THE ADAPTORS Cont...
A Lock the stroller seat into
the adaptors in the
forward facing position.
B Adjust the stroller backrest
angle as required.
4.13 TO INSTALL THE STROLLER SEAT USING
THE ADAPTORS
CAUTION: STROLLER SEAT MUST BE CORRECTLY
ATTACHED, (SEE FITTING AND REMOVAL SECTIONS 1.12 & 1.15).
CAUTION
63
Page 64

A Lock the infant carrier into
the adaptors, with the infant
carrier facing towards the
stroller handle.
B Pull up on the infant carrier
to make sure it is locked in.
4.14 TO INSTALL THE INFANT CARRIER USING
THE ADAPTORS
IMPORTANT NOTE:
DO NOT INSTALL THE INFANT CARRIER IN A FORWARD FACING POSITION,
EVEN WHEN USED IN CONJUCTION WITH THE SECOND SEAT. THE INFANT
CARRIER MUST ALWAYS FACE REARWARDS.
CAUTION: INFANT CARRIER MUST BE CORRECTLY
ATTACHED, (SEE FITTING AND REMOVAL SECTIONS 3.2 & 4.11).
64
Page 65
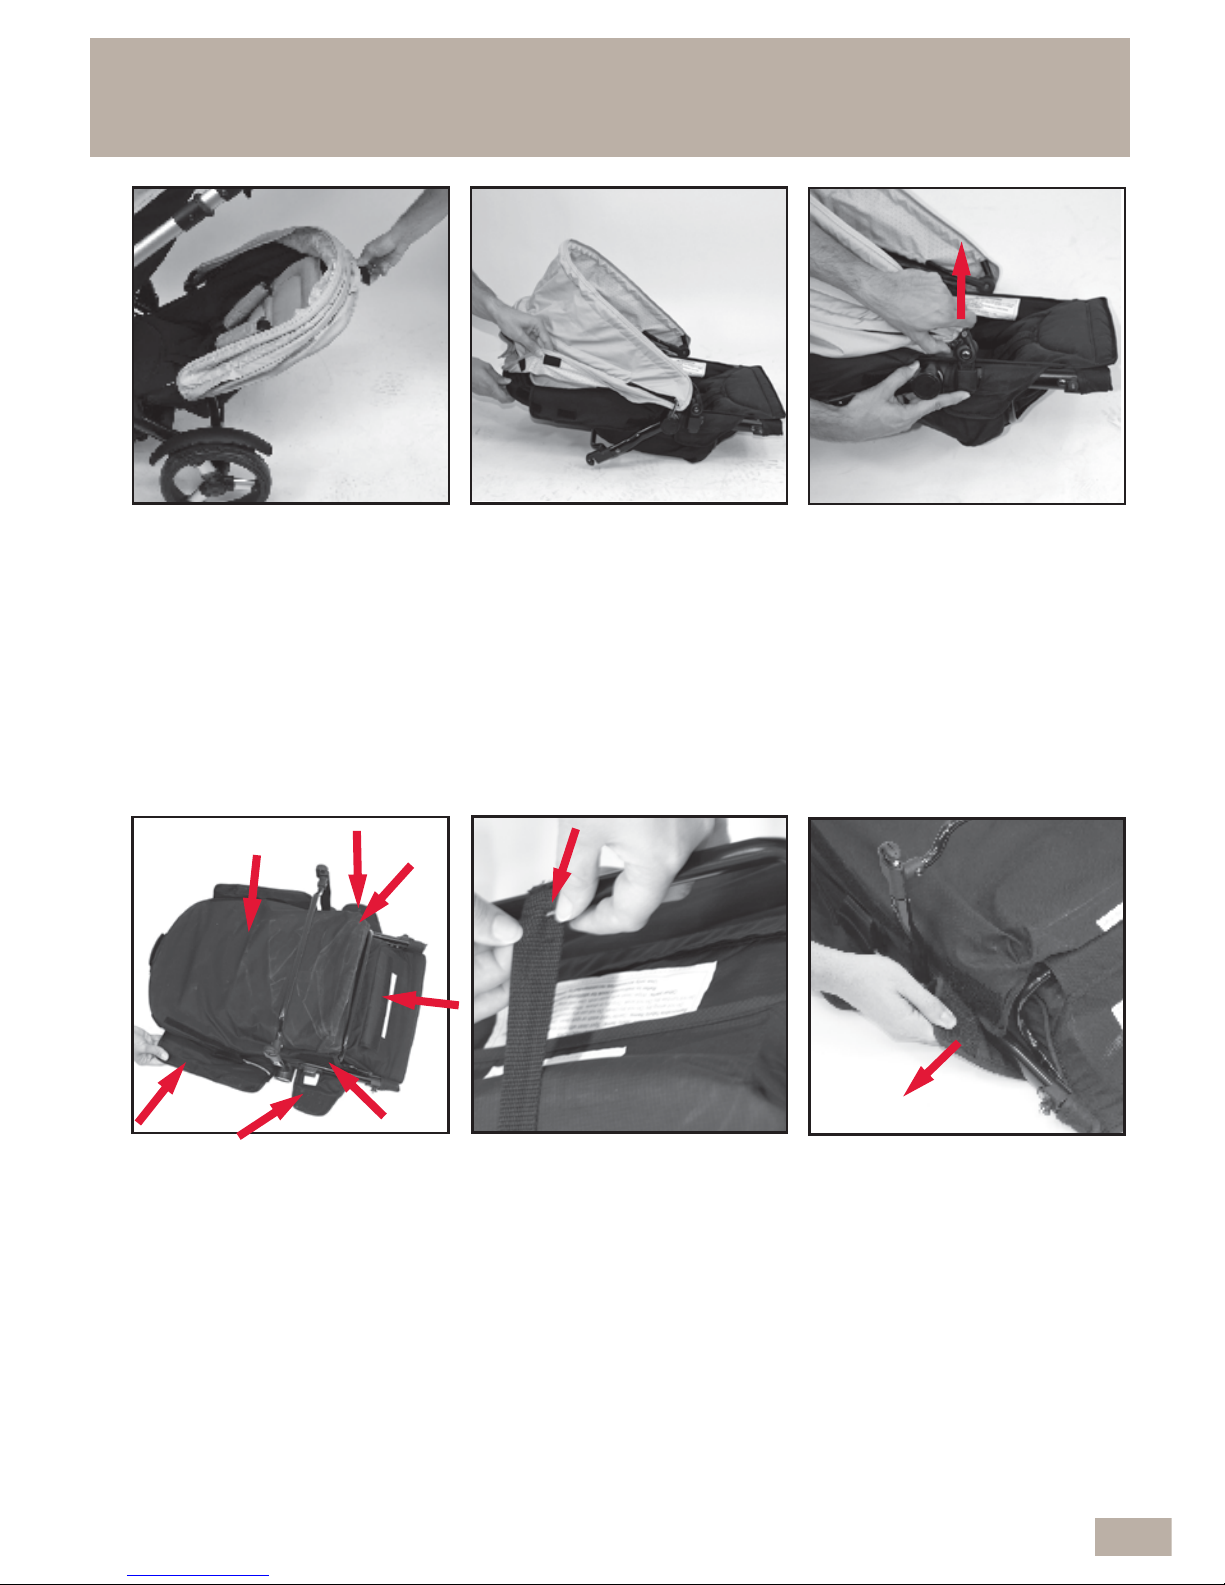
A To fit the infant carrier to
the second seat frame,
you must first remove the
second seat from the
stroller and remove the
soft goods.
(1)
(2)
(3)
(4)
(3)
(2)(A)
4.15 FITTING & REMOVING SOFT GOODS FROM
THE SECOND SEAT FRAME
B Lay the second seat frame
on a flat surface facing
upwards. Release hook
and loop tabs which
attach the canopy to the
top of the second seat.
C To remove the canopy,
press in and hold the
release tabs while pulling
the canopy out of the
frame mouldings.
D Turn the second seat over
so it is facing downwards,
then release all the hook
and loop tabs
E Undo the D ring from the
bar by sliding the webbing
through the slot.
F Release hook and loop tab
(1 & 2) on both sides.
65
Page 66
SS9
SS9
4.15 FITTING & REMOVING SOFT GOODS FROM
THE SECOND SEAT FRAME cont...
SS2
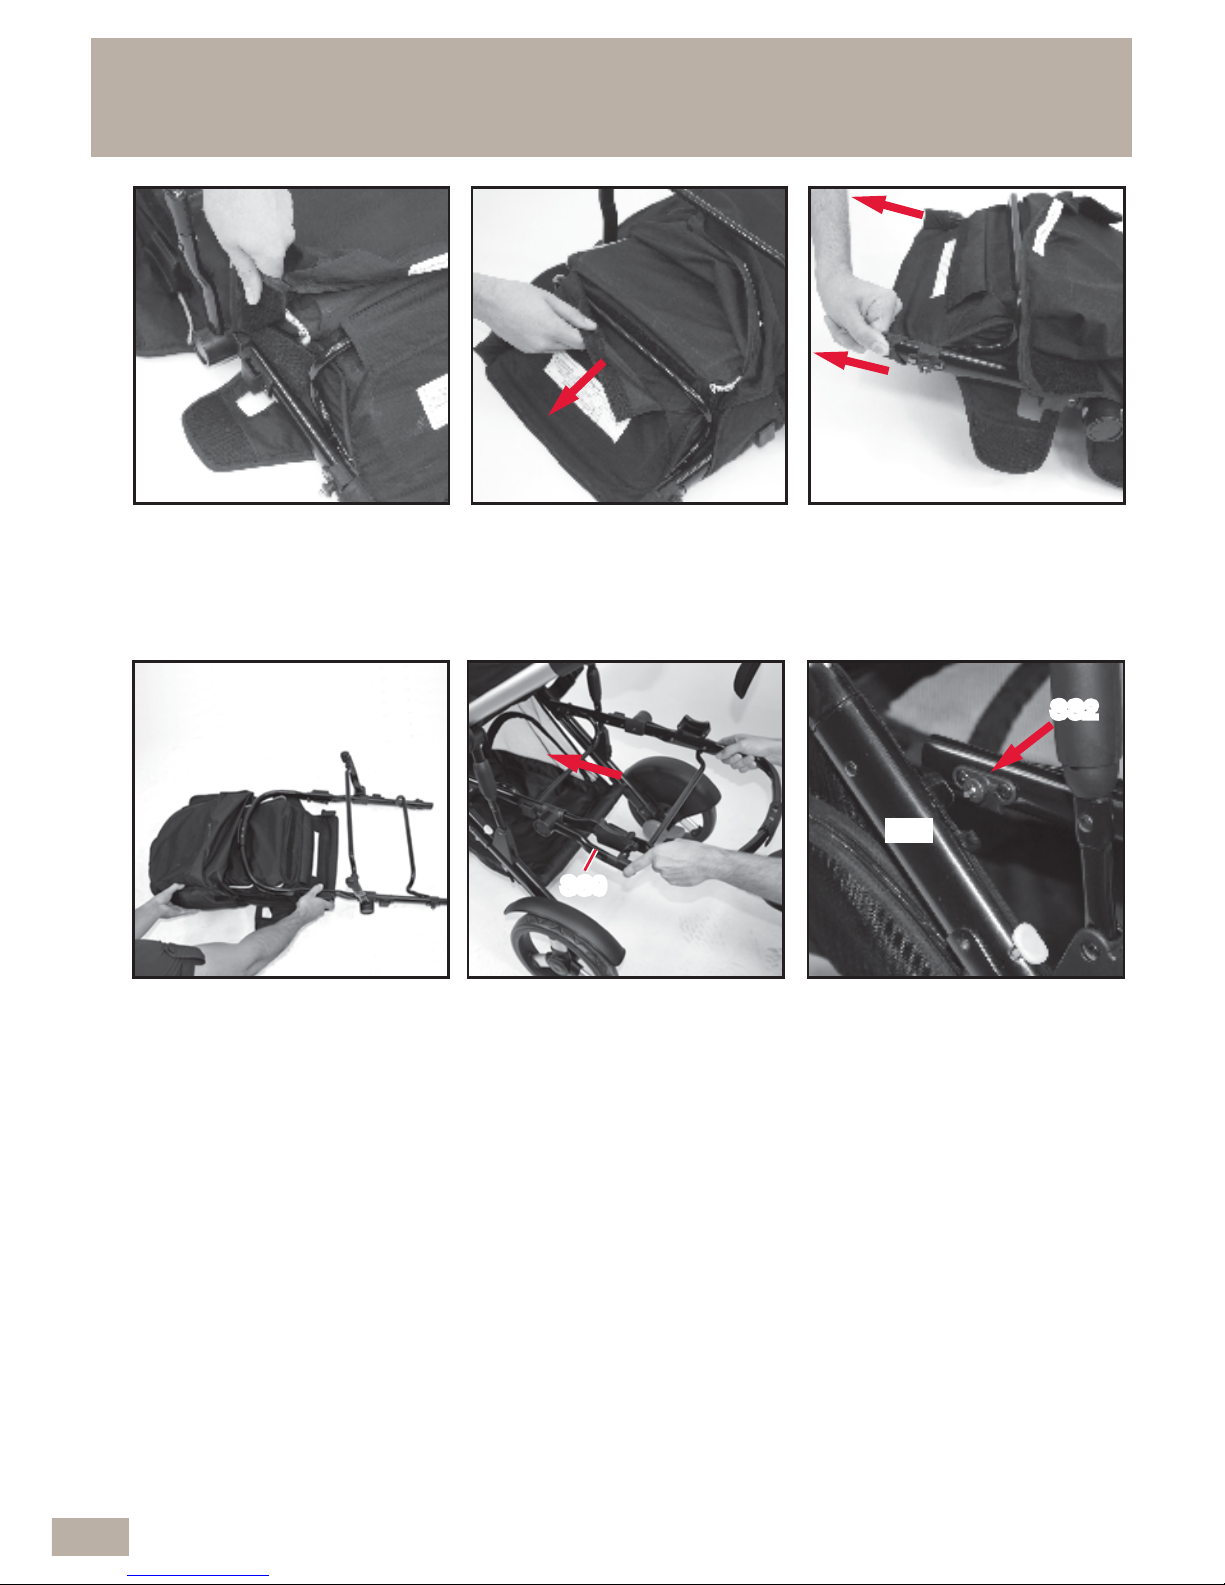
G Release the hook and
loop tabs on both sides.
H Release hook and loop
tab.
I Pull the fabric pocket off
from both button frame
posts.
J Pull the fabric clear of the
mouldings and pull the
fabric off the frame. The
following steps explain
how to fit the second seat
frame to the stroller.
K The second seat
connecting pins (SS2)
need to lock into the frame
mouldings (S28). Hold the
second seat frame so the
leg tube (SS9) is
underneath and facing
the head end of the
second seat.
L Hold the second seat and
hook the connecting pins
(SS2) into the stroller
frame mouldings (S28),
then pull downwards.
66
S28
Page 67
4.16 FITTING & REMOVING INFANT CARRIER
FROM SECOND SEAT FRAME
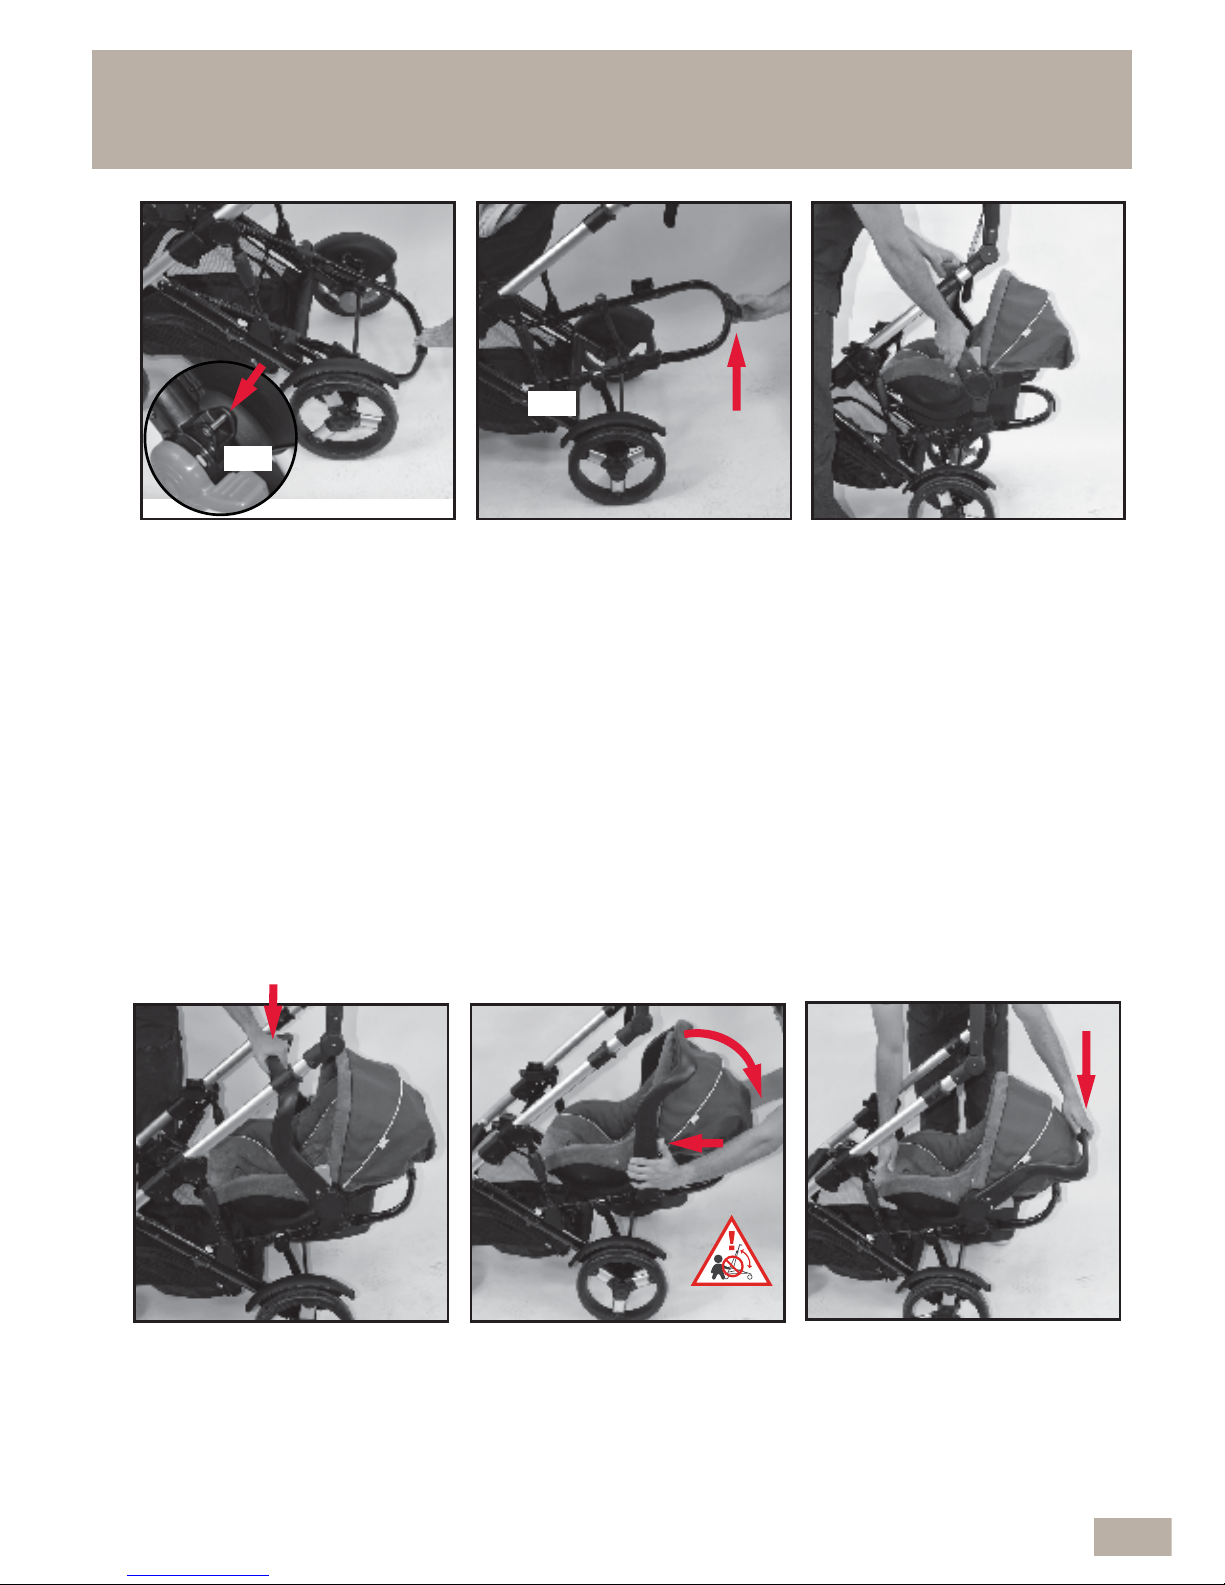
B Raise the backrest
adjusting lever and lift the
head end of the second
seat so that the foot end
slides down the stroller
frame and engages into
the second lock (S29).
When locked, frame is
slightly above horizontal.
A Lower the second seat
frame and push down to
lock the leg tubes (SS9)
into the lower stroller frame
mouldings (S30).
Repeat step L if the frame
doesn’t lock into place.
D Push down on the infant
carrier and make sure it is
place in the frame
mouldings. The infant
carrier now needs to be
locked securely into the
frame.
E By squeezing in and
holding the latches on
either side of the handle,
rotate the handle
backwards. The GREEN
indicator will now to RED.
F Release the handle latches.
Then with one hand holding
the front of the infant carrier,
push the infant carrier
handle all the way down
until you hear it lock into
the frame.
C For easier installation,
remove stroller seat or
infant carrier from frame,
(see sections 1.15 (b) &
3.2 (O)). The infant carrier
must face towards the front
of the stroller. With the
infant carrier handle in the
upright position, locate the
infant carrier handle
mouldings on either side,
directly over the second
seat frame mouldings.
Notice the indicator is
GREEN.
CAUTION
67
S30
S29
Page 68

Note: To create more space when the infant carrier is installed on the second seat
frame, you can use the adaptors on the stroller frame to support the stroller seat or
second infant carrier.
4.16 FITTING & REMOVING INFANT CARRIER
FROM SECOND SEAT FRAME cont...
G The handle indicator
should now be GREEN
and the infant carrier
should be locked into the
frame. If indicator is RED
the infant carrier handle is
not in the locked position,
repeat steps E & F.
H IMPORTANT: Pull up on
both sides of the infant
carrier and confirm it is
locked into the frame. If
not locked in on both
sides, repeat steps E to
G.
I Secure your baby into the
infant carrier by the
harness provided. (Refer to
the instruction manual
which comes with the infant
carrier).
J To remove the infant carrier,
squeeze both handle
latches in to release the
locks. The indicator will now
be RED. Rotate the handle
forward.
K Continue to rotate the
handle forward until it
returns to the upright
position. Release the
latches, the indicator
should now be GREEN.
L Lift and remove the infant
carrier away from the
second seat frame.
68
Page 69
(1)
(2)
(3)
(4)
(3)
(2)(1)
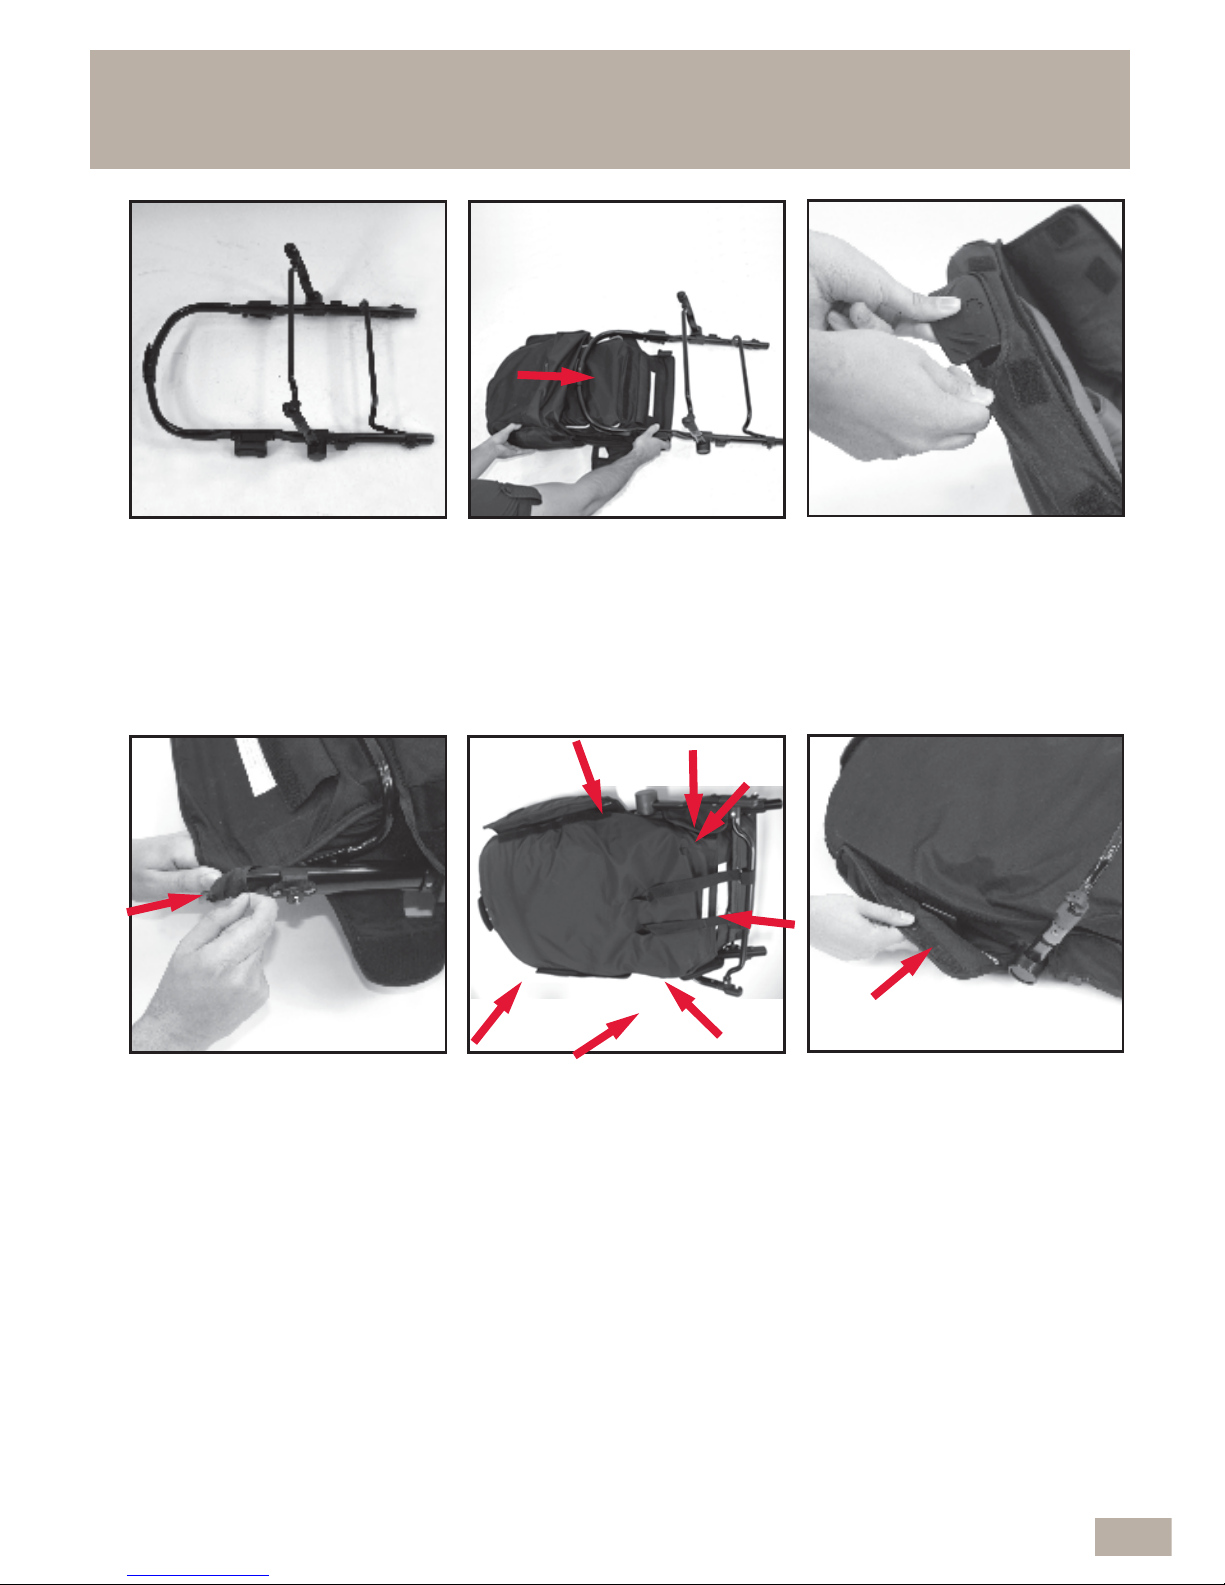
4.17 REFIT THE SOFT GOODS TO THE SECOND
SEAT FRAME
A Lay the second seat frame
on a flat surface as shown
above.
B Pull the fabric over the
frame.
C Ensure the latch at the top
of the frame is pulled
through the cutout in the
fabric cover.
D Stretch the bottom of the
cover to refit the fabric
pocket on the bottom
frame post. Repeat for
both sides.
E Re-attach all the hook and
loop tabs and pull the
mouldings through the
holes in the soft goods.
F Attach hook and loop tab
(1) on both sides.
69
Page 70
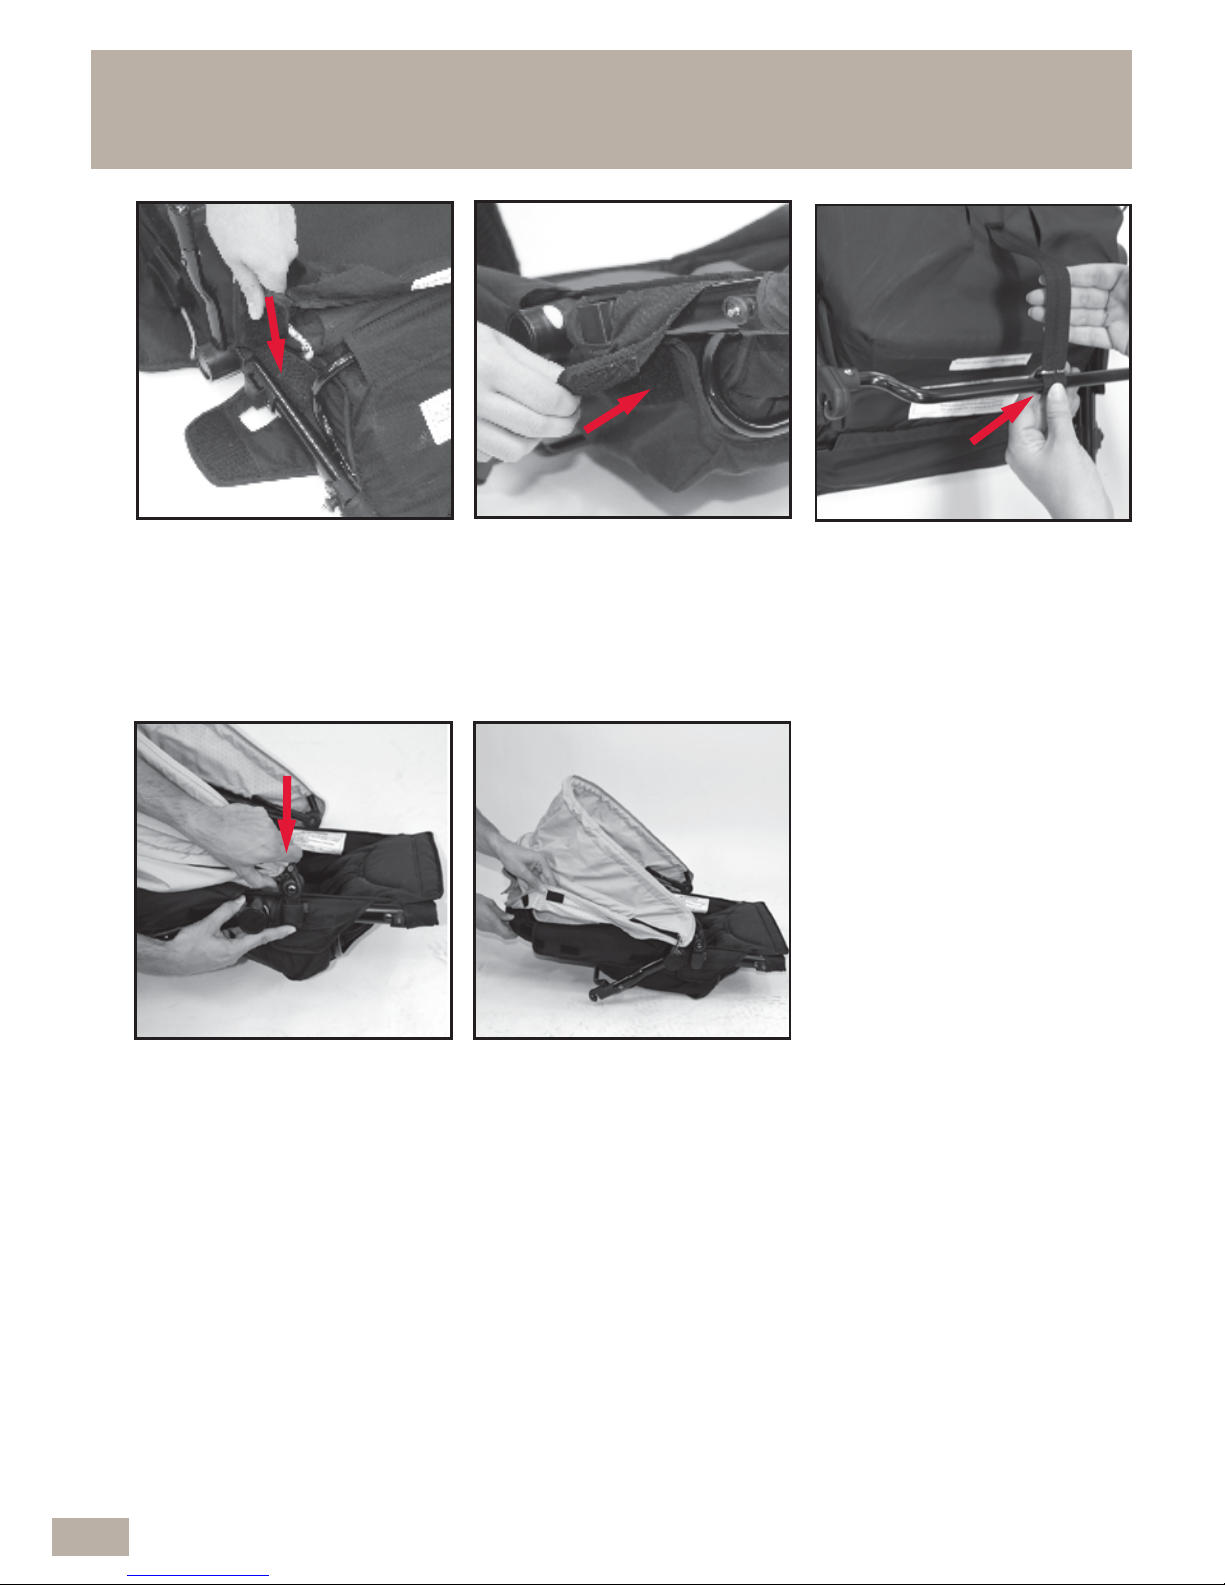
NOTE: Removal of the second seat soft goods is the reverse instructions of
the above procedure.
4.17 REFIT THE SOFT GOODS TO THE SECOND
SEAT FRAME cont...
G Attach hook and loop tab
(3) on both sides.
H Attach hook and loop tab
(2) on both sides making
sure the canopy moulding
on the top side of the frame
is exposed.
I Attach the D ring and
webbing around the bar
by sliding the webbing
through the D ring slot.
J Turn the second seat over
so it is facing upwards. To
attach the canopy, insert
the canopy mouldings
onto the frame mouldings
until they snap in.
K Attach the canopy hook
strips to the pile strips
around the top and sides.
70
Page 71
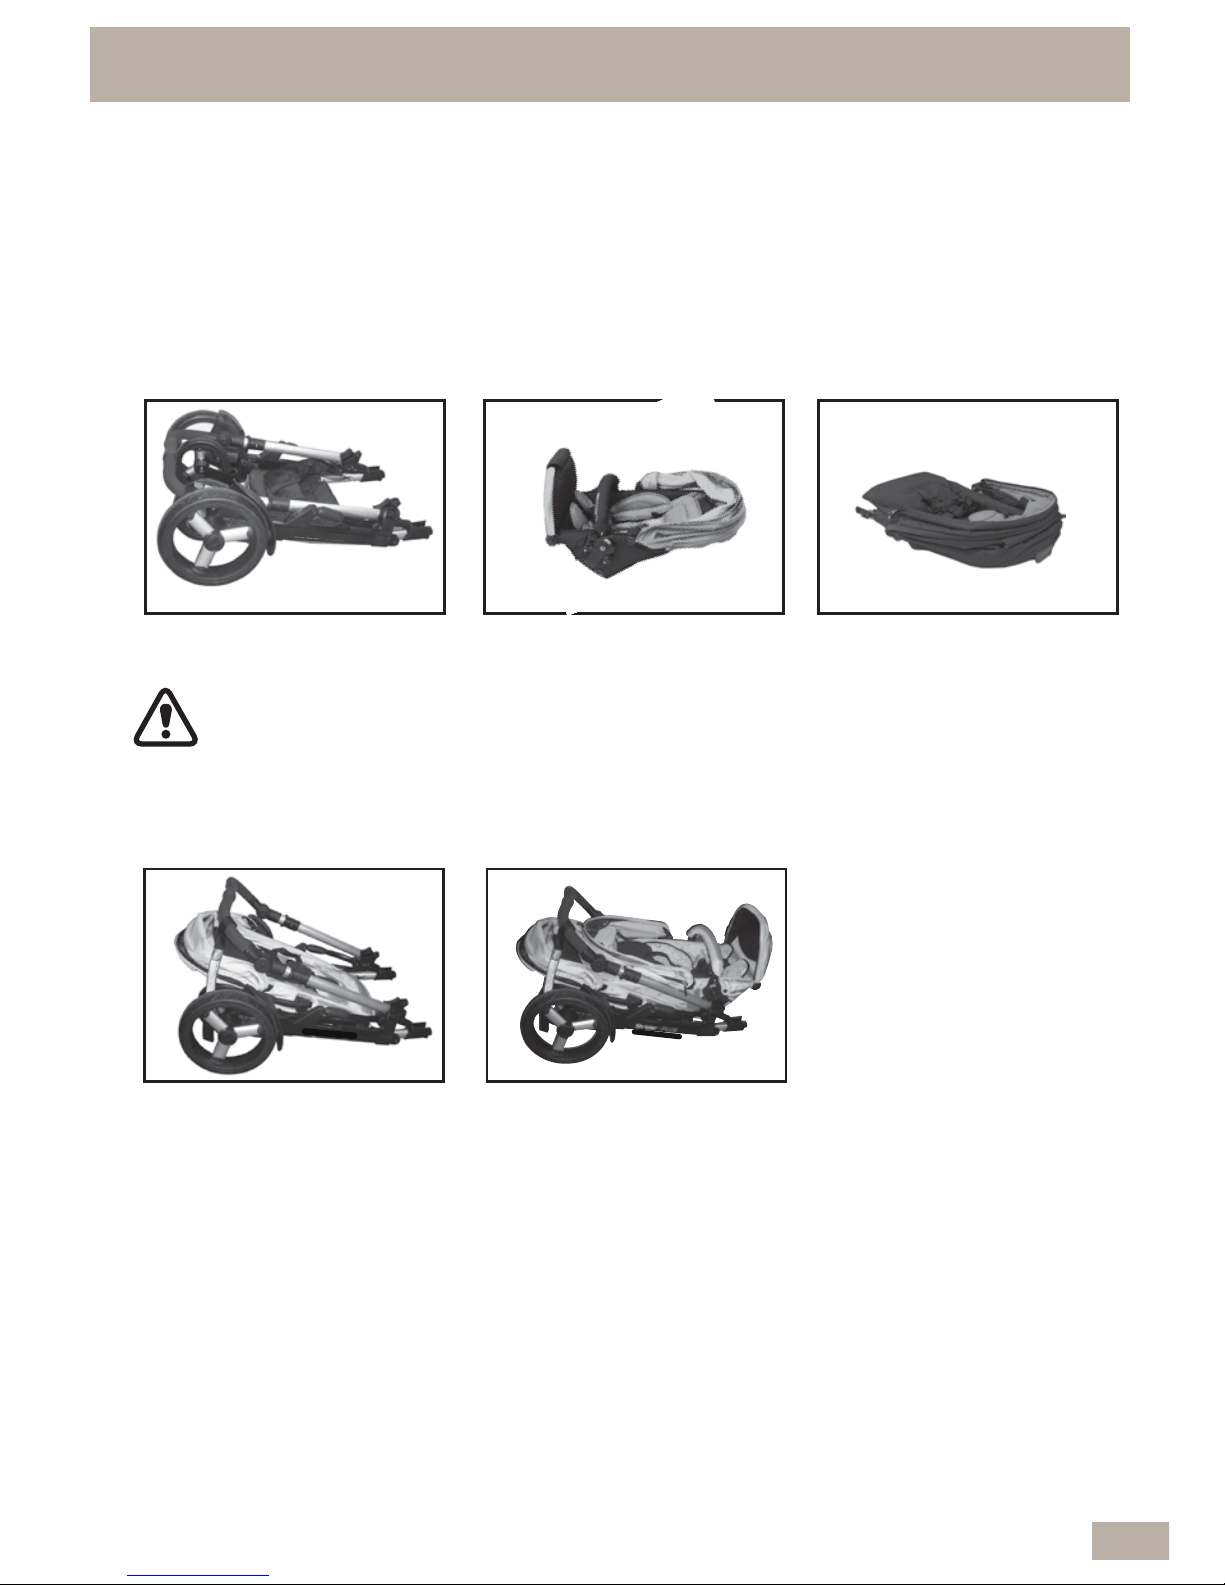
STROLLER FOLDING CONFIGURATIONS
Stroller frame only Stroller seat
Stroller frame
+ Second seat
Stroller frame + seat
+ Second seat
Second seat
The following are recommended configurations for storage and transportation in a vehicle.
Shown with second seat (optional accessory, sold separately).
Note: The easiest method is to remove the top seat and optional accessories from the
stroller frame and place the accessories and stroller frame into the vehicle separately.
Note: The stroller pivotal handle is required to be place into the regular or
highest lockable position (see section 1.10).
This will prevent the handle from coming into contact with the second seat
and causing damage to the stroller.
If the tension is to hard DO NOT force, re-open the stroller and ensure the
stroller pivotal handle is set to the highest point.
CAUTION: The stroller can be folded with the top seat and
seat attached to the stroller frame, however, caution must be taken when
lifting the stroller because of the overall weight.
PLEASE REFER TO PAGE 11 FOR LIFTING TECHNIQUES.
71
Page 72

CARE AND MAINTENANCE
• To prolong the life of your stroller keep it clean and do not leave it in the direct sunlight or in
the car boot for extended periods of time.
• Removable fabric covers and trims may be cleaned using warm water with a household
soap or mild detergent. Allow it to dry fully, preferably away from the direct sunlight.
.
• Non removable fabric covers and trims may be spot cleaned using a damp sponge with
soap or a mild detergent. Allow it to dry completely before folding or storing it away.
• In some climates the covers and trims may be affected by mould and mildew. To help
prevent this occurring, do not fold or store the product if it is damp or wet. Always store
the product in a well ventilated area.
• When using your stroller at the beach - completely clean your stroller afterwards to remove
the sand and salt from the mechanisms and wheel assembly. Sand and salt will cause
premature wear and corrosion.
• If there are compression marks on the tyres - Use a domestic hair dryer to gently warm
(DO NOT OVERHEAT) the tyre and the compression marks should slowly disappear.
• Always check parts regularly for tightness of screws, nuts, and other fasteners - tighten if
required. To maintain the safety of your nursery product, seek prompt repairs for bent, torn,
worn or broken parts.
THIS PRODUCT IS NOT INTENDED FOR COMMERCIAL USE.
72
Page 73

NOTES
73
Page 74

youtube.com/user/BritaxChildcare
facebook.com/steelcraft
twitter.com/britaxaustralia
britax.com.au
1300 303 330
68
Art No.4001656
BRITAX CHILD CARE PTY. LTD. A Britax International Company ABN 55 006 773 6 000
99 D erby Road, Sunshine, Victoria, 3020, Australia
Britax Childcar e Pty Ltd (Customer Serv ice 1300 303 330)
Britax Childcar e (NZ) Ltd (Customer Se rvice 0508 688 822)
For our entire Steelcraft product range, visi t www.britax.com.a u
Due to the variations in style and design of our products, the illu strations used in this instruction
book let are generic.
We reserve the right to alter these products without notice.
Fabric and colour may vary from images shown.
©2012-2013 The Steelcraft, Compact, Strider and Strid er Plus trademarks are the property of
Britax Childcare Pty. Ltd. - Australia
The Bri tax Trademark is the property of Britax Childcare Holdings Limite d - UK.
P
atents a pply. Patents pending.
This product i s designed to comply with Australian and New Zealan d standard
AS/NZS2088: 2013 “Prams and Strollers - Safety Require ments.”
* Excludes accessories
 Loading...