

Page 1
100927_KIDplus_SICT_Cover_standard.fm Seite 1 Dienstag, 19. Oktober 2010 3:40 15
15 - 36 kg
KID plus SICT
Page 2
100927_KIDplus_SICT_Cover_standard.fm Seite 2 Dienstag, 19. Oktober 2010 3:40 15
Wir schicken Ihnen gerne diese Anleitung auch in deutsch zu.
Bitte wenden Sie sich an die obenstehende Adresse.
We are happy to send you these instructions also in English
language. Please contact the address stated above.
Nous vous enverrons ces instructions volontiers aussi en
français. Veuillez vous adresser à l'adresse indiquée ci-dessous.
Con mucho gusto le enviaríamos estas instrucciones en español.
Por favor, póngase en contacto a la dirección de más abajo.
Nós lhe enviamos com prazer este manual em português.
Dirija-se, sff. ao endereço indicado abaixo.
Se lo desidera, Le inviamo queste istruzioni anche in italiano.
Si rivolga all'indirizzo sottostante.
Мы охотно вышлем Вам это руководство также на русском
языке. Просьба обратиться по нижеуказанном у адресу.
Denne vejledning foreligger også på dansk. Tilsendes efter
ønske. Kontakt nedenstående adresse.
Wij sturen u deze handleiding ook graag tot in de Nederlandse
taal. Gelieve daarvoor het onderstaande adres te contacteren.
С удоволствие ще Ви изпратим това ръководство и на немски
BG. Моля обърнете се на горепосочения адрес.
V trimitem aceste instruciuni i n limba RO.
V rugm s ne contactai la adresa de mai sus.
Size memnuniyetle bu talimatnameyi türkçe dilinde de göndeririz.
Lütfen aşağı da belirtilen adrese başvurunuz.
Mπορούµε να σας στείλουµε τις οδηγίες και στα Ελληνικά.
Επικοινωνήστε µε την ανωτέρω διεύθυνση.
Wyślemy Państwu chętnie niniejszą instruckję obsługi w języku
polskim. Prosimy zwrócić się pod niżej wymieniony adres.
Rádi Vám tento návod zašleme v českém jazyce.
Obrat’te se prosím na níže uvedenou adressu.
Radi Vám pošleme tento návod k použitiu i v slovenskom jazyku.
Obrát’te sa prosím na dole uvedenú adresu.
A leírást szívesen megküldjük Önnek magyar nyelven is.
Kérjük, szíveskedjen a lenti címhez fordulni.
To navodilo Vam radi pošljemo tudi v slovenskem jeziku.
Prosimo, da se obrnete na spodnji naslov.
Rado cemo Vam poslati ovu Uputu i na hrvatskom jeziku.
Molimo da se obratite na dolje navedenu adresu.
Vi skickar dig gärna denna anvisning även på svenska.
Var god vänd dig till nedanstående adress.
Vi sender deg gjerne denne veiledningen på norsk.
Du kan henvende deg til adressen nedenfor.
Lähetämme sinulle nämä ohjeet mielellämme myös Suom
en kielellä. Ota yhteys allamainittuun osoitteeseen.
Sme saadame teile meelsasti selle juhendi ka eesti keeles.
Palun pöörduge eespool toodud aadressil.
Mēs o instrukciju Jums labprāt nosūtīsim arī latvie u valodā.
Lūdzu, griezieties augstāk norādītajā adresē.
Galime atsiųsti instrukciją ir lietuvių kalba.
Prašom kreiptis aukščiau nurodytu adresu.
EDV-Nr. 2000002534 - 09/10
Page 3
100922_KIDplus_D-GB-F.fm Seite 1 Montag, 27. September 2010 2:13 14
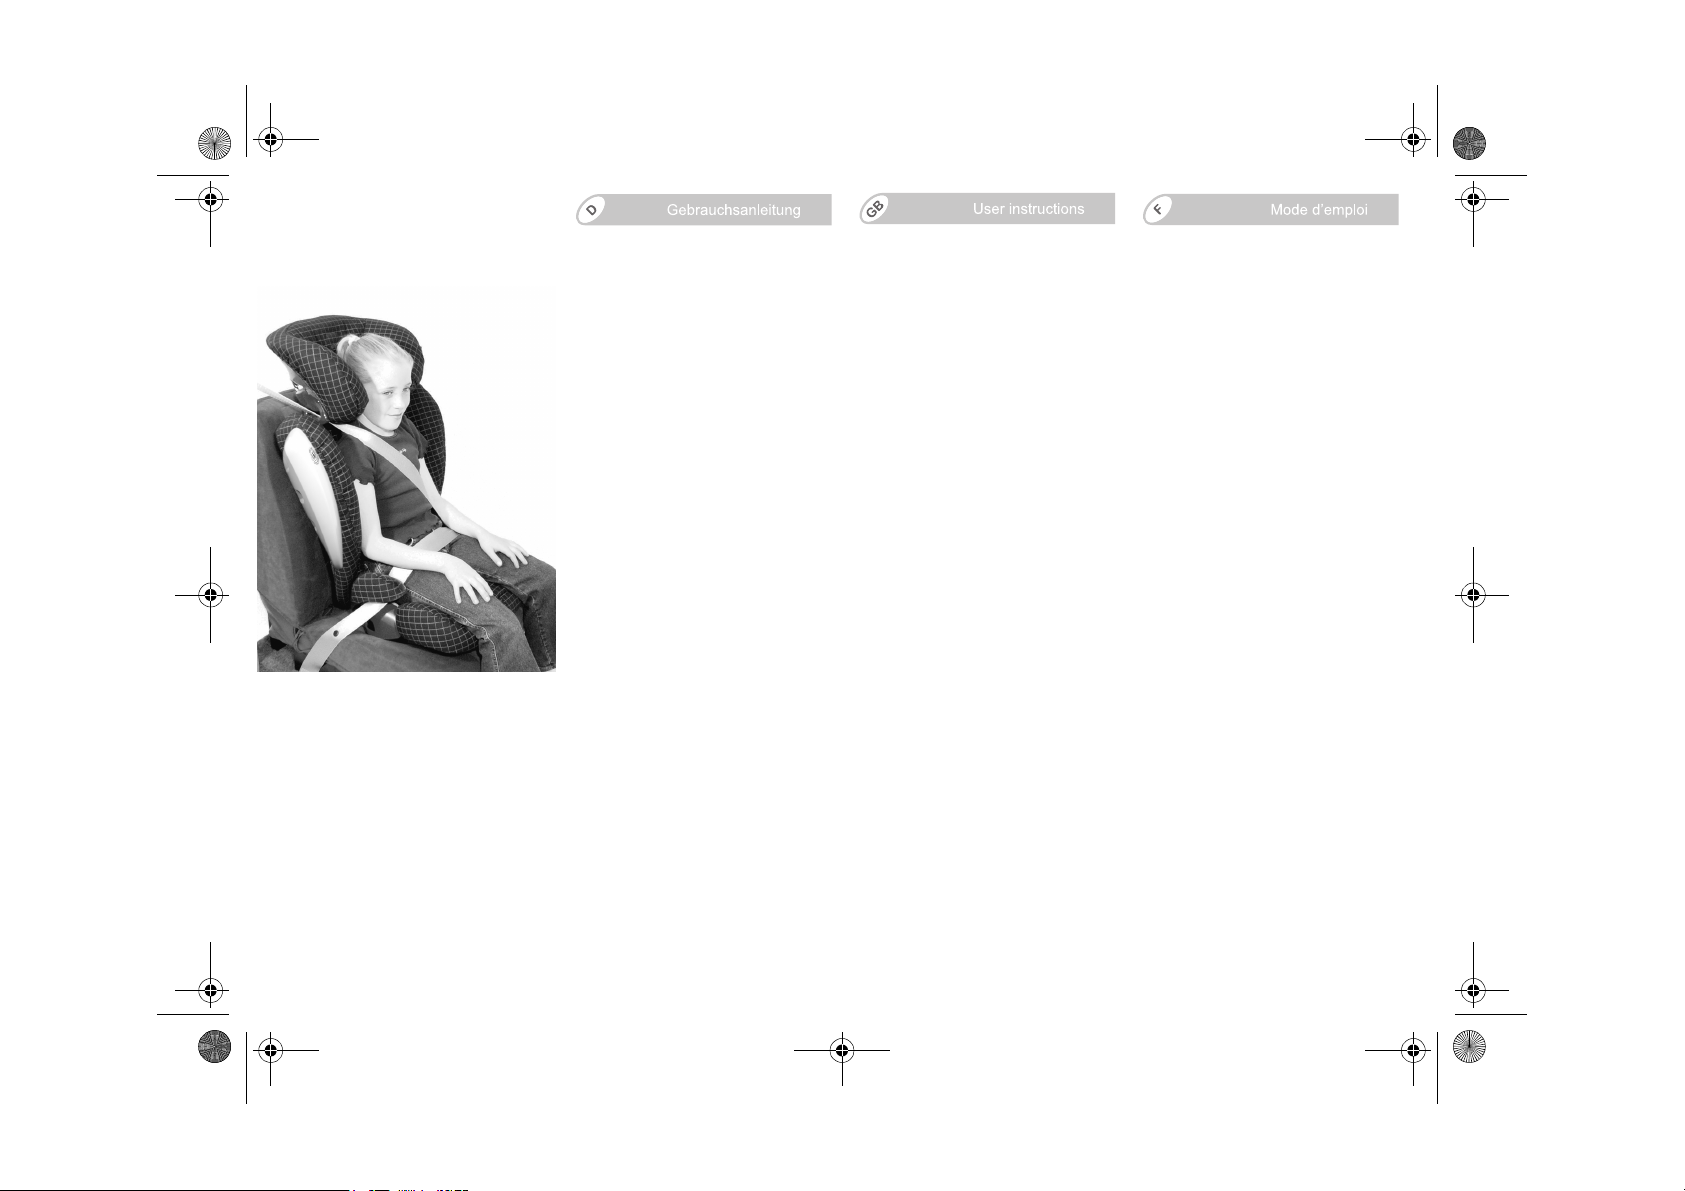
KID plus SICT
Gebrauchsanleitung
Wir freuen uns, dass unser
KID plus SICT Ihr Kind sicher durch
einen neuen Lebensabschnitt
begleiten darf.
Um Ihr Kind richtig schützen zu
können, muss der KID plus SICT
unbedingt so verwendet und
eingebaut werden, wie wir es Ihnen
in dieser Anleitung beschreiben.
Wenn Sie noch Fragen zur Benutzung
haben, wenden Sie sich bitte an uns.
BRITAX RÖMER
Kindersicherheit GmbH
Britax Excelsior Ltd.
Inhalt
1. Eignung...........................................2
2. Verwendung im Fahrzeug ............. 3
3. Sichern Ihres Kindes im
Fahrzeug ......................................... 4
3.1 Befestigen der Rückenlehne ....6
3.2 Breiten-Verstellung des
Sitzkissens ............................... 7
3.3 Höhen-Verstellung der
Kopfstütze ................................8
3.4 Ruhestellung der
Rückenlehne ............................9
3.5 Anschnallen Ihres Kindes ......10
3.6 So ist Ihr Kind richtig
gesichert ................................12
4. Pflegeanleitung ............................13
4.1 Reinigung...............................14
4.2 Abziehen des Bezuges ..........15
4.3 Aufziehen des Bezuges .........16
5. Hinweise zur Entsorgung ............16
6. 2 Jahre Garantie ...........................16
7. Garantiekarte / Übergabe-Check ..19
User instructions
We are pleased that our KID plus SICT
may accompany your child safely
through a new stage of his or her life.
In order to protect your child
correctly, the KID plus SICT must
always be used and installed as
described in these instructions.
If you have any further questions
regarding its use, please feel free to
contact us.
BRITAX RÖMER
Kindersicherheit GmbH
Britax Excelsior Ltd.
Contents
1. Suitability ........................................2
2. Use in the vehicle ...........................3
3. Securing your child in the vehicle ...4
3.1 Attaching the backrest..............6
3.2 Adjusting the width of the seat
cushion.....................................7
3.3 Adjusting the height of the
headrest ...................................8
3.4 Reclining position of the
backrest ...................................9
3.5 Securing your child ................ 10
3.6 Checklist to ensure that your
child is buckled up correctly ...12
4. Care instructions.......................... 13
4.1 Cleaning................................. 14
4.2 Removing the cover ...............15
4.3 Re-fitting the cover.................16
5. Notes regarding disposal ............16
6. 2-year warranty ............................ 16
7. Warranty Card / Transfer Check ...20
Mode d’emploi
Nous sommes heureux que notre
KID plus SICT puisse accompagner
votre enfant en toute sécurité pendant
un nouveau chapitre de sa vie.
Pour protéger efficacement votre
enfant, le KID plus SICT doit
impérativement être utilisé et
installé de la manière décrite dans
le présent mode d’emploi.
Pour toute question complémentaire,
n’hésitez pas à nous contacter.
BRITAX RÖMER
Kindersicherheit GmbH
Britax Excelsior Ltd.
Table des matières
1. Habilitation......................................2
2. Utilisation dans le véhicule ...........3
3. Sécurité de votre enfant dans le
véhicule...........................................4
3.1 Fixation du dossier ...................6
3.2 Réglage en largeur de l'assise ..7
3.3 Réglage en hauteur de
l'appui-tête................................8
3.4 Stabilisation du dossier ............9
3.5 Mise en place de la ceinture
de votre enfant .......................10
3.6 Voici comment votre enfant
est bien protégé .....................12
4. Consignes d’entretien .................13
4.1 Nettoyage...............................14
4.2 Retrait de la housse ...............15
4.3 Remise en place de la housse ...16
5. Remarques relatives à l’élimination.. 16
6. 2 ans de garantie ..........................16
7. Carte de garantie / Procès-verbal
de remise........................................21
Page 4
100922_KIDplus_D-GB-F.fm Seite 2 Montag, 27. September 2010 2:13 14
1. Eignung
Zulassung
Britax/
RÖMER
Auto-
Kindersitz
KID plus
SICT
*ECE = Europäische Norm für
Sicherheitsausrüstung
• Der Auto-Kindersitz ist ausgelegt,
geprüft und zugelassen
entsprechend den Anforderungen
der europäischen Norm für
Kindersicherheits-Einrichtungen
(ECE R 44/04). Das Prüfzeichen E
(in einem Kreis) und die
Zulassungsnummer befinden sich
auf dem Zulassungsetikett
(Aufkleber am Auto-Kindersitz).
•Der KID plus SICT ist als
Kombination aus Sitzkissen und
Rückenlehne geprüft und
zugelassen.
Vor sic ht! Keines der beiden Teile
darf in Verbindung mit anderen
Sitzkissen oder Rückenlehnen
verwendet werden.
• Die Zulassung erlischt, sobald Sie
am Auto-Kindersitz etwas
verändern. Änderungen darf
ausschließlich der Hersteller
vornehmen.
•Der KID plus SICT darf
ausschließlich zur Sicherung Ihres
Kindes im Fahrzeug verwendet
werden. Er eignet sich keinenfalls
Zuhause als Sitzgelegenheit oder
Spielzeug.
Prüfung und Zulassung
nach ECE* R 44/04
Gruppe Körpergewicht
ll+lll 15 bis 36 kg
1. Suitability
Certification
Britax/
RÖMER
Child safety
seat
KID plus
SICT
*ECE = European Standard for Safety
Equipment
Tested and certified
according to ECE* R 44/04
Group Body weight
ll+lll 15 to 36 kg
• The child safety seat has been
designed, tested and certified to the
requirements of the European
Standard for Child Safety
Equipment (ECE R 44/04). The seal
of approval E (in a circle) and the
approval number are located on the
approval label (sticker on the child
safety seat).
•The KID plus SICT, as a
combination of the seat cushion and
backrest, has been checked and
approved.
Caution! Do not use either of the
parts in connection with other seat
cushions or backrests.
• This approval shall be invalidated if
you make any modifications to the
child safety seat. No modifications
may be made to the child safety
seat other than by the
manufacturer.
•Use the KID plus SICT exclusively
for securing your child in your
vehicle. It is in no way suitable as a
seat or toy in the home.
2
1. Habilitation
Homologation
Britax/
RÖMER
Siège auto
KID plus
SICT
*ECE = norme européenne pour les
équipements de sécurité
• Le siège auto est conçu, contrôlé et
homologué conformément aux
exigences de la norme européenne
pour les équipements de sécurité
pour enfants (ECE R 44/04). Le
signe de contrôle E (dans un cercle)
et le numéro d’homologation se
trouvent sur l’étiquette
d’homologation (autocollant sur le
siège auto).
•Le KID plus SICT a été testé et
homologué en tant que
combinaison d'une assise et d'un
dossier.
Attention ! Aucun des deux
éléments ne peut être utilisé avec
d'autres assises ou dossiers.
• Le siège auto perd son
homologation dès que vous réalisez
des modifications. Toute
modification doit exclusivement être
réalisée par le fabricant.
• KID plus SICT est exclusivement
réservé à l’installation sécuritaire de
votre enfant dans votre véhicule. Il
convient en aucun cas à un usage
domestique en tant que chaise ou
jouet.
Vérification et
homologation selon
ECE* R 44/04
Groupe Poids
ll+lll 15 à 36 kg
Page 5
100922_KIDplus_D-GB-F.fm Seite 3 Montag, 27. September 2010 2:13 14
2. Verwendung im
2. Use in the vehicle
Fahrzeug
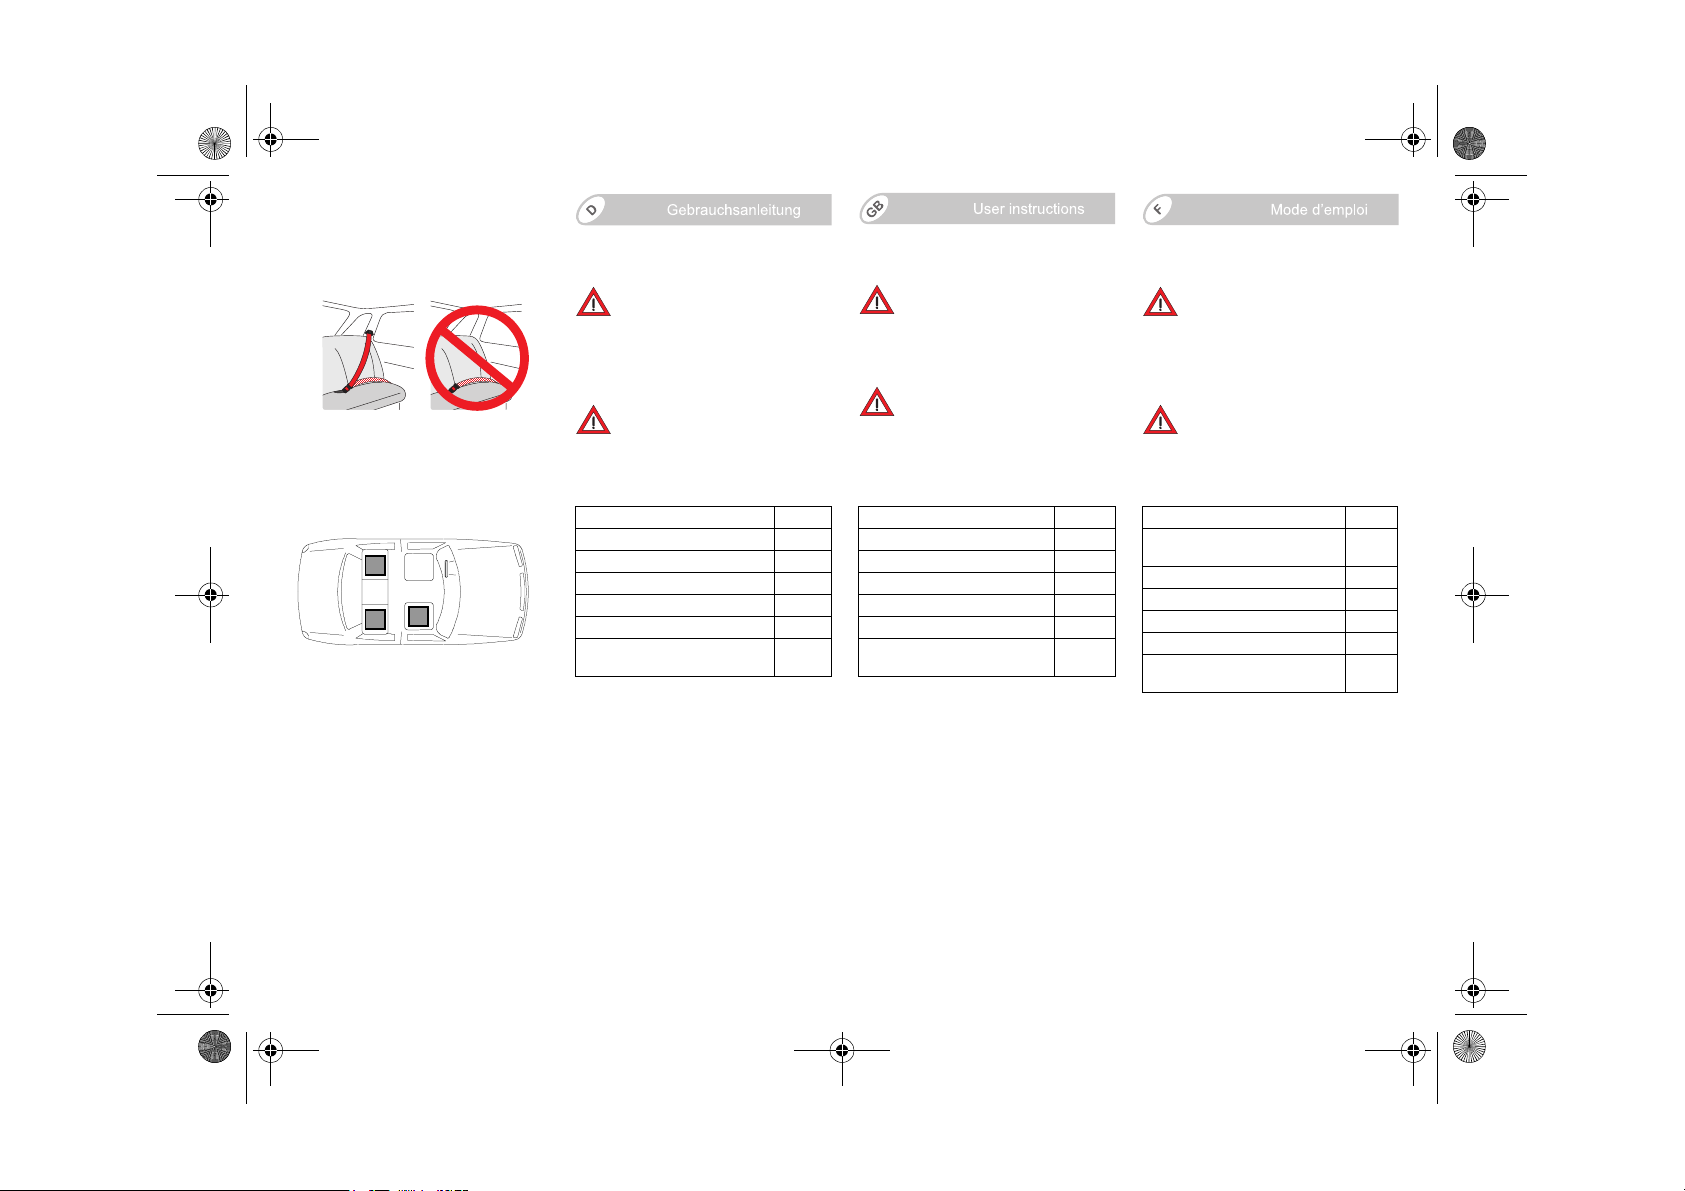
Gefahr! Wird Ihr Kind im
Kindersitz nur mit einem 2Punkt-Gurt gesichert, kann es
dadurch bei einem Unfall
schwer verletzt oder sogar
getötet werden.
Nie in Verbindung mit einem
2-Punkt-Gurt verwenden!
So können Sie Ihren AutoKindersitz verwenden:
in Fahrtrichtung ja
entgegen der Fahrtrichtung nein 1)
mit 2-Punkt-Gurt nein
mit 3-Punkt-Gurt 2) ja
auf Beifahrersitz ja 3)
auf äußeren Rücksitzen ja
auf mittlerem Rücksitz (mit 3-
Punkt-Gurt)
(Bitte beachten Sie die Vorschriften
Ihres Landes)
ja 4)
Danger! Should your child be
secured in the vehicle seat with
only a 2-point belt, he or she
could sustain serious injuries
possibly resulting in death.
Never use in connection with
a 2-point belt!
This is how you can use your child
safety seat:
forward facing yes
rearward facing no 1)
with 2-point belt no
with 3-point belt 2) yes
on front passenger seat yes 3)
on outer rear seat yes
on centre rear seat (with 3-
point belt)
(Please observe the relevant
regulations in your country.)
yes 4)
2. Utilisation dans le
véhicule
Danger ! Si vous attachez votre
enfant dans le siège à l'aide
d'une ceinture de sécurité à
deux points seulement, il peut
être gravement blessé, voire
tué, en cas d'accident.
N'utilisez jamais avec une
ceinture à deux points !
Voici comment vous pouvez utiliser
le siège auto :
dans le sens de la marche oui
dans le sens contraire de la
marche
avec ceinture à 2 points non
avec ceinture à 3 points 2) oui
sur le siège du passager oui 3)
sur les sièges arrière latéraux oui
sur le siège arrière central
(avec ceinture à 3 points)
(Veuillez respecter les directives en
non
1)
oui 4)
vigueur dans votre pays)
1) Verwendung ist nur auf einem
rückwärtsgerichteten Fahrzeugsitz (z.B. Van,
Minibus) zulässig, der auch für den Transport
von Erwachsenen zugelassen ist. Es darf kein
Airbag auf den Sitz wirken.
2) Der Gurt muss nach ECE R 16 (oder
vergleichbarer Norm) genehmigt sein z.B.
erkennbar am umrandeten "E", "e" auf dem
Prüfetikett am Gurt.
3) bei Front-Airbag: weit nach hinten schieben,
ggf Hinweis im Fahrzeug-Handbuch beachten.
4) Verwendung ist nicht möglich, wenn nur ein
2-Punkt-Gurt vorhanden ist.
1) Use is permitted on a rearward-facing vehicle
seat (e.g. in a van or minibus) only if the vehicle
seat is also approved for use by adults. The seat
may not be in the area of effect of an airbag.
2) The safety belt must be approved to ECE R
16 or a comparable standard (see test label on
belt with an "E" or "e" in a circle).
3) If there is a front airbag: slide back all the way
or nearly so, observe any instructions in vehicle
owner's manual.
4) Cannot be used if the vehicle seat is
equipped with only a 2-point belt.
1) L'utilisation sur un siège dirigé dos à la route
(p.ex. van, minibus) n'est autorisée que si celuici convient également au transport d'adultes. Ce
siège ne doit pas être protégé pas un airbag.
2) La ceinture doit être homologuée selon ECE
R 16 (ou une norme comparable) ce qui est par
exemple signalé par la lettre "E", "e" insérée
dans un cercle et figurant sur l’étiquette de
contrôle.
3) Avec un airbag frontal : reculer le siège le
plus possible. Le cas échéant, respectez les
consignes contenues dans le manuel de votre
véhicule.
4) Utilisation impossible lorsqu’il n'existe qu'une
ceinture à 2 points.
Page 6
100922_KIDplus_D-GB-F.fm Seite 4 Montag, 27. September 2010 2:13 14
3. Sichern Ihres Kindes im
Fahrzeug
Zum Schutz Ihres Kindes
• Grundsätzlich gilt: Je enger der
Sicherheitsgurt am Körper Ihres
Kindes anliegt, desto größer ist die
Sicherheit.
• Bitte lassen Sie Ihr Kind im Auto-
Kindersitz nie unbeaufsichtigt im
Fahrzeug zurück.
• Benutzung auf dem Rücksitz:
Stellen Sie den Vordersitz so weit
nach vorne, dass Ihr Kind mit den
Füssen nicht an der Rückenlehne
des Vordersitzes anstößt
(Verletzungsgefahr).
• Die Kunstoffteile des Kindersitzes
heizen sich in der Sonne auf.
Vorsicht! Ihr Kind kann sich daran
verbrennen. Schützen Sie den
Kindersitz, wenn er gerade nicht
gebraucht wird, vor intensiver
Sonneneinstrahlung.
• Lassen Sie Ihr Kind nur auf der
Gehwegseite ein- und aussteigen.
• Lockern Sie längere Reisen durch
Pausen auf, in denen Ihr Kind
seinen Bewegungsdrang ausleben
kann.
• Beachten Sie, dass der Kindersitz
nicht an der Fahrzeugtür oder der
Fahrzeuginnenwand anliegt.
Tipp! Zwischen dem Kindersitz und
der Fahrzeugtür bzw. der
Fahrzeuginnenwand muss ein
Freiraum sein.
3. Securing your child in
the vehicle
For the protection of your
child
• As a general rule: The more snugly
the safety harness fits over your
child's body, the safer your child will
be.
• Please do not leave your child
unattended in the child safety seat
in the vehicle.
• Installation on the rear seat: Move
the front seat forward far enough
that you child's feet cannot hit the
back rest of the front seat (to
prevent risk of injury).
• The plastic parts of the child safety
seat can heat up in the sun.
Caution! Your child may get burnt.
Protect the child seat against
intensive solar radiation when it is
not actually in use.
• Allow your child to enter and exit the
vehicle only on the side away from
traffic.
• Make stops during longer journeys
to give your child an opportunity to
run about and play.
• Ensure that the child seat is not
located by the vehicle door or the
interior wall of the vehicle.
Tip! There must be space between
the child seat and the vehicle door
or the interior vehicle wall.
3. Sécurité de votre enfant
dans le véhicule
Pour protéger votre enfant
• Les principes suivants sont à
respecter : Plus la ceinture de
sécurité est proche du corps de
votre enfant, plus celui-ci est en
sécurité.
• Ne laissez pas votre enfant dans le
siège auto dans la voiture sans
surveillance.
• Utilisation sur le siège arrière :
Avancez le siège avant de manière
à ce que les pieds de votre enfant
ne touchent pas le dossier de celuici (risques de blessures).
• Les parties en matière plastique du
siège auto se réchauffent en plein
soleil.
Attention ! Votre enfant risque de
se brûler. Protégez le siège auto
des rayons du soleil lorsque vous
ne l'utilisez pas.
• Ne faites monter ou descendre
votre enfant que du côté du trottoir.
• Lors des longs trajets, ménagez
des pauses afin que votre enfant
puisse se dégourdir les jambes.
• Veillez à ce que le siège enfant ne
repose pas contre la porte ou la
paroi intérieure du véhicule.
Astuce ! Un espace vide doit être
conservé entre le siège enfant et la
porte ou la paroi intérieure du
véhicule.
4
Page 7
100922_KIDplus_D-GB-F.fm Seite 5 Montag, 27. September 2010 2:13 14
Zum Schutz aller
Fahrzeuginsassen
Bei einer Notbremsung oder einem
Unfall können ungesicherte
Gegenstände und Personen andere
Mitfahrer verletzen. Bitte achten Sie
deshalb stets darauf, dass...
• die Rückenlehnen der Fahrzeugsitze
festgestellt sind (z.B. umklappbare
Rücksitzbank einrasten).
• im Fahrzeug (z.B. auf der
Hutablage) alle schweren oder
scharfkantigen Gegenstände
gesichert sind.
• alle Personen im Fahrzeug
angeschnallt sind.
• der Auto-Kindersitz im Auto immer
gesichert ist, auch wenn kein Kind
transportiert wird.
• der Air Cushion 27 nicht an der
Fahrzeugtür oder der
Fahrzeuginnenwand anliegt.
Zum Schutz Ihres Fahrzeuges
• An einigen Auto-Sitzbezügen aus
empfindlichem Material (z.B. Velours,
Leder etc.) können durch die
Benutzung von Auto-Kindersitzen
Gebrauchsspuren auftreten. Um das
zu vermeiden, können Sie z.B. eine
Decke oder ein Handtuch unterlegen.
Zum Schutz beim Umgang
mit dem Kindersitz
• Der Kindersitz darf nie freistehend
verwendet werden - auch nicht zum
Probesitzen.
For the protection of all
vehicle occupants
In the case of an emergency stop or
an accident unsecured persons or
objects may cause injury to other
vehicle occupants. Please always
check that...
• the backrests of the vehicle seats
are locked (i.e. that a foldable rear
seat bench latch is engaged).
• all heavy or sharp-edged objects in
the vehicle (e.g. on the parcel shelf)
are secured.
• all persons in the vehicle have their
seat belts fastened.
• the child safety seat is always
secured when it is in the vehicle,
even if no child is being transported.
• do not place the Air Cushion 27 by
the vehicle door or the interior wall
of the vehicle.
To protect your vehicle
• Some vehicle seat covers of
sensitive materials (e.g. velour,
leather, etc.) may develop wear
marks when child seats are used.
This can be avoided by placing a
blanket or towel under the child
seat.
For your protection when
handling the child seat
• Do not use the child seat when it is
free standing, even to test it out.
Caution! The backrest 2 may tip
backward. Always place the child
Pour protéger tous les
passagers
En cas de freinage d’urgence ou
d’accident, les objets et personnes
non attachés risquent de blesser
d’autres passagers. Veuillez donc
toujours veiller à ce que…
• les dossiers des sièges de voiture
soient verrouillés (enclenchez par
exemple le banc arrière rabattable),
• tous les objets lourds ou à bords
vifs (par exemple sur la lunette
arrière) soient bien fixés,
• toutes les personnes aient mis leur
ceinture,
• le siège auto soit toujours fixé dans
la voiture même si aucun enfant ne
l’occupe,
• l’Air Cushion 27 ne repose pas
contre la porte ou la paroi intérieure
du véhicule.
Pour protéger votre véhicule
• Sur certaines housses de siège de
véhicule recouvertes d’une matière
sensible (velours, cuir, etc.), l’utilisation
de sièges auto risque de laisser des
traces. Pour éviter cela, vous pouvez
mettre en-dessous une couverture ou
une serviette, par exemple.
Protection lors de la
manipulation d'un siège
enfant
• Le siège enfant ne doit jamais être
utilisé non installé, même pour
l’essayer.
Page 8
100922_KIDplus_D-GB-F.fm Seite 6 Montag, 27. September 2010 2:13 14
Vor sic ht! Die Rückenlehne 2 kann
nach hinten kippen. Stellen Sie den
Kindersitz immer zuerst auf den
Fahrzeugsitz bevor sich Ihr Kind
hineinsetzt.
• Der Air Cushion 27 darf nicht
belastet werden.
• Der Kindersitz darf nicht auf den Air
Cushion 27 gelegt werden.
• Der Air Cushion 27 darf nicht als
Tragegriff verwendet werden.
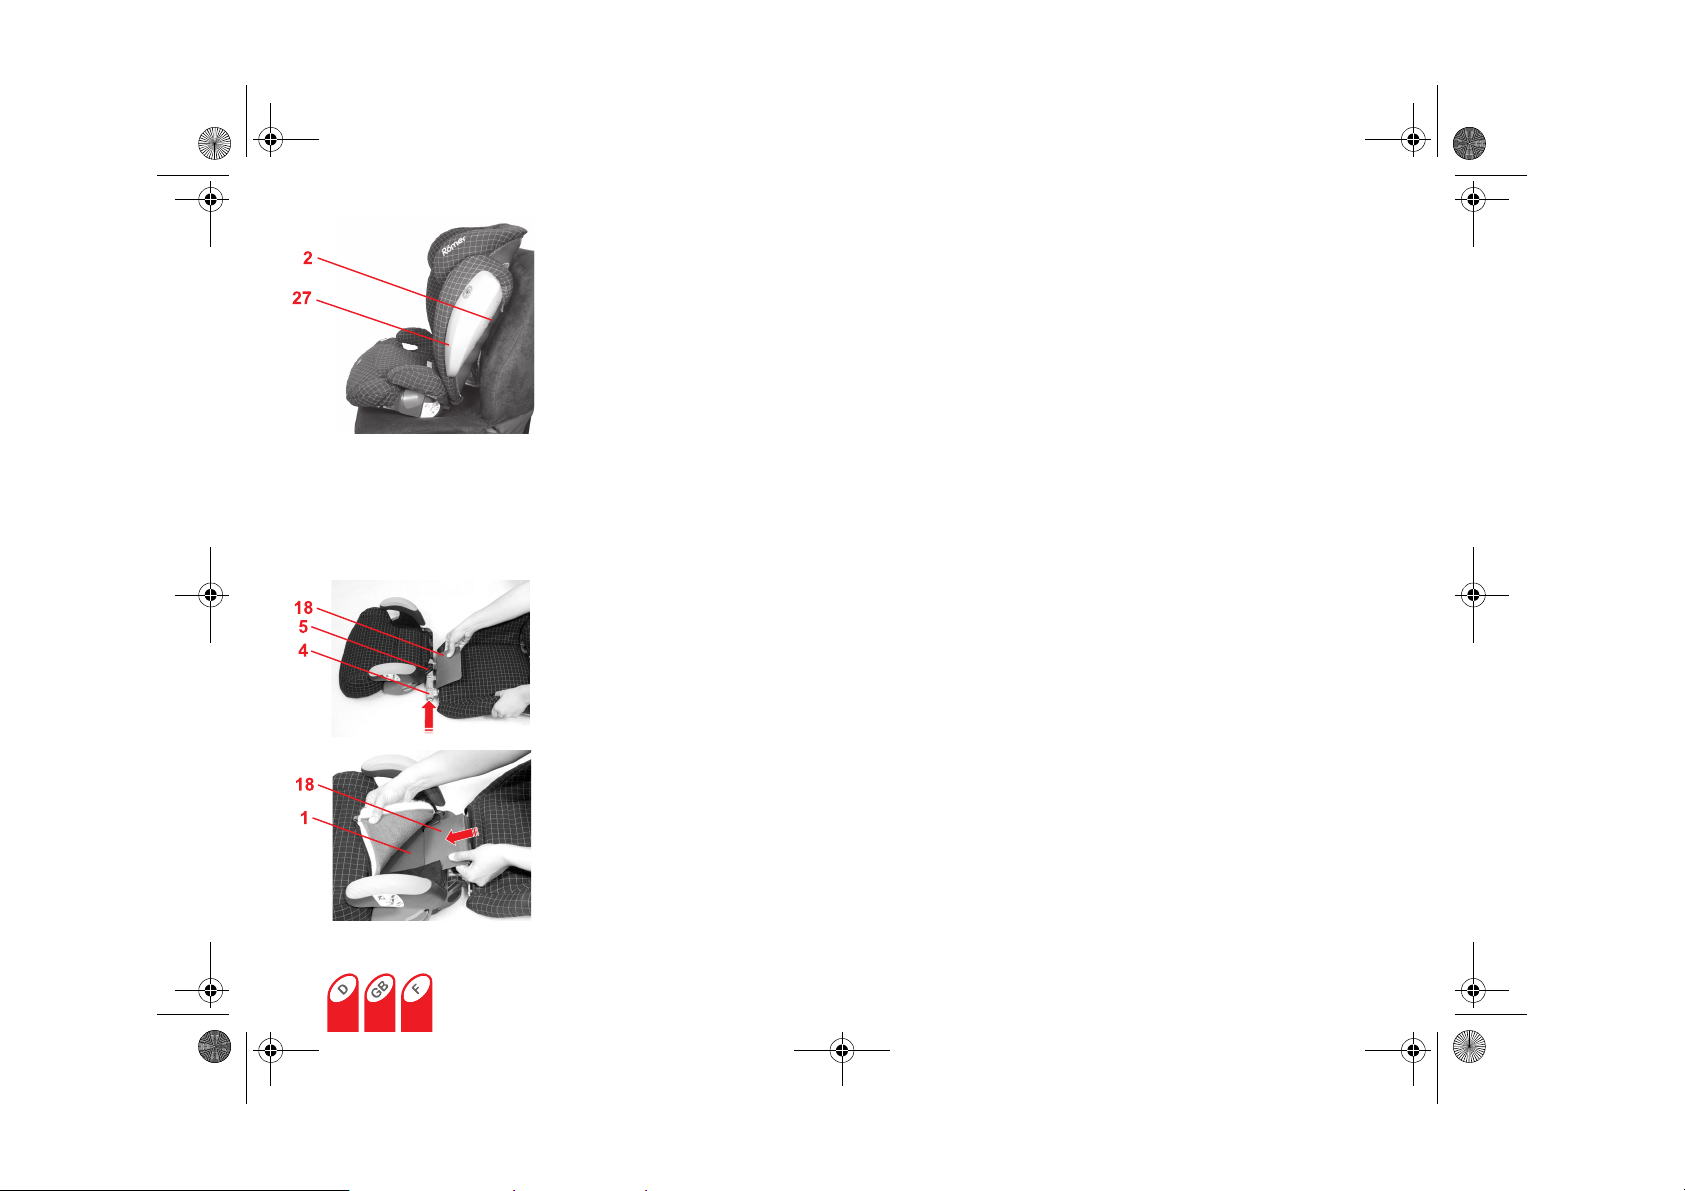
3.1 Befestigen der
Rückenlehne
Der Kindersitz besteht aus einem
Sitzkissen 1 und einer Rückenlehne 2
mit verstellbarer Kopfstütze 3. Die
Kombination bietet Ihrem Kind den
gewünschten Schutz und Komfort.
Þ Legen Sie die Rückenlehne 2 flach
hinter das Sitzkissen 1.
Þ Klappen Sie die
Gelenkabdeckung 18 nach oben.
Þ Schieben Sie die Gelenkachse 4
der Rückenlehne 2 so weit wie
möglich in die Führung 5 am
Sitzkissen 1.
Þ Schieben Sie die
Gelenkabdeckung 18 so unter den
Bezug des Sitzkissens 1, dass sie
auf der Kunstofffläche aufliegt.
seat on the vehicle seat before
having your child sit down in it.
• No load may be placed on the
Air Cushion 27.
• Do not place the child seat on the
Air Cushion 27.
• The Air Cushion 27 may not be
used as a carrying handle.
3.1 Attaching the backrest
The child seat is composed of a seat
cushion 1 and a backrest 2 with an
adjustable headrest 3. The comination
provides your child with the desired
protection and comfort.
Þ Place the backrest 2 evenly behind
the seat cushion 1.
Þ Fold the axis cover 18 upwards.
Þ Push the articulated axis 4 of the
backrest 2 as far as possible into
the guide 5 on the seat cushion 1.
Þ Push the axis cover 18 under the
seat cushion cover in such a way 1,
that is rests on the plastic surface.
Attention ! Le dossier 2 risque de
basculer vers l’arrière. Placez
toujours le siège enfant sur le siège
du véhicule avant d’y installer votre
enfant.
• L’Air Cushion 27 ne doit subir
aucune contrainte.
• Le siège enfant ne doit pas être
posé sur l’Air Cushion 27.
• L’Air Cushion 27 ne doit pas être
utilisé comme poignée de transport.
3.1 Fixation du dossier
Le siège enfant se compose d'une
assise 1 et d'un dossier 2 à appui-tête
réglable 3. Cette combinaison offre à
votre enfant la protection et le confort
souhaités.
Þ Placez le dossier 2 à plat derrière
l'assise 1.
Þ Rabattez le cache du dispositif
d'articulation 18 vers le haut.
Þ Poussez l'axe d'articulation 4 du
dossier 2 aussi loin que possible
dans le guidage 5 de l'assise 1.
Þ Faites glisser le cache du dispositif
d'articulation 18 sous la housse de
l'assise 1, de sorte que la partie en
plastique repose à plat.
6
Page 9
100922_KIDplus_D-GB-F.fm Seite 7 Montag, 27. September 2010 2:13 14
Gefahr! Beim Hochschwenken
der Rückenlehne 2 darf sich
nichts im Bereich der
Gelenkachse 4 zwischen
Rückenlehne 2 und
Sitzkissen 1 befinden.
Vor sic ht! Sie oder Ihr Kind können
sich z.B. die Finger einklemmen und
verletzen.
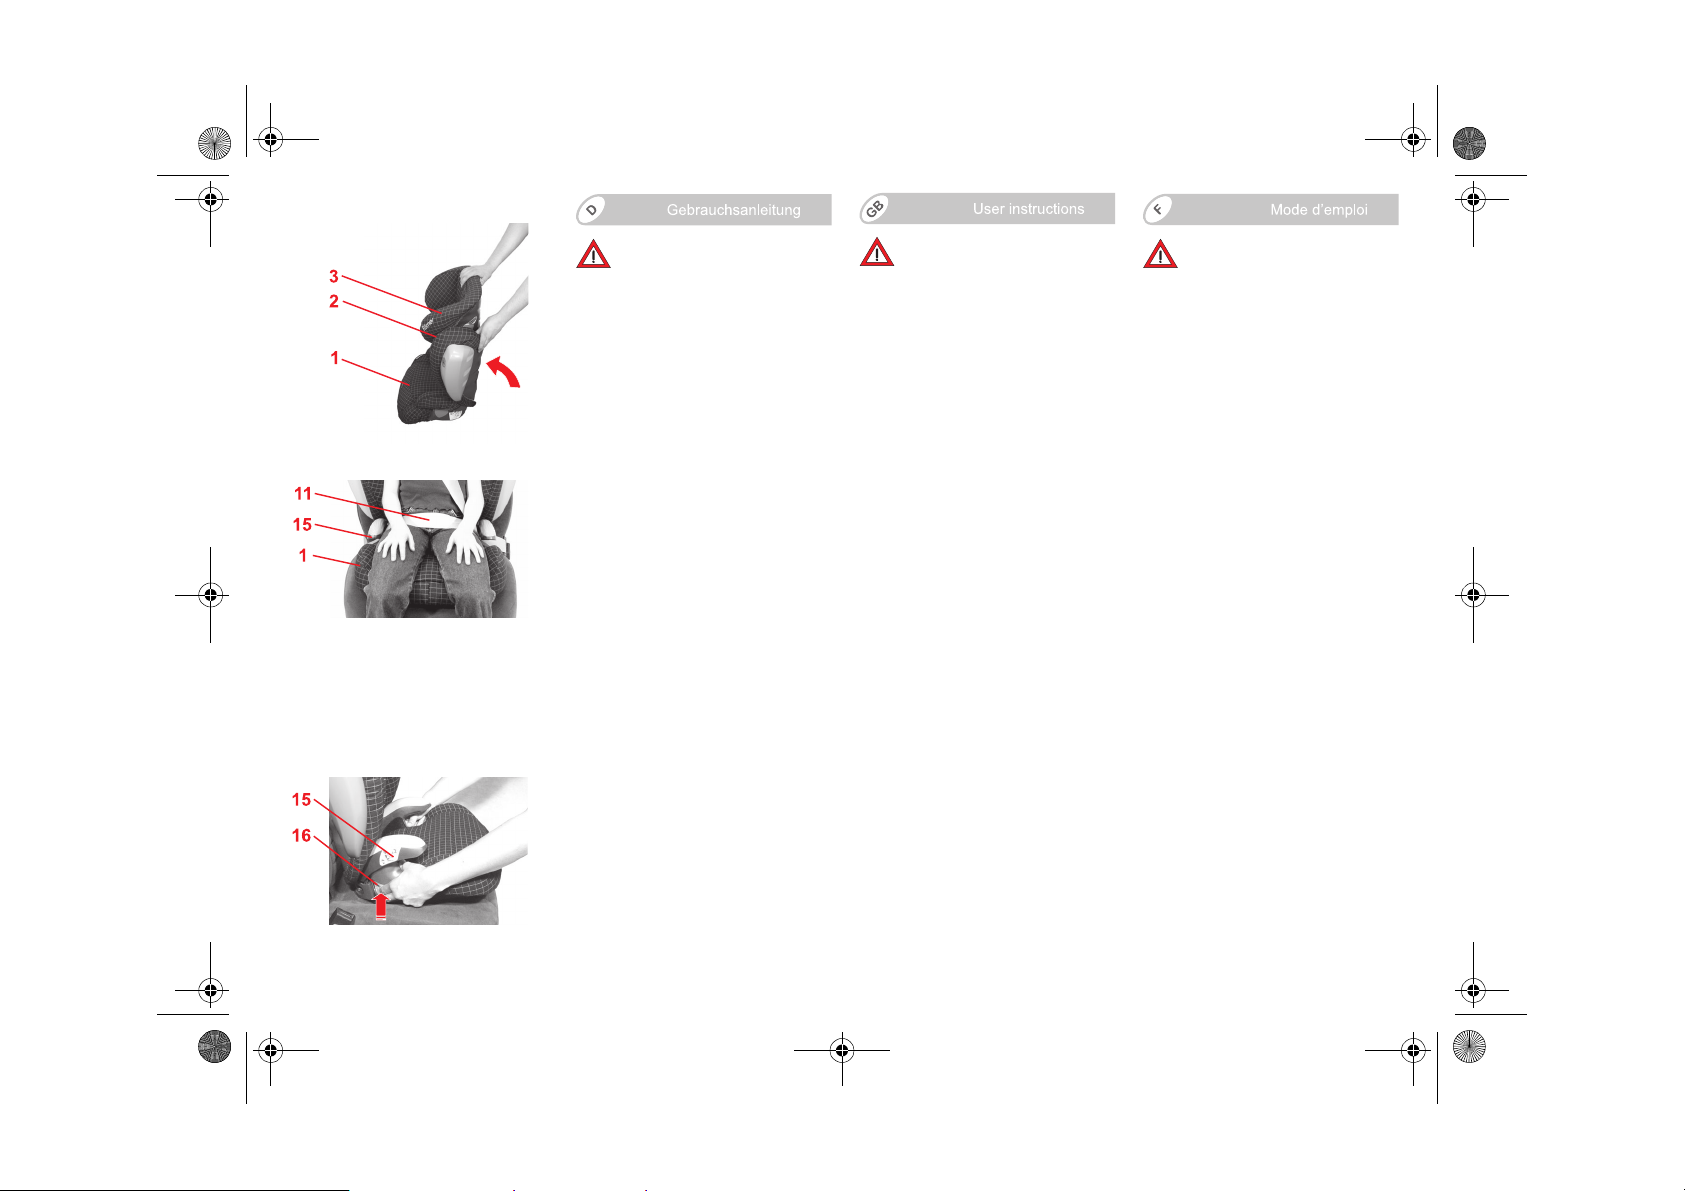
Þ Schwenken Sie die Rückenlehne 2
nach oben, bis sie einrastet.
3.2 Breiten-Verstellung des
Sitzkissens
Ein richtig angepasstes Sitzkissen 1
gewährleistet den optimalen Verlauf
des Beckengurtes 11, und erhöht
dadurch den Schutz Ihres Kindes. Sie
können die Seitenteile 15 des
Sitzkissens 1 in drei Breiten einstellen.
• Das Sitzkissen 1 muss so
eingestellt sein, dass die
verstellbaren Seitenteilen 15 dem
Becken Ihres Kindes so nah wie
möglich sind ohne es einzuengen.
So können Sie die Breite des
Sitzkissens 1 Ihrem Kind anpassen:
Þ Fassen Sie auf beiden Seiten an
der Außenseite der Seitenteile 15 in
die hellgrauen Verstelltasten 16.
Þ Drücken Sie beide
Verstelltasten 16 nach oben und
ziehen Sie die Seitenteile 15 in die
breiteste Stellung.
Danger! When swivelling up
the backrest 2, nothing must
come between the backrest 2
and the seat cushion 1 in the
area of the articulated axis 4.
Caution! You or your child could pinch
your fingers, injuring them.
Þ Turn the backrest 2 upwards until it
engages.
3.2 Adjusting the width of
the seat cushion
A properly adjusted seat cushion 1
ensures optimum distribution of the
lap belt section 11 and protects your
child better. You can adjust the side
parts 15 of the seat cushion 1 to three
widths.
• The seat cushion 1 must be
adjusted in such a way that the
adjustable side parts 15 are as
close as possible to your child's lap
without constricting him or her.
Here is how you can adjust the seat
cushion 1 to your child:
Þ Grasp the light grey adjustment
buttons 16 on the exterior of the
side parts 15 by both sides.
Þ Press both adjustment buttons 16
upwards and pull the side parts 15
into the widest position.
Danger ! Lors du redressement
du dossier 2, aucun objet ne
doit se trouver dans la zone de
l’axe de basculement 4 entre le
dossier 2 et le coussin
d’assise 1.
Attention ! Vous ou votre enfant
risquez par ex. de vous coincer les
doigts ou de vous blesser.
Þ Basculez le dossier 2 vers le haut
jusqu'à ce qu'il s'encliquète.
3.2 Réglage en largeur de
l'assise
Une assise correctement réglée 1
garantit un déplacement optimal de la
sangle ventrale 11, augmentant ainsi
la protection de votre enfant. Vous
pouvez régler les parties latérales 15
de l'assise 1 sur trois largeurs
différentes.
•L'assise 1 doit être réglée de telle
façon que les parties latérales
réglables 15 épousent au plus près
le bassin de votre enfant, sans le
serrer.
Voici comment adapter la largeur de
l'assise 1 à votre enfant :
Þ Saisissez le côté externe des
parties latérales 15 par les touches
de réglage gris clair 16.
Þ Appuyez les deux touches de
réglage 16 vers le haut et tirez les
parties latérales 15 en position de
largeur maximale.
Page 10
100922_KIDplus_D-GB-F.fm Seite 8 Montag, 27. September 2010 2:13 14
Þ Lassen Sie Ihr Kind im Kindersitz
Platz nehmen.
Þ Drücken Sie nun beide
Verstelltasten 16 erneut und
verstellen Sie die Seitenteile 15 in
die gewünschte Breite.
Vor sic ht! Die Seitenteile müssen
eingerastet sein. Ziehen Sie an den
Seitenteilen um das Einrasten zu
überprüfen.
Þ Have your child sit in the child seat.
Þ Now press both adjustment
buttons 16 again and adjust the
side parts 15 to the desired width.
Caution! The side parts must
engage. Pull up on the side parts to
ensure that they are engaged.
Þ
Faites asseoir votre enfant dans le
siège.
Þ
Appuyez à présent
de réglage
les parties latérales
souhaitée.
Attention !
doivent être encliquetées. Tirez sur les
parties latérales afin de vérifier que
celles-ci sont correctement fixées.
les deux
15
à la largeur
touches
16
à nouveau et amenez
Les parties latérales
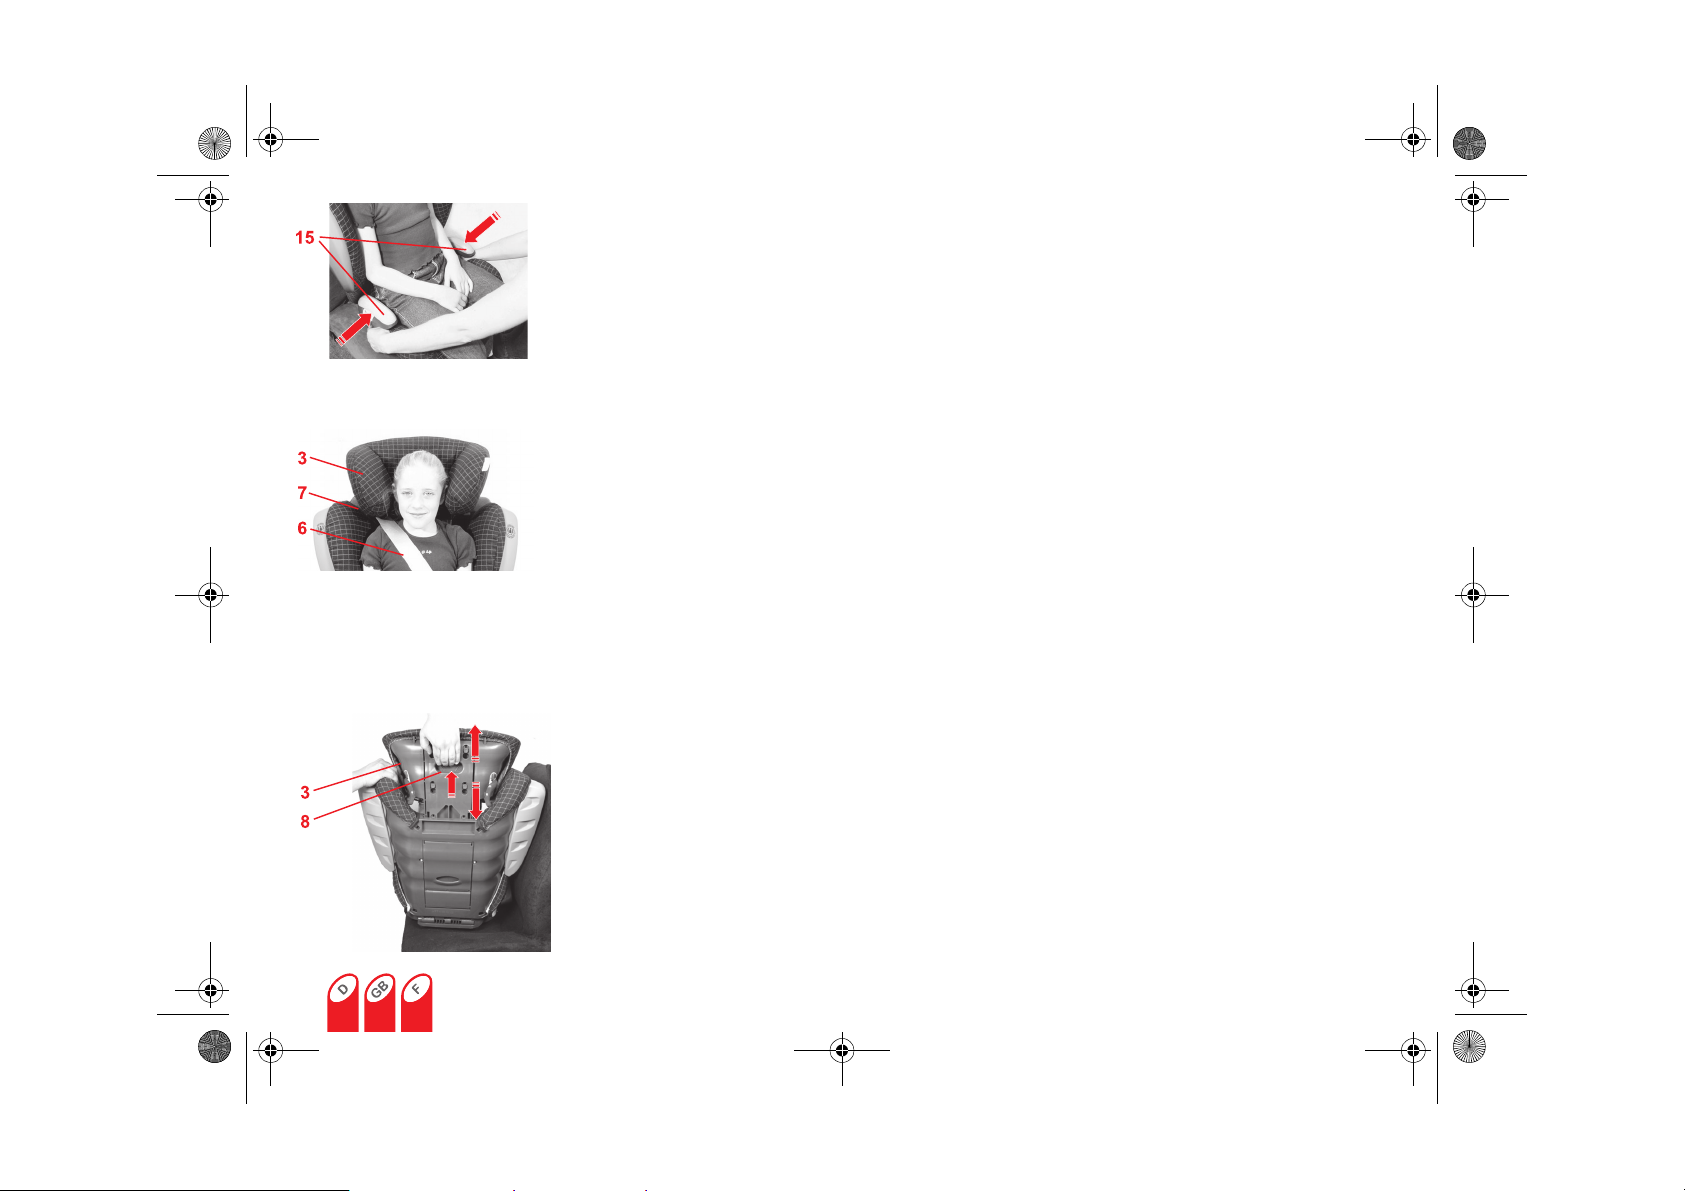
3.3 Höhen-Verstellung der
Kopfstütze
Eine richtig angepasste Kopfstütze 3
gewährleistet den optimalen Verlauf
des Diagonalgurtes 6, und bietet
Ihrem Kind den gewünschten Schutz
und Komfort. Sie können die Höhe der
Kopfstütze 3 in elf Stellungen
einrasten.
• Die Kopfstütze 3 muss so
eingestellt sein, dass zwischen den
Schultern Ihres Kindes und der
Kopfstütze 3 noch zwei Finger breit
Platz ist.
So können Sie die Höhe der
Kopfstütze 3 der Körpergröße Ihres
Kindes anpassen:
Þ Fassen Sie in den Verstellgriff 8 an
der Rückseite der Kopfstütze 3 und
ziehen Sie ihn etwas nach oben.
Nun ist die Kopfstütze entriegelt.
Þ Jetzt können Sie die entriegelte
Kopfstütze 3 in die gewünschte
Höhe verstellen. Sobald Sie den
Verstellgriff 8 loslassen, rastet die
Kopfstütze 3 ein.
3.3 Adjusting the height of
the headrest
A properly adjusted headrest 3
ensures the optimum distribution of
the diagonal belt section 6 and
provides your child with the desired
protection and comfort. You can adjust
the height of the headrest 3 to eleven
positions.
• The headrest 3 must be adjusted in
such a way that you can still pass
two fingers between the your child's
shoulders and the headrest 3.
To adjust the height of the
headrest 3 to fit your child:
Þ Grasp the adjustment handle 8 by
the back of the headrest 3 and pull
it upwards slightly. The headrest is
now released.
Þ You can now adjust the released
headrest 3 to the desired height.
As soon as you have let go of the
adjustment handle 8, the headrest
will engage.
8
3.3 Réglage en hauteur de
l'appui-tête
Un appui-tête correctement réglé 3
garantit un déplacement optimal de la
sangle diagonale 6 et offre ainsi à
votre enfant la protection et le confort
souhaités. Vous pouvez régler l'appuitête 3 sur onze hauteurs différentes.
• L'appui-tête 3 doit être réglé de
façon telle qu'entre les épaules de
votre enfant et l'appui-tête 3 vous
puissiez encore glisser deux doigts.
Voici comment adapter la hauteur
de l'appui-tête 3 à la taille de votre
enfant :
Þ Saisissez la poignée de réglage 8
au dos de l'appui-tête 3 et tirez
légèrement vers le haut. L'appuitête est déverrouillé.
Þ Vous pouvez à présent régler
l'appui-tête 3 à la hauteur voulue.
Dès que vous lâchez la poignée de
réglage 8, l'appui-tête se verrouille.
Page 11
100922_KIDplus_D-GB-F.fm Seite 9 Montag, 27. September 2010 2:13 14
Þ Stellen Sie den Kindersitz auf den
Fahrzeugsitz.
Þ Lassen Sie Ihr Kind im Kindersitz
Platz nehmen und kontrollieren Sie
die Höhe.
Vor sic ht! Wiederholen Sie dies so
oft bis die Kopfstütze 3 optimal
eingestellt ist.
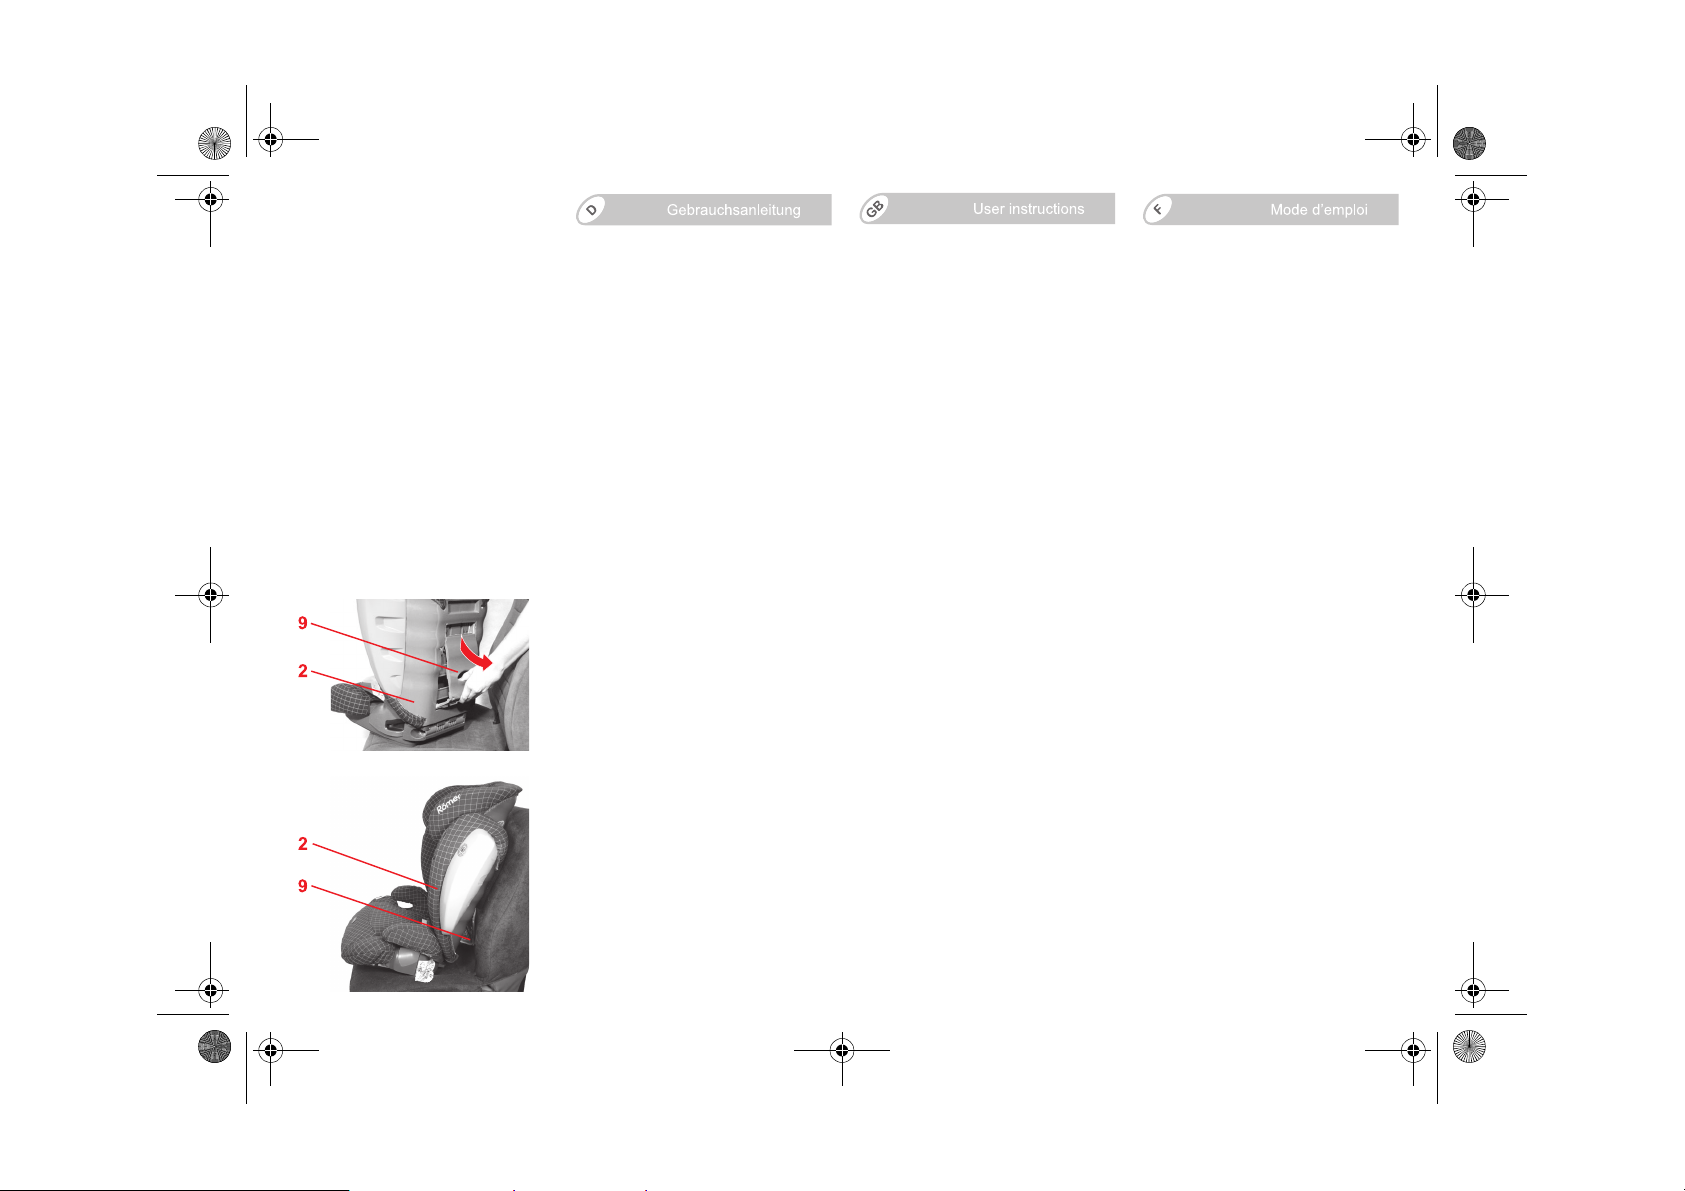
3.4 Ruhestellung der
Rückenlehne
Die Rückenlehne 2 des Kindersitzes
paßt sich stufenlos der Neigung des
Fahrzeugsitzes an.
Tipp! Die Rückenlehne 2 wird durch
eine kleine Raste senkrecht gehalten.
Drücken Sie die Rückenlehne 2 etwas
nach hinten um die Raste zu lösen.
Bitte beachten Sie: Der bestmögliche
Schutz ist nur gewährleistet, wenn der
Fahrzeugsitz in aufrechter Position ist.
Die Rückenlehne 2 des Kindersitzes
läßt sich, unabhängig vom
Fahrzeugsitz, nach hinten in eine
Ruhestellung neigen.
Þ Klappen Sie dazu den
Abstandswinkel 9 auf der Rückseite
der Rückenlehne 2 heraus.
Þ Place the child seat on the vehicle
seat.
Þ Have your child sit down in the child
seat and check the height.
Caution! Repeat this process until
the headrest 3 is at the optimal
height.
3.4 Reclining position of the
backrest
The backrest 2 of the child seat adapts
smoothly to the slant of the vehicle
seat.
Tip! The backrest 2 is held vertically
by a small notch. Press the backrest 2
slightly to the rear to release the
notch.
Please observe: The best possible
protection can only be ensured if the
vehicle seat is in its upright position.
The backrest 2 of the child seat can be
inclined backwards into a reclining
position independent of the the vehicle
seat.
Þ To do so, fold out the displacement
angle 9 on the back of the
backrest 2.
Þ Placez le siège enfant sur la
banquette du véhicule.
Þ Faites asseoir votre enfant et
contrôlez la hauteur.
Attention ! Renouvelez cette
opération autant de fois que
nécessaire jusqu’à ce que le réglage
de l’appui-tête 3 soit optimal.
3.4 Stabilisation du dossier
Le dossier 2 du siège enfant s'adapte
en continu à l'inclinaison du siège du
véhicule.
Astuce ! Le dossier 2 est maintenu en
position verticale par un petit
enclenchement. Poussez légèrement
le dossier 2 vers l‘arrière pour
débloquer l‘enclenchement.
Attention ! La meilleure protection
possible n'est assurée que lorsque le
siège du véhicule est en position
droite. Le dossier 2 du siège enfant
peut être basculé vers l'arrière en
position de repos, indépendamment
du siège du véhicule.
Þ Pour ce faire, abattez l'équerre 9
qui se trouve à l'arrière du
dossier 2.
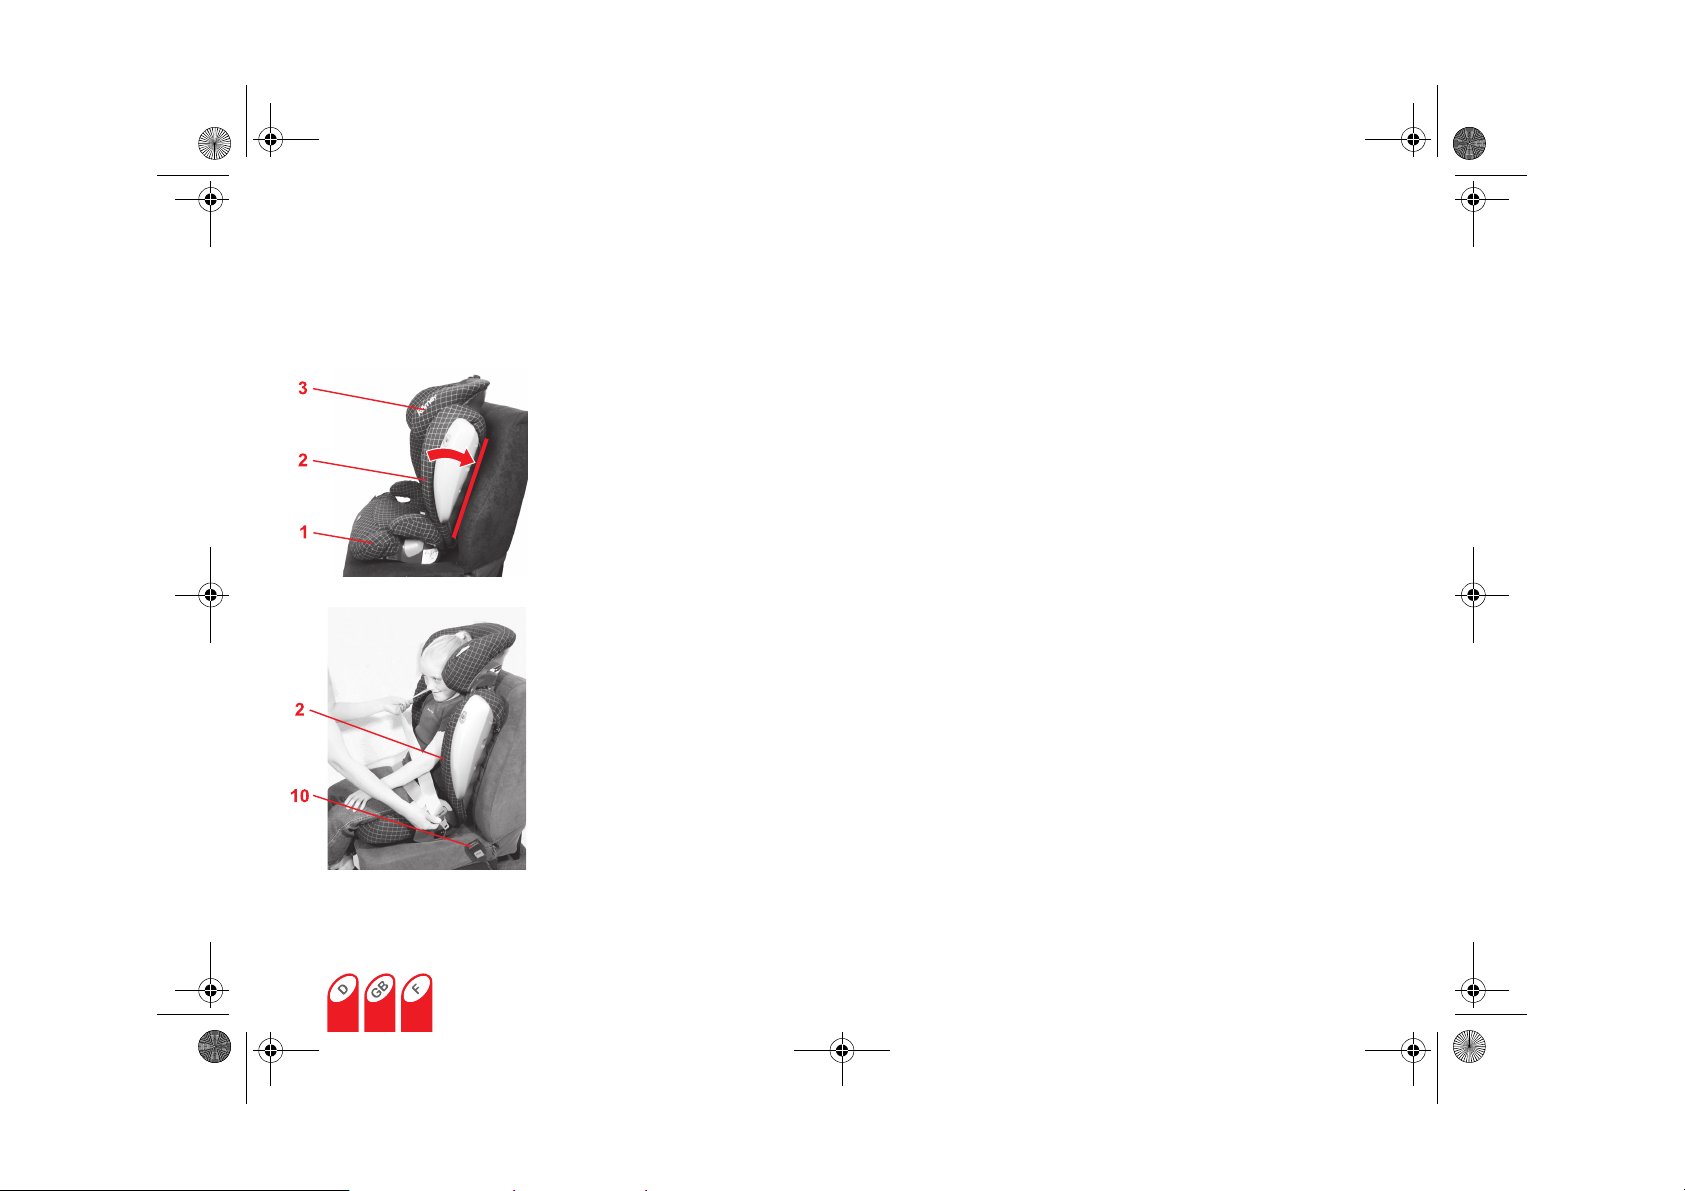
Þ Neigen Sie nun die Rückenlehne 2
so weit nach hinten, bis der
Abstandswinkel 9 flächig an der
Fahrzeugsitz-Rückenlehne anliegt.
Vorsicht! Neigen Sie die
Rückenlehne 2 nicht weiter als der
Abstandswinkel 9 vorgibt.
Þ Now incline the backrest 2
backwards until the displacement
angle 9 lies flat along the back of
the vehicle seat.
Caution! Do not incline the
backrest 2 farther than specified by
the displacement angle 9.
Þ Inclinez à présent le dossier 2 vers
l'arrière jusqu'à ce que l'équerre 9
s'appuie à plat sur le dossier du
siège du véhicule.
Attention ! N'inclinez pas le
dossier 2 plus que le permet
l'équerre 9.
Page 12
100922_KIDplus_D-GB-F.fm Seite 10 Montag, 27. September 2010 2:13 14
3.5 Anschnallen Ihres
Kindes
Der KID plus SICT erfordert keinen
Einbau im Fahrzeug. Ihr Kind wird
einfach im Kindersitz mit dem Autogurt
gesichert.
1. Autogurt anlegen
Þ Stellen Sie den Kindersitz auf den
Fahrzeugsitz. Achten Sie darauf,
dass die Rückenlehne 2 flächig an
der Rückenlehne des
Fahrzeugsitzes anliegt (siehe 3.4).
Tipp! Wenn die Kopfstütze des
Fahrzeugsitzes dabei stört, drehen
Sie sie einfach um.
Þ Lassen Sie Ihr Kind im Kindersitz
Platz nehmen.
Þ Ziehen Sie den Autogurt heraus
und führen Sie ihn vor Ihrem Kind
zum Auto-Gurtschloss 10.
Vor sic ht! Gurt nicht verdrehen.
Þ Rasten Sie die Schlosszunge im
Auto-Gurtschloss 10 ein. KLICK!
3.5 Securing your child
The KID plus SICT does not require
installation in the vehicle. Your child is
simply secured with the vehicle seat
belt.
1. Fastening the vehicle seat belt
Þ Place the child seat on the vehicle
seat. Please be sure that the
backrest 2 lies flat along the back of
the vehicle seat (see 3.4).
Tip! If the headrest of the vehicle
seat is bothersome, simply turn it
around.
Þ Have your child sit in the child seat.
Þ Pull out the vehicle seat belt and
guide it in front of your child to the
vehicle seat buckle 10.
Caution! Do not twist the belt.
Þ Engage the buckle tongue in the
vehicle seat buckle 10. CLICK!
3.5 Mise en place de la
ceinture de votre enfant
Le KID plus SICT ne nécessite aucun
aménagement du véhicule. Votre
enfant est simplement attaché dans
son siège à l'aide de la ceinture du
véhicule.
1. Poser la ceinture du véhicule
Þ Placez le siège enfant sur le siège
du véhicule. Veillez à ce que le
dossier 2 s'appuie bien à plat contre
le dossier du siège du véhicule
(voir 3.4).
Astuce ! Si l'appui-tête du siège du
véhicule gêne, retournez-le.
Þ Faites asseoir votre enfant dans le
siège.
Þ Déroulez la ceinture du véhicule et
passez-là, devant votre enfant,
jusqu'à son fermoir 10.
Attention ! Ne pas torsader la
sangle.
Þ Enclenchez la languette dans le
fermoir de la ceinture 10 du
véhicule. CLIC !
10
Page 13
100922_KIDplus_D-GB-F.fm Seite 11 Montag, 27. September 2010 2:13 14
2. Autogurt in die roten
Gurtführungen am Kindersitz
einlegen.
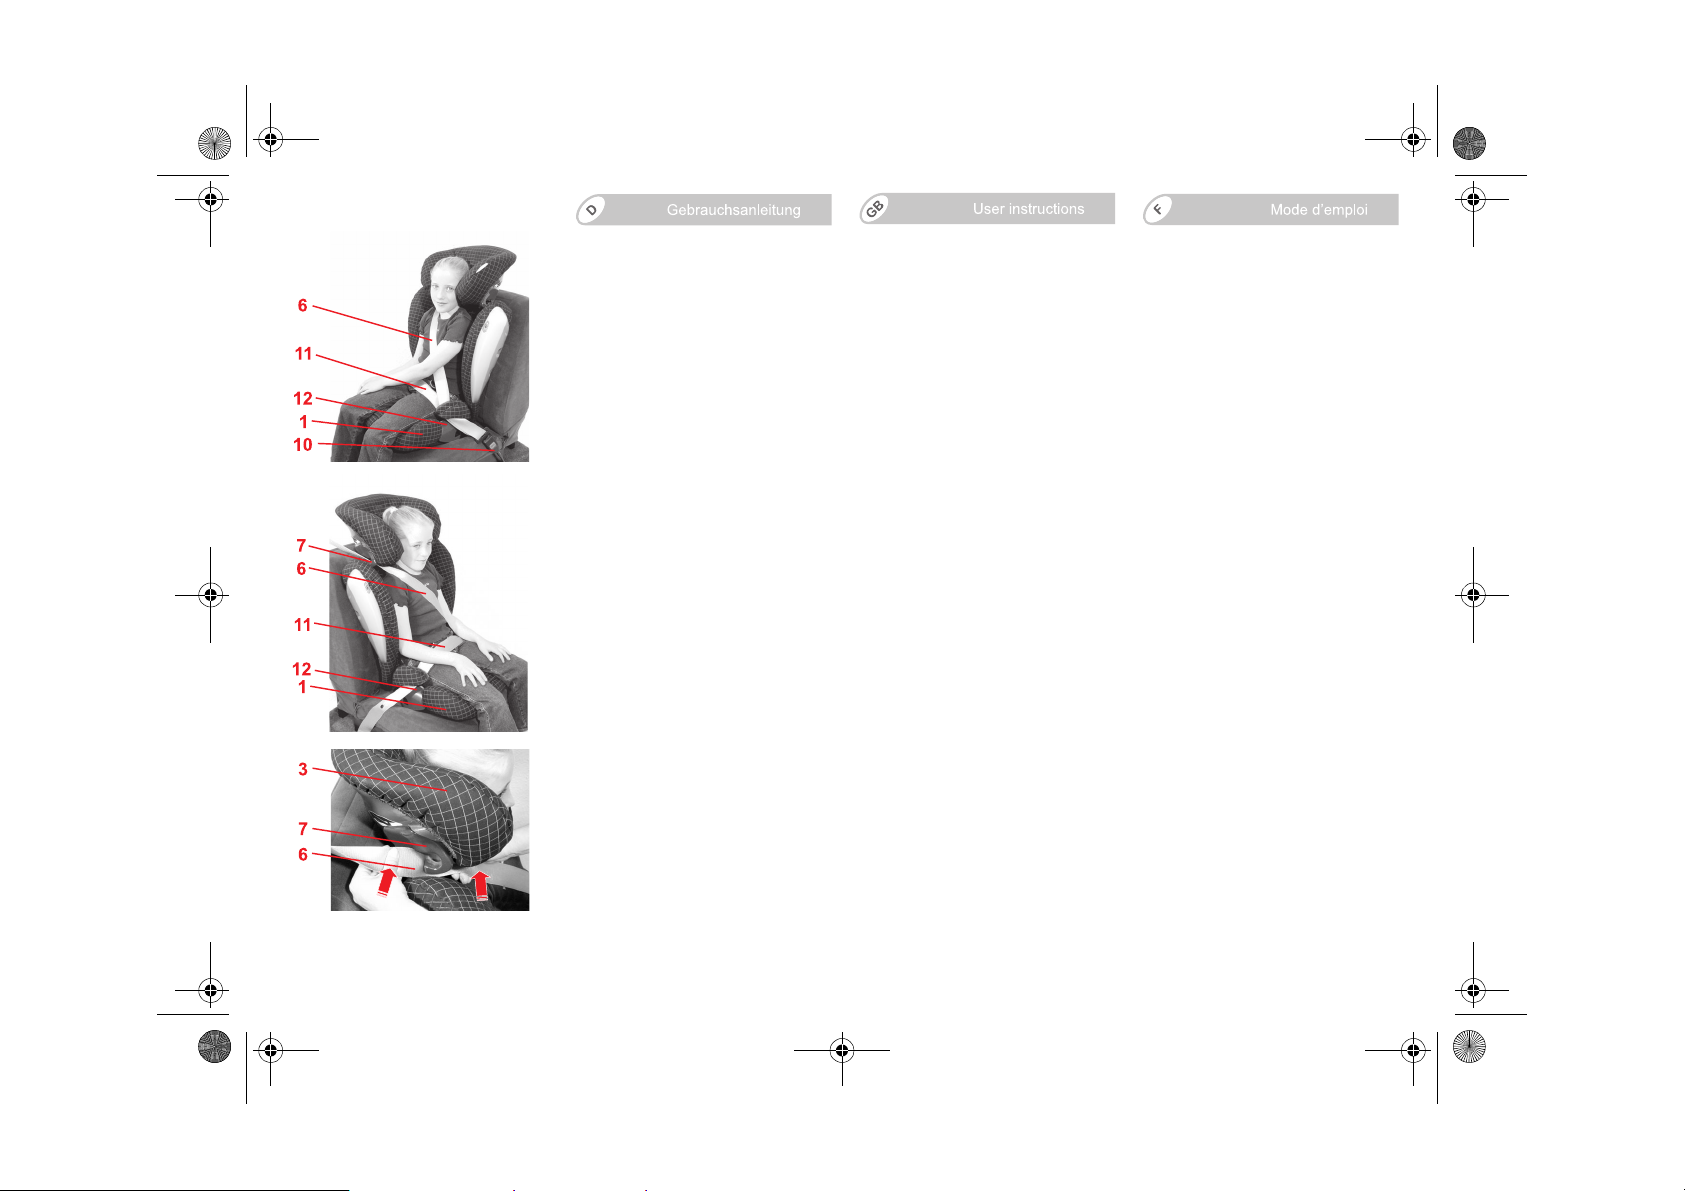
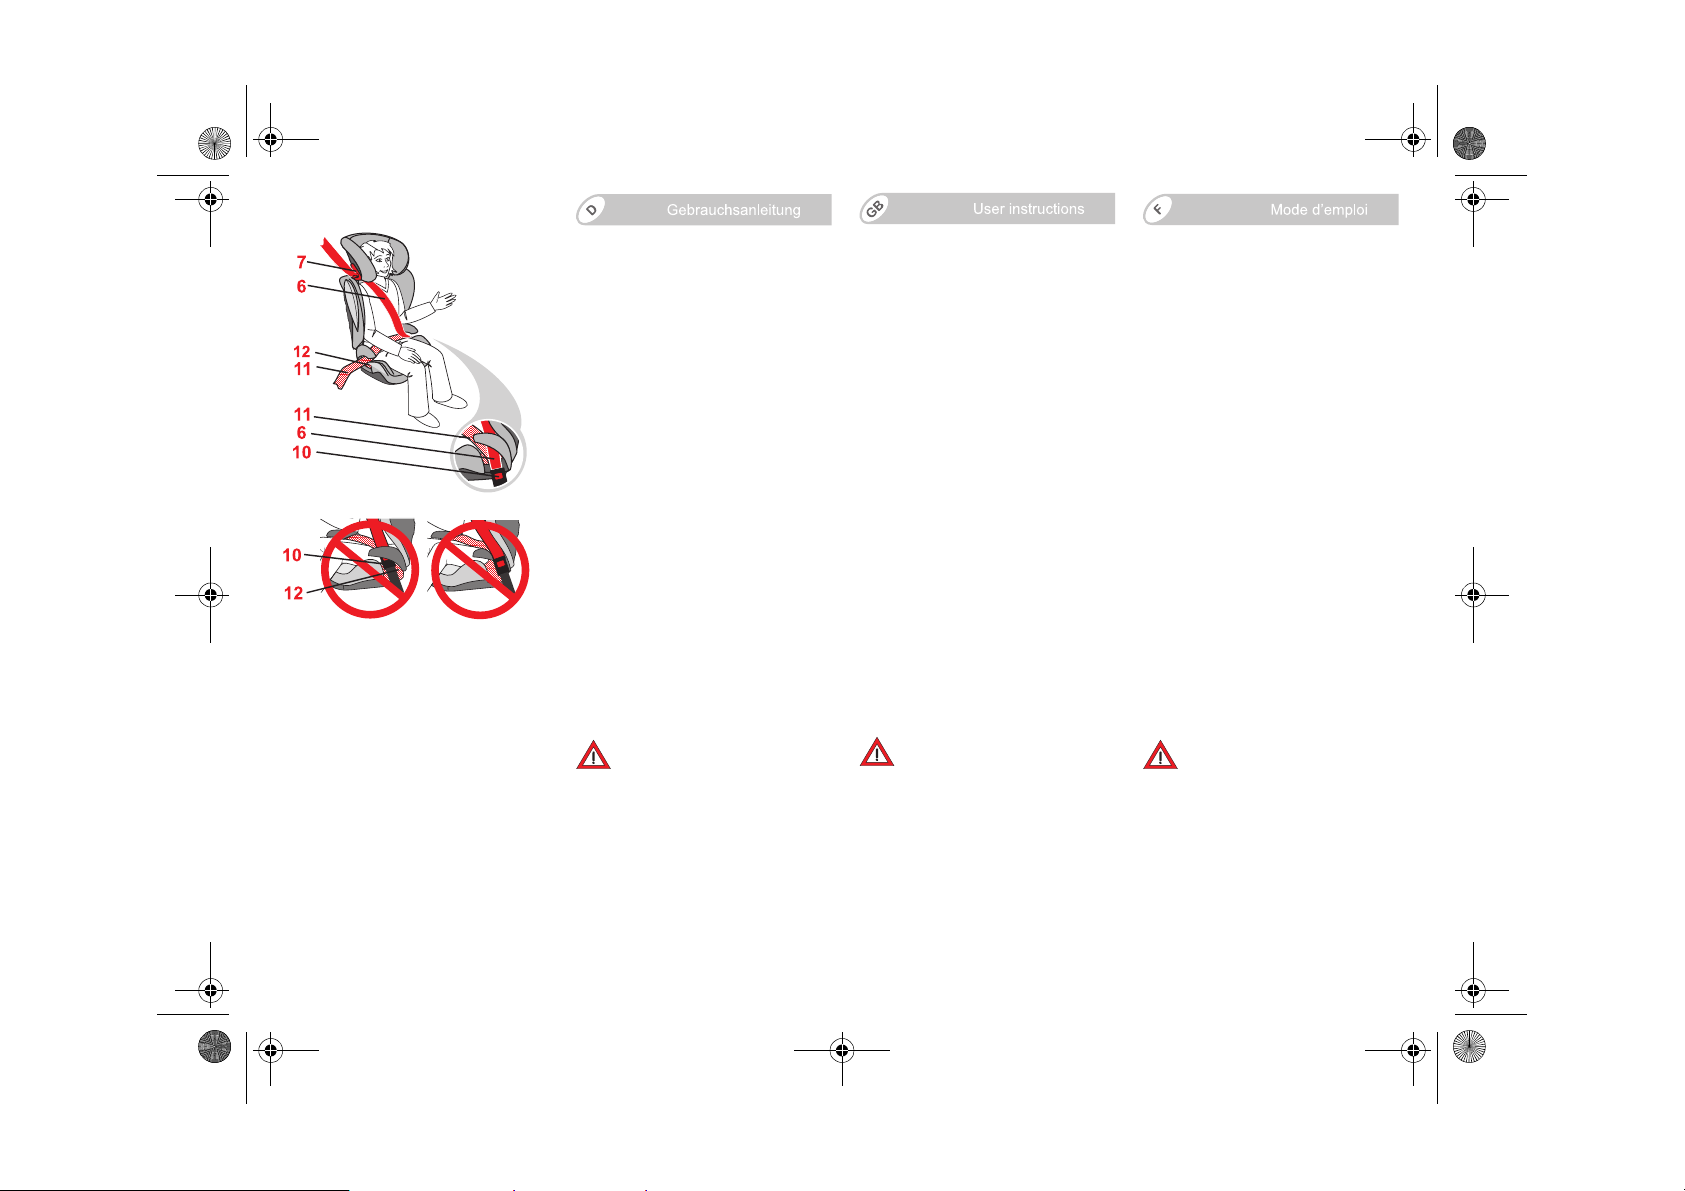
Þ Legen Sie den Diagonalgurt 6 und
den Beckengurt 11, auf der Seite
des Auto-Gurtschlosses 10, unter
die Armlehne, in die hellrote
Gurtführung 12 des Sitzkissens 1.
Vor sic ht! Das Auto-Gurtschloss 10
darf nicht zwischen der hellroten
Gurtführung 12 und der Armlehne
liegen.
Þ Legen Sie den Beckengurt 11 auf
der anderen Seite des Sitzkissens 1
ebenfalls in die hellrote
Gurtführung 12.
Vor sic ht! Der Beckengurt 11 muss
auf beiden Seiten so tief wie
möglich über die Leistenbeuge
Ihres Kindes verlaufen.
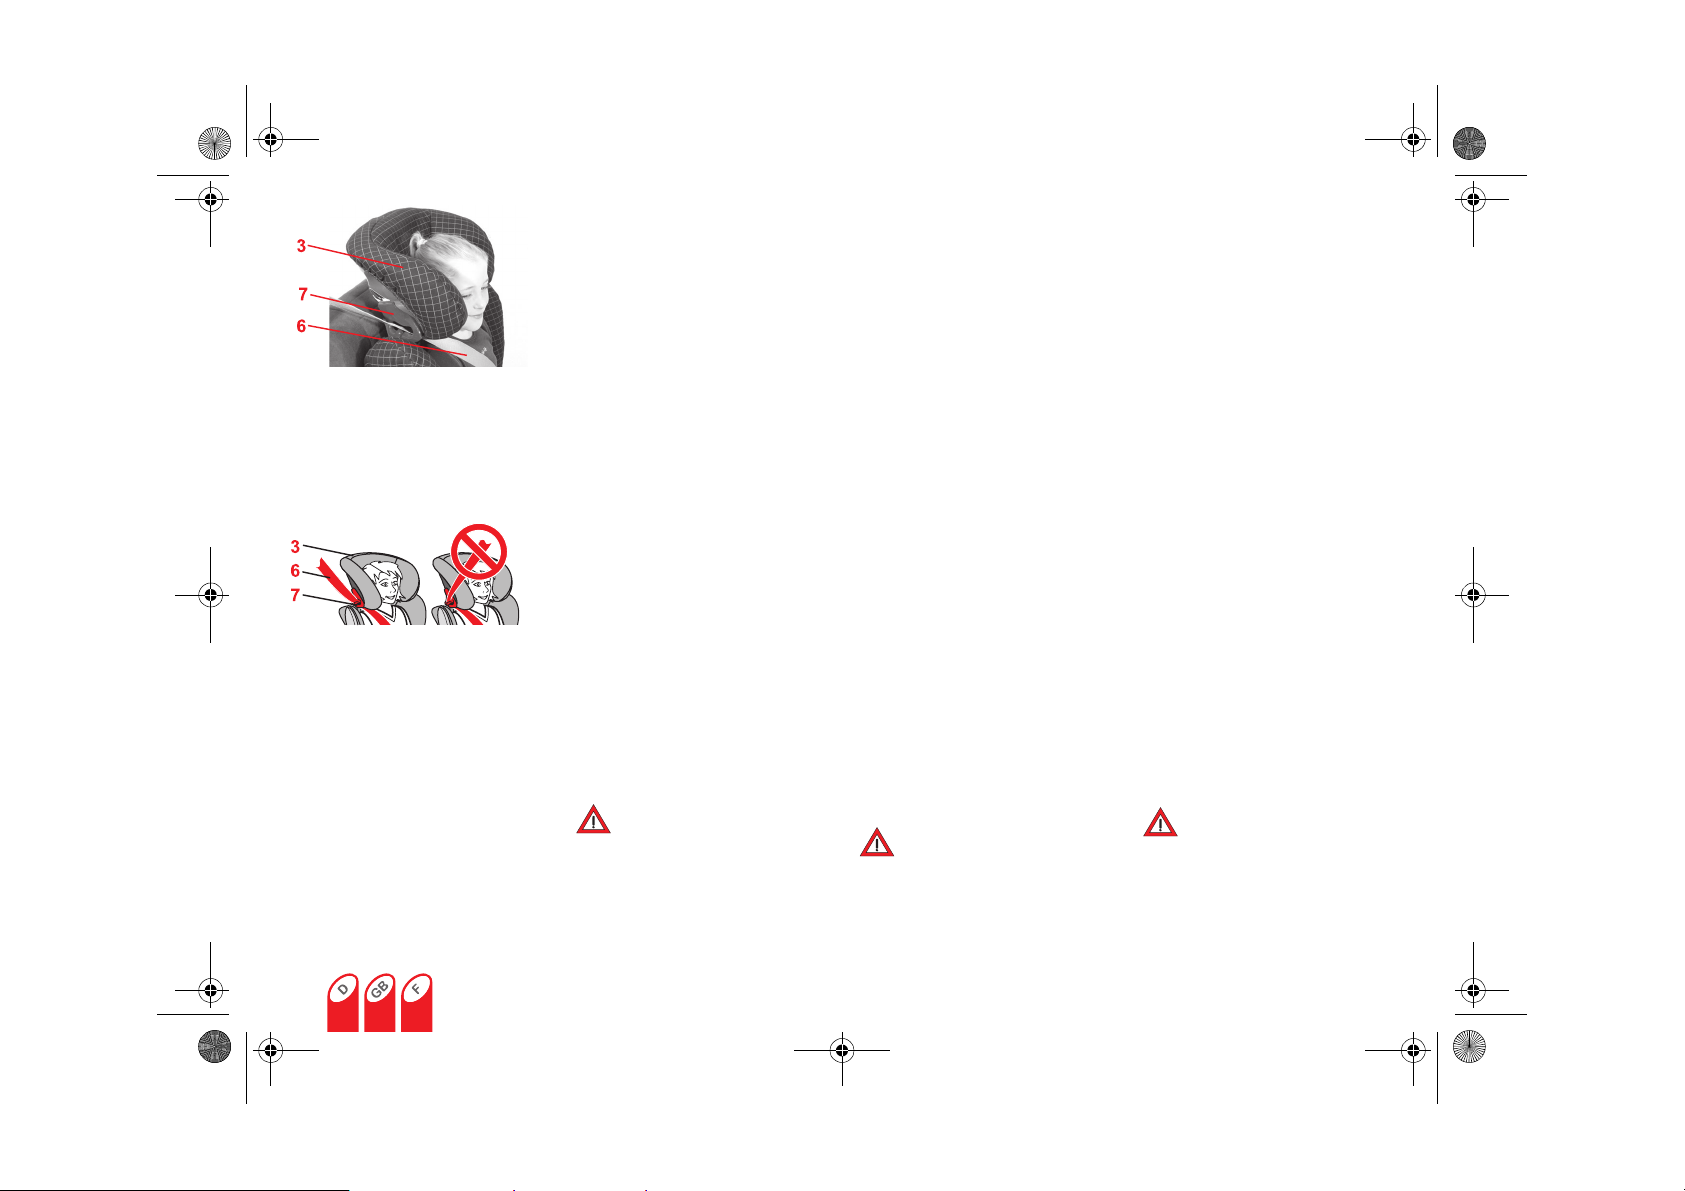
Þ Führen Sie den Diagonalgurt 6 in
den dunkelroten Gurthalter 7 der
Kopfstütze 3 ein, bis er vollständig
und unverdreht in Gurthalter 7 liegt.
Tipp! Verdeckt die Rückenlehne 2
den Gurthalter 7, können Sie die
Kopfstütze 3 nach oben verstellen.
Jetzt läßt sich der Diagonalgurt 6
leicht einführen. Stellen Sie nun die
Kopfstütze 3 wieder zurück in die
richtige Höhe.
2. Inserting the vehicle seat belt
into the red belt guides of the child
seat.
Þ Insert the diagonal belt section 6
and the lap belt section 11 on the
side of vehicle belt buckle 10 under
the armrest into the light red belt
guide 12 of the seat cushion 1.
Caution! The vehicle seat beat 10
may not rest between the light red
belt guide 12 and the armrest .
Þ Insert the lap belt section 11 on the
other side of the seat cushion 1 into
the light red belt guide 12 as well.
Caution! The lap belt section 11
must lie as low as possible over
your child's hips.
Þ Guide the diagonal seat belt
section 6 into the dark red belt
holder 7 of the headrest 3 until it
lies completely in the belt holder
and is not twisted 7.
Tip! If the backrest 2 conceals the
belt holder 7, you can adjust the
headrest 3 upwards. The diagonal
belt section 6 can now be easily
inserted. Now return the headrest 3
to the proper height.
2. Passez la ceinture dans les
guidages rouges du siège enfant.
Þ Passez la sangle diagonale 6 et la
sangle ventrale 11 du côté du
fermoir 10, sous l'accoudoir, dans le
guidage rouge clair 12 de l'assise 1.
Attention ! Le fermoir de ceinture
du véhicule 10 ne doit pas se
trouver entre le guidage rouge 12 et
l'accoudoir .
Þ Passez la sangle ventrale 11 de
l'autre côté de l'assise 1, également
dans le guidage rouge 12.
Attention ! La sangle ventrale 11
doit passer, des deux côtés, le plus
bas possible au-dessus de l’aine de
votre enfant.
Þ
Insérez la sangle diagonale6 dans le
support de sangle rouge foncé
l'appui-tête
repose complètement et sans être
torsadée dans le support de sangle
Astuce !
support de sangle
bouger l'appui-tête
Maintenant, la sangle diagonale
s'insère facilement. Replacez à
présent l'appui-tête
hauteur.
3
jusqu'à ce qu'elle
Si le dossier 2 cache le
7
, vous pouvez
3
vers le haut.
3
à la bonne
7
de
6
7
.
Page 14
100922_KIDplus_D-GB-F.fm Seite 12 Montag, 27. September 2010 2:13 14
Þ Vergewissern Sie sich, dass der
Diagonalgurt 6 über das
Schlüsselbein Ihres Kindes läuft
und nicht am Hals anliegt.
Tipp! Sie können die Kopfstütze 3
auch noch im Fahrzeug in der Höhe
anpassen.
Þ Vorsicht! Der Diagonalgurt 6 muss
schräg nach hinten verlaufen.
Tipp! Sie können den Gurtverlauf
mit dem verstellbaren Gurtumlenker
Ihres Fahrzeuges regulieren.
Þ Please also make sure that the
diagonal belt section 6 runs above
your child's collarbone and does not
rest at his or her throat.
Tip! You can also adjust the height
of the headrest 3 when you are in
the vehicle.
Þ Caution! The diagonal belt
section 6 must run slanted towards
the back.
Tip! You can regulate the
distribution of the belt using the
adjustable seat belt tightener of
your vehicle.
Þ
N'oubliez pas que la sangle
diagonale 6 doit passer sur la
clavicule de votre enfant, et non
dans son cou.
Astuce ! Vous pouvez encore
adapter l'appui-tête 3 en hauteur
dans le véhicule.
Þ Attention ! La sangle diagonale 6
doit se déplacer en diagonale vers
l'arrière.
Astuce ! Vous pouvez régler le
déplacement de la ceinture à l'aide
du renvoi de ceinture réglable de
votre véhicule.
Þ Vor sic ht! Der Diagonalgurt 6 darf
nie nach vorn zum Gurtumlenker
am Auto führen.
Tipp! Verwenden Sie in diesem Fall
den Kindersitz nur auf dem
Rücksitz.
Þ Straffen Sie den Autogurt, indem
Sie am Diagonalgurt 6 ziehen.
3.6 So ist Ihr Kind richtig
gesichert
Prüfen Sie zur Sicherheit
Ihres Kindes, dass...
• der Beckengurt 11 auf beiden
Seiten in den hellroten
Gurtführungen 12 des Sitzkissens
verläuft,
Þ Caution! The diagonal belt
section 6 may not guide forwards to
the seat belt tightener.
Tip! In this case, use the child seat
on the the rear seat.
Þ Tighten the lap belt section by
pulling the diagonal belt section 6.
3.6 Checklist to ensure that
your child is buckled up
correctly
For the safety of your child,
please check that...
• the belt lap section 11 runs through
both sides of the light red belt
guides 12 of the seat cushion,
12
Þ Attention ! La sangle diagonale 6
ne doit jamais aller vers l'avant du
véhicule pour rejoindre le renvoi de
ceinture.
Astuce ! Si c'est le cas, n'utilisez le
siège enfant que sur le siège arrière
du véhicule.
Þ Tendez la ceinture du véhicule en
tirant sur la sangle diagonale 6.
3.6 Voici comment votre
enfant est bien protégé
Vérifiez, pour la protection de
votre enfant, que...
• la sangle ventrale 11 passe bien
dans les guidages rouge clair 12 de
l'assise,
Page 15
100922_KIDplus_D-GB-F.fm Seite 13 Montag, 27. September 2010 2:13 14
• der Diagonalgurt 6 auf der Seite
des Auto-Gurtschlosses 10
ebenfalls in der hellroten
Gurtführung 12 des Sitzkissens
verläuft,
• der Diagonalgurt 6 durch den
dunkelroten Gurthalter 7 der
Kopfstütze verläuft,
• der Diagonalgurt 6 schräg nach
hinten verläuft,
• die Gurte gestrafft und nicht
verdreht sind,
• das Autogurt-Schloss 10 nicht
zwischen der hellroten
Gurtführung 12 und der Armlehne
des Sitzkissens liegt.
• der Kindersitz nicht an der
Fahrzeugtür oder
Fahrzeuginnenwand anliegt.
4. Pflegeanleitung
Zum Erhalt der
Schutzwirkung
• Bei einem Unfall mit einer
Aufprallgeschwindigkeit über 10 km/h
können Beschädigungen am AutoKindersitz aufgetreten sein, die nicht
unbedingt offensichtlich sind.
Lassen Sie diesen Kindersitz
unbedingt vom Hersteller überprüfen
und gegebenenfalls austauschen.
• Kontrollieren Sie regelmäßig alle
wichtigen Teile auf
• the diagonal belt section 6 also runs
through the light red belt guide 12 of
the seat cushion on the side of the
vehicle seat buckle 10,
• the diagonal belt section 6 runs
through the dark red belt holder 7 of
the headrest,
• the diagonal belt section 6 runs
slanted towards the back.
• the straps are tightened and not
twisted,
• the vehicle seat buckle 10 does not
rest between the light red guide 12
and the armrest of the seat cushion.
• ensure that the child seat is not
located by the vehicle door or the
interior wall of the vehicle.
4. Care instructions
To retain the protective effect
• In an accident at a collision speed
above 10 km/h the child seat could
suffer damage which is not
necessarily obvious.
In such cases it is extremely
important that you replace the child
seat. Please dispose of it properly
(see 5).
• Regularly check all important parts
for damage. Ensure the correct
• la sangle diagonale 6 passe bien,
du côté du fermoir de ceinture du
véhicule 10, également dans le
guidage rouge clair 12 de l'assise,
• la sangle diagonale 6 passe bien
dans le support de ceinture rouge
foncé 7 de l'appui-tête,
• la sangle diagonale 6 se déplace en
diagonale vers l'arrière,
• les bretelles sont bien tendues et
pas torsadées,
• le fermoir de ceinture du
véhicule 10 ne se trouve pas entre
le guidage de ceinture rouge
clair 12 et l'accoudoir de l'assise.
• le siège enfant ne repose pas
contre la porte ou la paroi intérieure
du véhicule.
4. Consignes d’entretien
Pour conserver l’efficacité de
la protection
• En cas de collision à une vitesse
supérieure à 10 km/h, il est possible
que le siège auto soit endommagé,
les dégâts n’étant pas forcément
visibles.
Remplacez impérativement ce
siège auto. Veuillez éliminer
l‘ancien siège auto selon la
réglementation (voir 5).
• Contrôlez régulièrement l’état de
toutes les pièces importantes.
Page 16
100922_KIDplus_D-GB-F.fm Seite 14 Montag, 27. September 2010 2:13 14
Beschädigungen. Vergewissern Sie
sich, dass die mechanischen
Bauteile einwandfrei funktionieren.
• Achten Sie darauf, dass der AutoKindersitz nicht zwischen harten
Teilen (Fahrzeugtür, Sitzschiene
etc.) eingeklemmt und beschädigt
wird.
• Lassen Sie einen beschädigten
Auto-Kindersitz (z.B. nach einem
Sturz) unbedingt vom Hersteller
überprüfen.
4.1 Reinigung
Achten Sie darauf, dass Sie nur einen
Original-Britax/RÖMER-Ersatzbezug
einsetzen, da der Bezug einen
wesentlichen Teil der Systemfunktion
darstellt. Ersatz erhalten Sie im
Fachhandel oder bei einer ADACGeschäftsstelle.
Der Auto-Kindersitz darf nicht
ohne Bezug verwendet
werden.
•Den Bezug können Sie abziehen
und mit Feinwaschmittel im
Schonwaschgang bei 30°C in der
Waschmaschine waschen. Bitte
beachten Sie die Anleitung auf dem
Waschetikett des Bezuges. Wenn
Sie mit mehr als 30 °C waschen, ist
ein Ausfärben des Bezugs stoffes
möglich. Den Bezug nicht schleudern und auf keinen Fall im
elektrischen Wäschetrockner
trocknen (der Stoff kann sich von
der Polsterung lösen).
operation of all mechanical
components.
• To prevent damage or breakage,
ensure that the child seat does not
become jammed in the car door,
seat runners, etc.
• Should the child seat be damaged
(for example after dropping it) it
must be inspected by the
manufacturer.
4.1 Cleaning
Please be sure to use only original
Britax/RÖMER replacement seat
covers, as the seat cover is important
to the proper functioning of the
system. Replacement seat covers are
available from your retailer and or at
ADAC (German Motoring Club)
branches.
The child seat must not be
used without the seat cover.
•The cover can be removed and
washed with a mild detergent using
the washing machine's cycle for
delicate items (30 °C). Please
observe the instructions on the
washing label of the cover. The
colours of the cover may fade if
washed at more than 30 °C. Do not
spin, and never tumble dry in an
electric clothes dryer (the fabric
may separate from the padding).
Assurez-vous du bon
fonctionnement de toutes les pièces
mécaniques.
• Veillez à ce que le siège auto ne
soit pas coincé entre des objets
durs (porte du véhicule, glissière du
siège, etc.), ce qui risquerait de
l’endommager.
• Faites impérativement contrôler un
siège auto endommagé (par
exemple après une chute) par le
fabricant.
4.1 Nettoyage
Veillez à seulement utiliser une
housse de rechange Britax/RÖMER
car la housse représente un élément
fonctionnel essentiel du système. Les
housses de rechange sont disponibles
dans les magasins spécialisés ou
dans une filiale de l’ADAC (automobile
club allemand).
Le siège auto ne doit pas être
utilisé sans housse .
•La housse peut être enlevée et
lavée en machine à 30° avec une
lessive pour linge délicat.
Respectez les instructions de
lavage figurant sur l'étiquette de la
housse. Si vous lavez la housse à
des températures supérieures à
30°, le tissu risque de déteindre. Ne
pas essorer la housse et ne la
mettre en aucun cas dans le sèchelinge (le tissu risque de se décoller
du rembourrage).
14
Page 17
100922_KIDplus_D-GB-F.fm Seite 15 Montag, 27. September 2010 2:13 14
• Die Kunststoffteile können Sie mit
einer Seifenlösung abwaschen.
Keine scharfen Mittel (wie z.B.
Lösungsmittel) verwenden.
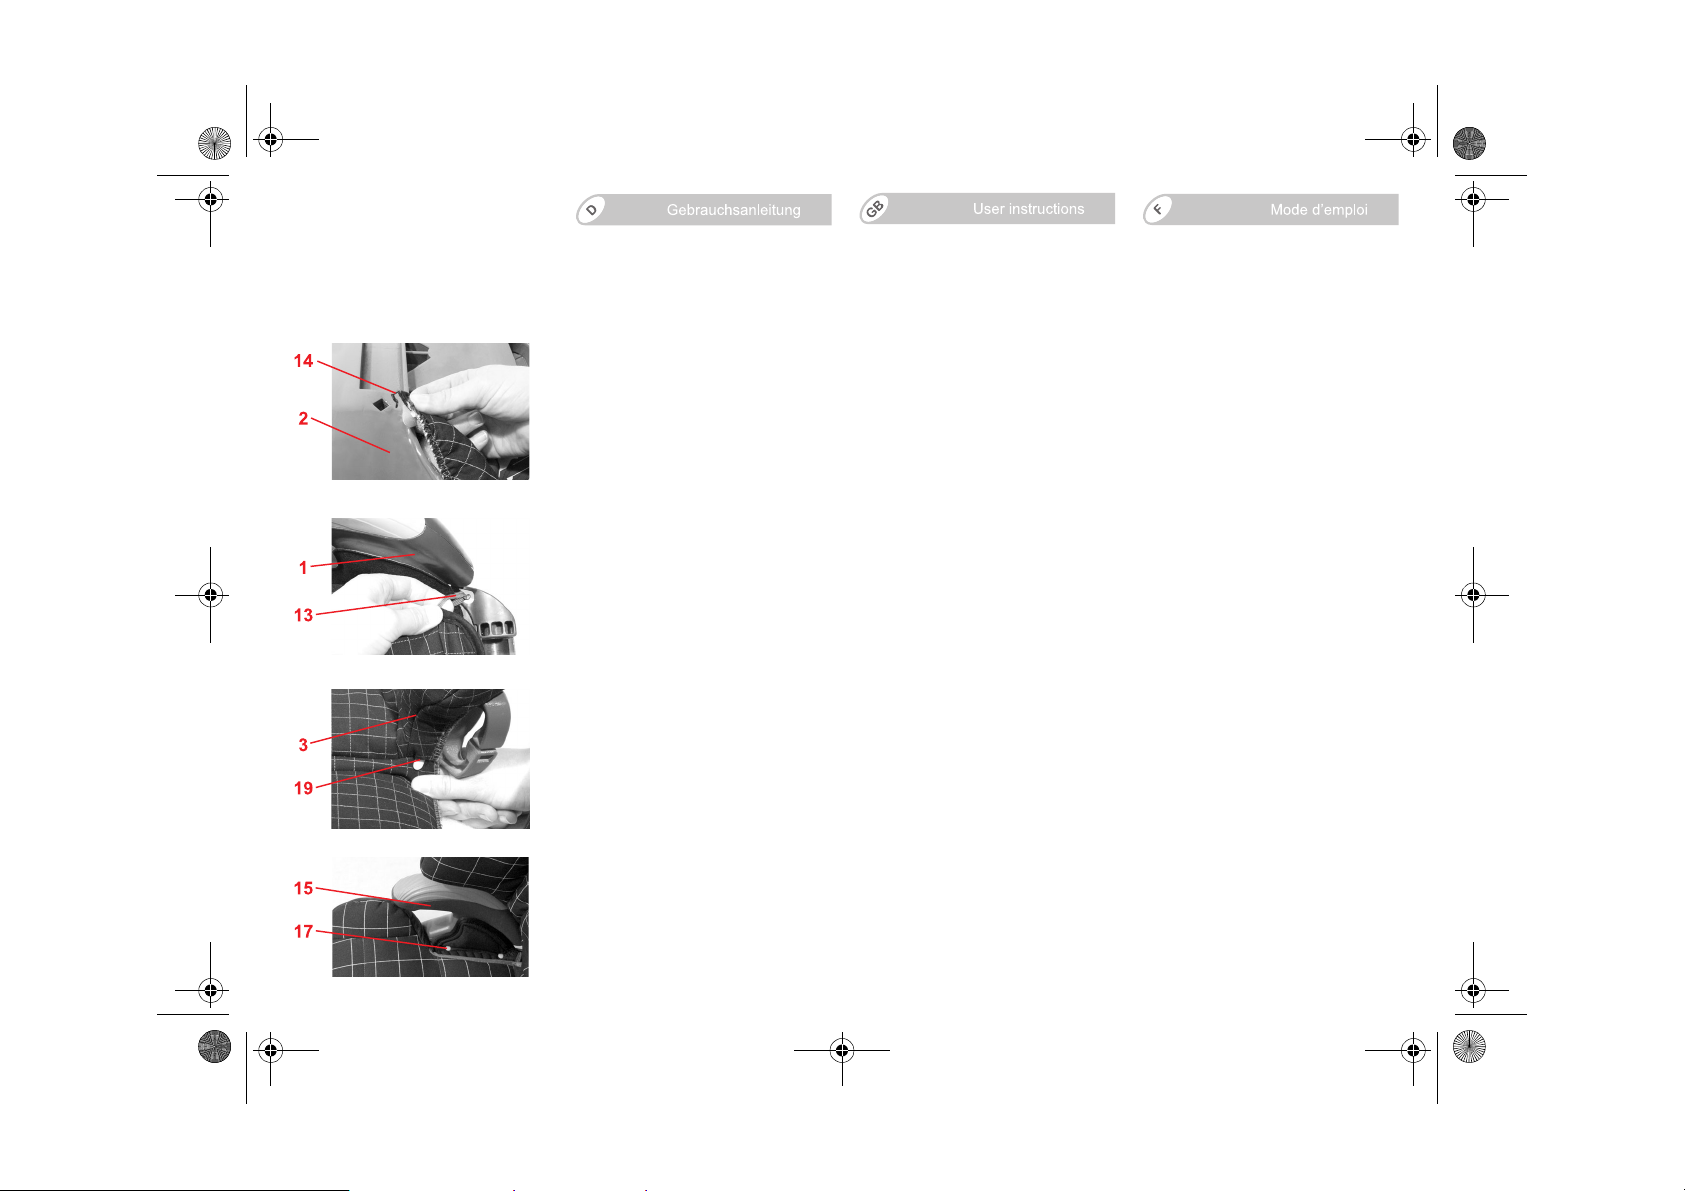
4.2 Abziehen des Bezuges
Þ Hängen Sie die Bezugshaken 14
der Rückenlehne 2 aus.
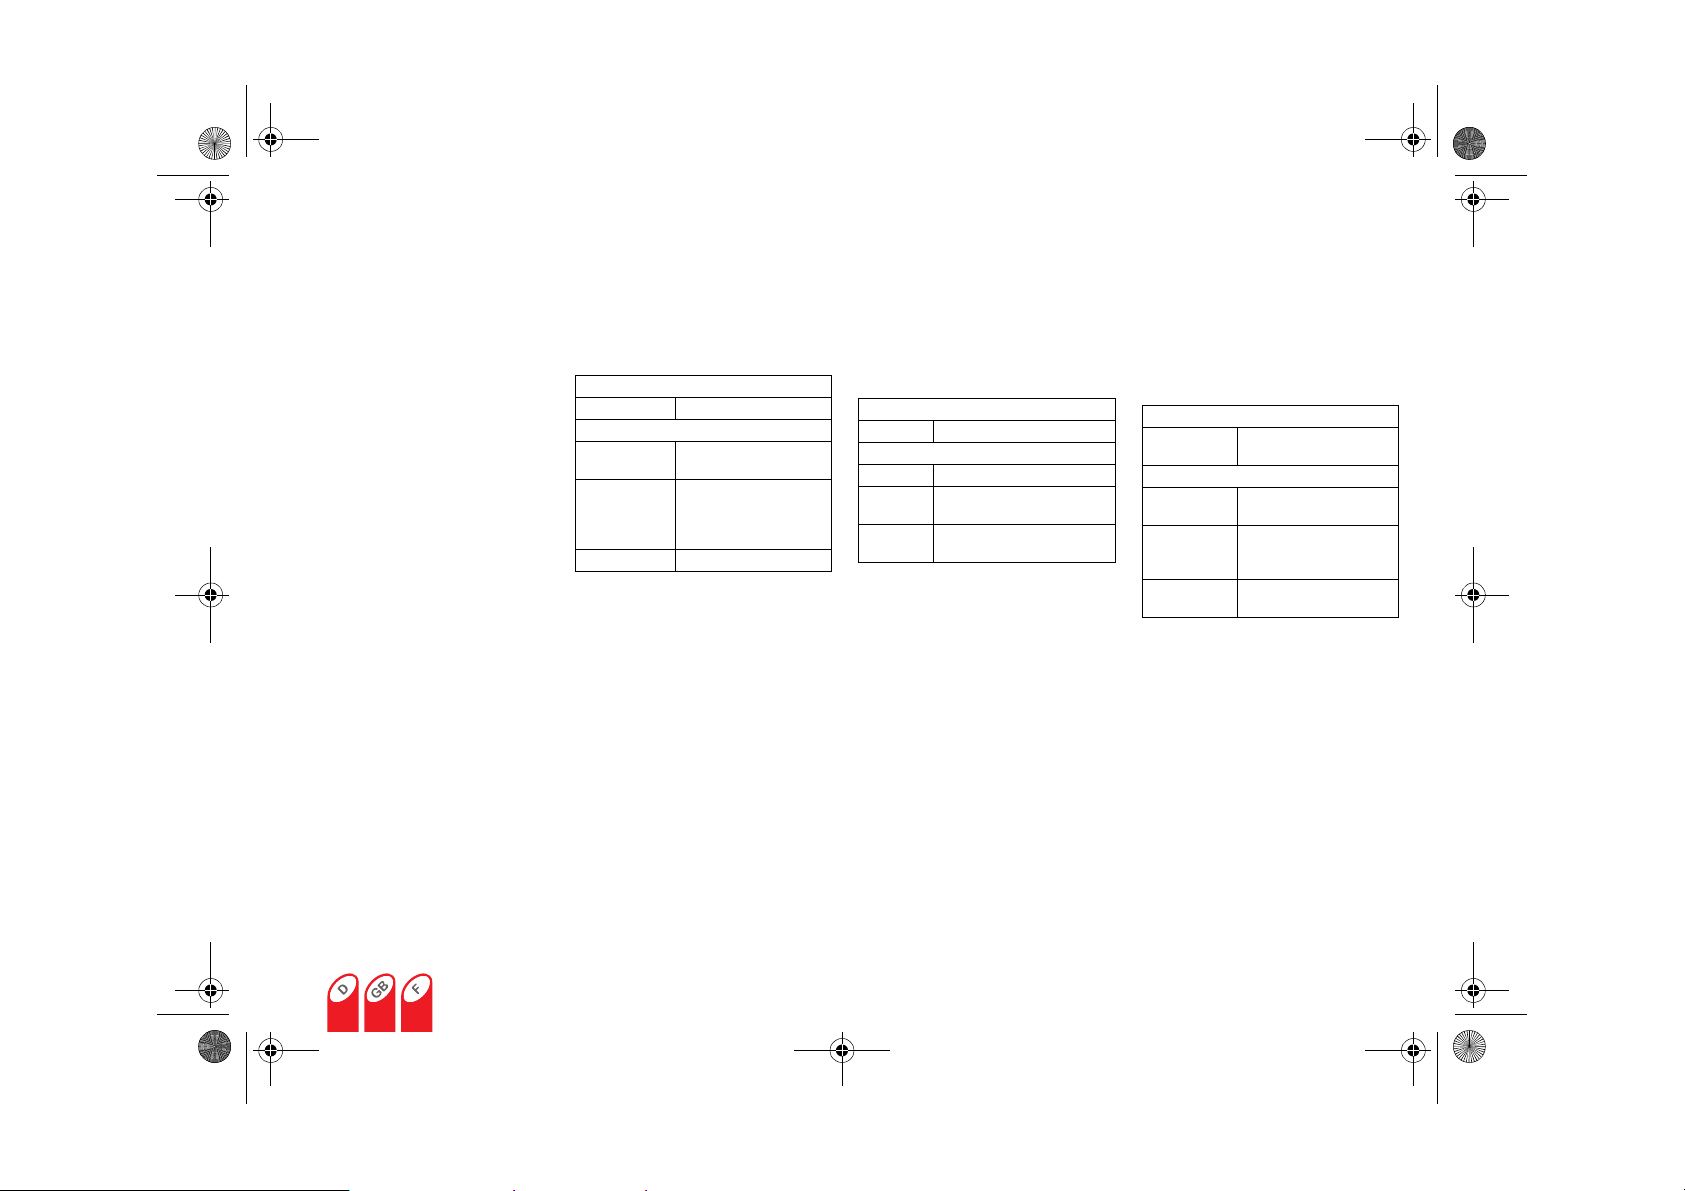
Þ Hängen Sie die
Gummischlaufen 13 des
Sitzkissens 1 aus.
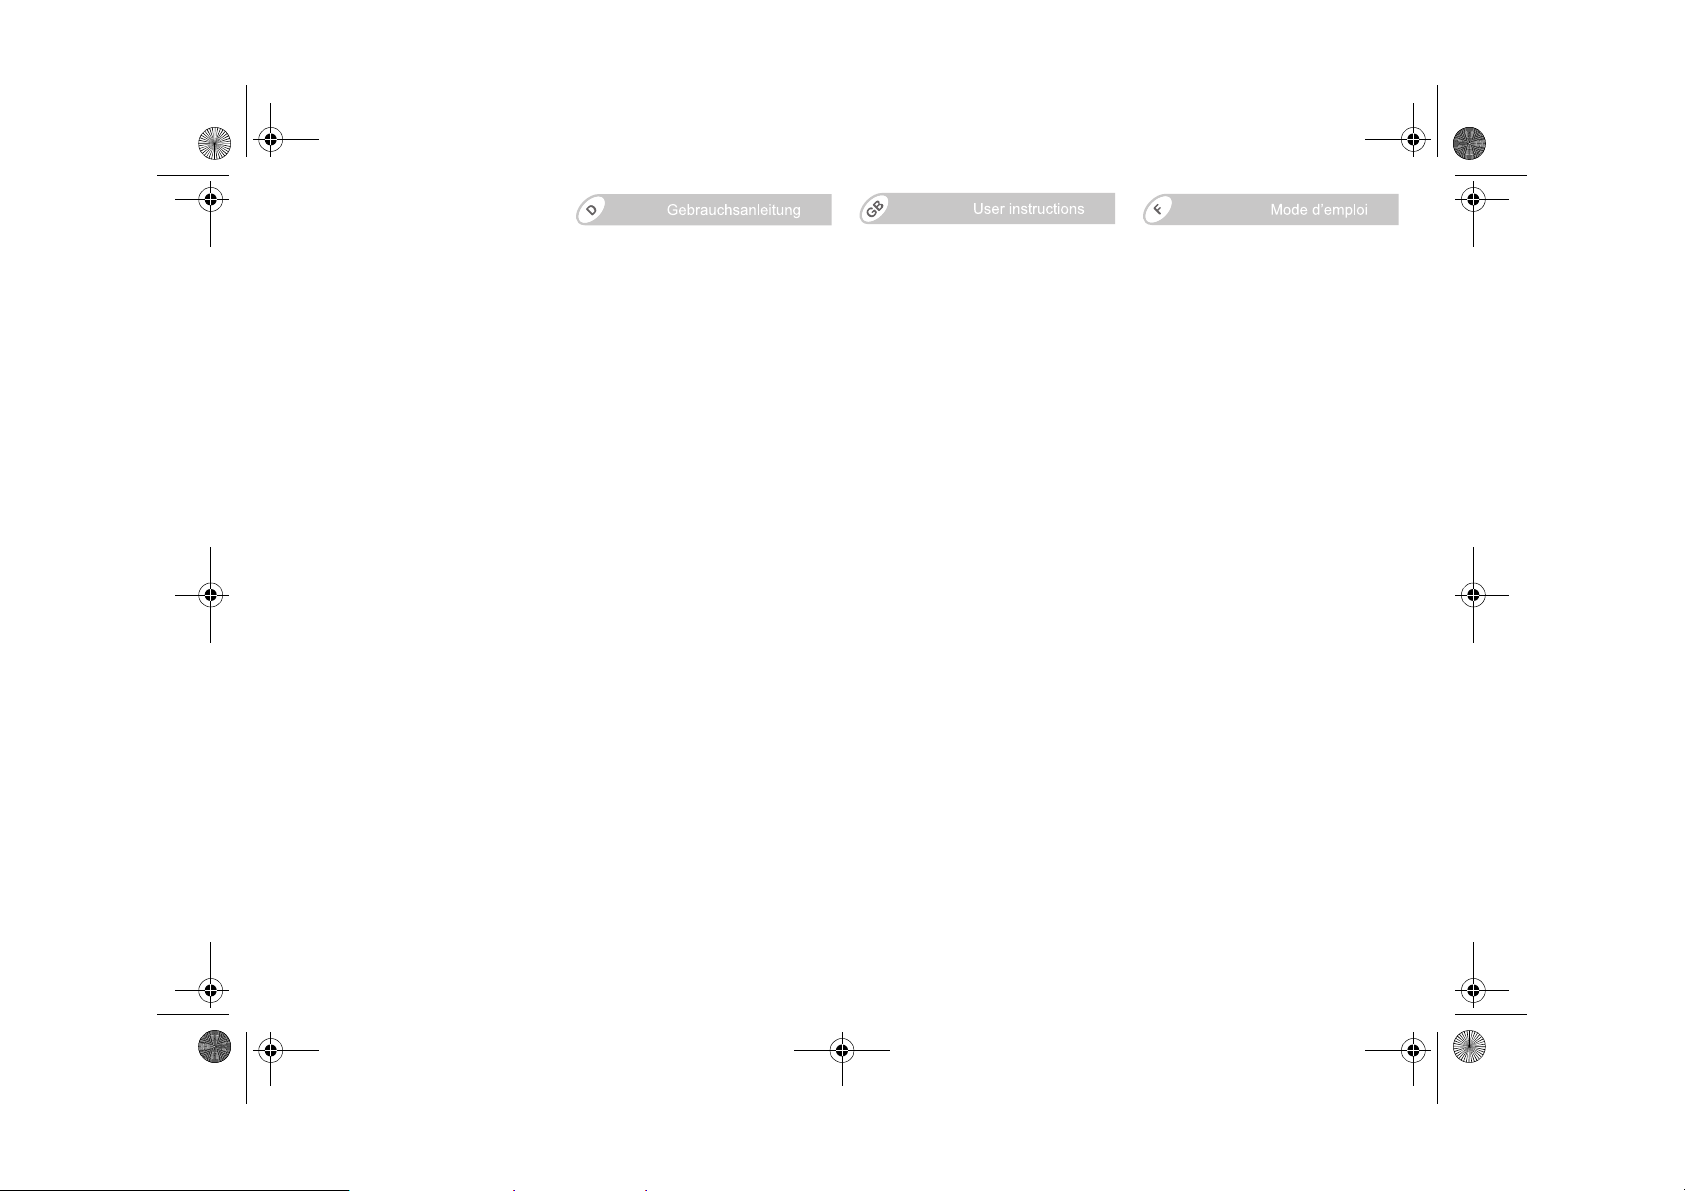
Þ Hängen Sie die Knopflöcher 19 der
Kopfstütze 3 aus.
•The plastic parts can be cleaned
using soapy water. Do not use
harsh cleaning agents (such as
solvents).
4.2 Removing the cover
Þ
Unhook the cover hook 14 of the
backrest 2.
Þ Unhook the elastic loops 13 of the
seat cushion 1.
Þ Unhook the buttonholes 19 of the
headrest 3.
• Vous pouvez laver les éléments en
matière plastique avec une eau
savonneuse. Ne pas utiliser de
détergents ou de produits corrosifs
(solvants par exemple).
4.2 Retrait de la housse
Þ Décrochez le crochet de housse 14
du dossier 2.
Þ Décrochez les boucles
élastiques 13 de l'assise 1.
Þ Défaites les boutonnières 19 de
l'appui-tête 3.
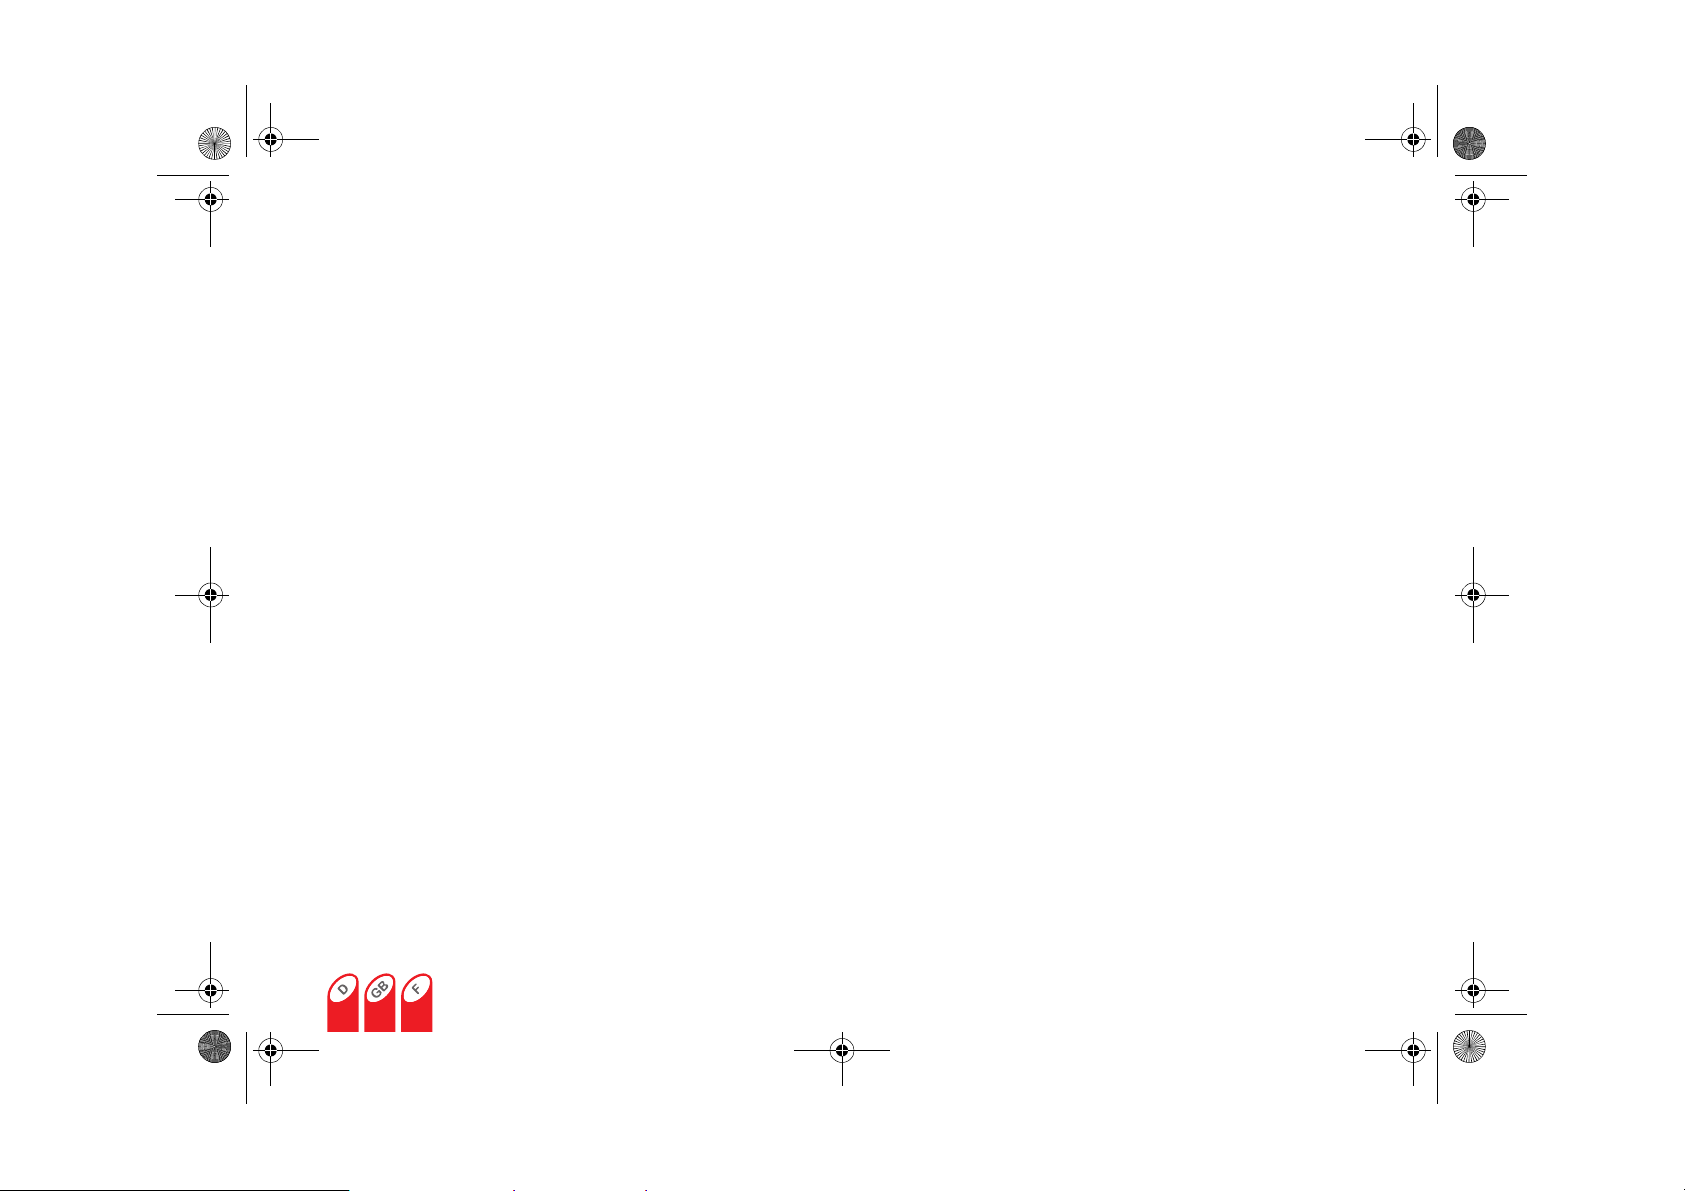
Þ Ziehen Sie die Stöpsel 17 aus dem
Bezug der Seitenteile 15.
Þ Nun können Sie den Bezug
abnehmen.
Þ Pull the stopper 17 out of the cover
of the wings 15.
Þ You can now pull the cover off.
Þ Désolidarisez les ergots 17 de la
housse des parties latérales 15.
Þ Maintenant vous pouvez retirer la
housse.
Page 18
100922_KIDplus_D-GB-F.fm Seite 16 Montag, 27. September 2010 2:13 14
4.3 Aufziehen des Bezuges
Þ Gehen Sie einfach in umgekehrter
Reihenfolge vor.
5. Hinweise zur Entsorgung
Bitte beachten Sie die
Entsorgungsbestimmungen Ihres
Landes.
Entsorgung der Verpackung
Container für Pappe
Entsorgung der Einzelteile
Bezug Restmüll, thermische
Kunststoffteile entsprechend
Metallteile Container für Metalle
Ver wer tung
Kennzeichnung in die
dafür vorgesehenen
Container
6. 2 Jahre Garantie
Für diesen Auto-/Fahrradkindersitz /
Kinderwagen leisten wir eine Garantie
für Fabrikations- oder Material-Fehler
von 2 Jahren. Die Garantiezeit beginnt
am Tage des Kaufes. Zum Nachweis
bewahren Sie bitte die ausgefüllte
Garantiekarte, den von Ihnen
unterzeichneten Übergabe-Check
sowie den Kaufbeleg für die Dauer der
Garantiezeit auf.
Bei Reklamationen ist der
Garantieschein dem Kindersitz
beizufügen. Die Garantie-leistung
beschränkt sich auf Auto-/
Fahrradkindersitze / Kinderwagen, die
sachgemäß behandelt wurden und die
in sauberem und ordentlichem
Zustand zurückgesandt werden.
4.3 Re-fitting the cover
Þ Simply proceed in the reverse
order.
5. Notes regarding
disposal
Please observe the waste disposal
regulations in your country.
Disposal of packaging
Container for paperboard
Disposal of components
cover garbage, thermal utilisation
plastic
parts
metal
parts
container corresponding to
the label on the part
container for metals
6. 2-year warranty
For this car/bicycle child seat /
pushchair we provide a 2-year
warranty against manufacturing or
material defects. The warranty period
is effective from the day of purchase.
As proof we ask that you fill out the
Warranty Card and retain it for the
whole term of the warranty period,
together with the Transfer Check
signed by you and your sales receipt.
In the case of a warranty claim, the
Warranty Card must be returned
together with the product. The
warranty covers only car/bicycle child
seats / pushchairs which have been
handled properly and which have
been sent to us in a clean condition.
16
4.3 Remise en place de la
housse
Þ Procédez simplement en sens
inverse.
5. Remarques relatives à
l’élimination
Veuillez respecter les directives en
vigueur dans votre pays.
Elimination de l’emballage
Conteneur pour le
carton
Elimination des pièces détachées
Housse Déchets résiduels,
Pièces en
matière
plastique
Pièces
métalliques
recyclage thermique
suivant le marquage,
dans le conteneur
spécialement prévu
Conteneur pour métaux
6. 2 ans de garantie
Pour ce siège auto / bicyclette /cette
poussette, nous accordons une garantie
de 2 ans pour les défauts de fabrication
ou de matériau. La garantie débute le
jour de l’achat. Pour apporter la preuve
de la garantie, veuillez conserver
pendant toute la durée de la garantie : la
carte de garantie remplie, le procèsverbal de remise que vous avez signé
ainsi que la facture d’achat.
Pour toute réclamation, la carte de
garantie doit être jointe au siège pour
enfants. La prestation de garantie est
limitée aux sièges auto / bicyclette /
poussettes qui ont été traités comme il
Page 19
100922_KIDplus_D-GB-F.fm Seite 17 Montag, 27. September 2010 2:13 14
Die Garantie erstreckt sich nicht
auf:
• natürliche Abnutzungserscheinungen und Schäden durch
übermäßige Beanspruchung
• Schäden durch ungeeignete oder
unsachgemäße Verwendung
Garantiefall oder nicht?
Stoffe: Alle unsere Stoffe erfüllen
hohe Anforderungen in Bezug auf
Farbbeständigkeit gegen UVStrahlung. Dennoch bleichen alle
Stoffe aus, wenn sie der UV-Strahlung
ausgesetzt sind. Hierbei handelt es
sich um keinen Material-Fehler,
sondern um normale
Verschleißerscheinungen, für die
keine Garantie übernommen wird.
Schloss: Sollten Funktionsstörungen
am Gurtschloss auftreten, so sind
diese meist auf Verunreinigungen
zurückzuführen, welche
ausgewaschen werden können. Bitte
halten Sie sich in der Vorgehensweise
an Ihre Gebrauchsanleitung.
Im Garantiefall wenden Sie sich bitte
unverzüglich an Ihren Fachhändler. Er
wird Ihnen mit Rat und Tat zur Seite
stehen. Bei der Bearbeitung von
Reklamationsansprüchen kommen
produktspezifische
Abschreibungssätze zur Anwendung.
Hier verweisen wir auf die beim
Händler ausliegenden Allgemeinen
Geschäftsbedingungen.
The Warranty does not cover:
• natural signs of wear and damage
resulting from excessive stress.
• damage resulting from
inappropriate or improper use.
What is covered by the warranty?
Fabrics: All our materials meet very
high requirements with regard to
colour fastness when exposed to UV
radiation. Nevertheless, all fabrics
fade when exposed to UV radiation.
This is not a material defect, but rather
a normal sign of wear which is not
covered by the warranty.
Buckle: Buckle malfunction is often
due to accumulations of dirt and dust
which may stop it from working
properly. If this happens, the buckle
can be washed out. Please refer to
your user instructions.
Please contact your retailer directly in
the event of a warranty claim. He or
she will give you the advice and
support you need. When processing
claims, product-specific depreciation
rates will be applied. Please refer to
our General Terms and Conditions
which are available from your retailer.
convient et qui sont renvoyés propres
et complets.
La garantie ne couvre pas les
défauts suivants :
• usure naturelle et dommages dus à
une sollicitation excessive
• dommages dus à une utilisation
inappropriée et non conforme
Cas de garantie ou non ?
tous nos tissus répondent aux
Tissus :
exigences élevées quant à la résistance
des couleurs aux rayons UV. Malgré
tout, les tissus se décolorent lorsqu’ils
sont soumis aux rayons UV. Dans ce
cas, il ne s’agit pas de défaut de
matériel mais d’une usure normale qui
n’est pas couverte par la garantie.
Fermoir : au cas où le fermoir
présenterait des dysfonctionnements,
ceux-ci sont souvent dus aux
encrassements qui peuvent être
enlevés par lavage. Veuillez vous
conformer aux instructions de votre
mode d’emploi.
En cas de garantie, veuillez vous
adresser immédiatement à votre
revendeur spécialisé. Il vous assistera
volontiers. Lors du traitement des
droits résultant de réclamations, les
taux d’amortissement spécifiques au
produit sont appliqués. Pour cela,
veuillez consulter nos conditions
générales de vente disponibles chez
le revendeur.
Page 20
100922_KIDplus_D-GB-F.fm Seite 18 Montag, 27. September 2010 2:13 14
Verwendung, Pflege und Wartung
Der Auto-/Fahrradkindersitz /
Kinderwagen muss entsprechend der
Gebrauchsanleitung behandelt
werden. Wir weisen ausdrücklich
darauf hin, dass nur Original-Zubehör
bzw. Ersatzteile verwendet werden
dürfen.
Use, care and maintenance
The car/bicycle child seat / pushchair
must be used in accordance with the
user instructions. We would like to
point out that it is extremely important
that only Britax/RÖMER accessories
and replacement parts are used.
Utilisation, entretien et
maintenance
Le siège auto / bicyclette / la
poussette doivent être traités
conformément au mode d’emploi.
Nous signalons expressément que
seuls les accessoires et les pièces de
rechange d’origine doivent être
utilisés.
18
Page 21

100922_KIDplus_D-GB-F.fm Seite 19 Montag, 27. September 2010 2:13 14
7. Garantiekarte / Übergabe-Check
Name: _____________________________________________
Adresse: _____________________________________________
Postleitzahl: _____________________________________________
Ort: _____________________________________________
Telefon (mit Vorwahl): _____________________________________________
E-Mail: _____________________________________________
_____________________________________________
Auto-/
Fahrradkindersitz /
Kinderwagen:
Artikel-Nummer: _____________________________________________
Stoff-Farbe (Dessin): _____________________________________________
Zubehör: _____________________________________________
Kaufdatum: ____________________________________________
Käufer (Unterschrift): ____________________________________________
_____________________________________________
Übergabe-Check:
1. Vollständigkeit { geprüft
2. Funktionsprüfung
- Verstellmechanismus
Sitz
- Gurtzeug-Verstellung { geprüft
3. Unversehrtheit
- Sitz überprüfen { geprüft
- Stoffteile überprüfen { geprüft
- Kunststoffteile
überprüfen
in Ordnung
{ geprüft
in Ordnung
in Ordnung
in Ordnung
in Ordnung
{ geprüft
in Ordnung
Händler Stempel
{ Ich habe den Auto-/
Fahrradkindersitz /
Kinderwagen geprüft und
mich vergewissert, dass der
Sitz komplett übergeben
wurde und dass alle
Funktionen vollständig
funktionieren.
{ Ich habe ausreichend
Informationen über das
Produkt und seine
Funktionen vor dem Kauf
erhalten und die Pflege- und
Wartungsanweisungen zur
Kenntnis genommen.
Händler: ____________________________________________
Page 22

100922_KIDplus_D-GB-F.fm Seite 20 Montag, 27. September 2010 2:13 14
7. Warranty Card / Transfer Check
Name: ____________________________________________
Address: ____________________________________________
Post Code: ____________________________________________
City/Town: ____________________________________________
Telephone No.
(including area code):
e-mail address: ____________________________________________
Car/bicycle child seat /
pushchair:
Article No.: ____________________________________________
Fabric colour (design): ____________________________________________
Accessories: ____________________________________________
Date of purchase: ____________________________________________
____________________________________________
____________________________________________
____________________________________________
Transfer Check:
1. Completeness { examined OK{ I have checked the child car/
2. Function test
- Seat adjustment
mechanism
- Harness adjustment { examined
3. Intactness
- Seat { examined
- Fabrics { examined
- Plastic parts { examined
{ examined
OK
OK
OK
OK
OK
bicycle seat / pushchair and
am sure that the seat was
complete on delivery and that
all functions are sound.
{ I received adequate
information on the product
and its functions prior to
purchase and have noted the
care and maintenance
instructions.
Buyer (signature): ____________________________________________
Retailer: ____________________________________________
Retailer's stamp
Page 23

100922_KIDplus_D-GB-F.fm Seite 21 Montag, 27. September 2010 2:13 14
7. Carte de garantie / Procès-verbal de remise
Nom : ________________________________________________
Adresse : ________________________________________________
Code postal : ________________________________________________
Lieu : ________________________________________________
Téléphone (avec
préfixe) :
E-Mail : ________________________________________________
Siège auto /
bicyclette /
poussette :
Référence : ________________________________________________
Couleur du tissu
(dessin) :
Accessoires : ________________________________________________
Date de l’achat : ________________________________________________
________________________________________________
________________________________________________
________________________________________________
________________________________________________
Procès-verbal de remise :
1. Intégralité { contrôlé
2. Contrôle
fonctionnel
- Mécanisme de
réglage siège
- Réglage des sangles { contrôlé
3. Absence de
dommages
- Contrôle du siège { contrôlé
- Contrôle des
éléments textiles
- Contrôle des pièces
en matière plastique
en ordre
{ contrôlé
en ordre
en ordre
en ordre
{ contrôlé
en ordre
{ contrôlé
en ordre
{ J’ai contrôlé le siège auto /
bicyclette / la poussette et vérifié
qu’ils ont été remis en bon état
et complet, et que toutes les
fonctions sont parfaitement
opérationnelles.
{ J’ai reçu des informations
suffisantes concernant le produit
et ses fonctions avant l’achat, et
j’ai pris connaissance des
instructions d’entretien et de
maintenance.
Acheteur
(signature) :
Revendeur : ________________________________________________
________________________________________________
Cachet du revendeur
Page 24

100922_KIDplus_E-P-I.fm Seite 1 Montag, 27. September 2010 2:14 14
KID plus SICT
Instrucciones de uso
Nos alegramos de que nuestro
SICT
pueda acompañar a su hijo a
través de una nueva etapa de su vida.
Para poder proteger bien a su bebé,
es imprescindible instalar y utilizar
el KID plus SICT tal y como se
indica en estas instrucciones.
Para más información, póngase en
contacto con nosotros.
BRITAX RÖMER
Kindersicherheit GmbH
Britax Excelsior Ltd.
Contenido
1. Idoneidad ........................................ 2
2. Utilización en el vehículo ..............3
3. Sujeción del niño en el vehículo ... 4
3.1 Fijar el respaldo ....................... 6
3.2 Regulación de la anchura del
cojín del asiento .......................7
3.3 Regulación en altura del
reposacabezas......................... 8
3.4 Posición de reposo del
respaldo ................................... 9
3.5 Abrochar el cinturón al niño...10
3.6 Protección perfecta del niño .. 12
4. Instrucciones de
mantenimiento .............................13
4.1 Limpieza.................................14
4.2 Extracción de la funda ...........15
4.3 Colocación de la funda ..........16
5. Instrucciones sobre la eliminación
de los componentes ....................16
6. Dos años de garantía................... 16
7. Tarjeta de garantía / Control de
entrega .......................................... 19
KID plus
Manual de instruções
Congratulamo-nos pelo nosso
KID plus SICT acompanhar a sua
criança numa nova fase da vida.
Para poder proteger correctamente
a sua criança, o KID plus SICT tem
de ser utilizado e montado da forma
que é descrita neste manual.
Caso tenha dúvidas, consulte-nos.
BRITAX RÖMER
Kindersicherheit GmbH
Britax Excelsior Ltd.
Índice
1. Aptidão............................................2
2. Utilização no veículo......................3
3. Segurança da sua criança no
automóvel .......................................4
3.1 Fixação dos encostos ..............6
3.2 Ajuste em largura da
almofada do assento................7
3.3 Ajuste em altura do apoio
para a cabeça .......................... 8
3.4 Posição de repouso do
encosto ....................................9
3.5 Pôr o cinto de segurança
na sua criança........................ 10
3.6 Assim a sua criança está
correctamente protegida ........12
4. Instruções de conservação......... 13
4.1 Limpeza ................................. 14
4.2 Remoção do revestimento .....15
4.3 Colocação do revestimento ... 16
5. Indicações sobre a eliminação ...16
6. Garantia de 2 anos .......................16
7. Certificado de garantia /
verificação de transferência........20
Istruzioni per l'uso
Siamo lieti che il nostro KID plus SICT
possa accompagnare in modo sicuro il
vostro bambino durante un nuovo
periodo della sua vita.
Per garantire una corretta protezione
del vostro bambino,
deve necessariamente essere
utilizzato e installato come descritto
nelle presenti istruzioni
In caso di ulteriori domande in merito
all’utilizzo, non esitate a contattarci.
BRITAX RÖMER Kindersicherheit GmbH
Britax Excelsior Ltd.
Indice
1. Idoneità ...........................................2
2. Utilizzo in auto................................3
3. Sicurezza del vostro bambino
in auto .............................................4
3.1 Fissaggio dello schienale.........6
3.2 Regolazione in larghezza del
cuscino di seduta .....................7
3.3 Regolazione in altezza del
poggiatesta...............................8
3.4 Posizione di riposo dello
schienale ..................................9
3.5 Allacciamento del vostro
bambino ................................. 10
3.6 Corretto posizionamento del
vostro bambino.......................12
4. Istruzioni di manipolazione.........13
4.1 Pulizia..................................... 14
4.2 Rimozione del rivestimento ....15
4.3 Applicazione del rivestimento.. 16
5. Avvertenze per lo smaltimento...16
6. Garanzia di 2 anni ........................16
7. Cartolina di garanzia/ricevuta
del controllo alla consegna.........21
KID plus SICT
.
1
Page 25

100922_KIDplus_E-P-I.fm Seite 2 Montag, 27. September 2010 2:14 14
1. Idoneidad
Autorización
Asiento
infantil
Britax/
RÖMER
KID plus
SICT
*ECE = Norma europea para equipos de
seguridad
• El asiento infantil para vehículos ha
sido diseñado, probado y autorizado
conforme a las exigencias de la
norma europea para dispositivos de
seguridad para niños (ECE R 44/04).
El distintivo de control E (en un
círculo) y el número de autorización
se encuentran en la etiqueta de
autorización (pegatina sobre el
asiento infantil).
•El KID plus SICT plus ha sido
probado y autorizado como
combinación de cojín de asiento y
respaldo.
¡Cuidado! Ninguno de estos dos
componentes puede utilizarse en
combinación con otros asientos o
respaldos.
• La autorización deja de ser válida en
el momento en que se realice alguna
modificación en el asiento infantil.
Las modificaciones debe efectuarlas
exclusivamente el fabricante.
•El KID plus SICT sólo se debe
utilizar para la seguridad de su hijo
en el vehículo. En ningún caso es
adecuado como asiento o juguete
en casa.
Control y autorización
conforme a ECE* R 44/04
Grupo Peso corporal
ll+lll de 15 a 36 kg
1. Aptidão
Autorização
Cadeira de
criança para
automóvel
Britax/RÖMER
KID plus
SICT
*ECE = Norma europeia sobre equipamento de
segurança
• A cadeira de criança para automóvel
está equipada, verificada e
homologada de acordo com os
requisitos da norma europeia sobre
dispositivos de segurança para
crianças (ECE R 44/04). O
certificado de verificação E (num
circulo) e o número de homologação
encontram-se na etiqueta de
homologação (autocolante na
cadeira de criança para automóvel).
•O KID plus SICT está verificado e
homologado como combinação de
almofadas de assento e encosto.
Cuidado! Nenhuma das peças deve
ser utilizada com outras almofadas
de assento ou encosto.
• A homologação extingue-se logo
que a cadeira de criança para
automóvel sofra alterações. As
alterações devem ser efectuadas
exclusivamente pelo fabricante.
•O KID plus SICT deve ser utilizado
exclusivamente para a segurança
da sua criança dentro do veículo.
Não é, em circunstância alguma,
apropriado como assento ou como
brinquedo dentro de casa.
Verificação e
autorização conforme
ECE* R 44/04
Grupo Peso
ll+lll 15 a 36 kg
1. Idoneità
Omologazione
Seggiolino
da auto
Britax/
RÖMER
KID plus
SICT
*ECE = Normativa europea per le dotazioni di
sicurezza
• Il seggiolino da auto è progettato,
collaudato e omologato
conformemente ai requisiti della
normativa europea per i dispositivi
di sicurezza per bambini (ECE R
44/04). Il marchio di collaudo E
(all’interno di un cerchio) e il
numero di omologazione sono
indicati sull'etichetta di
omologazione (adesivo presente
sul seggiolino da auto).
• KID plus SICT è stato collaudato e
omologato relativamente alla
combinazione cuscino di seduta/
schienale.
Attenzione! Nessuno dei due
componenti deve essere utilizzato in
combinazione con altri cuscini di
seduta o altri schienali.
• L’omologazione decade non appena
vengono apportate modifiche al
seggiolino da auto. Le modifiche
possono essere apportate
esclusivamente dal produttore.
•Il KID plus SICT deve essere
utilizzato esclusivamente per la
sicurezza del bambino in auto. Non
è adatto in nessun caso come
seggiolino da casa o giocattolo.
Collaudo e omologazione
a norma ECE* R 44/04
Gruppo Peso corporeo
ll+lll da 15 a 36 kg
Page 26

100922_KIDplus_E-P-I.fm Seite 3 Montag, 27. September 2010 2:14 14
2. Utilización en el vehículo
¡Peligro! Si su niño se sujeta al
asiento infantil con un cinturón
de tan sólo 2 puntos, un
accidente puede causarle
lesiones graves o incluso la
muerte.
No lo utilice nunca en
combina-ción con un
cinturón de 2 puntos.
2. Utilização no veículo
Perigo! Se a criança estiver
segura na cadeira de criança
apenas com um cinto de 2
pontos de fixação, em caso de
acidente, ela pode ficar
gravemente ferida e até mesmo
morrer.
Nunca utilizar em conjunto
com um cinto de 2 pontos de
fixação!
Usos permitidos del asiento
infantil:
en el sentido de la circulación sí
en sentido contrario a la
circulación
con cinturón de dos puntos no
no 1)
con cinturón de tres puntos 2) sí
Pode utilizar a sua cadeira de
criança para automóvel:
no sentido da marcha do veículo sim
no sentido contrário ao da
marcha
com cinto de 2 pontos de fixação não
com cinto de 3 pontos de fixação 2)sim
não 1)
en el asiento del copiloto sí 3)
en asientos posteriores laterales sí
en el asiento posterior central
sí 4)
(con cinturón de 3 puntos)
(Consulte las regulaciones vigentes
en su país)
1) Su utilización está permitida en un asiento
del vehículo orientado en sentido contrario a la
marcha (p.ej. vehículo comercial tipo Van,
minibus), que también está homologado para el
transporte de adultos. El asiento no puede tener
airbag.
2) El cinturón debe estar homologado conforme
a la norma ECE R 16 (u otra similar), que se
indica, por ejemplo, mediante el símbolo ”E”, ”e”
rodeado por un círculo en la etiqueta de
homologación del cinturón.
3) con airbag frontal: retírelo a la mayor
distancia posible y observe las indicaciones del
manual del vehículo.
4) El uso no es posible si se dispone tan sólo de
cinturón de 2 puntos.
no assento do passageiro sim 3)
nos bancos traseiros laterais sim
no assento traseiro do meio
sim 4)
(com cinto de 3 pontos de
fixação)
(Preste atenção às prescrições do seu
país)
1) A utilização só é permitida num assento do
veículo virado para trás (p.ex. van, minibus) que
também esteja autorizado para o transporte de
adultos. Nesse lugar não deve estar activo
qualquer airbag.
2) O cinto tem de estar homologado conforme
ECE R 16 (ou norma semelhante) p.ex.
reconhecido no "E" em redor, "e" na etiqueta de
verificação no cinto.
3) no caso de airbag frontal: deslocar o mais
para trás possível, event. seguir indicações no
manual de instruções do veículo.
4) A utilização não é possível quando existir
apenas um cinto de 2 pontos de fixação.
2. Utilizzo in auto
Pericolo! Se il vostro bambino
viene assicurato nel seggiolino
solamente mediante una
cintura a 2 punti, in caso di
incidente potrebbe riportare
lesioni gravi o potrebbe
esserne causato il decesso.
Non utilizzate mai in
combina-zione con una
cintura a 2 punti!
Potete utilizzare il seggiolino da
auto come riportato di seguito:
in direzione di marcia sì
in senso opposto alla direzione
di marcia
con cintura a 2 punti no
con cintura a 3 punti 2) sì
sul sedile del passeggero sì 3)
su sedili posteriori esterni sì
sul sedile posteriore centrale
(con cintura a 3 punti)
(Attenetevi alle disposizioni del vostro
paese)
1) L'utilizzo è consentito solamente su un sedile
dell'auto rivolto all'indietro (ad es. van, minibus),
che è omologato anche per il trasporto di adulti.
Nessun airbag deve essere attivo sul sedile.
2) La cintura deve essere omologata a norma
ECE R 16 (o norma comparabile), riconoscibile
ad es. dalla “E”, “e” contornata sull’etichetta di
collaudo presente sulla cintura.
3) In caso di airbag frontale: spostate
ampiamente all'indietro, eventualmente
attenetevi alla indicazioni riportate nel manuale
dell'automobile.
4) L’utilizzo non è possibile, se è presente
solamente una cintura a 2 punti.
no 1)
sì 4)
3
Page 27

100922_KIDplus_E-P-I.fm Seite 4 Montag, 27. September 2010 2:14 14
3. Sujeción del niño en el
vehículo
Para la protección del niño
• Principalmente es válido: que
cuanto más se fije el cinturón de
seguridad al niño, mayor es la
seguridad.
• Nunca deje al bebé en el asiento
sin vigilancia.
• Uso en el asiento posterior:
Coloque el asiento delantero tan
adelantado que el niño no pueda
tocar con los pies el respaldo del
asiento delantero (peligro de
lesiones).
• Las piezas de plástico del asiento
infantil se calientan cuando se
exponen al sol.
¡Cuidado! El niño podría quemarse
si las toca. Por ello, es
recomendable proteger el asiento
infantil de una irradiación solar
intensa si no se está utilizando.
• Sólo permita que su hijo suba y
baje por el lado de la acera.
• Haga más cómodos los viajes
largos mediante pausas en las que
su niño disfrute de libertad de
movimientos.
• Tenga en cuenta que el asiento
infantil no debe colocarse junto a la
puerta del vehículo ni junto a la
ventana interior de éste. Un
consejo: Entre el asiento infantil y
la puerta del vehículo y/o la ventana
interior del vehículo debe haber
siempre un hueco.
3. Segurança da sua
criança no automóvel
Para a protecção da sua
criança
• É válido fundamentalmente: Quanto
mais justo o cinto de segurança
estiver ao corpo da sua criança,
tanto maior será a segurança.
• Nunca deixe a sua criança sem
vigilância na cadeira de criança
para automóvel.
• Utilização no banco traseiro:
Coloque o assento dianteiro o mais
para a frente possível de forma que
a criança não bata com os pés no
encosto traseiro do assento
dianteiro (perigo de ferimentos).
• As peças em material sintético da
cadeira de criança aquecem
quando expostas ao sol.
Cuidado! A sua criança pode, por
isso, queimar-se. Proteja o assento
de criança, quando não estiver a
ser utilizado, de exposição solar
intensa.
• Deixe a sua criança entrar e sair
apenas pelo lado do passeio.
• Faça pausas em grandes viagens
em que a sua criança possa
exercitar os seus movimentos.
• Certifique-se de que o assento para
criança não está encostado à porta
do veículo ou ao painel interior do
veículo. Dica! Deve existir um
espaço entre o assento para
criança e a porta do veículo ou
painel interior do veículo.
3. Sicurezza del vostro
bambino in auto
Per la protezione del vostro
bambino
• In linea di massima vale quanto
indicato di seguito: quanto più la
cintura aderisce al corpo del
bambino, tanto maggiore è la
sicurezza.
• Non lasciate mai incustodito il
vostro bambino dopo averlo
sistemato nel seggiolino in auto.
• Utilizzo sul sedile posteriore:
posizionate il sedile anteriore il più
possibile in avanti fino a quando il
vostro bambino con i piedi non
tocca lo schienale del sedile
anteriore (pericolo di lesione).
• Le parti in plastica del seggiolino si
surriscaldano, se esposte al sole.
Attenzione! In caso di contatto, il
bambino può scottarsi. Proteggete il
seggiolino, se non viene utilizzato al
momento, da radiazioni solari
intense.
• Fate salire e scendere il bambino
solamente dal lato di accesso.
• Alleggerite i viaggi prolungati con
pause, durante le quali il vostro
bambino può assecondare lo
stimolo di muoversi.
• Fare in modo che il seggiolino non
appoggi alla portiera o alla parete
interna del veicolo. Consiglio! Tra il
seggiolino e la portiera o la parete
interna del veicolo deve esserci
spazio libero.
Page 28

100922_KIDplus_E-P-I.fm Seite 5 Montag, 27. September 2010 2:14 14
Para mayor protección de
todos los ocupantes del
vehículo
En caso de frenada de emergencia o
accidente, los objetos y las personas
que no estén asegurados pueden
lesionar a otros ocupantes. Por ello, es
recomendable que se asegure de que:
• los respaldos de los asientos del
vehículo estén fijados (p. ej.:
bloquee el asiento trasero abatible).
• todos los objetos pesados o de
bordes afilados que vayan en el
vehículo estén bien sujetos (p. ej.
en la percha).
• todos los ocupantes lleven
abrochado el cinturón de seguridad.
• el asiento infantil esté siempre bien
fijado, aunque no esté ocupado.
• no coloque el Air Cushion 27 junto a
la puerta ni junto a la ventana
interior del vehículo.
Para mayor protección de su vehículo
• En las tapicerías de los vehículos
hechas con materiales delicados (p. ej.
terciopelo, piel, etc.), el uso de asientos
infantiles puede dejar marcas. Para
evitarlo, puede colocar debajo del
asiento una manta, un pañuelo, etc.
Para la protección durante la
manipulación del asiento
infantil
• El asiento infantil nunca se debe
utilizar como asiento aislado fuera
del vehículo, ni siquiera para
probarlo.
Para a protecção de todos os
ocupantes do veículo
Em caso de uma travagem de
emergência ou em caso de acidente
objectos não seguros e pessoas
podem ferir outros ocupantes. Por
isso, preste sempre atenção para que
• os encostos do assento do condutor
estejam fixos (p.ex. encaixar encosto
do banco dobrável).
• no veículo (p.ex. na chapeleira)
todos os objectos pesados ou de
arestas afiadas estejam seguros.
• todas as pessoas tenham o cinto de
segurança colocado.
• a cadeira para crianças esteja sempre
fixa no automóvel, mesmo quando
não transporte nenhuma criança.
• a Air Cushion 27 não pode estar
encostada à porta do veículo ou ao
painel interior do veículo.
Para protecção do seu automóvel
• Em alguns revestimentos dos
assentos em material delicado
(p.ex. veludo, pele, etc) podem
aparecer vestígios de utilização
devido às cadeiras para crianças.
Para evitar isso, pode colocar p.ex.
uma cobertura ou uma toalha.
Para a protecção no
manuseamento da cadeira de
criança
• A cadeira de criança não pode ser
utilizada sem se encontrar apoiada
– nem mesmo como experiência.
Cuidado! O encosto 2 pode dobrar
Per la protezione di tutti i
passeggeri
In caso di frenata brusca o di
incidente, gli oggetti non fissati o le
persone non allacciate possono ferire
gli altri passeggeri. Fate pertanto
sempre attenzione a che...
• gli schienali dei sedili dell’auto siano
bloccati (ad es. fate scattare in
posizione i sedili posteriori ribaltabili);
• tutti gli oggetti pesanti o con spigoli
vivi presenti in auto (ad es. sul
ripiano posteriore) siano fissati;
• tutte le persone presenti all’interno
dell’auto siano allacciate;
• il seggiolino da auto sia sempre
fissato all’interno dell’auto, anche se
non viene trasportato alcun bambino;
• l’Air Cushion 27 non appoggi alla
portiera o alla parete interna del veicolo.
Per la protezione della vostra
automobile
• A causa dell’uso di seggiolini da
auto, alcuni rivestimenti in materiale
delicato dei sedili (ad es. velluto,
pelle, ecc.) possono mostrare
tracce di usura. Per evitare questo
inconveniente, potete mettere sotto
i seggiolini ad es. una coperta o un
asciugamano.
Per l'impiego sicuro del
seggiolino
• Il seggiolino non deve mai essere
utilizzato in posizione libera –
nemmeno per una seduta di prova.
Attenzione! Lo schienale 2 non
5
Page 29

100922_KIDplus_E-P-I.fm Seite 6 Montag, 27. September 2010 2:14 14
¡Cuidado! El respaldo 2 se puede
volcar hacia atrás. Coloque siempre
el asiento infantil en el asiento del
vehículo antes de que el niño se
siente.
• El Air Cushion 27 no debe
someterse a ninguna carga.
• El asiento infantil no debe colocarse
encima del 27 Air Cushion.
• El Air Cushion 27 no debe utilizarse
como asa.
3.1 Fijar el respaldo
El asiento infantil cuenta con un cojín
de asiento 1 y un respaldo 2 con un
reposacabezas regulable 3. La
combinación le ofrece a su hijo la
protección y confort deseados.
Disponga al mismo nivel el
respaldo 2 tras el cojín del
asiento 1.
Pliegue la tapa protectora de la
articulación 18 hacia arriba.
Desplace el eje articulado 4 del
respaldo 2 lo más lejos posible por
la guía 5 del cojín del asiento 1.
Desplace la tapa protectora de la
articulación 18 por debajo de la
funda del cojín del asiento 1, de
manera que se apoye sobre la
superficie de plástico.
para trás. Em primeiro lugar,
coloque a cadeira de criança no
assento do veículo antes de sentar
a sua criança.
• A Air Cushion 27 não pode ser
sobrecarregada.
• O assento para criança não pode
ser colocado sobre a
Air Cushion 27.
• A Air Cushion 27 não pode ser
utilizada como pega de transporte.
3.1 Fixação dos encostos
A cadeira de criança é composta por
uma almofada de assento 1 e um
encosto 2 com um apoio regulável de
cabeça 3. A combinação oferece à
sua criança a protecção e o conforto
desejados.
Coloque o encosto 2 de forma
plana atrás da almofada do
assento 1.
Dobre a cobertura da união
articulada 18 para cima.
Desloque o eixo da união
articulada 4 do encosto 2 o mais
possível para a guia 5 na almofada
do assento 1.
Mova a cobertura da união
articulada 18 para baixo do
revestimento da almofada do
assento 1, de forma que assente na
superfície de plástico.
può essere inclinato all’indietro.
Collocate sempre il seggiolino sul
sedile dell’auto, prima di far sedere
il bambino.
• Non comprimere l'Air Cushion 27.
• Non collocare il seggiolino
sull'Air Cushion 27.
• Non utilizzare l'Air Cushion 27 come
maniglione di trasporto.
3.1 Fissaggio dello
schienale
Il seggiolino è composto da un cuscinio
di seduta 1 e da uno schienale 2 con
poggiatesta regolabile 3. Questa
combinazione offre al vostro bambino la
protezione e il comfort desiderati.
Distendete lo schienale 2 dietro il
cuscino di seduta 1.
Piegate verso l'alto la copertura
dello snodo 18.
Spingete il più possibile l'asse di
snodo 4 dello schienale 2 nella
guida 5 del cuscino di seduta 1.
Spingete la copertura dello
snodo 18 il più possibile sotto il
rivestimento del cuscino di
seduta 1, in modo tale da farla
poggiare sulla superficie in plastica.
Page 30

100922_KIDplus_E-P-I.fm Seite 7 Montag, 27. September 2010 2:14 14
¡Peligro! Al elevar el
respaldo 2 no puede haber
nada en la zona del eje
articulado 4 entre el respaldo 2
y el cojín del asiento 1.
¡Cuidado! Usted o su hijo se podrían,
p. ej., pillar y herir los dedos.
Mueva el respaldo 2 hacia arriba,
hasta que encaje.
3.2 Regulación de la anchura
del cojín del asiento
Un cojín de asiento adaptado
correctamente 1 garantiza la
disposición óptima del cinturón de
pelvis 11, y con ello aumenta la
protección de su niño. Puede ajustar
las piezas laterales 15 del cojín del
asiento 1 en tres anchuras.
• El cojín del asiento 1 debe
ajustarse de forma tal que las
piezas laterales ajustables 15 estén
lo más cercanas posible a la cintura
de su niño sin apretarle.
De esta forma puede ajustar la
anchura del cojín del asiento 1 al
tamaño de su hijo:
Sujete por ambos lados de la parte
exterior de las piezas laterales 15
por los botones de regulación de
color gris claro 16.
Presione ambos botones de
regulación 16 hacia arriba y tire de
las piezas laterales 15 hasta la
posición más ancha.
Perigo! Ao elevar o encosto 2
não se pode encontrar nada na
área da união articulada 4 entre
o encosto 2 e a almofada de
assento 1.
Cuidado! Você ou a sua criança
podem, p. ex., entalar os dedos e
magoar-se.
Mova para cima o encosto 2, até
encaixar.
3.2 Ajuste em largura da
almofada do assento
Um almofada correctamente
adaptada 1 garante o correr perfeito
do cinto para a cintura 11 , e aumenta,
por isso, a protecção da sua criança.
Pode regular as partes laterais 15 da
almofada do assento 1 em três
larguras.
• A almofada do assento 1 tem de ser
ajustada de forma que as partes
laterais reguláveis 15 estejam o
mais próximo possível da cinta da
criança sem a apertar.
Pode ajustar a largura da almofada
do assento 1 à sua criança da
seguinte forma:
Segure ambos os lados exteriores
das partes laterais 15 nas teclas de
ajuste em cinzento claro 16.
Prima ambas as teclas de ajuste 16
para cima e puxe as partes
laterais 15 para a posição mais
larga.
Pericolo!
schienale
deve trovare nel campo dell’asse
di snodo
cuscino di seduta
Attenzione! Voi stessi o il vostro
bambino potreste ad es. schiacciarvi
le dita e portare lesioni.
Spingendo lo
2
verso l’alto, nulla si
4
tra schienale 2 e
1
.
Spingete lo schienale 2 verso l'alto,
fino a farlo scattare in sede.
3.2 Regolazione in larghezza
del cuscino di seduta
Un cuscino di seduta adattato
correttamente
ottimale della cintura addominale
aumentando in tal modo il livello di
protezione del vostro bambino. Potete
regolare le parti laterali
di seduta
• Il cuscino di seduta 1 deve essere
regolato in modo tale che le parti
laterali regolabili 15 aderiscano il
più possibile alla schiena del vostro
bambino, senza tuttavia
comprimerlo.
Potete adattare la larghezza del
cuscino di seduta 1 al vostro
bambino come indicato di seguito.
1
assicura lo scorrimento
1
in tre larghezze.
15
11
,
del cuscino
Afferrate su entrambi i lati la parte
esterna dei componenti laterali 15 in
corrispondenza dei tasti di
regolazione di colore grigio chiaro 16.
Spingete verso l'alto i due tasti di
regolazione 16 e tirate la parti
laterali 15 nella posizione più larga.
7
Page 31

100922_KIDplus_E-P-I.fm Seite 8 Montag, 27. September 2010 2:14 14
Deje que su niño tome asiento en el
asiento infantil.
Presione ahora ambos botones de
regulación 16 de nuevo y ajuste las
piezas laterales 15 en la anchura
deseada.
¡Cuidado! Las piezas laterales
deben estar encajadas. Tire de las
piezas laterales para comprobar
que están encajadas.
3.3 Regulación en altura del
reposacabezas
Un reposacabezas adaptado
correctamente 3 garantiza la
disposición óptima del cinturón
diagonal 6, y le ofrece a su niño la
protección y confort deseados. Puede
regular la altura del reposacabezas 3
en hasta once posiciones.
• El reposacabezas 3 debe ajustarse
de forma tal que entre los hombros
de su niño y el reposacabezas 3
queden aún dos dedos de anchura.
Para ajustar la altura del
reposacabezas 3 al tamaño de su
niño, proceda del siguiente modo:
Sujete el mando de regulación8 en la
parte trasera del reposacabezas
tire un poco hacia arriba. Ahora está
desbloqueado el reposacabezas.
3
y
Ahora puede regular el
reposacabezas 3 desbloqueado en
la altura deseada. Tan pronto como
suelte el mando de regulación 8 se
encaja el reposacabezas.
Deixe que a criança se sente na
cadeira para criança.
Volte a premir agora ambas as teclas
de ajuste 16 e ajuste as partes
laterais 15 para a largura desejada.
Cuidado! As partes laterais têm de
estar encaixadas. Puxe as partes
laterais para verificar o encaixe.
3.3 Ajuste em altura do
apoio para a cabeça
Um apoio para a cabeça
correctamente ajustado 3 garante um
correr óptimo do cinto diagonal 6, e
proporciona à sua criança a protecção
e o conforto desejados. Pode encaixar
a altura do apoio para a cabeça 3 em
onze posições.
• O apoio para a cabeça 3 tem de
estar ajustado de forma que entre
os ombros da criança e o apoio
para a cabeça 3 ainda exista a
largura de dois dedos.
Pode ajustar a altura dos apoios
para a cabeça 3 à altura do corpo
da criança:
Pegue no cabo de ajuste 8 no lado
traseiro do apoio para a cabeça 3 e
puxe-o um pouco para cima. Agora
o apoio para a cabeça está
desbloqueado.
Agora pode ajustar o apoio para a
cabeça desbloqueado 3 para a
altura desejada. Logo que solte o
cabo de ajuste 8, o apoio para a
cabeça encaixa.
Fate prendere posto al vostro
bambino sul seggiolino.
Ora premete nuovamente i due tasti
di regolazione 16 e regolate le parti
laterali 15 nella larghezza desiderata.
Attenzione! Le parti laterali devono
scattare in sede. Tirate le parti laterali
per verificarne il bloccaggio.
3.3 Regolazione in altezza
del poggiatesta
Un poggiatesta adattato correttamente
3 assicura lo scorrimento ottimale
della cintura diagonale 6 e offre al
vostro bambino la protezione e il
comfort desiderati. Potete bloccare
l'altezza del poggiatesta 3 in undici
posizioni.
• Il poggiatesta 3 deve essere
regolato in modo tale che tra le
spalle del vostro bambino e il
poggiatesta 3 sia presente uno
spazio di due dita di larghezza.
Potete adattare l’altezza del
poggiatesta 3 alle dimensioni del
vostro bambino come riportato di
seguito.
Afferrate l'impugnatura di
regolazione 8 sul lato posteriore del
poggiatesta 3 e tiratela leggermente
verso l'alto. Ora il poggiatesta è
sbloccato.
Ora potete regolare il poggiatesta
sbloccato
appena rilasciate l'impugnatura di
regolazione
3
all'altezza desiderata. Non
8
, il poggiatesta si blocca.
Page 32

100922_KIDplus_E-P-I.fm Seite 9 Montag, 27. September 2010 2:14 14
Coloque el asiento infantil sobre el
asiento del vehículo.
Deje que su niño tome asiento en el
asiento infantil y controle la altura.
¡Cuidado! Repita esta operación
tantas veces como sea necesario
hasta que el reposacabeza 3 esté
ajustado de forma óptima.
Coloque a cadeira de criança no
assento do automóvel.
Deixe que a sua criança se sente
na cadeira e regule a altura.
Cuidado! Repita este processo
tantas vezes até que o apoio para a
cabeça 3 se encontre ajustado na
perfeição.
Collocate il seggiolino sul sedile
dell'auto.
Fate prendere posto al vostro
bambino sul seggiolino e controllate
l’altezza.
Attenzione! Ripetete questa
procedura finchè il poggiatesta 3 ha
raggiunto la posizione ottimale.
3.4 Posición de reposo del
respaldo
El respaldo 2 del asiento infantil se
regula de manera continua y se
adapta perfectamente a la inclinación
del asiento del vehículo.
n consejo!
U
vertical mediante un pequeño anclaje.
Presione el respaldo
para soltar el anclaje.
Preste atención a: la mejor protección
sólo se garantiza cuando el asiento
del vehículo se encuentra en posición
vertical. El respaldo 2 del asiento
infantil puede inclinarse
independientemente del asiento del
vehículo hacia atrás, en una posición
de reposo.
El respaldo2 se mantiene
2
algo hacia atrás
Para ello abra el ángulo de
distancia 9 de la parte trasera del
respaldo 2.
Ahora, incline el respaldo 2 hacia
atrás, hasta que la superficie del
respaldo quede completamente
pegada 9 al respaldo del asiento
del vehículo.
¡Cuidado! No incline el respaldo 2
más de lo que indica el ángulo de
distancia 9.
3.4 Posição de repouso do
encosto
O encosto 2 da cadeira de criança
adapta-se continuamente à inclinação
do assento do veículo.
Dica! O encosto 2 mantem-se na
vertical através de um pequeno
encaixe. Pressione o encosto 2
ligeiramente para trás de modo a
soltar o encaixe.
Preste atenção: A melhor protecção
possível só é garantida se o assento
do veículo estiver na posição vertical.
O encosto 2 da cadeira de criança
inclina-se para trás,
independentemente do assento do
veículo, para a posição de repouso.
Para isso, abra para fora o ângulo
distanciador 9 no lado traseiro do
encosto 2.
Incline agora o encosto 2 o mais
para trás até eu o ângulo
distanciador 9 se bem encostado
no encosto do assento do veículo.
Cuidado! Não incline o encosto 2
mais do que o ângulo de
inclinação 9 permite.
3.4 Posizione di riposo dello
schienale
Lo schienale 2 del seggiolino si adatta
in continuo all'inclinazione del sedile
dell'auto.
Consiglio! Lo schienale 2 viene
mantenuto verticale con un piccolo
dispositivo di sicurezza. Premete lo
schienale 2 leggermente all‘indietro
per allentare il dispositivo di sicurezza.
Attenetevi a quanto riportato di seguito:
la massima protezione possibile viene
assicurata solamente se il sedile
dell'auto si trova in posizione eretta. Lo
schienale 2 del seggiolino può essere
inclinato all'indietro in una posizione di
riposo, indipendentemente dal sedile
dell'auto.
A tale scopo estraete l'angolo di
distanza 9 sul lato posteriore dello
schienale 2.
Ora inclinate lo schienale 2
all'indietro fino a quando l'angolo di
distanza 9 aderisce in modo piatto
allo schienale del sedile dell'auto.
Attenzione! Inclinate lo schienale 2
non forzando l'angolo di distanza 9.
9
Page 33

100922_KIDplus_E-P-I.fm Seite 10 Montag, 27. September 2010 2:14 14
3.5 Abrochar el cinturón al
niño
El KID plus SICT no requiere de
montaje en el vehículo. El niño se
asegura fácilmente en el asiento
infantil con el cinturón de seguridad.
1. Abrocharse el cinturón de
seguridad
Coloque el asiento infantil sobre el
asiento del vehículo. Asegúrese de
que la superfice del respaldo 2
quede completamente pegada al
respaldo del asiento del vehículo.
(véase 3.4)
Un consejo: Si el reposacabezas
del asiento del vehículo molesta,
sólo tiene que girarlo.
Deje que su niño tome asiento en el
asiento infantil.
Tire del cinturón de seguridad y
abróchelo pasando el cinturón por
delante del niño 10.
¡Cuidado! No retuerza el cinturón.
Introduzca la lengüeta en el broche
del cinturón del vehículo 10. CLIC
3.5 Pôr o cinto de
segurança na sua
criança
O KID plus SICT não necessita de
montagem no veículo. A sua criança é
protegida na cadeira de criança com o
cinto do automóvel.
1. Colocar o cinto do automóvel
Coloque a cadeira de criança no
assento do automóvel. Preste
atenção para que o encosto 2 se
encontre bem encostado no
encosto do assento do automóvel.
(ver 3.4)
Dica! Se o apoio para a cabeça do
assento do automóvel causar
perturbação, rode-o simplesmente.
Deixe que a criança se sente na
cadeira para criança.
Puxe para fora o cinto do
automóvel e coloque-o pela frente
da criança no fecho do cinto do
automóvel 10.
Cuidado! Não torcer o cinto.
Encaixe as linguetas do fecho no
fecho do cinto do automóvel 10.
CLIQUE!
3.5 Allacciamento del vostro
bambino
KID plus SICT non richiede alcun
montaggio sull'auto. Il vostro bambino
verrà assicurato nel seggiolino
semplicemente con la cintura
dell'auto.
1. Applicazione della cintura
dell'auto
Collocate il seggiolino sul sedile
dell'auto, facendo attenzione a che
lo schienale 2 aderisca in modo
piatto allo schienale del sedile
dell'auto. (ved. 3.4)
Consiglio! Se il poggiatesta del
sedile dell'auto è d'intralcio,
ruotatelo.
Fate prendere posto al vostro
bambino sul seggiolino.
Estraete la cintura del'auto e fatela
passare davanti al vostro bambino
verso la relativa chiusura 10.
Attenzione! Non attorcigliate la
cintura.
Fate scattare la linguetta di
chiusura nella chiusura della cintura
dell’auto 10 in modo percettibile!
Page 34

100922_KIDplus_E-P-I.fm Seite 11 Montag, 27. September 2010 2:14 14
2. Introduzca el cinturón de
seguridad por las guías rojas del
asiento infantil.
Coloque el cinturón diagonal 6 y el
cinturón de pelvis 11 en el lado del
broche del cinturón del vehículo 10
bajo los reposabrazos, en la guía
roja clara 12 del cojín del asiento 1.
¡Cuidado! El broche del cinturón
del vehículo 10 no puede
encontrarse entre la guía roja
clara 12 y el reposabrazos.
Coloque el cinturón de pelvis 11 por
el otro lado del cojín del asiento 1
del mismo modo en la guía roja
clara 12.
¡Cuidado! El cinturón de pelvis 11
debe pasar lo más bajo posible por
encima del pliegue inguinal del niño
en ambos lados.
Pase el cinturón diagonal 6 por el
soporte de color rojo oscuro 7 del
reposacabezas 3, hasta que se
deslice por detrás de la lengüeta de
bloqueo 7.
Un consejo: Si cubre el respaldo 2
con el soporte del cinturón 7, los
reposacabezas 3 se podrán
levantar. Ahora se puede introducir
con facilidad el cinturón diagonal 6.
Vuelva a colocar ahora el
reposacabezas 3 a la altura
adecuada.
2. Colocar o cinto do automóvel nas
guias vermelhas do cinto na
cadeira de criança.
Coloque o cinto diagonal 6 e o cinto
para a cintura 11 no lado do fecho
do cinto do automóvel 10 por baixo
dos apoios para os braços, na guia
vermelha do cinto 12 da almofada
do assento 1.
Cuidado! O cinto do automóvel 10
não se deve encontrar entre a guia
em vermelho claro 12 e o apoio
para os braços.
Coloque o cinto para a cintura 11
no outro lado da almofada do
assento 1 também na guia do cinto
em vermelho claro 12.
Cuidado!O cinto para a cintura 11
tem de passar o mais justo possível
por cima da região inguinal da
criança.
Passe o cinto diagonal 6 pelo
suporte do cinto vermelho escuro 7
do apoio para a cabeça 3, até ele
se encontrar totalmente no suporte
do cinto sem estar torcido 7.
Conselho! Se o suporte do cinto
cobrir 2 os encostos 7, os apoios
para a cabeça podem 3 ser
ajustados para cima. Desta forma,
o cinto diagonal pode ser 6
introduzido facilmente. Volte a
colocar agora os apoios para a
cabeça 3 na altura correcta.
2. Inserite la cintura dell'auto nelle
guide rosse della cintura del
seggiolino.
Collocate la cintura diagonale 6 e la
cintura addominale 11 sul lato della
chiusura della cintura dell'auto 10
sotto al bracciolo all'interno della
guida della cintura di colore rosso
chiaro 12 del cuscino di seduta 1.
Attenzione! La chiusura della cintura
dell'auto 10 non deve trovarsi tra la
guida della cintura di colore rosso
chiaro 12 e il bracciolo.
Collocate la cintura addominale 11
sull'altro lato del cuscino di seduta 1
sempre all'interno della guida della
cintura di colore rosso chiaro 12.
Attenzione! La cintura
addominale 11 deve passare, su
entrambi i lati, il più in basso possibile
sull’inguine del vostro bambino.
Inserite la cintura diagonale 6 nel
supporto della cintura di colore rosso
scuro 7 del poggiatesta 3, in modo
tale che la cintura venga a trovarsi
completamente inserita in posizione
non attorcigliata nel supporto 7.
Consiglio! Qualora lo schienale 2
nasconda il supporto della cintura 7,
è possibile spostare il poggiatesta 3
verso l'alto. In tal modo l'inserimento
della cintura diagonale 6 può essere
eseguito con facilità. A questo punto
riportare il poggiatesta 3 nella
posizione corretta.
11
Page 35

100922_KIDplus_E-P-I.fm Seite 12 Montag, 27. September 2010 2:14 14
Asegúrese de que el cinturón
diagonal 6 pasa por encima de la
clavícula del niño, y no está en
contacto con el cuello.
Un consejo: También puede
adaptar la altura del
reposacabezas 3 a la altura del
vehículo.
¡Cuidado! El cinturón diagonal 6
debe estar dispuesto hacia atrás de
forma transversal.
Un consejo: Puede regular el
cinturón con desviador del cinturón
regulable de su vehículo.
¡Cuidado! El cinturón diagonal 6 no
puede llevar hacia adelante en
dirección al desviador del cinturón.
Un consejo: En ese caso utilice el
asiento infantil sólo en el asiento
posterior.
Tense el cinturón de seguridad
tirando del cinturón diagonal 6.
3.6 Protección perfecta del
niño
Para mayor seguridad del
niño, compruebe que:
• el cinturón de pelvis 11 pasa por
ambos lados por las guías rojas
claras 12 del cojín del asiento,
Certifique-se de que o cinto
diagonal 6 passa pela clavícula da
criança e não pelo pescoço.
Dica! Pode ajustar também em
altura o apoio para a cabeça 3 no
veículo.
Cuidado! O cinto diagonal 6 tem de
passar para trás na diagonal.
Dica! Pode regular a passagem do
cinto com o dispositivo de desvio
regulável do cinto do seu veículo.
Cuidado! O cinto diagonal 6 nunca
deve passar pela frente para o
dispositivo de desvio do cinto.
Dica! Neste caso, utilize a cadeira
de criança apenas no assento
traseiro.
Estique o cinto do automóvel,
enquanto puxa o cinto diagonal 6.
3.6 Assim a sua criança está
correctamente protegida
Verifique a segurança da sua
criança de forma que...
• o cinto para a cintura 11 passe em
ambos os lados nas guias em
vermelho claro do cinto 12 da
almofada do assento,
Accertatevi che la cintura
diagonale 6 scorra sulla clavicola
del vostro bambino e non si trovi in
corrispondenza della gola.
Consiglio! Potete regolare in
altezza il poggiatesta 3 anche in
auto.
Attenzione! La cintura diagonale 6
deve scorrere all'indietro
trasversalmente.
Consiglio! Potete regolare lo
scorrimento della cintura con
l'avvolgitore regolabile della cintura
della vostra auto.
Attenzione! La cintura diagonale 6
non deve mai essere fatta passare
davanti per arrivare all'avvolgitore
della cintura dell'auto.
Consiglio! In tal caso utilizzate il
seggiolino solamente sul sedile
posteriore.
Tendete la cintura dell'auto, tirando
la cintura diagonale 6.
3.6 Corretto posizionamento
del vostro bambino
Per la sicurezza del vostro
bambino verificate che...
• la cintura addominale scorra 11 su
entrambi i lati all'interno delle guide
della cintura di colore rosso
chiaro 12 del cuscino di seduta,
Page 36

100922_KIDplus_E-P-I.fm Seite 13 Montag, 27. September 2010 2:14 14
• el cinturón diagonal 6 del lado del
broche del cinturón de seguridad 10
pasa por la guía roja clara 12 del
cojín del asiento,
• el cinturón diagonal 6 pasa a través
del soporte del cinturón rojo
oscuro 7 del reposacabezas,
• el cinturón diagonal 6 pasa hacia
atrás de forma transversal,
• los cinturones están tensados y no
retorcidos,
• el broche del asiento de
seguridad 10 no se encuentra entre
la guía roja clara 12 y el
reposabrazos del cojín del asiento.
• el asiento infantil no debe colocarse
junto a la puerta del vehículo ni
junto a la ventana interior de éste.
4. Instrucciones de
mantenimiento
Para mantener el efecto
protector
• En un accidente a una velocidad de
colisión de más de 10 km/h pueden
producirse daños en el asiento del
bebé que no siempre pueden
apreciarse a simple vista.
Sustituya sin falta este asiento
infantil. Elimínelo, por favor, de
forma correcta (véase 5).
• Controle regularmente si las piezas
importantes están dañadas.
Asegúrese de que todas las piezas
• o cinto diagonal 6 no lado do fecho
do cinto do automóvel 10 também
passe na guia em vermelho
claro 12 da almofada do assento,
• o cinto diagonal 6 passe pelo
suporte do cinto azul escuro 7 do
apoio para a cabeça,
• o cinto diagonal 6 passe para trás
na diagonal,
• os cintos estejam apertados e não
torcidos,
• o fecho do cinto do automóvel 10
não se encontre entre a guia em
vermelho claro 12 e os apoios para
os braços da almofada do assento.
• O assento para criança não deve
estar encostado à porta do veículo
ou ao painel interior do veículo.
4. Instruções de
conservação
Para obtenção do efeito de
protecção
• Em caso de acidente com uma
velocidade de colisão superior a 10
km/h podem ocorrer danos na
cadeira de criança, que podem não
ser evidentes.
Substitua obrigatoriamente esta
cadeira de criança. Por favor
elimine-o de acordo com a norma
(ver 5).
• Controle regularmente todas as
peças importantes quanto a danos.
• la cintura diagonale scorra 6 sul lato
della chiusura della cintura
dell'auto 10 sempre all'interno della
guida della cintura di colore rosso
chiaro 12 del cuscino di seduta,
• la cintura diagonale 6 scorra
attraverso il supporto della cintura
di colore rosso scuro 7 del
poggiatesta,
• la cintura diagonale 6 scorra
all'indietro trasversalmente,
• le cinture siano tese e non si siano
attorcigliate,
• la chiusura della cintura dell'auto 10
non si trovi tra la guida della cintura
di colore rosso chiaro 12 e il
bracciolo del cuscino di seduta.
• che il seggiolino non appoggi alla
portiera o alla parete interna del
veicolo.
4. Istruzioni di
manipolazione
Per conservare l’azione
protettiva
• In caso di incidente ad una velocità
di collisione superiore ai 10 km/h,
possono essersi verificati danni al
seggiolino da auto, che non
necessariamente sono visibili.
Sostituite assolutamente questo
seggiolino. Eseguite un regolare
smaltimento (ved. 5).
• Verificate regolarmente l’eventuale
presenza di danni sulle parti
importanti. Accertatevi che i
13
Page 37

100922_KIDplus_E-P-I.fm Seite 14 Montag, 27. September 2010 2:14 14
mecánicas funcionan sin
problemas.
• Compruebe que el asiento del bebé
no quede aprisionado entre piezas
duras (puerta del vehículo, raíles
del asiento, etc.), ya que podría
dañarse.
• Cuando el asiento esté dañado (p.
ej. tras una caída), es
imprescindible que el fabricante lo
examine.
4.1 Limpieza
Asegúrese de utilizar únicamente una
funda de repuesto original Britax/
RÖMER, ya que la funda constituye
un elemento esencial de la
funcionalidad del sistema. Podrá
encontrar repuestos en tiendas
especializadas o en las tiendas ADAC
(club automovilístico alemán).
El asiento infantil no debe
usarse sin funda.
• Puede retirar la funda y lavarla con
un detergente suave a 30 ºC en la
lavadora. Preste atención a las
instrucciones en la etiqueta con las
instrucciones de lavado de la funda.
Si lava a más de 30 ºC puede
decolorarse la tela de la funda. No
centrifugue la funda y no la seque
nunca en una secadora eléctrica (la
funda podría separarse del
acolchado).
Certifique-se que os componentes
mecânicos funcionam de forma
impecável.
• Preste atenção para que a cadeira
de criança não esteja apertada
entre duas peças duras (porta do
veículo, calha do assento etc.) e
estar danificada.
• Leve uma cadeira de criança para
automóvel danificada (p.ex. após
uma queda) para ser reparada no
fabricante.
4.1 Limpeza
Preste atenção para só colocar um
revestimento sobressalente original
Britax/RÖMER pois o revestimento
representa uma parte essencial do
funcionamento do sistema. O
sobressalente pode ser obtido num
revendedor especializado ou num
ponto de recepção da ACP.
A cadeira de criança para
automóvel não deve ser
utilizada sem revestimento.
• Pode retirar o revestimento e laválo na máquina com detergente
suave no modo delicado a 30 ºC.
Siga as instruções na etiqueta de
lavagem do revestimento. Se lavar
a mais de 30 °C, é possível que
ocorra o tingimento do tecido do
revestimento. Não centrifugar o
revestimento e nunca secar num
secador de roupa eléctrico (o tecido
pode soltar-se do estofamento).
componenti meccanici funzionino
perfettamente.
• Fate attenzione che il seggiolino da
auto non venga schiacciato tra parti
dure (portiera dell’auto, guide dei
sedili, ecc.) e conseguentemente
danneggiato.
• Fate assolutamente controllare dal
produttore il seggiolino da auto se
risulta danneggiato (ad es. dopo
una caduta).
4.1 Pulizia
Fate attenzione ad utilizzare
esclusivamente rivestimenti di ricambio
originali Britax/RÖMER, poiché il
rivestimento è una parte essenziale per
il funzionamento del sistema. I
rivestimenti di ricambio sono disponibili
nei negozi specializzati o presso i punti
ACI (Automobile Club d'Italia).
Il seggiolino da auto non deve
essere utilizzato senza
rivestimento.
• Potete rimuovere il rivestimento e
lavarlo in lavatrice a 30 °C con un
detersivo e un programma per capi
delicati. Attenetevi alle istruzioni
riportate sull'etichetta di lavaggio
del rivestimento. Se lavate a più di
30 °C, è possibile che il tessuto del
rivestimento si scolorisca. Non
centrifugate il rivestimento e in
nessun caso asciugatelo
nell’asciugatrice elettrica (il tessuto
può staccarsi dall’imbottitura)
Page 38

100922_KIDplus_E-P-I.fm Seite 15 Montag, 27. September 2010 2:14 14
•Las piezas de plástico pueden
lavarse con una solución jabonosa.
No utilice productos agresivos (p.
ej. disolventes).
4.2 Extracción de la funda
Desenganche los ganchos de la
funda 14 del respaldo 2.
Desenganche los bucles de
goma 13 del cojín del asiento 1.
Desenganche los ojales 19 del
reposacabezas 3.
•As peças em material sintético
podem lavar-se com uma solução
saponácea. Não utilizar produtos
ácidos (como p.ex. solventes).
4.2 Remoção do
revestimento
Levante os ganchos do
revestimento 14 dos encostos 2.
Levante as corrediças de
borracha 13 dos almofada do
assento 1.
Levante as casas dos botões 19
dos apoios para a cabeça 3.
• Potete lavare le parti in plastica
con una soluzione acqua e sapone.
Non utilizzate detergenti aggressivi
(ad es. solventi).
4.2 Rimozione del
rivestimento
Sganciate i ganci del
rivestimento 14 dello schienale 2.
Sganciate gli occhielli elastici 13 del
cuscino di seduta 1.
Sganciate le asole 19 del
poggiatesta 3.
Retire el botón 17 de la funda de la
pieza lateral 15.
Ahora puede retirar la funda.
Puxe a cavilha 17 do revestimento
das partes laterais 15.
Agora pode retirar o revestimento.
15
Estraete i tappi 17 dal rivestimento
delle parti laterali 15.
Ora potete rimuovere il
rivestimento.
Page 39

100922_KIDplus_E-P-I.fm Seite 16 Montag, 27. September 2010 2:14 14
4.3 Colocación de la funda
Repita la operación en orden
inverso.
5. Instrucciones sobre la
eliminación de los
componentes
Consulte las disposiciones de
eliminación vigentes en su país.
Eliminación del embalaje
Contenedor de papel y
cartón
Eliminación de las piezas individuales
Funda Basura general,
Piezas de
plástico
Piezas
metálicas
aprovechamiento térmico
En el contenedor que
corresponda en función de
su identificación.
Contenedor de metales
6. Dos años de garantía
Este asiento infantil para vehículos o
bicicletas / este cochecito tiene una
garantía de 2 años por defectos de
fabricación o de material. El período
de garantía comienza el día de la
compra del producto. Conserve la
tarjeta de garantía, el control de
entrega firmado por usted y el
justificante de compra para acreditar
la duración del período de garantía.
En caso de reclamación, el asiento
infantil deberá ir acompañado del
certificado de garantía. La garantía
4.3 Colocação do
revestimento
Proceda simplesmente pela ordem
inversa.
5. Indicações sobre a
eliminação
Preste atenção às determinações
nacionais acerca da eliminação.
Eliminação da embalagem
Contentor para cartão
Eliminação de peças soltas
Revestimento Lixo restante,
Peças em
material
sintético
Peças de
metal
aproveitamento térmico
conforme marcação no
contentor para tal
previsto
Contentor para metais
6. Garantia de 2 anos
Para esta cadeira de crianças para
bicicleta/automóvel disponibilizamos
uma garantia de erros de fabrico e do
material de 2 anos. A duração da
garantia começa no dia da compra.
Como comprovativo guarde o
certificado de garantia preenchido, a
verificação de transferência assinada
por si assim como a prova de compra
para a duração do tempo de garantia.
No caso de reclamação deve anexar o
certificado de garantia à cadeira de
criança. A garantia restringe-se a
4.3 Applicazione del
rivestimento
Procedete semplicemente in senso
contrario.
5. Avvertenze per lo
smaltimento
Attenetevi alle disposizioni del
vostro paese relative allo
smaltimento.
Smaltimento dell’imballaggio
Container per cartone
Smaltimento delle singole parti
Rivestimento Rifiuti non riciclabili,
Parti in
plastica
Parti in
metallo
riciclaggio termico
in base al contrassegno
riportato sui container
previsti a tale scopo
Container per metalli
6. Garanzia di 2 anni
Per questo seggiolino da auto/
bicicletta/passeggino, la garanzia è di
2 anni per i difetti di fabbricazione o
relativi al materiale. La garanzia
decorre dal giorno dell’acquisto. Come
prova, conservate, per tutta la durata
del periodo di garanzia, la cartolina di
garanzia compilata, la ricevuta del
controllo alla consegna, da voi
controfirmata, e lo scontrino
d’acquisto.
In caso di reclami, allegate il tagliando
di garanzia al seggiolino. La garanzia
Page 40

100922_KIDplus_E-P-I.fm Seite 17 Montag, 27. September 2010 2:14 14
queda restringida a los asientos
infantiles para vehículos o bicicletas /
cochecitos que hayan sido utilizados
adecuadamente y que se remitan
limpios y en correcto estado.
La garantía no comprende:
• Los desperfectos propios del
desgaste normal ni los daños
producidos al forzar el asiento
• Daños debidos a un uso
inapropiado.
¿Qué cubre exactamente la garantía?
Todos nuestros tejidos
Tejidos:
cumplen unos estándares estrictos en
cuanto a la resistencia de los colores
a las radiaciones ultravioletas. No
obstante, todos los tejidos pierden
color cuando se exponen a
radiaciones ultravioleta. No se trata,
pues, de un defecto de material, sino
de fenómenos normales de desgaste
que, por lo tanto, no están cubiertos
por la garantía.
Broche: Los problemas de
funcionamiento en el broche del
cinturón se deben generalmente a la
suciedad acumulada, que puede
eliminarse con un buen lavado. Para
ello, siga las instrucciones de uso.
En los casos propios de garantía,
diríjase inmediatamente a una tienda
especializada. Allí le aconsejarán y le
proporcionarán la ayuda necesaria. A
la hora de tramitar los derechos de
reclamación, se aplican las tasas de
amortización específicas del producto.
cadeiras de criança para bicicleta /
automóvel que foram manuseadas
correctamente e são enviadas num
estado limpo e correcto.
A garantia não se estende a:
• fenómenos naturais de desgaste e
danos por sujeições excessivas
• danos devido a uma utilização
imprópria ou incorrecta.
Caso de garantia ou não?
Material:
preenchem os mais altos requisitos
relativamente a
estabilidade da cor contra radiação
UV. Porém, todos os tecidos
desbotam, quando são expostos à
radiação UV. Neste caso, não se trata
de nenhum erro no material, mas sim
de fenómenos normais de desgaste,
para os quais não se assume
qualquer garantia.
Fecho: Se ocorrerem avarias de
funcionamento no fecho do cinto,
estas atribuem-se muitas vezes a
sujidade, que pode ser lavada. Preste
atenção ao modo de procedimento no
manual de instruções.
Em caso da garantia dirija-se de
imediato ao seu revendedor
especializado. Ele vai estar sempre ao
seu lado para o apoiar. No
processamento de reclamações são
empregadas taxas de amortização
específicas do produto. Aqui
Todos os nossos materiais
è limitata ai seggiolini da auto/
bicicletta/passeggino, utilizzati in
modo conforme e restituiti puliti ed in
ordine.
La garanzia non copre:
• le normali tracce d’usura e i danni
causati da una sollecitazione
eccessiva,
• i danni causati da un utilizzo non
idoneo e non conforme.
Caso coperto da garanzia?
Materiale:
soddisfano elevati requisiti
relativamente alla
resistenza dei colori ai raggi UV.
Tuttavia, tutti i tessuti sbiadiscono, se
vengono esposti ai raggi UV. A tale
riguardo non si tratta in alcun caso di
un difetto del materiale, ma di un
normale fenomeno di usura, che non è
coperto da garanzia
Chiusura: eventuali anomalie di
funzionamento della chiusura della
cintura vanno quasi sempre fatte
risalire alla presenza di sporco, che
può essere eliminato con il lavaggio.
Attenetevi alla procedura indicata
nelle istruzioni per l’uso.
In caso di diritto di garanzia,
rivolgetevi immediatamente al vostro
rivenditore specializzato, che vi
assisterà con consigli e fatti concreti.
Nel disbrigo dei casi in garanzia
vengono applicate le detrazioni
specifiche del prodotto. A tale riguardo
tutti i nostri materiali
17
Page 41

100922_KIDplus_E-P-I.fm Seite 18 Montag, 27. September 2010 2:14 14
A este respecto, nos remitimos a las
Condiciones Generales de
Contratación expuestas en el
comercio del vendedor especializado.
Uso, cuidado y mantenimiento
El asiento infantil para vehículos o
bicicletas / el cochecito debe utilizarse
de acuerdo con las instrucciones de
uso. Se indica de forma expresa que
deben utilizarse exclusivamente
accesorios y repuestos originales.
remetemo-nos às condições
comerciais gerais expostas pelo
vendedor.
Utilização, conservação e
manutenção
A cadeira de criança para bicicleta/
automóvel tem de ser manuseada
conforme o manual de instruções.
Chamamos a atenção para que sejam
utilizados apenas acessórios ou peças
sobressalentes originais.
si rimanda alle condizioni commerciali
generali disponibili presso il
rivenditore specializzato.
Utilizzo, manipolazione e
manutenzione
Il seggiolino da auto/bicicletta/
passeggino deve essere trattato
conformemente a quanto riportato
nelle istruzioni per l'uso. Si richiama
espressamente l’attenzione sul fatto
che possono essere utilizzati solo
accessori e/ o pezzi di ricambio
originali.
Page 42

100922_KIDplus_E-P-I.fm Seite 19 Montag, 27. September 2010 2:14 14
7. Tarjeta de garantía / Control de entrega
Nombre: ________________________________________________
Dirección: ________________________________________________
Código postal: ________________________________________________
Localidad: ________________________________________________
Teléfono (con prefijo): ________________________________________________
Correo electrónico: ________________________________________________
________________________________________________
Asiento infantil para
coche o bicicleta /
cochecito:
Número de artículo: ________________________________________________
Color de la funda
(diseño):
Accesorios: ________________________________________________
Fecha de compra: ________________________________________________
________________________________________________
________________________________________________
Control de entrega:
1. Completo comprobado
2. Prueba de funcionamiento
- Mecanismo de regulación del
asiento
- Regulación de correas comprobado
3. Integridad
- Examinar el asiento comprobado
- Examinar tejidos comprobado
- Examinar piezas de plástico comprobado
correcto
comprobado
correcto
correcto
correcto
correcto
correcto
He examinado el asiento
infantil para vehículos o
bicicletas / el cochecito y
me he asegurado de
que el asiento se
entrega completo y de
que todos sus
dispositivos funcionan
correctamente.
He recibido información
suficiente sobre el
producto y su
funcionamiento antes
de la compra y conozco
las instrucciones de
cuidado y
mantenimiento.
Comprador (firma): ________________________________________________
Vendedor: ________________________________________________
Sello del vendedor
Page 43

100922_KIDplus_E-P-I.fm Seite 20 Montag, 27. September 2010 2:14 14
7. Certificado de garantia / verificação de transferência
Nome: ________________________________________________
Endereço: ________________________________________________
Código Postal: ________________________________________________
Local: ________________________________________________
Telefone (com
indicativo):
E-Mail: ________________________________________________
Cadeira de criança
para bicicleta/
automóvel:
Número de artigo: ________________________________________________
Cor do tecido (Dessin): ________________________________________________
Acessórios: ________________________________________________
Data de compra: _______________________________________________
________________________________________________
________________________________________________
________________________________________________
Verificação de transferência:
1. Integridade verificado
2. Verificação da
funcionalidade
- mecanismo de ajuste do
assento
- Ajuste da banda do cinto verificado
3. Integridade
- Verificar assento verificado
- Verificar peças do tecido verificado
- Verificar peças em material
sintético
em condições
verificado
em condições
em condições
em condições
em condições
verificado
em condições
Verifiquei a cadeira de
criança para bicicleta/
automóvel e certifiqueime de que o assento foi
entregue completo e
que todas as funções
funcionam na sua
totalidade.
Obtive informações
suficientes acerca do
produto e das suas
funções antes da
compra e tomei
conhecimento das
instruções de
conservação e
manutenção.
Comprador
(assinatura):
Vendedor: _______________________________________________
_______________________________________________
Carimbo do vendedor
Page 44

100922_KIDplus_E-P-I.fm Seite 21 Montag, 27. September 2010 2:14 14
7. Cartolina di garanzia/ricevuta del controllo alla consegna
Nome: _____________________________________________
Indirizzo: _____________________________________________
C.A.P.: _____________________________________________
Località: _____________________________________________
Telefono (con
prefisso):
E-mail: _____________________________________________
Seggiolino da auto /
bicicletta /
passeggino:
Numero articolo: _____________________________________________
Colore tessuto
(design):
Accessori: _____________________________________________
Data d’acquisto: _____________________________________________
_____________________________________________
_____________________________________________
_____________________________________________
_____________________________________________
Controllo alla consegna:
1. Completezza controllato
2. Controllo
funzionamento
- meccanismo di
regolazione seggiolino
- Regolazione cinture controllato
3. Integrità
- Controllo seggiolino controllato
- Controllo parti in
tessuto
- Controllo parti in
plastica
in ordine
controllato
in ordine
in ordine
in ordine
controllato
in ordine
controllato
in ordine
Ho controllato il seggiolino da
auto/bicicletta/passeggino e mi
sono accertato/a, che il
seggiolino è stato consegnato
al completo e che tutte le sue
parti funzionano perfettamente.
Prima dell’acquisto ho ricevuto
sufficienti informazioni sul
prodotto e sul suo
funzionamento, e ho preso atto
delle disposizioni per la sua
manipolazione e
manutenzione.
Acquirente (firma): _____________________________________________
Rivenditore: _____________________________________________
Timbro rivenditore
Page 45

100922_KIDplus_RUS-DK-NL.fm Seite 1 Montag, 27. September 2010 2:16 14
KID plus SICT
Содержание
1. Назначение.................................... 2
2. Применение в автомобиле.........3
3. Обеспечение безопасности
ребенка в автомобиле.................4
3.1 Закрепление спинки сиденья.. 6
3.2 Регулировка ширины
подушки сиденья.................... 7
3.3 Регулировка высоты
подголовника ..........................8
3.4 Исходное положение спинки
сиденья ...................................9
3.5 Пристегивание ребенка
ремнями................................ 10
3.6 Проверка безопасности
ребенка .................................12
Руководство по
эксплуатации
Mы счастливы, что наше KID plus
SICT сможет стать надежным
спутником Вашего ребенка на
первых месяцах его жизни.
Для надлежащей защиты
ребенка, это KID plus SICT
должно быть установлено, а
затем эксплуатироваться, только
в полном соответствии с
настоящей инструкцией.
Если у Вас возникнут
дополнительные вопросы по его
применению, то просим обращаться
в нашу фирму.
BRITAX RÖMER
Kindersicherheit GmbH
Britax Excelsior Ltd.
4. Инструкция по уходу за
сиденьем..................................... 13
4.1 Очистка................................. 14
4.2 Снятие чехла ....................... 15
4.3 Надевание чехла ................. 16
5. Указ ани я по утилизации........... 16
6. Двухгодичная гарантия ............ 16
7. Гарантийный талон / Формуляр
контроля при покупке ............... 19
Brugsvejledning
Det glæder os, at vores KID plus
SICT kan ledsage Deres barn gennem
en nyt og vigtigt livsafsnit.
For at kunne beskytte barnet
optimalt skal KID plus SICT
monteres og anvendes præcist som
beskrevet i denne vejledning.
De er altid velkommen til at kontakte
os, hvis De har spørgsmål.
BRITAX RÖMER
Kindersicherheit GmbH
Britax Excelsior Ltd.
Indhold
1. Egnethed.........................................2
2. Anvendelse i køretøjet ...................3
3. Sådan sikres barnet i bilen............ 4
3.1 Fastgøring af ryglænet .............6
3.2 Breddejustering af siddepuden..7
3.3 Højdejustering af
hovedstøtten ............................ 8
3.4 Ryglænets hvileposition ...........9
3.5 Fastspænding af barnet .........10
3.6 Sådan sikres barnet korrekt ...12
4. Plejeanvisning ..............................13
4.1 Rengøring ..............................14
4.2 Aftagning af betrækket ........... 15
4.3 Påsætning af betrækket ......... 16
5. Affaldsdeponering .......................16
6. 2 års garanti ..................................16
7. Garantikort / udleveringskontrol ..20
Gebruiksaanwijzing
Gefeliciteerd met de aankoop van de
KID plus SICT: de juiste keuze om uw
kind veilig door een nieuwe levensfase
te begeleiden.
De KID plus SICT moet voor een
juiste bescherming van uw kind
altijd zo worden gebruikt en
gemonteerd als in deze
gebruiksaanwijzing beschreven.
Als u nog vragen hebt over het gebruik,
neem dan contact met ons op.
BRITAX RÖMER
Kindersicherheit GmbH
Britax Excelsior Ltd.
Inhoud
1. Geschiktheid................................... 2
2. Gebruik in de auto.......................... 3
3. Beveiliging van uw kind in de
auto..................................................4
3.1 Bevestiging van de rugleuning ..6
3.2 Instelling van de breedte
van het zitkussen .....................7
3.3 Instelling van de hoogte
van de hoofdsteun....................8
3.4 Ruststand van de rugleuning ...9
3.5 De gordel bij uw kind omdoen ..10
3.6 Zo is uw kind goed beveiligd ... 12
4. Onderhoudshandleiding..............13
4.1 Reiniging ................................14
4.2 De bekleding verwijderen.......15
4.3 De bekleding bevestigen........16
5. Afvalverwijderings-instructies....16
6. 2 jaar garantie ...............................16
7. Garantiekaart/
overdrachtscontrole ....................21
Page 46

100922_KIDplus_RUS-DK-NL.fm Seite 2 Montag, 27. September 2010 2:16 14
1. Назначение
Разрешение на эксплуатацию
Авто-
мобильное
детское
сиденье
Britax/
RÖMER
KID plus
SICT
*ECE = Европейский стандарт на
оборудование для обеспечения
безопасности в эксплуатации
• Автомобильное детское сиденье
сконструировано, испытано и
допущено к эксплуатации в
соответствии с требованиями
Европейского стандарта на
оборудование для обеспечения
безопасной перевозки детей в
автомобиле (ECE R 44/04). Знак
проверки (буква Е в кружке) и
номер разрешения на
эксплуатацию приведены на
допуске к эксплуатации (наклейка
на сиденье).
KID plus SICT
•
допущено к эксплуатации в
качестве единого изделия,
состоящего из подушки и спинки.
Внимание!
использование какой-либо из этих
частей вместе с подушкой или,
соответственно, спинкой от другого
сиденья.
Проверка и разрешение
на эксплуатацию
согласно стандарту
ECE* R 44/04
Группа Вес тела
ll+lll от 15 до 36 кг
проверено и
Не допускается
• При внесении пользователем
каких-либо изменений в
конструкцию сиденья, разрешение
на эксплуатацию утрачивает силу.
Изменения могут вноситься
исключительно фирмой
изготовителем.
• Модель
KID plus SICT
должна
использоваться только для
закрепления Вашего ребенка в
автомобиле. Она абсолютно не
пригодна для использования в
качестве сиденья или игрушки в
домашних условиях.
1. Egnethed
Godkendelse
Britax/
RÖMER
barnestol til
bilen
KID plus
SICT
*ECE = Europæisk norm for sikkerhedsudstyr
• Barnestolen til bilen er konstrueret,
afprøvet og godkendt i henhold til
kravene i den europæiske norm for
børnesikkerhedsudstyr (ECE R 44/
04). Kontrolmærket E (i cirklen) og
godkendelsesnummeret sidder på
godkendelsesetiketten (mærkat på
barnestolen).
• KID plus SICT er afprøvet og
godkendt som en kombination af
siddepude og ryglæn.
Forsigtig! Ingen af de to dele må
bruges sammen med andre
siddepuder eller ryglæn.
• Godkendelsen bortfalder
øjeblikkeligt, hvis der ændres ved
barnestolens konstruktion.
Ændringer må kun foretages af
producenten.
• KID plus SICT må udelukkende
bruges til sikring af barnet i
køretøjet. Den må ikke anvendes
som stol eller legetøj i hjemmet.
Afprøvet og godkendt i
henhold til
ECE* R 44/04
Gruppe Kropsvægt
ll+lll 15 til 36 kg
1. Geschiktheid
Goedkeuring
Britax/
RÖMER
autokinder-
zitje
KID plus
SICT
*ECE = Europese norm voor
veiligheidsuitrusting
• Het autokinderzitje is ontworpen,
gecontroleerd en goedgekeurd
overeenkomstig de eisen in de
Europese norm voor
veiligheidsvoorzieningen voor
kinderen (ECE R 44/04). Het
keurmerk E (in een rondje) en het
goedkeuringsnummer bevinden
zich op het goedkeuringslabel
(sticker op het autokinderzitje).
•De KID plus SICT is als combinatie
van zitkussen en rugleuning getest
en goedgekeurd.
Voorzichtig! De beide delen
mogen niet afzonderlijk in
combinatie met andere zitkussens
of rugleuningen worden gebruikt.
• De goedkeuring vervalt zodra er
wijzigingen in het autokinderzitje
worden aangebracht. Wijzigingen
mogen alleen door de fabrikant
worden uitgevoerd.
• Het autokinderzitje KID plus SICT
mag uitsluitend ter bescherming
van uw kind in de auto worden
gebruikt. Het is niet geschikt om in
huis als stoeltje of speelgoed te
worden gebruikt.
Controle en goedkeuring
conform ECE* R 44/04
Groep Lichaamsgewicht
ll+lll 15 t/m 36 kg
2
Page 47

100922_KIDplus_RUS-DK-NL.fm Seite 3 Montag, 27. September 2010 2:16 14
1) Применение разрешается только на
установленным против движения
автомобильном сиденье (напр., в жилом
фургоне, микроавтобусе), которое также
допускается для транспортировки взрослого
человека. Сиденье не должно быть
оборудовано надувной подушкой
безопас ности.
2) Рем ен ь должен иметь разрешение на
эксплуатацию согласно стандарту ECE R 16
(или аналогичному стандарту),
2. Применение в
автомобиле
Опасно! Если ребенок
фиксируется в детском
сиденье только ремнем
безопасности с двухточечным
креплением, то в случае дорожнотранспортного происшествия он
может получить тяжелые травмы
или даже погибнуть.
Никогда не используйте это
сиденье в комбинации с
2-точечным ремнем
безопасности!
Варианты применения детского
сиденья в автомобиле:
в направлении движения да
против движения нет 1)
с 2-точечным ремнем нет
с 3-точечным ремнем 2) да
на переднем сиденье да 3)
на задних сиденьях по краям да
на среднем заднем сиденье
(с 3-точечным ремнем)
(Пожалуйста, соблюдайте
предписания, действующие в
Вашей стране)
свидетельством чему является, например,
буква "E" ("e") в кружке на этикетке допуска на
ремне.
3) для передней надувной подушки
безопасн ости: сдвинуть назад до конца, при
необходимости, воспользоваться указаниями
руководства по эксплуатации автомобиля.
4) Применение не возможно, если имеется
только один 2-точечный ремень.
да 4)
2. Anvendelse i køretøjet
Fare! Hvis barnet kun sikres
med en 2-punkt-sele i
barnestolen, kan det kvæstes
hårdt eller blive dræbt, hvis der sker
en ulykke.
Må aldrig bruges sammen
med en 2-punkt-sele!
Barnestolens
anvendelsesmuligheder:
I kørselsretningen ja
Modsat kørselsretningen nej 1)
Med 2-punkt-sele nej
Med 3-punkt-sele 2) ja
På passagersædet ja 3)
På de yderste bagsæder ja
På mellemste bagsæde
(med 3-punkt-sele)
(Følg forskrifterne i Deres land.)
1) Er kun tilladt til brug på bagudvendte bilsæder
(f.eks. i varevogne, minibus), som også er
godkendte til transport af voksne. Der må ikke
være airbag ved sædet.
2) Selen skal være g odkendt i henhold til ECE R 16
(eller tilsvarende norm). En sådan godkendelse vil
fremgå af et "E", "e" (med cirkel) på selens
kontrolmærke.
3) Ved front-airbag: skubbes langt bagud, se
evt. i bilens instruktionsbog.
4) Kan ikke bruges, hvis der kun er en 2-punktsele.
ja 4)
2. Gebruik in de auto
Gevaar! Als uw kind in het
kinderzitje slechts met een
tweepuntsgordel is beveiligd,
dan kan het daardoor bij een ongeval
zwaar gewond of zelfs gedood
worden.
Nooit in combinatie met een
tweepuntsgordel gebruiken!
Het autokinderzitje kan als volgt
worden gebruikt:
in de rijrichting ja
tegen de rijrichting in nee 1)
met tweepuntsgordel nee
met driepuntsgordel 2) ja
op de passagiersstoel ja 3)
op de achterbank aan de
buitenkant
op de achterbank in het
midden
(met driepuntsgordel)
(Houd u aan de in uw land geldende
voorschriften.)
1) Het gebruik is alleen toegestaan op een
achterwaarts gerichte zitplaats (bijv. bus,
minibus) die ook voor het vervoer van
volwassenen is toegestaan. Er mag op deze
zitplaats geen airbag aanwezig zijn.
2) De gordel dient overeenkomstig ECE R 16 (of
een vergelijkbare norm) goedgekeurd te zijn. Dit
is bijv. herkenbaar aan de omcirkelde "E", "e" op
het controlelabel van de gordel.
3) bij airbag voorin: ver naar achteren schuiven,
evt. de instructies in het handboek van uw auto
in acht nemen.
4) Gebruik is niet mogelijk als er alleen een
tweepuntsgordel aanwezig is.
ja
ja 4)
Page 48

100922_KIDplus_RUS-DK-NL.fm Seite 4 Montag, 27. September 2010 2:16 14
3. Обеспечение
безопасности ребенка
в автомобиле
Для защиты Вашего
ребенка
• В принципе, действует следующее
правило: Чем плотнее ремень
безопасности прилегает к телу
ребенка, тем надежнее его защита.
• Никогда не оставляйте ребенка в
установленном в автомобиле
детском сиденье без присмотра.
• Применение детского сиденья на
заднем сиденье автомобиля:
Передвиньте переднее сиденье
вперед настолько, чтобы ребенок
не касался ногами спинки
переднего сиденья (Опасность
травмирования!).
• Пластмассовые части детского
сиденья нагреваются на солнце.
Внимание! Ребен ок может при этом
получить ожоги. Защитите детское
сиденье, если оно не используется
в данный момент, от интенсивного
солнечного излучения.
• Позволяйте ребенку входить и
выходить только со стороны
тротуара.
• При длительных поездках
делайте остановки, на которых
ребенок сможет дать волю
своему стремлению двигаться.
• Внимание! Детское сиденье не
должно прилегать к двери или
внутренним стенкам
Совет!
автомобиля.
Между
детским сиденьем и дверью, а
также внутренними стенками
автомобиля рекомендуется
оставлять свободное
пространство.
3. Sådan sikres barnet i
bilen
Beskyt barnet
• Generelt gælder: Jo tættere selen
sidder mod barnets krop, desto
større er sikkerheden.
• Lad aldrig barnet være uden opsyn,
når det sidder i barnestolen i bilen.
• Anvendelse på bagsædet: Ryk
forsædet så langt frem, at barnet
ikke kan nå forsædets ryglæn med
fødderne (fare for tilskadekomst).
• Barnestolens plastdele opvarmes,
når solen skinner på dem.
Forsigtig! Pas på, at barnet ikke
brænder sig. Beskyt barnestolen
mod kraftigt sollys, når den ikke er i
brug.
• Lad kun barnet stige ind og ud af
bilen til fortovssiden.
• Hold regelmæssigt pauser under
længere ture, så barnet har
mulighed for at bevæge sig.
• Sørg for, at autostolen ikke stilles
op ad bilens dør eller indervæg.
Tip! Der skal være et mellemrum
mellem autostolen og bilens dør
eller indervæg.
3. Beveiliging van uw kind
in de auto
Ter bescherming van uw kind
• In principe geldt: Hoe beter de
gordel op het lichaam van uw kind
aansluit, des te groter de veiligheid.
• Laat uw kind nooit zonder toezicht
in het kinderzitje in de auto achter.
• Gebruik op de achterbank: Schuif
de voorstoel zo ver naar voren dat
de voeten van uw kind de
rugleuning van de voorstoel niet
raken (verwondingsgevaar).
• De kunststofdelen van het
kinderzitje worden heet in de zon.
Voorzichtig! Uw kind kan zich
hieraan verbranden. Bescherm het
kinderzitje, wanneer dit tijdelijk niet
wordt gebruikt, tegen intensieve
zonnestraling.
• Laat uw kind alleen in- en
uitstappen aan de zijde van het
trottoir.
• Houd tijdens lange ritten regelmatig
pauzes zodat u tegemoetkomt aan
de bewegingsdrang van uw kind.
• Let erop dat het kinderzitje niet het
autoportier of de binnenwand van
de auto raakt. Tip! Er moet ruimte
zijn tussen het kinderzitje en het
autoportier of de binnenwand van
de auto.
4
Page 49

100922_KIDplus_RUS-DK-NL.fm Seite 5 Montag, 27. September 2010 2:16 14
Для защиты всех
пассажиров
При экстренном торможении или
дорожно-транспортном
происшествии незакрепленные
предметы и не пристегнутые
пассажиры могут причинить
травмы другим пассажирам.
Поэтому необходимо всегда
следить за тем, чтобы…
• спинки сидений автомобиля
были закреплены (напр.,
зафиксировать заднее откидное
многоместное сиденье).
• все находящиеся в автомобиле
(напр., между спинкой заднего
сиденья и задним стеклом
кузова) тяжелые предметы или
предметы с острыми краями
были закреплены,
• все пассажиры были
пристегнуты ремнями,
• детское сиденье всегда было
зафиксировано, даже если в нем
не перевозится ребенок,
• воздушная подушка 27 не
должна прилегать к двери или
внутренним стенкам
автомобиля.
Для защиты Вашего
автомобиля
• На некоторых обивках
автомобильных сидений из
восприимчивых к истиранию
материалов (напр., велюр, кожа
и т.п.) вследствие установки на
них детского сиденья могут
появиться потертые места.
Чтобы этого избежать, под него
можно подложить, например,
покрывало или полотенце.
Меры защиты при
обращении с детским
сиденьем
• Запрещается использовать
детское сиденье в отдельно
стоящем виде – даже для
опробования.
Внимание! Спинка 2 может
опрокинуться назад. Всегда
устанавливайте детское
сиденье, прежде чем посадить
в него ребенка.
Passagersikkerhed
Hårde opbremsninger eller biluheld
indebærer altid en risiko for
tilskadekomst som følge af f.eks.
genstande eller personer, som ikke er
sikret forsvarligt. Forvis Dem derfor
altid om, at ..
• bilsædernes ryglæn er fikseret
(gælder også for bagsædet).
• tunge eller skarpkantede genstande
i bilen (f.eks. på baghylden) er
sikret forsvarligt.
• alle personer i bilen benytter
sikkerhedssele.
• barnestolen er spændt fast, også
selvom barnet ikke sidder i den.
• Air Cushion 27 må ikke stilles op ad
bilens dør eller indervæg.
Beskyttelse af bilen
• På sædebetræk af f.eks. velour,
læder etc. vil barnestolen nogle
gange efterlade mærker. For at
undgå dette kan man lægge et tæppe
eller et håndklæde ind under stolen.
Sikkerhed ved brug af
autostolen
• Autostolen må aldrig anvendes
fritstående - heller ikke når den
prøvesiddes.
Forsigtig! Ryglænet 2 kan vippes
bagover. Stil altid autostolen på
Ter bescherming van alle
passagiers
Bij een noodstop of een ongeval kunnen
niet vastgezette voorwerpen of personen
andere passagiers verwonden. Zorg er
daarom altijd voor dat...
• de rugleuningen van de zitplaatsen
zijn vastgezet (bijv. de neerklapbare
rugleuning van de achterbank
vsatklikken);
• alle zware of scherpe voorwerpen in
de auto (bijv. op de hoedenplank)
zijn vastgezet;
• alle personen in de auto de gordel
om hebben;
• het kinderzitje in de auto is vastgezet,
ook als er geen kind word vervoerd;
• het Air Cushion 27 niet het
autoportier of de binnenwand van
de auto raakt.
Ter bescherming van uw auto
• Bepaalde autostoelbekledingen van
gevoelig materiaal (bijv. velours,
leer, etc) kunnen tekenen van
slijtage gaan vertonen door gebruik
van het autokinderzitje. Dit kan
worden voorkomen door
bijvoorbeeld een deken of
handdoek onder het zitje te leggen.
Ter bescherming bij gebruik
van het kinderzitje
• Het kinderzitje mag nooit worden
gebruikt als dit niet is vastgezet ook niet om het uit te proberen.
Voorzichtig! De rugleuning 2 kan
naar achteren kantelen. Zet het
Page 50

100922_KIDplus_RUS-DK-NL.fm Seite 6 Montag, 27. September 2010 2:16 14
• Нельзя нагружать воздушную
подушку 27.
• Сиденье для ребенка не должно
располагаться на воздушной
подушке 27.
• Нельзя использовать воздушную
подушку 27 в качестве ручки для
переноски.
3.1 Закрепление спинки
сиденья
Детское сиденье состоит из
подушки для сидения 1 и спинки 2 с
регулируемым подголовником 3.
Так ая комбинация обеспечивает
ребенку надлежащую защиту и
желаемое удобство при сидении.
Þ Опустите спинку сиденья 2
горизонтально позади подушки
сиденья 1.
Þ Откиньте вверх крышку
шарнира 18.
Þ Вставьте ось шарнира 4 спинки
сиденья 2 как можно дальше в
направляющую 5 на подушке
сиденья 1.
køretøjets sæde, før barnet sættes i.
• Air Cushion 27 må ikke belastes.
• o Autostolen må ikke stilles på
Air Cushion 27.
• o Air Cushion 27 må ikke anvendes
som bærehåndtag.
3.1 Fastgøring af ryglænet
Barnestolen består af en siddepude 1
og et ryglæn 2 med justbar
hovedstøtte 3. Denne kombination
giver barnet den optimale sikkerhed
og komfort.
Þ Læg ryglænet 2 fladt ned bag
siddepuden 1.
Þ Tryk afdækningen til ledet 18 opad.
Þ Skub ledets akse 4 til ryglænet 2 så
langt ind i føringen 5 på
siddepuden 1 som muligt.
kinderzitje altijd eerst op de
autostoel voordat u uw kind erin
plaatst.
• Het Air Cushion 27 mag niet
worden belast.
• o Het kinderzitje mag niet op het
Air Cushion 27 worden geplaatst.
• o Het Air Cushion 27 mag niet als
handgreep worden gebruikt.
3.1 Bevestiging van de
rugleuning
Het kinderzitje bestaat uit een
zitkussen 1 en een rugleuning 2 met
instelbare hoofdsteun 3. Deze
combinatie biedt uw kind de gewenste
bescherming en comfort.
Þ Leg de rugleuning 2 plat achter het
zitkussen 1.
Þ Klap de scharnierafdekking 18
omhoog.
Þ Schuif de scharnieras 4 van de
rugleuning 2 zo ver mogelijk in de
geleiding 5 van het zitkussen 1.
Þ Вставьте крышку шарнира 18 под
чехол подушки сиденья 1, чтобы
она располагалась на
пластмассовой поверхности.
Þ Skub afdækningen til ledet 18 ind
under siddepudens betræk 1, så
den ligger på kunststoffet.
6
Þ Schuif de scharnierafdekking 18
dusdanig onder de bekleding van
het zitkussen 1, dat deze op het
kunststofoppervlak ligt.
Page 51

100922_KIDplus_RUS-DK-NL.fm Seite 7 Montag, 27. September 2010 2:16 14
Опасно! При раскладывании
спинки 2 ничего не должно
находиться в зоне шарнирной
оси 4 между спинкой 2 и
подушкой сиденья 1.
Внимание! Вы (или Ваш ребенок)
можете, к примеру, защемить
пальцы.
Þ Поднимайте спинку сиденья 2
вверх до тех пор, пока она не
зафиксируется.
3.2 Регулировка ширины
подушки сиденья
Правильно подогнанная подушка
1
сиденья
наложение поясного ремня
безопасности
повышает уровень защиты Вашего
ребенка. Боковые части
сиденья
любое из трех значений ширины.
• Подушка сиденья
Вы можете отрегулировать ширину
подушки сиденья 1 для Вашего
ребенка следующим образом:
Þ
Þ
обеспечивает оптимальное
11
, и тем самым
15
1
можно отрегулировать на
отрегулирована таким образом,
чтобы переставляемые боковые
15
части
ребенка как можно плотнее, но при
этом не сдавливали их.
Возьмитесь с обеих сторон наружной
части боковых частей
серые регулировочные кнопки
Оттяните
кнопки
боковые части
наибольшей ширины.
прилегали к бедрам
обе
регулировочные
16
вверх и раздвиньте
15
подушки
1
должна быть
15
за светло-
в положение
16
.
Fare! Når ryglænet svinges op
2, må der ikke befinde sig noget
i området ved mellemledet 4
mellem ryglænet 2 og
siddepuden 1.
Forsigtig! De eller Deres barn kan
f.eks. få fingrene i klemme og komme
til skade.
Þ Vip ryglænet opad, indtil 2 det går i
hak.
3.2 Breddejustering af
siddepuden
En korrekt indstillet siddepude 1 sikrer,
at hofteselen 11 sidder optimalt og
giver bedre beskyttelse af barnet.
Sidedelene 15 til siddepuden 1 kan
indstilles til tre forskellige bredder.
• Siddepuden 1 skal indstilles, så de
justerbare sidedele 15 sidder så tæt
som muligt mod barnets bækken
uden at sidde for stramt.
Sådan kan siddepudens bredde 1
tilpasses barnet:
Þ Tag fat på begge sider af
sidedelenes yderside 15 i de
lysegrå justeringsknapper 16.
Þ Tryk begge justeringsknapper 16
opad, og træk sidedelene 15 til den
bredeste indstilling.
Gevaar! Als de rugleuning 2
wordt opgeklapt, mag zich in de
buurt van de scharnieras 4
niets tussen rugleuning 2 en
zitkussen 1 bevinden.
Voorzichtig! Uw vingers of die van uw
kind kunnen klem komen te zitten en
gewond raken.
Þ Draai de rugleuning 2 naar boven
totdat deze vastklikt.
3.2 Instelling van de breedte
van het zitkussen
Een goed aangepast zitkussen 1
waarborgt de optimale positie van het
heupgedeelte van de gordel 11, en
verhoogt daardoor de beveiliging van
uw kind. U kunt de zijstukken 15 van
het zitkussen 1 in drie breedtes
instellen.
• Het zitkussen 1 moet zo zijn
ingesteld dat de instelbare
zijstukken 15 zich zo dicht mogelijk
bij het bekken van uw kind
bevinden zonder het in te klemmen.
U kunt de breedte van het zitkussen 1
als volgt aan uw kind aanpassen:
Þ Steek uw handen aan beide zijden
aan de buitenkant van de
zijstukken 15 in de lichtgrijze
instelknoppen 16.
Þ Druk beide instelknoppen 16 naar
boven en trek de zijstukken 15 in de
breedste stand.
Page 52

100922_KIDplus_RUS-DK-NL.fm Seite 8 Montag, 27. September 2010 2:16 14
Þ
Уса д ите ребенка в детское сиденье.
Þ
Теп ер ь снова оттяните
регулировочные кнопки
отрегулируйте положение боковых
15
частей
Внимание!
быть зафиксированы. Потяните за
боковые части, чтобы проверить
их фиксацию.
на желаемую ширину.
Боковые части должны
обе
16
и
Þ
Þ Lad barnet sætte sig på barnestolen.
Þ Tryk nu på begge
justeringsknapper 16 igen, og indstil
sidedelene 15 til den ønskede
bredde.
Forsigtig! Sidedelene skal gå i hak.
Træk i sidedelene for at kontrollere,
om de er gået i hak.
Uw kind kan vervolgens in het
kinderzitje gaan zitten.
Þ Druk nu beide instelknoppen 16
opnieuw in en stel de zijstukken 15
in de gewenste breedte in.
Voorzichtig! De zijstukken moeten
zijn vastgeklikt. Trek aan de
zijstukken om te controleren of deze
zijn vastgeklikt.
3.3 Регулировка высоты
подголовника
Правильно подогнанный
подголовник
оптимальному наложению
диагонального ремня безопасности
и обеспечивает ребенку надлежащую
защиту и желаемое удобство при
сидении. Высота подголовника
может быть отрегулирована в любом
из одиннадцати фиксируемых
положений.
• Подголовник
установлен так, чтобы между
плечами ребенка и
подголовником
промежуток шириной в два пальца.
Вы можете подогнать высоту
подголовника 3 к росту ребенка
следующим образом:
Þ
Возьмитесь за регулировочную
ручку
подголовника
немного вверх. При это м
подголовник расфиксируется.
Þ
Теперь расфиксированный
подголовник
3
способствует
3
должен быть
3
еще оставался
8
на обратной стороне
3
и оттяните ее
3
можно переместить
3
3.3 Højdejustering af
hovedstøtten
En korrekt indstillet hovedstøtte 3
sikrer, at diagonalselen sidder optimalt
6 og giver barnet den optimale komfort
og sikkerhed. Hovedstøttens højde 3
6
,
kan indstilles i elleve positioner.
• Hovedstøtten 3 skal indstilles, så
der er plads til to fingre mellem
barnets skuldre og hovedstøtten 3.
Hovedstøttens højde 3 tilpasses
barnets størrelse på følgende
måde:
Þ Tag fat i indstillingshåndtaget 8 på
bagsiden af hovedstøtten 3 og træk
det lidt opad. Nu er hovedstøtten
løsnet.
Þ Nu kan hovedstøtten 3 indstilles til
den ønskede højde.
Så snart De slipper
indstillingshåndtaget 8 går
hovedstøtten i hak.
3.3 Instelling van de hoogte
van de hoofdsteun
Een goed aangepaste hoofdsteun 3
waarborgt de optimale positie van de
diagonale gordel 6, en biedt uw kind
de gewenste beveiliging en comfort. U
kunt de hoogte van de hoofdsteun 3 in
elf standen vastklikken.
• De hoofdsteun 3 moet zo zijn
ingesteld dat er tussen de
schouders van uw kind en de
hoofdsteun 3 nog twee vingers
ruimte is.
U kunt de hoogte van de
hoofdsteun 3 als volgt aan de
lichaamsgrootte van uw kind
aanpassen:
Þ Grijp de instelhendel 8 aan de
achterkant van de hoofdsteun 3
vast en trek deze iets naar boven.
Nu is de hoofdsteun ontgrendeld.
Þ U kunt nu de ontgrendelde
hoofdsteun 3 in de gewenste
hoogte instellen.
Zodra u de instelhendel 8 loslaat,
klikt de hoofdsteun vast.
8
Page 53

100922_KIDplus_RUS-DK-NL.fm Seite 9 Montag, 27. September 2010 2:16 14
на желаемую высоту.
Как только регулировочная ручка
будет отпущена, подголовник
зафиксируется.
Þ
Установите детское сиденье на
сиденье автомобиля.
Þ
Дайте Вашему ребенку занять
место в детском сиденье, а затем
отрегулируйте высоту сиденья.
Внимание!
несколько раз с тем, чтобы
подголовник
наилучшим образом.
Повторите это
3
был отрегулирован
3.4 Исходное положение
спинки сиденья
Спинка2 детского сиденья может
бесступенчато подгоняться к
наклону автомобильного сиденья.
Полезный совет! Спинка 2 сиденья
удерживается в вертикальном
положении небольшим фиксатором.
Слегка надавите на спинку 2 в
направлении назад, чтобы
расцепить фиксатор.
Пожалуйста, имейте в виду
следующее: Наилучшая защита
обеспечивается только в том случае,
когда автомобильное сиденье
находится в вертикальном
положении. Спинка 2 детского
сиденья может быть наклонена назад
в исходное положение, независимо
от автомобильного сиденья.
Þ
Для этого следует откинуть наружу
опорный уголок
стороне спинки сиденья
9
на обратной
2
.
Þ Stil autostolen på bilsædet.
8
Þ Lad barnet sætte sig i autostolen,
og kontrollér højden.
Forsigtig! Gentag dette, indtil
hovedstøtten 3 er indstillet optimalt.
3.4 Ryglænets hvileposition
Barnestolens ryglæn 2 tilpasser sig
trinløst til bilsædernes hældning.
Tip! Ryglænet 2 holdes lodret ved
hjælp af en lille holder. Tryk ryglænet 2
lidt tilbage for at løsne holderen.
Vær opmærksom på følgende: Den
bedste beskyttelse opnås kun, hvis
bilsædet befinder sig i lodret position.
Barnestolens ryglæn 2 kan vippes
tilbage til hvileposition uafhængigt af
bilsædet.
Þ For at gøre dette skal
afstandsvinklen 9 på bagsiden af
ryglænet 2 klappes ud.
Þ Plaats het kinderzitje op de
autostoel.
Þ Laat uw kind in het kinderzitje
plaatsnemen en controleer de
hoogte.
Voorzichtig! Herhaal dit proces
totdat de hoofdsteun 3 optimaal is
ingesteld.
3.4 Ruststand van de
rugleuning
De rugleuning 2 van het kinderzitje
past zich traploos aan de hellingshoek
van de autostoel aan.
Tip! De rugleuning 2 wordt met een
kleine grendel verticaal gehouden.
Druk de rugleuning 2 iets naar
achteren om de grendel te
ontgrendelen.
Let op! De beste bescherming is
alleen gewaarborgd als de autostoel
rechtop staat. De rugleuning 2 van het
kinderzitje kan, onafhankelijk van de
autostoel, naar achteren in een
ruststand leunen.
Þ Klap daarvoor de afstandshoek 9
aan de achterkant van de
rugleuning 2 uit.
Page 54

100922_KIDplus_RUS-DK-NL.fm Seite 10 Montag, 27. September 2010 2:16 14
Þ
Отклоните теперь спинку2 назад
настолько, чтобы опорный уголок
прилегал своей плоскостью к
спинке автомобильного сиденья.
Внимание!
дальше, чем это позволяет
опорный уголок
Не отклоняйте спинку2
9
.
Þ Vip nu ryglænet 2 så langt tilbage,
at afstandsvinklen 9 ligger med hele
9
fladen på bilsædets ryglæn.
Forsigtig! Vip ikke ryglænet 2
længere tilbage, end
afstandsvinklen 9 indikerer.
Þ
Laat vervolgens de rugleuning 2 zo
ver naar achteren leunen totdat de
afstandshoek 9 vlak tegen de
rugleuning van de autostoel
aankomt.
Voorzichtig! Laat de rugleuning 2
niet verder naar achteren leunen
dan de afstandshoek 9 toestaat.
3.5 Пристегивание ребенка
ремнями
KID plus SICT
в автомобиле. Ребенка просто
пристегивают в детском сиденье с
помощью автомобильного ремня
безопасности.
1. Наложение автомобильного
ремня
не требует установки
Þ Уст ано в ит е детское сиденье на
автомобильное сиденье.
Проверьте, чтобы спинка 2
прилегала своей плоскостью к
спинке автомобильного сиденья
(см. 3.4).
Полезный совет! Если при этом
подголовник автомобильного
сиденья мешает, то просто
поверните его.
Þ
Уса д ите ребенка в детское сиденье.
Þ Вытяните автомобильный ремень
и уложите его перед ребенком к
замку автомобильного ремня 10 .
Внимание! Не допускать
скручивания ремня.
Þ Зафиксируйте язычки в замке
автомобильного ремня 10. ЩЕЛК!
3.5 Fastspænding af barnet
KID plus SICT kræver ingen
montering i bilen. Barnet sikres i
barnestolen med bilselen.
1. Fastspænding af bilselen
Þ Stil barnestolen på bilsædet. Sørg
for, at ryglænet 2 sidder med hele
fladen op ad bilsædets ryglæn
(se 3.4).
Godt råd! Hvis bilens hovedstøtte
er i vejen, kan den drejes.
Þ Lad barnet sætte sig på
barnestolen.
Þ Træk bilselen foran barnet til bilens
selelås 10
Forsigtig! Pas på, at selen ikke
snor sig.
Þ Lad låsetungen gå i hak i bilens
selelås 10. KLIK!
3.5 De gordel bij uw kind
omdoen
De KID plus SICT hoeft niet in de
auto te worden gemonteerd. Uw kind
wordt eenvoudigweg met de
autogordel in het kinderzitje vastgezet
1. Autogordel omdoen
Þ Plaats het kinderzitje op de
autostoel. Zorg ervoor dat de
rugleuning 2 vlak tegen de
rugleuning van de autostoel
aankomt (zie 3.4).
Tip! Als de hoofdsteun van de
autostoel daarbij in de weg zit, draai
dan gewoon om.
Þ Laat uw kind in het kinderzitje
plaatsnemen.
Þ Trek de autogordel los en leid deze
voor uw kind langs naar het slot van
de autogordel 10.
Voorzichtig! Draai de gordel niet.
Þ Klik de gesp in het slot van de
autogordel 10 vast. KLIK!
10
Page 55

100922_KIDplus_RUS-DK-NL.fm Seite 11 Montag, 27. September 2010 2:16 14
2. Укладка автомобильного ремня
в красные направляющие на
детском сиденье.
Þ
Уло ж ите диагональный ремень6 и
поясной ремень
замка автомобильного ремня
под подлокотник, в светло-красную
направляющую
сиденья
Внимание!
автомобильного ремня
должен находиться между светлокрасной направляющей
подлокотником.
1
.
Замок
11
со стороны
12
подушки
10
12
не
10
и
Þ Уло ж ите поясной ремень 11 с
другой стороны подушки
сиденья 1 также в светлокрасную направляющую 12.
Внимание! Поясной ремень 11
по обеим сторонам должен
проходить как можно ниже через
паховый сгиб ребенка.
Þ Протяните диагональный
плечевой ремень безопасности 6
через темно-красный держатель
ремня 7 подголовника 3 таким
образом, чтобы он полностью
находился в держателе ремня 7 и
не был перекручен.
Полезный совет! Если спинка
сиденья 2 закрывает держатель
ремня 7, подголовник 3 можно
приподнять вверх. Теперь
диагональный плечевой ремень
безопасности 6 может быть легко
протянут. Установите затем
подголовник 3 снова на прежней
высоте.
2. Bilselen lægges i de røde
seleføringer på barnestolen.
Þ Læg diagonalselen 6 og
hofteselen 11 på bil-selelåsens
side 10 under armlænet i
siddepudens 12 lyserøde
seleføring 1.
Forsigtig! Bilens selelås 10 må
ikke ligge mellem den lyserøde
seleføring 12 og armlænet.
Þ Læg ligeledes hofteselen 11 på den
anden side af siddepuden 1 i den
lyserøde seleføring 12.
Forsigtig! Hofteselen 11 skal på
begge sider sidde så tæt på barnets
lysken som muligt.
Þ Træk diagonalselen 6 ind i den
mørkerøde seleholder 7 til
hovedstøtten 3, indtil den ligger helt
i seleholderen 7 uden at dreje.
Tip! Hvis ryglænet dækker 2
seleholderen 7, kan hovedstøtten 3
stilles opad. Nu er det let at trække
diagonalselen 6 ind. Stil nu
hovedstøtten 3 tilbage til den rigtige
højde igen.
2. Autogordel in de rode
gordelgeleiders van het kinderzitje
leggen.
Þ Leid de diagonale gordel 6 en de
heupgordel 11 aan de kant van het
gordelslot van de auto 10 onder de
armleuning, door de lichtrode
gordelgeleider 12 van het
zitkussen 1.
Voorzichtig! Het gordelslot van de
auto 10 mag niet tussen de
lichtrode gordelgeleider 12 en de
armleuning liggen.
Þ Leid de heupgordel 11 aan de
andere zijde van het zitkussen 1
ook door de lichtrode
gordelgeleider 12.
Voorzichtig!De heupgordel 11
moet aan beide zijden zo laag
mogelijk over de liezen van uw kind
lopen.
Þ Leid de diagonale gordel 6 in de
donkerrode gordelhouder 7 van de
hoofdsteun 3 totdat deze zich
volledig en ongedraaid in
gordelhouder 7 bevindt.
Tip! Als de rugleuning 2 de
gordelhouder 7 bedekt, kunt u de
hoofdsteun 3 naar boven verstellen.
Nu kan de diagonale gordel 6
gemakkelijk worden aangebracht.
Zet de hoofdsteun 3 vervolgens
weer terug op de juist hoogte.
Page 56

100922_KIDplus_RUS-DK-NL.fm Seite 12 Montag, 27. September 2010 2:16 14
Þ Убедитесь, что диагональный
ремень 6 проходит поверх
ключицы ребенка, и что он не
прилегает к его шее.
Полезный совет! Вы можете
отрегулировать подголовник 3 по
высоте также еще в автомобиле.
Þ Внимание! Диагональный
ремень 6 должен проходить
назад в поперечном
направлении.
Полезный совет! Вы можете
выставить положение ремня
безопасности на теле с помощью
регулируемого дефлектора для
ремня Вашего автомобиля.
Þ Внимание! Диагональный
ремень 6 в автомобиле никогда
не должен проходить вперед к
дефлектору ремня.
Полезный совет! В этом
случае используйте детское
сиденье только на заднем
сиденье автомобиля.
Þ Подтяните автомобильный
ремень путем натяжения
диагонального ремня 6.
Þ Kontrollér, at diagonalselen 6 ligger
over barnets kraveben og ikke ved
halsen.
Godt råd! Hovedstøtten 3 kan også
tilpasses i højden, mens
barnestolen befinder sig i køretøjet.
Þ Forsigtig! Diagonalselen 6 skal
forløbe skråt bagud.
Godt råd! Seleforløbet kan
reguleres med den justerbare
selestyring i bilen.
Þ Forsigtig! Diagonalselen 6 må
aldrig føres frem til bilens
selestyring.
Godt råd! Hvis dette er tilfældet,
må barnestolen kun bruges på
bagsædet.
Þ Stram bilselen ved at trække i
diagonalselen 6.
Þ
Controleer of de diagonale gordel 6
over het sleutelbeen van uw kind
loopt en niet vast tegen de hals ligt.
Tip! U kunt de hoogte van de
hoofdsteun 3 ook nog in de auto
aanpassen.
Þ Voorzichtig! De diagonale gordel 6
moet schuin naar achteren lopen.
Tip! U kunt de positie van de gordel
met de instelbare gordelomleider
van uw auto regelen.
Þ Voorzichtig! De diagonale gordel 6
mag nooit naar voren naar de
gordelomleider in de auto lopen.
Tip! Gebruik in dat geval het
kinderzitje alleen op de achterbank.
Þ Trek de autogordel strak door aan
de diagonale gordel 6 te trekken.
3.6 Проверка
безопасности ребенка
Для гарантии безопасности
Вашего ребенка убедитесь
в том, что…
• поясной ремень11 по обеим
сторонам проходит в светлокрасных направляющих
подушки сиденья,
12
3.6 Sådan sikres barnet
korrekt
Se for en sikkerheds skyld
efter, at...
• hofteselen 11 på begge sider sidder
i siddepudens lyserøde
seleføringer 12,
3.6 Zo is uw kind goed
beveiligd
Controleer voor de veiligheid
van uw kind of...
• de heupgordel 11 aan beide zijden
door de twee lichtrode
gordelgeleiders 12 van het
zitkussen loopt;
12
Page 57

100922_KIDplus_RUS-DK-NL.fm Seite 13 Montag, 27. September 2010 2:16 14
4. Инструкция по уходу за
сиденьем
Для сохранения защитной
функции сиденья
• При дорожно-транспортном
происшествии в результате
столкновения или наезда на
препятствие со скоростью свыше
10 км/ч в детском сиденье могут
возникнуть повреждения, которые
не всегда видны невооруженным
глазом. Обязательно замените
повреждённое детское сиденье.
Пожалуйста, утилизируйте
• диагональный ремень 6 на
стороне замка автомобильного
10
ремня
красной направляющей
подушки сиденья,
• диагональный ремень
через темно-красный держатель
ремня
• диагональный ремень
назад в поперечном направлении,
• ремни натянуты и не перекручены,
• замок автомобильного ремня10
не находится между светлокрасной направляющей
подлокотником подушки сиденья.
• Детское сиденье не должно
прилегать к двери или внутренним
стенкам автомобиля.
повреждённое сиденье согласно
предписаниям (см. 5.).
• Ре гулярно проверяйте все
ответственные детали на предмет
отсутствия повреждений.
Убедитесь в том, что детали
механической конструкции
функционируют безупречно.
также проходит в светло-
7
подголовника,
12
6
проходит
6
проходит
12
и
• at diagonalselen 6 på siden af
bilens selelås 10 også sidder i
siddepudens lyserøde
seleføring 12,
• diagonalselen 6 går gennem den
mørkerøde seleholder 7 til
hovedstøtten,
• diagonalselen 6 forløber skråt
bagud,
• selerne er stramme og ikke snoede,
• bilens selelås 10 ikke ligger mellem
den lyserøde seleføring 12 og
siddepudens armlæn.
• stil ikke autostolen op ad bilens dør
eller indervæg.
4. Plejeanvisning
Bevarelse af barnestolens
beskyttende virkning
• Ved uheld med en
kollisionshastighed på over 10 km/t
kan autostolen have taget skade,
uden at det kan ses.
Udskift omgående denne autostol.
Bortskaf den efter reglerne (se 5.).
• Kontroller med jævne mellemrum,
at ingen af de vigtige dele har taget
skade. Forvis Dem om, at de
mekaniske komponenter fungerer
efter hensigten.
• de diagonale gordel 6 aan de kant
van het slot van de autogordel 10
ook door de lichtrode
gordelgeleider 12 van het zitkussen
loopt;
• de diagonale gordel 6 door de
donkerrode gordelhouder 7 van de
hoofdsteun loopt;
• de diagonale gordel 6 schuin naar
achteren loopt;
• de gordels goed strak zitten en niet
zijn verdraaid;
• het slot van de autogordel 10 zich
niet tussen de lichtrode
gordelgeleider 12 en de armleuning
van het zitkussen bevindt.
• het kinderzitje niet het autoportier of
de binnenwand van de auto raakt.
4. Onderhoudshandleiding
Voor het behoud van de
beschermende werking
• Bij ongevallen waarbij de
botssnelheid hoger dan 10 km/u is,
kan het autokinderzitje beschadigd
raken, hoewel de beschadigingen
niet altijd zichtbaar zijn.
Vervang in zo‘n geval het kinderzitje
altijd. Voer het zitje volgens de
geldende voorschriften af (zie 5).
• Controleer alle belangrijke onderdelen
regelmatig op beschadiging. Zorg
ervoor dat de mechanische
componenten goed functioneren.
Page 58

100922_KIDplus_RUS-DK-NL.fm Seite 14 Montag, 27. September 2010 2:16 14
• Следите за тем, чтобы сиденье не
было зажато и повреждено между
жесткими деталями конструкции
автомобиля (двери,
направляющие сидений и т.д.).
• Поврежденное сиденье (например,
в результате падения) в
обязательном порядке должно
быть передано изготовителю для
проверки.
4.1 Очистка
Вы должны проследить за тем, чтобы
использовался только оригинальный
запасной чехол фирмы Britax/
RÖMER, поскольку этот чехол
представляет собой существенную
часть конструкции сиденья. Запасной
чехол можно приобрести в
специализированной торговле или в
ADAC (Автомобильный клуб ФРГ).
Запрещается эксплуатация
детского сиденья без чехла.
• Вы можете снять
последующей стирки в стиральной
машине в щадящем режиме при
температуре 30°C с
использованием нейтрального
моющего средства. Пожалуйста,
соблюдайте указания по стирке,
приведенные на этикетке чехла.
При стирке с температурой выше
30°C материал чехла может
полинять. Не разрешается отжим
чехла в центрифуге, а также его
сушка в электрической сушилке
(ткань может отслоиться от
набивки).
чехол
для
• Pas på, at barnestolen ikke kommer
i klemme mellem hårde bildele
(f.eks. bildøren, glideskinnerne
osv.) og på denne måde
beskadiges.
• Barnestole, som er blevet
beskadiget (f.eks. fordi de er faldet
ned), skal altid efterses af
producenten.
4.1 Rengøring
Der må kun benyttes originale Britax/
RÖMER-reservebetræk til
barnestolen, da disse udgør en vigtig
del af hele systemets funktion.
Reservebetræk kan købes i
specialforretninger eller hos ADAC
(tysk autoklub, svarer til FDM).
Barnestolen må ikke benyttes
uden betræk
• Betrækket kan aftages til vask.
Vaskes ved 30°C i vaskemaskinen
(finvask). Følg anvisningerne på
betrækkets vaskemærke. Hvis
betrækket vaskes ved varmere
temperaturer end 30°C , kan
farverne løbe ud. Betrækket må
ikke centrifugeres, og det må under
ingen omstændigheder tørres i
tørretumbleren (stoffet kan løsne
sig fra polstringen).
• Zorg ervoor dat het autokinderzitje
niet tussen harde delen (portier,
stoelrail, etc) klem komt te zitten en
beschadigd raakt.
• Laat een autokinderzitje dat
beschadigd is (bijv. als dit is
gevallen) altijd door de fabrikant
controleren.
4.1 Reiniging
Gebruik uitsluitend een originele
bekleding van Britax/RÖMER,
aangezien de bekleding van wezenlijk
belang is voor de werking van het
systeem. Losse bekleding is
verkrijgbaar bij de vakhandel en bij
filialen van de ADAC (de Duitse
ANWB).
Het autokinderzitje mag niet
zonder bekleding worden
gebruikt.
•De bekleding kan worden
verwijderd en in de wasmachine
worden gewassen met een
fijnwasprogramma op 30°C en een
fijnwasmiddel. Let op de
aanwijzingen op het wasetiket van
de bekleding. Als de bekleding op
meer dan 30°C wordt gewassen,
kan de bekledingsstof verkleuren.
De bekleding mag niet worden
gecentrifugeerd of in een
elektrische wasdroger worden
gedroogd (hierdoor kan de stof van
de vulling losraken).
14
Page 59

100922_KIDplus_RUS-DK-NL.fm Seite 15 Montag, 27. September 2010 2:16 14
•
Пластмассовые детали
промывать в мыльном растворе.
Запрещается
сильнодействующие моющие
средства (например,
растворители).
применять
можно
• Plastdelene tørres af med
sæbevand. Undgå brug af stærke
rengøringsmidler (f.eks.
opløsningsmidler).
•De kunststofdelen kunnen met
een zeepoplossing worden
gereinigd. Gebruik geen bijtende
middelen (zoals oplosmiddelen).
4.2 Снятие чехла
Þ Вытяните наружу крючок чехла 14
спинки сиденья 2.
Þ Вытяните наружу резиновые
петли 13 подушки сиденья 1.
Þ Вытяните наружу петли 19
подголовника 3.
Þ Вытяните заглушки 17 из чехла
боковин 15.
Þ Теперь Вы можете снять чехол.
4.2 Aftagning af betrækket
Þ Tag betrækkets kroge 14 ud af
ryglænet 2.
Þ Tag gummistropperne 13 til
siddepuden 1 af.
Þ Tag knaphullerne 19 til
hovedstøtten 3 af.
Þ Træk propperne 17 ud af betrækket
på sidedelene 15.
Þ Nu kan betrækket tages af.
4.2 De bekleding verwijderen
Þ Maak de bekledingshaken 14 van
de rugleuning 2 los.
Þ Maak de rubberen lussen 13 van
het zitkussen 1 los.
Þ Maak de knoopgaten 19 van de
hoofdsteun 3 los.
Þ Trek de afsluitstoppen 17 uit de
bekleding van de zijstukken 15.
Þ De bekleding kan nu worden
verwijderd.
Page 60

100922_KIDplus_RUS-DK-NL.fm Seite 16 Montag, 27. September 2010 2:16 14
4.3 Надевание чехла
Þ Все описанные операции следует
выполнить в обратной
последовательности.
5. Указания по
утилизации
Пожалуйста, соблюдайте
предписания по утилизации,
действующие в Вашей стране.
Утилизация упаковочных материалов
Контейнер для картона
Утилизация отдельных деталей
Чехол Прочие отходы,
Пластмассо
вые детали
Металличес
кие детали
использование для
регенерации тепла
согласно маркировке в
предусмотренные для
этого контейнеры
Контейнер для
металлолома
6. Двухгодичная гарантия
На это автомобильное/велосипедное
детское сиденье/детскую коляску мы
предоставляем двухгодичную
гарантию на отсутствие брака
изготовления или дефектов
материалов. Гарантийный срок
исчисляется с даты покупки. Для
подтверждения сохраняйте
заполненный гарантийный талон,
подписанный Вами формуляр
контроля при покупке, а также
торговый чек на весь период
действия гарантийных обязательств.
4.3 Påsætning af betrækket
Þ Gå frem i omvendt rækkefølge.
5. Affaldsdeponering
(Følg forskrifterne i Deres land.)
Deponering af emballagen
Container til pap
Deponering af enkeltdele
Betræk Restaffald, termisk
Plastdele I containere i henhold til
Metaldele Container til metal
forarbejdning
mærkningen
6. 2 års garanti
Til disse stole til bilen/cyklen/
barnevognen yder vi 2 års garanti på
fabrikations- eller materialefejl.
Garantiperioden begynder den dag,
produktet købes. Du bedes i hele
garantiperioden opbevare det udfyldte
garantikort, udleveringsbeviset, som
er underskrevet af dig samt
købskvitteringen.
I forbindelse med evt. reklamationer
skal garantibeviset vedlægges
autostolen. Garantien ydes kun, hvis
autostolen/cykelautostolen/
4.3 De bekleding bevestigen
Þ
Ga gewoon in omgekeerde
volgorde te werk.
5. Afvalverwijderingsinstructies
Houd u aan de in uw land geldende
voorschriften inzake
afvalverwijdering.
Afvoer van de verpakking
Bij het oud papier
Afvoer van de afzonderlijke delen
Bekleding Huisvuil, thermische
Kunststofdelen Overeenkomstig de
Metalen delen Container voor metaal
verwerking
aanduiding op het deel
in de daarvoor
bestemde container
6. 2 jaar garantie
Wij geven 2 jaar garantie op fabricageen materiaalfouten in deze
autokinderzitjes/fietskinderzitjes/
kinderwagens. De garantieperiode
gaat in op de datum van aankoop.
Bewaar om aanspraak op de garantie
te kunnen maken de ingevulde
garantiekaart, de door u ondertekende
overdrachtscontrole en het
aankoopbewijs gedurende de gehele
garantieperiode.
Bij het indienen van een garantieclaim
dient het garantiebewijs met het
16
Page 61

100922_KIDplus_RUS-DK-NL.fm Seite 17 Montag, 27. September 2010 2:16 14
При представлении рекламаций к
сиденью должен быть приложен
гарантийный талон. Гарантийные
обязательства распространяются
только на детские автомобильные/
велосипедные сиденья/детские
коляски, с которыми обращались
надлежащим образом, и которые
были отправлены обратно в чистом и
аккуратном виде.
Гарантийные обязательства не
распространяются:
• на естественной износ, а также
на повреждения, вызванные
чрезмерной нагрузкой
• на повреждения, возникшие как
следствие применения не по
назначению или неправильной
эксплуатации
Действует гарантия или нет?
Материалы:
отвечают строгим требованиям в
отношении сохранения цвета под
воздействием УФ-излучения. Не
смотря на это, все материалы,
подвергающиеся воздействию УФизлучения, выцветают. При этом речь
идет не о дефектах материалов, а о
естественных признаках износа, на
которые гарантийные обязательства
не распространяются.
Замок:
большинстве случаев вызваны
загрязнением, которое можно
удали ть промыванием. В своих
действиях руководствуйтесь,
Все наши материалы
Неисправности замк а в
barnevognen er blevet behandlet med
den fornødne omhu og returneres i ren
og ordentlig stand.
Garantien dækker ikke:
• naturlig slitage samt skader, der er
opstået som følge af for voldsom
belastning.
• Skader, der er opstået, fordi
• autostolen er blevet behandlet
forkert eller anvendes i modstrid
med det egentlige formål.
Garanti eller ej?
Alle vore stoffer opfylder
Stoffer:
meget strenge krav med hensyn til
farveægthed i forhold til UV-stråler.
Alligevel vil stoffernes farver falme,
hvis de udsættes for UV-stråler. Der er
her tale om normalt slid og ikke om
materialefejl, og det er derfor ikke
omfattet af garantien.
Lås: Hvis der konstateres funktionsfejl
på selelåsen, skyldes det som regel
snavs, der kan vaskes væk. Følg altid
anvisningerne i
betjeningsvejledningen.
Hvis du ønsker at gøre brug af
garantien, bedes du henvende dig til
kinderzitje te worden meegestuurd. De
garantie is alleen van toepassing op
autokinderzitjes/fietskinderzitjes/
kinderwagens waar juist mee is
omgegaan en die in schone en goed
staat worden teruggezonden.
Uitgesloten van garantie zijn:
• normale tekenen van slijtage en
schade ten gevolge van overmatige
belasting
• schade ten gevolge van onbedoeld
of onjuist gebruik
Garantie of niet?
Stoffen:
Al onze stoffen voldoen aan
hoge eisen wat betreft
kleurbestendigheid tegen UV-straling.
Alle stoffen verbleken echter als deze
aan UV-straling worden blootgesteld.
Hierbij gaat het niet om
materiaalfouten, maar om normale
slijtageverschijnselen die van garantie
zijn uitgesloten.
Slot: Eventuele problemen met het
slot zijn meestal het gevolg van
verontreinigingen die kunnen worden
verwijderd door het slot met water te
reinigen. Houd u zich hierbij aan de
instructies in uw gebruiksaanwijzing.
Page 62

100922_KIDplus_RUS-DK-NL.fm Seite 18 Montag, 27. September 2010 2:16 14
пожалуйста, настоящей инструкцией
по эксплуатации.
В случаях, требующих
предоставления услуг по гарантии,
немедленно обращайтесь в
специализированный магазин,
продавший Вам этот товар. Там Вам
будет оказана помощь словом и
делом. При обработке рекламаций
применяются нормы амортизации
для конкретного изделия. Здесь мы
обращаем Ваше внимание на общие
условия сделки, с которыми можно
ознакомиться у продавца.
Применение, уход и техническое
обслуживание
При обращении с автомобильным/
велосипедным детским сиденьем/
детской коляской необходимо
соблюдать инструкции по
эксплуатации. Мы настоятельно
обращаем Ваше внимание на то,
что использоваться могут только
оригинальные запасные части или
принадлежности.
en specialforretning. Her vil du blive
vejledt af professionelle fagfolk. Ved
reklamationer bruges der
produktspecifikke afskrivningssatser.
Vi gør i den forbindelse opmærksom
på vores Almindelige
Forretningsbetingelser, som du kan få
udleveret hos forhandleren.
Anvendelse, pleje og
vedligeholdelse
Autostolen til bilen/cyklen /
barnestolen skal behandles i
overensstemmelse med
betjeningsvejledningen. Vi gør
udtrykkeligt opmærksom på, at der
kun må benyttes originalt tilbehør /
reservedele.
Neem, als uw kinderzitje nog onder de
garantie valt, onmiddellijk contact op
met uw vakhandel. Hier wordt u met
raad en daad terzijde gestaan. Bij de
behandeling van garantieclaims
worden productspecifieke
afschrijvingsregels toegepast.
Hiervoor verwijzen wij u naar de bij de
vakhandel verkrijgbare algemene
voorwaarden.
Gebruik, onderhoud en verzorging
Het autokinderzitje, fietskinderzitje of
de kinderwagen moet overeenkomstig
de gebruiksaanwijzing worden
gebruikt en onderhouden. Wij wijzen
er nadrukkelijk op dat uitsluitend
originele accessoires en onderdelen
mogen worden gebruikt.
18
Page 63

100922_KIDplus_RUS-DK-NL.fm Seite 19 Montag, 27. September 2010 2:16 14
7. Гарантийный талон / Формуляр контроля при покупке
Фамилия: ________________________________________________
Адрес: ________________________________________________
Почтовый индекс: ________________________________________________
Город: ________________________________________________
Телефон ( с кодом
страны, города):
Электронная
почта:
Автомобильное/
велосипедное
детское сиденье /
детская коляска:
Номер артикула: ________________________________________________
Цвет материала
(узор):
Принадлежности: ________________________________________________
Дата покупки: ________________________________________________
________________________________________________
________________________________________________
________________________________________________
________________________________________________
________________________________________________
Формуляр контроля при покупке:
1. Комплектность { проверено
2. Функциональный
контроль
- Механизм регулировки
сиденья
- Рег ули ровка ремней { проверено
3. Сохранность
- Контроль сиденья { проверено
- Контроль матерчатых
элементов
- Контроль
пластмассовых деталей
в порядке
{ проверено
в порядке
в порядке
в порядке
{ проверено
в порядке
{ проверено
в порядке
{ Я проверил
автомобильное/
велосипедное детское
сиденье / детскую коляску и
удостоверился в том, что
сиденье передано мне в
полном комплекте, и что
все его функции действуют
в полном объеме.
{ Я получил достаточну ю
информацию об изделии и
его функциях перед
покупкой и принял к
сведению указания по
эксплуатации и
техническому
обслуживанию.
Покупатель
(подпись):
Продавец: ________________________________________________
________________________________________________
Штамп продавца
Page 64

100922_KIDplus_RUS-DK-NL.fm Seite 20 Montag, 27. September 2010 2:16 14
7. Garantikort / udleveringskontrol
Navn: ________________________________________________
Adresse: ________________________________________________
Postnummer: ________________________________________________
By: ________________________________________________
Telefon (inkl. omr.nr.):
E-mail: ________________________________________________
Barnestol til bilen/
cyklen /
barnevognen:
Artikelnummer: ________________________________________________
Stoffarve (dessin): ________________________________________________
Tilbehör: ________________________________________________
Købsdato: ________________________________________________
________________________________________________
________________________________________________
________________________________________________
Udleveringskontrol:
1. Fuldstændighed { afprøvet
2. Funktionskontrol
- Justeringsmekanisme
sæde
- Selejustering { afprøvet
3. Er stolen intakt
- Kontrol af sæde { afprøvet
- Kontrol af stof { afprøvet
- Kontrol af plastdele { afprøvet
i orden
{ afprøvet
i orden
i orden
i orden
i orden
i orden
{ Jeg har afprøvet autostolen til
bilen/cyklen/barnevognen og
kontrolleret, at jeg har fået
udleveret samtlige dele, og at
stolen er fuldt funktionsdygtig.
{ Jeg har modtaget omfattende
informationer om produktet og
dets funktioner inden købet og
taget pleje- og
vedligeholdelsesanvisn ingerne til
efterretning.
Køber
(underskrift):
Forhandler: ______________________________________________
_______________________________________________
Forhandlerens stempel
Page 65

100922_KIDplus_RUS-DK-NL.fm Seite 21 Montag, 27. September 2010 2:16 14
7. Garantiekaart/overdrachtscontrole
Naam: _______________________________________________
Adres: _______________________________________________
Postcode: _______________________________________________
Plaats: _______________________________________________
Telefoon (incl.
netnummer):
E-mail: _______________________________________________
Autokinderzitje/
fietskinderzitje/
kinderwagen:
Artikelnummer: _______________________________________________
Kleur stof (dessin): _______________________________________________
Accessoires: _______________________________________________
Datum van
aankoop:
_______________________________________________
_______________________________________________
_______________________________________________
_______________________________________________
Overdrachtscontrole:
1. Volledigheid { gecontroleerd
2. Controle van de
werking
- Instelmechanisme zitje { gecontroleerd
- Instelling gordel { gecontroleerd
3. Controleren op
beschadigingen
- Zitje controleren { gecontroleerd
- Stoffen delen
controleren
- Kunststofdelen
controleren
in orde
in orde
in orde
in orde
{ gecontroleerd
in orde
{ gecontroleerd
in orde
{ Ik heb het autokinderzitje/
het fietskinderzitje/de
kinderwagen
gecontroleerd en mijzelf
ervan overtuigd dat het
zitje/de kinderwagen
compleet en volledig
functionerend aan mij is
overgedragen.
{ Ik heb voorafgaand aan de
aankoop voldoende
informatie over het product
en de werking ervan
gekregen en ben op de
hoogte gesteld van de
onderhouds- en
verzorgingsvoorschriften.
Klant
(handtekening):
Verkoper: _______________________________________________
_______________________________________________
Stempel vakhandel
 Loading...