

Page 1

KID plus
Gebrauchsanleitung
Wir freuen uns, dass unser KID plus
Ihr Kind sicher durch einen neue n
Lebensabschnitt begleiten darf.
Um Ihr Kind richtig schützen zu
können, muss der KID plus
unbedingt so verwendet und
eingebaut werden, wie wir es Ihnen
in dieser Anleitung beschreiben.
Wenn Sie noch Fragen zur Benutzung
haben, wenden Sie sich bitte an uns.
BRITAX RÖMER
Kindersicherheit GmbH
Britax Excelsior Ltd.
Inhalt
1. Eignung ......................... ............. ....2
2. Verwendung im Fahrzeug ............3
3. Sichern Ihres Kindes im
Fahrzeug .................... ....................4
3.1 Befestigen der Rückenlehne ...6
3.2 Breiten-Verstellung des
Sitzkissens ....................... .......7
3.3 Höhen-Verstellung der
Kopfstütze ...................... .........8
3.4 Ruhestellung der
Rückenlehne........................... 9
3.5 Anschnal l e n Ih r es Ki nd e s .....10
3.6 So ist Ihr Kind richtig
gesichert ...............................12
4. Pflegeanleitung ........................... 13
5. Reinigung ....................................14
5.1 Abziehen des Bezuges .........15
5.2 Aufziehen des Bezuges ........15
6. Hinweise zur Entsorgung ...........16
7. 2 Jahre Garantie ..........................16
8. Garantiekarte / Übergabe-Check 19
User instructions
We are pleased that our KID plus may
accompany your child safely through a
new stage of his or her life.
In order to protect your child
correctly, the KID plus must always
be used and installed as described
in these instructions.
If you have any further questions
regarding its use, please feel free to
contact us.
BRITAX RÖMER
Kindersicherheit GmbH
Britax Excelsior Ltd.
Contents
1. Suitability ......................... ..............2
2. Use in the vehicle ..........................3
3. Securing your child in the vehicle 4
3.1 Attaching the b ac k rest .............6
3.2 Adjusting the width of the seat
cushion ...................... ............. . 7
3.3 Adjusting the height of the
headrest .................... ..............8
3.4 Reclining position of the
backrest ..................................9
3.5 Securing your child ...............10
3.6 Checklist to ensure that your
child is buckled up correctly ..12
4. Care instructions ..................... .. ..13
4.1 Cleaning ....... ......................... 14
4.2 Removing the cover ..............15
4.3 Re-fitting the cove r .... ... .........15
5. Notes regarding disposal ...........16
6. 2-year warranty ...........................16
7. Warranty Card / Transfer Check 20
Mode d’emploi
Nous sommes heureux que notre KID
plus puisse accompagner votre enfant
en toute sécurité pendant un nouv eau
chapitre de sa vie.
Pour protéger efficacement votre
enfant, le KID plus doit
impérativement être utilisé et
installé de la manière décrite dans
le présent mode d’emploi .
Pour toute question complémenta ire,
n’hésitez pas à nous contacter.
BRITAX RÖMER
Kindersicherheit GmbH
Britax Excelsior Ltd.
Table des matières
1. Habilitation .......................... ...........2
2. Utilisation dans le véhicule ..........3
3. Sécurité de votre enfant dans le
véhicule .................... ................... ...4
3.1 Fixation du do ssier ..................6
3.2 Réglage en largeur de l'assise 7
3.3 Réglage en hauteur de l'appui-tête8
3.4 Stabilisation du dossier ........ ...9
3.5 Mise en place de la ceinture de
votre enfant ...........................10
3.6 Voici comment votre enfant es t
bien protégé ..........................12
4. Consignes d’entretien ................13
4.1 Nettoyage ... ..................... ...... 14
4.2 Retrait de la hous se .......... ....15
Remise en place de la housse
4.3
5. Remarques relatives à l’élimination 16
6. 2 ans de garantie ... .. .................... 1 6
7. Carte de garantie / Procès-verbal
de remise .....................................21
.15
Page 2
1. Eignung
Zulassung
Britax/
RÖMER
Auto-
Kindersitz
KID plus
*ECE = Europäische Norm für
Sicherheitsausrüstung
• Der Auto-Kindersitz ist ausgelegt,
geprüft und zugelassen
entsprechend den Anforderungen
der europäischen Norm für
Kindersicherheits-Einrichtungen
(ECE R 44/04). Das Prüfzeichen E
(in einem Kreis) und die
Zulassungsnummer befinden sich
auf dem Zulassungsetikett
(Aufkleber am Auto-Kindersitz) .
•Der KID plus ist als Kombination
aus Sitzkissen und Rückenlehne
geprüft und zugelassen.
Vorsicht! Keines der beiden Teile
darf in Verbindung mit anderen
Sitzkissen oder Rückenlehnen
verwendet werden.
• Die Zulassung erlischt, sobald Sie
am Auto-Kindersitz etwas
verändern. Änderungen darf
ausschließlich der Hersteller
vornehmen.
•Der KID plus darf ausschließlich
zur Sicherung Ihres Kindes im
Fahrzeug verwendet werden. Er
eignet sich keinenfalls Zuhause als
Sitzgelegenheit oder Spielzeug.
Prüfung und Zulassung
nach ECE* R 44/04
Gruppe Körpergewicht
ll+lll 15 bis 36 kg
1. Suitability
Certification
Britax/
RÖMER
Child safety
seat
KID plus
*ECE = European Standard for Safety
Equipment
• The child safety seat has been
designed, tested and certified to the
requirements of the European
Standard for Child Safety
Equipment (ECE R 44/04). The seal
of approval E (in a circle) and the
approval number are located on the
approval label (sticker on the child
safety seat).
•The KID plus, as a combination of
the seat cushion and backrest, has
been checked and approved.
Caution! Do not use either of the
parts in connection with other seat
cushions or backrests.
• This approval shall be invalidated if
you make any modifications to the
child safety seat. No modifications
may be made to the child safety
seat other than by the
manufacturer.
• Use the KID plus ex clusively for
securing your child in your vehicle.
It is in no way suitable as a seat or
toy in the home.
Tested and certified
according to ECE* R 44/04
Group Body weight
ll+lll 15 to 36 kg
1. Habilitation
Homologation
Britax/
RÖMER
Siège auto
KID plus
*ECE = norme européenne pour les
équipements de sécurité
• Le siège auto est conçu, contrôlé et
homologué conformément aux
exigences de la norme européenne
pour les équipements de sécurité
pour enfants (ECE R 44/04). Le
signe de contrôle E (dans un cercle)
et le numéro d’homologation se
trouvent sur l’étiquette
d’homologation (autocollant sur le
siège auto).
•Le KID plus a été testé et
homologué en tant que
combinaison d'une assise et d'un
dossier.
Attention ! Aucun des deux
éléments ne peut être utilisé avec
d'autres assises ou dossiers.
• Le siège auto perd son
homologation dès que vous réalisez
des modifications. Toute
modification doit exclusivement être
réalisée par le fabricant.
• KID plus est exclusivement réservé
à l’installation sécuritaire de votre
enfant dans votre véhicule. Il
convient en aucun cas à un usage
domestique en tant que chaise ou
jouet.
Vérification et
homologation selon
ECE* R 44/04
Groupe Poids
ll+lll 15 à 36 kg
2
Page 3
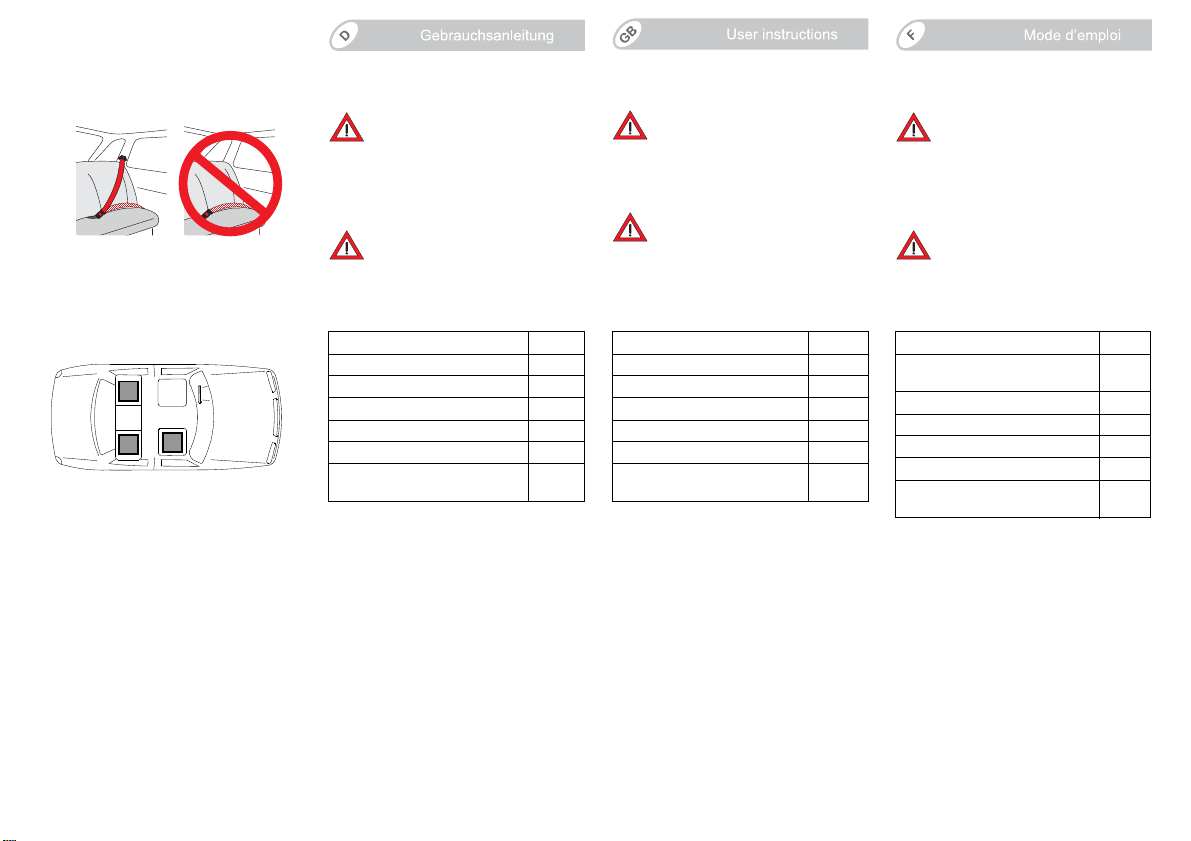
2. Verwendung im Fahrzeug
Gefahr! Wird Ihr Kind im
Kindersitz nur mit einem 2Punkt-Gurt gesichert, kann es
dadurch bei einem Unfall
schwer verletzt oder sogar
getötet werden.
Nie in Verbindung mit einem
2-Punkt-Gurt verwenden!
2. Use in the vehicle
Danger! Should your child be
secured in the vehicle seat with
only a 2-point belt, he or she
could sustain serious injuries
possibly resulting in death.
Never use in connection with
a 2-point belt!
2. Utilisation dans le
véhicule
Danger ! Si vous attachez votre
enfant dans le siège à l'aid e
d'une ceinture de sécurité à
deux points seulement, il peut
être gravement blessé, voire
tué, en cas d'accident.
N'utilisez jamais avec une
ceinture à deux points !
So können Sie Ihren AutoKindersitz verwenden:
in Fahrtrichtung ja
entgegen der Fahrtrichtung nein 1)
mit 2-Punkt-Gurt nein
mit 3-Punkt-Gurt 2) ja
auf Beifahrersitz ja 3)
auf äußeren Rücksitzen ja
auf mittlerem Rücksitz (mit 3-
ja 4)
Punkt-Gurt)
(Bitte beachten Sie die Vorschr iften
Ihres Landes)
1) Verwendung ist nur auf einem
rückwärtsgerichteten Fahrzeugsitz (z.B. Van,
Minibus) zulässig, der auch für den Transport
von Erwachsenen zugelassen ist. Es darf kein
Airbag auf den Sitz wirken.
2) Der Gurt muss nach ECE R 16 (oder
vergleichbarer Norm) genehmigt sein z.B.
erkennbar am umrandeten "E", "e" auf dem
Prüfetikett am Gurt.
3) bei Front-Airbag: weit nach hinten schieben,
ggf Hinweis im Fahrzeug-Handbuch beachten.
4) Verwendung ist nicht möglich, wenn nur ein
2-Punkt-Gurt vorhanden ist.
This is how you can use your child
safety seat:
forward facing yes
rearward facing no 1)
with 2-point belt no
with 3-point belt 2) yes
on front passenger seat yes 3)
on outer rear seat yes
on centre rear seat (with 3-
yes 4)
point belt)
(Please observe the relevant
regulations in your country.)
1) Use is permitted on a rearw ard-fac ing vehi cle
seat (e.g. in a van or minibus) only if the vehicle
seat is also approved for use by adult s. The seat
may not be in the area of effect of an airbag.
2) The safety belt must be approved to ECE R
16 or a comparable standard (see test label on
belt with an "E" or "e" in a circle).
3) If there is a front airbag: slide back all the way
or nearly so, observe any instructions in vehicle
owner's manual.
4) Cannot be used if the vehicle seat is
equipped with only a 2-point belt.
Voici comment vous pouvez utiliser
le siège auto :
dans le sens de la marche oui
dans le sens contraire de la
marche
non
1)
avec ceinture à 2 points non
avec ceinture à 3 points 2) oui
sur le siège du passager oui 3)
sur les sièges arrière latéraux oui
sur le siège arrière central
(avec ceinture à 3 points)
(Veuillez respecter les dir ectives en
vigueur dans votre pays)
1) L'utilisation sur un siège dirigé dos à la route
(p.ex. van, minibus) n'est autorisée que si celuici convient également au transport d'adultes. Ce
siège ne doit pas être protégé pas un airbag.
2) La ceinture doit être homologuée selon ECE
R 16 (ou une norme comparable) ce qui est par
exemple signalé par la lettre "E", "e" insérée
dans un cercle et figurant sur l’étiquette de
contrôle.
3) Avec un airbag frontal : reculer le siège le
plus possible. Le cas échéant, respectez les
consignes contenues dans le manuel de votre
véhicule.
4) Utilisation impossible lorsqu’il n'existe qu'une
ceinture à 2 points.
oui 4)
Page 4

3. Sichern Ihres Kindes im Fahrzeug
Zum Schutz Ihres Kindes
• Grundsätzlich gilt: Je enger der
Sicherheitsgurt am Körper Ihres
Kindes anliegt, desto größer ist di e
Sicherheit.
• Bitte lassen Sie Ihr Kind im Auto-
Kindersitz nie unbeaufsichtigt im
Fahrzeug zurück.
• Benutzung auf dem Rücksitz:
Stellen Sie den Vordersitz so we it
nach vorne, dass Ihr Kind mit den
Füssen nicht an der Rückenlehne
des Vordersitzes anstößt
(Verletzungsgefahr).
• Die Kunstoffteile des Kindersitzes
heizen sich in der Sonne auf.
Vorsicht! Ihr Kind kann sich daran
verbrennen. Schützen Sie den
Kindersitz, wenn er gerade nicht
gebraucht wird, vor intensiver
Sonneneinstrahlung.
• Lassen Sie Ihr Kind nur auf der
Gehwegseite ein- und aussteigen.
• Lockern Sie läng ere Reisen durch
Pausen auf, in denen Ihr Kind
seinen Bewegungsdrang ausleben
kann.
3. Securing your child in
the vehicle
For the protection of your
child
• As a general rule: The more snugly
the safety harness fits over your
child's body, the safer your child will
be.
• Please do not leave your child
unattended in the child saf ety seat
in the vehicle.
• Installation on the rear seat: Move
the front seat forward far e nough
that you child's feet cannot hit the
back rest of the front seat (to
prevent risk of injury).
• The plastic parts of the child safety
seat can heat up in the sun.
Caution! Your child may get burnt.
Protect the child seat against
intensive solar radiation when it is
not actually in use.
• Allow your child to enter and exit the
vehicle only on the side away from
traffic.
• Make stops during longer journeys
to give your child an opportunity to
run about and play.
3. Sécurité de votre enfant
dans le véhicule
Pour protéger votre enfant
• Les principes suivants sont à
respecter : Plus la ceinture de
sécurité est proche du corps de
votre enfant, plus celui-ci est en
sécurité.
• Ne laissez pas votre enfant dans le
siège auto dans la voiture sans
surveillance.
• Utilisation sur le siège arrière :
Avancez le siège avant de manière
à ce que les pieds de votre enfant
ne touchent pas le dossier de celu ici (risques de blessures).
• Les parties en matièr e plastique du
siège auto se réchauffent en plein
soleil.
Attention ! Votre enfant risque de
se brûler. Protégez le siège auto
des rayons du soleil lorsqu e vous
ne l'utilisez pas.
• Ne faites monter ou descendre
votre enfant que du côté du trottoir.
• Lors des longs trajets, ménagez
des pauses afin que votre enfant
puisse se dégourdir les jambes.
Zum Schutz aller
Fahrzeuginsassen
Bei einer Notbremsung oder einem
Unfall können ungesicherte
Gegenstände und Personen andere
Mitfahrer verletzen. Bitte achten Sie
deshalb stets darauf, dass...
For the protection of all
vehicle occupants
In the case of an emergency stop or
an accident unsecured persons or
objects may cause injury to other
vehicle occupants. Please always
check that...
4
Pour protéger tous les
passagers
En cas de freinage d’urgence ou
d’accident, les objets et personnes
non attachés risquent de blesser
d’autres passagers. Veuillez donc
toujours veiller à ce que…
Page 5
• die Rückenlehnen der
Fahrzeugsitze festgestellt sind (z.B .
umklappbare Rücksitzban k
einrasten).
• im Fahrzeug (z.B. auf der
Hutablage) alle schweren oder
scharfkantigen Gegenstände
gesichert sind.
• alle Personen im F ahrzeug
angeschnallt sind.
• der Auto-Kin dersitz im Auto immer
gesichert ist, auch wenn kein Kind
transportiert wird.
• the backrests of the vehicle seats
are locked (i.e. that a folda ble rear
seat bench latch is engaged).
• all heavy or sharp-edged objects in
the vehicle (e.g. on the parcel shelf)
are secured.
• all persons in the vehicle have their
seat belts fastened.
• the child safety seat is always
secured when it is in the vehicle,
even if no child is being transpor ted.
• les dossiers des sièges de voiture
soient verrouillés (enclenchez par
exemple le banc arrière rabattable),
• tous les objets lourds ou à bords
vifs (par exemple sur la lunette
arrière) soient bien fixés,
• toutes les personnes aient mis leur
ceinture,
• le siège auto soit toujours fixé dans
la voiture même si aucun enfant ne
l’occupe.
Zum Schutz Ihres Fahrzeuges
• An einigen Auto-Sitzbezügen aus
empfindlichem Material (z.B.
Velours, Leder etc.) können durch
die Benutzung von AutoKindersitzen Gebrauchsspuren
auftreten. Um das zu vermeiden,
können Sie z.B. eine Decke oder
ein Handtuch unterlegen.
Zum Schutz beim Umgang
mit dem Kindersitz
• Der Kindersitz darf nie freistehend
verwendet werden - auch nicht zum
Probesitzen.
Vorsicht! Die Rückenlehne 2 kann
nach hinten kippen. Stellen Sie den
Kindersitz immer zuerst auf den
Fahrzeugsitz bevor sich Ihr Ki nd
hineinsetzt.
To prot ect your vehicle
• Some vehicle seat covers of
sensitive materials (e.g. velour,
leather, etc.) may develop wear
marks when child seats are used.
This can be avoided by placing a
blanket or towel under the child
seat.
For your protection when
handling the child seat
• Do not use the child seat when it is
free standing, even to test it out.
Caution! The backrest 2 may tip
backward. Always place the child
seat on the vehicle seat before
having your child sit down in it.
Pour protéger votre véhicule
• Sur certaines housses de siège de
véhicule recouvertes d’une matière
sensible (velours, cuir, etc.),
l’utilisation de sièges auto risque de
laisser des traces. Pour év iter cela,
vous pouvez mettre en-dessous
une couverture ou une serviette,
par exemple.
Protection lors de la
manipulation d'un siège
enfant
• Le siège enfant ne doit jamais être
utilisé non installé, même pour
l’essayer.
Attention ! Le dossier 2 risque de
basculer vers l’arrière. Placez
toujours le siège enfant sur le siège
du véhicule avant d’y installer votre
enfant.
Page 6
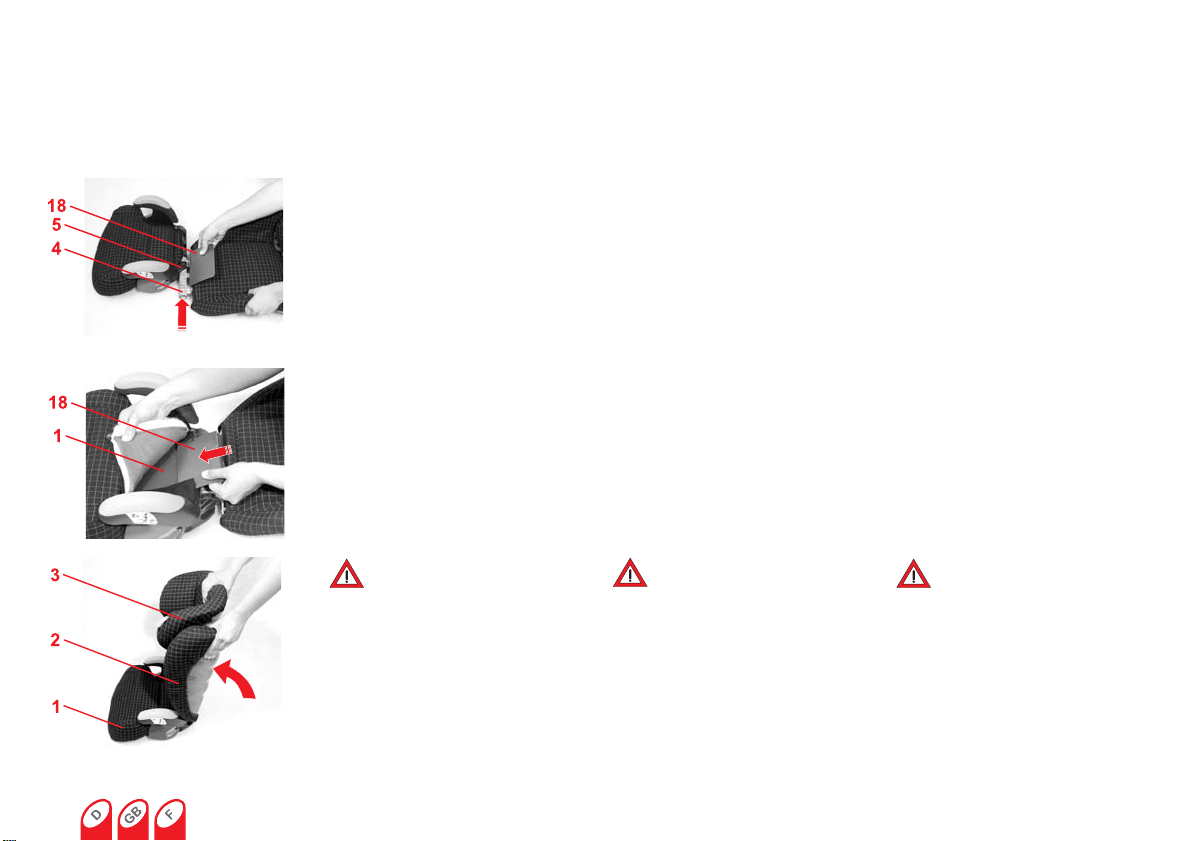
3.1 Befestigen der Rückenlehne
Der Kindersitz besteht aus einem
Sitzkissen 1 und einer Rücken lehne 2
mit verstellbarer Kopfstütze 3. Die
Kombination bietet Ihrem Kind den
gewünschten Schutz und Komfort.
Þ Legen Sie die Rückenlehne 2 flach
hinter das Sitzkissen 1.
Þ Klappen Sie die Gelenkabdeckung
18 nach oben.
Þ Schieben Sie die Gelenkachse 4
der Rückenlehne 2 so weit wie
möglich in die Führung 5 am
Sitzkissen 1.
3.1 Attaching the backrest
The child seat is composed of a seat
cushion 1 and a backrest 2 with an
adjustable headrest3. The comination
provides your child with the desired
protection and comfort.
Þ Place the backrest 2 evenly behind
the seat cushion 1.
Þ Fold the axis cover 18 upwards.
Þ Push the articulated axis 4 of the
backrest 2 as far as possible into
the guide 5 on the seat cushion 1.
3.1 Fixation du dossier
Le siège enfant se compose d'une
assise 1 et d'un dossier 2 à appui-tête
réglable 3. Cette combinaison offre à
votre enfant la protection et le confort
souhaités.
Þ Placez le dossier 2 à plat derrière
l'assise 1.
Þ Rabattez le cache du dispositif
d'articulation 18 vers le haut .
Þ Poussez l'axe d'articulation 4 du
dossier 2 aussi loin que possible
dans le guidage 5 de l'assise 1.
Þ Schieben Sie die Gelenkabdeckung
18 so unter den Bezug des
Sitzkissens 1, dass sie auf der
Kunstofffläche aufliegt.
Gefahr! Beim Hochschwenken
der Rückenlehne 2 darf sich
nichts im Bereich der
Gelenkachse 4 zwischen
Rückenlehne 2 und Sitzkissen
1 befinden.
Vorsicht! Sie oder Ihr Kind können
sich z.B. die Finger einklemmen und
verletzen.
Þ Schwenken Sie die Rückenlehne 2
nach oben, bis sie einrastet.
Þ Push the axis cover 18 under the
seat cushion cover in such a way 1,
that is rests on the plastic surface.
Danger! When swivelling up
the backrest 2, nothing must
come between the backrest 2
and the seat cushion 1 in the
area of the articulated axis 4.
Caution! You or your child could pinch
your fingers, injuring them.
Þ Turn the backrest 2 upwards until it
engages.
6
Þ Faites glisser le cache du dispositif
d'articulation 18 sous la housse de
l'assise 1, de sorte que la partie en
plastique repose à plat.
Danger ! Lors du redressement
du dossier 2, aucun objet ne
doit se trouver dans la zone de
l’axe de basculement 4 entre le
dossier 2 et le coussin d’assise
1.
Attention ! Vous ou votre enfant
risquez par ex. de vous coincer les
doigts ou de vous blesser.
Þ Basculez le dossier2 vers le haut
jusqu'à ce qu'il s'encliquète.
Page 7
3.2 Breiten-Verstellung des Sitzkissens
Ein richtig angepasstes Sitzkisse n 1
gewährleistet den optimalen Verlauf
des Beckengurtes 11, und erhöht
dadurch den Schutz Ihres Kindes. Sie
können die Seitenteile 15 des
Sitzkissens 1 in drei Breiten einstellen.
• Das Sitzkissen 1 muss so
eingestellt sein, dass die
verstellbaren Seitenteilen15 dem
Becken Ihres Kindes so nah wie
möglich sind ohne es einzuengen.
3.2 Adjusting the width of
the seat cushion
A properly adjusted seat cushion 1
ensures optimum distribution of the
lap belt section 11 and protects your
child better. You can adjust the side
parts 15 of the seat cushion 1 to three
widths.
• The seat cushio n 1 must be
adjusted in such a way that the
adjustable side parts 15 are as
close as possible to your child's lap
without constricting him or her.
3.2 Réglage en largeur de
l'assise
Une assise correctement réglée1
garantit un déplacement optimal de la
sangle ventrale 11, augmentant ainsi
la protection de votre enfant. Vous
pouvez régler les parties latérales 15
de l'assise 1 sur trois largeurs
différentes.
•L'assise 1 doit être réglée de telle
façon que les parties latérales
réglables 15 épousent au plus près
le bassin de votre enfant, san s le
serrer.
So können Sie die Breite des
Sitzkissens 1 Ihrem Kind anpassen:
Þ Fassen Sie auf beiden Seiten an
der Außenseite der Seitente ile 15 in
die hellgrauen Verstelltasten 16.
Þ Drücken Sie beide Verstelltasten 16
nach oben und ziehen Sie die
Seitenteile 15 in die breiteste
Stellung.
Þ Lassen Sie Ihr Kind im Kindersitz
Platz nehmen.
Þ Drücken Sie nun beide
Verstelltasten 16 erneut und
verstellen Sie die Seitenteile 15 in
die gewünschte Breite.
Vorsicht! Die Seitenteile müssen
eingerastet sein. Ziehen Sie an den
Seitenteilen um das Einrasten zu
überprüfen.
Here is how you can adjust the seat
cushion 1 to your child:
Þ Grasp the light grey adjustment
buttons 16 on the exterior of the
side parts 15 by both sides.
Þ Press both adjustment buttons 16
upwards and pull the side parts 15
into the widest position.
Þ Have your child sit in the child seat.
Þ Now press both adjustment buttons
16 again and adjust the side parts
15 to the desired width.
Caution! The side parts must
engage. Pull up on the side parts to
ensure that they are engaged.
Voici comme nt adapter la largeur de
l'assise 1 à votre enfant :
Þ Saisissez le côté externe des
parties latérales 15 par les touches
de réglage gris clair 16.
Þ Appuyez les deux touches de
réglage 16 vers le haut et tirez les
parties latérales 15 en position de
largeur maximale.
Þ Faites asseoir votre enfant dans le
siège.
Þ Appuyez à présent les deux
touches de réglage 16 à nouveau et
amenez les parties latérale s 15 à l a
largeur souhaitée.
Attention ! Les parties latérales
doivent être encliquetées. Tirez sur
les parties latérales afin de vérifier
que celles-ci sont correctement
fixées.
Page 8

3.3 Höhen-Verstellung der Kopfstütze
Eine richtig angepasste Kopfstütze3
gewährleistet den optimalen Verlauf
des Diagonalgurtes 6, und bietet
Ihrem Kind den gewünschten Schutz
und Komfort. Sie können die Höhe der
Kopfstütze 3 in elf Stellungen
einrasten.
•Die Kopfstütze3 muss so
eingestellt sein, dass zwis chen den
Schultern Ihres Kindes und der
Kopfstütze 3 noch zwei Finger breit
Platz ist.
3.3 Adjusting the height of
the headrest
A properly adjusted headrest 3
ensures the optimum distribution of
the diagonal belt section 6 and
provides your child with the desired
protection and comfort. You ca n adjust
the height of the headrest 3 to eleven
positions.
• The headrest 3 must be adjusted in
such a way that you can still pass
two fingers between the your chi ld's
shoulders and the headrest 3.
3.3 Réglage en hauteur de
l'appui-tête
Un appui-tête correctement réglé3
garantit un déplacement optimal de la
sangle diagonale6 et offre ainsi à
votre enfant la protection et le confort
souhaités. Vous pouvez régler l'appuitête 3 sur onze hauteurs différentes.
• L'appui-tête 3 doit être réglé de
façon telle qu'entre les épau les de
votre enfant et l'appui-t ê te 3 vous
puissiez encore glisser deux doigts.
So können Sie die Höhe der
Kopfstütze 3 der Körpergröße Ihres
Kindes anpassen:
Þ Fassen Sie in den V e rs te llg riff 8 an
der Rückseite der Kopfstütze 3 und
ziehen Sie ihn etwas nach oben.
Nun ist die Kopfstütze entri eg elt.
Þ Jetzt können Sie die entriegelte
Kopfstütze 3 in die gewünschte
Höhe verstellen. Sobald Sie den
Verstellgriff 8 loslassen, rastet die
Kopfstütze 3 ein.
Þ Stellen Sie den Kindersitz auf den
Fahrzeugsitz.
Þ Lassen Sie Ihr Kind im Kindersitz
Platz nehmen und kontrollieren Sie
die Höhe.
Vorsicht! Wiederholen Sie dies so
oft bis die Kopfstütze 3 optimal
eingestellt ist.
To adjust the height of the
headrest 3 to fit your child:
Þ Grasp the adjustment handle 8 by
the back of the headrest 3 and pull
it upwards slightly. The headrest is
now released.
Þ You can now adjust the released
headrest 3 to the desired height.
As soon as you have let go of the
adjustment handle 8, the headrest
will engage.
Þ Place the child seat on the vehicle
seat.
Þ Have your child sit down in the child
seat and check the height.
Caution! Repeat this process until
the headrest 3 is at the optimal
height.
8
Voici comment adapter la hauteur
de l'appui-tête 3 à la taille de votre
enfant :
Þ Saisissez la poignée de réglage 8
au dos de l'appui-tête 3 et tirez
légèrement vers le haut. L'appuitête est déverrouillé.
Þ Vous pouvez à présent régler
l'appui-tête 3 à la hauteur voulue.
Dès que vous lâchez la poignée de
réglage 8, l'appui-tête se verrouille.
Þ Placez le siège enfant sur la
banquette du véhicule.
Þ Faites asseoir votre enfant et
contrôlez la hauteur.
Attention ! Renouvelez cette
opération autant de fois que
nécessaire jusqu’à ce que le
réglage de l’appui-tête 3 soit
optimal.
Page 9

3.4 Ruhestellung der Rückenlehne
Die Rückenlehne 2 des Kindersitzes
paßt sich stufenlos der Neigung des
Fahrzeugsitzes an.
Tipp! Die Rückenlehne 2 wird durch
eine kleine Raste senkrecht gehal ten.
Drücken Sie die Rückenlehne 2 etwas
nach hinten um die Raste zu lösen.
Bitte beachten Sie: Der bestmögliche
Schutz ist nur gewährleistet, wenn der
Fahrzeugsitz in aufrechter Positi on ist.
Die Rückenlehne 2 des Kindersitzes
läßt sich, unabhängig vom
Fahrzeugsitz, nach hinten in eine
Ruhestellung neigen.
Þ Klappen Sie dazu den
Abstandswinkel 9 auf der Rückseite
der Rückenlehne 2 heraus.
3.4 Reclining position of the
backrest
The backrest 2 of the child seat adapts
smoothly to the slant of the vehicle
seat.
Tip! The backrest 2 is held vertically
by a small notch. Press the backrest 2
slightly to the rear to release the
notch.
Please observe: The best possi ble
protection can only be ensured if the
vehicle seat is in its upright position.
The backrest 2 of the child seat can be
inclined backwards into a reclining
position independent of the the vehicle
seat.
Þ To do so, fold out the displacement
angle 9 on the back of the
backrest 2.
3.4 Stabilisation du dossier
Le dossier 2 du siège enfant s'adapte
en continu à l'inclinaison du siège du
véhicule.
Astuce ! Le dossier 2 est maintenu en
position verticale par un petit
enclenchement. Poussez légèrement
le dossier 2 vers l‘arrière pour
débloquer l‘enclenchement.
Attention ! La meilleure protection
possible n'est assurée que lor sque le
siège du véhicule est en position
droite. Le dossier 2 du siège enfant
peut être basculé vers l'arrièr e en
position de repos, indépendamment
du siège du véhicule.
Þ Pour ce faire, abattez l'équerre 9
qui se trouve à l'arrière du
dossier 2.
Þ Neigen Sie nun die Rückenlehne2
so weit nach hinten, bis der
Abstandswinkel 9 flächig an der
Fahrzeugsitz-Rückenlehne anliegt.
Vorsicht! Neigen Sie die
Rückenlehne 2 nicht weiter als der
Abstandswinkel 9 vorgibt.
Þ Now incline the backrest 2
backwards until the displacement
angle 9 lies flat along the back of
the vehicle seat.
Caution! Do not incline the
backrest 2 farther than specified by
the displacement angle 9.
Þ Inclinez à présent le dossier 2 vers
l'arrière jusqu'à ce que l'équerre9
s'appuie à plat sur le dossier du
siège du véhicule.
Attention ! N'inclinez pas le
dossier 2 plus que le permet
l'équerre 9.
Page 10

3.5 Anschnallen Ihres Kindes
Der KID plus erfordert keinen Einbau
im Fahrzeug. Ihr Kind wird einfach im
Kindersitz mit dem Autogurt gesichert.
1. Autogurt anlegen
Þ Stellen Sie den Kindersitz auf den
Fahrzeugsitz. Achten Sie darau f,
dass die Rückenlehne 2 flächig an
der Rückenlehne des
Fahrzeugsitzes anliegt (siehe 3.4).
Tipp! Wenn die Kopfstütz e des
Fahrzeugsitzes dabei stört, dr ehen
Sie sie einfach um.
3.5 Securing your child
The KID plus does not require
installation in the vehicle. Your child is
simply secured with the vehicle se at
belt.
1. Fastening the vehicle seat belt
Þ Place the child seat on the vehicle
seat. Please be sure that the
backrest 2 lies flat along the back of
the vehicle seat (see 3.4).
Tip! If the headrest of the vehicle
seat is bothersome, simply turn it
around.
3.5 Mise en place de la
ceinture de votre enfant
Le KID plus ne nécessite aucun
aménagement du véhicule. Votre
enfant est simplement attaché dans
son siège à l'aide de la ceinture du
véhicule.
1. Poser la ceinture du véhicule
Þ Placez le siège enfant sur le siège
du véhicule. Veillez à ce que le
dossier 2 s'appuie bien à plat contre
le dossier du siège du véhicule (voir
3.4).
Astuce ! Si l'appui-tête du siège du
véhicule gêne, retournez-le.
Þ Lassen Sie Ihr Kind im Kindersitz
Platz nehmen.
Þ Ziehen Sie den Autogurt heraus
und führen Sie ihn vor Ihrem Kind
zum Auto-Gurtschloss10.
Vorsicht! Gurt nicht verdrehen.
Þ Rasten Sie die Schlosszunge im
Auto-Gurtschloss 10 ein. KLICK!
Þ Have your child sit in the child seat.
Þ Pull out the vehicle seat belt an d
guide it in front of your child to the
vehicle seat buckle 10.
Caution! Do not twist the belt.
Þ Engage the buckle tongue in the
vehicle seat buckle 10. CLICK!
10
Þ Faites asseoir votre enfant dans le
siège.
Þ Déroulez la ceinture du véhicule et
passez-là, devant votre enfa nt,
jusqu'à son fermoir 10.
Attention ! Ne pas torsader la
sangle.
Þ Enclenchez la languette dans le
fermoir de la ceinture 10 du
véhicule. CLIC !
Page 11

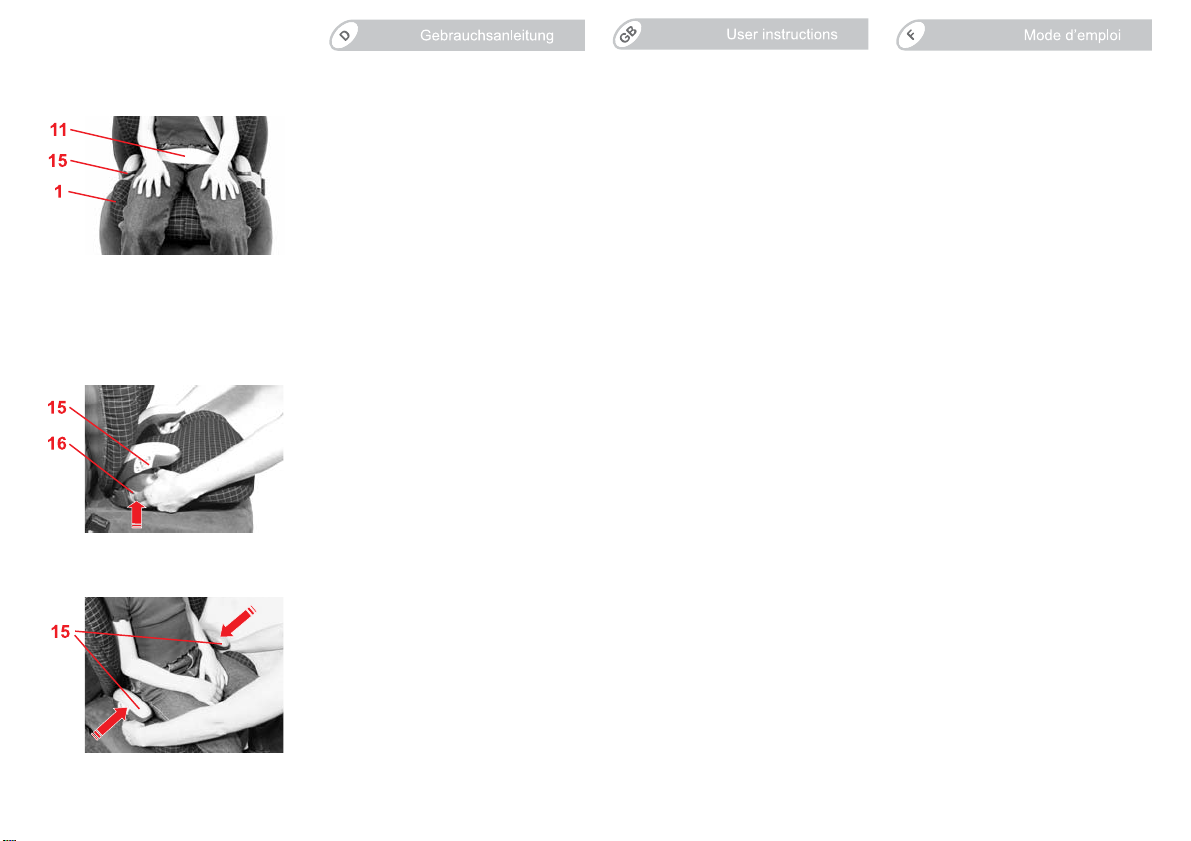
2. Autogurt in die roten
Gurtführungen am Kindersitz
einlegen.
Þ Legen Sie den Diagonalgurt 6 und
den Beckengurt 11, auf der Seite
des Auto-Gurtschlosses 10, unter
die Armlehne, in die hellrote
Gurtführung 12 des Sitzkissens 1.
Vorsicht! Das Auto-Gurtschloss 10
darf nicht zwischen der hellroten
Gurtführung 12 und der Armlehne
liegen.
2. Inserting the vehicle seat belt
into the red belt guides of the child
seat.
Þ Insert the diagonal belt section 6
and the lap belt section 11 on the
side of vehicle belt buckle 10 under
the armrest into the light red belt
guide 12 of the seat cushion 1.
Caution! The vehicle seat beat 10
may not rest between the light red
belt guide 12 and the armrest .
2. Passez la ceinture dans les
guidages rouges du siège enfant.
Þ Passez la sangle diagonale 6 et la
sangle ventrale 11 du côté du
fermoir 10, sous l'accoudoir, dans le
guidage rouge clair 12 de l'assise 1.
Attention ! Le fermoir de ceinture
du véhicule 10 ne doit pas se
trouver entre le guidage rouge 12 et
l'accoudoir .
Þ Legen Sie den Beckengurt 11 auf
der anderen Seite des Sitzkissens 1
ebenfalls in die hellrote
Gurtführung 12.
Vorsicht! Der Beckengurt 11 muss
auf beiden Seiten so tief wie
möglich über die Leistenbeuge
Ihres Kindes verlaufen.
Þ Führen Sie den Diagonalgu rt6 in
den dunkelroten Gurthalter 7 der
Kopfstütze 3 ein, bis er vollständig
und unverdreht in Gurthalter 7 liegt.
Tipp! Verdeckt die Rückenlehne 2
den Gurthalter 7, können Sie die
Kopfstütze 3 nach oben verstellen.
Jetzt läßt sich der Diagonalgurt 6
leicht einführen. Stellen Sie nun die
Kopfstütze 3 wieder zurück in die
richtige Höhe.
Þ Insert the lap belt section11 on the
other side of the seat cushion 1 into
the light red belt guide 12 as well.
Caution! The lap belt section 11
must lie as low as possible over
your child's hips.
Þ Guide the diagonal seat belt
section 6 into the dark red belt
holder 7 of the headrest 3 until it
lies completely in the be lt holder
and is not twisted 7.
Tip! If the backrest 2 conceals the
belt holder 7, you can adjust the
headrest 3 upwards. The diagonal
belt section 6 can now be easily
inserted. Now return the headrest 3
to the proper height.
Þ Passez la sangle ventrale 11 de
l'autre côté de l'assise 1, également
dans le guidage rouge 12.
Attention ! La sangle ventrale 11
doit passer, des deux côtés, le plus
bas possible au-dessus de l’aine de
votre enfant.
Þ Insérez la sangle diagonale 6 dans
le support de sangle rouge foncé 7
de l'appui-tête 3 jusqu'à ce qu'elle
repose complètement et sans être
torsadée dans le support de san gle
7.
Astuce ! Si le dossier 2 cache le
support de sangle 7, vous pouvez
bouger l'appui-tête 3 vers le haut.
Maintenant, la sangle diagonale 6
s'insère facilement. Replacez à
présent l'appui-tête 3 à la bonn e
hauteur.
Page 12

Þ Vergewissern Sie sich, dass der
Diagonalgurt 6 über das
Schlüsselbein Ihres Kindes läuft
und nicht am Hals anliegt.
Tipp! Sie können die Kopfstütze 3
auch noch im Fahrzeug in der Höhe
anpassen.
Þ Vorsicht! Der Diagonalgurt6 muss
schräg nach hinten verlaufen.
Tipp! Sie können den Gurtverlauf
mit dem verstellbaren Gurtumlenker
Ihres Fahrzeuges regulieren.
Þ Please also make sure that the
diagonal belt section 6 runs above
your child's collarbone and does not
rest at his or her throat.
Tip! You can also adjust the height
of the headrest 3 when you are in
the vehicle.
Þ Caution! The diagonal belt
section 6 must run slanted towards
the back.
Tip! You can regulate the
distribution of the belt us ing the
adjustable seat belt tightener of
your vehicle.
Þ N'oubliez pas que la sangle
diagonale 6 doit passer sur la
clavicule de votre enfant, et non
dans son cou.
Astuce ! Vous pouvez encore
adapter l'appui-tête 3 en hauteur
dans le véhicule.
Þ Attention ! La sangle diagonale 6
doit se déplacer en diagonale vers
l'arrière.
Astuce ! Vous pouvez régler le
déplacement de la ceinture à l'aide
du renvoi de ceinture réglable de
votre véhicule.
Þ Vorsicht! Der Diagonalgurt 6 darf
nie nach vorn zum Gurtumlenker
am Auto führen.
Tipp! Verwenden Sie in diesem Fall
den Kindersitz nur auf dem
Rücksitz.
Þ Straffen Sie den Autogurt, indem
Sie am Diagonalgurt 6 ziehen.
3.6 So ist Ihr Kind richtig gesichert
Prüfen Sie zur Sicherheit
Ihres Kindes, dass...
• der Beckengurt 11 auf beiden
Seiten in den hellroten
Gurtführungen 12 des Sitzkissens
verläuft,
Þ Caution! The diagonal belt section
6 may not guide forwards to the
seat belt tightener.
Tip! In this case, use the child seat
on the the rear seat.
Þ Tighten the lap belt section by
pulling the diagonal belt se ction 6.
3.6 Checklist to ensure that
your child is buckled up
correctly
For the safety of your child,
please check that...
• the belt lap section 11 runs through
both sides of the light red belt
guides 12 of the seat cushion,
12
Þ Attention ! La sangle diagonale 6
ne doit jamais aller vers l'avant du
véhicule pour rejoindre le renvoi de
ceinture.
Astuce ! Si c'est le cas, n'utilisez le
siège enfant que sur le siège arrière
du véhicule.
Þ Tendez la ceinture du véhicule en
tirant sur la sangle diagonale 6.
3.6 Voici comment votre
enfant est bien protégé
Vérifiez, pour la protection de
votre enfant, que...
• la sangle ventrale 11 passe bien
dans les guidages rouge clair 12 de
l'assise,
Page 13

• der Diagonalgurt 6 auf der Seite
des Auto-Gurtschlosses 10
ebenfalls in der hellroten
Gurtführung 12 des Sitzkissens
verläuft,
• der Diagonalgurt 6 durch den
dunkelroten Gurthalter 7 der
Kopfstütze verläuft,
• der Diagonalgurt 6 schräg nach
hinten verläuft,
• die Gurte gestrafft und nicht
verdreht sind,
• the diagonal belt section 6 also runs
through the light red belt g uide 12 of
the seat cushion on the side of the
vehicle seat buckle 10,
• the diagonal belt section 6 runs
through the dark red bel t holder7 of
the headrest,
• the diagonal belt section 6 runs
slanted towards the back.
• the straps are tightened and not
twisted,
• la sangle diagonale 6 passe bien,
du côté du fermoir de ceinture du
véhicule 10, également dans le
guidage rouge clair 12 de l'assise,
• la sangle diagonale 6 passe bien
dans le support de ceinture rouge
foncé 7 de l'appui-tête,
• la sangle diagonale 6 se déplace en
diagonale vers l'arrière,
• les bretelles sont bien tendues et
pas torsadées,
• das Autogurt-Schloss 10 nicht
zwischen der hellroten
Gurtführung 12 und der Armlehne
des Sitzkissens liegt.
4. Pflegeanleitung
Zum Erhalt der
Schutzwirkung
• Bei einem Unfall mit einer
Aufprallgeschwindigkeit über 10
km/h können Beschädigungen am
Auto-Kindersitz aufgetreten sein,
die nicht unbedingt offensichtlich
sind.
Lassen Sie diesen Kindersitz
unbedingt vom Hersteller
überprüfen und gegebenenfalls
austauschen.
• Kontrollieren Sie regelmäßig alle
wichtigen Teile auf
Beschädigungen. V ergew issern Sie
sich, dass die mechanischen
Bauteile einwandfrei funktionieren.
• the vehicle seat buckle 10 does not
rest between the light red guide 12
and the armrest of the seat cushion.
4. Care instructions
To retain the protective effect
• In an accident at a collision speed
above 10 km/h the child seat could
suffer damage which is not
necessarily obvious.
In such cases it is extremely
important that you replace the child
seat. Please dispose of it properly
(see 5).
• Regularly check all important parts
for damage. Ensure the correct
operation of all mechanical
components.
• le fermoir de ceinture du
véhicule 10 ne se trouve pas entre
le guidage de ceinture rouge
clair 12 et l'ac coudoir de l'assise.
4. Consignes d’entretien
Pour conserver l’efficacité de
la protection
• En cas de collision à une vitesse
supérieure à 10 km/h, il est possible
que le siège auto soit endommagé,
les dégâts n’étant pas forcément
visibles.
Remplacez impérativement ce
siège auto. Veuillez éliminer
l‘ancien siège auto selon la
réglementation (voir 5).
• Contrôlez régulièrement l’état de
toutes les pièces importantes.
Assurez-vous du bon
fonctionnement de toutes les pièces
mécaniques.
Page 14

• Achten Sie darauf, dass der AutoKindersitz nicht zwischen harten
Teilen (Fahrzeugtür, Sitzschiene
etc.) eingeklemmt und beschädigt
wird.
• Lassen Sie einen beschädigten
Auto-Kindersitz (z.B. nach einem
Sturz) unbedingt vom Hersteller
überprüfen.
• To prevent damage or breakage,
ensure that the child seat does not
become jammed in the car door,
seat runners, etc.
• Should the child seat be damaged
(for example after dropping it) it
must be inspected by the
manufacturer.
• Veillez à ce que le siège auto ne
soit pas coincé entre des objets
durs (porte du véhicule, glissière du
siège, etc.), ce qui risquerai t de
l’endommager.
• Faites impérativement contrôler un
siège auto endommagé (par
exemple après une chute) par le
fabricant.
4.1 Reinigung
Achten Sie darauf, dass Sie nur einen
Original-Britax/RÖMER-Ersatzbezug
einsetzen, da der Bezug einen
wesentlichen Teil der Systemfunktion
darstellt. Ersatz erhalten Sie im
Fachhandel oder bei einer ADACGeschäftsstelle.
Der Auto-Kindersitz darf nicht
ohne Bezug verwendet
werden.
•Den Bezug können Sie abziehen
und mit Feinwaschmittel im
Schonwaschgang bei 30°C in der
Waschmaschine waschen. Bitte
beachten Sie die Anleitung auf dem
Waschetikett des Bezuges. Wenn
Sie mit mehr als 30 °C waschen, ist
ein Ausfärben des Bezugs stoffes
möglich. Den Bezug nicht schleudern und auf keinen Fall im
elektrischen Wäschetrockner
trocknen (der Stoff kann sich von
der Polsterung lösen).
•Die Kunststoffteile können Sie mit
einer Seifenlösung abwaschen.
Keine scharfen Mittel (wie z.B.
Lösungsmittel) verwenden.
4.1 Cleaning
Please be sure to use only original
Britax/RÖMER replacement seat
covers, as the seat cover is important
to the proper functioning of the
system. Replacement seat covers are
available from your retailer and or at
ADAC (German Motoring Club)
branches.
The child seat must not be
used without the seat cover.
•The cover can be removed and
washed with a mild detergent using
the washing machine's cycle for
delicate items (30 °C). Please
observe the instructions on the
washing label of the cover. The
colours of the cover may fade if
washed at more than 30 °C. Do not
spin, and never tumble dry in an
electric clothes dryer (the fabric
may separate from the padding).
•The plastic parts can be cleaned
using soapy water. Do not use
harsh cleaning agents (such as
solvents).
14
4.1 Nettoyage
Veillez à seul eme nt utiliser une
housse de rechange Britax/RÖMER
car la housse représente un élém ent
fonctionnel essentiel du système. Les
housses de rechange sont disponibles
dans les magasins spécialisés ou
dans une filiale de l’ADAC (automobile
club allemand).
Le siège auto ne doit pas être
utilisé sans housse .
•La housse peut être enlevée et
lavée en machine à 30° avec une
lessive pour linge délicat .
Respectez les instructions de
lavage figurant sur l'étiquette de la
housse. Si vous lavez la housse à
des températures supérieures à
30°, le tissu risque de déteindre. Ne
pas essorer la housse et ne la
mettre en aucun cas dans le sèchelinge (le tissu risque de se décoller
du rembourrage).
• Vous pouvez laver les éléments en
matière plastique avec une eau
savonneuse. Ne pas utiliser de
détergents ou de produit s co rro sifs
(solvants par exemple).
Page 15

4.2 Abziehen des Bezuges
Hängen Sie die Bezugshaken 14
Þ
der Rückenlehne 2 aus.
4.2 Removing the cover
Unhook the cover hook 14 of the
Þ
backrest 2.
4.2 Retrait de la housse
Décrochez le crochet de hous se 14
Þ
du dossier 2.
Þ Hängen Sie die Gummischlaufen
13 des Sitzkissens 1 aus.
Þ Hängen Sie die Knopflöcher 19 der
Kopfstütze 3 aus.
Þ Ziehen Sie die Stöpsel 17 aus dem
Bezug der Seitenteile 15.
Þ Nun können Sie den Bezug
abnehmen.
4.3 Aufziehen des Bezuges
Þ Gehen Sie einfach in umgekehrter
Reihenfolge vor.
Þ Unhook the elastic loops 13 of the
seat cushion 1.
Þ Unhook the buttonholes 19 of the
headrest 3.
Þ Pull the stopper 17 out of the cover
of the wings 15.
Þ You can now pull the cover off.
4.3 Re-fitting the cover
Þ Simply proceed in the reverse
order.
Þ Décrochez les boucles élastiq ue s
13 de l'assise 1.
Þ Défaites les boutonnières 19 de
l'appui-tête 3.
Þ Désolidarisez les ergots 17 de la
housse des parties latérales 15.
Þ Maintenant vous pouvez retirer la
housse.
4.3 Remise en place de la
housse
Procédez simplement en sens
Þ
inverse.
Page 16

5. Hinweise zur Entsorgung
Bitte beachten Sie die
Entsorgungsbestimmungen Ihres
Landes.
Entsorgung der Verpackung
Container für Pappe
Entsorgung der Einzelteile
Bezug Restmüll, thermische
Kunststoffteile entsprechend
Metallteile Container für Metalle
Verwertung
Kennzeichnung in die
dafür vorgesehenen
Container
5. Notes regarding
disposal
Please observe the waste disposal
regulations in your country.
Disposal of packaging
Container for paperboard
Disposal of components
cover garbage, thermal utilisation
plastic
parts
metal
parts
container corresponding to
the label on the part
container for metals
5. Remarques relatives à
l’élimination
Veuillez respecter les directives en
vigueur dans votre pays.
Elimination de l’emballage
Conteneur pour le
carton
Elimination des pièces détachées
Housse Déchets résiduels,
Pièces en
matière
plastique
Pièces
métalliques
recyclage thermique
suivant le marquage,
dans le conteneur
spécialement prévu
Conteneur pour métaux
6. 2 Jahre Garantie
Für diesen Auto-/Fahrradkindersitz /
Kinderwagen leisten wir eine Garantie
für Fabrikations- oder Material-Feh ler
von 2 Jahren. Die Garantiezeit beginnt
am Tage des Kaufes. Zum Nachweis
bewahren Sie bitte die ausgefüllte
Garantiekarte, den von Ihnen
unterzeichneten Übergabe-Check
sowie den Kaufbeleg für die Dauer der
Garantiezeit auf.
Bei Reklamationen ist der
Garantieschein dem Kindersitz
beizufügen. Die Garantie-leistung
beschränkt sich auf Auto-/
Fahrradkindersitze / Kinderwagen, die
sachgemäß behandelt wurden und die
in sauberem und ordentlichem
Zustand zurückgesandt werden.
6. 2-year warranty
For this car/bicycle child seat /
pushchair we provide a 2-year
warranty against manufacturin g or
material defects. The warranty period
is effective from the day of purchase.
As proof we ask that you fill out the
Warranty Card and retain it for the
whole term of the warranty period,
together with the Transfer Check
signed by you and your sales receipt.
In the case of a warranty claim, the
Warranty Card must be returned
together with the product. The
warranty covers only car/bicycle child
seats / pushchairs which have been
handled properly and which have
been sent to us in a clean condition.
16
6. 2 ans de garantie
Pour ce siège auto / bicyclette /cette
poussette, nous accordons une
garantie de 2 ans pour les défauts de
fabrication ou de matériau. La garantie
débute le jour de l’achat. Pour
apporter la preuve de la garantie,
veuillez conserver pendant toute la
durée de la garantie : la carte de
garantie remplie, le procès-verbal de
remise que vous avez signé ainsi que
la facture d’achat.
Pour toute réclamation, la carte de
garantie doit être jointe au siège pour
enfants. La prestation de garantie est
limitée aux sièges auto / bicyclette /
poussettes qui ont été traités comme il
convient et qui sont renvoyés propres
et complets.
Page 17

Die Garantie erstreckt sich nicht
auf:
• natürliche Abnutzungserscheinungen und Schäden durch
übermäßige Beanspruchung
• Schäden durch ungeeignete oder
unsachgemäße Verwendung
The Warranty does not cover:
• natural signs of wear and damage
resulting from excessive str ess.
• damage resulti ng from
inappropriate or improper use .
La garantie ne couvre pas les
défauts suivants :
• usure naturelle et dommages dus à
une sollicitation excessive
• dommages dus à une uti li sation
inappropriée et non conforme
Garantiefall oder nicht?
Stoffe: Alle unsere Stoffe erfüllen
hohe Anforderungen in Bezug auf
Farbbeständigkeit gegen UVStrahlung. Dennoch bleichen alle
Stoffe a us, w enn sie de r UV-Strahlung
ausgesetzt sind. Hierbei handel t es
sich um keinen Material-Fehler,
sondern um normale
Verschleißerscheinungen, für die
keine Garantie übernommen wird.
Schloss: Sollten Funktionsstörunge n
am Gurtschloss auftreten, so sind
diese meist auf Verunreinigungen
zurückzuführen, welche
ausgewaschen werden können. Bitte
halten Sie sich in der Vorgehensweise
an Ihre Gebrauchsanleitung.
Im Garantiefall wenden Sie sich bitte
unverzüglich an Ihren Fachhändler. Er
wird Ihnen mit Rat und Tat zur Seite
stehen. Bei der Bearbeitung von
Reklamationsansprüchen kommen
produktspezifische
Abschreibungssätze zur Anwendu ng.
Hier verweisen wir auf die beim
Händler ausliegenden Allgemeinen
Geschäftsbedingungen.
What is covered by the warranty?
Fabrics: All our materials meet very
high requirements with regard to
colour fastness when exposed to UV
radiation. Nevertheless, all fabrics
fade when exposed to UV radiation.
This is not a material defect, b ut rather
a normal sign of wear which is not
covered by the warranty.
Buckle: Buckle malfunction is often
due to accumulations of dirt and du st
which may stop it from working
properly. If this happens, the buckle
can be washed out. Please refer to
your user instructions.
Please contact your retailer directly in
the event of a warranty claim. He or
she will give you the advice and
support you need. When processing
claims, product-specific depreciation
rates will be applied. Please refer to
our General Terms and Conditions
which are available from your retailer.
Cas de garantie ou non ?
tous nos tissus répondent
Tissus :
aux exigences élevées quant à
la résistance des couleurs aux rayons
UV. Malgré tout, les tissus se
décolorent lorsqu’ils sont soumis aux
rayons UV. Dans ce cas, il ne s’agit
pas de défaut de matériel mais d’une
usure normale qui n’est pas couverte
par la garantie.
Fermoir : au cas où le fermoir
présenterait des dysfonctio nnements,
ceux-ci sont souvent dus aux
encrassements qui peuvent être
enlevés par lavage. Veuillez vous
conformer aux instructions de votre
mode d’emploi.
En cas de garantie, veuillez vous
adresser immédiatement à votre
revendeur spécialisé. Il vous assistera
volontiers. Lors du traitement des
droits résultant de réclamations, les
taux d’amortissement spécifiques au
produit sont appliqués. Pour cela,
veuillez consulter nos conditions
générales de vente disponibles chez
le revendeur.
Page 18

Verwendung, Pflege und Wartung
Der Auto-/Fahrradkinders itz /
Kinderwagen muss entsprechend der
Gebrauchsanleitung behandelt
werden. Wir weisen ausdrücklich
darauf hin, dass nur Original-Zubehör
bzw. Ersatzteile verwendet werden
dürfen.
Use, care and maintenance
The car/bicycle child seat / pushchair
must be used in accordance with the
user instructions. We would like to
point out that it is extremely important
that only Britax/RÖMER accessories
and replacement parts are used.
Utilisation, entretien et
maintenance
Le siège auto / bicyclette / la
poussette doivent être traités
conformément au mode d’emploi.
Nous signalons expressément que
seuls les accessoires et les pièces de
rechange d’origine doivent être
utilisés.
18
Page 19

7. Garantiekarte / Übergabe-Check
Name: _____________________________________________
Adresse: _____________________________________________
Postleitzahl: _____________________________________________
Ort: _____________________________________________
Telefon (mit Vorwahl): _____________________________________________
E-Mail: _____________________________________________
_____________________________________________
Auto-/
Fahrradkindersitz /
Kinderwagen:
Artikel-Nummer: _____________________________________________
Stoff-Farbe (Dessin): _____________________________________________
Zubehör: _____________________________________________
Kaufdatum: ____________________________________________
_____________________________________________
Übergabe-Check:
1. Vollständigkeit { geprüft
2. Funktionsprüfung
- Verstellmechanismus
Sitz
- Gurtzeug-Verstellung { geprüft
3. Unversehrtheit
- Sitz überprüfen { geprüft
- Stoffteile überprüfen { geprüft
- Kunststoffteile
überprüfen
in Ordnung
{ geprüft
in Ordnung
in Ordnung
in Ordnung
in Ordnung
{ geprüft
in Ordnung
{ Ich habe den Auto-/
Fahrradkindersitz /
Kinderwagen geprüft und
mich vergewissert, dass der
Sitz komplett übergeben
wurde und dass alle
Funktionen vollständig
funktionieren.
{ Ich habe ausreichend
Informationen über das
Produkt und seine
Funktionen vor dem Kauf
erhalten und die Pflege- und
Wartungsanweisungen zur
Kenntnis genommen.
Käufer (Unterschrift): ____________________________________________
Händler: ____________________________________________
Händler Stempel
Page 20

7. Warranty Card / Transfer Check
Name: ____________________________________________
Address: ____________________________________________
Post Code: ____________________________________________
City/Town: ____________________________________________
Telephone No.
(including area code):
e-mail address: ____________________________________________
Car/bicycle child seat /
pushchair:
Article No.: ____________________________________________
Fabric colour (design): ____________________________________________
Accessories: ____________________________________________
Date of purchase: ____________________________________________
Buyer (signature): ____________________________________________
____________________________________________
____________________________________________
____________________________________________
Transfer Check:
1. Completeness { examined OK{ I have checked the child car/
2. Function test
- Seat adjustment
mechanism
- Harness adjustment { examined
3. Intactness
- Seat { examined
- Fabrics { examined
- Plastic parts { examined
{ examined
OK
OK
OK
OK
OK
Retailer's stamp
bicycle seat / pushchair and
am sure that the seat was
complete on delivery and that
all functions are sound.
{ I received adequate
information on the product
and its functions prior to
purchase and have noted the
care and maintenance
instructions.
Retailer: ____________________________________________
Page 21

7. Carte de garantie / Procès-verbal de remise
Nom : ________________________________________________
Adresse : ________________________________________________
Code postal : ________________________________________________
Lieu : ________________________________________________
Téléphone (avec
préfixe) :
E-Mail : ________________________________________________
Siège auto /
bicyclette /
poussette :
Référence : ________________________________________________
Couleur du tissu
(dessin) :
Accessoires : ________________________________________________
Date de l’achat : ________________________________________________
________________________________________________
________________________________________________
________________________________________________
________________________________________________
Procès-verbal de remise :
1. Intégralité { contrôlé
2. Contrôle
fonctionnel
- Mécanisme de
réglage siège
- Réglage des sangles { contrôlé
3. Absence de
dommages
- Contrôle du siège { contrôlé
- Contrôle des
éléments textiles
- Contrôle des pièces
en matière plastique
en ordre
{ contrôlé
en ordre
en ordre
en ordre
{ contrôlé
en ordre
{ contrôlé
en ordre
{ J’ai contrôlé le siège auto /
bicyclette / la poussette et vérifié
qu’ils ont été remis en bon état
et complet, et que toutes les
fonctions sont parfaitement
opérationnelles.
{ J’ai reçu des informations
suffisantes concernant le produit
et ses fonctions avant l’achat, et
j’ai pris connaissance des
instructions d’entretien et de
maintenance.
Acheteur
(signature) :
Revendeur : ________________________________________________
________________________________________________
Cachet du revendeur
 Loading...