

Page 1
9 kg – 22 kg
(~9 M - 5 Y)
JOCKEY³ COMFORT
Gebrauchsanleitung
User Instructions
Mode d'emploi
Istruzioni per l’uso
Brugsvejledning
Gebruiksaanwijzing
Bruksanvisning
Bruksanvisning
Käyttöohje
DE
GB
FR
IT
DK
NL
SE
NO
FI
Page 2

DE
Gebrauchsanleitung
JOCKEY³ Comfort
1
Gebrauchsanleitung
Wir freuen uns, dass unser JOCKEY³ Comfort Ihr
Kind sicher durch einen neuen Lebensabschnitt
begleiten darf.
Um Ihr Kind richtig schützen zu können, muss der
JOCKEY³ Comfort unbedingt so montiert und
verwendet werden, wie wir es Ihnen in dieser
Anleitung beschreiben.
Wenn Sie noch Fragen zur Benutzung haben,
wenden Sie sich bitte an uns.
BRITAX RÖMER
Kindersicherheit GmbH
%ULWD[([FHOVLRU/WG
Page 3

GB
User instructions
User instructions
Mode d’emploi
We are pleased that our JOCKEY³ Comfort may
accompany your child safely throug h a ne w stage
of his or her life.
In order to protect your child correctly, the
JOCKEY³ Comfort must always be mounted an d
used as described in these instructi on s.
If you have any further questions regarding its use,
please feel free to contact us.
BRITAX RÖMER
Kindersicherheit GmbH
%ULWD[([FHOVLRU/WG
Nous sommes heureux que notre JOCKEY³
Comfort puisse accompagner votre enfant en
toute sécurité pendant un nouveau chapitre de sa
vie.
Pour protéger efficacement votre bébé, le
JOCKEY³ Comfort doit impérativement être utilisé
et installé de la manière décrite dans le présent
mode d’emploi.
Pour toute question complémentaire, n’hésitez pas
à nous contacter .
BRITAX RÖMER
Kindersicherheit GmbH
%ULWD[([FHOVLRU/WG
2
Page 4
DE
Gebrauchsanleitung
Inhalt
WARNUNG! .............................................................. 5
1. Eignung ........................... .................................... 9
2. Verwendung am Fahrrad .................................. 11
2.1 Montage am Fahrra d .................................. 17
3. Gebrauch Ihres Fahrrad-Kindersitzes ............ 25
3.1 Anpassen de r Sch u lterg u r te .......................27
3.2 Anpassen de r Fußs tü tzen ..........................29
3.3 Anschnallen Ihres Kindes ...........................31
3.4 Einstellen der Rückenlehne ........................ 33
3.5 Abnehmen des Fahrrad-Kindersitzes .........35
4. Vor jeder Fahrt .................................................. 35
5. Reinigung ................... ....................................... 37
6. Hinweise zur Entsorgung ......................... .. ... .. 39
3
Page 5

GB
User instructions
Contents
WARNING! ................................................................ 6
1. Suitability ................... ............................... .........10
2. Using on the bicycle .........................................12
2.1 Mounting on the bicycle ..............................18
3. Using your bicycle child seat ..........................26
3.1 Adjusting th e sh o ulde r stra p s ......................28
3.2 Adjusting th e fo o tr ests ................................30
3.3 Securing your child .....................................32
3.4 Setting the backrest ....................................34
3.5 Dismounting of the bicycle child seat ..........36
4. Before each ride ................................................36
5. Cleaning ....................... ................................ ......38
6. Notes regarding disposal .................................40
Table des matières
AVERTISSEMENT !.................................................... 6
1. Habilitation ................. ....................................... 10
2. Utilisation sur la bicyclette ..............................12
2.1 Installation sur la bicyclette ......................... 18
3. Utilisation du siège bicyclette .... ... ... .. ... ..........26
3.1 Adaptation des bretelles ............................. 28
3.2 Adaptation des repose-pieds ......................30
3.3 Mise en place de la ceinture de votre
enfant ...................... .. ...... ..... ..... ..... ... ..... ..... 32
3.4 Réglage du dossier ..................................... 34
3.5 Démontage du siège bicyclette ..................36
4. Avant chaque trajet ..........................................36
5. Nettoyage ........................................................ ..38
6. Remarques relatives à l’élimination ............... 40
4
Page 6
DE
Gebrauchsanleitung
WARNUNG!
• Im Gurtschloss befinden sich Magnete.
Beachten Sie die damit verbundenen Gefahren
(z. B. für Herzschrittmacher).
• Schnallen Sie Ihr Kind im Fahrrad-Kindersitz
immer an.
• Lassen Sie Ihr Kind im Fahrrad-Kindersitz
niemals aus den Augen, wenn Sie Ihr Fahrrad
abstellen.
• Bitte schüt zen Sie Ihr Kind zusätzlich mit einem
Kinder-Fahrradhelm.
• Achten Sie darauf, dass weder ihr Kind noch
Kleidungsstücke in bewegliche Teile des
Fahrrades geraten können. Legen Sie immer die
Fußbänder an. Verstauen Sie herumhängende
Bänder, Kleiderstücke...
• Überprüfen Sie ob alle Teile am Fahrrad, mit
montiertem Fahrrad-Kindersitz, noch richtig
funktionieren.
• Durch den Anbau des Fahrrad-Kindersitzes
verändert sich das Fahrverhalten ihres
Fahrrades (Gleichgewicht , Lenkung und
Bremsen). Passen Sie Ihre Fahrweise
entsprechend an.
5
• Befestigen Sie nie Gepäck am Kindersitz.
Page 7
GB
User instructions
WARNING!
• There are magnets in the harness buckle.
Please be aware of the risks associated with this
(risks to pacemakers, for example ).
• Always secure your child when he or she is in the
bicycle child seat.
• Never leave yo ur child unattended in the bicycle
child seat when you park your bicycle.
• Please have your child wear a child's bicycle
helmet as additional protection.
• Pay attention that neither your child nor pieces of
clothing can come into contact w ith moving pa rts
of the bicycle. Always put on the footstraps. Tuck
away any hanging straps, pieces o f cl othing...
• Please check that all the parts on the bicycle still
function correctly when the bi cycle child seat is
mounted.
• Mounting the bicycle child seat changes your
bicycle's handling (balance, steering and
braking). Adapt your riding style accordingly.
• Never tie down luggage on the child seat.
A VERTISSEMENT !
• Des aimants se trouvent dans la boucle de
la ceinture. Faites attentio n aux risques liés aux
aimants (par ex. pour les stimulateurs
cardiaques).
• Attachez toujours votre enfant dans le siè ge
bicyclette.
• Ne quittez jamais des yeux votre enfant installé
dans le siège bicyclette lorsque vous
immobilisez la bicyclette.
• En outre, protégez votre enfant avec un casque
pour enfant.
• Veillez à ce que ni votre enfant ni vos vêteme nt s
ne puissent se prendre dans les pièces mobiles
de la bicyclette. Fixez toujours les attaches de
pieds. Rangez notamment les bandes et
vêtements lâches...
• Veuillez également vérifi er que toutes les pièces
de la bicyclette fonctionnent correctement
lorsque le siège bicyclette est installé.
• L'install ation du siège bicyclette modifie le
comportement de votre bicyclette (équilibre,
guidage et freinage). Adaptez votre conduite en
conséquence.
• Ne fixez jamais de bagage sur le siège enfant.
6
Page 8

DE
Gebrauchsanleitung
• Überprüfen Sie, auch wenn Sie ohne Kind
fahren, ob der Kindersitz fest ist und keine Teile
in bewegliche Fahrradteile kommen können.
• Beim Transport auf dem Autodach-Gepäckträger
müssen Sie den Kindersitz vom Fahrrad
abnehmen.
Prüfen Sie, zur Sicherheit Ihres Kindes, dass...
• die Schulte rgurte und die Fußbänder straff
angelegt sind.
• sich Ihr Kin d im Fahrrad-Kindersitz nicht an
scharfen oder spitzen Teilen verletzen.
• der Haltbügel beitseitig eingerastet ist.
• alle Schrau ben angezogen sind.
• der Fahrrad-Kindersitz auch mit Kind genügend
Abstand vom Gepäckträger bzw. Hinterrad hat.
• der Fahrrad-Kindersitz nicht verwendet werden
darf, wenn irgendein Teil beschädigt ist.
7
Page 9

GB
User instructions
• Even if you are riding without a child, check that
the child seat is secure and that no parts can
come into contact with moving bicycle parts
• When transporting the bicycle on a car's roof
carrier, you must take the child seat off the
bicycle.
For the safety of your child, please check that...
• the shoulder straps and the footstraps are tig ht.
• your child cannot injure him- or herself on shar p
or pointed parts.
• the support rods are engaged on both sides.
• all screws are tightened.
• the bicycle child seat has sufficient clearance to
the luggage carrier or back wheel, even if the
child is seated in it.
• the bicycle child seat may not be used if any part
is damaged.
• Même si vous vous déplacez sans enfant,
vérifiez que le siège enfant est bien fixé et
qu'aucune pièce ne peut se prendre dans les
pièces mobiles de la bicyclette
• Retirez le siège enfant lors du transport sur le
porte-bicyclette de toit de la voiture.
Vérifiez, pour la protection de votre enfant,
que...
• les bretelles et les attaches de pieds sont
tendues.
• votre enfant installé dans le siège bicyclette ne
puisse pas se blesser à des pièces tranchantes
ou pointues.
• l'anse de maintien est bloquée des deux côtés.
• toutes les vis sont serrées.
• la distanc e entre le siège bicyclette et le port ebagage est suffisante même lorsque l' enfant est
installé.
• le siège bic y clette ne doit pas être utilisé si une
quelconque pièce est endommagée.
8
Page 10
DE
Gebrauchsanleitung
1. Eignung
Bitte beachten Sie die gese tz liche n Be stim m ung en
Ihres Landes.
Britax / RÖMER
Fahrrad-Kindersitz
JOCKEY³
Comfort
Prüfung nach
EN* 14344:2004
Körpergewicht 9 - 22 kg
Alter 9 M - 5 Jahre
*EN = Europäische Norm
• Bitte beachten Sie unabhängig vom
Mindestgewicht (9 - 22 kg) und des Mindestalter
(9 M - 5 Jahre):
Ihr Kind muss sicher selbständig sitzen können,
um in einem Fahrrad-Kindersitz mitzufahren.
• Bitte überprüfen Sie von Zeit zu Zeit ob Ihr Kind
die obere Gewichtsgrenze noch einhält.
• Kinder unter 7 Jahren dürfen nur von Personen
auf dem Fahrrad transportiert werden, die älter
als 16 Jahre sind.
9
Page 11
GB
User instructions
1. Suitability
Please observe the legal regulations in your
country.
Britax / RÖMER
Fahrrad-Kindersitz
JOCKEY³
Comfort
*EN = European Norm
Tested according to
EN* 14344:2004
Body weight 9 - 22 kg
Age 9 months to 5 years
1. Habilitation
Veuillez respecter les directives d’élimination en
vigueur dans votre pays.
Britax / RÖMER
Siège bicyclette
JOCKEY³
Comfort
*EN = Norme européenne
Vérification selon
EN* 14344:2004
Poids 9 - 22 kg
Âge 9 mois à 5 ans
• Please pay attention to the following, regardless
of the minimum weight (9 – 22 kg) and the
minimum age (9 months to 5 years):
Your child must be able to sit securely on his or
her own to ride in a bicycle child seat.
• Please check from time to time to see if your
child still falls below the upper weight limit.
• Children under 7 years old may only be
transported on the bicycle by persons older than
16 years old.
• Merci de respecter indépendamment le poids
minimal (9 - 22 kg) et l’âge minimal (9 mois à
5 ans) :
Votre enfant doit pouvoir se tenir bien assis tout
seul afin de pouvoir s'asseoir dans un siège
bicyclette.
• Veuillez vérifier de temps en temps le poids de
votre enfant ne dépasse pas la limite de poids
supérieure.
• Les enfants de moins de 7 ans ne doivent être
transportés sur la bicyclette que par des
personnes âgées de plus de 16 ans.
10
Page 12
DE
Gebrauchsanleitung
2. Verwendung am Fahrrad
Die Verwendung dieses FahrradKindersitzes ist nicht möglich ...
• wenn Ihr Fahrrad für eine solche zusätzliche
Last nicht ausgelegt ist.
Bitte fragen Sie hierzu den Fahr radh erst el ler um
Rat.
• wenn der Sattelrohrdurchmesser kleiner als 28
mm ist.
• wenn der Sattelrohrdurchmesser größer als 40
mm ist.
• wenn das Sattelrohr oval ist.
• wenn der montierte Fahrrad-Kindersitz nach
vorne hängt.
Ihr Kind kann sonst von der Sitzf läche rutschen.
Bitte überprüfen Sie die Lage, si e ist abhängig
vom Sattelrohrwinkel Ihres Fahrrades.
• wenn der Gepäckträger breiter als 150 mm ist.
• an der Sattelstütze.
11
Page 13
GB
User instructions
2. Using on the bicycle
It is not possible to use this bicycle child
seat ...
• if your bicycl e is not designed for an additional
load such as this.
Please consult the bicycle manufacturer.
• if the seat tube diameter is less than 28 mm.
• if the seat tube diameter is greater than 40 mm.
• if the seat tube is oval.
• if the mounted bicycle child seat hangs forward.
Otherwise your child seat could slip off the seat
surface. Please check the positi on, which
depends on the seat tube angle of yo ur bicycle.
• if the luggage carrier is wider than 150 mm.
(Please note: A luggage carrier is not necessarily
required to use the bicycle chi ld seat!)
• on the seat pillar.
2. Utilisation sur la bicyclette
L'utilisation de ce siège bicyclette n'est
pas possible...
• si la bicyclette n'est pas conçue pour une telle
charge supplémentaire.
Veuillez demander conseil à votre vendeur de
bicyclette.
• si le diamètre du tube de fixation de la selle est
inférieur à 28 mm.
• si le diamètre du tube de fixation de la selle est
supérieur à 40 mm.
• si le tube de f ixation de la selle est ovale.
• si le siège bicyclette penche vers l'avant une fois
installé.
Sinon, votre enfant risque de glisser de la
surface d'assise. Veuillez vérifier la position, elle
dépend de l'angle avec le tube de fixation de la
selle de votre bicyclette.
• si la largeu r du porte-bagage est supérieure à
150 mm.
• au dispositif de fixation de la selle.
12
Page 14
DE
Gebrauchsanleitung
13
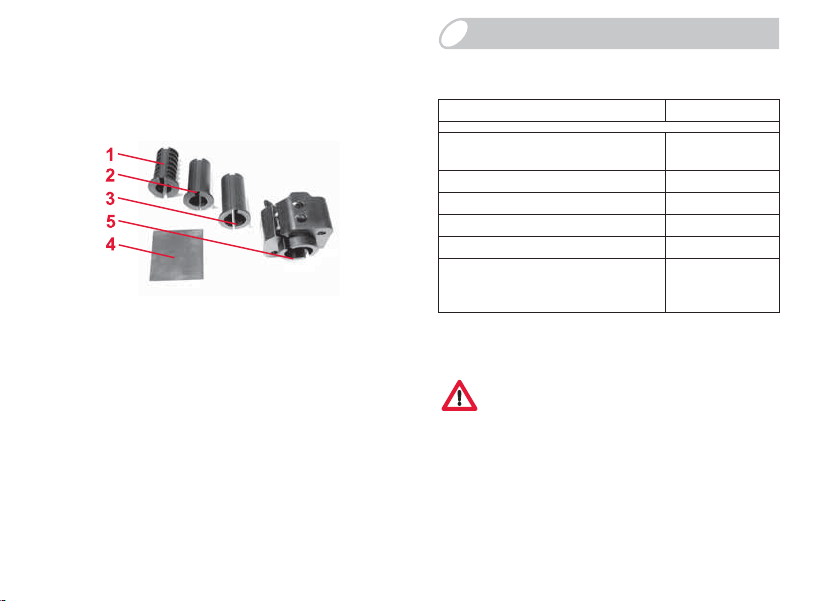
So können Sie Ihren Fahrrad-Kindersitz
verwenden:
Radgröße des Fahrrades 26“ / 28“ Zoll
Sattelrohrdurchmesser
(bei ovalen Rohren nicht möglich)
• Einlegeteil 1 Ø 28 mm Ø 28 - 30 mm
• Einlegeteil 2 Ø 32 mm Ø 31 - 34 mm
• Einlegeteil 3 Ø 36 mm Ø 35 - 37 mm
• ohne Einlegeteil Ø 38 - 40 mm
• Einlegegummi 4 zum genauen
Ø 28 - 40 mm
Anpassen des
Durchmessers
Zum Schutz aller Verkehrsteilnehmer
• WARNUNG! Änderungen am Fahrrad-Kindersitz
und an der Halterung 5 darf ausschli eßlich der
Hersteller vornehmen.
• WARNUNG! Durch den Anbau des FahrradKindersitzes verändert sich das Fahrverhalten
ihres Fahrrades (Gleichgewich t, Lenkung und
Bremsen). Passen Sie Ihre Fahrweise
entsprechend an.
Page 15
GB
User instructions
You can use your bicycle child seat as follows:
Wheel size of the bicycle 26“ / 28“
Seat tube diameter
(not possible for oval tubes)
• Insert 1 Ø 28 mm Ø 28 - 30 mm
• Insert 2 Ø 32 m m Ø 31 - 34 mm
• Insert 3 Ø 36 m m Ø 35 - 37 mm
• Without insert Ø 38 - 40 mm
• Rubber insert pad 4 to precisely
Ø 28 - 40 mm
adapt to the
diameter
Procédez comme suit pour utiliser le siège
bicyclette :
Taille de la roue de la bicyclette
Diamètre du tube de fixation de
(impossible sur les tubes ovales)
• Pièce d'insertion 1 Ø 28 mm Ø 28 - 30 mm
• Pièce d'insertion 2 Ø 32 mm Ø 31 - 34 mm
• Pièce d'insertion 3 Ø 36 mm Ø 35 - 37 mm
• sans pièce d'insertion Ø 38 - 40 mm
• Patte d'insertion en
caoutchouc 4
la selle
26“ / 28“
pouces
Ø 28 - 40 mm
pour
l'adaptation
précise du
diamètre
For the protection of all road users
• WARNING! Changes to the bicycle c hild seat
and to the mounting bracket 5 may be made
exclusively by the manufacturer.
• WARNING! Mounting the bicycle child seat
changes your bicycle's handling (balance,
steering and braking). Adapt your riding style
accordingly.
Pour protéger tous les passagers
• AVERTISSEMENT ! Les modifications sur le
siège bicyclette et sur le dispositi f de fix ation 5
sont strictement réservée s au fabricant.
• AVERTISSEMENT ! L'installation du siège
bicyclette modifie le comportement de votre
bicyclette (équilibre, guidage et freinage).
Adaptez votre conduite en consé quence.
14
Page 16

DE
Gebrauchsanleitung
• Es sollten nie zwei Kinder auf einem Fahrrad
transportiert werden. Dies beeinträchtigt das
Fahrverhalten erheblich.
• WARNUNG! Befestigen Sie nie Gepäck am
Kindersitz. Bitte nützen Sie zum
Gepäcktransport einen Vorderradgepäckträger
oder Ähnliches.
• Überprüfen Sie, auch wenn Sie ohne Kind
fahren, ob der Kindersitz fest ist und keine Teile
in bewegliche Fahrradteile kommen können (z.B.
Gurte in die Speichen)
• Beim Transport auf dem Autodach-Gepäckträger
müssen Sie den Kindersitz vom Fahrrad
abnehmen. Der sehr hohe Luftwider stand kann
zu Schäden am Fahrrad und Kindersitz führen
und letztlich sogar Unfälle ver ursachen.
Zum Schutz vor Diebstahl
• Sie können den Fahrrad-Kindersitz vor Diebstahl
schützen. Ziehen Sie ein Fahrradschloss durch
die Grifflöcher des Kindersitzes und sichern Sie
es am Fahrradrahmen.
15
Page 17

GB
User instructions
• Never transport two children on one bicycle. Th is
considerably impairs the bicycle's handling.
• WARNING! Never tie down luggage on the child
seat. Please use a front wheel luggage carrier or
the like to transport luggage.
• Even if you are riding without a child, check that
the child seat is secure and that no parts can
come into contact with moving bicycle parts (the
belts with the spokes, for example) .
• When transporting the bicycle on a car's roof
carrier, you must take the child seat off the
bicycle. The very high air resistance can damage
the bicycle and child seat and even cause
accidents.
• Ne transportez jamais deux enfants sur une
bicyclette car cela entraverait con sidérablement
le comportement en conduite.
• AVERTISSEMENT ! Ne fixez jamais de bagage
sur le siège enfant. Pour le transport de
bagages, utilisez un porte-bagage de roue avant
ou un dispositif similaire.
• Même si vous vous déplacez sans enfant,
vérifiez que le siège enfant est bien fixé et
qu'aucune pièce ne peut se prendre dans les
pièces mobiles de la bicyclette ( par ex. la
ceinture dans les rayons).
• Retirez le siège enfant lors du transport sur le
porte-bicyclette de toi t de la voiture. La très
haute résistance de l'air peu t entraîner des
dommages sur la bicyclette ou sur le siège
enfant, voire provoquer des ac cidents.
Theft protection
• You can protect the bicycle child seat against
theft. Put a bicycle lock thro ugh the child seat's
grip holes and secure it to the bi cycle frame.
Protection antivol
• Vous pouvez protéger le siège bicyclette contre
le vol. Faites passer un cadenas d e bicyclette
dans les orifices de poignée du s iège enfant et
fixez-le à la structure de la bicyclet te.
16
Page 18
DE
Gebrauchsanleitung
17
2.1 Montage am Fahrrad
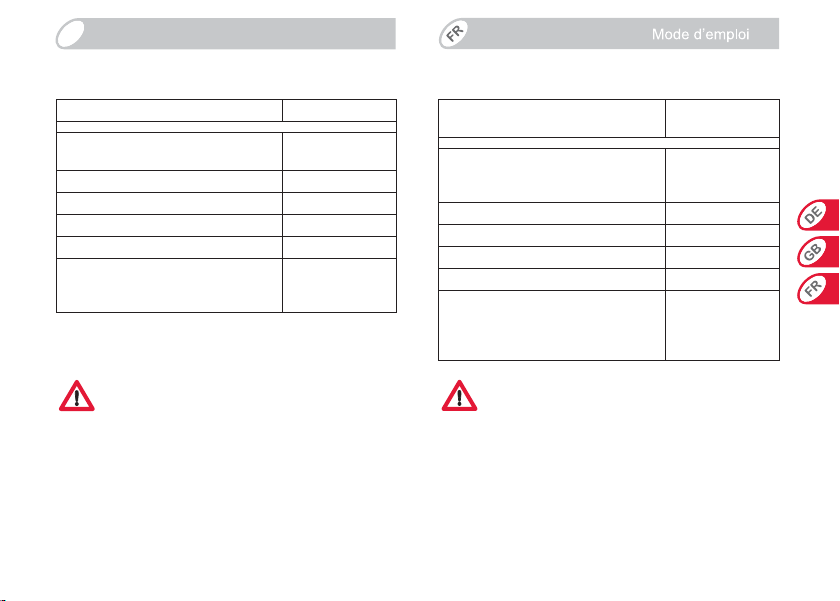
So befestigen Sie die Halterung am Sattelrohr:
Þ Messen Sie de n Du rc hmesser des Sattelrohres.
Þ Stecken Sie das passende Einlegeteil 1/2/3, mit
dem Spalt nach hinten, auf das Sat telrohr 6
(siehe 2.)
Tipp! Legen Sie bei Zwischengrößen (z.B. Ø 31
mm) zusätzlich den Einlegegummi 4 um das
Sattelrohr 6, um den Durchmesser möglichst
genau anzupassen.
Þ Klappen Sie die Halterung 5 um das Einlegeteil.
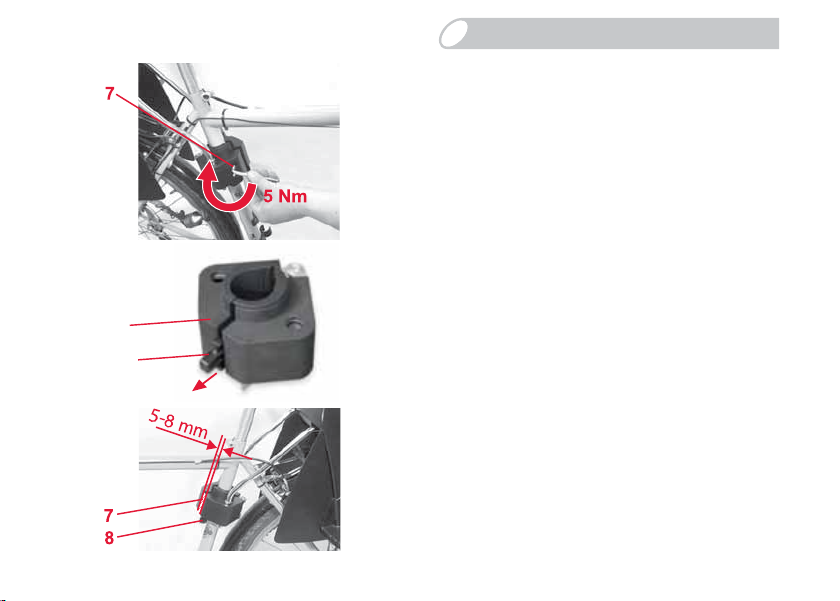
Þ Ziehen Sie die Schrauben 7 mit einem Innen-
Sechskant-Schlüssel (Größe 5) nur leicht an.
Damit Sie die Halterung 5 noch etwas
verschieben können.
Vorsicht! Achten Sie darauf dass die
Verschraubung 7 vorn und der Sicherungsriegel
8 unten ist.
Page 19

GB
User instructions
2.1 Mounting on the bicycle
Attaching the mounting bracket to the seat
tube:
Þ Measure the diameter of the seat tube.
Þ Put the appropriate insert 1/2/3, with the opening
facing backwards, onto the seat tube 6 (see 2.)
Tip! For in-between sizes (Ø 31 mm, for
example), also place the rubber insert pad 4
around the seat tube 6 to adapt to the diameter
as precisely as possible.
Þ Fold the mounting bracket 5 around the insert.
2.1 Installation sur la bicyclette
Procédez comme suit pour fixer le dispositif de
fixation sur le tube-support de la selle :
Þ Mesurez le diamètre du tube-support de la selle.
Þ Insérez la pièce d'insertion correspondante 1/2/3
sur le tube-support de la selle 6 (voir 2) en
orientant la fente vers l'arrière.
Astuce ! Pour les tailles intermédiaires (par ex.
Ø 31 mm), placez en outre une patte d'insertion
en caoutchouc 4 autour du tube-support de la
selle 6 pour adapter le diamètre avec la plus
grande précision possible.
Þ Rabattez le dispositif de fixation 5 autour de la
pièce d'insertion.
Þ Tighten the screws 7 slightly using an hollow
hexagon wrench (size 5). This way, you can still
move the mounting bracket 5 a little.
Caution! Pay attention that the screws 7 are in
front and the safety-catch 8 is on the bottom.
Þ Serrez légèrement les vis 7 à l'aide d'une clé
mâle coudée (taille 5) afin de pouvoir encore
déplacer légèrement le dispositif de fixation 5.
Attention ! Veillez à ce que le raccord à vis 7
soit à l'avant et le verrou de sécurité 8 en bas.
18
Page 20
DE
Gebrauchsanleitung
19
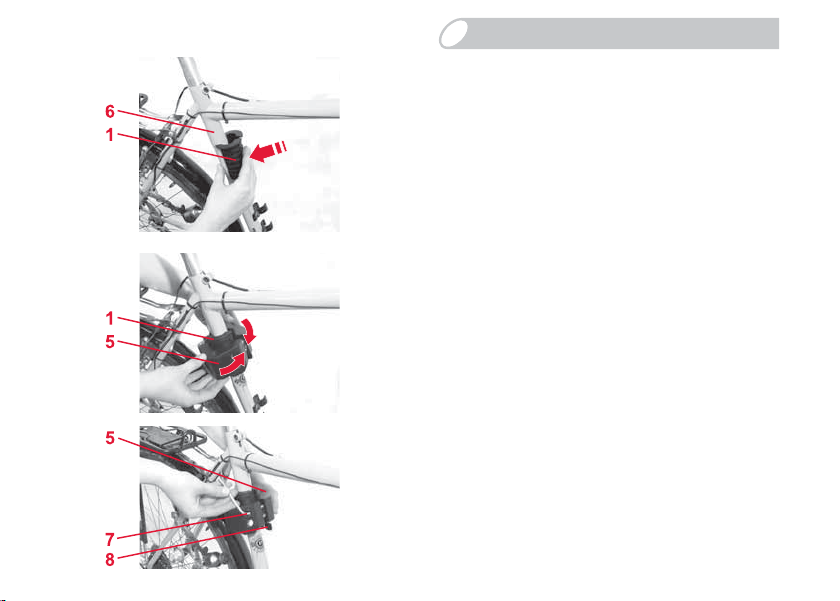
Þ
Stecken Sie den Fahrrad-Kindersitz mit dem
Haltebügel 9 in die Rastlöcher 10 bis er
einrastet.
Vorsicht! Vergewissern Sie sich dass der
Sicherungsriegel 8 in beiden Bügelenden
eingerastet ist.
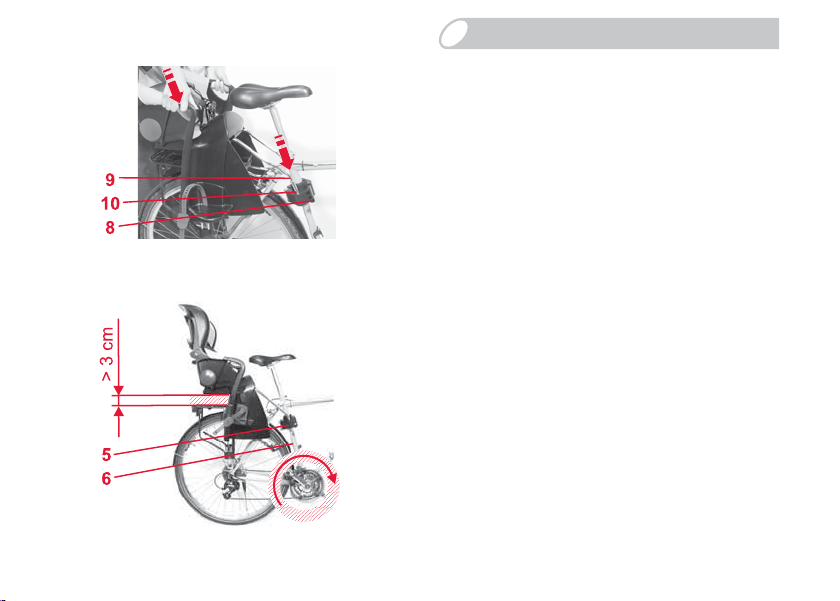
So positionieren Sie die Halterung 9 richtig am
Fahrrad:
Verschiebe n Sie den Fahrrad-Kindersitz am
Sattelrohr 6 so, dass...
Þ ... zwischen dem Gepäckträger und dem
Kindersitz mindestens 3 cm Abstand bleibt.
Þ ... die Schalt- und Bremszüge nicht behindert
werden,
Þ ... der Fahrrad-Kindersitz nicht im Trittbereich
der Fahrradpedale und der Beine i st.
Page 21

GB
User instructions
Þ Using the support rods 9 , put the bicycle child
seat into the snap-on holes 10 until it engages.
Caution! Make sure that the safety-catch 8 is
engaged in both rod ends.
Þ Insérez le siè ge bicyclette accomp agné de l'anse
de maintien 9 dans les orifices d'enclenchement
10 jusqu'a ce qu'il s'enclenche.
Attention ! Vérifiez que le verrou de sécurité 8
est enclenché au niveau des deux extrémités de
l'anse.
Positioning the mounting bra cket 9 correctl y on
the bicycle:
Move the bicycle child seat on the seat tube 6 so
that...
Þ ... there is a minimum clearance of 3 cm between
the luggage carrier and the child seat.
Þ ... the gear-shift and brake cables are not
hindered.
Þ ... the bicycle child seat does not get in the way
of the bicycle pedals or your legs.
Procédez comme suit pour positionner
correctement le dispositif de fixation 9 sur la
bicyclette :
Déplacez le siège bicyclett e sur le tube-support de
la selle 6 de manière à ce...
Þ ... qu'un écart de 3 cm soit maintenu entre le
porte-bagage et le siège enfant.
Þ ... que les câbles de changement de vitesse et
de freinage ne soient gênés.
Þ ... le sièg e bic ycle tte n e so it pa s dans la z one de
pédalage ou des jambes.
20
Page 22
DE
Gebrauchsanleitung
5
x
21
Þ
Ziehen Sie die Schrauben 7 der Halt erung 5 mit
einem Innen-Sechskant-Schlüssel (Größe 5) mit
einem Drehmoment von 5 Nm fest. Verwenden
Sie das Prüfstück X um ein e ko rr ek te
Befestigung zu erreichen.
Überprüfen Sie mit dem Prüfstück X, dass der
Spalt an der Verschraubung 7 nicht breiter als
8 mm (dicke Seite Prüfstück) und ni cht sch mäler
als 5 mm (dünne Seite Prüfstück) ist.
Vorsicht! Ziehen Sie die Schrauben 7 nie zu fest
an. Das Sattelrohr 6 kann sonst beschädigt
werden.
Page 23

GB
User instructions
Tighten the screws 7 in the support 5 using an Allen
key (size 5) with a torque of 5 Nm. Use the test
piece X to achieve the correct fastening.
Use the test piece X to check that the gap at the
screw connection 7 is not wider than 8 mm (thick
side of the test piece) and not narrower than 5 mm
(thin side of the test piece).
Þ Serrez à présent les vis 7 du dispositif de fixation
5 à l'aide d'une clé mâle coudée (taille 5) à un
couple de serrage de 5Nm. Utilisez l’embout de
sécurité X pour assurer une fixation correcte.
Vérifiez à l’aide de l’embout de sécurité X, que la
fente au niveau du raccord vissé 7 ne dépasse
pas 8 mm de large (côté épais de l’embout de
sécurité) et qu’elle ne soit pas inférieure à 5 mm
(côté mince de l’embout de sécurité).
Caution! Ensure that the screws 7 are never
tightened too tightly. This could otherwise damage
the seat post 6.
Attention ! Ne serrez jamais trop les vis 7. Le
tube-support de la selle 6 peut également être
endommagé.
22
Page 24
DE
Gebrauchsanleitung
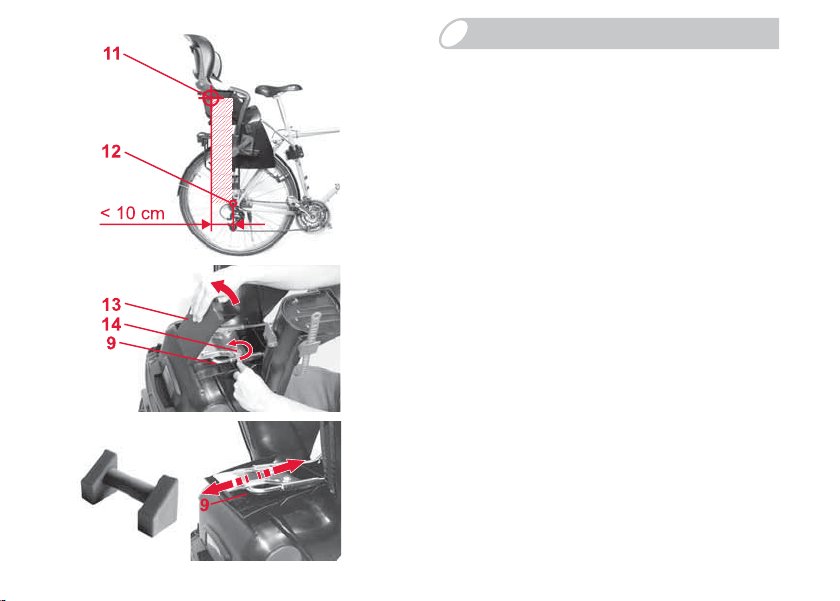
So stellen Sie den Schwerpunkt ein:
Þ Überprüfen Sie den Schwerpunkt des Fahrrad-
Kindersitzes.
Achten Sie darauf, dass das aufgedruckte
Fadenkreuz 11 möglichst weit vorne und nicht
mehr als 10 cm hinter der Hinterachse 12 liegt.
Þ Drücken Sie den Sicherungsriegel 8 zurück und
ziehen Sie den Fahrrad-Kindersitz aus der
Halterung 5.
Þ Öffnen Sie die Klappe des Anleitungsfaches 13.
Þ Drehen Sie die Schrauben 14 mit einem
Gabelschlüssel (Größe 13) etwa 10 mm heraus.
Þ Nun können Sie den Haltebügel 9 verschieben.
Þ Wenn Sie den Haltebügel 9 in die hintere
Position verstellen, entfernen Sie die abgebildete
Transportsicherung.
Tipp! Sie kann anschließend in eine freie
Rastposition eingelegt werden
Þ Ziehen Sie die Schrauben 14 mit einem
Drehmoment von 10 Nm fest.
Þ Überprüfen Sie den Schwerpunkt erneut.
23
Page 25
GB
User instructions
Setting the centre of gravity:
Þ Check the bicycle child seat's centre of gravity.
Pay attention that the printed crosshairs 11 are
not more than 10 cm behind the rear axle 12.
Þ Press back the safety-catch 8 and take the
bicycle child seat out of the mounting bracket 5.
Procédez comme suit pour le centre de gravité :
Þ Vérifiez le centre de gravité du siège bicyclette.
Veillez à ce que la rétic ul e impr imée 11 ne se
trouve pas à plus de 10 cm de l'axe arrière 12.
Þ Repoussez le verrou de sécurité vers l'arrière 8,
retirez le siège bicyclette du dispositif de fixation
5.
Þ Open the flap of the user instructions
compartment 13.
Þ Unscrew the screws 14 about 10 mm using an
open-end wrench (size 13).
Þ Now you can move the support rods 9.
Þ Remove the illust rated tra nsport securi ng device
when you move the holder 9 to the rear position.
Tip! It can then be placed in a free locking position.
Þ Tighten the screws 14 with a torque of 10 Nm
Þ Check the centre of gravity again.
Þ Ouvrez le volet du boîtier de rangement du mode
d'emploi 13.
Þ Dévissez la vis 14 d'env. 10 mm à l'aide d'un clé
à fourche (taille 13).
Þ Vous pouvez à présent déplacer l'anse de
maintien 9.
Þ Retirez la sécurité de transport représentée
lorsque vous placez l'anse de maintie n 9 dans la
position arriére.
Astuce ! Ensuite, la sécurité de transport peut être
placée en position d'enclenchement.
Þ Serrez les vis 14 avec un couple de 10 Nm.
Þ Revérifiez le centre de gravité.
24
Page 26
DE
Gebrauchsanleitung
25
Bitte überprüfen Sie ob alle Teile am
Fahrrad, mit montiertem FahrradKindersitz, noch richtig funktionieren.
3. Gebrauch Ihres Fahrrad-
Kindersitzes
Zum Schutz Ihres Kindes
• Schnallen Sie Ihr Kind im Fahrrad-Kindersitz
immer an.
• WARNUNG! Lassen Sie Ihr Kind im FahrradKindersitz niemals aus den Augen, wenn Sie Ihr
Fahrrad abstellen.
• Bitte schüt zen Sie Ihr Kind zusätzlich mit einem
Kinder-Fahrradhelm.
• Bitte verwenden Sie einen Sattelfeder-Schutz,
wenn ihr Fahrradsattel Sattelfedern hat. Ihr Kind
kann sich sonst darin die Finger einklemmen.
(Fragen Sie im Fachhandel)
• Achten Sie darauf, dass weder ihr Kind noch
Kleidungsstücke in bewegliche Teile des
Fahrrades geraten können. Legen Sie immer die
Fußbänder an. Verstauen Sie herumhängende
Bänder, Kleiderstücke...
Page 27
GB
User instructions
Please check that all the parts on the
bicycle still function correctl y when the
bicycle child seat is mounted.
Veuillez ég aleme nt vé rifie r que tout es le s
pièces de la bicyclette fonctio nnent
correctement lorsque le siège bicyclette
est installé.
3. Using your bicycle child seat
For the protection of your child
• Always secure your child when he or she is in the
bicycle child seat.
• WARNING! Never leave your child unattended in
the bicycle child seat when you park your
bicycle.
• Please have your child wear a child's bicycle
helmet as additional protection.
• Please use a seat cover if your bicycle seat has
seat springs. Otherwise your chi ld could get his
or her fingers stuck there. (Ask your retailer)
• Pay attention that neither your child nor piec es of
clothing can come into contact w ith moving pa rts
of the bicycle. Always put on the footstraps. Tuck
away any hanging straps, pieces o f clothing...
3. Utilisation du siège bicyclette
Pour protéger votre enfant
• Attachez toujours votre enfant dans le siè ge
bicyclette.
• AVERTISSEMENT ! Ne quittez jamais des yeux
votre enfant installé dans l e siège bicyclette
lorsque vous immobilisez la bicyclett e.
• En outre, protégez votre enfant avec un casque
pour enfant.
• Utilisez également une protection du ressort de
la selle si votre selle est équipée de ressort s.
Sinon, votre enfant risque de s'y coincer les
doigts. (Demandez conseil dans un magasin
spécialisé.)
• Veillez à ce que ni votre enfant ni vos vêteme nt s
ne puissent se prendre dans les pièces mobiles
de la bicyclette. Fixez toujours les attaches de
pieds. Rangez notamment les bandes et
vêtements lâches...
26
Page 28

DE
Gebrauchsanleitung
• Schützen Sie Ihr Kind vor Kälte und Regen. Bitte
bedenken Sie, dass Sie Ihr Kind wärmer kleiden
als einen aktiven Radfahrer.
• Vorsicht! Die Kunstoffteile des Kindersitzes
heizen sich in der Sonne auf. Ihr Kind kann sich
daran verbrennen. Schützen S ie Ihr Kind und
den Kindersitz vor intensiver
Sonneneinstrahlung.
• Tipp! Ein 2-Bein-Fahr radständer macht Ihr
Fahrrad standsicherer. Das erleichtert Ihnen vor
allem das Hineinsetzen Ihres Kindes. (Fragen
Sie im Fachhandel)
3.1 Anpassen der Schultergurte
Richtig angepasste Schultergurte geben Ihrem
Kind im Fahrrad-Kindersitz sicheren Halt.
Die Schultergurte 15 müssen auf Schult er hö he
Ihres Kindes verlaufen oder etwas darüber.
27
Page 29

GB
User instructions
• Protect your child against the cold and rain.
Please remember that you, an active bicycle
rider, are wa rme r th an your child.
• Caution! The plastic par ts of the child safety
seat can heat up in the sun. Your child may get
burnt. Protect your child and the child seat
against intensive solar radi ation.
• Tip! A double kickstand will make your bicycle
more stabile. This primarily makes it ea sier for
you to put your child in the seat. (Ask your
retailer)
• Protégez votre enfant du froid et de la pluie.
Pensez à habiller votre enfant plus chaudement
qu'un cycliste en mouvement.
• Attention ! Les parties en matière plastique du
siège enfant se réchauffent en plein soleil. Votre
enfant risque de se brûler. Protégez votre enfant
et le siège enfant d'un fort rayonnement solaire.
• Astuce ! Les béquilles à double pied assurent
une meilleure stabilité de la bicyclette e t facilitent
avant tout l'installation de votre enfant.
(Demandez conseil dans un magasin
spécialisé.)
3.1 Adjusting the shoulder straps
Correctly adjusted shoulder straps ensure
optimal protection for your child in the bicycle
seat.
The shoulder straps 15 must lie at your child's
shoulder level or slightly above.
3.1 Adaptation des bretelles
La bonne adaptation des bretelles assure le
maintien efficace de votre enfant dans le siège
bicyclette.
Les bretelles 15 doivent se trouver à la hauteur des
épaules de votre enfant ou un peu au-des s us .
28
Page 30
DE
Gebrauchsanleitung
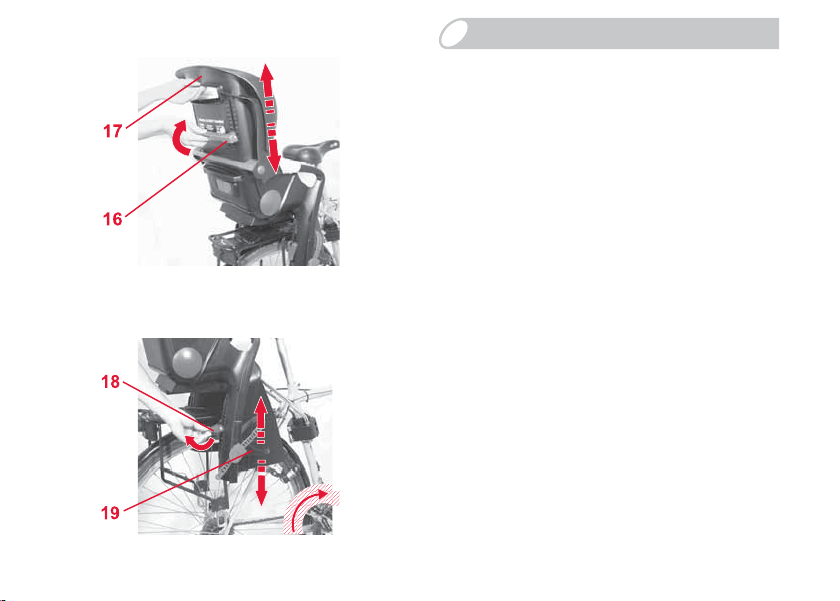
So können Sie die Höhe der Schultergurte der
Körpergrösse Ihres Kindes anpassen:
Þ Schwenken Sie den Kopfstützen-Versteller 16
nach oben.
Þ Schieben Sie die Kopfstütze 17 in die richtige
Schultergurthöhe.
Þ Drücken Sie den Kopfstützen-Versteller 16
wieder nach unten, um die Kopfstütze 17 zu
sichern.
3.2 Anpassen der Fußstützen
Þ Schwenken Sie die Fußstützen-Versteller 18
nach oben.
Þ Schieben Sie die Fußstützen 19 in die passende
Höhe.
Þ Drücken Sie den Fußstützen-Versteller 18
wieder nach unten, um die Fußstütze 19 zu
sichern.
Vorsicht! Achten Sie darauf, dass die
Fußstützen 19 nicht im Trittbereich der
Fahrradpedale und Beine sind.
29
Page 31

GB
User instructions
To ad just th e heig ht of the sh oulder s traps to fit
your child:
Þ Pivot the headrest adjuster 16 upwards.
Þ Slide the headrest 17 until the shoulder straps
are at the correct height.
Þ Press the headrest adju ster 16 downwards again
to secure the headrest 17.
Procédez comme suit pour adapter la hauteur
des bretelles à la taille de votre enfant :
Þ Basculez le dispositif de réglage des appui-têtes
16 vers le haut.
Þ Placez l'appui-tête 17 à la hauteur de bretelles
appropriée.
Þ Redescendez le dispositif de réglage de l'appui-
tête 16 pour bloquer l'appui-tête 17.
3.2 Adjusting the footrests
Pivot the footrest adjuster 18 upwards.
Þ
Þ Slide the footrests 19 to the correct height.
Þ Press the footrest adjuster 18 downwards again
to secure the footrest 19.
Caution! Pay attention that the f ootrests 19 do
not get in the way of the bicycle pedals or your
legs.
3.2 Adaptation des repose-pieds
Basculez le dispositif de ré glage des repose-
Þ
pieds 18 vers le haut.
Þ Placez les repose-pieds 19 à la hauteur
appropriée.
Þ Redescendez le dispositif de réglage des
repose-pieds 18 pour bloquer le repose-pied 19.
Attention ! Veillez à ce que les repose-pieds 19
ne se trouvent pas dans la zone de pédalage ou
des jambes.
30
Page 32

DE
Gebrauchsanleitung
31
3.3 Anschnallen Ihres Kindes
Þ Lockern Sie die Schultergurte 15. Drücken Sie
dazu auf die Gurtversteller 20 und sc hieben Sie
sie nach oben.
Þ Halten Sie die Drucktaste am Gurtschloss 21
gedrückt und schieben Sie diese seitlich. Ziehen
Sie gleichzeitig an den beiden Schultergurten
15, um die beiden Verschlüsse 22 zu lösen.
Þ Setzen Sie Ihr Kind in den Fahrrad-Kindersitz.
Þ Führen Sie die Schultergurte 15 über die
Schultern Ihres Kindes.
Þ Platzieren Sie die beiden Verschlüsse 22 in die
jeweils dafür vorgesehene Öffnung des
Gurtschlosses 21. Beachten Sie die
Kennzeichnung mit „R“ und „L“ auf Gurtschloss
21 und den Verschlüssen 22.
Þ WARNUNG! Prüfen Sie durch kräftiges Ziehen
an den Schultergurten 15, ob beide Verschlüsse
22 vollständig im Gurtschloss 21 eingerastet sind
und Ihr Kind richtig gesichert ist.
Þ Straffen Sie die Schultegurte 15 indem Sie an
den Enden ziehen.
Vorsicht! Achten Sie darauf, dass be ide
Schultergurte 15 straff und gleich lang sind..
Page 33

GB
User instructions
3.3 Securing your child
Loosen the shoulder straps 15. To do so, press
Þ
the strap adjuster 20 and push it upwards.
Þ Press and ho ld the bu tton on the harn ess buc kle
21 and push it to the side. At the same time, pull
on both shoulder straps 15 to release the two
buckles 22.
Þ Place your chi ld in the bicycle child seat.
Þ Put the shoulder straps 15 over the shoulders of
your child.
Þ Insert the two buckles 22 into the opening
provided on the harness buckle 21. Pay attention
to the “R” and “L” markings on the har ness
buckle 21 and the buckles 22.
Þ WARNING! Pull forcefully on the shoulder straps
15 to check that the two buckles 22 are fully
engaged in the harness buckle 21 and that your
child is secure.
Þ Tighten the shoulder straps 15 by pulling on the
ends.
Caution! Pay attention that both shoulder stra ps
15 are tight and of equal length.
3.3 Mise en place de la ceinture de
votre enfant
Desserrez les bretelles 15. Appuyez à cet effet
Þ
sur les dispositifs de réglage de la ceinture 20 et
faites les coulisser vers le haut.
Þ Maintenez la bouche de ceinture 21 enfoncez et
décalez-la latéralement. Tirez simultanément sur
les deux bretelles 15, pour ouvrir les deux
fermetures 22.
Þ Placez votre enfant dans le siège bicyclette.
Þ Passez les bre telles 15 sur les épaules de votre
enfant.
Þ Placez les deux fermetures 22 dans les
ouvertures prévues à cet effet sur la boucle de la
ceinture 21. Tenez compte du marquage « R » et
« L » sur la boucle de la ceinture 21 et les
fermetures 22.
Þ AVERTISSEMENT ! Contrôlez en tirant
fermement sur les bretelles 15 que les deux
fermetures 22 sont complètement enclenchées
dans la boucle de la ceinture 21 et que votre
enfant est correctement sécurisé.
Þ Tendez les bretelles 15 en tirant sur les
extrémités.
32
Page 34
DE
Gebrauchsanleitung
33
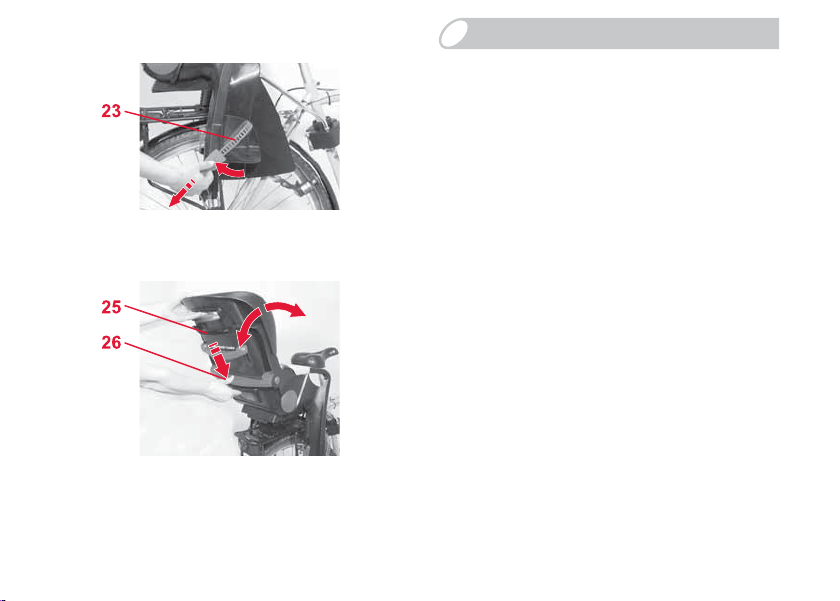
Þ
Schließen Sie die Fußbänder 23 und ziehen Sie
an den Enden, um Sie zu straffen
Vorsicht! Achten Sie darauf dass die Fußbänder
23 während der Fahrt imme r straf f angelegt sin d.
(Verletzungsgefahr)
3.4 Einstellen der Rückenlehne
So können Sie die Rückenlehne 25 nach hinten
neigen:
Þ Halten Sie die Rückenlehne 25 mit einer Hand
fest.
Þ Drücken Sie den Verstellgriff 26 nach unten.
Þ Schwenken Sie die Rückenlehne 25 vor oder
zurück in die gewünschte Stellung.
Þ Sobald Sie die Verstellgriff 26 loslassen, rastet
die Rückenlehne 25 ein.
Vorsicht! Vergewissern Sie sich, dass die
Rückenlehne 25 auf beiden Seiten eingerastet
ist.
Page 35

GB
User instructions
Þ Close the footstraps 23 and pull them on the
ends to tighten them
Caution! Pay attention that the footstraps 23 are
always tightened during the ri de. (to prevent risk
of injury)
Attention ! Veillez à ce que les deux bretelles 15
soient de longueur identique et tendues de la
même manière.
Þ Fermez les attaches de pieds 23 et tirez sur
leurs extrémités pour les tendre.
Attention ! Veillez à ce que les attaches de
pieds 23 soient bien tendues tout au long du
trajet. (Risque de blessure)
3.4 Setting the backrest
To place the backrest 25 in the reclined
position:
Þ Hold the backrest 25 tightly with one hand.
Þ Press down the adjustment handle 26.
Þ Pivot the backrest 25 forwards or backwards to
the desired position.
Þ As soon as you release the adjustment handle
26, the backrest 25 will lock into place.
Caution! Make sure that the backre st 25 is
engaged on both sides.
3.4 Réglage du dossier
Procédez comme suit pour incliner la dossier
25 vers l'arrière :
Þ Tenez le dossier 25 avec une main.
Þ Poussez la poignée de réglage 26 vers le bas.
Þ Basculez le dossier 25 vers l'avant ou vers
l'arrière dans la position souhaitée.
Þ Dès que vous relâchez la poignée de réglage 26,
le dossier 25 se bloque.
Attention ! Vérifiez que le dossier 25 est
enclenché des deux côtés.
34
Page 36

DE
Gebrauchsanleitung
3.5 Abnehmen des Fahrrad-
Kindersitzes
Im täglichen Gebrauch können Si e die Halterung 5
am Fahrrad lassen. Nehmen Sie einfach nur den
Fahrrad-Kindersitz ab.
Þ Drücken Sie den Sicherungsriegel 8 zurück und
ziehen Sie den Fahrrad-Kindersitz aus der
Halterung 5.
Tipp! Sie können auch an einem zweiten Fahrrad
eine zusätzliche Halterung 5 anbringen. (Fragen
Sie im Fachhandel)
4. Vor jeder Fahrt
Prüfen Sie, zur Sicherheit Ihres Kindes,
dass...
• die Schultergurte 15 und die Fußbänder 23 straff
angelegt sind.
• keine Körper- oder Kleidungsteile in die
beweglichen Teile des Fahrrades oder
Kindersitzes gelangen können (z.B. Bremsen,
Speichen, Sattelfedern...).
35
Page 37

GB
User instructions
3.5 Dismounting of the bicycle child
seat
You can leave the mounting bracket 5 on the
bicycle when you are riding without your child. Just
take off the bicycle child seat.
Þ Press back the safety-catch 8 and take the
bicycle child seat out of the mounting bracket 5.
Tip! You can also attach an additional mounting
bracket 5 to a second bicycle. (Ask your retailer)
3.5 Démontage du siège bicyclette
Pour l'usage quotidien, le dispositif de fixation 5
peut rester sur la bicyclette. Démontez unique ment
le siège bicyclette.
Þ Repoussez le verrou de sécurité vers l'arrière 8,
retirez le siège bicyclette du dispositif de fixation
5.
Astuce ! Vous pouvez également monter un
dispositif de fixation supplémentaire 5 sur une
deuxième bicyclette. (Demandez conseil dans un
magasin spécialisé.)
4. Before each ride
For the safety of your ch ild, pl ease check
that...
• the shoulder straps 15 and the footstraps 23 are
tight.
• no body parts or pieces of clothing can come into
contact with moving parts of the bi cycle or child
seat (e.g. brakes, spokes, seat spri ngs...).
4. Avant chaque trajet
Vérifiez, pour la protection de votre
enfant, que...
• les bretelles 15 et les attaches de pieds 23 sont
tendues.
• aucun corps ou vêtement ne puisse se prendre
dans les pièces mobiles de la bicycl ette ou du
siège enfant (par ex. les freins, les rayons, les
ressorts de la selle...).
36
Page 38

DE
Gebrauchsanleitung
37
• sich Ihr Kin d im Fahrrad-Kindersitz nicht an
scharfen oder spitzen Teilen verletzen kann (z.B.
ausgefranste Kabelenden).
• der Haltbügel 9 beitseitig eingerastet ist.
• alle Schrau ben 7+14 angezogen sind.
• der Fahrrad-Kindersitz auch mit Kind genügend
Abstand vom Gepäckträger bzw. Hinterrad hat.
Tipp! Wenn der Abstand zu gering ist können
Sie den Gepäckträger mit einem passenden
Gummi- oder Schaumstoffteil abpolstern.
• WARNUNG! Der Fahrrad-Kindersitz darf nicht
vewendet werden, wenn irgendein Teil
beschädigt ist.
Vorsicht! Lassen Sie alle defekte n Teile
umgehend von Ihrem Fachhändler austauschen.
5. Reinigung
•Den Bezug können Sie abziehen und mit
Feinwaschmittel im Schonwaschgang bei 30°C
in der Waschmaschine waschen. Halten Sie sich
bitte genau an die Waschanleitung am Bezug.
Wenn Sie mit mehr als 30 °C waschen, ist ein
Page 39

GB
User instructions
• your child cannot injure him- or herself on shar p
or pointed parts (e.g. frayed cable ends).
• the support rods 9 are engaged on both sides.
• all screws 7+14 are tightened.
• the bicycle child seat has sufficient clearance to
the luggage carrier or back wheel, even if the
child is seated in it.
Tip! If the clearance is too small, you can pad
the luggage carrier using a suitable rubber or
foam part.
• WARNING! The bicycle child seat may not be
used if any part is damaged.
Caution! Have all defective parts replaced
immediately by your retailer.
• votre enfant installé dans le siège bicyclette ne
puisse pas se blesser à des pièces t ranchantes
ou pointues (par ex. des extrémités de câbles
effilochées).
• l'anse de maintien 9 est bloquée des deux côtés.
• toutes les vis 7+14 sont serrées.
• la distanc e entre le siège bicyclette et le port ebagage est suffisante même lorsque l'enfant est
installé.
Astuce ! Si la distance est trop faible, vous
pouvez recouvrir le porte- bagage à l'aide d'une
pièce en caoutchouc et en mousse appropriée.
• AVERTISSEMENT ! Le siège bicyclette ne doit
pas être utilisé si une quelconqu e pièce est
endommagée.
Attention ! Faites immédiatement remplacer
toutes les pièces défectueuses pa r vo tre
revendeur spécialisé.
5. Cleaning
•The cover can be remo ved and washed with a
mild detergent using the washing machine's
cycle for delicate items (30 °C). Please observe
the instructions on the washing label of the
cover. The colours of the cover may fade if
5. Nettoyage
•La housse peut être enlevée et lavée en
machine à 30° avec une lessive pour linge
délicat. Veui lle z respecter exactement les
instructions de lavage sur l’étiquette de la
housse. Si vous lavez la housse à des
38
Page 40
DE
Gebrauchsanleitung
39
Ausfärben des Bezugsstoffes möglich. Den
Bezug nicht schleudern und auf keinen Fall im
elektrischen Wäschetrockner trocknen (der Stoff
kann sich von der Polsterung lösen).
•Die Kunststoffteile können Sie mit einer
Seifenlösung abwaschen. Keine scharfen Mittel
(wie z.B. Lösungsmittel) verwenden.
•Die Gurte können Sie mit einer lauwarmen
Seifenlösung abwaschen.
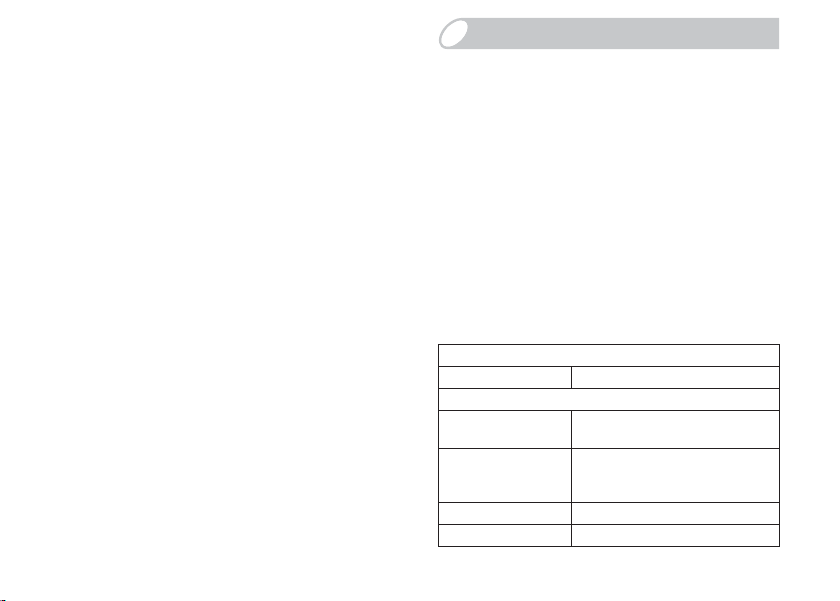
6. Hinweise zur Entsorgung
Bitte beachten Sie die Entsorgungsbestimmungen Ihres Landes.
Entsorgung der Verpackung
Container für Pappe
Entsorgung der Einzelteile
Bezug Restmüll, thermische
Kunststoffteile entsprechend Kennzeichnung
Metallteile Container für Metalle
Gurtband Container für Polyester
Verwertung
in die dafür vorgesehenen
Container
Page 41

GB
User instructions
washed at more than 30 °C. Do not spin, and
never tumble dry in an electric clothes dryer (the
fabric may separate from the padding).
•The plastic parts can be cleaned using soapy
water. Do not use harsh cleaning agents (such
as solvents).
•The harness can be removed and washed in
lukewarm soapy water.
températures supérieures à 30°, l e tissu risque
de déteindre. Ne pas essorer la ho usse et ne la
mettre en aucun cas dans le sèche -linge (le tissu
risque de se décoller du rembourrage).
• Vous pouvez laver les éléments en matière
plastique avec une eau savonneuse. Ne pas
utiliser de détergents ou de produits corrosifs
(solvants par exemple).
•Les sangles peuvent être lavé es à l’eau
savonneuse tiède.
6. Notes regarding disposal
Please observe the disposal regulations in your
country.
disposal of packaging
container for paperboard
disposal of components
cover garbage, thermal utilisation
plastic parts
metal parts container for metals
webbing conta iner for Polyester
container corresponding to
the label on the part
6. Remarques relatives à
l’élimination
Veuillez respecter les directives d’élimination
en vigueur dans votre pays.
Elimination de l’emballage
Conteneur pour le carton
Elimination des pièces détachées
Housse
Pièces en matière
plastique
Pièces métalliques Conteneur pour métaux
Sangle Conteneur pour polyester
Déchets résiduels, recyclage
thermique
suivant le marquage, dans le
conteneur spécialement prévu
40
Page 42

9 kg – 22 kg
(~9 M - 5 Y)
JOCKEY³ COMFORT
Istruzioni per l’uso
Brugsvejledning
Gebruiksaanwijzing
IT
DK
NL
Page 43

IT
Istruzioni per l’uso
JOCKEY³ Comfort
1
Istruzioni per l'uso
Siamo lieti che il nostro JOCKEY³ Comfort possa
accompagnare in modo sicuro il vostro bambino
durante un nuovo periodo della sua vita.
Per garantire una corretta pr otezione del vostro
bambino, JOCKEY³ Comfort deve
necessariamente essere montato e utilizzato come
descritto nelle presenti istruzion i.
In caso di ulteriori domande in merito all’utilizzo,
non esitate a contattarci.
BRITAX RÖMER
Kindersicherheit GmbH
%ULWD[([FHOVLRU/WG
Page 44

DK
NL
Gebruiksaanwijzing
Brugsvejledning
Brugsvejledning
Gebruiksaanwijzing
T ak for valget af vores JOCKEY³ Comfort til denne
nye, vigtige periode i Deres barns liv.
For at yde optimal beskyttelse er det vigtigt, at
JOCKEY³ Comfort monteres og anvendes præcist
som beskrevet i denne vejledning.
De er altid velkommen til at kontakte os, hvis De
har spørgsmål.
BRITAX RÖMER
Kindersicherheit GmbH
%ULWD[([FHOVLRU/WG
Gefeliciteerd met de aankoop van de JOCKEY³
Comfort: de juiste keuze om uw kind veilig door
een nieuwe levensfase te begeleiden.
De JOCKEY³ Comfort moet voor een juist e
bescherming van uw kind precies zo worden
gebruikt en ingebouwd als in deze
gebruiksaanwijzing beschreven.
Als u nog vragen hebt over het gebr uik, neem dan
contact met ons op.
BRITAX RÖMER
Kindersicherheit GmbH
%ULWD[([FHOVLRU/WG
2
Page 45

IT
Istruzioni per l’uso
Indice
CAUTELA! ................................................................ 5
1. Idoneità ............................ ........................... ......... 9
2. L'utilizzo alla bicicletta ..................................... 11
2.1 Montaggio alla bicicletta .............................17
3. Uso del vostro seggiolino da bicicletta .......... 25
3.1 Adattamento delle cinture spalle ................27
3.2 Adattamento dei poggiapiedi ......................29
3.3 Allacciamento de l vos tro b ambin o ............ .. 31
3.4 Regolazione dello schienale ....................... 33
3.5 Rimozione del seggiolino da bicicletta ........35
4. Prima di ogni viaggio ....................................... 35
5. Pulizia ................................................................ 37
6. Avvertenze per lo smaltimento ........................ 39
3
Page 46

DK
NL
Gebruiksaanwijzing
Brugsvejledning
Indhold
ADVARSEL! ............................................................. 6
1. Egnethed ...................... ................ ................ ...... 10
2. Anvendelse på cyklen ......................................12
2.1 Montering på cyklen ....................................18
3. Sådan bruges cykelstolen ................................26
3.1 Indstilling af skulderselerne .........................28
3.2 Indstilling af fodstøtterne .............................30
3.3 Fastspænding af barnet ..............................32
3.4 Indstilling af ryglænet ..................................34
3.5 Sådan tages cykelstolen af .........................36
4. Før kørsel ...........................................................36
5. Rengøring .................... ......................................38
6. Affaldsdeponering ............................................40
Inhoud
WAARSCHUWING! ................................................. 6
1. Geschiktheid ............ ......................................... 10
2. Gebruik op de fiets ....... .. ... ... ............................ 12
2.1 Montage o p de fie ts .................................... 18
3. Gebruik van het fietskinderzitje ...................... 26
3.1 De schoudergordels afstellen .....................28
3.2 De voetsteunen afstellen ............................ 30
3.3 De gordel bij uw kind omdoen ....................32
3.4 Instellen van de rugleuning ......................... 34
3.5 Verwijderen van het fietskinderzitje ............ 36
4. Voor elke rit .......................................................36
5. Reiniging ........................................................... 38
6. Instructies voor de afvoer ......................... .. ... .. 40
4
Page 47

IT
Istruzioni per l’uso
CAUTELA!
• Nella cintura vi sono delle calamite. Tenere
presente i rischi connessi(ad es. per
pacemaker).
• Allacciate sempre il vostro bambino nel
seggiolino da bicicletta.
• Non lasciate il bambino mai incustodito nel
seggiolino da bicicletta qu ando posteggiate la
bicicletta.
• Proteggete il vostro bambino con un casco da
bicicletta per bambini.
• Fate attenzione che il bambino e parti dei vestiti
non finiscano nei componenti mobi li della
bicicletta. Usate sempre i cen turini dei piedi.
• Controllate il corretto funzionamento di tutti i
componenti alla bicicletta con seggiol in o
montato.
• L'installazione del seggiolino da bicicletta
modifica il comportamento di guida della vostra
bicicletta (equilibrio, sterzata e frenatura).
Adattate la vostra guida convenientemente alla
situazione.
• Non fissate mai dei bagagli nel seggiolino.
5
• Controllate che, anche durante la guida senza
Page 48

DK
NL
Gebruiksaanwijzing
Brugsvejledning
ADVARSEL!
• I selelåsen er der magneter. Vær
opmærksom på de dermed forbundne farer
(f.eks. ved pacemaker).
• Spænd altid ba rnet fast i cykelstolen.
• Lad aldrig barnet sidde i cykelstolen uden opsyn,
når De stiller cyklen fra Dem.
• Beskyt endvidere barnet med en børnecykelhjelm.
• Sørg for, at hverken barnet elle r
beklædningsdele kan komme ind i cyklens
bevægelige dele. Spænd altid fodbånd ene. Sæt
løsthængende bånd og beklædningsdele på
plads....
• Kontrollér, at alle cyklens dele fungerer rigtigt,
når cykelstolen er monteret.
• Når cykelstolen monteres, ændres cyklens
køreegenskaber (balance, s tyring og bremser)
Måden at køre på skal derfor ændres
tilsvarende.
• Fastgør aldr ig bagage på barnestolen.
WAARSCHUWING!
• In het gordelslot bevinden zich magneten.
Houd rekening met de daaraan verbonden
gevaren (bijv. voor pacemakers).
• Doe altijd de gordel om bij uw kind, als deze in
het fietskinderzitje zit.
• Houd uw kind in het fietskinderzitje constant in
het oog wanneer u uw fiets stalt.
• Bescherm uw kind bovendien met een kinderfietshelm.
• Let erop dat noch uw kind, noch kledingstukken
in de bewegende delen van de fiet s terecht
kunnen komen. Maak altijd de voetriempjes vast
om de voeten van het kind. Stop loshangende
bandjes, kledingstukken en dergelijke weg.
• Controleer of alle onderdelen van de fiets ook bij
een gemonteerd fietskinderzitje nog goed
functioneren.
• Door het mon teren van het fietskinderzitje
verandert het rijgedrag van uw fiets (evenwicht,
sturing en remmen). Pas uw fietsgedrag
overeenkomstig aan.
• Bevestig nooit bagage aan het kinderzitje .
• Controleer ook wanneer u zonder kind fietst of
6
Page 49

IT
Istruzioni per l’uso
bambino, il seggiolino sia ins tallato saldamente e
che niente possa entrare nei componenti mobili
della bicicletta
• Dovete rimuovere il seggiolino dalla bicicletta se
volete trasportare la bicicletta sul portabagagli da
tetto.
Per la sicurezza del vostro bambino verificate
che...
• le cinture spalle e i centurini dei piedi siano tesi.
• che il vostro bambino non riporta lesioni da
componenti affilati o appuntiti (ad es. estremità
dei cavi sfilacciate).
• la staffa di fissaggio sia bloccato su entrambi i
lati.
• tutte le viti siano strette.
• il seggioli no da bicicletta anche con il bambi n o
dentro abbia abbastanza distanza dal
portapacchi o dalla ruota posteriore.
• Non potete utilizzare il seggiolino da bicicletta se
dovesse essere danneggiato un solo pezzo.
7
Page 50

DK
NL
Gebruiksaanwijzing
Brugsvejledning
• Selv om De kører uden barn, skal det
kontrolleres, at barnestole n sidde r fast , og at de r
ikke kan komme dele ind i de bevægelig e
cykeldele.
• Ved transport på bilens tagbagagebær er skal
barnestolen tages af cyklen.
het kinderzitje vastzit en er geen onderdelen van
in de bewegende delen van de fiet s terecht
kunnen komen. Bij het vervoeren van de fiets op
een imperiaal moet het kinderzit je van de fiets
worden gehaald.
Se for en sikkerheds skyld efte r, at...
• skulderselerne og fodbåndene sidder stramt.
• barnet i cykelstolen ikke kan komme til skade på
skarpe eller spidse dele (f.eks. flossede
kabelender).
• bøjlen er gået i hak i begge sider.
• alle skruer er skruet fast.
• cykelstolen også har tilstrækkelig afstand til
bagagebærer eller baghjul, når barnet sidder i
stolen.
• Cykelstolen må i kke anvendes, hvis nogle af
delene er beskadigede.
Controleer voor de veiligheid van uw kind of...
• de schoudergordels en de voetriemen
gespannen zijn.
• uw kind zich in het fietskinderzitje niet kan
bezeren aan scherpe of puntige onderdelen (bijv.
gerafelde kabeluiteinden).
• de bevestigingsbeugel aan beide zijden op zijn
plaats is geklikt.
• alle schroe ven zijn aangedraaid.
• het fietskinderzitje ook met het kind erin nog
voldoende afstand heeft tot de bagagedrager of
het achterwiel.
• Het fietskinderzitje mag niet worden gebruikt
wanneer enig onderdeel ervan be sc hadigd is.
8
Page 51

IT
Istruzioni per l’uso
1. Idoneità
Attenetevi alle disposizioni legali de l vos tro paese.
Britax / RÖMER
Seggiolino da
bicicletta
JOCKEY³
Comfort
Collaudo a norma
EN* 14344:2004
Peso corporeo 9 - 22 kg
Età 9 mesi - 5 anni
*EN = Normativa europea
• Si prega di osservare quanto segue
indipendentemente dal peso minimo (9 - 22 kg) e
dell’età minima (9 mesi - 5 anni):
Il vostro bambino è capace di rimanere seduto
autonomamente per viaggiare in un seggiolino
da bicicletta.
• Controllate di tanto in tanto che il vostro bambino
non superi il limite di peso.
• I bambini sotto i 7 anni possono essere
trasportati su biciclette da persone ol tre i 16 anni .
9
Page 52
DK
NL
Gebruiksaanwijzing
Brugsvejledning
1. Egnethed
Vær opmærksom på de lovmæssidge forskr ifter i
Deres land.
Britax / RÖMER
Cykelstol
JOCKEY³
Comfort
*EN = europæisk norm
Afprøvet i henhold til
EN* 14344:2004
Kropsvægt 9 - 22 kg
Alder: 9 måneder - 5 år
1. Geschiktheid
Houd u aan de in uw land geldende wett elijke
voorschriften.
Britax / RÖMER
Fietskinderzitje
JOCKEY³
Comfort
*EN = Europese norm
Controle conform
EN* 14344:2004
Lichaamsgewicht 9 - 22 kg
Leeftijd 9 maanden - 5 jaar
• Overhold følgende uafhængigt af
minimumsvægten (9-22 kg) og
minimumsalderen (9 måneder - 5 år):
Deres barn skal kunne sidde selv for at kunne
køre i cykelstol.
• Kontroller med jævne mellemrum, at barnet
stadig vejer mindre end den øverste
vægtgrænse.
• Børn under 7 år må kun transporteres på cyklen
af personen, som er over 16 år.
• Let op, onafhankelijk van minimaal gewicht (9 22 kg) en de minimale leeftijd (9 maande n - 5
jaar):
Uw kind moet goed zelfstandig kunnen zitten om
in een fietskinderzitje geplaatst te mogen
worden.
• Controleer af en toe of uw kind nog voldoet aan
de maximale gewichtsgrens.
• Kinderen onder de 7 jaar mogen alleen op de
fiets worden vervoerd door personen die ouder
zijn dan 16.
10
Page 53

IT
Istruzioni per l’uso
2. L'utilizzo alla bicicletta
L'utilizzo di questo seggiolino da
bicicletta non è possibile ...
• se la bicicletta non è progettata per un tale carico
supplementare.
Chiedete consiglio al produttore di bicicletta.
• se il diametro del tubo della sella è più piccolo di
28 mm.
• se il diametro del tubo della sella è più grande di
40 mm.
• se il tubo della sella ha una forma ovale.
• se il seggiolino da bicicletta montato pende in
avanti.
Altrimenti il vostro bambino scivolerebbe dalla
superficie di seduta. Controllate la posizione che
dipende dall'angolo del tub o della sella di vostra
bicicletta.
• se il portapacchi è più largo di 150 mm.
• al reggisella.
11
Page 54

DK
NL
Gebruiksaanwijzing
Brugsvejledning
2. Anvendelse på cyklen
Det er ikke muligt at anvende denne
cykelstol...
• hvis Deres cykel ikke er konstrueret til denne
ekstra belastning.
Spørg cykelfabrikanten til råds.
• hvis sadelrørets diameter er mindre end 28 mm.
• hvis sadelrørets diameter er større end 40 mm.
• hvis sadelrøret er ovalt.
• hvis den monterede cykelstol hælder fremad.
Hvis det er tilfældet, kan barnet glide ned af
sædet. Kontroller stillingen, so m er afhængig af
cykel-sadelrørets vinkel.
• hvis bagagebære ren er bredere end 150 mm.
• ved sadelstøtten.
2. Gebruik op de fiets
Dit fietskinderzitje kan niet worden
gebruikt...
• als uw fiets niet geschikt is voor een dergelijke
extra belasting.
Vraag uw fietsenmaker hierbij om advies.
• wanneer de doorsnede van uw zadelbuis kleiner
is dan 28 mm.
• wanneer de d oorsnede van uw zadelbuis groter
is dan 40 mm.
• wanneer uw zadelbuis ovaal is.
• wanneer het gemonteerde fietskinderzitje n aar
voren hangt.
Uw kind kan dan van de zitting glijde n.
Controleer de positionering, die afhankelijk is
van de zadelbuishoek van uw fiets.
• wanneer de bagagedrager breder is dan
150 mm.
• aan de zadelsteun.
12
Page 55

IT
Istruzioni per l’uso
Potete utilizzare il seggiolino da bicicletta come
riportato di seguito:
Dimensioni ruota della
bicicletta
Diametro del tubo della sella
(non possibile con tubi a forma
ovale)
• Componente di inserimento 1
Ø 28 mm
• Componente di inserimento 2
Ø 32 mm
• Componente di inserimento 3
Ø 36 mm
• senza componente di
inserimento
• Gomma da inserire 4 per adattare
26“ / 28“
pollici
Ø 28 - 40 mm
Ø 28 -30 mm
Ø 31 -34 mm
Ø 35 -37 mm
Ø 38 - 40 mm
perfettamente il
diametro
Per la protezione di tutti
gli utenti della strada
• CAUTELA! Le mod ifiche al seggiolino da
bicicletta e al supporto 5 possono essere
apportate esclusivamente dal produttore.
13
Page 56

DK
NL
Gebruiksaanwijzing
Sådan bruges cykelstolen:
Cyklens hjulstørrelse 26“ / 28“
Sadelrørets diameter
(ikke muligt ved ovale rør)
• Indsatsdel 1 Ø 28 mm Ø 28 - 30 mm
• Indsatsdel 2 Ø 32 mm Ø 31 - 34 mm
• Indsatsdel 3 Ø 36 mm Ø 35 - 37 mm
• uden indsatsdel Ø 38 - 40 mm
• Indsatsgummi 4 til nøjagtig
For alle trafikanters sikkerhed
• ADVARSEL! Cykelstolen og holderen 5 må
udelukkende ændres af producenten.
Brugsvejledning
tommer
Ø 28 - 40 mm
tilpasning af
diameteren
Het fietskinderzitje kan als volgt worden
gebruikt:
Wieldiameter van de fiets 26“ / 28“
Diameter zadelbuis
(niet mogelijk bij ovale
zadelbuizen)
• Inlegdeel 1 Ø 28 mm Ø 28 - 30 mm
• Inlegdeel 2 Ø 32 mm Ø 31 - 34 mm
• Inlegdeel 3 Ø 36 mm Ø 35 - 37 mm
• zonder inlegdeel Ø 38 - 40 mm
• Inlegrubber 4 voor het
Ø 28 - 40 mm
precies
aanpassen van
de diameter
Ter bescherming van alle
verkeersdeelnemers
• WAARSCHUWING! Wijzigingen aan het
fietskinderzitje en de bevestiging 5 mogen alleen
door de fabrikant worden uitgevoerd.
14
Page 57

IT
Istruzioni per l’uso
• CAUTELA! L'installazione del seggiolino da
bicicletta modifica il comportamento di guida
della vostra bicicletta (equilibri o, sterzata e
frenatura). Adattate la vostra guida
convenientemente alla situazione.
• Non portate mai due bambini sulla bicicletta. Ciò
pregiudica notevolmente il comportamento di guida.
• CAUTELA! Non f issate mai dei bagagli nel
seggiolino. Per trasportare i bagagli usate un
portapacchi anteriore o simile .
• Controllate che, anche durante la guida senza
bambino, il seggiolino sia installato saldamente e
che niente possa entrare nei componenti mobili
della bicicletta (ad es. le cin ture nei raggi della
ruota).
• Dovete rimuovere il seggiolino dalla bicicletta se
volete trasportare la bicic letta sul portabagag li da
tetto. La resistenza aerodinamica molto alta
potrebbe causare danni alla bicicletta e al
seggiolino e persino degli incidenti.
Per la protezione antifurto
• Così potete proteggere il seggiolino da bicicletta
da furti. Passate il cavo antifurto nei fori di presa
15
del seggiolino e fissarlo al telaio della bicicletta.
Page 58

DK
NL
Gebruiksaanwijzing
Brugsvejledning
• ADVARSEL! Når cykelstolen monteres, ændres
cyklens køreegenskaber (balance, styring og
bremser) Måden at køre på skal derfor ændres
tilsvarende.
• Der må aldrig transporteres to børn på en cykel.
Det nedsætter reaktions- og kørselsforhold
betydeligt.
• ADVARSEL! Fastgø r aldrig bagage på
barnestolen. Bagage skal transporteres på en
bagagebærer til forhjulet el ler lignende.
• Selv om De kører uden barn, skal det
kontrolleres, at barnestole n sidde r fast , og at de r
ikke kan komme dele ind i de bevægelig e
cykeldele (f.eks. seler i egerne)
• Ved transport på bilens tagbagagebær er skal
barnestolen tages af cyklen. D en meget høje
luftmodstand kan skade både cyklen og
barnestolen og i sidste ende forårsage ulykker.
• WAARSCHUWING! Door het monteren van het
fietskinderzitje verandert het rijgedrag van uw
fiets (evenwicht, sturing en remmen ). Pas uw
fietsgedrag overeenkomstig aan.
• Er mogen nooit twee kinderen op één fiets
worden vervoerd. Dit heeft aanzienlijke invloed
op het fietsgedrag.
• WAARSCHUWING! Bevestig nooit bagage aan
het kinderzitje. Gebruik voor het vervoeren van
bagage bijvoorbeeld een bagagedrager op de
voorzijde van de fiets.
• Controleer ook wanneer u zonder kind fietst of
het kinderzitje vastzit en er geen onderdelen van
in de bewegende delen van de fiet s terecht
kunnen komen (bijv. gordels tussen de spaken)
• Bij het vervoeren van de fiets op een imperiaal
moet het kinderzitje van de fiets worden gehaald.
De zeer hoge luchtweerstand kan leiden tot
schade aan de fiets en het kinderzitje, en
mogelijk zelfs ongevallen veroorzaken.
Beskyttelse mod tyveri
• Sådan kan barnestolen sikres mod tyveri. Træk
en cykellås gennem bærehullerne på
barnestolen, og lås den fast på cykelstellet.
Diefstalbeveiliging
• U kunt het fietskinderzitje tegen diefsta l
beveiligen. Haal een fietsslot door de
handgreepgaten van het kinderzitje en maak
deze vast aan het fietsframe.
16
Page 59

IT
Istruzioni per l’uso
2.1 Montaggio alla bicicletta
Così fissate il supporto al tubo della sella:
Þ Misurate il diametro del tubo della sella.
Þ Inserite il componente di inserimento 1/2/3, con
fessura posteriore, sul tubo della sella 6 (ved. 2.)
Consiglio! In caso di dimensioni intermedie (ad
es. Ø 31 mm) mettete anche la gomma 4 intorno
al tubo 6, per adattare il più possibile il diametro.
Þ Piegare il su pp or to 5 intorno al componente di
inserimento.
Þ Stringete le viti 7 con una chiave per viti ad
esagono cavo (misura 5) solo leggermente, per
poter spostare ancora un pò il supporto 5.
Attenzione! Fate attenzione che il raccordo a
vite 7 sia davanti e il blocc o di sicurezza 8 sotto.
17
Page 60

DK
NL
Gebruiksaanwijzing
Brugsvejledning
2.1 Montering på cyklen
Sådan fastgøres beslaget på sadelrøret:
Þ Mål sadelrørets diameter.
Þ Sæt en indsatsdel i med den rigtige størrelse 1/2/
3 med åbningen bagud på sadelrøret 6 (se 2.)
Tip! Ved mellemstørrelserne (f.eks. Ø 31 mm)
kan der endvidere lægges indsatsgummi 4
omkring sadelrøret 6, så diameteren tilpasses så
nøjagtigt som muligt.
2.1 Montage op de fiets
Zo maakt u de bevestiging aan de zadelbuis
vast:
Þ Meet de diameter van de zadelbuis.
Þ Zet het juiste inlegdeel 1/2/3 met de spleet naar
achteren over de zadelbuis 6 (zie 2.)
Tip! Plaats bij een tussenmaat (bijv. Ø 31 mm)
nog een inlegrubber 4 om de zadelbuis 6, om de
diameter zo precies mogelijk aan te passen.
Þ Klap beslaget 5 omkring indsatsdelen.
Þ Spænd i første omgang kun skruerne 7 let med
en unbraconøgle (størrelse 5). Beslaget 5 skal
kunne flyttes lidt endnu.
Forsigtig! Sørg for, at forskruningen 7 sidder
foran, og at sikringslåse n 8 vender nedad.
Þ Klap de bevestiging 5 om het inlegdeel.
Þ Draai de schroeven 7 met een inbussleutel
(maat 5) lichtjes aan. Zo kunt u de bevestiging 5
nog een beetje verschuiven.
Voorzichtig! Let erop dat de schroefbevestiging
7 zich aan de voorkant bevindt en de
bevestigingsgrendel 8 aan de ond erzijde.
18
Page 61

IT
Istruzioni per l’uso
Þ Inserite il seggiolino da bicicletta con le staffe di
fissaggio 9 nei fori di arresto 10 finché si blocca.
Attenzione! Asssicuratevi che il blocco di
sicurezza 8 sia bloccato in entrambe le estremità
delle staffe.
Così posizionate correttamente il supporto 9
alla bicicletta:
Spostate il seggiolino da bicicletta al tubo della
sella 6 in modo che...
Þ ... tra port apacch i e segg iolino r esti un a dist anza
di almeno 3 cm,
Þ ... i cavi di comando e i cavi dei freni non siano
ostacolati,
Þ ... il seggiolino da bicicletta non si trovi nell'area
di movimento dei pedali e delle gambe.
19
Page 62

DK
NL
Gebruiksaanwijzing
Þ
Sæt cykelstolen med bøjlen 9 i hullerne 10, indtil
den går i hak.
Forsigtig! Sørg for, at sikringslåsen 8 går i hak i
begge bøjleender.
Brugsvejledning
Þ Steek het fie tsk in derzitje met de
bevestigingsbeugels 9 in de klikgaten 10 tot
deze vastklikt.
Voorzichtig! Controleer of de
bevestigingsgrendel 8 over beide
beugeluiteinden is geklikt.
Sådan placeres beslaget 9 rigtigt på cyklen:
Flyt cykelstolen frem og tilbage på sadelrøret 6 , så
Þ ... der mindst er en afstand på 3 cm mellem
bagagebæreren og barnestolen.
Þ ... gear- og bremsefunktionerne ikke forstyrres,
Þ ... cykelstolen ikke generer området for ben og
pedaler.
Zo plaatst u de bevestiging 9 op de juiste
manier op de fiets:
Verschuif het fietskinderzitje langs de zadelbuis 6
tot...
Þ ... er tussen de bagagedrager en het kinderzitje
minimaal 3 cm afstand overblijft.
Þ ... de versnellings- en remleidingen niet beklemd
zitten,
Þ ... het fietskinderzitje zich niet binnen het
trapbereik van de fietspadelen en de benen
bevindt.
20
Page 63

IT
Istruzioni per l’uso
Þ Stringete le viti 7 del supporto 5 con una chiave
5
x
per viti ad esagono cavo (misura 5) con una
coppia di serraggio di 5 Nm. Utilizzate il pezzo in
prova X per assicurare un corretto fissaggio.
Verificate co n il pezzo in prova X che la fessura
del raccordo a vite 7 non sia più larga di 8 mm
(lato spesso del pezzo in prova) e non più stretta
di 5 mm (lato sottile del pezzo in prova).
Attenzione! Non stringete mai trop po le viti 7.
Altrimenti si potrebbe danneggiare il tubo della
sella 6.
21
Page 64

DK
NL
Gebruiksaanwijzing
Þ
Stram nu skruerne 7 i holderen 5 til med et
drejningsmoment på 5 Nm med en unbrakonøgle
(størrelse 5). Anvend teststykke X for at opnå
den korrekte forankring.
Kontrollér med teststykket X, at spalten
i samlingen 7 ikke er bred ere end 8 mm
(teststykkets tykke side ) og ikke smallere end
5 mm (teststykkets tynde side).
Brugsvejledning
Þ Draai de schroeven 7 van de bevestiging 5
met een inbussleutel (maat 5) aan met een
aanhaalmoment van 5 Nm. Gebruik het t eststuk
X om een correcte bevestiging te realiser en .
Controleer met het teststuk X, dat de spleet bij
de schroefkoppeling 7 niet breder is dan 8 mm
(dikke zijde teststuk) en niet smaller is dan 5 mm
(dunne zijde teststuk).
Forsigtig! Stram aldrig skruerne 7 for meget.
Ellers kan sadelrøret 6 beskadiges.
Pas op! Draai de schroeven 7 nooit te vast aan.
Anders kunt u de zadelbuis 6 beschadigen.
22
Page 65

IT
Istruzioni per l’uso
In questo modo potete regolare il baricentro.
Þ Controllate il baricentro del seggiolino da
bicicletta.
Fate attenzione che la croce di collimazione
stampata 11 si trovi non più di 10 cm dietro l'asse
posteriore 12.
Þ Premete il blocco di sicurezza 8 indietro ed
estraete il seggiolino da bicicletta dal supporto 5.
Þ aprite il coperchio del vano contenente le
istruzioni 13.
Þ Svitate le viti 14 con una chiave a bocca (misura
13) circa 10 mm.
Þ Adesso potete spostare la staffa di fissaggio 9.
Þ Rimuovete la p rotezi one per i l traspo rto illu strata
se regolate la staffa di fissaggio 9 nella posizione
posteriore.
Consiglio! Questa può essere inserita in una
posizione di blocco a scelta.
Þ Stringere le viti 14 con una coppia di serraggio
pari a 10 Nm.
Þ Controllate nuovamente il baricentro.
23
Page 66

DK
NL
Gebruiksaanwijzing
Sådan indstilles tyngdepunktet:
Brugsvejledning
Þ Kontrollér cykelstolens tyngdepunkt.
Sørg for, at det påtrykte kryds 11 ikke sidder
mere end 10 cm bag bagaksen 12 .
Þ Tryk sikringslåsen 8 tilbage, og tag cykelstolen
ud af beslaget 5.
Zo stelt u het zwaartepunt in:
Þ Controleer het zwaartepunt van het
fiestkinderzitje.
Zorg ervoor dat het op het zitje afgebeelde
draadkruis 11 niet meer dan 10 cm achter de
achteras 12 ligt.
Þ Duw de bevestigingsgrendel 8 naar achteren en
trek het fietskinderzitje uit de bevestiging 5.
Þ Åbn klappen til rummet 13.
Þ Skru skruerne 14 ca. 10 mm ud med en
gaffelnøgle (størrelse 13).
Þ Nu kan bøjlen 9 flyttes.
Þ Fjern den viste transportsikring, når du flytter
bøjlen 9 til den bageste position.
Tip! Derefter kan du indstille den position, du
ønsker.
Þ Stram skruerne 14 med et drejningsmoment på
10 Nm.
Þ Kontrollér ty ngdepunktet igen.
Þ Open de klep van het vak voor de
gebruiksaanwijzing 13.
Þ Draai de schroeven 14 met een steeksleutel
(maat 13) circa 10 mm naar buiten.
Þ Nu kunt u de bevestigingsbeugel 9 verschuiven.
Þ Verwijder de afgebeelde transportvergrendeling
wanneer u de bevestigingsbeuge l 9 in achterste
stand plaatst.
Tip! Deze kan vervolgens in ontgrendelde stand
worden teruggeplaatst.
Þ Draai de schroeven 14 vast met een
draaimoment van 10 Nm.
Þ Controleer het zwaartepunt opnieuw.
24
Page 67

IT
Istruzioni per l’uso
Controllate il corretto funzionamento di
tutti i componenti alla bicicletta con
seggiolino montato.
3. Uso del vostro seggiolino da
bicicletta
Per la protezione del vostro bambino
• Allacciate sempre il vostro bambino nel
seggiolino da bicicletta.
• CAUTELA! Non lasciate il bambino mai
incustodito nel seggiolino da bicicletta quando
posteggiate la bicicletta.
• Proteggete il vostro bambino con un casco da
bicicletta per bambini.
• Utilizzate un coprimolla se la vostra se lla di
bicicletta è dotata di molle, poiché il bambino
potrebbe infilarvi le dita e schiacciarsele.
(Chiedete nei negozi specializzati)
• Fate attenzione che il bambino e parti dei vestiti
non finiscano nei componenti mobi li della
bicicletta. Usate sempre i cen turini dei piedi.
25
Sistemare fasce, vestiti pendenti ...
Page 68

DK
NL
Gebruiksaanwijzing
Brugsvejledning
Kontrollér, at alle cyklens dele fungerer
rigtigt, når cykelstolen er monteret.
3. Sådan bruges cykelstolen
Beskyt barnet
• Spænd altid ba rnet fast i cykelstolen.
• ADVARSEL! Lad aldrig barnet sidde i cykelstolen
uden opsyn, når De stiller cyklen fra Dem.
• Beskyt endvidere barnet med en børnecykelhjelm.
• Brug en sadelfjedersikring, hvis cyklens sa del
har sadelfjedre. Ellers kan barnet få fingrene i
klemme i dem. (Spørg hos cykelhandl eren)
• Sørg for, at hverken barnet elle r
beklædningsdele kan komme ind i cyklens
bevægelige dele. Spænd altid fodbånd ene. Sæt
løsthængende bånd og beklædningsdele på
plads....
Controleer of alle onderdelen van de fiets
ook bij een gemonteerd fietskinderzitje
nog goed functioneren.
3. Gebruik van het fietskinderzit je
Ter bescherming van uw kind
• Doe altijd de gordel om bij uw kind, als deze in
het fietskinderzitje zit.
• WAARSCHUWING! Houd uw kind in het
fietskinderzitje constant in he t oog wanneer u uw
fiets stalt.
• Bescherm uw kind bovendien met een kinderfietshelm.
• Gebruik een zadelveerbeschermer wanneer uw
fietszadel een zadelveer heeft. Anders kunnen
de vingers van uw kind ertu ssen bek lemd rak en.
(Vraag hiernaar bij de vakhandel)
• Let erop dat noch uw kind, noch kledingstukken
in de bewegende delen van de fiet s terecht
kunnen komen. Maak altijd de voetriempjes vast
om de voeten van het kind. Stop loshangende
bandjes, kledingstukken en dergelijke weg.
26
Page 69

IT
Istruzioni per l’uso
• Proteggete il vostro bambino dal freddo e dall a
pioggia. Ricordatevi di vestire il bambino più
caldo di chi guida la bicicletta.
• Attenzione! Le parti in plastica del seggiol ino si
surriscaldano, se esposte al s ole. In caso di
contatto, il bambino può scottarsi. Proteggete il
vostro bambino e il seggiolino da bicicletta da
radiazioni solari intense.
• Consiglio! Un doppio cavaletto garantisce
un'elevata stabilità della bicicletta. Ciò facilita
soprattutto la sistemazione del bambino nel
seggiolino. (Chiedete nei ne gozi specializzati)
3.1 Adattamento delle cinture spalle
Le cinture spalle correttamente adattate
forniscono al vostro bambino un sostegno
sicuro nel seggiolino da bicicletta.
Le cinture spalle 15 devono scorrere all'altezza
delle spalle del bambino o leggermente più in alto.
27
Page 70

DK
NL
Gebruiksaanwijzing
• Beskyt barnet mod kulde og regn. Tænk på, at
barnet skal klædes varmere på end den aktive
cyklist.
• Forsigtig! Stol ens plastdele opvarmes, når
solen skinner på dem. Pas på, at barnet ikke
brænder sig. Beskyt barnet og stol en mod
voldsom solpåvirkning.
• Tip! En cykelfod med 2 ben gør cyklen mere
stabil. Det gør det lettere at sætte ba rne t i sto len
og at tage det ud. (Spørg hos cykelhandleren)
Brugsvejledning
• Bescherm uw kind tegen kou en regen. Kleed uw
kind warmer aan dan een actieve fie tser.
• Voorzichtig! De kunststofdelen van het
kinderzitje worden heet in de zon. Uw kind kan
zich hieraan verbranden. Besc herm uw kind en
het kinderzitje tegen sterke zon ne stralen.
• Tip! Met een tweepotige fietsstandaard staat uw
fiets stabieler . Het ve rg ema kkelijkt vooral het
plaatsen van uw kind in het zitje. (Vraag hiernaar
bij de vakhandel)
3.1 Indstilling af skulderselerne
Korrekt indstillede skulderseler giver barnet
den optimale støtte i cykelstolen.
Skulderselerne 15 skal lø be i barnets skulderhøjde
eller lidt over.
3.1 De schoudergordels afstellen
Juist afgestelde schoudergordels zorgen voor
een optimale ondersteuning van uw kind in het
fietskinderzitje.
De schoudergordels 15 moeten op schouderhoogte
van het kind of iets daarboven lopen.
28
Page 71

IT
Istruzioni per l’uso
Potete adattare l’altezza delle cinture spalle alle
dimensioni del vostro bambino come riportato
di seguito:
Þ Spostate in alto il regolatore del poggiatesta 16.
Þ Spostate il poggiatesta 17 alla giusta altezza
delle cinture spalle.
Þ Premete verso il basso il regolatore del
poggiatesta 16 per assicurare il poggiatesta 17.
3.2 Adattamento dei poggiapied i
Spostate in alto il regolatore dei poggiapiedi 18.
Þ
Þ Spostate i poggiapiedi 19 alla giusta altezza.
Þ Premete verso il basso il regolatore dei
poggiapiedi 18 per assicurare il poggiapiedi 19.
Attenzione! Fate attenzione che i poggiapiedi
19 non si trovino nell'area di movi mento dei
pedali e delle gambe.
29
Page 72

DK
NL
Gebruiksaanwijzing
Skulderselernes højde indstilles efter barnets
størrelse på følgende måde:
Brugsvejledning
Þ Drej hovedstøtte-indstillingen 16 op.
Þ Flyt hovedstøtten 17, så skulderselen har den
rigtige højde.
Þ Tryk hovedstøtte-indstillingen 16 ned igen, så
hovedstøtten 17 sidder fast.
De hoogte van de schoudergordels kan als
volgt aan de lichaamsgrootte van het kind
worden aangepast:
Þ Zwenk de hoofdsteunverstelling 16 naar boven.
Þ Schuif de hoofdsteun 17 op de juiste
schoudergordelhoogte.
Þ Duw de hoofdsteunverstelling 16 weer omlaag
om de hoofdsteun 17 vast te zetten.
3.2 Indstilling af fodstøtterne
Drej fodstøtte-indstillingen 18 op.
Þ
Þ Stil fodstøttern e 19 på den rigtige højde.
Þ Tryk fodstøtte-indstillingen 18 ned igen, så
fodstøtten 19 sidder fast.
Forsigtig! Sørg for, at fodstøtterne 19 ikke
sidder i det område, hvor pedalerne og benene
kører rundt rundt.
3.2 De voetsteunen afstellen
Þ Zwenk de voetsteunverstelling 18 naar boven.
Þ Schuif de voetsteunen 19 op de juiste hoogte.
Þ Duw de voetsteunverstelling 18 weer omlaag om
de voetsteunen 19 vast te zetten.
Voorzichtig! Let erop dat de voetsteunen 19
zich niet in het trapbereik van de fietspedalen en
benen bevinden.
30
Page 73

IT
Istruzioni per l’uso
3.3 Allacciamento del vostro bambino
Allentate le cinture spalle 15. Premete il
Þ
regolatore cintura 20 e spostatelo in alto.
Þ Tenere premuto il pulsante sulla fibbia di
chiusura 21 e spingerla di lato. Tirare
contemporaneamente entrambe le cinture spalle
15 per sbloccare entrambe le chiusure 22.
Þ Spingere il pulsante sulla fibbia di chiusur a 21
verso il basso, quindi premere il pulsante
all'indietro ed estrarre la fibbia di chiusura 21
dalla fessura di fissaggio 22.
Þ Collocate il bambino nel seggiolino da bicicletta.
Þ Fate passare le cinture spalle 15 sulle spalle del
vostro bambino.
Þ Posizion are entrambe le chiusure 22 nelle
apposite aperture della fibbia della cintura 21.
Prestare attenzione alle sigle “R” e “L” sulla
fibbia della cintura 21 e sulle chiusure 22.
Þ AVVERTENZA! Tirando con forza le cinture
spalle 15 verificare se entrambe le chiusure 22
sono completamente incastrate nella fibbia della
cintura 21 e se il bambino è allacciato
correttamente.
31
Page 74

DK
NL
Gebruiksaanwijzing
Brugsvejledning
3.3 Fastspænding af barnet
Þ
Løsn skulderselerne 15. Tryk på seleindstillingen
20, og skub den opad.
Þ Hold trykkn appen på selelåse n 21 nede, og skub
den til siden. Træk samtidigt i begge skulderseler
15 for at løsne begge låse 22.
Þ Skub trykknappen på selelåsen 21 nedad, tryk
derefter knappen bagud, og træk selelåsen 21
ud af fastgøringsslidsen 22.
Þ Sæt barnet i cykelstolen.
Þ Læg skulderselerne 15 over barnets skuldre.
Þ Placer begge låse 22 i de respektive åbninger i
selelåsen 21. Vær opmærksom på mærkni ngen
”R” og ”L” på selelåsen 21 og låsene 22.
Þ ADVARSEL! Kontrollér ved at trække hårdt i
skulderselerne 15, om begge låse 22 er gået helt
i indgreb i selelåsen 21 og dit barn er sikret
korrekt.
Þ Stram skulderselerne 15 ved at trække i
enderne.
Forsigtig! Sørg for, at begge skulderseler 15 er
stramme og lige lange.
3.3 De gordel bij uw kind omdoen
Maak de schoudergordels 15 wat losser. Druk
Þ
hiervoor op de gordelverstelling 20 en schuif
deze naar boven.
Þ Houd de drukknop op het gordelslot 21 ingedrukt
en schuif deze opzij. Trek tegelijkertijd aan de
beide schoudergordels 15, om de beide
sluitingen 22 los te maken.
Þ Schuif de drukknop op het gordelslot 21 naar
beneden, druk dan de knop naar ac hteren en
trek het slot 21 uit de bevestiging 22.
Þ Plaats uw kind in het fietskinderzitje.
Þ Leid de schoudergordels 15 over de schouders
van uw kind.
Þ Plaats de beide sluitingen 22 in de daarvoor
bedoelde opening van het gordel slot 21. Let op
de markering "R" en "L" op het gordels lot 21 en
de sluitingen 22.
Þ WAARSCHUWING! Controleer door krachtig
trekken aan de schoudergordels 15, of beide
sluitingen 22 volledig in het gordelslot 21 zijn
vergrendeld en uw kind correct i s gezekerd.
Þ Trek de schoudergordels 15 aan door aan de
uiteinden te trekken.
32
Page 75

IT
Istruzioni per l’uso
Þ Tendete le cinture spalle 15 tirando le estremità.
Attenzione! Fate attenzione che entrambe le
cinture spalle 15 siano tes e ed abb iano la stessa
lunghezza.
Þ Chiudete i centurini dei piedi 23 e tirate alle
estremità per tenderli
Attenzione! Fate attenzione che i centurini dei
piedi 23 siano sempre tesi durante il viaggio.
(Pericolo di lesioni)
3.4 Regolazione dello schienale
Potete inclinare all'indietro lo schienale 25
come riportato di seguito:
Þ Tenete fermo lo schienale 25 sempre con una
mano.
Þ Premete verso il basso l'impugnatura di
regolazione 26.
Þ Spostate lo schienale 25 in avanti o indietro fino
a raggiungere la posizione desiderata.
Þ Non appena rilasciate l'impugnatura di
regolazione 26 , lo schiena l e si bl oc ca 25 .
Attenzione! Asssicuratevi che lo schienale 25
sia bloccato su entrambi i lati .
33
Page 76

DK
NL
Gebruiksaanwijzing
Þ
Luk fodbåndene 23, og træk i enderne for at
stramme dem
Forsigtig! Sørg for, at fodbåndene 23 altid
sidder stramt under kørslen. (Fare for at komme
til skade)
Brugsvejledning
Voorzichtig! Let erop dat beide
schoudergordels 15 goed gespannen en even
lang zijn.
Þ Sluit de vo etriempjes 23 en trek aan de uiteinden
om ze aan te spannen
Voorzichtig! Zorg dat de voetriemen 23 tijdens
de rit altijd aangespannen zijn. (Letselgevaar)
3.4 Indstilling af ryglænet
Sådan vippes ryglænet 25 tilbage:
Þ Hold fast i ryglænet 25 med den ene hånd.
Þ Tryk indstillingsgrebet 26 nedad .
Þ Drej ryglænet 25 frem eller tilbage til den
ønskede stilling.
Þ Så snart indstillingsgrebet 26 slippes, går
ryglænet 25 i hak.
Forsigtig!Sørg for, at ryglænet 25 går i hak på
begge sider.
3.4 Instellen van de rugleuning
Zo kantelt u de rugleuning 25 naar achteren:
Þ Houd de rugleu ning 25 met één hand vast.
Þ Duw de instelhendel 26 omlaag.
Þ Kantel de rugleuning 25 naar voren of naar
achteren tot de gewenste stand.
Þ Zodra u de verstelknop 26 loslaat, klikt de
rugleuning 25 vast.
Voorzichtig! Controleer of de rugleuning 25 aan
beide zijden op zijn plaats is geklikt.
34
Page 77

IT
Istruzioni per l’uso
3.5 Rimozione del seggiolino da
bicicletta
Nell'uso quotidiano è possibile lasciare il sup porto 5
montato sulla bicicletta. È sufficiente estrarre solo il
seggiolino da bicicletta.
Þ Premete il blocco di sicurezza 8 indietro ed
estraete il seggiolino da bicicletta dal supporto 5.
Consiglio! Potete applicare un supporto 5
supplementare ad un'altra bicicletta. (Chiedete nei
negozi specializzati)
4. Prima di ogni viaggio
Per la sicurezza del vostro bambi n o
verificate che...
• le cinture spalle 15 e i centurini de i piedi 23 siano
tesi.
• i parti del corpo e dei vestiti non possano entrare
nei componenti mobili della bicicle tt a o del
seggiolino (ad es. freni, raggi, m olle de lla sell a. ..).
• che il vostro bambino non riporta lesioni da
componenti affilati o appuntiti (ad es. estremità
dei cavi sfilacciate).
35
Page 78

DK
NL
Gebruiksaanwijzing
Brugsvejledning
3.5 Sådan tages cykelstolen af
Ved dagligt brug kan beslaget 5 blive siddende på
cyklen. Tag bare cykelstolen af.
Þ Tryk sikringslåsen 8 tilbage, og tag cykelstolen
ud af beslaget 5.
Tip! De kan også anbringe et ekstra beslag 5 på en
anden cykel. (Spørg hos cykelhandleren)
3.5 Verwijderen van het
fietskinderzitje
Bij dagelijks gebruik kunt u de bevesti ging 5 op de
fiets laten zitten. V e rw ijder eenvoudig alleen het
fietskinderzitje.
Þ Duw de bevestigingsgrendel 8 naar achteren en
trek het fietskinderzitje uit de bevestiging 5.
Tip! U kunt ook een extra bevestiging 5 monteren
op een tweede fiets. (Vraag hiernaar bij de
vakhandel)
4. Før kørsel
Se for en sikkerheds skyld efter, at...
• skulderselerne 15 og fodbåndene 23 sidder
stramt.
• der ikke kan komme lege ms- eller
beklædningsdele ind i cyklens bevægelige dele
eller i stolen (f.eks. bremser, eger, sadelfjedre...).
• barnet i cykelstolen ikke kan komme til skade på
skarpe eller spidse dele (f.eks. flossede
kabelender).
4. Voor elke rit
Controleer voor de veiligheid van uw kind
of...
• de schoudergordels 15 en de voetriemen 23
gespannen zijn.
• er geen lich aamsdelen of kledingstukken in de
bewegende delen van de fiets of het kinderzitje
terecht kunnen komen (bijv. remmen, spaken,
zadelveren...).
• uw kind zich in het fietskinderzitje niet kan
bezeren aan scherpe of puntige onderdelen (bijv.
gerafelde kabeluiteinden).
36
Page 79

IT
Istruzioni per l’uso
• la staffa di fissaggio 9 sia bloccato su entrambi i
lati.
• tutte le viti 7+14 siano strette.
• il seggiolino da bicicletta anche con il bambino
dentro abbia abbastanza distanza dal
portapacchi o dalla ruota posteriore.
Consiglio!Se la distanza non è sufficiente,
potete imbottire il portapacchi con un pezzo di
gomma o di materiale espanso.
• CAUTELA! Non potete utilizzare il seggiolino da
bicicletta se dovesse essere danneggiato un
solo pezzo.
Attenzione! Fate sostrituire tutti i pezzi
danneggiati dal vostro rivenditore specializzato.
5. Pulizia
• Potete rimuovere il rivestimento e lavarlo in
lavatrice a 30° C con un detersivo e un
programma per capi delicati. Attenetevi
esattamente alle istruzioni di lavaggio presenti
sull’etichetta del rivestimento. Se lavate a più di
30° C, è possibile che il tessuto del rivestimento
si scolorisca Non centrifugate il rivestimento e in
alcun caso asciugatelo nell’ asciugatrice elettrica
37
(il tessuto può staccarsi dall’imbottitura)
Page 80

DK
NL
Gebruiksaanwijzing
•bøjlen 9 er gået i hak i begge sider.
• alle skruer 7+14 er skruet fast.
• cykelstolen også har tilstrækkelig afstand til
bagagebærer eller baghjul, når barnet sidder i
stolen.
Tip! Hvis afstanden er for lille, kan
bagagebæreren polstres med en gummi- eller
skumplastdel.
• ADVARSEL! Cykelstolen må ikke anve ndes, hvis
nogle af delene er beskadigede.
Forsigtig! Lad omgående alle defekte dele
udskifte hos cykelhandleren.
Brugsvejledning
• de bevestigingsbeugel 9 aan beid e zijden op zijn
plaats is geklikt.
• alle schroe ven 7+14 zijn aangedraaid.
• het fietskinderzitje ook met het kind erin nog
voldoende afstand heeft tot de bagagedrager of
het achterwiel.
Tip! Wanneer de afstand te klein is, kunt u de
bagagedrager met een op maat gemaakt stuk
rubber of schuimrubber bekleden.
• WAARSCHUWING! Het fietskinderzitje mag niet
worden gebruikt wanneer enig onderdeel ervan
beschadigd is.
Voorzichtig! Laat alle defecte onderdelen direct
door uw vakhandelaar vervangen.
5. Rengøring
• Betrækket kan aftages til vask. Vaskes ved 30°
C i vaskemaskinen (finvask). Følg
vaskeanvisningerne i betrækket. Hvis betrækket
vaskes ved varmere temperaturer, kan farverne
løbe ud. Betrækket må ikke centrifugeres, og det
må under ingen omstændigheder tørres i
tørretumbleren (stoffet løsner sig fra puden).
5. Reiniging
•De bekleding kan worden verwijderd en in de
wasmachine worden gewassen met een
fijnwasprogramma op 30°C en een
fijnwasmiddel. Houd u aan de wasvoorschriften
op het label van de bekleding. Als de bekleding
op meer dan 30 °C wordt gewassen, verkleurt de
stof mogelijk. De bekleding mag niet worden
gecentrifugeerd of in een elektrische wasdroger
worden gedroogd (hierdoor kan de stof van de
vulling losraken).
38
Page 81

IT
Istruzioni per l’uso
• Potete lavare le parti in plastica con una
soluzione acqua e sapone. Non utilizzate
detergenti aggressivi (ad es. solventi).
• Potete lavare la cintura con una soluzion e
tiepida di acqua e sapone.
6. Avvertenze per lo smaltimento
Attenetevi alle disposizioni del vostro paese in
materia di smaltimento.
Smaltimento dell’imballaggio
Container per cartone
Smaltimento delle singole parti
Rivestimento Rifiuti non riciclablili, riciclaggio
Parti in plastica in base al contrassegno riportato
Parti in metallo Container per metalli
Nastro della cintura Container per poliestere
termico
sui container previsti a tale
scopo
39
Page 82

DK
NL
Gebruiksaanwijzing
Brugsvejledning
• Barnestolens plastdele tørres af med
sæbevand. Undgå brug af stærke
rengøringsmidler (f.eks. opløsningsmidler).
• Selerne kan tørres af med lunkent sæbevand.
•De kunststofdelen kunnen met een
zeepoplossing worden gereini gd. Gebruik geen
bijtende middelen (als oplosmiddelen).
•De gordels kunnen met een lauwwarme
zeepoplossing worden gereinigd.
losgemaakt.
6. Affaldsdeponering
Vær opmærksom på de nationale og lokale
forskrifter omkring deponering af
affaldsprodukter.
Deponering af emballagen
Container til pap
Deponering af enkeltdele
Betræk Restaffald, termisk
Plastdele I containere i henhold til
Metaldele Container til metal
Selebånd Container til polyester
forarbejdning
mærkningen
6. Instructies voor de afvoer
Houd u aan de in uw land geldende
afvoervoorschriften.
Afvoer van de verpakking
Bij het oud papier
Afvoer van de afzonderlijke delen
Bekleding Huisvuil, thermische verwerking
Kunststofdelen Overeenkomstig de aanduiding
Metalen delen Container voor metaal
Gordels Container voor polyester
op het deel in de daar v o or
bestemde container
40
Page 83

9 kg – 22 kg
(~9 M - 5 Y)
JOCKEY³ COMFORT
Bruksanvisning
Bruksanvisning
Käyttöohje
SE
NO
FI
Page 84

SE
Bruksanvisning
JOCKEY³ Comfort
1
Bruksanvisning
Vi är glada över ditt val att låta JOCKEY³ Comfort
föra ditt barn säkert genom ett nytt kapitel i livet.
För att ditt barn ska skyddas på rätt sätt är det
ytterst viktigt att JOCKEY³ Comfort används och
monteras på det sätt som beskrivs i den här
bruksanvisningen.
Om du har frågor om hur produkten används är du
välkommen att vända dig till oss.
BRITAX RÖMER
Kindersicherheit GmbH
Britax Excelsior Ltd.
Page 85

NO
Bruksanvisning
FI
Käyttöohje
Bruksanvisning
Käyttöohje
Vi er glade for at du har valgt JOCKEY³ Comfort til
ditt barn.
For å kunne beskytte barnet ditt så godt som mulig
må JOCKEY³ Comfort monteres og benyttes
nøyaktig som beskrevet i denne bruksanvisningen.
Hvis du har ytterligere spørsmål om bruken,
vennligst henvend deg til oss.
BRITAX RÖMER
Kindersicherheit GmbH
Britax Excelsior Ltd.
Olemme iloisia, että JOCKEY³ Comfort turvaistuin saa saattaa lastasi turvallisesti uuden
elämänjakson läpi.
Jotta JOCKEY³ Comfort voisi suojella lastasi
oikein, se on ehdottomasti asennettava ja sitä on
käytettävä tässä ohjeessa kuvatulla tavalla.
Mikäli tarvitset lisätietoja turvaistuimen käytöstä,
ota meihin yhteyttä.
BRITAX RÖMER
Kindersicherheit GmbH
Britax Excelsior Ltd.
2
Page 86

SE
Bruksanvisning
Innehåll
VARNING!..................................................................5
1. Lämplighet .......................................................... 9
2. Användning på cykeln ...................... .. ... .......... 11
0RQWHULQJS§F\NHOQ
3. Att använda din cykelbarnstol ........................25
$QSDVVDD[HOE¦OWHQD
$QSDVVDIRWVW¸GHQ
6S¦QQDIDVWEDUQHW
-XVWHULQJDYU\JJVW¸GHW
7DDYF\NHOEDUQVWROHQ
4. Innan du cyklar ................................................. 35
5. Rengöring ................. ....... ........ ........ ........ ........ .. 37
6. Upplysningar om avfallshantering .................. 39
3
Page 87

NO
Bruksanvisning
FI
Käyttöohje
Innhold
ADVARSEL!..........................................................6
1. Egnethet .......................... ............... ................ .... 10
2. Bruk på sykkelen ..............................................12
0RQWHULQJS§V\NNHOHQ
3. Bruke sykkelbarnesetet ....................................26
7LOSDVQLQJDYVNXOGHUEHOWHQH
-XVWHULQJDYIRWVWºWWHQH
6SHQQHIDVWEDUQHW
6WLOOHLQQU\JJOHQHW
7DDYV\NNHOEDUQHVHWHW
4. Før hver tur ........................................................36
5. Rengjøring ...................... ...................................38
6. Avfallsbehandling .............................................40
Sisällys
VAROITUS!............................................................6
1. Soveltuvuus .................. .................................... 10
2. Käyttö polkupyörässä ...................................... 12
$VHQQXVSRONXS\¸U¦¦Q
3. Polkupyörän turvaistuimen käyttäminen ....... 26
2ONDY¸LGHQV¦¦W¦PLQHQ
-DONDWXNLHQV¦¦W¦PLQHQ
/DSVHQNLLQQLWW¦PLQHQWXUYDY¸LKLQ
6HON¦QRMDQV¦¦W¦PLQHQ
3RONXS\¸U¦QWXUYDLVWXLPHQLUURWWDPLQHQ
4. Ennen jokaista ajoa ...... .................................. .. 36
5. Puhdistaminen ........................... ....................... 38
6. Jätehuolto-ohjeita ................. .......... ........ .......... 38
4
Page 88

SE
Bruksanvisning
VARNING!
• I spännet finns magneter. Notera farorna
som detta innebär (t.ex. för pacemakers).
• Spänn allti d fast ditt barn i cykelbarnstolen.
• Släpp aldrig barnet i cykelbarnstolen med blic ken
när du parkerat cykeln.
• För att skydda barnet ska även en cykelhjälm för
barn användas.
• Se till att varken barnet eller något klädesplagg
kan dras in i cykelns rörliga delar. Spänn alltid
fast fotbanden. Stoppa in lösa r emmar och
klädesplagg.
• Kontrol lera att alla delar på cykeln fungerar
ordentligt när cykelbarnstolen är monterad.
• När cykelbarnstolen monteras ändras cykelns
köregenskaper (viktbalans, styrning och
bromsning). Anpassa din cykling utifrån detta.
• Sätt aldri g fast packning i barnstolen.
• Kontrollera noga, även när du cyklar utan barn,
att barnstolen sitter fast och att inga delar kan
5
Page 89

NO
Bruksanvisning
FI
Käyttöohje
ADVARSEL!
• Det befinner seg magneter i beltelåsen.
Vær oppmerksom på farene som er knytte t til
dette. (f.eks. for pacemakere).
• Ha alltid sikkerhetsselen på barnet når det sitter i
sykkelbarnesetet.
• La aldri barnet være uten oppsyn i
sykkelbarnesetet når du sett er fra deg sykkelen.
• Barnet må også ha på seg sykkelhjelm.
• Påse at hverken barnet eller klesplagg kan
komme inn i bevegelige deler på sykkelen. Bruk
alltid fotstroppene. Seler, stropper, løse klær må
stappes slik at de ikke kan komme inn i
bevegelige deler.
• Sjekk at alle deler på sykkelen fungerer som de
skal etter at sykkelbarneset et er montert.
• Når man monterer et barnesete, endres
sykkelens kjøreegenskaper (balanse, styring,
bremsing). Fart og kjørestil må tilpasses deretter.
• Ikke fest bagasje på barnesetet.
• Sjekk alltid at barnesetet sitter godt fast og at
ingen deler kan komme inn i bevegelige deler på
sykkelen (f.eks. at selene ikke kan komme inn i
eikene). Dette gjelder selv om det ikke sitter
noen i barnesetet
VAROITUS!
• Vyön lukossa on magneetteja. Huomioi niihin
liittyvät vaarat (esim. sydämentahdistimelle).
• Kiinnitä lapsi aina polkupyörän turvaistuimen
turvavöihin.
• Älä koskaan j ätä polkupyörän turvaistuimessa
istuvaa lasta valvomatta pysäköidessäsi pyörän.
• Suojaa lapsen pää lasten pyöräilykypärällä.
• Varmista, että lapsi tai hänen vaatteensa eivät
ulotu polkupyörän liikkuvii n osiin. Käytä aina
jalkahihnoja. Sijoita roikkuvat hihnat,
vaatekappaleet jne. turv allisesti.
• Tarkista, että kaikki polkupyörän osat toimivat
moitteettomasti polkupyörän turvais tu in
asennettuna.
• Polkupyörän turvaistuimen asentaminen muuttaa
polkupyörän ajo-ominaisuuksia (tasapainoa,
ohjausta ja jarruttamista). Mukauta ajotapasi sen
mukaan.
• Älä koskaan kiinnitä tavaroita turvaistuimeen.
• Tarkista aina – myös ilman lasta ajaessasi – että
turvaistuin on kiinnitetty kunnolla eikä mitään sen
osia pääse polkupyörän liik kuvien osien väliin
(esim. vöitä pinnojen väliin).
6
Page 90

SE
Bruksanvisning
dras in i rörliga cykeldelar (t.ex. remmar i
ekrarna).
• Om cykeln tr ansporteras på laststället på ett
biltak måste barnstolen tas av. Det mycket höga
luftmotståndet kan orsaka skador på cykeln och
barnstolen och i värsta fall leda till olyckor.
Kontrollera för barnets säkerhet att...
•axelbältena och fotbanden är spända.
• barnet i cykelbarnstolen inte kan skada sig på
vassa eller spetsiga delar (t.ex. uppfransade
vajerändar).
• fästbygeln har hakat fast på båda sidorna.
• alla skruva r är åtdragna.
• cykelbarnstolen har tillräckligt avstånd från
pakethållaren resp. bakhjulet även när barnet
sitter i.
• Cykelbarnstolen får inte användas om någon del
av den är skadad.
7
Page 91

NO
Bruksanvisning
FI
Käyttöohje
• Barnesetet må tas av før sykkelen skal
transporteres på bilens takstativ. Den høye
luftmotstanden kan føre til skader på sykkelen og
barnesetet, og kan også forårsake ulykker.
For barnets sikkerhet må du sjekke at...
• skulderselene og fotstroppene sitter stramt
• barnet ikke kan skade seg på skarpe eller spisse
gjenstander når det sitter i barnesetet (f.eks.
frynsete vaiere).
• festebøylen har gått i lås på begge sider
• alle skruene er strammet
• sykkelbarnesetet har stor nok avstand til
bagasjebrett / bakhjul, også når barnet sitter i det
• Sykkelbarnesetet må ikke brukes hvis en eller
flere deler er skadet.
• Jos polkupyörää kuljetetaan auton
kattotelineellä, turvaistuin on irrotettava.
Huomattava ilmanvastus voi vaurioittaa
polkupyörää ja turvaistuin ta ja aiheuttaa jopa
onnettomuuden.
Tarkista lapsesi turvallisuuden vuoksi, että...
•olkavyöt ja jalkahihnat ovat kireällä,
• lapsi ei voi polkupyörän turvaistuimessa loukata
itseään teräviin osiin (esim. purkautuneiden
johtojen päihin),
• kiinnike on lukittunut molemmilta puolilta,
• kaikki ruuvit on kiristetty,
• polkupyörän turvaistuin on myös lapsen siinä
istuessa riittävän kaukan a tavaratelineestä ja/ta i
takapyörästä.
• Polkupyörän turvaistuinta ei saa käyttää, jos
jokin sen osa on vaurioitunut.
8
Page 92

SE
Bruksanvisning
1. Lämplighet
Följ ditt lands lagstadgade bestämmelser.
Britax / RÖMER
Cykelbarnstol
JOCKEY³
Comfort
Kontrollerad enligt
EN* 14344:2004
Kroppsvikt 9 - 22 kg
Ålder 9 m – 5 år
*EN = Europeisk norm
• Observera oavsett minivikt (9 - 22 kg) och
miniålder (9 m - 5 år):
Barnet måste kunna sitta självt för att kunna åka
med i en cykelbarnstol.
• Se till att kontrollera då och då att ditt barn
fortfarande ligger under den övre viktgränsen.
• Barn under 7 år får endast transporteras på
cykeln av personer som är över 16 år.
9
Page 93

NO
Bruksanvisning
FI
Käyttöohje
1. Egnethet
Følg de lover og forskrifter som gjelder i ditt land.
Britax / RÖMER
Sykkelbarnesete
JOCKEY³
Comfort
*EN = europeisk standard
Te stet iht.
EN* 14344:2004
Kroppsvekt 9 - 22 kg
Alder 9 mnd. – 5 år
1. Soveltuvuus
Noudata asuinmaasi lakisääteisiä määräyksiä.
Britax / RÖMER
Polkupyörän
turvaistuin
JOCKEY³
Comfort
*EN = eurooppalainen normi
Tarkastus standardin EN*
14344:2004 mukaan
Lapsen paino 9 - 22 kg
Ikä 9 kk - 5 vuotta
• Vær oppmerksom på føl gende uavhengig av
minstevekt (9 – 22 kg) og minstealder (9 mnd. –
5 år):
Barnet må kunne sitte oppreist selv for å sitte i
sykkelsetet.
• Sjekk med jevne mellomrom om barnets vekt
fortsatt ligger under den øvre grens en .
• Kun syklister over 16 år har lov til å sykle med
barn under 7 år på barnesykkelsetet.
• Huomioithan riippumatta minimipainosta (9 - 22
kg) ja minimi-iästä (9 kk - 5 vuotta):
Että lapsen on osattava istua itsenäisesti ilman
tukea, jotta hän voi matkusta a polkupyörän
turvaistuimessa.
• Tarkista aika ajoin, ettei lapsen paino ylitä
enimmäispainorajaa.
• Vain yli 16-vuotiaat henk ilö t saavat kuljettaa alle
7-vuotiaita lapsia polkup yörällä.
10
Page 94

SE
Bruksanvisning
2. Användning på cykeln
Denna cykelbarnstol får inte användas...
• Om din cykel inte är konstruerad för sådan
extralast.
Rådfråga cykeltillverkaren om detta.
• Om sadelstångens diameter är mindre än
28 mm.
• Om sadelstångens diameter är större än 40 mm.
• Om sadelstången är oval.
• Om cykelbarnstolen hänger framåt när den är
monterad.
Annars kan ditt barn glida av sittytan. Kontrollera
cykelbarnstolens läge, det är beroende av vilken
vinkel cykelns sadelstång har.
• Om pakethåll aren är bredare än 150 mm.
• På sadelstödet.
11
Page 95

NO
Bruksanvisning
FI
Käyttöohje
2. Bruk på sykkelen
Det er ikke mulig å bruke dette
sykkelbarnesetet ...
• hvis sykkelen i kke er bygd for å tåle
belastningen.
Henvend deg til sykkelprodusenten hvis du lurer
på dette.
• på sykler med seterør med diameter under
28 mm
• på sykler med seterør med diameter over 40 mm
• på sykler med ovalt seterør
• hvis sykkelbarnesetet henger forover når det er
montert.
Barnet kan da skli ut av setet. Kontroller
stillingen til setet, det er avheng ig av vi nkelen på
seterøret.
• på sykler med bagasjebrett som er bredere enn
150 mm
• på setepinnen
2. Käyttö polkupyörässä
Tätä polkupyörän turvaistuinta ei saa
käyttää seuraavissa tapauksissa:
• Polkupyö rää ei ole suunniteltu tällaisten
lisäkuormien kuljettamiseen.
Kysy neuvoa polkupyöräsi valmistajalta .
• Satulaputken läpimitta on alle 28 mm.
• Satulaputken läpimitta on yli 40 mm.
• Satulaputki on soikea.
• Polkupyö rän turvaistuin jää asennettuna
eteenpäin kallelleen.
Lapsi voi tällöin luisua pois istuinosalta. Tarkista
istuimen asento polkupyörän satulaputken
kulman mukaan.
• Tavarateline on leveämpi kuin 150 mm.
• Turvaistuin asennet tuna pyörän satulan
tukiputkeen.
12
Page 96

SE
Bruksanvisning
13
Så här kan du använda din cykelbarnstol:
Cykelns hjulstorlek 26/28 tum
Sadelstångens diameter
(ej möjligt med ovala stänger)
• Iläggsdel 1 Ø 28 mm Ø 28 - 30 mm
• Iläggsdel 2 Ø 32 mm Ø 31 - 34 mm
• Iläggsdel 3 Ø 36 mm Ø 35 - 37 mm
• Utan iläggsdel Ø 38 - 40 mm
• Iläggsgummi 4 För exakt
Ø 28 - 40 mm
anpassning av
diametern
För att skydda alla trafikanter
• VARNING! Ändringar på cykelbarnstolen och på
hållaren 5 får endast utföras av tillverkaren.
• VARNING! När cykelbarnstolen monteras ändras
cykelns köregenskaper (viktbalans, styrning och
bromsning). Anpassa din cykling utifrån detta.
Page 97

NO
Bruksanvisning
FI
Käyttöohje
Slik kan du bruke sykkelbarnesetet:
Sykkelens hjuldiameter 26“ / 28“
Seterørdiameter
(ikke ovale rør)
• Innleggshylse 1 Ø 28 mm Ø 28 - 30 mm
• Innleggshylse 2 Ø 32 mm Ø 31 - 34 mm
• Innleggshylse 3 Ø 36 mm Ø 35 - 37 mm
• uten innleggshylse Ø 38 - 40 mm
• Innleggsgummi 4 For nøyaktig
Ø 28 - 40 mm
tilpasning til
diameteren
Voit käyttää polkupyörän turvaistuinta
seuraavasti:
Polkupyörän rengaskoko 26"/28"
Satulaputken läpimitta
(ei mahdollinen, jos putki on
soikea)
•Sisäosa 1 Ø 28 mm Ø 28–30 mm
•Sisäosa 2 Ø 32 mm Ø 31–34 mm
•Sisäosa 3 Ø 36 mm Ø 35–37 mm
• Ei sisäosaa Ø 38–40 mm
• Sisäkumi 4 läpimitan
Ø 28–40 mm
tarkkaa
säätämistä
varten
For brukernes sikkerhet
• ADVARSEL! Kun produsenten har lov til å utføre
endringer på sykkelbarnesetet og holderen 5.
• ADVARSEL! Når man monterer et barnesete,
endres sykkelens kjøreegenskaper (balanse,
styring, bremsing). Fart og kjørestil må tilpasses
deretter.
Turvajärjestelyjä tienkäyttäjille
• VAROITUS! Vain valmistaja saa tehdä
muutoksia polkupyörän turvai stuimeen ja
kiinnitykseen 5.
• VAROITUS! Polkupyörän turvaistuimen
asentaminen muuttaa polkupyörän ajoominaisuuksia (tasapaino a, ohjausta ja
jarruttamista). Mukauta ajotapasi sen mukaan.
14
Page 98

SE
Bruksanvisning
• Två barn bör aldrig transporteras på en cykel .
Detta försämrar köregenskaperna avsevärt.
• VARNING! Sätt aldr ig fast packni ng i barn stol en.
För att transportera packning bör en pakethållare
för framhjulet eller liknande anvä nd as .
• Kontrollera noga, även när du cyklar utan barn,
att barnstolen sitter fast och att inga delar kan
dras in i rörliga cykeldelar (t.ex. remmar i
ekrarna).
• Om cykeln tr ansporteras på laststället på ett
biltak måste barnstolen tas av. Det mycket höga
luftmotståndet kan orsaka skador på cykeln och
barnstolen och i värsta fall leda till olyckor.
Skydd mot stöld
• Cykelbarns tolen kan skyddas mot stöld. För ett
cykellås genom barnstolens grepphål och säkra
det mot cykelramen.
15
Page 99
NO
Bruksanvisning
FI
Käyttöohje
• Frakt aldri to barn på samme sykkel. Dette vil
svekke kjøreegenskapene betr ak telig.
• ADVARSEL! Ikke fest bagasje på barnesetet.
Bruk et bagasjebrett på forhjulet eller lignende til
å frakte gjenstander.
• Sjekk alltid at barnesetet sitter godt fast og at
ingen deler kan komme inn i bevegelige deler på
sykkelen (f.eks. at selene ikke kan komme inn i
eikene). Dette gjelder selv om det ikke sitter
noen i barnesetet
• Barnesetet må tas av før sykkelen skal
transporteres på bilens takstativ. Den høye
luftmotstanden kan føre til skader på sykkelen og
barnesetet, og kan også forårsake ulykker.
• Polkupyörän päällä ei koskaan tule kuljettaa
kahta lasta samanaikaisesti. Se heikentää
polkupyörän ajo-ominaisuuksia huomattavasti.
• VAROITUS! Älä koskaan kiinnitä tavaroita
turvaistuimeen. Käytä tavaroide n kuljettamiseen
etupyörän tavaratelinettä tai vastaavaa laitetta.
• Tarkista aina – myös ilman lasta ajaessasi – että
turvaistuin on kiinnitetty kunnolla eikä mitään sen
osia pääse polkupyörän liik kuvien osien väliin
(esim. vöitä pinnojen väliin).
• Jos polkupyörää kuljetetaan auton
kattotelineellä, turvaistuin on irrotettava.
Huomattava ilmanvastus voi vaurioittaa
polkupyörää ja turvaistuin ta ja aiheuttaa jopa
onnettomuuden.
Tyverisikring
• Sykkelbarnesetet kan tyverisikres. Før en
sykkellås gjennom håndtakene på barnesetet og
fest det til sykkelrammen.
Toimet varkauden estämiseksi
• Voit omilla toimillasi suojata polkupyörän
turvaistuinta varkauksilta. Pujota polkupyörän
lukko turvaistuimen kantokahvoje n lä pi ja lukitse
istuin polkupyörän runkoon.
16
Page 100

SE
Bruksanvisning
2.1 Montering på cykeln
Så här fäster du hållaren på sadelstången:
Þ Mät sadelstångens diameter.
Þ Sätt på den passande iläggsdelen 1/2/3 på
sadelstången 6 med mellanrummet bakåt (se 2.)
Tips! Vid mellanliggande storlekar (t.ex. Ø 31
mm) ska även iläggsgummit 4 sättas runt
sadelstången 6, så att diametern anpassas så
exakt som möjligt.
Þ Tryck ihop hållaren 5 runt ilägg s de len.
Þ Dra åt skruvarna 7 lätt med en insexnyckel
(storlek 5). Hållaren 5 ska kunna förskjutas
ytterligare en aning.
Varning! Se till att skruvarna 7 är på framsidan
av stången och säkerhetsspärren 8 nedtill.
17
 Loading...