

Page 1
0-25kg
To ret the cover, use the method shown
overleaf (dia 1d).
Make sure the straps are not twisted.
IMPORTANT – The cover and chest pads are
a safety feature. NEVER use the child seat
without them. Don’t put your child’s safety
at risk by using other makes of replacement
cover, they could stop the child seat from
protecting your child as well as it should.
A replacement cover is available from your
Britax stockist or contact Britax Customer
Service Department on +46 8564 841 00.
Guarantee
All Britax products are carefully designed,
manufactured and tested. However, should
this product prove faulty within 24 months of
purchase due to a materials or manufacturing
fault please return it to the original place of
purchase. We will then, at our discretion, either
repair it free of charge or replace it with the
same or a similar product.
For guarantee purposes proof of purchase will
be required. We recommend that you retain
your receipt and attach it to this user guide and
store in the seat.
Britax does not accept liability for damage
arising from abuse, misuse or negligence.
This guarantee is not transferable and
therefore does not apply to second-hand
products.
Your statutory rights are not affected by this
guarantee.
If in doubt
Not all car seats t all cars. For advice as
to the suitability of this restraint for your car
please use on our website at www.britax.eu,
call our Customer Service Helpline on
+46 8564 841 00rvice.u
A
B
Page 2

Warning
0-25kgs Group 0-2 (approximate age 0-7 years)
EXTREME HAZARD!
DO NOT under any circumstances use a rearward
facing child seat on a passenger seat tted with an
active airbag.
DO NOT use a forward facing child seat on a passenger
seat tted with an active airbag unless your vehicle
manufacturer conrms that it is safe.
DO NOT use the child seat on side facing or rearward
facing vehicle seats.
DO NOT use anything, such as a cushion or coat,
to raise the child seat off the passenger seat. In an
accident the child seat and your car seat belts would not
be able to protect your child as well as they should.
DO NOT use the child seat in the home. It has not been
designed for home use and should only be used in your
car.
DO NOT attempt to dismantle, modify or add to any
part of the child seat or change the way its harness
or your car seat belts are made or used. The ofcial
approval is no longer valid if modications are made.
NO modications may be made to the child seat other
than by the manufacturer.
DO NOT leave children alone in your car, even for a
short time.
DO NOT leave loose objects, such as luggage or books,
in the back of your car. They must be properly secured,
because if you have to stop your car suddenly loose
objects will keep moving and can then cause serious
injuries. Large and heavy loose objects are a particular
risk.
DO NOT leave folding passenger seats unlatched. If you
have to stop your car suddenly a loose seat back could
injure your child.
DO NOT allow children to play with or adjust the child
seat.
DO keep this user guide in the user guide storage slot.
DO cover the child seat if your car is left in direct
sunlight. Fittings can become hot to touch in sunny
weather and the cover may become faded.
DO make sure that the child seat does not become
trapped by a folding passenger seat or in the door of
your car.
DO make sure that you adjust the harness to t the
clothes your child is wearing before each journey –
a tting for winter clothes may be too slack for a child
wearing summer clothes.
DO store the child seat in a safe place when it is not
being used. Avoid placing heavy objects on top of it
and do not store near direct heat sources or in direct
sunlight.
DO always keep the child seat secure, even if it is not
being used by your child.
DO make sure that all occupants in the vehicle have
their seat belts fastened.
Britax, whilst taking into account child car seat contact
with vehicle seats throughout the development of new
products, cannot accept responsibility for damage
occurring to vehicle seats or seat belts.
IMPORTANT – The child seat MUST only be used with
a lap or a lap and diagonal seat belt (approved to UN/
ECE Regulation no. 16 or other equivalent standards).
Diagonal
Lap
Lap
Page 3
Introducing your new child seat
0-25kgs Group 0-2 (approximate age 0-7 years)
11
10
0-25kg
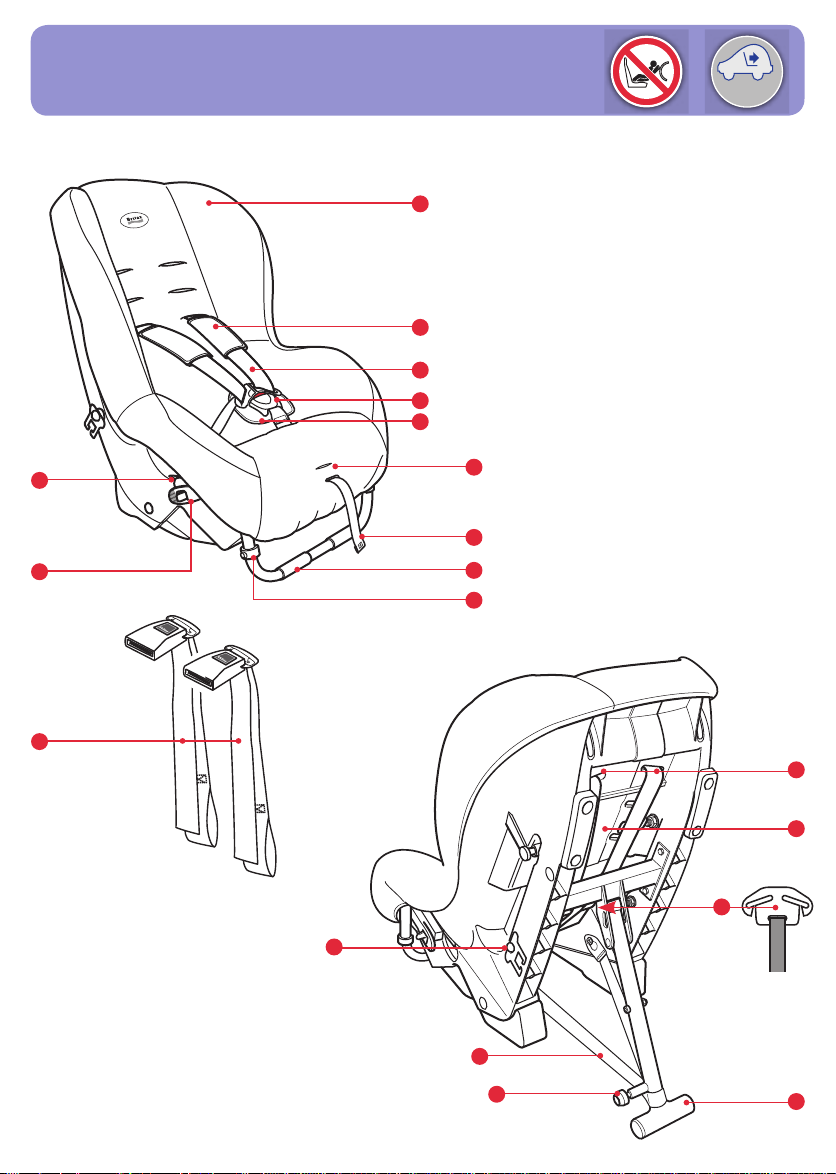
1. Seat cover
1
2. Shoulder pads
3. Harness straps
4. Harness buckle
5. Comfort pad
6. Harness adjuster button
2
3
4
5
7. Harness adjuster strap
8. Support leg
9. Support leg clip
10. Lock-off arm
11. Belt routing slot
6
7
8
9
12
12. Tether straps
13. Tether strap buckle tongue
14. Footprop tether
15. Footprop release knob
16. Shoulder strap slots
17. User guide storage (not shown)
18. Yoke (hidden)
19. Footprop
16
17
18
13
14
15
19
Page 4

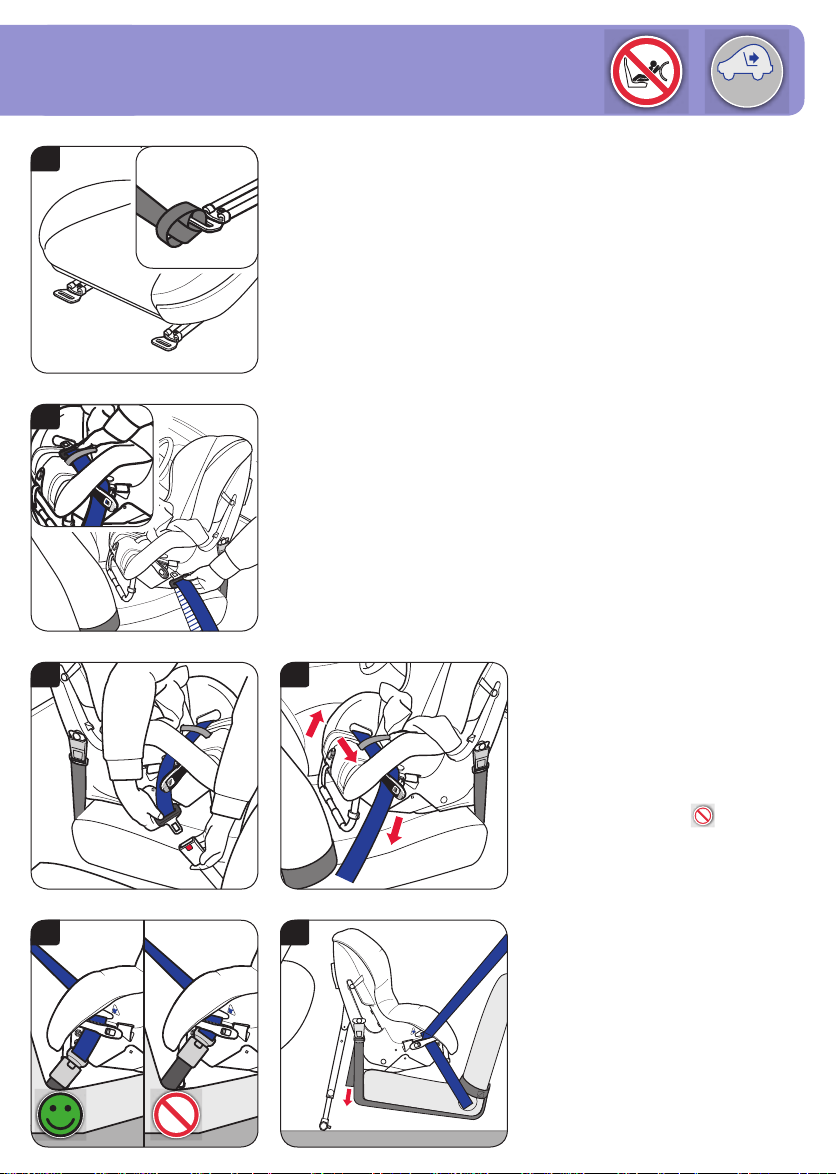
1. Adjusting the child seat to suit the weight of your child
IMPORTANT - This child seat has been designed to perform safely and independently of further external restraint.
1a
1b
0-25kg
1c
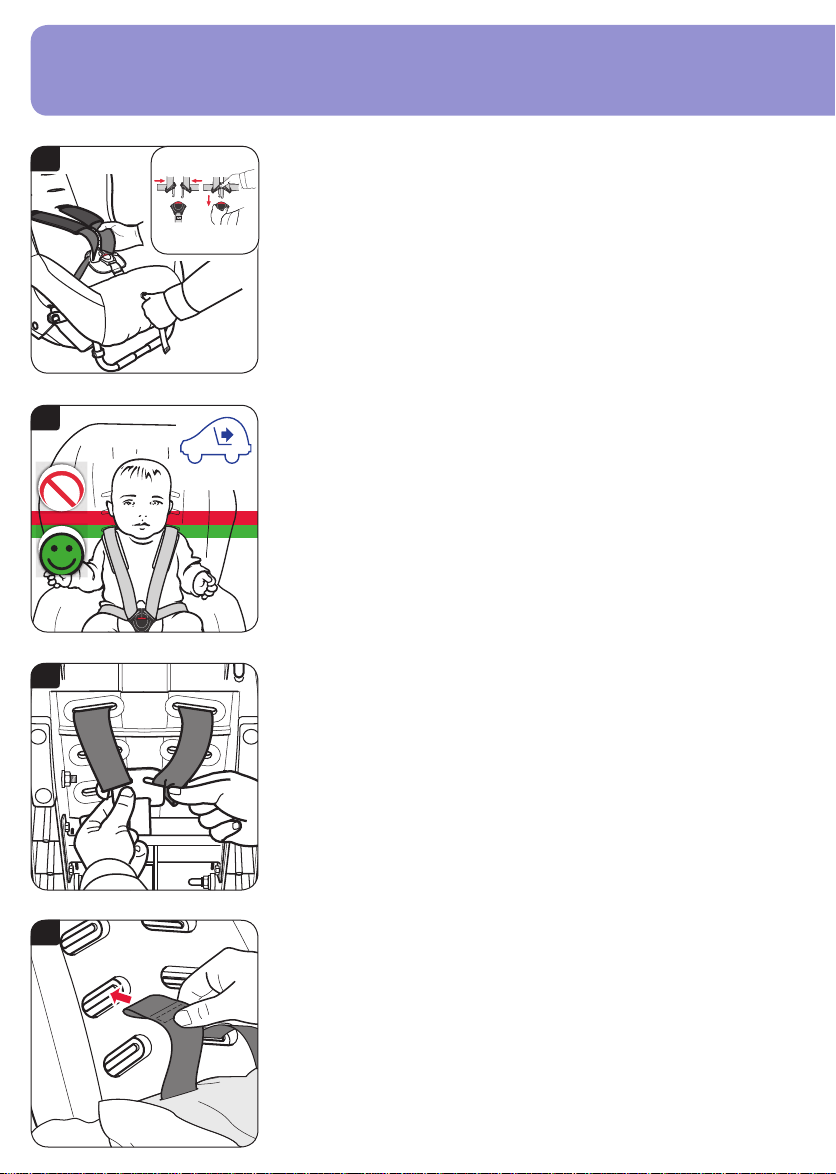
Adjusting the Harness
Press in and hold the harness release button and with your hands below the
chest pads (dia 1a) pull BOTH shoulder straps forward as far as they will go.
Unfasten the buckle by pressing the red harness buckle button. Fit the harness
around your child. To fasten the buckle; rst t the two upper sections together
(inset), then push them rmly into the lower section until you hear a positive
click. Gently pull the harness up to tighten the lap sections to t. Pull the
adjuster strap forward making sure the harness is a comfortable but FIRM t
around your child. Make sure the harness straps are not twisted.
IMPORTANT - You must adjust the height of the shoulder straps to the correct
position for your child BEFORE installing the child seat in a car. The chest
pads must sit high on the child’s shoulders as shown (dia 1b).
The shoulder straps MUST be threaded through the slots in the cover and shell
nearest the top of your child’s shoulders. If in any doubt use the slot just below
the shoulder rather than above it (dia 1b).
Once you reach the top slots your child may continue to use the seat until their
eye line is above the top of the seat shell.
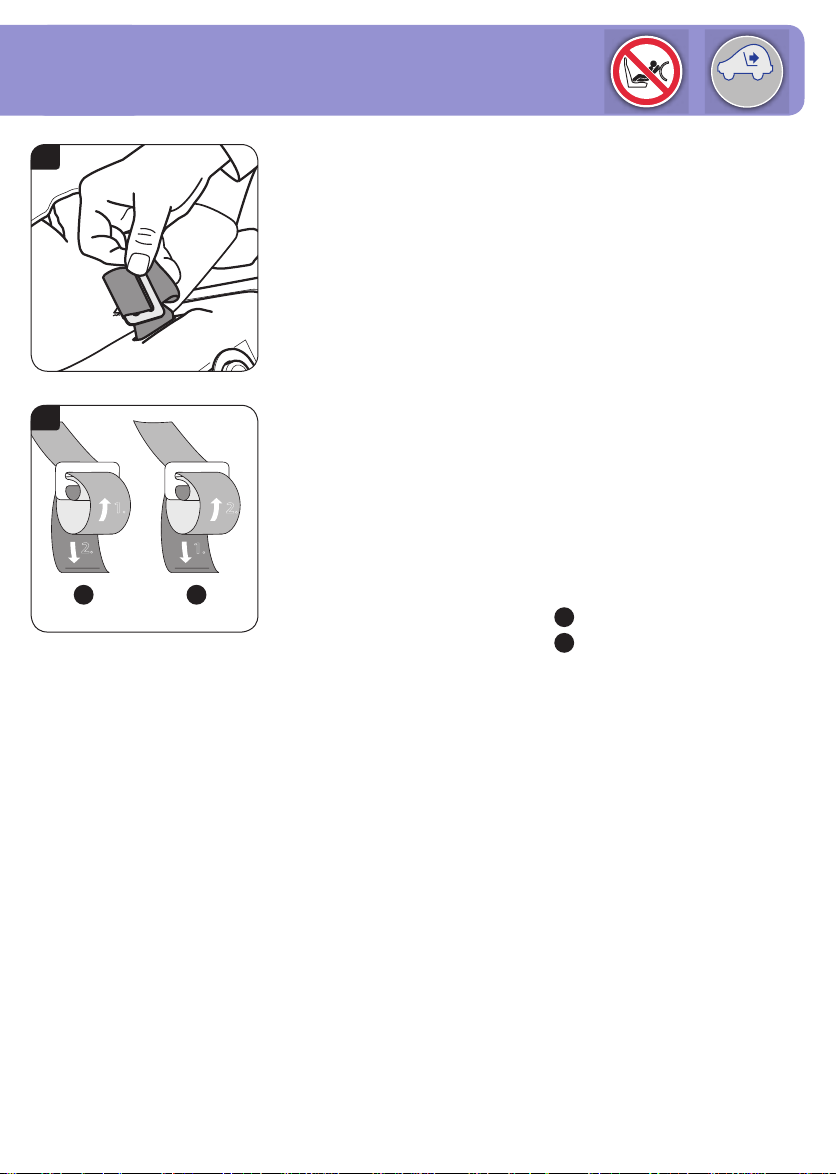
Changing the height of the shoulder straps
To loosen the harness, press in and hold the harness release button and with
your hand below the chest pads (dia 1a) pull BOTH shoulder straps forwards
as far as they will go. Pull the yoke out from behind the seat and unhook one
shoulder strap (dia 1c). Pull the cover from the top of the seat so that you can
see the slots in the seat shell. Pull the shoulder strap through to the front of the
seat.
1d
Pass the shoulder strap though the chosen slot and hook the shoulder strap
back onto the yoke (dia 1d). Repeat with the other shoulder strap.
Make sure that the straps are not twisted.
Page 5
1.
2.
1.
2.
0-25kg
1e
Rotate the exposed metal strap adjuster (dia 1e) and push it through the slot
in the cover and through to the underside of the seat shell. Ensure that it rests
horizontally so that it cannot be pulled back through the shell. Pull on the
buckle to make sure that it is secure and that the strap adjuster does not come
back through.
1f
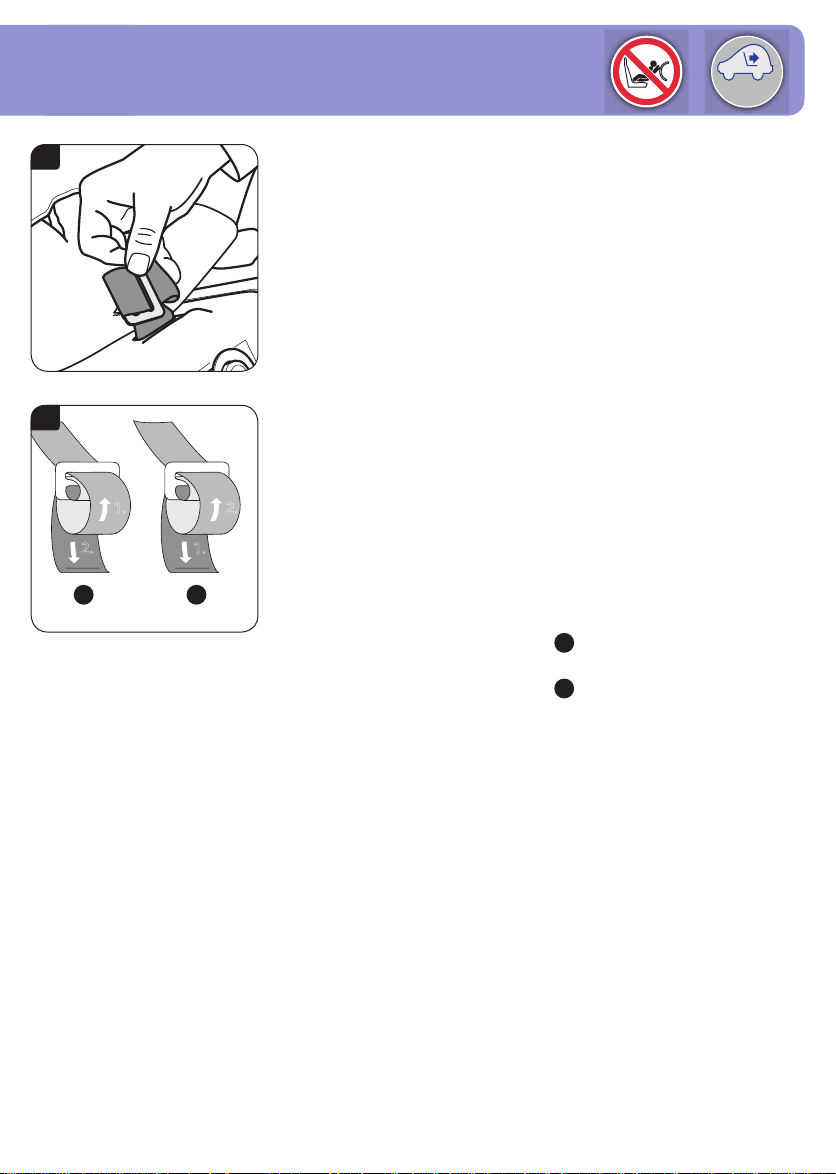
Adjusting the crotch strap
IMPORTANT - The buckle should
always be positioned low down on
your child’s body. You must adjust
the crotch strap to the correct length
for your child BEFORE installing the
child seat as it cannot be adjusted
in the car.
a. The crotch strap should only be
extended when normal harness
adjustment is not enough,
i.e. shoulder straps are at full
extension.
Press the harness adjuster tab with
one hand. With your other hand pull
the shoulder straps forward as far as
possible to loosen the harness.
The adjuster at the end of the crotch
strap is found under the front edge of
the child seat. To change the length
of the crotch strap thread it through
the adjuster in the direction of the
arrows shown (dia 1f).
– Shortening crotch strap
– Lengthening crotch strap
b. Always return the crotch strap to
its original, shorter length when
using the seat with a smaller baby.
c. DO NOT attempt to remove the
crotch strap from the adjuster.
Adjustment is made by feeding the
crotch strap through the adjuster
(dia 1f).
Page 6
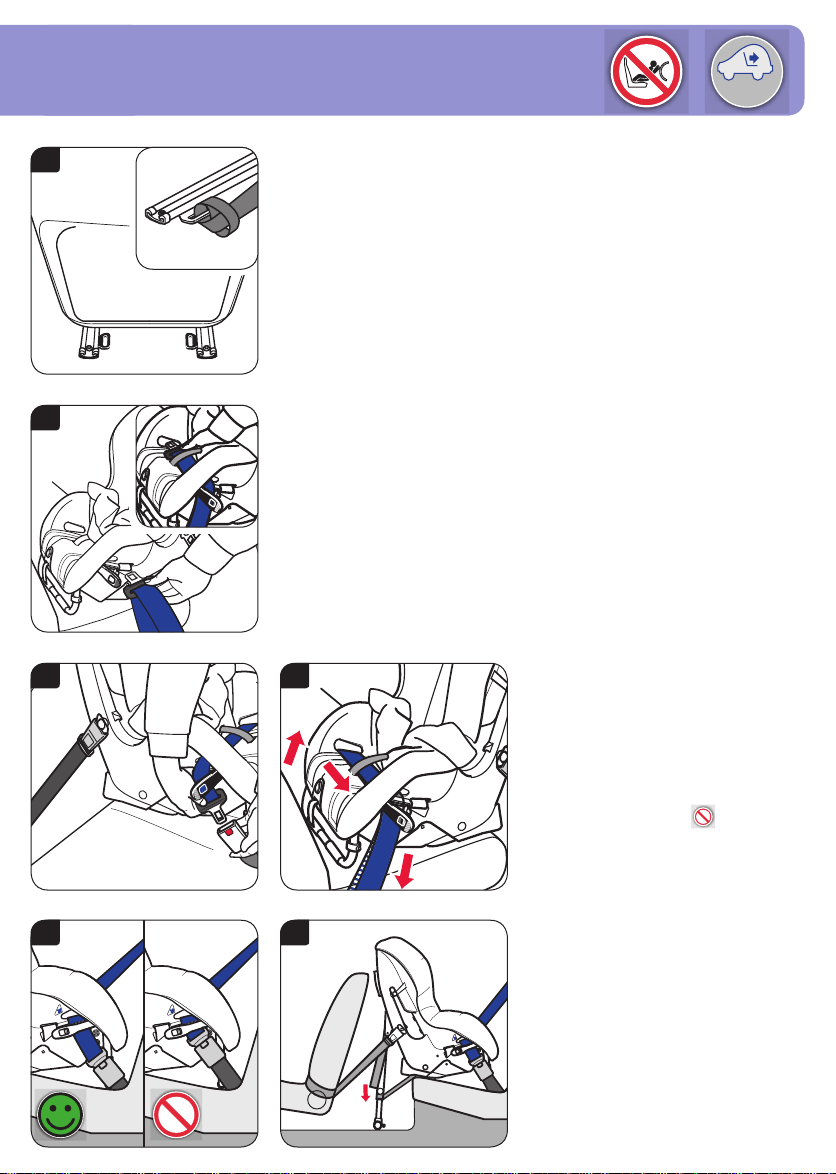
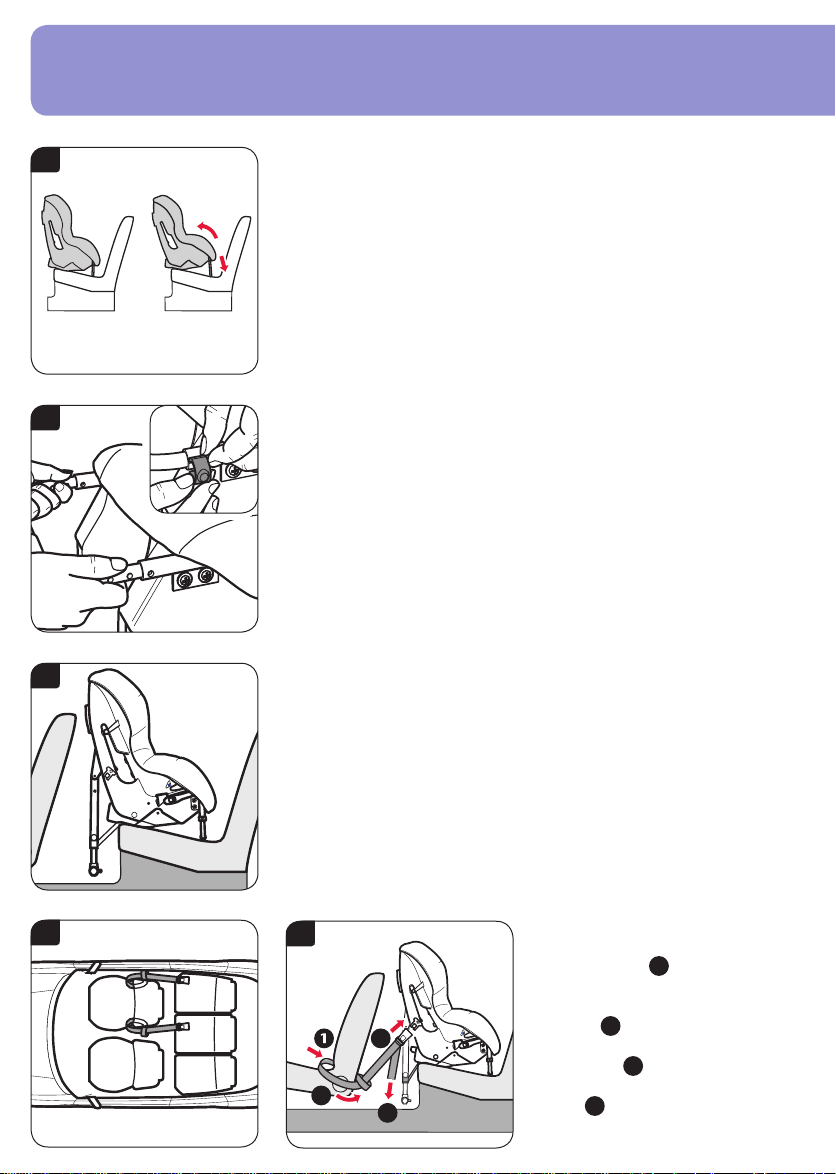
2. Installing your child seat (rearward facing) in rear side seat
IMPORTANT - This child seat has been designed to perform safely and independently of further external restraint.
2a
IMPORTANT - The child seat MUST only be used with a lap and diagonal
seat belt.
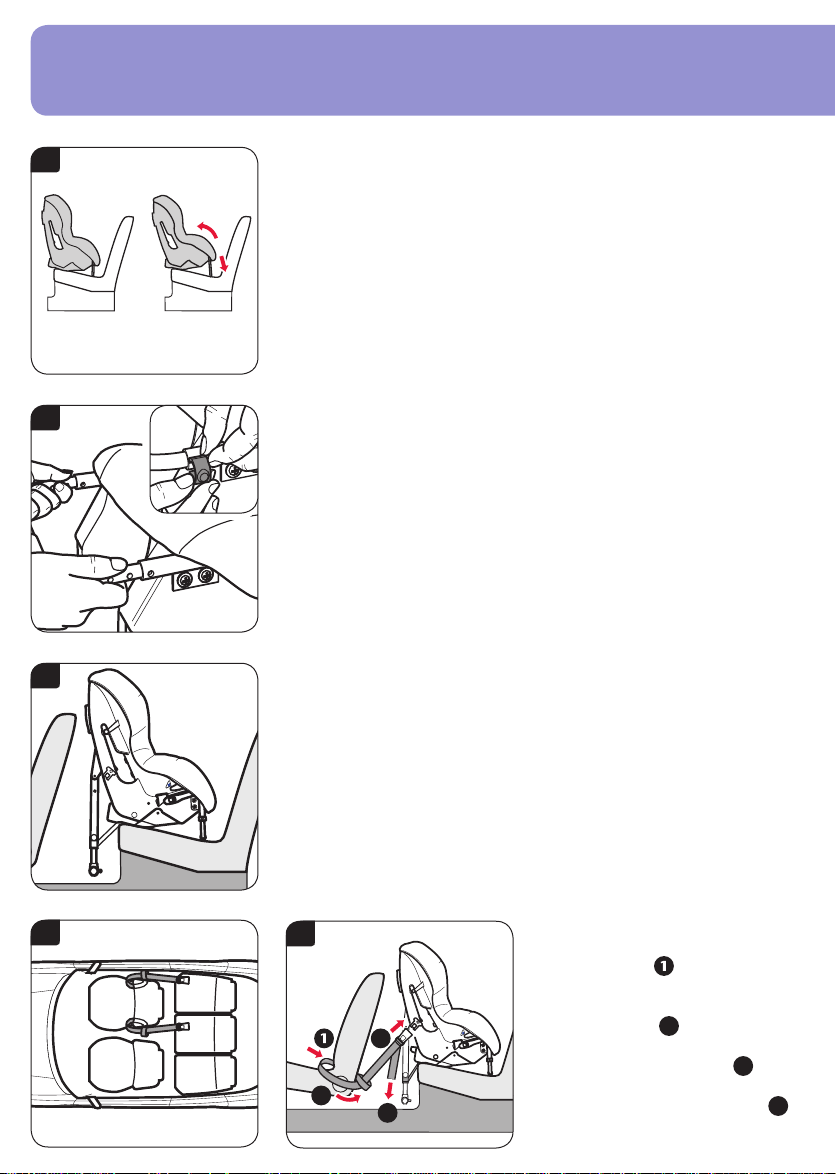
The child seat has an adjustable support leg (dia 2a). The smaller the child the
more reclined the seat must be.
2b
The larger the child the more upright the seat must be. To change the position
(if required) pull the support leg clips off of either side and slide the telescopic
leg in or out (dia 2b). Once satised with the position of the support leg, ret
the clips in the holes (inset). Make sure the hole positions chosen are the
same on both sides.
2c
Place the child seat rearward facing on the car seat. After installation the gap
between the seat in front and child seat should be a minimum of 10mm.
It must NOT rest against the car seat. If it does then adjust the car seat in front
without making the driver or passenger sit in an uncomfortable position. If not
try another seating position in the car (dia 2c).
Extend the footprop fully and make sure that the footprop tether brackets are
facing forwards and that the straps are not twisted. Lower the footprop and
adjust the height so that it is within approximately 30mm of the oor
(dia 2c). Use the ruler printed on the back page of this manual to get the
correct distance from the footprop to the oor.
2d
2e
Slide the loop ends of the tether straps
between the front car seat and back as
shown (dia 2d &
dia 2e). Bring the
buckle ends of the tether straps around
the outside of the car seat and feed
3
through the loops
of the tether straps onto the tongues
on the sides of the child seat
2
4
Provisionally tighten the tether straps by
pulling the loose ends downwards
2
. Snap the buckles
3
.
4
.
Page 7
0-25kg
2f
If your car is equipped with a runner loop on the seat runners, these may be
used as an alternative (see detail 2f).
IMPORTANT - Do not install the tether straps using the Luggage loops.
2g
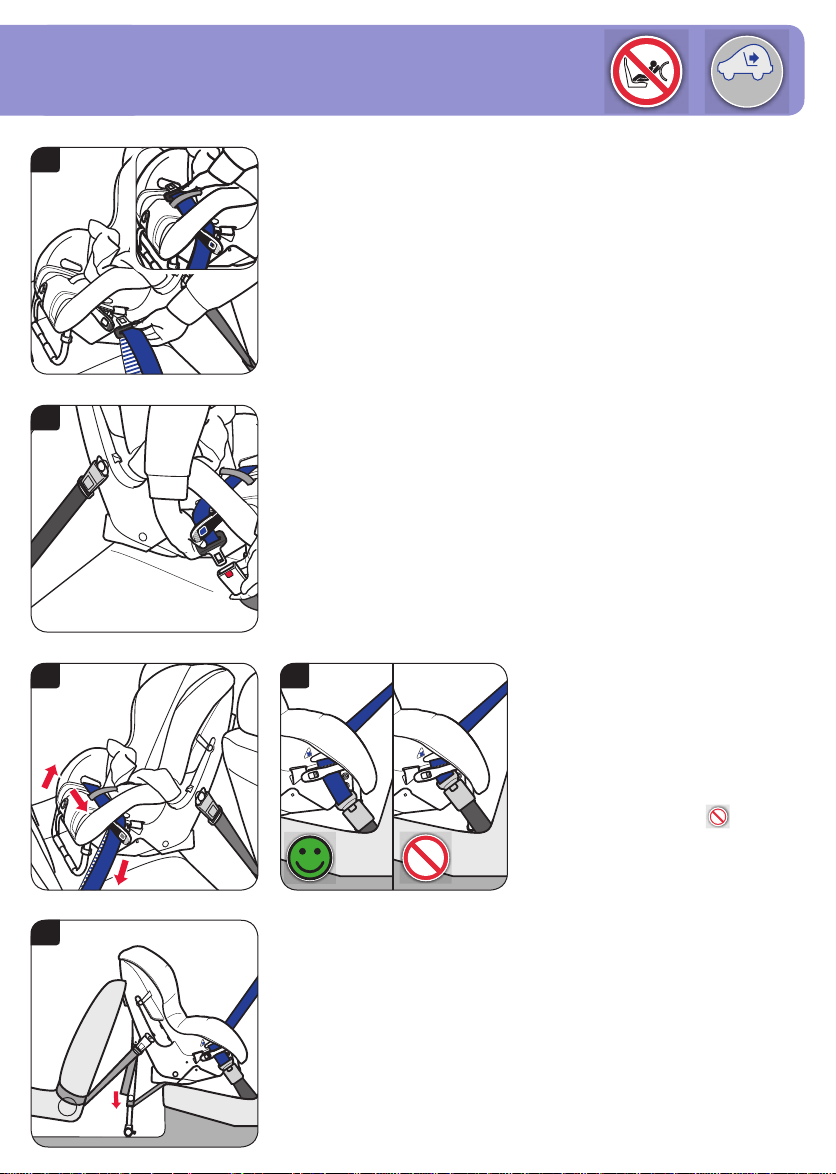
Pull off sufcient lap and diagonal belt (approx.600-900mm). Open the lock-off
arm on the side opposite the seat belt buckle. Pull back the child seat cover to
reveal the crotch strap. Feed the belt through the lock-off belt guide and seat
shell slot (dia 2g), up on to the top face of the seat base, behind the crotch
strap (inset) and down through the slot on the other side of the child seat.
Open the other lock-off arm, feed the seat belt under the lock-off arm and
attach the tongue into the buckle (dia 2h).
2h
2i
Pull all of the seat belt slack through the
child seat ensuring the seat belt is not
twisted (dia 2i). When the belt is as tight
as possible, close the lock-off arms on
BOTH sides of the seat ensuring that they
click into place.
If the buckle now lies in the position
marked as wrong with a
and the seat
belt cannot be correctly tightened (dia 2j),
try another seating position in the car.
Finally tighten the tether straps by pulling
the loose ends downwards (dia 2k)
2j
2k
until the footprop touches the oor. The
footprop must rest on a solid oor - not on
lids of storage boxes or similar.
Once rmly strapped in, test the child seat
by trying to move it back and forth and
side to side. If it seems loose, you must
re-install until rmly installed.
DO NOT rest the back of the child seat
against the driver or front passenger
seats.
Page 8
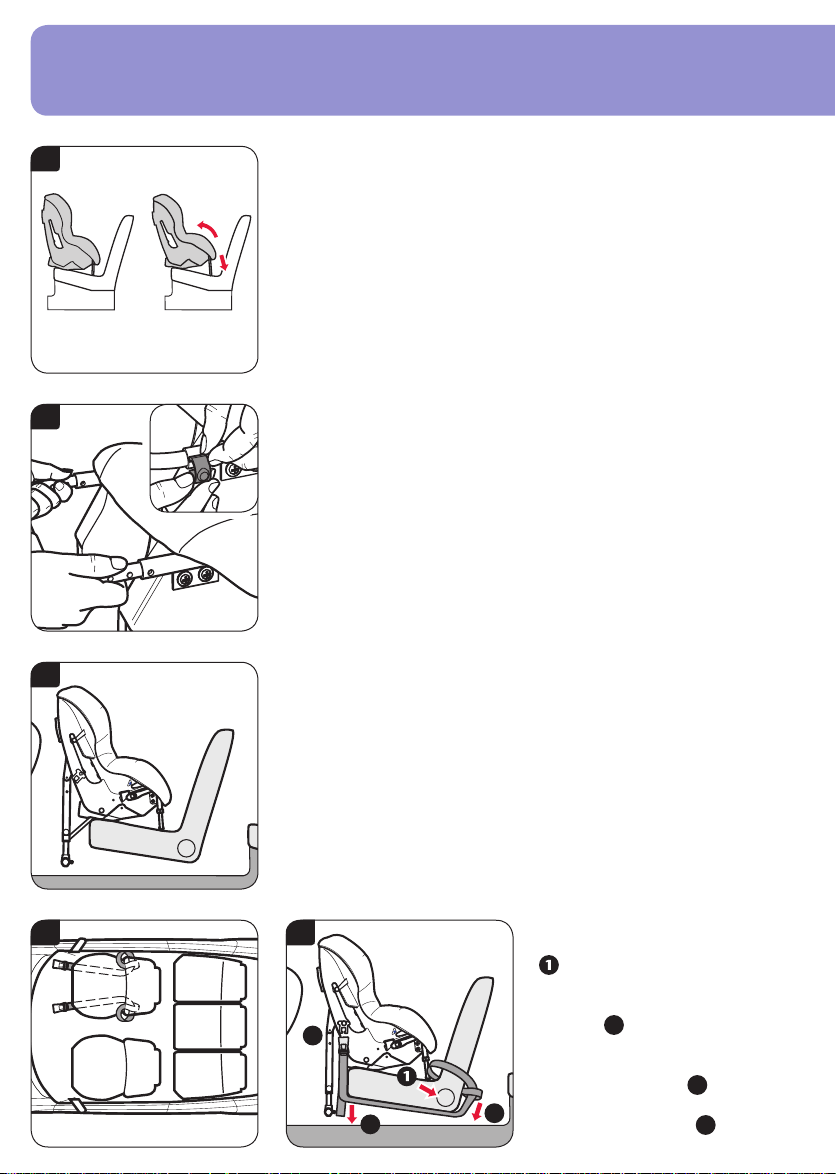
3. Installing your child seat (rearward facing) in rear middle seat
IMPORTANT - This child seat has been designed to perform safely and independently of further external restraint.
3a
IMPORTANT - The child seat can be used with either a lap or a lap and
diagonal seat belt.
The child seat has an adjustable support leg (dia 3a). The smaller the child
the more reclined the seat must be. The larger the child the more upright the
seat must be. To change the position (if required) pull the support leg clips off
of either side and slide the telescopic leg in or out (dia 3a). Once satised with
the position of the support leg, ret the clips in the holes (inset). Make sure the
hole positions chosen are the same on both sides.
3b
Place the child seat rearward facing with the back of the child seat positioned
centrally between the driver and passenger seat.
Extend the footprop fully and make sure that the footprop tether brackets are
facing forwards and that the straps are not twisted. Lower the footprop and
adjust the height so that it is within approximately 30mm of the oor
(dia 3b). Use the ruler printed on the back page of this manual to get the
correct distance from the footprop to the oor.
3c
3d
Loop a tether strap around both the
front driver and passenger seat as
shown (dia 3c).
If your car is equipped with a runner
loop on the seat runners, these may be
used as an alternative (see detail 3d).
IMPORTANT - Do not install the tether
straps using the Luggage loops
3e
3
2
4
Slide the loop ends of the tether straps between the front car seat and back
as shown (dia 3e). Bring the buckle ends of the tether straps around the
outside of the car seat and feed through the loops
tether straps onto the tongues on the sides of the child seat
tighten the tether straps by pulling the loose ends downwards
2
. Snap the buckles of the
. Provisionally
3
.
4
Page 9
0-25kg
3f
Pull off sufcient lap and diagonal belt (approx.600-900mm). Open the lock-off
arm on the side opposite the seat belt buckle. Pull back the child seat cover to
reveal the crotch strap. Feed the belt through the lock-off belt guide and seat
shell slot (dia 3f) on to the top face of the seat base, behind the crotch strap
(inset) and down through the slot on the other side of the child seat.
3g
3h
Open the other lock-off arm , feed the seat belt under the lock-off arm and
attach the tongue into the buckle (dia 3g).
3i
Pull all of the seat belt slack through
the child seat ensuring the seat belt
is not twisted (dia 3h). When the belt
is as tight as possible, close the lockoff arms on BOTH sides of the seat
ensuring that they click into place.
If the buckle now lies in the position
marked as wrong with a
and the
seat belt cannot be correctly tightened
(dia 3i), try another seating position in
the car.
3j
Finally tighten the tether straps by pulling the loose ends downwards (dia 3j)
until the footprop touches the oor. The footprop must rest on a solid oor - not
on lids of storage boxes or similar.
Once rmly strapped in, test the child seat by trying to move it back and forth
and side to side. If it seems loose, you must re-install until rmly installed.
DO NOT rest the back of the child seat against the driver or front passenger
seats.
Page 10
4. Installing your child seat (rearward facing) in front seat
IMPORTANT - This child seat has been designed to perform safely and independently of further external restraint.
4a
IMPORTANT - The child seat MUST only be used with a lap and diagonal
seat belt.
The child seat has an adjustable support leg (dia 4a). The smaller the child the
more reclined the seat must be. The larger the child the more upright the seat
must be.
4b
To change the position (if required) pull the support leg clips off of either side
and slide the telescopic leg in or out (dia 4b). Once satised with the position
of the support leg, ret the clips in the holes (inset). Make sure the hole
positions chosen are the same on both sides.
Push the vehicle front seat back to accommodate the child seat ensuring that
any passenger directly behind will still be able to sit in a comfortable position.
The larger your child, the more upright the sitting position should be.
4c
Place the child seat rearward facing and push rmly into the car seat (dia 4c).
IMPORTANT - DO NOT rest the back of the child seat on the dashboard or
close to the windscreen.
Extend the footprop fully and make sure that the footprop tether brackets are
facing forwards and that the straps are not twisted. Lower the footprop and
adjust the height so that it is within approximately 30mm of the oor
(dia 4c). Use the ruler printed on the back page of this manual to get the
correct distance from the footprop to the oor.
4d
4e
Slide the loop ends of the tether straps
between the front car seat and back
as shown (dia 4d). Bring the buckle
ends of the tether straps around the
outside of the car seat and feed through
3
the loops
under the seat. Snap the buckles of the
2
. Slide the buckle ends
tether straps onto the tongues on the
sides of the child seat
tighten the tether straps by pulling the
4
2
loose ends downwards
3
. Provisionally
4
.
Page 11
0-25kg
4f
If your car is equipped with a runner loop on the seat runners, these may be
used as an alternative.
IMPORTANT - Do not install the tether straps using the Luggage loops.
4g
Pull off sufcient lap and diagonal belt (approx.600-900mm). Open the lock-off
arm on the side opposite the seat belt buckle. Pull back the child seat cover to
reveal the crotch strap. Feed the belt through the lock-off belt guide and seat
shell slot (dia 4g), up on to the top face of the seat base, behind the crotch
strap (inset) and down through the slot on the other side of the child seat.
Open the other lock-off arm, feed the seat belt under the lock-off arm and
attach the tongue into the buckle (dia 4h).
4h
4i
Pull all of the seat belt slack through the
child seat ensuring the seat belt is not
twisted (dia 4i). When the belt is as tight
as possible, close the lock-off arms on
BOTH sides of the seat ensuring that
they click into place.
If the buckle now lies in the position
marked as wrong with a
and the seat
belt cannot be correctly tightened (dia 4j),
try another seating position in the car.
Finally tighten the tether straps by pulling
the loose ends downwards (dia 4k)
4j
4k
until the footprop touches the oor. The
footprop must rest on a solid oor - not on
lids of storage boxes or similar.
Once rmly strapped in, test the child
seat by trying to move it back and forth
and side to side. If it seems loose, you
must re-install until rmly installed.
DO NOT rest the back of the child
seat on the dashboard or close to the
windscreen.
Page 12

DK
Vigtigt!
0-25 kg, gruppe 0-2 (ca. 0-7 år)
Du skal følge disse instruktioner nøje. Hvis sædet ikke er
monteret på en sikker måde, og dit barn ikke er spændt
korrekt fast, er dit barn og andre passagerer i alvorlig fare
for legemsbeskadigelse i tilfælde af, at der sker en ulykke.
Læs denne brugervejledning, FØR du prøver at
montere barnesædet i bilen.
Hampshire Trading Standards Authority og
Britax tilråder, at man ikke køber eller sælger
brugte barnesæder. Bortskaf dit barnesæde
på en sikker måde. Sælg det ikke, og forær det
ikke væk.
Efter en ulykke bør barnesædet og
sikkerhedsselerne i bilen udskiftes. Selvom
de ser ubeskadigede ud, vil barnesædet og
sikkerhedsselerne i bilen ikke være i stand til
at beskytte dit barn så godt, som de burde,
hvis du skulle komme ud for en ny ulykke.
Intet barnesæde er ugtsikkert
Selesystemer kan ikke udformes, så de er
fuldstændigt “børnesikrede” og stadig opfylder
de lovmæssige krav i den europæiske
standard ECE R44. Selen skal være spændt
og justeret korrekt hele tiden, og barnet skal
opfordres til forblive i selesystemet.
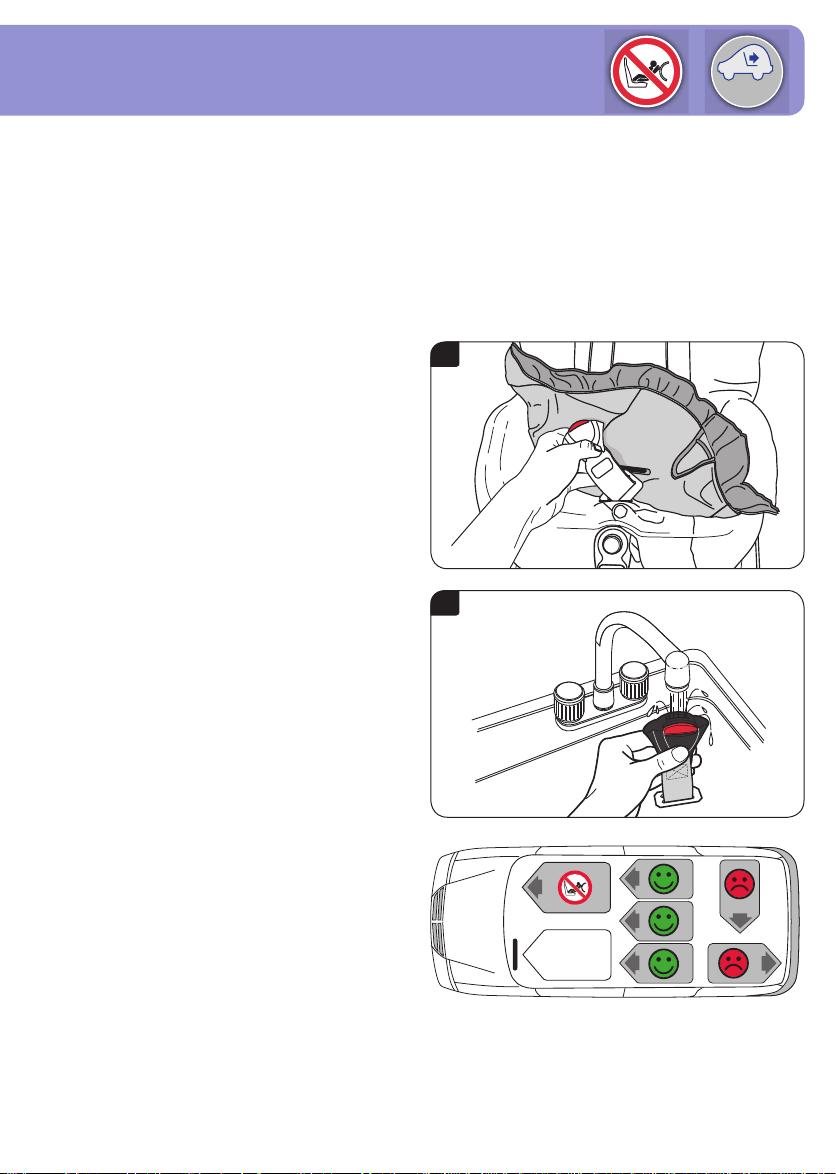
Vedligeholdelse af barnesædet
Der kan komme mad og drikke ind i spændet
på selesystemet. Dette kan forhindre spændet
i at fungere korrekt – det vil ikke klikke. Vask
det i lunkent vand, til det er rent (dias A og B).
Rengøring af betrækket
Læs vaskeinstruktionerne på mærkaterne på
betrækket.
Du MÅ IKKE tørretumble betrækket –
centrifuger det, og lad det hænge til tørre.
Rengøring af selerne og skalkonstruktionen
Brug KUN mild håndsæbe og varmt vand.
SKIL IKKE og forsøg ikke at skille nogen af
delene til selesystemet og sædet ad, når du
rengør dem.
BRUG IKKE opløsningsmidler, rensemidler
eller opvaskemiddel, da disse kan svække
selesystemet og sædet.
BRUG ALDRIG smøreolie til nogle af
sædedelene.
Aftagning og placering af betrækket igen
Tryk udløsningsknappen til selen ind, og
hold den inde, og træk med hånden under
brystpuderne (dias 1a) BEGGE skulderseler
så langt frem som muligt.
Løft selehægten ud fra sin plads bag sædet,
og tag begge skulderremmene ud (dias 1c).
Træk betrækket af den øverste del af sædet,
og brug metoden på modsatte side (dias 1d)
til at føre remmene om på forsiden af sædet.
Spænd spændet op og afmonter komfortpuden
ved at trække velcrolukningen fra hinanden.
Tag brystpuderne af skulderremmene.
Træk forsigtigt betrækket af sædet, og
før skulderremmene, selespændet og
Page 13
0-25kg
justeringsremmen gennem åbningerne
i betrækket.
For at sætte betrækket på igen skal du bruge
den metode, som vises på modsatte side
(dias 1d).
Kontroller, at seleremmene ikke er snoede.
VIGTIGT – Betrækket og brystpuderne
er vigtige for sikkerheden.Brug ALDRIG
barnesædet uden dem. Bring ikke dit barns
sikkerhed i fare ved at bruge betræk af andre
fabrikater. Dette kan forhindre, at barnesædet
beskytter dit barn optimalt.
Et nyt betræk kan fås hos en Britax-forhandler,
eller du kan kontakte Britax kundeservice på
tlf. +46 8564 841 00.
Garanti
Alle Britax-produkter er blevet omhyggeligt
designet, produceret og testet. Hvis det inden
for 24 måneder efter købsdatoen viser sig, at
dette produkt har mangler pga. materiale- eller
produktionsfejl, skal du returnere det til den
forhandler, hvor du købte det. Herefter vil vi
efter eget skøn enten reparere det gratis eller
erstatte det med det samme eller et tilsvarende
produkt.
Et købsbevis er påkrævet af hensyn til
garantien. Vi anbefaler, at du opbevarer
din kvittering, hæfter den sammen med
brugervejledningen og opbevarer den i sædet.
Britax påtager sig intet ansvar for skader, som
måtte opstå i forbindelse med misbrug, forkert
brug eller forsømmelighed.
Denne garanti kan ikke overføres til andre og
gælder derfor ikke for brugte produkter.
Dine lovbefalede rettigheder påvirkes ikke af
denne garanti.
Hvis du er i tvivl
Barnesæderne passer ikke til alle biler. Hvis
du ikke er sikker på, om selen passer til din bil,
kan du bruge på vores websted på adressen
www.britax.eu, ringe til vores kundeservice på
tlf. +46 8564 841 00
A
B
Page 14

Advarsel
0-25 kg, gruppe 0-2 (ca. 0-7 år)
ALVORLIG FARE!
RUG IKKE under nogen omstændigheder et
bagudvendt barnesæde på et passagersæde, som er
udstyret med en aktiveret airbag.
BRUG IKKE barnesædet på passagersæder, som
er udstyret med en aktiveret airbag, medmindre
bilfabrikanten bekræfter, at det er forsvarligt.
BRUG IKKE barnesædet på sæder, der vender
sidelæns i bilen.
BRUG ALDRIG NOGET, som f.eks. en pude eller en
frakke, til at hæve barnesædet fra passagersædet. Ved
en ulykke ville barnesædet og sikkerhedsselerne i bilen
ikke være i stand til at beskytte dit barn så godt, som de
burde.
BRUG IKKE barnesædet i hjemmet. Det er ikke
beregnet til brug i hjemmet og bør kun benyttes i bilen.
FORSØG IKKE at afmontere, modicere, eller tilføje
noget til barnesædet eller på nogen måde ændre ved
den måde, sikkerhedsselerne i bilen fungerer eller
bruges. Den ofcielle godkendelse er ikke længere
gyldig, hvis der er foretaget modikationer. INGEN
ANDRE end producenten må foretage modikationer af
barnesædet.
EFTERLAD ALDRIG dine børn alene i bilen - heller ikke
for et kort øjeblik.
EFTERLAD IKKE dit barn uden opsyn i en babylift,
heller ikke i et kort øjeblik.
LAD IKKE genstande, som bagage eller bøger ligge
løst bagest i bilen. De skal fastgøres i tilfælde af, at du
bliver nødt til at foretage en hård opbremsning, da løse
genstande vil fortsætte med at bevæge sig, hvorved
de kan forårsage alvorlige skader. Store og tunge
genstande udgør en særlig risiko.
SLÅ ALTID passagersæderne tilbage i låst position.
Hvis du pludselig skal stoppe bilen, kan et løst sæde
skade dit barn.
TILLAD ALDRIG børnene at lege med barnesædet eller
at justere det.
OPBEVAR denne brugervejledning i
opbevaringsrummet.
DÆK barnesædet til, hvis din bil står i direkte sollys.
Metallisk og plastisk udstyr kan blive varmt at røre ved i
solskinsvejr, og betrækket kan falme.
SØRG FOR, at barnesædet ikke bliver klemt inde af et
sæde, der kan vippes eller i bildøren.
SØRG FOR at tilpasse selesystemet til det tøj, dit barn
har på, før hver køretur –
en tilpasning til vintertøj kan være for løs til et barn, som
er iført sommertøj.
SØRG FOR at opbevare barnesædet et sikkert sted,
når det ikke bruges. Undgå at placere tunge genstande
oven på det, og undlad at opbevare det ved siden af
varmekilder, som f.eks. radiatorer.
SØRG FOR at barnesædet altid er sikret, også selv om
det ikke er i brug.
SØRG FOR, at alle passagerer i bilen har spændt deres
sikkerhedsseler.
Selv om der i hele produktudviklingsforløbet er taget
hensyn til, at barnesædet er i kontakt med bilsædet, kan
producenten ikke tage ansvar for skader, som opstår på
bilsæder eller sikkerhedsseler.
VIGTIGT – Barnesædet SKAL bruges med en hoftesele
eller en trepunktssikkerhedssele (godkendt iht. FN/ECE
nr. 16 eller tilsvarende standarder).
Diagonal
Hofte
Hofte
Page 15

Præsentation af dit nye barnesæde
0-25 kg, gruppe 0-2 (ca. 0-7 år)
11
10
0-25kg
1. Sædebetræk
1
2. Skulderpuder
3. Seleremme
4. Selespænde
5. Komfortpude
6. Selejusteringsknap
2
3
4
5
7. Justeringsrem til sele
8. Støtteben
9. Støttebensholder
10. Låseklap
11. Seleføringsåbning
6
7
8
9
12
12. Seleremme
13. Spændebeslag på selerem
13
14. Støttefodssele
15. Justeringsknop til støttefod
16. Åbning til skulderrem
17. Opbevaringsrum til brugervejledning (ikke vist)
18. Selehægte (skjult)
19. Støttefod
16
17
18
14
15
19
Page 16
1. Justering af barnesædet, så det passer til dit barns vægt
VIGTIGT - Barnesædet er udviklet med henblik på sikker brug uden yderligere ekstern sele.
1a
1b
0-25kg
1c
Justering af selen
Tryk udløsningsknappen til selen ind, og hold den inde, mens du med
hænderne under brystpuderne (dias 1a) trækker BEGGE skulderremme så
langt frem som muligt.
Åbn selen ved at trykke på den røde knap på selespændet. Spænd selen
rundt om dit barn. For at spænde spændet skal du først samle de to øverste
dele (indsat) og derefter skubbe dem hårdt ind i den nederste del, indtil
du hører et klik. Træk forsigtigt selen opad for at stramme hofteselen, så
den passer. Træk justeringsremmen fremad for at sikre, at selesystemet er
komfortabelt, men slutter TÆT omkring dit barn. Kontroller, at seleremmene
ikke er snoede.
VIGTIGT - Du skal justere højden på skulderremmene til den korrekte position
for dit barn, FØR du monterer barnesædet i bilen. Brystpuderne skal sidde højt
på barnets skuldre som vist (dias 1b).
Skulderremmene SKAL føres gennem de åbninger i betrækket og
skalkonstruktionen, der er tættest på toppen af dit barns skuldre. Hvis du er
i tvivl, skal du bruge den åbning, som sidder lige under skuldrene frem for over
skuldrene (dias 1b).
Når du når til den øverste åbning, kan dit barn blive ved med at bruge sædet,
indtil øjnene er over det øverste af sædets skalkonstruktion.
Ændring af højden på skulderremmene
Hvis du vil løsne selen, skal du trykke udløsningsknappen til selen ind og holde
den inde, mens du med hånden under brystpuderne (dias 1a) trækker BEGGE
skulderremme så langt frem som muligt. Løft selehægten ud fra dens plads
bag sædet, og tag den ene skulderrem ud (dias 1c). Træk betrækket af det
øverste af barnesædet, så du kan se åbningerne i skalkonstruktionen. Træk
skulderremmen ud på forsiden af sædet.
1d
Træk skulderremmen gennem den valgte åbning, sæt skulderremmen tilbage
på selehægten (dias 1d). Gør det samme med den anden skulderstrop.
Kontroller, at seleremmene ikke er snoede.
Page 17
1.
2.
1.
2.
0-25kg
1e
Drej metalbeslaget (dias 1e), og skub det gennem åbningen i betrækket og
gennem skalkonstruktionen til bagsiden. Kontroller, at det ligger vandret, så
det ikke kan blive trukket tilbage gennem skalkonstruktionen. Træk i spændet
for at sikre, at det sidder fast, og at justeringsbeslaget ikke kan glide tilbage
igen.
1f
Justering af skridtremmen
VIGTIGT - Spændet skal altid
placeres så lavt som muligt
på barnet. Du skal justere
skridtremmen, så den har den
rigtige længde til dit barn, FØR du
monterer barnesædet, da den ikke
kan justeres, når sædet er monteret
i bilen.
a. Skridtremmen bør kun
Tryk på justeringsknappen til selen
med én hånd. Træk med den anden
hånd BEGGE skulderremme så langt
frem som muligt for at løsne selen.
Justeringen for enden af
skridtremmen nder du under
barnesædets forreste kant. For at
ændre på skridtremmens længde
skal du føre den igennem justeringen
i den retning, pilene viser (dias 1f).
forlænges, når normal
selejustering ikke er nok, dvs.
når skulderremmene ikke kan
forlænges mere.
b. Sæt altid skridtremmen tilbage
til sin oprindelige, kortere
– Sådan gøres skridtremmen
kortere
– Sådan gøres skridtremmen
længere
længde, når du bruger sædet til
en mindre baby.
c. Du må IKKE forsøge at fjerne
skridtremmen fra justeringen.
Du justerer skridtremmen ved
at føre den gennem justeringen
(dias 1f).
Page 18
2. Montering af barnesædet (bagudvendt brug) i en af siderne på bagsædet
VIGTIGT - Barnesædet er udviklet med henblik på sikker brug uden yderligere ekstern sele.
2a
VIGTIGT - Barnesædet SKAL monteres med en trepunktssikkerhedssele.
Barnesædet har et justerbart støtteben (dias 2a). Jo mindre barnet er, jo mere
tilbagelænet skal sædet være.
2b
Jo større barnet er, jo mere opretstående skal sædet være. Hvis positionen
skal ændres, skal du trække støttebensholderne fri på begge sider og skubbe
teleskopbenene ind eller ud (dias 2b). Når støttebenet står rigtigt, skal
holderne sættes fast i åbningerne igen (indsat). Kontroller, at der bruges
de samme åbningshuller på begge sider.
2c
Placer barnesædet bagudvendt på passagersædet. Efter montering skal
afstanden mellem sædet foran og barnesædet være mindst 10 mm. Det må
IKKE hvile mod bilsædet. Hvis det gør det, skal du tilpasse sædet foran, uden
at gøre det ubehageligt for føreren eller passageren på forsædet. Ellers kan du
prøve at placere sædet et andet sted i bilen (dias 2c).
Træk støttefoden helt ud, og kontroller, at holderne til støttefodsselen vender
fremad, og at selerne ikke er snoet. Sænk støttefoden, og juster højden, så
den er ca. 30 mm fra gulvet (dias 2c). Brug linealen bag på manualen til at
nde den rigtige afstand fra støttefoden til gulvet.
2d
2e
Før seleremmene med løkker mellem
det forreste bilsæde og tilbage som
vist (dias 2d og
1
dias 2e). Før
seleremmene med spænder hele vejen
rundt om bilsædet, og før dem gennem
3
løkkerne
seleremmene på holderne på siden af
barnesædet
2
4
midlertidigt ved at trække de løse ender
nedad
2
. Fastgør spænderne på
3
. Spænd seleremmene
4
.
Page 19

0-25kg
2f
Hvis bilen er udstyret med et beslag på glideskinnerne, kan disse også bruges
(se detalje 2f).
VIGTIGT - Monter ikke seleremmene med bagagestropperne.
2g
Frigør tilstrækkeligt af trepunktsselen (ca. 600-900 mm). Åbn låseklappen på
den modsatte side af sikkerhedsselespændet. Træk betrækket til barnesædet
tilbage, så skridtremmen bliver synlig. Før selen gennem det låselige
selespænde og åbningen til sædeskallen (dias 2g), op til den øverste del af
sædet, bag skridtremmen (indsat) og ned gennem åbningen på den anden
side af barnesædet.
Åbn låseklappen, før sikkerhedsselen under låseklappen, og fastgør beslaget
i spændet (dias 2h).
2h
2i
Træk alt slæk i sikkerhedsselen
gennem barnesædet, og kontroller, at
sikkerhedsselen ikke er snoet (dia 2i). Når
selen er så stram som muligt, skal du lukke
låseklapperne på BEGGE sider af sædet og
kontrollere, at de klikker på plads.
Hvis spændet sidder forkert, hvilket er
markeret med et
, og sikkerhedsselen
ikke kan strammes korrekt (dias 2j), kan du
prøve en anden placering i bilen.
Fastgør til sidst seleremmene ved at trække
de løse ender nedad (dias 2k), indtil
2j
2k
støttefoden rammer gulvet. Støttefoden
skal stå på et fast gulv – ikke på låg fra
opbevaringsbokse eller lignende.
Når sædet er blevet strammet godt fast, skal
du afprøve det ved at forsøge at bevæge det
frem og tilbage og fra side til side. Hvis det
er løst, skal du montere det igen, indtil det
sidder godt fast.
Barnesædet MÅ IKKE hvile mod førersædet
eller passagerforsædet.
Page 20

3. Montering af barnesædet (bagudvendt brug) midterst på bagsædet
VIGTIGT - Barnesædet er udviklet med henblik på sikker brug uden yderligere ekstern sele.
3a
VIGTIGT - Barnesædet kan bruges med en hoftesele og med en
trepunktssikkerhedssele.
Barnesædet har et justerbart støtteben (dias 3a). Jo mindre barnet er, jo mere
tilbagelænet skal sædet være. Jo større barnet er, jo mere opretstående skal
sædet være. Hvis positionen skal ændres, skal du trække støttebensholderne
fri på begge sider og skubbe teleskopbenene ind eller ud (dias 3a). Når
støttebenet står rigtigt, skal holderne sættes fast i åbningerne igen (indsat).
Kontroller, at der bruges de samme åbningshuller på begge sider.
3b
Sæt barnesædet med bagsiden fremad og placeret midt mellem førersædet og
passagersædet.
Træk støttefoden helt ud, og kontroller, at holderne til støttefodsselen vender
fremad, og at selerne ikke er snoet. Sænk støttefoden, og juster højden, så
den er ca. 30 mm fra gulvet (dias 3b). Brug linealen bag på manualen til at
nde den rigtige afstand fra støttefoden til gulvet.
3c
3d
Før en selerem rundt i en løkke om
både førersædet og passagersædet
som vist (dias 3c).
Hvis bilen er udstyret med et beslag på
glideskinnerne, kan disse også bruges
(se detalje 3d).
VIGTIGT - Monter ikke seleremmene
med bagagestropperne.
3e
Før seleremmene med løkker mellem det forreste bilsæde og tilbage som
vist (dias 3e). Før seleremmene med spænder hele vejen rundt om bilsædet,
og før dem gennem løkkerne
holderne på siden af barnesædet
at trække de løse ender nedad
3
2
4
2
. Fastgør spænderne på seleremmene på
. Spænd seleremmene midlertidigt ved
3
.
4
Page 21

0-25kg
3f
Frigør tilstrækkeligt af trepunktsselen (ca. 600-900 mm). Åbn låseklappen på
den modsatte side af sikkerhedsselespændet. Træk betrækket til barnesædet
tilbage, så skridtremmen bliver synlig. Før selen gennem det låselige
selespænde og åbningen til sædeskallen (dias 3f) videre til den øverste del
af sædet, bag skridtremmen (indsat) og ned gennem åbningen på den anden
side af barnesædet.
3g
3h
Åbn låseklappen, før sikkerhedsselen under låseklappen, og fastgør beslaget i
spændet (dias 3g).
3i
Træk alt slæk i sikkerhedsselen
gennem barnesædet, og kontroller, at
sikkerhedsselen ikke er snoet (dia 3h).
Når selen er så stram som muligt, skal
du lukke låseklapperne på BEGGE sider
af sædet og kontrollere, at de klikker på
plads.
Hvis spændet sidder forkert, hvilket er
markeret med et
, og sikkerhedsselen
ikke kan strammes korrekt (dias 3i), kan
du prøve med en anden placering i bilen.
3j
Fastgør til sidst seleremmene ved at trække de løse ender nedad (dias 3j),
indtil støttefoden rammer gulvet. Støttefoden skal stå på et fast gulv – ikke på
låg fra opbevaringsbokse eller lignende.
Når sædet er blevet strammet godt fast, skal du afprøve det ved at forsøge
at bevæge det frem og tilbage og fra side til side. Hvis det er løst, skal du
montere det igen, indtil det sidder godt fast.
Barnesædet MÅ IKKE hvile mod førersædet eller passagerforsædet.
Page 22

4. Montering af barnesædet (bagudvendt brug) på forsædet
VIGTIGT - Barnesædet er udviklet med henblik på sikker brug uden yderligere ekstern sele.
4a
VIGTIGT – Barnesædet SKAL monteres med en trepunktssikkerhedssele.
Barnesædet har et justerbart støtteben (dias 4a). Jo mindre barnet er, jo mere
tilbagelænet skal sædet være. Jo større barnet er, jo mere opretstående skal
sædet være.
4b
Hvis positionen skal ændres, skal du trække støttebensholderne fri på begge
sider og skubbe teleskopbenene ind eller ud (dias 4b). Når støttebenet står
rigtigt, skal holderne sættes fast i åbningerne igen (indsat). Kontroller, at der
bruges de samme åbningshuller på begge sider.
Skub bilens forsæde tilbage for at gøre plads til barnesædet, og kontroller, at
der er plads til, at der kan sidde en passager behageligt lige bagved. Jo større
barnet er, jo mere oprejst skal sidestillingen være.
4c
Anbring barnesædet med bagsiden fremad, og pres det hårdt ind i bilsædet
(dias 4c).
VIGTIGT - Bagsiden af barnesædet MÅ IKKE hvile mod instrumentpanelet eller
tæt på forruden.
Træk støttefoden helt ud, og kontroller, at holderne til støttefodsselen vender
fremad, og at selerne ikke er snoet. Sænk støttefoden, og juster højden, så
den er ca. 30 mm fra gulvet (dias 4c). Brug linealen bag på manualen til at
nde den rigtige afstand fra støttefoden til gulvet.
4d
4e
Før seleremmene med løkker mellem
det forreste bilsæde og tilbage
som
vist (dia 4d). Før seleremmene med
spænder hele vejen rundt om bilsædet,
og før dem gennem løkkerne
3
Før spænderne under sædet. Fastgør
spænderne på seleremmene på
holderne på siden af barnesædet
2
.
3
.
Spænd seleremmene midlertidigt ved
at trække de løse ender nedad
4
2
4
.
Page 23

0-25kg
4f
Hvis bilen er udstyret med et beslag på glideskinnerne, kan disse også bruges.
VIGTIGT - Monter ikke seleremmene med bagagestropperne.
4g
Frigør tilstrækkeligt af trepunktsselen (ca. 600-900 mm). Åbn låseklappen på
den modsatte side af sikkerhedsselespændet. Træk betrækket til barnesædet
tilbage, så skridtremmen bliver synlig. Før selen gennem det låselige
selespænde og åbningen til sædeskallen (dias 2g), videre op til den øverste
del af sædet, bag skridtremmen (indsat) og ned gennem åbningen på den
anden side af barnesædet.
Åbn låseklappen, før sikkerhedsselen under låseklappen, og fastgør beslaget
i spændet (dias 4h).
4h
4i
Træk alt slæk i sikkerhedsselen
gennem barnesædet, og kontroller, at
sikkerhedsselen ikke er snoet (dia 4i). Når
selen er så stram som muligt, skal du lukke
låseklapperne på BEGGE sider af sædet og
kontrollere, at de klikker på plads.
Hvis spændet sidder forkert, hvilket er
markeret med et
ikke kan strammes korrekt (dias 4j), kan
, og sikkerhedsselen
du prøve med en anden placering i bilen.
Fastgør til sidst seleremmene ved at trække
de løse ender nedad (dias 4k), indtil
4j
4k
støttefoden rammer gulvet. Støttefoden
skal stå på et fast gulv – ikke på låg fra
opbevaringsbokse eller lignende.
Når sædet er blevet strammet godt fast,
skal du afprøve det ved at forsøge at
bevæge det frem og tilbage og fra side til
side. Hvis det er løst, skal du montere det
igen, indtil det sidder godt fast.
Bagsiden af barnesædet MÅ IKKE hvile
mod instrumentpanelet eller tæt på
forruden.
Page 24

FIN
Tärkeää!
0–25 kg, ryhmä 0–2 (noin 0–7-vuotiaat)
Näitä ohjeita on seurattava tarkasti. Jos istuinta ei
asenneta kunnolla, eikä hihnoja kiinnitetä oikein, lapsi
ja muut matkustajat ovat vaarassa onnettomuuden
sattuessa.
Lue tämä käyttöohje huolellisesti ENNEN
turvaistuimen asentamista.
Standardeja myöntävä Hampshire Trading
Standards Authority sekä Britax suosittelevat,
että turvaistuimia ei osteta tai myydä
käytettynä. Hävitä turvaistuin asianmukaisesti.
Älä myy tai välitä sitä toiselle henkilölle.
Turvaistuin ja turvavyöt on vaihdettava
onnettomuuden jälkeen. Vaikka turvaistuin ja
vyöt saattavat näyttää vahingoittumattomilta,
ne eivät ehkä suojaa lasta riittävästi seuraavan
onnettomuuden aikana.
Turvaistuin ei ole pakovarma
Valjaat eivät voi olla täysin pakovarmoja
Yhdistyneiden Kansakuntien Euroopan
talouskomission standardin 44 vaatimusten
mukaisesti. Valjaat on aina kiinnitettävä ja
säädettävä oikein, minkä lisäksi lapsia on
kehotettava käyttämään valjaita.
Turvaistuimen huoltaminen
Valjaiden lukon sisään saattaa kulkeutua
ruokaa tai juomaa. Tämä voi aiheuttaa sen,
että lukko ei toimi asianmukaisesti. Lukon
kieli ei napsahda kiinni lukkopesässä. Pesu
lämpimällä vedellä (kuvat A ja B).
Päällisen puhdistaminen
Lue päälliseen merkityt pesuohjeet.
ÄLÄ linkoa. Ripusta kuivumaan.
Valjaiden ja rungon puhdistaminen
VAIN käsinpesu. Käytä käsisaippuaa ja
lämmintä vettä.
ÄLÄ irrota valjaiden tai istuimen osia
puhdistuksen aikana.
ÄLÄ käytä liuottimia, puhdistusaineita tai
pesuaineita, sillä nämä aineet saattavat
heikentää valjaita tai istuinta.
ÄLÄ öljyä istuimen osia.
Päällisen irrottaminen ja kiinnittäminen
Pidä valjaiden vapautuspainiketta, aseta
kätesi rintakehän pehmusteiden alle (kuva
1a) ja vedä KUMPAAKIN olkahihnaa
mahdollisimman eteen.
Vedä solki istuimen takaa ja irrota molemmat
olkahihnat (kuva 1c).
Irrota päällinen ja vedä hihnat istuimen
etupuolelle ohjekuvassa (kuva 1d) esitetyllä
tavalla. Avaa lukko ja irrota istuinpehmuste
avaamalla koukku ja silmukka. Liu’uta
rintakehän pehmusteet irti olkahihnoista.
Irrota päällinen varovasti. Vie olkahihnat
sekä valjaiden lukko ja säätöhihna päällisen
aukkojen läpi.
Page 25

0-25kg
Kiinnitä päällinen ohjekuvassa esitetyllä tavalla
(kuva 1d).
Varmista, että hihnat eivät ole kiertyneet.
TÄRKEÄÄ! Päällinen ja rintakehän
pehmusteet ovat suojavarusteita. ÄLÄ
koskaan käytä turvaistuinta ilman niitä.
Muiden valmistajien päällisten käyttäminen
tässä turvaistuimessa saattaa heikentää
turvaistuimen turvallisuutta.
Varapäällinen on saatavilla Britaxjälleenmyyjältä. Voit myös ottaa yhteyden
Britaxin asiakaspalveluun numerossa
+46 8564 841 00.
Takuu
Kaikki Britax-tuotteet on suunniteltu,
valmistettu ja testattu huolellisesti. Jos
tuotteessa tästä huolimatta ilmenee materiaalitai valmistusvirhe 24 kuukauden kuluessa
ostopäivästä, palauta tuote ostopaikkaan.
Tällöin voimme harkintamme mukaan joko
korjata tuotteen veloituksetta tai korvata sen
uudella tai vastaavalla tuotteella.
Varaudu esittämään kuitti palautuksen
yhteydessä. Suosittelemme, että kiinnität
kuitin tuotteen käyttöohjeeseen, jota säilytät
turvaistuimessa.
Britax ei ole vastuussa vahingoista, jotka
aiheutuvat väärinkäytöstä tai laiminlyönnistä.
Tuotetakuuta ei voi siirtää, joten sitä ei voi
soveltaa käytetyissä tuotteissa.
Takuu ei vaikuta lakisääteisiin oikeuksiisi.
Lisätietoja
Kaikki istuimet eivät sovi kaikkiin autoihin.
Lisätietoja turvaistuimen sopivuudesta saat
käyttämällä Web-sivustomme -palvelua
osoitteessa www.britax.co.uk, soittamalla
asiakaspalvelun numeroon
+46 8564 841 00
A
B
Page 26

Varoitus
0–25 kg, ryhmä 0–2 (noin 0–7-vuotiaat)
ERITTÄIN TÄRKEÄÄ!
ÄLÄ kiinnitä turvaistuinta siten, että lapsen selkä
on ajosuuntaa kohti, jos auton istuin on varustettu
turvatyynyllä.
DO NOT ÄLÄ kiinnitä turvaistuinta siten, että se on
ajosuuntaa kohti, ellei auton valmistaja takaa käytön
turvallisuutta.
ÄLÄ kiinnitä turvaistuinta istuimeen, joka on selkä
ajosuuntaa kohti tai sivuttain.
ÄLÄ kohota turvaistuinta esimerkiksi tyynyn tai takin
avulla. Turvaistuin ja turvavyö eivät tällöin suojaa lasta
riittävän hyvin onnettomuustilanteessa.
ÄLÄ käytä turvaistuinta kotona. Turvaistuin ei sovellu
kotikäyttöön. Käytä turvaistuinta vain autossa.
ÄLÄ tee auton turvavöiden toimintaan vaikuttavia
muutoksia tai pura turvaistuinta osiin tai muokkaa tai
lisää siihen tai valjaisiin osia. Takuu ei ole voimassa,
mikäli teet muutoksia. Turvaistuinta EI saa muokata
kukaan muu kuin istuimen valmistaja.
ÄLÄ koskaan jätä lapsia yksin autoon.
ÄLÄ jätä lasta turvaistuimeen yksin edes lyhyeksi aikaa
ÄLÄ jätä auton takaosaan irrallisia esineitä, kuten
matkatavaroita tai kirjoja. Irralliset esineet on säilytettävä
turvallisessa paikassa ajon aikana, sillä muuten ne
voivat esimerkiksi äkkijarrutuksen aikana aiheuttaa
vakavia vammoja. Suurikokoiset irralliset esineet ovat
erityisen vaarallisia.
ÄLÄ jätä kääntyviä istuimia lukitsemattomaan
asentoon. Äkkijarrutuksen aikana lukitsematon istuin voi
vahingoittaa lasta.
ÄLÄ anna lasten leikkiä turvaistuimella tai muokata sen
säätöjä.
SÄILYTÄ tämä käyttöohje sille osoitetussa
säilytyspaikassa.
PEITÄ turvaistuin, mikäli pysäköityyn autoon kohdistuu
suora auringonpaiste. Turvaistuimen osat voivat
kuumentua suorassa auringonpaisteessa, minkä lisäksi
päällinen voi haalistua.
VARMISTA, että turvaistuin ei voi jäädä istuimen tai
oven väliin.
VARMISTA, että säädät valjaat lapsesi vaatteiden
mukaan ennen jokaista matkaa.
Talvivaatteiden mukaiset säädöt voivat olla liian löysät
kesävaatteisiin puetulle lapselle.
SÄILYTÄ turvaistuin turvallisessa paikassa. Älä aseta
turvaistuimen päälle painavia esineitä tai säilytä sitä
esimerkiksi lämpölähteiden läheisyydessä tai suorassa
auringonpaisteessa.
KÄYTÄ turvaistuinta aina turvallisesti.
VARMISTA, että kaikkien matkustajien turvavyöt on
kiinnitetty.
Uusien turvaistuinten tuotannossa on pyritty
huomioimaan se, että turvaistuin on kosketuksessa
auton istuimen kanssa, mutta Britax ei ole vastuussa
ajoneuvon istuimille tai turvavöille aiheutuneista
vahingoista.
TÄRKEÄÄ! Turvaistuinta saa käyttää VAIN lantiovyön
tai lantio- ja poikittaisvyön kanssa, kun ne ovat
Yhdistyneiden Kansakuntien Euroopan talouskomission
säännön 16 tai vastaavan standardin mukaisia.
Poikittaisvyö
Lantiovyö
Lantiovyö
Page 27

Uuden turvaistuimen esittely
0–25 kg, ryhmä 0–2 (noin 0–7-vuotiaat)
11
10
0-25kg
1. Istuimen päällinen
1
2. Olkapehmusteet
3. Valjaiden hihnat
4. Valjaiden lukko
5. Istuinpehmuste
6. Valjaiden säätöpainike
2
3
4
5
7. Valjaiden säätöhihna
8. Tukijalka
9. Tukijalan kiinnitin
10. Lukitusvarsi
11. Vyön ohjainaukko
6
7
8
9
12
12. Ylähihnat
13. Ylähihnan soljet
13
14. Takatukijalan ylähihna
15. Takatukijalan vapautusnuppi
16. Olkahihnan aukko
17. Käyttöohjeen säilytyspaikka (ei näkyvissä)
18. Kiinnityssolki (piilossa)
19. Takatukijalka
16
17
18
14
15
19
Page 28

1. Turvaistuimen säätäminen kasvavan lapsen painon mukaiseksi
TÄRKEÄÄ! - Tämä turvaistuin on suunniteltu siten, että se on turvallinen ilman muuta ulkoista kiinnitystä.
1a
1b
0-25kg
1c
Valjaiden säätäminen
Pidä valjaiden vapautuspainiketta, aseta kätesi rintakehän pehmusteiden alle
(kuva 1a) ja vedä MOLEMMAT olkahihnat mahdollisimman eteen.
Avaa lukko painamalla valjaiden lukon punaista painiketta. Kiinnitä valjaat
lapsen ympärille. Sulje valjaiden lukko sovittamalla ensin valjaiden yläosat
yhteen (sisäkuva), ja työntämällä ne sitten kiinni alaosaan, kunnes kuulet
napsahduksen. Kiristä lapsen lantion yli kulkeva vyö vetämällä valjaiden
hihnoja varovasti ylöspäin. Kiristä valjaat sopivan NAPAKASTI vetämällä
säätöhihnaa eteenpäin. Varmista, että hihnat eivät ole kiertyneet.
TÄRKEÄÄ! Olkahihnojen korkeus on säädettävä lapselle sopivaksi ENNEN
turvaistuimen asennusta. Rintakehän pehmusteiden on ulotuttava lapsen
olkapäiden tasolle ohjekuvassa esitetyllä tavalla (kuva 1b).
Olkahihnat TÄYTYY pujottaa päällisen ja istuimen aukkojen läpi lapsen
olkapäiden tasolle Älä kiinnitä olkahihnoja liian ylös (kuva 1b).
Lapsi voi käyttää istuinta, kunnes istuimen yläosa on hänen silmiensä tasalla.
Olkahihnojen korkeuden säätäminen
Löysennä valjaita painamalla valjaiden vapautuspainiketta, asettamalla
kätesi rintakehän pehmusteiden alle (kuva 1a) ja vetämällä MOLEMMAT
olkahihnat mahdollisimman eteen. Ota esiin turvavyön suojuksen takana oleva
kiinnityssolki ja avaa toinen olkahihna (kuva 1c). Nosta päällistä niin, että näet
rungossa olevat aukot. Pujota hihna turvaistuimen etupuolelle.
1d
Pujota olkahihna valitun aukon läpi ja kiinnitä olkahihna solkeen (kuva 1d).
Toimi samoin toisen olkahihnan kanssa.
Varmista, että hihnat eivät ole kiertyneet.
Page 29

1.
2.
1.
2.
0-25kg
1e
Käännä metallinen hihnasäädin (kuva 1e) ja työnnä se päällisen aukon läpi
istuimen rungon alle. Varmista, että hihnasäädin on sellaisessa asennossa,
että sitä ei voi vahingossa vetää takaisin rungon läpi. Tarkista lukon kiinnitys.
1f
Alahihnan säätäminen
TÄRKEÄÄ! - Valjaiden lukon on
aina oltava mahdollisimman alhaalla.
Alahihnan pituus on sovitettava
lapselle ENNEN turvaistuimen
asentamista autoon, koska sitä ei voi
säätää autossa.
Alahihnan säädin on turvaistuimen
etureunan alla. Muuta alahihnan
pituutta pujottamalla sitä säätimen
läpi nuolien osoittamiin suuntiin
(kuva 1f).
– Alahihnan lyhentäminen
– Alahihnan pidentäminen
a. Alahihnaa saa pidentää vain, jos
valjaiden tavallinen säätäminen ei
riitä ja olkahihnojen koko pituus on
jo käytössä.
b. Lyhennä alahihnaa aina, kun
turvaistuinta käyttää pienempi
lapsi.
c. ÄLÄ irrota alahihnaa säätimestä.
Säätäminen tehdään syöttämällä
alahihnaa säätimen läpi (kuva 1f).
Paina valjaiden säätösolkea toisella
kädellä. Löysää valjaita vetämällä
toisella kädellä olkahihnoja
mahdollisimman eteen.
Page 30

2. Turvaistuimen asentaminen (selkä menosuuntaan) takapenkin sivuistuimelle
TÄRKEÄÄ! - Tämä turvaistuin on suunniteltu siten, että se on turvallinen ilman muuta ulkoista kiinnitystä.
2a
TÄRKEÄÄ! - Turvaistuinta saa käyttää VAIN yhdessä lantio- ja poikittaisvyön
kanssa.
Turvaistuimessa on säädettävä tukijalka (kuva 2a). Mitä pienempi lapsi, sitä
kallistetummassa asennossa istuimen on oltava.
2b
Mitä kookkaampi lapsi, sitä pystymmässä asennossa istuimen on oltava.
Muuta asentoa (jos tarpeen) irrottamalla tukijalan kiinnikkeet molemmilta
puolilta ja pidentämällä tai lyhentämällä säädettävää jalkaa (kuva 2b).
Kun tukijalka on säädetty sopivaksi, aseta kiinnikkeet takaisin aukkoihinsa
(sisäkuva). Varmista, että toisiaan vastaavat aukot on valittu molemmin
puolin.
2c
Aseta turvaistuin autoon siten, että istuimeen asetettu lapsi on selkä
ajosuuntaa kohti. Asennuksen jälkeen etupenkin ja turvaistuimen välisen tilan
on oltava vähintään 10 mm. Turvaistuin EI saa koskettaa etupenkkiä. Jos
näin on, säädä etupenkkiä. Varmista kuitenkin, että kuljettaja tai matkustaja ei
joudu istumaan epämukavassa asennossa. Tai kokeile asentaa turvaistuin eri
paikkaan autossa (kuva 2c).
Vedä takatukijalka ulos ja varmista, että jalkatuen ylähihnan kiinnittimet
osoittavan eteenpäin ja että hihnat eivät ole kiertyneet. Laske takatukijalkaa
ja säädä sen korkeutta niin, että se on noin 30 mm lattiasta (kuva 2c). Mittaa
jalkatuen ja lattian välinen etäisyys tämän ohjeen takakannessa olevalla
mitalla.
2d
2e
Vedä ylähihnojen lenkilliset päät
etuistuimen selkänojan ja penkin välistä
ohjekuvassa esitetyllä tavalla (kuva
2d ja
kuva 2e). Vedä ylähihnojen
soljelliset päät etupenkin ympäri
. Voit
4
.
2
.
3
2
4
ulkokautta ja työnnä ne lenkkeihin
Kiinnitä ylähihnojen soljet turvaistuimen
kyljissä oleviin lukkoihin
3
kiristää ylähihnoja tilapäisesti vetämällä
irrallisista päistä alaspäin
Page 31

0-25kg
2f
Jos autosi istuimen kiskoissa on lenkit, myös niitä voi käyttää kiinnittämiseen
(kuva 2f).
TÄRKEÄÄ! Älä kiinnitä ylähihnoja matkatavaralenkkeihin.
2g
Vedä lantio- ja poikittaisvyötä sopivasti esille (noin 600–900 mm). Avaa
istuimen vyönsoljen vastakkaisella puolella oleva lukitusvarsi. Vedä
turvaistuimen päällistä niin, että alahihna tulee näkyviin. Vedä vyö lukitusvyön
ohjaimen ja istuimen rungossa olevan aukon läpi (kuva 2g) istuimen jalustan
etupuolelle, alahihnan taitse (sisäkuva) ja istuimen toisessa kyljessä olevan
aukon läpi.
Avaa toinen lukitusvarsi, vedä turvavyö lukitusvarren alta ja kiinnitä lukko
(kuva 2h).
2h
2i
Vedä turvavyö turvaistuimen läpi
kokonaan ja varmista, että turvavyö ei
ole kiertynyt (kuva 2i). Kun turvavyö
on mahdollisimman tiukassa, sulje
lukitusvarret istuimen KUMMALLAKIN
puolella niin, että kuulet napsahduksen.
Jos lukko jää kuvan osoittamaan väärään
asentoon
, eikä turvavyötä voi kiristää
kunnolla (kuva 2j), aseta istuin johonkin
muuhun paikkaan autossa.
Kiristä ylähihnat lopuksi vetämällä
löysiä päitä alaspäin (kuva 2k),
2j
2k
kunnes takatukijalka koskettaa lattiaa.
Takatukijalan on oltava vasten tasaista
lattiaa, ei laatikoita tai vastaavia.
Kun turvaistuin on kunnolla kiinnitetty,
kokeile liikuttaa sitä sivusuunnassa ja
eteen- ja taaksepäin. Jos kiinnitys tuntuu
liian löysältä, asenna istuin uudestaan
kunnollisesti.
ÄLÄ aseta turvaistuimen selkää
kuljettajan tai matkustajan istuinta vasten.
Page 32

3. Turvaistuimen asentaminen (selkä menosuuntaan) takapenkin keski-istuimelle
TÄRKEÄÄ! - Tämä turvaistuin on suunniteltu siten, että se on turvallinen ilman muuta ulkoista kiinnitystä.
3a
TÄRKEÄÄ! Turvaistuinta saa käyttää VAIN lantiovyön tai lantio- ja
poikittaisvyön kanssa.
Turvaistuimessa on säädettävä tukijalka (kuva 3a). Mitä pienempi lapsi,
sitä kallistetummassa asennossa istuimen on oltava. Mitä kookkaampi
lapsi, sitä pystymmässä asennossa istuimen on oltava. Muuta asentoa (jos
tarpeen) irrottamalla tukijalan kiinnikkeet molemmilta puolilta ja pidentämällä
tai lyhentämällä säädettävää jalkaa (kuva 3a). Kun tukijalka on säädetty
sopivaksi, aseta kiinnikkeet takaisin aukkoihinsa (sisäkuva). Varmista, että
toisiaan vastaavat aukot on valittu molemmin puolin.
3b
Aseta turvaistuin selkä menosuuntaan siten, että istuimen selkä on kuljettajan
ja matkustajan istuinten välissä.
Vedä takatukijalka ulos ja varmista, että jalkatuen ylähihnan kiinnittimet
osoittavan eteenpäin ja että hihnat eivät ole kiertyneet. Laske takatukijalkaa
ja säädä sen korkeutta niin, että se on noin 30 mm lattiasta (kuva 3b). Mittaa
jalkatuen ja lattian välinen etäisyys tämän ohjeen takakannessa olevalla
mitalla.
3c
3d
Kierrä ylähihna sekä kuljettajan
että matkustajan istuimen ympäri
ohjekuvassa esitetyllä tavalla
(kuva 3c).
Jos autosi istuimen kiskoissa on lenkit,
myös niitä voi käyttää kiinnittämiseen
(kuva 3d).
TÄRKEÄÄ! Älä kiinnitä ylähihnoja
matkatavaralenkkeihin.
3e
Vedä ylähihnojen lenkilliset päät etuistuimen selkänojan ja penkin välistä
ohjekuvassa esitetyllä tavalla (kuva 3e). Vedä ylähihnojen soljelliset päät
etupenkin ympäri ulkokautta ja työnnä ne lenkkeihin
soljet turvaistuimen kyljissä oleviin lukkoihin
tilapäisesti vetämällä irrallisista päistä alaspäin
3
2
4
2
. Kiinnitä ylähihnojen
. Voit kiristää ylähihnoja
3
.
4
Page 33

0-25kg
3f
Vedä lantio- ja poikittaisvyötä sopivasti esille (noin 600–900 mm). Avaa
istuimen vyönsoljen vastakkaisella puolella oleva lukitusvarsi. Vedä
turvaistuimen päällistä niin, että alahihna tulee näkyviin. Vedä vyö lukitusvyön
ohjaimen ja istuimen rungossa olevan aukon läpi (kuva 3f) istuimen jalustan
etupuolelle, alahihnan taitse (sisäkuva) ja istuimen toisessa kyljessä olevan
aukon läpi.
3g
3h
Avaa toinen lukitusvarsi, vedä turvavyö lukitusvarren alta ja kiinnitä lukko
(kuva 3g).
3i
Vedä turvavyö turvaistuimen läpi
kokonaan ja varmista, että turvavyö ei
ole kiertynyt (kuva 3h). Kun turvavyö
on mahdollisimman tiukassa, sulje
lukitusvarret istuimen KUMMALLAKIN
puolella niin, että kuulet napsahduksen.
Jos lukko jää kuvan osoittamaan
väärään asentoon
voi kiristää kunnolla (kuva 3i), aseta
, eikä turvavyötä
istuin johonkin muuhun paikkaan
autossa.
3j
Kiristä ylähihnat lopuksi vetämällä löysiä päitä alaspäin (kuva 3j), kunnes
takatukijalka koskettaa lattiaa. Takatukijalan on oltava vasten tasaista lattiaa,
ei laatikoita tai vastaavia.
Kun turvaistuin on kunnolla kiinnitetty, kokeile liikuttaa sitä sivusuunnassa
ja eteen- ja taaksepäin. Jos kiinnitys tuntuu liian löysältä, asenna istuin
uudestaan kunnollisesti.
ÄLÄ aseta turvaistuimen selkää kuljettajan tai matkustajan istuinta vasten.
Page 34

4. Turvaistuimen asentaminen (selkä menosuuntaan) etupenkille
TÄRKEÄÄ! - Tämä turvaistuin on suunniteltu siten, että se on turvallinen ilman muuta ulkoista kiinnitystä.
4a
TÄRKEÄÄ! Turvaistuinta saa käyttää VAIN yhdessä lantio- ja poikittaisvyön
kanssa.
Turvaistuimessa on säädettävä tukijalka (kuva 4a). Mitä pienempi lapsi, sitä
kallistetummassa asennossa istuimen on oltava. Mitä kookkaampi lapsi, sitä
pystymmässä asennossa istuimen on oltava.
4b
Muuta asentoa (jos tarpeen) irrottamalla tukijalan kiinnikkeet molemmilta
puolilta ja pidentämällä tai lyhentämällä säädettävää jalkaa (kuva 4b).
Kun tukijalka on säädetty sopivaksi, aseta kiinnikkeet takaisin aukkoihinsa
(sisäkuva). Varmista, että toisiaan vastaavat aukot on valittu molemmin
puolin.
Työnnä auton etupenkkiä taaksepäin niin, että sekä turvaistuimelle että
takapenkillä istuvalle matkustajalle jää riittävästi tilaa. Mitä kookkaampi lapsi,
sitä pystympi istuimen asennon on oltava.
4c
Aseta turvaistuin selkä menosuuntaan ja työnnä se kunnolla auton istuimeen
(kuva 4c).
TÄRKEÄÄ! ÄLÄ aseta turvaistuimen selkää kojelautaa vasten tai lähelle
tuulilasia.
Vedä takatukijalka ulos ja varmista, että jalkatuen ylähihnan kiinnittimet
osoittavan eteenpäin ja että hihnat eivät ole kiertyneet. Laske takatukijalkaa
ja säädä sen korkeutta niin, että se on noin 30 mm lattiasta (kuva 4c). Mittaa
jalkatuen ja lattian välinen etäisyys tämän ohjeen takakannessa olevalla
mitalla.
4d
4e
Vedä ylähihnojen lenkilliset päät
etuistuimen selkänojan ja penkin välistä
ohjekuvassa esitetyllä tavalla
(kuva 4d). Vedä ylähihnojen soljelliset
päät etupenkin ympäri ulkokautta
3
ja työnnä ne lenkkeihin
soljelliset päät istuimen alle. Kiinnitä
2
. Liu’uta
ylähihnojen soljet turvaistuimen kyljissä
oleviin lukkoihin
ylähihnoja tilapäisesti vetämällä
4
2
irrallisista päistä alaspäin
3
. Voit kiristää
4
.
Page 35

0-25kg
4f
Jos autosi istuimen kiskoissa on lenkit, myös niitä voi käyttää kiinnittämiseen.
TÄRKEÄÄ! Älä kiinnitä ylähihnoja matkatavaralenkkeihin.
4g
Vedä lantio- ja poikittaisvyötä sopivasti esille (noin 600–900 mm). Avaa
istuimen vyönsoljen vastakkaisella puolella oleva lukitusvarsi. Vedä
turvaistuimen päällistä niin, että alahihna tulee näkyviin. Vedä vyö lukitusvyön
ohjaimen ja istuimen rungossa olevan aukon läpi (kuva 2g) istuimen jalustan
etupuolelle, alahihnan taitse (sisäkuva) ja istuimen toisessa kyljessä olevan
aukon läpi.
Avaa toinen lukitusvarsi, vedä turvavyö lukitusvarren alta ja kiinnitä lukko
(kuva 4h).
4h
4i
Vedä turvavyö turvaistuimen läpi
kokonaan ja varmista, että turvavyö ei
ole kiertynyt (kuva 4i). Kun turvavyö
on mahdollisimman tiukassa, sulje
lukitusvarret istuimen KUMMALLAKIN
puolella niin, että kuulet napsahduksen.
Jos lukko jää kuvan osoittamaan väärään
asentoon
, eikä turvavyötä voi kiristää
kunnolla (kuva 4j), aseta istuin johonkin
muuhun paikkaan autossa.
Kiristä ylähihnat lopuksi vetämällä
löysiä päitä alaspäin (kuva 4k),
4j
4k
kunnes takatukijalka koskettaa lattiaa.
Takatukijalan on oltava vasten tasaista
lattiaa, ei laatikoita tai vastaavia.
Kun turvaistuin on kunnolla kiinnitetty,
kokeile liikuttaa sitä sivusuunnassa ja
eteen- ja taaksepäin. Jos kiinnitys tuntuu
liian löysältä, asenna istuin uudestaan
kunnollisesti.
ÄLÄ aseta turvaistuimen selkää
kojelautaa vasten tai lähelle tuulilasia.
Page 36

N
Viktig!
0–25 kg, gruppe 0–2 (omtrentlig alder: 0–7 år)
Sørg for at du følger disse instruksjonene nøye. Hvis dette
setet ikke er skikkelig montert og barnet ikke er festet på
riktig måte, er det en stor risiko for at barnet og andre
passasjerer vil bli skadd hvis det skjer en ulykke.
Les denne brukerhåndboken nøye FØR du
forsøker å montere barnesetet.
Hampshire Trading Standards Authority
og Britax fraråder kjøp og salg av brukte
barneseter. Avhend barnesetet på en sikker
måte. Ikke selg eller gi det videre.
Barnesetet og sikkerhetsbeltene bør skiftes
etter en ulykke. Selv om de ser uskadde ut,
kan det hende at de ikke gir full beskyttelse
ved en eventuell ny ulykke.
Ingen barneseter er rømningssikre
Selesystemene kan ikke lages slik at de
er helt barnesikre og samtidig oppfyller de
juridiske kravene i den europeiske standarden
ECE R44. Kontroller at selen er riktig festet
og justert til enhver tid, og pass på at barnet
beholder selen på.
Ta vare på barnesetet
Det kan komme mat eller drikke inn i spennen
på barneseteselen. Dette kan føre til at den
ikke virker som den skal. Rengjør den i varmt
vann (g. A og B).
Rengjøre trekket
Les vaskeinstruksjonene på trekket.
IKKE kjør trekket i tørketrommelen – kjør det
på kort sentrifugering og heng det opp til tørk.
Rengjøre selen og setet
Vask BARE med klut – bruk håndsåpe og
varmt vann.
IKKE ta fra hverandre eller prøv å ta fra
hverandre deler av selen eller setet når du
rengjør dem.
IKKE bruk løsemidler, rengjøringsmidler eller
oppvaskmidler. Disse kan svekke selen og
setet.
IKKE påfør smøremidler eller olje på noen av
delene på setet.
Ta av og på trekket
Trykk inn spenneknappen mens du stikker
hånden under brystputene (g. 1a) og trekker
BEGGE skulderstroppene så langt fremover
som mulig.
Løft opp bøylen fra bak setet, og hekt av
begge skulderstroppene (g. 1c).
Dra trekket av toppen av setet, og bruk
fremgangsmåten som vises på neste side
(g. 1d), til å føre stroppene til fremsiden
av setet. Løsne spennen og fjern
beskyttelsesputen ved å løsne kroken. Skyv
brystputene av skulderstroppene. Dra trekket
forsiktig av setet, slik at skulderstroppene,
Page 37

0-25kg
selespennen og justeringsstroppen slipper
gjennom åpningene i trekket.
Hvis du vil ta på igjen trekket, bruker du
fremgangsmåten som vises på neste side
(g. 1d).
Kontroller at stroppene ikke er vridd.
VIKTIG – Trekket og brystputene har en
sikkerhetsfunksjon. IKKE bruk barnesetet uten
dem. Ikke utsett barnet for fare ved å bruke
andre typer trekk. Det kan føre til at barnet ikke
blir tilstrekkelig beskyttet.
Et nytt trekk kan skaffes fra Britaxforhandleren, eller du kan kontakte
kundeservice hos Britax på tlf.
+46 856 484 100.
Garanti
Alle Britax-produkter er nøye konstruert,
produsert og testet. Hvis det skulle oppstå feil
på dette produktet innen 24 måneder etter
kjøpet på grunn av en materiellfeil eller en
produksjonsfeil, kan du levere det inn ved det
opprinnelige kjøpsstedet. Vi vil da reparere det
gratis eller erstatte det med et identisk eller
tilsvarende produkt.
Kjøpsbevis er nødvendig ved bruk av
garantien. Vi anbefaler at du beholder
kvitteringen, fester den til brukerhåndboken og
oppbevarer den i setet.
Britax tar ikke ansvar for eventuell skade som
oppstår på grunn av misbruk, feilbruk eller
uaktsomhet.
Denne garantien er ikke overførbar og gjelder
derfor ikke brukte produkter.
Dine juridiske rettigheter påvirkes ikke av
denne garantien.
Hvis du har spørsmål
Ikke alle bilseter passer i alle biler. Hvis du vil
nne ut om setet passer til bilen, kan du bruke
webområdet vårt, www.britax.co.uk, ringe
kundeservice på +46 856 484 100
A
B
Page 38

Advarsel!
0–25 kg, gruppe 0–2 (omtrentlig alder: 0–7 år)
FARE!
IKKE bruk et bakovervendt barnesete på et
passasjersete med aktiv kollisjonspute.
IKKE bruk et forovervendt barnesete på et
passasjersete med aktiv kollisjonspute med mindre
bilprodusenten bekrefter at det er trygt.
IKKE bruk barnesetet i sidevendte eller bakovervendte
bilseter.
IKKE bruk ting som puter eller jakker til å heve
barnesetet. Dette kan føre til at barnet ikke blir ordentlig
beskyttet av setet eller sikkerhetsbeltene ved en ulykke.
IKKE bruk barnesetet i hjemmet. Det er ikke laget for
bruk i hjemmet og skal bare brukes i bilen.
IKKE demonter eller endre barnesetet, eller endre
måten selen eller sikkerhetsbeltene skal brukes på.
Den ofsielle godkjenningen er ikke lenger gyldig hvis
det foretas endringer. Bare produsenten kan foreta
endringer av barnesetet.
IKKE la barnet sitte alene i bilen, ikke en gang for en
kort stund.
IKKE la barnet sitte i babybæreren uten tilsyn, ikke en
gang for en kort stund.
Sørg for at det ikke ligger løse gjenstander, som
bagasje eller bøker, bak i bilen. Slike gjenstander må
sikres godt, ettersom de kan forårsake alvorlig skade
ved en plutselig stopp. Store og tunge løse gjenstander
utgjør en ekstra stor risiko.
IKKE la nedfellbare passasjerseter være usikret. Hvis
du plutselig må stoppe, kan et usikret sete skade barnet.
IKKE la barna leke med eller justere barnesetet.
Oppbevar denne brukerhåndboken i
oppbevaringslommen.
Dekk til barnesetet hvis bilen parkeres i direkte sollys.
Delene kan bli for varme i solen, og trekket kan falme.
Kontroller at barnesetet ikke blir sittende fast under et
nedfellbart passasjersete eller i bildøren.
Juster selen slik at den passer klærne barnet har på
seg, før hver kjøretur – en tilpasning for vinterklær kan
være for løs for sommerklær.
Oppbevar barnesetet på et sikkert sted når det
ikke er i bruk. Unngå å plassere tunge gjenstander
oppå barnesetet, og oppbevar det ikke nær direkte
varmekilder eller i direkte sollys.
Sørg alltid for at barnesetet er sikret, også når det ikke
brukes av barnet.
Sørg for at alle passasjerene har på seg
sikkerhetsbelte.
Selv om det tas hensyn til kontakt mellom barneseter
og bilseter under utviklingen av nye produkter, kan ikke
Britax ta ansvar for eventuelle skader på bilseter eller
sikkerhetsbelter.
VIKTIG – Barnesetet må BARE brukes med hofte- eller
et hofte- og diagonalbelte (i samsvar med
UN/ECE-forskrift nr. 16 eller andre tilsvarende
standarder).
Diagonal
Hofte
Hofte
Page 39

Bli kjent med det nye barnesetet
0–25 kg, gruppe 0–2 (omtrentlig alder: 0–7 år)
11
10
0-25kg
1. Setetrekk
1
2. Skulderputer
3. Selestropper
4. Selespenne
5. Beskyttelsespute
6. Knapp for selejustering
2
3
4
5
7. Justeringsrem for sele
8. Støtteben
9. Klemme for støtteben
10. Låsearm
11. Spor for beltemontering
6
7
8
9
12
12. Festestropper
13. Spennetunge for festestropp
13
14. Feste for støttefot
15. Frigjøringsknapp for støttefot
16. Spor for skulderstropp
17. Oppbevaringslomme for brukerhåndbok (vises ikke)
18. Bøyle (skjult)
19. Støttefot
16
17
18
14
15
19
Page 40

1. Justere barnesetet slik at det passer vekten til barnet
VIKTIG - Dette barnesetet er utformet slik at det fungerer trygt og er uavhengig av ytterligere ekstern sikring.
1a
1b
0-25kg
1c
Justere selen
Trykk inn spenneknappen mens du stikker hendene under brystputene
(g. 1a) og trekker BEGGE skulderstroppene forover så langt som mulig.
Løsne spennen ved å trykke på den røde knappen på spennen. Fest selen
rundt barnet. Fest først de to øverste delene sammen for å feste spennen
(innsatt), og skyv dem deretter inn i den nederste delen til du hører et klikk.
Trekk selen forsiktig opp for å stramme hoftedelen. Trekk justeringsstroppen
fremover og kontroller at selen sitter komfortabelt, men TETT rundt barnet.
Kontroller at selestroppene ikke er vridd.
VIKTIG – Du må justere skulderstroppene til den riktige høyden for barnet
FØR du monterer barnesetet i bilen. Brystputene skal sitte høyt på skuldrene
til barnet, som vist (g. 1b).
Skulderstroppene MÅ tres gjennom åpningene i trekket og setet ved
overkanten av skuldrene til barnet. Hvis du er i tvil, bør du bruke åpningen
under skulderen i stedet for åpningen over skulderen (g. 1b).
Når de øverste åpningene er tatt i bruk, kan barnet fortsette å bruke setet til
øyelinjen er over toppen av setet.
Endre høyden på skulderstroppene
Du løsner selen ved å trykke inn seleknappen mens du stikker hånden under
brystputene (g.1a) og trekker BEGGE skulderstroppene forover så langt som
mulig. Løft opp bøylen fra bak setet, og hekt av den ene skulderstroppen
(g. 1c). Dra trekket av toppen av setet, slik at du kan se åpningene i setet.
Trekk skulderstroppen gjennom til fremsiden av setet.
1d
Før skulderstroppen gjennom den valgte åpningen, og hekt skulderstroppen
tilbake på bøylen (g. 1d). Gjenta prosedyren for den andre skulderstroppen
Kontroller at stroppene ikke er vridd.
Page 41

1.
2.
1.
2.
0-25kg
1e
Roter den synlige justeringsmekanismen for metallstroppen (g. 1e), og skyv
den gjennom åpningen i trekket og gjennom til undersiden av setet. Sørg for
at den er i horisontal stilling, slik at den ikke kan trekkes tilbake gjennom setet.
Trekk i spennen for å kontrollere at den er sikker, og at stroppjusteringen ikke
sklir tilbake.
1f
Justere skrittstroppen
VIKTIG - Spennen skal alltid
plasseres lavt på barnets kropp.
Du må justere skrittstroppen til riktig
lengde for barnet FØR du setter
barnesetet i bilen. Stroppen kan ikke
justeres i bilen.
a. Skrittstroppen bør bare forlenges
hvis vanlig selejustering ikke er
nok, dvs. hvis skulderstroppene er
maks. forlenget.
b. Still alltid stroppen tilbake til vanlig
lengde hvis setet brukes til et
mindre barn.
Trykk med én hånd på klaffen
for selejustering. Med den andre
hånden trekker du skulderstroppene
forover så langt som mulig, for å
løsne selen.
Du nner justeringsmekanismen
på enden av skrittstroppen
under fronten på barnesetet.
Hvis du vil endre lengden på
skrittstroppen, fører du den gjennom
justeringsmekanismen i pilens
retning (g. 1f).
– gjøre skrittstroppen kortere
– gjøre skrittstroppen lengre
c. IKKE forsøk å fjerne skrittstroppen
fra justeringen. Justeringer foretas
ved at du mater skrittstroppen
gjennom justeringsmekanismen
(g. 1f).
Page 42

2. Montere barnesetet (vendt bakover) i baksetet til siden
VIKTIG - Dette barnesetet er utformet slik at det fungerer trygt og er uavhengig av ytterligere ekstern sikring.
2a
VIKTIG – Barnesetet må BARE brukes med et hofte- og diagonalbelte.
Barnesetet har et justerbart støtteben (g. 2a). Jo mindre barnet er, jo mer
tilbakelent må setet være.
2b
Jo større barnet er, jo mer oppreist må setet være. Hvis du vil endre
posisjonen, trekker du støttebenklemmene av på hver side og skyver
teleskopbenet inn eller ut (g. 2b). Når du er fornøyd med posisjonen til
støttebenet, setter du klemmene på igjen i hullene (innsatt). Kontroller at
hullposisjonen som velges, er den samme på begge sider.
2c
Plasser barnesetet bakovervendt på bilsetet. Etter monteringen skal
mellomrommet mellom setet foran og barnesetet være minst 10 mm. Det skal
IKKE lenes mot bilsetet. Hvis det gjør det, skal du justere bilsetet foran uten
at sjåføren eller passasjeren sitter i en ukomfortabel stilling. Hvis dette ikke
fungerer, kan du prøve å feste setet et annet sted i bilen (g. 2c).
Trekk støttefoten helt ut, og kontroller at festebrakettene for støttefoten vender
forover, og at stroppene ikke er vridd. Senk støttefoten, og juster høyden slik at
den er ca. 30 mm fra gulvet (g. 2c). Bruk linjalen trykt på baksiden av denne
håndboken til å måle riktig avstand mellom støttefoten og gulvet.
2d
2e
Før løkkene på festestroppene mellom
forsetet og baksetet i bilen som vist
(g. 2d og
g. 2e). Før spennene
på festestroppene rundt utsiden av
bilsetet og inn gjennom løkkene
2
3
2
4
. Knepp spennene på festestroppene
sammen på tungene på sidene av
barnesetet
3
. Stram festestroppene
ved å trekke de løse endene
nedover
4
.
Page 43

0-25kg
2f
Hvis bilen er utstyrt med løkker på setetrekkene, kan disse brukes som et
alternativ (se 2f).
VIKTIG – Ikke monter festestroppene ved å bruke bagasjeløkkene.
2g
Trekk ut tilstrekkelig hofte- og diagonalbelte (ca. 600–900 mm). Åpne
låsearmen på motsatt side av sikkerhetsbeltespennen. Dra tilbake trekket på
barnesetet for å få frem skrittstroppen. Før beltet gjennom låsebeltesporet
og setesporet (g. 2g), opp til toppen av setesokkelen, bak skrittstroppen
(innsatt) og ned gjennom sporet på den andre siden av barnesetet.
Åpne den andre låsearmen, før sikkerhetsbeltet under låsearmen, og fest
tungen i spennen (g. 2h).
2h
2i
Trekk hele slakken på sikkerhetsbeltet
gjennom barnesetet for å sikre at
sikkerhetsbeltet ikke er vridd (g. 2i). Når
beltet er så stramt som mulig, lukker du
låsearmene på BEGGE sider av setet.
Du skal høre et klikk når de låses på plass.
Hvis spennen nå ligger i posisjonen
som er markert som feil med
sikkerhetsbeltet ikke kan strammes på
, og
riktig vis (g. 2j), bør du forsøke å plassere
barnesetet et annet sted i bilen.
Stram til slutt festestroppene ved å trekke
2j
2k
de løse endene nedover (g. 2k) helt til
støttefoten berører gulvet. Støttefoten
må hvile på et fast gulv – ikke lokk på
oppbevaringsesker eller lignende.
Når barnesetet er godt festet, kontrollerer
du at det sitter godt ved å prøve å bevege
det fram og tilbake og fra side til side. Hvis
det virker løst, må du montere det på nytt til
det sitter godt.
IKKE len baksiden av barnesetet mot fører-
eller passasjersetet.
Page 44

3. Montere barnesetet (vendt bakover) i baksetet i midten
VIKTIG - Dette barnesetet er utformet slik at det fungerer trygt og er uavhengig av ytterligere ekstern sikring.
3a
VIKTIG – Barnesetet kan brukes enten med et hofte- eller et hofte- og
diagonalbelte.
Barnesetet har et justerbart støtteben (g. 3a). Jo mindre barnet er, jo mer
tilbakelent må setet være. Jo større barnet er, jo mer oppreist må setet være.
Hvis du vil endre posisjonen, trekker du støttebenklemmene av på hver side og
skyver teleskopbenet inn eller ut (g. 3a). Når du er fornøyd med posisjonen
til støttebenet, setter du klemmene på igjen i hullene (innsatt). Kontroller at
hullposisjonen som velges, er den samme på begge sider.
3b
Plasser barnesetet slik at det vender bakover med ryggen på barnesetet
plassert midt mellom fører- og passasjersetet.
Trekk støttefoten helt ut, og kontroller at festebrakettene for støttefoten vender
forover, og at stroppene ikke er vridd. Senk støttefoten, og juster høyden slik at
den er ca. 30 mm fra gulvet (g. 3b). Bruk linjalen trykt på baksiden av denne
håndboken til å måle riktig avstand mellom støttefoten og gulvet.
3c
3d
Før en festestropp rundt både fører- og
passasjersetet som vist (g. 3c).
Hvis bilen er utstyrt med løkker på
setetrekkene, kan disse brukes som et
alternativ (se 3d).
VIKTIG – Ikke monter festestroppene
ved å bruke bagasjeløkkene.
3e
Før løkkene på festestroppene gjennom forsetet og baksetet som vist
(g. 3e). Før spennene på festestroppene rundt utsiden av bilsetet og inn
gjennom løkkene
tungene på sidene av barnesetet
løse endene nedover
3
2
4
2
. Knepp spennene på festestroppene sammen på
. Stram festestroppene ved å trekke de
.
4
3
Page 45

0-25kg
3f
Trekk ut tilstrekkelig hofte- og diagonalbelte (ca. 600–900 mm). Åpne
låsearmen på motsatt side av sikkerhetsbeltespennen. Dra tilbake trekket på
barnesetet for å få frem skrittstroppen. Før beltet gjennom låsebeltesporet og
setesporet (g. 3f), opp til toppen av setesokkelen, bak skrittstroppen (innsatt)
og ned gjennom sporet på den andre siden av barnesetet.
3g
3h
Åpne den andre låsearmen, før sikkerhetsbeltet under låsearmen, og fest
tungen i spennen (g. 3g).
3i
Trekk hele slakken på sikkerhetsbeltet
gjennom barnesetet for å sikre at
sikkerhetsbeltet ikke er vridd (g. 3h). Når
beltet er så stramt som mulig, lukker du
låsearmene på BEGGE sider av setet. Du
skal høre et klikk når de låses på plass.
Hvis spennen nå ligger i posisjonen
som er markert som feil med
sikkerhetsbeltet ikke kan strammes
, og
på riktig vis (g. 3i), bør du forsøke å
plassere barnesetet et annet sted i bilen.
3j
Stram til slutt festestroppene ved å trekke de løse endene nedover (g. 3j) helt
til støttefoten berører gulvet. Støttefoten må hvile på et fast gulv – ikke lokk på
oppbevaringsesker eller lignende.
Når barnesetet er godt festet, kontrollerer du at det sitter godt ved å prøve
å bevege det fram og tilbake og fra side til side. Hvis det virker løst, må du
montere det på nytt til det sitter godt.
IKKE len baksiden av barnesetet mot fører- eller passasjersetet.
Page 46

4. Montere barnesetet (vendt bakover) i forsetet
VIKTIG - Dette barnesetet er utformet slik at fungerer trygt og uavhengig av ytterligere ekstern sikring.
4a
VIKTIG – Barnesetet må BARE brukes med et hofte- og diagonalbelte.
Barnesetet har et justerbart støtteben (g. 4a). Jo mindre barnet er, jo mer
tilbakelent må setet være. Jo større barnet er, jo mer oppreist må setet være.
4b
Hvis du vil endre posisjonen, trekker du støttebenklemmene av på hver side
og skyver teleskopbenet inn eller ut (g. 4b). Når du er fornøyd med
posisjonen til støttebenet, setter du klemmene på igjen i hullene (innsatt).
Kontroller at hullposisjonen som velges, er den samme på begge sider.
Skyv forsetet i bilen bakover for å gjøre plass til barnesetet, og sørg for at
passasjerer i setet rett bak fremdeles kan sitte i en komfortabel stilling.
Jo større barnet er, jo mer oppreist bør sittestillingen være.
4c
Plasser setet vendt bakover, og skyv det godt inn mot bilsetet (g. 4c).
VIKTIG - IKKE len ryggen på barnesetet mot instrumentpanelet eller nær
frontruten.
Trekk støttefoten helt ut, og kontroller at festebrakettene for støttefoten vender
forover, og at stroppene ikke er vridd. Senk støttefoten, og juster høyden slik
at den er ca. 30 mm fra gulvet (g. 4c). Bruk linjalen trykt på baksiden av
denne håndboken til å måle riktig avstand mellom støttefoten og gulvet.
4d
4e
Før løkkene på festestroppene gjennom
forsetet og baksetet
som vist
(g. 4d). Før spennene på
festestroppene rundt utsiden av bilsetet
og inn gjennom løkkene
2
3
. Før spennene inn under setet.
Knepp spennene på festestroppene
sammen på tungene på sidene av
barnesetet
ved å trekke de løse endene
4
2
nedover
3
. Stram festestroppene
4
.
Page 47

0-25kg
4f
Hvis bilen er utstyrt med løkker på setetrekkene, kan disse brukes som et
alternativ.
VIKTIG – Ikke monter festestroppene ved å bruke bagasjeløkkene.
4g
Trekk ut tilstrekkelig hofte- og diagonalbelte (ca. 600–900 mm). Åpne
låsearmen på motsatt side av sikkerhetsbeltespennen. Dra tilbake trekket på
barnesetet for å få frem skrittstroppen. Før beltet gjennom låsebeltesporet
og setesporet (g. 4g), opp til toppen av setesokkelen, bak skrittstroppen
(innsatt) og ned gjennom sporet på den andre siden av barnesetet.
Åpne den andre låsearmen, før sikkerhetsbeltet under låsearmen, og fest
tungen i spennen (g. 4h).
4h
4i
Trekk hele slakken på sikkerhetsbeltet
gjennom barnesetet for å sikre at
sikkerhetsbeltet ikke er vridd (g. 4i). Når
beltet er så stramt som mulig, lukker du
låsearmene på BEGGE sider av setet. Du
skal høre et klikk når de låses på plass.
Hvis spennen nå ligger i posisjonen
som er markert som feil med
sikkerhetsbeltet ikke kan strammes
, og
på riktig vis (g. 4j), bør du forsøke å
plassere barnesetet et annet sted i bilen.
Stram til slutt festestroppene ved å trekke
4j
4k
de løse endene nedover (g. 4k) helt til
støttefoten berører gulvet. Støttefoten
må hvile på et fast gulv – ikke lokk på
oppbevaringsesker eller lignende.
Når barnesetet er godt festet, kontrollerer
du at det sitter godt ved å prøve å bevege
det fram og tilbake og fra side til side.
Hvis det virker løst, må du montere det
på nytt til det sitter godt.
IKKE len ryggen på barnesetet mot
instrumentpanelet eller nær frontruten.
Page 48

S
Viktigt!
0–25 kg grupp 0–2 (ungefärlig ålder: 0–7 år)
Du måste följa instruktionerna noggrant och på rätt
sätt. Om stolen inte sätts fast ordentligt och barnet inte
spänns fast på rätt sätt är risken stor att barnet och andra
passagerare skadas om en olycka inträffar.
Läs den här användarhandboken noggrant INNAN
du installerar bilbarnstolen.
Hampshire Trading Standards Authority och
Britax rekommenderar inte att bilbarnstolar
köps eller säljs begagnade. Kassera
bilbarnstolen på ett säkert sätt. Sälj den inte
och ge inte bort den.
Efter en olycka ska bilbarnstolen och bilbältena
bytas ut. Även om de inte ser skadade ut
kan skyddsegenskaperna nedsättas för
bilbarnstolen och bilbältena, så att de inte
skyddar lika bra om en ny olycka inträffar.
Inga bilbarnstolar är helt rymningssäkra
Det är inte möjligt att utforma selessystem som
är helt ”barnsäkra” och som samtidigt uppfyller
de juridiska kraven i EU-standard ECE R44.
Selen måste spännas åt och justeras på rätt
sätt vid varje användning och barnen ska
uppmuntras att sitta kvar i selessystemet.
Skötsel av bilbarnstolen
Det kan hamna rester av mat eller dryck inuti
spännet på selen. Det kan få spännet att
fungera sämre eftersom det inte kommer att
klicka på plats. Rengör det med varmt vatten
tills det är rent (bild A och B).
Rengöra överdraget
Läs på tvättrådsetiketterna på överdraget.
Torktumla INTE överdraget – centrifugera det
bara en kort stund och låt det dropptorka.
Rengöra sele och sits
Torka av och använd ENBART vanlig tvål och
varmt vatten.
Ta INTE isär, och försök inte ta isär, några
delar av selen eller kudden när du rengör dem.
Använd INTE någon sorts lösningsmedel,
tvättmedel eller diskmedel eftersom det kan
skada selen och kudden.
Försök INTE smörja eller olja in någon del av
stolen.
Ta bort och sätta tillbaka överdraget
Tryck på och håll in frigöringsknappen för
selen. Håll handen nedanför bältesmuddarna
(bild 1a) och dra BÅDA axelremmarna framåt
så långt det går.
Ta fram remfästet som nns på stolens
baksida och kroka av båda axelremmarna
(bild 1c).
Dra av överdraget från stolens övre del
och använd den metod som visas på
nästa sida (bild 1d) för att dra remmarna
till stolens framsida. Lossa spännet och
ta bort spännesdynan genom att lossa
kroken och öglan. För bältesmuddarna
ut ur axelremmarna. Dra försiktigt av
Page 49

0-25kg
överdraget från stolen och trä axelremmarna,
bältesspännet och justeringsremmen genom
slitsarna i överdraget.
När du vill sätta tillbaka överdraget använder
du den metod som visas på nästa sida
(bild 1d).
Se till att remmarna inte har snott sig.
VIKTIGT! Överdraget och bältesmuddarna
fyller en säkerhetsfunktion. Använd ALDRIG
bilbarnstolen utan dem. Utsätt inte barnet
för fara genom att använda andra typer av
överdrag. Det kan försämra bilbarnstolens
skyddsegenskaper.
Du kan köpa ett nytt överdrag från din
Britax-leverantör eller genom att kontakta
Britax kundtjänst på telefonnummer
+46 8564 841 00.
Garanti
Alla Britax-produkter är noggrant utformade,
tillverkade och testade. Om produkten ändå
skulle visa sig vara felaktig inom 24 månader
efter inköpet på grund av fel i material
eller tillverkning returnerar du den till det
ursprungliga inköpsstället. Vi kommer då att
efter eget godtycke antingen reparera den utan
kostnad eller ersätta den med en likadan eller
likvärdig produkt.
I garantiärenden krävs inköpsbevis. Vi
rekommenderar att du behåller kvittot och
fäster det i användarhandboken och förvarar
den i stolen.
Britax tar inget ansvar för skador som uppstår
av missbruk, felaktig användning eller
försumlighet.
Den här garantin kan inte överlåtas och täcker
därmed inte produkter som köpts i andra hand.
Den här garantin påverkar inte dina
lagstadgade rättigheter.
Om du är osäker
Alla bilbarnstolar passar inte i alla bilar. Du
kan ta reda på om den här bälteskudden
passar i din bil genom att använda på vår
webbplats www.britax.eu, ringa kundtjänst på
telefonnummer +46 8564 841 00
A
B
Page 50

Varning!
0–25 kg grupp 0–2 (ungefärlig ålder: 0–7 år)
EXTREM FARA!
Använd INTE under några omständigheter en bakåtvänd
bilbarnstol i ett bilsäte med inkopplad airbag.
Använd INTE en framåtvänd bilbarnstol i ett bilsäte med
inkopplad airbag om inte biltillverkaren har bekräftat att
det är säkert.
Använd INTE bilbarnstolen i bilsäten som är vända åt
sidan eller bakåt.
Använd INTE något föremål, t.ex. kuddar eller jackor, till
att höja bilbarnstolen från passagerarsätet. Det leder till
att barnet inte skyddas lika effektivt av bilbarnstolen och
bilbältena vid en olycka.
Använd INTE bilbarnstolen i hemmet. Den är inte
avsedd för hemmabruk utan ska endast användas i
bilen.
Försök INTE plocka isär, ändra eller lägga till delar
på bilbarnstolen, eller ändra selens eller bilbältenas
utformning eller användningssätt. Om du gör ändringar
gäller inte det ofciella godkännandet. Bilbarnstolen får
INTE ändras, annat än av tillverkaren.
Lämna ALDRIG barn ensamma i bilen, ens en liten
stund.
Lämna ALDRIG barnet utan uppsikt i en bilbarnstol, ens
en liten stund.
Lämna INGA lösa föremål, t.ex. väskor eller böcker,
liggande lösa i baksätet på bilen. De måste sättas fast
ordentligt, för om du bromsar in hastigt kan eventuella
lösa föremål kastas runt och orsaka allvarliga skador.
Stora och tunga föremål är särskilt riskabla.
Lämna INTE fällbara passagerarsäten lossade. Om du
måste bromsa in hastigt kan ett löst säte skada barnet.
Låt ALDRIG barn leka med eller ställa om bilbarnstolen.
Förvara den här användarhandboken i förvaringsckan.
Täck ALLTID över bilbarnstolen om bilen står i direkt
solljus. Olika delar kan bli mycket heta i solen och
överdraget kan blekas.
Kontrollera att bilbarnstolen inte kan klämmas fast av ett
nedfällbart passagerarsäte eller i bildörren.
Kontrollera att selen är åtdragen så att den passar för
barnets klädsel före varje bilfärd – om selen justerats
efter vinterkläder sitter den kanske för löst om barnet
har sommarkläder på sig.
Förvara ALLTID bilbarnstolen på ett säkert ställe när
den inte används. Undvik att placera tunga föremål på
stolen och förvara den inte nära direkta värmekällor eller
i direkt solljus.
Ha ALLTID bilbarnstolen fastspänd, även när den inte
används.
Se till att alla passagerare i bilen har satt på sig
säkerhetsbältena.
Även om bilbarnstolens kontakt med bilsätet tas i
beaktande vid utvecklingen av nya produkter kan Britax
inte ta något ansvar för skador som åsamkas bilsäten
eller bilbälten.
VIKTIGT! Bilbarnstolen MÅSTE användas med ett
trepunktsbälte (godkänt enligt UN/ECE-föreskrift nr 16
eller annan motsvarande standard).
Diagonal
Höft
Höft
Page 51

Presentation av din nya bilbarnstol
0–25 kg grupp 0–2 (ungefärlig ålder: 0–7 år)
11
10
0-25kg
1. Överdrag
1
2. Axelmuddar
3. Selens remmar
4. Bältesspänne
5. Spännesdyna
6. Justeringsknapp för sele
2
3
4
5
7. Justeringsrem för sele
8. Stödben
9. Stödbensfäste
10. Låsarm
11. Bälteshål
6
7
8
9
12
12. Förankringsremmar
13. Spänne för förankringsrem
13
14. Golvstödförankring
15. Frigöringsspak för golvstöd
16. Axelremsslits
17. Förvaringscka för användarhandbok (syns inte)
18. Remfäste (dolt)
19. Golvstöd
16
17
18
14
15
19
Page 52

1. Justera bilbarnstolen så att den passar barnets vikt
VIKTIGT! - Den här bilbarnstolen har utformats för att fungera säkert och oberoende av ytterligare externa skydd.
1a
1b
0-25kg
1c
Justera selen
Tryck på och håll in frigöringsknappen för selen. Håll händerna nedanför
bältesmuddarna (bild 1a) och dra BÅDA axelremmarna framåt så långt det
går.
Lossa spännet genom att trycka på den röda knappen på bältesspännet.
Trä selen runt barnet. När du ska fästa spännet sätter du först ihop de två
övre delarna (infälld bild) och trycker sedan bestämt in dem i den nedre
delen tills du hör ett klickljud. Dra försiktigt selen uppåt så att höftdelen sitter
åt. Dra justeringsremmen framåt och se till att selen löper bekvämt men
SPÄNT över barnet. Se till att selens remmar inte har snott sig.
VIKTIGT! Du måste justera höjden på axelremmarna till rätt läge för barnet
INNAN du installerar bilbarnstolen i bilen. Bältesmuddarna måste sitta högt
upp på barnets axlar enligt bilden (bild 1b).
Axelremmarna MÅSTE träs genom de hål i överdraget och stolen som sitter
närmast barnets axlar. Om du är osäker på vilken slits du ska använda ska du
hellre välja en som sitter lite nedanför axeln än en som sitter lite ovanför
(bild 1b).
När du använder den översta slitsen kan barnet fortsätta att använda
bilbarnstolen ända tills barnets ögonlinje når ovanför stolskanten.
Ändra höjden på axelremmarna
När du vill lossa selen trycker du in och håller ned frigöringsknappen för selen.
Håll handen nedanför bältesmuddarna (bild 1a) och dra BÅDA axelremmarna
framåt så långt det går. Ta fram remfästet som nns på stolens baksida och
kroka av en av axelremmarna (bild 1c). Dra av överdraget från stolens övre
del så att du ser slitsarna i stommen. Dra igenom axelremmen till stolens
framsida.
1d
Trä axelremmen genom vald slits och haka på den på remfästet igen (bild 1d).
Gör på samma sätt med den andra axelremmen.
Se till att remmarna inte har snott sig.
Page 53

1.
2.
1.
2.
0-25kg
1e
Vrid den synliga remjusteraren i metall (bild 1e) och tryck den genom
slitsen i överdraget och igenom till stommens undersida. Se till att den ligger
horisontellt så att den inte kan dras tillbaka genom stommen. Dra i spännet
för att se till att det sitter ordentligt och att remjusteraren inte kan föras tillbaka
genom slitsen.
1f
Justera grenremmen
VIKTIGT! Spännet ska alltid
placeras långt ned på barnets kropp.
Du måste justera grenremmen så
att den är lagom lång för barnet
INNAN du installerar bilbarnstolen i
bilen, eftersom den inte kan justeras
efteråt.
a. Grenremmen ska endast
förlängas när den normala
selesjusteringen inte räcker
Tryck på selens justeringsfäste med
ena handen. Med den andra handen
lossar du på selen genom att dra
axelremmarna framåt så långt som
möjligt.
Justeringen på grenremmens ände
sitter under bilbarnstolens framkant.
Du kan justera grenremmens
längd genom att mata den genom
justeringen i pilarnas riktning
(bild 1f).
till, d.v.s. när axelremmarna är
maximalt förlängda.
b. Återställ alltid grenremmen till
dess ursprungliga kortare längd
– Korta grenremmen
– Förlänga grenremmen
när du använder stolen med ett
mindre barn.
c. Försök INTE lossa grenremmen
från justeringen. Du justerar
genom att mata grenremmen
genom justeringen (bild 1f).
Page 54

2. Installera bilbarnstolen (bakåtvänd användning) i baksätets sidosäte
VIKTIGT! - Den här bilbarnstolen har utformats för att fungera säkert och oberoende av ytterligare externa skydd.
2a
VIKTIGT! Bilbarnstolen MÅSTE användas tillsammans med ett trepunktsbälte.
Bilbarnstolen har ett justerbart stödben (bild 2a). Ju mindre barnet är desto
mer tillbakalutad måste stolen vara.
2b
Ju större barnet är desto mer upprätt måste stolen vara. Om du behöver byta
position lossar du på stödbensfästena på båda sidorna och drar teleskopbenet
in eller ut (bild 2b). När du är nöjd med stödbenets placering sätter du tillbaka
fästena i hålen (infälld bild). Se till att hålen har placerats lika på båda sidor.
2c
Placera bilbarnstolen bakåtvänd på bilsätet. Efter installationen ska
mellanrummet mellan sätet framför och bilbarnstolen vara minst 10 mm. Sätet
framför ska INTE vila mot bilbarnstolen. Om det gör det justerar du sätet
framför utan att det leder till att föraren eller passageraren sitter obekvämt. Om
det inte fungerar kan du välja någon annan placering av bilbarnstolen i bilen
(bild 2c).
Dra ut golvstödet helt och se till att dess förankringsfästen pekar nedåt och
att remmarna inte har snott sig. Sänk golvstödet och justera höjden så att den
är inom cirka 30 mm över golvet (bild 2c). Använd den linjal som är tryckt på
baksidan av den här handboken för att få rätt avstånd från golvstödet till golvet.
2d
2e
Dra förankringsremmarnas ögleändar
mellan sätet i fram och i bak enligt
bilden (bild 2d och
bild 2e).
Dra förankringsremmarnas spännen
runt sätets utsida och mata
3
igenom öglorna
förankringsremmarnas spännen
2
. Klicka fast
i spännena på bilbarnstolens sidor
3
2
4
. Spänn åt förankringsremmarna
provisoriskt genom att dra de lösa
ändarna nedåt
4
.
Page 55

0-25kg
2f
Om bilen har öglor på sätets skenor kan även de användas (se detaljbild 2f).
VIKTIGT! Installera inte förankringsremmarna med väsköglorna.
2g
Dra igenom tillräckligt mycket av trepunktsbältet (cirka 600–900 mm).
Öppna låsarmen på motsatt sida av bältesspännet. Dra överdraget bakåt så
att grenremmen blir synlig. För in bältet genom låsbälteshållaren och stommen
(bild 2g), upp till basdelens ovansida, bakom grenremmen (infälld bild) och
ned igenom slitsen på andra sidan av bilbarnstolen.
Öppna den andra låsarmen, mata in bältet under låsarmen och fäst ikarna
i spännet (bild 2h).
2h
2i
Dra hela bältet igenom sätet så att det
spänns åt. Se till att bältet inte har snott
sig (bild 2i). När bältet sitter så spänt som
möjligt stänger du igen låsarmarna på
BÅDA sidorna av stolen och ser till att de
klickar på plats.
Om spännet nu ligger i den position som
har felmarkerats med en
och bilbältet
inte kan spännas åt korrekt (bild 2j) provar
du någon annan placering av bilbarnstolen
i bilen.
Dra slutligen åt förankringsremmarna
2j
2k
genom att dra de lösa ändarna nedåt (bild
2k) tills golvstödet rör golvet. Golvstödet
måste vila mot ett plant golv – inte mot
lock till förvaringskartonger eller liknande.
När stolen sitter fast på rätt sätt kan du
testa den genom att försöka röra den fram
och tillbaka och åt sidan. Om bilbarnstolen
verkar sitta för löst måste du installera om
den till den sitter fast ordentligt.
Vila INTE baksidan av bilbarnstolen mot
föraren eller passerarsätet.
Page 56

3. Installera bilbarnstolen (bakåtvänd användning) vid baksätets mellersta plats
VIKTIGT! - Den här bilbarnstolen har utformats för att fungera säkert och oberoende av ytterligare externa skydd.
3a
VIKTIGT! - Bilbarnstolen kan användas med ett trepunktsbälte.
Bilbarnstolen har ett justerbart stödben (bild 3a). Ju mindre barnet är desto
mer tillbakalutad måste stolen vara. Ju större barnet är desto mer upprätt
måste stolen vara. Om du behöver byta position lossar du på stödbensfästena
på båda sidorna och drar teleskopbenet in eller ut (bild 3a). När du är nöjd
med stödbenets placering sätter du tillbaka fästena i hålen (infälld bild).
Se till att hålen har placerats lika på båda sidor.
3b
Placera bilbarnstolen bakåtvänd med baksidan placerad mitt emellan
förarsätet och passagerarsätet.
Dra ut golvstödet helt och se till att dess förankringsfästen pekar nedåt och
att remmarna inte har snott sig. Sänk golvstödet och justera höjden så att den
är cirka 30 mm ovanför golvet (bild 3b). Använd den linjal som är tryckt på
baksidan av den här handboken för att få rätt avstånd från golvstödet till golvet.
3c
3d
Gör en ögla med förankringsremmarna
runt både förarsätet och
passagerarsätet enligt bilden (dia 3c).
Om bilen har öglor på sätets skenor kan
även de användas (se detaljbild 3d).
VIKTIGT! Installera inte
förankringsremmarna med väsköglorna
3e
Dra förankringsremmarnas ögleändar mellan framsätet och baksätet
enligt bilden (bild 3e). Dra förankringsremmarnas spännen runt sätets utsida
och mata igenom öglorna
i spännena på bilbarnstolens sidor
provisoriskt genom att dra de lösa ändarna nedåt
3
2
4
2
. Klicka fast förankringsremmarnas spännen
. Spänn åt förankringsremmarna
3
.
4
Page 57

0-25kg
3f
Dra igenom tillräckligt mycket av trepunktsbältet (cirka 600–900 mm). Öppna
låsarmen på motsatt sida av bältesspännet. Dra överdraget bakåt så att
grenremmen blir synlig. Dra bältet igenom bälteslåshållaren och stommen
(bild 3f) till basdelens ovansida, bakom grenremmen (infälld bild) och ned
igenom slitsen på den andra sidan av bilbarnstolen.
3g
3h
Öppna den andra låsarmen, mata in bältet under låsarmen och fäst ikarna
i spännet (bild 3g).
3i
Dra hela bältet igenom sätet så att det
spänns åt. Se till att bältet inte har snott
sig (bild 3h). När bältet sitter så spänt
som möjligt stänger du igen låsarmarna
på BÅDA sidorna av stolen och ser till
att de klickar på plats.
Om spännet nu ligger i den position
som har felmarkerats med
och
bilbältet inte kan spännas åt korrekt
(bild 3i) får du försöka med en annan
placering av bilbarnstolen.
3j
Dra slutligen åt förankringsremmarna genom att dra de lösa ändarna nedåt
(bild 3j) tills golvstödet når golvet. Golvstödet måste vila mot ett plant golv
– inte mot lock till förvaringskartonger eller liknande.
När stolen sitter fast på rätt sätt kan du testa den genom att försöka röra den
fram och tillbaka och åt sidan. Om bilbarnstolen verkar sitta för löst måste du
installera om den till den sitter fast ordentligt.
Vila INTE baksidan av bilbarnstolen mot föraren eller passerarsätet.
Page 58

4. Installera bilbarnstolen (bakåtvänd användning) i framsätet
VIKTIGT! - Den här bilbarnstolen har utformats för att fungera säkert och oberoende av ytterligare externa skydd.
4a
VIKTIGT! Bilbarnstolen MÅSTE användas tillsammans med ett trepunktsbälte.
Bilbarnstolen har ett justerbart stödben (bild 4a). Ju mindre barnet är desto
mer tillbakalutad måste stolen vara. Ju större barnet är desto mer upprätt
måste stolen vara.
4b
Om du behöver byta position lossar du på stödbensfästena på båda sidorna
och drar teleskopbenet in eller ut (bild 4b). När du är nöjd med stödbenets
placering sätter du tillbaka fästena i hålen (infälld bild). Se till att hålen har
placerats lika på båda sidor.
Dra tillbaka bilens framsäte så att bilbarnstolen får plats, och se till att
passageraren direkt bakom fortfarande kan sitta bekvämt. Ju större barnet är
desto mer upprätt måste sittpositionen vara.
4c
Placera bilbarnstolen bakåtvänt och tryck försiktigt in den i sätet (bild 4c).
VIKTIGT! Luta INTE bilbarnstolens baksida mot instrumentbrädan eller
i närheten av vindrutan
Dra ut golvstödet helt och se till att dess förankringsfästen pekar nedåt och
att remmarna inte har snott sig. Sänk golvstödet och justera höjden så att den
är inom cirka 30 mm över golvet (bild 4c). Använd den linjal som är tryckt på
baksidan av den här handboken för att få rätt avstånd från golvstödet till golvet.
4d
4e
Dra förankringsremmarnas
ögleändar mellan sätet i fram och i
bak
enligt bilden (bild 4d). Dra
förankringsremmarnas spännen runt
sätets utsida och mata igenom öglorna
2
3
. Dra in spännena under sätet. Klicka
fast förankringsremmarnas spännen
i spännena på bilbarnstolens sidor
3
. Spänn åt förankringsremmarna
provisoriskt genom att dra de lösa
4
2
ändarna nedåt
4
.
Page 59

0-25kg
4f
Om bilen har öglor på sätets skenor kan även de användas.
VIKTIGT! Installera inte förankringsremmarna med väsköglorna.
4g
Dra igenom tillräckligt mycket av trepunktsbältet (cirka 600–900 mm). Öppna
låsarmen på motsatt sida av bältesspännet. Dra överdraget bakåt så att
grenremmen blir synlig. Dra bältet igenom bälteslåshållaren och stommen
(bild 4g) till basdelens ovansida, bakom grenremmen (infälld bild) och ned
igenom slitsen på den andra sidan av bilbarnstolen.
Öppna den andra låsarmen, mata in bältet under låsarmen och fäst ikarna i
spännet (bild 4h).
4h
4i
Dra hela bältet igenom sätet så att det
spänns åt. Se till att bältet inte har snott
sig (bild 4i). När bältet sitter så spänt som
möjligt stänger du igen låsarmarna på BÅDA
sidorna av stolen och ser till att de klickar
på plats.
Om spännet nu ligger i den position som har
felmarkerats med
och bilbältet inte kan
spännas åt korrekt (bild 4j) får du försöka
med en annan placering av bilbarnstolen.
Dra slutligen åt förankringsremmarna
genom att dra de lösa ändarna nedåt (bild
4j
4k
4k) tills golvstödet når golvet. Golvstödet
måste vila mot ett plant golv – inte mot lock
till förvaringskartonger eller liknande.
När stolen sitter fast på rätt sätt kan du
testa den genom att försöka röra den fram
och tillbaka och åt sidan. Om bilbarnstolen
verkar sitta för löst måste du installera om
den till den sitter fast ordentligt.
Luta INTE bilbarnstolens baksida mot
instrumentbrädan eller i närheten av
vindrutan.
Page 60

18
GB
Britax Excelsior Limited
1 Churchill Way West
Andover
Hampshire SP10 3UW
United Kingdom
Tel: 01264 386034
www.britax.eu
17
16
15
14
13
12
11
10
9
8
7
6
DK
FIN
Britax is a registered trademark of Britax Childcare
F. Bülow & Co. ApS
Baldersbuen 37-39
DK-2640 Hedehusene
Tlf: 46 59 11 55
Fax: 46 59 11 66
E-mail: post@bylow.dk
www.bylow.dk
Britax er et registreret varemærke tilhørende
Britax Childcare
Oy Britax Pohjolan Lapset Ab
Kauppakartanonkatu 15 D
FI - 00930 Helsinki
Puhelin 09-343 60 10
Fax: 09-343 22 13
E-mail: service.fi@britax.com
www.britax.
Britax on Britax Childcaren rekisteröity tavaramerkki
N
Britax AB
Strömögatan 5
SE-164 40 KISTA
Tel: 08-564 841 00
Fax: 08-98 01 89
E-mail: service.se@britax.com
www.britax.se
Britax er et registrert varemerke for Britax Childcare
5
S
4
Britax AB
Strömögatan 5
SE-164 40 KISTA
Tel: 08-564 841 00
3
Fax: 08-98 01 89
E-mail: service.se@britax.com
www.britax.se
2
Britax är ett registrerat varumärke som tillhör
Britax Childcare
1
 Loading...