

Page 1

Frontier XT
User Guide
Guide d’utilisation canadien
IMPORTANT: Please thoroughly read and understand all instructions
before installing this child seat. Store this user guide in the pocket under
the cover (See features pages for reference).
IMPORTANT : Veuillez lire attentivement et comprendre toutes les instructions
avant d’installer ce siège pour enfant. Rangez ce guide dans la pochette sous la
housse (Voir pages de caractéristiques)
Page 2

©2010 Britax Child Safety, Inc. All rights reserved. Printed in USA P366700_R2:03.10
This product and its components are subject to change without notice.
Warnings ......................................................................................................2
Safety Information .......................................................................................4
Important Notes ....................................................................................................4
Certification ...........................................................................................................4
Registration ...........................................................................................................5
Child Seat Features .....................................................................................6
Child Seat Fit Requirements ......................................................................8
Vehicle Compatibility ..................................................................................10
Compatible Vehicle Seat Belts ............................................................................10
Incompatible Vehicle Seat Belts ..........................................................................14
Child Seat Functions ...................................................................................16
Installing the Child Seat ..............................................................................26
General Information .............................................................................................26
Harness Mode .................................................................................................26
Booster Mode ..................................................................................................27
Installing the Child Seat: Harness Mode ..................................................28
Lower Universal Anchorage System (LUAS) – Short Path ................................28
Lap-Shoulder Belt – Selecting a Belt Path ..........................................................32
Lap-Shoulder Belt – Short Path ...........................................................................34
Lap-Shoulder Belt – Long Path ...........................................................................38
Lap Belt – Short Path............................................................................................42
Switching Between Modes .........................................................................46
Harness to Booster Mode ....................................................................................46
Booster to Harness Mode ....................................................................................48
Positioning the Child Seat: Booster Mode ...............................................52
Using LUAS...........................................................................................................53
Lap-Shoulder Belt.................................................................................................54
Securing Your Child ....................................................................................55
Harness Mode ......................................................................................................55
Booster Mode .......................................................................................................58
Care and Maintenance ................................................................................60
Tips and Troubleshooting ...........................................................................69
Warranty .......................................................................................................72
Table of Contents
Page 3
2
3
Section Title
Section Title
Harness mode: use only with children who weigh between 11.4 •
and 29.5 kg (25 and 65 lbs) and whose height is between 76.2
and 144.8 cm (30 and 57 in.) and are at least 2 years of age.
Booster mode: use only with children who weigh between 18.2 •
and 54.5 kg (40 and 120 lbs) and whose height is between 106.7
and 165.1 cm (42 and 65 in.).
Use this child seat forward-facing only.•
The positioning block must be rotated to the front of the child seat •
when used in harness mode.
The positioning block must be rotated to the rear of the child seat •
when used in booster mode.
Adjust the belts provided with this child seat so they fit snugly •
around your child. A snug strap should not allow any slack. It lies
in a relatively straight line without sagging. It does not press on the
child’s flesh or push the child’s body into an unnatural position.
Secure the top tether strap provided with this child seat.•
Even when unoccupied, the booster seat must be secured to •
the vehicle by means of a lower connector system (LCS) if the
booster seat is installed in a seating position that is equipped
with a lower universal anchorage system (LUAS) or by means
of a vehicle seat belt if it is installed in a seating position that is
not equipped with a lower universal anchorage system and if
equipped with a tether strap, by means of a tether strap.
Follow all instructions on the child seat labels and in this user •
guide.
Register your child seat with the manufacturer, Britax Child Safety, •
Inc. by visiting www.Britax.ca/registration, OR complete and return
the registration card that was shipped with this child seat.
HUGS™ chest pads must be used in forward-facing mode.•
In booster mode, use only the vehicle’s lap and shoulder belt •
system when restraining the child in this booster seat.
To prevent injury due to deterioration or hidden damage, •
discontinue use of this child seat when it is older than nine
years or has been in a moderate or severe crash. See date of
manufacture and expiration date located on child seat shell. See
page 6.
According to accident statistics, children are safer when properly •
restrained in a vehicle’s rear seating positions than in the front
seating positions.
The use of non-Britax covers, inserts, toys, accessories, or •
tightening devices is not approved by Britax. Their use could
cause this child seat to fail Canadian Motor Vehicle Safety
Standards or not perform as intended in a crash.
When using in a vehicle with airbags, refer to your vehicle owners •
manual for child seat installation instructions and precautions.
Never use the harness or adjuster strap to lift or carry this child •
seat. Doing so could damage the harness adjuster and webbing.
Always carry this child seat by the shell or tether straps. The
primary protection for occupants of a vehicle in a collision is the
body of the vehicle itself; a child seat may not protect a child
when the vehicle is seriously im pact ed. However, correctly
installed, a child seat will substantially improve the chances for
survival in most crashes.
For harness mode refer to your vehicle owner’s manual or contact •
the vehicle manufacturer for the maximum weight rating for the
LUAS anchors in your vehicle. Use the vehicle seat belt (not LCS
connectors) for installations with children who weigh more than
the vehicle LUAS anchor limit. Unless specified otherwise by the
vehicle manufacturer, assume a 18.2 kg (40 pound) child is the
vehicle LUAS anchor limit.
WARNING!
DEATH or SERIOUS INJURY can occur:
Page 4
4
5
Important Notes
Verify that the child seat is securely installed and that the harness is •
properly adjusted around the child each time the child seat is used.
Adjust the harness to fit the clothes the child is wearing. Remove •
bulky coats and/or jackets before putting the child in the child seat.
Do not, except as described in this booklet, attempt to •
disassemble any part of the child seat or change the way the
harness or vehicle’s seat belts are used.
Do not use anything to raise the child seat off the vehicle seat. •
In a crash, this could cause the child seat not to perform as
intended.
This child seat must not be used in the home, in boats, or other •
non-certified applications.
Cover the child seat when the vehicle is parked in direct sunlight. •
Parts of the child seat can become hot enough to burn a child.
Store the child seat in a safe place when it is not being used. •
Avoid placing heavy objects on top of the child seat.
Do not allow children to play with this child seat.•
Always check the back seat upon leaving your vehicle to prevent •
leaving a child restrained in a child seat alone in the vehicle.
Do not leave loose objects, e.g. books, bags, etc., in the back of •
a vehicle. In the event of a sudden stop, loose objects will keep
moving, potentially striking passengers and causing serious
injuries.
Do not leave folding vehicle seats unsecured. In the event of a •
sudden stop, a loose seat back could cause the child seat not to
perform as intended.
Certification
This child seat system conforms to all applicable
Canadian Motor Vehicle Safety Standards (CMVSS
213 and 213.2).
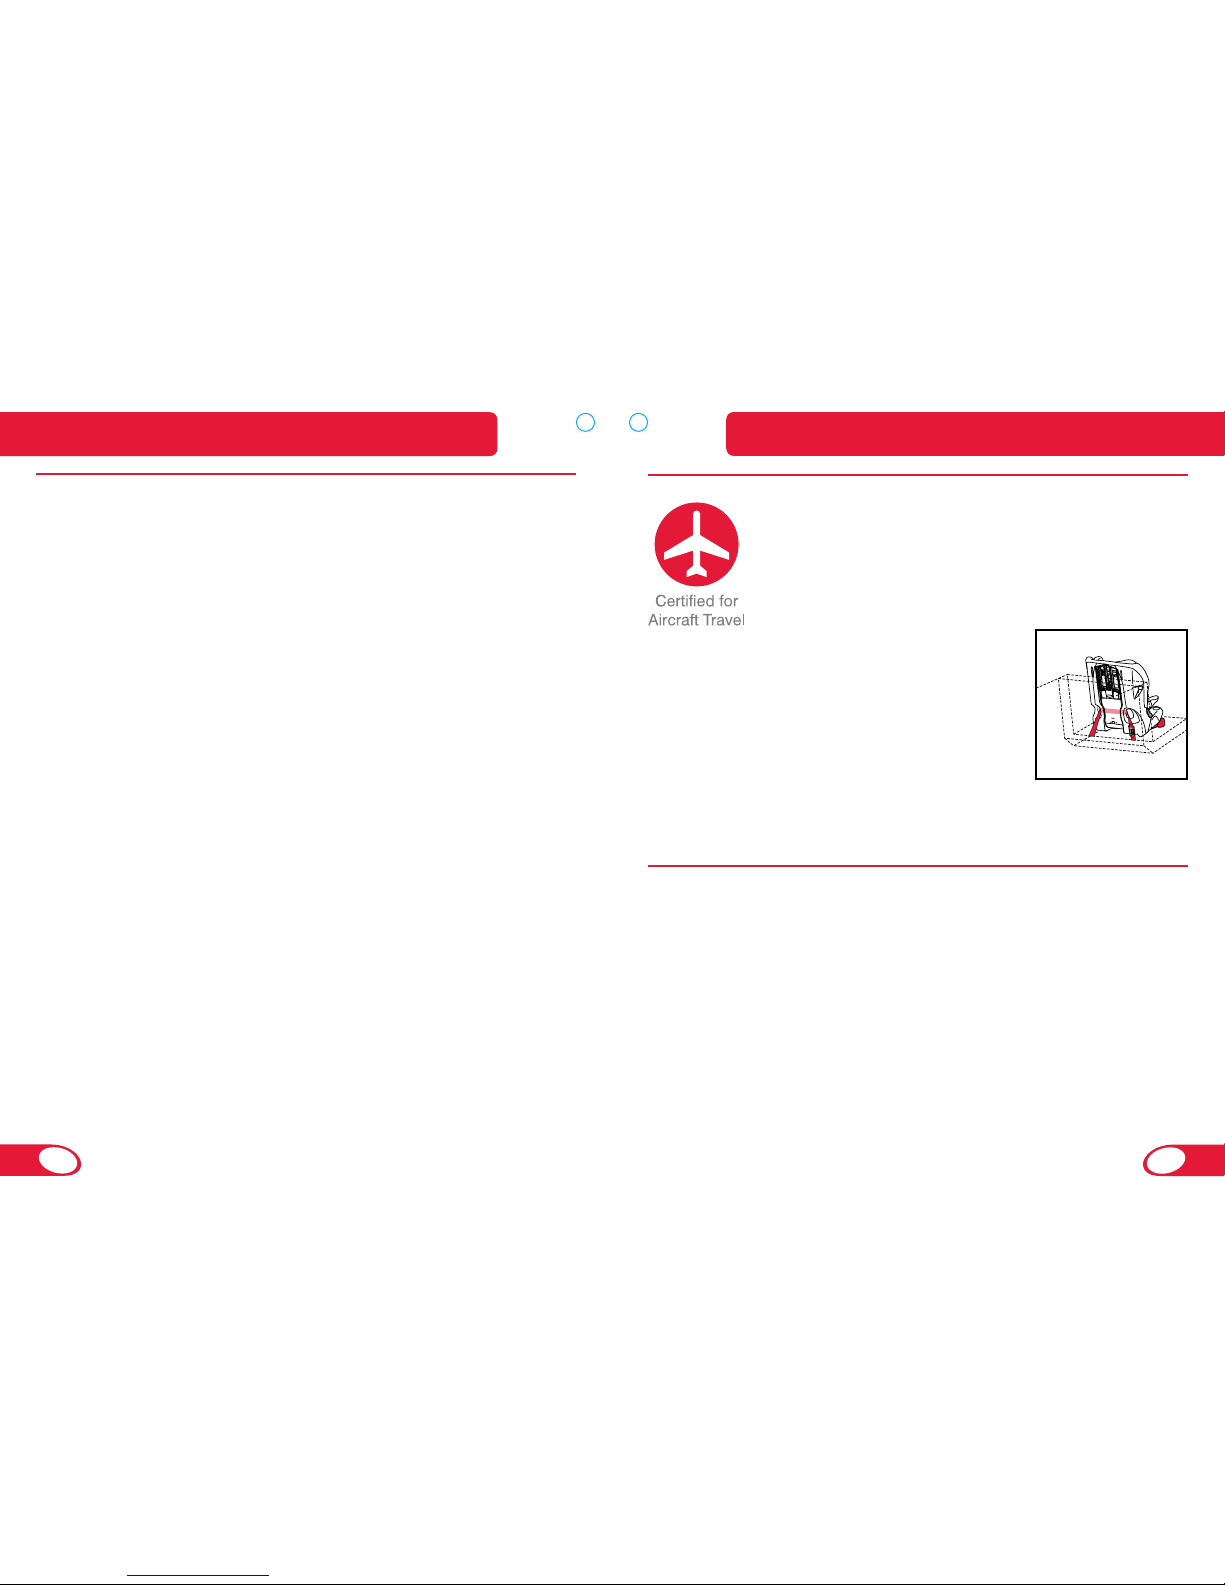
This Restraint is Certified for Use in Motor Vehicles
and Aircraft when Used in Harness Mode.
This Restraint is Not Certified for Use in Aircraft when
Used in Booster Mode.
Belt positioning booster seats require lapshoulder belt installation not available in aircraft.
Follow lap-belt installation instructions found on
page 42, to install this child seat in aircraft.
NOTE: The Versa-Tether cannot be used in aircraft.
Install your child seat in a window seat to avoid
blocking the aisle.
If the aircraft lap belt is too short, ask the flight attendant for a belt
extender.
Registration
Child seats can be recalled for safety reasons. You must register
this child seat to be reached in a recall. Send your name, address,
and the child seat’s model number and manufacturing date to
Britax Child Safety, Ltd., P.O Box 7289 RPO Brunswick Square,
Saint John NB E2L 9Z9, or call 1-888-4BRITAX, or register online
at www.Britax.ca/registration.
Serial Number:___________________________________
Batch Number:___________________________________
Date of Manufacture:______________________________
Safety InformationSafety Information
Page 5
6
7
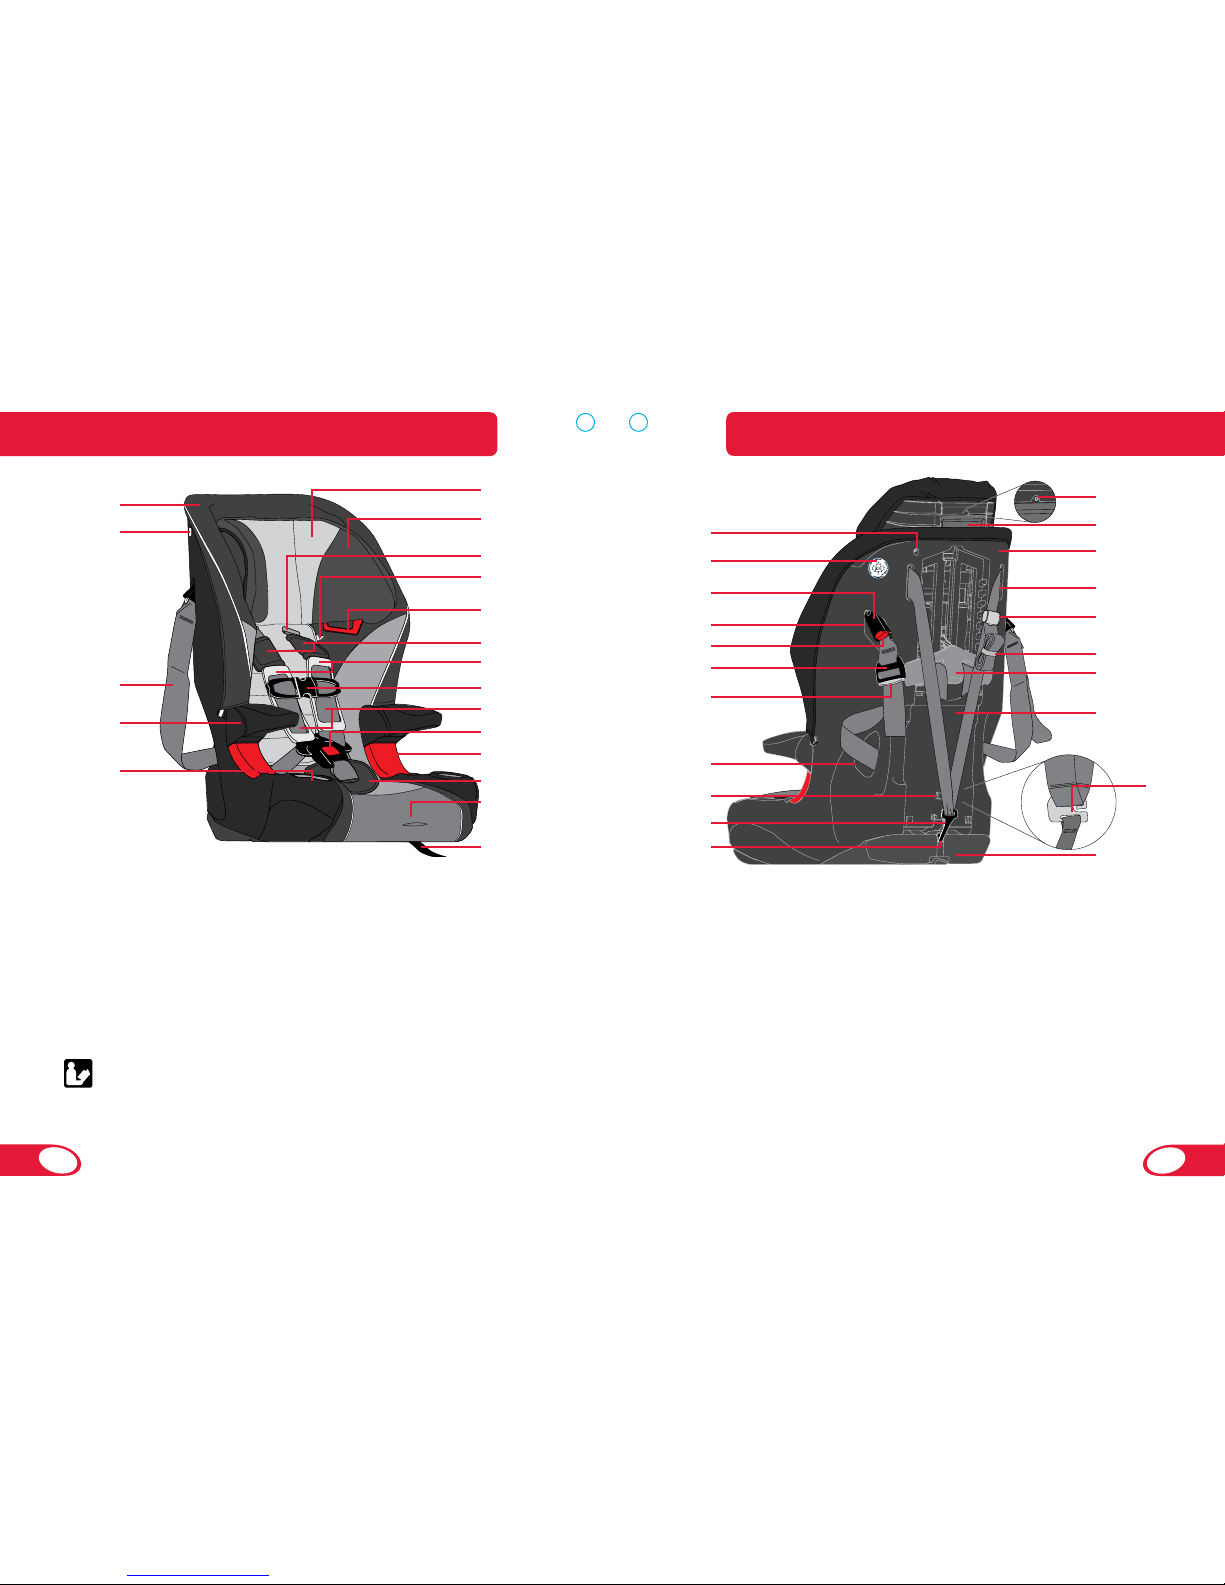
Cover1
Manufactured Date and 2
Expiration Date Label
LCS Strap3
Arm Rest4
Cup Holder5
Head Restraint6
Head Restraint Cover7
Harness Slot8
9 User Guide Storage (in
pocket behind cover)
Shoulder Belt Guide10
Comfort Pads11
HUGS™ Chest Pads12
Chest Clip13
Harness Straps14
Harness Buckle15
Lower Belt Guide16
Belly Pad17
Harness Adjuster Release 18
Lever (under flap)
Harness Adjuster Strap19
Locking Screw Storage Slot20
National Safety Mark21
LCS Connector22
LCS Connector Storage Slot23
LCS Connector Release Button24
LCS Adjuster25
LCS Adjuster Release Button26
Belt Slot27
Harness Yoke Storage (on belt 28
shield)
Versa-Tether29
®
Hook
Versa-Tether30
®
Storage Clip
Locking Screw31
Head Restraint Adjuster32
Shell33
Versa-Tether (Tether Strap)34
Versa-Tether35
®
Adjuster
Versa-Tether36
®
Webbing
Storage Strap
Harness Height Adjuster37
Belt Shield38
Harness Yoke (behind Belt 39
Shield)
Positioning Block40
6
7
8
10
15
16
18
17
19
31
32
33
34
35
36
37
38
40
39
4
3
2
1
29
28
30
26
27
25
24
23
21
20
22
5
9
11
12
14
13
Child Seat FeaturesChild Seat Features
Page 6
8
9
Harness Mode:
Children must:
be at least two years of age 1 and
weigh between 11.4 – 29.5 kg (25 – 65 lbs) 2 and
stand 76.2 – 144.8 cm (30 – 57 in.) in height 3 and
WARNING! Harness mode use of this child seat is ONLY
for children who meet ALL of the following requirements. If the
child does not meet all harness mode requirements because
the child is too small, another type of child seat MUST be used.
If your child does not meet all harness mode requirements
because they are too large, you may need to use this child
seat in booster mode. Thoroughly review all fit requirements
before using the child seat.
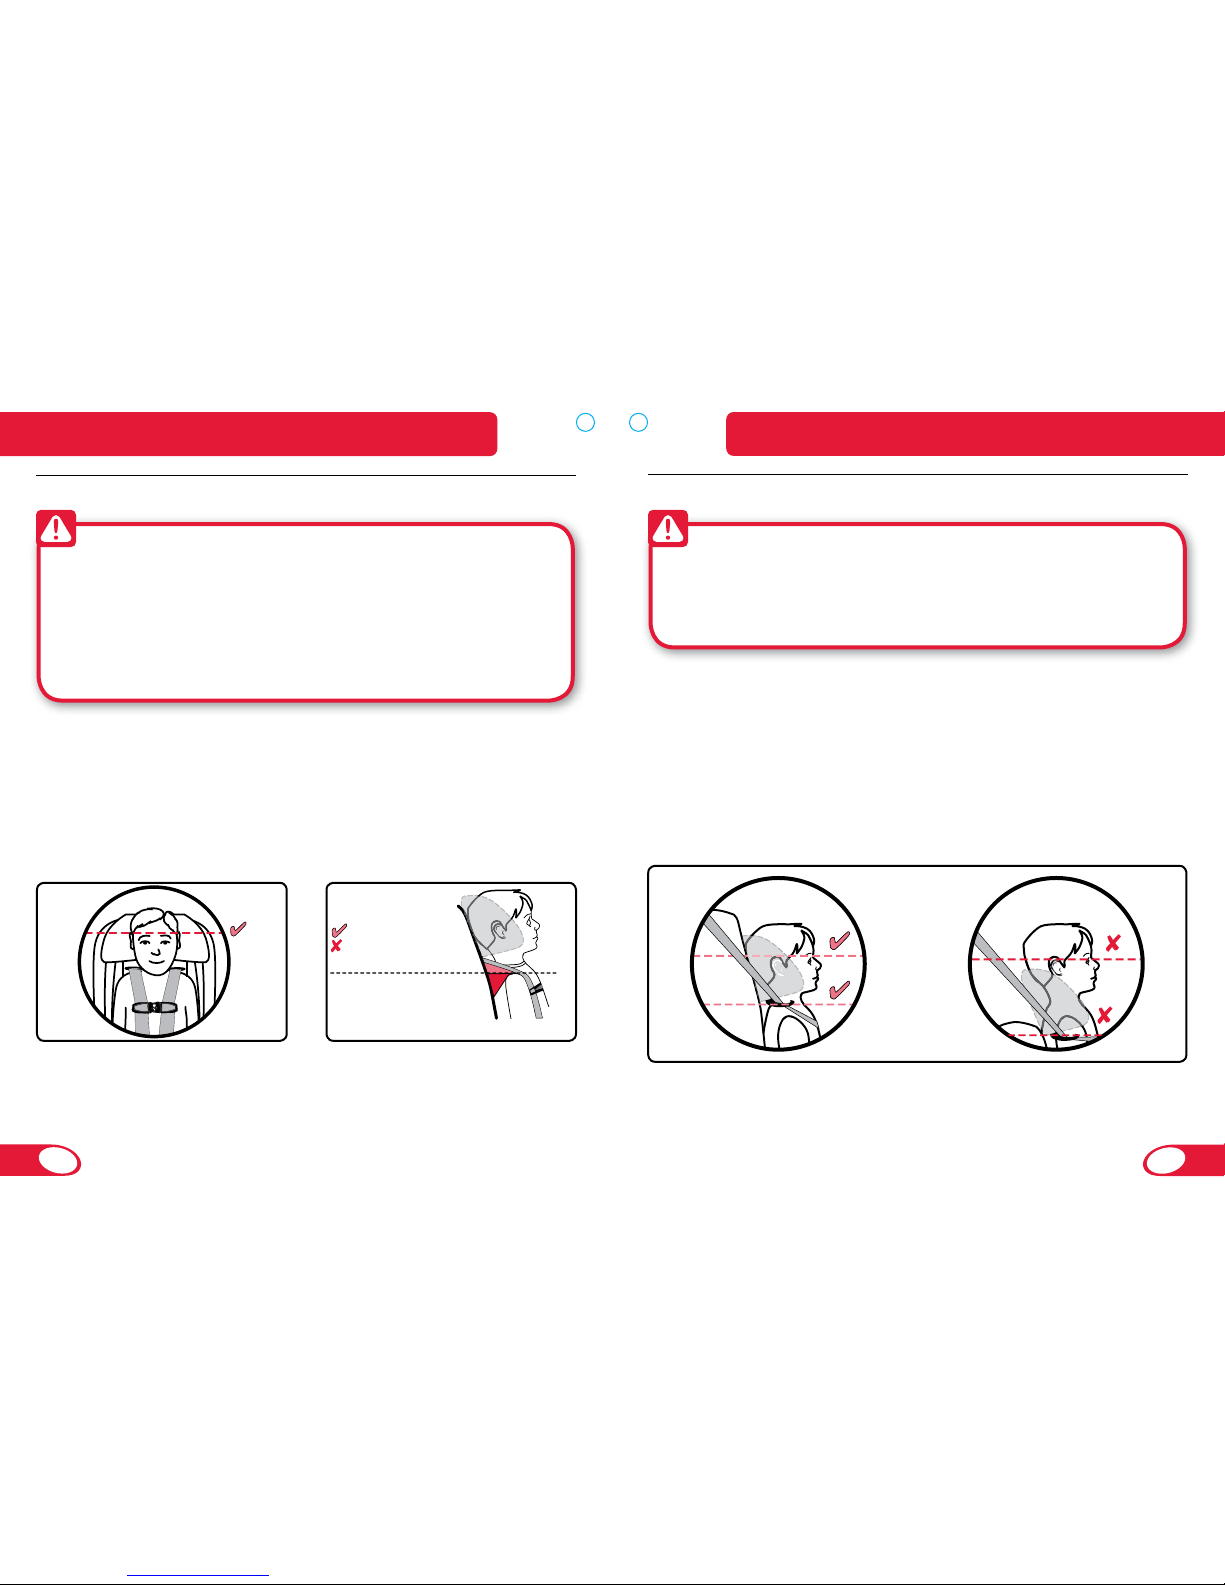
WARNING! Booster mode use of this child seat is ONLY for
children who meet ALL of the following requirements. Use only the
vehicle’s lap and shoulder belt to secure the child. If the child does not
meet all booster mode requirements because the child is too small,
you may need to use this child seat in harness mode. Thoroughly
review all fit requirements before using the child seat.
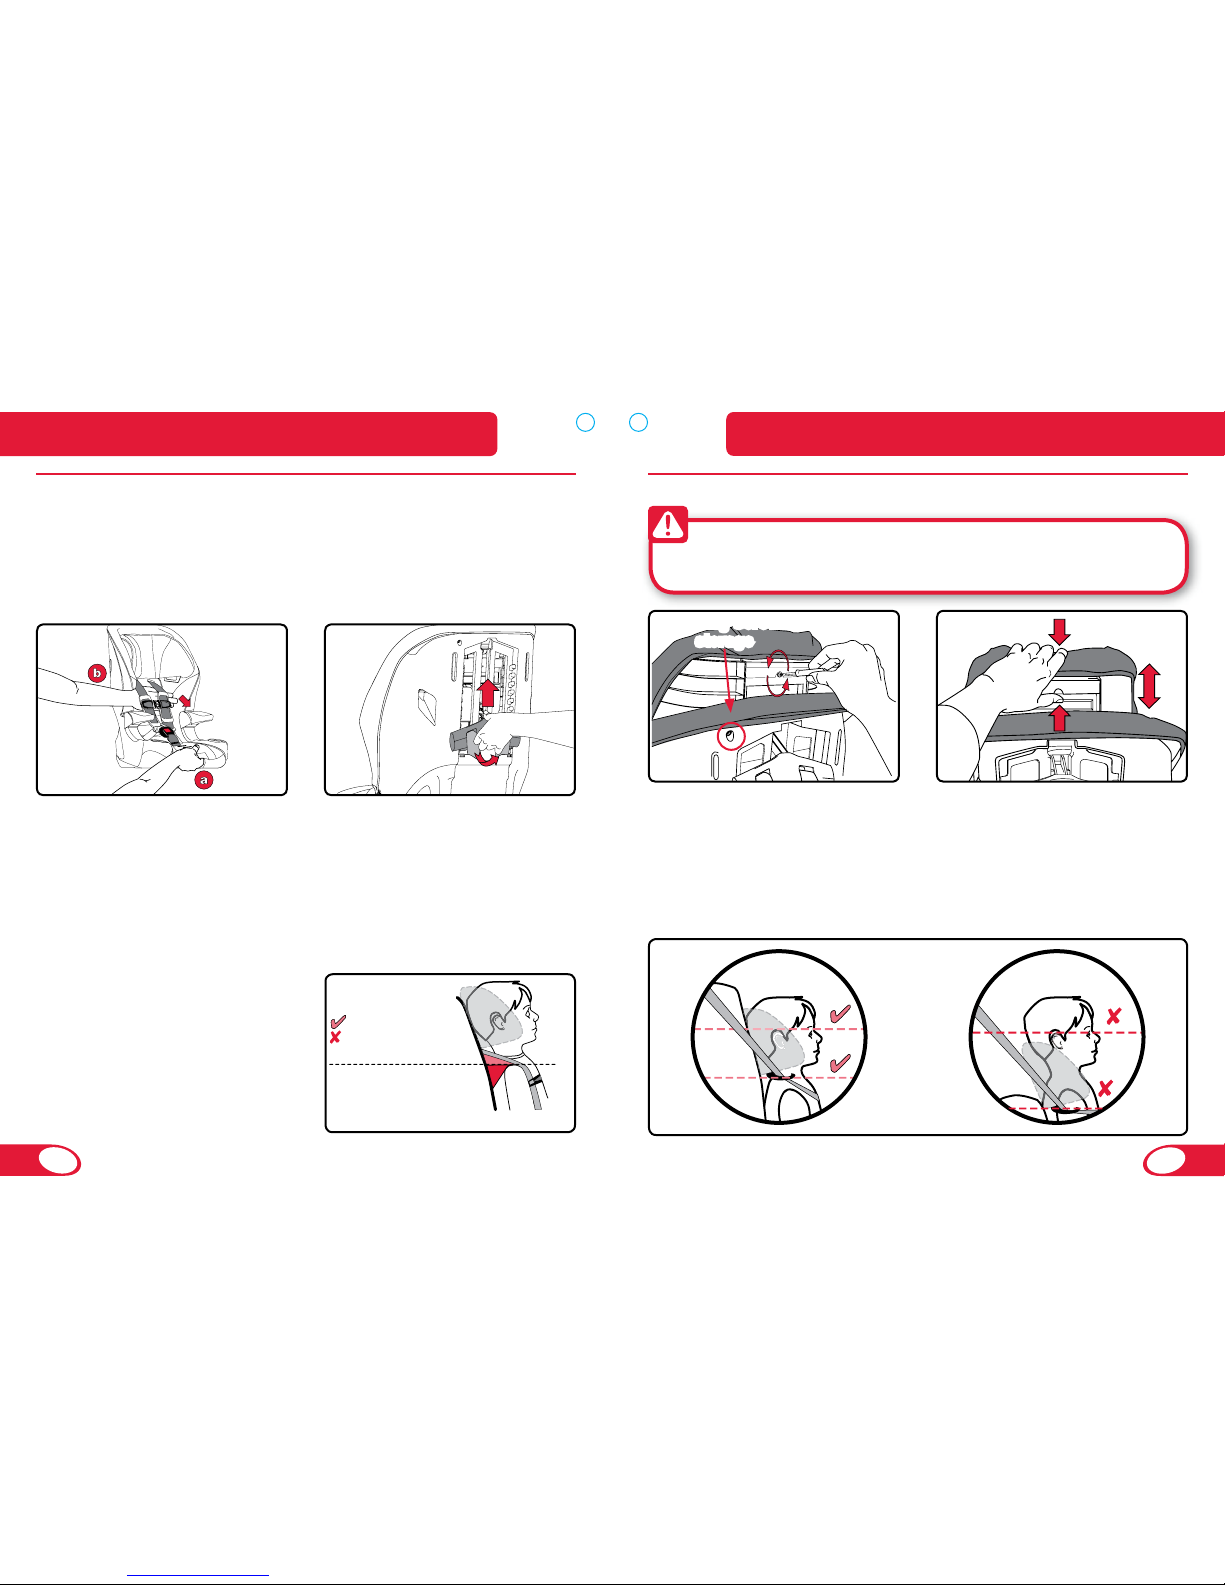
Children must:
be at least 18.2 – 54.5 kg (40 – 120 lbs) 1 and
stand 106.7 – 165.1 cm (42 – 65 in.) in height 2 and
the top of the child’s ears must be below the top of the head 3
restraint and
the vehicle seat belt must be appropriately positioned at or 4
above the child’s shoulder through the shoulder belt guide.
Shoulder level
Above Shoulder Level
Below Shoulder Level
NOTE: Britax recommends booster mode only after the child
outgrows harness mode.
the top of the child’s 4
ears must be below the
top of the head restraint
when seated and
the harness straps must 5
be located at or above
the child’s shoulders
when seated.
Booster Mode:
Child Seat Fit RequirementsChild Seat Fit Requirements
Page 7
10
11
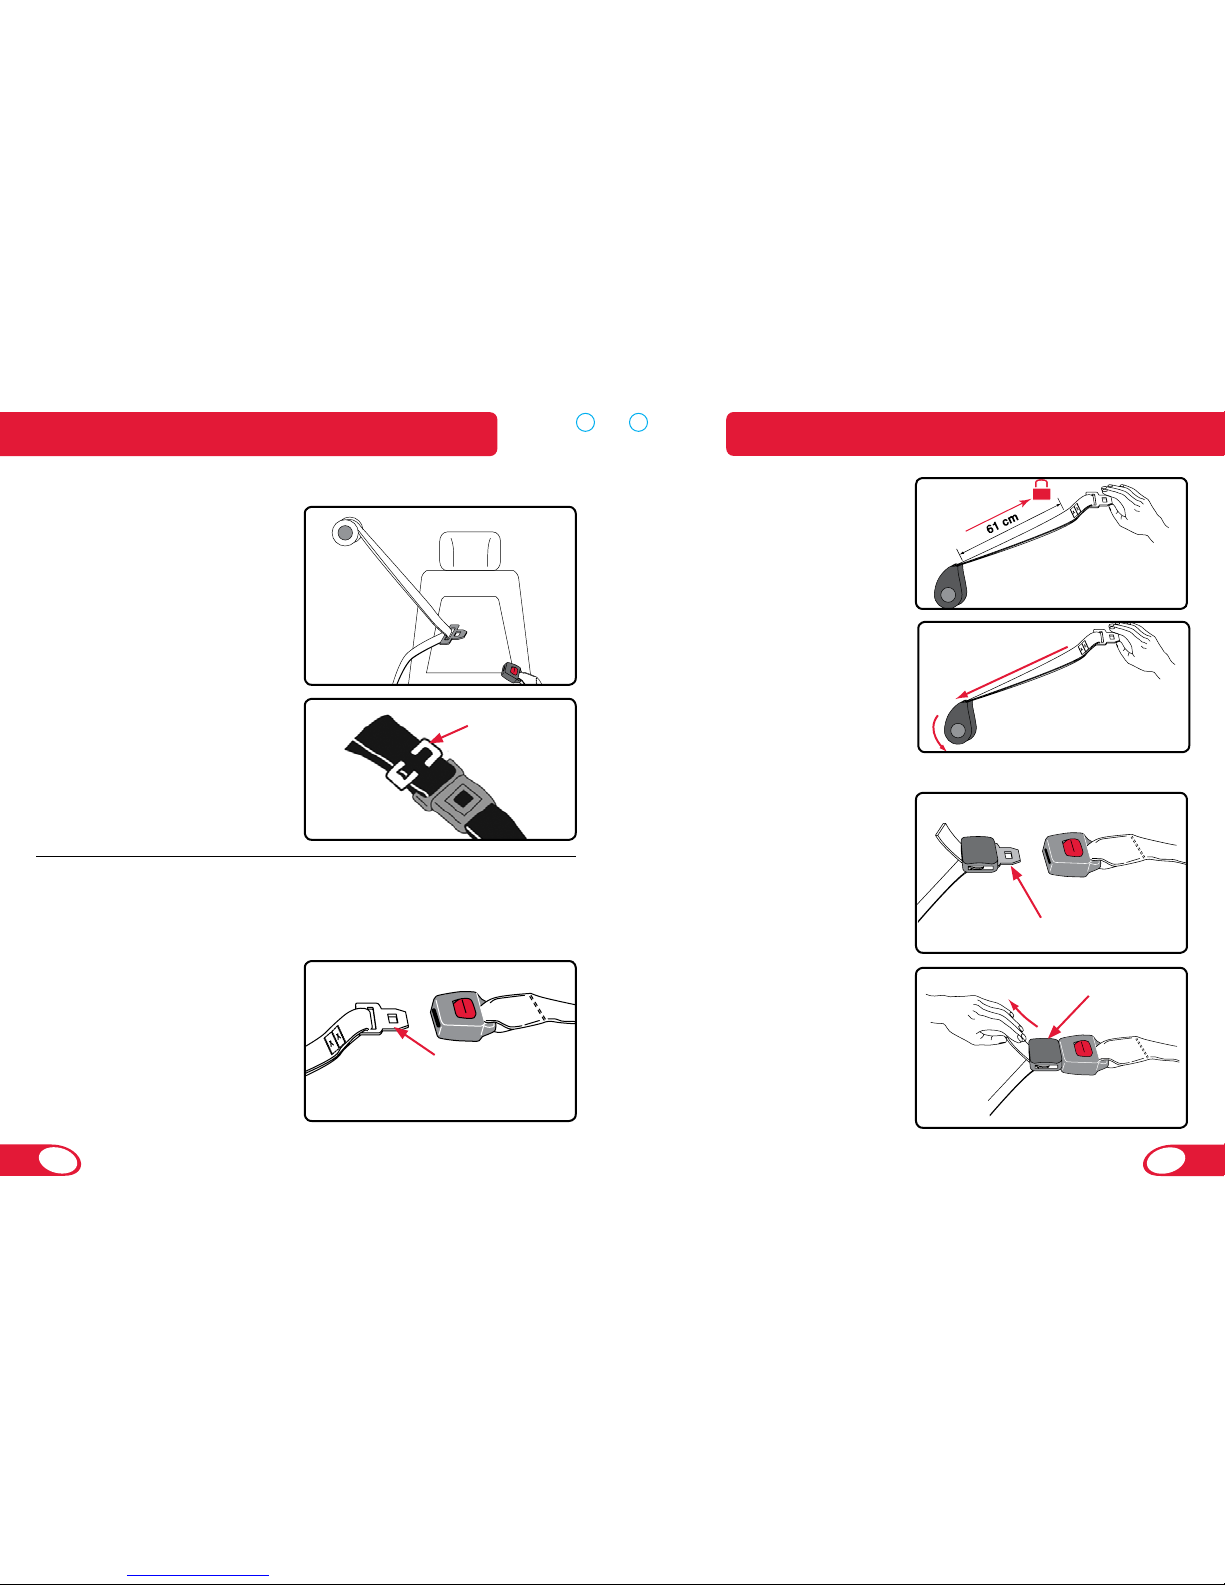
Switchable Retractor in ALR Mode with Sliding Latch Plate3.
Has a latch plate that freely
a
slides along the vehicle seat
belt webbing.
Has a retractor that can be
b
switched to function as an
ALR by pulling the vehicle
seat belt fully out until a
clicking sound can be
heard when retracting.
To use a child seat with this *
type of vehicle seat belt, you
will need to switch to the ALR
mode or use a locking clip.
Compatible Vehicle Seat Belts
NOTE: The information in this section only applies to installation
with vehicle seat belts.
Vehicle seats and seat belts differ from vehicle to vehicle. Refer to
your vehicle owner’s manual for specific information about your
vehicle seat belts and their use with child seats.
Lap-Shoulder (3-Point) Belt
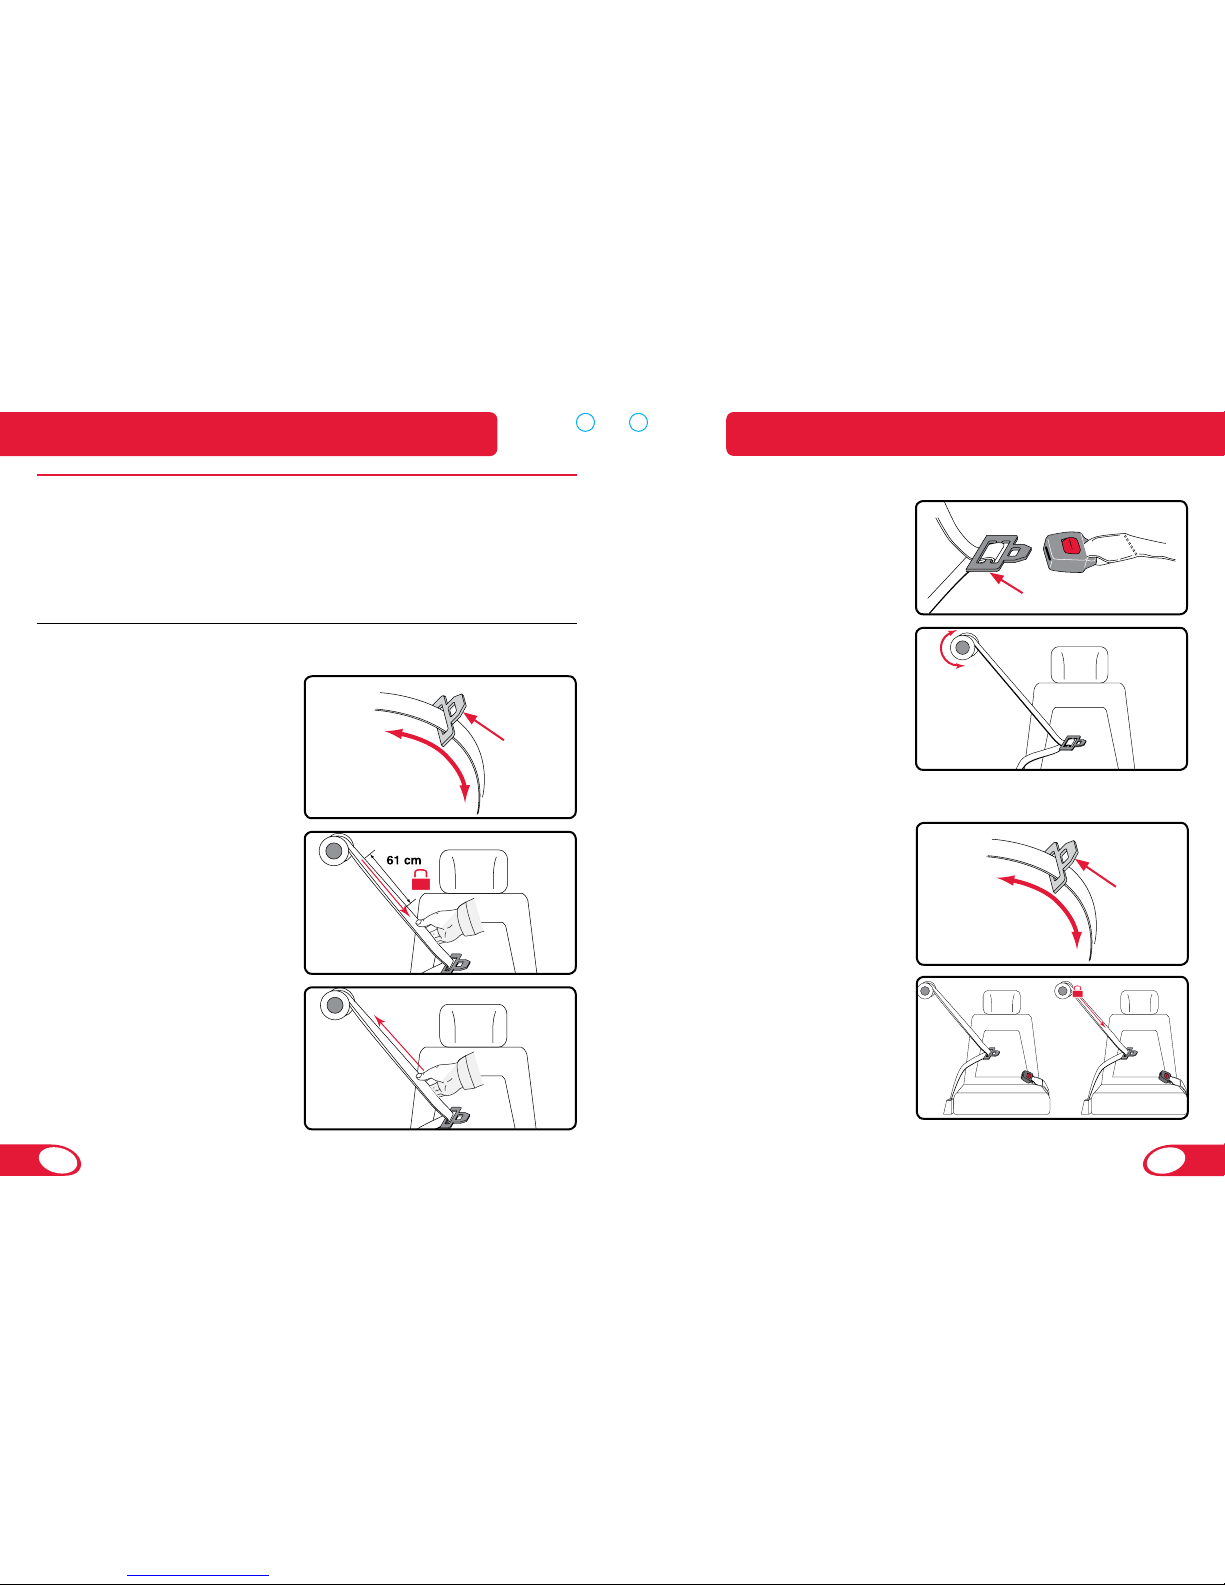
ALR (Automatic Locking Retractor) with Sliding Latch Plate 1.
Has a latch plate that freely
a
slides along the vehicle seat
belt webbing.
Has a retractor that stops the
b
belt from being pulled out
again once the belt webbing
has been pulled out at least
61 cm (24 in.).
Tightens by feeding the
c
belt webbing back into the
retractor.
ELR (Emergency Locking Retractor) with Locking Latch Plate2.
Has a latch plate that does
a
not allow the lap part of the
belt to become loose after it
is buckled.
Has a retractor that locks
b
only in an emergency
situation such as sudden
stop or crash.
Latch
Plate
Latch
Plate
Latch
Plate
Vehicle CompatibilityVehicle Compatibility
Page 8
12
13
Locking Latch Plate6.
Has a latch plate that
a
does not allow the belt to
become loose after it is
buckled.
Tightens by pulling on the
b
belt webbing.
ELR (Emergency Locking Retractor) with a Sliding Latch Plate4.
Has a latch plate that freely
a
slides along the vehicle
seat belt webbing.
Has a retractor that locks
b
only in an emergency
situation such as sudden
stop or crash.
IMPORTANT: This belt type requires
the use of a locking clip to secure
the seat during installation. A locking
clip must be secured approximately
2.5 cm (1 in.) from the latch plate to
secure the child seat.
Call Britax Consumer Services at
1(888) 427-4829 to obtain a locking
clip.
Has a retractor that stops the b
belt from being pulled out
again once the belt webbing
has been pulled out at least
61 cm (24 in.).
Tightens by feeding the
c
belt webbing back into the
retractor.
Latch
Plate
Adjuster
Latch
Plate
Lap Belt
IMPORTANT: A Lap belt may only be used to install the child seat
in harness mode and should never be used to secure your child in
booster mode.
ALR (Automatic Locking 5.
Retractor)
Has a latch plate that is a
sewn into the webbing.
2.5 cm (1 in.)
from Latch
Plate
Vehicle CompatibilityVehicle Compatibility
Page 9
14
15
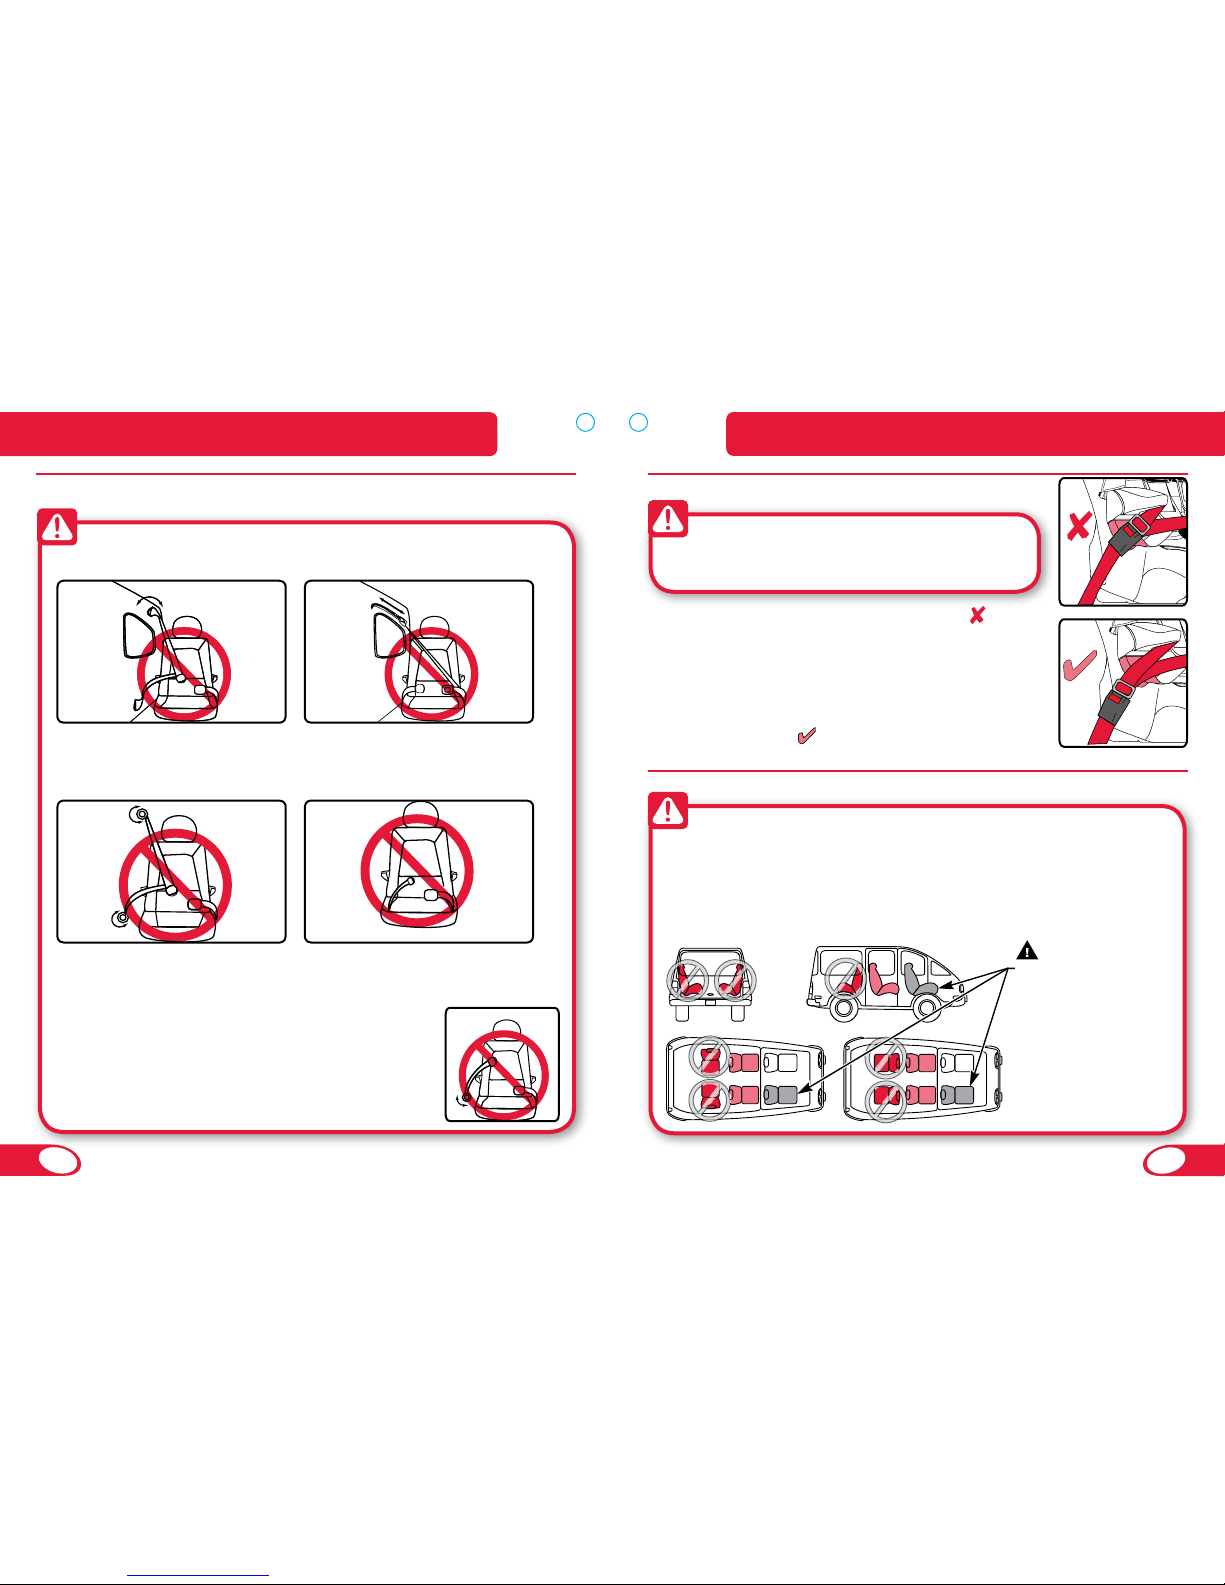
Vehicle Buckle Positions
WARNING! The following types of vehicle seat belts are
NOT compatible with this child seat:
Incompatible Vehicle Seat Belts
Lap-shoulder belts with 1
top or bottom anchor
points on the vehicle door.
Motorized, automatic vehicle 2
seat belts.
Lap-shoulder belts that have 3
a separate retractor each
for the lap part and shoulder
part.
Lap belts forward of the 4
vehicle seat bight.
Lap belts that have a retractor that locks only 5
in case of a sudden stop (emergency locking
retractor or ELR).
WARNING! Some vehicles have no seating positions which
are compatible with this child seat or any other child seat. If in
doubt, contact the vehicle manufacturer for assistance.
Forward-facing vehicle seats MUST be used with this child
seat. Side-facing or rear-facing seats CANNOT be used. See
diagram below.
Vehicle Seating Positions
DO NOT place a child seat
in the front seat of a
vehicle with a passenger
air bag unless
deactivated. DEATH or
SERIOUS INJURY can
occur. See your vehicle
owner's manual for child
seat installation
instructions. The back
seat is the safest place for
children 12 and under.
WARNING!
WARNING! The position of the vehicle
seat belt buckle can adversely affect the
stability of the child seat.
If the buckle lies near the incorrect position ( ) when
the vehicle seat belt is tightened, try fitting the child
seat in another seating position in the vehicle OR
consult your vehicle owner’s manual to see if you
can lower the vehicle buckle position by twisting the
vehicle buckle stalk. If it is not possible to achieve
the correct position (
) for the buckle, then another
seating position MUST be used.
Vehicle CompatibilityVehicle Compatibility
Page 10
16
17
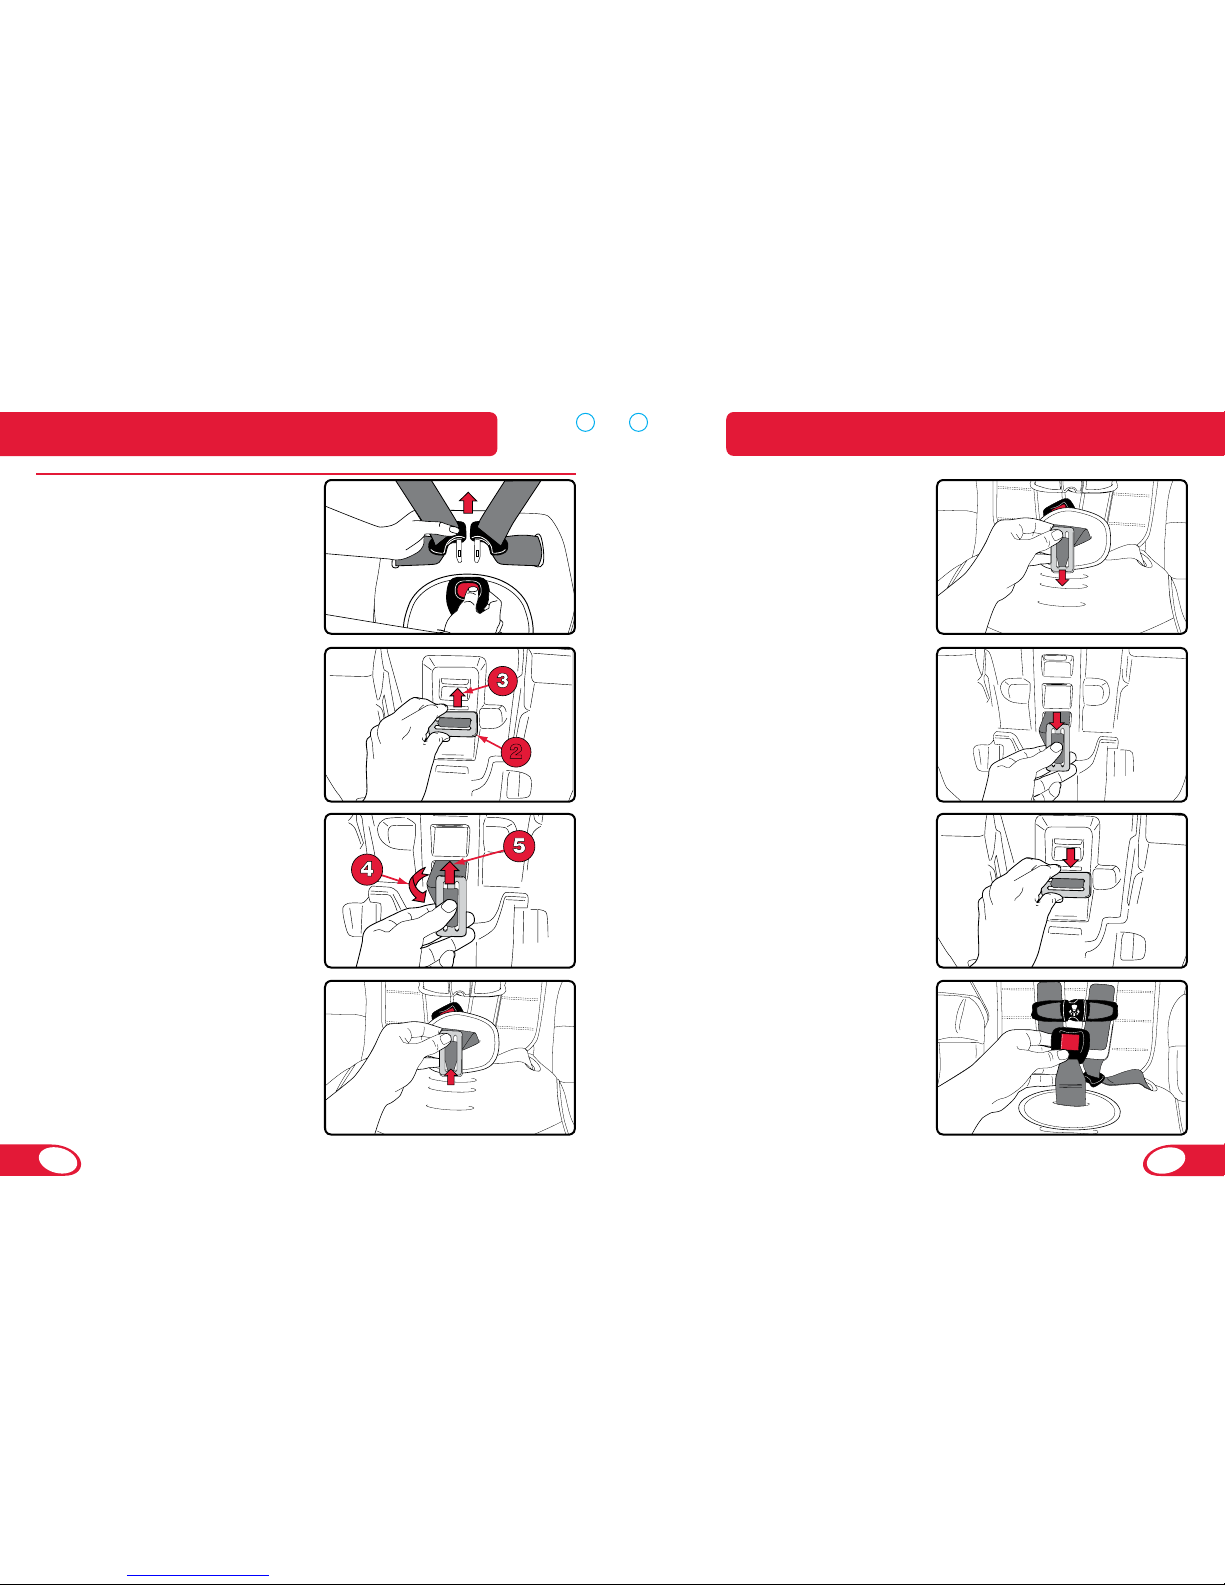
Harness Mode: Harness Height Adjustment
IMPORTANT: Make all adjustments for the fit of your child before
using the child seat. Place the child seat on the floor and have your
child sit in the seat. Follow the instructions on the following pages
to make the proper adjustments to the harness, buckle, and head
restraint.
WARNING! Head restraint adjustment is for use in Booster
Mode ONLY. DO NOT Use the head restraint adjuster when the
harness is attached.
Lift the head restraint 2
adjuster release to move
the head restraint.
Loosen the harness. 1
Press release levera
Pull both harness straps b
forward
Lift and slide the harness 2
height adjuster into the
desired position, then
release.
Ensure the adjuster is *
seated securely between
the notches.
Booster Mode: Head Restraint Adjustment
Remove the locking screw
1
from the head restraint
adjuster and insert into the
shell to store for later use.
IMPORTANT: The vehicle seat belt must be positioned at or above
the child’s shoulder through the shoulder belt guide.
IMPORTANT: In harness mode,
the harness height adjuster also
adjusts the height for the head
restraint. Always position the
harness straps at or above your
child’s shoulders.
Locking Screw
storage
Shoulder level
Above Shoulder Level
Below Shoulder Level
Child Seat FunctionsChild Seat Functions
Page 11
18
19
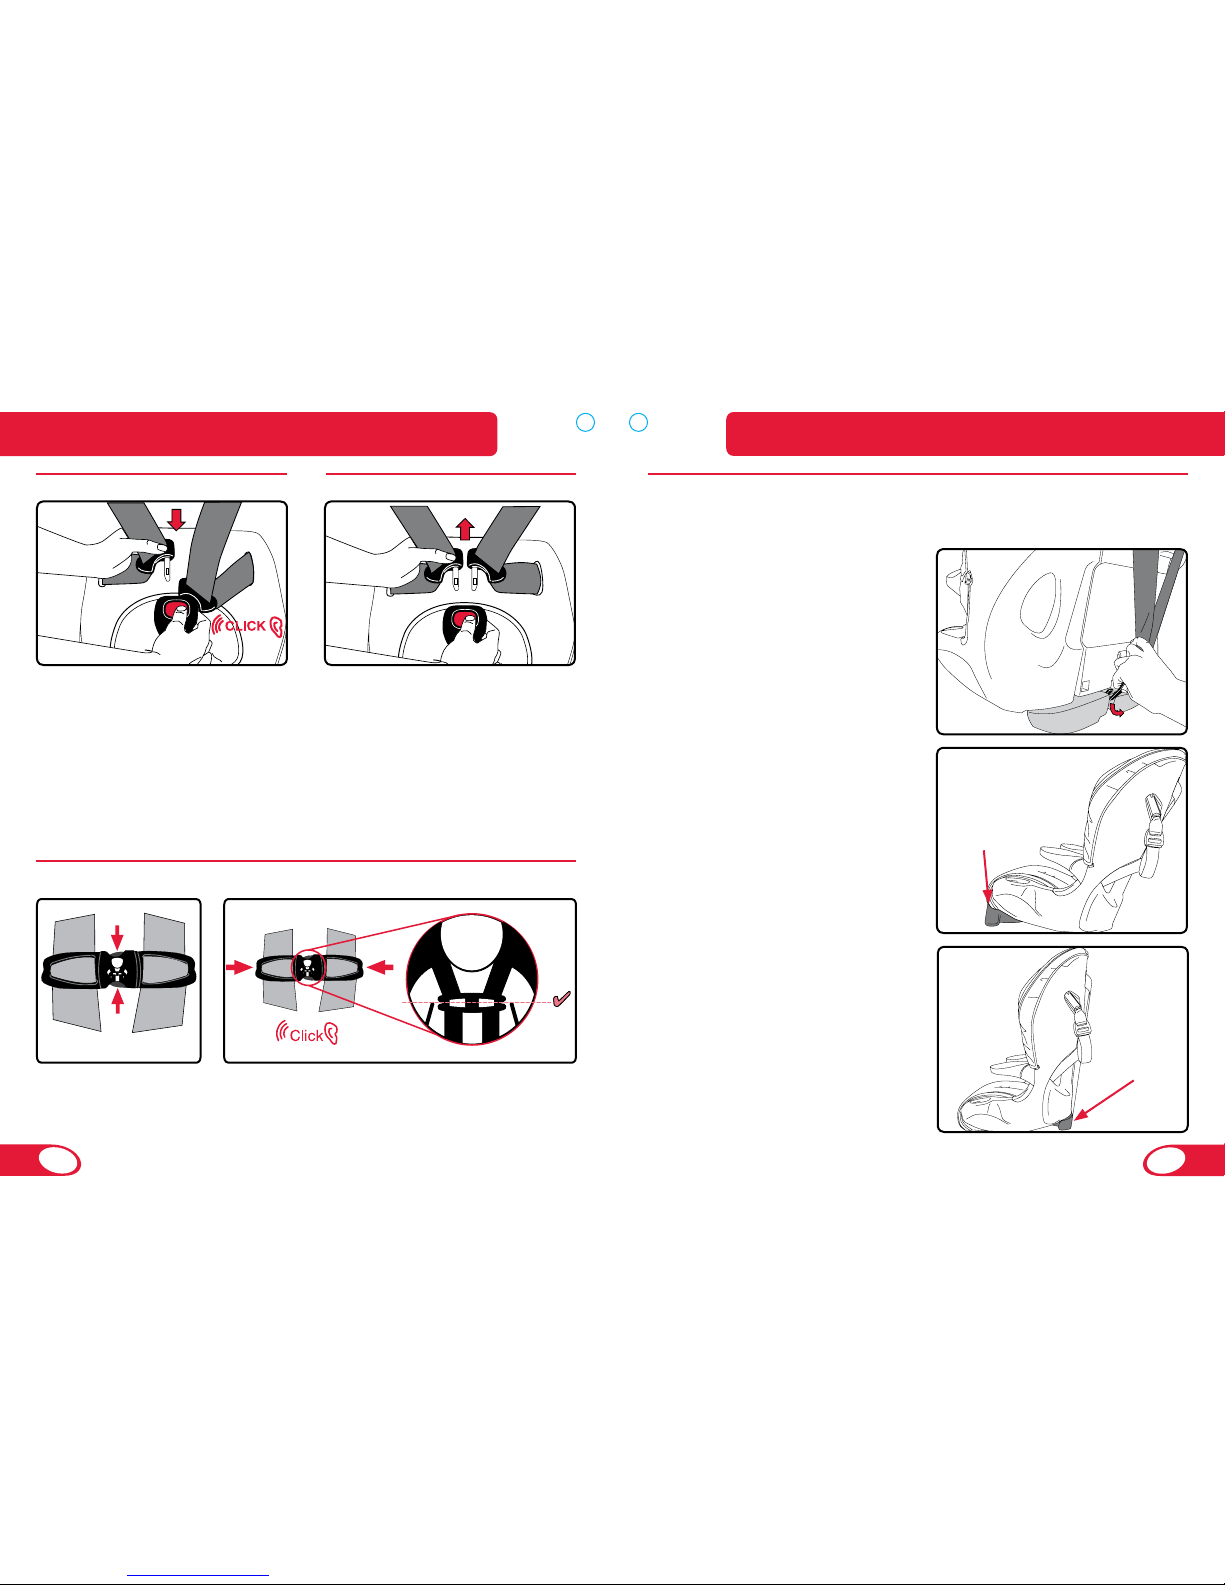
Adjusting Buckle Position
Removing the Buckle
Unbuckle the harness by
1
pressing the release button
and pulling the tongues.
Re-threading the Buckle
IMPORTANT: Select the slot
closest to, but not under the child.
Turn and push the buckle 1
retainer through the slot in the
cover and child seat shell.
Locate the buckle retainer on
2
the bottom of the child seat.
Slide the buckle retainer up
3
or down to release it from the
child seat shell.
Pull the buckle retainer away
4
from the child seat to loosen.
Turn and push the buckle
5
retainer through the slot in the
child seat shell.
Pull the buckle retainer 2
through the slots in the cover
and child seat shell to the
bottom of the child seat.
Pull the buckle away from the
4
child seat until tight.
Ensure that the buckle strap is *
not twisted.
2
Pull the buckle retainer 6
through the slots in the child
seat shell and cover to the top
of the child seat.
Slide the buckle retainer back
3
into place to hold it against
the child seat shell.
Child Seat FunctionsChild Seat Functions
Page 12
20
21
Insert one tongue at a time into
the buckle.
NOTE: Proper connection is
confirmed with an audible click
after inserting each buckle
tongue.
Fastening the Buckle Releasing the Buckle
Press the release button and
pull the tongues from the
buckle.
NOTE: Periodically clean
the buckle to ensure proper
operation. See Page 67.
Using the Chest Clip
Squeeze to
1
open
Push together to fasten
2
NOTE: Always position the chest clip at
armpit level.
Using the Positioning Block
NOTE: Set the positioning block position BEFORE installing.
Unhook the Versa-Tether from
1
the storage clip
Harness Position2
Booster Position3
Positioning
Block
Positioning
Block
Child Seat FunctionsChild Seat Functions
Page 13
22
23
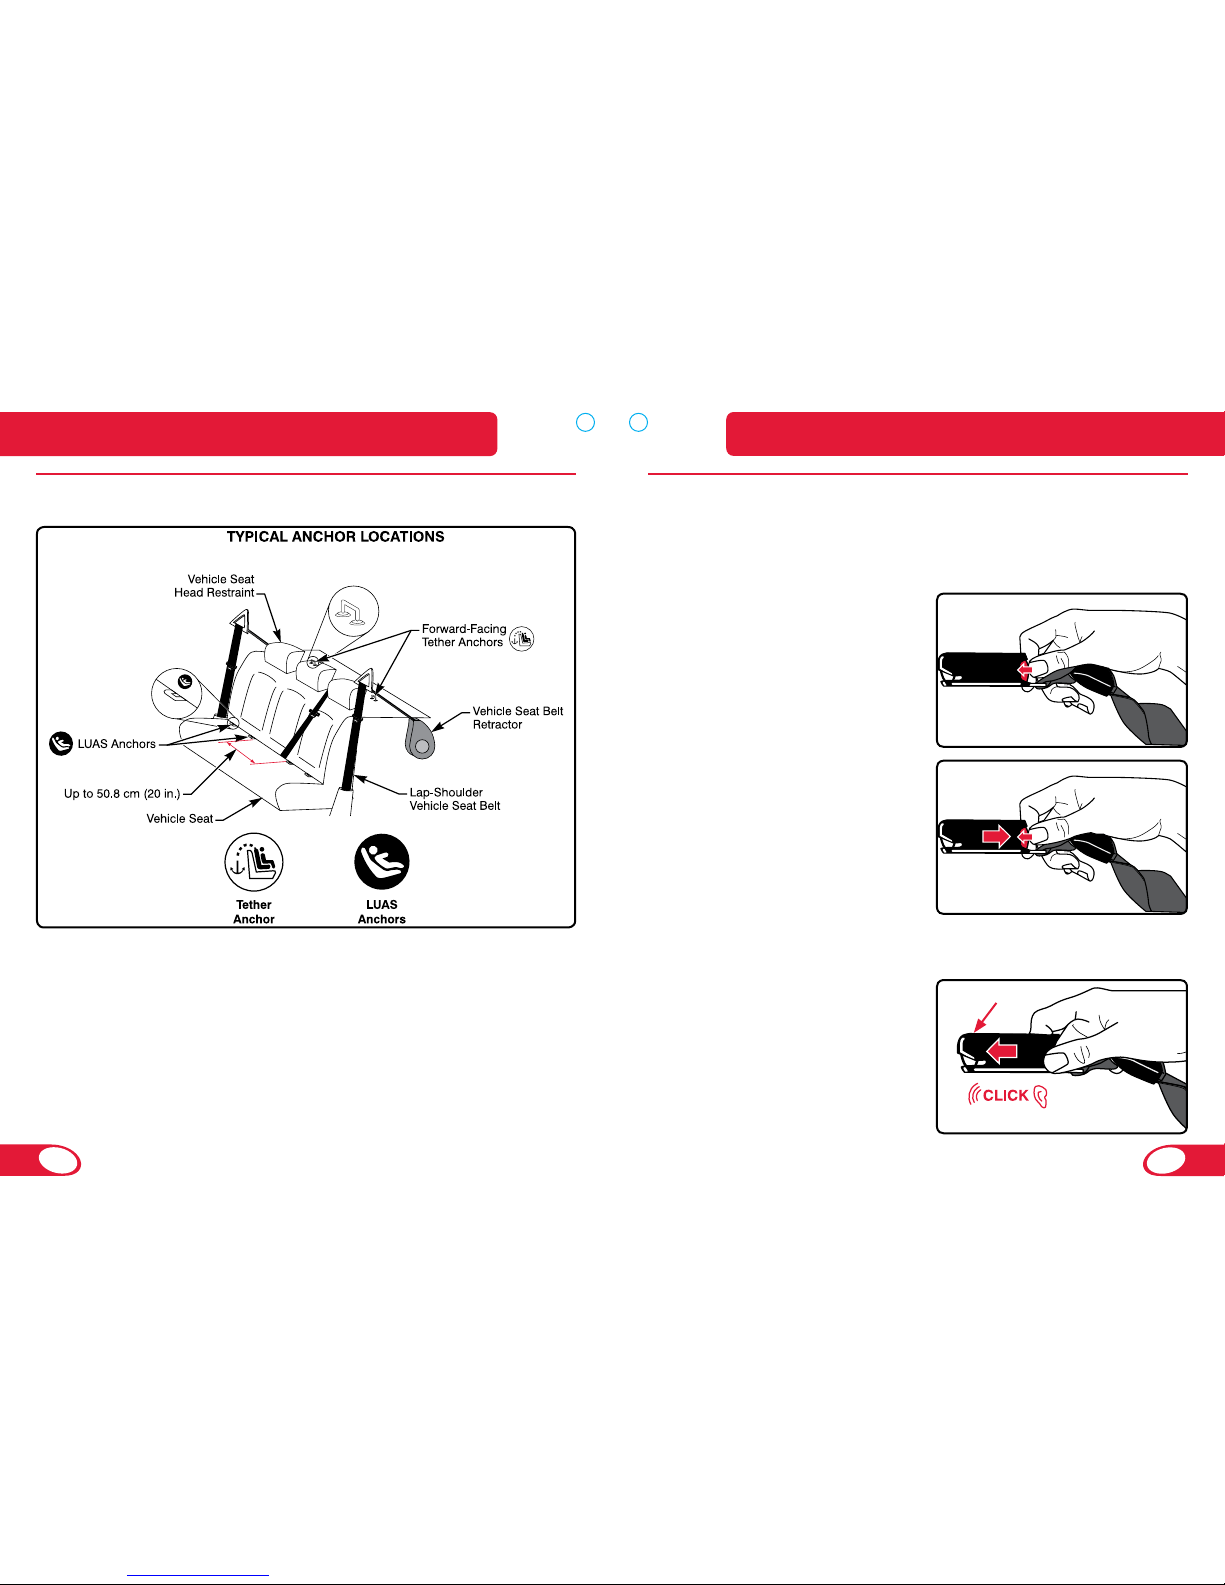
Using the Lower Connector System (LCS)
The LCS connectors are located on the sides of the shell in the
storage slots. Store the LCS connectors when not in use.
To remove the LCS connector from the storage slot or lower
anchor:
Press and hold the red release
1
button.
Pull the LCS connector from
2
the storage slot or lower
anchor.
To attach the LCS connector to the storage slot or lower
anchor:
Firmly push the LCS connector
into the slot or lower anchor until a
click is heard to store.
NOTE: The LCS connectors store
in the slots with the top down.
Using the Lower Universal Anchorage System (LUAS)
and Tether
The figure above shows typical locations for lower anchors and
tether anchors in a vehicle. Check your vehicle owner’s manual for
the exact LUAS anchor locations and seating positions (if equipped),
information on use with a child seat, and for the maximum weight
rating for the LUAS anchors.
Standard vehicle seat spacing between LUAS anchors is 27.9 cm
(11 inches). This child seat can be used in a seating position with
up to 50.8 cm (20 inches) of space between the LUAS anchors if the
vehicle manufacturer allows.
Top
Child Seat FunctionsChild Seat Functions
Page 14
24
25
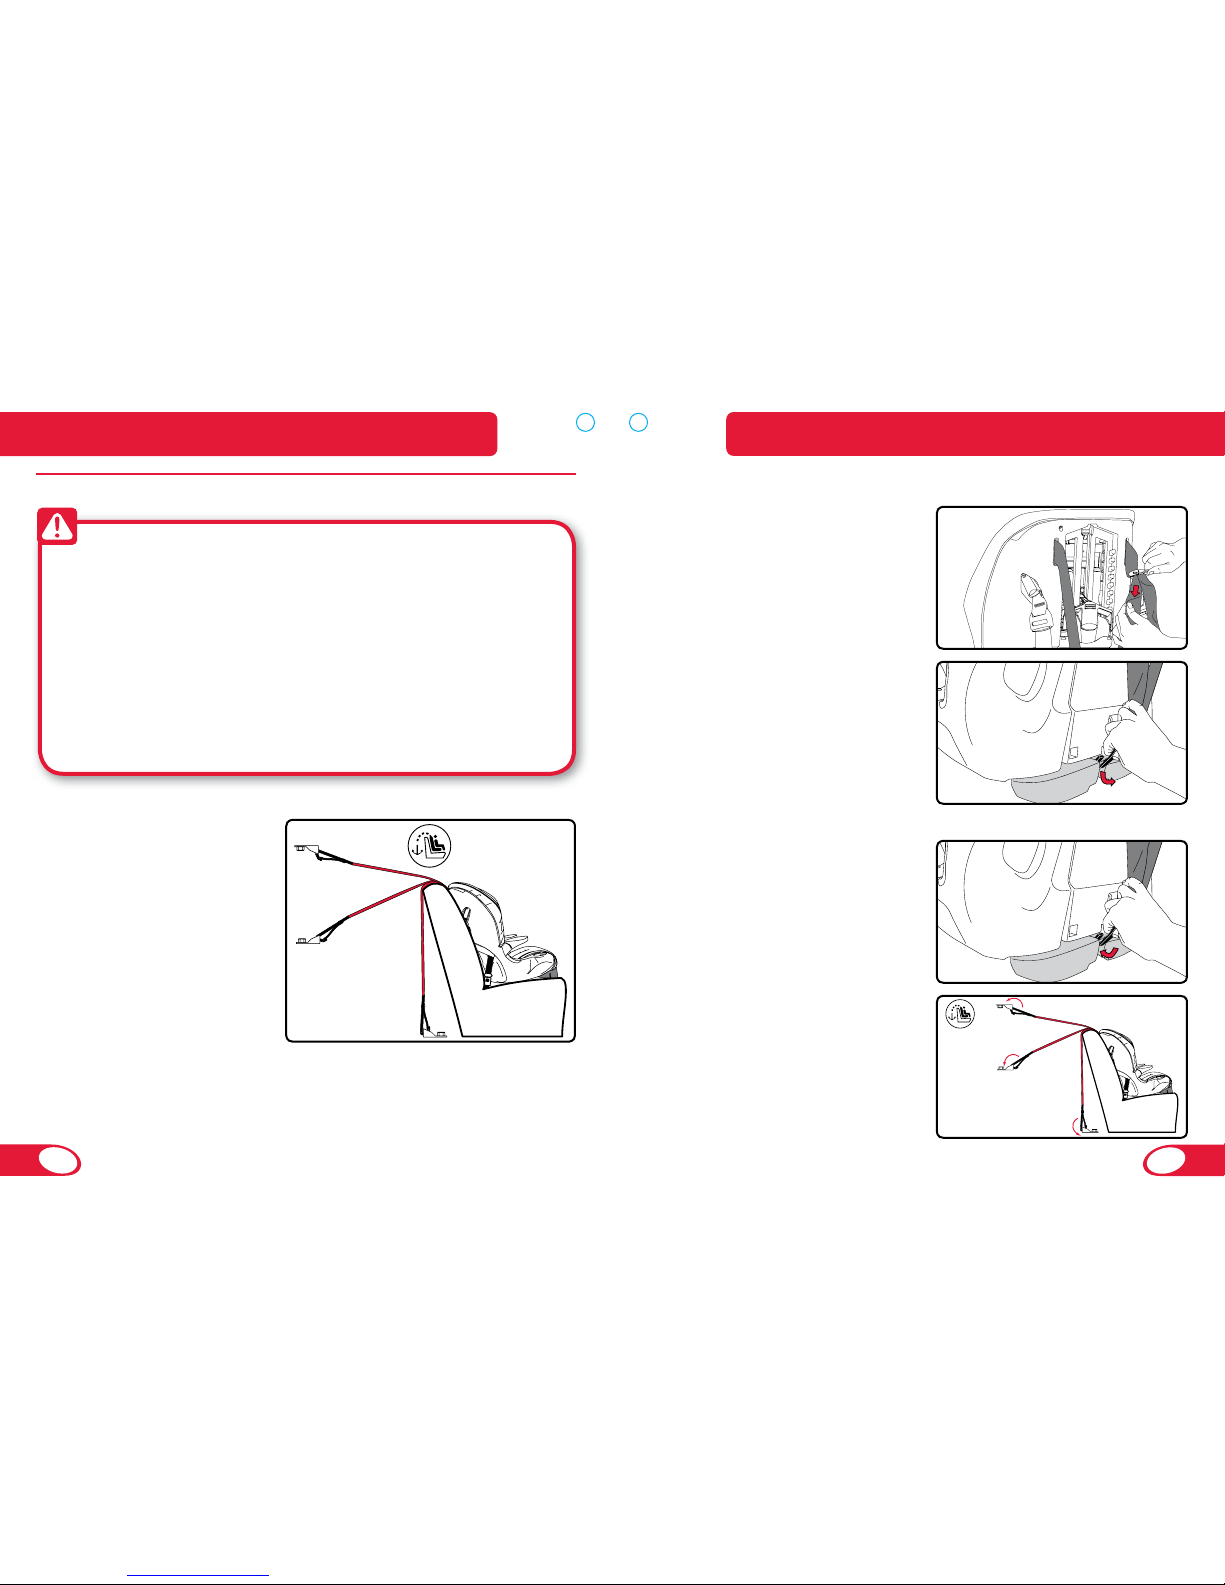
To remove the Versa-Tether from the storage clip:
Remove the webbing from the
1
elastic strap and loosen the
Versa-Tether.
Remove the Versa-Tether
2
®
hook from the storage clip.
To attach the Versa-Tether to the storage clip or a tether
anchor:
Firmly press the hook over the
1
storage clip or tether anchor
point.
Always attach the hook over 2
the anchor point.
IMPORTANT: Use the elastic strap
to contain extra webbing. Always
ensure any excess webbing is
contained within your vehicle.
Using the Versa-Tether
WARNING!
Attach the Versa-Tether only to tether anchors identified by •
your vehicle manufacturer as tether anchorage points.
If your vehicle does not currently have a tether anchor •
attachment, refer to your vehicle owner’s manual or
contact your vehicle man u fac tur er for assistance. DO
NOT modify your vehicle without advice from your vehicle
manufacturer.
You MUST always• use the Versa-Tether in harness mode.
Using the tether will improve the stability of your child seat
and reduce the risk of injury.
Tether anchor locations vary
from vehicle to vehicle. Check
your vehicle owner’s manual
and look for the tether anchor
symbol shown in the diagram
to help identify where the top
tether anchor point is located
in your vehicle.
OR
OR
OR
OR
Child Seat FunctionsChild Seat Functions
Page 15

26
27
WARNING!
Long belt path is only for use with a lap-shoulder belt. Never •
use the long belt path option with the LUAS or a lap belt.
Use• only the vehicle’s lap and shoulder belt system when
restraining a child in booster mode. Never restrain a child with
only a lap belt in booster mode.
You MUST always• use the Versa-Tether in harness mode.
Install forward-facing only.•
DO NOT use anything to raise the child seat off of the vehicle seat.•
Refer to your vehicle owner’s manual or contact the vehicle •
manufacturer for the maximum weight rating for the LUAS
anchors in your vehicle. Use the vehicle seat belt (not LCS
connectors) for installations with children who weigh more than
the vehicle LUAS anchor limit. Unless specified otherwise by
the vehicle manufacturer, assume a 18.2 kg (40 lb) child is the
vehicle LUAS anchor limit.
General Information
Harness Mode
The positioning block must be •
rotated to the front when installing
the child seat in harness mode.
Based on your vehicle’s seat belt •
configuration, you may achieve
a more secure installation using
one of two approved lapshoulder belt path options (long
or short belt path). If the first
installation method results in more than 2.5 cm (1 in.) of front-toback or side-to-side movement at the belt path, try the other option.
See page 32 for information on selecting a belt path to install this
child seat in your vehicle.
Use this child seat in harness mode with children at least 2 years of •
age and 11.4 – 29.5 kg (25 – 65 lbs) who stand 76.2 – 144.8 cm (30
– 57 in.) in height. Britax recommends using harness mode to 65 lbs
(29.5 kg). See the Child Seat Fit Recommendations section on page 8
for information on when your child has outgrown harness mode.
Booster Mode
The positioning block must •
be rotated to the back when
positioning the child seat in
booster mode.
This child seat can be used in •
booster mode with children who
stand 106.7 – 165.1 cm (42 – 65
in.) in height and weigh more
than 18.2 kg (40 lbs). Britax
recommends using harness
mode to 29.5 kg (65 lbs).
When positioning this child •
seat in booster mode use the
vehicle’s lap-shoulder belt to
secure the child and child seat
into the desired seating position.
In booster mode, this child seat •
can be positioned on the vehicle
seat using the LUAS. Use the
vehicle’s lap-shoulder belt to
secure the child. Ensure that the LUAS system does not interfere with
the vehicle seat belt function and alignment when securing your child.
Positioning
Block
Positioning
Block
Installing the Child SeatInstalling the Child Seat
Page 16
28
29
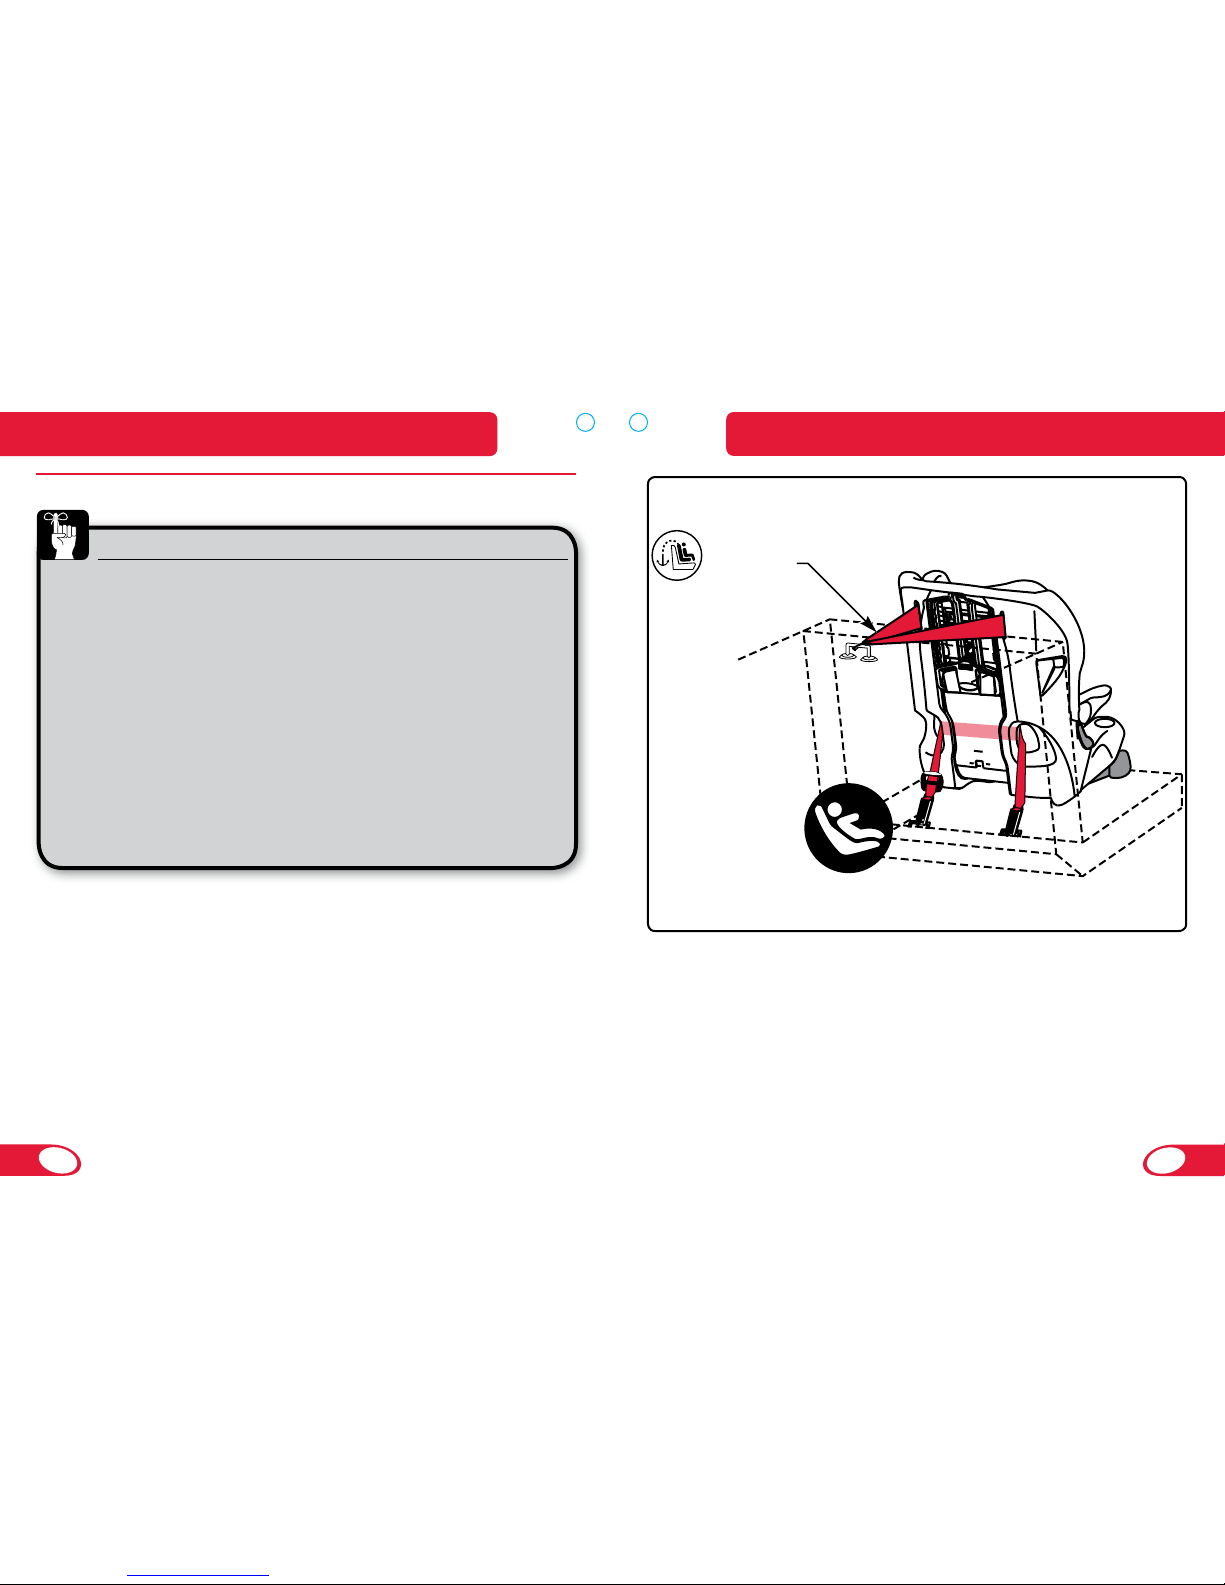
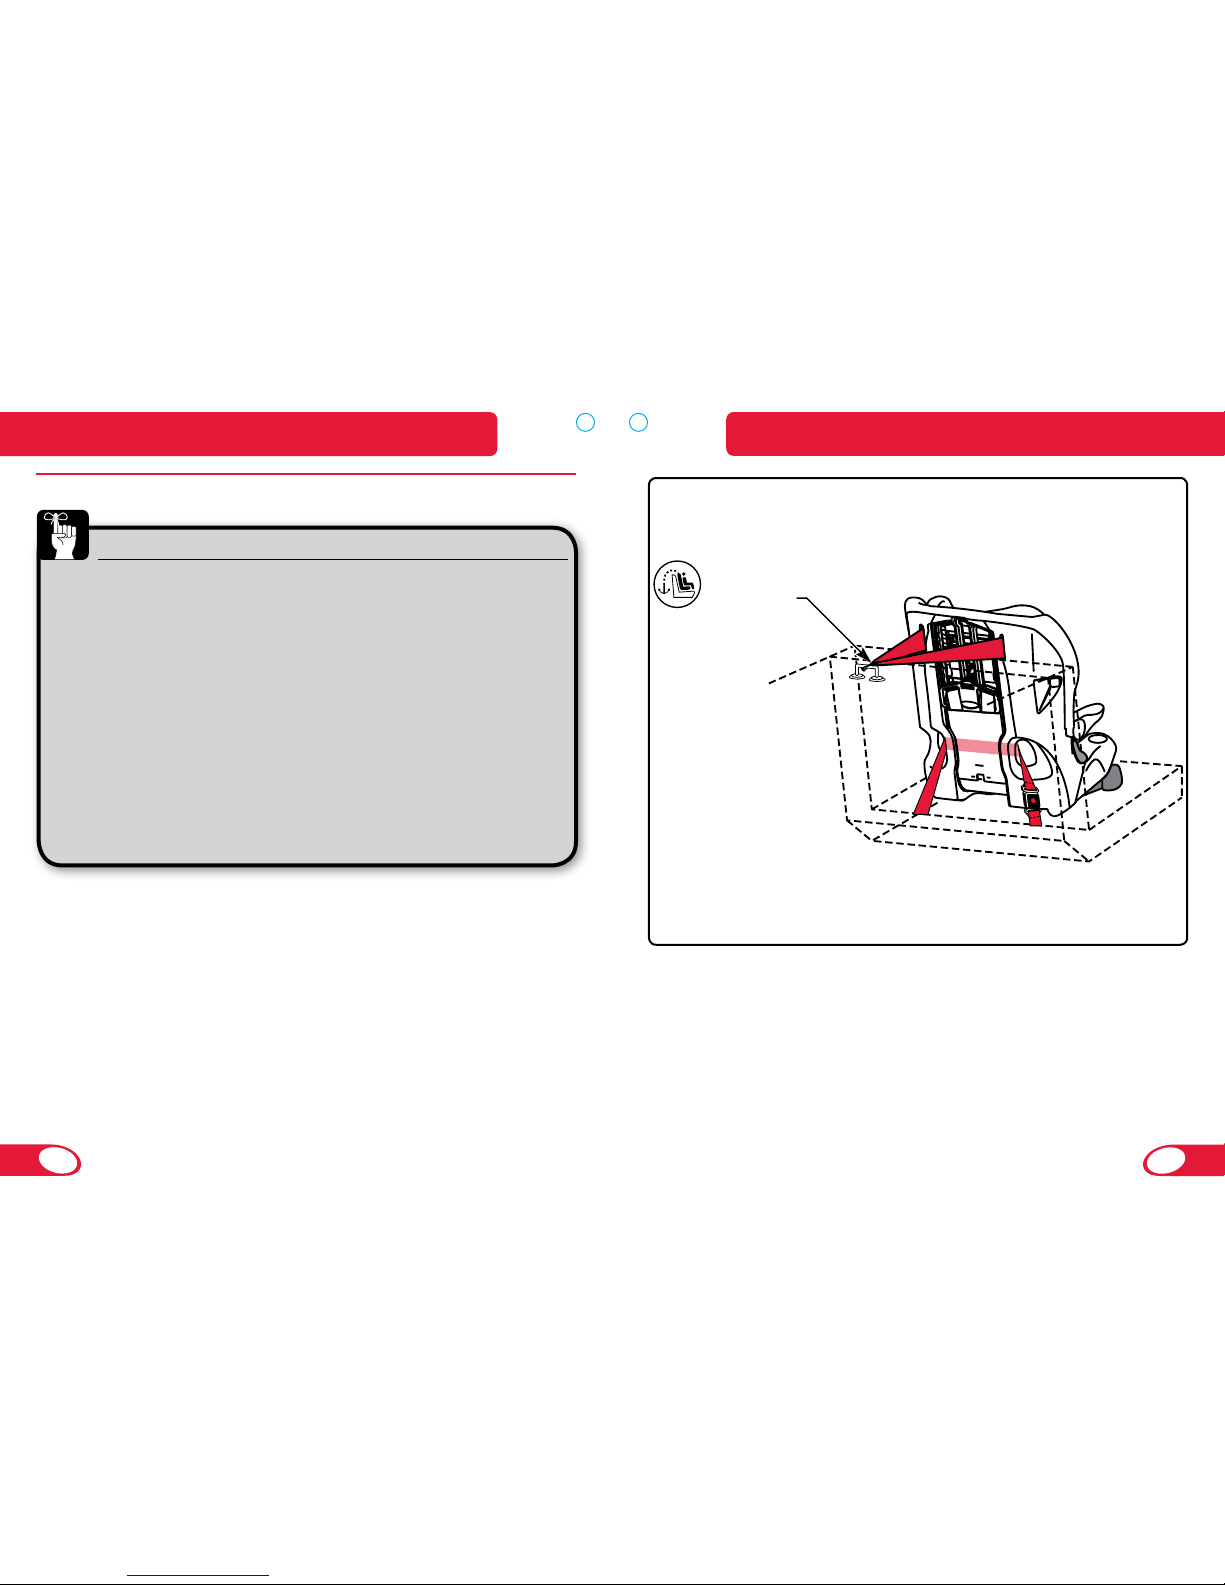
LCS – Short Path
Before you begin:
Check that your vehicle has LUAS anchors. 9
Check your vehicle owner’s manual for the vehicle’s LUAS *
anchor limits.
Check that your vehicle has a top tether anchor. 9
You MUST always* use the Versa-Tether in harness mode.
Using the tether will improve the stability of your child seat and
reduce the risk of injury. Check your vehicle owner’s manual for
tether anchor locations.
Remove the Versa-Tether 9
®
hook from the storage clip and
place it over the child seat back to keep it from becoming
pinned between the child seat and vehicle seat during
installation.
Versa-Te ther
(Top Te ther)
Install with the LUAS using only the short belt path as shown
above.
Installing the Child Seat: Harness ModeInstalling the Child Seat: Harness Mode
Page 17
30
31
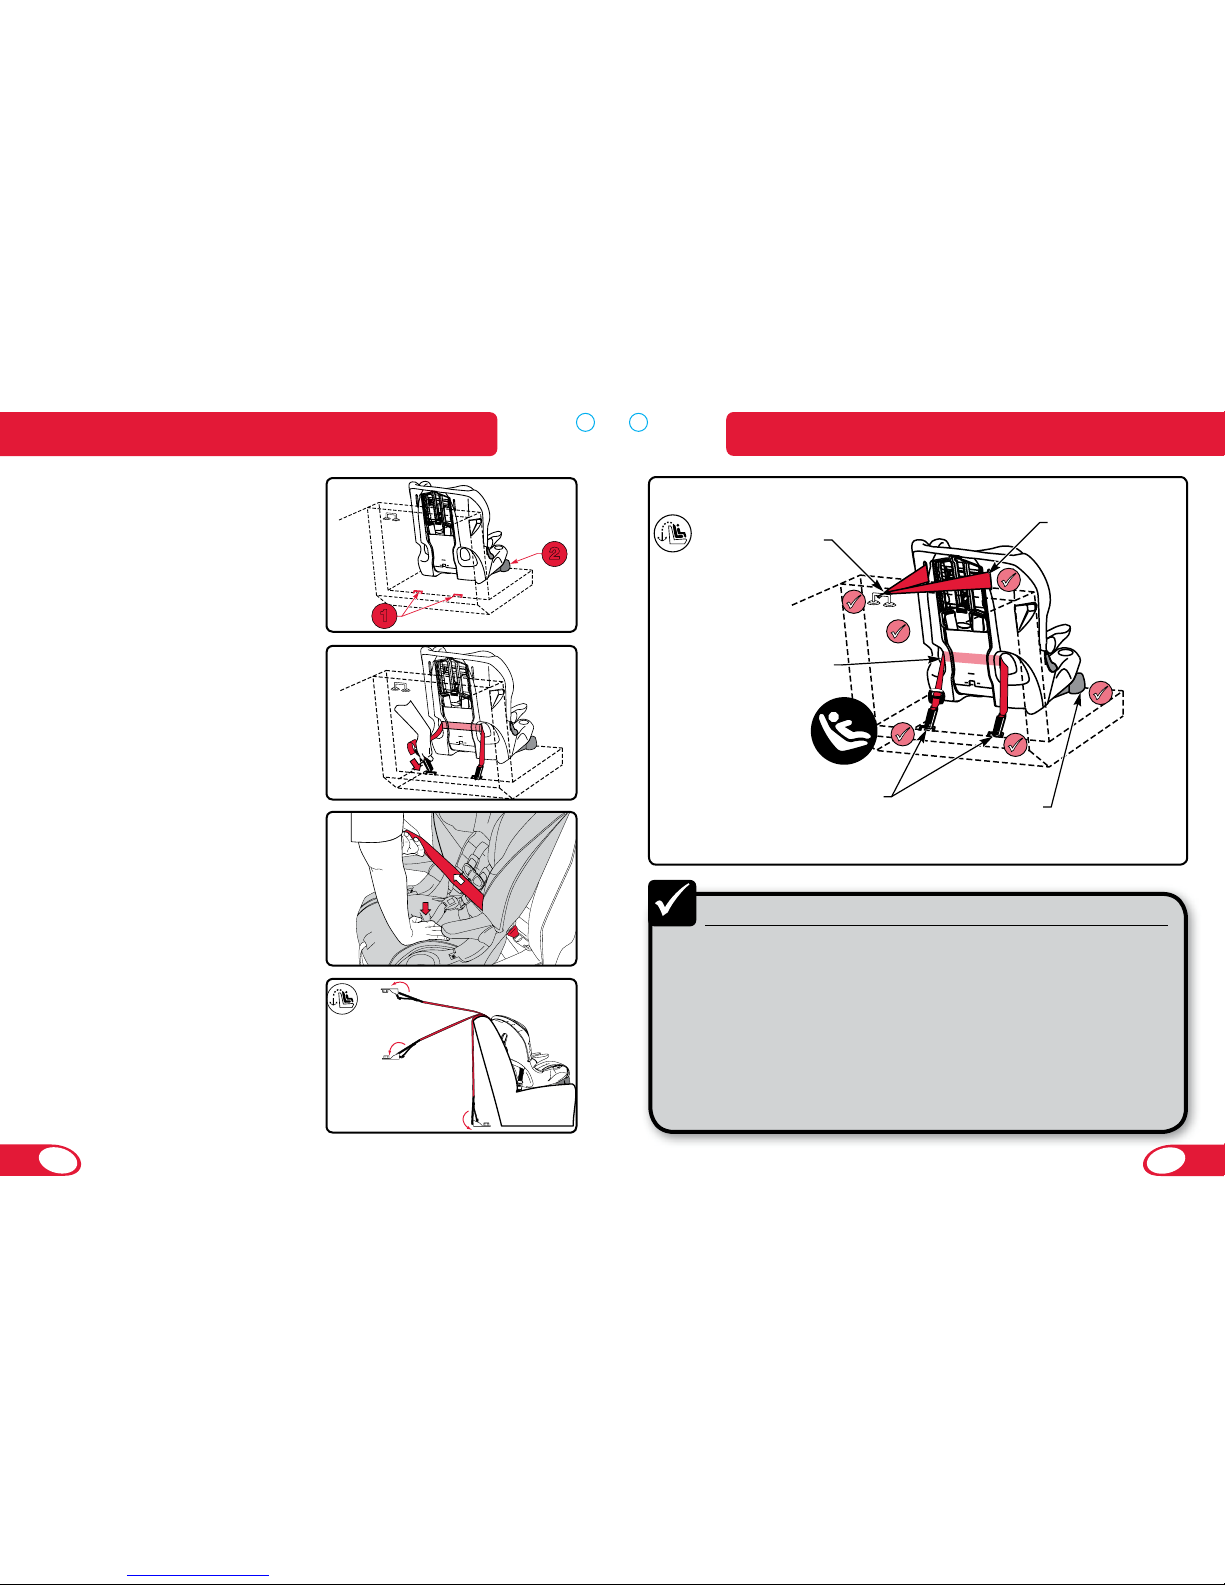
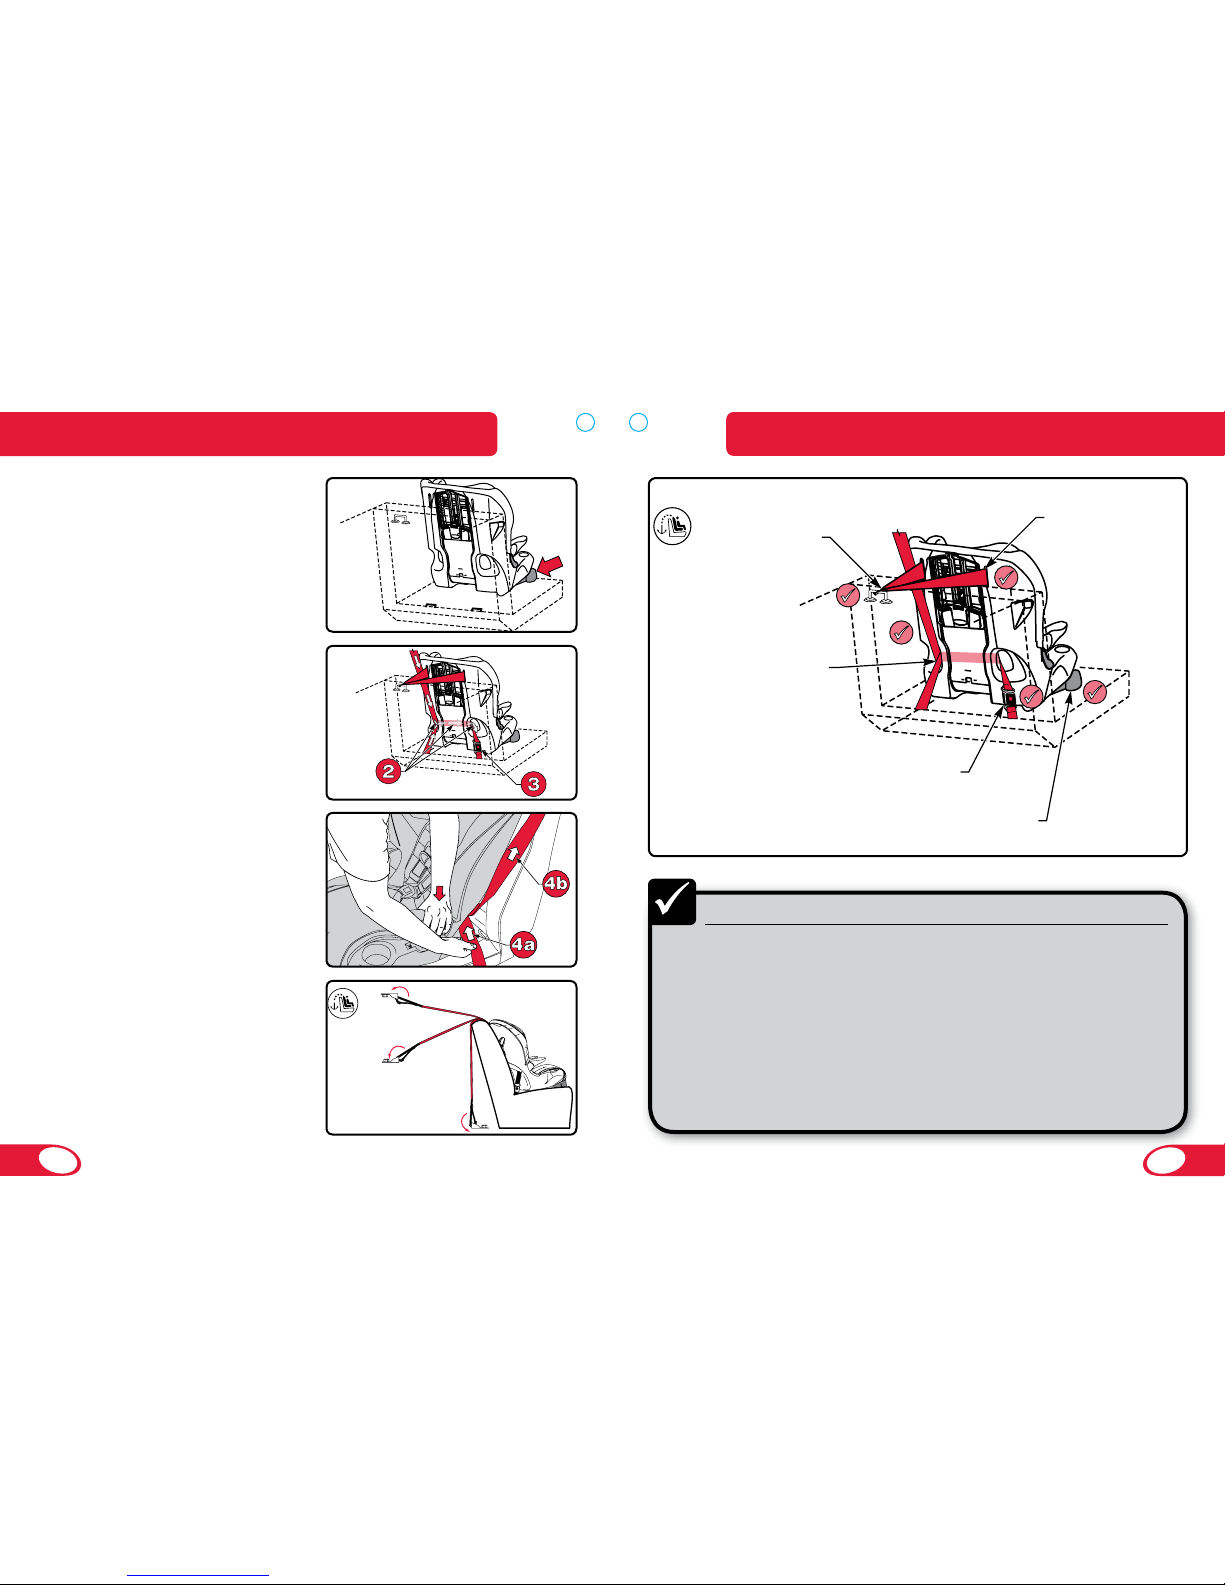
Locate the LUAS anchors in 1
your vehicle.
Ensure harness height is *
adjusted to fit your child.
Rotate the positioning block to 2
the front and place the child
seat on the vehicle seat.
Verify that the LCS strap is not
3
twisted and firmly press the
LCS connectors onto their
adjacent LUAS anchors to
attach.
Push the child seat into the
4
vehicle seat and pull the end
of the LCS strap through the
belt slot to secure.
The child seat is secure when it *
cannot be moved front-to-back
or side-to-side more than 2.5
cm (1 in.) at the belt path. If the
child seat is not secure, repeat
the installation procedure or
use a different seating location.
Firmly press the Versa-Tether5
®
hook to the vehicle tether
anchor to attach. Remove all
slack from the tether webbing.
Use the elastic strap to contain
6
extra webbing.
1
2
OR
OR
Checklist
Check that positioning block is rotated to the front. 9
Check all connections and verify that child seat is secure. 9
The child seat is secure when it cannot be moved front-to-*
back or side-to-side more than 2.5 cm (1 in.) at the belt path.
If the child seat is not secure, repeat the installation procedure
or use a different seating location.
Ensure any excess Versa-Tether 9
®
webbing is stored in elastic
band. Always ensure any excess webbing is contained within
your vehicle.
< 2.5 cm.
Check Versa-T e ther
®
(Top Te ther) attachment
Check that Versa-T e ther
®
(Top Te ther) webbing is
stored in elastic band
Check LCS
connector attachments
Check that the
Positioning Block is
rotated to the front
Check that there is
LESS than 2.5 cm (1 in.)
of movement (front to back
or side to side) at the belt path
Installing the Child Seat: Harness ModeInstalling the Child Seat: Harness Mode
Page 18
32
33
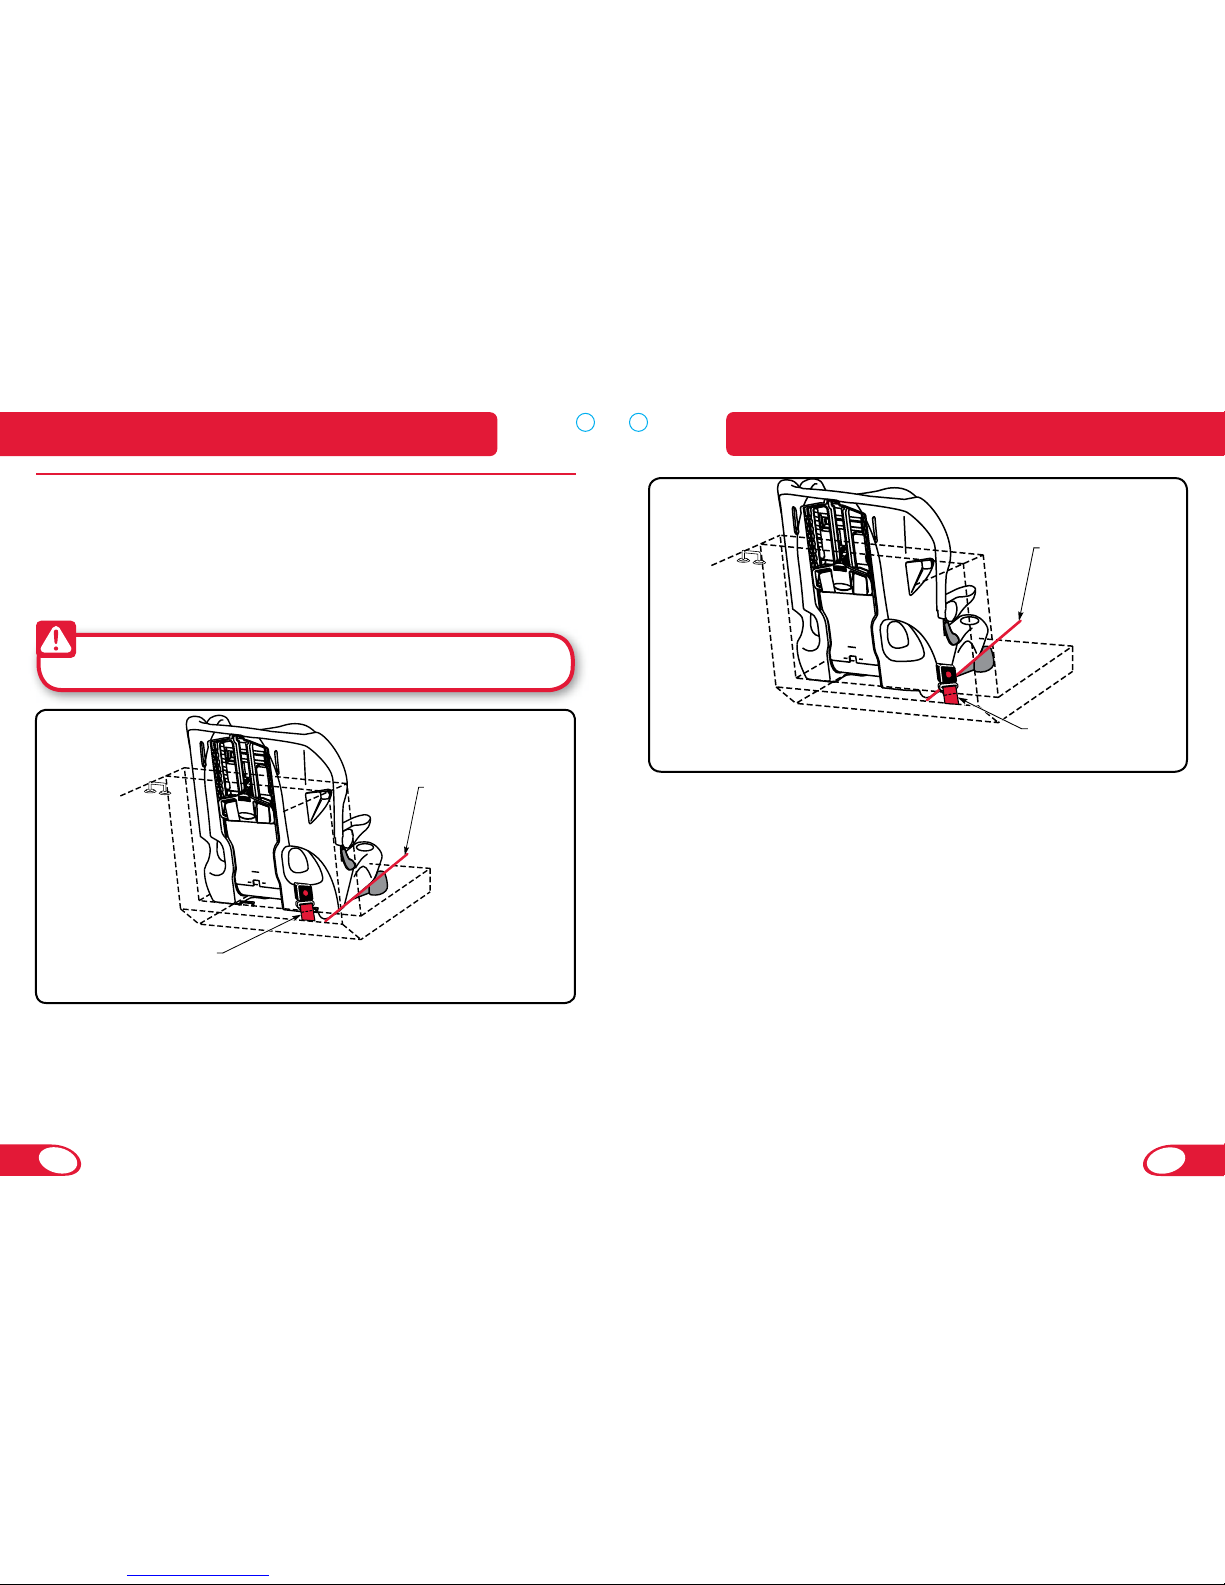
Lap-Shoulder Belt – Selecting a Belt Path
Due to variability in vehicle seat designs and belt systems, the
Frontier XT child seat can be secured to the vehicle seat by a
lap-shoulder belt with either a short belt path or a long belt path
installation method.
The following may help with selecting which belt path to try first:
WARNING! Do not use the long belt path for LUAS or lap
belt installations.
Outside edge
of child seat
Buckle stalk behind
child seat
The buckle stalk is in position for
short belt path installation
Outside edge
of child seat
Buckle stalk beside
child seat
The buckle stalk is in position for
long belt path installation
If the buckle stalk is to the side of the child seat (i.e. the child B
seat is narrower than the insertion points of the vehicle seat belt
system), then the long belt path may be the best option to try first.
If one installation method results in more than 2.5 cm (1 in.) of
front-to-back or side-to-side movement at the belt path, then try the
other method.
Both the short and long lap-shoulder belt path installation
methods meet or exceed all Canadian Motor Vehicle Safety
Standards. Either of these options can be used based upon vehicle
compatibility for children at least 2 years old and 11.4 kg (25 lbs)
up to 29.5 kg (65 lbs) in harness mode.
Rotate the positioning block to the front and place the child
A
seat on the vehicle seat in the chosen seating position. Note the
position of the vehicle buckle stalk relative to the child seat. If the
buckle stalk is behind the child seat (i.e. the child seat is wider
than the insertion points of the vehicle seat belt system), then the
short belt path may be the best option to try first.
Installing the Child Seat: Harness ModeInstalling the Child Seat: Harness Mode
Page 19
34
35
Before you begin:
Check that your vehicle has a seat belt that can be locked. 9
Check your vehicle owner’s manual to determine what type of *
vehicle seat belt you have and how it can be locked for use with
child seats. If your vehicle seat belt does not lock, a locking clip
must be used. Call Britax Consumer Services at 1(888)427-4829
to obtain a locking clip.
Check that your vehicle has a top tether anchor? 9
You MUST always* use the Versa-Tether in harness mode.
Using the tether will improve the stability of your child seat and
reduce the risk of injury. Check your vehicle owner’s manual for
tether anchor locations.
Remove the Versa-Tether 9
®
hook from the storage clip and
place it over the child seat back to keep it from becoming
pinned between the child seat and vehicle seat during
installation.
Versa-Te ther
®
(Top Te ther)
Lap-Shoulder Belt – Short Path
Short lap-shoulder belt path installation
Installing the Child Seat: Harness ModeInstalling the Child Seat: Harness Mode
Page 20
36
37
Rotate the positioning block to 1
the front and place the child
seat on the vehicle seat.
Ensure harness height is *
adjusted to fit your child.
Pull the vehicle seat belt out and 2
route the belt through the first
belt slot, under the cover and
through the second belt slot.
Verify that the belt is not
3
twisted and then buckle.
Push the child seat firmly
4
into the vehicle seat while
removing all slack from the lap
part (a), then shoulder part (b)
of the vehicle seat belt.
Ensure that the vehicle seat belt *
is locked as directed by your
vehicle owner’s manual.
The child seat is secure when it *
cannot be moved front-to-back
or side-to-side more than 2.5
cm (1 in.) at the belt path. If the
child seat is not secure, repeat
the installation procedure or
use a different seating location.
Firmly press the Versa-Tether5
®
hook to the vehicle tether
anchor to attach. Remove all
slack from the tether webbing.
Use the elastic strap to contain
6
extra webbing.
OR
OR
Checklist
Check that positioning block is rotated to the front. 9
Check all connections and verify that child seat is secure. 9
The child seat is secure when it cannot be moved front-to-*
back or side-to-side more than 2.5 cm (1 in.) at the belt path.
If the child seat is not secure, repeat the installation procedure
or use a different seating location.
Ensure any excess Versa-Tether 9
®
webbing is stored in elastic
band. Always ensure any excess webbing is contained within
your vehicle.
Check Versa-T e ther
®
(Top Te ther) attachment
Check vehicle
buckle attachment
<2.5 cm
Check that Versa-T e ther
®
(Top Te ther) webbing is
stored in elastic band
Check that the
Positioning Block is
rotated to the front
Check that there is
LESS than 2.5 cm (1 in.)
of movement (front to back
or side to side) at the belt path
Installing the Child Seat: Harness ModeInstalling the Child Seat: Harness Mode
Page 21

38
39
Before you begin:
Check that your vehicle has a seat belt that can be locked. 9
Check your vehicle owner’s manual to determine what type of *
vehicle seat belt you have and how it can be locked for use with
child seats. If your vehicle seat belt does not lock, a locking clip
must be used. Call Britax Consumer Services at 1(888)427-4829
to obtain a locking clip.
Check that your vehicle has a top tether anchor? 9
You MUST always* use the Versa-Tether in harness mode.
Using the tether will improve the stability of your child seat and
reduce the risk of injury. Check your vehicle owner’s manual for
tether anchor locations.
Remove the Versa-Tether 9
®
hook from the storage clip and
place it over the child seat back to keep it from becoming
pinned between the child seat and vehicle seat during
installation.
Versa-Te ther
®
(Top Te ther)
Long lap-shoulder belt path installation
Lap-Shoulder Belt – Long Path
Installing the Child Seat: Harness ModeInstalling the Child Seat: Harness Mode
Page 22

40
41
Rotate the positioning block to the 1
front and place the child seat on the
vehicle seat.
Ensure harness height is adjusted *
to fit your child.
Position the shoulder part of the vehicle
2
seat belt behind the head restraint.
IMPORTANT: DO NOT route the vehicle
seat belt under the cover or through the
belt guide on the head restraint.
Route the lap and shoulder parts of 3
the vehicle seat belt over the lap belt
guide, through the belt slot, across
the back of the child seat shell, then
through the second belt slot.
Verify the vehicle seat belt is not
4
twisted, then buckle.
Push the child seat firmly into the vehicle
5
seat while removing all slack from the
lap part (a), then from the shoulder part
(b) of the vehicle seat belt.
Ensure that the vehicle seat belt is *
locked as directed by your vehicle
owners manual.
The child seat is secure when it *
cannot be moved front-to-back
or side-to-side more than 2.5 cm
(1 in.) at the belt path. If the child
seat is not secure, repeat the
installation procedure or use a
different seating location.
Firmly press the Versa-Tether
6
®
hook
to the vehicle tether anchor to attach.
Remove all slack from the tether
webbing.
Use the elastic strap to contain extra
7
webbing.
3
4
OR
OR
Checklist
Check that positioning block is rotated to the front. 9
Check all connections and verify that child seat is secure. 9
The child seat is secure when it cannot be moved front-to-*
back or side-to-side more than 2.5 cm (1 in.) at the belt path.
If the child seat is not secure, repeat the installation procedure
or use a different seating location.
Ensure any excess Versa-Tether 9
®
webbing is stored in elastic
band. Always ensure any excess webbing is contained within
your vehicle
Check Versa-T e ther
®
(Top Te ther) attachment
Check vehicle
buckle attachment
<2.5 cm
Check that Versa-T e ther
®
(Top Te ther) webbing is
stored in elastic band
Check that the
Positioning Block is
rotated to the front
Check that there is
LESS than 2.5 cm (1 in.)
of movement (front to back
or side to side) at the belt path
Installing the Child Seat: Harness ModeInstalling the Child Seat: Harness Mode
Page 23
42
43
Lap Belt – Short Path
Before you begin:
Check that your vehicle has a seat belt that can be locked. 9
Check your vehicle owner’s manual to determine what type of *
vehicle seat belt you have and how it can be locked for use with
child seats.
Check that your vehicle has a top tether anchor? 9
You MUST always* use the Versa-Tether in harness mode.
Using the tether will improve the stability of your child seat and
reduce the risk of injury. Check your vehicle owner’s manual for
tether anchor locations.
Remove the Versa-Tether 9
®
hook from the storage clip and
place it over the child seat back to keep it from becoming
pinned between the child seat and vehicle seat during
installation.
Install with the lap belt using only the short belt path as shown
above.
Versa-Te ther
®
(Top Te ther)
Installing the Child Seat: Harness ModeInstalling the Child Seat: Harness Mode
Page 24

44
45
Rotate the recline block to the 1
front and place the child seat
on the vehicle seat.
Ensure harness height is *
adjusted to fit your child.
Pull the vehicle seat belt out and 2
route the belt through the first
belt slot, under the cover and
through the second belt slot.
Verify that the belt is not
3
twisted, then buckle.
Push the child seat firmly
4
into the vehicle seat while
removing all slack from the
vehicle seat belt.
Ensure that the vehicle seat *
belt is locked as directed by
your vehicle owner’s manual.
The child seat is secure when it *
cannot be moved front-to-back
or side-to-side more than 2.5
cm (1 in.) at the belt path. If the
child seat is not secure, repeat
the installation procedure or
use a different seating location.
Firmly press the Versa-Tether 5
hook to the vehicle tether
anchor to attach. Remove all
slack from the tether webbing.
Use the elastic strap to contain
6
extra webbing.
Checklist
Check that positioning block is rotated to the front. 9
Check all connections and verify that child seat is secure. 9
The child seat is secure when it cannot be moved front-to-*
back or side-to-side more than 2.5 cm (1 in.) at the belt path.
If the child seat is not secure, repeat the installation procedure
or use a different seating location.
Ensure any excess Versa-Tether 9
®
webbing is stored in elastic
band. Always ensure any excess webbing is contained within
your vehicle
2
3
OR
OR
Check Versa-T e ther
®
(Top Te ther) attachment
Check vehicle
buckle attachment
<2.5 cm
Check that Versa-T e ther
®
(Top Te ther) webbing is
stored in elastic band
Check that the
Positioning Block is
rotated to the front
Check that there is
LESS than 2.5 cm (1 in.)
of movement (front to back
or side to side) at the belt path
Installing the Child Seat: Harness ModeInstalling the Child Seat: Harness Mode
Page 25

46
47
Turn and slide the retainer 6
through the slot to remove.
Pull the harness webbing tight *
from the other side before
pulling the retainer through.
Repeat steps 5 and 6 for the
remaining harness buckle strap.
Remove the locking screw
7
from the head restraint
adjuster and insert into the
shell to store.
IMPORTANT: Store the screw in
the slot provided in the shell. Store
all parts of the harness in a safe
place. These parts will be needed
to convert the child seat back to
harness mode.
Pull the harness straps out of
4
the slots.
DO NOT remove the HUGS™ *
chest pads or chest clip.
On the bottom of the seat, 5
slide the retainer of one
harness strap up and pull it
away from the child seat shell.
This seat may only be used in booster mode with children who
stand 106.7 – 165.1 cm (42 – 65 in.) in height and weigh more than
18.2 kg (40 lbs). Britax recommends booster mode only after the
child outgrows harness mode.
Harness to Booster Mode
To remove the harness and buckle:
Loosen the harness.
1
Press release levera
Pull both harness straps forwardb
Remove the belt shield and 2
unhook the harness straps from
the yoke.
Replace the belt shield (a) then
3
store the yoke in the slot (b).
Locking
Screw storage
Switching Between ModesSwitching Between Modes
Page 26

48
49
Nest the harness straps by 9
inserting the right strap loop
into the left strap loop.
Remove the harness yoke
8
from storage on the belt shield
(a), then remove the belt
shield (b).
Turn and slide the retainer of
5
each harness strap through
the harness slot.
Ensure that the icon on the *
chest clip faces out.
Slide each retainer back into 6
place on the child seat shell.
Booster to Harness Mode
To replace the harness and
buckle:
Move the harness adjuster to
1
the highest position (a), then
move the head restraint to the
lowest position (b).
Ensure that harness slots in *
the cover, head restraint and
harness adjuster are aligned.
Replace the locking screw 2
to lock the head restraint
adjuster.
Turn and slide the retainer of
3
the buckle strap through the
buckle slot.
Choose the slot that is closest *
to, but not under your child.
Slide the retainer back into 4
place to hold it against the
child seat shell. Verify that the
strap is not twisted, and that
the button faces out.
Locking
Screw storage
Insert the harness straps 7
through the slots in the cover,
shell, and harness adjuster to
the back of the child seat.
Switching Between ModesSwitching Between Modes
Page 27

50
51
Pull the adjuster strap to 13
tighten the harness.
Pull the harness adjuster away *
from the child seat (parallel
to the ground) to tighten. See
page 57.
Before reattaching the harness 10
straps, hold the harness yoke
as shown, and ensure that the
adjuster strap attached to the
yoke is not twisted.
Adjuster
Strap
Checklist
Check that the harness straps are not twisted 9
Ensure the chest clip and HUGS 9 ™ pads face outward.
Check that the adjuster strap is not twisted 9
Check that the harness yoke is in the proper orientation and 9
that the harness straps are nested securely onto the yoke
Slide nested harness straps 11
completely onto the harness
yoke.
Replace the belt shield over
12
the harness straps and yoke.
IMPORTANT: Check the harness straps and attachments before
using the child seat.
Check that Harness
Yo ke hangs as shown,
and that Harness
Straps are nested
securely on the yoke
Check that the
Chest Clip and
HUGS™ Chest
pads face outward
Check that
Harness Straps
are not twisted
Check that Adjuster
Strap is not twisted
FRONTBACK
Switching Between ModesSwitching Between Modes
Page 28

52
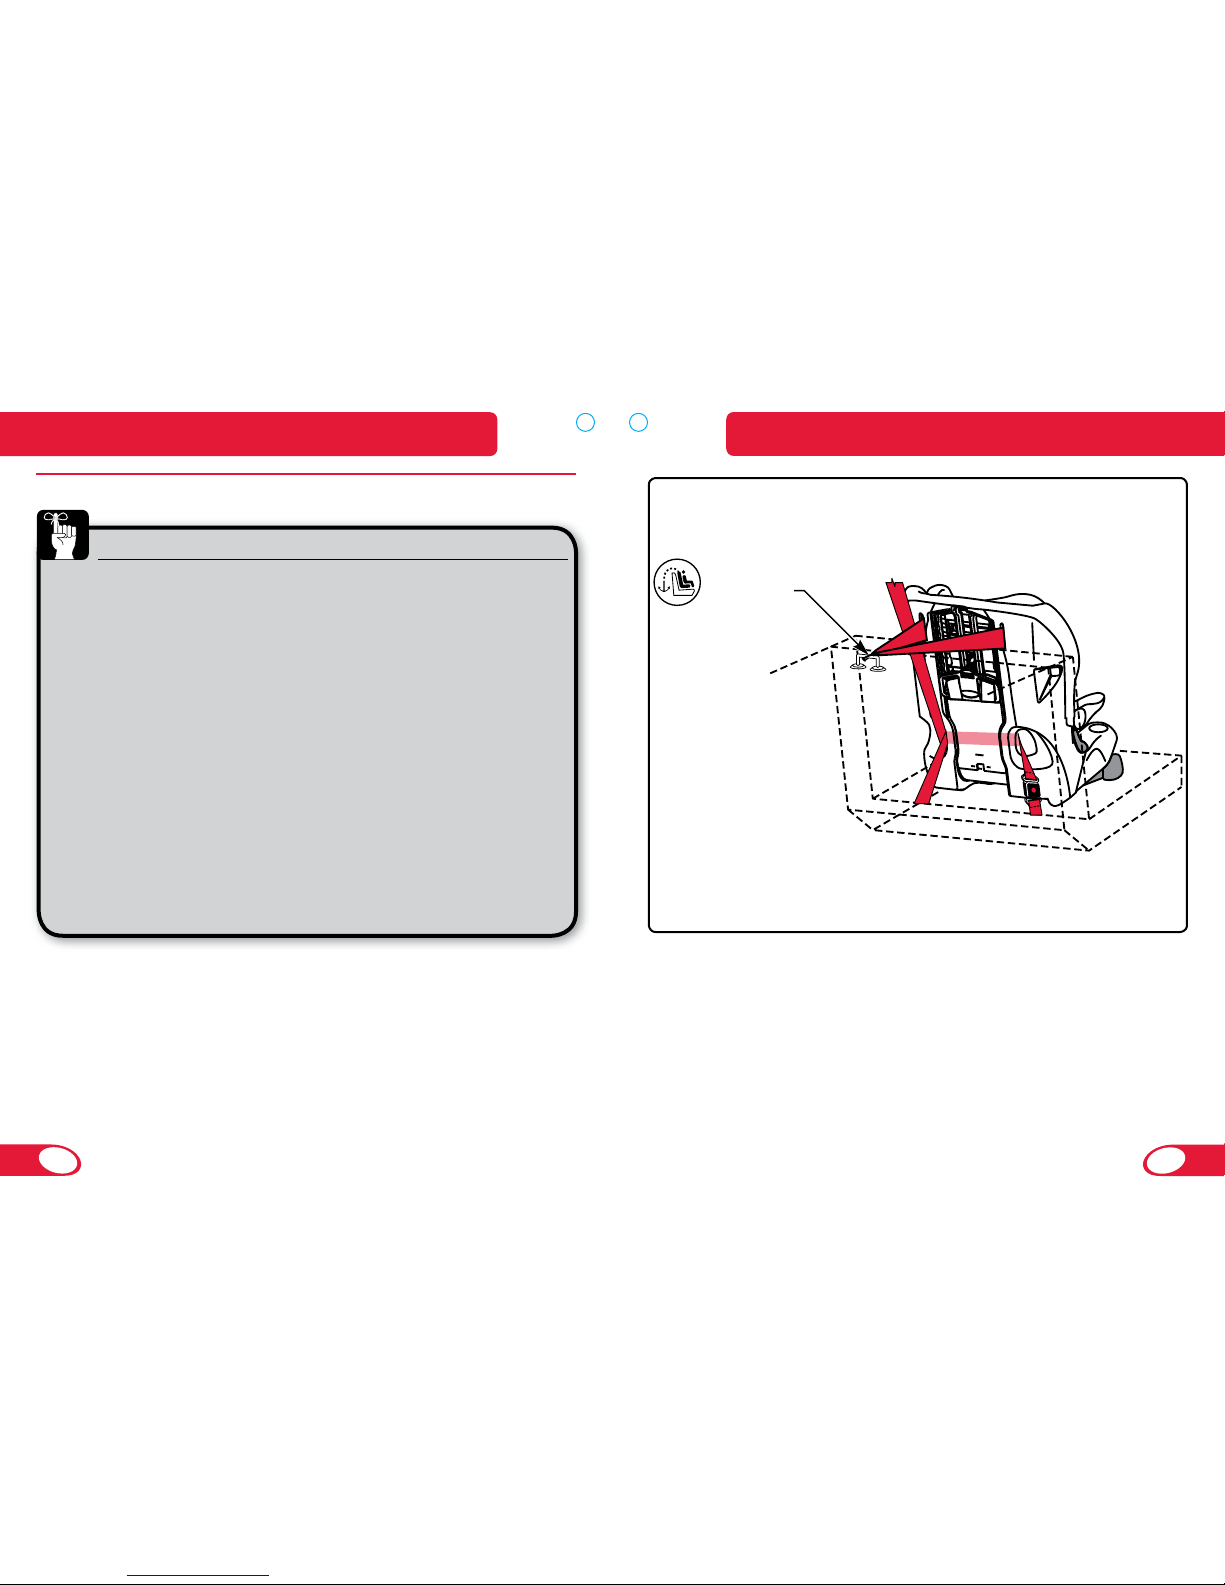
53
Detach the Versa-Tether1
®
hook
from the storage clip.
Ensure the positioning block
2
is rotated to the back.
Place the child seat on the
3
vehicle seat and connect the
LCS connectors to the vehicle
LUAS anchors.
Push the child seat into the
4
vehicle seat and pull the end
of each LCS strap through
the belt slot to remove slack.
Repeat as necessary. Store *
excess webbing behind cover.
Using LCS
Positioning the Child Seat: Booster ModePositioning the Child Seat: Booster Mode
Before you begin:
Does your vehicle have a top tether anchor in the chosen seating 9
position?
Does your vehicle have LUAS anchors in the chosen seating position? 9
IMPORTANT: Use the LUAS only to position this child seat to your vehicle
seat. Secure your child using the vehicle’s lap-shoulder belt system.
WARNING!
Position forward-facing • only in a seating position with a
lap-shoulder belt.
Use • only the vehicle’s lap and shoulder belt system when
securing a child in booster mode. Never secure a child
with a lap belt only in booster mode.
Always• secure the unoccupied child seat.
If the LUAS anchors in your vehicle prevent proper vehicle •
seat belt fit across your child you cannot use the LUAS to
position this seat in booster mode. See below.
The vehicle seat belt fits properly
when the lap part sits low across
the child’s hips (a) and the
shoulder part lies across the
child’s shoulder and does not
contact the child’s neck when
routed through the upper belt
guide (b).
a
b
Page 29

54 55
Firmly press the Versa-Tether5
®
hook to the vehicle tether
anchor to attach. Remove all
slack from the tether webbing.
Use the elastic strap to contain
6
extra webbing.
Always ensure any excess *
webbing is contained within
your vehicle
Use the vehicle’s lap-shoulder 7
belt to secure your child.
Lap-Shoulder Belt
Ensure that the positioning
1
block is rotated to the back.
Place the child seat on the
2
vehicle seat and use the
vehicle’s lap-shoulder belt to
secure your child.
OR
OR
Positioning the Child Seat: Booster Mode
WARNING!
Never route the vehicle seat belt over the child when •
using this child seat in harness mode.
Adjust the belts provided with this child seat so they •
fit snugly around your child. A snug strap should not
allow any slack. It lies in a relatively straight line without
sagging. It does not press on the child’s flesh or push the
child’s body into an unnatural position.
The HUGS™ chest pads must be used at all times.•
Adjust the harness to fit the clothes the child is wearing. •
Remove bulky coats and/or jackets before putting the
child in the child seat.
Verify that the child seat is secure and the harness is •
properly adjusted around the child each time the child
seat is used.
Harness Mode
Before you begin:
Always check the seat area for debris and remove it to prevent
interference with the harness adjuster mechanism.
Positioning
Block
Securing Your Child
Page 30

56
57
Fasten the chest clip.7
The correct height for the chest *
clip is at the middle of the
chest at armpit level.
The HUGS* ™ chest pads may
be placed in any position
that is comfortable for the
child within the range of the
correctly placed chest clip.
Loosen the harness.1
Press release levera
Pull both harness straps forwardb
Open the chest clip.2
Press tabsa
Pull apartb
Release the buckle and place 3
the harness straps around the
armrests.
Pull the harness adjuster strap
6
to tighten the harness.
The harness should have *
a comfortable but snug fit
around the child. A snug strap
should not allow any slack. It
lies in a relatively straight line
without sagging. It does not
press on the child’s flesh or
push the child’s body into an
unnatural position. You should
not be able to pinch excess.
7
Pull the harness adjuster away
from the child seat (parallel to
the ground) to tighten.
Do not pull sideways.
Checklist
Before traveling, verify that the:
Harness straps are not twisted. 9
Harness is snug. 9
Buckle is fastened. 9
Chest clip is at the child’s armpit level. 9
Place the child in the child 4
seat and position the harness
straps around the child.
Fasten the harness buckle.
5
Proper connection is confirmed *
with an audible click after
inserting each buckle tongue.
Securing Your ChildSecuring Your Child
Page 31

58
59
Fasten the vehicle seat belt 4
across the child.
Lap part of the vehicle seat belt *
must be routed low across the
child’s hips.
Pull the vehicle seat belt out 3
and route the shoulder part of
the vehicle seat belt through
the upper belt guide.
Booster Mode
WARNING!
Only use a lap-shoulder belt to secure the child in booster •
mode.
Use the shoulder belt guides on the child seat to ensure •
proper fit.
Ensure the lap part of the belt sits low across the child’s hips •
and that the shoulder part does not contact the child’s neck.
Before you begin:
Ensure that the positioning block is in booster position.•
If your vehicle seat back is adjustable, ensure it is in the •
upright position before placing the child seat on the vehicle
seat.
Place the child seat on the vehicle seat and have the child sit in 1
the child seat.
Adjust the head restraint so
2
the shoulder belt guides
position the vehicle seat belt
at or just above the child’s
shoulders. The child’s ears
should be below the top of the
head restraint.
Checklist
Before traveling, verify that the:
Vehicle seat belt is not twisted. 9
Buckle does not rest on red belt guide. 9
Shoulder part of vehicle seat belt is routed through upper belt guide at 9
or above the child’s shoulder and does not contact the child’s neck.
Lap part of the vehicle belt is routed low across the child’s hips. 9
Remove slack from the vehicle 5
seat belt.
Securing Your ChildSecuring Your Child
Page 32

60
61
Pull the harness straps 4
through the shell and cover to
the front of the child seat.
Loosen the harness.
1
Press release levera
Pull both harness straps forwardb
Unbuckle the harness, then 2
move the harness adjuster to
the highest position.
Remove the belt shield and
3
unhook both harness straps
from the yoke.
Remove the screw to unlock
5
the head restraint adjuster and
raise the head restraint to the
highest position.
Store the screw in the slot in *
the shell.
Unhook the elastic bands, 6
then remove the cover from
the head restraint.
Be careful not to damage the *
energy-absorbing foam.
Unfasten the clips behind the 7
armrests, then pull the cover
from the lower belt guides.
Cover Removal
Care and MaintenanceCare and Maintenance
WARNING!
Never remove the buckle tongues from the harness. •
DO NOT remove the HUGS• ™ pads from the harness straps.
Locking
Screw storage
Page 33

62
63
Turn and push the buckle 8
retainer through the shell and
cover to the top of the seat.
Pull the belly pad over the *
buckle retainer to remove.
Pull the harness straps, buckle 9
tongues, HUGS™ chest pads,
and chest clip through the
slots in the cover.
Remove the elastic loops from
10
the hooks on the bottom of the
child seat, then pull the lower
part of the cover from the
bottom of the child seat shell.
Route the cover around the
11
head restraint and remove the
entire cover from the child
seat shell.
Cleaning the Cover
HAND WASH the cover using cold water and mild soap.•
LINE DRY to prevent the cover from shrinking.•
DO NOT:•
Bleach*
Machine wash*
Machine dry*
Iron*
Cleaning the Harness
SPONGE CLEAN the harness using warm water and mild soap.•
TOWEL DRY•
DO NOT:•
Disassemble the harness*
Bleach*
Machine wash*
Machine dry*
Iron*
Cleaning the Shell
SPONGE CLEAN the shell using warm water and mild soap.•
TOWEL DRY•
DO NOT use abrasive cleaners•
Care and MaintenanceCare and Maintenance
Page 34

64
65
Replacing the Cover
Fit the cover around the head
1
restraint.
Be careful not to damage the *
energy-absorbing foam.
Fit the bottom of the cover 2
over the lower part of the child
seat shell, then pull the elastic
loops over the hook on the
bottom of the child seat shell.
Pull the harness straps, buckle
3
tongues, HUGS™ chest pads,
and chest clip through the
appropriate holes in the cover.
Push the cover under the
4
lower belt guides.
Replace the screw to lock the
7
head restraint adjuster.
Insert the harness straps
8
through the slots in the cover,
shell, and harness adjuster to
the back of the child seat.
Pull the head restraint cover
5
over the head restraint shell,
and reattach the elastic bands.
Be careful not to damage the *
energy-absorbing foam.
Move the harness adjuster to 6
the highest position (a), then
move the head restraint to the
lowest position (b).
Ensure that harness slots in *
the cover, head restraint and
harness adjuster are aligned.
Care and MaintenanceCare and Maintenance
Page 35

66
67
Turn and push the buckle 2
retainer through the shell and
cover to the top of the seat.
Pull the belly pad over the *
buckle retainer to remove.
To Clean:
THOROUGHLY RINSE the •
buckle using warm water.
TEST THE BUCKLE by fastening •
and unfastening until a positive click is heard after inserting
each buckle tongue. If clicks are not heard, repeat the cleaning
procedure.
TOWEL DRY•
DO NOT:•
Soak*
Lubricate*
Use solvents*
Use soap or household detergents*
Cleaning the Buckle
If your child eats and drinks while in the child seat, you may need
to check the buckle periodically and rinse out any accumulated
debris or dried liquids.
Remove the Buckle
Locate the metal retainer on the
1
bottom of the child seat, and
slide the retainer up to release it
from the child seat shell.
Push the buckle retainer 11
through the slots in the child
seat shell and cover to the
bottom of the child seat.
Ensure the harness straps are *
not twisted and that the buckle
faces out.
Ensure that the adjuster strap 9
attached to the yoke is not
twisted, then slide nested
harness straps completely
onto the harness yoke. See
pages 49 and 50.
Replace the belt shield over
10
the harness straps and yoke.
Reattach the clips behind the
12
arm rests and slide the fabric
under the lower belt guides.
Care and MaintenanceCare and Maintenance
Page 36

68
69
Turn and push the buckle 2
retainer through the slots in
the cover and shell to the
bottom of the child seat.
Re-thread the Buckle
Select the slot closest to, but not under the child.
1
Pull the buckle away from the 3
child seat until tight. Verify that
the buckle retainer lies flat
against the child seat shell.
Ensure that the buckle strap is *
not twisted and that the button
faces out.
Energy-Absorbing Tether
The Versa-Tether can indicate when the child seat has been in a
moderate or severe crash and replacement of the child seat is
necessary.
Figure 1 shows the tether when
the child seat is acceptable for
continued use (provided the child
seat has not been involved in a
crash). The colored stitching will
be intact and the webbing will be
held under a tether label.
Figures 2 and 3 show examples
of when the child seat is
unacceptable for continued use.
If the tether label is torn, or if one
or both of the loops have pulled
through the back side of the shell
and/or any of the colored stitching
has ripped, the child seat is no
longer acceptable for use.
IMPORTANT: Discontinue use of
child seat if it has been involved
in a moderate or severe crash,
regardless of whether the loops
have pulled through the back
side of the shell and the colored
stitching has been ripped.
1
2
3
Tips and TroubleshootingCare and Maintenance
Page 37

70
71
Tips
TIP: If you’re having difficulty
attaining a tight installation in
harness mode using the short belt
route, try reclining the vehicle seat
back during installation. Once the
installation process is complete,
return the vehicle seat back to the
most upright position possible. See
Figure A.
NOTE: This tip will only be helpful if your vehicle seat back is able to
recline. See page 15 for important information on choosing a vehicle
seating position. The back seat is the safest place for children 12 and
under.
TIP: When installing the child seat
using the short belt route (Figure B):
Buckle the vehicle seat belt or •
attach the LCS connectors to
the vehicle anchors.
Pull the vehicle buckle stalk or •
LCS connectors into the belt
slot to properly align it into the
belt path.
Tighten. •
Troubleshooting
Problem: The harness is hard to adjust.
Possible Solution: Check that the harness slots in the head
restraint and harness adjuster are properly aligned. Do not use the
head restraint adjuster when the harness is attached.
Possible Solution: The yoke may be caught on a strap or other
component of the child seat. Remove the obstruction and try
adjusting the harness again.
Problem: The adjuster strap is fraying at the sides:
Possible Solution: Pull the harness adjuster strap away from the
child seat (parallel to the ground) to tighten. Do not pull sideways.
Doing so may cause the harness adjuster strap to fray at the sides.
See page 57.
Problem: The buckle will not fasten with a click after each tongue
is inserted.
Possible solution: There may be debris in the buckle mechanism.
Clean the buckle as shown on page 67 and try fastening the
buckle again.
If you have misplaced your head restraint lock-out screw, you can
purchase a replacement #8 x 1.25 cm sheet metal screw at any
hardware store.
Please contact Consumer Services at 1.888.427.4829 if you have
an issue not listed here.
A
b
Tips and Troubleshooting Tips and Troubleshooting
Page 38

72
73
This child seat was manufactured by Britax Child Safety, Inc. Britax® warrants this
product to the original retail purchaser as follows:
LIMITED ONE-YEAR WARRANTY
This product is warranted against defective materials or work man ship for one year
from the date of original purchase. Proof of purchase is required. Your exclusive
remedy for this warranty is that Britax will, at its option, provide repair or replacement
components for this product. Britax reserves the right to discontinue or change
fabrics, parts, models or products, or to make substitutions.
To make a claim under this warranty, you must contact Britax Consumer Services at
1-888-427-4829 or write to us using the address on the back cover of this booklet.
PLEASE COMPLETE AND MAIL THE OWNER REGISTRATION
CARD WITHIN (30) DAYS OF PURCHASE
You may also register online at www.Britax.ca/registration.
WARRANTY LIMITATIONS
This warranty does not include damages which arise from negligence, misuse or
use not in accordance with the product instruction.
The use of non-Britax Child Safety, Inc. covers, inserts, toys, accessories, or
tightening devices is not approved by Britax. Their use could cause this child seat
to fail Federal Motor Vehicle Safety Standards or not perform as intended in a crash.
Their use automatically voids the Britax warranty.
LIMITATION OF DAMAGES
The warranty and remedies as set forth above are exclusive and in lieu of all others,
oral or written, express or implied. In no event will Britax, or the retailer selling this
product, be liable to you for any damages, including incidental or consequential
damages, arising out of the use or inability to use this product.
LIMITATIONS OF WARRANTIES AND OTHER WARRANTY TERMS
AND PROVINCIAL LAWS
Any implied warranties, including implied warranties of merchantability and fitness
for a particular purpose, shall be limited to the duration and terms of the express
written warranty. Some provinces do not allow limitations on how long an implied
warranty lasts or the exclusion or limitation of incidental or consequential damages,
so the above lim i ta tions may not apply to you. This warranty gives you specific legal
rights, and you may have other rights, which vary from state to state. Neither Britax,
nor the retailer selling this product, authorizes any person to create for it any other
warranty, obligation, or liability in connection with this product.
Warranty
Page 39

75
©2010 Britax Child Safety, Inc. Tous droits réservés. Imprimés aux USA P366700_R2:03.10
Ce produit et ses composants peuvent changer sans préavis.
Mises en garde ............................................................................................76
Information de sécurité ...............................................................................78
Notes importantes ................................................................................................78
Certification ...........................................................................................................78
Enregistrement .....................................................................................................79
Fonctions du siège pour enfant .................................................................80
Conditions pour l’ajustement du siège pour enfant ................................82
Compatibilité du véhicle .............................................................................84
Ceintures de sécurités compatibles .................................................................... 84
Ceintures de sécurité du véhicule incompatibles ..............................................88
Fonctions du siège pour enfant .................................................................90
Installer le siège pour enfant......................................................................100
Informations générales ........................................................................................100
Mode harnais ........................................................................................................100
Mode rehausseur .................................................................................................101
Installer le siège pour enfant : Mode harnais ........................................... 102
Dispositif Universel d’Ancrage (DUA) – Chemin court .......................................102
Ceinture baudrier – Choisir un chemin de ceinture ...........................................106
Ceinture baudrier – Chemin court .......................................................................108
Ceinture baudrier – Chemin long ........................................................................112
Ceinture sous-abdominale – Chemin court ........................................................116
Basculer entre chaque mode .....................................................................120
Mode harnais au mode rehausseur ....................................................................120
Mode rehausseur au mode harnais ....................................................................122
Positionner le siège pour enfant : Mode rehausseur ..............................126
Utiliser les DUAs ...................................................................................................127
Ceinture baudrier..................................................................................................128
Attacher votre enfant...................................................................................129
Mode harnais ........................................................................................................129
Mode rehausseur .................................................................................................130
Soin et entretien ..........................................................................................131
Conseils et dépannage ............................................................................... 132
Guarantie ......................................................................................................133
Table des matières
Page 40

76
77
Section Title
Section Title
Mode harnais : utiliser avec des enfants dont le poids se situe entre •
11,4 et 29,5 kg (25 et 65 lb) et dont la taille se situe entre 76,2 et
144,8 cm (30 et 57 pc) et qui sont d’au moins 2 ans.
Mode rehausseur : utiliser avec des enfants dont le poids se situe •
entre 18,2 et 54,5 kg (40 et 120 lb) et dont la taille se situe entre
106,7 et 165,1 cm (42 et 65 pc).
Utiliser ce siège pour enfant orienté vers l’avant seulement.•
Le bloc de positionnement doit être pivoté vers l’avant du siège pour •
enfant lorsqu’il est utilisé en mode harnais.
Le bloc de positionnement doit être pivoté vers l’arrière du siège •
pour enfant lorqu’il est utilisé en mode rehausseur.
Ajustez les ceintures fournies avec le siège pour enfant pour qu’elles •
soient ajustées correctement autour de l’enfant. Une sangle bien
ajustée ne devrait pas avoir de jeu. Elle repose en ligne relativement
droite sans s’affaisser. Elle n’appuie pas sur la peau de l’enfant ou
déplace le corps de l’enfant en position inconfortable.
Attachez la courroie d’ancrage fournie avec ce siège pour enfant.•
Même s’il n’est pas occupé, le rehausseur doit être attaché •
au véhicule à l’aide du système d’ancrage inférieur (SAI) si le
rehausseur est installé sur un siège équipé d’un dispositif universel
d’ancrage (DUA) ou à l’aide de la ceinture de sécurité du véhicule s’il
est installé sur un siège n’étant pas équipé d’un dispositif d’ancrage
universel et si équipé d’une courroie d’ancrage, à l’aide de celle-ci.
Suivez toutes les instructions des étiquettes du sièges pour enfant et •
de ce guide d’utilisateur.
Enregistrez votre siège auprès du fabricant, Britax Child Safety, Inc. •
en visitant www.Britax.ca/registration, OU remplissez et expédiez la
carte d’enregistrement fournie avec ce siège pour enfant.
Les coussins de poitrine HUGS™ doivent être utilisés en mode •
orienté vers l’avant.
En mode rehausseur, utilisez le système ceinture baudrier et sous-•
abdominale pour retenir votre enfant dans ce rehausseur seulement.
Pour prévenir toute blessures en raison d’une détérioration ou d’un •
dommage non apparent, cessez d’utiliser ce siège pour enfant 9 ans
après sa date de fabrication ou s’il a subit un accident modéré ou
grave. Voir la date de fabrication et d’expiration situés sur la coque
du siège pour enfant. Voir page 80.
Selon les statistiques d’accident de la route, les enfants sont plus en •
sécurité lorsqu’il sont attachés dans un siège arrière que les sièges
avants.
L’utilisation de housses, pièces rapportées, accessoires ou •
dispositifs d’attache non conçus par Britax n’est pas approuvé par
Britax. Leur utilisation pourrait empêcher ce siège pour enfant de
passer les normes de sécurité automobile canadiennes ou de ne
pas performer comme prévu lors d’un accident.
Lorsque vous utilisez un véhicule avec des coussins gonflables, •
veuillez vous référer au manuel de l’utilisateur du véhicule pour les
instructions et précautions pour l’installation du siège pour enfant.
Ne jamais utiliser le harnais ou la sangle d’ajustement pour •
soulever ou transporter ce siège pour enfant. Faire ceci pourrait
endommager le dispositif d’ajustement du harnais ou la sangle.
Toujours transporter ce siège pour enfant par la coque ou la
courroie d’ancrage. La protection principale pour les occupants
d’un véhicule lors d’un accident est le corps du véhicule lui-même;
un siège pour enfant pourrait ne pas protéger l’enfant lorsque
le véhicule est sérieusement accidenté. Toutefois, si installé
correctement, un siège pour enfant peut réduire les chances de
survie dans la plupart des accidents.
Pour le mode harnais, veuillez vous référer au manuel de l’utilisateur •
du véhicule ou contacter le fabricant du véhicule pour connaitre le
poids maximum des barres d’ancrage du DUA de votre véhicule.
Utilisez les ceintures de sécurité (et non les attaches SAI) pour les
installations avec les enfant dont le poids est supérieur à la limite de
poids des barres d’ancrage du DUA. À moins qu’il ne soit spécifié
autrement par le fabricant du véhicule, tenez compte que la limite de
poids des barres d’ancrage du DUA est de 18,2 kg (40 livres).
MISE EN GARDE!
Peut entrainer la MORT ou des BLESSURES GRAVES :
Page 41

78
79
Notes importantes
Vérifiez que le siège pour enfant est correctement installé et que le •
harnais est bien ajusté autour de l’enfant à chaque fois que le siège
est utilisé.
Ajustez le harnais pour qu’il correspond au vêtement que l’enfant •
porte. Retirez les mantaux épais et/ou vestons avant de placer
l’enfant dans le siège.
Ne pas, à moins qu’il ne le soit demandé dans ce manuel, •
essayer de désassembler toute partie de ce siège pour enfant ou
de changer la façon dont le harnais ou les ceintures de sécurité
sont utilisés.
Ne pas utiliser quoi que ce soit pour soulever le siège hors du •
siège du véhicule. Lors d’un accident, ceci pourrait empêcher
au siège pour enfant de performer tel que prévu.
Ce siège pour enfant ne doit pas être utilisé dans la maison, •
bateau, ou pour tout autre application non-certifié.
Couvrez le siège pour enfant lorsque le véhicule est garé •
directement sous les rayons du soleil. Les parties du siège pour
enfant peuvent devenir brulantes et blesser un enfant.
Rangez le siège pour enfant dans un endrois sûr lorsqu’il n’est •
pas utilisé. Évitez de placer des objets lourds sur le siège pour
enfant.
Toujours vérifier le siège arrière du véhicule pour éviter de laisser •
un enfant attaché sans surveillance dans le véhicule.
Ne pas laisser des objets détachés, c-à-d. des livres, sacs, etc., •
sur la banquette arrière du véhicule. Lors d’un arrêt soudain, les
objets non sécurisés resteront en mouvement, pouvant heurter
les passagers et causer des blessures graves.
Ne pas laisser des sièges pliants non-sécurisés. Lors d’un •
arrêt soudain, ceci pourrait empêcher le siège pour enfant de
performer tel que voulu.
Certification
Cet ensemble de retenue pour enfant est conforme à toutes
les normes de sécurité automobile canadienne applicables
(CMVSS 213 et 213.2).
Cet ensemble de retenue est certifié pour une utilisation dans
les véhicules automobiles et les avions, en mode harnais.
Cet ensemble de retenue n’est pas certifié pour une
utilisation dans un avion lorsqu’il est utilisé en mode
rehausseur.
Les rehausseur demandent une installation à l’aide
de la ceinture baudrier, non-disponible dans un siège
d’avion.
Suivez les instructions d’installation se situant à la
page 126, pour installer le siège pour enfant dans un
siège d’avion.
NOTE : La courroie d’ancrage ne peut pas être utilisée
dans un avion.
Installez le siège de l’enfant dans un siège près d’une fenêtre pour éviter de
bloquer l’allée.
Si la ceinture du siège est trop courte, demandez à l’agent de bord une
extension de ceinture.
Enregistrement
Les sièges pour enfant peuvent être rappellés pour des raisons de
sécurité. Envoyez votre nom, addresse et le numéro de modèle et date de
fabrication à Britax Child Safety, Ltd., Case postale 7289 RPO Brunswick
Square, Saint John NB E2L 9Z9, ou appelez au 1-888-4BRITAX, ou
enregistrez vous en ligne au www.Britax.ca/registration.
Numéro de série:___________________________________
Numéro de lot:___________________________________
Date de fabrication:______________________________
Certifié pour le
voyage en avion
Informations de sécuritéInformations de sécurité
Page 42

80
81
Housse1
Étiquette de date de fabrication 2
et date d’expiration
Sangle SAI3
Accoudoir4
Porte-gobelet5
Appui-tête6
Housse de l’appui-tête7
Fente du harnais8
9 Rangement du guide de
l’utilisateur (dans la pochette
sous la housse)
Guide de la ceinture baudrier10
Coussins de confort11
Coussins de poitrine HUGS™12
Attache à la poitrine13
Sangles du harnais14
Boucle du harnais15
Guide de ceinture inférieur16
Coussin abdominal17
Levier de relâchement du disposif 18
d’ajustement du harnais (sous le
hourlet)
Sangle du dispositf d’ajustement 19
du harnais
Fente de rangement de la vis de 20
verrou
Marque de sécurité nationale21
Attache SAI22
Fente de rangement des 23
attaches SAI
Bouton de relâchement de 24
l’attache SAI
Dispositif d’ajustement du SAI25
Bouton de relâchement du 26
dispositf d’ajustement du SAI
Fente de ceinture27
Rangement de la chappe du 28
harnais (sur le bouclier de
ceinture)
Crochet Versa-Tether29
®
Attache de rangement Versa-30
Tether
®
Vis de verrou31
Dispositif d’ajustement de 32
l’appui-tête
Coque33
Versa-Tether (Courroie 34
d’ancrage)
Dispositif d’ajustement Versa-35
Tether
®
Sangle pour le rangement de la 36
sangle Versa-Tether
®
Dispositif d’ajustement de la 37
hauteur du harnais
Bouclier de ceinture38
Chappe du harnais (sous le 39
bouclier de ceinture)
Bloc de positionement40
6
7
8
10
15
16
18
17
19
31
32
33
34
35
36
37
38
40
39
4
3
2
1
29
28
30
26
27
25
24
23
21
20
22
5
9
11
12
14
13
Fonctions du siège pour enfantFonctions du siège pour enfant
Page 43

82
83
Mode harnais :
L’enfant doit :
avoir au moins deux ans 1 et
peser entre 11,4 – 29,5 kg (25 – 65 lb) 2 et
mesurer entre 76,2 – 144,8 cm (30 – 57 pc) 3 et
MISE EN GARDE ! L’utilisation du mode harnais avec
ce siège pour enfant est seulement SEULEMENT pour les
enfants qui répondent à TOUTES les conditions suivantes. Si
l’enfant ne correspond pas aux exigences du mode harnais
parce que l’enfant est trop petit, un autre siège pour enfant
DOIT être utilisé. Si votre enfant ne correspond pas au mode
harnais parce qu’il est trop grand, il se peut que vous ayez à
utiliser ce siège pour enfant en mode rehausseur. Veuillez lire
toutes les exigences avant d’utiliser le siège pour enfant.
MISE EN GARDE ! L’utilisation du mode rehausseur avec
ce siège pour enfant est seulement SEULEMENT pour les enfants qui
répondent à TOUTES les conditions suivantes. Utilisez seulement les
ceintures baudrier et sous-abdominales du véhicule pour attacher l’enfant.
Si l’enfant ne correspond pas au mode rehausseur parce qu’il est trop
petit, il se peut que vous ayez à utiliser ce siège en mode harnais. Veuillez
lire toutes les exigences avant d’utiliser ce siège pour enfant.
L’enfant doit :
peser entre 18,2 – 54,5 kg (40 – 120 lb) 1 et
mesurer entre 106,7 – 165,1 cm (42 – 65 pc) 2 et
le sommet des oreilles de l’enfant doivent être en dessous 3
du haut de l’appui-tête et
la ceinture du véhicule doit être positionné au niveau ou 4
au dessus de l’épaule de l’enfant au travers du guide de
ceinture.
Niveau des épaules
Au dessus des épaules
En dessous des épaules
NOTE : Britax recommande d’utiliser le mode rehausseur
seulement lorsque l’enfant a dépassé le mode harnais.
le sommet des oreilles 4
de l’enfant doivent être
en dessous du haut de
l’appui-tête lorsqu’il est
assis et
les sangles du harnais 5
doivent se situer au
niveau ou au dessus
des épaules de l’enfant
lorsqu’il est assis.
Mode rehausseur :
Conditions pour l’ajustement du siège pour enfantConditions pour l’ajustement du siège pour enfant
Page 44

84
85
Rétracteur variable en mode auto-bloquant avec patte libre3.
Possède une boucle glissant
a
librement au long de la
sangle de ceinture.
Possède un rétracteur qui
b
peut être changé pour
fonctionner en tant que
rétracteur autobloquant en
tirant la ceinture de sécurité
du véhicule complètement
jusqu’à ce que vous
entendiez un déclic.
Pour utiliser un siège pour enfant *
avec ce type de ceinture, vous
devez convertir le rétracteur au
mode autobloquant ou utiliser une
pince de verrouillage.
Ceintures de sécurité du véhicule compatibles
NOTE : Les informations de cette section s’appliquent à une
installation avec les ceintures de sécurité du véhicule.
Les sièges et ceintures de sécurité du véhicule peuvent changer
d’un véhicule à l’autre. Veuillez vous référer au manuel de
l’utilisateur du véhicule pour obtenir les informations spécifiques
sur les ceintures de sécurité de votre véhicule et leur utilisation
avec des sièges pour enfant.
Ceinture baudrier (3-Point)
Rétracteur auto-bloquant avec 1.
patte de la boucle libre
Possède une patte de la a
boucle qui glisse librement
au long de la sangle de la
ceinture.
Possède un rétracteur qui
b
empêche la ceinture d’être
tirée une deuxième fois
lorsqu’elle est sortie d’au
moins 61 cm (24 pc).
Se resserre en se rétractant
c
dans le rétracteur.
Rétracteur à blocage d’urgence avec boucle auto-verrouillante2.
Possède une patte de
a
la boucle qui ne permet
pas à la portion sousabdominale de la ceinture
de se désserrer après être
bouclé.
Le rétracteur se verrouille
b
seulement lors d’une
situation d’urgence tel
qu’un arrêt soudain ou un
accident.
Patte de
la boucle
Patte de la
Boucle
Patte de
la boucle
Compatibilité du véhiculeCompatibilité du véhicule
Page 45

86
87
Patte de la boucle bloquante6.
Possède une boucle qui
a
ne permet pas à la ceinture
de se désserrer après être
bouclé.
Serrer en tirant sur la sangle
b
de la ceinture.
Rétracteur à bloquage automatique avec boucle libre4.
Possède une patte qui
a
glisse librement au long de
la ceinture.
Possède un rétracteur qui
b
se verrouille lors d’une
situation d’urgence tel
qu’un arrêt soudain ou un
accident.
IMPORTANT : Ce type de ceinture
demande l’utilisation d’une pince de
verrouillage pour sécuriser le siège
lors de l’installation. Une pince de
verrouillage doit être utilisé à 2.5 cm
(1 pc) de la boucle pour sécuriser
le siège. Appelez le service à la
clientèle de Britax au 1(888) 4274829 pour obtenir une pince.
Possède un rétracteur qui b
empêche la ceinture d’être
tirée une deuxième fois
lorsqu’elle est sortie d’au
moins 61 cm (24 pc).
Se resserre en se rétractant
c
dans le rétracteur.
Patte de
la boucle
Ajusteur
Patte de
la boucle
Ceinture sous-abdominale
IMPORTANT : Une ceinture sous-abdominale peut être utilisé
seulement pour le mode harnais et ne devrait jamais être utilisé
pour attacher votre enfant en mode rehausseur.
Rétracteur autobloquant5.
Possède une patte de
a
boucle cousu dans la
sangle.
2.5 cm (1 pc)
de la boucle
Compatibilité du véhiculeCompatibilité du véhicule
Page 46

88
89
Positions de la boucle du véhicule
MISE EN GARDE! Les types de ceintures de sécurité du véhicule
suivantes ne sont PAS compatibles avec ce siège pour enfant :
Ceinture de sécurité du véhicule incompatibles
Les ceintures baudrier 1
avec leurs points
d’ancrage sur la porte du
véhicule.
Les ceintures automatiques 2
motorisées.
Les ceintures baudrier 3
possèdant un rétracteur
séparé pour la portion
baudrier et sousabdominale.
Les ceintures sous-4
abdominales en avant de la
jonction dossier-coussin.
Les ceintures sous-abdominales qui possède un 5
rétracteur à bloquage d’urgence seulement.
MISE EN GARDE! Certains véhicules ne possède aucune
position assise compatible avec ce siège pour enfant ou tout autre
siège pour enfant. En cas de doute, contactez le fabricant pour obtenir
de l’assistance. Les sièges orientés vers l’avant DOIVENT être utilisés
avec ce siège pour enfant. Les sièges orientés vers le côté ou l’arrière
NE PEUVENT PAS être utilisés. Voir le diagramme ci-dessous.
Positions assises du véhicule
NE PA S placer un siège pour
enfant à l’avant du véhicule
sur un siège avec un sac
gonflable à moins qu’il ne soit
désactivé. Peut entrainer la
MORT ou des BLESSURES
GRAVES. Voir le manuel de
l’utilisateur pour les
instructions d’installation d’un
siège pour enfant. L’arrière du
véhicule est l’emplacement le
plus sécuritaire pour les
enfants de 12 ans et moins.
MISE EN GARDE !
MISE EN GARDE! La position de la
ceinture de sécurité peut affecter la stabilité
du siège pour enfant.
Si la boucle se tient près de la position incorrecte ( )
lorsque la ceinture du siège du véhicule est serrée, essayez
une autre position sur la banquette OU consultez le manuel
de l’utilisateur du véhicule pour vérifiez sir vous pouvez
descendre la position de la boucle de ceinture du véhicule
en tournant la tige de la boucle. S’il n’est pas possible
d’obtenir la position correcte ( ) pour la boucle, un autre
emplacement sur la banquette DOIT être utilisé.
Compatibilité du véhiculeCompatilbilité du véhicule
Page 47

90
91
Mode harnais : ajustment de la hauteur du
harnais
IMPORTANT :
Faire tous les ajustements du siège avec l’enfant avant
d’utiliser le siège pour enfant. Placez le siège pour enfant sur le plancher et
installez votre enfant. Suivez les instructions sur les pages suivantes pour
effectuer les ajustements du harnais et de l’appui-tête.
MISE EN GARDE ! L’ajustement de l’appui-tête est
SEULEMENT pour le mode rehausseur. NE PAS utiliser
l’ajusteur de l’appui-tête lorsque le harnais est attaché.
Soulevez la poignée 2
d’ajustement de l’appuitête pour le déplacer.
Desserrez le harnais. 1
Appuyez sur le levier de a
relâchement
Tirez les deux sangles du b
harnais vers l’avant
Tirez et glissez le dispositif 2
d’ajustement de la hauteur
du harnais à la position
désiré et relâchez.
Assurez vous que *
l’ajusteur est bien ancré
entre les encoches.
Mode rehausseur : Ajustement de l’appui-tête
Retirez la clé de verrou
1
de l’appui-tête et rangez
la dans la coque pour
l’utiliser plus tard.
IMPORTANT : La ceinture du véhicule doit être placée au niveau ou
au dessus des épaules de l’enfant, au travers du guide de ceinture.
IMPORTANT : Dans le mode
harnais, le dispositif d’ajustement
de la hauteur du harnais ajuste
aussi l’appui-tête. Positionnez
toujours les sangles du harnais au
niveau ou au dessus des épaules
de l’enfant.
Rangement de
la clé
Niveau des épaules
Au dessus des épaules
En dessous des épaules
Fonctions du siège pour enfantFonctions du siège pour enfant
Page 48

92
93
Ajuster la position de la
boucle
Retirer la boucle
Débouclez le harnais en
1
appuyant sur le bouton de
relâchement et en tirant les
pattes.
Ré-acheminer la boucle
IMPORTANT : Sélectionnez la
fente la plus proche de l’enfant, et
non celle en dessous.
Tournez et poussez la boucle
1
au travers de la fente dans la
housse et la coque du siège
pour enfant.
Situez l’arrêtoir de la boucle au
2
dessous du siège.
Faites glisser l’arrêtoir de la
3
boucle vers le haut ou vers
le bas pour le dégager de la
coque.
Tirez sur l’arrêtoir pour
4
désserrer.
Tournez et poussez l’arrêtoir
5
de la boucle pour le passer au
travers de la coque.
Tirez sur l’arrêtoir au travers
2
des fentes de la housse et de
la coque au dessous du siège
pour enfant.
Tirez sur la boucle dans le 4
sens opposé du siège pour
enfant jusqu’à ce qu’elle soit
serrée.
Assurez vous que la sangle de *
la boucle n’est pas entortillé.
2
Tirez sur l’arrêtoir pour passer 6
au travers des fentes de la
coque et de la housse au
dessus du siège pour enfant.
Glissez l’arrêtoir de la boucle
3
en place contre la coque du
siège pour enfant.
Fonctions du siège pour enfantFonctions du siège pour enfant
Page 49

94
95
Insérez une pattre à la fois
dans la boucle.
NOTE : Une bonne connexion
est confirmé avec un déclic
audible après avoir inséré
chaque patte.
Boucler la boucle Déboucler la boucle
Appuyer sur le bouton de
relâchement et tirer sur les
pattes de la boucle.
NOTE : Nettoyez
périodiquement la boucle
pour assurer un bon
fonctionnement. Voir Page 141.
Utiliser l’attache à la poitrine
Pressez pour
1
ouvrir
Poussez ensemble pour attacher
2
NOTE : Toujours positionner l’attache à la
poitrine au niveau des aisselles.
Utiliser le bloc de positionnement
NOTE : Ajustez le bloc de positionnement AVANT d’installer.
Décrochez la courroie
1
d’ancrage Versa-Tether de son
crochet de rangement
Position en mode harnais2
Position en mode rehausseur3
Bloc de
positionnement
Bloc de
positionnement
Fonctions du siège pour enfantFonctions du siège pour enfant
Page 50

96
97
Utiliser le système d’attache inférieur (SAI)
Les attaches SAI sont situés aux côtés de la coque dans des fentes
de rangement. Rangez les attaches SAI lorsqu’elle ne sont pas
utilisées.
Pour retirer les attaches SAI de leur fente de rangement ou des
barres d’ancrage inférieures :
Appuyez et tenez le bouton de
1
relâchement rouge.
Tirez sur l’attache SAI hors de
2
la fente de rangement ou de la
barre d’ancrage
Pour attacher l’attache SAI à la fente de rangement ou la barre
d’ancrage :
Poussez fermement l’attache SAI
dans la fente ou la barre d’ancrage
inférieure jusqu’à ce que vous
entendiez un déclic.
NOTE : Les attaches SAI se
rangent dans les fentes de haut en
bas.
Utilisation du dispositif d’ancrage universel (DUA) et
de la courroie d’ancrage
L’illustration ci-haut affiche les emplacements typiques pour les barres
d’ancrage inférieures et les boulons d’ancrage dans un véhicule. Vérifiez votre
manuel de l’utilisateur du véhicule pour situer exactement l’emplacement des
barres d’encrage DUA et des positions assises, l’information d’utilisation avec
un siège pour enfant et du poids nominal des barres d’ancrage DUA.
L’espace entre un siège du véhicule et les barres d’ancrage DUA est 27,9 cm
(11 pc). Ce siège pour enfant peut être utilisé en position assise jusqu’à 50,8
cm (20 pc) d’espace entre les barres d’ancrage DUA et le siège si le fabricant
du véhicule le permet.
Haut
EMPLACEMENTS TYPIQUE DES
BARRES D’ANCRAGE
Appui-tête du
véhicule
Boulon
d’ancrage
Barres
d’ancrage
DUA
Barres
d’ancrage DUA
Jusqu’à 50,8 cm (20 pc)
Siège du véhicule
Ceinture de
sécurité baudrier
du véhicule
Rétracteur de la
ceinture de sécurité
Boulons d’ancrage
pour l’orientation
avant
Fonctions du siège pour enfantFonctions du siège pour enfant
Page 51

98
99
Pour retirer la courroie d’ancrage Versa-Tether de sa fente de
rangement :
Retirez la sangle de la ficelle
1
élastique et desserrez la
courroie Versa-Tether.
Retirez le crochet Versa-
2
Tether® de son crochet de
rangement.
Pour attacher la courroie Versa-Tether au crochet de rangement
ou un boulon d’ancrage :
Appuyez fermement le crochet
1
sur le crochet de rangement
ou le point d’ancrage.
Toujours attacher le crochet 2
au point d’ancrage par le haut.
IMPORTANT : Utilisez la bande
élastique pour contenir la sangle
supplémentaire. Assurez vous
toujours que tout excédent de
sangle est contenu dans le
véhicule.
Utiliser la courroie d’ancrage Versa-Tether
MISE EN GARDE !
Attachez la courroie d’ancrage Versa-Tether seulement aux •
boulons d’ancrage identifiés par le fabricant du véhicule
en tant que points d’ancrage.
Si votre véhicule ne possède pas de boulon d’ancrage, •
veuillez vous référer au manuel de l’utilisateur du véhicule
ou contactez le fabricant du véhicule pour obtenir de
l’aide. NE PAS modifier votre véhicule sans aide du
fabricant.
Vous DEVEZ toujours• utiliser la courroie d’ancrage
Versa-Tether en mode harnais. L’utilisation de la courroie
d’ancrage augmente la stabilité du siège pour enfant et
réduit le risque de blessures.
Les emplacement des
boulons d’ancrage peut varier
selon le véhicule. Vérifiez
le manuel de l’utilisateur
du véhicule et cherchez
le symbole de boulon
d’ancrage tel qu’illustré dans
le diagramme pour aider à
identifier le boulon d’ancrage
supérieur dans votre véhicule.
OU
OU
OU
OU
Fonctions du siège pour enfantFonctions du siège pour enfant
Page 52

100
101
MISE EN GARDE !
Le chemin de ceinture long est conçu pour la ceinture baudrier •
seulement. Ne jamais utiliser le chemin de ceinture long avec le DUA
ou la ceinture sous-abdominale.
Utilisez seulement le système de ceinture sous-abdominale et baudrier •
lorsque vous attachez votre enfant en mode rehausseur. Ne jamais
attacher un enfant avec une ceinture sous-abdominale seulement, en
mode rehausseur.
Vous DEVEZ toujours• utiliser la courroie Versa-Tether en mode harnais.
Installation orienté vers l’avant seulement.•
NE PAS utiliser quoi que ce soit pour soulever le siège pour enfant hors du •
siège du véhicule.
Veuillez vous référer au manuel de l’utilisateur du véhicule ou contacter •
le fabricant du véhicule pour obtenir le poids maximum des barres
d’ancrage DUA du véhicule. Utilisez la ceinture de sécurité du véhicule
(non les attaches SAI) pour les installations avec des enfants dont le poids
est supérieur à la limite des barres DUA. À moins qu’il ne le soit spécifié
autrement par le fabricant du véhicule, vous pouvez assumer que 18,2 kg
(40 lb) est la limite de poids de la barre d’ancrage DUA du véhicule.
Information générale
Mode harnais
Le bloc de positionnement doit •
être pivoté vers l’avant lorsque vous
installez le siège pour enfant en mode
harnais.
Selon la configuration de ceinture de •
sécurité du véhicule, vous pouvez
obtenir une installation plus sécuritaire
à l’aide d’un seul chemin de ceinture
baudrier (chemin de ceinture long
ou court). Si la première méthode d’installation résulte en un mouvement de
plus de 2,5 cm (1 pc) de l’avant vers l’arrière ou d’un côté à l’autre au niveau
de l’acheminement de ceinture, essayez l’autre option. Voir la page 106 pour
d’autres information sur la sélection du chemin de ceinture pour installer ce
siège pour enfant dans votre véhicule.
Utilisez ce siège pour enfant en mode harnais avec des enfant agés de 2 ans et •
plus et 11,4 – 29,5 kg (25 – 65 lb) mesurant 76,2 – 144,8 cm (30 – 57 pc). Britax
recommande l’utilisation du mode harnais jusqu’à 65 lb (29,5 kg). Voir la section
de recommandations sur l’ajustement du siège pour enfant à la page 83 pour
des informations lorsque votre enfant est trop grand pour le mode harnais.
Mode rehausseur
Le bloc de positionnement doit être •
pivoté lorsque vous positionnez le
siège pour enfant en mode rehausseur.
Ce siège pour enfant doit être utilisé •
en mode rehausseur avec les enfants
mesurant 106,7 – 165,1 cm (42 – 65
pc) et pesant plus de 18,2 kg (40 lb).
Britax recommande l’utilisation du
mode harnais jusqu’à 29,5 kg (65 lb).
Lorsque vous positionnez ce siège •
pour enfant en mode rehausseur,
utilisez la ceinture de sécurité baudrier
pour attacher l’enfant et le siège pour
enfant dans la position désirée.
En mode rehausseur, ce siège pour •
enfant peut être positionné sur le siège
du véhicule à l’aide du DUA. Utilisez
la ceinture baudrier du véhicule pour
attacher l’enfant.Assurez-vous que
le système DUA n’interfere pas avec la fonction et l’alignement de la ceinture
lorsque vous attachez votre enfant.
Bloc de
positionnement
Bloc de
positionnement
Installer le siège pour enfantInstaller le siège pour enfant
Page 53

102
103
SAI – Chemin court
Avant de commencer :
Vérifiez que le véhicule possède des barres d’ancrage DUA. 9
Vérifiez le manuel de l’utilisateur du véhicule pour les limites de *
poids des barres d’ancrage DUA.
Vérifiez que votre véhicule possède un boulon d’ancrage 9
supérieur.
Vous DEVEZ toujours* utiliser la courroie Versa-Tether en
mode harnais. L’utilisation de la courroie d’ancrage améliore
la stabilité du siège pour enfant et réduit le risque de blessure.
Vérifiez le manuel de l’utilisateur pour les emplacements des
boulons d’ancrage.
Retirez le crochet Versa-Tether 9
®
du crochet de rangement et
placez le par dessus le siège pour enfant pour l’empêcher
de se coincer entre le siège et le siège pour enfant lors de
l’installation.
Versa-Te ther
(Top Te ther)
Installez avec le DUA à l’aide du chemin de ceinture court
seulement, tel qu’illustré ci-haut.
Installer le siège pour enfant : Mode harnais
Installer le siège pour enfant : Mode harnais
Versa-Theter
(Boulon d’ancrage)
Page 54

104
105
Situez les barres d’ancrage DUA 1
dans votre véhicule.
Assurez vous que la hauteur du harnais *
est ajusté selon la taille de l’enfant.
Faites pivoter le bloc de 2
positionnement vers l’avant et
placez le siège pour enfant sur le
siège du véhicule.
Vérifiez que la sangle SAI 3
n’est pas entortillé et appuyez
fermement les attaches SAI à leur
barres d’ancrage DUA pour les
attacher.
Poussez sur le siège pour enfant 4
dans le siège du véhicule et tirez
sur le bout de la sangle SAI au
travers de la fente de ceinture
pour sécuriser.
Le siège pour enfant est sécuritaire *
lorsqu’il ne peut pas être déplacé de
l’avant vers l’arrière et d’un côté à l’autre
plus de 2,5 cm (1 pc) au chemin de
ceinture. Si le siège pour enfant n’est
pas sécurisé, répétez la procédure
d’installation ou utilisez un autre
emplacement.
Appuyez fermement le crochet 5
Versa-Tether® sur le boulon
d’ancrage pour attacher. Retirez le
jeu dans la courroie d’ancrage.
Utilisez la bande élastique pour 6
contenir la sangle de surplus.
1
2
OU
OU
Feuille de contrôle
Vérifiez que le bloc de positionnement est pivoté vers l’avant. 9
Vérifiez toutes les connexions et vérifiez que le siège pour enfant est 9
sécuritaire.
Le siège pour enfant est sécuritaire lorsqu’il ne peut pas être déplacé *
de l’avant vers l’arrière et d’un côté à l’autre plus de 2,5 cm (1 pc) au
chemin de ceinture. Si le siège pour enfant n’est pas sécurisé, répétez
la procédure d’installation ou utilisez un autre emplacement.
Assurez vous que l’excédant de courroie Versa-Tether 9
®
est rangé à
l’aide de la bande élastique. Assurez-vous toujours que l’excédant
soit contenu dans le véhicule.
< 2,5 cm.
Vérifiez l’attache
Versa-T e ther
®
(Boulon du haut)
Vérifiez que la sangle
Versa-T e ther
®
(boulon
du haut) est rangée
avec la bande
élastique
Vérifiez la connexion
des attaches SAI
Vérifiez que le
bloc de positionnement
est pivoté vers l’avant
Vérifiez qu’il y a
MOINS de 2,5 cm (1 pc)
de mouvement (avant vers
l’arrière ou d’un côté à l’autre)
au chemin de ceinture
Installer le siège pour enfant : Mode harnais
Installer le siège pour enfant : Mode harnais
Page 55

106
107
Ceinture baudrier - Choisir un chemin de ceinture
En raison de la variabilité des modèles de sièges et des systèmes
de ceinture, le siège pour enfant Frontier XT peut être attaché au
siège du véhicule à l’aide d’une ceinture baudrier avec la méthode
d’installation de chemin de ceinture court ou long.
Ce qui suit peut aider à choisir quel chemin essayer en premier :
MISE EN GARDE! Ne pas utiliser le chemin de ceinture long
pour le DUA ou les installation avec la ceinture sous-abdominale.
Côté extérieur
du siège pour
enfant
Tige de la boucle
derrière le siège
pour enfant
La tige de la boucle est en position pour
l’installation avec le chemin de ceinture court
Côté extérieur
du siège pour
enfant
La tige de la boucle
à côté du siège pour
enfant
La tige de la boucle est en position pour
l’installation à chemin long
Si la tige de la boucle se tient sur le côté du siège pour enfant (c.à.d. le siège B
pour enfant est plus étroit que les points d’insertion du système de ceinture du
véhicule), alors le chemin long pourrait être la meilleure option.
Si une des méthodes d’installation donne un mouvement de plus de 2.5 cm (1 pc)
de l’avant vers l’arrière ou d’un côté à l’autre, essayez l’autre méthode.
Les deux méthodes d’installation de la ceinture baudrier (longue et courte)
sont conforme et excède toutes les normes de sécurité de véhicule automobile
canadienne. une de ces options peut être utilisée selon la compatibilité du véhicule
pour les enfants d’au moins deux ans et de 11,4 kg (25 lb) jusqu’à 29,5 kg (65
lb) en mode harnais.
Faites pivoter le bloc de positionnement vers l’avant et placez le siège pour enfant A
dans le siège du véhicule à la position assise choisie. Prennez note de la position
de la tige de la boucle du véhicule en relation avec le siège pour enfant. Si la tige
de la boucle se trouve derrière le siège pour enfant (c.à.d. le siège pour enfant est
plus large que les points d’insertion du système de ceinture du véhicule), alors le
chemin de ceinture le plus court peut être essayé en premier.
Installer le siège pour enfant : Mode harnais
Installer le siège pour enfant : Mode harnais
Page 56

108
109
Avant de commencer :
Vérifiez que votre véhicule possède une ceinture de sécurité 9
qui peut être vérouillée.
Vérifiez le manuel de l’utilisateur du véhicule pour déterminer *
quel type de ceinture de sécurité vous possèdez et la façon
dont elles se bloquent. Si votre ceinture du véhicule ne
se bloque pas, une pince de verrouillage soit être utilisée.
Contactez le service à la clientèle de Britax au 1(888)427-4829
pour obtenir une pince de verrouillage.
Vérifiez que votre véhicule possède un boulon d’ancrage? 9
Vous DEVEZ toujours* utiliser la courroie Versa-Tether en
mode harnais. L’utilisation de la courroie augmente la stabilité
du siège et réduit le risque de blessures. Vérifiez le manuel de
l’utilisateur du véhicule pour les emplacements des boulons
d’ancrage.
Retirez le crochet Versa-Tether 9
®
de son crochet de rangement
et placez-le au dessus du siège pour enfant pour l’empêcher
de se coincer lors de l’installation.
Versa-Te ther
®
(Top Te ther)
Ceinture baudrier – Chemin court
Installation avec le chemin court avec la ceinture baudrier
Installer le siège pour enfant : Mode Harnais
Installer le siège pour enfant : Mode harnais
Versa-Theter
(Boulon d’ancrage)
Page 57

110
111
Faites pivoter le bloc de 1
positionnement vers l’avant du siège
et placez le siège pour enfant dans
le siège du véhicule.
Assurez vous que la hauteur du *
harnais est ajustée à celle de l’enfant.
Tirez sur la ceinture de sécurité vers 2
l’extérieur et acheminez la ceinture
au travers de la première fente de
ceinture au travers de la housse et
au travers de la deuxième fente de
ceinture.
Vérifiez que la ceinture n’est pas 3
entortillée et bouclez.
Poussez le siège pour enfant 4
fermement dans le siège du véhicule
tout en retirant le jeu de la ceinture
sous-abdominale (a), puis de la
ceinture baudrier (b) de la ceinture
du véhicule.
Assurez vous que la ceinture du *
véhicule est verrouillé tel que décrit
dans le manuel de l’utilisateur du
véhicule.
Le siège pour enfant est sécuritaire *
lorsqu’il ne peut pas être déplacé
de l’avant vers l’arrière et d’un côté
à l’autre plus de 2,5 cm (1 pc) au
chemin de la ceinture. Si le siège pour
enfant n’est pas sécuritaire, répétez
l’installation ou utilisez une autre
position assise.
Appuyez fermement le crochet *
Versa-Tether
®
au boulon d’ancrage.
Retirez le jeu de la courroie.
Utilisez la bande élastique pour 5
contenir le surplus de courroie.
OU
OU
Feuille de contrôle
Vérifiez que le bloc de positionnement est pivoté vers l’avant. 9
Vérifiez toutes les connexions et que le siège pour enfant est 9
sécuritaire.
Le siège pour enfant est sécuritaire lorsqu’il ne peut pas être déplacé *
de l’avant vers l’arrière et d’un côté à l’autre plus de 2,5 cm (1 pc) au
chemin de la ceinture. Si le siège pour enfant n’est pas sécuritaire,
répétez l’installation ou utilisez une autre position assise.
Assurez vous que la courroie Versa-Tether 9
®
est rangée dans
la bande élastique. Assurez vous toujours que la courroie est
contenue dans le véhicule.
Vérifiez l’attache
Versa-T e ther
®
(Boulon du haut)
Vérifiez l’attache de
la boucle du véhicule
<2,5 cm
Vérifiez que la sangle
Versa-T e ther
®
(boulon
du haut) est rangée
dans la bande
élastique
Vérifiez que le bloc de
positionnement est pivoté
vers l’avant
Vérifiez qu’il a MOINS
de 2,5 cm (1 pc) de
mouvement (avant/arrière,
un côté à l’autre) au chemin
de la ceinture
Installer le siège pour enfant : mode harnais
Installer le siège pour enfant : mode harnais
Page 58

112
113
Avant de commencer :
Vérifiez que la ceinture de votre véhicule peut être verrouillé. 9
Vérifiez le manuel de l’utilisateur du véhicule pour déterminer *
quel type de ceinture de sécurité de véhicule vous possèdez
et la façon dont celle-ci peut être verrouillé avec le siège pour
enfant. Si la ceinture du siège de véhicule ne se verrouille pas,
une pince de verrouillage doit être utilisé. Appelez le service à la
clientèle de Britax au au 1(888)427-4829 pour obtenir une pince
de verrouillage.
Vérifiez que votre véhicule possède un boulon d’ancrage 9
supérieur.
Vous DEVEZ toujours* utiliser la courroie Versa-Tether en
mode harnais. L’utilisation de la courroie augmente la stabilité
du siège et réduit le risque de blessures. Vérifiez le manuel de
l’utilisateur du véhicule pour les emplacements des boulons
d’ancrage.
Retirez le crochet Versa-Tether 9
®
de son crochet de rangement
et placez-le au dessus du siège pour enfant pour l’empêcher
de se coincer lors de l’installation.
Versa-Te ther
®
(Top Te ther)
Installation avec la ceinture baudrier et chemin long
Ceinture baudrier
1 – Chemin long
Installer le siège pour enfant : Mode harnais
Installer le siège pour enfant : Mode harnais
Versa-Theter
(Boulon d’ancrage)
Page 59

114
115
Faites pivoter le bloc de 1
positionnement vers l’avant du siège
et placez le siège pour enfant dans
le siège du véhicule.
Assurez vous que la hauteur du harnais *
est ajustée à celle de l’enfant.
IMPORTANT : NE PAS acheminer la ceinture
du véhicule sous la housse ou au travers du
guide de ceinture de l’appui-tête.
Acheminez la portion sous-abdominale
2
et baudrier au dessus du guide de
ceinture sous-abdominale, au travers
de la fente de ceinture, au travers de la
coque du siège et puis au travers de la
deuxième fente de ceinture.
Vérifiez que la ceinture de sécurité n’est
3
pas entortillée, et puis bouclez.
Poussez le siège fermement dans la
4
banquette tout en retirant le jeu de la
portion sous-abdominale (a), puis de
la portion baudrier (b) de la ceinture du
véhicule.
A*
ssurez vous que la ceinture du véhicule
est verrouillé tel que décrit dans le
manuel de l’utilisateur du véhicule.
Le siège pour enfant est sécuritaire *
lorsqu’il ne peut pas être déplacé de
l’avant vers l’arrière et d’un côté à l’autre
plus de 2,5 cm (1 pc) au chemin de la
ceinture. Si le siège pour enfant n’est pas
sécuritaire, répétez l’installation ou utilisez
une autre position assise.
Appuyez fermement le crochet Versa-5
Tether® au boulon d’ancrage. Retirez le
jeu de la courroie.
Utilisez la bande élastique pour contenir
6
le surplus de sangle.
3
4
OU
OU
Feuille de contrôle
Vérifiez que le bloc de positionnement est pivoté vers l’avant. 9
Vérifiez toutes les connexions et que le siège pour enfant est 9
sécuritaire.
Le siège pour enfant est sécuritaire lorsqu’il ne peut pas être déplacé *
de l’avant vers l’arrière et d’un côté à l’autre plus de 2,5 cm (1 pc) au
chemin de la ceinture. Si le siège pour enfant n’est pas sécuritaire,
répétez l’installation ou utilisez une autre position assise.
Assurez vous que le courroie Versa-Tether 9
®
est rangée dans
la bande élastique. Assurez vous toujours que la courroie est
contenue dans le véhicule.
Vérifiez l’attache
Versa-T e ther
®
(Boulon du haut)
Vérifiez l’attache de
la boucle du véhicule
<2,5 cm
Vérifiez que la sangle
Versa-T e ther
®
(boulon
du haut) est rangée
dans la bande
élastique
Vérifiez que le bloc de
positionnement est pivoté
vers l’avant
Vérifiez qu’il a MOINS
de 2,5 cm (1 pc) de
mouvement (avant/arrière,
un côté à l’autre) au chemin
de la ceinture
Installer le siège pour enfant : Mode harnais
Installer le siège pour enfant : Mode harnais
Page 60

116
117
Ceinture sous-abdominale - Chemin court
Avant de commencer :
Vérifiez que la ceinture de votre véhicule peut être verrouillé. 9
Vérifiez le manuel de l’utilisateur du véhicule pour déterminer *
quel type de ceinture de sécurité de véhicule vous possèdez
et la façon dont celle-ci peut être verrouillé avec le siège pour
enfant. Si la ceinture du siège de véhicule ne se verrouille pas,
une pince de verrouillage doit être utilisé. Appelez le service à la
clientèle de Britax au au 1(888)427-4829 pour obtenir une pince
de verrouillage.
Vérifiez que votre véhicule possède un boulon d’ancrage 9
supérieur.
Vous DEVEZ toujours* utiliser la courroie Versa-Tether en
mode harnais. L’utilisation de la courroie augmente la stabilité
du siège et réduit le risque de blessures. Vérifiez le manuel de
l’utilisateur du véhicule pour les emplacements des boulons
d’ancrage.
Retirez le crochet Versa-Tether 9
®
de son crochet de rangement
et placez-le au dessus du siège pour enfant pour l’empêcher
de se coincer lors de l’installation.
Installez avec la ceinture de sécurité sous-abdominale
seulement au travers du chemin court tel qu’indiqué ci-haut.
Versa-Te ther
®
(Top Te ther)
Installer le siège pour enfant : Mode harnaisInstaller le siège pour enfant : Mode harnais
Versa-Theter
(Boulon d’ancrage)
Page 61

118
119
Faites pivoter le bloc 1
d’inclinaison vers l’avant et
placez le siège pour enfant
sur le siège du véhicule.
Assurez vous que la hauteur *
du harnais est ajusté à la taille
de l’enfant.
Tirez sur la ceinture de sécurité 2
et acheminez la ceinture au
travers de la première fente de
ceinture, sous la housse et au
travers de la deuxième fente de
ceinture.
Vérifiez que la ceinture n’est
3
pas entortillée, puis bouclez.
Poussez le siège pour enfant
4
fermement dans la banquette
tout en retirant le jeu dans
la ceinture de sécurité du
véhicule.
A* ssurez vous que la ceinture du véhicule
est verrouillé tel que décrit dans le
manuel de l’utilisateur du véhicule.
Le siège pour enfant est sécuritaire *
lorsqu’il ne peut pas être déplacé de
l’avant vers l’arrière et d’un côté à l’autre
plus de 2,5 cm (1 pc) au chemin de la
ceinture. Si le siège pour enfant n’est
pas sécuritaire, répétez l’installation ou
utilisez une autre position assise.
Appuyez fermement le crochet 5
Versa-Tether au boulon
d’ancrage pour l’attacher.
Retirez le jeu de la sangle de
la courroie.
Utilisez la bande élastique pour
6
contenir le surplus de courroie.
Feuille de contrôle
Vérifiez que le bloc de positionnement est pivoté vers l’avant. 9
Vérifiez toutes les connexions et que le siège pour enfant est sécuritaire. 9
Le siège pour enfant est sécuritaire lorsqu’il ne peut pas être déplacé de *
l’avant vers l’arrière et d’un côté à l’autre plus de 2,5 cm (1 pc) au chemin de
la ceinture. Si le siège pour enfant n’est pas sécuritaire, répétez l’installation
ou utilisez une autre position assise.
Assurez vous que le courroie Versa-Tether 9
®
est rangée dans la bande
élastique. Assurez vous toujours que la courroie est contenue dans le
véhicule.
2
3
OU
OU
Vérifiez l’attache
Versa-T e ther
®
(Boulon du haut)
Vérifiez l’attache de
la boucle du véhicule
<2,5 cm
Vérifiez que la sangle
Versa-T e ther
®
(boulon
du haut) est rangée
dans la bande
élastique
Vérifiez que le bloc de
positionnement est pivoté
vers l’avant
Vérifiez qu’il a MOINS
de 2,5 cm (1 pc) de
mouvement (avant/arrière,
un côté à l’autre) au chemin
de la ceinture
Installer le siège pour enfant : Mode harnais
Installer le sièger pour enfant : Mode harnais
Page 62

120
121
Tournez et faites glissez
l’arrêtoir au travers de la fente
pour retirer.
Tirez sur la sangle du harnais *
jusqu’à ce qu’elle soit serrée à
partir de l’autre côté avant de
passer l’arrêtoir au travers.
Répétez les étapes 5 à 6 pour la
sangle de harnais restante.
Retirez la vis de verrouillage
6
de l’appui-tête et insérez dans
la coque pour ranger.
IMPORTANT : Rangez la vis dans
la fente dans la coque. Rangez
toutes les parties du harnais dans
un emplacement sûr. Ces parties
seront nécéssaires pour convertir
le siège pour enfant au mode
harnais de nouveau.
Tirez le harnais hors des
4
fentes.
NE PAS retirer les coussins de *
poitrine HUGS™ ou l’attache à
la poitrine.
En dessous du siège, faites 5
glisser l’arrêtoir d’une des
sangles du harnais vers le
haut et tirez-le hors de la
coque du siège pour enfant.
Ce siège peut seulement être utilisé en mode rehausseur avec
les enfants mesurant 106,7 – 165,1 cm (42 – 65 pc) et dont le
poids est supérieur à 18,2 kg (40 lb). Britax recommande d’utiliser
le mode rehausseur seulement après que l’enfant ai dépassé le
mode harnais.
Mode harnais au mode rehausseur
Pour retirer le harnais et la boucle :
Desserrez le harnais.
1
Appuyez sur le levier de a
relâchement
Tirez les deux sangles du harnais b
vers l’avant
Retirez le bouclier de ceinture 2
et décrochez les sangles du
harnais de la chappe.
Replacez le bouclier de
3
ceinture (a) et rangez la
chappe dans la fente (b).
Rangement de la vis
de verrouillage
Basculer entre chaque modeBasculer entre chaque mode
Page 63

122
123
Encochez chaque sangles du 9
harnais en insérant la boucle
de droite dans la boucle de
gauche.
Retirez la chappe du harnais
8
du rangement dans le bouclier
de ceinture (a), puis retirez le
bouclier de ceinture (b).
Faites tourner et glisser
5
l’arrêtoir de chaque sangle du
harnais au travers des fentes
du harnais.
Assurez-vous que l’icône de *
l’attache à la poitrine fait face à
l’extérieur.
Faites glisser chaque arrêtoir 6
en place dans la coque du
siège pour enfant.
Insérez les sangles du harnais 7
au travers des fentes dans la
housse, la coque et l’ajusteur
du harnais vers l’arrière du
siège pour enfant.
Mode harnais au mode
rehausseur
Replacer le harnais et la boucle:
Déplacez l’ajusteur du harnais
1
jusqu’au bout (a), déplacez
l’appui-tête jusqu’en bas(b).
Assurez-vous que les fentes *
du harnais dans la housse,
l’appui-tête et l’ajusteur du
harnais sont alignés.
Replacez la vis de verrouillage 2
pour verrouiller l’ajusteur de
l’appui-tête.
Tournez et glissez l’arrêtoir
3
de la sangle de la boucle
au travers de la fente de la
boucle.
Choisissez la fente la plus *
proche, mais pas celle sous
l’enfant.
Faites glisser l’arrêtoir en 4
place pour qu’il s’accote
contre la coque du siège pour
enfant. Vérifiez que la sangle
n’est pas entortillée, et que le
bouton fait face à l’extérieur.
Rangement de la vis
de verrouillage
Basculer entre chaque modeBasculer entre chaque mode
Page 64

124
125
Tirez sur l’ajusteur pour serrer 13
le harnais.
Tirez sur l’ajusteur hors du *
siège (parallèle au sol) pour
serrer. Voir page 131.
Avant de réattacher les 10
sangles du harnais, tenez
la chappe du harnais tel
qu’illustré, et assurez-vous
que la chappe n’est pas
entortillée.
Sangle de
l’ajusteur
Liste de contrôle
Vérifiez que le harnais n’est pas entortillé. 9
Vérifiez que l’attache à la poitrine et les coussins HUGS 9 ™ font face à
l’extérieure.
Vérifiez que la sangle d’ajustement n’est pas entortillée. 9
Vérifiez que la chappe du harnais est correctement orienté est que 9
les sangles sont correctement encoché dans la chappe.
Faites glisser les sangles 11
du harnais encochées
completement dans la chappe
du harnais.
Replacez le bouclier de
12
ceinture sur les sangles du
harnais et la chappe.
IMPORTANT : Vérifier les sangles du harnais et les attaches avant
d’utiliser le siège pour enfant.
Vérifiez que la chappe du harnais
repose tel qu’indiqué,
et que les sangles du harnais
sont encochées
correctment sur la chappe
Vérifiez que
l’attache à la
poitrine et les
coussins HUGS™
font face à
l’extérieur
Vérifiez que
les sangles du harnais
ne sont pas entortillées
Vérifiez que la sangle
d’ajustement n’est pas
entortillée
AVANTARRIÈRE
Basculer entre chaque modeBasculer entre chaque mode
Page 65

126
127
Détachez le crochet Versa-1
Tether® du crochet de
rangement.
Assurez-vous que le bloc de
2
positionnement est pivoté vers
l’arrière.
Placez le siège pour enfant
3
sur le siège du véhicule et
connectez les attaches SAI
au barres d’ancrage DUA du
véhicule.
Appuyez le siège pour enfant
4
dans le siège du véhicule et
passez sur les sangles SAI
au travers des fentes de
ceinture pour serrer.
Répétez tant que nécéssaire. *
Rangez l’excédant de sangle
derrière la housse.
Utiliser le SAI
Positionner le siège pour enfant : Mode rehausseurPositionner le siège pour enfant : Mode rehausseur
Avant de commencer :
Est-ce que votre véhicule possède un boulon d’ancrage supérieure pour la 9
position assise choisie?
Est-ce que votre véhicule possède des barres d’ancrage DUA pour la position 9
assise choisie?
IMPORTANT : Utilisez le DUA pour positionner le siège dans le siège du véhicule.
Attachez l’enfant à l’aide du système de ceinture baudrier et sous-abdominale.
MISE EN GARDE !
Positionnez vers l’avant • seulement dans une position assise avec
une ceinture baudrier.
Utilisez • seulement le système de ceinture baudrier et sous-
abdominale du véhicule lorsque vous attachez l’enfant en mode
rehausseur. Ne jamais attacher un enfant avec une ceinture sousabdominale seulement en mode rehausseur.
Toujours• attacher un siège non-occupé.
Si les barres d’ancrage DUA de votre véhicule empêchent d’utiliser •
le système de ceinture correctement, vous ne pouvez pas utiliser
le DUA pour installer le siège en mode rehausseur. Voir ci-dessous.
La ceinture de sécurité est bien
ajustée lorsqu’elle repose sur la partie
inférieure des hanches de l’enfant (a)
et que la partie baudrier repose sur
les épaules de l’enfant et n’entre pas
en contact avec le cou de l’enfant
lorsqu’elle est acheminée au travers
du guide de ceinture (b).
a
b
Page 66

128 129
Poussez fermement le crochet 1
Versa-Tether® sur le boulon
d’ancrage pour attacher.
Retirer le jeu de la courroie
d’ancrage.
Utilisez la bande élastique pour
2
contenir le surplus de sangle.
Assurez-vous de toujours *
contenir l’excédant de sangle à
l’intérieur du véhicule
Utilisez la ceinture sous-3
abdominale et baudrier pour
attacher votre enfant.
Ceinture baudrier
Assurez vous que le bloc de
1
positionnement est pivoté vers
l’arrière.
Placez le siège pour enfant
2
dans le siège du véhicule et
utilisez la ceinture baudrier
pour attacher l’enfant.
OU
OU
Positionner le siège pour enfant : Mode rehausseur
MISE EN GARDE !
Ne jamais acheminer la ceinture de sécurité autour de •
l’enfant lorsque vous utilisez ce siège en mode harnais.
Ajustez les ceintures offertes avec ce siège pour enfant •
pour qu’elles soient correctment ajustées. Une sangles
ajustée n’a aucun jeu. Elle repose en ligne relativement
droite sans s’affesser. Elle n’appuie pas sur la peau de
l’enfant ou le déplace dans une position inconfortable.
Les coussins de poitrine HUGS™ doivent être utilisés en •
tout temps.
Ajustez le harnais de façon à ce qu’il s’ajuste aux •
vêtements que l’enfant porte. Retirez les manteaux et/ou
vestons avant de placer l’enfant dans le siège pour enfant.
Vérifiez que le siège pour enfant est sécuritaire et que le •
harnais est correctement ajusté autour de l’enfant chaque
fois qu’il est utilisé.
Mode harnais
Avant de commencer :
Toujours vérifier pour des débris et retirez les pour empêcher
toute interférence avec le mécanisme d’ajustement du harnais.
Bloc de
positionnement
Attacher votre enfant
Page 67

130
131
Bouclez l’attache à la poitrine.7
La bonne hauteur pour *
l’attache à la poitrine est le
millieu de la poitrine au niveau
des aisselles.
Les coussins de poitrine *
HUGS™ peuvent être placés
en position confortable
pour l’enfant aux environs
de l’attache à la poitrine,
correctment installée.
Desserrez le harnais1
Appuyez sur le levier de a
relâchement du harnais
Tirez les sangles vers l’avantb
Ouvrez l’attache à la poitrine.2
Appuyez sur les ongletsa
Détachezb
Détachez la boucle et placez 3
les sangles autour des
accoudoirs.
Tirez la sangle du dispositif
6
d’ajustement du harnais pour
serrer le harnais.
Le harnais devrait avoir un *
ajustement confortable autour de
l’enfant. Une sangle bien ajustée ne
devrait pas avoir de jeu. Elle repose
en ligne relativement droite sans
s’affesser. Elle n’appuie pas sur la
peau de l’enfant et ne le déplace
pas en position inconfortable. Vous
ne devriez pas être en mesure de
pincer un excédant dans la ceinture.
7
Tirez l’ajusteur du harnais
dans le sens opposé du siège
(parallèle au sol) pour serrer.
Ne pas tirer vers les côtés.
Liste de contrôle
Avant de voyager, vérifiez que :
Les sangles du harnais ne sont pas entortillées. 9
Le harnais est bien ajusté. 9
La boucle est attachée. 9
L’attache à la poitrine est au niveau des aisselles. 9
Placez l’enfant dans le siège 4
pour enfant et positionnez les
sangles du harnais autour de
l’enfant.
Attachez la boucle du harnais.
5
Une bonne connexion est *
confirmée lorsqu’un déclic
audible est entendu après avoir
attaché chaque patte.
Attacher votre enfantAttacher votre enfant
Page 68

132
133
Attachez la ceinture de 4
sécurité autour de l’enfant.
La partie sous-abdominale de *
la ceinture doit être acheminé
au niveau des hanches de
l’enfant.
Tirez sur la ceinture de 3
sécurité et acheminez la partie
baudrier au travers du guide
de ceinture supérieur.
Mode rehausseur
MISE EN GARDE !
Utilisez seulement la ceinture baudrier pour attacher l’enfant •
en mode rehausseur.
Utilisez les guides de ceinture baudrier sur le siège pour •
enfant pour assurer un ajustement optimal.
Assurez vous que le partie sous-abdominale repose sur les •
hanches de l’enfant et que la partie baudrier n’est pas en
contact avec le cou de l’enfant.
Avant de commencer :
Assurez vous que le bloc de positionnement est en position •
rehausseur.
Si le dossier du siège est ajustable, assurez vous qu’il est •
en position vertical avant de placer l’enfant.
Placez le siège pour enfant dans le siège du véhicule et placez 1
l’enfant dans le siège pour enfant.
Ajustez l’appui-tête pour
2
que le guide de ceinture
positionne la ceinture baudrier
au niveau ou juste au dessus
des épaules de l’enfant. Les
oreilles de l’enfant devraient
être sous le sommet de
l’appui-tête.
Feuille de contrôle
Avant de voyager, vérifiez que :
La ceinture de sécurité n’est pas entortillée. 9
La boucle ne repose pas sur le guide de ceinture rouge. 9
La partie baudrier de la ceinture de sécurité est acheminé au travers du guide 9
de ceinture supérieur au niveau ou au dessus de l’épaule de l’enfant et n’entre
pas en contact avec le cou de l’enfant.
La portion sous-abdominale de la ceinture de sécurité est acheminée sur les 9
hanche de l’enfant
.
Retirez le jeu de la ceinture de 5
sécurité.
Attacher votre enfantAttacher votre enfant
Page 69

134
135
Tirez sur les sangles du 4
harnais au travers de la coque
et la housse vers l’avant du
siège pour enfant.
Desserrez le harnais.
1
Appuyez sur le levier de a
relâchement
Tirez les deux sangles du harnais b
vers l’avant
Débouclez le harnais, et 2
déplacez l’ajusteur à sa
position la plus haute.
Retirez le bouclier de ceinture
3
et décrochez les deux sangles
du harnais de la chappe.
Retirez la vis pour
5
déverrouiller l’appui-tête et
le soulever à sa plus haute
position.
Rangez la vis dans la fente de *
la coque.
Décrochez les bandes 6
élastiques, puis retirez la
housse de l’appui-tête.
Faites attention pour ne pas *
endommager la mousse
absorbante d’énergie.
Détachez les pinces sous les 7
accoudoirs, et tirez la housse
des guides de ceinture
inférieure.
Retirer la housse
Soin et entretienSoin et entretien
MISE EN GARDE !
Ne jamais retirer les pattes de la boucle du harnais.•
NE PAS retirer les coussins HUGS• ™ du harnais.
Rangement de la vis
de verrouillage
Page 70

136
137
Tournez et poussez l’arrêtoir 8
de la boucle au travers de la
coque et de la housse vers le
haut du siège.
Passez le coussin abdominal *
au dessus de l’arrêtoir pour
retirer.
Tirez sur les sangles du 9
harnais, pattes de la boucle,
coussins de poitrine HUGS™
et attache à la poitrine au
travers des fentes dans la
housse.
Retirez les bandes élastiques
10
des crochets en dessous du
siège pour enfant, puis tirez la
partie inférieure de la housse
vers le dessous du siège pour
enfant.
Acheminez la housse autour
11
de l’appui-tête et retirez la
housse toute entière de la
coque du siège pour enfant.
Nettoyer la housse
LAVER LA HOUSSE À LA MAIN à l’aide d’eau froide et savon •
doux.
SÉCHER À PLAT pour empêcher la housse de rétrécir.•
NE PAS :•
Utiliser d’eau de javel*
Laver à la machine*
Sécher à la machine*
Repasser*
Nettoyer le harnais
NETTOYER LE HARNAIS À L’ÉPONGE à l’aide d’eau tiède et •
savon doux.
SÉCHER À L’AIDE D’UN LINGE.•
NE PAS :•
Désassembler le harnais*
Utiliser d’eau de javel*
Laver à la machine*
Sécher à la machine*
Repasser*
Nettoyer la coque
LAVER LA COQUE À L’AIDE D’UNE ÉPONGE à l’aide d’eau •
tiède et savon doux.
SÉCHER À L’AIDE D’UN LINGE•
NE PAS utiliser de nettoyants abrasifs•
Soin et entretienSoin et entretien
Page 71

138
139
Replacez la vis pour verrouiller 7
l’ajusteur de l’appui-tête.
Insérez les sangles du harnais
8
au travers des fentes dans la
housse, la coque et l’ajusteur
du harnais vers l’arrière du
siège pour enfant.
Tirez la housse par dessus
5
la coque de l’appui-tête
et réattachez les bandes
élastiques.
Assurez-vous de ne pas *
endommager la mousse
absorbante d’énergie.
Déplacez l’ajusteur du harnais 6
à son plus haut point (a), et
déplacez l’appui-tête à sa plus
basse position (b).
Assurez-vous que les fentes *
du harnais dans la housse,
l’appui-tête et l’ajusteur du
harnais sont alignées.
Replacer la housse
Placez la housse autour de
1
l’appui-tête.
Faites attention de ne pas *
endommager la mousse
absorbante d’énergie.
Placez le bas de la housse 2
par dessus la partie basse
de la coque du siège pour
enfant, puis passez les bandes
élastiques sur les crochets au
bas de la coque du siège.
Tirez sur les sangles du
3
harnais, pattes de la boucle,
coussins de poitrine HUGS™
et attache à la poitrine au
travers des fentes dans la
housse.
Poussez la housse sous les
4
guides de ceinture inférieures.
Soin et entretienSoin et entretien
Page 72

140
141
Tournez et poussez l’arrêtoir 2
de la boucle au travers de
la coque et de la housse du
siège.
Tirez le coussin abdominal par *
dessus la boucle pour le retirer.
Pour nettoyer :
RINSER ABONDAMMENT la •
boucle à l’aide d’eau tiède.
TESTEZ LA BOUCLE en •
bouclant et débouclant la
boucle jusqu’à ce que vous entendez un déclic positif après
avoir inséré chaque patte de la boucle. Si les déclics ne sont
pas entendus, répétez la procédure de nettoyage.
SECHEZ À L’AIDE D’UN LINGE.•
NE PAS :•
Tremper*
Lubrifier*
Utiliser des solvants*
Utiliser des savons ou détergeants ménagers*
Nettoyer la boucle
Si votre enfant mange ou boit dans le siège pour enfant, il se peut
que vous ayez à vérifier la boucle périodiquement et rinser tout
débris accumulé ou liquides séché.
Retirer la boucle
Situez l’arrêtoir de métal en
1
dessous du siège et faites-le
glisser vers le haut pour le
déloger de la coque.
Poussez l’arrêtoir de la boucle 11
au travers des fentes de la
coque et de la housse du
siège pour enfant vers le
dessous du siège.
Assurez vous que les sangles *
du harnais ne sont pas
entortillés et que la boucle fait
face à l’extérieur.
Assurez-vous que la sangle 9
de l’ajusteur attaché à la
chape n’est pas entortillé, puis
glisser les sangles du harnais
emboîté complètement dans
la chape du harnais. Voir
pages 123 et 124.
Replacez le bouclier de
10
ceinture sur les sangles du
harnais et la chape.
Ré-attachez les pinces
12
derrière les accoudoirs et
faites glisser le matériel
sous les guides de ceintures
inférieurs.
Soin et entretienSoin et entretien
Page 73

142
143
Tournez et poussez l’arrêtoir 2
de la boucle au travers de la
housse et la coque vers le
dessous du siège pour enfant.
Ré-acheminer la boucle
Sélectionnez la fente la plus proche de l’enfant, mais non celle
1
sous l’enfant.
Tirez la boucle dans le sens
3
opposé jusqu’à ce qu’elle soit
serrée. Vérifiez que l’arrêtoir
de la boucle repose sur la
coque du siège pour enfant.
Assurez-vous que la sangle de *
la boucle ne soit pas entortillée
et que le bouton fait face à
l’avant du siège.
Courroie absorbante d’énergie
Le Versa-Tether peut indiquer lorsque le siège pour enfant a subit
un accident grave ou modéré et que le remplacement du siège
pour enfant est nécéssaire.
Illustration 1 affiche la courroie
lorsque le siège pour enfant peut
être utilisé (si le siège n’a pas subi
d’accident). La couture coloré est
intacte et la courroie est contenue
sous l’étiquette.
Les illustrations 2 et 3 affiche des
exemples lorsque le siège ne peut
pas être utilisé. Si l’étiquette est
brisé, ou si une des boucles est
passé au travers de la coque et/
ou si la couture colorée est brisée,
le siège pour enfant n’est plus
utilisable.
IMPORTANT : Cessez d’utiliser
un siège pour enfant qui a subi un
accident modéré ou sévère, sans
tenir compte si les boucles sont
passées au travers de la coque et
que la couture coloré est brisée.
1
2
3
Conseils et dépannageSoin et entretien
Page 74

144
145
Conseils
CONSEIL : Si vous avez des
difficultés à obtenir une installation
serrée avec le mode harnais en
utilisant le chemin de ceinture
court, essayez d’incliner le siège
lors de l’installation. Une fois le
processus d’installation terminé,
remontez le siège à sa position
la plus droite possible. Voir
illustration A.
NOTE : Ce conseil ne peut vous aider que si le siège du véhicule peut
s’incliner. Vois page 89 pour des informations importantes sur le choix
d’une position assise. La banquette arrière est l’emplacement le plus
sûr pour les enfants de 12 ans et moins.
CONSEIL : Lorsque vous installez
le siège pour enfant à l’aide du
chemin de ceinture court (Ill B):
Bouclez la ceinture du véhicule •
ou attachez les attaches SAI au
barres d’ancrage.
Tirez sur la tige de la boucle •
de ceinture ou les attaches SAI
dans la fente de ceinture pour
l’aligner correctement dans le chemin de ceinture.
Serrer. •
Dépannage
Problème : Le harnais est difficile à ajuster.
Solution possible : Vérifiez que les fentes du harnais dans l’appui-
tête et le dispositif d’ajustement du harnais sont alignées. Ne pas
utiliser le dispositif d’ajustement du harnais de l’appui-tête lorsque
le harnais est attaché.
Solution possible : La chape peut être coincée dans une sangle
ou autre élément du siège pour enfant. Retirez l’obstruction et
essayez d’ajuster le harnais de nouveau.
Problème : La sangle du dispositif d’ajustement s’éffiloche :
Solution possible : Tirez la sangle du dispositif d’ajustement
du harnais dans le sens opposé du siège pour enfant (parallèle
au sol) pour serrer. Ne pas tirer vers les côtés. Faire ceci peut
effilocher la sangle du harnais. Voir page 131.
Problème: Le boucle ne se boucle pas avec un déclic lorsque
chaque patte est insérée.
Solution possible: Il peut y avoir des débris dans le mécanisme de
la boucle. Nettoyez la boucle tel qu’illustré en page 141 et essayez
la boucle de nouveau.
Si vous avez perdu la vis de verrou de l’appui-tête, vous pouvez
acheter une vis à tête plate #8 x 1.25 cm chez n’importe quel
quincaillerie.
Veuillez contacter le service à la clientèle au 1.888.427.4829 si
vous avez un problème non listé ci-haut.
A
b
Conseils et dépannage Conseils et dépannage
Page 75

146
147
Ce siège pour enfant est fabriqué par Britax Child Safety, Inc. Britax® guarantie ce
produit à l’acheteur original chez le détaillant tel que décrit ci-dessous :
GUARANTIE D’UN AN LIMITÉ
Ce produit est guarantie contre les matériaux ou la fabrication défectueuse pour la
période d’un an à partir de la date d’achat originale. Preuve d’achat requise. Votre
recours exclusif quant à cette guarantie est que Britax pourra, à sa discression, offrir
une réparation ou un remplacement des pièces de ce produit. Britax se réserve le
droit de discontinuer ou de changer des matériaux, pièces, modèles ou produits ou
de faire des substitutions.
Pour faire une réclamation sous cette guarantie, vous devez contacter le service à
la clientèle de Britax au 1-888-427-4829 ou nous écrire à l’addresse écrite à l’arrière
de ce livret.
VEUILLEZ REMPLIR ET EXPÉDIER LA CARTE D’ENREGISTREMENT
DANS LES (30) PROCHAINS JOURS SUIVANT L’ACHAT.
Vous pouvez aussi vous enregistrer en ligne à www.Britax.ca/registration.
LIMITES DE LA GUARANTIE
Cette guarantie n’inclut pas les endommagements provenant d’une négligeance,
abus ou d’une utilisation hors des normes écrites dans ce manuel de l’utilisateur.
L’utilisation de housses, pièces rapportées, accessoires, ou appareils de serrement
non conçu par Britax Child Safety Inc, n’est pas approuvé par Britax. Leur utilisation
pourrait rendre ce siège pour enfant non-conforme aux normes de sécurité de
véhicule automobile ou ne pas performer tel que voulu lors d’un accident. Leur
utilisation annule la guarantie de Britax.
LIMITATION DES ENDOMMAGEMENTS
Cette guarantie et ces recours ci-haut sont exclusifs et prévalent sur tout autre
recours, oral ou écrit, exprimé ou tacite. Britax ou le marchant vendant ce
produit, ne sont en aucun cas passible pour tout endommagements, incluant les
endommagements accessoires et indirects, causés par l’utilisation ou l’inabilité
d’utiliser ce produit.
LIMITATIONS DES GUARANTIES, AUTRES TERMES DE LA
GUARANTIE ET LOIS PROVINCIALES
Toute guarantie tacite, incluant les guaranties de qualité marchande et de bon
fonctionnement pour un but particulier, seront limités à la durée et les termes
de cette guarantie explicite. Certaines provinces ne permettent aucune limite
sur la durée d’une garantie tacite ou l’exclusion, limitation ou des dommages
accessoires ou indirects, donc les limitations ci-haut peuvent ne pas s’appliquer
à vous. Cette guarantie vous donne vos droits légaux spécifiques, et vous pouvez
posséder d’autres droits, qui peuvent varier d’une province à l’autre. Britax et le
marchant n’autorisent aucune personne à créer toute autre guarantie, obligation, ou
responsabilité pour ce produit.
Guarantie
Page 76

Britax Child Safety, Ltd.
P. O. Box 7289,
RPO Brunswick Square,
Saint John NB E2L 9Z9.
A Britax Childcare Group
Limited company
Une société de Britax Childcare
Group Limited
Te l. : 1-888-427-4829
www.Britax.ca
 Loading...