

Page 1
Introducing your new child car seat
You must ensure that you follow these instructions carefully and correctly. If this seat is not tted securely and your child is
not strapped in correctly, your child and other passengers are at serious risk of injury in the event of an accident
IMPORTANT!
Please read this User Guide carefully BEFORE trying to install your child car seat
The Hampshire Trading Standards Authority and Britax advi se
that child car seats should not be bought or sold second -hand.
Please dispose of your child seat safely. Do not sell or pass it on.
After an accident, the chil d seat and your vehicle seat belts
should be replaced. Although they may look undamaged, if you
were to have another accident the child seat and your vehicle
seat belts may not be able to protect your child as well as they
should.
No child seat is escape proof
Harness systems cannot be designed to be completely “child
proof” and yet comply with the legal requirements of Euro pean
Standard ECE R44. The harness must be fastened and adjusted
correctly at all times and children encourage d to remain within
the harness system.
Looking after your child sea t
Food and drink may nd their way inside the buckle of the
harness. This can stop it from working proper ly – it will not click.
Wash in warm water until clean (dia A and B).
Cleaning the cover
Please read the labels on the cover for washing instructions.
DO NOT tumble dry the cover – short spin and drip dr y only.
Cleaning the seat shell
Sponge clean ONLY using hand soap and warm water.
DO NOT take apart, or attempt to take apart, any par t of the seat
when cleaning.
DO NOT use solvents, detergents or washing-up liquid as these
may weaken the seat.
DO NOT lubricate or oil any part of the seat.
Removing the cover
Press in and hold the adjuster button with your hand below the
chest pads (dia 1a) pull BOTH shoulder straps forward as far
as possible. Unfasten the buckle by pressing the red harness
buckle button (dia 1c). Undo the press studs from around the
harness straps on either side of the headrest cover, tilt the
headrest forward and lift off the headre st cover. Undo the press
studs on the backrest cover, push the harness buckle and
adjuster strap through the cover, unhook the elastic seam of the
cover from under the edge of the seat shell and gently lift the
backrest cover off the shell.
Re-tting the cover
Simply proceed in the reverse order.
IMPORTANT – The cover is a safety feature. NEVER use the child
seat without it. Don’t put your child’s safety at risk by using other
makes of replacement cover, they could stop the child seat from
protecting your child as well as it should.
A replacement cover is available from your Britax stockist o r
contact Britax Customer Servi ce Department on 01264 386034.
Guarantee
All Britax products are carefully des igned, manufactured and
tested. However, should this product prove faulty within 12
months of purchase due to a materials or manufacturing fault
please return it to the original place of purchase. We will then, at
our discretion, either repair it free of charge or replace it wi th the
same or a similar product.
For guarantee purposes proof of purchase will be required. We
recommend that you retain your
receipt and attach it to this user
guide.
They should be kept in a safe place.
Britax does not accept liability for damage arising from abuse,
misuse or negligence. This guarantee is not transferable and
therefore does not apply to second-hand products.
Your statutory rights are not affected by this guarantee.
If in doubt
Not all car seats t all cars. For advice as to the suitabilit y of this
restraint for your vehicle please use the vehicle approval list,
on our website at www.britax.eu or call our Customer
Service Helpline on 01264 386034 or e mail helpline@britax.eu.
IMPORTANT – ISOFIX should only be used with
vehicles which appear on the supplied vehicle
applications list. An up-to-date c opy of the list can
also be found on our website.
Britax, whilst taking into account child car seat contact
with vehicle seats throughout the development of new
products, cannot accept responsibility for damage
occurring to vehicle seats or seat belts.
IMPORTANT – The child seat MUST only be used
with a lap and diagonal seat belt (approved to UN/
ECE Regulation no. 16 or other equivalent standards).
Britax Excelsior Limit ed
1 Churchill Way West
Andover
Hampshire SP10 3UW
United Kingdom
A Britax Childcare com pany
Customer Service Helpline: 01264 386034
Email: helpline@britax.eu
Switchboard: 01264 333343
Fax: 01264 334146
www.britax.eu
Britax is a registered t rademark of Brita x Childcare
WARNING
EXTREME HAZA RD!
DO NOT use the child seat on a passenger seat tted with an
active front airbag unless your vehicle manufacturer con rms
that it is safe.
DO NOT use the child seat on rearward facing seats.
DO NOT use the child seat on side facing vehicle seats.
DO NOT use anything, such as a cushion or coat, to raise the child
seat off the passenger seat. In an accident the child seat and your
vehicle seat belts would not be able to protect your child as well as
they should.
DO NOT use the child seat in the home. It has not been
designed for home use and should only be used in your vehicle.
DO NOT attempt to dismantle, modify or add to any part of the
child seat or change the way its harness or your vehicle seat
belts are made or used. The ofcial approval is no longer valid if
modications are made. NO modications may be made to t he
child seat other than by the manufacturer.
DO NOT leave children alone in your car, even for a short time.
DO NOT leave loose objects, such as luggage or books, in the
back of your vehicle. They must be properly secured, because
if you have to stop your vehicle suddenly loose objects will keep
moving and can then cause serious injuries. Large and heavy
loose objects are a particular risk.
DO NOT leave folding passenger seats unlatched. If you have to
stop your vehicle suddenly a loose seat back could injure your
child.
DO NOT allow children to play with or adjust the child seat.
DO keep this user guide in the user guide storage slot.
DO cover the child seat if your car is left in direct sunlight.
Fittings can become hot to touch in sunny weather and the cover
may become faded.
DO make sure that the child seat does not become trapped by a
folding passenger seat or in the door of your car.
DO make sure that you adjust the harness to t the clothes your
child is wearing before each journey – a tting for winter c lothes
may be too slack for a child wearing summer clothes.
DO store the child seat in a safe place when it is not being used.
Avoid placing heavy objects on top of it and do not store near
direct heat sources or in direct sunlight.
DO always keep the child seat secure, even if it is not being used
by your child.
DO make sure that all occupants in the vehicle are correctly
restrained.
DO where necessary, use the insertion guides whe n installing
the child seat with ISOFIX ttings. Failure to do so may result in
damage to your vehicle seat.
DO make sure that your child seat is rmly latched to its
anchorage points.
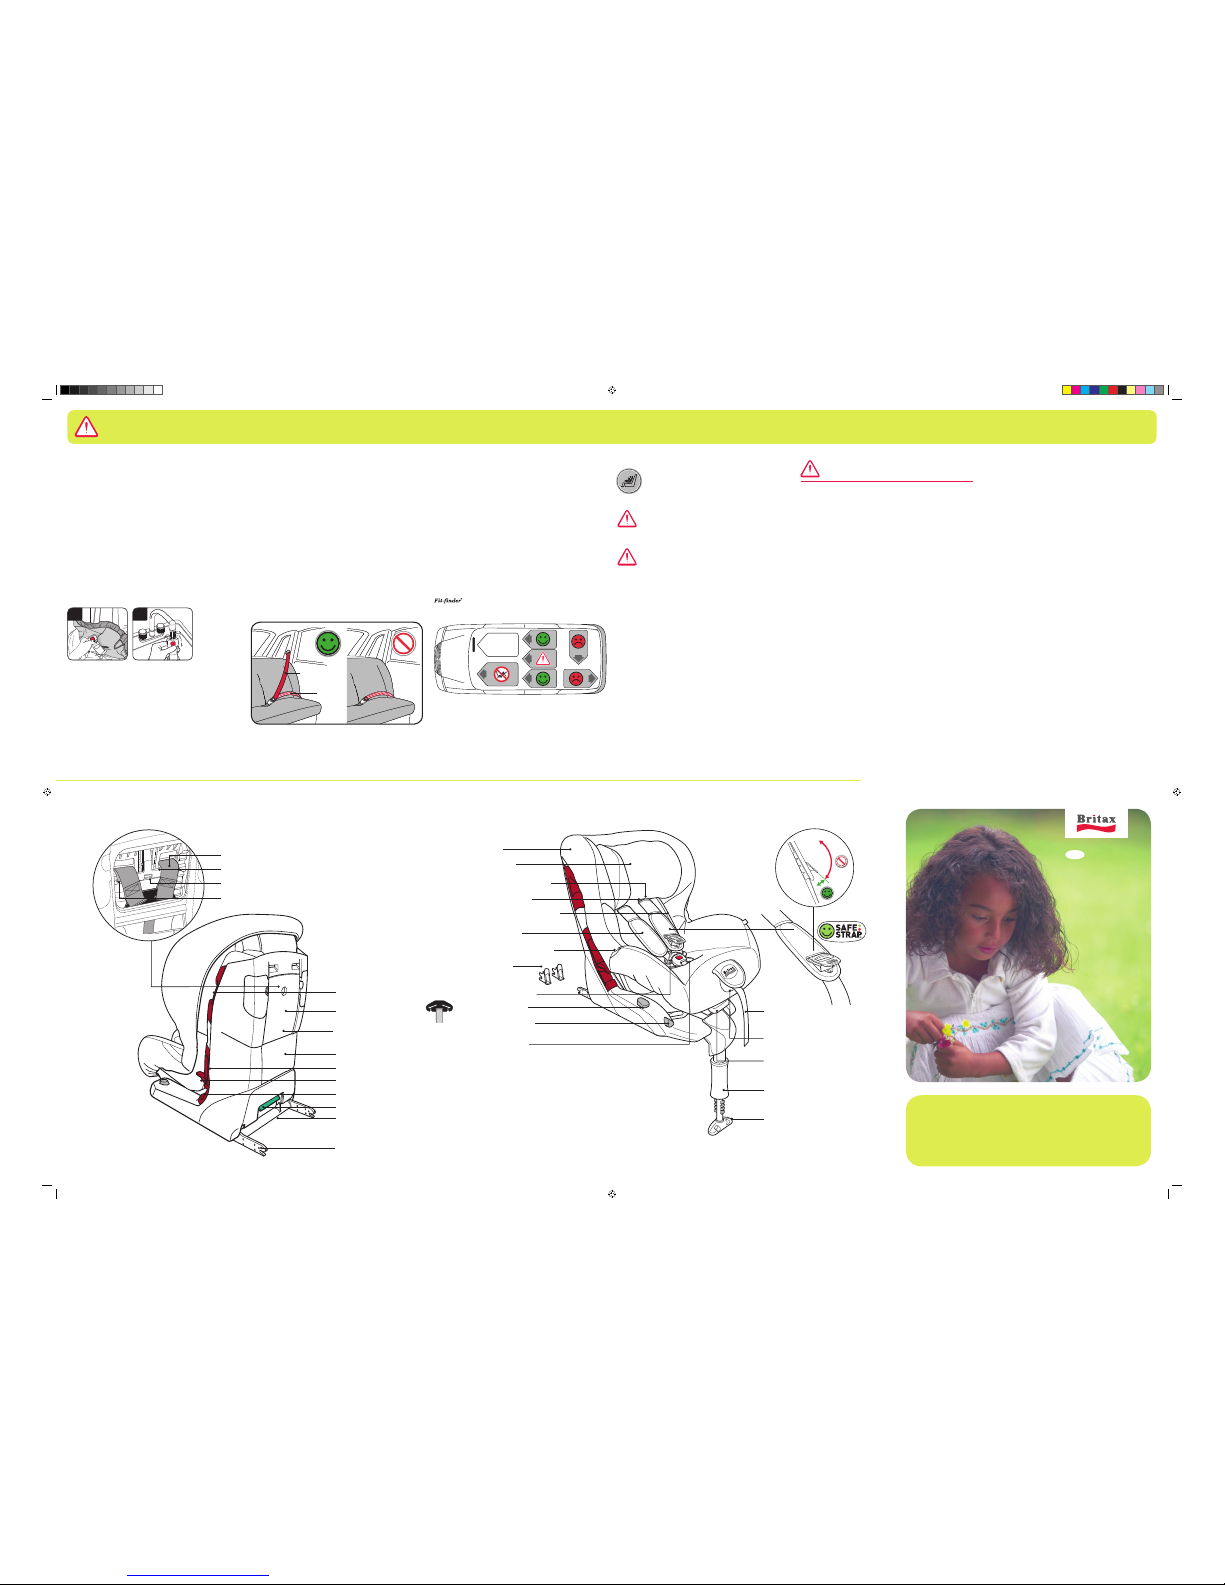
Diagonal
Lap
Explora ISOFIX
GB
User Guide
9-18Kg (Group 1)
A
B
Cover
Shoulder strap slot s
Chest pads
Harness buckle
Insertion
guides
Comfort pad
Adjuster button
(underneath cover)
Recline handle
(underneath front of se at)
Adjuster strap
Safety button
Tension button
Foot prop handle
Foot prop
Elastic stowage str ip
Headrest
Quick removable cove r
Yoke (behind belt shield)
Seat belt clamp
Clamp lever
Green catch relea se handle
Catch arm
Seat shell
Upper Routing guide
Lap belt routing gui de
User guide storage sl ot (under child seat)
Harness adjuster
Harness strap
Chest pad strap
Chest pad attachm ent arm
Harness strap
BBO-674-00
User guide storage a p - pull to open
1297.003 - Explora ISOFIX (UK).i1 1 18/1/07 14:48:32
Page 2
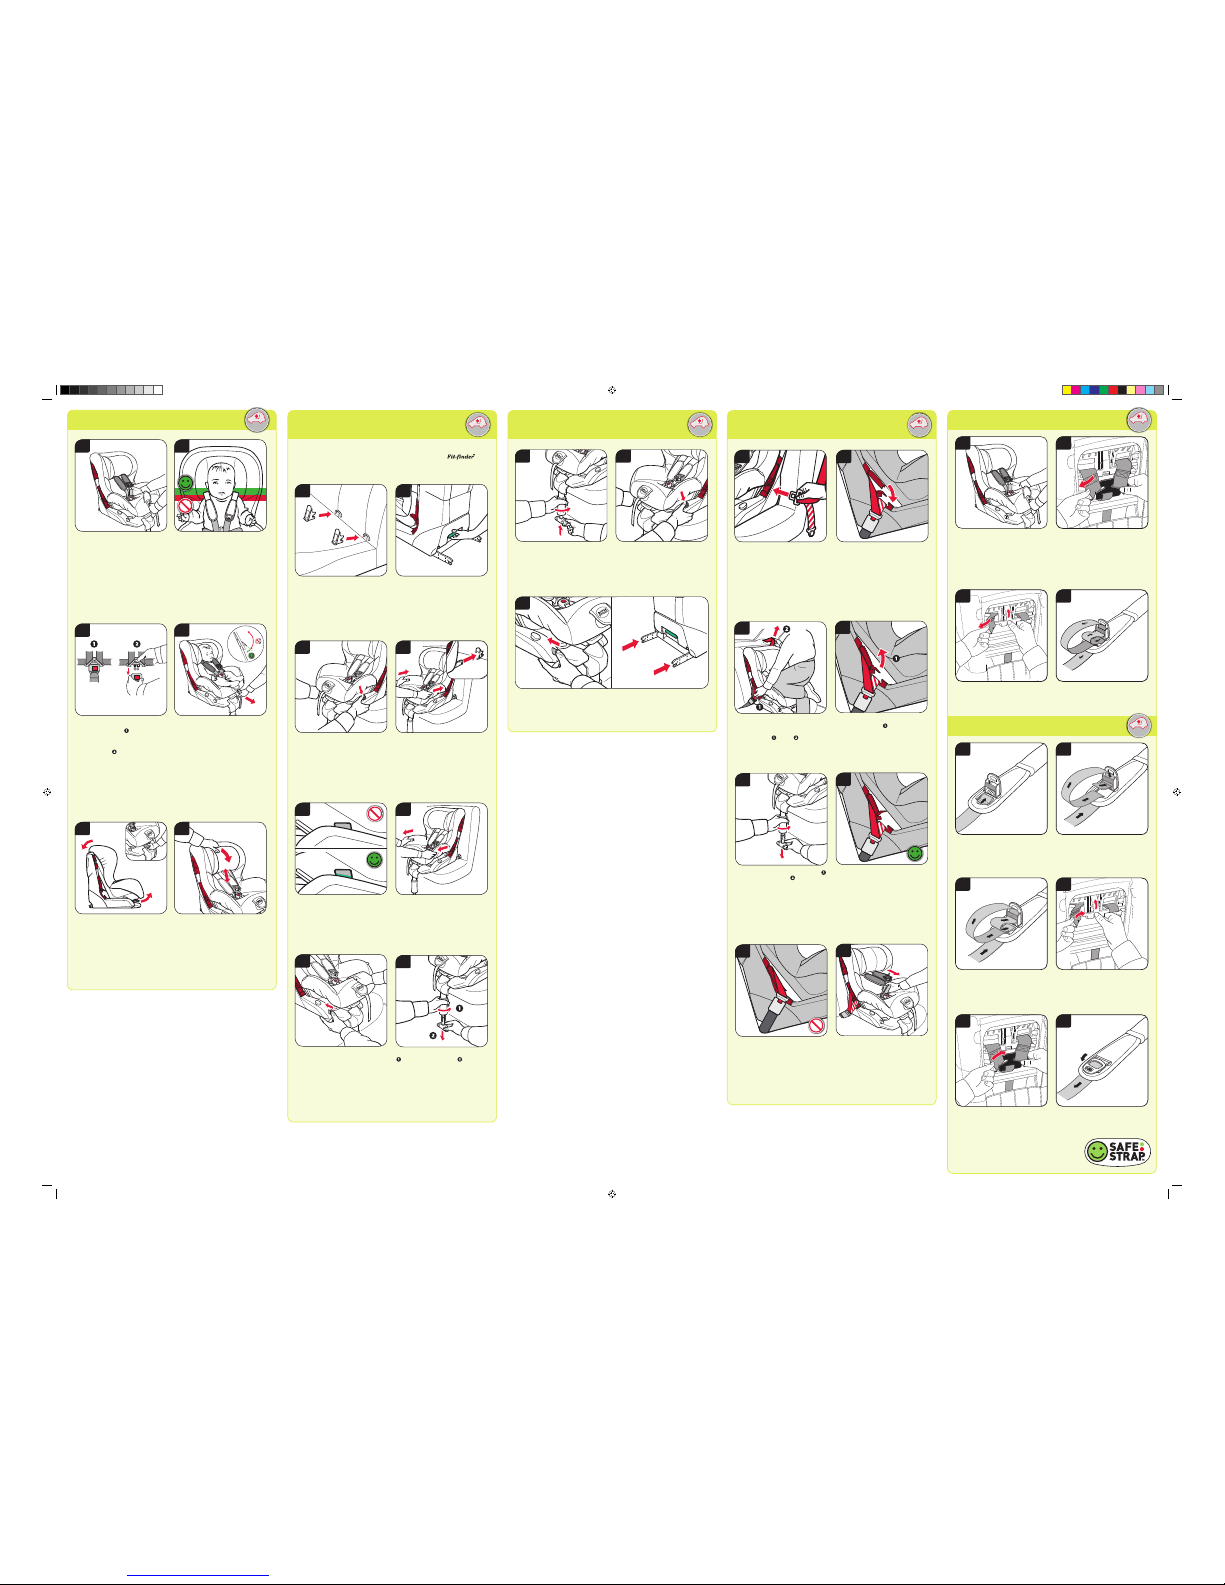
1. Adjusting the child seat
1a
1c
1f
1b
1e
1d
2. Installing the child seat using your in-car
ISOFIX ttings
IMPORTANT – The child seat is semi -universal. For advice as to th e suitability of the
child seat for your vehicle you MUST u se the vehicle applications l ist, on
our website at www.britax.eu, call our Custo mer Service Helpline on 0126 4 386034 or
email helpline@britax.e u.
2a
2b
2c
2d
2f
2e
2g
2h
Installing the chil d seat
If required, clip the two inser tion guides
onto the two ISOFIX anchorag e points
on the vehicle seat (between sea t and
backrest). The cut out on the inser tion
guide must point upwards (dia 2a). The
insertion guides should b e removed when
not in use.
Pull the green catch release hand le at the
base on the back of the seat out to exten d
the two catch
arms fully (dia 2b).
Unfold the foot prop from the bas e.
Press the safety buttons on t he left and
right side of the seat base togethe r
(dia 2c).
TIP - This ensures that both hook s on the
locking arms are open and read y to use.
Guide both catch arms into the in sert
guides until the arms engage on bo th
sides (dia 2d). “CLICK!”
IMPORTANT – The green marking s on
the safety buttons must now be v isible on
both sides (dia 2e).
Pull on the child seat to ensure it is
engaged on both sides (dia 2f ).
Press the tension button whil st pushing
the child seat against the backr est of the
vehicle seat (dia 2g).
Turn the foot prop handle anticlock wise
and pull out the foot prop until it rests
rmly on the oor of the vehicle (d ia 2h).
IMPORTANT – The foot prop must never
be suspended in mid-air or supp orted by
other objects. Also ensure th at the foot
prop does not raise the child sea t from the
vehicle seat surface.
3. Removing the child seat installed with
ISOFIX ttings
3a
3b
3c
Turn the foot prop handle anti-clo ckwise to
shorten it (dia 3a).
Press the safety buttons on t he left and
right side of the child seat to rele ase it from
the vehicle (dia 3b).
The catch arms release.
Press and hold the tension but ton whilst pushing the catch ar ms into the seat base at the
same time (dia 3c).
Fold the foot prop onto the bottom s ide of the seat base.
4. Installing the child seat in your vehicle
using a lap and diagonal seat belt
4g
4h
4a
4f
4c
4e
IMPORTANT – Do not twist the bel t
Firmly push the child seat into your ve hicle
seat using your body weight. Pull and h old
the diagonal belt . Pull at to remove all
slack in the lap belt and insert t he diagonal
belt into the upper routing guide. (di a 4c).
IMPORTANT – Do not twist the bel t.
Whilst holding the diagonal be lt tight pull
up on the clamp lever until it engages
(dia 4d).
IMPORTANT – The diagonal seat bel t
section may only be clamped on th e side
of the vehicle seat buckle
IMPORTANT – Ensure catch arms are
stowed.
Unfold the foot prop and place th e child
seat facing forward on the veh icle seat.
Pull up on the adjustment handle and pul l
the seat shell forward into the r eclining
position.
Pull out the vehicle seat belt and pla ce it
between the seat shell and the sea t base
(dia 4a).
Turn the foot prop handle anticlock wise
and pull out the foot prop until it rests
rmly on the oor of the vehicle (d ia 4e).
IMPORTANT – The foot prop must never
be suspended in mid-air or supp orted by
other objects. Also ensure th at the foot
prop does not raise the child sea t from the
vehicle seat surface.
IMPORTANT – After installin g the child
seat you need to check the positi on of the
seat belt buckle.
Checking the posit ion of the seat
belt buckle
If, after following the instal lation
instructions, your seat belt b uckle looks
like this (dia 4f) the child seat s hould now
be secure. To check this try to pull the se at
forward by the harness. It sho uld feel rm,
not loose.
Engage the buckle tongue in the vehi cle
seat buckle. CLICK!
Place the lap belt section in th e lap belt
routing guides on both sides of th e seat
base.
Press down the clamp lever of the dar k
red seat belt clamp on the same sid e of
the seat as the vehicle seat buckle. I nsert
the diagonal seat belt sectio n in the belt
clamp (dia 4b).
If, after following the above inst ructions,
your seat belt buckle looks like thi s
(dia 4g) the child seat is NOT corr ectly
installed.
Try another seating position in your c ar.
The child seat should now be secur e.
To check pull forward rmly on the
harness. There should be lit tle or no
movement (dia 4h).
If you are in any doubt contact Custom er
services on 01264 3860 34 or use our
Fit-nder servic e at www.britax .eu.
To remove the child seat from the car,
simply reverse these instruc tions.
6. Retting the SAFESTRAP™
Push the adjuster button in and at the same
time pull BOTH shoulder straps forward as
far as possible (dia 5a).
Turn the seat around and open the User
Guide storage ap. Lift the harness adjuster
at the back of the seat shell and move it
up so that the shoulder strap slots in the
headrest are in the top position.
Unhook the harness strap from the yoke at
the back of the child seat. Pull the harness
strap through the shoulder strap slot to the
front of the seat (dia 5b).
Remove the chest pad strap from the chest
pad attachment arm. Pull the chest pad
strap through the shoulder strap slots to the
front of the seat (dia 5c).
Feed the harness strap all the way out of
the SAFESTRAP™ mechanism until it is
released (dia 5d).
Making sure the harness strap is not twisted
push the loop end of the harness strap up
through the front of the SAFESTRAP™
mechanism and pull through (dia 6a).
Ensure there is enough slack and thread
the harness strap down over the bar of
the SAFESTRAP™ mechanism and pull
through (dia 6b).
Feed the harness strap under the
SAFESTRAP™ mechanism. Push through
the harness strap until it appears out the
top of the chest pad. Ensure the strap is not
twisted (dia 6c).
Push the chest pad strap through the
shoulder strap slot towards the back of the
seat. Attach the chest pad strap to the chest
pad adjustment arm (dia 6d).
Push the harness strap through the
shoulder strap slot towards the back of the
seat. Attach the harness strap to the yoke.
Ensure the harness strap and the chest pad
strap are not twisted (dia 6e).
Pull through all the excess slack to close
the indicator (dia 6f).
5. Removing the SAFESTRAP™
9-18kg
5a 5b
5c 5d
6a 6b
6c 6d
6e 6f
4b
4d
9-18kg 9-18kg
9-18kg
9-18kg
9-18kg
Harness adjustm ent
With one hand press the adjuster b utton
and with your other hand BELOW the
chest
pads, pull both shoulder straps
forward as far as possible to l oosen the
harness (dia 1a).
Your child’s head MUST be centralised
within the headrest (dia 1b).
The shoulder strap slots in the c over and
shell MUST be level with the top of your
child’s shoulders. If in any doubt always
position the slots slightly ab ove the
shoulder rather than below it (dia 1b).
However, once you reach the top positio n
your child may continue to use the sea t
until their eye line is above the top of the
seat shell or their weight exceeds 18kg.
Unfasten the buckle by pressing t he red
harness buckle button (dia 1c).
To fasten the buckle; rst t the two uppe r
sections together, then push them rmly
into the lower section until you hea r a
positive “CLICK” .
To tighten the harness
Sit your child in the child seat and t t he
harness. Tighten the harnes s by pulling
the adjuster strap forward un til the gap
on the SAFESTRAP™ indicat or is less
than 2cm wide. This indicates tha t the
harness should be comfor table but rmly
tted around your child. Make sure t he
harness straps are not twis ted.
IMPORTANT – The lap section of the
harness should rest as for ward and as low
as possible over your child’s pelvis.
Finally, ensure the chest pads are pulled
down onto your child’s chest (dia 1d).
Reclining the child se at
The child seat can be used in eithe r an
upright, or reclined posit ion (dia 1e).
Squeeze the recline handle
(dia 1e inset), underneath the front o f the
child seat, and slide the child se at shell
into the desired position.
To adjust the height of the he adrest
and harness to t your ch ild:
Loosen the harness straps as f ar as
possible.
Tip the headrest forward. Th e headrest
adjuster is now unlocked.
Slide the headrest up or down until t he
shoulder straps are at the cor rect height.
Push the headrest back onto the seat s hell
to lock the headrest adjuster agai n
(dia 1f).
1297.003 - Explora ISOFIX (UK).i2 2 18/1/07 14:48:38
 Loading...