

Page 1
EXTREME HAZARD !
DO NOT use the chi ld seat on a
passenger se at fitted with an a ctive
front airbag unl ess your vehicle
manufacture r confirms that it is s afe.
DO NOT use anyt hing, such as a cushi on or coat,
to raise the child seat off the passenger seat. In an
accident the child seat and your car seat belts would
not be able to protect your child as well as they should.
DO NOT use the chi ld seat in the home. I t has not
been design ed for home use and s hould only be us ed
in your car.
DO NOT attempt to d ismantle, modi fy or add to any
part of the ch ild seat or change t he way its harness
or your car seat belts are made or used. The official
approval is no lon ger valid if mod ifications a re made.
NO modificat ions may be made to th e child seat
other than by the ma nufacturer.
DO NOT leave child ren alone in your c ar, even for a
short time .
DO NOT leave loose o bjects, s uch as luggage
or books, in t he back of your car. They must be
properly se cured, becaus e if you have to stop your
car suddenly l oose objects will keep movi ng and can
then cause ser ious injuries. Large and he avy loose
objects a re a particul ar risk.
DO NOT leave foldi ng passenge r seats unlatche d. If
you have to stop your car s uddenly a loos e seat back
could injure your ch ild.
DO NOT allow chil dren to play with or a djust the
child seat.
DO keep this user g uide in the user g uide storage
pocket.
DO cover the child se at if your car is lef t in direct
sunlight. Fitt ings can become hot to touch in sunny
weather and the cove r may become faded.
DO make sure that the c hild seat does n ot become
trapped by a fol ding passeng er seat or in the do or of
your car.
DO make sure that you ad just the harne ss to fit the
clothes your chi ld is wearing be fore each journ ey – a
fitting for wint er clothes may be to o slack for a child
wearing summe r clothes.
BB0- 665-00 1/8
You must ensure that you follow these instructions carefully and correctly. If this seat is not fitted
securely and your child is not strapped in correctly, your child and other passengers are at serious
risk of injury in the event of an accident
IMPORTANT!
The Hampshire Tradin g Standards Auth ority and
Britax advi se that child car se ats should not b e
bought or sold s econd-hand . Please dispose o f your
child seat safel y. Do not sell or pass it on.
After an accid ent, the child se at and your car seat
belts shou ld be replaced. A lthough they m ay look
undamaged, if yo u were to have another accident
the child seat and y our car seat belt s may not be able
to protect your chi ld as well as they sh ould.
No child seat is e scape proof
Harness sy stems cannot be designed to be
completely “child pro of” and yet comp ly with the
legal require ments of European Standard ECE R4 4.
The harness m ust be fasten ed and adjusted co rrectly
at all times and ch ildren encour aged to remain
within the har ness syste m.
Looking after yo ur child seat
Food and drink m ay find their way insi de the
buckle of the ha rness. This c an stop it from working
properly – it w ill not click. Wash in w arm water until
clean (dia A and B ).
Pull the cover from the top of the seat and bring the
straps through the shel l to the front of the seat and
remove the ches t pads. Unfast en the buckle an d
remove the comfort pad by unfastening the hook and
eye strip. Gently pull the cover off the seat, easing the
shoulder straps adjuster, shoulder straps, and harness
buckle and adjuster strap through the slots in the cover.
To refit the cover, reverse this met hod of removal.
Make sure the straps are not twisted when refitting
through the cover a nd on to the yoke.
IMPOR TANT – The cover is a safet y feature. NEVER
use the child seat w ithout it. Don’t pu t your child’s
safety at ris k by using other make s of replacement
cover, they could stop the ch ild seat from prote cting
your child as well a s it should.
A replacement cover i s available from yo ur Britax
stockist or cont act Britax Customer Ser vice
Departm ent on 01264 386034 .
Guarantee
All Britax p roducts ar e carefully de signed,
manufacture d and tested. However, should this
product prove faulty within 12 months of purchase
due to a materials o r manufactur ing fault pleas e
return it to the or iginal place of pu rchase. We will
then, at our discretion, either repair it free of charge or
replace it with th e same or a similar product.
For guarantee p urposes proo f of purchase wil l be
required. We recom mend that you ret ain your receipt
and attach it to th is user guide. Th ey should be kept
in a safe place.
Britax doe s not accept liabilit y for damage arising
from abuse, misus e or negligence . This guarantee
is not transfe rable and the refore does not a pply to
second-han d product s.
Your statutory rights are not affected by this guarantee.
If in doubt
Not all car seats fit all cars. For advice as to the
suitability of this restraint for your car please use
on our website at www.britax.eu, call
our Customer Service Helpline on 01264 386034 or
email helpline@ uk.britaxeurope.com.
Britax Exce lsior Limited
1 Churchill Way West
Andover
Hampshire SP10 3UW
United Kingd om
A Britax Chil dcare company
Customer Ser vice Helpline: 01264 386034
Email: hel pline@uk.b ritaxeurope.com
Switchboard : 01264 333343
Fax: 01264 334146
www.brita x.eu
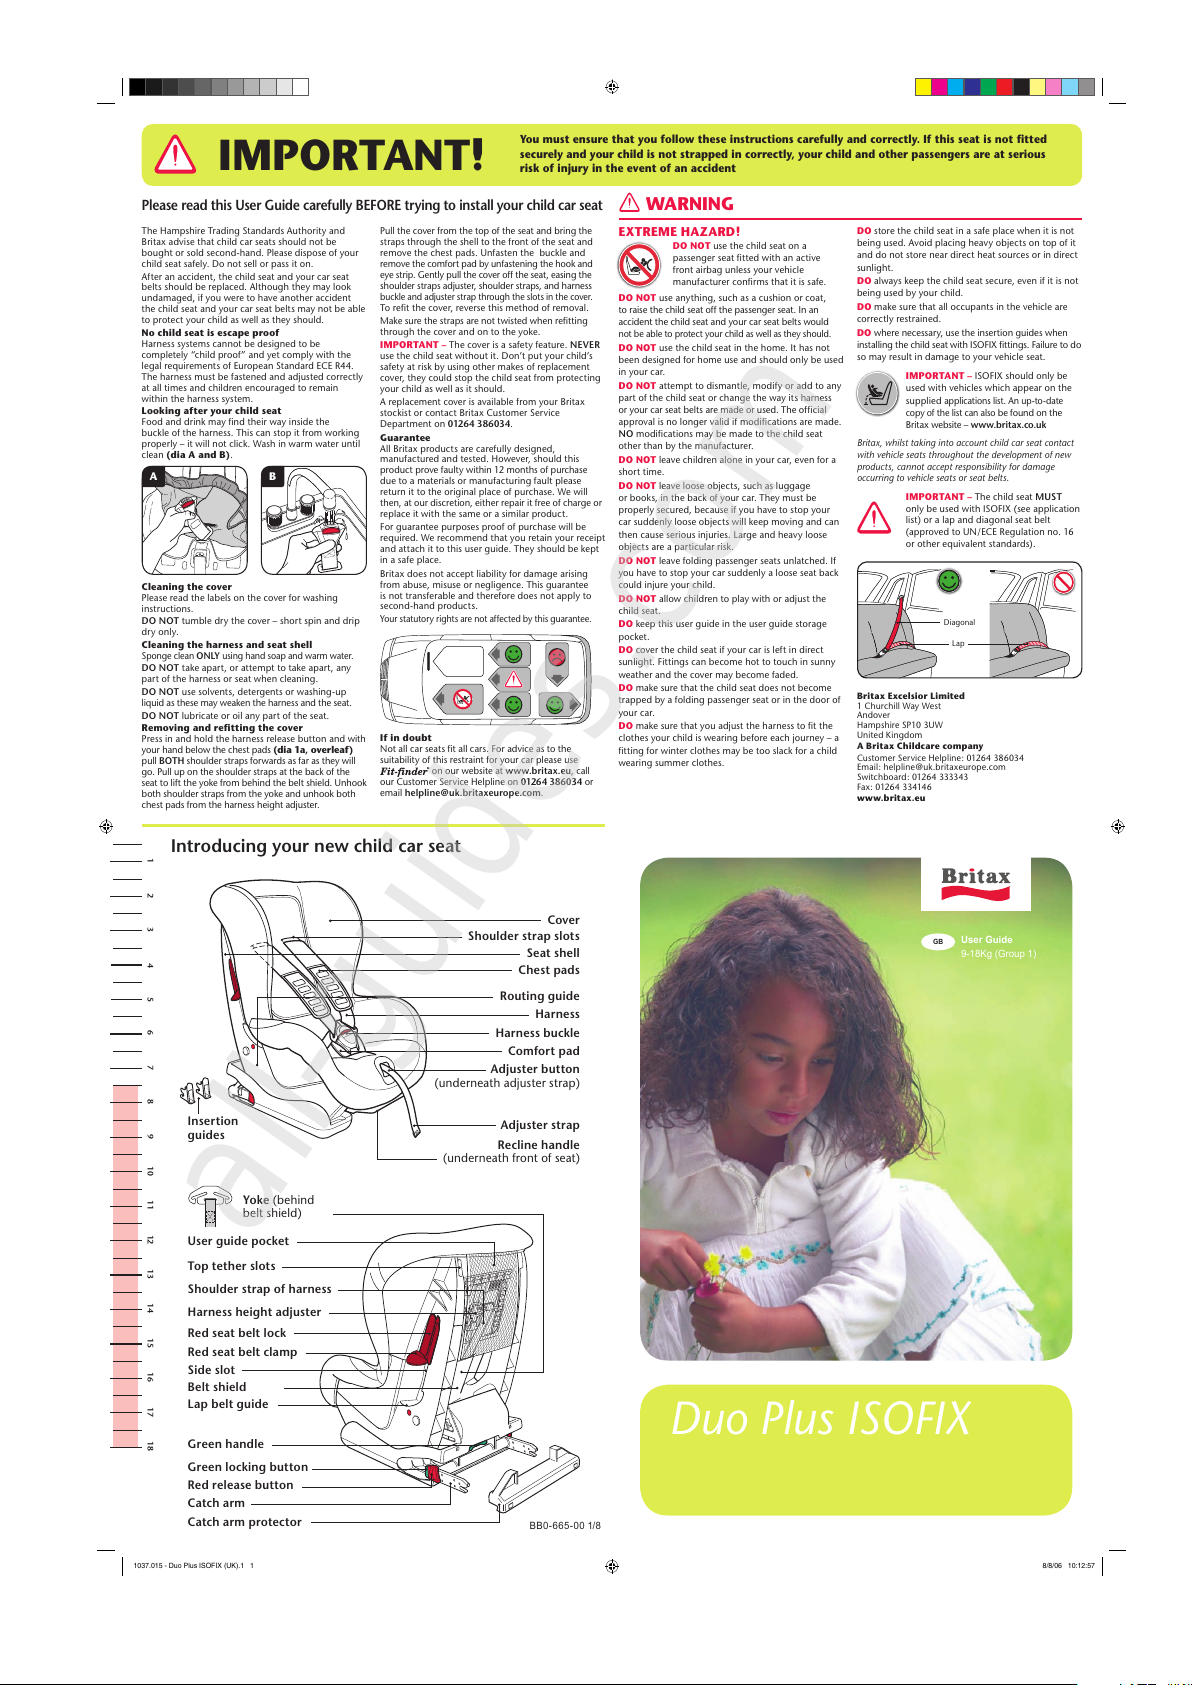
Introducing your new child car seat
1 2 3 4 5 6 7 8 9 10 11 12 13 14 15 16 17 18
Cover
Yoke (behind
belt shield)
Top tether slots
User guide p ocket
Harness height adjuster
Red seat belt lock
Shoulder strap of harness
Red seat belt clamp
Side slot
Lap belt guide
Belt shield
Green handle
Red release button
Catch arm
Catch arm prote ctor
Shoulder strap slots
Chest pads
Seat shell
Harness
Harness buckle
Insert ion
guides
Comfort pad
Routing guide
Adjuster b utton
(underneath adjuster strap)
Recline handle
(underneath front of seat)
Adjuster s trap
Green lock ing button
DO store the chil d seat in a safe place w hen it is not
being used. Avoi d placing heav y objects o n top of it
and do not store nea r direct heat sou rces or in direc t
sunlight.
DO always keep th e child seat secure, e ven if it is not
being used by your c hild.
DO make sure that all o ccupants in the ve hicle are
correctly re strained.
DO where necessary, use the insertion guides when
installing the child seat with ISOFIX fittings. Failure to do
so may result in dama ge to your vehicle se at.
IMPOR TANT – ISOFIX should o nly be
used with vehic les which appe ar on the
supplied
applications list. An up-to-date
copy of the list can also
be found on the
Britax website – www.britax.co.uk
Britax, whilst taking into account chil d car seat contact
with vehicle seats throughou t the development of new
products, cannot accep t responsibility for damag e
occurring to vehicle seats or seat be lts.
IMPOR TANT – The child seat M UST
only be used wit h ISOFIX (see appl ication
list) or a lap and dia gonal seat belt
(approved to UN /ECE Regulat ion no. 16
or other equiv alent standa rds).
WARNING
Please read this User Guide carefully BEFORE trying to install your child car seat
Cleaning the cove r
Please read the l abels on the cover fo r washing
instruct ions.
DO NOT tumble dr y the cover – short spin and drip
dry only.
Cleaning the ha rness and seat s hell
Sponge clean ONLY using hand soap and warm water.
DO NOT take apar t, or attempt to take apart, a ny
part of the ha rness or seat wh en cleaning.
DO NOT use solvent s, detergents or washing- up
liquid as these may weaken the harness and the seat.
DO NOT lubricate o r oil any part of the seat.
Removing and r efitting the cover
Press in and hol d the harness r elease butto n and with
your hand below the chest pads (dia 1a, overleaf)
pull BOTH shoulder straps forwards as far as they will
go. Pull up on the shoulder straps at the back of the
seat to lift the yoke from behind the belt shield. Unhook
both shoulder straps from the yoke and unhook both
chest pads from the harness height adjuster.
A B
Diagonal
Lap
Duo Plus ISOFIX
GB
User Guide
9-18Kg (Group 1)
1037.015 - Duo Plus ISOFIX (UK).1 1 8/8/06 10:12:57
All manuals and user guides at all-guides.com
all-guides.com
Page 2
B
C
A
IMPORTANT – You must
adjust the height of the
shoulder straps to the correct
position for your child BEFORE
installing the child seat, as
they cannot be adjusted once
installed in the car.
Harness adjustme nt
With one hand press the
adjuster button and with your
other hand BELOW the chest
pads, pull both shoulder straps
forward as far as possible to
loosen the harness (dia 1a).
Unfasten the buckle by
pressing the red harness
buckle button A (dia 1b).
Fit the harness around your
child. To fasten the buckle;
first fit the two upp er
sections together, then push
them firmly into the lower
section until you hear a
positive click B.
Place your hand on the
harness height adjuster and
with your thumb, squeeze
the adjuster tab A (dia 1d).
The top of the adjuster
can now pivot outwards,
releasing the bar B from
the adjuster notches C.
Now move the adjuster up
or down to an appropriate
height for your child. Pull
the adjuster strap to remove
any excess slack. Re-tr y your
child in the seat.
To tighten the harness
With your child in the seat
and the harness fas tened,
check that the harness is not
twisted and pull the shoulder
straps up to tighten the
lap section of the har ness.
Then tighten the harne ss by
pulling the adjuster st rap
forward making sure the
harness is a comfort able but
FIRM fit around your child.
Reclining the chil d seat
The child seat has a choice
of three recline positions for
your child’s comfort. It can
be used in either an upright
, reclined or sleeping
position (dia 1e).
Squeeze the recline handle,
underneath the front of
the child seat, and slide
the child seat shell into the
desired position.
IMPORTANT – Each time
you adjust the child seat
check that it is still secure
and that the seat belt/top
tether is tight, if fitted.
1. Adjusting the child seat Children weighing 9-18kg (approx 9 months to 4 years)
Adjusting the harness
The shoulder strap slots in the
cover and shell MUST be level
with the top of your child’s
shoulders. If in any do ubt
always position the slot s
slightly above the shoulder
rather than below it (dia 1c).
However, once you reach the
top position your child may
continue to use the seat until
their eye line is above the
top of the seat shell or their
weight exceeds 18kg.
B
A
Forward Ancho rages
The child seat can be securely
fitted in many cars using the
lap and diagonal seat belt.
However, some types of car
designs prevent you from
making a good installation
due to the position of the
seat belt lower anchorage
points (the point where
your seat belt and buckle are
attached to the vehicle).
Put the ruler printed on the
front of this user guide on
your car seat in the position
shown (dia 3a). Now
decide if both of the lowe r
anchorage points are in line
with the white or red area of
the ruler. If they are in the
white area then you can use
this position for the child seat.
If either of the lower
anchorage points are in
the red area then you
should try the child seat in
another position in the car.
IMPORTANT – The child
seat MUST only be installed
using a lap and diagonal seat
belt routed as shown. The
child seat should NEVER be
fitted using a lap belt only.
IMPORTANT – Ensure
that the ISOFIX catch arms
are within the base of the
seat and that the catch arm
protector is fitted.
Firmly, push the child seat
into the car seat, using your
body weight (dia 3c). Pull
the seat belt to tighten the
lap section (dia 3c),
and then pull the diagonal
section of the seat belt
tight , keep pulling the
diagonal section of t he seat
belt (dia 3d), as you
swivel the seat belt clamp
upwards until it engages
(dia 3d inset).
The child seat should now
be secure. To check pull
forward firmly on the
harness. There sho uld be
little or no movement.
IMPORTANT – After
installing the child seat you
need to check the position
of the seat belt buckle.
Checking the position of
the seat belt buckle
If, after following the
installation instr uctions,
your seat belt buckle look s
like this (dia 3e) the child
seat should now be secure.
To check this try to pull the
seat forward by the harness.
It should feel firm, not loose.
3. Installing the child seat in your car with a lap and diagonal seat belt
With the child seat on the car
seat in the upright position
(not reclined), pas s the seat
belt through both side slots.
Fasten the seat belt, making
sure it is not twisted. Before
going any further make sure
that the lap section of the
seat belt passes below both
lap belt guides (dia 3b).
Swivel the seat belt clamp
down and thread the
diagonal section of t he seat
belt through the seat belt
lock (dia 3b inset).
IMPORTANT – The child seat
has two red seat belt locks.
Only use the one FURTHEST
away from the seat belt buckle.
If, after following the above
instructions, your seat
belt buckle look s like this
(dia 3f) the child seat is
NOT correctly installed.
Try another seating position
in your car.
If you are in any doubt
contact Customer Ser vices
on 01264 386034.
To remove the car seat from
the car simply unfasten the
seat belt.
IMPORTANT – The child
seat has been specific- vehicle
approved. For advice as to
the suitability of the child seat
for your car and if it has to
be installed with a top tether
or requires an additional
performance pad, please
call our Customer Ser vice
Helpline on 01264 386034,
visit www.britax.eu, or
refer to the applications
list. The top tether kit
and performance pad are
available from your Britax
stockist. A fitting guide is
supplied with the tethe r kit.
Installing the child seat
If required, clip the t wo
insertion guid es onto the
two ISOFIX anchorage
points on the vehicle
seat (between seat and
backrest). The cut out on
the insertion guide must
point upwards (dia 2a).
The insertion guides should
be removed when not in
use and can be stored in the
user guide pocket. Pull the
green handle at the base on
the back of the seat out to
extend the two catch
arms
fully (dia 2b).
into the insertion guides
(dia 2d). Place your thumb
on the green locking but ton
and press in firmly until you
feel the system latch. Ensure
that you feel and hear the
locks engage (click) and
that the green button on
the catch arm has extende d.
Repeat for the other side of
the seat (dia 2e).
Firmly push the side arms
of the child seat into the
vehicle seat, applying even
pressure on both sides, to
ensure it is latched in fully
on each side (dia 2f). The
seat should now be secure.
To check, pull forward
firmly on the harness.
There should be litt le or no
movement.
IMPORTANT – Ensure that
the child seat is latched
correctly ever y time you use
it and that the green locking
button is visible on both sides.
Removing the child seat
from your car
To release the ISOFIX
fixings, hold in the green
locking button whilst
squeezing the red but ton on
one side of the seat. Repeat
for the other side.
To release the top tether
anchoring, loosen the s trap
by lifting the metal tongue
of the adjuster and remove
the spring hook from the
anchoring point. Finally,
remove the insertio n guides
from the vehicle seat.
If in any doubt contact our
Customer Service Helpline
on 01264 386034.
2. Installing the child seat in your car using the ISOFIX fittings
To release
the catch arm
protector, hold in the
green locking button w hilst
squeezing the red button
on one side of the seat (dia
2c). Repeat for the other
side. Remove the catch arm
protector and store it in a
safe place.
With the child seat on the
car seat in the upright
position (not reclined) ,
guide the two catch arms
B
C
9-18kg
1a 1b 1c 1d 1e
2a 2b 2c 2d 2e 2f
3a 3b 3c 3d 3e 3f
1037.015 - Duo Plus ISOFIX (UK).2 2 8/8/06 10:12:59
All manuals and user guides at all-guides.com
 Loading...