

Page 1
Recall Information
Child restraints could be recalled for safety reasons. You must
register this restraint to be reached in a recall. Send your
name, address and the restraint's model number and manufacturing date to:
Britax Child Safety, Inc.
460-R Greenway Industrial Drive
Fort Mill, SC 29715
or call
1 (888) 4 BRITAX
For recall information,
call the U.S. Government's Auto Safety Hotline
at 1-800-424-9393.
In the DC area call 1 (202) 366-0123.
Fill out the registration card attached to your Cruiser and mail
it in today!
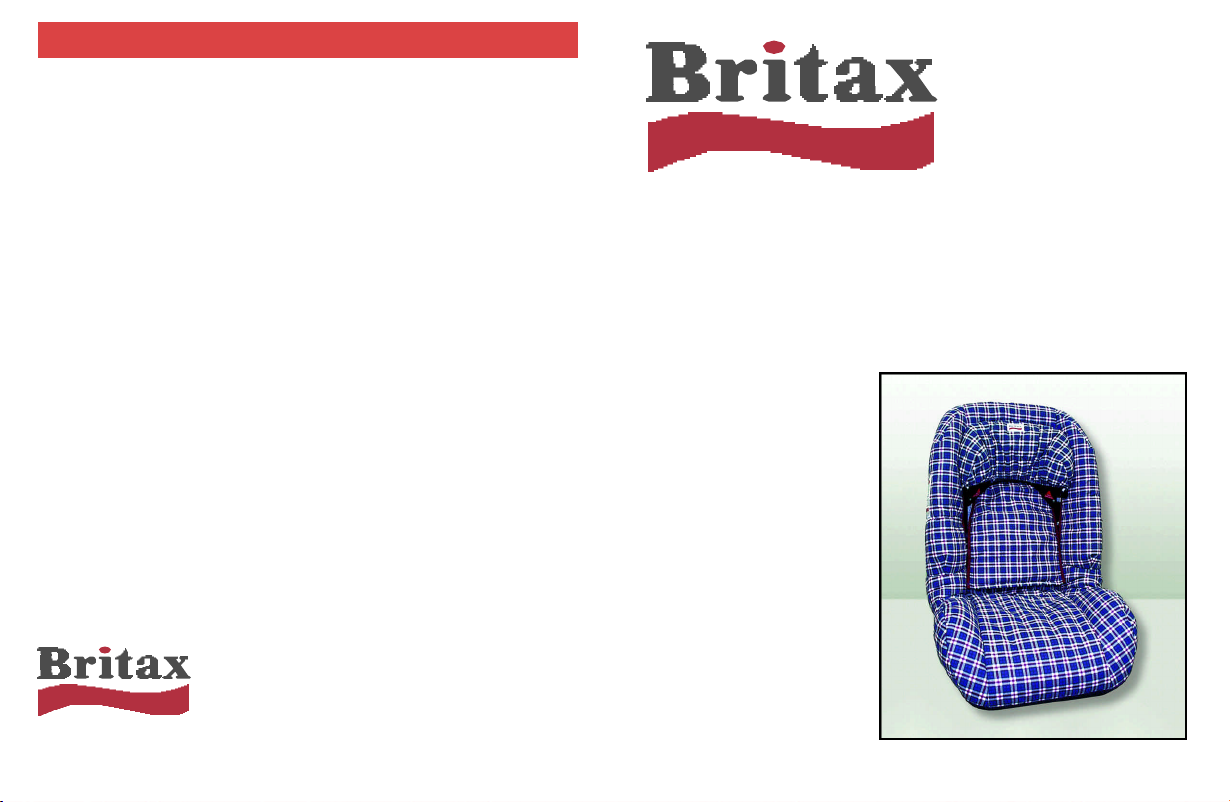
CRUISER
Booster Seat for Lap / Shoulder Belts
For children between 30 - 60 lbs
BRITAX Child Safety, Inc.
460-R Greenway Industrial Drive
Fort Mill, SC 29715
Tel: (888) 4BRITAX
#1 2/99 PN 000-258
Page 2
Table of Contents
I n t ro d u c t i o n . . . . . . . . . . . . . . . . . . . . . . . . . . . . . . . . . . . . . . . . . 2
Get to know your Cru i s e r. . . . . . . . . . . . . . . . . . . . . . . . . . . . . . . 4
Install Using Lap & Shoulder Seat Belt . . . . . . . . . . . . . . . . . . . . . . . . . . 5
Incompatible Seating Positions . . . . . . . . . . . . . . . . . . . . . . . . . . . 8
How to Care for your Cru i s e r . . . . . . . . . . . . . . . . . . . . . . . . . . . . 9
I m p o rtant Notes. . . . . . . . . . . . . . . . . . . . . . . . . . . . . . . . . . . . . 1 2
Wa rr a n t y . . . . . . . . . . . . . . . . . . . . . . . . . . . . . . . . . . . . . . . . . . 1 4
Recall Inform a t i o n. . . . . . . . . . . . . . . . . . . . . . . . . . . . . Back Cover
Never use this Cruiser in a vehicle front seat with an airbag
unless the airbag is off!
Never use this Cruiser with a lap belt only!
Never use this Cruiser with a shoulder belt only!
Use only with a lap / shoulder belt!
Introduction
This product fulfills the re q u i rements of the U.S. Federal Motor
Vehicle Safety Standards and is certified for use in motor vehicles.
This restraint is not certified for aircraft use. It is only intended for
use as a forw a rd facing car seat for children weighing between 30
- 60 lbs.; and is not to be used in the home, in boats, or other nonc e rtified applications.
Introduction (Continued)
FAILURE TO FOLLOW EACH OF THE FOLLOWING INSTRUCTIONS CAN RESULT IN YOUR CHILD STRIKING THE VEHICLE'S
INTERIOR DURING A SUDDEN STOP OR CRASH.
SECURE THE CHILD SEAT WITH A VEHICLE BELT AS SPECIFIED
IN THIS INSTRUCTION BOOKLET.
USE ONLY THE VEHICLE’S LAP AND SHOULDER BELT SYSTEM
WHEN RESTRAINING THE CHILD IN THIS BOOSTER SEAT.
Under no circumstances should you use the Cruiser with two
point seat belts (lap belt only or shoulder belt only). Your child
will be seriously injured in the event of a crash!
The National Highway Traffic Safety Administration recommends, according to accident statistics, that parents select the
rear seat as the safest location for a child car seat. However,
the actual dimensions of the seat and details of the safety belts
used to attach the child seat differ from vehicle to vehicle.
Please study the section on Compatible Seat Belts. If in doubt,
consult your motor vehicle handbook and your Britax dealer.
The primary protection for occupants of a motor vehicle in a
collision is the structure of the vehicle itself, and a child seat will
not protect a child when the vehicle sustains very serious damage. However, a child in a child seat correctly installed, will
substantially improve the chances for survival in all accidents.
Make sure that you understand the correct way to use this child
seat in your vehicle.
2
3
Page 3
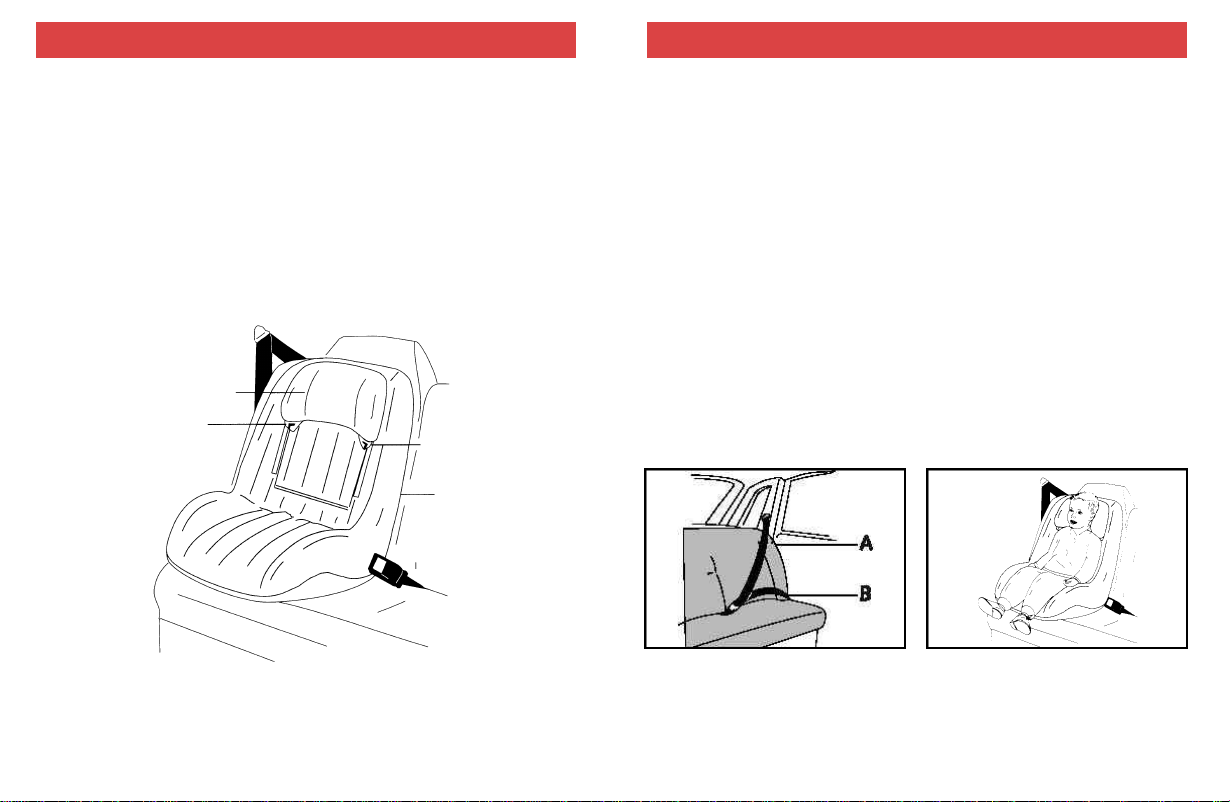
Get To Know Your Cruiser
Install Using Lap & Shoulder Seat Belt
This page will help you to recognize the diff e rent parts of your
C ru i s e r.
WA R N I N G !
DO NOT place any child seat on front seat with air bag unless air
bag is turned off - DEATH or SERIOUS INJURY can occur. - T h e
back seat is the safest place for children 12 and under.
USE ONLY THE VEHICLE’S LAP AND SHOULDER BELT SYSTEM
WHEN RESTRAINING THE CHILD IN THIS BOOSTER SEAT.
S e c u re this child restraint even when it is not occupied. In a crash
an unsecured child restraint may injure other occupants.
Sliding Head Support
Seat belt Guide
Seat belt
Guide
Cover
Zip At
Back
To protect your child in a crash, you must use the Cruiser together with
seat belts that are compatible. Diff e rent vehicles have diff e rent types of
seat belts. The Cruiser must be used only with a lap & shoulder seat belt.
Under no circumstances should you use the Cruiser with a two point seat
belt (lap belt only or shoulder belt only.) Your child will be seriously
i n j u red in the event of a crash! T h e re are lap & shoulder seat belts that
will not work with the Cru i s e r. If your car has seat belts which are
attached to the door at the top or at the bottom, such belts will not work
with the Cru i s e r. Cruiser is only intended for use in vehicle seats that are
f o rw a rd facing. This restraint is not intended for use in seats that are
re a rw a r d facing or side facing. Do not use it in such seats.
This restraint is not certified for aircraft use. Aircraft seats have only lap
belts.
If you have any questions about what kind of belts you have, please re f e r
to your vehicle's instruction book or re t u r n to the store where your purchased the Cru i s e r. The store will be happy to help you determine if the
belts are compatible with the use of the Cru i s e r.
The Cruiser has been carefully designed, manufactured, and tested.
Replacement covers are available from your Britax dealer or calling
customer service at 1-888-4BRITA X .
4
This is a lap and shoulder seat belt.
A. Shoulder section.
B. Lap section.
1. Place the Cruiser in your car,
making sure it is pushed firm l y
back into the passenger seat. Sit
your child on the Cru i s e r.
5
Page 4

Install Using Lap & Shoulder Seat Belt
Install Using Lap & Shoulder Seat Belt
2. Move the head support up or
down so that the slot in the seat
belt guide is level with your child's
s h o u l d e r .
4. Thread the shoulder section
of the belt through the belt
guide as shown.
3. Fasten the lap & shoulder belt
a c ross the Cru i s e r. The lap section
of the belt should sit as far forw a r d
as possible over the hips. Make
s u re the belt is not twisted.
5. Pull the shoulder belt here
to tighten the lap section.
NOTE: Children will sometimes try to put the shoulder
belt under their arm. Corre c t
this immediately - an incorrectly worn belt will cause
injuries in a crash.
6
6. With your other hand pull
the shoulder belt tight
t h rough the seat-belt guide.
Again, make sure the seat belt
is not twisted.
Do not leave your Cruiser loose. Always fasten the belt acro s s
the Cruiser when it is not being used by your child.
7. Your child and Cru i s e r
should now be secure .
Releasing Your Child
To release your child fro m
the Cruiser simply unbuckle
the belt.
REMEMBER - NO CHILD SEAT IS ESCAPE PROOF!
In the event of an emerg e n c y, seat belts are designed to meet
the recognized standard for quick release. Children should be
educated to not play with the seat belt buckle. After the accident, the Cruiser and seat belts should be replaced. Although
they may look undamaged, there can be hidden damage or
weakness.
7
Page 5

Incompatible Seating Positions
WARNING!
Use the Cruiser in vehicle
seats which are forward facing only!
Do not use on rearward-facing or side facing vehicle
seats.
You must use forward-facing vehicle seats with this
restraint. Side-facing or
rear-facing vehicle seats in
vans, station wagons or
trucks CANNOT be used
with this restraint.
How to Care for Your Cruiser
The cover of the Cruiser is held in place by a zipper on the
back side and a panel with velcro behind the child. Open the
zipper and the panel and carefully remove the cover.
CLEANING THE COVER
Read the label on the cover for washing instructions. The
cover is machine-washable.
DO NOT machine dry the cover - drip dry only.
CLEANING THE HARNESS AND SEAT
Only use hand soap and warm water.
DO NOT remove or take the head support apart when
removing the cover or cleaning the Cruiser. It is unnecessary
and will damage the Cruiser.
DO NOT use solvents, detergents or cleaning fluid as these
may weaken the belts or seat structure.
Taking Off the Cover - Step 1
Lay the Cruiser on a clean, flat
s u rface and undo the hook
and eye found underneath the
head support cover.
8
Taking Off the Cover - Step 2
Unhook the elastic loops
f rom the seat belt guides and
gently pull off the head supp o rt cover.
9
Page 6

How to Care for Your Cruiser
How to Care for Your Cruiser
Taking Off the Cover - Step 3
Gently lift up the cover flap
and pull it out from behind
the head support.
Taking Off the Cover - Step 5
Tu r n the Cruiser onto its fro n t
and undo both elastic ties. Pull
the ties through to the fro n t
and slip the cover off .
Taking Off the Cover - Step 4
Sit the Cruiser up. Unzip the
cover at the top and pull it
down until you see the two
elastic ties near the bottom
of the head support guides.
Taking Off the Cover - Step 6
The Cruiser should now look
like this.
10
Putting On The Cover - Step 1
Pull the cover over the bottom of
the Cru i s e r. Stop before you cover
the small holes for elastic ties.
Putting On The Cover - Step 3
Feed the other part of the tie
t h rough the bottom of the head
s u p p o rt guide. Attach it to the
hook end of the tie. Repeat
steps 2 & 3 for the other side.
Putting On The Cover - Step 2
Take hook end of one of the elastic ties attached to the inside of
the cover and push it through the
hole. You may need to use a
straw or pencil to push it thro u g h .
Putting On The Cover - Step 4
Pull the cover over the Cru i s e r.
Push the cover flap back behind
the head support and fasten it
to the Ve l c ro strips. Fasten the
zip at the top of the cover.
11
Page 7

How to Care for Your Cruiser (Continued)
Important Notes
Important Notes
DO - Follow these instruc-
tions in the order shown
before installing the Cruiser
in your vehicle.
DO - Keep the instructions
safe for future reference.
DO - Cover the Cruiser if it is
exposed to direct sunshine.
Metal fittings can become
hot to touch in sunny weather and the cover fabric may
also become faded.
DO - Put the lightest passen-
ger on the seat behind the
Cruiser if seat-belts are not
Putting On The Cover - Step 5
Put the head support cover back
onto the head support, fastening the elastic loops over the
seat belt guides. Finally, pass
the elastic hook and tie thro u g h
the holes in the head support
and fasten them together.
available on the back seats.
In an accident a heavy passenger could cause more
injuries to your child than a
light one.
DO - Store Cruiser in a safe
place when it is not being
used. Avoid placing heavy
objects on it.
DO - Secure this child
restraint even when it is not
occupied. In a crash an
unsecured child restraint may
injure other occupants.
DO NOT - Use the Cruiser in a residence. It has not been
designed for home use and should only be used in your vehicle.
DO NOT - Use anything, such as a cushion or coat to raise
the Cruiser off the passenger seat. In an accident the Cruiser
and vehicle seat belts would not be able to protect your child
as well as they should.
DO NOT - Attempt to disassemble or modify any part of the
Cruiser or your vehicle seat belts.
DO NOT - Leave loose objects, such as books or luggage, in
the back of your vehicle. Always keep them secure. If you
stop suddenly a loose seat back could prevent the Cruiser for
protecting your child.
DO NOT - Leave foldable passenger seats unlatched. If you
stop suddenly a loose seat back could prevent the Cruiser
from protecting your child.
DO NOT - Leave children alone in your vehicle, even for a
short time.
12
13
Page 8

Limited One-Year Warranty
Limited One-Year Warranty
This Child Restraint was manufactured by Britax Child Safety,
Inc. (Britax Model 822). Britax Child Safety, Inc. ("Britax")
warrants this product to the original retail purchaser as follows:
LIMITED ONE-YEAR WARRANTY. This product is warranted
against defective materials or workmanship for one year from
the date of original purchase. Proof of purchase is required.
Your exclusive remedy for this Warranty is that Britax will, at
its option, provide repair or replacement components for this
product or refund the original purchase price of the product.
Britax reserves the right to discontinue or change fabrics,
parts, models or products, or to make substitutions.
To make a claim under this Warranty, you must contact your
Britax Retailer or Britax, Customer Service Department at 1
(888) 427-4829, or write to 460-R Greenway Industrial Drive,
Fort Mill, SC 29725. Proof of purchase is required.
PLEASE COMPLETE AND MAIL THE PRE-ADDRESSED
OWNER REGISTRATION CARD WITHIN THIRTY (30) DAYS
OF PURCHASE
WARRANTY LIMITATIONS. This Warranty does not include
damages, which arise from negligence, misuse or use not in
accordance with the product instruction.
LIMITATION OF DAMAGES. The Warranty and remedies as
set forth above are exclusive and in lieu of all others, oral or
written, express or implied. In no event will Britax or the
dealer selling this product be liable to you for any damages,
including incidental or consequential damages, arising out of
the use or inability to use this product.
LIMITATIONS OF WARRANTIES AND OTHER WARRANTY
TERMS AND STATE LAW RIGHTS. Any implied Warranties,
including implied Warranties of merchantability and fitness for
a particular purpose, shall be limited to the duration and
terms of the express written Warranty. Some states do not
allow limitations on how long an implied Warranty lasts or
the exclusion or limitation of incidental or consequential damages, so the above limitations may not apply to you. This
Warranty gives you specific legal rights, and you may have
other rights which vary from state to state. Neither Britax,
nor the dealer selling this product, authorizes any person to
create for it any other warranty, obligation, or liability in connection with this product.
14
15
 Loading...