

Britax COMPAQ DELUXE, 25/C/2004 Series, 25/D/2004 Series Instructions For Installation & Use

Instructions for
Installation & Use
COMPAQ™ & COMPAQ™ DELUXE
Series number:
25/C/2004 &
25/D/2004
INFORMATION FOR BUYERS:
FOR USE WITH CHILDREN FROM BIRTH TO 18 KG.
CHECK THAT THIS CHILD RESTRAINT WILL FIT IN
YOUR CAR.
IMPORTANT: KEEP THIS BOOKLET IN THE PLACE
PROVIDED ON THE CHILD RESTRAINT.
Convertible
Child restraint
for vehicle use.
For use with
children up to
12kg.
Rearward Facing
For use with children
from
8kg up to 18kg.
Forward Facing.
INDEX
WHO TO CONTACT
WHO TO CONTACT
INTRODUCTION
HOW TO INSTALL
WARNINGS
4.
2.
3.
3.
F O R T O D D L E R A N D C H I L D U S E
HOW TO SET-UP
HOW TO INSTALL
SPECIAL FEATURES SPECIAL FEATURES
SUITABLE FOR USE
SUITABLE FOR USE
WARNINGS
WARNINGS
7.
15.
16.
17.
18.
8. 16.
8.
F O R B A B Y U S E
F O R C H I L D U S E
HOW TO SET-UP 9.
HOW TO CLEAN
TRAVELLING TIPS
22.
26.
CARE & MAINTENANCE
IN CASE OF ACCIDENT
23.
27.
F O R B A B Y A N D C H I L D U S E
HOW TO INSTALL
HOW TO USE
11.
13. HOW TO USE
21.
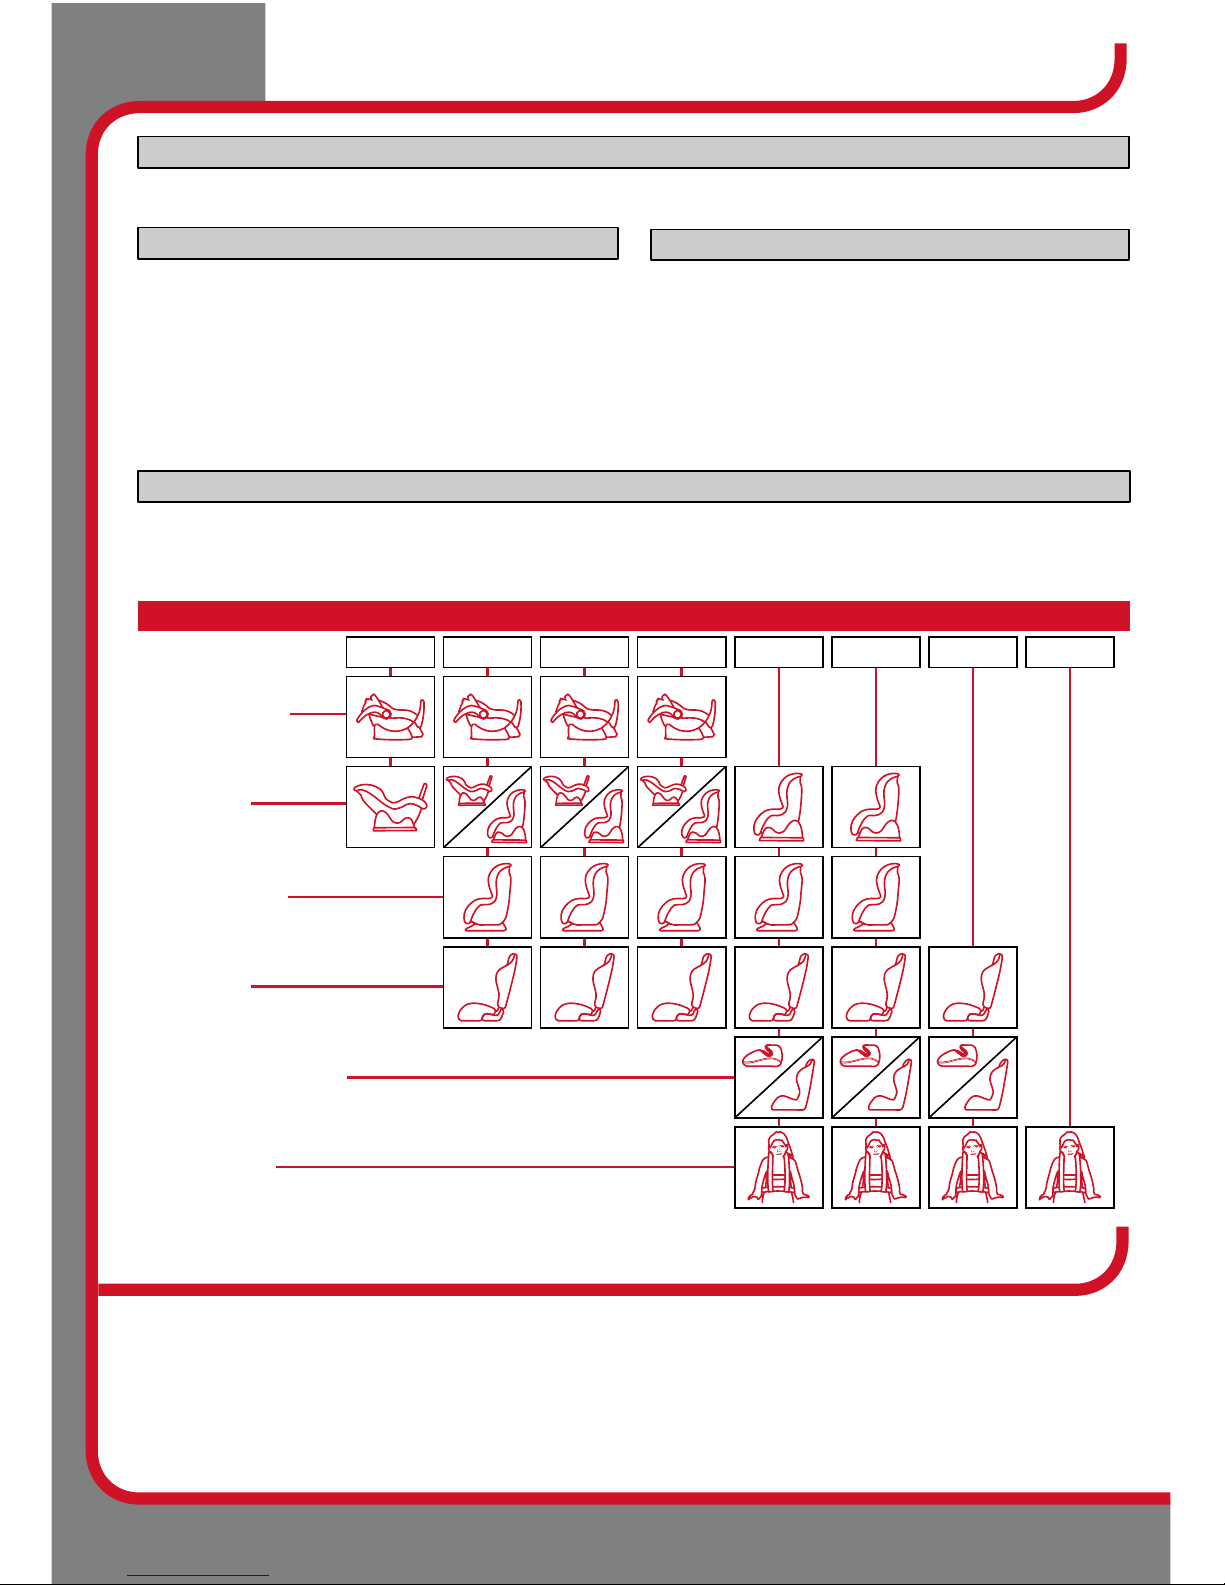
EASY SELECTOR GUIDE
Infant Restraint
Convertible
Child Car Seat
Forward-Facing
Child Car Seat
Convertible
Booster Seat
Child Booster Seats
and Booster Cushions
Child Harness
Birth
8kg
9kg
14kg
18kg 26kg 32kg
12kg
**
**
Refer to Catalogue.
*
Contact your Local Distributor.
INTERNATIONAL ENQUIRIES
For interstate and country enquiries, Service & Spare
Parts (9:30am to 5:00pm E.S.T.) Phone: 1300 303 330
Head office: 99 Derby Road Sunshine, Victoria 3020
Phone: (03) 9288 7288 Fax: (03) 9311 5798
PO Box 100-247 Auckland 9 Phone: (09) 443 0102
Fax: (09) 443 0120 Phone toll free: 0800 688 822.
Britax Childcare Pty. Ltd. A Britax International company.
(Incorporated in Victoria) A.C.N. 006 773 600 A.B.N 55 006 773 600.
Britax Childcare NZ Limited. A Britax International company.
NEW ZEALAND
AUSTRALIA
CROTCH STRAP POSITION (13)
CROTCH STRAP POSITION (21)
ACCESSORIES & FEATURES
24.
Forward & Rearward Facing
2
INTRODUCTION & IMPORTANT INFO
No child restraint can guarantee absolute protection from injury in every crash. However, to
ensure that your child gets all the protection designed into the restraint PLEASE READ AND
FOLLOW THESE INSTRUCTIONS EXACTLY. In the event of doubt about the method of
installation, consult Britax Childcare or agent or a child restraint fitting station authorised by the
relevant transport authority or in New Zealand, the agent for the vehicle. Use only Safe-n-Sound
recommended parts and accessories, which are available from most Safe-n-Sound retailers (refer
to page 24 for accessories).
Use the restraint exactly as shown in the instructions.
Fit the restraint firmly to the car seat.
Fit the harness firmly to the child.
A loose restraint or harness is dangerous.
Supervision of children is needed because they may be able to undo buckles and adjusters.
DO NOT LEAVE CHILDREN UNATTENDED IN THE CAR.
Do not alter or modify this restraint.
Repairs must only be done by the manufacturer or agent.
Do not allow the restraint to come into contact with polishes, oils, bleach and other
chemicals.
THIS RESTRAINT MUST BE ATTACHED TO A CHILD RESTRAINT ANCHORAGE POINT
IN THE CAR. REFER TO CAR OWNER’S HANDBOOK FOR LOCATION OF ANCHORAGE
POINTS. REFER TO A CHILD RESTRAINT FITTING STATION IF NO ANCHORAGE
POINTS ARE IN THE MOTOR CAR.
Destroy the restraint if it has been in a severe crash, even if no damage is visible.
DO NOT USE THIS RESTRAINT WITHOUT THE COVER.
Do not use seat belt extenders, even if the car seat belt is not long enough to secure the
child restraint.
Regularly check the restraint components, straps and other fitments for correct function &
condition. Seek prompt repair.
To ensure baby’s back is evenly supported do not put more than one nappy on the baby and
make sure the nappy is not thickly folded at the back.
DO NOT USE CHILD RESTRAINTS IN A SEATING POSITION WHERE AN AIRBAG IS
FITTED. FOLLOW THE CAR MANUFACTURER’S RECOMMENDATIONS.
The restraint is not intended to be a substitute baby cot or bed. It is designed to enable safe
transportation of children in motor vehicles.
THIS RESTRAINT IS NOT SUITABLE FOR USE IN A HATCHBACK OR WAGON WHERE
THE ANCHORAGE STRAP MAY FALL INTO A SPLIT IN THE SEAT BACK.
Protect all webbing from abrasion and cutting by sharp corners and edges.
Straps may be damaged by unsecured cargo in a collision. Secure or remove hazardous
cargo before using this restraint.
The restraint should not be purchased or sold as a second hand item. It is recommended
not to use child restraints older that 10 years as the protection in an accident may be
reduced.
WARNINGS
3
Forward & Rearward Facing
HOW TO INSTALL
IMPORTANT INSTALLATION NOTE:
In some vehicles the anchor fitting in the rear vertical panel can only be installed in one
way. Please refer to vehicle owner's
handbook or a child restraint fitting station for
correct method.
Consult the vehicle owner's handbook for location of anchor fittings or anchorage points
and the possible use of spacers. Some vehicles may have an anchor fitting fitted by the
vehicle manufacturer. If anchorage points cannot be found refer to car manufacturer or
local child restraint fitting station or traffic authority for optimum position of anchorage
point and the use of spacers.
IMPORTANT WARNING: THE ATTACHMENT CLIP COVER MUST ALWAYS BE USED AS
IT PREVENTS THE RISK OF INCORRECT FITMENT OF THE ATTACHMENT CLIP TO
THE ANCHOR FITTING. ALWAYS ENSURE THAT THE ATTACHMENT CLIP IS
CORRECTLY ENGAGED TO THE ANCHOR FITTING AND NOT HOOKED OR FITTED TO ANY
OTHER OBJECT BEFORE EACH USE OF THE RESTRAINT. THIS IS ESPECIALLY
IMPORTANT IN VEHICLES SUCH AS STATION WAGONS, VANS, HATCH BACKS OR
VEHICLES WITHOUT A FIXED PARCEL SHELF, SINCE THE ANCHOR POINT IS USUALLY
NOT VISIBLE.
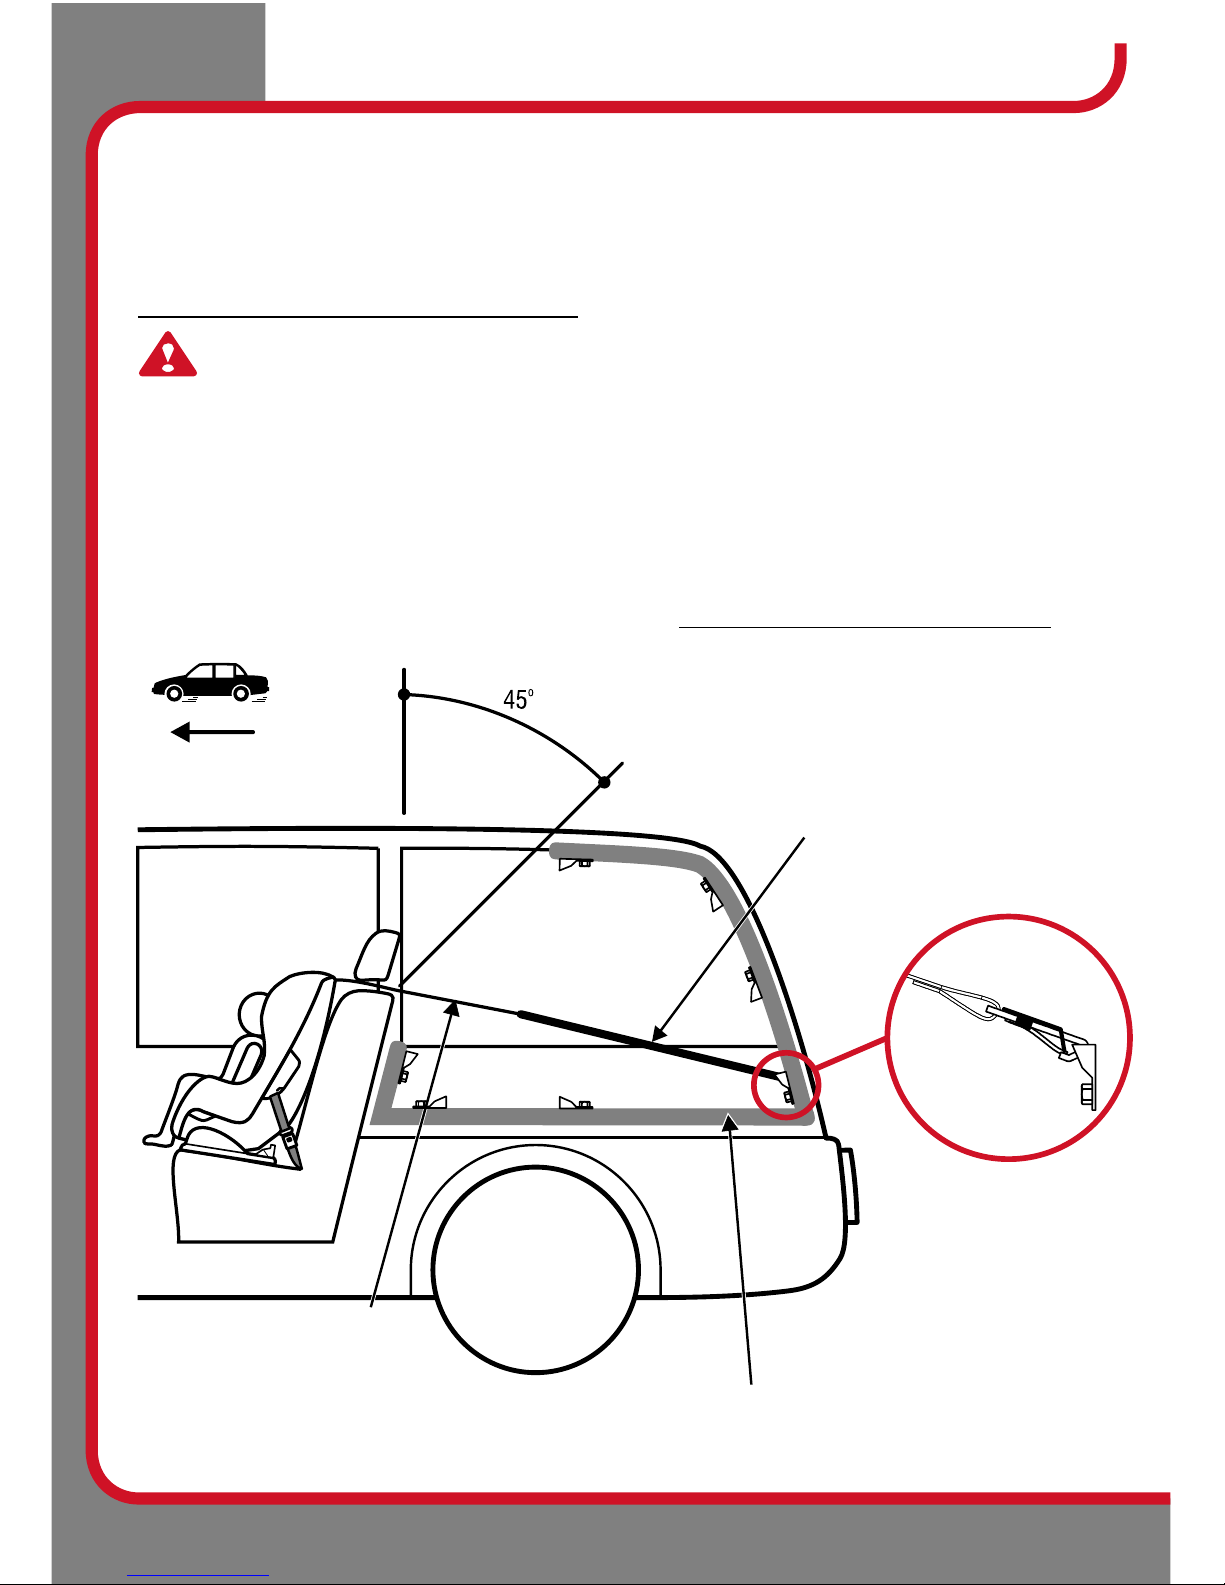
UPPER ANCHORAGE STRAP
The shaded areas of this diagram illustrate the possible locations of the anchor fitting. Within each
shaded area is an anchor fitting showing the correct way to install the fitting. Ensure the anchor
fitting is aligned as illustrated unless stated otherwise in the vehicle owner’s handbook.
CORRECT ENGAGEMENT
OF ATTACHMENT CLIP TO
ANCHOR FITTING.
Adjustable upper
anchorage strap.
Extension Strap distance to be measured:
Length 300mm -
(Use Safe-n-Sound part 0035 or equivalent).
Length 600mm -
(Use Safe-n-Sound part 0036 or equivalent).
Available from all major child restraint retailers.
Rear facing installation may require a longer
extension strap.
Front of
vehicle
Forward & Rearward Facing
4

HOW TO INSTALL
If the car is fitted with child restraint anchorage point...
Locate the anchorage point behind the rear seating position
to be used. Consult the car owners handbook for the location
of the anchorage points. The anchorage point should be
directly behind and central to the restraint. Remove thread
plug from the parcel shelf, floor/roof, etc. and install anchor bolt
and fitting as shown right.
CAUTION: Do not overtighten anchor bolt. Overtightening may
fracture or break bolt. Maximum torque is 20 N.m. (14.75 ft.lb.)
Note: Minimum of five full turns of anchor bolt is required before
tightening force is applied. Do not overtighten.
Anchor bolt
Lock washer
Anchor fitting
Spacers
(if required)
Trim
Metal
panel
Securing nut
Lock washer
Anchor bolt
Anchor fitting
Spacers (if required)
Reinforcing washer
Trim
Metal
panel
Centre line of
seating position
200 mm
min.
Drill 9 mm
diameter hole.
Do not drill
through fuel
lines, fuel tanks,
electrical wiring
or radio speakers.
If the car is not fitted with child restraint
anchorage points...
For Sedans only - Drill 9mm diameter hole in
the parcel shelf on the centreline of the seating
position as shown right. Before drilling the hole,
check the underside for accessibility.
For vehicles other than Sedans - In Australia,
consult your nearest child restraint fitting
station or traffic authority for vehicle
inspection to find the best, correct position for the
placement of the anchorage point, and for the
correct attachment bolt length and use of spacers.
In New Zealand, consult the agent for the vehicle.
Note to Queensland purchasers: The installation of
anchorage points must be approved by authorised officers
appointed by Queensland Transport. Authorised officers
can be sourced from all Queensland Transport Customer
Service and Queensland Ambulance Service Centres.
Front of vehicle
WARNING: CHILD RESTRAINTS MUST NOT BE ATTACHED TO UNSOUND
METAL OR TO WOOD, OR SYNTHETIC STRUCTURES. WHEN DRILLING 9 MM
HOLE DO NOT DRILL THROUGH FUEL LINES, FUEL TANKS, ELECTRICAL
WIRING, OR RADIO SPEAKERS. WEBBING STRAPS MUST BE PROTECTED FROM
SHARP CORNERS AND EDGES. THE ANCHOR FITTING MUST BE USED ONLY AS
DESCRIBED ABOVE. IT MUST NOT BE HOOKED ONTO ANY OTHER OBJECT.
Front of vehicle
ANCHOR FITTING:
ONLY USE A 5/16 UNC GRADE 5 BOLT.
IF THE BOLT IS NOT THE CORRECT
LENGTH THE CAR MANUFACTURER’S
HAND BOOK CAN PROVIDE ADVICE ON
THE CORRECT LENGTH BOLT.
5
Forward & Rearward Facing
HOW TO INSTALL
Attachment
Clip
10°
Important: If using an Extension Strap,
positioning the Attachment Clip above the
baby may lead to injury in an accident
therefore make sure that the Attachment
Clip is not positioned in front of the vehicle
seat.
Extension
Strap
Attachment Clip must
not be in front of the
vehicle seat front.
Attachment Clip must
be behind the front of
the vehicle seat.
Front of
vehicle
TO REMOVE RESTRAINT FROM VEHICLE
A.
B.
C.
Disengage seat belt tongue from buckle and remove
from restraint.
Fully press Upper Anchorage Strap Adjuster Button (A)
while pulling Upper Anchorage Strap (B) to slacken as
shown right. In some vehicles loosening of the Upper
Anchorage Strap may be difficult. If so, try pushing the
restraint against the vehicle seat back or slightly lifting
the restraint to release the tension.
Disengage Attachment Clip from Anchor Fitting. The
child restraint is now disconnected.
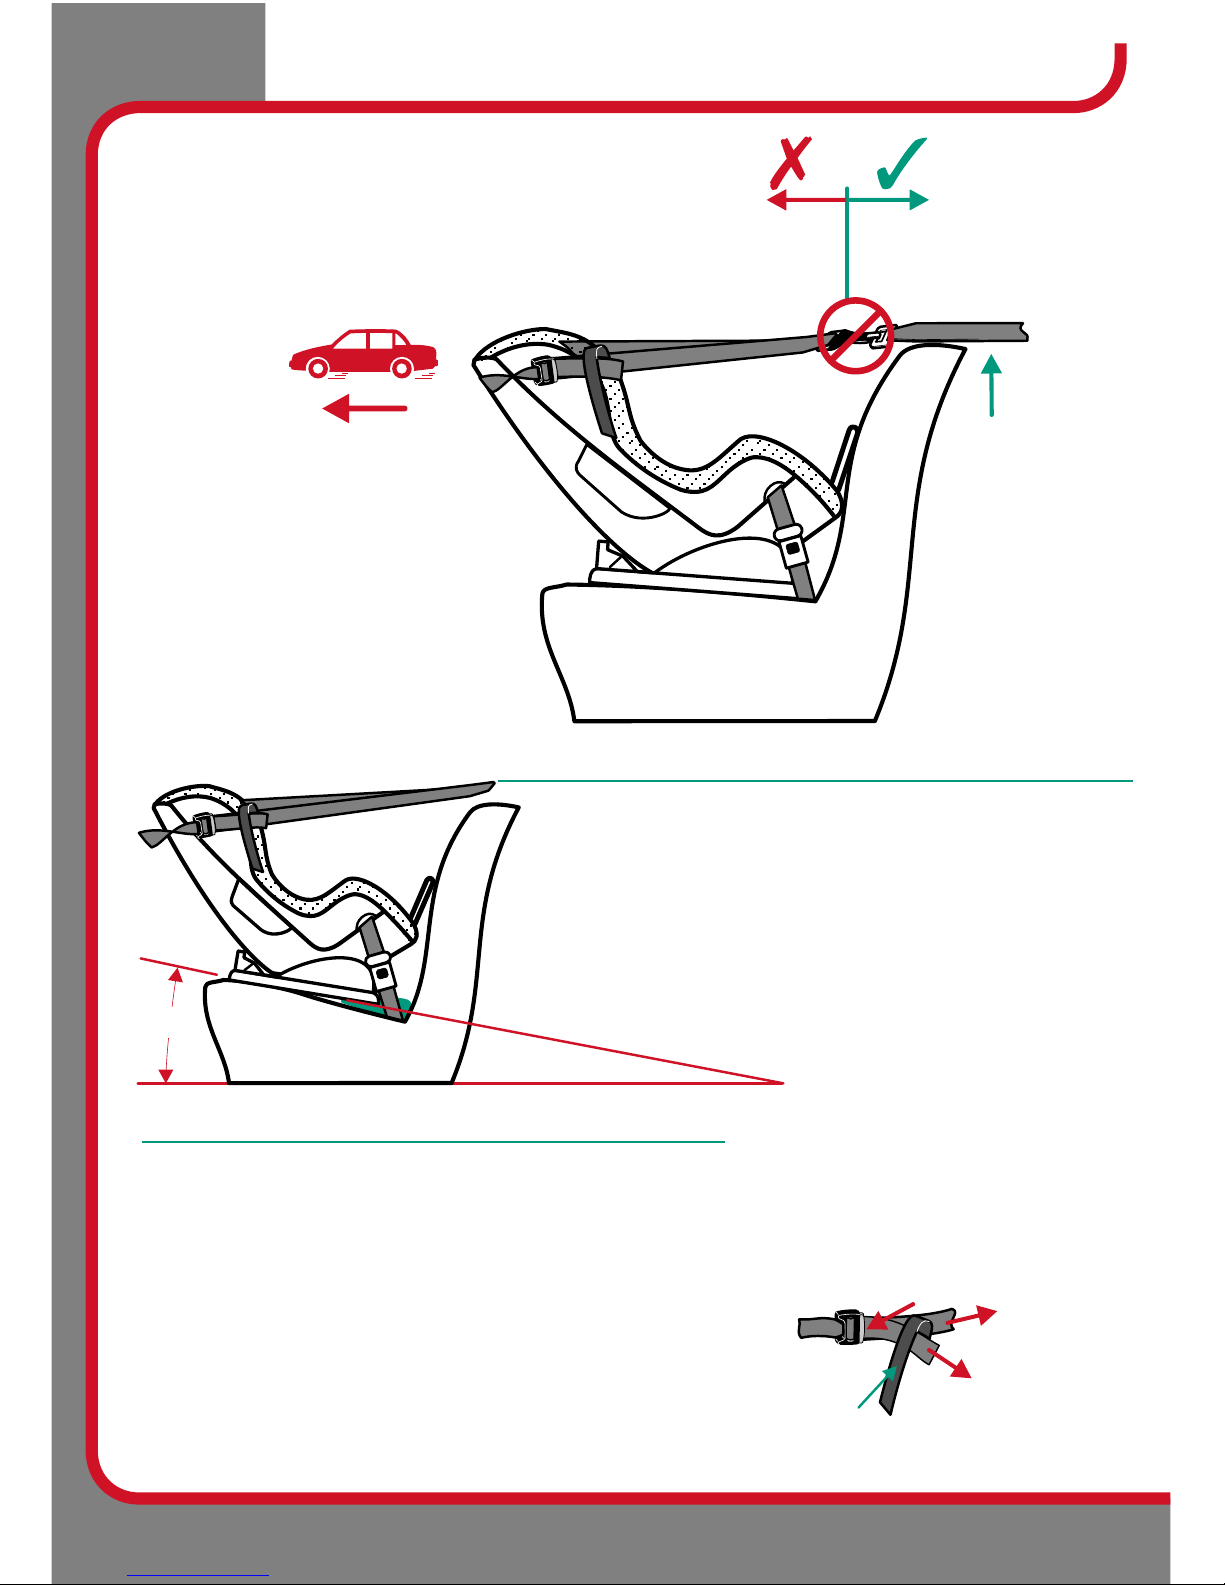
ANGULAR ADJUSTMENT OF RESTRAINT
Some vehicle seats have more rearward slope
than others. If the angle of the seat causes the
baby to be too upright for comfort, the angle may
be altered by placing a firm packing between the
seat and the underside of the base. Packing can
be a firmly rolled up towel or nappy.
Do not remove all of the rearward slope by over
packing. Always leave a rearward slope angle of
approximately 10 degrees.
Pull Adjustment
Strap to remove
slack.
Storage
Strap
Fully press Adjuster Button (A)
while pulling Upper Anchorage
Strap (B) to lengthen.
A
B
Forward & Rearward Facing
6

7
Rearward Facing (Up to 12 kg)
Front of
vehicle
1 2 3 4 5 6
8
9
10
11
12131415
7
Harness
Buckle
Harness
Tongues
1.
2.
3.
4.
5.
6.
7.
8.
9.
10.
11.
12.
13.
14.
15.
16.
Padded cover for baby’s comfort.
Padded insert for extra comfort. (If
supplied)
Adjustable Upper Anchorage Strap.
Harness Adjuster Lock. (Under flap)
Stabilising Bar for baby use.
Attachment Clip & Cover.
Anchor Fitting.
Harness Adjustment Strap.
Quick release Harness Buckle. (Red
Button)
Vehicle seat belt.
Easy fitting of lap or lap-sash seat belts.
Fully adjustable 6 point harness.
Recline Base in baby position.
Upper Anchorage Storage Strap.
Upper Anchorage Strap Adjuster.
Recline foot in baby position.
SPECIAL FEATURES FOR BABY USE
16
Do not allow the front seat to alter
the installed position of the
restraint.
DO NOT USE RESTRAINT IN REARWARD
FACING MODE WITHOUT STABILISING BAR
FULLY EXTENDED.
Do not use the restraint without the Upper
Anchorage Strap correctly attached.
DO NOT USE CHILD RESTRAINTS IN A
SEATING POSITION WHERE AN AIR BAG IS
FITTED. FOLLOW THE CAR
MANUFACTURER’S RECOMMENDATIONS.
If your vehicle is not fitted with an anchor point,
please contact a Safety Restraint Fitting Station
authorised by the relevant State Government
Body for correct fitment of the restraint. In New
Zealand contact the agent for the vehicle. The
upper anchorage strap must be attached to an
anchorage point using an extension strap if
necessary.
Do not use on any vehicle seat which
faces sideways or rearwards.
When using the restraint in the front
seat, do not use the rear seat. The
upper anchorage strap will need to
pass the rear seating position to attach
to an anchorage point.
To be used only in a rearward-facing
position for a child weighing up to 12kg.
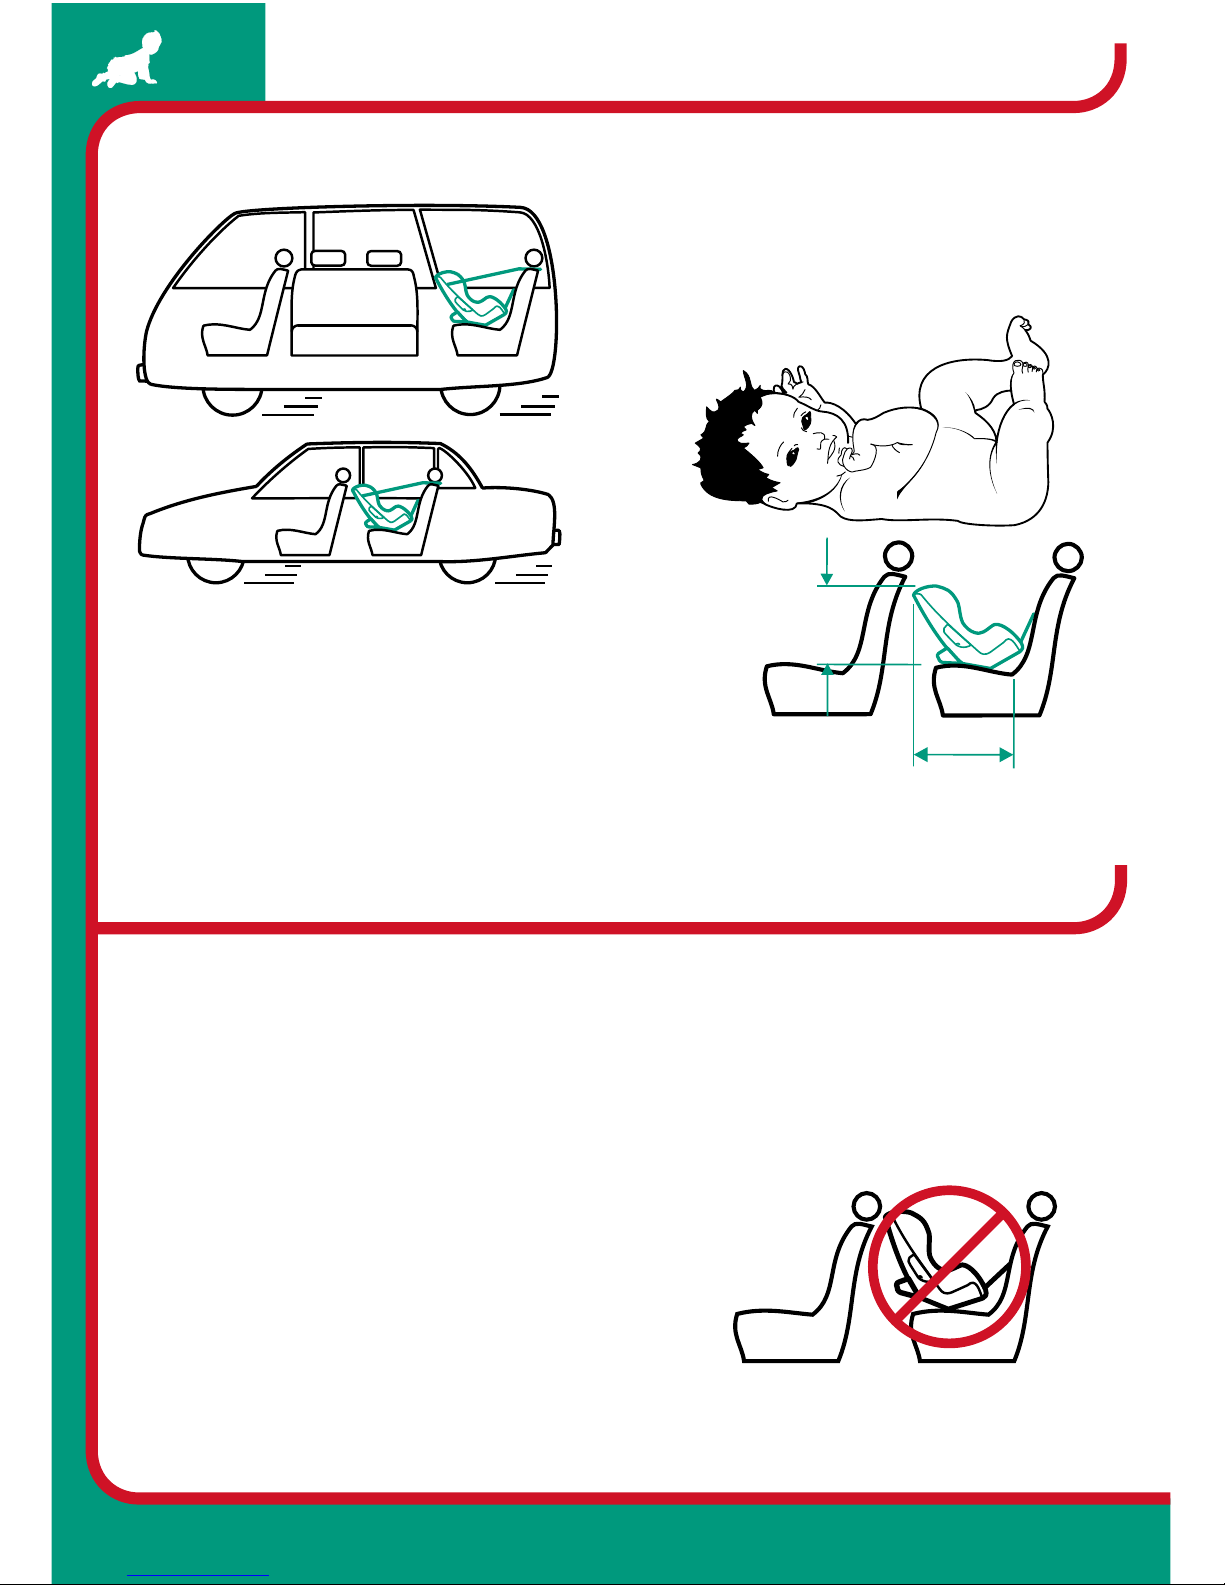
The purchaser should check the measurements
between the front of the seat back of the rear seat and
all front seats in the car in which the child restraint is
intended to be used, to ensure that the space is
sufficient.
In certain vehicles, where the rear seat area is too
restricted, the only position possible for the restraint is on the front seat and
adjusted as rearward as possible (provided no airbag is fitted in this position).
TO BE USED WITH A LAP-SASH OR LAP ONLY SEAT BELT IN THE FRONT OR BACK
OF MOST CARS WITH FORWARD-FACING SEATS.
500 mm
560 mm
Up to 12 kg Facing Rearward
WARNINGS
SUITABLE FOR USE
Rearward Facing (Up to 12 kg)
FOR
BABY
USE
8
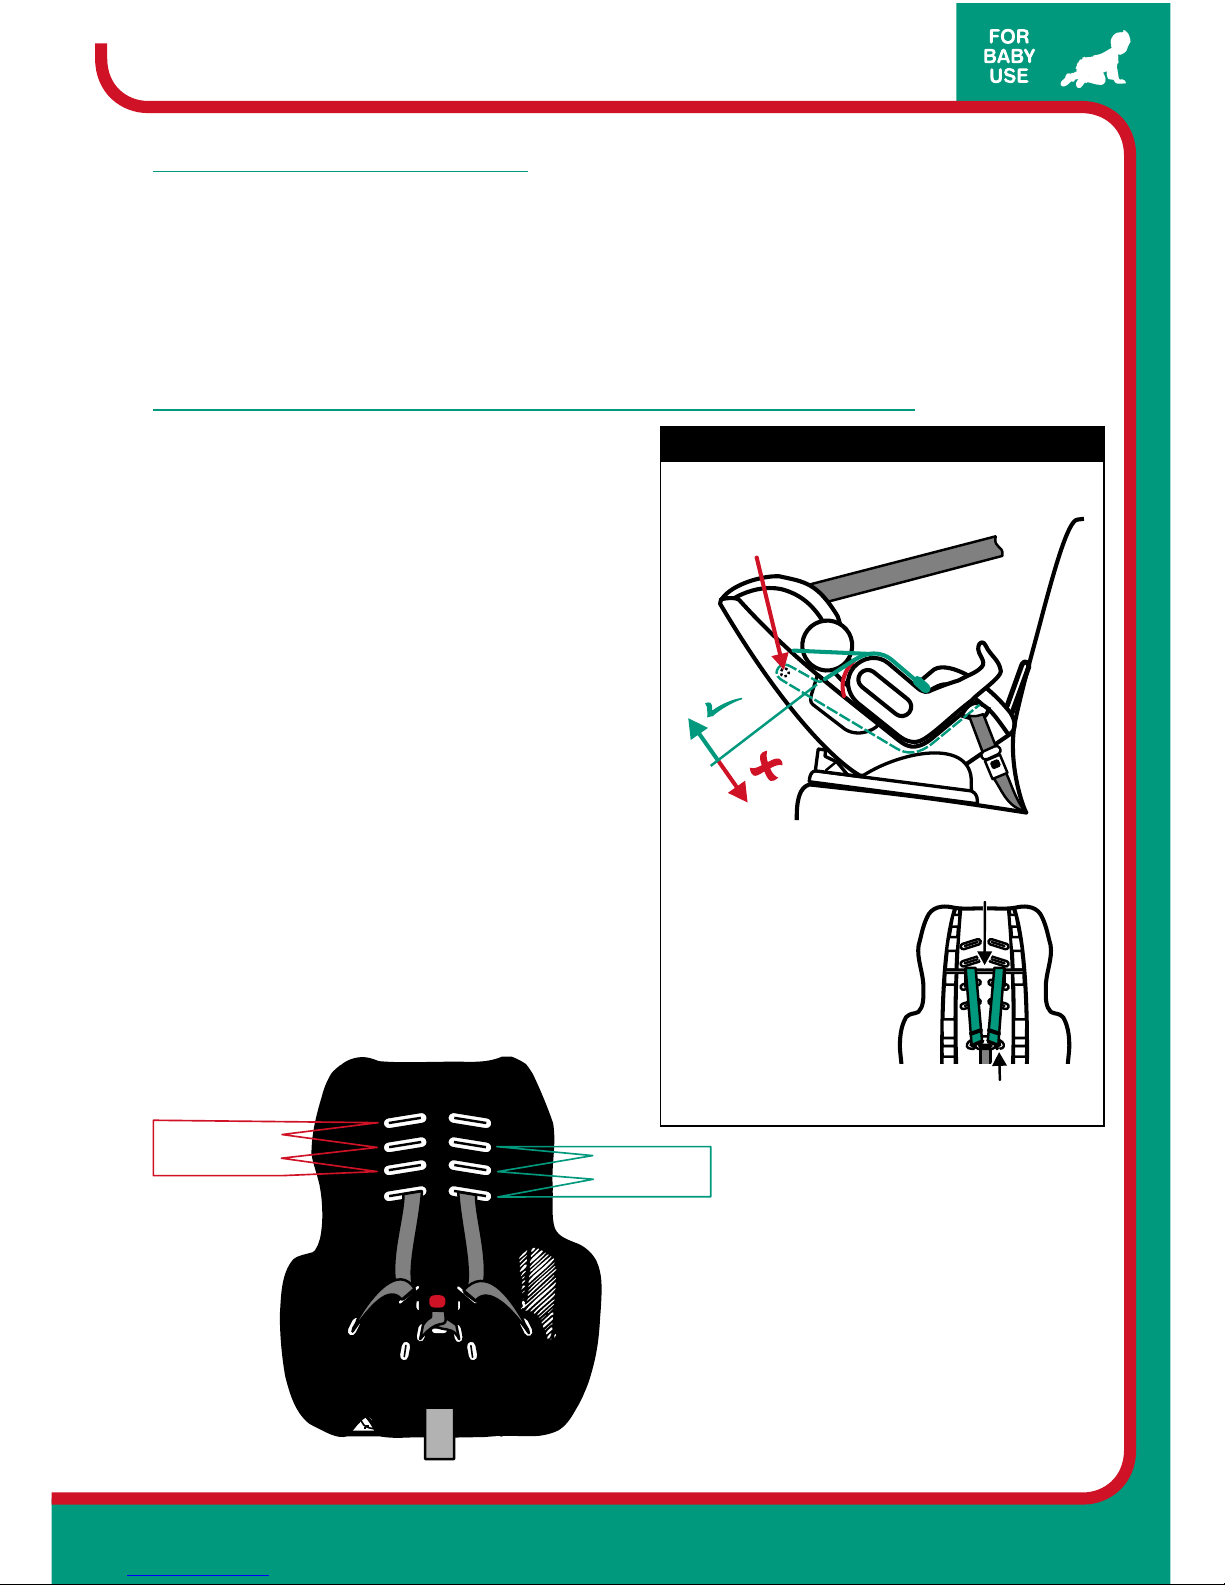
ADJUSTING SHOULDER HARNESS STRAPS HEIGHT
FOR BABY USE REARWARD FACING
Correct fitment of the harness is very
important as it restrains the baby in the
restraint. The harness must fit firmly
around upper torso of the baby and be
positioned so as to leave the baby's arms
and legs free.
For baby up to 12 kg the shoulder straps
must be in the slots which are nearest to
the child’s shoulders, but not lower than
the child’s shoulders. If your baby weighs
more than 12 kg then the restraint should
be converted for child use. (Refer to
Forward Facing, ‘Child Use’ section.)
Upper shoulder strap slots.
Medium shoulder strap slots.
Lower shoulder strap slots.
Shoulder harness strap.
Harness tongues and buckle.
Lap strap slot.
Baby Crotch Strap Slot (inner).
1.
2.
3.
4.
5.
6.
7.
SETTING UP THE HARNESS
A.
B.
C.
D.
E.
Sit the restraint on a flat ground and supported from behind so that it will not tip over.
Get the child to sit comfortably in position.
Determine the desired shoulder strap position.
Remove the child and adjust the shoulder straps using the following methods.
Repeat steps A-C to confirm the correct set-up of the built-in harness.
REARWARD FACING - BIRTH TO 12kg
Shoulder straps must
be threaded through
appropriate shoulder
strap slots then over
the top of bar at rear
of restraint.
Bar
Strap Connector
FOR CHILD
8kg to 18kg
77
66 66
77
44 44
55
33
22
11
FOR BABY
up to 12kg
Under 12kg
Harness
straps
over bar
HOW TO SET-UP
9
Rearward Facing (Up to 12 kg)
 Loading...