

Page 1

CLICK & GO
INFANT CARRIER
LOWER FRAME
FOR STRIDER COMPACT STROLLER & E BRAKE STROLLER
TO ACCOMMODATE A BRITAX SAFE-N-SOUND
UNITY INFANT CARRIER WITH INTEGRATED
CLICK & GO ADAPTERS
INSTRUCTION MANUAL
IMPORTANT: KEEP THIS BOOKLET IN A SAFE PLACE FOR FUTURE REFERENCE
Series No. ZA8345
WITH INTEGRATED CLICK AND GO RECEIVERS
Page 2

02
WARNINGS:
RETAIN FOR FUTURE REFERENCE.
READ ALL INSTRUCTIONS CAREFULLY BEFORE ASSEMBLY AND USE
OF THIS ADAPTER. ALWAYS FOLLOW THE INSTRUCTIONS.
THE CORRECT USE AND MAINTENANCE OF THIS PRODUCT IS
ESSENTIAL.
• DO NOT USE THE CLICK & GO INFANT CARRIER LOWER FRAME WITH
ANY OTHER MODELS OF STROLLER.
• THE CLICK & GO INFANT CARRIER LOWER FRAME MUST BE CORRECTLY
FITTED AND LOCKED ONTO THE STROLLER FRAME.
• THE CLICK & GO INFANT CARRIER LOWER FRAME CAN ONLY BE USED IN
THE FORWARD FACING POSITION, CONNECTED TO THE REAR OF THE
STROLLER.
• THE CLICK AND GO INFANT CARRIER LOWER FRAME CAN ONLY BE
USED TO ACCOMMODATE A SAFE-N-SOUND UNITY INFANT
CARRIERS WITH INTEGRATED CLICK & GO ADAPTERS.
• THE CLICK AND GO INFANT CARRIER LOWER FRAME CAN ONLY BE
USED ON THE STEELCRAFT STRIDER COMPACT STROLLER SERIES
AND THE BRITAX E BRAKE STROLLER SERIES.
• IT IS UNSAFE TO USE ACCESSORIES NOT APPROVED FOR USE WITH
THE CLICK AND GO INFANT CARRIER LOWER FRAME.
• THE MAXIMUM WEIGHT OF THE CHILD USING THIS PRODUCT IS NOT TO
EXCEED 12KGS.
WARNINGS
IMPORTANT NOTES
Page 3

03
MANUAL HANDLING TECHNIQUES
The SMART lifting technique
This technique can be used to pick up small light loads from low levels.
Size up the Load
• Assess the load (size, shape and weight).
• Assess whether the load needs to be moved;
• Where is it going to be placed” Check that there are no obstructions;
• Assess whether mechanical or human assistance is required.
Move the Load as close to the body as possible
• A load is heavier to lift or carry if it is not close to the body.
• The whole hand should be used to ensure a firm grip.
Always bend your knees
• Maintain balance.
• Keep feet apart and in a comfortable position.
• Minimise lower back bending.
• Bend knees preferable at as large an angle as possible but not at a right angle use a semi squat in preference to a full squat.
Raise the load with your legs
• Achieve the lift smoothly and without jerkiness.
• Maintain the normal curvature of the spine to allow the force of the load to be
distributed evenly from the spine to the pelvis.
Turn your feet in the direction that you want to move the load.
• Avoid unnecessary bending, twisting and reaching.
• Change direction by turning your feet and not your back.
• To set the load down, squat down, keep your head up and let
• Let your legs do the work.
Remember to ‘THINK TALL’ chest lifted, shoulders relaxed, chin tucked in
and head level.
Page 4
04
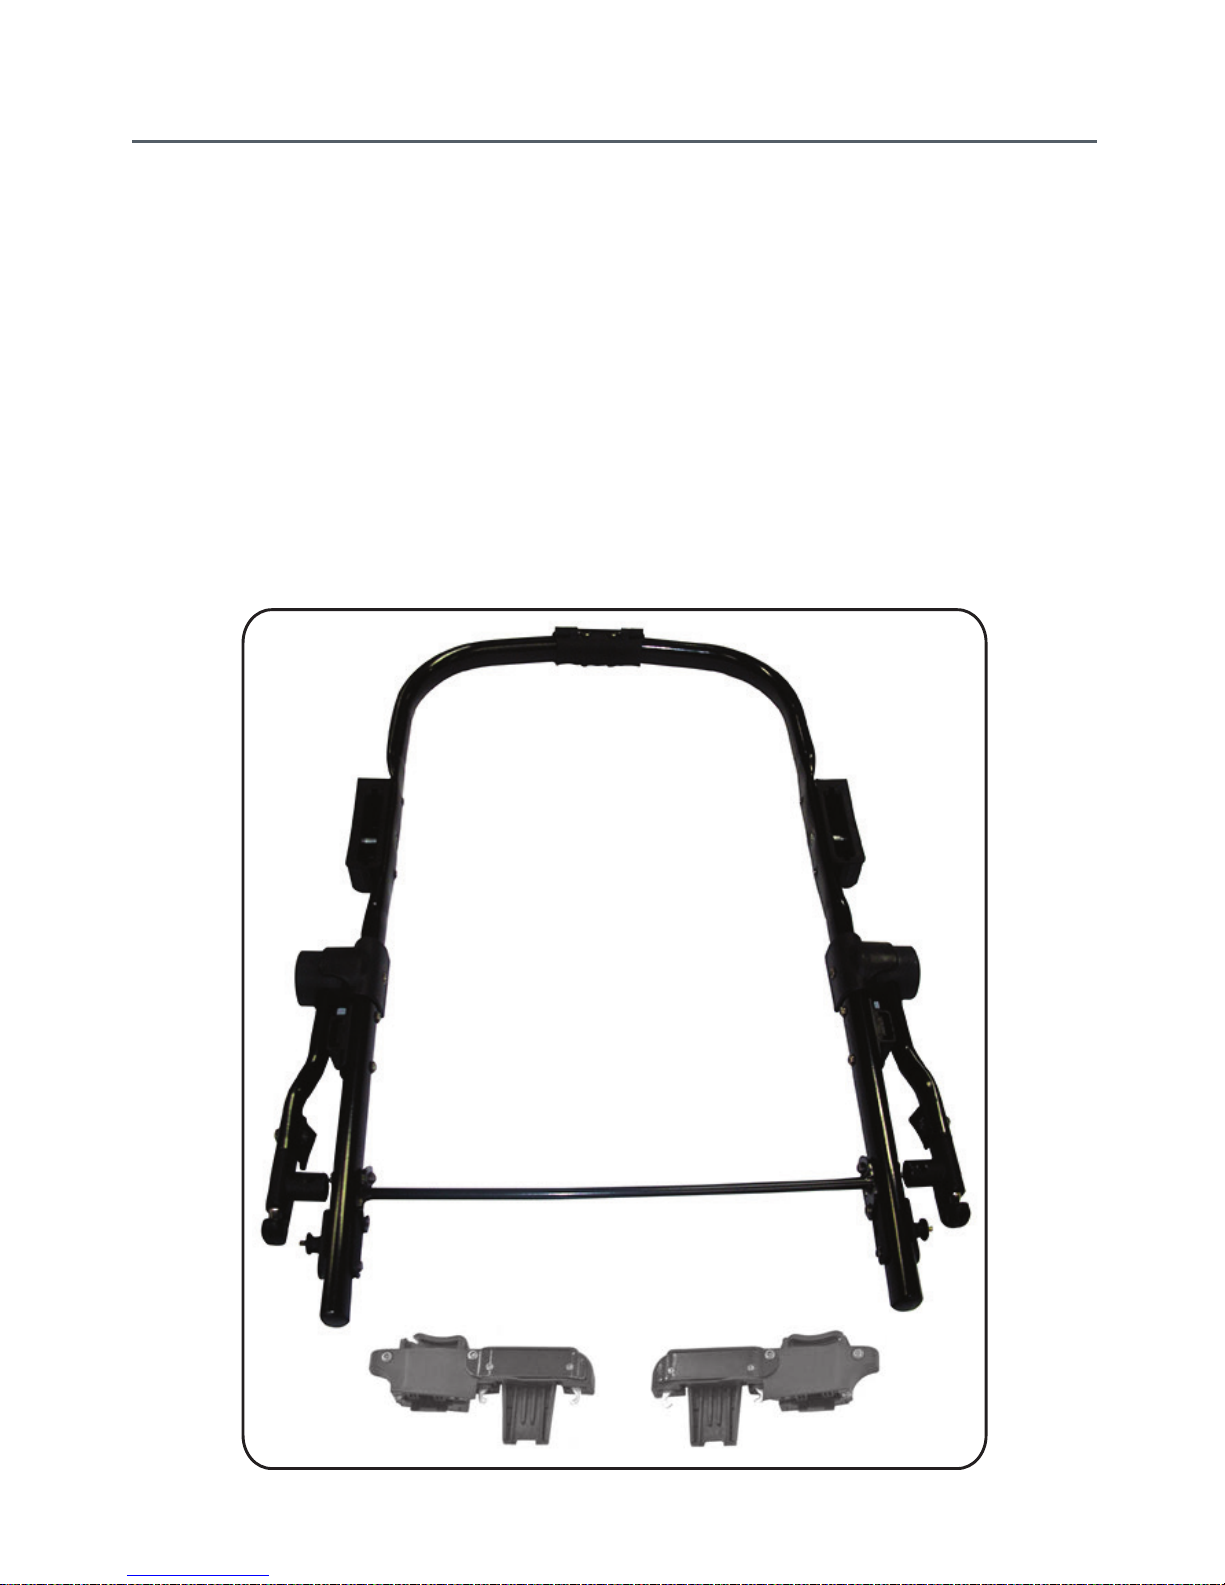
INFANT CARRIER LOWER FRAME
1. INFANT CARRIER LOWER FRAME CONNECTING PINS
2. INFANT CARRIER LOWER FRAME LEG TUBES
3. INFANT CARRIER RELEASE BUTTONS
4. UNITY INFANT CARRIER RECEIVERS
5. INFANT CARRIER LOWER FRAME FOLDING LEVER
6. INFANT CARRIER LOWER FRAME STABILISING BAR
7. STEELCRAFT INFANT CARRIER RECEIVERS
1
1
2
2
3
3
4
4
5
6
7
Page 5
05
TO USE THE STEELCRAFT RECEIVERS
SUPPLIED WITH THE INFANT CARRIER
LOWER FRAME
A Take one Steelcraft receiver at a time and align the receivers with the stroller
frame mouldings. The receiver extends towards the front of the stroller and the
ribbed section of the mouldings face inwards.
B Insert the receiver into the stroller mouldings. Push down on the receiver until
you hear a ‘click’ which indicates the receiver has locked into the stroller frame
mouldings.
C Pull up on each receiver to check they are locked on.
BRITAX RECOMMEND THE STEELCRAFT RECEIVERS SUPPLIED WITH
THE INFANT CARRIER LOWER FRAME BE ATTACHED TO THE STROLLER
FRAME BEFORE INSTALLING AND USING THE UNITY INFANT CARRIER ON
THE INFANT CARRIER LOWER FRAME.
THE STEELCRAFT RECEIVERS CREATE MORE SPACE BETWEEN THE TOP
SEAT AND THE UNITY INFANT CARRIER IN THE LOWER FRAME.
IMPORTANT NOTE
A
C
B
Page 6

06
TO USE THE STEELCRAFT RECEIVERS
SUPPLIED WITH THE INFANT CARRIER
LOWER FRAME
E To remove the receivers, press the button on top of the receiver and pull the
receiver up out of the stroller frame mouldings.
D
D Install the stroller seat or Steelcraft infant carrier.
To install the stroller seat on the Strider Compact stroller using the
Steelcraft receivers: Please refer to Page 63 of the Strider Compact
Instruction Manual supplied with the stroller.
To install the Steelcraft Infant Carrier on the Strider Compact stroller
using the Steelcraft receivers: Please refer to Page 64 of the Strider
Compact Instruction Manual supplied with the stroller.
To install the stroller seat on the E-Brake stroller using the Steelcraft
receivers: Please refer to Page 97 of the E-Brake Instruction Manual supplied
with the stroller.
To install the Steelcraft Infant Carrier on the E-Brake stroller using
the Steelcraft receivers: Please refer to Page 98 of the E-Brake Instruction
Manual supplied with the stroller.
Page 7

07
TO FIT THE INFANT CARRIER LOWER FRAME
A Apply the stroller brake. For easier installation, remove the stroller seat or
infant carrier from the upper section of the stroller frame. Remove the
accessory bag from the stroller, if fitted. Rotate the pivotal handle up to create
more assembly space.
B The infant carrier lower frame connecting pins (1) need to lock into the lower
stroller frame mouldings. Hold the infant carrier lower frame so the leg tubes
(2) are underneath and facing the infant carrier lower frame.
PLEASE REFER TO PAGE 3 FOR LIFTING TECHNIQUES.
• WHEN FITTING THE CLICK & GO INFANT CARRIER LOWER FRAME TO THE
STROLLER, BE AWARE OF THE DANGER OF BEING INJURED BY MOVING
PARTS AND LOCKING DEVICES DURING THE PROCESS.
• THE CLICK & GO INFANT CARRIER LOWER FRAME MUST BE CORRECTLY
FITTED AND LOCKED ONTO THE STROLLER FRAME.
• THE CLICK & GO INFANT CARRIER LOWER FRAME CAN ONLY BE USED IN
THE FORWARD FACING POSITION, CONNECTED TO THE REAR OF THE
STROLLER. KEEP ALL HANDS AND LIMBS CLEAR OF THESE PARTS.
IMPORTANT NOTES
2
2
CAUTION
B
Page 8
08
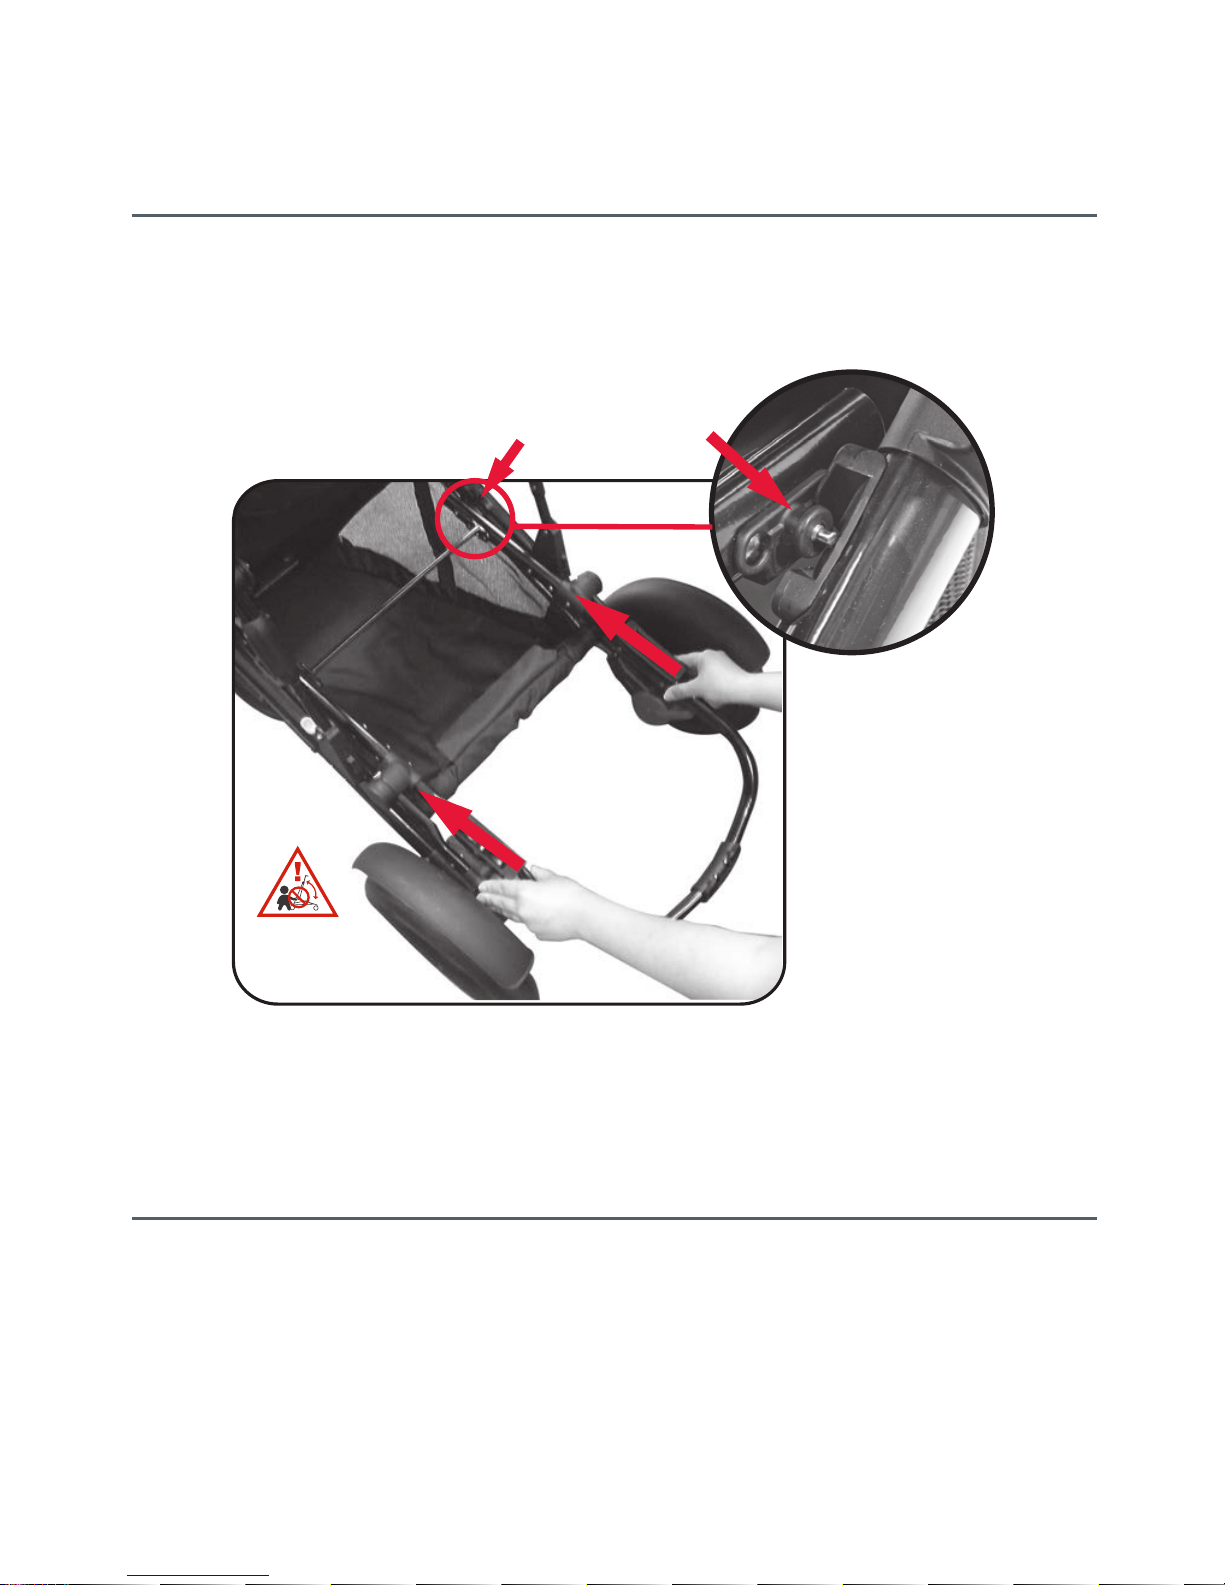
TO FIT THE INFANT CARRIER LOWER FRAME
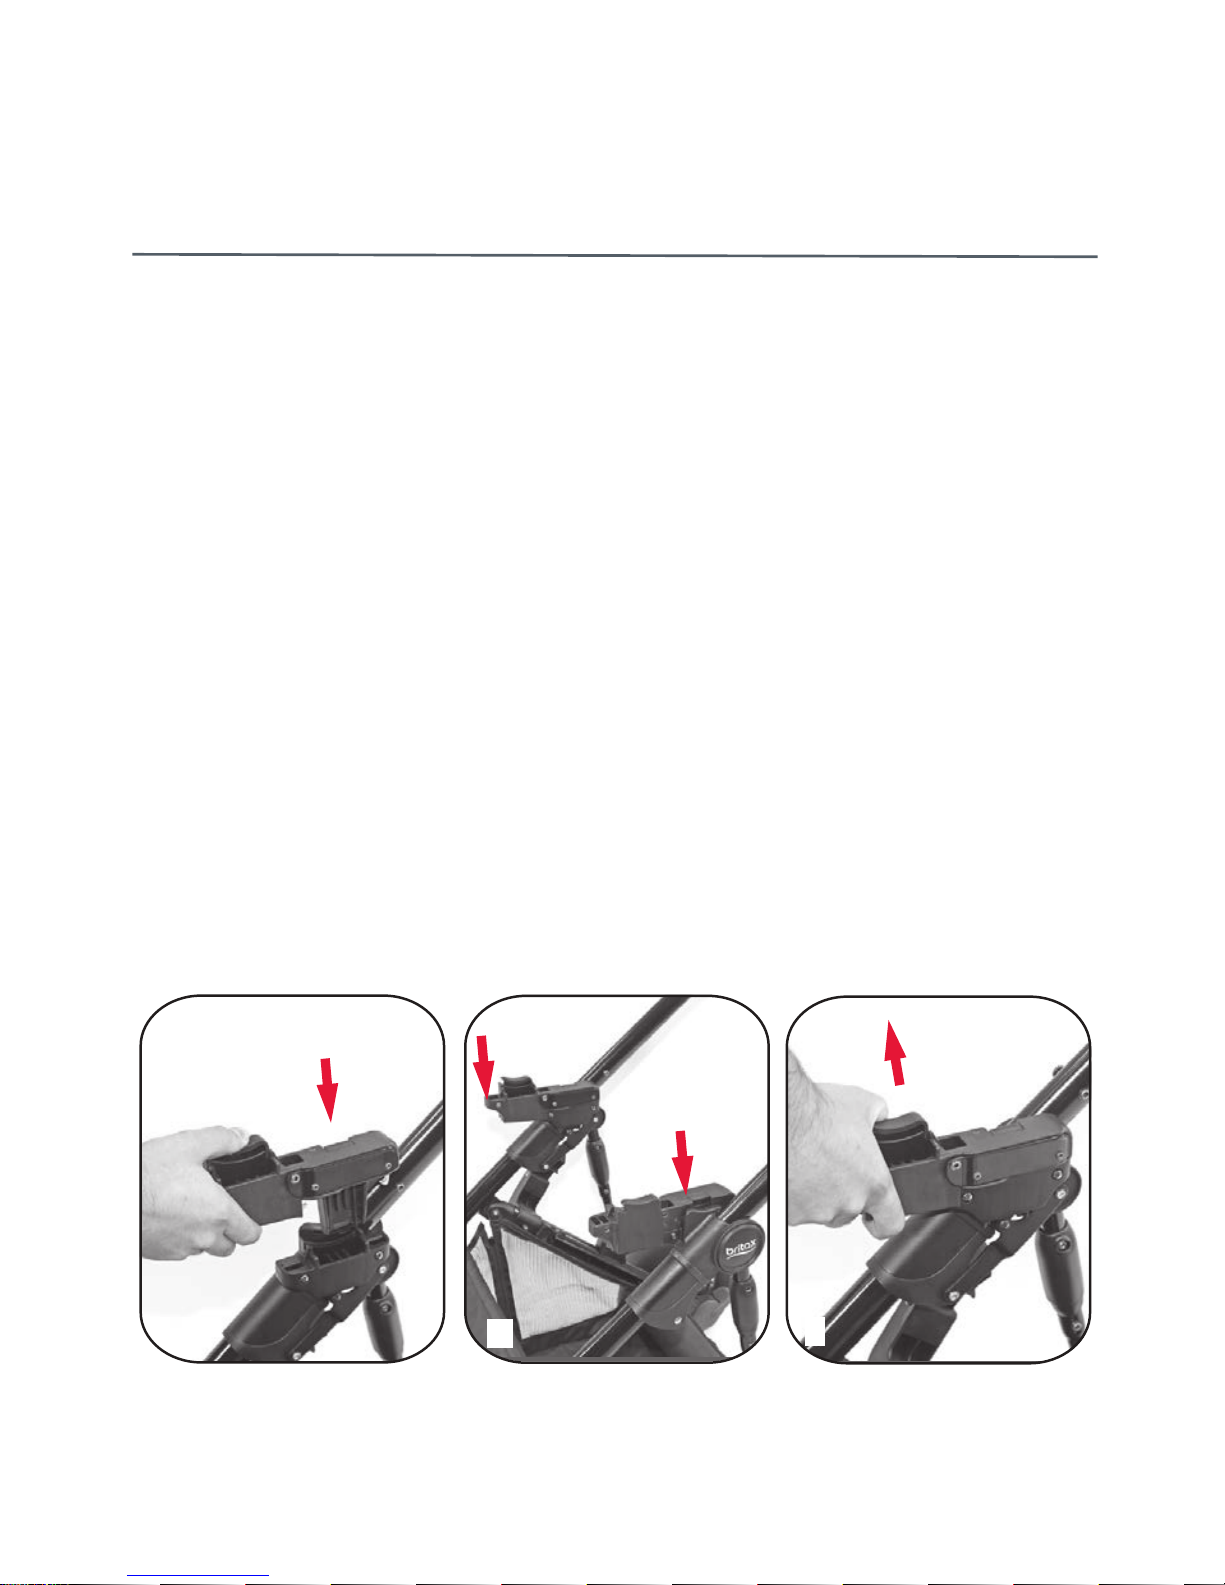
C Then hook the infant carrier lower frame connecting pins (1) into the stroller
frame mouldings, then pull downwards.
D Lower the infant carrier frame and push down to lock the leg tubes (2) into the
lower stroller frame mouldings. Repeat Step D if the frame doesn’t lock into
place.
1
C
D
CAUTION
2
Page 9

09
TO FIT THE INFANT CARRIER LOWER FRAME
E Pull up on the infant carrier lower frame to make sure it is locked onto the
stroller frame.
F Lift the folding lever (5) on the infant carrier lower frame and raise the frame so
it slides down the stroller frame and engages into the second lock on the
stroller. When locked, the lower adapter frame is locked slightly above
horizontal.
F
5
Page 10
10
TO INSTALL THE UNITY INFANT CARRIER
INTO THE INFANT CARRIER LOWER FRAME
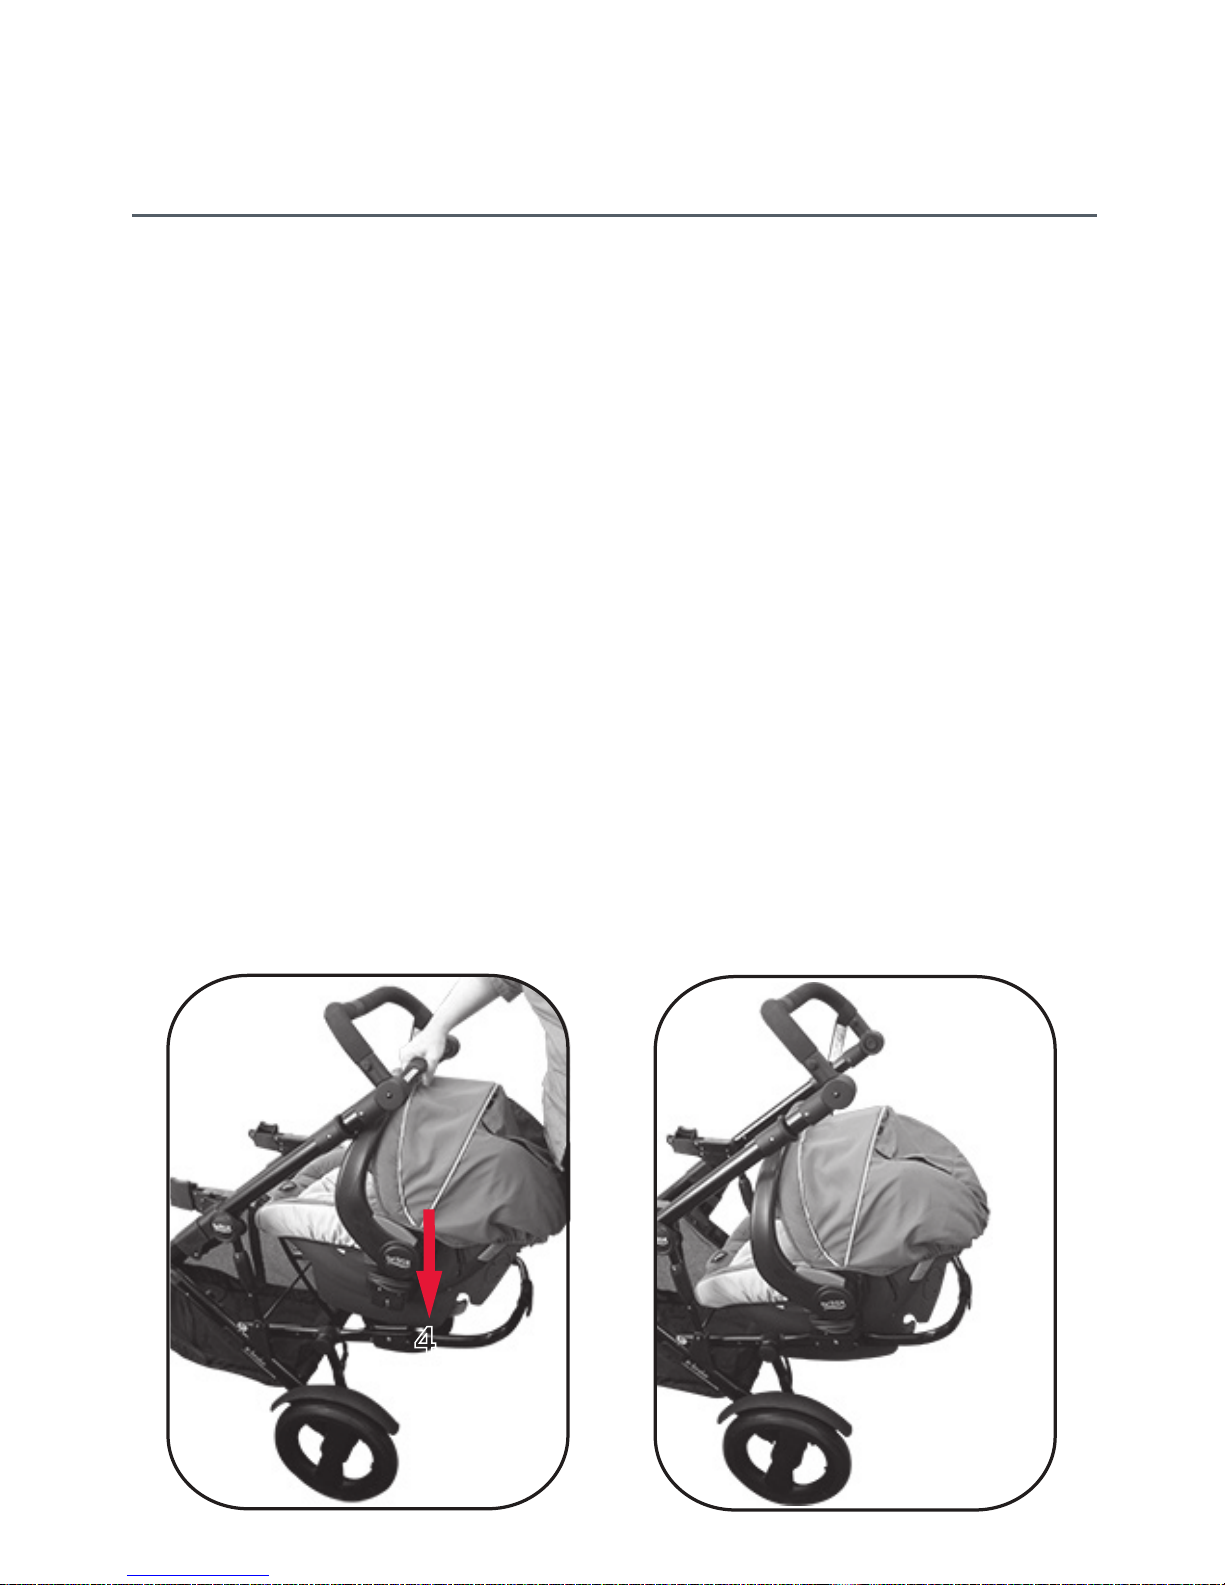
A Lift the infant carrier above the infant carrier lower frame and locate the infant
carrier adapters over the receivers (4) on the infant carrier lower frame and
push down until it has locked into the receivers. Pull up on the infant carrier to
confirm it has locked into place.
PLEASE REFER TO PAGE 3 FOR LIFTING TECHNIQUES.
• THESE INSTRUCTIONS ARE FOR INSTALLING THE BRITAX SAFE-N-SOUND
UNITY INFANT CARRIER INTO THE CLICK & GO INFANT CARRIER LOWER
FRAME ONLY.
FOR INSTALLING THE INFANT CARRIER IN THE CAR PLEASE FOLLOW
THE INSTRUCTION BOOK INCLUDED WITH THE INFANT CARRIER.
• TO SECURE YOUR CHILD IN THE INFANT CARRIER PLEASE FOLLOW THE
INSTRUCTION BOOK INCLUDED WITH THE INFANT CARRIER.
• FOR EASIER INSTALLATION, REMOVE THE STROLLER SEAT OR INFANT
CARRIER FROM THE UPPER SECTION OF THE STROLLER FRAME AND
ROTATE THE STROLLER PIVOTAL HANDLE TO THE MOST UPRIGHT
POSITION.
IMPORTANT NOTES
4
Page 11

11
CAUTION
TO RELEASE THE UNITY INFANT CARRIER
FROM THE INFANT CARRIER LOWER FRAME
A Use both hands to push the release levers up on the infant carrier adapters
which are located on both sides of the infant carrier and then lift the infant
carrier away from the frame.
.
PLEASE REFER TO PAGE 3 FOR LIFTING TECHNIQUES.
• THESE INSTRUCTIONS ARE FOR REMOVING THE BRITAX SAFE-N-SOUND
UNITY INFANT CARRIER FROM THE CLICK & GO INFANT CARRIER LOWER
FRAME ONLY. FOR REMOVING THE INFANT CARRIER FROM THE CAR
PLEASE FOLLOW THE INSTRUCTION BOOK INCLUDED WITH THE INFANT
CARRIER.
IMPORTANT NOTES
A
A
CAUTION
Page 12

TO FOLD THE INFANT CARRIER LOWER
FRAME
PLEASE REFER TO PAGE 3 FOR LIFTING TECHNIQUES.
• WHEN FOLDING THE CLICK & GO INFANT CARRIER LOWER FRAME BE
AWARE OF THE DANGER OF BEING INJURED BY MOVING PARTS AND
LOCKING DEVICES DURING THE PROCESS.
• THE BRITAX SAFE-N-SOUND UNITY CARRIER MUST BE REMOVED FROM
THE LOWER FRAME BEFORE REMOVING INFANT CARRIER LOWER
FRAME FROM THE STROLLER FRAME.
NOTE: FOR EASIER REMOVAL, ROTATE THE PIVOTAL HANDLE OF THE
STROLLER IN THE MOST UPRIGHT POSITION.
IMPORTANT NOTES
A Lift the infant carrier lower frame folding lever (5) up and press the second
lock button on the stroller frame and lower the infant carrier frame.
12
A
Page 13

13
TO REMOVE THE INFANT CARRIER LOWER
FRAME
.
PLEASE REFER TO PAGE 3 FOR LIFTING TECHNIQUES.
• WHEN REMOVING THE CLICK & GO INFANT CARRIER LOWER FRAME BE
AWARE OF THE DANGER OF BEING INJURED BY MOVING PARTS AND
LOCKING DEVICES DURING THE PROCESS.
• THE BRITAX SAFE-N-SOUND UNITY CARRIER MUST BE REMOVED FROM
THE INFANT CARRIER LOWER FRAME BEFORE REMOVING THE INFANT
CARRIER FRAME FROM THE STROLLER FRAME.
IMPORTANT NOTES
B
CAUTION
TO FOLD THE INFANT CARRIER LOWER
FRAME
B. The infant carrier lower frame will slide up the stroller frame to the folded
position. The infant carrier lower frame can now be folded with stroller. (Refer
to the Stroller Instruction book regarding steps on folding the stroller.)
Page 14

14
TO REMOVE THE INFANT CARRIER LOWER
FRAME
B
3
3
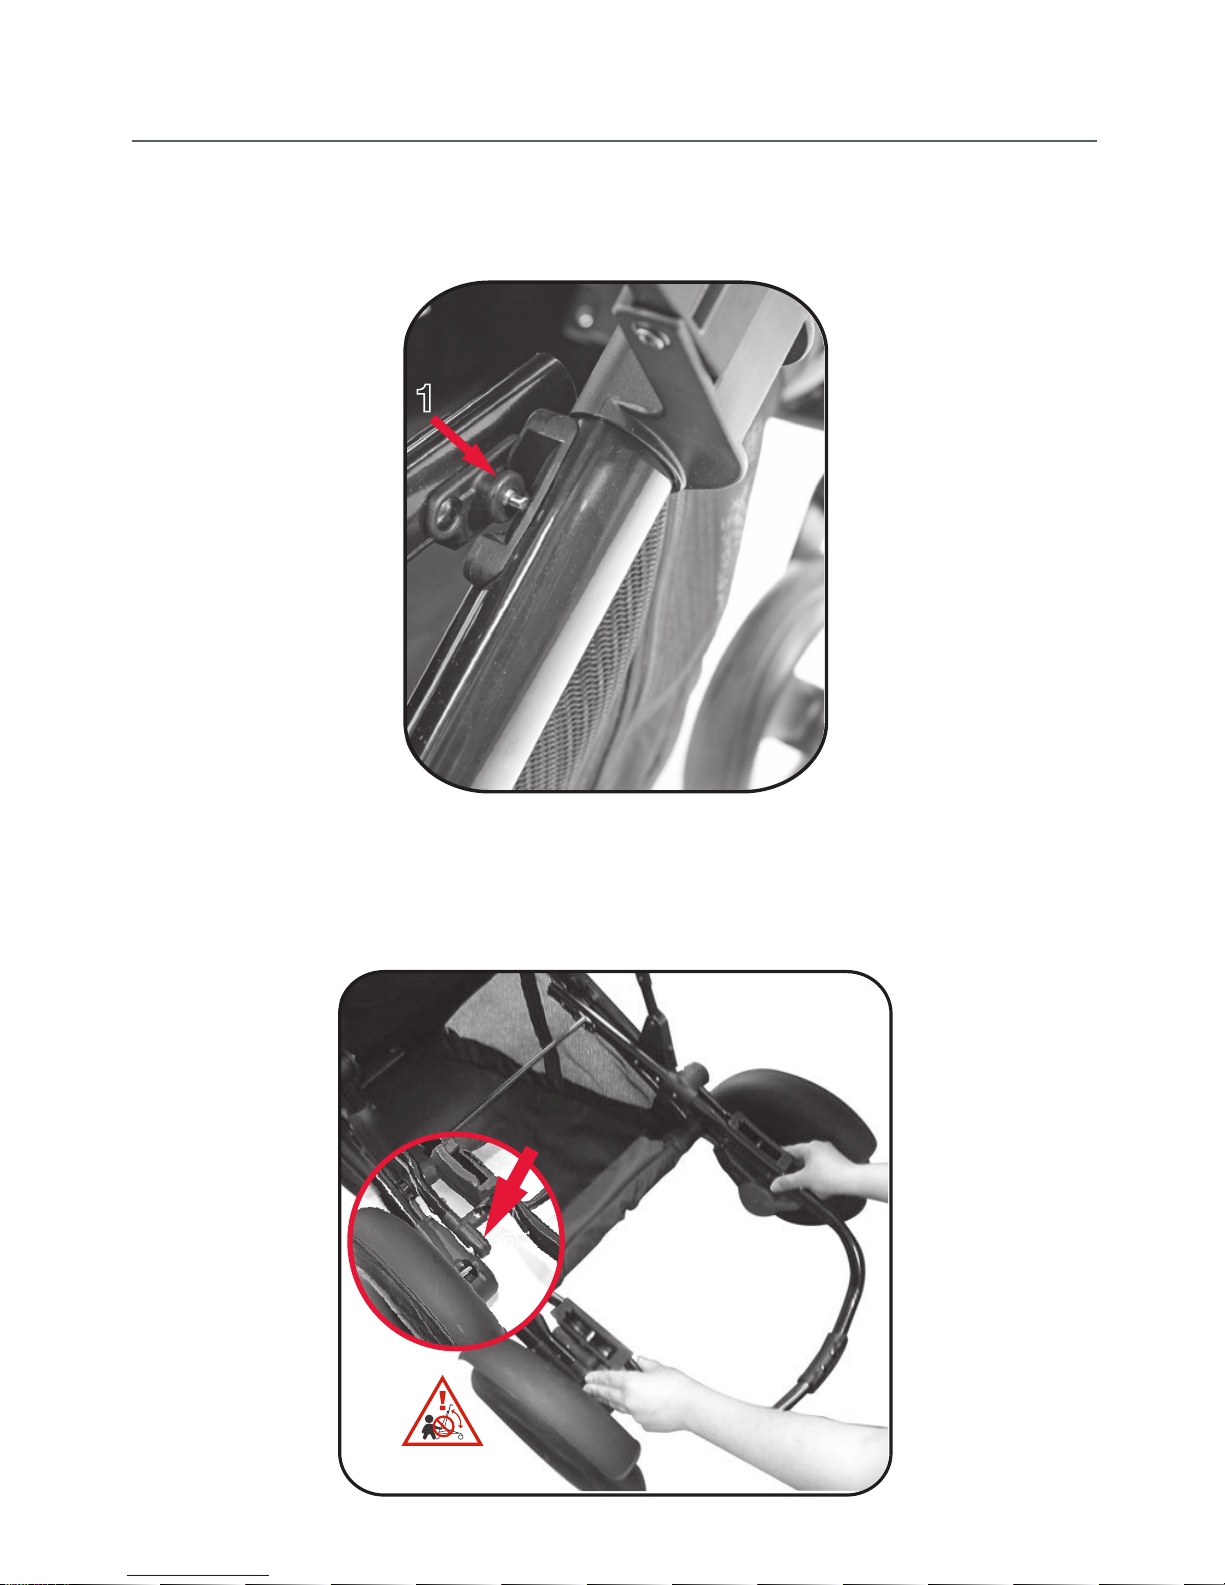
A Fold the infant carrier lower frame under the stroller frame - See page 12.
B With the infant carrier lower frame in the folded position, locate the release
buttons (3) on both sides of the frame and fully depress the release buttons
until you see the adjacent buttons pop out of the mouldings.
NOTE: FOR EASIER REMOVAL, ROTATE THE PIVOTAL HANDLE OF THE
STROLLER IN THE MOST UPRIGHT POSITION.
Page 15
CARE AND MAINTENANCE
• Always check parts regularly for tightness of screws, nuts, and other
fasteners - tighten if required. To maintain the safety of your nursery
product, seek prompt repairs for bent, torn, worn or broken parts.
THIS PRODUCT IS NOT INTENDED FOR COMMERCIAL USE.
15
TO REMOVE THE INFANT CARRIER LOWER
FRAME
C A gentle upward, then forward motion (as indicated by the arrow) will be
required to release the infant carrier lower frame connecting pins (1) out of the
stroller frame mouldings.
D Lift the infant carrier lower frame out and away from the stroller frame.
C
CAUTION
1
Page 16

Art No. 4001811
BRITAX CHILDCARE PTY. LTD.
A Britax International Company
ABN 55 006 773 6000
99 Derby Road Sunshine
Victoria 3020 Australia
Britax Childcare Pty Ltd
(Customer Service 1300 303 330)
Britax Childcare (NZ) Ltd
(Customer Service 0508 688 822)
Due to the variations in style and design of our products, the
illustrations used in this instruction booklet are generic.
We reserve the right to alter these products without notice.
The Britax Trademark is the property of Britax Childcare
Holdings Limited - UK.
This product is designed to comply with Australian and
New Zealand standard AS/NZS2088:2013 “Prams and
Strollers - Safety Requirements.”
2013 Copyright Britax Childcare Pty. Ltd. Australia
youtube.com/britaxaustralia
facebook.com/britaxaustralia
twitter.com/britaxaustralia
pinterest/britaxaustralia
britax.com.au
1300 303 330
16
 Loading...