

Page 1

Roundabout
PLEASE READ
INSTRUCTIONS
STORE UNDER COVER
PRIÈRE DE LIRE
LES INSTRUCTIONS
RANGER SOUS
LA HOUSSE
Canadian User Guide
Guide de l’utilisateur Canadien
®
Page 2

Table of Contents
Safety Information
Warnings ......................................................................................................2
Important Notes ...........................................................................................4
Certification ..................................................................................................5
Registration ..................................................................................................5
Important Harness Adjustments ...................................................................6
Child Seat Features...........................................................................................8
Vehicle Compatibility
Vehicle Safety Belts .......................................................................................10
Vehicle Buckle Positions ................................................................................11
Vehicle Seating Positions ..............................................................................11
Installation : Rear-facing
Lower Universal Anchorage System (LUAS) Installation ..............................12
Lap-Shoulder Belt Installation ......................................................................14
Lap-Belt Installation .....................................................................................16
Installation : Forward-facing
Lower Universal Anchorage System (LUAS) Installation ..............................18
Lap-Shoulder Belt Installation .......................................................................20
Lap-Belt Installation .....................................................................................22
Aircraft Installation ...........................................................................................24
Installation : Versa-Tether
Safety Information ........................................................................................25
Using the Versa-Tether .................................................................................26
Tether Connector Strap ................................................................................27
Child Seat Functions
Switching the Lower Connector System (LCS) .............................................28
Storing the LCS Connectors .........................................................................28
Recline Adjustment ......................................................................................29
Chest Clip .....................................................................................................29
Harness Buckle .............................................................................................30
How to Adjust Harness Slot Height ..............................................................31
Securing Your Child ......................................................................................31
Care and Maintenance .....................................................................................33
Warranty ...........................................................................................................37
©2008 Britax Child Safety, Inc. All rights reserved. Printed in USA P319000_R1_05_08
This product and its components are subject to change without notice.
®
Page 3
2
3
WARNING !
DEATH or SERIOUS INJURY can occur if the following
are not observed :
Use only with children who weigh between 2.3 – 18.1 kg (5 – 30 •
lbs) and whose height is between 55.9 – 101.6 cm (22 – 40 in.).
Use rear-facing for children who weigh between 2.3 – 13.6 kg (5 – •
30 lbs) and whose height is between 55.9 – 76.2 cm (22 – 30 in.)
Use forward-facing for children who weigh between 9.1 – 18.1 •
kg. (20 – 40 lbs) and whose height is between 68.6 – 101.6 cm
(27 – 40 in.).
This child seat must be in the recline position when installed rear-•
facing.
This child seat must be in the upright position when installed •
forward-facing.
Adjust the belts provided with this child seat so they fit snugly •
around your child. A snug strap should not allow any slack. It lies
in a relatively straight line without sagging. It does not press on the
child’s flesh or push the child’s body into an unnatural position.
Secure the top tether strap provided with this child seat.•
The child seat must be secured to the vehicle by means of a lower •
connector system if it is installed in a seating position that is equipped
with a lower universal anchorage system or by means of a vehicle
seat belt if it is installed in a seating position that is not equipped with
a lower universal anchorage system, and by means of a tether strap,
as shown in the installation instructions. Use of the tether strap is
required forward-facing and is optional rear-facing.
Follow all instructions on the child seat labels and in this user •
guide.
Register your child seat with the manufacturer, Britax Child Safety, •
Inc. by visiting www.BritaxUSA.com/registration, OR complete and
return the registration card that was shipped with this child seat.
To prevent injury due to deterioration or hidden damage, discontinue •
use of a child seat that is older than six years or has been in a moderate
or severe crash. See date of manufacture located on child seat (page
9).
This child seat must not be used in the home, in boats, or in other •
non-certified applications.
Based on crash statistics, it is recommended that parents select the •
back seat as the safest location for a properly installed child seat.
Please study the Vehicle Compatibility section on pages 10-11 to
ensure your child’s safety and consult your vehicle owner’s manual.
Secure this child seat even when it is not occupied. In a crash, an •
unsecured child seat may injure vehicle occupants.
When using in a vehicle with air bags, refer to your vehicle owner’s •
manual for child seat installation instructions and precautions.
Never use adjuster strap to lift or carry this child seat. Doing so could •
cause damage to harness adjuster and webbing. Always carry this
child seat by its shell or tether straps.
The primary protection for vehicle occupants in a collision is the •
body of the vehicle itself. A child seat will not protect a child when
a vehicle is seriously impacted. However, correctly installed, a child
seat will substantially improve the chances for survival in most
crashes. Make sure all users fully understand the correct ways to
use this child seat in a vehicle.
Page 4
4
5
Safety Information Safety Information
Important Notes
Verify that the child seat is securely installed and that the harness •
is properly adjusted around the child each time the child seat is
used.
Adjust the harness to fit the clothes the child is wearing. Remove •
bulky coats and/or jackets before putting the child in child seat.
Cover the child seat when the vehicle is parked in direct sunlight. •
Parts of child seat could become hot enough to burn a child.
Store the child seat in a safe place when it is not being used. •
Avoid placing heavy objects on top of it.
Do not leave children alone in a vehicle, even for a short time.•
Do not, except as described in this booklet, attempt to •
disassemble any part of the child seat or change the way the
harness or vehicle’s seat belts are used.
Do not leave loose objects, e.g. books, bags, etc., in the back of •
a vehicle. In the event of a sudden stop, loose objects will keep
moving, potentially causing serious injuries.
Do not leave folding vehicle seats unlatched. In the event of a •
sudden stop, a loose seat back could cause the child seat not to
perform as intended.
Do not allow children to play with this child seat.•
Do not use anything to raise the child seat off vehicle seat except •
as described in these instructions. In a crash, this could cause the
child seat not to perform as intended.
Certification
This child seat system conforms to all applicable Canadian Motor
Vehicle Safety Standards (213 and 213.1). This child seat is certified
for use in motor vehicles and aircraft.
Registration
Child seats can be recalled for safety reasons. You must register this
child seat to be reached in a recall. Send your name, address, and
the child seat’s model number and manufacturing date to Britax
Child Safety, Ltd., P.O. Box 7289, RPO Brunswick Square, Saint
John NB E2L 9Z9, or call 1-888-427-4829, or register online at
www.BritaxUSA.com/registration.
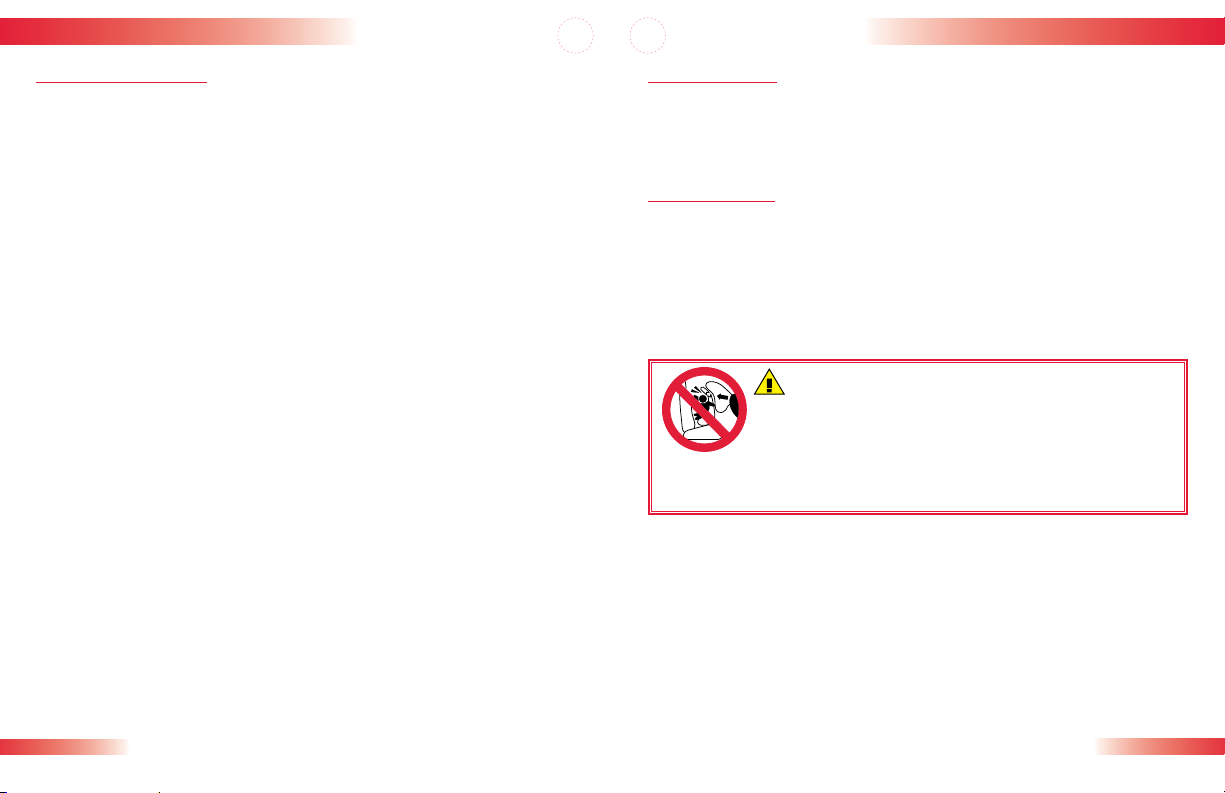
WARNING!
rear-facing in the front seat of a vehicle with a
passenger air bag unless deactivated. DEATH or
SERIOUS INJURY can occur. See your vehicle
owner's manual for child seat installation instructions. The
back seat is the safest place for children 12 and under.
DO NOT place a child seat
Page 5
6
7
Safety Information Safety Information
2.5 cm
1 inch
Forward-Facing
Important Harness Adjustments
According to the American Academy of Pediatrics :
All infants should ride rear-facing until they have reached at least 1 year
of age and weigh at least 9.1 kg (20 lbs). That means that if your infant
reaches 9.1 kg (20 lbs) before her first birthday, she should remain rearfacing at least until she turns 1 year old. It is best for children to ride rearfacing to the highest weight or height allowed by the manufacturer.
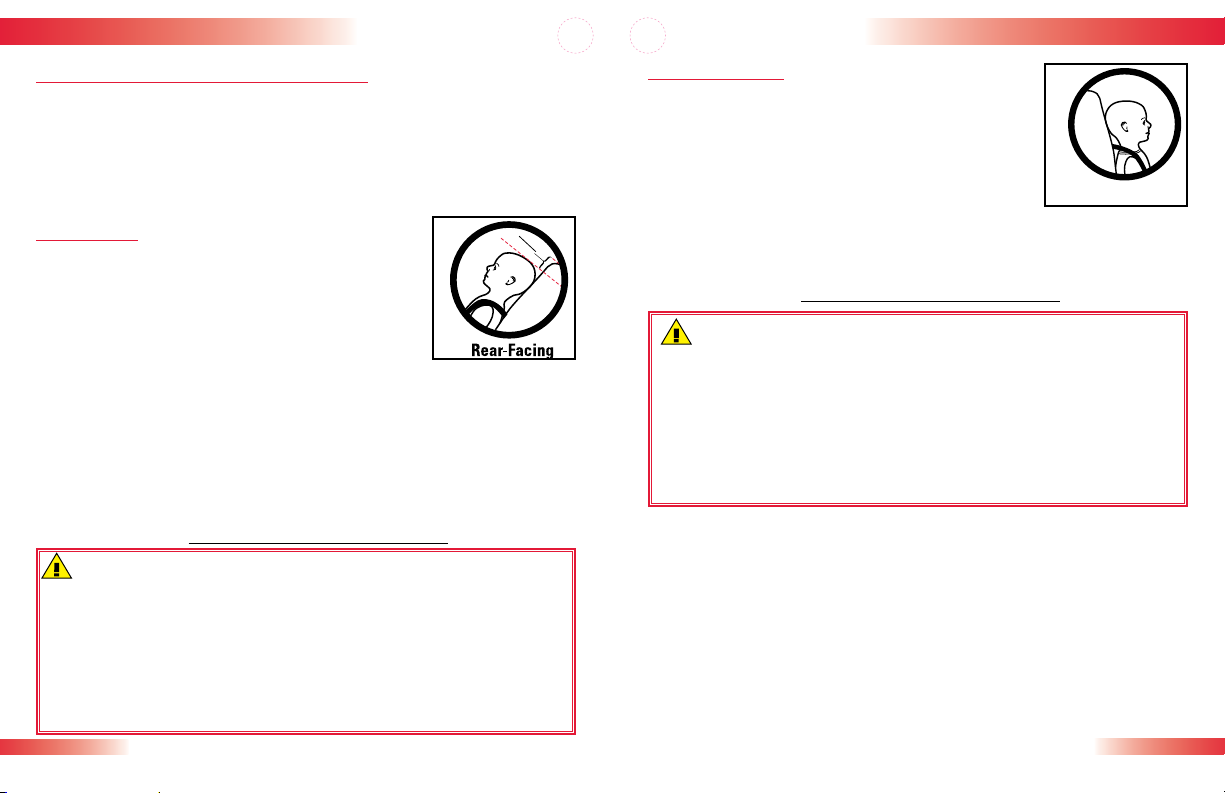
Rear-Facing
Weight 2.3 – 13.6 kg (5 – 30 lbs).
Only use rear-facing with children :
who weigh between 2.3 – 13.6 kg (5 – 30 lbs) • and
whose height is between 55.9•
and
when the top of the child’s head is 2.5 cm (1 inch) or •
more below the top of the child seat shell (Fig. A) and
when the harness straps are located in slots at or below the child’s shoulders (Fig. A)•
– 76.2 cm (22 – 30 inches)
A
If the child cannot be secured within these requirements because the
child exceeds height or weight requirements, review the forwardfacing guidelines on page 7.
If the child cannot be snugly secured within these requirements
because the child is too small, selection of a different child seat (such
as an infant carrier) may be required.
IMPORTANT: See How to Adjust Harness Slot Height on page 31.
WARNING!
following apply :
the child is less than 2.3 kg (5 lbs) in weight • or
the child is less than 55.9 cm (22 inches) in height • or
the child exceeds 13.6 kg (30 lbs) in weight • or
the child exceeds 76.2 cm (30 inches) in height • or
the top of the head is less than 2.5 cm (1 inch) from the top of the child •
seat shell (Fig. A) or
the harness straps are located in slots above the child’s shoulders•
Do NOT use the child seat rear-facing if any of the
Forward-Facing
Weight 9.1 kg (and 1 year) – 18.1 kg (20 – 40 lbs)
Only use forward-facing with children :
who are at least one year of age • and
who weigh between 9.1 – 18.1 kg. (20 – 40 lbs) • and
whose height is between 68.6 •
inches) and
when the top of the child’s ears are below the top •
of the child seat shell and
when the harness straps are located in slots at or above the child’s shoulders •
(Fig. B)
– 101.6 cm (27 – 40
b
IMPORTANT: See How to Adjust Harness Slot Height on page 31.
WARNING!
the following apply :
the child is less than one year of age • or
the child is less than 9.1 kg (20 lbs) in weight • or
the child is less than 68.6 cm (27 inches) in height • or
the child exceeds 18.1 kg (40 lbs) in weight • or
the child exceeds 101.6 cm (40 inches) in height • or
the top of the ears are above the top of the child seat shell • or
the harness straps are located in slots below the child’s shoulders•
Do NOT use the child seat forward-facing if any of
Page 6
8
9
1
7
8
9
10
11
12
13
3
4
2
5
6
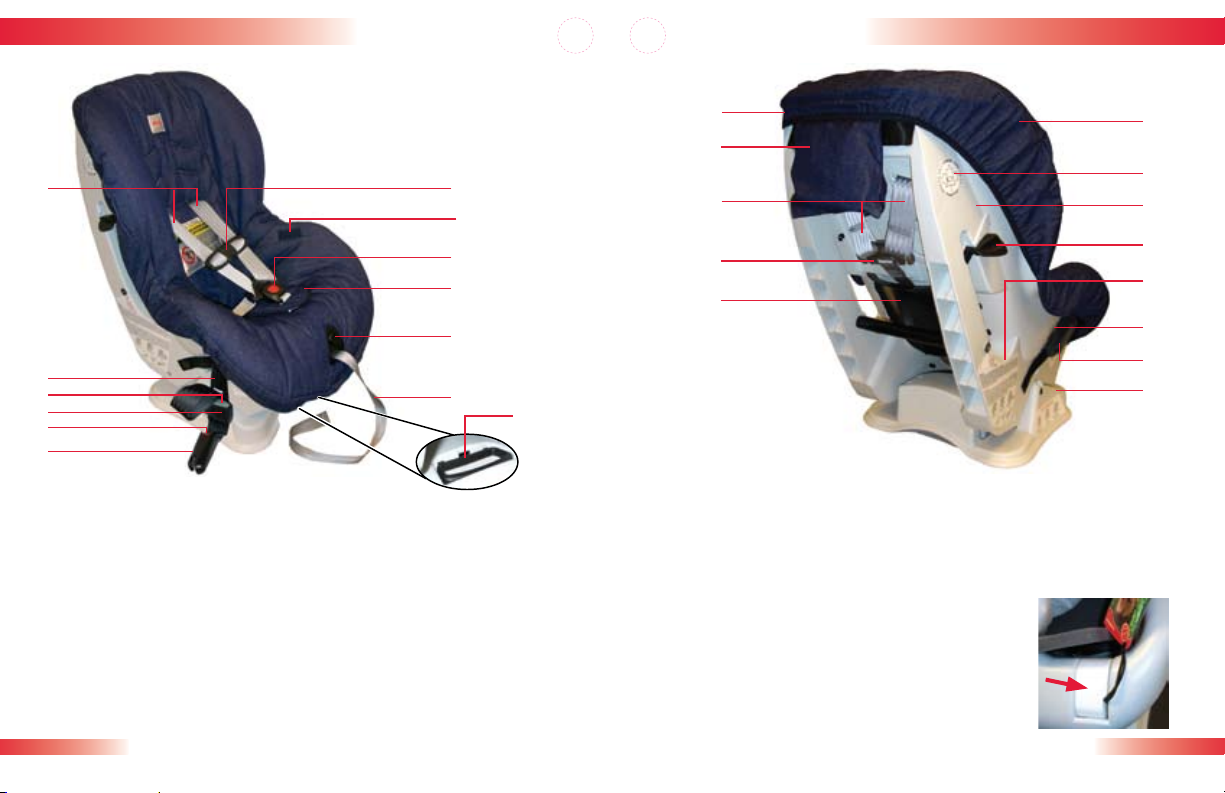
Child Seat Features
15
14
1
17
16
18
19
20
21
22
23
24
25
Child Seat Features
Harness Straps1
LCS Connector Strap2
LCS Adjuster Release Button3
LCS Adjuster4
LCS Connector Release Button5
Belly Pad10
Harness Adjuster Release 11
Button
Harness Adjuster Strap12
Recline Handle (Front of Base)13
LCS Connector (Stored Under Cover)6
Chest Clip7
Harness Holder8
Harness Buckle9
Serial Number and Manufactured 14
Date (Under Cover)
Versa-Tether15
®
(Top Anchorage
Strap) - in pouch
Harness Yoke16
Forward-Facing Lock-Off21
Forward-Facing Belt Path22
Rear-Facing Belt Path23
Rear-Facing Lock-Off24
Base25
Belt Guard17
Cover18
National Safety Mark19
Shell20
IMPORTANT: When not in use, this user guide should
be stored under the cover. DO NOT discard the foam
inserts found under the cover.
Page 7
10
11
Vehicle Compatibility
DO NOT place a child seat
rear-facing in the front
seat of a vehicle with a
passenger air bag unless
deactivated. DEATH or
SERIOUS INJURY can
occur. See your vehicle
owner's manual for child
seat installation instructions. The back seat is the
safest place for children 12
and under.
WARNING!
Vehicle Compatibility
Vehicle Safety Belts
NOTE : The information in this section only applies to installation with
vehicle safety belts.
IMPORTANT: Vehicle seats and safety belts differ from vehicle to vehicle.
Refer to your vehicle owner’s manual for specific information about vehicle
safety belts and their use with child seats. Some vehicles have no seating
positions which are compatible with this child seat or any other child seat.
If in doubt, contact the vehicle manufacturer for assistance.
This child seat can fit securely in most vehicles using existing vehicle
belts. However, some vehicle designs prevent a secure fit of the
child seat.
The vehicle owner’s manual will have information on the types of
vehicle belts in your vehicle. If your belt type is listed below, select
another seating position or use the Lower Universal Anchorage
System (LUAS).
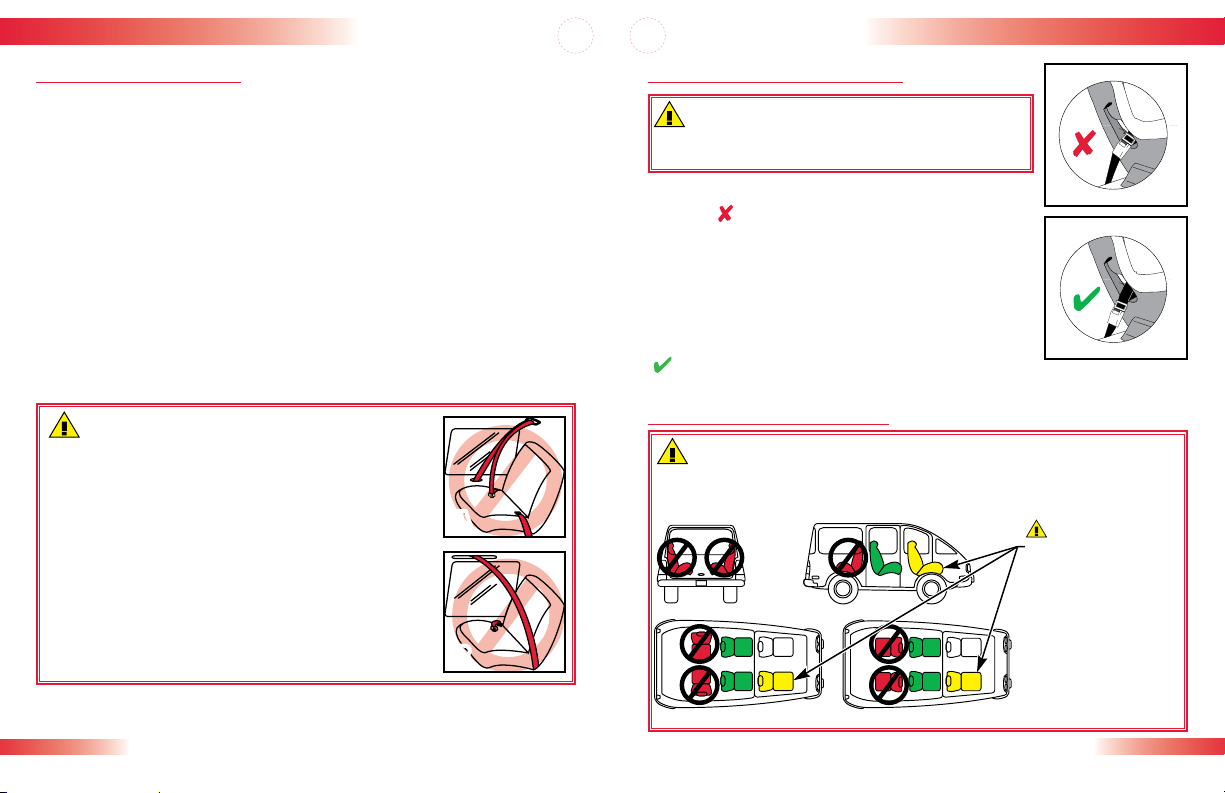
WARNING!
belts are not compatible with this child seat :
Front vehicle belts with top or bottom anchorage •
points in the door. (Fig. A & B)
Motor-driven, automatic vehicle belts. (Fig. B)•
Lap-shoulder belts that have separate retractors •
for shoulder section and lap section in which lap
section retractor does not lock.
Non-locking, two-point Emergency Locking •
Retractor (ELR) vehicle belts.
Lap-shoulder ELR vehicle belts without use of the •
lock-off.
NOTE : Refer to your vehicle owner’s manual to determine the kind of
retractors used in your vehicle and how to operate them.
The following types of vehicle
A
b
Vehicle Buckle Positions
WARNING!
buckle can adversely affect the stability of the
child seat.
If the buckle lies near the position marked
wrong ( ) when the vehicle belt is tightened,
try fitting the child seat in another seating
position in the vehicle OR consult your vehicle
owner’s manual to see if you can lower the
vehicle buckle position by twisting the vehicle
buckle stalk.
If it is not possible to achieve the correct position
( ) for the buckle, then another seating position
MUST be used.
Vehicle Seating Positions
WARNING!
this child seat. Side-facing or rear-facing seats CANNOT be used.
See diagram below.
The position of the vehicle belt
Forward-facing vehicle seats MUST be used with
Page 8
12
13
Installation : Rear-facing
30–45º
0º
90º
Installation : Rear-facing
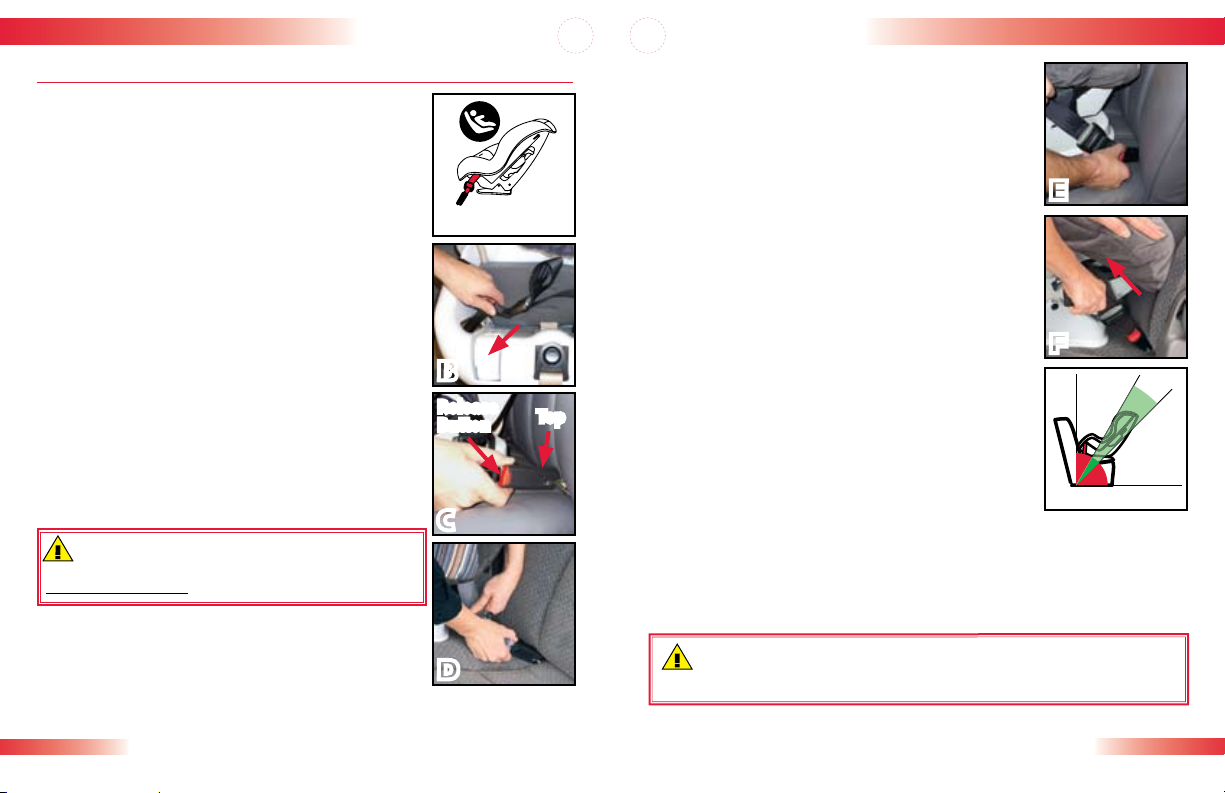
Lower Universal Anchorage System (LUAS) Installation
Figure A illustrates a typical rear-facing LUAS •
installation.
Verify that your vehicle is equipped with LUAS anchors. •
If LUAS anchors are not available, you must use vehicle
belt installation methods.
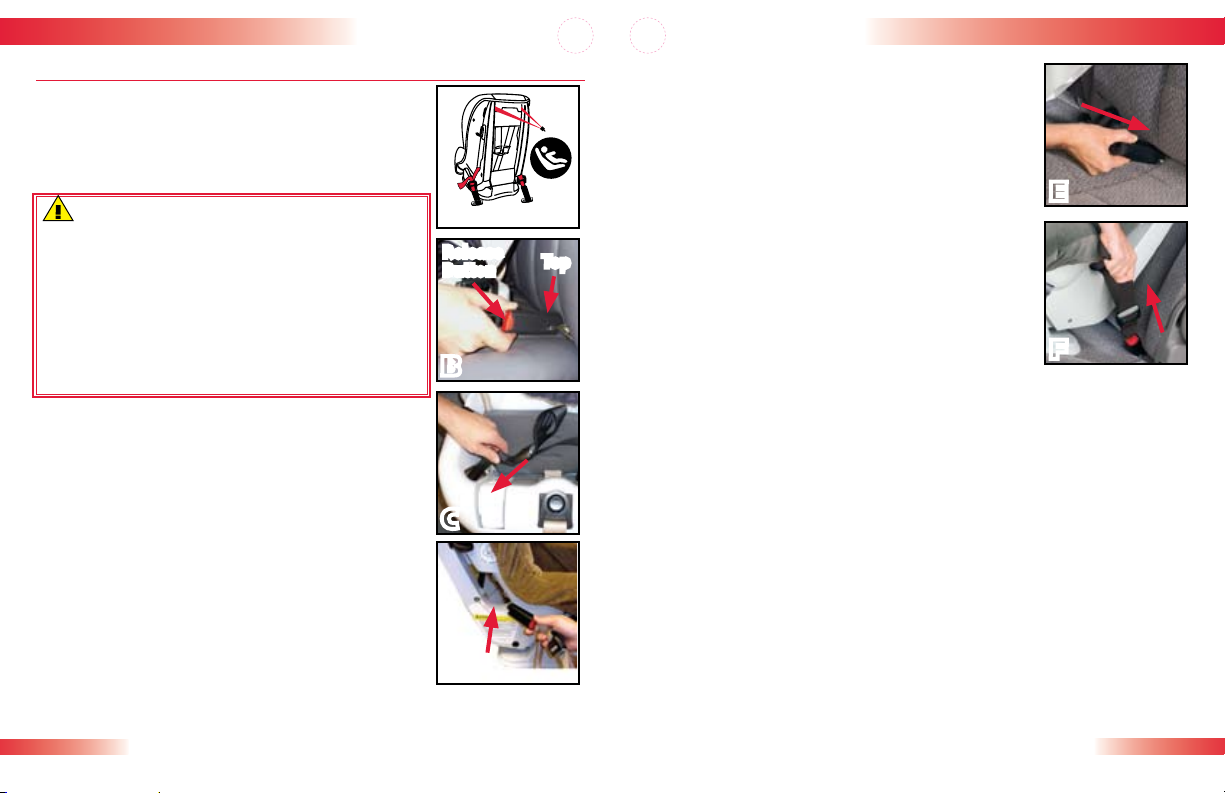
If stored, remove the LCS strap and connectors 1
from the storage slots under the cover. See
page 28.
Press and hold one LCS adjuster release button, 2
then pull to extend LCS strap to full length.
Repeat on the other end of the strap
IMPORTANT:
Check that the LCS connector strap is tight and not •
twisted, and that the LCS connectors are in an upright
position (Fig. C) to ensure proper installation.
The LCS strap must rest behind the child seat buckle •
strap.
Thread each LCS connector through the 3
adjacent rear-facing belt slot (Fig. B).
Fully recline the child seat and place it sideways 4
on the vehicle seat with the front facing toward
you.
WARNING!
recline position when installed rear-facing. See
Recline Adjustment on page 29.
This child seat must be in the
Verify that the LCS straps are not twisted and 5
attach the closest LCS connector to the vehicle
seat to the farthest LUAS anchor (Fig. D).
Rotate the child seat into the rear-facing 6
position.
A
Rear-facing
b
Release
Button
c
d
Top
Verify that the LCS strap is not twisted and 7
attach the remaining LCS connector to the
adjacent LUAS anchor (Fig. E).
NOTE : It may be necessary to switch the LCS
connectors as shown on page 28 if ANY of the
following conditions exist :
LCS connector is not in an upright position (Fig. C).•
LCS strap is twisted.•
A positive click is NOT heard when the LCS connector •
connects to the LUAS anchor.
e
NOTE : If a positive click is not heard, but the LCS
connector is in an upright position, you should not
switch the LCS connectors. The strap may be too
tight or twisted, or there may be debris in the LCS
connector.
f
Push the child seat firmly into the vehicle 8
seat while pulling the LCS adjuster strap tight
(Fig. F).
Verify all connections are secure and that the 9
child seat is stable.
The child seat is secure when it cannot be moved •
more than 2.5 cm (1 inch) front-to-back or side-toside at the belt path. If the child seat is not secure,
repeat the procedure or use an alternate seating location.
When properly installed in the rear-facing position, the back angle of the child •
seat should be 30º – 45º from vertical (not to exceed 45º) when the car is parked
on a level surface (Fig. G).
If necessary, the proper recline angle can be achieved by placing a rolled towel •
or pool noodle in the crease of the vehicle seat to level the child seat’s base.
WARNING!
vehicle seat. This could cause your child seat not to perform as
intended.
Rear-facing installation can be improved by the use of the Versa-Tether.•
pages 25 – 27.
Do not raise the child seat off the front edge of the
G
See
Page 9
14
15
Installation : Rear-facing
30–45º
0º
90º
Installation : Rear-facing
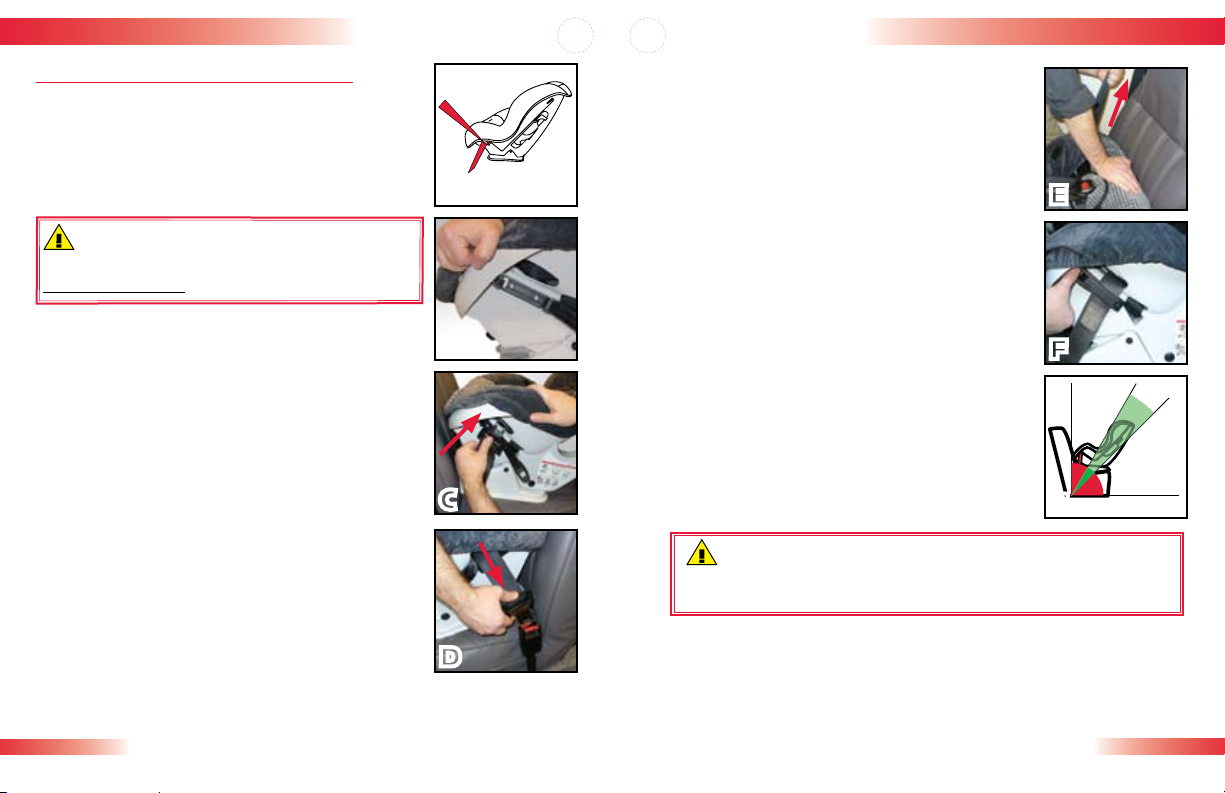
Lap-Shoulder Belt Installation
Figure A illustrates a typical rear-facing, lap-shoulder •
belt installation.
When not in use, always store LCS connectors in storage •
slots. See page 28.
Fully recline the child seat and place it rear-1
facing on the vehicle seat.
WARNING!
recline position when installed rear-facing. See
Recline Adjustment on page 29.
Lift the child seat cover and open the rear-2
facing lock-off farthest from where the vehicle
belt will be buckled (Fig. B).
Pull the vehicle belt out then pass it through 3
the rear-facing belt slot (Fig. C).
Vehicle belt can be routed over or under the cover.•
Route the vehicle belt across the child seat then 4
through the opposite rear-facing belt slot.
IMPORTANT: The vehicle belt must rest behind
the child seat buckle strap.
Verify that the vehicle belt is not twisted, 5
position the lap belt portion through the open
lock-off, then buckle (Fig. D).
Push the child seat firmly into the vehicle seat 6
while removing slack first from lap portion of
the vehicle belt, then from the shoulder portion
(Fig. E).
Position the shoulder portion of the vehicle belt 7
through the open lock-off, tighten belt, close the lock-off arm (Fig.
F), and replace the cover.
A
This child seat must be in the
b
c
d
Rear-facing
The lock-off is properly closed when a positive click •
is heard.
To prevent breakage, never extend the lock-off arm •
beyond its normal open position and always keep
the lock-off closed when not in use.
If your vehicle is equipped with an automatic locking •
retractor (ALR), use of the lock-offs is not required
as long as the ALR is locked. Check your vehicle
owner’s manual to determine what type of retractor
your vehicle has and how to lock the retractor.
e
Verify that the vehicle belt is tight and that the 8
child seat is secure.
The child seat is secure when it cannot be moved •
more than 2.5 cm (1 inch) front-to-back or side-toside at the belt path. If the child seat is not secure,
repeat the procedure or use an alternate seating
location.
When properly installed in the rear-facing position, •
the back angle of the child seat should be 30º – 45º
from vertical (not to exceed 45º) when the car is
parked on a level surface (Fig. G).
If necessary, the proper recline angle can be achieved •
by placing a rolled towel or pool noodle in the crease
of the vehicle seat to level the child seat’s base.
WARNING!
of the vehicle seat. This could cause your child seat not to perform
as intended.
Rear-facing installation can be improved by the use of the Versa-Tether.•
See pages 25 – 27.
Do not raise the child seat off the front edge
f
G
Page 10
16
17
Installation : Rear-facing
30–45º
0º
90º
Rear-Facing
Installation : Rear-facing
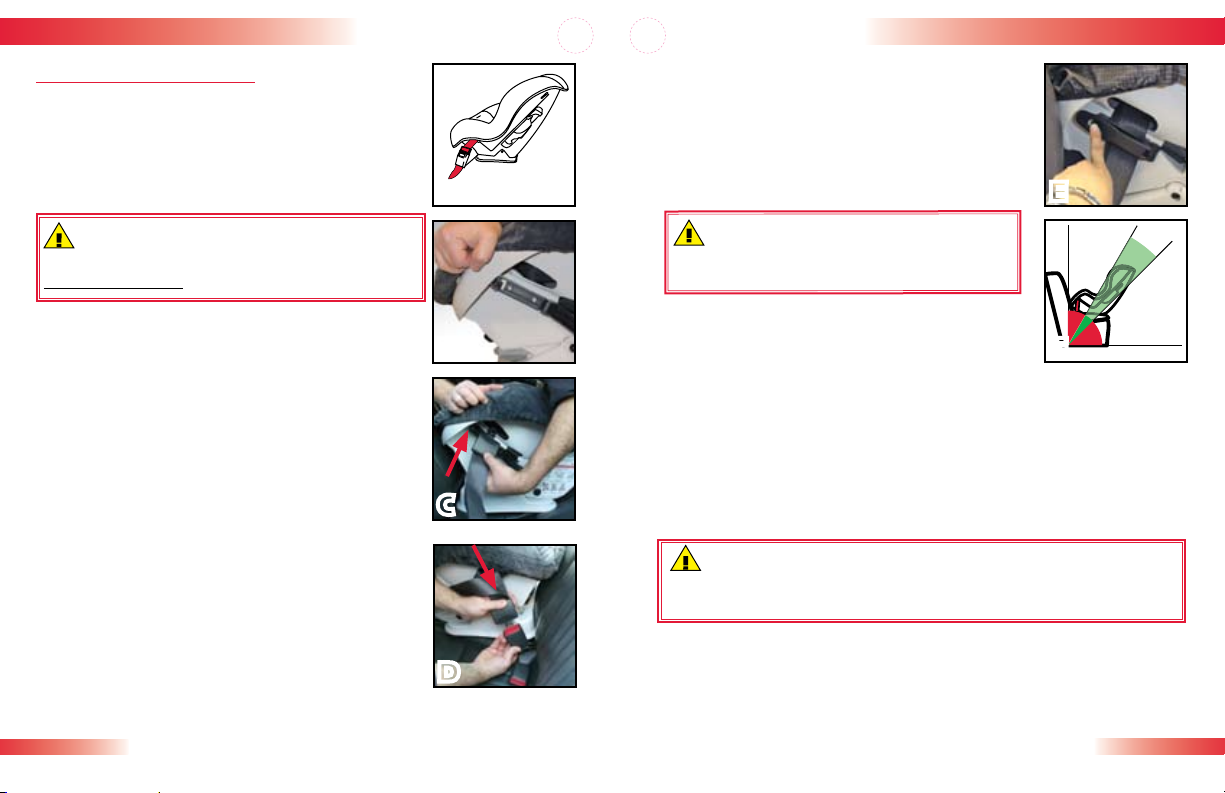
Lap-Belt Installation
Figure A illustrates a typical rear-facing, lap-belt •
installation.
When not in use, always store the LCS connectors in •
storage slots. See page 28.
Fully recline the child seat and place it rear-1
facing on the vehicle seat.
WARNING!
recline position when installed rear-facing. See
Recline Adjustment on page 29.
Lift the child seat cover and open rear-facing 2
lock-off farthest from where the vehicle belt
will be buckled (Fig. B).
Pull the vehicle belt out and pass it through 3
the rear-facing belt slot (Fig. C).
The vehicle belt can be routed over or under the child •
seat cover.
Route the vehicle belt across the child seat then 4
through the opposite rear-facing belt slot.
IMPORTANT: The vehicle belt must rest behind
the child seat buckle strap.
Verify that the vehicle belt is not twisted, 5
position belt through the open lock-off, then
buckle (Fig. D).
Push the child seat firmly into the vehicle seat 6
while removing slack from the vehicle belt.
Tighten the belt, close the lock-off arm (Fig. 7
F), and replace the cover.
The lock-off is properly closed when a positive click is heard.•
This child seat must be in the
Rear-facing
A
b
c
d
To prevent breakage, never extend the lock-off arm •
beyond its normal open position and always keep
lock-off closed when not in use.
If your vehicle is equipped with an automatic locking •
retractor (ALR), use of the lock-offs is not required as
long as the ALR is locked. Check your vehicle owner’s
manual to determine the type of retractor your vehicle
has and how to lock the retractor.
WARNING!
a non-locking, two-point Emergency Locking
Retractor (ELR) vehicle belt.
Do not use this seat with
e
Verify that the vehicle belt is tight, locked, 8
and that the child seat is secure.
The child seat is secure when it cannot be •
moved more than 2.5 cm (1 inch) frontto-back or side-to-side at the belt path. If the child seat is not
secure, repeat the procedure or use an alternate seating location.
When properly installed in the rear-facing position, the back angle of the •
child seat should be 30º – 45º from vertical (not to exceed 45º) when the
car is parked on a level surface (Fig. F).
If necessary, the proper recline angle can be achieved by placing a rolled •
towel or pool noodle in the crease of the vehicle seat to level the child
seat’s base.
WARNING!
the vehicle seat. This could cause your child seat not to perform as
intended.
Rear-facing installation can be improved by the use of the Versa-Tether.•
See pages 25 – 27.
Do not raise the child seat off the front edge of
f
Page 11
18
19
Installation : Forward-Facing Installation : Forward-Facing
Lower Universal Anchorage System (LUAS) Installation
Figure A illustrates a typical forward-facing LUAS •
installation.
Verify that your vehicle is equipped with LUAS •
anchors. If LUAS anchors are not available, you must
use vehicle
WARNING!
This child seat must NOT be used forward-•
facing for children less than one year of age OR
who weigh less than 9.1 kg (20 lbs).
This child seat must be in full upright position •
when installed forward-facing.
Always use the Versa-Tether when the child seat •
is installed forward-facing. Check your vehicle
owner’s manual for approved tether anchor
locations.
IMPORTANT: Check that the LCS connector strap is
tight and not twisted, and that the LCS connectors
are in an upright position (Fig. B) to ensure proper
installation.
Remove the LCS connectors from storage slots 1
under the cover. See page 28. Pull both LCS
connectors completely through the child seat’s
right-side, rear-facing belt slot (Fig. C) so they
are on the outside of the shell.
NOTE : Child seat is assembled in rear-facing
mode.
Press and hold one LCS adjuster release button, 2
then pull to extend the LCS strap to full length.
Repeat on the other end of the strap.
Thread the appropriate LCS connector through 3
the forward-facing belt path (Fig. D) at the back of the child seat.
belt installation methods.
A
Forward-facing
Release
Button
b
c
d
Top
Place the child seat sideways in the upright 4
position on the vehicle seat with the back of the
child seat facing you.
Remove the Versa-Tether from the pouch and 5
place up and over the child seat back.
Verify that the LCS strap is not twisted and attach 6
the closest LCS connector to the vehicle seat back
to the farthest LUAS anchor (Fig. B).
A positive click confirms attachment.•
NOTE : It may be necessary to switch LCS connectors
as shown on page 28 if ANY of the following
conditions exist :
LCS connector is not in an upright position (Fig. D).•
LCS strap is twisted.•
A positive click is NOT heard when the LCS connector •
connects to the LUAS anchor.
NOTE : If a positive click is not heard, but the LCS
connector is in an upright position, you should not switch the LCS connector. The
strap may be too tight or twisted, or there may be debris in the LCS connector
Rotate the child seat into the forward-facing position. 7
Verify that the LCS strap is not twisted and attach the remaining LCS 8
connector to the adjacent LUAS anchor (Fig. D).
A positive click confirms attachment• .
Push the child seat into the vehicle seat while pulling the LCS adjuster 9
strap tight (Fig. F). Ensure the bottom of the child seat base is in full
contact with the vehicle seat.
Attach the Versa-Tether10
chosen seating position. Remove all slack from the tether to secure. Store
any excess webbing in the tether pouch. See pages 25 – 27.
Verify all connections are secure and that the child seat is stable. 11
The child seat is secure when it cannot be moved front-to-back or side-to-side •
more than 2.5 cm (1 inch) at the belt path. If the child seat is not secure, repeat
the procedure or use an alternate seating location.
®
hook to the designated tether anchor for the
e
f
.
Page 12
20
21
Installation : Forward-Facing Installation : Forward-Facing
Lap-Shoulder Belt Installation
Figure A illustrates a typical forward-facing lap-•
shoulder belt installation.
When not in use, always store LCS connectors in •
storage slots. See page 28.
A
WARNING!
This child seat must NOT be used forward-•
facing for children less than one year of age OR
who weigh less than 9.1 kg (20 lbs).
This child seat must be in full upright position •
when installed forward-facing.
Always use the Versa-Tether when the child seat •
is installed forward-facing. Check your vehicle
owner’s manual for approved tether anchor
locations.
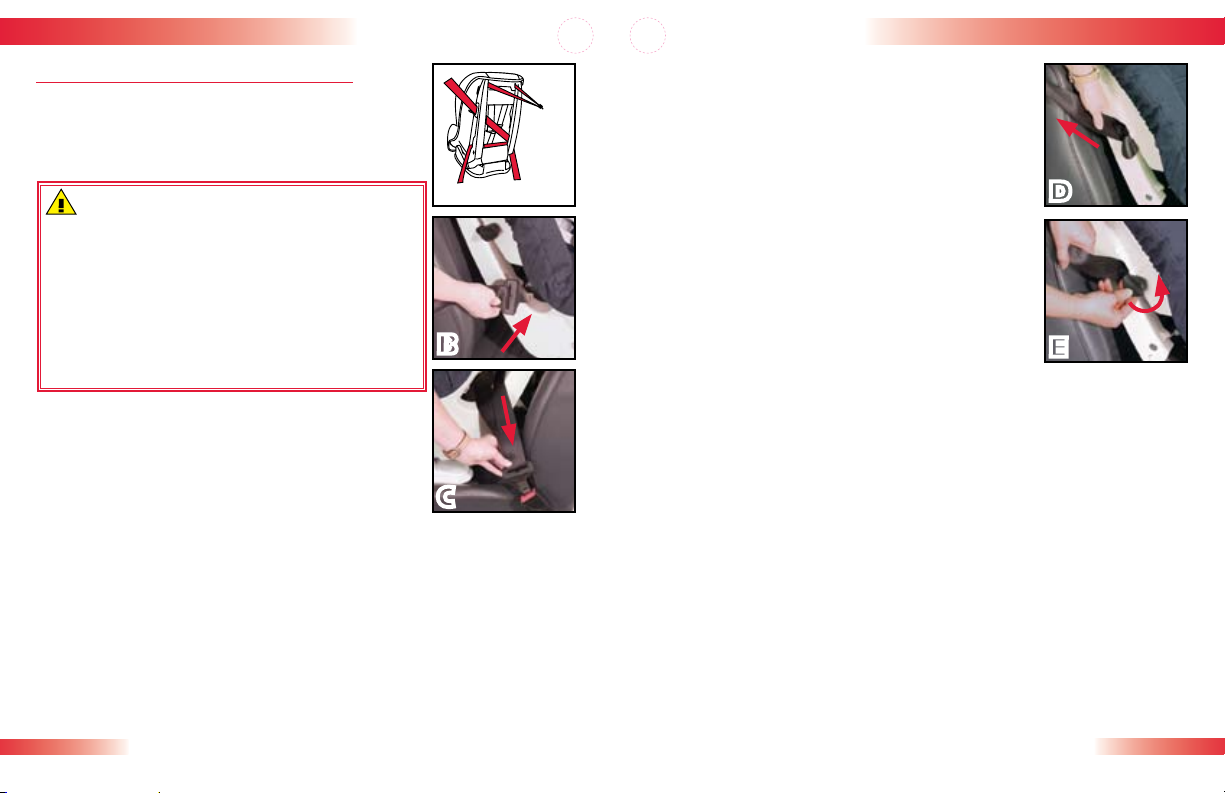
Place the child seat forward-facing on the 1
vehicle seat. Ensure the bottom of the child seat
base is in full contact with the vehicle seat.
Remove the Versa-Tether from the pouch 2
and place it up and over the child seat back.
Pull the vehicle belt out then pass it through the forward-facing 3
belt path to the opposite side of the child seat (Fig. B).
Verify that the vehicle belt is not twisted, then buckle (Fig. C).4
Rotate lever downward to open the forward-facing lock-off 5
farthest from where the vehicle belt is buckled.
Push the child seat firmly into the vehicle seat while first 6
removing slack from the lap portion of the vehicle belt and then
the shoulder portion (Fig. D).
Forward-facing
b
c
Hold the shoulder belt tight and rotate 7
the lock-off until the vehicle belt is secured
(Fig. E).
If your vehicle is equipped with an automatic locking •
retractor (ALR), use of the lock-offs is not required
as long as the ALR is locked. Check your vehicle
owner’s manual to determine what type of retractor
your vehicle has, and how to lock the retractor.
Attach the Versa-Tether8
®
hook to the
d
designated tether anchor for the chosen
seating position. Remove all slack from the
tether to secure. Store excess webbing in the
tether pouch. See pages 25 – 27.
Verify that the vehicle belt is tight and that 9
the child seat is secure.
The child seat is secure when it cannot be moved front-to-back or side-•
to-side more than 2.5 cm (1 inch) at the belt path. If the child seat is not
secure, repeat the procedure or use an alternate seating location.
e
Page 13

22
23
Installation : Forward-Facing Installation : Forward-Facing
Lap-Belt Installation
Figure A illustrates a typical forward-facing, lap-•
belt installation.
When not in use, always store the LCS connectors •
in storage slots. See page 28.
WARNING!
This child seat must NOT be used forward-•
facing for children less than one year of age
OR who weigh less than 9.1 kg (20 lbs).
This child seat must be in full upright position •
when installed forward-facing.
Always use the Versa-Tether when the child •
seat is installed forward-facing. Check your
vehicle owner’s manual for approved tether
anchor locations.
Place the child seat forward-facing on the 1
vehicle seat. Ensure the bottom of the child
seat base is in full contact with the vehicle
seat.
Remove the Versa-Tether from the pouch 2
and place it up and over the child seat back.
Pull the vehicle belt out, then pass it through the forward-facing 3
belt path to the opposite side of the child seat (Fig. B).
Verify that the vehicle belt is not twisted, then buckle (Fig. C).4
Push the child seat firmly into vehicle seat while tightening the 5
vehicle belt.
A
b
c
Forward-facing
Attach the Versa-Tether6
®
hook to the designated tether anchor
for the chosen seating position. Remove all slack from the
tether to secure. Store excess webbing in the tether pouch. See
pages 25 – 27.
Verify that the vehicle belt is tight, locked, and child seat is 7
secure.
The child seat is secure when it cannot be moved front-to-back or side-•
to-side more than 2.5 cm (1 inch) at the belt path. If the child seat is not
secure, repeat the procedure or use an alternate seating location.
Page 14

24
25
Aircraft Installation
Installation : Versa-Tether
®
This child seat is certified for aircraft use. Most
airlines in Canada and the U.S. will allow use of
a child seat as long as it is labeled as an approved
child seat for airline use and fits properly on the
aircraft seat. Contact the airline about their
policy prior to traveling.
Install your child seat in a window seat to
avoid blocking the aisle.
If the aircraft lap belt is too short, ask the
flight attendant for a belt extender.
Rear-Facing Installation
For rear-facing aircraft installation (Fig. A),
follow Rear-Facing Lap-Belt Installation
instructions on pages 16 – 17.
Forward-Facing Installation
For forward-facing aircraft installation
(Fig. B), follow Forward-Facing Lap-Belt
Installation instructions on pages 22 – 23.
Rear-facing
A
Forward-facing
b
Safety Information
WARNING!
When using the child seat in forward-facing mode, attach the Versa-•
only to tether anchors designated by the vehicle manufacturer
Tether
as tether anchorage points. Use of other locations is not approved or
permitted.
DO NOT modify the vehicle without advice from the vehicle •
manufacturer if a tether anchorage is not available.
IMPORTANT:
If your vehicle does not currently have a tether anchor •
attachment, refer to your vehicle owner’s manual or contact the
vehicle manufacturer for assistance.
For vehicles manufactured January 1989 through August 2000 •
equipped with vehicle manufacturer designated tether anchorage
locations consisting of a hole or threaded hole, tether anchorage
hardware is available upon request – at no cost – by contacting
Britax Consumer Services at 1-888-427-4829.
Page 15

26
27
Installation : Versa-Tether
OR
OR
®
Installation : Versa-Tether
®
®
Consult your vehicle owner’s manual for 1
designated tether anchorage locations.
Locate the tether on the rear of the 2
child seat and remove the tether from
the pouch.
Place the tether up and over the child 3
seat back.
Install the child seat using the LUAS 4
or the vehicle belts according to the
instructions in this manual.
Tilt the tether release tab ; then pull to 5
fully extend the tether strap into a “V”
shape.
Locate the hook on the strap and 6
loosely attach the tether to the vehicle’s
designated tether anchor.
See figure A for forward-facing installation.•
See figures B and C for rear-facing •
installations.
Secure the child seat by a vehicle seat 7
belt OR with the LCS connectors.
Pull the tether adjuster strap to remove 8
all slack. Roll up excess webbing and
store in tether pouch.
Verify there is tension in the tether 9
strap and that the child seat is properly
secured.
The child seat is secure when it cannot be moved front-to-back or side-to-•
side more than 2.5 cm (1 inch) at the belt path.
A
b
c
Tether Connector StrapUsing the Versa-Tether
WARNING!
facing tether installation.
Because every vehicle model is different,
sometimes you cannot find a location to
properly anchor the tether. Use the tether
connector strap to assist in creating an
anchor point (Fig. D).
Find a fixed vehicle anchor point that is 1
bolted to the floor.
If you cannot find an acceptable location to •
create an anchor point, contact the vehicle
manufacturer to identify a suitable tether connection point.
Route the strap around the fixed vehicle anchor point.2
Take the metal D-ring and thread it through the webbing loop 3
on the other end of the strap (Fig. D).
Pull the metal D-ring all the way through until the strap is 4
tight.
Use the D-ring as an attachment point for the hook on the 5
tether strap.
NOTE : Store the tether connector strap in the tether pouch when not
in use.
Only use tether connector strap for rear-
d
Page 16

28
29
Child Seat Functions
Child Seat Functions
Switching the Lower Connector System (LCS)
The LCS strap may need to be switched to the proper
belt path in rear-facing (Fig. A) versus forward-facing
(Fig. B) installations. If a proper connection of the LCS
connectors to the LUAS anchors cannot be achieved,
complete the following procedure to switch the
connectors.
Lift the front of the child seat cover to access the 1
LCS connectors.
Pass the LCS connector strap through the belt 2
path on the child’s right side (Fig. C).
Pass one LCS connector through the appropriate 3
belt path ensuring that the larger part of the
connector is on top for the installation procedure
you wish to use (Fig D).
Verify that the harness is not twisted.•
IMPORTANT: When installing this child seat in rearfacing mode, the LCS strap must rest behind the
child seat buckle strap.
NOTE: To ensure LCS connector is properly aligned
with vehicle’s LUAS anchor, the connector’s red
release button should face away from vehicle seat
back, and the larger of the two connector sections is
on top (Fig. D).
Replace the cover and continue with the installation 4
procedure.
Storing the LCS Connectors
When the LCS connectors are not in use, lift the
child seat cover to access LCS storage slots (Fig. E).
Fold each end of the LCS strap and slide each LCS
connector into the adjacent slots.
NOTE : Child seats are shipped from Britax with LCS
connectors in the storage slots.
A
Rear-facing
A
Forward-facing
c
Release
Button
d
Top
Recline Adjustment
Pull the recline handle then slide the child seat shell into
the desired position. (Fig. F) Release the recline handle
and verify the child seat has locked into position.
WARNING!
This child seat must be in the recline position when •
installed rear-facing.
Child seat must be in. full upright position when •
installed forward-facing
.
e
NOTE : It will be necessary to loosen the tether,
vehicle seat belt, and/or LCS strap before adjusting
the recline position. The tether, vehicle seat belt,
and/or LCS strap must be properly re-tightened after
adjusting the recline position.
f
Chest Clip
Fastening the Chest Clip
Fasten the chest clip by pushing the two halves
together until a positive click is heard.
Releasing the Chest Clip
Squeeze the middle tab together. 1
Pull apart the two pieces (Fig. G).2
G
Adjusting the Chest Clip
Slide chest clip up or down on harness so it is
positioned at the middle of the child’s chest, level with
the child’s armpits (Fig. H).
h
Page 17

30
31
Child Seat Functions
x 2
Child Seat Functions
Harness Buckle
Fastening the Harness Buckle
Hold the harness buckle with one hand.1
Use the other hand to insert one buckle 2
tongue at a time into the harness buckle
(Fig. A).
A proper connection is confirmed with a positive •
click after inserting each buckle tongue.
Releasing the Harness Buckle
Brace the rear of the harness buckle with 1
one hand.
Use your thumb to press the release button 2
and slide both buckle tongues to remove
from the buckle (Fig. B).
IMPORTANT: Periodically clean the harness buckle to ensure safe
operation. See page 36.
A
b
How to Adjust Harness Slot Height
IMPORTANT: See Important Harness Adjustments
on pages 6 – 7 for important instructions on proper
harness fit based on your child’s height and weight.
Loosen the harness by pressing the harness-1
adjuster release button while pulling the harness
straps forward as far as possible (Fig. C).
From the rear of the child seat, unhook the 2
harness straps from the harness yoke (Fig. D).
Pull upper harness straps through the shell, foam, 3
and cover to the front of the child seat.
Thread the harness straps through the appropriate 4
harness slots in the cover, foam, and child seat
shell (Fig. E).
Reattach harness straps to the harness yoke (Fig. 5
D).
Pull harness adjuster strap to tighten the harness.6
Verify all harness straps are threaded at the same 7
height and are not twisted.
Securing Your Child
Loosen the harness by pressing the harness adjuster 1
release button located on the front of the child
seat, then pull the harness straps forward (Fig. C).
Release the chest clip by squeezing the tabs and 2
sliding pieces apart (Fig. F).
Unfasten the harness buckle by pressing the release 3
button and sliding the tongues out.
Move the harness straps to the side of the child 4
seat.
Use the harness holder located on the straps and side of the cover to aid •
in holding the straps.
Place child in the child seat.5
c
d
e
f
Page 18

32
33
Child Seat Functions
Care and Maintenance
Position harness straps around the child and fasten 6
the harness buckle (Fig. A) and chest clip (Fig. B).
Proper connection of the harness buckle is confirmed •
with a positive click after inserting each buckle
tongue.
If the buckle will not fasten with a positive click after •
inserting each buckle tongue, the harness buckle or
adjuster area may be clogged with food, drink or
other debris that needs to be removed. See page 36
for cleaning instructions.
IMPORTANT: Gently pull up on the harness straps
to tighten lap section of the harness which should fit
across the child’s upper thighs.
Slowly pull the adjuster strap to tighten the 7
harness around the child (Fig. C).
Position the chest clip at the middle of the child’s 8
chest, level with the armpits (Fig. D).
Verify that harness is not twisted and child is 9
properly secured.
IMPORTANT:
Always pull on the harness after securing the child to •
ensure the buckle tongues are secure in the harness
buckle.
Adjust the belts provided with this child seat so they •
fit snugly around your child. A snug strap should not
allow any slack. It lies in a relatively straight line
without sagging. It does not press on the child’s flesh
or push the child’s body into an unnatural position.
The harness should have a comfortable but snug fit
around the child. You should not be able to pinch
excess webbing at the shoulder once the harness is
properly secured.
A
b
c
d
Child Seat Cover Removal
WARNING!
the buckle tongues from the harness. They cannot be reattached
after removal. If reassembled incorrectly, the child seat may not
perform as intended.
Loosen the harness by pressing the harness 1
adjuster release button while pulling the
harness straps forward as far as possible.
Unhook the harness straps from the harness 2
yoke on rear of child seat (Fig. E).
Pull the upper harness straps through the 3
shell and cover to the front of child seat.
Remove the harness buckle and belly pad by 4
turning the metal buckle strap retainer of the
harness buckle on the underside of the child
seat so the short side will slide through the
child seat shell (Fig. F).
Gently remove the upper portion of the 5
cover. Be careful not to damage the energyabsorbing foam.
Push the metal buckle strap retainer through the slots in the 6
shell and cover to the top of the child seat.
Pull the lower harness straps, buckle tongues, and chest clip 7
through lower slots in cover.
Remove the entire cover from child seat.8
Do not take apart the harness. Never remove
e
f
Page 19

34
35
Care and Maintenance Care and Maintenance
Refitting the Cover
To refit the cover, reverse the previous directions. Make sure the
harness straps are properly threaded through the chest clips and
the harness is not twisted.
Cleaning the Cover
HAND WASH using cold water and mild soap.•
LINE or LIE-FLAT DRY to prevent the cover from shrinking.•
DO NOT• bleach, machine wash, machine dry or iron.
Cleaning the Shell
SPONGE CLEAN using warm water and mild soap.•
TOWEL DRY•
DO NOT• use solvents, abrasive cleaners or disassemble the
harness.
Cleaning the Harness
SPONGE CLEAN using warm water and mild soap.•
TOWEL DRY•
DO NOT• bleach, machine wash, machine dry or disassemble
the harness.
Harness Buckle Removal
Fully recline the child seat.1
Locate the metal buckle strap retainer 2
on the bottom of the child seat.
Pull the retainer away from the child 3
seat to loosen.
Turn the retainer so the short side will 4
go through the slot in the child seat shell
(Fig. A).
Push the retainer through the slots in the shell and cover to the 5
top of the child seat.
A
Re-threading the Harness Buckle
Locate the slot in the cover and shell for the harness buckle.1
Turn the metal buckle strap retainer so the short side will go 2
through the slot in the cover and the child seat shell (Fig A).
Push the retainer through the slots in the shell and cover, to the 3
bottom of the child seat.
Pull the harness buckle away from the child seat until tight and 4
verify the harness buckle strap is not twisted and the release
button is facing outward.
Page 20

36
37
Care and Maintenance
x 2
Warranty
Cleaning the Harness Buckle
If a child eats and drinks while in the child seat,
the harness buckle may need to be periodically
checked and cleaned of any accumulated food,
drink, debris or dried liquids.
REMOVE THE BUCKLE as described on page •
35.
THOROUGHLY RINSE using warm water •
(Fig. A).
TEST THE HARNESS BUCKLE by fastening •
(Fig. B) and unfastening (Fig. C) until a
positive click is heard after inserting each
buckle tongue. If either click is not heard,
repeat cleaning procedure.
TOWEL DRY•
DO NOT• lubricate, use solvents, abrasive
cleaners, soap or other household detergents.
A
b
c
This child seat was manufactured by Britax Child Safety, Inc. Britax® warrants this product
to the original retail purchaser as follows :
LIMITED ONE-YEAR WARRANTY
This product is warranted against defective materials or workmanship for one year from
the date of original purchase. Proof of purchase is required. The exclusive remedy for this
warranty is that Britax will, at its option, provide repair or replacement components for
this product or refund the original purchase price of the product. Britax reserves the right
to discontinue or change fabrics, parts, models or products, or to make substitutions.
To make a claim under this warranty, contact Britax Consumer Services at
1-888-427-4829 or write to us at Britax Child Safety, Ltd., P.O. Box 7289, RPO Brunswick
Square, Saint John NB E2L 9Z9. Proof of purchase is required.
PLEASE COMPLETE AND MAIL THE OWNER REGISTRATION CARD WITHIN (30)
DAYS OF PURCHASE OR VISIT WWW.BRITAXUSA.COM/REGISTRATION.
WARRANTY LIMITATIONS
This warranty does not include damages which arise from negligence, misuse or use not
in accordance with the product instruction.
The use of non-Britax Child Safety, Inc., covers, inserts, toys, accessories, or tightening
devices is not approved by Britax. Their use could cause this child seat to fail Canadian
Motor Vehicle Safety Standards or not perform as intended in a crash. Their use
automatically voids the Britax warranty.
LIMITATION OF DAMAGES
The warranty and remedies as set forth above are exclusive and in lieu of all others, oral
or written, express or implied. In no event will Britax, or the retailer selling this product,
be liable for any damages, including incidental or consequential damages, arising out of
the use or inability to use this product.
LIMITATIONS OF WARRANTIES AND OTHER WARRANTY TERMS AND PROVINCIAL
LAWS
Any implied warranties, including implied warranties of merchantability and fitness for
a particular purpose, shall be limited to the duration and terms of the express written
warranty. Some provinces do not allow limitations on how long an implied warranty
lasts or the exclusion or limitation of incidental or consequential damages, so the above
limitations may not apply. This warranty gives you specific legal rights, and you may have
other rights, which vary from province to province. Neither Britax, nor the retailer selling
this product, authorizes any person to create for it any other warranty, obligation, or
liability in connection with this product.
Page 21

39
Table des matières
Consignes de sécurité
Mises en garde .............................................................................................40
Remarques importantes ...............................................................................42
Homologation ..............................................................................................43
Enregistrement .............................................................................................43
Important réglage du harnais .......................................................................44
Caractéristiques du siège d'auto ......................................................................46
Compatibilité des véhicules
Ceintures de sécurité du véhicule .................................................................48
Positions de la boucle de ceinture du véhicule .............................................49
Positions assises du véhicule .........................................................................49
Installation : siège orienté face à l'arrière
Installation du système d'ancrage universel au bas (LUAS) ..........................50
Installation de la ceinture à trois points d'appui ...........................................52
Installation de la ceinture sous-abdominale .................................................54
Installation : siège orienté face à l'avant
Installation du système d'ancrage universel au bas (LUAS) ..........................56
Installation de la ceinture à trois points d'appui ...........................................58
Installation de la ceinture sous-abdominale .................................................60
Installation dans un avion ................................................................................62
Installation : sangle Versa-Tether
Consignes de sécurité ...................................................................................63
Utilisation de la sangle Versa-Tether
®
®
...........................................................64
Sangle de connexion d'attache ....................................................................65
Fonctions du siège d'auto
Interversion du système à connecteur bas (LCS) ....................................................66
Rangement des connecteurs LCS ...........................................................................67
Réglage de l'inclinaison ................................................................................67
Attache de poitrine .......................................................................................67
Boucle du harnais .........................................................................................68
Comment régler la hauteur des fentes du harnais ........................................69
Installation de l'enfant en toute sécurité.......................................................69
Soins et entretien .............................................................................................71
Garantie ............................................................................................................75
©2008 Britax Child Safety, Inc. Tous droits réservés. Imprimé aux États-Unis P319000
R1 :02.08 Ce produit et ses composants sont sujets à modification sans préavis.
Page 22

40
41
MISE EN GARDE !
LA MORT ou DES BLESSURES GRAVES peuvent survenir si l'on ne
se conforme pas au contenu des rubriques suivantes :
Utiliser uniquement avec des enfants dont le poids se situe entre 2,3 et •
18,1 kg (5 et 40 lb) et dont la taille se situe entre 55,9 et 101,6 cm (22
et 40 po).
Utiliser les sièges orientés face à l'arrière pour les enfants dont le poids se •
situe entre 2,3 et 13,6 kg (5 et 30 lb) et dont la taille se situe entre 55,9 et
76,2 cm (22 et 30 po).
Utiliser les sièges orientés face à l'avant pour les enfants dont le poids se •
situe entre 9,1 et 18,1 kg (20 et 40 lb) et dont la taille se situe entre 68,6
et 101,6 cm. (27 et 40 po).
Ce siège d'auto doit être en position inclinée lorsqu'il est orienté face à •
l'arrière. Ce siège d'auto doit être en position verticale lorsqu'il est orienté
face à l'avant.
Régler les sangles fournies avec ce siège d'auto pour qu'elles soient bien •
ajustées autour de l'enfant. Une sangle bien ajustée ne devrait permettre
aucun jeu. Elle suit un chemin presque rectiligne sans pendre. Elle n'appuie
pas contre la chair de l'enfant et elle ne pousse pas le corps de l'enfant dans
une position non naturelle.
Fixer la sangle d'attache du haut fournie avec ce siège d'auto.•
Le siège d’auto doit être fixé au véhicule au moyen d’un système à •
connecteur au bas s’il est installé dans une position assise avec système
d’ancrage universel au bas ou au moyen d’une ceinture de sécurité du
véhicule s’il est installé dans une position assise sans système d’ancrage
universel au bas, ainsi qu’au moyen d’une sangle d’attache, tel qu’il
est indiqué dans les instructions d’installation. L’utilisation de la sangle
d’attache est obligatoire si le siège est orienté face à l’avant et est
facultative s’il est orienté face à l’arrière.
Suivre toutes les instructions qui figurent sur ce siège d'auto ainsi que •
dans le guide de l'utilisateur.
Enregistrer le siège d'auto auprès du fabricant, Britax Child Safety, Inc., en •
visitant le site www.BritaxUSA.com/registration, OU remplir et retourner la
fiche d'enregistrement fournie avec ce siège d'auto.
Pour éviter des blessures dues à une détérioration ou à des dommages •
cachés, discontinuer l'utilisation d'un siège d'auto lorsqu'il a plus de six ans
d'existence ou qu'il a servi lors d'un accident moyen ou grave. Voir la date
de fabrication indiquée sur le siège d'auto (à la page 47).
Ce siège d'auto ne doit pas être utilisé à la maison, dans un bateau, ou dans •
d'autres conditions pour lesquelles il n'est pas homologué.
Compte tenu des statistiques sur les accidents, on recommande aux parents •
de choisir la banquette arrière comme endroit le plus sûr pour l'installation
correcte du siège d'auto. Bien examiner la section Compatibilité des véhicules
aux pages 48 et 49 afin de garantir la sécurité de l'enfant. Consulter aussi le
manuel du propriétaire du véhicule.
Bien fixer ce siège d'auto même lorsqu'il n'est pas utilisé. Lors d'un accident, •
un siège d'auto non fixé peut blesser les occupants du véhicule.
Lorsqu'on utilise le siège d'auto dans un véhicule équipé de sacs gonflables, •
consulter le manuel du propriétaire du véhicule pour connaître les instructions
d'installation du siège d'auto et les précautions à prendre.
Ne jamais utiliser la sangle de réglage pour soulever ou pour transporter •
ce siège d'auto. Cela pourrait endommager le dispositif de réglage et les
sangles du harnais. Toujours transporter ce siège d'auto par sa coquille ou
par ses sangles d'attache.
Lors d'une collision, la principale protection pour les occupants du véhicule •
est la carrosserie du véhicule. Un siège d'auto ne protégera pas un enfant
si le véhicule subit un impact grave. Toutefois, s'il est correctement installé,
un siège d'auto augmentera considérablement les chances de survie dans
la plupart des accidents. S'assurer que tous les utilisateurs comprennent
parfaitement les manières correctes d'utiliser ce siège d'auto dans un
véhicule.
Page 23

42
43
Consignes de sécurité Consignes de sécurité
Remarques importantes
Vérifier que le siège d'auto est bien fixé et que le harnais est ajusté •
correctement autour de l'enfant chaque fois qu'on utilise le siège
d'auto.
Régler le harnais pour qu'il s'ajuste bien aux vêtements portés par •
l'enfant. Retirer les vestes ou manteaux encombrants avant de placer
l'enfant dans le siège d'auto.
Couvrir le siège d'auto lorsque le véhicule est stationné directement au •
soleil. Certaines parties du siège d'auto peuvent devenir suffisamment
chaudes pour brûler un enfant.
Ranger le siège d'auto dans un endroit sûr lorsqu'il n'est pas utilisé. •
Éviter de placer des objets lourds par-dessus le siège.
Ne pas laisser des enfants seuls dans un véhicule, même pour une courte •
période de temps.
Sauf de la manière décrite dans ce livret, ne pas essayer de démonter une •
quelconque partie du siège d'auto ni de modifier la manière d'utiliser le
harnais ou les ceintures de sécurité du véhicule.
Ne pas laisser d'objets non fixés, comme des livres, des sacs, etc., dans •
la partie arrière d'un véhicule. En cas d'arrêt brusque, les objets non
fixés peuvent bouger et causer des blessures graves.
Ne pas laisser des sièges de véhicule rabattables non verrouillés. En cas •
d'arrêt brusque, un dossier de siège non fixé pourrait empêcher le siège
d'auto de fonctionner de la manière prévue.
Ne pas laisser les enfants jouer avec ce siège d'auto.•
Ne rien utiliser pour soulever le siège d'auto du siège du véhicule, sauf •
de la manière décrite dans les présentes instructions. En cas d'accident,
cela pourrait empêcher le siège d'auto de fonctionner de la manière
prévue.
Homologation
Ce siège d'auto est conforme à toutes les Normes de sécurité des véhicules
automobiles du Canada (213 et 213.1) en vigueur. Ce siège d'auto est
homologué pour l'utilisation dans les véhicules automobiles et dans les
avions.
Enregistrement
Les sièges d'auto peuvent faire l'objet de rappels pour des raisons de
sécurité. Vous devez enregistrer ce siège d'auto afin que l'on puisse vous
rejoindre en cas de rappel. Veuillez faire parvenir votre nom, votre adresse,
ainsi que le numéro de modèle et la date de fabrication du siège d'auto
à Britax Child Safety, Ltd., case postale 7289, comptoir postal Brunswick
Square, Saint-Jean NB E2L 9Z9, ou composer le 1 888 427-4829, ou vous
enregistrer en ligne à www.BritaxUSA.com/registration.
MISe eN GARde !
d'auto orienté face à l'arrière dans le siège avant d'un
véhicule équipé d'un sac gonflable pour passager à
moins que ce sac ne soit désactivé. LA MORT ou DES
BLESSURES GRAVES peuvent survenir. Consulter le
manuel du propriétaire du véhicule pour connaître les instructions
d'installation du siège d'auto. La banquette arrière est l'endroit le plus
sûr pour les enfants 12 et dessous.
NE PAS placer un siège
Page 24

44
45
Consignes de sécurité Consignes de sécurité
2,5 cm
(1 po)
Siège orienté
face à l'arrière
Face à l'avant
Important réglage du harnais
Selon l'American Academy of Pediatrics (l'Académie américaine de pédiatrie) : Tous
les bébés devraient être installés dans des sièges orientés face à l'arrière jusqu'à ce
qu'ils aient au moins un an et qu'ils atteignent un poids de 9,1 kg (20 lb). Cela
signifie que si le poids de votre bébé atteint 9,1 kg (20 lb) avant son premier
anniversaire, il devra demeurer dans un siège orienté face à l'arrière jusqu'à ce qu'il
ait un an. Il est préférable d'orienter les sièges d'auto face à l'arrière en respectant
les limites de taille et de poids autorisées par le fabricant.
Siège orienté face à l'arrière
Poids entre 2,3 et 13,6 kg (5 et 30 lb).
Utiliser les sièges orientés face à l'arrière uniquement
pour les enfants :
dont le• poids se situe entre 2,3 et 13,6 kg (5 et 30 lb) et
dont la taille se situe entre 55,9 cm et 76,2 cm (22 et •
30 po) et
quand le haut de la tête de l'enfant est à 2,5 cm (1 po) •
ou plus au-dessous de la partie supérieure de la coquille du siège (figure A) et
quand les sangles du harnais sont situées dans les fentes, à la hauteur ou au-dessous •
des épaules de l'enfant (figure A)
Si l'enfant ne peut être installé sans danger en fonction de ces exigences parce
qu'il est plus grand ou plus lourd, examiner les directives à l'égard des sièges
qui font face à l'avant à la page 45.
Si l'enfant ne peut être installé dans son siège de façon sécuritaire parce qu'il
est trop petit, il pourrait être nécessaire de choisir un autre type de siège d'auto
(comme un porte-bébé).
IMPORTANT : Voir Comment régler la hauteur des fentes du harnais à la page 69.
MISe eN GARde !
Ne PAS utiliser de siège orienté face à l'arrière
si l'une ou l'autre des situations suivantes s'applique :
l'enfant pèse moins de 2,3 kg (5 lb) • ou
l'enfant mesure moins de 55,9 cm (22 po)• ou
l'enfant pèse plus de 13,6 kg (30 lb)• ou
l'enfant mesure plus de 76,2 cm (30 po)• ou
le haut de la tête de l'enfant est à moins de 2,5 cm (1 po) de la partie •
supérieure de la coquille du siège (figure A) ou
quand les sangles du harnais sont situées dans les fentes qui se trouvent au-•
dessus des épaules de l'enfant
A
Face à l'avant
Poids entre 9,1 kg (et 1 an) et 18,1 kg (20 et 40 lb)
Utiliser les sièges orientés face à l'avant uniquement
pour les enfants :
qui sont âgés d'au moins un an • et
dont le poids se situe entre 9,1 kg et 18,1 kg (20 et •
40 lb) et
dont la taille se situe entre 68,6 cm et 101,6 cm (27 et •
40 po) et
quand le haut des oreilles de l'enfant est au-dessous de la partie supérieure de la •
coquille du siège et
quand les sangles du harnais sont situées dans les fentes qui se trouvent à la •
hauteur ou au-dessus des épaules de l'enfant (figure B)
b
IMPORTANT : Voir Comment régler la hauteur des fentes du harnais à la
page 69.
MISe eN GARde !
Ne PAS utiliser de siège orienté face à l'avant si
l'une ou l'autre des situations suivantes s'applique :
l'enfant est âgé de moins d'un an • ou
l'enfant pèse moins de 9,1 kg (20 lb) • ou
l'enfant mesure moins de 68,6 cm (27 po) • ou
l'enfant pèse plus de 18,1 kg (40 lb) • ou
l'enfant mesure plus de 101,6 cm (40 po) • ou
le haut des oreilles de l'enfant arrive au-dessus de la partie supérieure de la •
coquille du siège ou
quand les sangles du harnais se trouvent dans les fentes qui se trouvent au-•
dessous des épaules de l'enfant
Page 25

46
47
15
14
1
17
16
18
19
20
21
22
23
24
25
Caractéristiques du siège d'auto Caractéristiques du siège d'auto
1
7
8
9
10
11
12
13
3
4
2
5
6
Sangles du harnais1
Sangle de connecteur LCS2
Bouton de déverrouillage de 3
dispositif de réglage LCS
Dispositif de réglage LCS4
Bouton de déverrouillage de 5
connecteur LCS Chape du harnais
Connecteur LCS (rangé sous la 6
housse)
Attache de poitrine7
Porte-harnais8
Boucle du harnais9
Protecteur ventral10
Bouton de déverrouillage de 11
dispositif de réglage du harnais
Sangle de réglage du harnais12
Poignée d'inclinaison (avant de la 13
base)
Numéro de série et date de 14
fabrication (sous la housse)
Versa-Tether15
®
(sangle d'ancrage du
haut) - dans une pochette
Chape du harnais16
Protège-sangle17
Housse18
Marque National Safety19
Chemin de sangle pour siège 22
orienté face à l'avant
Chemin de sangle pour siège 23
orienté face à l'arrière
Verrou de siège orienté face à 24
l'arrière
Base25
Coquille20
Verrou de siège orienté face à l'avant21
IMPORTANT : Lorsqu'on ne l'utilise pas, ce guide de
l'utilisateur doit être rangé sous la housse. NE PAS
jeter les pièces rapportées en mousse qui se trouve
sous la housse.
Page 26

48
49
Compatibilité des véhicules
NE PAS placer un siège d'auto
orienté face à l'arrière dans le
siège avant d'un véhicule
équipé d'un sac gonflable
pour passager à moins que ce
sac ne soit désactivé. LA
MORT ou DES BLESSURES
GRAVES peuvent survenir.
Consulter le manuel du
propriétaire du véhicule pour
connaître les instructions
d'installation du siège d'auto.
La banquette arrière est
l'endroit le plus sûr pour les
enfants de 12 ans et moins.
MISE EN GARDE!
Compatibilité des véhicules
Ceintures de sécurité du véhicule
REMARQUE : L'information contenue dans la présente section vise
uniquement l'installation avec des ceintures de sécurité de véhicule.
IMPORTANT : Les sièges et les ceintures de sécurité de véhicule diffèrent d'un
véhicule à l'autre. Consulter le manuel du propriétaire du véhicule pour obtenir de
l'information précise sur les ceintures de sécurité du véhicule et sur leur utilisation
avec des sièges d'auto. Dans certains véhicules, il n'existe aucune position assise
qui soit compatible avec ce siège d'auto ou avec tout autre siège d'auto. En cas de
doute, communiquer avec le fabricant du véhicule pour obtenir de l'aide.
Ce siège d'auto peut être installé en toute sécurité dans la plupart des véhicules au
moyen des ceintures déjà en place dans le véhicule. Toutefois, la configuration de
certains véhicules ne permet pas d'installer le siège d'auto en toute sécurité.
Le manuel du propriétaire du véhicule contient de l'information sur les types de
ceinture de véhicule que l'on retrouve dans le véhicule en question. Si le type
de ceinture du véhicule figure dans la liste ci-dessous, choisir une autre position
assise ou utiliser le système d'ancrage universel au bas (LUAS).
MISe eN GARde !
suivants ne sont pas compatibles avec ce siège d'auto :
Ceintures de véhicu• le avant avec points d'ancrage au
haut ou au bas dans la porte. (figures A et B)
Ceintures de véhicule automatiques, commandées par •
moteur. (Figure B)
Ceintures à trois points d'appui qui sont munies de •
rétracteurs distincts pour la section épaules et pour
la section jambes, et dont le rétracteur de la section
jambes ne se verrouille pas.
Ceintures de véhicule à rétracteur à blocage d'urgence à •
deux points d'appui, non verrouillable.
Ceintures de véhicule à rétracteur à blocage d'urgence à •
trois points d'appui sans l'utilisation du verrouillage.
REMARQUE : Consulter le manuel du propriétaire du véhicule pour
déterminer le type des rétracteurs utilisés dans le véhicule et pour savoir
comment les faire fonctionner.
Les types de ceinture de véhicule
A
b
Positions de la boucle de ceinture du
véhicule
MISe eN GARde !
de la ceinture du véhicule peut nuire à la
stabilité du siège d'auto.
Si la boucle repose près de la position indiquée comme
étant mauvaise ( ) lorsque la ceinture de ce véhicule
est serrée, essayer d'installer le siège d'auto dans une
autre position assise dans le véhicule OU consulter le
manuel du propriétaire du véhicule pour voir s'il est
possible d'abaisser la position de la boucle de ceinture
du véhicule en tordant le pied de la boucle.
S'il est impossible d'obtenir la position correcte ( ) de la
boucle, on DOIT alors utiliser une autre position assise.
Positions assises du véhicule
MISe eN GARde !
DOIVENT être utilisés avec ce siège d'auto. Les sièges orientés
face au côté ou face à l'arrière NE DOIVENT PAS être utilisés.
Voir le diagramme ci-dessous.
La position de la boucle
Des sièges de véhicule orientés face à l'avant
Page 27

50
51
Installation : siège orienté face à l'arrière
30–45º
0º
90º
Installation : siège orienté face à l'arrière
Installation avec système d'ancrage universel au bas (LUAS)
La figure• A illustre une installation type du siège orienté face
à l'arrière avec LCS.
Vérifier que le véhicule • est équipé de dispositifs d'ancrage
LCS. Si l'on ne dispose pas de dispositifs d'ancrage LUAS,
on doit suivre les méthodes d'installation avec ceinture de
sécurité de véhicule.
Si la sangle e1. t les connecteurs LCS sont rangés, les sortir des
fentes de rangement sous la housse. Voir la page 67.
Appuyer sur un bouton de déverrouillage de dispositif de 2.
réglage LCS et le maintenir enfoncé, puis tirer pour sortir
la sangle LCS sur toute sa longueur. Répéter la procédure
à l'autre extrémité de la sangle.
IMPORTANT :
Vérifier que la sangle de connecteur LCS est tendue, mais n'est •
pas tordue et que les connecteurs LCS sont dans une position
verticale (figure C) pour s'assurer que l'installation est faite
correctement.
La sangle LCS doit reposer derrière la boucle du siège d'auto. •
Passer chaque conn3. ecteur LCS par la fente de ceinture de
siège orienté face à l'arrière adjacente (figure B).
Incliner complètement le siège d'auto et le placer de côté 4.
sur le siège du véhicule, le devant face à vous.
MISe eN GARde !
position inclinée lorsqu'il est orienté face à l'arrière.
Voir Réglage de l'inclinaison à la page 67.
Vérifier que les sangles LCS ne sont pas tordues et attacher le 5.
connecteur LCS le plus près du dossier du siège du véhicule au
dispositif d'ancrage LUAS le plus éloigné (figure D).
Faire pivoter le siège d'auto en position face à l'arrière.6.
Vérifier que la sangle LCS n'est pas tordue et attacher 7.
l'autre connecteur LCS au dispositif d'ancrage LUAS
adjacent (figure E).
Ce siège d'auto doit être en
face à l'arrièret
A
b
Bouton
de déverrouillage
c
d
Dessus
REMARQUE : Il peut être nécessaire d'intervertir les
connecteurs LUAS, tel qu'il est indiqué à la page 66, si L'UNE
OU L'AUTRE des conditions suivantes existe :
Le connecteur LCS n'est pas dans une position verticale tel •
qu'il est illustré à la figure C.
La sangle LCS est tordue.•
On n’entend PAS un déclic distinct lorsque le connecteur LCS •
et le dispositif d’ancrage LUAS sont raccordés.
REMARQUE : Si l'on n'entend pas un déclic positif mais
que le connecteur LCS est dans une position verticale, on
ne doit pas intervertir les connecteurs LUAS. Il est possible
que la sangle soit trop serrée ou tordue, ou encore qu'il y
ait des débris dans le connecteur LUAS.
Pousser fermement le siège d'auto dans le siège du 8.
véhicule tout en tirant la sangle de réglage LCS jusqu'à
ce qu'elle soit tendue (figure F).
Vérifier que toutes les connexions sont solides et que le 9.
siège d'auto est stable.
Le siège d'auto est bien fixé lorsqu'on ne peut pas le bouger •
de plus de 2,5 cm (1 po) d'avant en arrière ou d'un côté à
l'autre au chemin de sangle. Si le siège d’auto n’est pas bien
fixé, reprendre la procédure ou choisir un autre emplacement
pour l’installation.
Une fois le siège d• 'auto correctement installé en position
face à l'arrière, son angle d'inclinaison arrière doit être
d'environ 30º à 45º par rapport à la verticale (sans
dépasser 45º) lorsque l'automobile est stationnée sur une surface horizontale
(figure G).
Si nécessaire, on peut obtenir le bon angle d'inclinaison en plaçant une serviette •
enroulée ou un cylindre de piscine en styromousse dans le creux du siège du
véhicule pour mettre à niveau la base du siège d'auto.
MISe eN GARde !
bord avant du siège du véhicule. Cela pourrait empêcher le siège d'auto de
fonctionner de la manière prévue.
On peut améliorer l'installation d'un siège orienté face à l'arrière en utilisant la sangle •
Versa-Tether
®
(voir les pages 63 à 65).
Ne pas soulever le siège d'auto pour le décoller du
e
f
G
Page 28

52
53
Installation : siège orienté face à l'arrière
30–45º
0º
90º
Installation : siège orienté face à l'arrière
Installation avec ceinture à trois points
d'appui
La figure A illustre une installatio• n type du siège orienté
face à l'arrière avec ceinture à trois points d'appui.
Lorsque les connecteurs LUAS ne sont pas utilisés, toujours •
les ranger dans les fentes de rangement. Voir la page 67.
Incliner complètement le siège d'auto et le placer 1.
face à l'arrière sur le siège du véhicule.
MISe eN GARde !
en position inclinée lorsqu'il est orienté face à l'arrière.
Voir Réglage de l'inclinaison à la page 67.
Soulever la housse du siège d'auto et ouvrir le verrou 2.
de siège orienté face à l'arrière le plus éloigné du
point où la ceinture du véhicule se boucle (figure B).
Dérouler la ceinture du véhicule, puis la passer par 3.
la fente de ceinture de siège orienté face à l'arrière
(figure C).
La ceinture du véhicule peut être passée par-dessus la •
housse ou en dessous.
Passer la ceinture du véhicule en travers du siège 4.
d'auto, puis par la fente opposée de ceinture de
siège orienté face à l'arrière.
Ce siège d'auto doit être
IMPORTANT : La ceinture du véhicule doit reposer derrière la sangle de
boucle du siège d'auto.
Vérifier que la ceinture du véhicule n'est pas tordue, placer la partie jambes de la 5.
ceinture du véhicule à travers le verrou, puis boucler la ceinture (figure D).
Pousser fermement le siège d'auto dans le siège du véhicule tout en 6.
éliminant le jeu tout d'abord dans la partie jambes de la ceinture du
véhicule, puis dans sa partie épaules (figure E).
Placer la partie épaules de la ceinture du véhicule à travers le verrou, serrer la 7.
ceinture, puis fermer le bras du verrou (figure F) et remettre la housse en place.
Le verrou est fermé correctement lorsqu'on entend un déclic positif.•
Pour éviter tout bris, ne jamais tirer le bras du verrou au-delà de sa position •
face à l'arrièret
A
b
c
ouverte normale et toujours garder le verrou fermé
lorsqu'il n'est pas utilisé.
Si votre véhicule est équipé d'un rétracteur •
autobloquant, il n'est pas nécessaire d'utiliser les
verrous tant que le rétracteur autobloquant est
verrouillé. Consulter le manuel du propriétaire du
véhicule pour déterminer le type de rétracteur que
l'on retrouve dans le véhicule et pour savoir comment
verrouiller le rétracteur.
Vérifier que la ceinture du véhicule est tendue et que 8.
le siège d'auto est bien fixé.
Le siège d'auto est bien fixé lorsqu'on ne peut pas le •
bouger de plus de 2,5 cm (1 po) d'avant en arrière ou
d'un côté à l'autre au chemin de sangle. Si le siège d’auto
n’est pas bien fixé, reprendre la procédure ou choisir un
autre emplacement pour l’installation.
Une fois le siège d'auto correctement installé en •
position face à l'arrière, son angle d'inclinaison arrière
doit être d'environ 30º à 45º par rapport à la verticale
(sans dépasser 45º) lorsque l'automobile est stationnée
sur une surface horizontale (figure G).
Si nécessaire, on peut obtenir le bon angle d'inclinaison •
en plaçant une serviette enroulée ou un cylindre
de piscine en styromousse dans le creux du siège du
véhicule pour mettre à niveau la base du siège d'auto.
MISe eN GARde !
d'auto pour le décoller du bord avant du siège
du véhicule. Cela pourrait empêcher le siège d'auto
de fonctionner de la manière prévue.
On peut améliorer l'installation d'un siège orienté face •
à l'arrière en utilisant la sangle Versa-Tether® (voir les
pages 63 à 65).
Ne pas soulever le siège
d
e
f
G
Page 29

54
55
Installation : siège orienté face à l'arrière
30–45º
0º
90º
Installation : siège orienté face à l'arrière
Installation avec ceinture sous-abdominale
La figure A illustre une installation type du siège orienté •
face à l'arrière avec ceinture sous-abdominale.
Lorsque les connecteurs LUAS ne sont pas utilisés, •
toujours les ranger dans les fentes de rangement. Voir
la page 67.
Incliner complètement le siège d'auto et le placer 1.
face à l'arrière sur le siège du véhicule.
MISe eN GARde !
en position inclinée lorsqu'il est orienté face à
l'arrière. Voir Réglage de l'inclinaison à la page 67.
Soulever la housse du siège d'auto et ouvrir le verrou 2.
de siège orienté face à l'arrière le plus éloigné du point
où la ceinture du véhicule se boucle (figure B).
Dérouler la ceinture du véhicule et la passer par la 3.
fente de ceinture de siège orienté face à l'arrière
(figure C).
La ceinture du véhicule peut être passée par-dessus •
la housse du siège d'auto ou en dessous.
Passer la ceinture du véhicule en travers du siège 4.
d'auto, puis par la fente opposée de ceinture de
siège orienté face à l'arrière.
Ce siège d'auto doit être
IMPORTANT : La ceinture du véhicule doit reposer derrière la sangle de
boucle du siège d'auto.
Vérifier que la ceinture du véhicule n'est pas tordue, placer la ceinture du 5.
véhicule à travers le verrou, puis la boucler (figure D).
Pousser fermement le siège d'auto dans le siège du véhicule tout en 6.
éliminant le jeu de la ceinture du véhicule.
Serrer la ceinture, puis fermer le verrou, et remettre la housse en place. 7.
Le verrou est fermé correctement lorsqu'on entend un déclic positif.•
Pour éviter tout bris, ne jamais tirer le bras du verrou au-delà de sa position •
ouverte normale et toujours garder le verrou fermé lorsqu'il n'est pas utilisé.
face à l'arrièret
A
b
c
Si votre véhicule est équipé d'un rétracteur •
autobloquant, il n'est pas nécessaire d'utiliser les
verrous tant que le rétracteur autobloquant est
verrouillé. Consulter le manuel du propriétaire du
véhicule pour déterminer le type de rétracteur que
l'on retrouve dans le véhicule et pour savoir comment
verrouiller le rétracteur.
MISe eN GARde !
avec une ceinture de véhicule à rétracteur à blocage
d’urgence à deux points d’appui, non verrouillable.
Vérifier que la ceinture du véhicule est bien tendue 8.
et que le siège d'auto est bien fixé.
Le siège d'auto est bien fixé lorsqu'on ne peut pas le •
bouger de plus de 2,5 cm (1 po) d'avant en arrière ou
d'un côté à l'autre au chemin de sangle. Si le siège d’auto
n’est pas bien fixé, reprendre la procédure ou choisir un
autre emplacement pour l’installation.
Une fois le siège d'auto correctement installé en •
position face à l'arrière, son angle d'inclinaison arrière
doit être d'environ 30º à 45º par rapport à la verticale
(sans dépasser 45º) lorsque l'automobile est stationnée
sur une surface horizontale (figure F).
Si nécessaire, on peut obtenir le bon angle d'inclinaison •
en plaçant une serviette enroulée ou un cylindre de piscine en styromousse
dans le creux du siège du véhicule pour mettre à niveau la base du siège
d'auto.
MISe eN GARde !
bord avant du siège du véhicule. Cela pourrait empêcher le siège d'auto de
fonctionner de la manière prévue.
On peut améliorer l'installation d'un siège orienté face à l'arrière en utilisant •
la sangle Versa-Tether® (voir les pages 63 à 65).
Ne pas utiliser ce siège
Ne pas soulever le siège d'auto pour le décoller du
d
e
f
Page 30

56
57
Installation : siège orienté face à l'avant Installation : siège orienté face à l'avant
Installation avec système d'ancrage universel au bas (LUAS)
La figure A illustre une installation type du siège orienté •
face à l'avant avec LUAS.
Vérifier que le véhicule est équipé de dispositifs d'ancrage •
LUAS. Si l'on ne dispose pas de dispositifs d'ancrage LUAS,
on doit suivre les méthodes d'installation avec ceinture de
sécurité de véhicule.
face à l'avantt
MISe eN GARde!
Ce siège d'auto NE doit PAS être utilisé en mode orienté face •
à l'avant avec un enfant qui est âgé de moins d'un an OU qui
pèse moins de 9,1 kg (20 lb).
Ce siège d'auto doit être en position verticale lorsqu'il est •
orienté face à l'avant.
Toujours utiliser la sangle Versa-Tether lorsque le siège est •
orienté face à l'avant. Consulter le manuel du propriétaire
du véhicule pour connaître les emplacements des dispositifs
d'ancrage approuvés.
IMPORTANT :
Vérifier que la sangle de connecteur LCS est tendue, mais •
n'est pas tordue et que les connecteurs LCS sont dans une
position verticale (figure B) pour s'assurer que l'installation
est faite correctement.
Si les connecteurs LCS sont rangés, les sortir des fentes 1.
de rangement sous la housse. Voir la page 67. Tirer les
deux connecteurs LCS complètement à travers la fente de
ceinture de siège orienté face à l'arrière du côté droit du
siège d'auto (figure C) pour qu'ils soient à l'extérieur de la
coquille.
REMARQUE: Le siège d'auto est assemblé en mode orienté face
à l'arrière.
Appuyer sur un bouton de déverrouillage de dispositif de 2.
réglage LCS et le maintenir enfoncé, puis tirer pour sortir
la sangle LCS sur toute sa longueur. Répéter la procédure
à l'autre extrémité de la sangle.
Passer le connecteur LCS approprié par la fente de ceinture 3.
de siège orienté face à l'avant (figure D) à l'arrière du siège d'auto.
Placer le siège d'auto de côté en position verticale sur le siège du véhicule, le 4.
dossier du siège d'auto face à vous.
A
Bouton
de déverrouillage
b
c
d
Dessus
Retirer la sangle Versa-Tether5.
par-dessus le dossier du siège d'auto.
Vérifier que la sangle LCS n'est pas tordue et attacher le 6.
connecteur LCS le plus près du dossier du siège du véhicule
au dispositif d'ancrage LUAS le plus éloigné (figure E).
Un déclic positif indi• que un bon raccordement.
REMARQUE : Il peut être nécessaire d'intervertir les
connecteurs LUAS, tel qu'il est indiqué à la page 66, si L'UNE
OU L'AUTRE des conditions suivantes existe :
Le connecteur LCS n'est pas dans une position verticale tel •
qu'il est illustré à la figure D.
La sangle LCS est tordue.•
On n’entend PAS un déclic distinct lorsque le connecteur •
LCS et le dispositif d’ancrage LUAS sont raccordés.
REMARQUE : Si l'on n'entend pas un déclic positif mais que le
connecteur LCS est dans une position verticale, on ne doit pas
intervertir les connecteurs LUAS. Il est possible que la sangle soit
trop serrée ou tordue, ou encore qu'il y ait des débris dans le
connecteur LUAS.
MISe eN GARde !
verticale lorsqu'il est orienté face à l'avant. Voir Réglage de
l'inclinaison à la page 67.
Faire pivoter le siège d'auto en position face à l'avant. 7.
Vérifier que la sangle LCS n'est pas tordue et attacher l'autre 8.
connecteur LCS au dispositif d'ancrage LUAS adjacent
(figure F).
Un déclic positif indique un bon raccordement.•
Pousser le siège d'auto dans le siège du véhicule tout en tirant la sangle de réglage 9.
LCS jusqu'à ce qu'elle soit tendue (figure G). S'assurer que le dessous de la base du
siège d'auto fait complètement contact avec le siège du véhicule.
Attacher le crochet Versa-Tether10.
assise choisie. Éliminer tout le jeu de la sangle d'attache pour obtenir une fixation
solide. Ranger toute longueur de sangle en excès dans la pochette de la sangle
d'attache. Voir les pages 63 à 65.
Vérifier que toutes les connexions sont solides et que le siège d'auto est stable. 11.
Le siège d'auto est bien fixé lorsqu'on ne peut pas le bouger de plus de 2,5 cm (1 po) •
d'avant en arrière ou d'un côté à l'autre au chemin de sangle. Si le siège d’auto
n’est pas bien fixé, reprendre la procédure ou choisir un autre emplacement pour
l’installation.
®
de la pochette et la placer
e
f
Le siège d'auto doit être en position
G
®
au dispositif d'ancrage désigné pour la position
Page 31

58
59
Installation : siège orienté face à l'avant Installation : siège orienté face à l'avant
Installation avec ceinture à trois points
d'appui
La figure A illustre une installation type du siège orienté •
face à l'avant avec ceinture à trois points d'appui.
Lorsque les connecteurs LCS ne sont pas utilisés, toujours •
les ranger dans les fentes de rangement. Voir la page 67.
MISe eN GARde!
Ce siège d'auto NE doit PAS être utilisé en mode orienté •
face à l'avant avec un enfant qui est âgé de moins d'un
an OU qui pèse moins de 9,1 kg (20 lb).
Ce siège d'auto doit être en position verticale lorsqu'il est •
orienté face à l'avant.
Toujours utiliser la sangle Versa-Tether lorsque le siège est •
orienté face à l'avant. Consulter le manuel du propriétaire
du véhicule pour connaître les emplacements des
dispositifs d'ancrage approuvés.
Placer le siège d'auto orienté face à l'avant sur le 1.
siège du véhicule. S'assurer que le dessous de la base
du siège d'auto fait complètement contact avec le
siège du véhicule.
Retirer la sangle Versa-Tether2.
placer par-dessus le dossier du siège d'auto.
Dérouler la ceinture du véhicule, puis la passer par le chemin de sangle de siège 3.
orienté face à l'avant jusqu'au côté opposé du siège d'auto (figure B).
Vérifier que la ceinture du véhicule n'est pas tordue, puis la boucler (figure C).4.
Faire pivoter le levier vers le bas pour ouvrir le verrou de siège orienté face à 5.
l'avant le plus éloigné du point où la ceinture du véhicule se boucle.
Pousser fermement le siège d'auto dans le siège du véhicule tout en 6.
éliminant le jeu tout d'abord dans la partie jambes de la ceinture du
véhicule, puis dans sa partie épaules (figure D).
Tenir la sangle d’épaule tendue et tourner le verrou jusqu’à ce qu’il soit bien 7.
enclenché (figure E).
®
de la pochette et la
A
b
c
face à l'avantt
Si votre véhicule est équipé d'un rétracteur •
autobloquant, il n'est pas nécessaire d'utiliser les
verrous tant que le rétracteur autobloquant est
verrouillé. Consulter le manuel du propriétaire du
véhicule pour déterminer le type de rétracteur que
l'on retrouve dans le véhicule et pour savoir comment
verrouiller le rétracteur.
Attacher le crochet Versa-Tether8.
désigné pour la position assise choisie. Éliminer tout le
jeu de la sangle d'attache pour obtenir une fixation
solide. Ranger toute longueur de sangle en excès dans
la pochette de la sangle d'attache. Voir les pages 63
à 65.
Vérifier que la ceinture du véhicule est tendue et que 9.
le siège d'auto est bien fixé.
Le siège d'auto est bien fixé lorsqu'on ne peut pas le •
bouger de plus de 2,5 cm (1 po) d'avant en arrière ou
d'un côté à l'autre au chemin de sangle. Si le siège d’auto n’est pas bien fixé,
reprendre la procédure ou choisir un autre emplacement pour l’installation.
®
au dispositif d'ancrage
d
e
Page 32

60
61
Installation : siège orienté face à l'avant Installation : siège orienté face à l'avant
Installation avec ceinture sous-abdominale
La figure A illustre une installation type du siège orienté •
face à l'avant avec ceinture sous-abdominale.
Lorsque les connecteurs LCS ne sont pas utilisés, •
toujours les ranger dans les fentes de rangement. Voir
la page 67.
face à l'avantt
MISe eN GARde!
Ce siège d'auto NE doit PAS être utilisé en mode orienté face •
à l'avant avec un enfant qui est âgé de moins d'un an OU
qui pèse moins de 9,1 kg (20 lb).
Ce siège d'auto doit être en position verticale lorsqu'il est •
orienté face à l'avant.
Toujours utiliser la sangle Versa-Tether lorsque le siège est •
orienté face à l'avant. Consulter le manuel du propriétaire
du véhicule pour connaître les emplacements des dispositifs
d'ancrage approuvés.
Placer le siège d'auto orienté face à l'avant sur le siège 1.
du véhicule. S'assurer que le dessous de la base du
siège d'auto fait complètement contact avec le siège
du véhicule.
Retirer la sangle Versa-Tether2.
placer par-dessus le dossier du siège d'auto.
Dérouler la ceinture du véhicule, puis la passer par 3.
le chemin de sangle de siège orienté face à l'avant
jusqu'au côté opposé du siège d'auto (figure B).
Vérifier que la ceinture du véhicule n'est pas tordue, puis la boucler (figure C).4.
Pousser fermement le siège d'auto dans le siège du véhicule tout en serrant 5.
la ceinture du véhicule.
Attacher le crochet Versa-Tether6.
position assise choisie. Éliminer tout le jeu de la sangle d'attache pour obtenir
une fixation solide. Ranger toute longueur de sangle en excès dans la pochette
de la sangle d'attache. Voir les pages 63 à 65.
®
de la pochette et la
®
au dispositif d'ancrage désigné pour la
A
b
c
Vérifier que la ceinture du véhicule est tendue et verrouillée et que le siège 7.
d'auto est bien fixé.
Le siège d'auto est bien fixé lorsqu'on ne peut pas le bouger de plus de 2,5 cm •
(1 po) d'avant en arrière ou d'un côté à l'autre au chemin de sangle. Si le
siège d’auto n’est pas bien fixé, reprendre la procédure ou choisir un autre
emplacement pour l’installation.
Page 33

62
63
Installation dans un avion Installation : sangle Versa-Tether
Homologué pour les
voyages en avion
Consignes de sécuritéInstallation dans un avion
Ce siège d'auto est homologué pour l'utilisation
dans les avions. Au Canada et aux États-Unis,
la plupart des transporteurs aériens permettent
l'utilisation d'un siège d'auto pourvu que celui-ci
soit étiqueté comme siège d'auto approuvé pour
l'utilisation à bord des avions de transporteurs
aériens et qu'il s'ajuste correctement sur le siège
d'avion. Communiquer avec le transporteur aérien
pour connaître sa politique avant d'effectuer
un déplacement.
MISe eN GARde !
Lorsqu'on utilise le siège d'auto en mode orienté face à l'avant, attacher •
la sangle Versa-Tether® uniquement aux dispositifs d'ancrage désignés
par le fabricant du véhicule comme points d'ancrage de sangle d'attache.
L'utilisation d'autres points n'est pas approuvée ni permise.
NE PAS modifier le véhicule sans demander l'avis du fabricant du véhicule si •
l'on ne dispose pas d'un point d'ancrage de sangle d'attache.
®
Installer le siège d'auto dans un siège côté hublot
pour éviter de bloquer l'allée.
Si la ceinture sous-abdominale de l'avion est
trop courte, demander une rallonge de ceinture
à l'agent de bord.
Installation du siège orienté face à l'arrière
Dans le cas de l'installation du siège orienté
face à l'arrière (figure A), suivre les instructions
relatives à l'installation du siège orienté face
à l'arrière avec ceinture sous-abdominale aux
pages 54 et 55.
Installation du siège orienté face à l'avant
Dans le cas de l'installation du siège orienté
face à l'avant (figure B), suivre les instructions
relatives à l'installation du siège orienté face à
l'avant avec ceinture sous-abdominale aux pages 60 et 61.
A
b
IMPORTANT :
Si le véhicule n'est pas actuellement équipé d'un dispositif d'ancrage •
pour sangle d'attache, consulter le manuel du propriétaire du véhicule
ou communiquer avec le fabricant du véhicule pour obtenir de l'aide.
Pour les véhicules fabriqués entre janvier 1989 et août 2000 équipés •
d’emplacements de dispositifs d’ancrage désignés qui sont constitués
d’un trou ou d’un trou fileté, il est possible de se procurer des pièces
d’ancrage sur demande – sans frais – en communiquant avec le
service à la clientèle de Britax au 1 888 427-4829.
Page 34

64
65
Installation : sangle Versa-Tether
OU
OU
®
Installation : sangle Versa-Tether
®
®
Consulter le manuel du propriétaire du véhicule 1.
pour connaître les emplacements des dispositifs
d'ancrage approuvés.
Sortir la sangle d'attache de la pochette située 2.
derrière le siège.
Placer la sangle d'attache par-dessus le dossier 3.
du siège d'auto.
Installer le siège d'auto en utilisant le 4.
A
système LUAS ou les ceintures du véhicule
conformément aux instructions contenues
dans le présent manuel.
Incliner la languette de déverrouillage de 5.
la sangle d'attache, puis tirer pour sortir
complètement la sangle d'attache de façon à
former un « V ».
Trouver le crochet sur la sangle et attacher 6.
lâchement la sangle au dispositif d’ancrage
b
désigné du véhicule.
Voir la figure A pour l'installation du siège orienté •
face à l'avant.
Voir les figures B et C pour les installations du siège •
orienté face à l'arrière.
Fixer le siège d'auto avec une ceinture de 7.
sécurité OU avec les connecteurs LUAS.
Tirer sur la sangle de réglage du dispositif 8.
d'attache pour éliminer tout le jeu. Enrouler la
longueur en trop et la ranger dans la pochette.
c
Vérifier que la sangle d'attache est tendue et 9.
que le siège d'auto est bien fixé.
Le siège d'auto est bien fixé lorsqu'on ne peut pas le bouger de plus de 2,5 cm •
(1 po) d'avant en arrière ou d'un côté à l'autre au chemin de sangle.
Sangle de connexion d'attacheUtilisation de la sangle Versa-Tether
MISe eN GARde !
connexion d'attache dans le cas de l'installation d'un siège orienté
face à l'arrière avec sangle d'attache.
Comme chaque modèle de véhicule est différent,
il est possible qu'on ne trouve pas d'endroit pour
ancrer correctement la sangle d'attache. Utiliser la
sangle de connexion d'attache pour aider à créer
un point d'ancrage (figure D).
Repérez un point d’ancrage fixe qui soit 1.
boulonné au plancher du.
S'il est impossible de trouver un endroit acceptable •
pour créer un point d'ancrage, communiquer avec
le fabricant du véhicule pour qu'il vous aide à
repérer un point de raccordement approprié pour la sangle d'attache.
Passer la sangle autour du point d'ancrage fixe du véhicule.2.
Prendre l'anneau en D-en-métal et le passer dans la boucle de sanglage 3.
à l'autre extrémité de la sangle (figure D).
Tirer l'anneau en D-en-métal complètement jusqu'à ce que la sangle 4.
soit tendue.
Utiliser l'anneau en D-en-métal comme point d'attache pour le crochet 5.
sur la sangle d'attache.
REMARQUE : Ranger la sangle de connexion d'attache dans la
pochette de la sangle d'attache.
Utiliser uniquement la sangle de
d
Page 35

66
67
Fonctions du siège d'auto
Fonctions du siège d'auto
Interversion du système à connecteur bas (LCS)
Il peut être nécessaire de modifier la position de la
sangle LCS pour obtenir un bon alignement du chemin
de sangle lorsqu'on installe le siège orienté face à
l'arrière (figure A) plutôt que face à l'avant (figure B).
S'il est impossible d'obtenir un bon raccordement des
connecteurs LCS au dispositif d'ancrage LUAS, suivre la
procédure ci-dessous pour intervertir les connecteurs
Soulever le devant de la housse du siège d'auto pour 1.
avoir accès aux connecteurs LUAS.
Passer la sangle de connecteur LCS dans le chemin 2.
de sangle sur le côté droit de l'enfant (figure C).
Passer un connecteur LCS dans le chemin de sangle 3.
approprié en s'assurant que la partie la plus grosse
du connecteur soit sur le dessus selon la procédure
d'installation qu'on désire suivre (figure D).
Vérifier que le harnais n'est pas tordu.•
IMPORTANT : Lorsqu'on installe ce siège d'auto en
mode orienté face à l'arrière, la sangle LCS doit reposer
derrière de sangle du boucle du siège d'auto.
REMARQUE : Pour que le connecteur LCS soit
correctement aligné sur le dispositif d'ancrage LUAS du
véhicule, le bouton de déverrouillage rouge du connecteur
doit être orienté dans la direction opposée au dossier du
siège du véhicule et la plus grosse des deux sections du
connecteur doit être sur le dessus (figure D).
Remettre la housse en place et poursuivre la 4.
procédure d'installation avec système LUAS.
A
b
c
Bouton de
déverrouillage
d
Dessus
Rangement des connecteurs LCS
Lorsque les connecteurs LCS ne sont pas utilisés, soulever
la housse du siège d'auto pour avoir accès aux fentes de
rangement LCS (figure E). Plier chaque extrémité de la
sangle LCS et glisser chaque connecteur LCS dans les fentes
adjacentes.
REMARQUE : Les sièges d'auto sont livrés par Britax avec
les connecteurs LCS rangés dans les fentes de rangement.
Réglage de l'inclinaison
Tirer la poignée d'inclinaison, puis glisser la coquille du
siège d'auto dans la position désirée (figure F). Relâcher la
poignée d'inclinaison et vérifier que le siège d'auto est bien
verrouillé en position.
MISe eN GARde !
Ce siège d'auto doit être en position inclinée lorsqu'il est •
orienté face à l'arrière.
Ce siège d'auto doit être en position verticale lorsqu'il est •
orienté face à l'avant.
e
f
REMARQUE : Il est nécessaire de desserrer la sangle d'attache,
la ceinture de sécurité du véhicule ou la sangle LCS avant de
régler l'inclinaison. La sangle d'attache, la ceinture de sécurité
du véhicule ou la sangle LCS doivent être correctement
tendues de nouveau après le réglage de l'inclinaison.
Attache de poitrine
Bouclage de l'attache de poitrine
Boucler l'attache de poitrine en poussant les deux moitiés l'une
contre l'autre jusqu'à ce qu'on entende un déclic positif.
Déverrouillage de l'attache de poitrine
Presser la languette du milieu1.
Tirer les deux parties pour les éloigner l'une de l'autre 2.
(figure G).
Réglage de l'attache de poitrine
Glisser l'attache de poitrine vers le haut ou vers le bas sur
le harnais de façon à la placer au milieu de la poitrine de l'enfant, au niveau des
aisselles (figure H).
G
h
Page 36

68
69
Fonctions du siège d'auto
Attacher la boucle
Déclic
2 fois
Détacher la boucle
Attacher la boucle
Déclic
Fonctions du siège d'auto
Boucle du harnais
Fixation de la boucle du harnais
Tenir la boucle du harnais avec une main. 1.
Utiliser l'autre main pour insérer une langue de 2.
boucle à la fois dans la boucle du harnais (figure
A).
Un bon raccordement est indiqué par un déclic •
distinct après l'insertion de chaque langue de
boucle.
Déverrouillage de la boucle du harnais
Immobiliser l'arrière de la boucle du harnais avec 1.
une main.
Avec votre pouce, appuyer sur le bouton de 2.
déverrouillage et glisser les deux langues de
boucle pour les retirer de la boucle (figure B).
IMPORTANT : Nettoyer régulièrement la boucle du harnais pour s'assurer
de son bon fonctionnement. Voir la page 74.
A
b
Comment régler la hauteur des fentes du
harnais
IMPORTANT : Voir Important réglage du harnais
aux pages 44 et 45 pour connaître les instructions
importantes sur le réglage correct du harnais en fonction
de la taille et du poids de l'enfant.
Desserrer le harnais en appuyant sur le bouton 1.
c
de déverrouillage de réglage du harnais tout en
tirant les sangles du harnais vers l'avant le plus
loin possible
Depuis l'arrière du siège d'auto, décrocher les sangles 2.
du harnais de la chape du harnais (figure D).
Tirer les sangles du harnais à travers la coquille, la 3.
mousse et la housse jusqu'à l'avant du siège d'auto.
Passer les sangles du harnais par les fentes de harnais 4.
appropriées dans la housse, dans la mousse et dans la
coquille du siège d'auto (figure E).
Rattacher les sangles du harnais à la chape du harnais 5.
(figure D).
Tirer sur la sangle de réglage du harnais pour serrer le 6.
harnais.
Vérifier que toutes les sangles du harnais passent à la 7.
même hauteur et ne sont pas tordues.
(figure C).
d
e
Positionnement de l'enfant en toute sécurité
Desserrer le harnais en appuyant sur le bouton de 1.
déverrouillage de dispositif de réglage du harnais situé
sur le devant du siège d'auto, puis tirer les sangles du
harnais vers l'avant (figure C).
Détacher l'attache de poitrine en pressant les languettes 2.
et en glissant les deux parties pour les éloigner l'une de
l'autre (figure F).
Détacher la boucle du harnais en appuyant sur le bouton de déverrouillage et 3.
en glissant les langues vers l’extérieur.
Déplacer les sangles du harnais sur le côté du siège d'auto. 4.
Utiliser le porte-harnais situé sur les sangles et sur le côté de la housse pour •
tenir les sangles plus facilement.
f
Page 37

70
71
Fonctions du siège d'auto
Soins et entretien
Placer l'enfant dans le siège d'auto.5.
Placer les sangles du harnais autour de l’enfant et 6.
attacher la boucle du harnais (figure A) et l'attache de
poitrine (figure B).
Le bon raccordement de la boucle du harnais est •
indiqué par un déclic distinct après l’insertion de
chaque langue de boucle.
Si la boucle ne s’attache pas en faisant entendre •
distinctement un déclic après l’insertion de chaque
langue de boucle, il est possible que la zone de la
boucle du harnais ou du dispositif de réglage soit
encombrée par des aliments, des boissons ou d’autres
débris qu’il faudra enlever. Voir la page 74 pour
connaître les instructions de nettoyage.
IMPORTANT : Tirer doucement les sangles du harnais
vers le haut pour serrer la section jambes du harnais,
laquelle devrait reposer sur le haut des cuisses de
l’enfant.
Tirer lentement sur la sangle de réglage pour serrer le 7.
harnais autour de l'enfant (figure C).
Placer l'attache de poitrine au milieu de la poitrine de 8.
l'enfant, au niveau des aisselles (figure D).
Vérifier que le harnais n’est pas tordu et que l’enfant est 9.
installé en toute sécurité.
IMPORTANT :
Tirer toujours sur le harnais après avoir installé l'enfant •
pour s'assurer que les langues de boucle sont fixées
solidement dans la boucle du harnais.
Régler les sangles fournies avec ce siège d’auto pour •
qu’elles soient bien ajustées autour de l’enfant. Une
sangle bien ajustée ne devrait permettre aucun jeu.
Elle suit un chemin presque rectiligne sans pendre.
Elle n'appuie pas contre la chair de l'enfant et elle ne
pousse pas le corps de l'enfant dans une position non
naturelle. Le harnais doit être confortable tout en étant bien ajusté autour
de l'enfant. Une fois le harnais installé en toute sécurité, on ne devrait pas
pouvoir pincer un excès de sangle de harnais aux épaules de l'enfant.
A
b
c
d
Retrait de la housse du siège d'auto
MISe eN GARde !
retirer les langues de boucle du harnais. Une fois retirées, elles ne
peuvent plus être rattachées. Si le montage est incorrect, cela pourrait
empêcher le siège d'auto de fonctionner de la manière prévue.
Desserrer le harnais en appuyant sur le bouton 1.
de déverrouillage de réglage du harnais tout en
tirant les sangles du harnais vers l'avant le plus
loin possible.
Décrocher les sangles du harnais de la chape du 2.
harnais à l'arrière du siège d'auto (figure E).
Tirer les sangles supérieures du harnais à travers 3.
la coquille et la housse jusqu'à l'avant du siège
d'auto.
Retirer la boucle du harnais et le protecteur ventral 4.
du harnais en tournant le dispositif de retenue
métallique de la sangle de la boucle du harnais
sur le dessous du siège d'auto de sorte que le côté
court glisse à travers la coquille du siège d'auto
(figure F)
Retirer doucement la partie supérieure de la housse. 5.
Faire attention de ne pas endommager la mousse amortissante.
Pousser le dispositif de retenue métallique de la sangle de la boucle à 6.
travers les fentes de la coquille et de la housse jusqu'au haut du siège
d'auto.
Tirer les sangles inférieures du harnais, les langues de boucle et l'attache 7.
de poitrine par les fentes inférieures dans la housse.
Retirer complètement la housse du siège d'auto.8.
Ne pas démonter le harnais. Ne jamais
e
f
Page 38

72
73
Soins et entretien Soins et entretien
Remise en place de la housse
Pour remettre la housse en place, suivre les instructions ci-dessus en sens
inverse. S'assurer que les sangles du harnais sont passées correctement
dans les attaches de poitrine et que le harnais n'est pas tordu.
Nettoyage de la housse
LAVER À LA MAIN avec de l'eau froide et un savon doux.•
SÉCHER SUR UNE CORDE ou À PLAT pour éviter que la housse ne •
rétrécisse.
NE PAS utiliser d'agent de blanchiment, laver à la machine, sécher à la •
machine ou repasser.
Nettoyage de la coquille
NETTOYER À L'ÉPONGE avec de l'eau tiède et un savon doux.•
SÉCHER AVEC UNE SERVIETTE•
NE PAS utiliser de solvants ou de nettoyeurs abrasifs ni démonter le •
harnais.
Nettoyage du harnais
NETTOYER À L'ÉPONGE avec de l'eau tiède et un savon doux.•
SÉCHER AVEC UNE SERVIETTE•
NE PAS utiliser d'agent de blanchiment, laver à la machine, sécher à la •
machine ou démonter le harnais.
Retrait de la boucle du harnais
Incliner complètement le siège d'auto.1.
Trouver le dispositif de retenue métallique de 2.
la sangle de la boucle sur le dessous du siège
d'auto.
Tirer sur le dispositif de retenue en l'éloignant 3.
du siège d'auto pour le desserrer.
Tourner le dispositif de retenue pour que le 4.
côté court passe par la fente dans la coquille
du siège d'auto (figure A).
Pousser le dispositif de retenue à travers les fentes de la coquille et de 5.
la housse jusqu'au haut du siège d'auto.
A
Passage de la boucle du harnais
Trouver la fente dans la housse et dans la coquille pour la boucle du 1.
harnais.
Tourner le dispositif de retenue métallique de la sangle de la boucle 2.
pour que le côté court passe par la fente dans la housse et dans la
coquille du siège d'auto (figure A).
Pousser le dispositif de retenue à travers les fentes de la coquille et de 3.
la housse jusqu'au bas du siège d'auto.
Tirer sur la boucle du harnais pour l’éloigner du siège d’auto jusqu’à ce 4.
que la sangle soit tendue, puis vérifier que la sangle n’est pas tordue et
que le bouton de déverrouillage est orienté vers l’extérieur
Page 39

74
75
Soins et entretien
Attacher la boucle
Déclic
2 fois
Détacher la boucle
Attacher la boucle
Déclic
Garantie
Nettoyage de la boucle du harnais
Si un enfant mange et boit pendant qu'il est installé
dans le siège d'auto, il peut être nécessaire de vérifier
régulièrement la boucle du harnais et de la nettoyer
pour enlever les aliments, les boissons, les débris ou
les liquides séchés qui pourraient s'y accumuler.
RETIRER LA BOUCLE de la manière décrite à la •
page 73.
BIEN RINCER avec de l'eau tiède (figure A).•
FAIRE L'ESSAI DE LA BOUCLE DU HARNAIS en •
l'attachant (figure B) et en la détachant (figure C)
jusqu’à ce qu’on entende distinctement un déclic
après l’insertion de chaque langue de boucle.
Si l’un des déclics n’est pas entendu, répéter la
procédure de nettoyage.
SÉCHER AVEC UNE SERVIETTE•
NE PAS• lubrifier, ni utiliser des solvants, des
nettoyeurs abrasifs, du savon ou d'autres
détergents ménagers.
A
b
c
Ce siège d'au
l'acheteur au détail initial de la façon suivante :
GARANTIE LIMITÉE D'UN AN
Ce produit est garanti contre les défauts de matériaux ou de main-d'œuvre pour une période
d'un an à partir de la date de l'achat initial. Une preuve d'achat est exigée. La seule mesure
de redressement offerte en vertu de cette garantie est que Britax fournira, à son gré, une
réparation ou des composants de rechange pour ce produit ou un remboursement du prix
d'achat initial du produit. Britax se réserve le droit de discontinuer ou de modifier les tissus,
les pièces, les modèles ou les produits, ou d'y faire des substitutions.
Pour faire une demande en vertu de cette garantie, communiquer avec le service à la clientèle
de Britax au 1 888 427-4829 ou écrire à Britax Child Safety, Ltd., case postale 7289, comptoir
postal Brunswick Square, Saint-Jean NB E2L 9Z9. Une preuve d'achat est exigée.
VEUILLEZ REMPLIR LA CARTE D'ENREGISTREMENT DU PROPRIÉTAIRE ET LA
POSTER DANS LES TRENTE (30) JOURS QUI SUIVENT L'ACHAT OU VISITER LE SITE
WWW.BRITAXUSA.COM/REGISTRATION.
LIMITES DE LA GARANTIE
Cette garantie ne couvre pas les dommages qui résultent d'une négligence, d'une mauvaise
utilisation ou d'une utilisation non conforme aux instructions relatives au produit.
L'utilisation de housses, de pièces rapportées, de jouets, d'accessoires ou de dispositifs de
serrage autres que ceux de Britax Child Safety, Inc. n'est pas approuvée par Britax. Leur
utilisation pourrait faire en sorte que le siège d'auto ne soit pas conforme aux Normes de
sécurité des véhicules automobiles du Canada ou ne fonctionne pas de la manière prévue en
cas d'accident. Leur utilisation annule automatiquement la garantie de Britax.
LIMITES DES DOMMAGES
La garantie et les mesures de redressement énoncées ci-dessus sont exclusives et tiennent
lieu de toutes les autres, verbales ou écrites, expresses ou implicites. En aucun cas Britax,
ou le détaillant qui vend ce produit, ne pourra être tenu responsable de tout dommage,
incluant les dommages accessoires ou indirects, qui découlerait de l'utilisation de ce produit
ou de l'inaptitude à utiliser ce produit.
LIMITES DES GARANTIES ET AUTRES CONDITIONS DES GARANTIES ET LOIS
PROVINCIALES
Toute garantie tacite, incluant les garanties tacites de qualité marchande et d'adéquation à un
but particulier, se limitera à la durée et aux conditions de la garantie écrite expresse. Certaines
provinces ne permettent pas de limite quant à la durée d'une garantie tacite ni d'exclusion ou de
limite quant aux dommages accessoires ou indirects, de sorte que les limites énoncées ci-dessus
peuvent ne pas s'appliquer. Cette garantie vous donne des droits légaux précis, et vous pouvez
avoir d'autres droits qui peuvent varier d'une province à l'autre. Ni Britax, ni le détaillant qui
vend ce produit, n'autorise une quelconque personne à créer en son nom toute autre garantie,
obligatio
to a été fabriqué par Britax Child Safety, Inc. Britax® garantit ce produit à
n ou responsabilité en rapport avec ce produit.
Page 40

Britax Child Safety, Ltd.
P.O. Box 7289,
RPO Brunswick Square,
Saint John NB E2L 9Z9.
A Britax Childcare Group Limited
company
Une société de Britax Childcare
Group Limited
Tel. : 1-888-427-4829
BritaxUSA.com
Manufactured in Charlotte, NC, USA
IMPORTANT :
dOuble check eveRy TIMe yOu uSe ThIS cAR SeAT.
IMPORTANT :
cONTRe-véRIfIeR chAque fOIS qu'ON uTIlISe ce SIèGe
Double Check Car Seat-to-Vehicle Installation :
Check that the lower connector or vehicle seat belt connections to the vehicle are tight
and secure.
Verify the car seat cannot be moved front-to-back or side-to-side more than 2.5 cm
(1 in) at the belt path.
Double Check Child-to-Car Seat Installation :
Tug on the buckle to ensure a proper connection.
Confirm harness straps are snug and over both shoulders and hips. You should not be
able to pinch excess harness strap webbing at the child’s shoulder.
Make sure the chest clip is properly fastened and positioned in the middle of the child’s
chest at armpit level.
Contre-vérifier l'installation du siège d'auto dans le véhicule :
Vérifier que les connexions du connecteur du bas ou de la ceinture de sécurité du véhicule
au véhicule sont serrées et solides.
Vérifier que le siège d'auto ne peut pas bouger de plus de 2,5 cm (1 po) d'avant en
arrière ou d'un côté à l'autre au chemin de sangle.
Contre-vérifier l'installation de l'enfant dans le siège d'auto :
Tirer brusquement sur la boucle pour s'assurer que le raccordement est bon.
Vérifier que les sangles du harnais sont bien ajustées et passent sur les épaules et sur les
hanches. On ne devrait pas pouvoir pincer un excès de sangle de harnais aux épaules de
l'enfant.
S'assurer que l'attache de poitrine est fixée correctement et qu'elle est placée au milieu
de la poitrine de l'enfant, au niveau des aisselles.
d'AuTO.
 Loading...