

Page 1
Page 2

Page 3

Contents
Safety Information
Components of your Brio SmartClean
Getting Started
Connecting and Charging
Best Practices for Li-On Batteries
Using the Brio SmartClean
Brushing Techniques
Brushing Modes
Caring for your Brio SmartClean
Recycling your Brio SmartClean
Warranty / Support
2
8
10
10
11
12
13
15
18
19
20
1
Page 4

Safety Information
IMPORTANT SAFEGUARDS: READ ALL INSTRUCTIONS
BEFORE USING
The SmartClean 201 has been carefully designed to oer
you and your family a new and unique brushing experience
that is safe and eective. When using electrical
products, basic safety precautions should always be followed.
2
Page 5

To reduce the risk of electric shock:
• Always unplug this product after charging is complete
• Do not use while bathing
• Do not place the product where it can fall into water
• Do not place, drop, or otherwise submerge product in
water or other liquid
• If charger falls into water, unplug immediately and
discontinue use
• Never use charger if the cord or plug are damaged
WARNINGS To reduce the risk of burns,
electrocution, re or injury:
• Use this product only for its intended use as described
in the manual.
• Do not use accessories, chargers, or attachments that
are made by other manufacturers.
• Discontinue use if product is damaged in any way.
Safety Information |
3
Page 6

• Do not allow any portion of this product to be used as a toy.
• Do not pull or carry by cord, use cord as a handle, or pull
cord around sharp edges or corners.
• Keep cord away from heated surfaces.
• Do not unplug by pulling on the cord. To unplug, grasp the
plug, not the cord.
• Only connect this product to a properly grounded outlet
that is GFCI protected.
• Do not plug into an outlet with a voltage other than
specied on the bottom of the charger.
• Never force the plug into the outlet; Discontinue use
if it does not easily t into the outlet
• Do not use the charger outdoors
• Avoid using brush head with bent or crushed bristles.
Excessively warn bristles may break o while brushing.
Replace brush head every 3 months or sooner,
depending on wear.
4
Page 7

• This product is designed to clean your teeth, gums, and
tongue only. Discontinue use of this product and contact
a physician or dentist if discomfort or pain is experienced.
• This product is not intended for use by persons with
reduced physical, sensory, or mental capabilities or lack
of experience or knowledge of this product unless they
are supervised or otherwise given instruction by a person
responsible for their safety.
• Children should be supervised while using the product
to ensure safe and proper use.
• Do not use attachments other than those sold by
the manufacturer.
• Never place any portion of this product in the dishwasher.
• If the product is dropped, the brush head should be
replaced before the next use, even if no damage is visible.
Safety Information |
5
Page 8

Medical Warnings
• Consult your dental professional before you use this
product if you have had oral or gum surgery in the previous
2 months.
• Contact your dental professional if excessive bleeding
occurs after using this product or if bleeding occurs beyond
the rst week of use.
• If you have a pacemaker or other implanted device, contact
your physician or the device manufacturer prior to use.
• This product has been tested and is compliant with safety
standards for electromagnetic devices.
• Consult your physician prior to using this product if you
have medical concerns.
| Safety Information
6
Page 9

Page 10
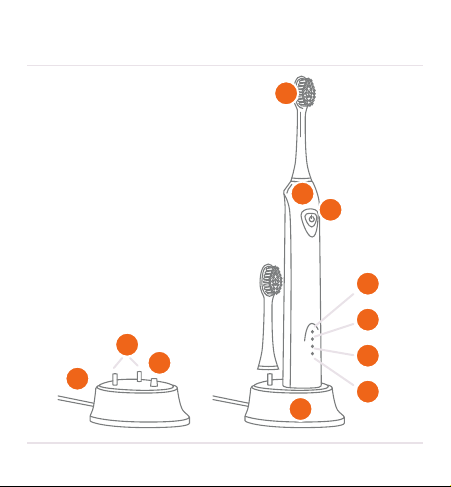
Components of your Brio SmartClean
A
B
C
D
E
J
K
8
I
H
F
G
Page 11

Brush Head
A
B
Toothbrush Handle
C
On/O & Brushing Mode Button
Normal Working Mode Indicator
D
Soft Working Mode Indicator
E
Massage Working Mode Indicator
F
Charging Indicator
G
Charger Unit
H
I
Handle Stand
J
Brush Head Stand
K
Charging Cable
Components |
9
Page 12

Getting Started
Connecting and Charging
• The SmartClean 201 has a water-resistant handle. It is
designed to be rinsed lightly but not meant to be used
under water or in very wet situations.
• Charge the brush before rst use. The brush will come
from the factory with a partial charge but should be fully
charged prior to use.
• To charge the brush, plug in the charging base to a suitable
outlet as described in the “Safety Information” section. Place
the brush handle in the cradle. When the unit is charging, the
blue “charging” indicator light on the handle will illuminate.
• A full charge takes approximately 24 hours and will sustain
the brush for about six weeks of regular brushing before
requiring a charge.
10
Page 13

• The charge indicator light will switch from a solid blue light
when charging to a ashing blue light when fully charged.
Best Practices for Li-ON Batteries
• The LI-ON battery cannot be overcharged, but the battery’s
life can be improved by more frequent charging.
• Fully charging the battery (leave on charging base for
at least 24 hours) every 1-2 weeks will extend the life
of the toothbrush.
• When the battery is too low, the brush will either not turn
on or shut o mid-cycle. This is done to protect the battery
from excessive discharge. When this happens, make sure
to fully charge the battery before continuing use.
• If any diminished power or vigor is noted while using
the brush, fully charge the brush before next use.
• Avoid exposing the toothbrush to excessively high or
low temperatures.
Getting Started |
11
Page 14

Using the Brio SmartClean
Remove protective packaging and attach the brush head to
the handle. Wet bristles and apply any kind of toothpaste.
To avoid splashing, place the brush head in your mouth before
turning on the brush.
You may notice a slight tickling or tingling sensation when rst
using a sonic toothbrush. As you become more accustomed to
brushing with a sonic toothbrush, this sensitivity will diminish.
New sonic toothbrush users may prefer to use the toothbrush
on “Soft” mode for the rst two weeks of use before using
the brush in “Normal” mode. Replace the Brush head every
3 months, or more often if needed. Replace the head if the
bristles have become much softer, bent, or misshapen.
12
Page 15

Brushing Technique with the Brio SmartClean
It is important to note that brushing technique with a sonic
toothbrush is very dierent than using a manual toothbrush.
Please read this section carefully.
• Place the brush head in your mouth with the bristles at a
45 degree angle to your teeth.
• Start in a specic zone of your mouth – upper outside,
upper inside, lower outside or lower inside.
• The 30-second timer will provide a reminder to switch
zones. The SmartClean has a two-minute cycle time: After
the cycle is complete, the brush will turn o.
• Gently press the button to start the brushing cycle. Hold
the handle with a light grip and gently move the bristles
in a small circular motion from the gums to the teeth and
back. For a right- handed person, use a counter-clockwise
motion, and a clockwise motion for a left-handed person.
Using the Brio SmartClean |
13
Page 16

• Spend several seconds on each tooth before moving on.
Use light pressure and let the vibrations of the brush do
the work.
• If you wish to whiten teeth or remove stains, extra time
may be needed in those areas. Spend extra time on the
areas of concern after you have completed a full brushing
cycle of your entire mouth.
• If you have braces, gently turn or roll the brush head all the
way around the brackets and wires in order to reach the
entire tooth. Continue until you have covered your entire
mouth. Fully brushing your mouth with braces may require
more brushing time than a single cycle.
• Dental restorations such as implants, crowns, caps,
bridges, and llings should be brushed as you would
your natural tooth surfaces unless otherwise directed
by your dental professional.
14
Page 17

Brushing Modes
• The Brio SmartClean oers three dierent brushing modes
for diering oral care needs:
• Normal Mode - Exceptional cleaning power for
experienced sonic toothbrush users
• Soft Mode - Gentle, yet thorough cleaning for sensitive
areas or new sonic toothbrush users
• Massage Mode - Gentle stimulation of the gums
How to Switch Between Brushing Modes
• Power On/O and brushing mode selection are controlled
by the power button. Pressing this button will cycle
through the modes in order. Pressing the button again will
turn o the toothbrush.
• The SmartClean 201 automatically starts in the Normal
mode when pressing the power button once.
Using the Brio SmartClean |
15
Page 18

• To change from Normal mode to Soft mode, press the power
button a second time.
• Pressing the power button again will switch to massage mode.
• The brushing mode indicator light indicates the current
brushing mode.
• To turn o the brush, press the brushing mode button.
If the brush has been on for less than 15 seconds, it is
necessary to cycle through all the modes before the brush
will turn o. After the brush has been running for 15
seconds without a cycle change, it will turn o with
a single push of the power button.
| Using the Brio SmartClean
16
Page 19

Page 20

Caring For Your Brio SmartClean
• Thoroughly rinse brush head and bristles after each use.
Towel dry and remove excess water after rinsing.
• Occasionally remove brush head to clean handle and head
separately under running water. Use caution not to fully
submerge the brush handle.
• Make sure to unplug the charging unit before cleaning it.
The charging unit should only be cleaned with a dry or
damp cloth. Never submerge the charging unit or hold it
under running water.
• Do not plug in charging unit until it is completely dry.
18
Page 21

Recycling Your Brio SmartClean
This product contains rechargeable batteries. Due to the
construction and risks of dismantling this product, it is
recommended that the consumer does not attempt to
remove the battery from the brush handle. In the interest
of protecting the environment, please recycle this unit
properly with a responsible recycler in your area. For local
electronics recyclers in your area visit www.e-stewards.org.
If an electronics recycler is not available, please visit
www.brio4life.com for instructions on how to send the brush
back to us for proper recycling.
Care & Recycling |
19
Page 22

Warranty & Support
The Brio SmartClean is guaranteed to function properly from
two years from the date of purchase. Defects due to faulty
materials and workmanship will be repaired or replaced at
Brio’s expense with a qualied receipt.
To contact Brio customer service please call (248) 268-6530.
For more information on the warranty service process,
please visit www.brio4life.com/service
20
Page 23

Warranty Exclusions
Items not covered under warranty:
• Brush heads
• Damage caused by misuse, abuse, neglect, alterations,
or unauthorized repair.
• Normal wear and tear, including chips, scratches, abrasions,
and discoloration or fading. Slightly diminished battery
capacity after rst year of use.
Implied Warranties
Any implied warranties, including implied warranties of
merchantability and tness for a particular purpose, shall
be limited to the duration of the express warranties set forth
above. In some states, limitations on duration of implied
warranties do not apply.
Warranty & Support |
21
Page 24

Limitation of Remedies
• In no event shall Brio or any of its aliated companies be
liable for any special, incidental, or consequential damages
based upon breach of warranty, breach of contract,
negligence, tort, or any other legal theory. Such damages
include, without limitation, loss of savings or revenue,
loss of prot, loss of use; the claims of third parties
including, without limitation, dentists and dental hygienists,
and cost of any substitute equipment or services. Some
states do not allow the exclusion or limitation of incidental
or consequential damages.
Troubleshooting
• If you are unable to resolve a problem of any kind based
on the information within these instructions. Please
contact Brio Customer Service at (248) 268-6530 to speak
to a representative.
| Warranty & Support
22
Page 25

Page 26

Problem
Toothbrush will not turn on
Tickling sensation when using the SmartClean
The brush head rattles
Brush seems less powerful
24
Page 27

Solution
Recharge your brush overnight. Make sure the charging light is
illuminated when the brush is placed on the charger. Remove
from charger when the charging light has started blinking.
A slight tingling/tickling sensation is normal for new users of
sonic toothbrushes. This sensation will diminish quickly with
continued use.
Remove and re-attach brush head to handle, being sure to
push down rmly.
The brush may need recharging. Place on the charger until
the charge light indicates a full charge by ashing.
Troubleshooting |
25
Page 28

Problem
The brush handle got excessively wet or was submerged
underwater and will no longer turn on.
26
Page 29

Solution
Discontinue use. Dry o handle and place the brush handle in
a sealed bag of uncooked rice for 7 days to assist in removing
moisture from the brush. If the brush will not turn on or
function properly, please properly dispose of the brush.
Troubleshooting |
27
Page 30

 Loading...