

Page 1
Counter-Top
Point of Use
Water Dispenser
Setup Manual
Model No.: CLCTPOU620UVF2
Page 2

Table of Contents
Safety Information .................................................................... 3
Intended Use ......................................................................... 4
Product Features ..................................................................... 4
Product Dimensions ....................................................................4
Indicator Panel Description ..............................................................5
Package Contents. . . . . . . . . . . . . . . . . . . . . . . . . . . . . . . . . . . . . . . . . . . . . . . . . . . . . . . . . . . . . . . . . . . . . 5
Materials Needed ..................................................................... 5
Installation ........................................................................... 6
Install the Dispenser ....................................................................6
Connect to the Cold Water Supply ........................................................6
Flush the Filters ........................................................................7
Install the Filters and Complete the Installation .............................................8
Operation ............................................................................ 9
Turn the Dispenser On/O ...............................................................9
Dispense Cold Water ...................................................................9
Dispense Hot Water and Activate Child Safety Lock .........................................9
Troubleshooting ......................................................................10
Cleaning and Maintenance .............................................................10
Filter Replacement Schedule .............................................................11
Replace the Filters ......................................................................11
Filter Specifications .....................................................................11
Care and Maintenance ..................................................................11
Warranty .............................................................................12
2
Page 3

Safety Information
WARNING: To reduce risk of injury and property damage, you must read this entire guide before assembling,
installing and operating the dispenser.
WARNING: This product dispenses water at very high temperatures. Failure to use properly can cause personal
injury. When operating this dispenser, always exercise basic safety precautions, including the following:
• Prior to use, this dispenser must be properly assembled and installed in accordance with this
manual.
• For indoor use only. Keep the water dispenser in a dry place away from direct sunlight. Do NOT use
outdoors.
• Install and use only on a hard, flat and level surface.
• Do NOT place the water dispenser in an enclosed space or cabinet.
• Do NOT operate the dispenser in the presence of explosive fumes.
• Use only properly grounded outlets.
• Do not use an extension cord.
• Always grasp the plug and pull straight out from the outlet. Never unplug by pulling on the power
cord.
• Do NOT use the dispenser if the cord becomes frayed or otherwise damaged. If the supply cord is
damaged, it must be replaced by the manufacturer, its service agent or similarly qualified persons in
order to avoid a hazard.
• To protect against electric shock, do NOT immerse cord, plug, or any other part of the dispenser in
water or other liquids.
• Ensure the water dispenser is unplugged prior to cleaning.
• Never allow children to dispense hot water without proper and direct supervision. Unplug the unit to
prevent unsupervised use by children.
• Service should be performed only by a certified technician.
• The appliance must not be cleaned by a water jet and is not suitable for installation in an area where
a water jet could be used.
WARNING: Keep ventilation openings, in the appliance enclosure or in the built-in structure, clear of obstruction.
WARNING: Do not use mechanical devices or other means to accelerate the defrosting process, other than those
recommended by the manufacturer.
• This appliance should work under environment of temperatures from 4°C~40°C (39°F~104°F) and
humidity ≤90%.
• Never turn the machine upside down or lean it more than 45°.
• After turning the dispenser o, allow the dispenser to sit idle for 3 minutes before turning on again.
3
Page 4
Intended Use
This appliance is intended to be used in household and similar applications such as:
• Sta kitchen areas in shops, oces and other working environments
• Farm houses
• Clients in hotels, motels and other residential type environments
• Bed and breakfast type environments
• Catering and similar non-retail applications
This appliance is not intended for use by persons (including children) with reduced physical, sensory or mental
capabilities, or lack of experience and knowledge, unless they have been given supervision or instruction concerning
use of the appliance by a person responsible for their safety.
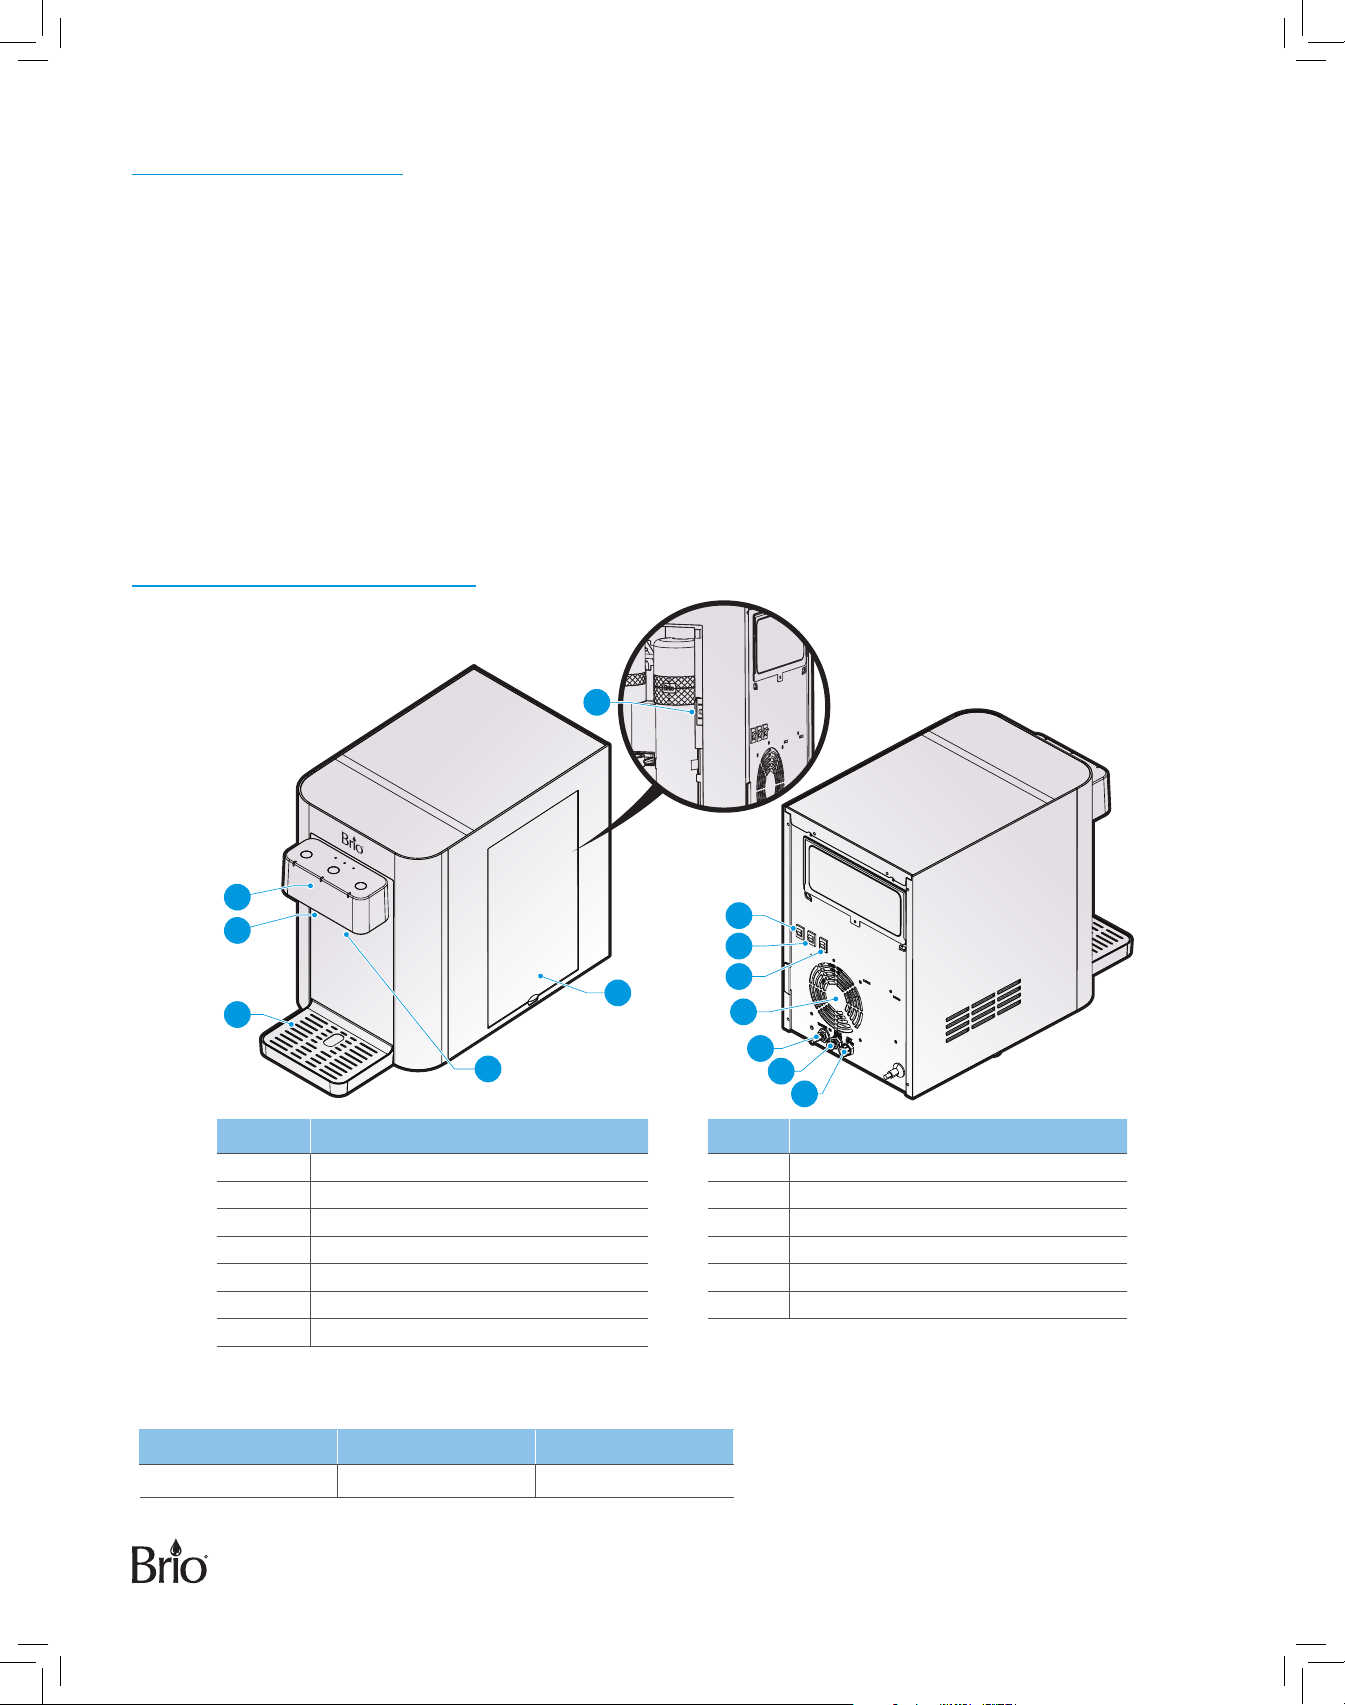
Product Features
13
1
2
3
5
Part Description Part Description
1 Control panel 8 Hot water switch
2 Water outlet 9 Fan
3 Drip tray 10 Water inlet
4 Filter cover 11 Cold water drain
5 Nightlight 12 Hot water drain
6 Nightlight switch 13 Filter reset button
7 Cold water switch
Product Dimensions
Height Width Depth
6
7
8
4
9
10
11
12
41.3 cm (16.25 in.) 27.9 cm (11 in.) 55.8 cm (22.0 in.)
4
Page 5
Indicator Panel Description
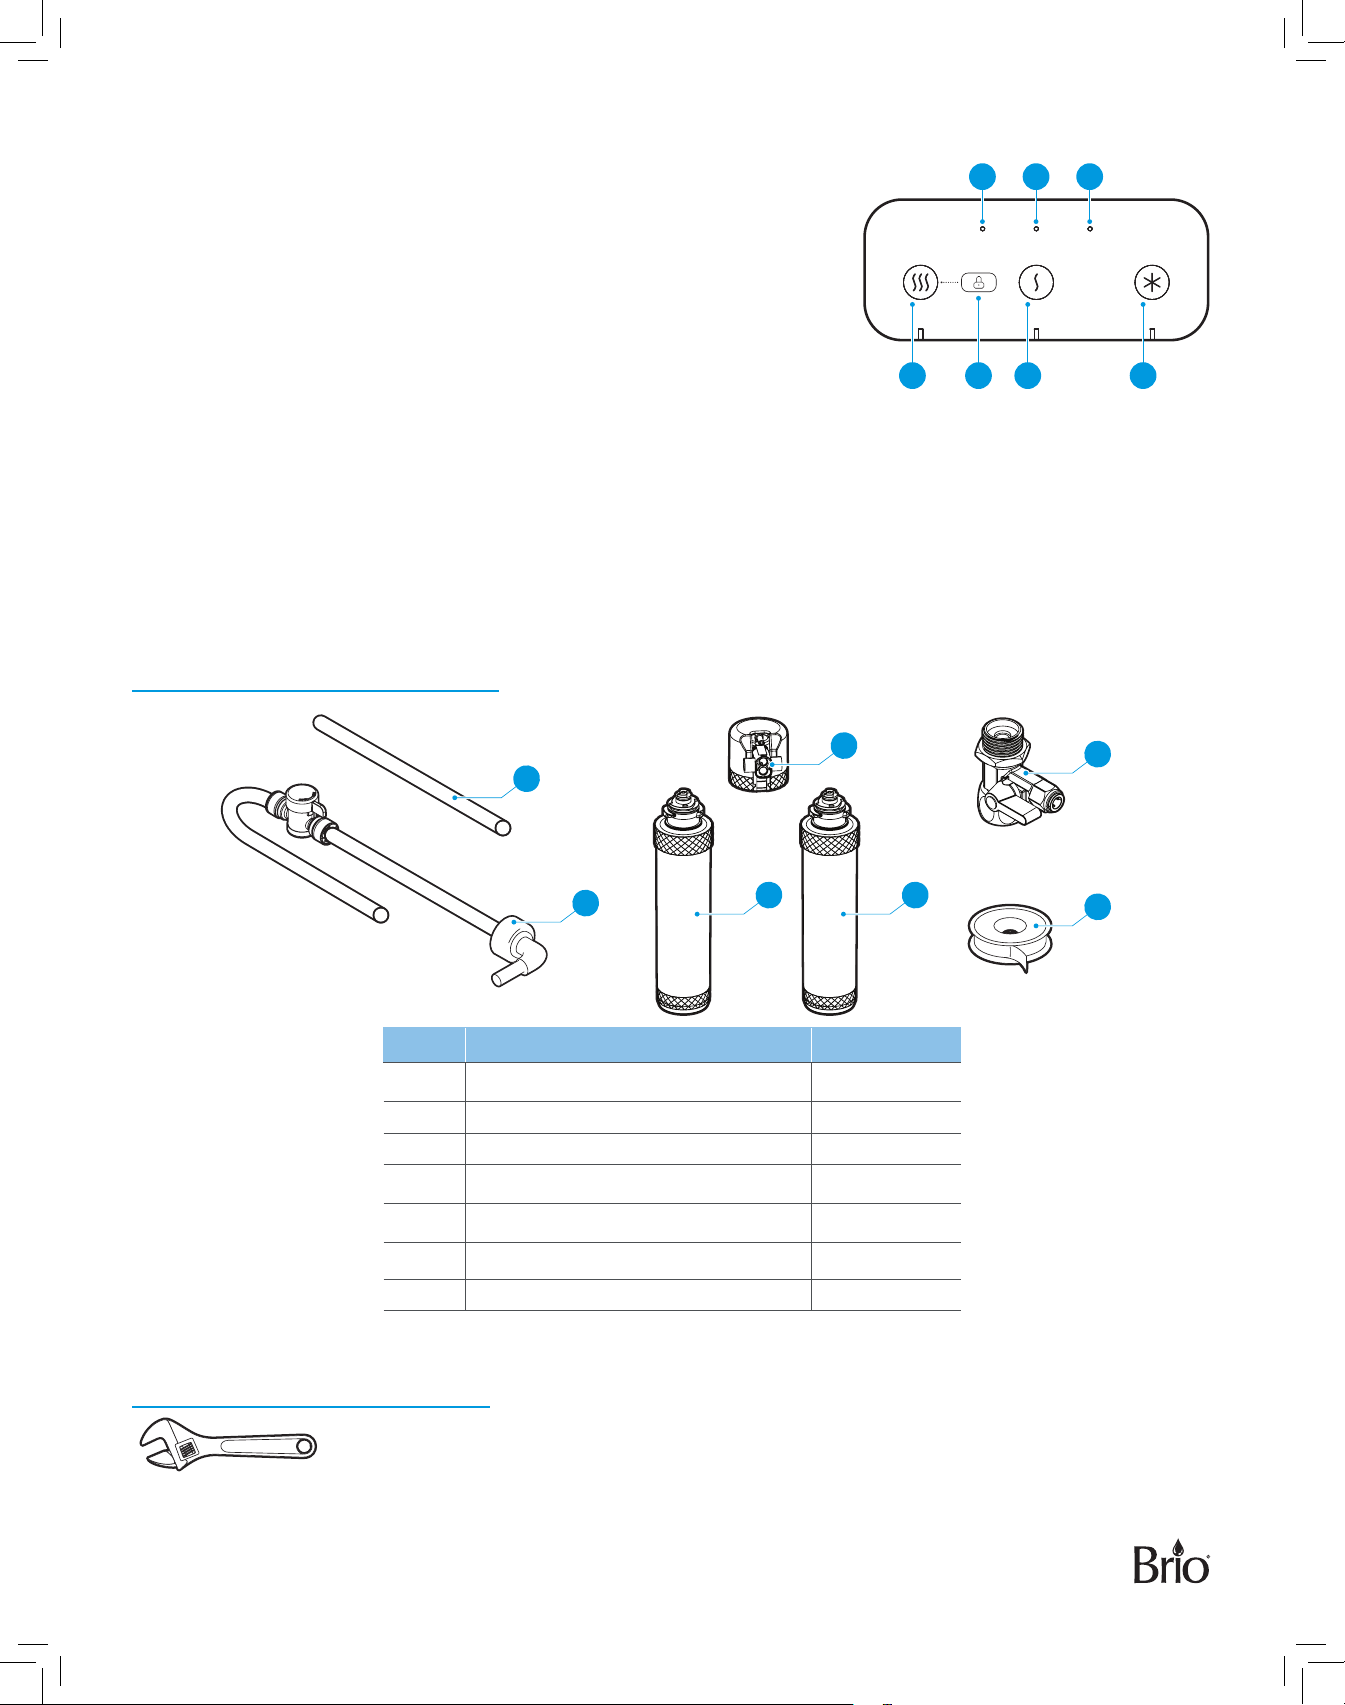
1. Hot Water Button – Press to activate the hot water feature. The Hot
icon illuminates to indicate hot water feature is selected and working.
2. Child Lock Button – Press to activate the child safety lock feature.
This de-activates the hot water feature.
3. Ambient Water Button – Press to activate the ambient water feature.
The Ambient icon illuminates to indicate that ambient water is
selected.
4. Cold Water Button – Press to activate the cold water feature. The Cold
icon illuminates to indicate that the cold water feature is selected and
working.
5. Filter 1 (Sediment) Indicator Light – This light ashes
when the Sediment lter has expired and needs to be replaced.
6. Filter 2 (Carbon +Ultra ltration) Indicator Light – This light ashes when the Carbon +Ultra ltration lter has
expired and needs to be replaced.
7. UV – The UV icon illuminates when the UV is working.
1
5 6 7
32 4
Package Contents
C
A
B
D E
Part Description Quantity
A Filter flushing tube 1
B Shut-o valve tube (7 ft.) 1
C Filter housing (for filter flushing) 1
D Sediment filter 1
E Carbon +Ultra Filtration filter 1
F Feed water adapter (with extra nut) 1
G Plumber’s tape 1
F
G
Materials Needed
Wrench
5
Page 6
Installation
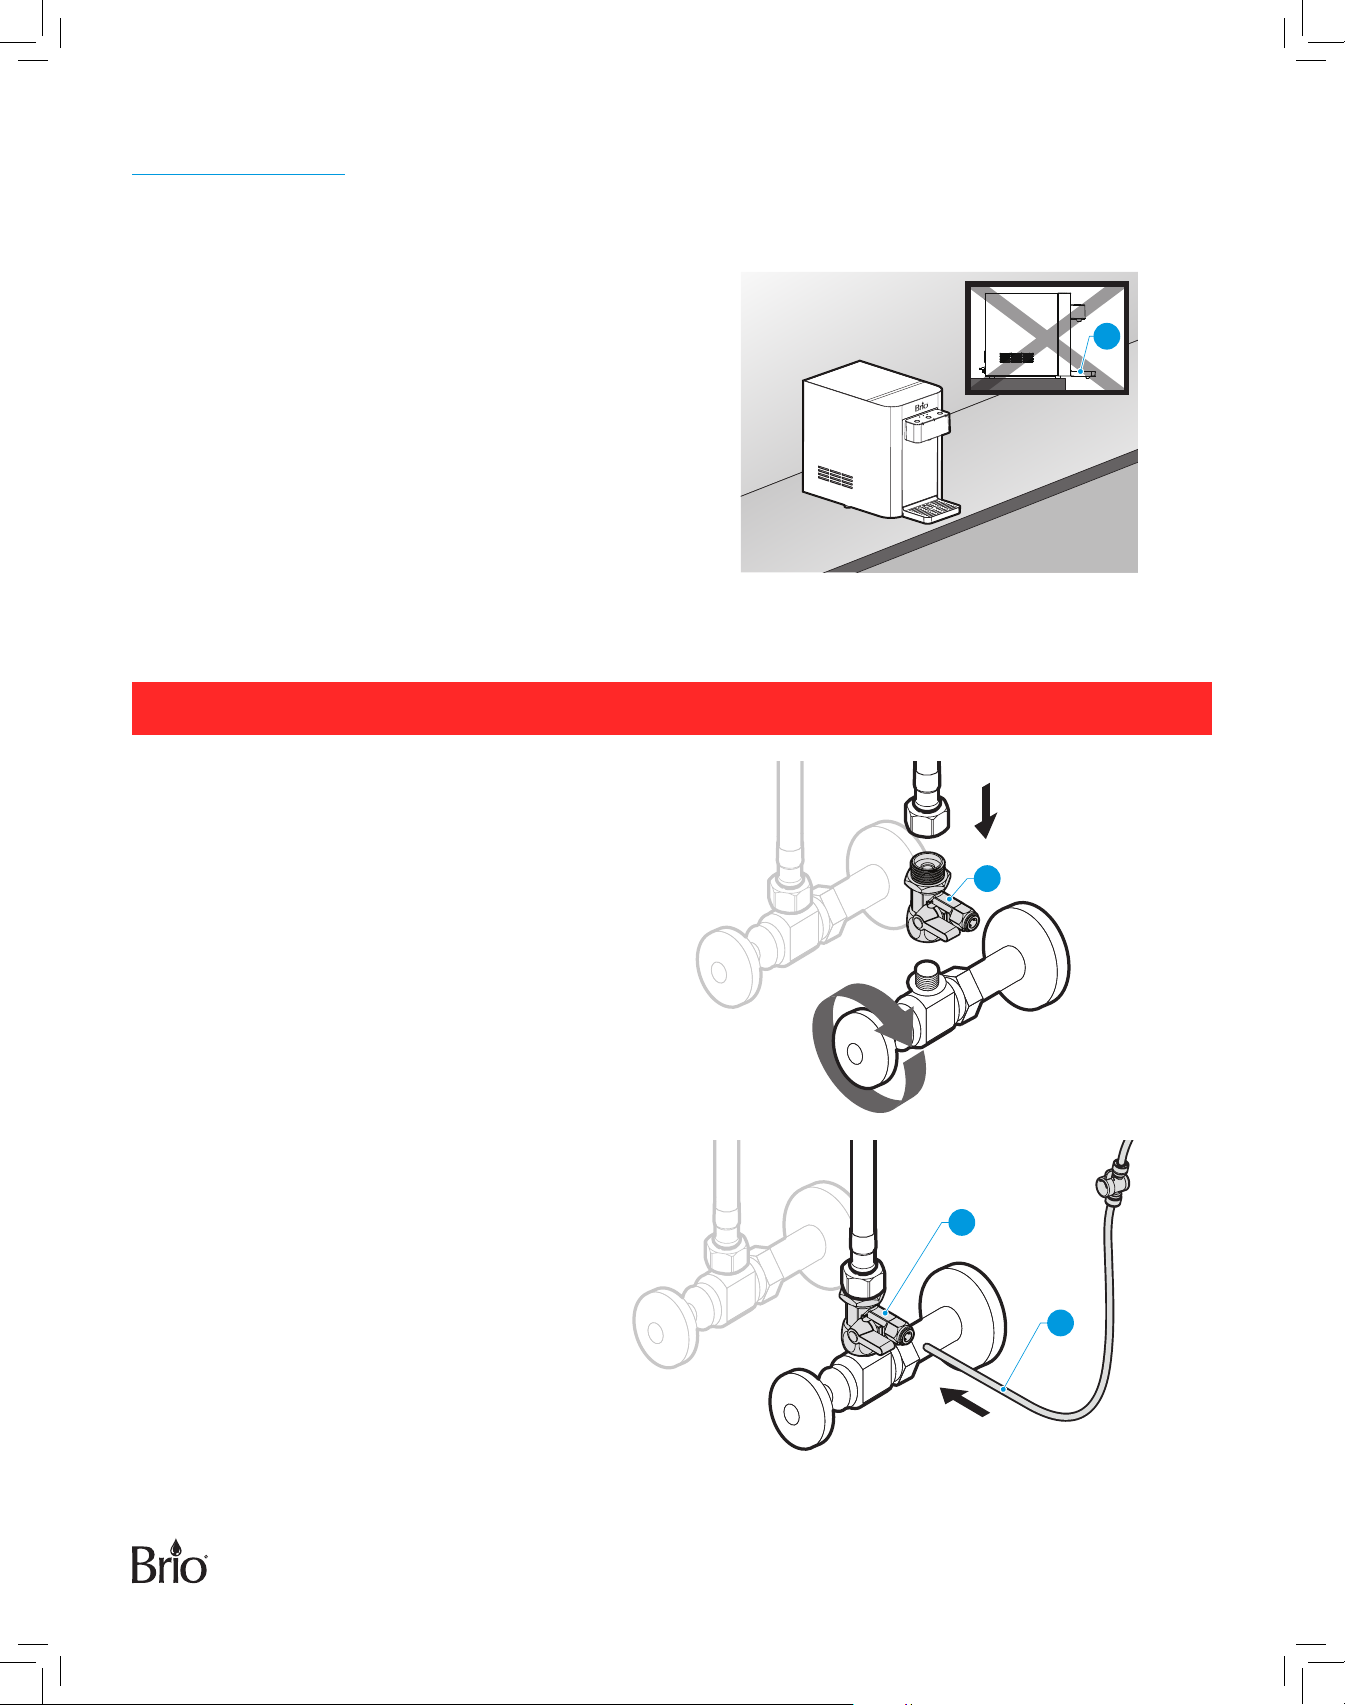
1. Install the Dispenser
A. Place the dispenser upright.
B. Locate the dispenser on a hard and level surface
in a cool shaded location near a grounded wall
outlet.
NOTICE: Do NOT plug in the power cord until the
entire installation section is completed.
C. Position the back of the dispenser no closer than
7.62 cm (3 in.) from a wall and permit free airow
between the wall and water dispenser.
D. Ensure the drip tray (3) is placed securely in the
dispenser to ensure it does not fall off.
3
2. Connect to the Cold Water Supply
CAUTION: DO NOT CONNECT THIS WATER LINE TO A HOT WATER SUPPLY LINE. The water supply to the unit
MUST be from the COLD WATER LINE. Using HOT WATER will severely damage your filters.
A. Turn off and then disconnect the
current cold water supply line.
B. Connect the feed water adapter (F) to
the cold water supply line.
C. Connect the cold water supply line on
top of the feed water adapter (F).
F
NOTE: An extra adapter nut is included
on top of the feed water
adapter (F) to attach to a 3/8 in.
or 1/2 in. feed plumbing line.
D. Insert the shut-off valve with tube (B)
straight into the quick connector piece
of the feed water adapter (F).
F
B
6
Page 7
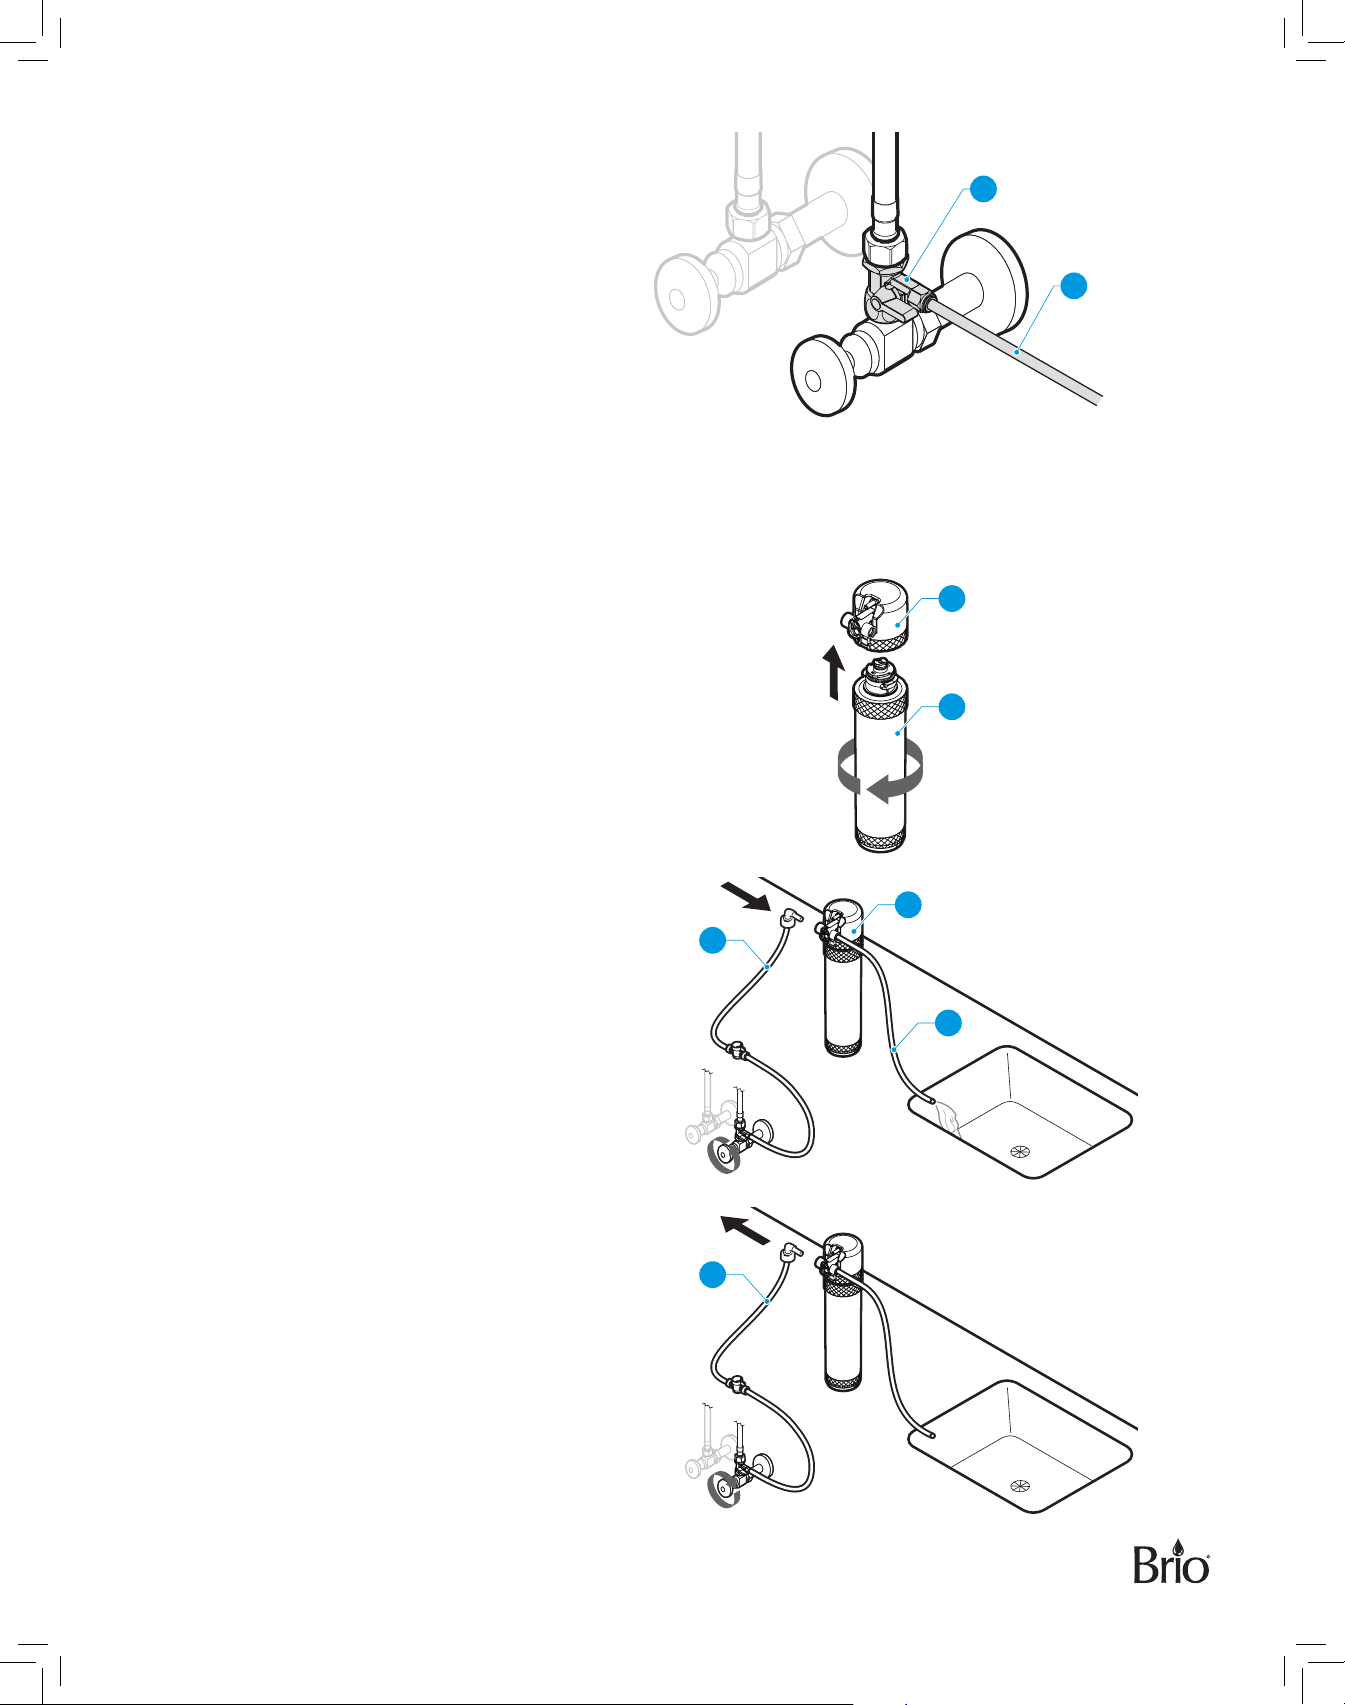
E. Gently tug on the tube (B) to ensure a
secure connection with the feed water
adapter (F).
3. Flush the Filters
IMPORTANT: Follow this procedure every time you replace your filters.
IMPORTANT: Ensure the water supply is o before you begin.
F
B
A. Connect a lter (D) to the lter housing (C)
by twisting the lter (D) clockwise.
B. Connect the tip of the shut-off valve tube (B)
to the left side of the lter housing (C).
C. Connect the lter ushing tube (A) to the
right side of the lter housing (C) and lay the
open end of the lter ushing tube (A) over
a sink or receptacle to collect water.
C
D
C
B
A
D. Flush each lter for a minimum of
5minutes. The recommended rate is
1.5-3gallons of water (about 10 minutes)
oruntil the water is clear in appearance.
E. Shut off the valve at the water source and
remove the lter housing from the tube (B).
B
7
Page 8
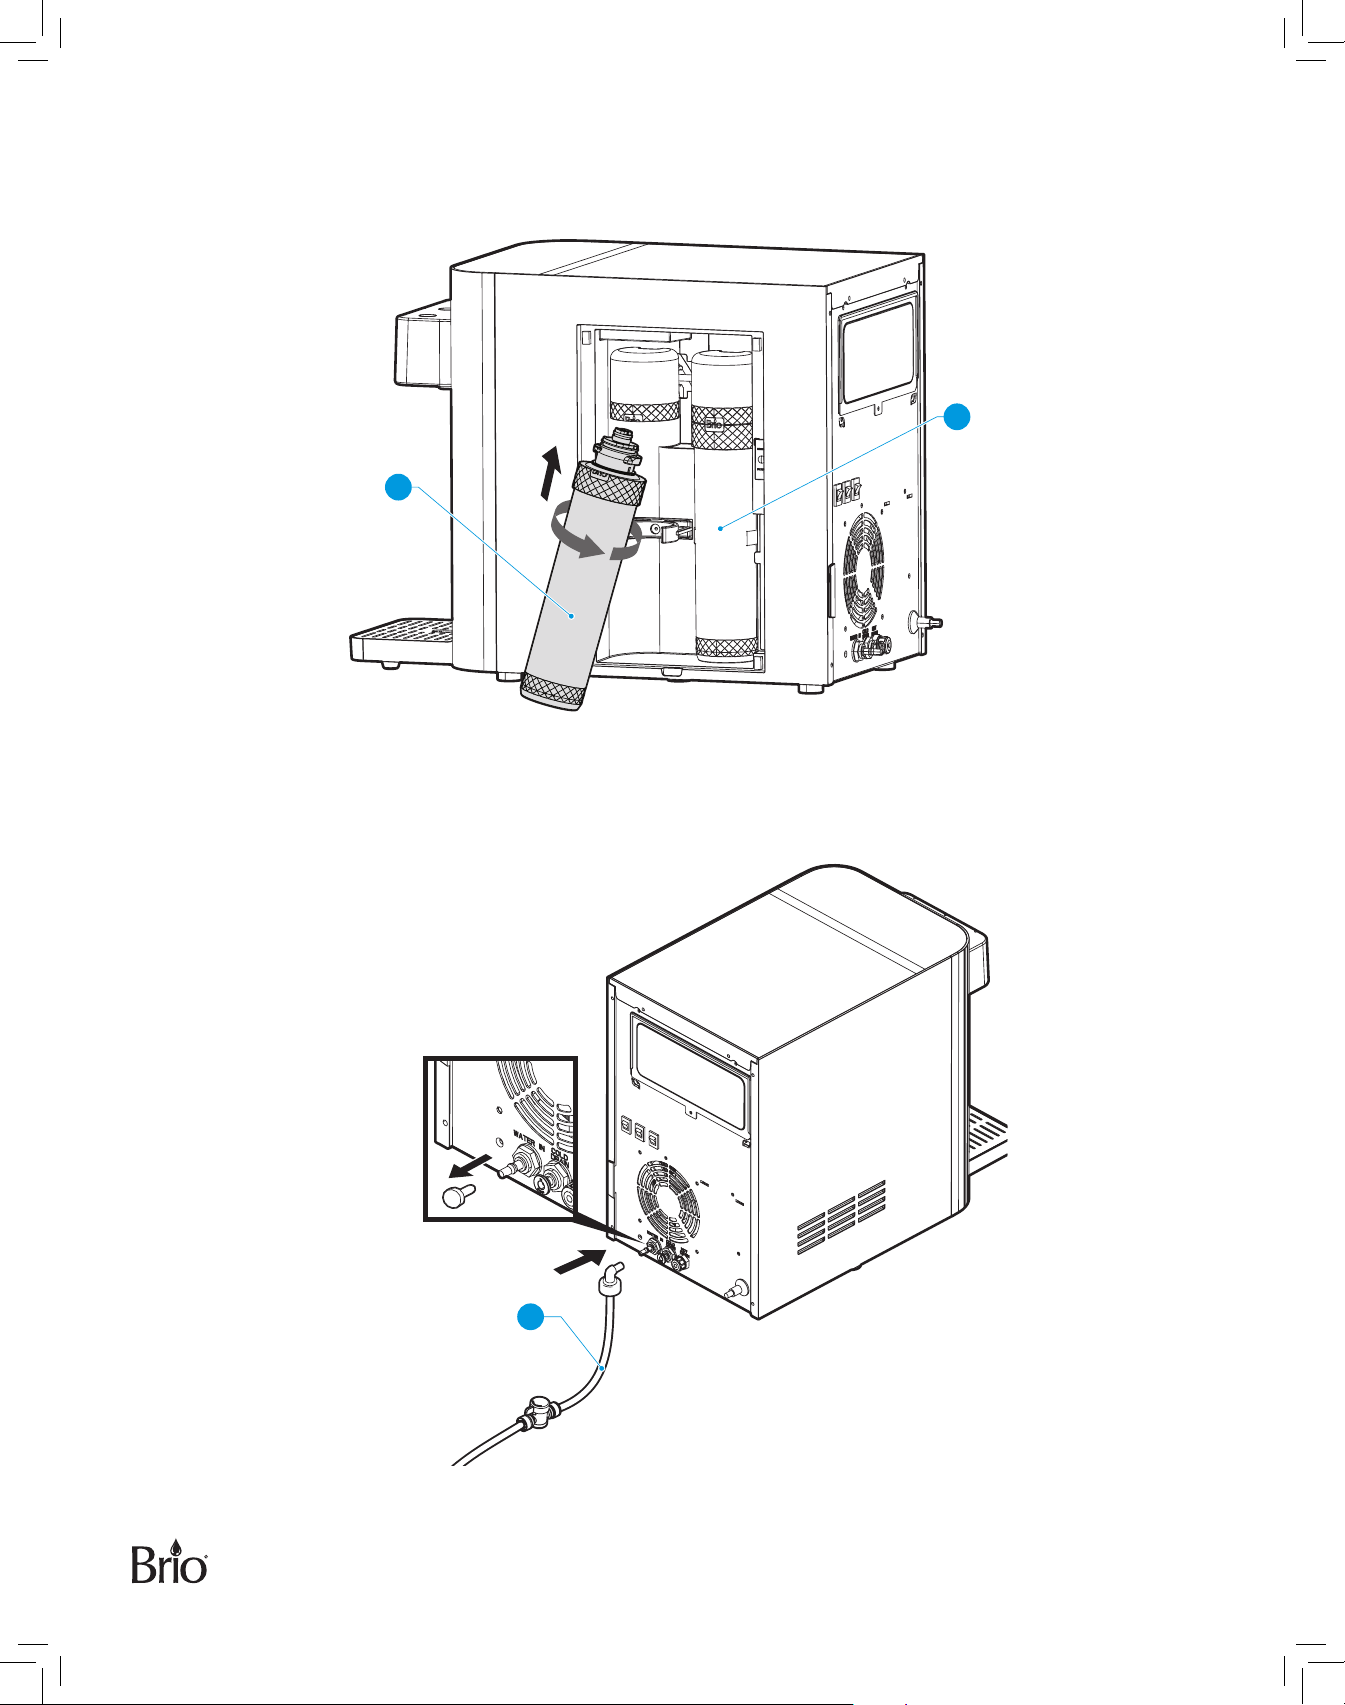
4. Install the Filters and Complete the Installation
A. After ushing, twist each lter (D and E) clockwise into the lter housings located inside the dispenser cabinet.
The sediment lter (D) goes on the left, the carbon +ultra ltration lter (E) on the right.
E
D
B. Remove the safety plug from the water inlet hole on the back of the dispenser by pushing in the inlet hole collar
and then gently pulling out the plug.
C. Connect the tip of the shut-off valve tube (B) into the water inlet hole on the back of the dispenser. Then turn on
the main water supply and ensure the valve in the tube (B) is on.
B
8
Page 9

Operation
IMPORTANT: This unit has been tested and sanitized prior to packing and shipping. During transit, dust and
odors can accumulate in the tank and lines. Dispense and dispose at least one quart of water prior
to drinking any water.
Turn the Dispenser On/O
IMPORTANT: Before you activate the hot and cold switches, ensure water has filled the tanks inside the
dispenser in order to prevent dry heating.
1. Plug in the dispenser and turn the On/Off switch to On.
2. Run water through the cold and hot water taps until water begins to dispense.
3. To power on the cooling system, ip the cooling switch to the On position.
4. To power on the heating system, ip the heating switch to the On position.
Dispense Cold Water
NOTE: Water will take approximately 1 hour after plugging in and turning on to become completely chilled. The
cooling light will turn o once the water has been fully chilled.
1. Press the cold water button on the dispenser control panel and then press your drinking glass or container
against the water outlet to dispense cold water.
2. Release when your container is full.
Dispense Hot Water and Activate Child Safety Lock
CAUTION: This unit dispenses water at temperatures that can cause severe burns. Avoid direct contact with hot
water. Keep children and pets away from the unit while dispensing. Never allow children to dispense
hot water without proper and direct supervision. Disable the heating feature by switching the heating
convenience switch to the O position.
NOTE: Water will take approximately 15-20 minutes after plugging in and turning on to reach its hottest
temperature. The heating light will turn o once the water has been fully heated.
1. This water dispenser is equipped with a child safety feature in order to prevent inadvertent dispensing. To
enable dispensing of hot water, press the hot water button on the dispenser control panel and then press your
drinking glass or container against the water outlet to dispense hot water.
2. To disable hot water, press the child lock button on the dispenser control panel.
3. Release when your container is full.
9
Page 10
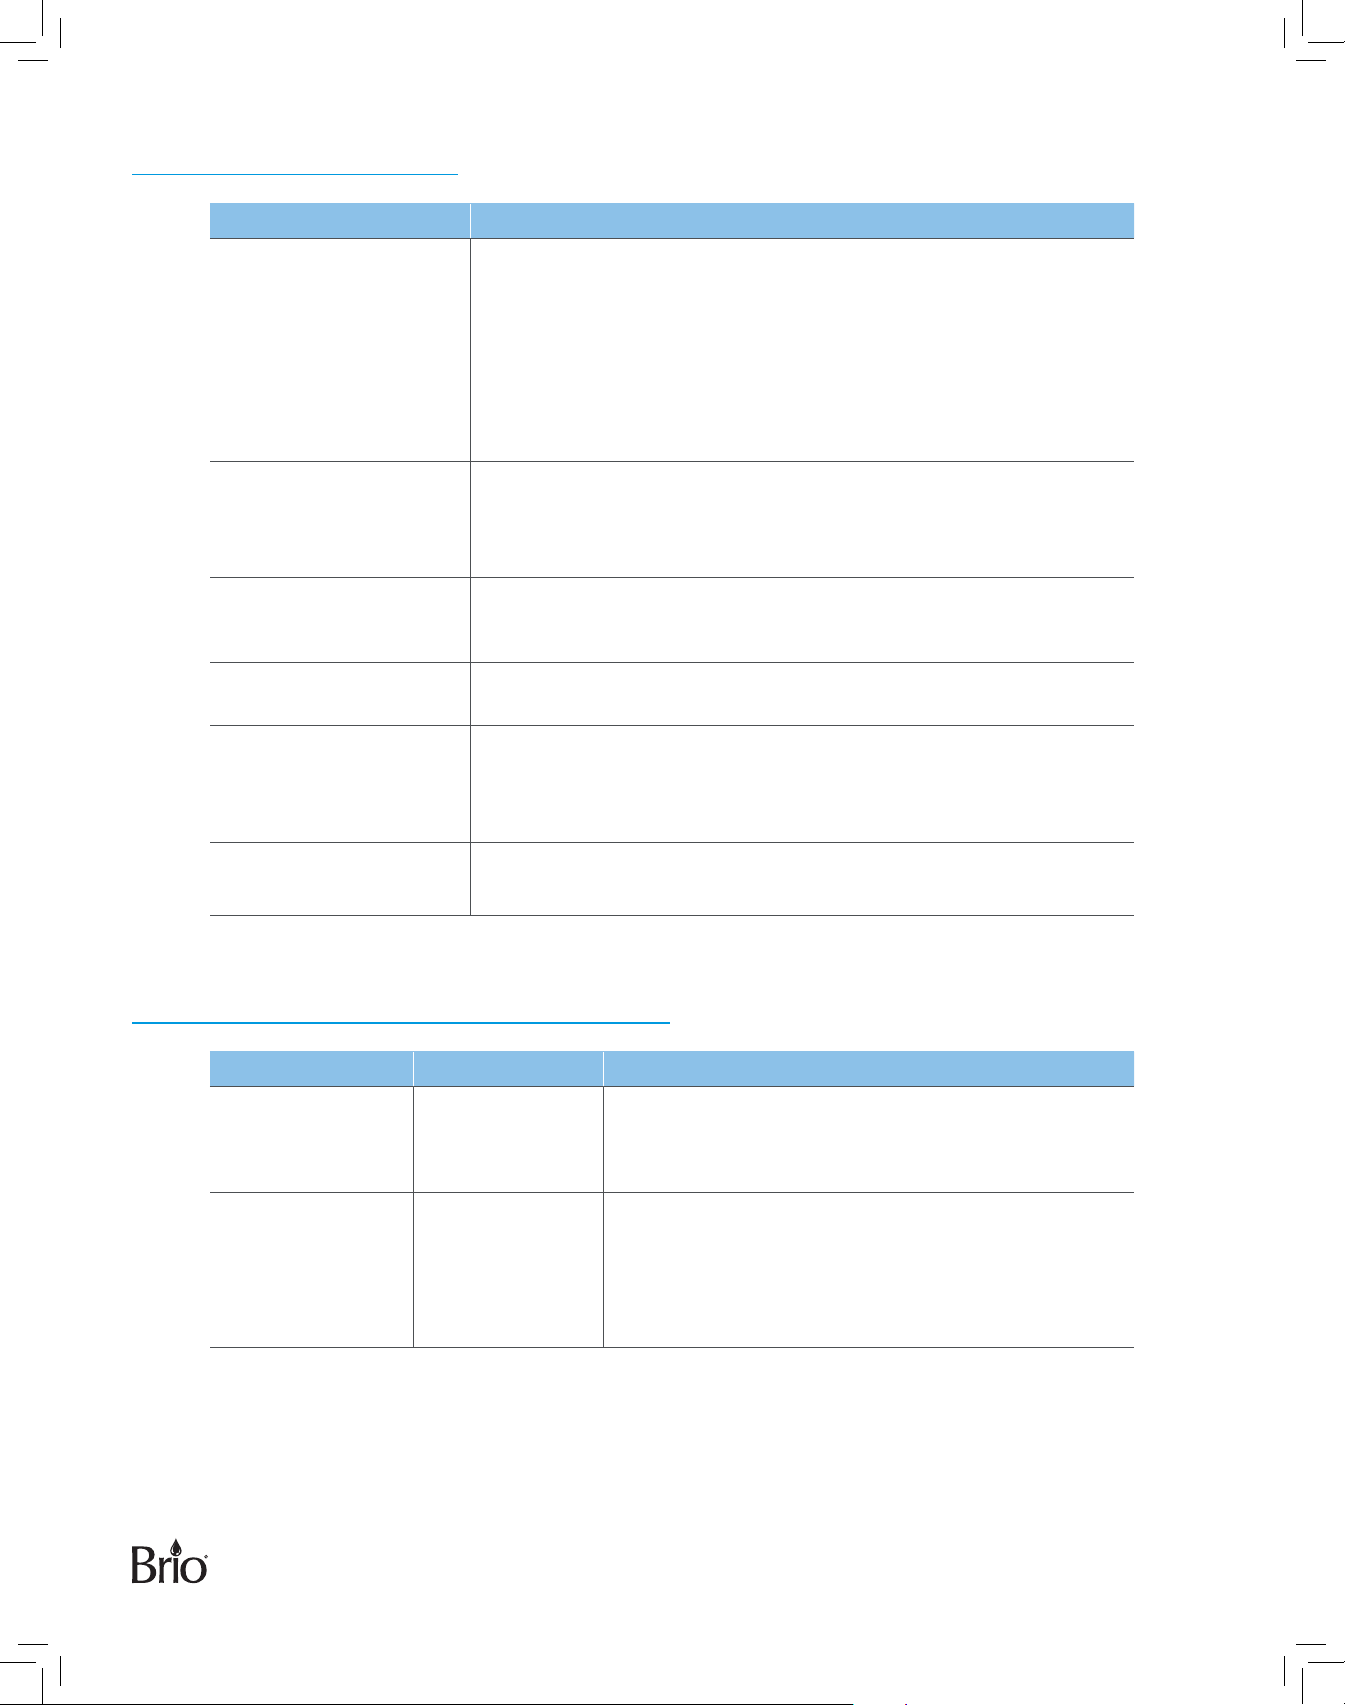
Troubleshooting
Problem Solution
The cold water is not
cold.
The hot water is not hot.
The nightlight is not
working.
The dispenser is noisy.
There is water leakage.
The machine is not
dispensing water.
• It takes up to one hour after setup to dispense cold water.
• Make sure the power cord is properly connected to a working
outlet.
• Make sure the back of the dispenser is at least 7.62 cm from a wall
and there is free airflow on all 7.62 cm sides of the dispenser.
• Make sure green power switch on back of dispenser is On.
• If water still isn’t cold, call customer service at +1 844-257-4103 for
assistance.
• It takes 15-20 minutes after setup to dispense hot water.
• Make sure the power cord is properly connected to a working
outlet.
• Make sure red power switch on back of dispenser is On.
• Make sure the power cord is properly connected to a working
outlet
• Make sure the nightlight power switch on back of dispenser is On.
• Ensure the dispenser is located on a level surface.
• The heating tube may be generating a slight noise. This is normal.
If the 3 lights are flashing, a leak was detected.
• The pipe is not connected properly. Check all water connections
and tubes to ensure everything is connected properly.
• The water and PE pipes have burst. Replace the water and PE pipe.
• The dispenser has become too cold and the lines are blocked
by ice. Turn the cooling switch o for at least 4 hours to allow the
water in the lines to thaw.
Cleaning and Maintenance
Task Frequency Instruction
Use a disinfectant, purchased separately, following
Sanitizing Every 3 months
Removing minerals
deposits
Every 6 months
directions from manufacturer for proper amount to
use. Use the Cleaning the Dispenser directions when
sanitizing.
Mix 4 liters water with 200g citric acid crystals, inject
into the machine and make sure the water can flow out
of the hot water tap. Switch on the power and allow it
to heat for about 10 minutes. After 30 minutes, drain the
liquid and clean it with water, dispensing two or three
times.
10
Page 11
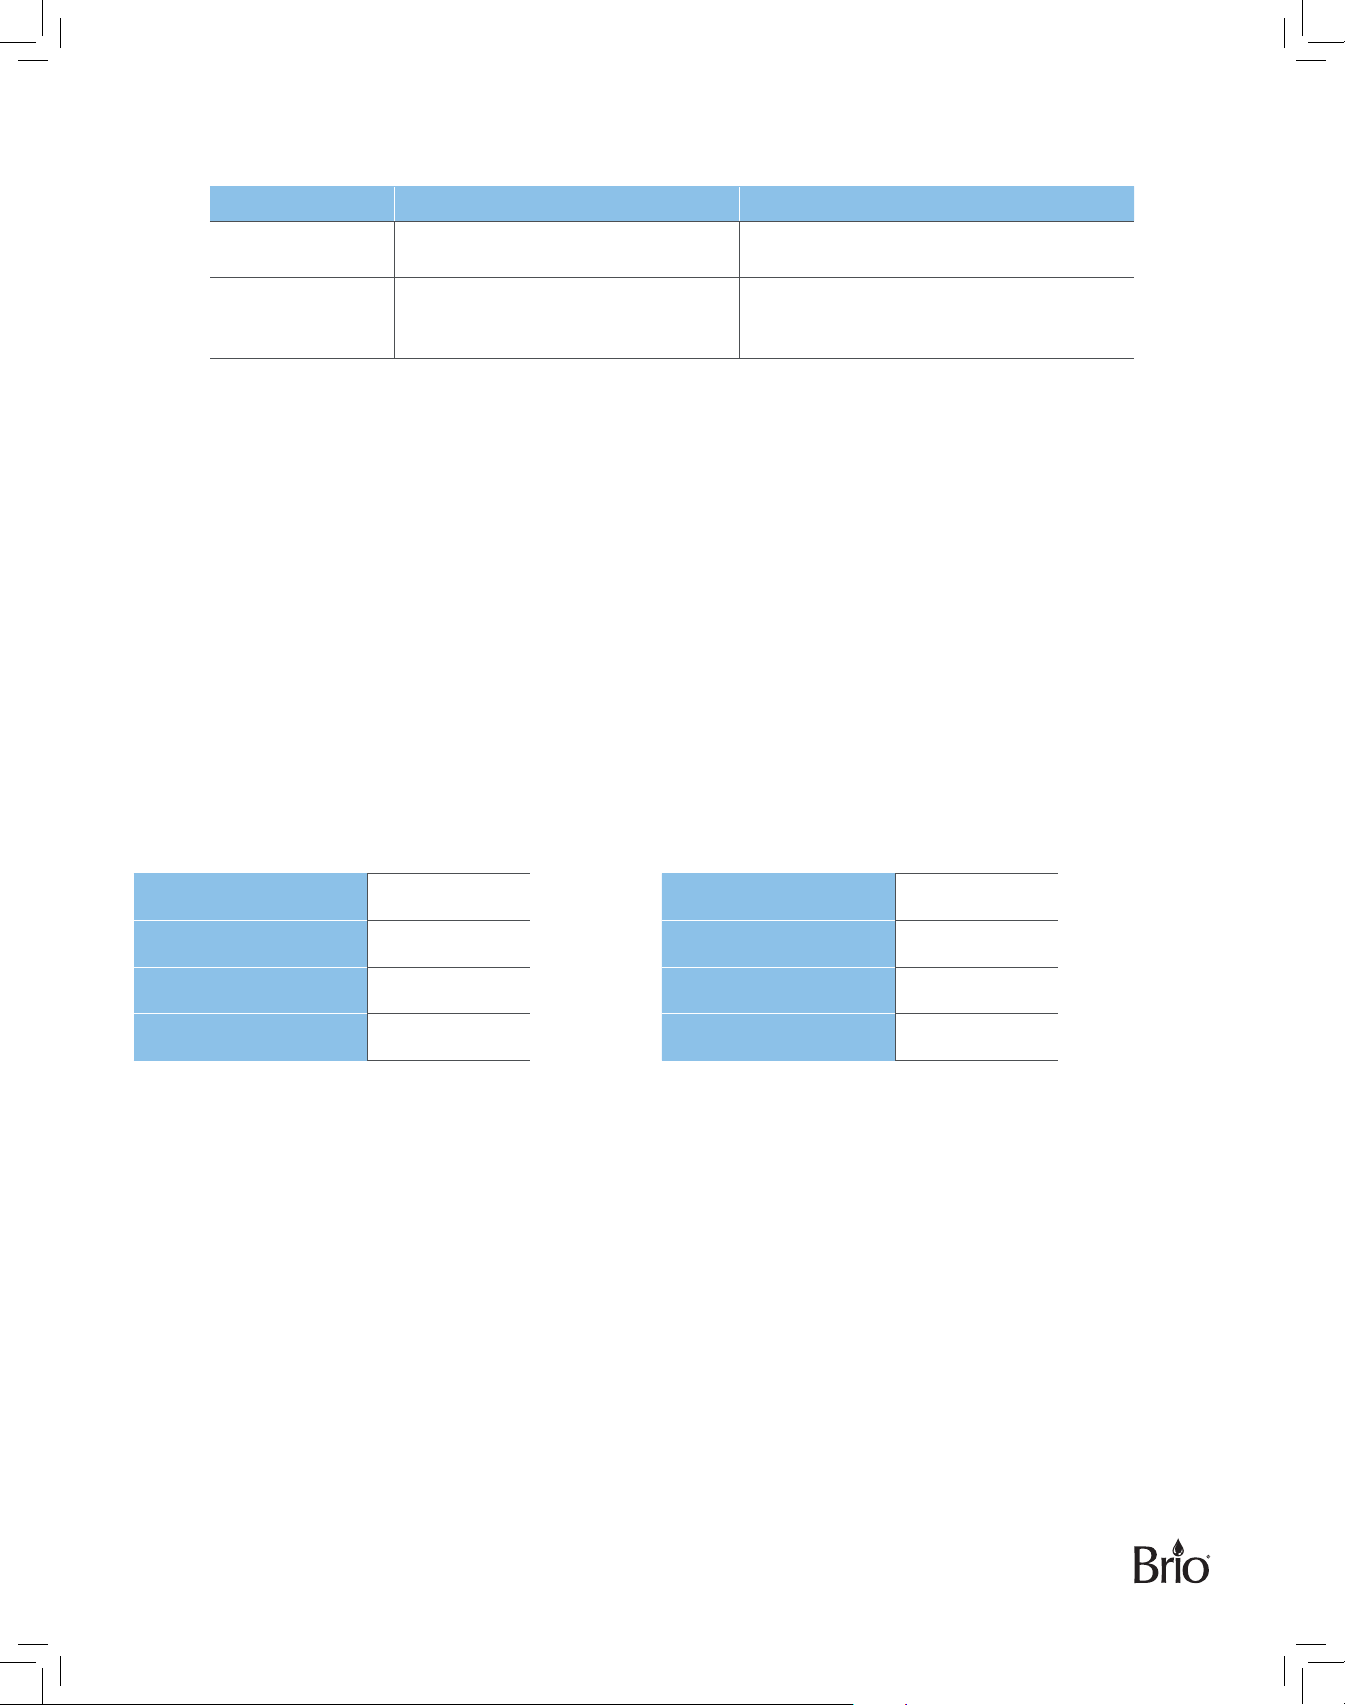
Filter Replacement Schedule
Filter Type Replacement Schedule Function
Carbon + Ultra
Filtration
Sediment 6 months or 950 gallons
6 months or 950 gallons
Reduces chlorine, taste and odor, lead
and cysts.
Performs a coarse filtration of original
water. Removes mud, sand, iron, rust,
and suspensions, and impurities.
Replace the Filters
IMPORTANT: Only replace the filters with new filters designed for this dispenser. Any other type of filter will
damage the machine and void any warranty.
When a filter is approaching the end of its life, the red indicator light starts to blink. When the filter has reached the
end of its life, the indicator light remains red. To change filters:
1. Shut off the water supply.
2. Remove the old lters and replace with new lters. Ensure the sediment lter is on the left and the carbon block
lter is on the right.
3. To ush your new lters, follow the instructions in Step 4 - Flush the Filters and Complete the Installation.
4. Press the lter reset button until the red indicator light turns off.
Filter Specifications
Sediment Filter Carbon +Ultra Filtration Filter
(Sediment, Dirt, and Rust Removal) (Taste and Impurity Removal)
Filter Capacity
Flow Rate
Suggested PSI
Temperature
950 Gallons
0.8 GPM
14.5 - 58 psi
33 - 100 °F
Filter Capacity
Flow Rate
Suggested PSI
Temperature
950 Gallons
0.8 GPM
14.5 - 58 psi
33 - 100 °F
Care and Maintenance
• Keep this dispenser in a dry and cool place and avoid direct sunshine.
• Ensure the back of the dispenser is at least 7.62 cm (3 in.) away from the wall.
• Never put the dispenser on paper or foam, which may store water and then cause creepage. Never put anything
flammable beside this machine.
• Do not use the dispenser outdoors or in a place that can be splashed by water.
• If the dispenser is not in use for longer than a 24-hour period, turn o the heating switch or the refrigerating
switch to save power and drain any remaining water.
• If the water supply is cut o, shut o the water supply and turn the dispenser o. When the water supply is back
on, re-open the water supply to the dispenser, turn the dispenser on, and allow the dispenser to run in order to
discharge sediment.
11
Page 12

Warranty
Brio (“Vendor”) warrants to the original purchaser of the Brio Water Coolers (the “Product”), and to no other person,
that if the Product is assembled and operated in accordance with the printed instructions accompanying it, then
for a period of one (1) year from the date of purchase, all parts in the Product shall be free from defects in material
and workmanship. This Limited Warranty shall be limited to repair or replacement of parts, which prove defective
under normal use and service and which Vendor shall determine in its reasonable discretion upon examination to be
defective. To take advantage of this Limited Warranty, please follow these steps:
1. Please retain your sales slip or invoice, as Vendor may require reasonable proof of your date of purchase.
2. Contact Vendor’s Customer Service Department using the contact information listed below.
3. Return parts to Vendor, per Vendor’s instructions, at your cost and expense.
4. Upon receipt by Vendor, Vendor shall advise you in writing whether a defect covered by this Limited Warranty exists
in any returned part and whether your claim has been approved or denied.
5. Upon Vendor’s approval of your claim, Vendor will replace such defective part without charge to you.
WHAT THIS LIMITED WARRANTY DOES NOT COVER: This Limited Warranty does not cover any failures or operating
diculties of the Product due to accident, abuse, misuse, alteration, misapplication, improper installation or improper
maintenance or service by you or any third party, or failure to perform normal and routine maintenance on the Product,
as set out in the User’s Manual. In addition, this Limited Warranty does not cover damages to the finish, such as
scratches, dents, discoloration or rust after purchase.
This Limited Warranty is the only express warranty given on the Product and is in lieu of all other express warranties.
Vendor disclaims all warranties for products that are purchased from seller other than authorized retailers or
distributors. THIS LIMITED WARRANTY RESTRICTS THE DURATION OF ANY AND ALL IMPLIED WARRANTIES,
INCLUDING WITHOUT LIMITATION, THE IMPIED WARRANTY OF MERCHANTABILITY AND FITNESS FOR A
PARTICULAR PURPOSE TO THE ONE (1) YEAR TERM OF THIS LIMITED WARRANTY. UPON THE EXPIRATION OF
THE ONE (1) YEAR TERM OF THIS LIMITED WARRANTY, VENDOR DISCLAIMS ANY AND ALL IMPLIED WARRANTIES,
INCLUDING WITHOUT LIMITATION THE IMPLIED WARRANTIES OF MERCHANTABILITY AND FITNESS FOR A
PARTICULAR PURPOSE, THE PRODUCT BEING THUS SOLD AS-IS, WITH ALL FAULTS. FURTHER, VENDOR
SHALL HAVE NO LIABILITY WHATSOEVER TO PURCHASER OR ANY THIRD PARTY FOR ANY SPECIAL, INDIRECT,
PUNITIVE, INCIDENTAL, OR CONSEQUENTIAL DAMAGES. OTHER THAN THIS LIMITED WARRANTY, THERE ARE
NO WARRANTIES WHICH EXTEND BEYOND THE DESCRIPTION ON THE FACE HEREOF. Vendor assumes no
responsibility for any defects caused by third parties. This Limited Warranty gives you specific legal rights, and you
may have other rights which vary from state to state. State law may also override statements in this Limited Warranty
regarding the restriction on the duration of implied warranties. Some jurisdictions do not allow exclusion or limitation of
special, incidental or consequential damages, or limitations on how long awarranty lasts, so the above exclusion and
limitations may not apply to you.
12
Page 13
©2020 DTWUSA
Contact Us
Call: +1 844-257-4103
 Loading...