

Page 1
WATER COOLER
USER’S MANUAL
Thank you for purchasing a Brio water cooler. Please read this user’s
manual thoroughly for using the water coolers safely and appropriately.
CBP500 Premiere Series
Top-Load Coolers
CBP500: Hot & Cold, White
CBP505: Cook & Cold, White
CBP520: Hot & Cold, Black
CBP525: Cook & Cold, Black
Page 2
SAFETY PRECAUTIONS
• Plug in the dispenser in the way described in this manual.
• In accordance with these instructions, the dispenser must be properly located
and installed before use
• Use only water. Do not use coee, tea or other beverages.
• Dispenser must be unplugged before cleaning, sanitizing or repairing. Regular
cleaning is advised to ensure satisfactory water quality.
• Wipe any water spills after loading or unloading water bottles.
• Do not use with water that is microbiologically unsafe or of unknown quality.
• periodically remove dirt and lint from the condenser on the back of the cooler.
WARNING: The hot water is heated to approximately 90°C (194°F). Temperatures
above 52°C (125°F) can cause severe burns from scalding. DO NOT ALLOW CHILDREN
TO USE THE HOT WATER DISPENSING BUTTON WITHOUT PROPER AND DIRECT
SUPERVISION.
• Ensure the dispenser stands upright for 2 hours before loading water bottle, plugging
in or turning the unit on.
• Always lift dispenser by handle located on rear of unit. DO NOT Lift dispenser by the
faucets, this part of the cooler may break and cause leaks if pulled by force.
• Supervise children when using the dispenser; water from hot faucet will be extremely
hot and may scald.
•
The recommended placement of the water dispenser is indoors. Keep away from
direct sunlight and exessive moisture
WARNING: The dispenser must be grounded – if the appliance is improperly grounded, it may result in an electric shock
IMPORTANT: To provide additional protection from the risk of shock, the dispenser
MUST be connected to a ground fault circuit interrupter (GFCI) outlet at all times. Use
of an extension cord will void any warranties. See warranty document for complete
terms and conditions.
Cautions
•
Do not connect the dispenser to the power outlet yet. Install the dispenser on a at and secure
place approximately 4 inches (10cm) from the wall.
•
If you need to move the dispenser, wait approximately 1hour after turning o the power. Upon
moving, do not tilt the dispenser more than 45 degrees.
•
Make sure that the electric socket is correctly grounded to prevent electric shock.
Check If the Water Levers are rmly closed.
•
•
This dispenser is intended for indoor use only.
•
Do not expose to direct sunlight.
Page 3
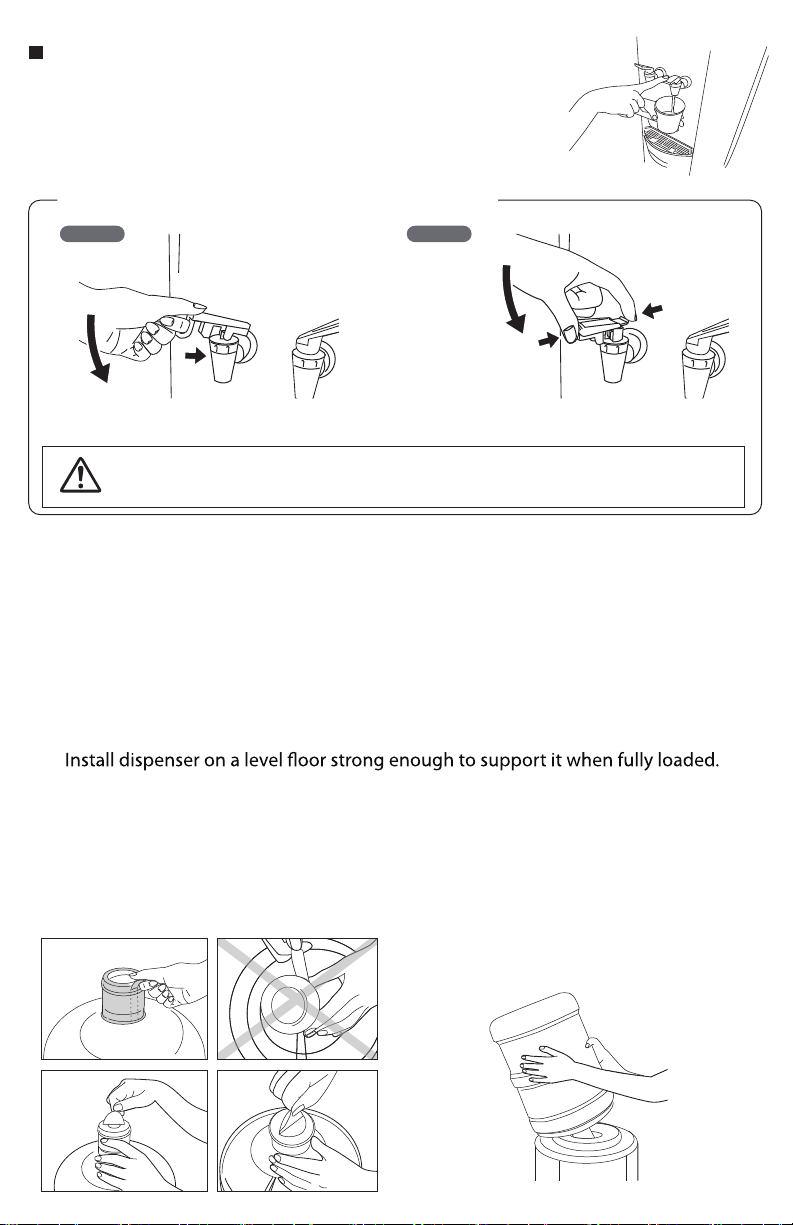
Cold Water Faucet (Blue Lever) and Hot Water Faucet (Red Lever)
Press the Blue Lever for Cold Water and Red Lever for Hot Water, respectively.
Place a cup directly below a faucet and depress the correct lever ,but be
careful using the hot water. Even when a bottle is empty, Cold Water is
available, for a small volume, but hot water is not available when the bottle is
empty.
How to use Child Lock Lever
TYPE 1 TYPE 2
Hot water comes out if pressing the whole lever with
the bottom of lever pressed with the index finger.
Cautions
When the hot water comes out, be careful not to burn yourself.
Do not allow the children to use the dispenser unsupervised.
Hot water comes out if pressing the whole lever with
the lever pressed with the thumb and index finger.
RECEIVING
Inspect the dispenser box carefully for any evidence of shipping or handling damage
before signing to receive goods. In case of shipping damage, claims should be led
emmediately with the carrier
HOW TO INSTALL AND USE
Keep cooler unplugged until water ows all the way through faucets
1.
2. Ensure dispenser stands upright for a minimum of 2 hours before loading water bottle.
3. Place dispenser a minimum of 4 inches away from the wall to ensure ventilation.
4.
5. Do not install dispenser where it will be subject to direct sunlight, heat or moisture.
6. Wipe down the water bottle cap and neck to ensure there is no debris.
PREPARE WATER BOTTLE
Remove the Cap Seal on the top of the bottle cap (if
necessary).
* Make sure not to remove the plastic cap of bottle.
INSTALL BOTTLE IN NO-SPILL SYSTEM
Invert the bottle and place it into the top of the No-Spill
System. As the water lls the reservoirs inside the machine, the
water leaving the bottle will be replaced with air seen as
bubbles rising in the bottle. This is normal and will stop when
the reservoir is lled. This process will repeat itself each time
water is drawn from the dispenser.
Page 4
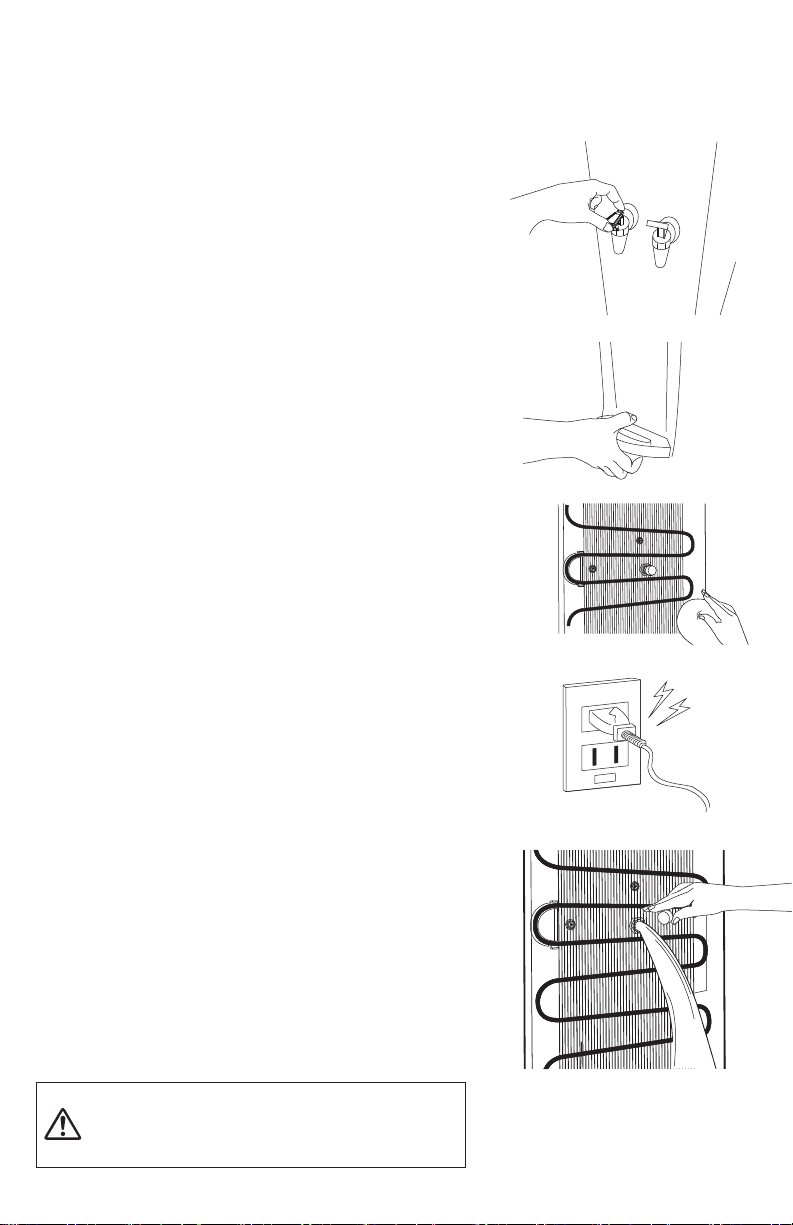
Remove the Air inside the Hot Water Tank
After installing a bottle, remove the air inside the Hot Water Tank by pressing and holding
the Hot Water Lever as shown in the following gure until water starts to come out of the
water outlet.
Place a cup under the hot dispenser faucet. Squeeze the
front and back of the left faucet handle together and push
down until water ows continuously. Depress the cold
water faucet to make sure there is a continuous ow of
water
Case / Drip Tray
Case: Clean the dispenser using a soft damp cloth. At
all times, do not use abrasive cleaning materials or
implements.
Once the soiled parts of the dispenser have been
cleansed, dry using a soft cloth.
Drip Tray: Clean the Drip Tray and then wipe o with a
neutral detergent and a soft cloth.
Radiator Condenser
A radiator is mounted on the back of Dispenser. If it is too
close to a wall, or when the radiator gets covered in dust,
the cooling eciency will be impaired. Please clean the
dust o with a soft brush or vacuum cleaner. This should
be done regularly.
Check the Power Cord / Plug
Check to see that the power cord is not damaged or
overheating, and also that no heavy objects are placed
on it. Failure of the power cord could lead to re or shock
hazards. Please frequently check.
Check the Leakage
If the bottle is not rmly xed to the No-Spill System, or
when the Drain Cork is not closed completely, leakage
may occur. Check if there are any leakages on the back or
bottom by moving the dispenser.
Leakage of Tank
If there are any leakages, drain the Cold Water through
Water outlet.
Drain the hot water by removing the cap of Hot Water
Drain Valve.
Before draining hot water, wait one hour
Cautions
after turning power o to allow water to
cool down. Otherwise, you may be burnt
by hot water.
Page 5
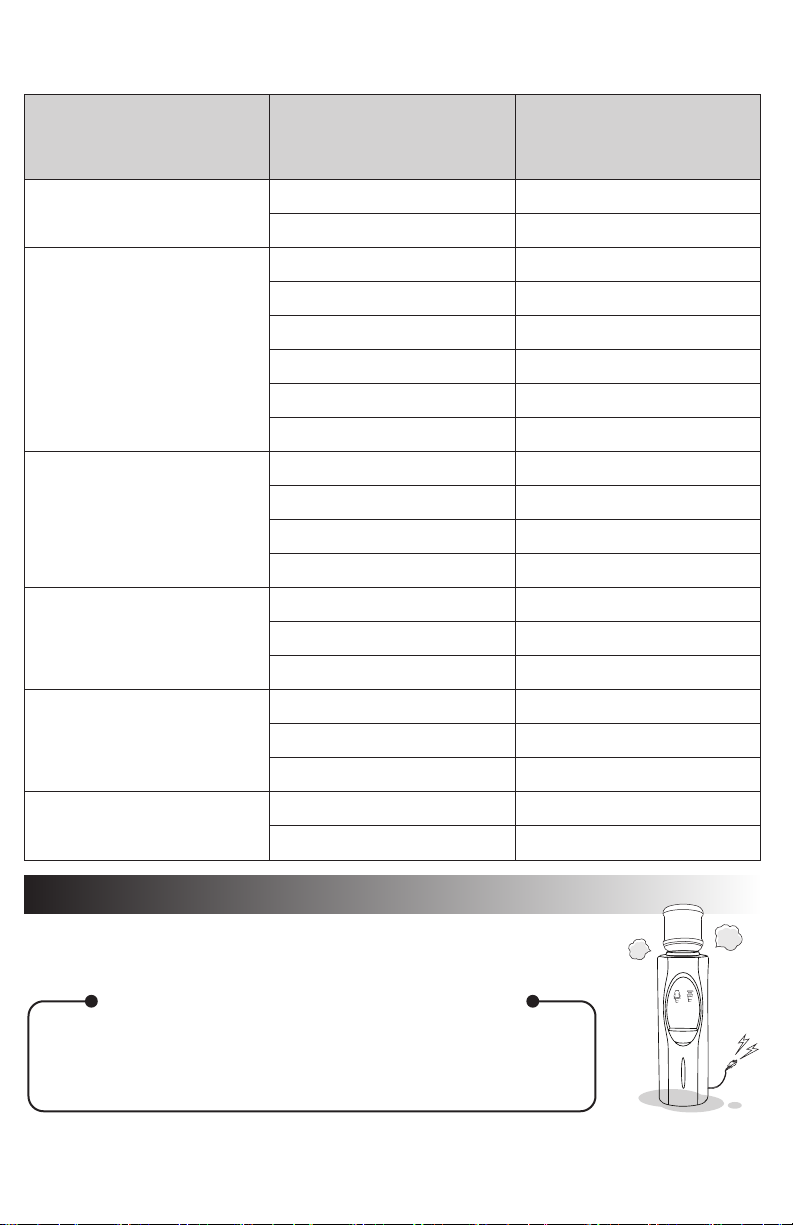
TROUBLESHOOTING
Please check the following items prior to asking for repair
Troubles Things to check Troubleshooting
Water does not come out
(Cold Water & Hot Water)
Cold water does not come out
Hot water does not come out
Dispenser is leaking
Bottle is leaking
Noise
Is the bottle empty?
Is the air inside the Tank removed
completely?
Is the power cord unplugged?
Is the power appropriately supplied?
Has the circuit breaker tripped?
Is the capacity for producing cold water exceeded by
your demand? Is the remaining cooling time too short?
Is the temperature too high?
Are there dust on the radiator
condenser?
Is the back of the dispenser too close to
a wall?
Is the power cord unplugged?
Is the power off?
Is Circuit Breaker closed?
Is the capacity for producing hot water
exceeded by your demand?
Is hot water switch turned off?
Is either the Hot or Cold faucet leaking? If the faucets are loose, firmly fasten
Is the Hot Water Drain leaking?
Is the water condensing on the surface
of Tank?
Is the Tank leaking?
Is the bottle correctly inserted in the
No-Spill System?
Is the bottle broken or cracked?
Is the dispenser making a vibrating noise?
Is the dispenser in contact with a wall or
other products?
Replace with a new bottle.
Press and hold the lever until the water
comes out through Hot Water Faucet.
Check the power cord.
Check the Distribution board.
Reduce consumption to within capacity
specified for the dispenser.
Install in a place where the air is well circulated.
Do not expose to direct sun light.
Clean the radiator condenser mounted
on the back.
Install with 15cm separated from a wall. Reinstall to
allow the radiator condenser to be cooled down.
Check the power cord.
Check the plug board.
Reduce consumption to within capacity
specified for the dispenser.
Turn on Hot Water Switch mounted on the back.
them.
Frimly fasten the cap of Hot Water Drain.
Install the dispenser in a cool place.
Take off the bottle and then drain the water
(contact the shop you purchased the dispenser from).
Put in the bottle correctly.
Replace with a new bottle.
Make sure that it is installed on a level
solid horizontal surface.
Keep the designated space away from a
wall or other products.
Repair & After Sales Service
Unplug the power cord and then contact our representative
from whom you purchased the dispenser.
Please inform us of following information
(1) Name (Company Name) and Address
(2) How to contact the staff in charge of the dispenser
(3) Details of problems encounterd.
Page 6
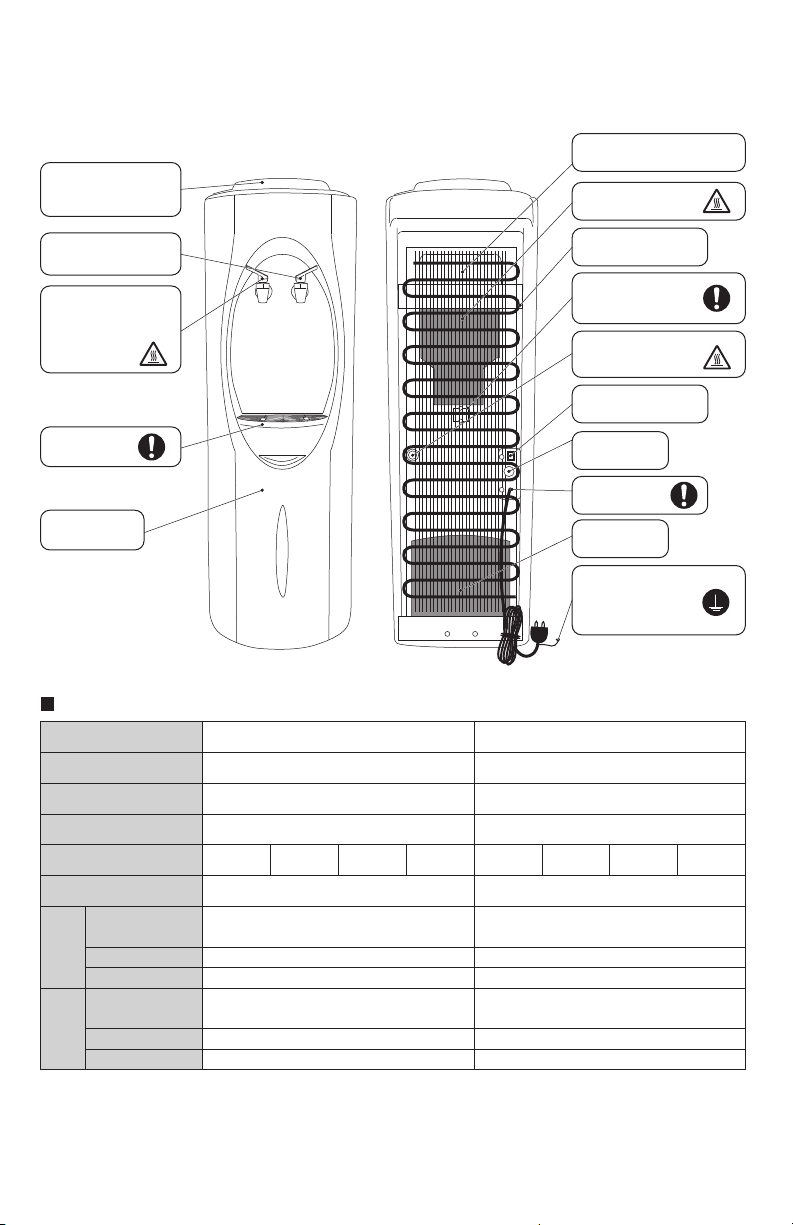
COOLER, PARTS AND ACCESSORIES
Names of Each Component
No-Spill System
(bottle holder)
Cold Water Tank
Hot Water Tank
Cold Water Faucet
(Cold water comes out)
Hot Water Faucet
(Hot water comes out)
(Use to drain the air from
Hot Water Tank)
Radiator Condenser
Cold Water Thermostat
(Do not touch with a hand)
Hot Water Drain
(Use to drain hot water)
Hot Water Switch
Drip Tray
Fuse
Power cord
Front Panel
Compressor
Earth
(Make sure that this
dispenser is properly earthed)
Specifications
Name
Model Number
Size(mm)
Weight
Power
Consumption Power
Continous
Discharging Capacity
Cool
Temperature
Water
Tank Capacity
Continous
Discharging Capacity
Hot
Water
Temperature
Tank Capacity
* For the improvement of product Brio reserves the right to change specifications without notice.
You must confirm the correct voltage(V) and frequency(Hz) and then plug to the outlet. Check the proper voltage in the back of dispenser.
*
Manufactured by: DOWNTOWN WHOLESALERS
Hot and Cold Water Dispenser
CBP500 & CBP520
320(W) x 320(D) x 970(H)
15kg
220-240V
50Hz
220V
60Hz
100V
50/60Hz
400W/Heating, 100W/cooling
1.4ℓ
5°C ~ 12°C
About 3.4ℓ (Stainless Steel Tank)
1.4ℓ
80°C ~ 90°C
About 1.92ℓ (Stainless Steel Tank)
115V
60Hz
Cook and Cold Water Dispenser
CBP505 & CBP525
320(W) x 320(D) x 970(H)
14.3kg
220-240V
50Hz
220V
60Hz
100V
50/60Hz
100W/cooling
1.4ℓ
5°C ~ 12°C
About 3.4ℓ (Stainless Steel Tank)
-
Room Temperature
-
115V
60Hz
 Loading...