

Page 1
LASER PROJECTOR
-1---------------------------------------------------------------
-------------------------------------------------------------30-
Page 2
Copyright
Notice
This publication, including all photographs, illustrations and software, is pro te ct ed
under international copyright laws, with all rights reserved. Neither this manual,nor any
of the material contained herein, maybe reproduced without written consent of the
author.
-----------------------------------------------------------------
Disclaimer
The information in this document is subject to change without notice. The manufacturer
makes no representations or warranties with respect to the contents hereof and
specifically disclaims any implied warranties of merchantability or fitness for any
particular purpose. The manufacturer reserves the right to revise this publication and to
make changes from time to time in the content hereof without obligation of the
manufacturer to notify any person of such revision or changes.
----------------------------------------------------------------Important Safety Information
Important:
It is strongly recommended that you read this section carefully before using the
projector.The sesafety and usage instructions will ensure that you enjoy many years
of safe use of the projector.
Keep this manual for future reference.
Symbols Used
Warning symbols are used on the unit and in this manual to alert you of hazardous
situations.
The following styles are used in this manual to alert you to important information.
FCC Compliance Statement
This equipment has been tested and found to comply with the limits for a Class
B digital device pursuant to Part 15 of the FCC Rules. These limits are designed
to provide reasonable protection against harmful interference when the equipment
is operated in a commercial environment.
This equipment generates, uses, and can radiate radio frequency energy and, if
not installed and used in accordance with the instruction manual, may cause
harmful interference to radio communications. Operation of this equipment in a
residential area is likely to cause harmful interference in which case the user will
be required to correct the interference at his/her own expense.
Changes or modifications not expressly approved by the parties responsible for
compliance could void the user's authority to operate the equipment.
Warning:
* Alerts you to situations that may damage the unit, create a hazardous environment,
or cause personal injury.
* Throughout this manual, component parts and items in the OSD menus are denoted
in bold font as in this
example:
* “Push the Menu button on the remote control to open the Main menu.”
General Safety Information
Do not place the unit on an unstable surface, cart, or stand.
Avoid using the system near water, in direct sunlight, or near a heating device.
Do not place heavy objects such as books or bags on the unit.
Do not watch the lens directly (Specially children) it is bad for your eyes .
Projector Installation Notice
*Place the projector in a horizontal position.
-1---------------------------------------------------------------
-------------------------------------------------------------30-
Page 3
Remote Control Problems
Problem: The projector does not respond to the remote control
1. Direct the remote control towards remote sensor on the front of the projector.
2. Ensure the path between remote and sensor is not obstructed.
3. Turn off any fluorescent lights in the room.
4. Check the battery polarity.
5. Replace the battery.
6. Turn off other infrared-enabled devices in the vicinity.
7. Replace the remote control.
Sound Problems
Problem: There is no sound
1. Adjust the volume on the remote control or control panel.
2. Press the Source button to switch to the correct input source, if necessary.
3. Check your computer or video source to make sure the volume is turned up and the
audio output is set for the correct source.
4. Check the audio cable connections between the projector and your video source.
4. Test the source audio output with other speakers.
5. Have the projector serviced.
Problem: The sound is distorted
* Ensure that the intake vents do not recycle hot air from the exhaust vent.
* When operating the projector in an enclosed space, ensure that the surrounding air
temperaturewithin the enclosure does not exceed operation temperature while the
projector is running, and the air intake and exhaust vents are unobstructed.
* All enclosures should pass a certified thermal evaluation to ensure that the projector
does not recycle exhaust air, as this may cause the device to shutdown even if the
enclosure temperature is within the acceptable operation temperature range.
Power safety
*Only use the supplied power cord.
*Do not place anything on the power cord.
*Ensure the voltage matches with projector.
*Remove the batteries from the remote control when storing or not in use for a
prolonged period.1. Check the audio cable connection.
1. Check the audio cable connection.
2. Test the source audio output with other speakers.
3. Have the projector serviced.
Having the Projector Serviced
If you are unable to solve the problem, you should have the projector serviced. Pack the
projector in the original carton and contact BRILENS support at www.brilens.com or
call us.
-29--------------------------------------------------------------
-------------------------------------------------------------2-
Page 4
Introduction
Projector Features
Package Checklist
Optional Components
Projector Part Locations
Projector Parts - Top/Left Side
Projector Parts - Control Panel
Projector Parts - Rear
Projector Parts - Base
Projector Parts - Remote Control
Install Projector
Projector Placement
Projector Distance
Projector Connections
Connecting to a Computer for VGA Cable
Connecting to a Computer for HDMI Cable
Connecting the video device with video cable
Connecting the audio device with audio cable
Insert U/TF card
3. Ensure all connections are securely attached.
4. Ensure the attached device is turned on.
5. Ensure a connected PC is not in a suspended mode.
6. Ensure a connected notebook computer is configured for an external display.
"No Signal" Message Appears
If the "No Signal" message appears, try the following solutions:
1.Press the Source button and wait a few seconds for an image to appear.
2.Turn on the connected computer or video source, and press its play button to
begin your presentation, if necessary.
3.Check the connection from the projector to your video sources.
4.If you are projecting from a laptop computer, make sure it is set up to display on an
external monitor.
5.If necessary, turn the projector and the connected computer or video source off
and turn on again.
Image Problems
Problem: No image appears on the screen
Operate Projector
Turning the Projector on and off
Selecting the Signal
Selecting the Language for the Projector Menus
Setting the Screen Type
Adjusting the Image Height
Adjusting the Image Position
Image Aspect Ratio
Changing the Image Aspect Ratio
Available Image Aspect Ratios
3D setting
Wireless transmission screen
Multimedia function
Movie
Audio Playing
-3 --------------------------------------------------------------
1. Verify the settings on your notebook or desktop PC.
2. Turn off all the equipment and power everything up again. The projector should
be turned on last.
Problem: The image is blurred
1. Adjust the Focus on the projector.
2. Ensure the projector-to-screen distance is within the specified range.
3. Check that the projector lens is clean.
Problem: The image is wider at the top or bottom (trapezoid effect)
1. Position the projector so it is as perpendicular to the screen as possible.
2. Press Menu button > Option >Keystone to adjust the image you want.
Problem: The image is flat with no contrast
Adjust the Contrast setting on the Picture menu > Picture Mode >User>Contrast.
Problem: The color of the projected image does not match the source image.
------------------------------------------------------------28-
Page 5
Caution: Use only the type of batteries specified in this manual. Do not install batteries
of different types, or mix new and old batteries.
1.Open the battery cover
2.Remove the old batteries
Warning: If the battery fluid has leaked, wipe it away with a soft cloth and avoid getting
the fluid on your hands. If it gets on your hands, wash them immediately to avoid injury.
Photo Browsing
Document Browser
Remote Control Operation
Set the remote control
Changing the remote control battery
Controlling Volume with the volume buttons
Setting the time zone
Menu Instruction
3.Insert the batteries with the + and – ends facing.
4.Close the battery cover and press it down until it clicks into place.
Warning: Dispose of used batteries according to local regulations. Do not expose
batteries to heat or flame. Keep batteries out of the reach of children; they are choking
hazards and are very dangerous if swallowed.
Transporting the projector
The projector contains precision parts, some of which are glass. Follow these
guidelines to transport or ship the projector safely:
*Remove any equipment connected to the projector.
*Do one of the following:
*If you are using the standard zoom lens, keep it installed on the projector.
*If you are using an optional lens unit, remove it from the projector.
*If the projector did not come with a lens, attach the cover that was included with the
projector to the lens mount.
*When transporting the projector a long distance or as checked luggage, pack it in a firm
box with cushioning around it and mark the box "Fragile."
Solving Problems
Common Problems And Solutions
These guidelines provide tips to deal with problems you may encounter while using the
projector. If the problem remains unsolved, contact your dealer for assistance.
After spending time troubleshooting, the problem can often be traced to something as
simple as a loose connection. Check the following before proceeding to the
problem-specific solutions.
1. Use some other electrical device to confirm that the electrical outlet is working.
2. Ensure the projector is turned on.
Maintaining Projector
Cleaning the lens
Cleaning the projector case
Replacing the remote control batteries
Transporting the projector
Solving Problems
Common problems and Solutions
"No Signal" Message Appears
Image Problems
No image appears on the screen
The image is blurred
The image is wider at the top or bottom (trapezoid effect)
The image is reversed
The image is streaked
The image is flat with no contrast
Remote Control Problems
The projector does not respond to the remote control
Sound Problem
There is no sound
The sound is distorted
Having the projector serviced
Notice
FCC Compliance Statement
CE Compliance Statement
Safety Certifications
-27--------------------------------------------------------------
------------------------------------------------------------ 4-
Page 6
Introduction
Maintaining Projector
Projector features
Our projectors integrates high-performance optical engine of projection technology and
a user-friendly design to deliver high reliability and easy of use.
Pro LS1280 have the following features:
1. Native resolution 1280 x 800 HD 720P.
2.Light source OSRAM LED lamp + OSRAM LASER lamp.
3.Lifespan is over 50,000 hours.
4.Supports shutter 3d.
5.Wireless transmission screen function.
6.Portable,size 25 x 19 x 7cm,net weight 1.5KG.
7.Full sealed optical lens ensure clear free.
8.Full sealed,Dustproof and Rapid Heat Dissipation were awarded the patent.
9.Support numerous languages on-screen menus.
10.Built-in 4W x 2 speakers for stereo audio.
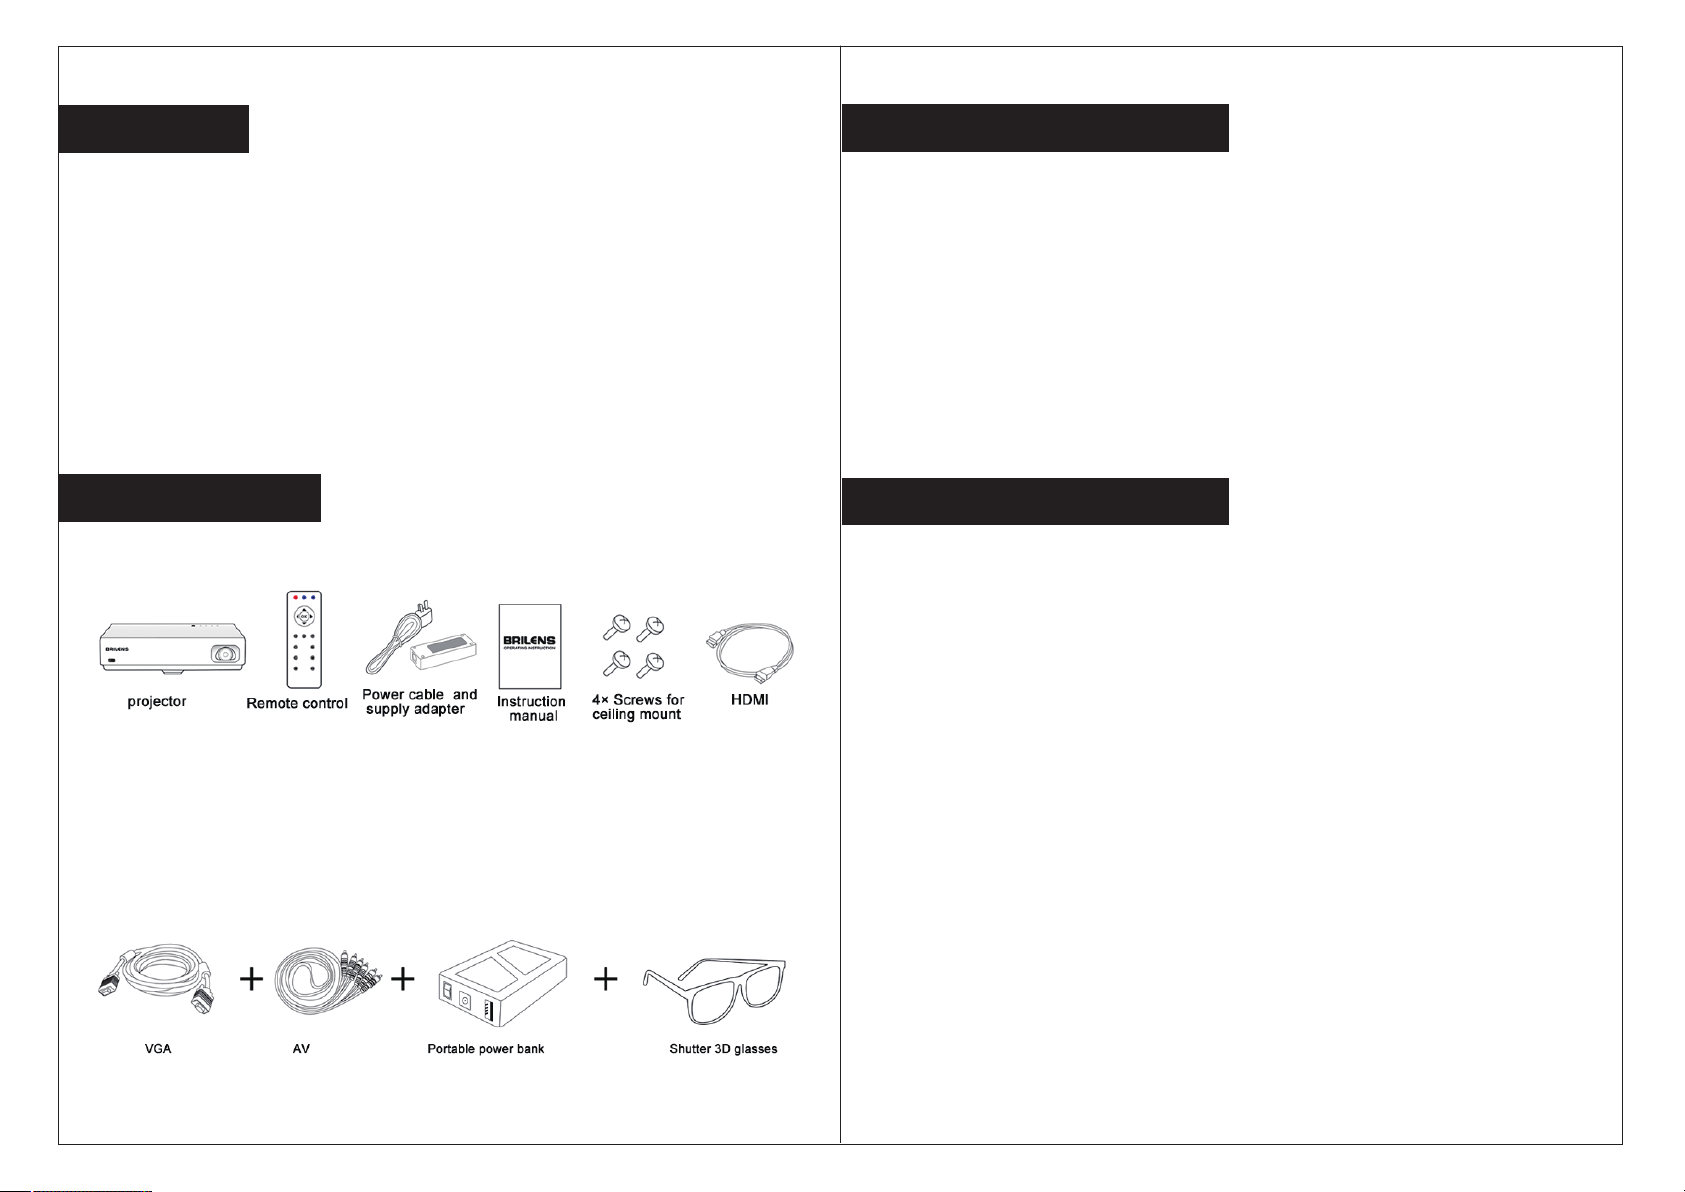
Package checklist
All packages will contain the following parts.If any is missing,please contact the
distributor.
Cleaning the lens
Clean the projector's lens periodically, or whenever you notice dust or smudges on
the surface.
*To remove dust or smudges, gently wipe the lens with lens-cleaning paper.
*To remove stubborn smudges, moisten a soft, lint-free cloth with lens cleaner and
gently wipe the lens. Do not spray any liquid directly on the lens.
Warning: Do not use a lens cleaner that contains flammable gas. The high heat
generated by the projector lamp may cause a fire.
Caution: Do not use glass cleaner or any harsh materials to clean the lens and do
not subject the lens to any impacts; you may damage it. Do not use canned air, or
the gases may leave a residue. Avoid touching the lens with your bare hands to
prevent fingerprints on or damage to the lens surface.
Cleaning the Projector Case
Before cleaning the projector case, turn off the projector and unplug the power cord.
*To remove dust or dirt, use a soft, dry, lint-free cloth.
*To remove stubborn dirt, use a soft cloth moistened with water and mild soap. Do
not spray liquid directly on the projector.
Caution: Do not use wax, alcohol, benzene, paint thinner, or other chemicals to
clean the projector case. These can damage the case. Do not use canned air, or
the gases may leave a residue.
Optional components
Depending on how you use the projector,you may need to obtain the following
components:
*To connect a computer through its VGA port to the projector. You need a VGA cable or
adapter.
*For the convenience of mobile office, you need a mobile power supply.
*To watch 3D movies, you need a pair of shutter 3D glasses.
-5 --------------------------------------------------------------
Replacing the remote control batteries
The remote control uses two AAA manganese or alkaline batteries. Replace the
batteries as soon as they run out.
------------------------------------------------------------26-
Page 7
Sound
Sound Mode
Sound Mode
Press the but ton to enter sound
menu button ,then press directi on
button to set t he sound mode
(Stand,Mu sic,User,Sports )
Press the but ton, then press
direction b utton to set the balanc e
of the left and r ight sound channel.
Projector Part Locations
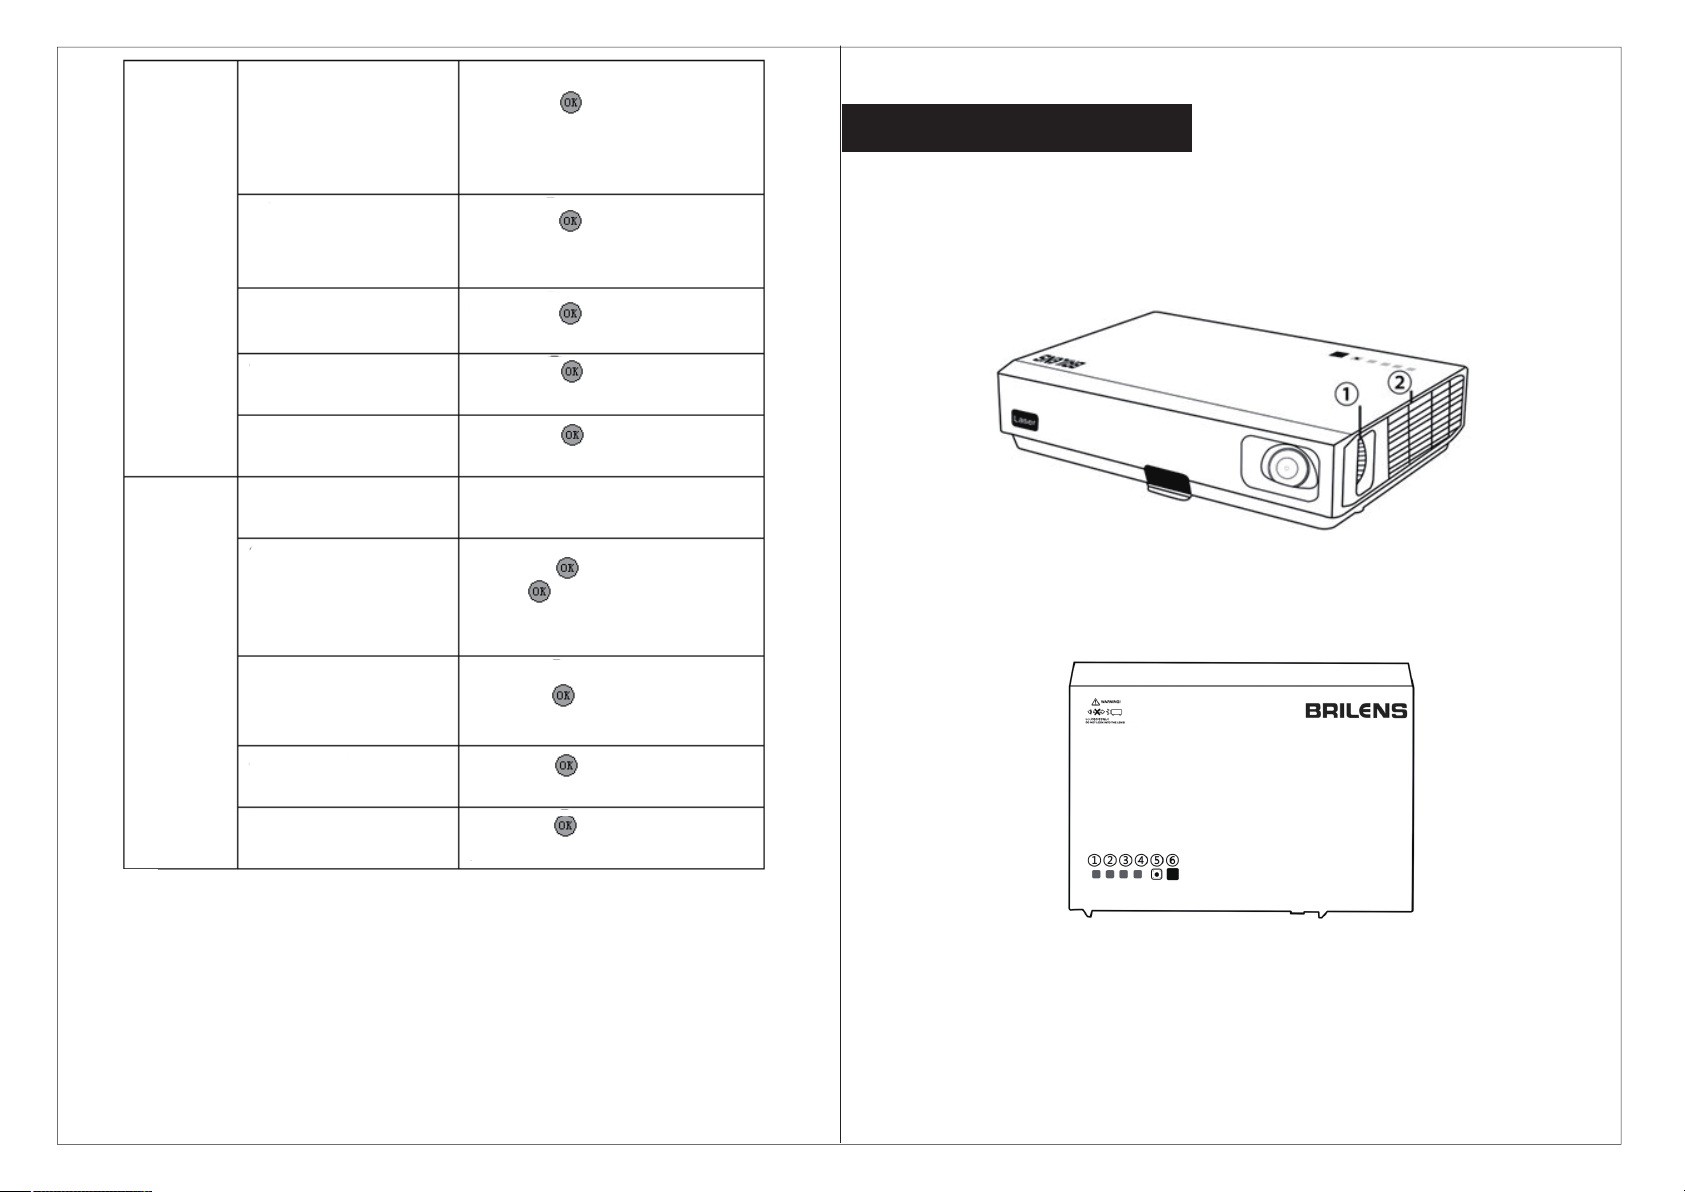
Projector Parts - Top/Left Side
1.Focus(Adjust definition)
Zoom(Adjust screen size)
2.Left and Right Heat Vent
Auto Volume
Surround So und
Audio-Out M ode
Temperatu re
Software Up date(USB)
Applicati on
Widi/Mira cast
Automatic S ync
Time Domain
Press the but ton to set the
automatic v olume on or off.
Press the but ton to set to
surround so und on or off.
Press the but ton to set
audio-out m ode(Auto,PCM).
Read and disp lay the working
temperatu re of the light source.
Press the .bu tton to enter, then
press butto n ag ain to confirm
the upgrade . To exit, press the
menu key and retu rn.
Press the but ton to enter wireless
transmiss ion screen.
Press the but ton to set automatic
sync on or off.
Press the but ton , then select the
geographi cal location.
Note:
If OSD menu is not activated in 15 seconds,OSD will close automatically.Because of
variable signal not all the OSD items can be settled.For example,if projector is
connected to PC via VGA,user can adjust the “Horizontal position/Vertical position”
via menu “Picture>Screen”. If not, setting cannot be changed and display is in
grayscale.
1. To watch movie,please select Picture Menu>Brightness Light>Image Mode.
2. To view files from PC,please select Picture Menu>Brightness Light>Text Mode.
3.To use under ECO condition,please select Picture Menu>Brightness Light>Saving
Mode.g Mode.
Projector Parts - Control Panel
1.Power 2. Menu
3.Source 4.IR Sensor
5.Direction&Enter 6. Quick
7.Indicator Light
-25--------------------------------------------------------------
------------------------------------------------------------6-
Page 8
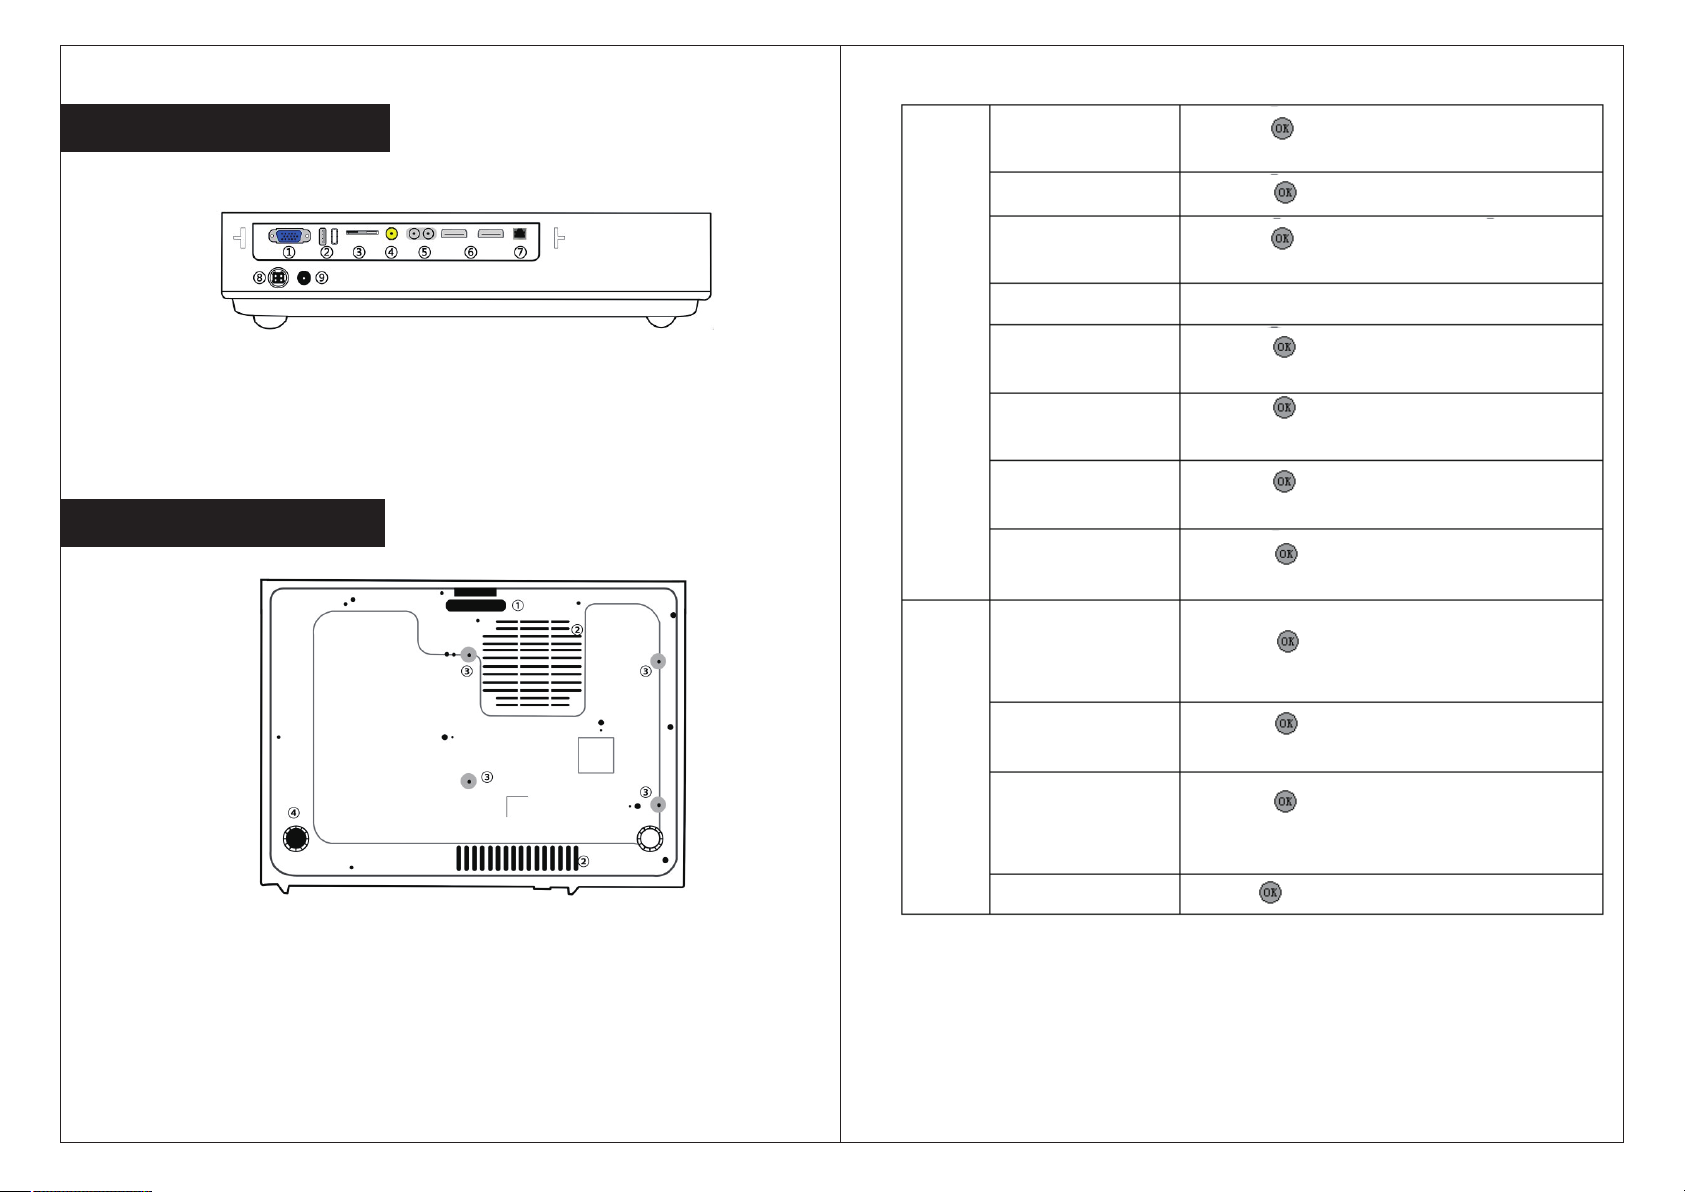
Projector Parts - Rear
OSD Languag e
Press the but ton to enter, then pres s direction
button to set t he menu language.
1. USB 2.HDMI X 2
3.VGA 4.Adapter
5.Battery socket 6.TF Card
7.Audio-in 8.Audio-out
9.Video Input 10.Anti-theft
Projector Parts - Base
Option
3D
Choose Menu t ime
Restore Fac tory
Default
Nosignal Sc reen Color
Network Con figuration
Auto Turnov er
Shape Mode
Keystone
Display Mod e
Display For mat
Press the but ton to set the menu displ ay time.
Press the butt on t o enter,then pres s button
again to confir m or press the menu but ton to exit.
Red/Blue/ Green
Press the but ton to enter, then pres s the
direction b utton to select netwo rk settings.
Press the but ton to set on or off.(Cho se a uto
turnover on,how you choose to install is front
projectio n)
Press the but ton to select image pro jection
mode.(Fro nt,Rear,Front cei ling,Rear ceiling )
Press the but ton to enter, then pres s direction
button to man ually correct the tra pezoid image.
Press the but ton to set the 3D signal so urce
display mod e.(2D,3D,3D To 2D)
Press the but ton to set the 3D signal pl ayback
format.(S ide by side, Top bottom )
1.Screen Height Adjustment
2.Heat Emission Vent
3.Installation Diagram
4.Tilt adjustment knob
(Rotate it to adjust image tilt on the
left and right.)
-7---------------------------------------------------------------
3D Output Asp ect
LR View Switc h
Press the but ton to set the aspect rat io of the
3D image outp ut.(Full screen,C enter,Audio
Adapter)
Press the button to set to choose the left or right view.
-----------------------------------------------------------24-
Page 9
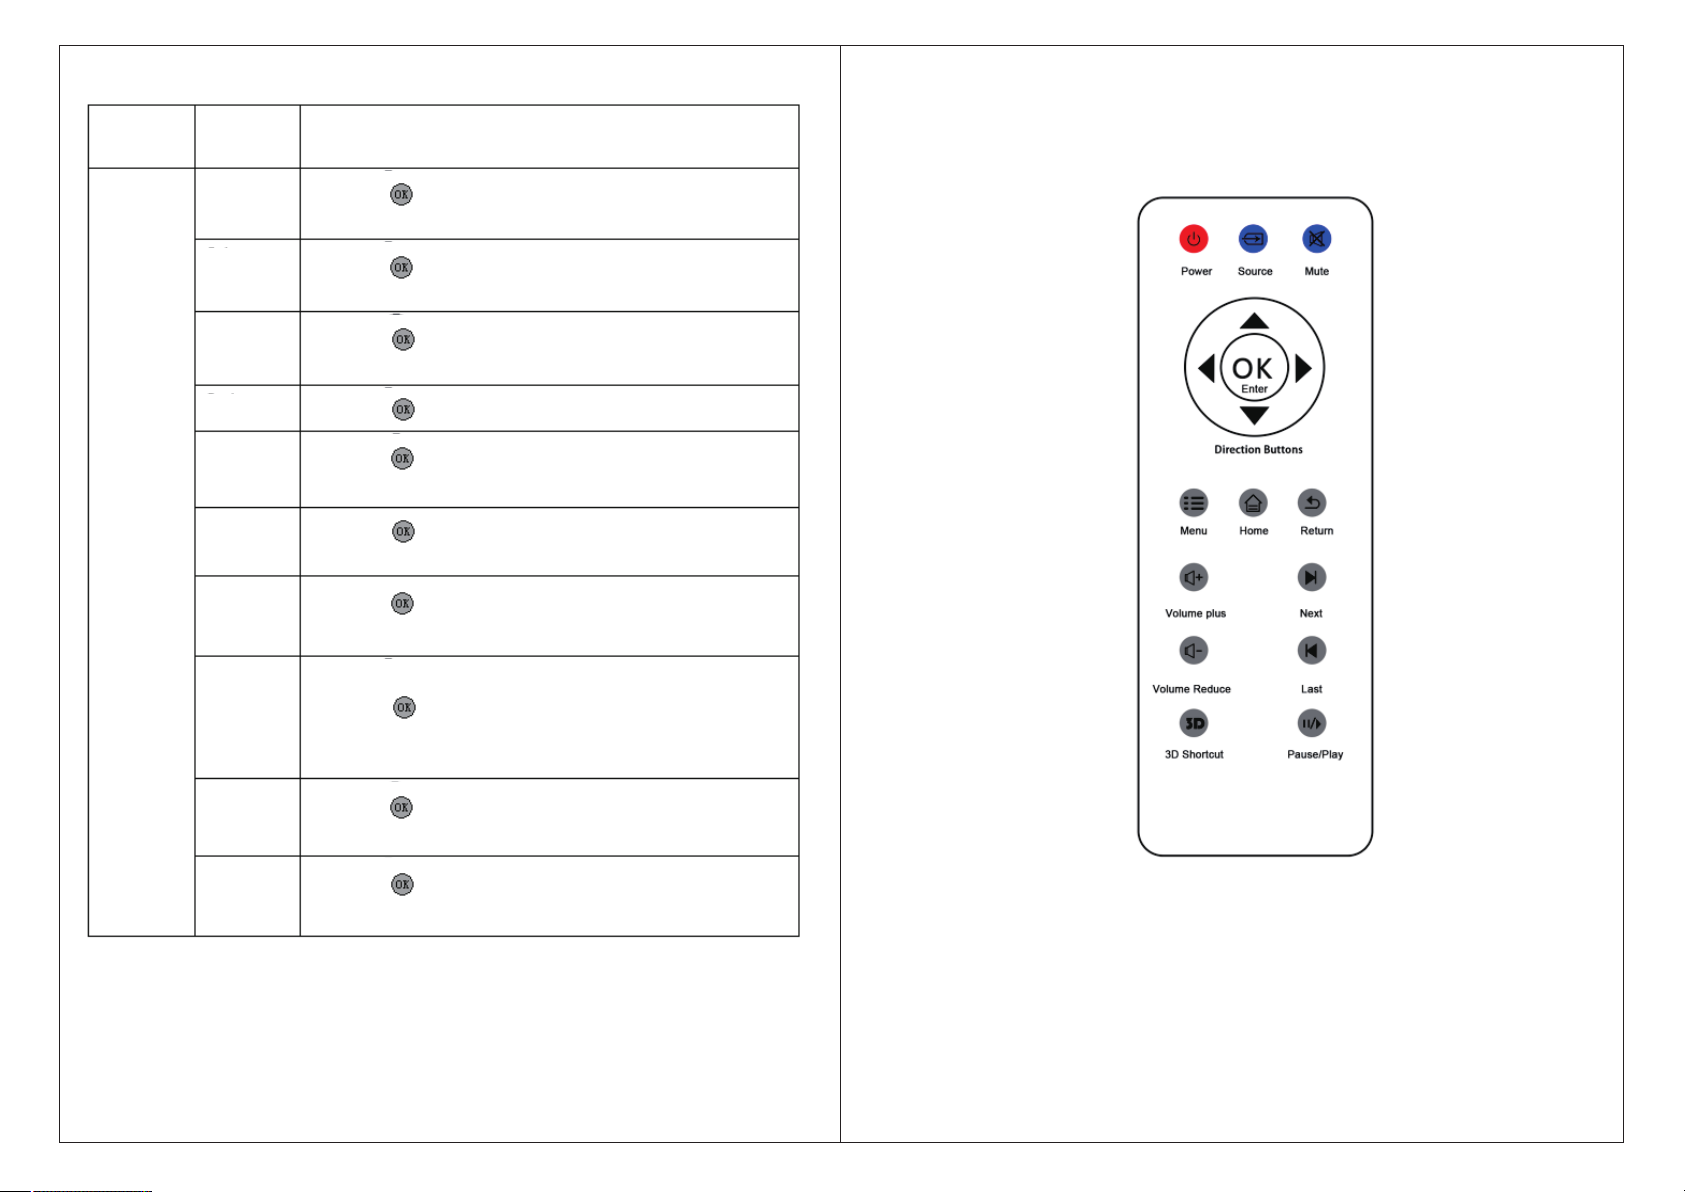
Main Menu
Submenu
Indicatio n
Projector Parts - Remote Control
Picture Mode
Color
Aspect Rati o
Scaler
Zoom
Projector Parts - Base
PICTURE
Noise
reduction
MPEG
Noise
abatement
Dynamic
contrast
enhanceme n t
Press the but ton,then press dire ction button to set pic ture
display mod e (Contrast,Brigh tness,Color,Sha rpeness).
Press the but ton,then press dire ction button to adjus t
color item of p icture display mode (Red,Blue,Green )
Press the but ton to adjust width and h eight ratio of pictur e
display mod e(auto, 16:10, 16:9 , 4: 3).
Press the but ton to adjust picture s ize.
Press the but ton to adjust picture s ize from small to
large(0-9 o pt ion)
Press the but ton to set level of noise r eduction.(Low,
Middle,Hi gh,Auto,Off)
Press the but ton to set level of noise r eduction。
(Low, Middl e, High, Auto, off)
Press the but ton set Dynamic contr ast enhancement
on/off
Sc re en
Brightnes s
light
Press the but ton,then press dire ction button to adjus t
picture mod e(VGA Available)
Press the but ton,then press dire ction button to adjus t
picture bri ghtness mode.(Tex t,Image,Energy)
-23--------------------------------------------------------------
Note:
1. Make sure there is no obstacle between the remote control and projector, as the
remote control signal may be reflected back and affect operation.
2. Buttons and keys of projector have the same function with buttons of remote
control.
3.Our manual introduces functions based on remote control.
------------------------------------------------------------8-
Page 10
INSTALL PROJECTOR
2. Remove the old battery and install new battery(with the positive end upward).
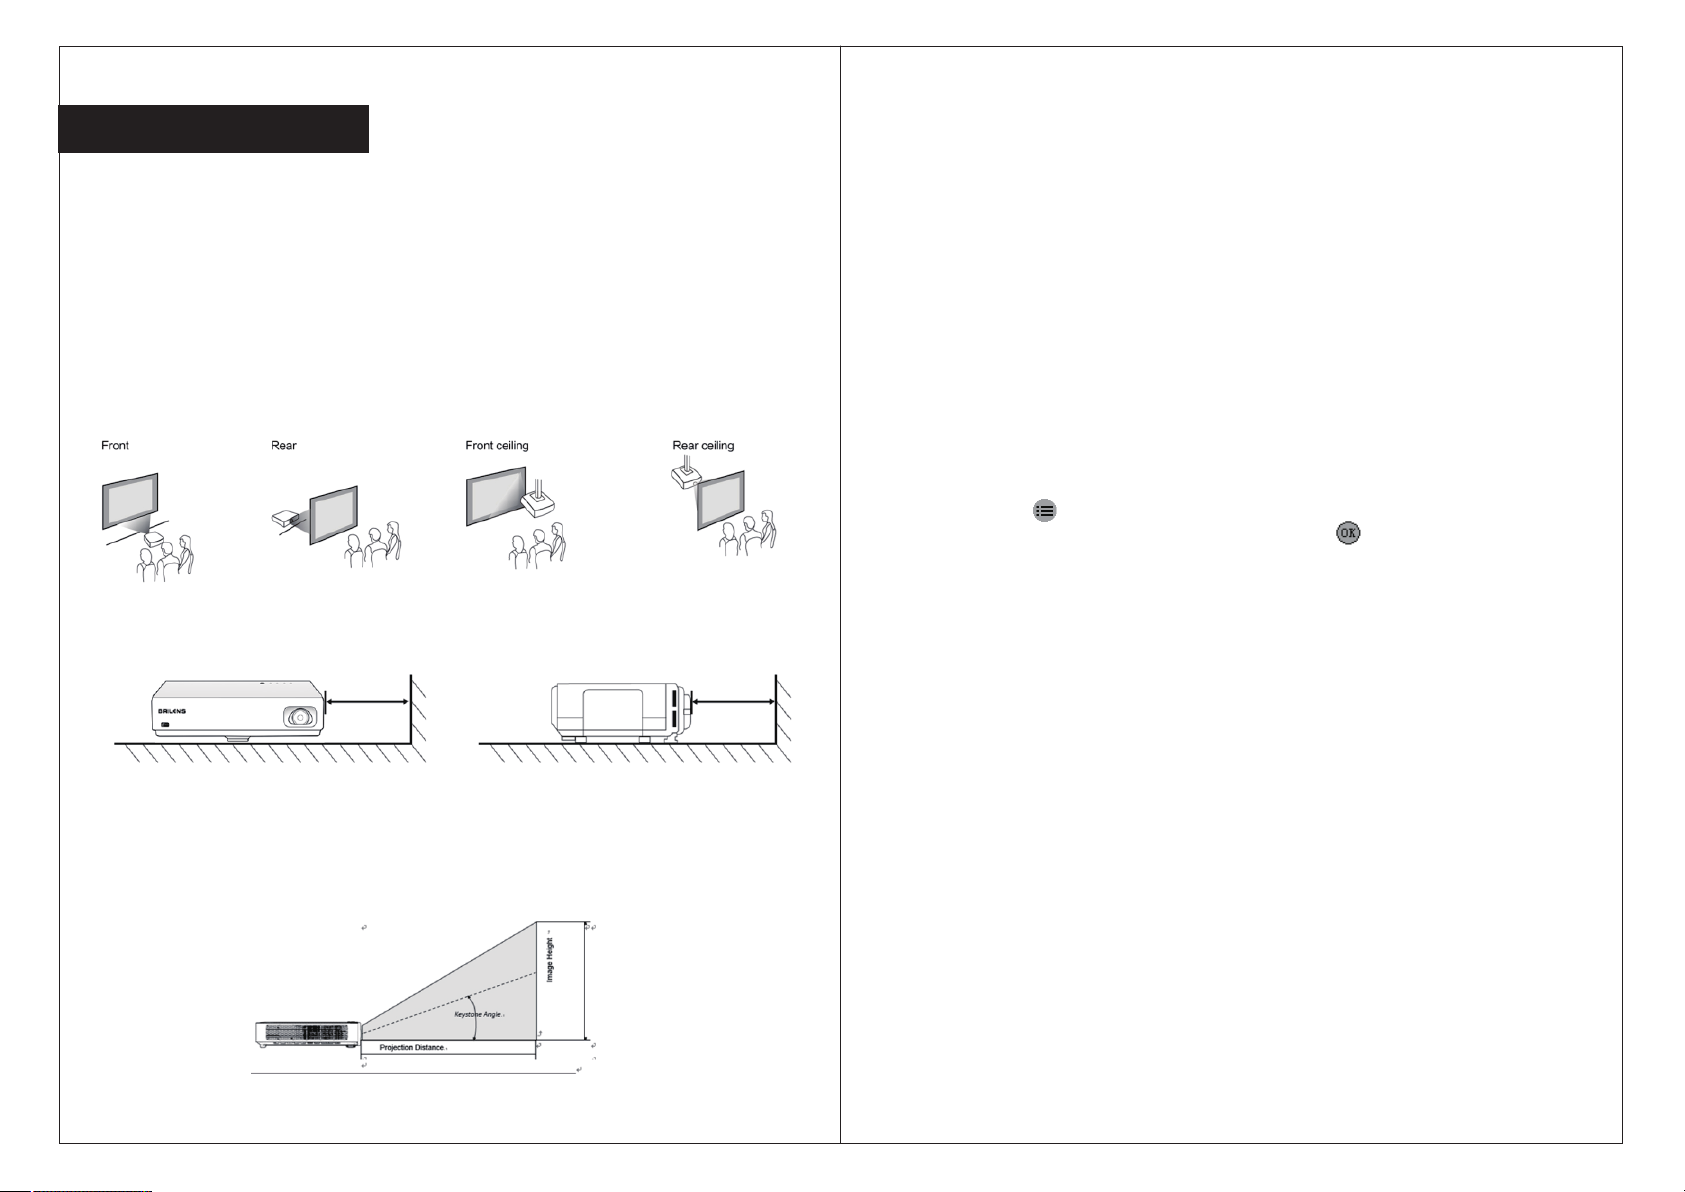
Projector placement
*You can place the projector on almost any flat surface to project an image.
*You can also install the projector in a ceiling mount if you want to use it in a fixed location.
Caution:
*Place the projector on a sturdy, level surface or install it using a compatible mount.
*Leave plenty of space around and under the projector for ventilation,and do not place
anything that could block the vents.
Projector setup and installation options:
Ways of installation:
Note:Leave at least 20 inches (50 cm) of space in front of air exhaust and intake vents
when setting up multiple projector,20 inches (50 cm) of space between the projector.
Controlling Volume with the volume buttons
You can use the Volume buttons on the remote control to adjust the volume as you
project a presentation with audio. The volume buttons control the projector's
internal speaker system or any external speakers you connected to the projector.
1.Turn on the projector and start a presentation that includes audio.
2.To lower or raise the volume, press the Volume - or Volume + buttons on the
remote control.
Setting the time zone
You can set the time zone for the projector.
1.Press the Menu button.
2.Select the Application menu > Time Zone and press button.
3.Setting the Time Zone you want..
Menu Instruction
This projector has a screen display (OSD) setting menu to adjust and change
settings.The OSD menu has five sub-menu:
Projector Distance
The distance at which you place the projector from the screen determines the
approximate size of the image.The image size increases the farther the projector is
from the screen, but can vary depending on the zoom factor, aspect ratio,and other
settings.
-9 --------------------------------------------------------------
------------------------------------------------------------22-
Page 11
Remote Control Operation
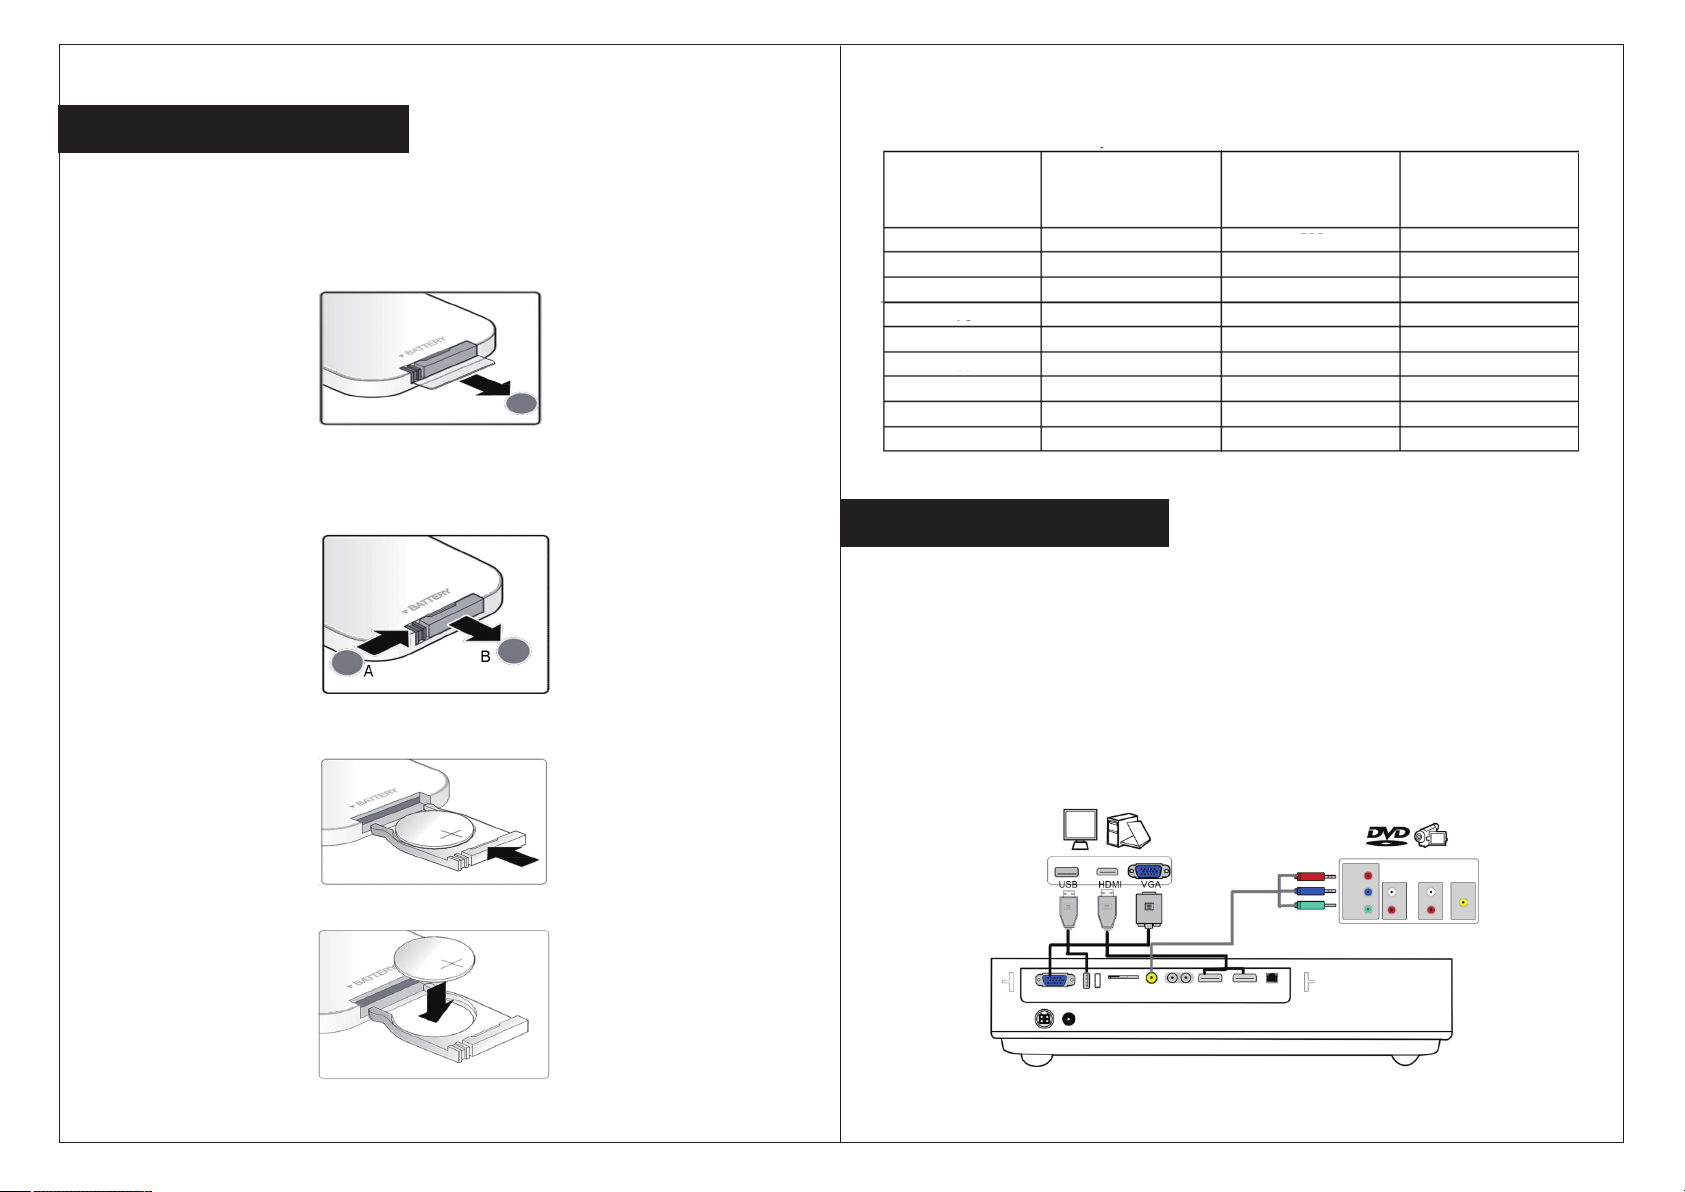
Standard Zoom Lens--16:10 Aspect Ratio
Set the remote control
The remote control is equipped with a pre-installed 3V lithium battery(CR2025).
Before using the remote control,take out the plastic sheet from the battery warehouse.
Changing remote control battery
1. Move and open the battery cover towards the direction of arrow A.Pull the cover out
towards the direction of arrow B.
2.Remove the old battery and install new battery(with the positive end upward).
Image Size
Diagonal
(Inch)
40
50
60
70
80
90
100
110
120
Image Width
(mm)
861
107
128
150
171
193
2100
2340
2560
Image Height
(mm)
538
675
800
945
1070
1215
1300
1485
1600
Projectio n Distance
Max/Min
(mm)
1990/1640
2480/2050
3040/2533
3470/2870
4040/3352
4460/3700
5030/4 176
5455/4520
6020/5 000
Projector connections
Connecting signal source to projector,you must confirm:
1. Turn off all adapters before connecting.
2. Using the corresponding cable to receive each signal .
3. Ensure the cable is plugged firmly.
As shown in the following interface, part of the cable may not be included in the
original package . Please contact the dealer for purchasing information.
The connection graph just for your reference on the below. The projector of
different models have different multimedia interfaces on the back .
3. Fit the battery's cover again.
-21 --------------------------------------------------------------
------------------------------------------------------------10-
Page 12
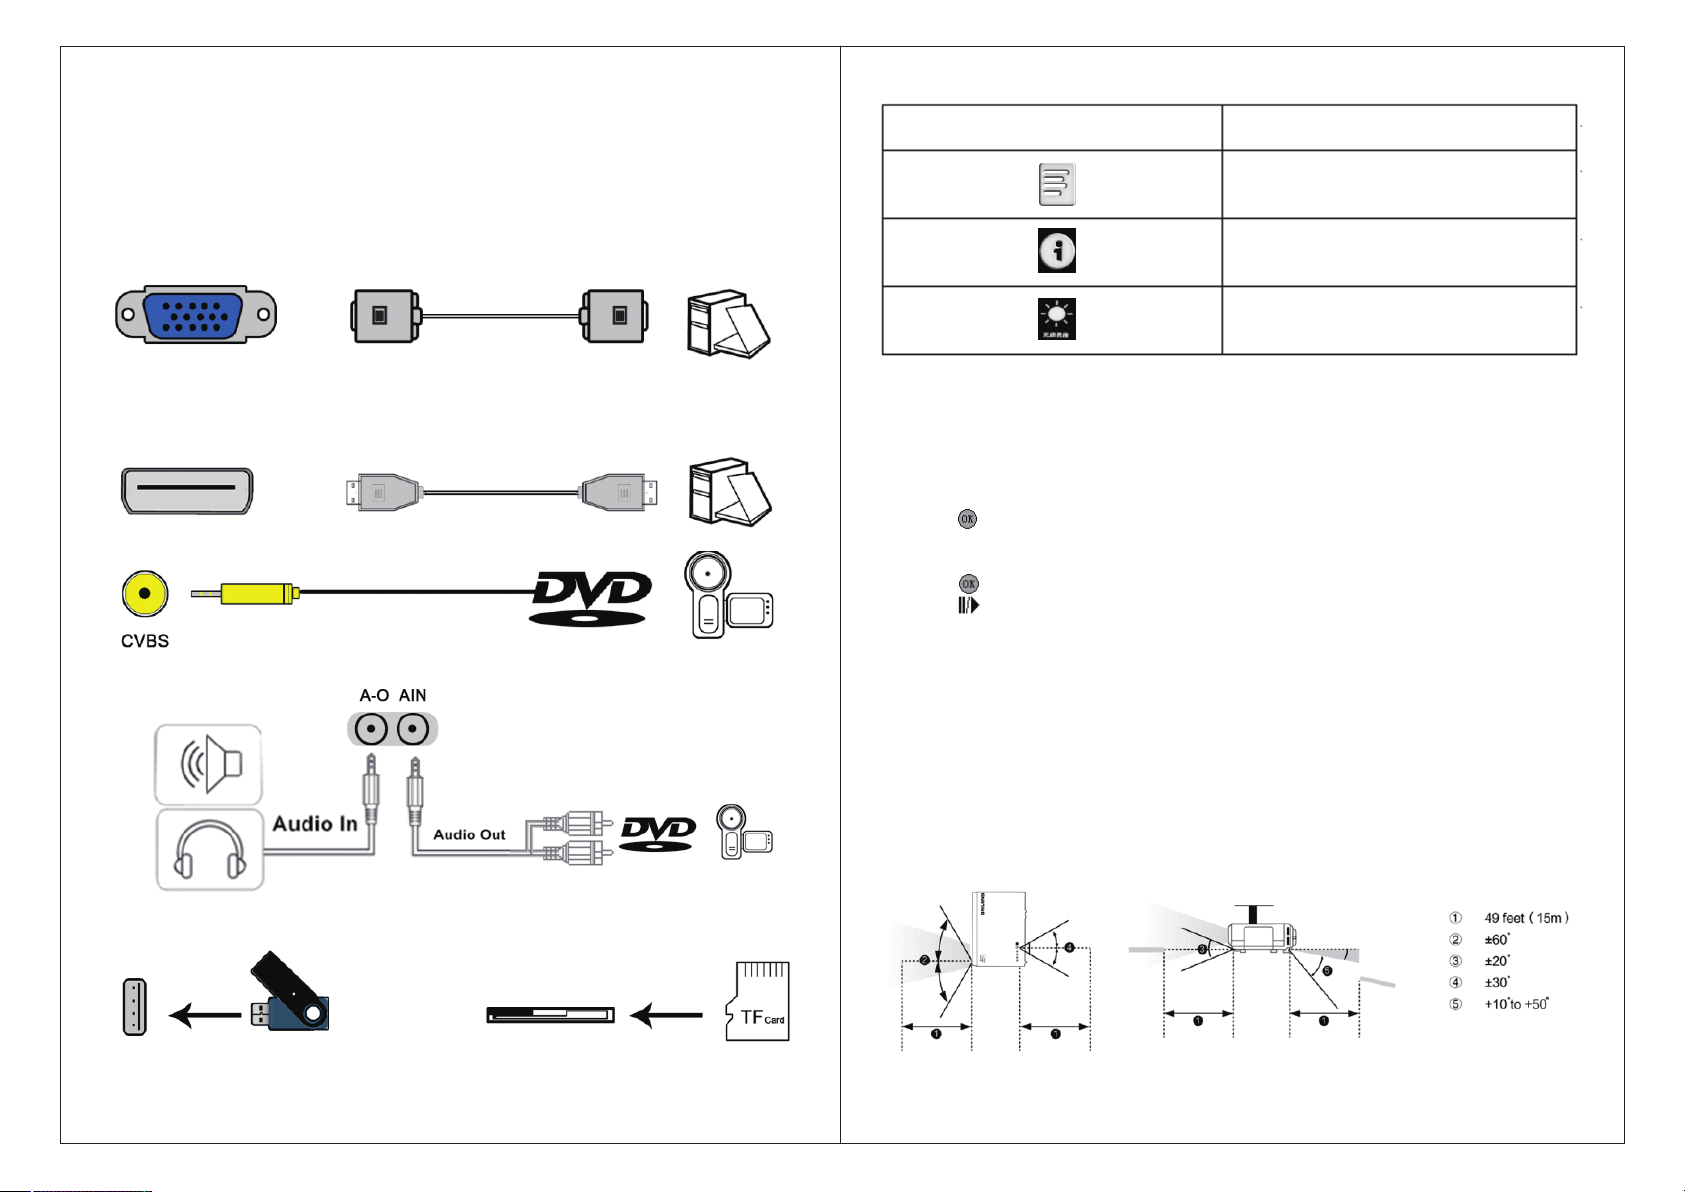
Connecting to a Computer for VGA Video
= =
Buttons
Functions
You can connect the projector to your computer using a VGA computer cable.
1.If necessary, disconnect your computer's monitor cable.
2.Connect the VGA computer cable to your computer's monitor port.
3.Connect the other end to a Computer port on the projector.
4.Tighten the screws on the VGA connectors
Connecting to a Computer for HDMI Video and Audio
1.Connect the HDMI cable to your video source's HDMI output port.
2.Connect the other end to the projector's HDMI port.
Connecting the video device with video cable
Connecting the audio device with audio cable
Photo playlist
Photo details
Light source working mode (Text, Image,
Energy saving)
Document Browser
Document browser only supports “txt” documents.
Follow these steps to view a document via document browser.
1.Press “ ◄“ or “ ►” button on Media Center Menu, then select “Document”.
2.Press button to open the document directory.
3.Press “◄ “ or “ ► ” button to select the folder which includes the document you
want.
4.Press to select the document.
5.Press to play.In the directory menu, press “Menu” button to add or delete file.
Remote Control Operation
The remote control lets you control the projector from almost anywhere in the room,
up to 49 feet (15 m) away. You can point it at the front or rear of the projector.
Insert U/TF card
-11 --------------------------------------------------------------
Make sure that you aim the remote control at the projector's receivers within the
angles listed here.
Note: Avoid using the remote control in conditions with bright fluorescent lights or
in direct sunlight, or the projector may not respond to commands. If you will not use
the remote control for a long time, remove the batteries.
------------------------------------------------------------20-
Page 13
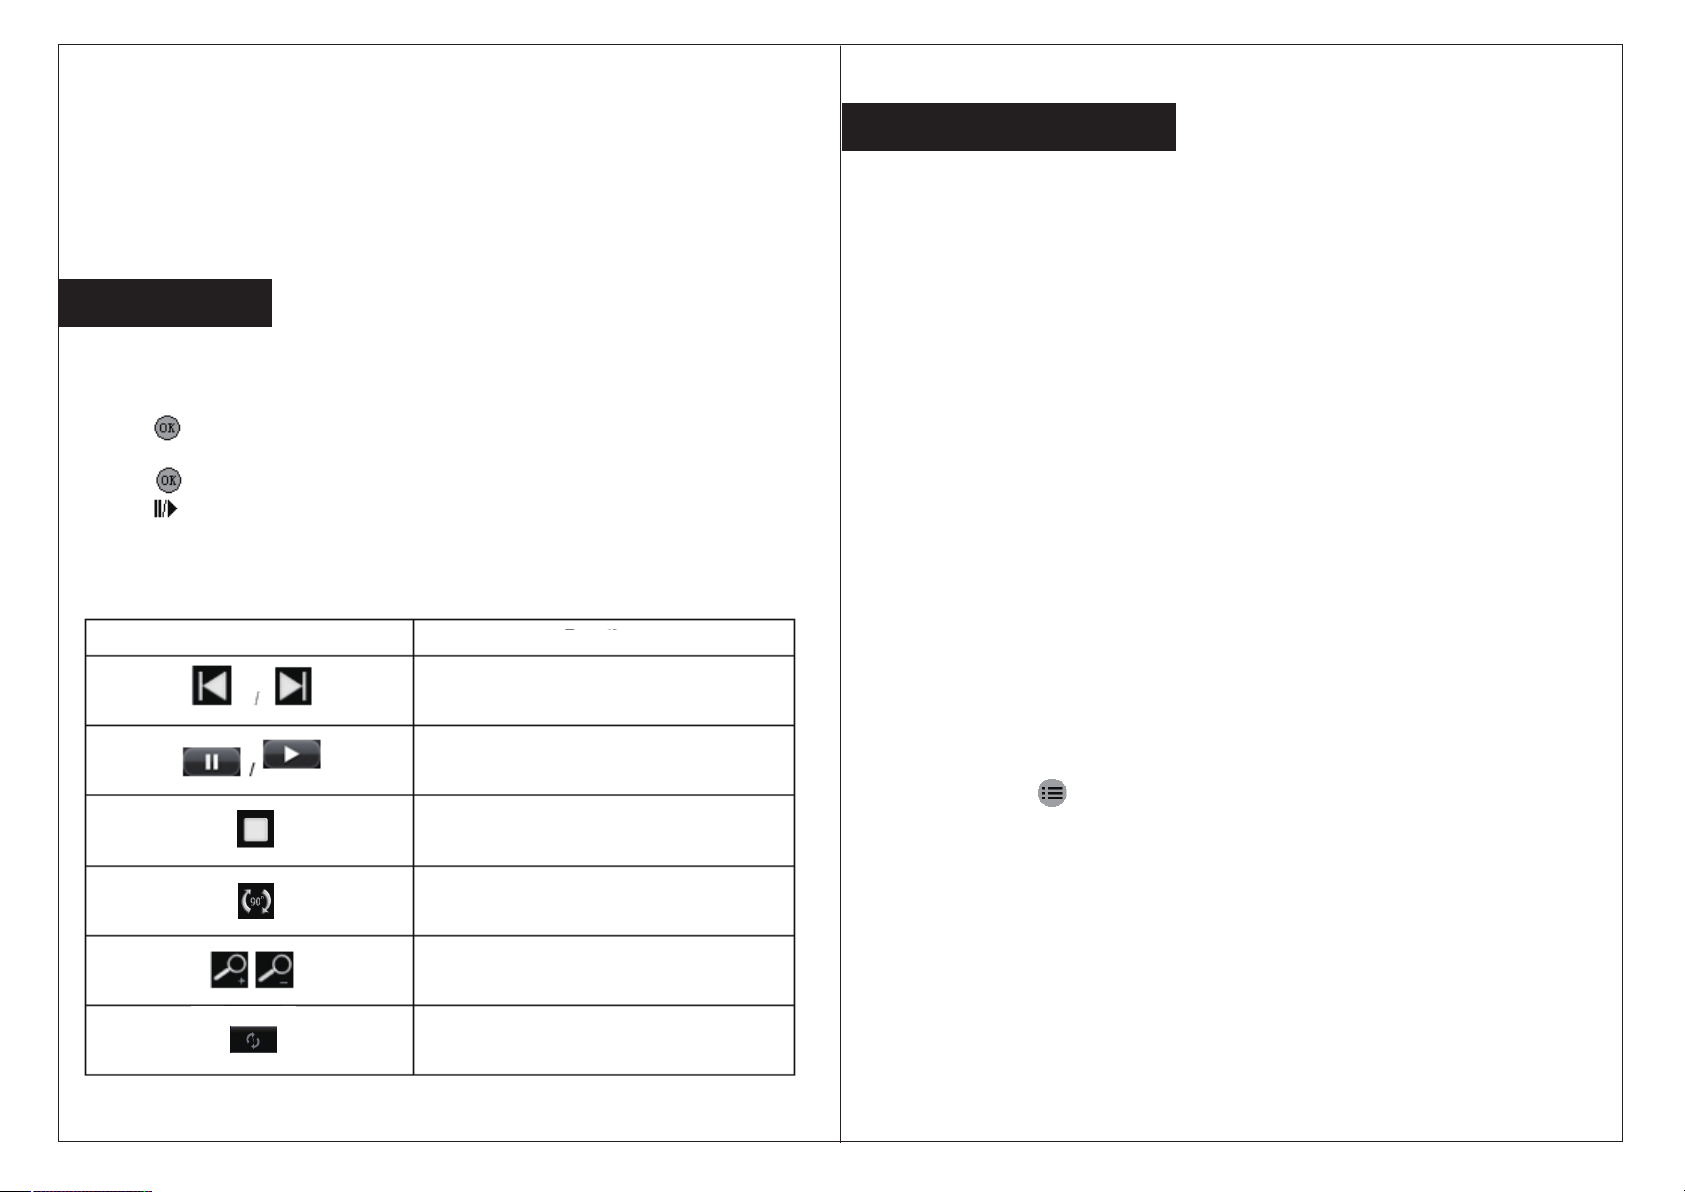
Photo Browsing
The photo browser supports the following format:
BMP(Max 4,000 x 3000 pixels)
PNG(Max 4,000 x 3000 pixels)
JPG(Max 4,000 x 3000 pixels)
Photo Viewing
If you want to see a photo via photo browser, do the following steps:
1. Press “ ◄ ” or “ ► ” button on Media Center Menu, then select “Photo Browsing”.
2.Press button to open the document directory.
3.Press “ ◄ “ or “ ► ” button and select the folder which includes the photo you want.
4.Press button to select the photo.
5.Press to play.
In the directory menu, press”Menu” button to add or delete file.
OPRATE PROJECTOR
Turning the Projector on and off
1. Connect the power cord to the projector. Connect the other end to a wall outlet.
The power indicator light on .
2. Turn on the connected devices.
3. Ensure the Power Indicator Light is not flashing. Then press the POWER button
to turn on the projector.
4.If more than one input device is connected, press the SOURCE button and use ▲▼
to scroll among the devices.
5.To turn the projector off, press the POWER button. When the “Power Off? Press
Power again” message appears, press the POWER button.The projector turns off.
Note: With Direct Power On turned on, the projector turns on as soon as you plug it in.
Warning: Never look into the projector lens when the lamp is on. This can damage
your eyes and is especially dangerous for children and pets.
Selecting the signal
Control Interface for Photo Browser.
Photo browser control interface is as below:
Buttons
/
-19 --------------------------------------------------------------
/
Return to previous / Forward to next
Pause / Play
Stop playing
Rotate photo
Zoom in / Zoom out
Loop Playback
Functions
1.Press Source on remote control or projector control panel to select the Signal
Source by up and down button.
2.Press OK button on remote control or press Enter button on projector control
panel to confirm your selection.
Note:The project screen will show “No Signal”, if there is no signal input. And 10
seconds later, the projector will be standby.
Selecting the Language for the Projector Menus
1.Press the Menu button on remote control or projector control panel.
2.Select the Option menu and press OK button on remote control or press Enter
button on projector control panel.
3.Select the OSD Language setting and press OK button.
4.Select the language you want to use then press OK button.
5.Press Menu or Exit button to return.
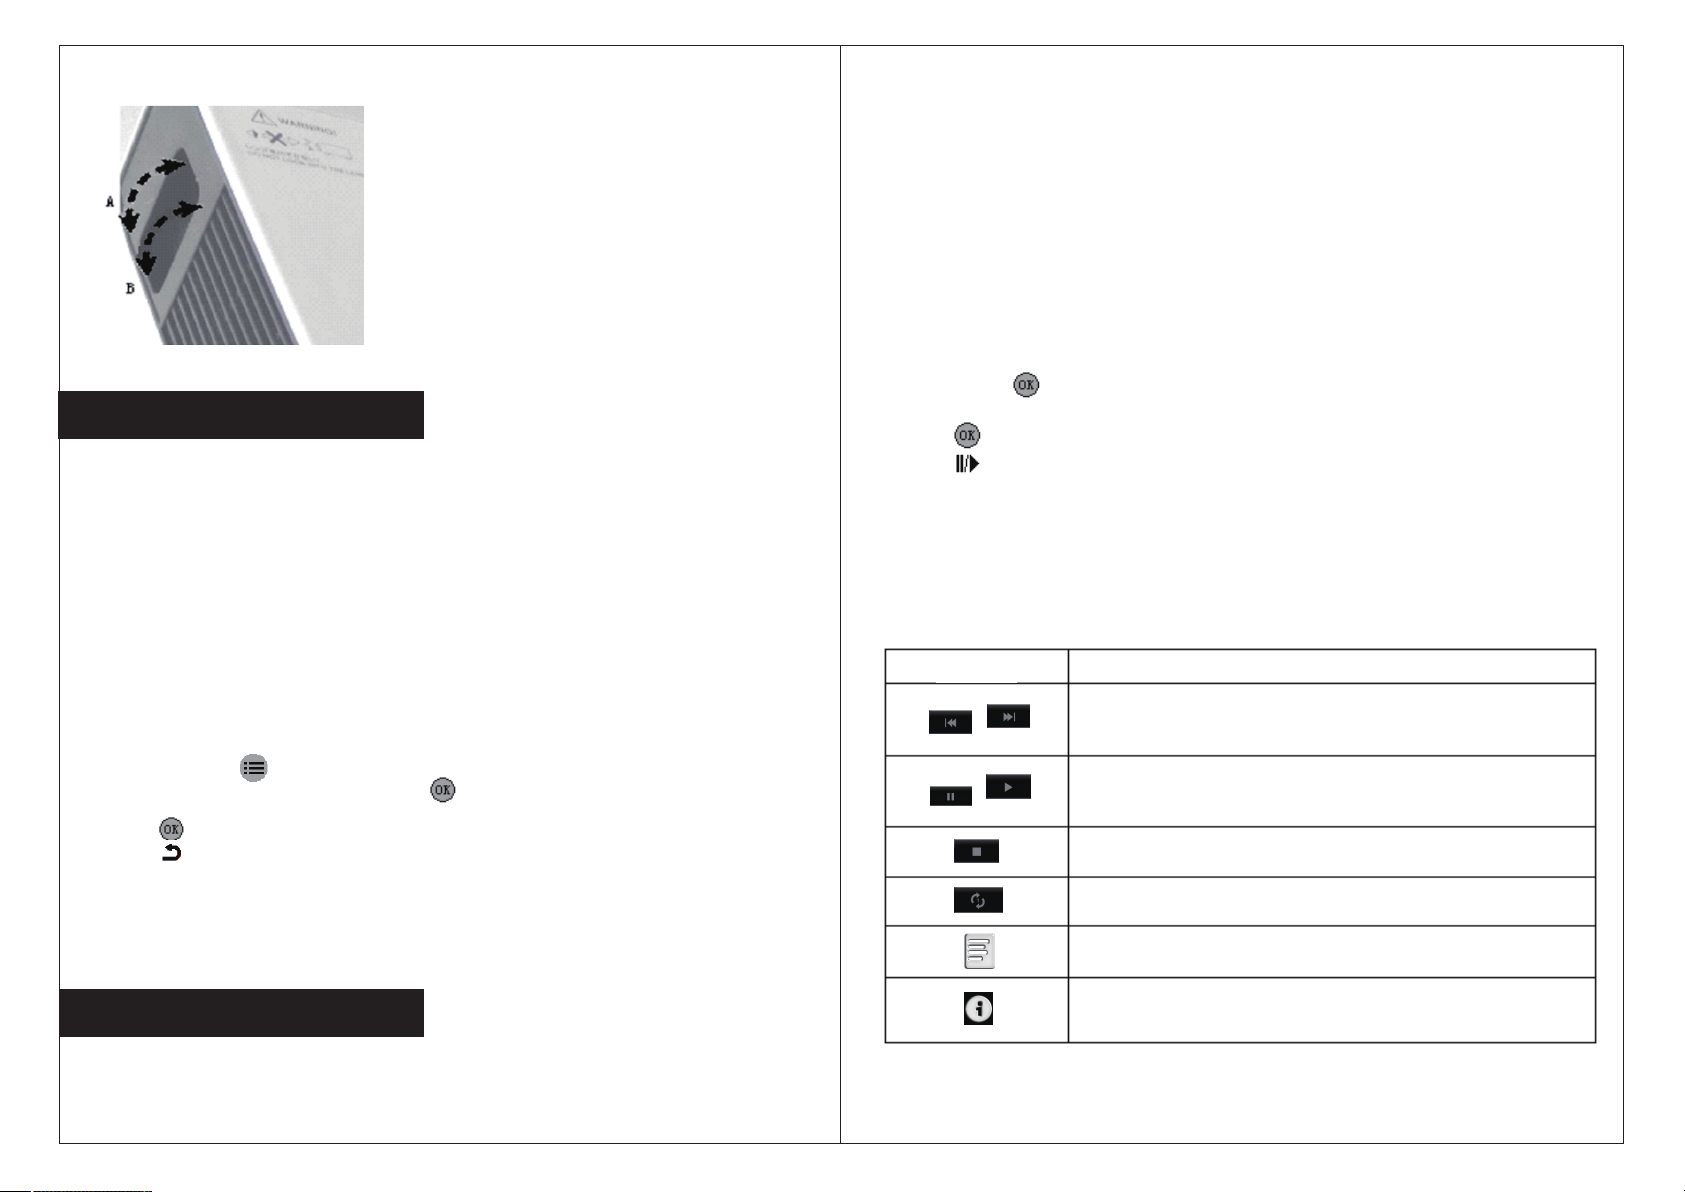
Adjust Image
Adjust the projected image's resolution using image focus control button A, located
at one end of the projector.
Adjust the projected image's size using image zoom control button B, located next
to A.
------------------------------------------------------------12-
Page 14
Adjusting the Image Height
If you are projecting from a table or other flat surface, and the image is too high or low,
you can adjust the image height using the projector's adjustable feet.
The audio player supports the following formats:
MP3(Max 256Kbps)
WMA,MID,MIDI,MP1,MP2,OGG,AAC,AMR,WAV,AC3,M4A,AWB,APE.
Playing Music
If you want to play music , follow these steps:
1.Press “ “ or “ ” button on Media Interface Menu, then select “Music”◄ ►
2.Press button button to open the document directory.
3.Press “ ◄ “ or “ ►” button and select the folder which includes the song you want.
4.Press to select the song.
5.Press to play.
In the directory menu, press the ”Menu” button to add or delete file.
1.Turn on the projector and display an image.
2. To adjust the image height, rotate the front foot to extend or retract it.
3. If the image is tilted, rotate the rear feet to adjust their height.
If the projected image is unevenly rectangular, you need to adjust the image shape with
Keystone Function Key on the control panel.
Adjusting the Image Position
Sometimes, the user may find the image is ladder-shaped.
Follow these steps to adjust the position of the projected image as necessary:
1.Press the Menu button and select Option menu.
2. Choose Keystone submenu and press button
3.Press “ ◄“ or “ ► ” button to adjust the position of the projected image you want.
4.Press button to confirm.
5.Press button to return.
Image Aspect Ratio
Changing the Image Aspect Ratio
You can change the aspect ratio of the displayed image to resize it.
Supported Audio Formats
-13 --------------------------------------------------------------
Control Interface
Music player control interface is as below:
Buttons
/
/
------------------------------------------------------------18-
Return to previous / Forward to next
Pause / Play
Stop playing
Loop playback
Song playlist
Song details
Functions
Page 15
Control Interface
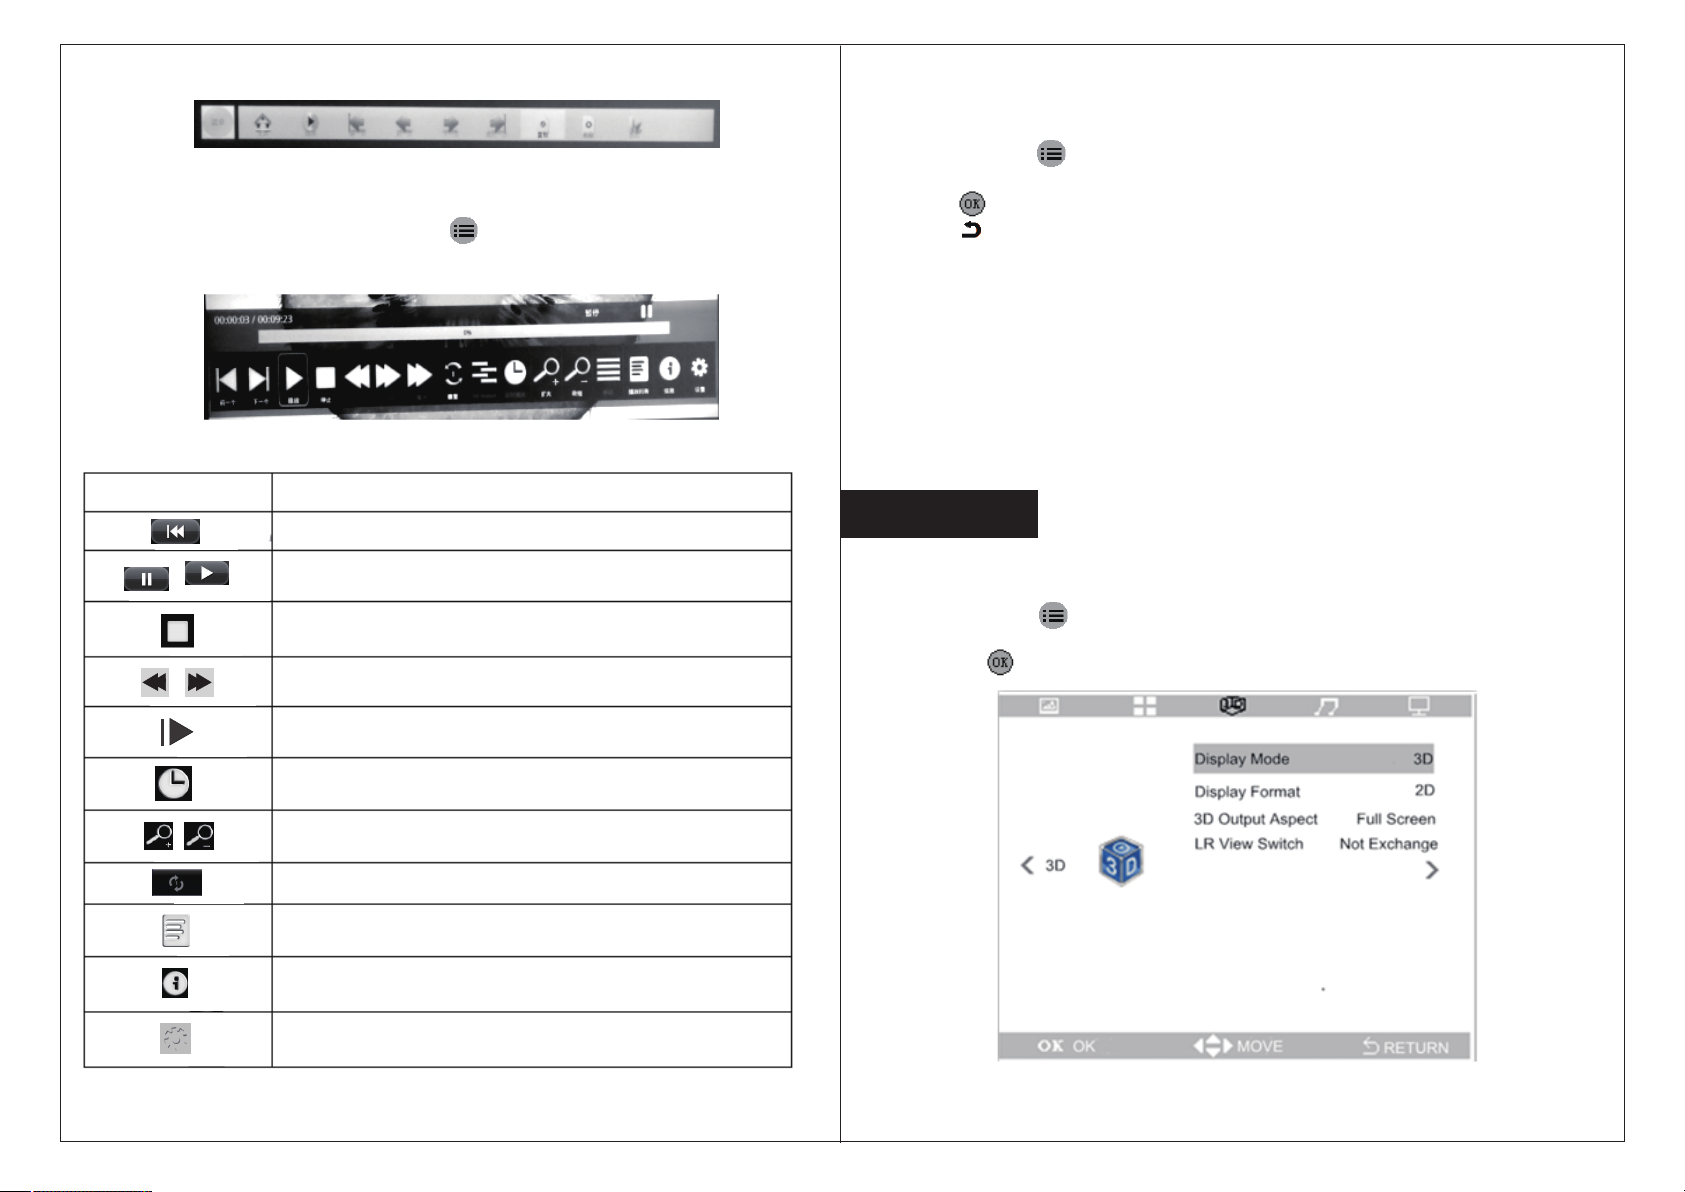
In the process of the Movie, press the Menu button will jump out of the control
interface.If there is no user input for 15 seconds, the control interface will automatically
disappear.
1.Turn on the projector and display an image you want.
2.Press the Menu button and select Picture menu
3.Choosing Aspect Ratio to change the Image Aspect Ratio.
4.Press button to confirm.
5.Press button to return.
Note:The shape and size of the displayed image changes, and the name of the
aspect ratio appears briefly on the screen.
Available Image Aspect Ratios
You can select the image aspect ratios, depending on the selected screen type
setting and the input signal from your image source.
Control functions are described in the following table:
Button Function
Return to previous / Forward to next
/
Pause / Play
Stop playing
Fast rewind/ Fast forward
Slow play
Set special time frame to play
Zoom in/ Zoom out
Loop playback
Movie playlist
Movie details
Note: Black bands and cropped images may project in certain aspect ratios,
depending on the aspect ratio and resolution of your input signal.
3D setting
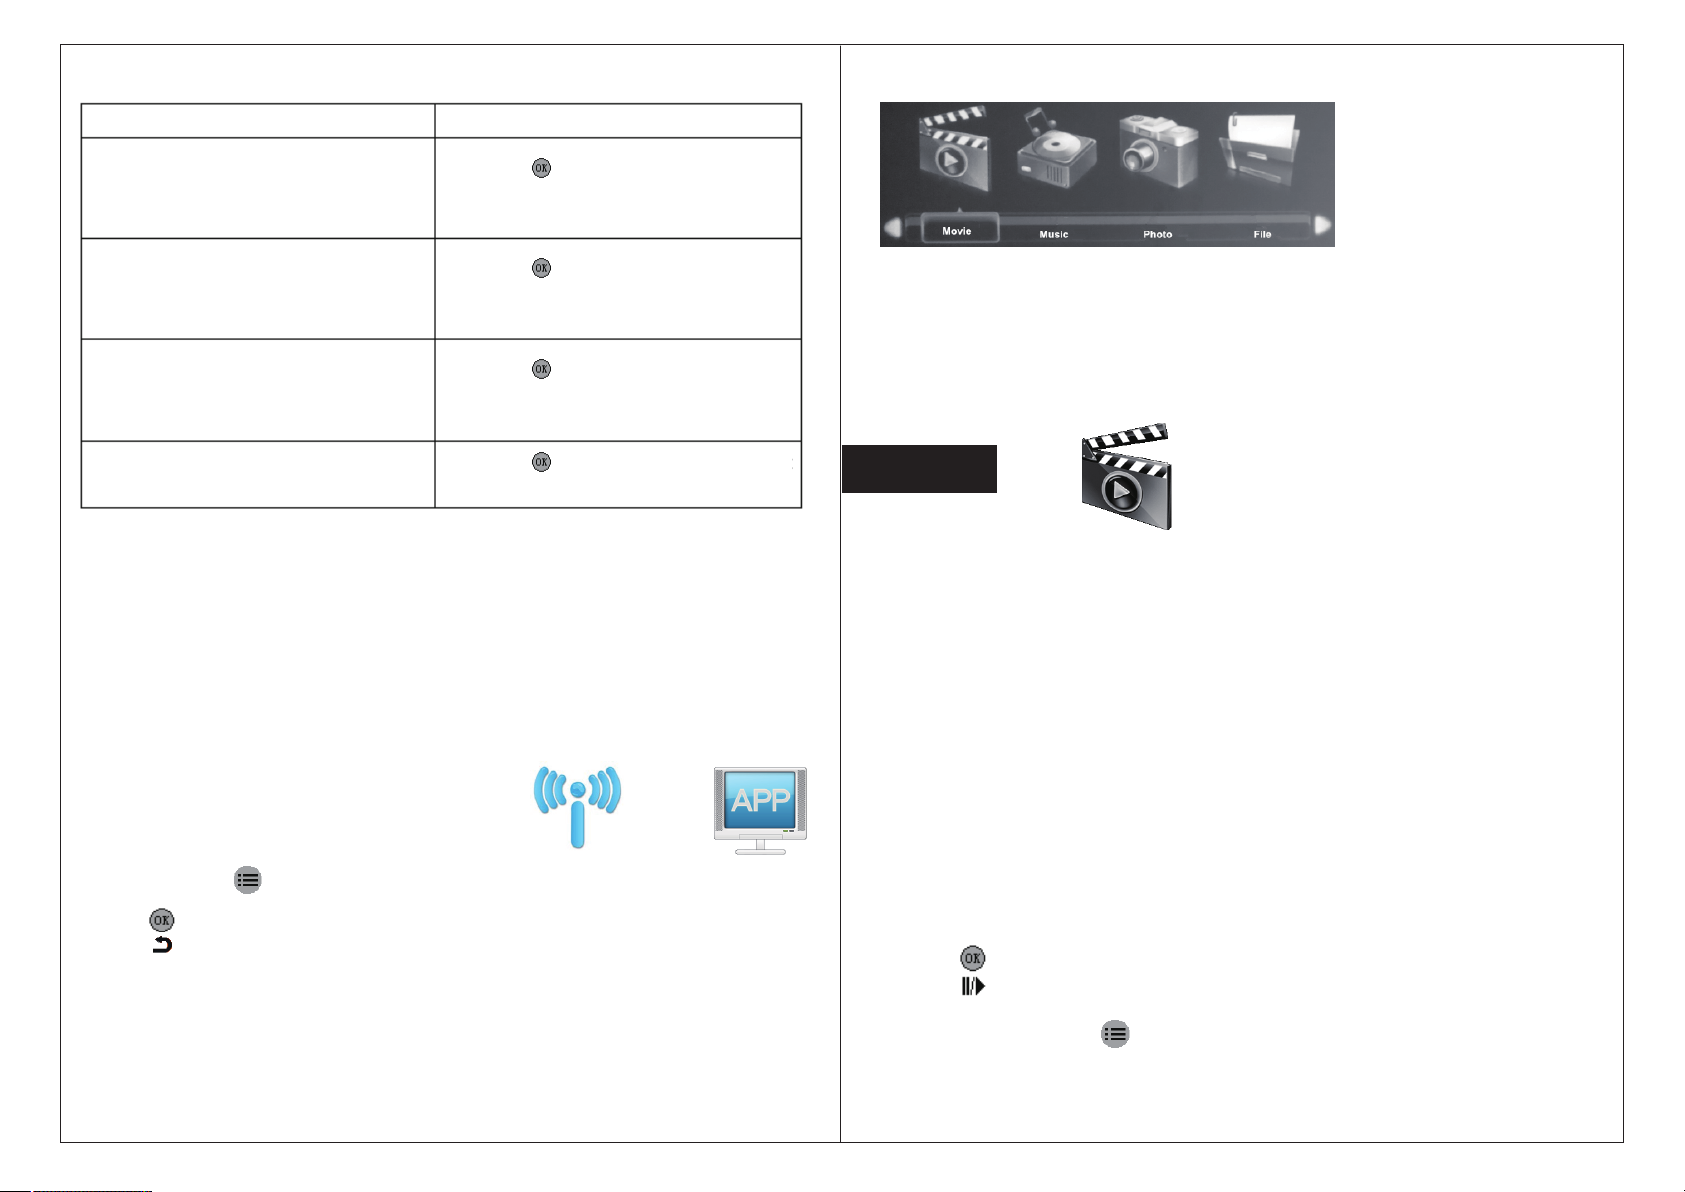
Perform the following steps to access and adjust 3D settings:
1. Press the Menu button to enter the OSD menu
2. Select the 3D Menu.
3. Press the button to adjust the option settings.
Setting(Image& Sound /Ratio /Brightness / 3D Setting)
-17 --------------------------------------------------------------
------------------------------------------------------------14-
Page 16
Item Indication
Press the button to set the 3D signal
Display Mode
source display mode.
(2D,3D,3D To 2D)
Press the button to set the 3D signal
Display Format
3D Output Aspect
LR View Switch
Note:
1. If you use the 3D function, you must set the display mode as 3D in the 3D menu. Also,
set the display format to one that matches the signal source format(Side by side, Top
bottom).
2. If you use the 3D setting, then you must ensure that the 3D signal is from the correct
source.
3. You will need 3D glasses to view 3D images. Please follow the configuration instructions
of the glasses to complete the setup process.
Wireless transmission screen
Open wireless transmission screen
If you want to use the wireless do the follow steps:
1. Press the Menu button, then press “ ◄“ or “ ►” button to select “Application”.
2. Press “▲” or “▼” button to select “Widi/Miracast”
3. Press button to enter.
4.Press to exit when the device cannot support wireless transmission or is unable to
connect.
Multimedia Function
Multimedia design help you easily access inserted USB flash disk or TF Card files.
Movies,music files,photos and other documents can be displayed.
playback format.
(Side by side, Top bottom)
Press the button to set the aspect ratio
of the 3D image output.
(Full screen,Center,Audio Adapter)
Press the button to set to choose the
left or right view.
Multimedia center menu includes four access application:
Movie Video Player included that can play multiple video formats.
Music Music Player that supports many types of audio files.
Photos Photo Browser supports multiple formats of pictures and contains
slide function.
Document Document Browser,which can display TXT document.
Movie
Supports the following movie formats:
H. 264 video, up to 720 p @ 30 FPS; Main Pro le level 3.1, AAC - LC audio, up to 160
Kbps, 48 KHZ, m4v,mp4 and mov stereo audio file format.
MPEG-4 video, up to 2.5 Mbps, 640 x480 pixels @ 30 FPS; Simple Profile,
AAC - LC audio.
maximum 160 Kbps/channel, 48 KHZ, m4v,mp4 and mov stereo audio file format.
Motion JPEG (M - JPEG) up tp 35 Mbps, 1280 x720 pixel, 30 FPS, U - Law audio, avi
PCM stereo audio file.
Unicode subtitle file:ssa,ass,srt,smi.
Watch movie
To play a movie,please follow these steps(other applications can be operated in
the same way):
1. Press Source button and choose Media choose the“movie”icon.
2. Press button to choose the“movie”icon.
3.Press button to play the selected movie.
Under the directory menu button you can perform functions to modify
or remove files. Other files can be managed in the same way.
-15 --------------------------------------------------------------
------------------------------------------------------------16-
 Loading...