

1
BTPC-PH2
TABLET PC-CAPACITIVA 7”-TELÉFONO-3G-DUAL SIM
Android 4.1.2-GPS-Bluetooth
Manual de Instrucciones

2
CONTENIDO
1 Introducción
1.1 Advertencias
1.2 Instrucciones de seguridad
2. Funcionamiento
2.1 Preparación y uso
2.3 Iconos de estado
3. Guía de inicio rápido
3.1 Botones de función
3.2 Encendido y apagado
3.3 Abrir y cerrar pantallas
3.4 Uso de la pantalla táctil
3.5 Interfaz principal
3.6 Aplicaciones
3.7 Conexión USB
3.8 Sistemas de entrada
3.9 Técnicas de aplicaciones
4. Ajustes básicos
4.1 Tarjeta SIM
4.2 WiFi
4.3 Bluetooth
4.4 Uso de datos
4.5 Otras funciones
4.6 Perfiles de audio
4.7 Pantalla
4.8 Almacenamiento
4.9 Batería
4.10 Aplicaciones y programas
4.11 Cuentas y sincronización
4.12 Servicios de localización
4.13 Configuración de seguridad
4.14 Idioma y entrada de texto
4.15 Copia de seguridad y reset
4.16 Fecha y hora
4.17 Programar encendido y apagado
4.18 Accesibilidad
4.19 Opciones de desarrollo
4.20 Acerca del dispositivo
5. Multimedia
5.1 Música
5.2 Vídeo
5.3 Galería de fotos

3
5.4 Cámara
5.5 Radio FM
6. Funciones de comunicación
6.1 Teléfono
6.2 Mensaje de texto
6.3 Lista de contactos
7. Internet
7.1 Navegador
7.2 Correo electrónico
8. GPS
9. Otros aplicaciones
9.1 Reloj
9.2 Calculadora
9.3 Administrador de archivos
9.4 Grabadora
10. Procedimientos de instalación
10.1 Instalar
10.2 Desinstalar
11. Solución de problemas

4
1. INTRODUCCIÓN
1.1 Advertencias
Por favor, mantenga siempre el dispositivo alejado de sitios húmedos,
no utilice el dispositivo ni el cargador con las manos mojadas. No
exponga el dispositivo a temperaturas extremas, tanto fías como
calientes. Evite golpes bruscos.
No desmonte nunca el dispositivo pues es causa de pérdida de la
garantía.
1.3 Instrucciones de seguridad
- Antes de usar el dispositivo, por favor, lea con atención estas
instrucciones
- No utilice nunca el dispositivo mientras conduce, con el fin de
garantizar una conducción segura.
- Respete las normas en cada zona en las que use el dispositivo, como
hospitales, gasolineras, etc.
- Respete las normas a bordo de un avión, para impedir que la señal
interfiera en los dispositivos de navegación.
- Mantenga el dispositivo alejado de equipos magnéticos ya que las
radiaciones pueden provocar pérdidas de datos o mal funcionamiento.
- Mantener lejos del alcance de niños y supervisar el uso realizado por
niños.
- No utilice nunca el dispositivo en el baño u otro ambiente húmedo.
2. FUNCIONAMIENTO
2.1 Preparación y uso
Cargue la batería por completo antes de usar el dispositivo, para ello
use el adaptador suministrado.
2.3 Iconos de estado
5
Nuevo Email
Modo Avión
USB conectado
Depuración USB
Botón VOLVER
Descargando archivo/apk
Ajustes y aplicaciones recientes
Botón HOME
Indicador de batería
WIFI COnectada
Botón de encendido
Pulsación larga para encender o apagar y corta para
modo standby
Volumen +
Aumentar volume
Volume n -
Disminuir volumen
Botón HOME
Para volver al menú principal
Botón volver
Para volver a la pantalla anterior
Botón Menú
Muestra la interfaz de menú
Botón Ajustes y APK
Muestra ajustes y aplicaciones recientes
Los iconos de estado o aviso se encuentran en la barra inferior, puede desplegar
la barra para mayor información .
3. GUÍA DE INICIO RÁPIDO
3.1 Botones de función
3.2 Encendido y apagado
Encendido: Mantenga pulsado el botón de encendido durante 3
segundos. El sistema entrará en estado de bloqueo de la pantalla, por
favor, desbloquee la pantalla
Apagado:
1. Mantenga pulsado el botón de encendido y se mostrará la pantalla
de apagado.
6
2. Podrá seleccionar: APAGADO-SILENCIO-AVIÓN-REINICIO
3. Seleccione apagado.
3.3 Abrir y cerrar pantallas
1. Pantalla irá a modo standby por su cuenta si no se usa ninguna
función en un periodo de tiempo con el fin de ahorrar batería
2. Cuando la pantalla esté encendida, pulse el botón de encendido
rápidamente y la pantalla se apagará inmediatamente.
Para volver a encender la pantalla pulse el botón de encendido de
nuevo. Una vez encendida mostrara el menú de bloqueo, podrá
desbloquear o entrar en la función cámara:
3.4 Uso de la pantalla táctil
Hacer clic: Para hacer clic debe tocar con el dedo en la posición
deseada.
Apertura de icono: Para abrir un icono o programa pulse sobre él.
Deslizamiento: Para deslizar la pantalla pase rápidamente el dedo
hacia izquierda/derecha o arriba/abajo
Mover: Mantenga pulsado con el dedo un icono y arrástrelo a la
posición deseada. Luego suelte el icono dejando de pulsar.

7
Girar: Si está activada la función de giro, puede simplemente girar el
dispositivo para girar la pantalla o imagen.
3.5 Interfaz principal
En esta imagen se muestra la pantalla de inicio principal:
Página de inicio extendida: La página de inicio se puede extender
más allá de la anchura de la pantalla para ofrecer más espacio, donde
podrá poner accesos directos y widgets. Haga clic en el espacio en
blanco en la página de inicio y luego deslice hacia la derecha o la
izquierda para extender a la derecha o la izquierda de la pantalla:
Puede crear una carpeta de iconos en el escritorio. Para ello Arrastre
8
los iconos seleccionados al escritorio. A continuación, arrastre un
icono y sitúelo sobre otro para agrupar los iconos:
Pulse en el icono creado y se abrirá una nueva carpeta con los iconos
agrupados:
Es una forma muy práctica de ahorrar espacio en el escritorio principal
y tener las aplicaciones localizadas por tipo, fecha, etc.
Para eliminar los iconos del escritorio mantenga pulsado sobre el
icono y arrastre el icono a la papelera.
Para cambiar el fondo de escritorio presione en lugar en el que no
haya iconos y elija la opción deseada.
3.6 Aplicaciones
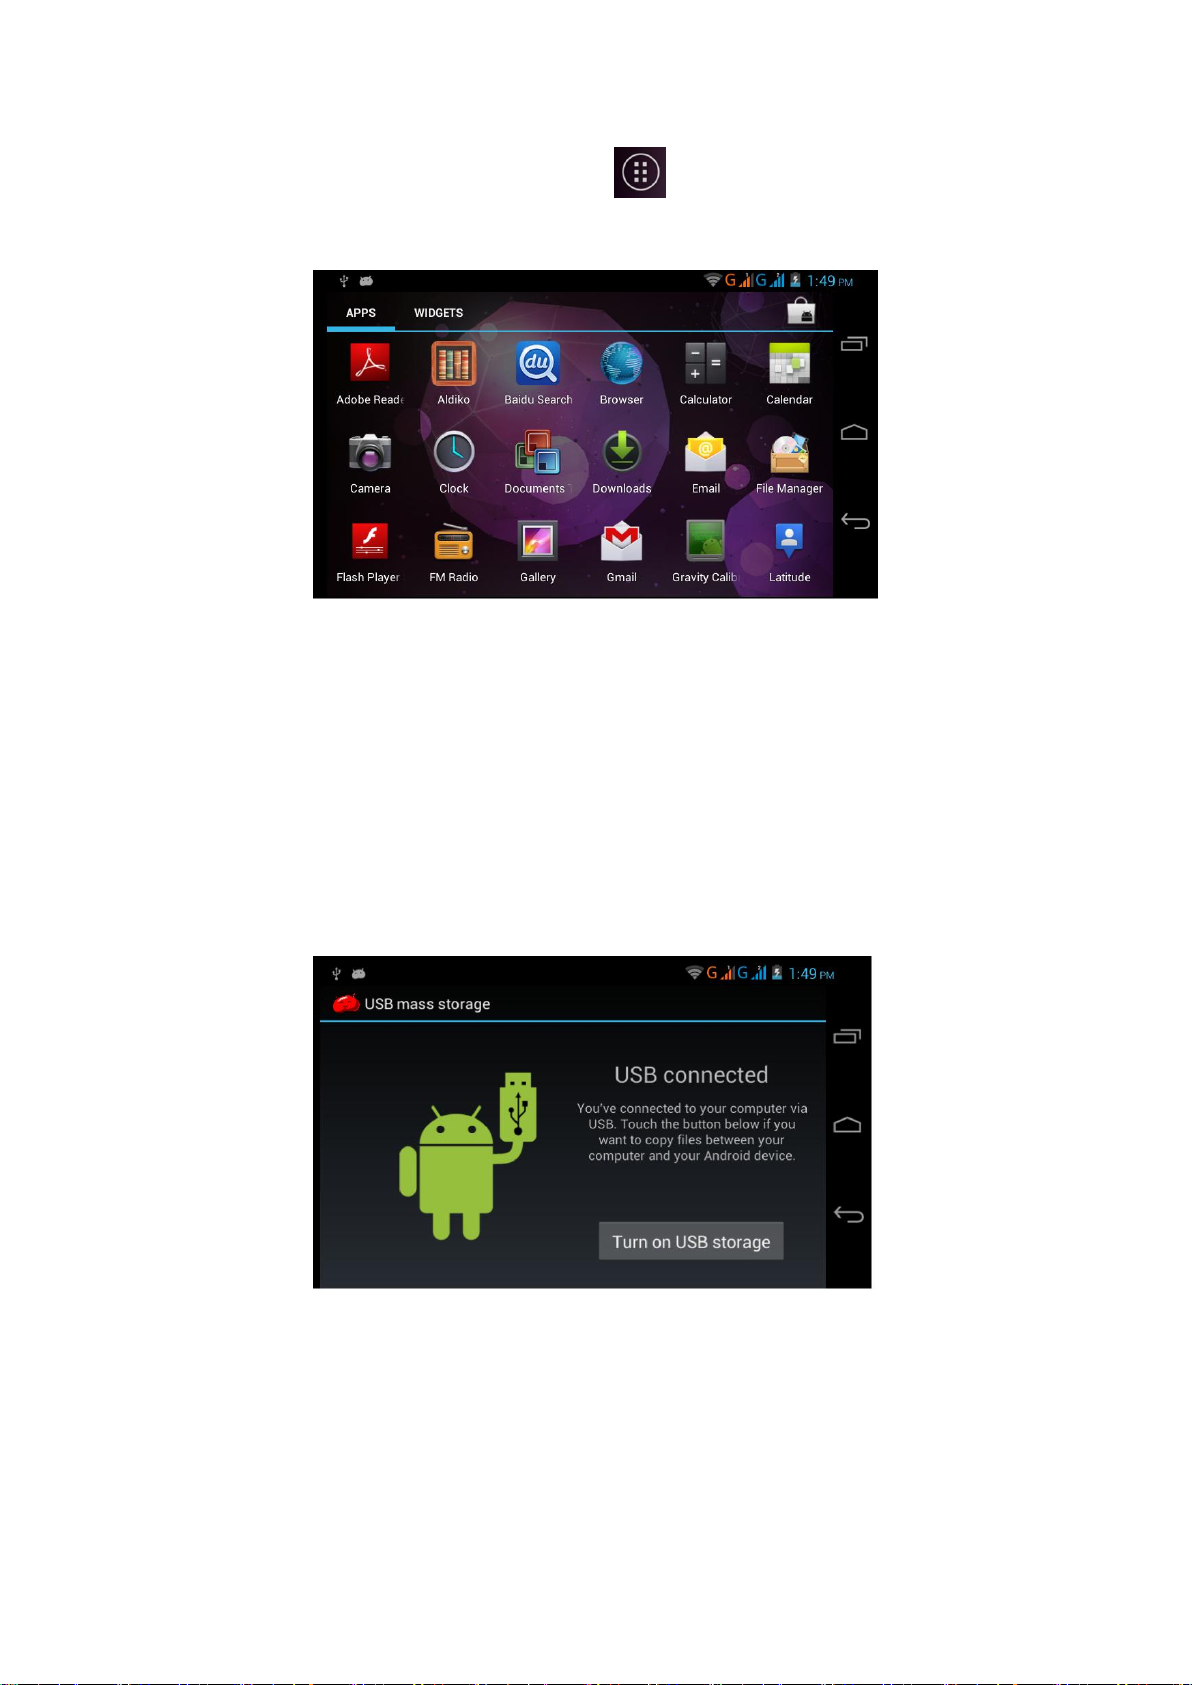
9
Haz clic en el icono de aplicaciones y seleccione la aplicación
deseada:
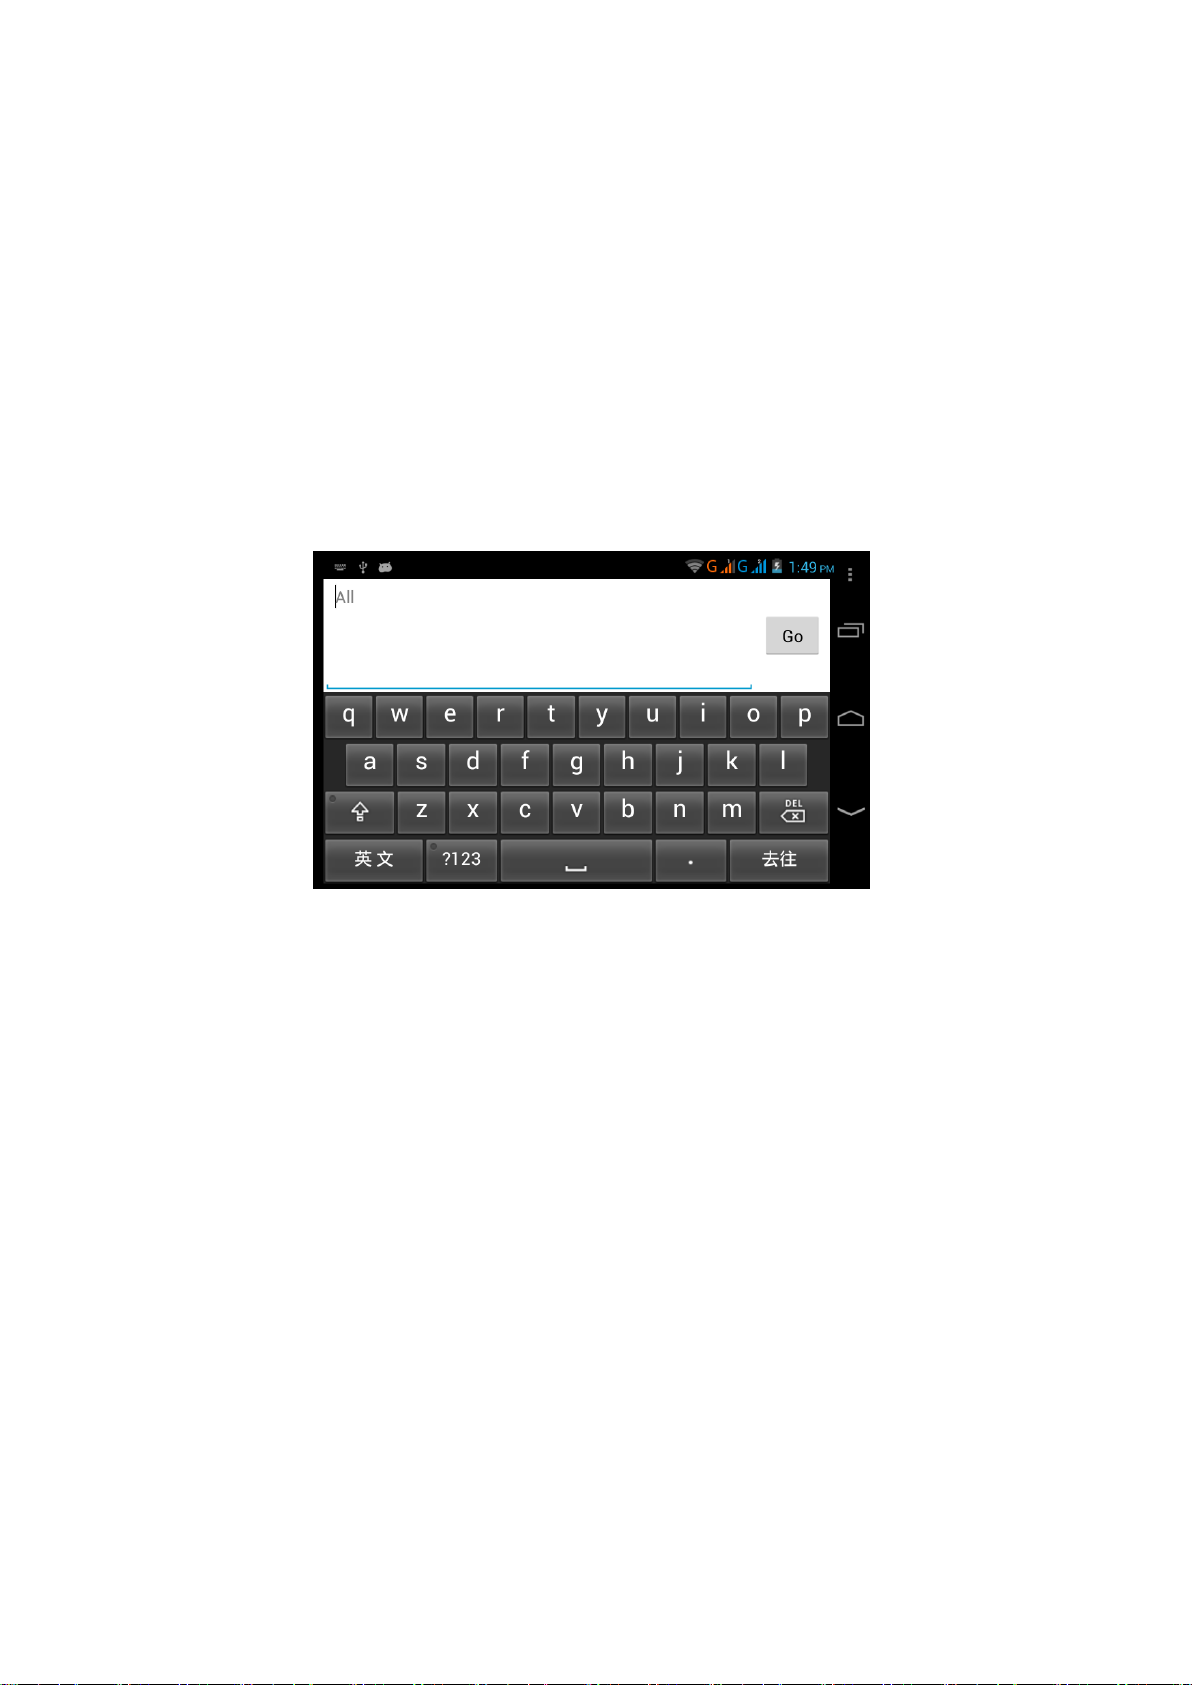
3.7 Conexión USB
Antes de transmitir los documentos, hay que realizar la configuración
de almacenamiento:
1. Conecte el dispositivo al PC mediante un cable USB. En la barra de
notificaciones se mostrará la información.
2. Abra la barra de notificaciones
3. Haga clic en USB"USB Conectado" y clic en "configuración de
almacenamiento USB abierto".
4. El USB está conectado correctamente.
Copiar documentos en la tarjeta de memoria
1. Conecte el dispositivo al PC por cable USB.
2. Configure la conexión USB.
3. Abra el icono "Mi PC" en su equipo, compruebe las opciones de
"disco extraíble".
4. Copie los documentos que necesita en el "disco extraíble".
10
5. Una vez terminada la copia "cierre la configuración de
almacenamiento USB".
Aviso: Cuando el dispositivo esté conectado a un PC y use el
almacenamiento USB, no podrá ver la información de la tarjeta
microsSD en el dispositivo. Para verla, debe desconectar primero el
cable USB.
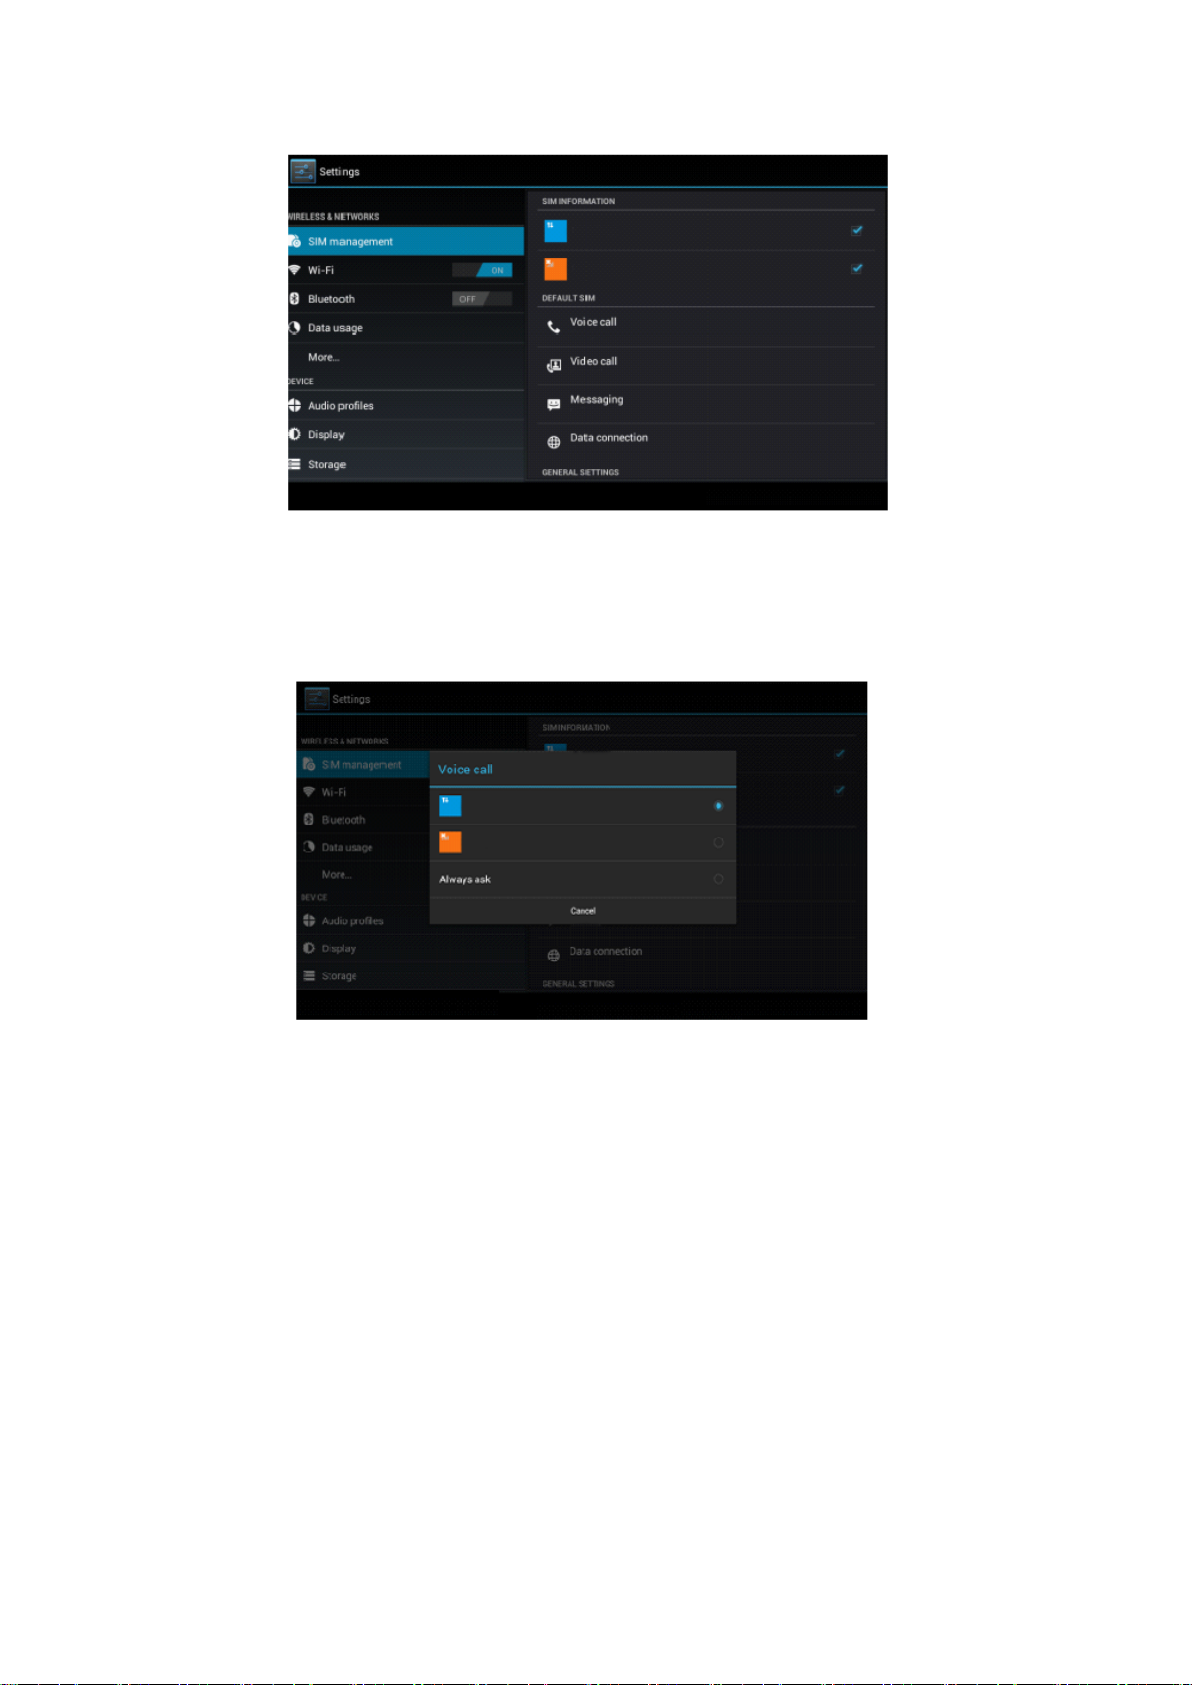
3.8 Sistemas de entrada
Para introducir texto puede utilizar el teclado de pantalla. Se mostrará
automáticamente al presentarse la opción de introducir texto o
números.
3.9 Técnicas de aplicaciones
En la interfaz de la aplicación, haga clic en widgets en la pantalla de
arriba. A continuación puede seleccionar cualquier widget pulsándolo
para crear el acceso directo, puede entrar en la aplicación a través del
icono de acceso directo.
Para crear iconos de acceso directo en el escritorio mantenga pulsado
el icono y muévalo hacia el escritorio. Recuerde; Si la posición de
destino no tiene espacio, el widget no se añadirá en la pantalla
principal.
4. AJUSTES BÁSICOS
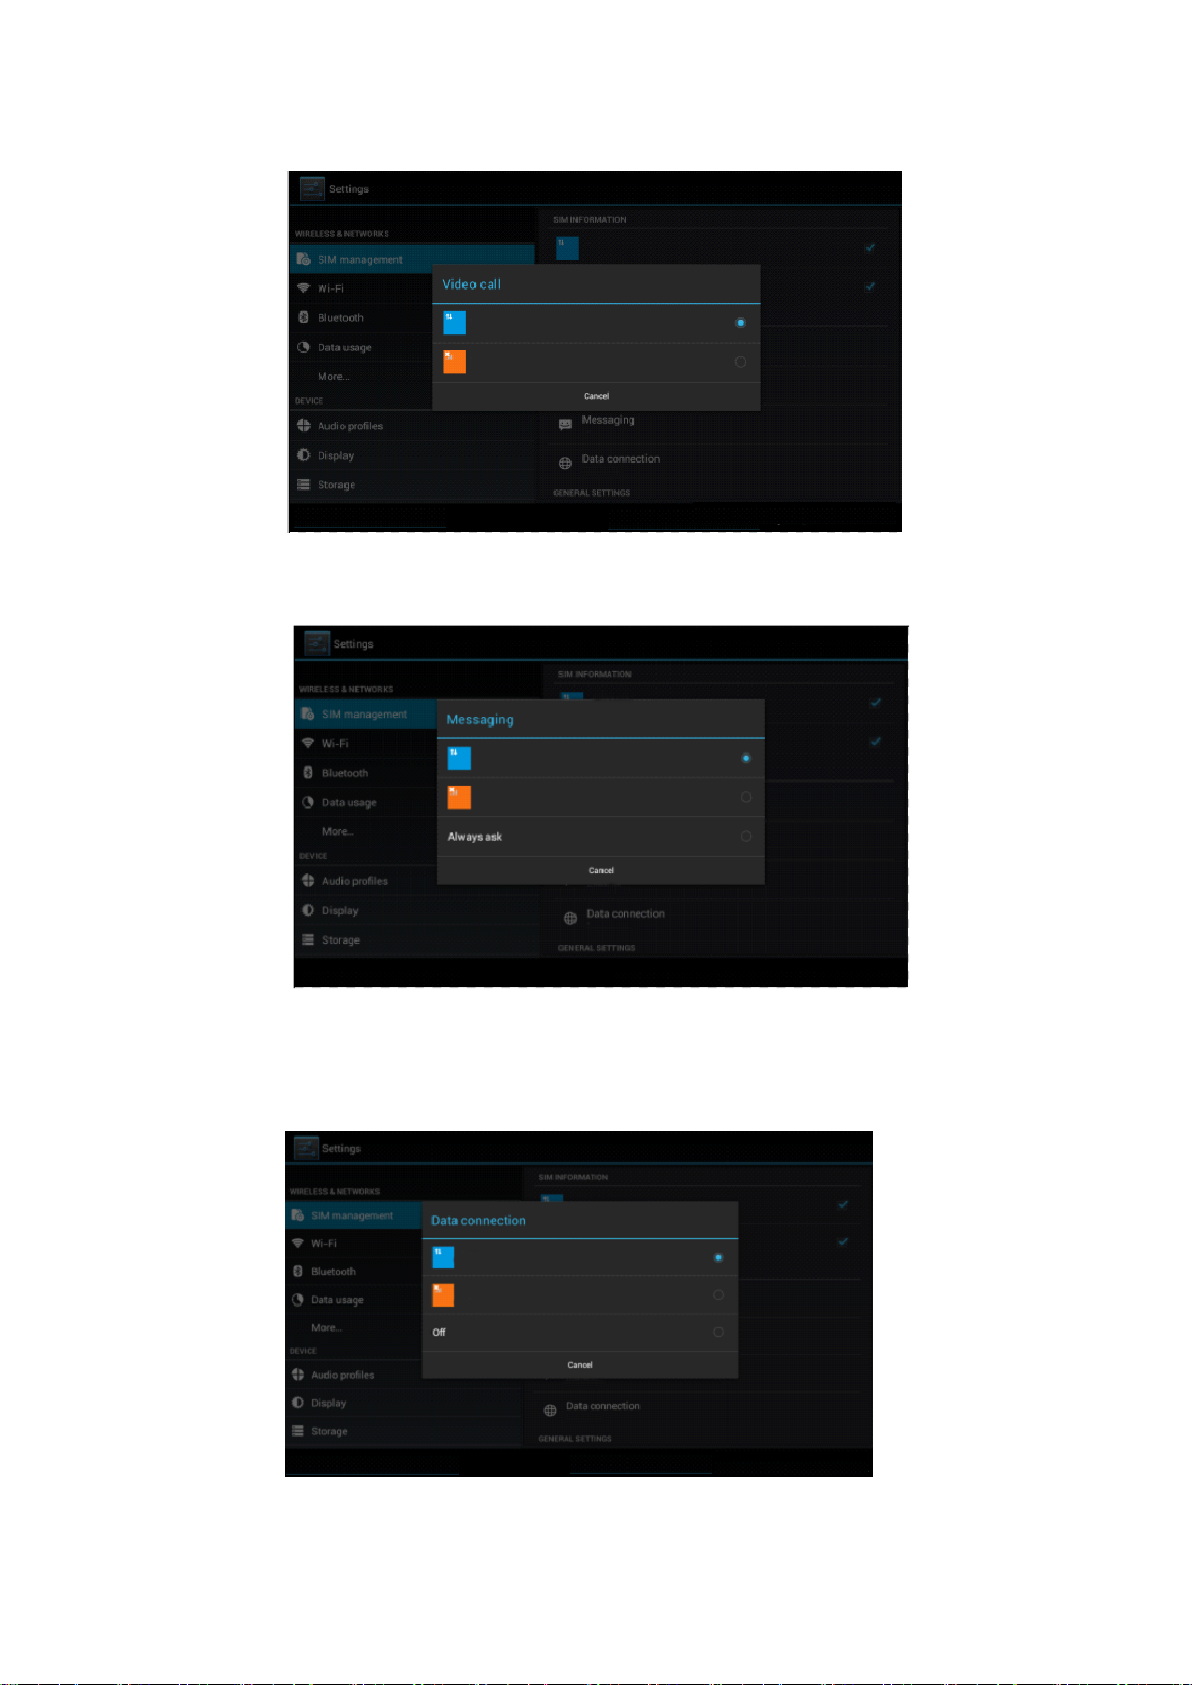
4.1 Tarjeta SIM
Haga clic en Configuración en el menú principal, seleccione Gestión de
SIM:
11
Haz clic llamadas de voz, seleccione la tarjeta SIM por defecto:
Haga clic en Configuración en el menú principal, seleccione Gestión de
SIM y haga clic en video llamada, seleccione la tarjeta SIM por
defecto:
12
Haga clic en Configuración en el menú principal, seleccione Gestión de
SIM, haga clic en mensaje, elegir la tarjeta SIM por defecto:
Haga clic en Configuración de aplicación en el menú principal, elija la
gestión de SIM, haga clic en la conexión de datos, seleccione la tarjeta
SIM por defecto:
13
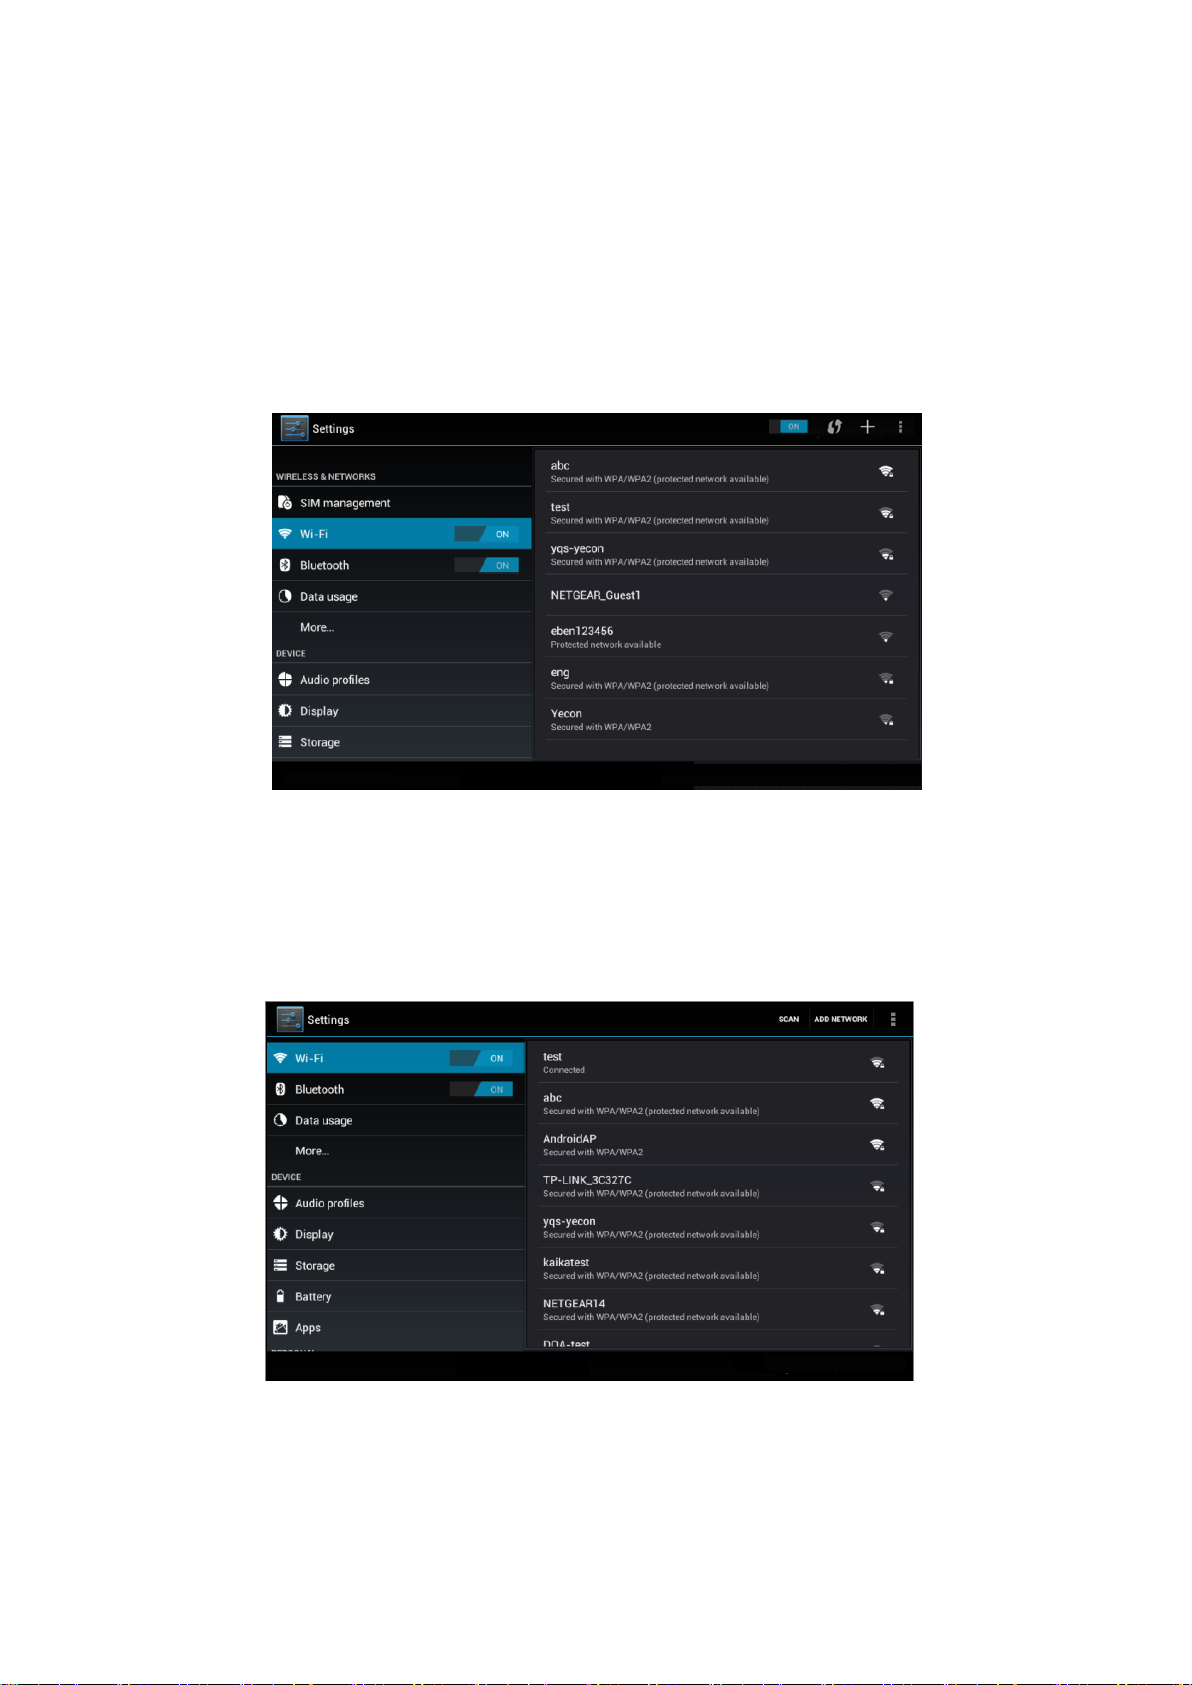
4.2 WiFi
Para conectar a una red WiFi:
1) Vaya el menú de ajustes y active WiFi.
2) El dispositivo buscará las redes WiFi dentro del radio de alcance
3) Seleccione la red deseada. Si tiene contraseña, establézcala y haga
clic en conectar:
Para añadir una nueva red WiFi, en el menú de ajustes de WiFi,
presione en el icono añadir red. Introduzca el SSID, el nombre de la
red inalámbrica y haga clic en Guardar. Haga clic en conectar a la
nueva red y siga los pasos:
Si abre la barra de avisos podrá ver la red a la que está conectado.
Podrá seleccionar en el menú de configuración de WiFi si desea avisos
de nuevas redes disponibles.
14
Puede mantener la conexión durante el modo standby o desactivarla:
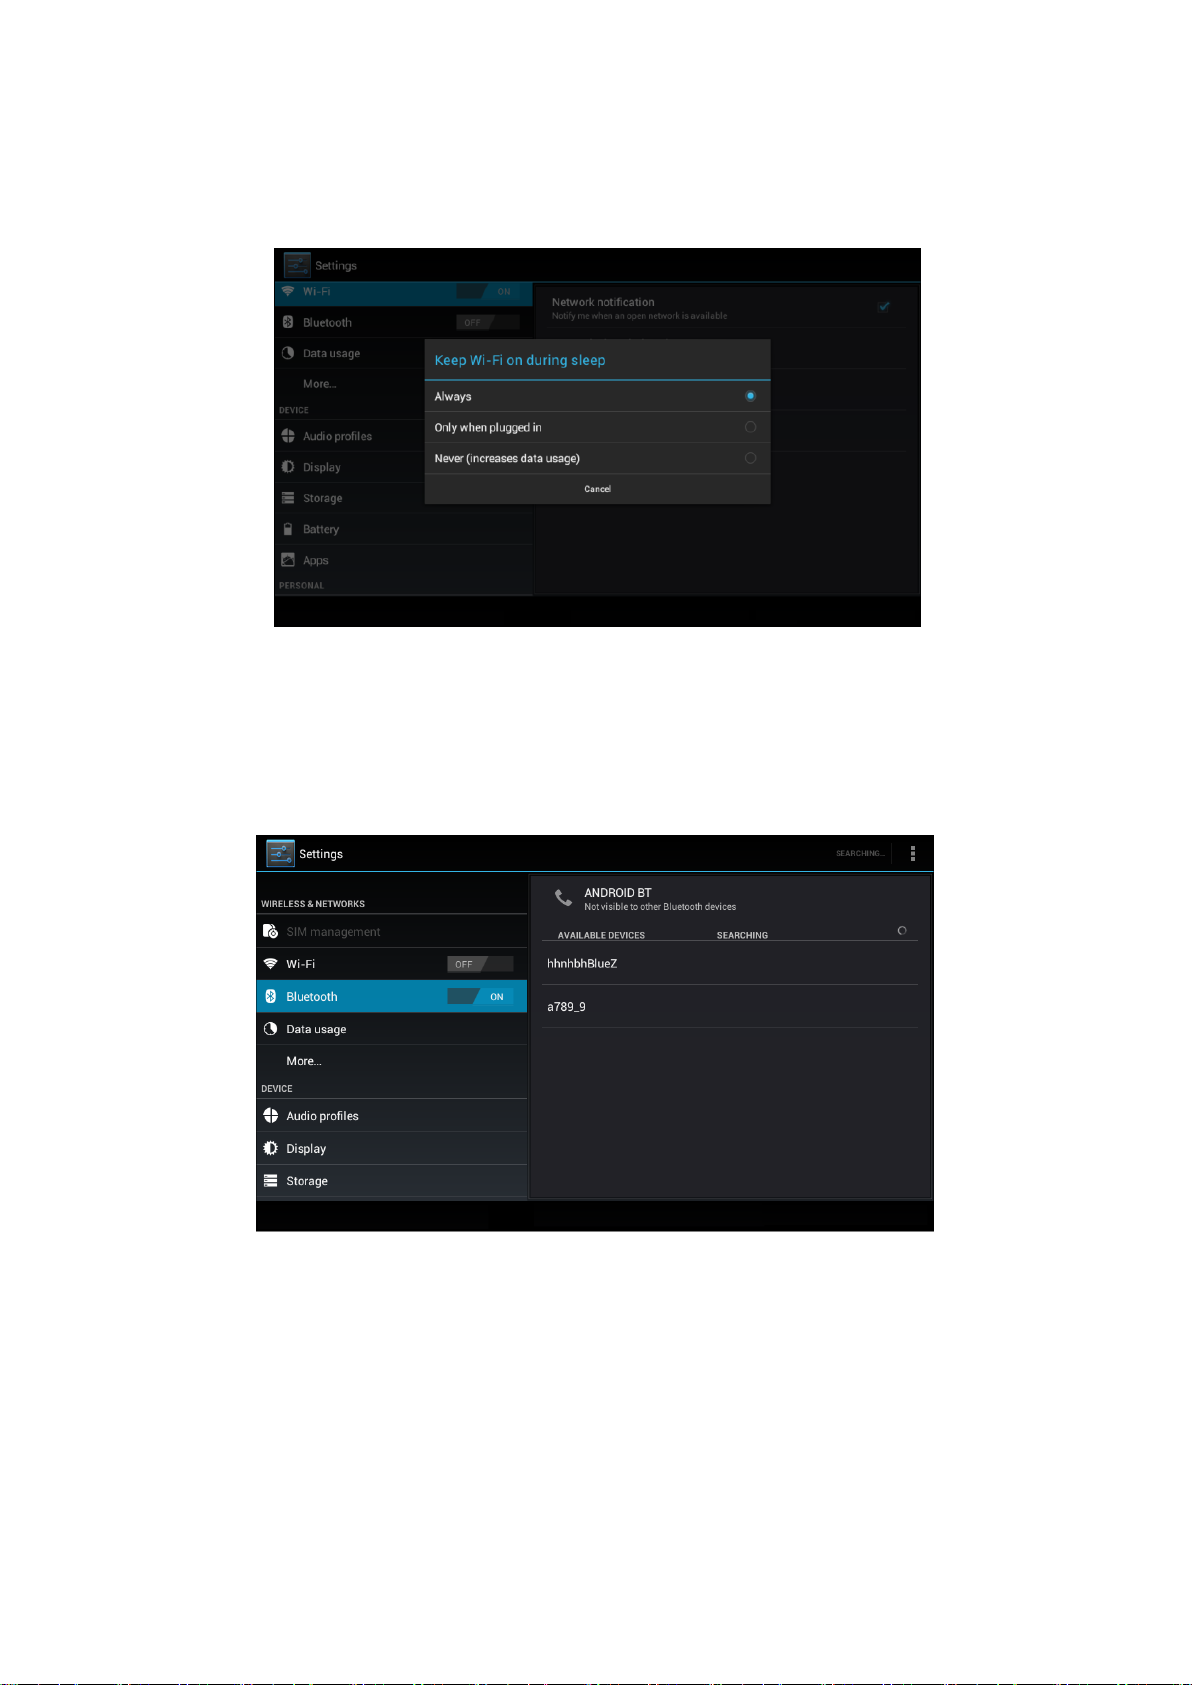
4.3 Bluetooth
1. Haga clic en el icono de ajustes
2. Seleccione y active Bluetooth
3. Mostrará la lista de dispositivos disponibles para conectar:
Haga clic en el dispositivo Bluetooth disponible y se abrirá la ventana
de solicitud. Establezca la contraseña de acuerdo a su dispositivo:
15
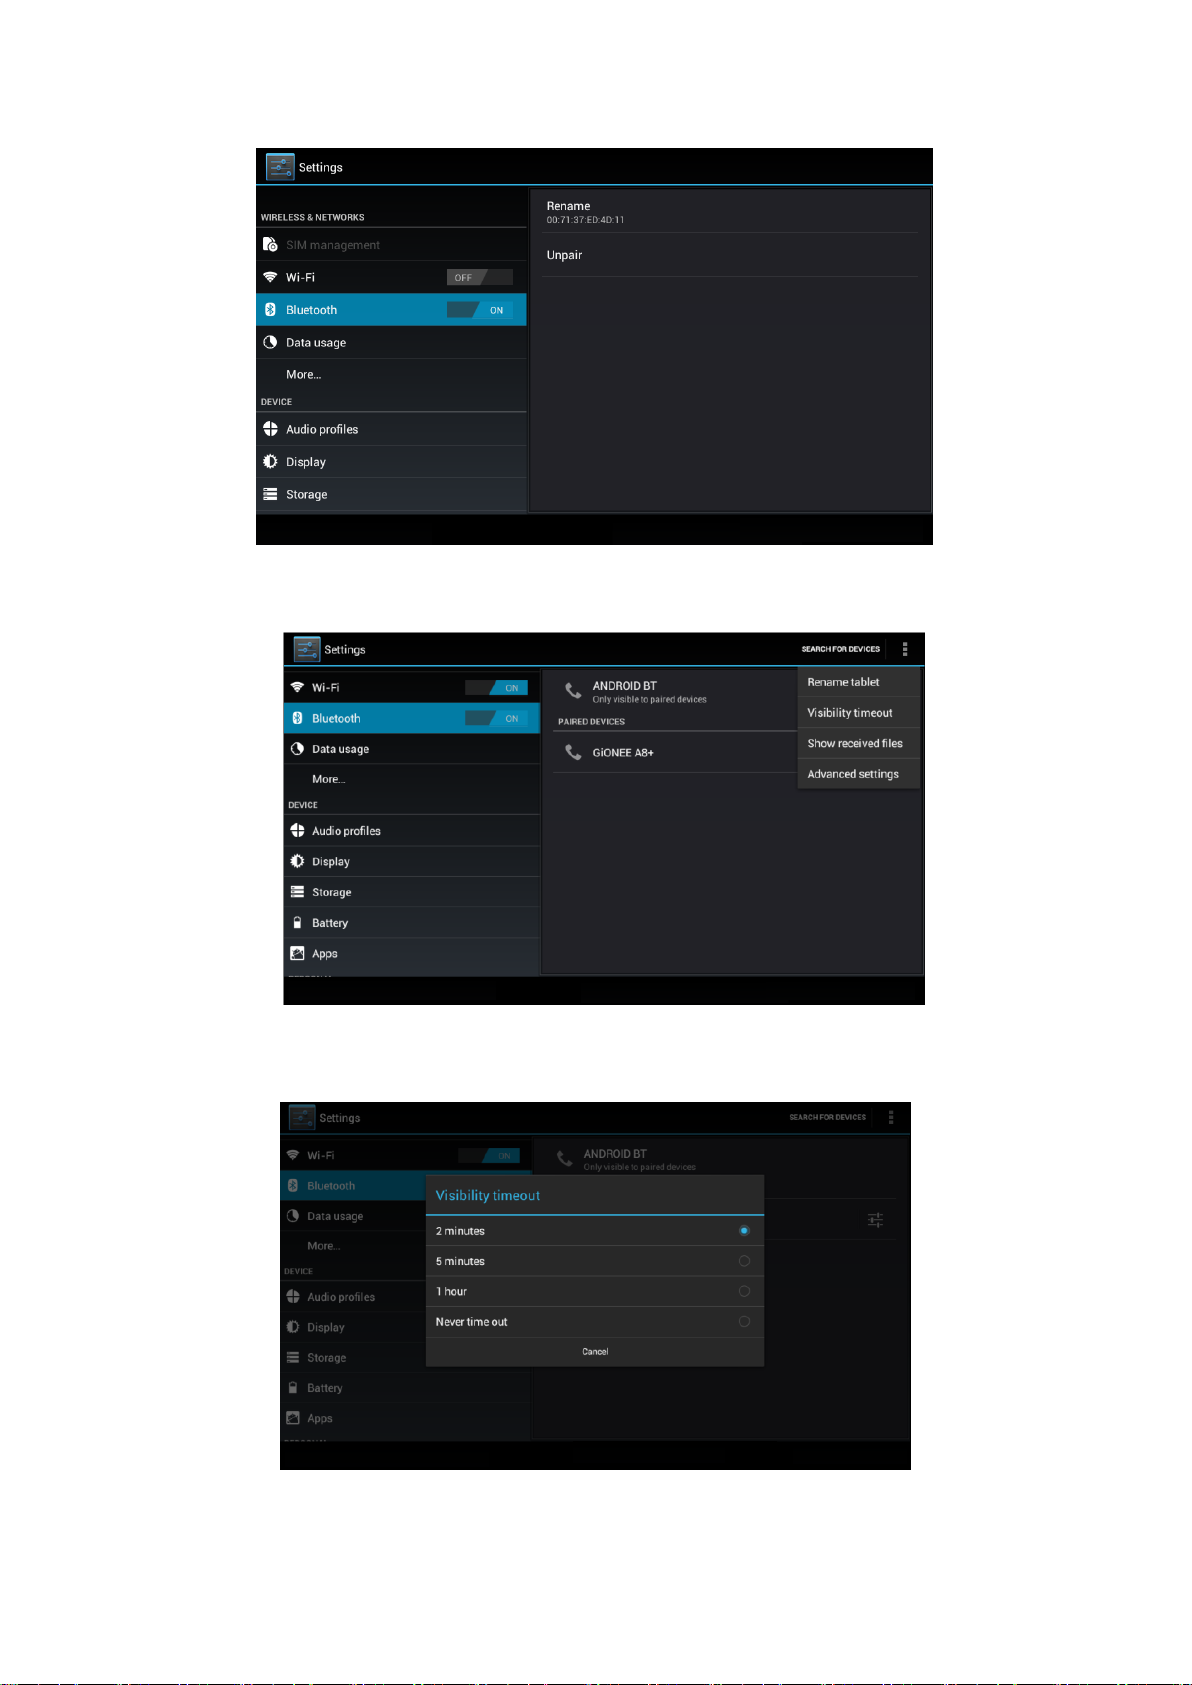
Puede cambiar el nombre de su dispositivo:
Para seleccionar la configuración de tiempo de espera de visibilidad:
16
Una vez realizada la transmisión por Bluetooth, seleccione mostrar
archivo:
Ajustes avanzados de Bluetooth: Elija configuración avanzada de
Bluetooth para realizar otros ajustes:
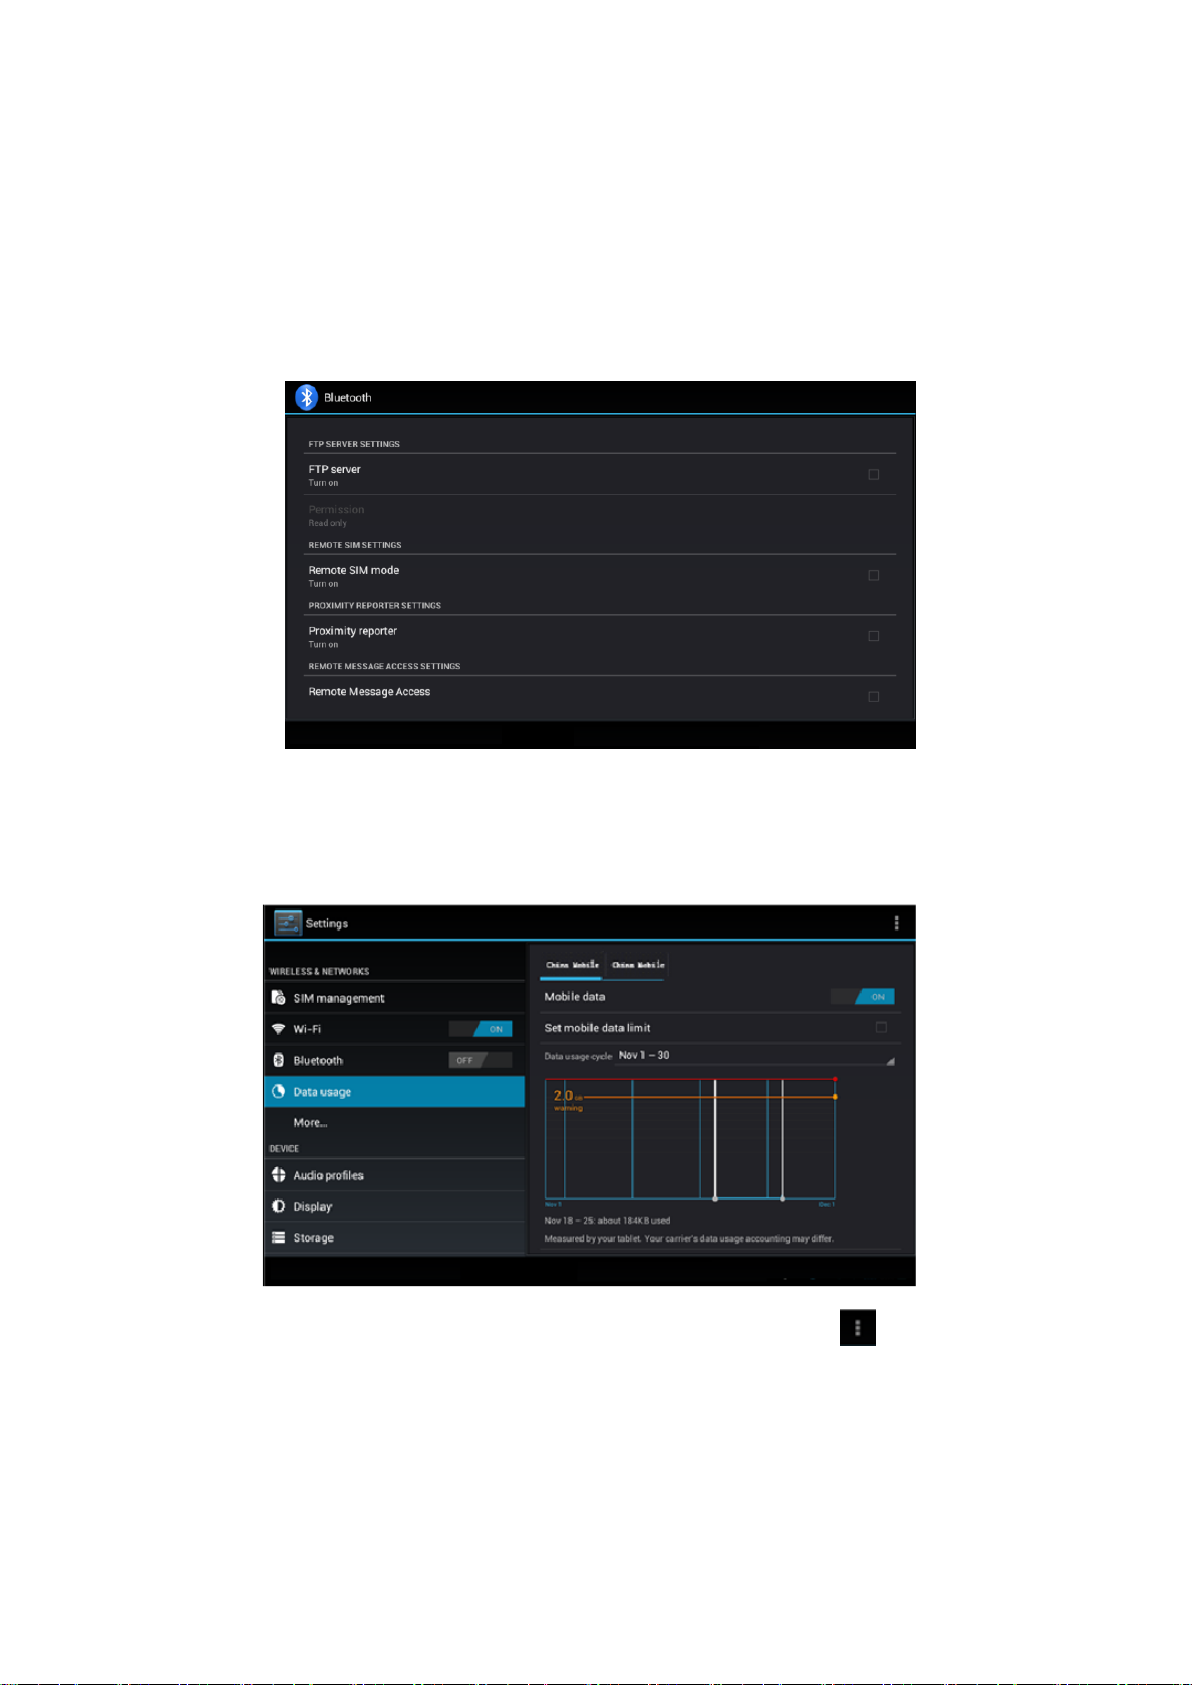
4.4 Uso de datos
Compruebe el uso de datos de la tarjeta SIM:
Para comprobar el uso de datos WIFI, presione el icono y haga clic
en uso de datos:

17
4.5 Otras funciones
Modo de avión: Cuando active el modo avión, la conexión WiFi y la
conexión SIM se desactivarán
VPN: Abra VPN y en Agregar red VPN. Introduzca el nombre y la
dirección del servidor, a continuación, guardar:
Haga clic en VPN, para introducir el nombre de usuario de VPN y su
contraseña, haga clic en conectarse:
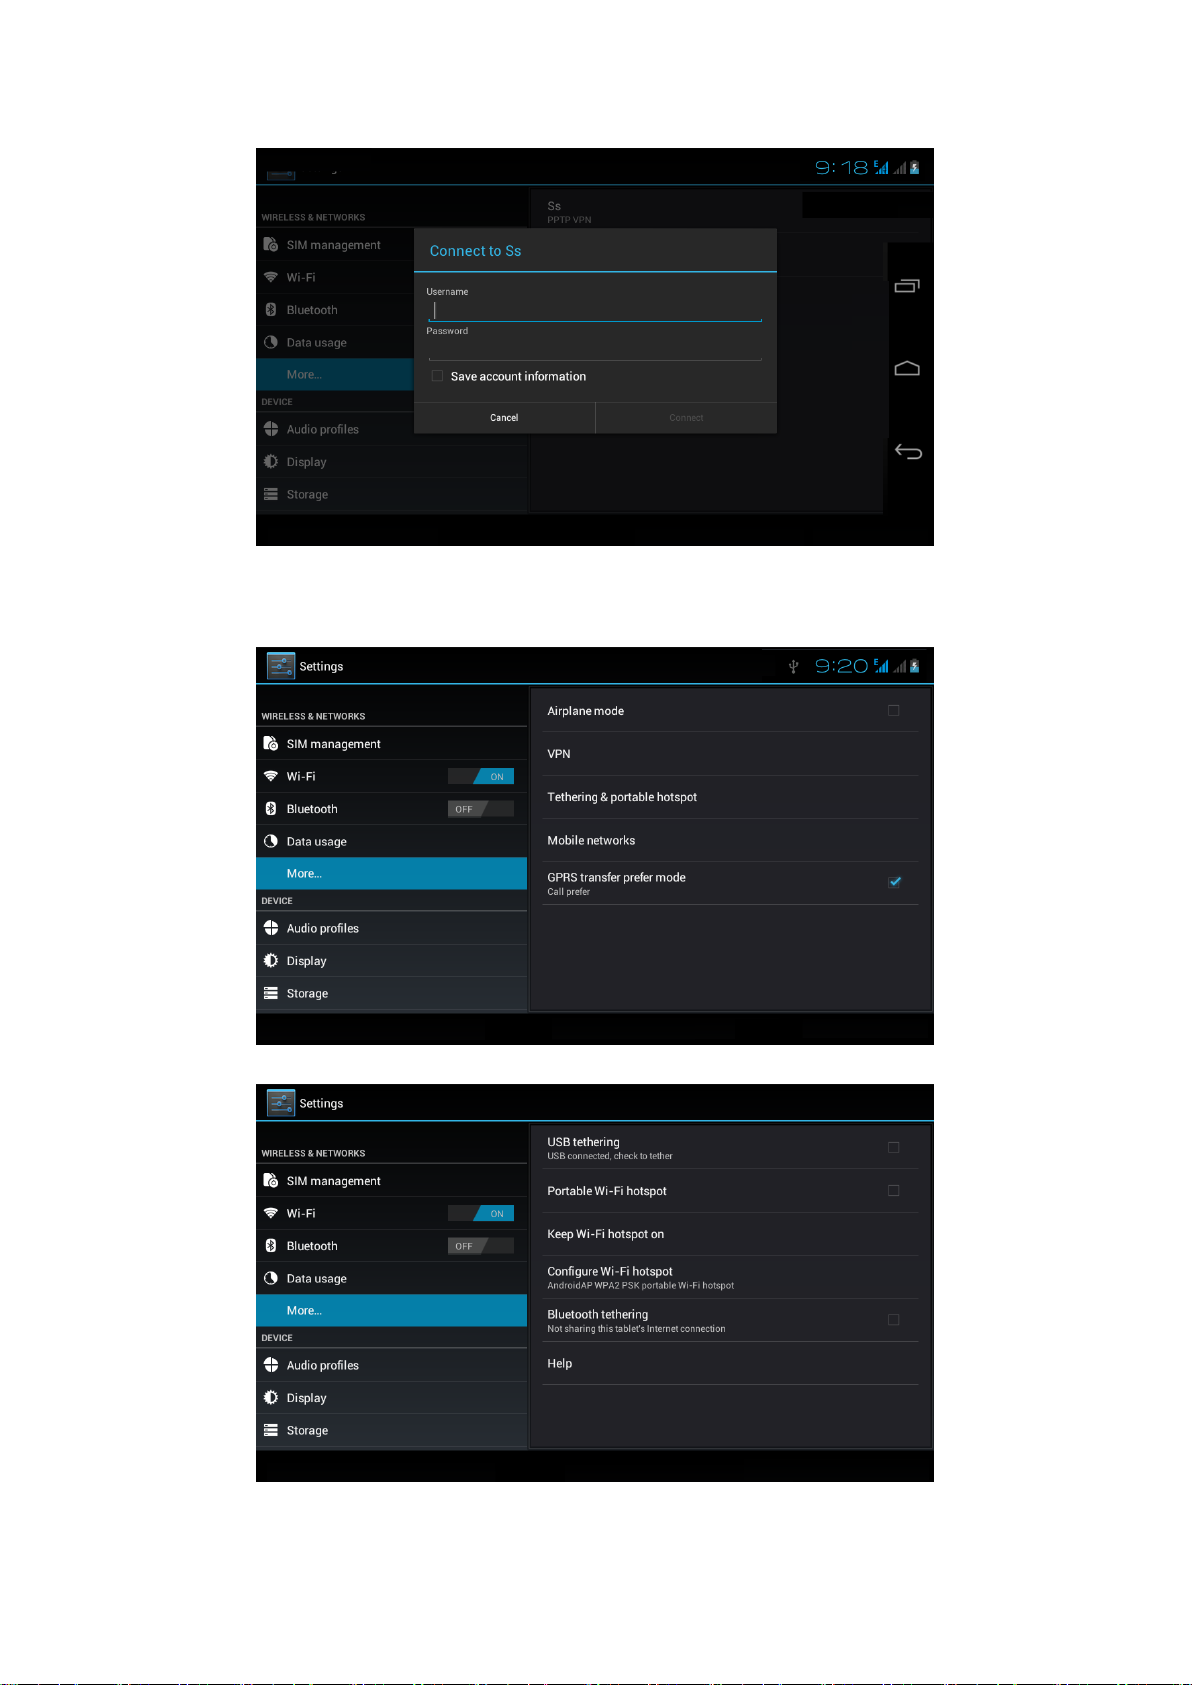
18
Haga clic en más para acceder a otras funciones de WiFi como el uso
compartido de redes y puntos de acceso portátiles:
19
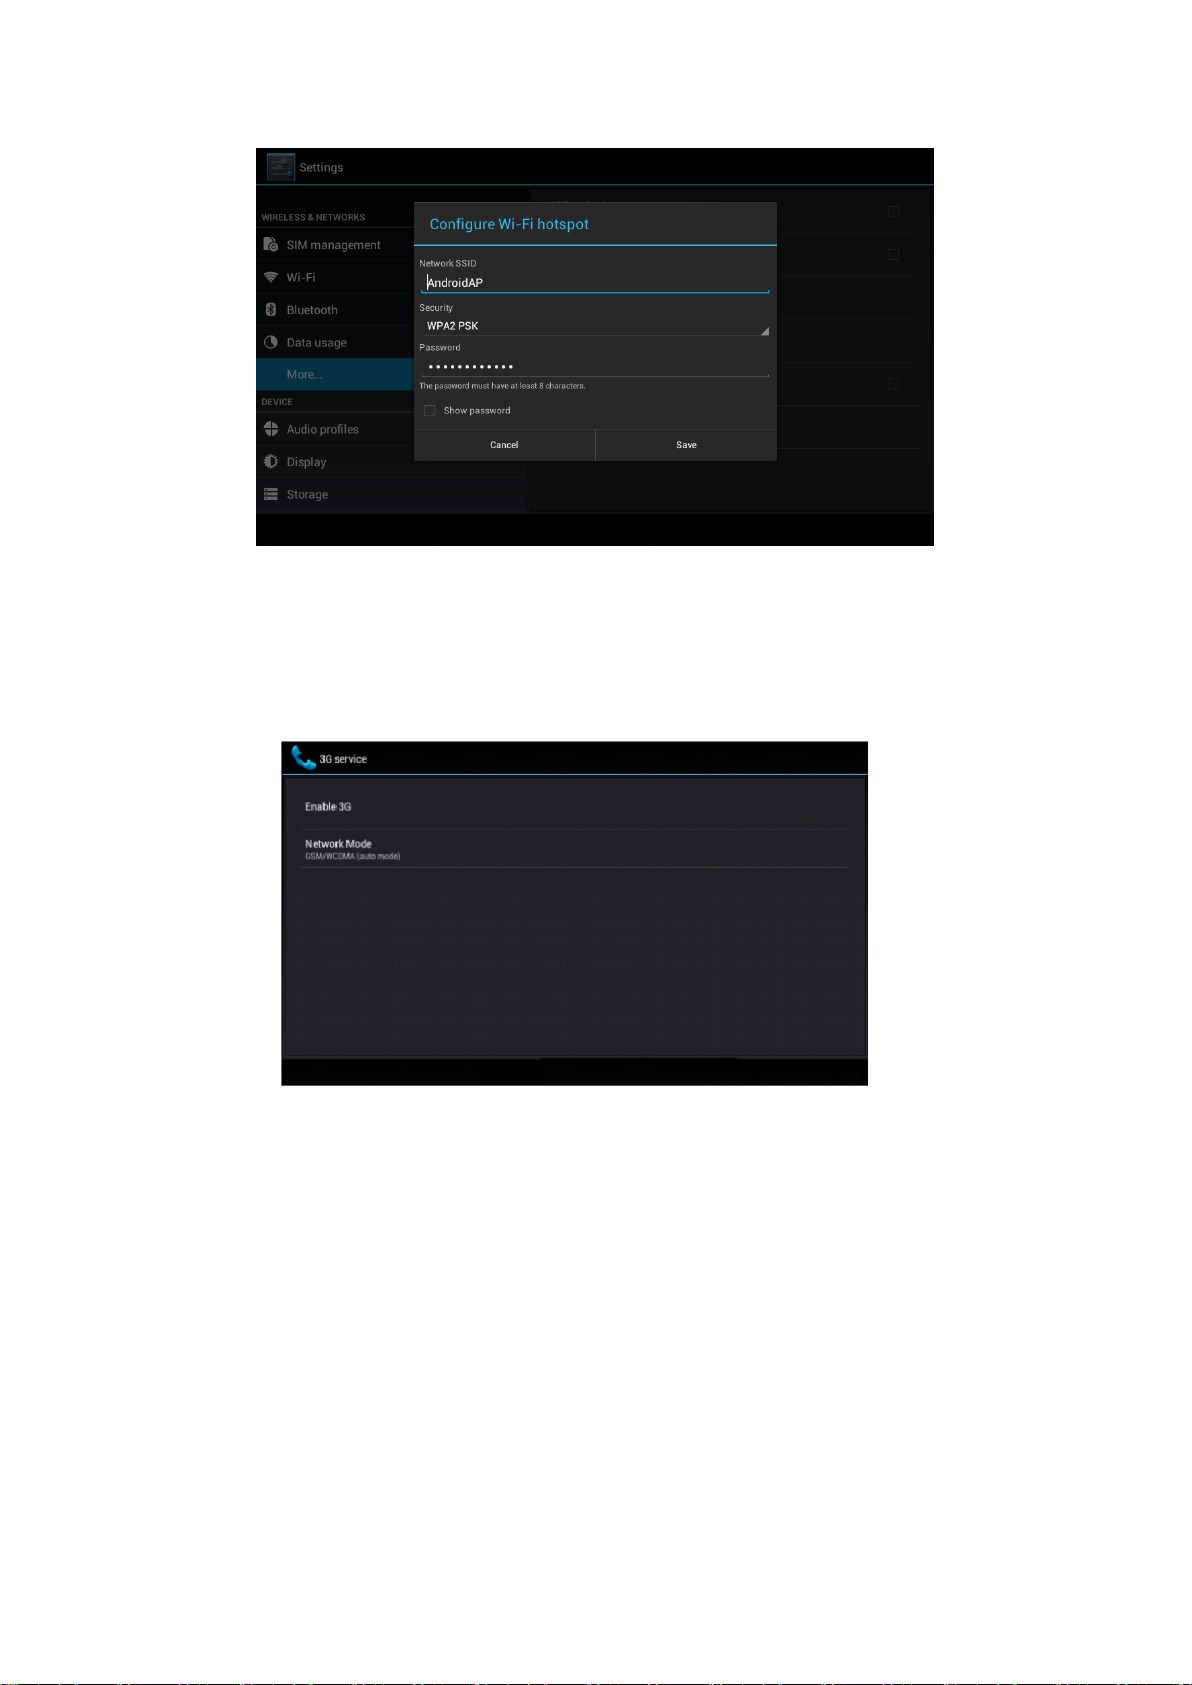
Redes Móviles
Servicio 3G: haga clic en servicio 3G y la tarjeta SIM por defecto. GSM
es 2G y WCDMA es 3G.
Access Point Name (APN): Haga clic en la red móvil:
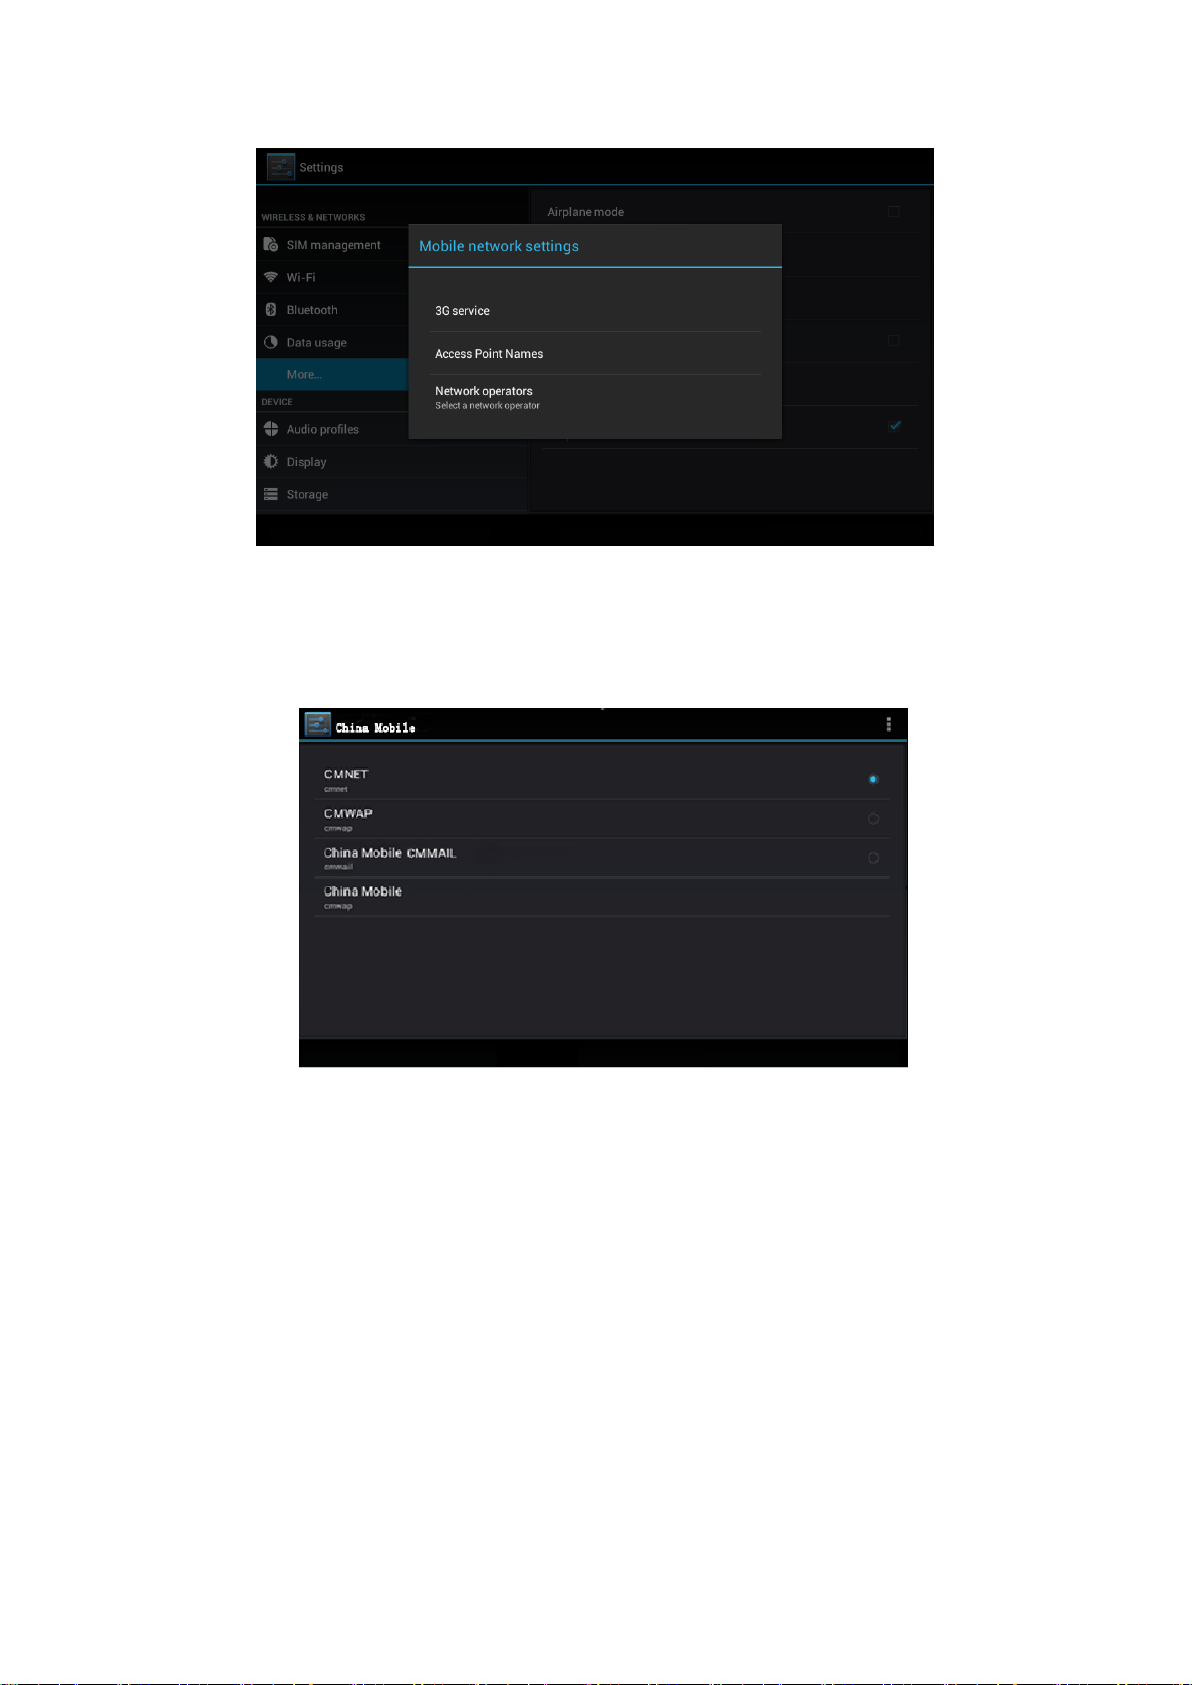
20
Elija los puntos de acceso (APN), seleccione la tarjeta SIM que se va a
conectar. Elija tipo de conexión:
Operador de Red: Haga clic en el operador de red, seleccione la tarjeta
SIM a conectar, el sistema buscará redes GSM y WCDMA disponibles:
21
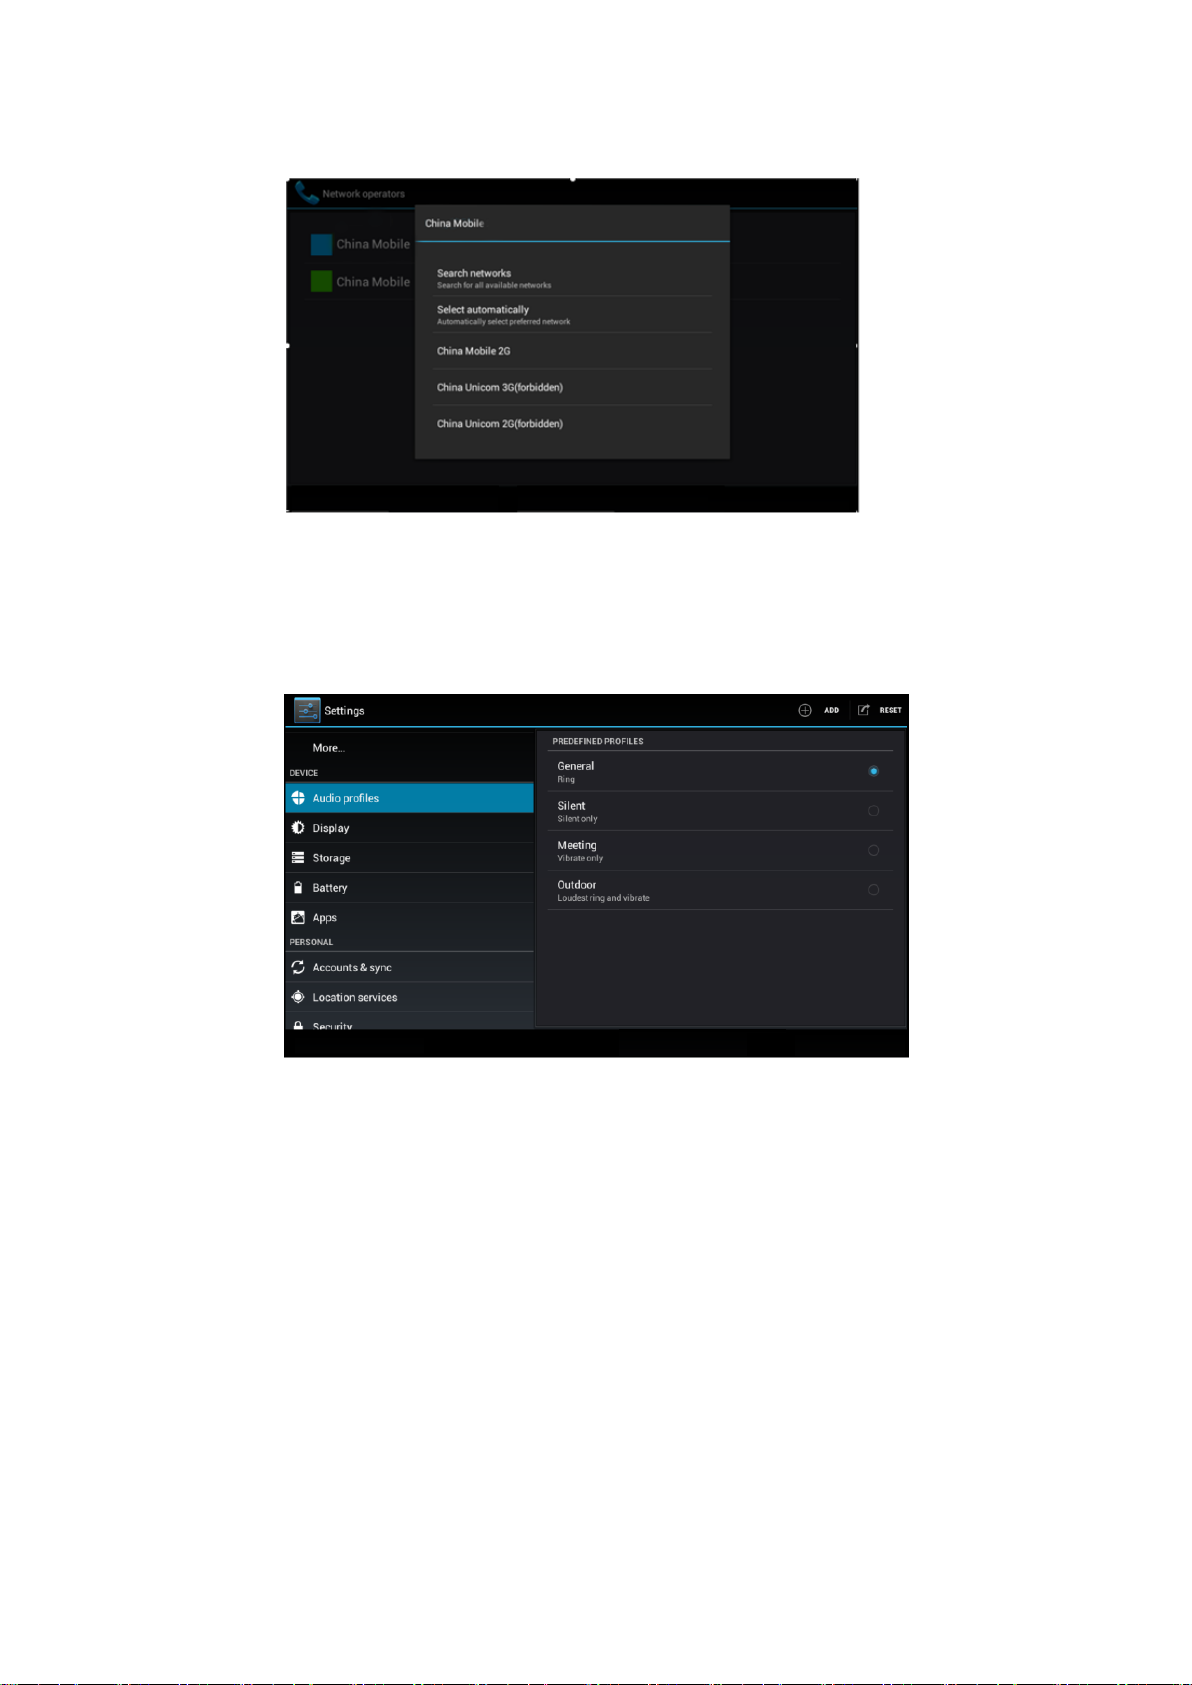
4.6 Perfiles de audio
En el menú de ajustes, seleccione Perfiles de audio.
Seleccione General para su configuración:
22
Podrá ajustar: Vibración, Volumen, etc:
Seleccione el tono para la llamada o video llamada:
23
4.7 Pantalla
En el menú pantalla podrá ajustar el Brillo de la pantalla:
Podrá seleccionar una foto para el fondo de escritorio:
24
Rotación automática: El dispositivo viene configurado por defecto con
rotación automática encendida. Puede cambiar esta función.
Función Sleep: seleccione está función para determinar el tiempo de
encendido antes de pasar a modo de espera.
Para seleccionar el tamaño de la fuente:
25
Ajuste de la posición del menú:
4.8 Almacenamiento
Vaya al menú de configuración, haga clic en memoria y podrá
seleccionar la ubicación preferida para el almacenamiento de
información.
Compruebe la tarjeta SD y espacio de almacenamiento del dispositivo.
1. Entre en configuración
2. Haga clic almacenamiento y compruebe el espacio de
almacenamiento.
26
Almacenamiento interno
Tarjeta Micro SD:
27
Extracción segura de la tarjeta SD
1. Haga clic en configuración.
2. Haga clic en la memoria.
3. Haga clic en desinstalar la tarjeta SD.
4. Ahora puede retirar la tarjeta SD de forma segura.
Nota: Si retira la tarjeta SD con seguridad puede proteger la tarjeta
SD y aumentar su vida útil.
4.9 Batería
Vaya al menú de configuración y seleccione la opción Batería:
4.10 Aplicaciones y programas
1. En el menú de ajustes haga clic en Aplicaciones.
2. Seleccione la aplicación y podrá gestionar y eliminar aplicaciones
instaladas y verificar en el sistema el espacio de almacenamiento
utilizado y el espacio disponible:
28
Uso en tarjeta SD
Aplicaciones en funcionamiento:
29
4.11 Cuentas y sincronización
Seleccione ajustes y abra cuantas y sincronización:
Seleccione una cuenta:
Una vez seleccionada, se sincronizará y se mostrará:
30
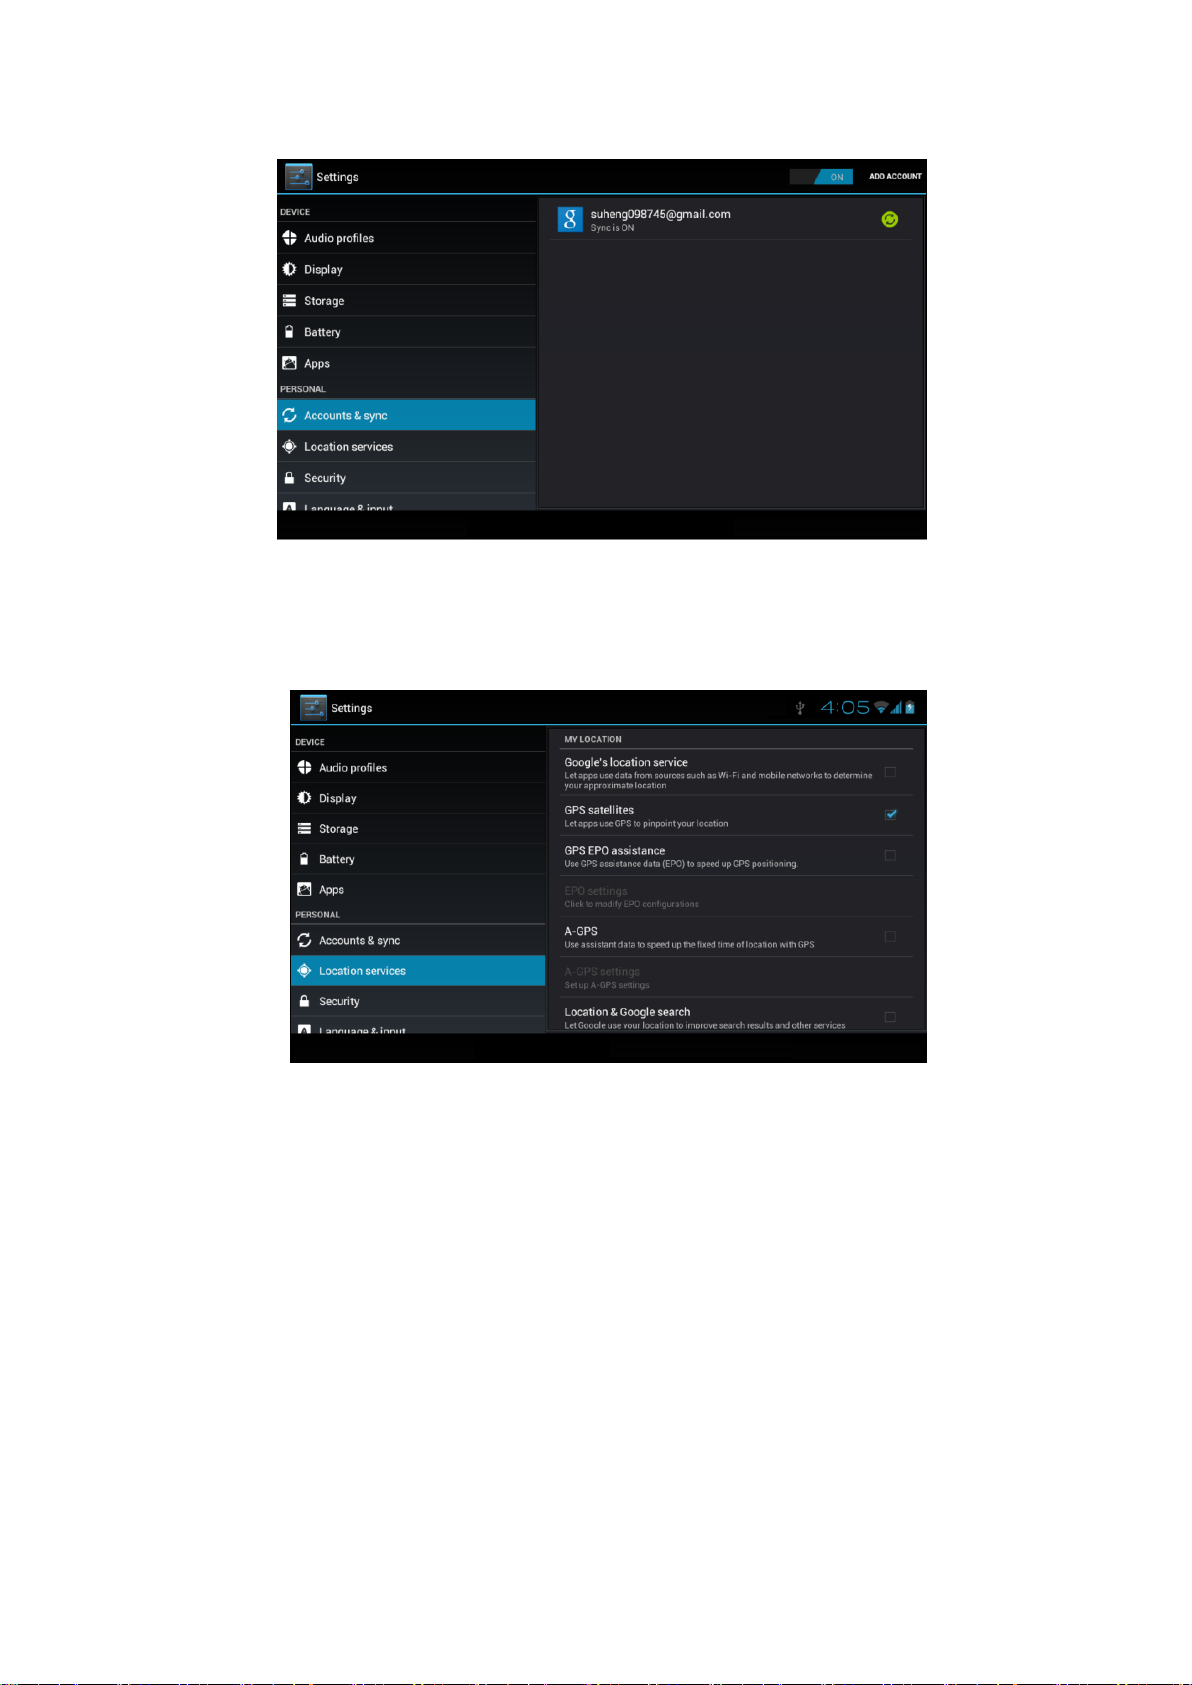
4.12 Servicios de localización
En el menú de ajustes seleccione servicios de localización:
- Servicio de ubicación de Google: Una vez seleccionado obtendrá su
posición a través de WiFi
- GPS: Una vez activado el GPS, podrá obtener la ubicación por GPS.
- Asistencia GPS
- AGPS: Actívelo para usar datos unidos a GPS:

31
Deshabilitar al iniciar el sistema: Haga clic en Deshabilitar al iniciar el
sistema.
Solicitud Network: Para obtener ubicación a través de red:
Server: Para cambiar el servicio de ubicación:

32
Localización y búsqueda de Google: Puede utilizar su información de
ubicación para mejorar los resultados de búsqueda y otros servicios.
4.13 Configuración de seguridad
Ajuste de bloqueo de pantalla: Puede bloquear la pantalla
estableciendo un patrón, para ello vaya a configuración , seguridad
bloqueo de pantalla:
Patrón de desbloqueo: seleccione Patrón y elija la forma deseada al
menos con 4 puntos. Confirme su selección.
Bloqueo mediante PIN: Introduzca el pin y confirme esta selección.
Además podrá establecer otros patrones como reconocimiento facial,
contraseña, etc. Además podrá ajustar otras opciones de seguridad:

33
4.14 Idioma y entrada de texto
Haga clic en Configuración, seleccione el idioma y el método de
entrada, seleccione el idioma para cambiar el idioma:
Haga clic en Configuración, seleccione el idioma y el método de
entrada, seleccione configuración del teclado Android:

34
Volver a la selección de idioma y de entrada y seleccione el método de
entrada que desea utilizar:

35
4.15 Copia de seguridad y reset
Conecte la opción WiFi e inicie su sesión en Google, con su cuenta de
google, seleccione copia seguridad de datos, el sistema copiará los
datos en su servidor de google.
Si necesita realizar una restauración de fábrica, por favor haga clic en
reiniciar:
Si necesita restauración de fábrica de recuperación, por favor haga
clic en reiniciar.

36
4.16 Fecha y hora
De acuerdo con el valor preestablecido, el sistema la fecha, la zona y
la hora tomando estos datos de la conexión a internet.
Para fijar la fecha y hora manualmente:
1. Haga clic en configuración.
2. Deslice la pantalla hacia abajo y seleccione fecha y hora.
3. Desactive "ajuste automático de fecha y hora".
4. Desactive "auto ajuste de zona.
5. Haga clic en Zona Seleccionar, a continuación, elija la zona.
6. Haga clic configuración de fecha y, a continuación seleccione la
fecha deseada.
7. Haga clic en Ajuste de la hora y haga clic en los botones superior e
inferior para ajustar la hora. Seleccione AM/PM y 12/24 horas.
4.17 Programar encendido y apagado
En el menú de configuración seleccione programar encendido y
apagado.

37
Podrá establecer una hora de encendido y otra de apagado y activar o
desactivar cada una de las horas.
4.18 Accesibilidad
Puede seleccionar el tamaño del texto, finalizar una llamada con el
botón ON/OFF, seleccionar si la pantalla gira automáticamente, etc:
4.19 Opciones de desarrollo
Cuenta con diferentes opciones para desarrolladores, por favor
consulte cada una:

38
4.20 Acerca del dispositivo
Estado: Muestra información sobre el estado del dispositivo, batería,
IMEI, etc.
5. MULTIMEDIA
5.1 Música
Entre en el reproductor de música :
En la pantalla del reproductor se muestran las diferentes opciones:

39
5.2 Vídeo
Seleccione el reproductor de vídeo :
En la ventana del reproductor de vídeo se muestran las diferentes
opciones.
5.3 Galería de fotos
En el menú de fotos podrá buscar fotos en el dispositivo y en la tarjeta
micros. Podrá ver y editar fotos y configurar fotos como fondo de
pantalla
Para ver imágenes
1. Haga clic en la Galería.

40
2. Haga clic en la carpeta que desea ver.
3. Haga clic en la imagen que desea ver, el sistema la reproducirá en
modo de pantalla completa de forma automática.
4. Las imágenes se pueden acercar y alejar, coloque dos dedos en la
pantalla y acerque y aleje para realizar la función zoom.
Nota: Para pasar de foto deslice el dedo a la izquierda o derecha.
Editar fotos: Abra una imagen a pantalla completa, haga clic en la
tecla de menú para mostrar la selección del menú, seleccione editar:
Pase de diapositivas: Seleccione presentación y las imágenes se
reproducirán automáticamente.
Recorte: Abra una imagen, seleccione recortar en el menú de fotos,
ajuste el tamaño al deseado seleccione recorte.
Editar: En el menú de fotos seleccione editar y podrá cambiar
parámetros como brillo, estilo, color, etc.
5.4 Cámara
En el menú principal busque y seleccione el icono de cámara :
5.5 Radio FM
Seleccione el icono de FM radio:

41
Haga clic en el botón superior derecho de menú para acceder a la lista
de emisoras:
RDS: Haga clic en la tecla de menú y seleccione los ajustes de RDS:
Para guardar emisoras: Pulse el botón en la interfaz principal
para guardar la emisora y el canal se guardará en la lista de canales.
Nota: Es necesario insertar los auriculares como antena durante el

42
uso de la radio FM.
6. FUNCIONES DE COMUNICACIÓN
6.1 Teléfono
Seleccione el icono de TELFONO en el menú principal:
6.2 Mensaje de texto
En el menú principal seleccione mensaje de texto :

43
6.3 Lista de contactos
Seleccione el icono de contactos :
Buscar contacto:
Añadir contacto:
7. INTERNET
7.1 Navegador
Cuando disponga de conexión móvil o esté conectado a una red WiFi
abra el navegador :

44
Haga clic la barra de direcciones para introducir el sitio web. Puede
hacer clic en el menú para actualizar, guardar en favoritos, compartir,
página, marcadores, historial, etc:
7.2 Correo electrónico
Siga los pasos de la guía de configuración de correo electrónico,
puede agregar el POP3 o IMAP del proveedor de servicios de correo
electrónico:

45
Ajustes de correo electrónico: haga clic en el icono de email ,
introduzca su dirección de email y contraseña. Haga clic en siguiente
y seleccione POP3 o IMAP. Haga clic en siguiente para comprobar si el
administrador puede recibir o enviar mensajes de correo electrónico.
Enviar un email: Haga clic en . Haga clic en refrescar para
comprobar si hay algún elemento nuevo.
Haga clic en la tecla menú, en la parte superior derecha,
seleccione . Añada el destinatario, texto, asunto, archivos
adjuntos, etc:
8. GPS

46
Entre en el menú GPS :
Cuando posicionamiento se realice, las barras azules pasarán a color
verde y mostrará información como latitud, longitud, altura, velocidad
y el tiempo de su ubicación:
9. OTROS APLICACIONES
9.1 Reloj
En el menú principal se puede mostrar la hora:

47
9.2 Calculadora
Seleccione el icono :
9.3 Administrador de archivos
Seleccione el icono de gestión de archivos :

48
Puede copiar, cortar, eliminar o cambiar el nombre de los archivos y
carpetas: seleccione el archivo o carpeta, mantenga pulsado el
archivo para acceder a estas opciones:
Seleccione el archivo que desea pegar y seleccione

49
Luego seleccione para entrar en el siguiente menú:
Para compartir un archivo, seleccione el archivo mediante una
pulsación seleccione compartir y el sistema mostrará las distintas
opciones para compartir:

50
Para crear una nueva carpeta, seleccione la parte donde desee crearla
y haga clic en el icono superior derecho para elegir carpeta nueva
.
9.4 Grabadora
En el menú principal presione el icono de grabadora . Presione el
icono de inicio de grabación para comenzar una grabación.
Puede parar la grabación con el botón y continuar con la misma
con el botón . El sistema recordará
Para reproducir una grabación seleccione el archivo y pulse play.

51
10. PROCEDIMIENTOS DE INSTALACIÓN
10.1 Instalar
Para instalar aplicaciones de fabricante haga clic en el Administrador
de Archivos y seleccionar la solicitud a instalar. Nota: los archivos
compatibles para instalación y funcionamiento lleven llevar el
sufijo .apk.
10.2 Desinstalar
Entre en el Administrador de Archivos, seleccione el elemento a
desinstalar y siga los pasos.
11. SOLUCIÓN DE PROBLEMAS
1. Uso por primera vez: cuando use el dispositivo por primera vez
puede experimentar un funcionamiento lento debido a que debe
actualizar el sistema e instalar software predeterminados. Una vez
realizado este primer uso el funcionamiento retomará la fluidez
habitual.
2. Si no puede conectarse Wi-Fi: Asegúrese de que el router
inalámbrico funciona en condiciones normales. Asegúrese de que el
dispositivo se encuentra a una distancia adecuada, evitando los
posibles obstáculos. Asegúrese de que el nombre de usuario y
contraseña son correctos.
3. Temperatura elevada: Cuando se usa un elevado número de
procedimientos y solicitudes y el brillo de la pantalla se encuentra al
máximo, el dispositivo puede calentarse.
4. Fallos en Email: Asegúrese que la conexión a internet es correcta.
Asegúrese de que su dirección de correo electrónico se encuentra
correctamente establecida
5. Funcionamiento anormal: Cuando se instala una aplicación externa
de otro fabricante debe asegurarse que es compatible con el
dispositivo. Tras cualquier instalación por favor reinicie el sistema por
seguridad.
6. Funcionamiento lento: Cuando se usa el dispositivo y no se reinicia

52
por un periodo de tiempo prolongado, puede provocar un excesivo
número de aplicaciones abiertas. Se recomienda reiniciar el
dispositivo para su depuración.
“Las especificaciones pueden cambiar sin previo aviso”
IMPORTADO
I.R.P., S.L.
AVDA. SANTA CLARA DE CUBA 5
SEVILLA, SPAIN
DECLARACIÓN DE CONFORMIDAD
I.R.P., S.L. declara bajo su responsabilidad que el aparato indicado cumple los
requisitos de las siguientes directivas:
DIRECTIVAS EMC
EN60950-1:2006/A11:2009/A1:2010
EN 62311: 2088
EN 301 489-1 V1.9.2:2011-09
EN 301 489-17 V2.1.1:2009-05
EN 300 328 V1.7.1: 2006-10
ETSI EN 301 489-1 V1.9.2(2011-09)
ETSI EN 301 489-17 V2.1.1(2009-05)
Descripción del aparato:
Modelo BRIGMTON BTPC-PH2
Dispositivo de conexión a internet
Importador: I.R.P., S.L.
Dirección: Avda. Santa Clara de Cuba 5, 41007, Sevilla.

53
BTPC-PH2
TABLET PC-CAPACITIVE 7”-PHONE-3G-DUAL SIM
Android 4.1.2-GPS-Bluetooth
Instruction Manual

54
Content
1 Introduction
1.1 Announcements
1.2 Safety Instruction
2 MID Introduction
2.1 MID Operation and Preparation
2.3 MID Status and Reminder
3 Quick Start Guide
3.1 Keys Function
3.2 Startup and Shutdown
3.3 Open and Close the Screen
3.4 Usage of Touch Screen
3.5 Main Interface
3.6 Visit Application Procedures
3.7 USB Connection
3.8 Words Input
3.9 Application Technique
4 Basic Setting
4.1 SIM Card Management Management
4.2 Wireless and Internet
4.3 Bluetooth
4.4 Data Usage Situation
4.5 More
4.6 Contexual Model
4.7 Display
4.8 Storage
4.9 Battery
4.10 Application
4.11 Account and Sync
4.12 Location Service
4.13 Security Setting
4.14 Language and Input Method
4.15 Backup and Reset
4.16 Date and Time
4.17 Fixed-time Startup and Shutdown
4.18 Assitance Function
4.19 Engineer Selection..
4.20 About Tablet
5 Multi-Media
5.1 Music
5.2 Video
5.3 Photo Gallery

55
5.4 Camera
5.5 FM Radio
6 Communication Function
6.1 Phone
6.2 Text Message
6.3 Contact List
7 Internet
7.1 Browser
7.2 Email
8 GPS Function
9 Other Application Procedures
9.1 Clock
9.2 Calculator
9.3 File Manager
9.4 Recorder
10 Installation of Procedures
10.1 Installation
10.2 Uninstall
11 Troubles Shooting

56
1 Introduction
1.1 Announcements
Preventive maintainance
Please always keep the MID dry. To avoid the device short
trouble, corrosion fault and electric short, please prevent the
device, battery and charger from water and moisture, and
don’t operate the device or charger by wet hand.
To avoid failure of device, battery and charger, please prevent
the device, battery, charger from violent shock or shake.
To avoid failure of device, battery and charger, please prevent
the device, battery, charger of all over heating or too cold
circumstance
Never shock, throw, prod the MID, or drop, extrude, bend the
MID.
Never disassemble the device and accessories arbitrarily,
otherwise the device and accessories are not in our company
warranty scope.
1.2 Safety Instruction
Before the operation of the MID, please read this chapter and teach
your kids about these information. For further details, please refer to
the safety instructions and announcement.
Never use the MID when driving car, in order to ensure
safe driving.
In the medical area, please abide by related rules and
regulations. Please shut down the MID when it is near to
the medical area.
To avoid the wireless signal to interrupt the plane-
controlled signal, please shut down the MID or using
airplane mode when you are boarding a flight,
To avoid electronic equipment failure, please shut down
the MID in the vicinage of high-accuracy electronic
equipments.

57
Please don’t disassemble the MID and accessories. Only
authorized agent has access to service the MID.
Please keep the MID far away from magnetic equipments,
the radiation of MID may erase the data stored in the
magnetic equipments.
Never use the MID in the vicinage of high temperature,
inflammable gas ( gas station).
Protect the MID and accessories from kids reach scope,
and avoid the kids to use the MID without parents’
supervision.
Please comply with related rules and regulations, and
respect others’ privacy and legal rights while using the
MID.
Please strictly adhere to related instructions in the manual
when using USB cable to ensure the safety of the MID or
PC.
Never use the MID in bathroom or other humid
environment, and please protect the MID from liquid wash
or wet.
2 Introduction
2.1 MID Operation and Preparation
Battery Charging
If this navigator is first used, please use AV adaptor to fully charge
it.
1. Apply the power adptor to charge for MID.

58
New email
Airplane Mode on
USB connected
USB debugging
connected
Return button
Downloading
Setting button &
Display recently-used
application
Home button
Current electric
volume.
WIFI connected, internet
is available
2.2 MID Status and Reminder
Reminder icons
When some remind message appears in your reminder window,
please click column and slip the screen to open the reminder list.
Choose the menu you need, and confirm the information. Then you
can close the reminder window through clicking the column to slide up.
Please refer to below status icons:
Reminder board
Reminder icons will work while receiving emails, WIFI is open, you
can open the reminder board to view the detailed information.
Open the reminder board
When the reminder column shows new reminder icon, please hold
the column and slip down your finger, then the reminder board is
opened.

59
Power button
Short press to sleep/wake up, long press to
startup and shutdown.
Volume +(up)
increase the volume
Volume -(down)
decrease the volume
HOME button (home)
Click it in any interface will return to main
interface.
Back button(back)
click it in any interface will return to previous
menu
Menu button
This button will display in menu interface.
Setting button
Can set the system and other menus &display
recently browsed history
3 Quick Start Guide
3.1 Keys Function
Keys Funcction Description:
3.2 Startup and Shutdown
Startup
Long press POWER key for three seconds, you can enter into
startup picture. The system enters into screen lock status, please
unlock it.
Shutdown
1.Long press POWER, it will popoup shutdown window.
2.Shutdowm window contains mute mode, airplane
mode,reboot mode and shutdown four options.
3.Click Shutdown is the last step.
3.3 Open and Close of the Screen
Screen will be closed on its own when no operation happens.
1. Screen will be closed on its own if no operation happens for
some time to save battery power
2. When screen is open, press POWER key, the screen will be

60
closed immediately.
Open the screen when it is closed.
If the screen is closed, short press POWER to open the screen. The
screen will be locked open it, it will show the picture as below picture,
left slide to unlock and enter into camera, right slide the unlock icon to
unlock the screen.
Picture 3.1
3.4 Usage of Touch Screen
MID operating methods
There are below methods to view the main screen, menu and
application procedure in your MID.
Click
When you want to use the screen keyboard typing or choose
application in the main interface, you only need to touch it by your
finger.
Press on
If you want to open some item( textbox or the link in the webpage), or
shortcut and main procedure move, you can press on this item.
Quickly slide or slide
Quickly slide or slide indicates make quick vertical or horizoncial
movement by finger.
Pull

61
searc
Set the
system
and other
menus . &
display
recently
Home
return
time
Battery
Notice
colum
Before you pull, you need to hold the it with strenghth until you pull it
into the position you want.
Rotate
For most pictures, you only need to retate the MID sidewise to change
the screen direction from horizoncial to vertical. For instance, when
you are typing wods, and watching movies.
3.5 Home Page
Main interface as below picture 3.2, long press the blank and it will
popup windows to set wallpaper, folder, widgets, and shortcut.
Picture 3.2
The extended home page
The home page can be extended beyond the wideness of screen
to provide more space, which you can put new-added shortcuts
and widgets. Click the blank space in home page then slide right
or left to extend to the right or left of the screen. In the home
page, there are two extended pictures, as Picture 3.3.

62
Picture 3.3
The shortcut icons management in desktop application.
Create folder icon in desktop
1. Drag the icons need to be put together on one icon(can
also overlay several icons)as Picture 3.4.
2. Then click the overlayed icons, the applications can be
folded, as Picture 3.5.
Click the unnamed folder in the black box, it will popup the hidden
keyboard, the folder name can be renamed (this is similiar with Apple
IOS system), the icons position can be changed through long press.

63
Picture 3.4
Picture 3.5
Remove the icons in desktop
1. Long press the icons need to be remove, then on the right
above of the screen, it will appear icons.
2. Drag the icon to the above of the remove icon, till the icon
become red, then move your finger to delete the icon.
Change the wallpaper of desktop
1.In home page, long press any blank space in main screen,
it will popup a window to change the wallpaper.
2.Click the gallery or wallpaper gallery to select the
wallpaper.

64
Return to
home page
3.6 Visit Application Procedures
Click in right top of Picture 3.2, enter into main interface as
Picture 3.6, choose the application procedure you want to visit.
Picture 3.6
3.7 USB Connection
MID storage configuration
Before transmitting documents, you have to conduct storage
configuration for your MID:
1. Connect the MID and computer by USB cable, the reminder
column will show the remind information.
2. Open the reminder board; please view the MID status and
reminder to learn how to open the board.
3. In the reminder board, click the “USB Connected”, it will as
below Picture 3.4, then click “open USB storage configuration”.
4. Now the USB is connected successfully.

65
Picture 3.7
Copy the document into memory card
1. Connect the MID to computer with USB cable.
2. As MID storage configuration, it is connected with computer
successfully.
3. Open the “My computer” in your computer, check the items in
“removable disc”.
4. Copy the documents you need into “removable disc”.
5. After copying finishes, click “shutdown the USB storage
configuration” to uninstall.
Notice: When the MID is connected with USB cable, and you open
the USB storage configuration, you can’t view the memory card
through the MID. Only after you detach the USB cable, you can
view the memory card in the MID.
3.8 Typing words
Use the screen keyboard
When you start the procedure or choose the words or numbers
edition, it will show the screen keyboard. The keyboard contains
below typing options:
1. Android keyboard
2. Google Pinyin

66
Choose the typing method you want
1. Click Setting pocedure application.
2. Click Language and Keyboard.
3. In the text setting area will reveal all the installed
words-typing methods in your MID.
4. Tick the typing method you want.
Use and switch of input method
Picture 3.8
3.9 Operation Technique
Enter widgets interface
In the application interface,click widgets on the above of
screen, or slide the screen, it will swtich into widgets interface.
Long press any widget to create its shortcut, then you can
enter into the application through the shortcut icon.
Create application shortcut icons in the desktop
In the application interface or widgets interface, long press
any icon to switch into desktop automatically, drag and hold
the icon, you can move to any position in the desktop.
Remind: If the target position has no space, the widget won’t
be add in the main screen.

67
4 Basic Setting
4.1 SIM Management
4.1-1 Voice call
Click settings in main menu, choose SIM Management, as Picture 4.1
Picture 4.1
Click voice call, choose defaulted SIM card, as Picture 4.2
Picture 4.2

68
4.1-2 Video Call
Click settings in main menu, choose SIM Management, and click video
call, choose defaulted SIM card when makes video call, as Picture 4.3
Picture 4.3
4.1-3 Message
Click settings in main menu, choose SIM Management, click message,
choose the defaulted SIM card when sends message, as Picture 4.4
Picture 4.4
4.1-4 Data Connection
Click setting application in main menu, choose SIM management,
click data connection, choose the defaulted SIM card, as Picture 4.5

69
Picture 4.5
4.2 Wireless and Internet
1. Connect Wi-Fi
1) In the main menu or interface, choose setting application
procedure.
2) Click WLAN, open wifi, MID will automatically search the
available Wifi wireless internet. As Picture 4.6
3) Choose the Wi-Fi internet you want to connect, if it has
password, it will popup the password window, enter
password, click connect.
Picture 4.6

70
2. Add Network
1) Click icon in right top, as Picture 4.7
Picture 4.7
2) Input network SSID, the wireless network name, click
save.
3) Click user name already saved, click connect to use
network, as Picture 4.8
Picture 4.8
3. Network Notice

71
If you open Network Notice, when WIFI signal appears, the
right bottom will remind you available WLAN network, as
Picture 4.6
4. Keep WI-FI on during sleep..
1. Click icon in right top of Picture 4.8, select advanced.
2. Click Keep WI-FI on during sleep, as Picture 4.9
Picture 4.9
4.3 Bluetooth
Bluetooth function operation
1. Click setting application in main menu interface
2. Click bluetooth and open it.
3. If somebody open bluetooth in your surroudings, click search
device in right above, then MID will automatically search the
bluetooth device nearby. As picture 4.10

72
Picture 4.10
4. Click the available Bluetooth device, it will popup request
window, enter into related password, and match the device to
connect.
5. After match successfully, choose the operation you want to,
click to enter into Picture 4.11.
Picture 4.11
Bluetooth setting
1. Rename tablet

73
Click icon in right top of Picture 4.10, as Picture 4.12,
select rename tablet, you can rename it as you want
Picture 4.12
2. Check visibility timeout
Select visibility timeout setting in Picture 4.12,
choose the time you want to set, as Picture 4.13(Note:
check overtime setting is the time setting when
Bluetooth is checked)
Picture 4.13

74
3 Display the file you received
Choose display the file you received in Picture 4.12, you can
view download and upload files.
4. Bluetooth advanced setting
Choose Bluetooth advanced setting in Picture 4.12, enter into
Picture 4.14
Picture 4.14
1. File transmission,
Open file transmission service, Connect Bluetooth FTP and customer
device to visit and operate the file.
2. Bluetooth distance induction device
Open Bluetooth distance induction device, when two Bluetooth
devices distance is quite far or connection is cut off, the
Bluetooth will remind you with sound.
4.4 Data Usage
Check SIM card data usage, as Picture 4.15

75
Picture 4.15
Check WIFI data usage
Click icon in right top of Picture 4.15, click Data Usage, as Picture 4.16
Picture 4.16
4.5 More
4.5-1 Airplane Mode
Airplane Mode can turn off WIFI and GSM card function quickly,
when airplane mode is turned on, WIFI and GSM can’t get any signal,
then airplane mode is turned off, WIFI and GSM module will recover to
previous state.

76
4.5-2 VPN
Open VPN, click add VPN network, as Picture 4.17. Input name
and server address, then save.
Picture 4.17
Click VPN, as Picture 4.18, input VPN user name and password,
click connect.
Picture 4.18
4.5-3 Network sharing and portable hotspots
Portable WI-FI hotspots

77
1. Click setting application in main menu.
2. Click more when wifi is well connected, open network share
and portable hotspot
Picture 4.19
Picture 4.20
3. Click keep WI-FI hotspots on, choose open time.
4. Return to previous menu, open portable WLAN hotspots,
click configure WI-FI hotspots.

78
Picture 4.21
5. Set passwords you want to, password should be more than
8 numbers.
4.5-4 Mobile Networks
1. 3G service
Click 3G service, as Picture 4.22, choose available defaulted SIM card,
GSM is 2G network, WCDMA is 3G network.
Picture 4.22
2. Access Point Name( APN)
Click mobile network, as Picture 4.23

79
Picture 4.23
Choose access points name (APN), choose SIM card you need to
connect,
Choose connect type, as Picture 4.24
Picture 4.24
Remark: (CMWAP transmitters data through GPRS, the webpage it
visit belongs to wap webpage, and CMNET support www browse
mobile phone network, it can also log in webpage in computer. And
the charges are also different.)

80
3. Network Operator
Click network operator, choose SIM card you need to connect, system
will search available GSM and WCDMA network, as Picture 4.25
Picture 4.25
4.5-5 GPRS data prior mode
After Open GPRS data prior mode, systems will priority chooses your
network.
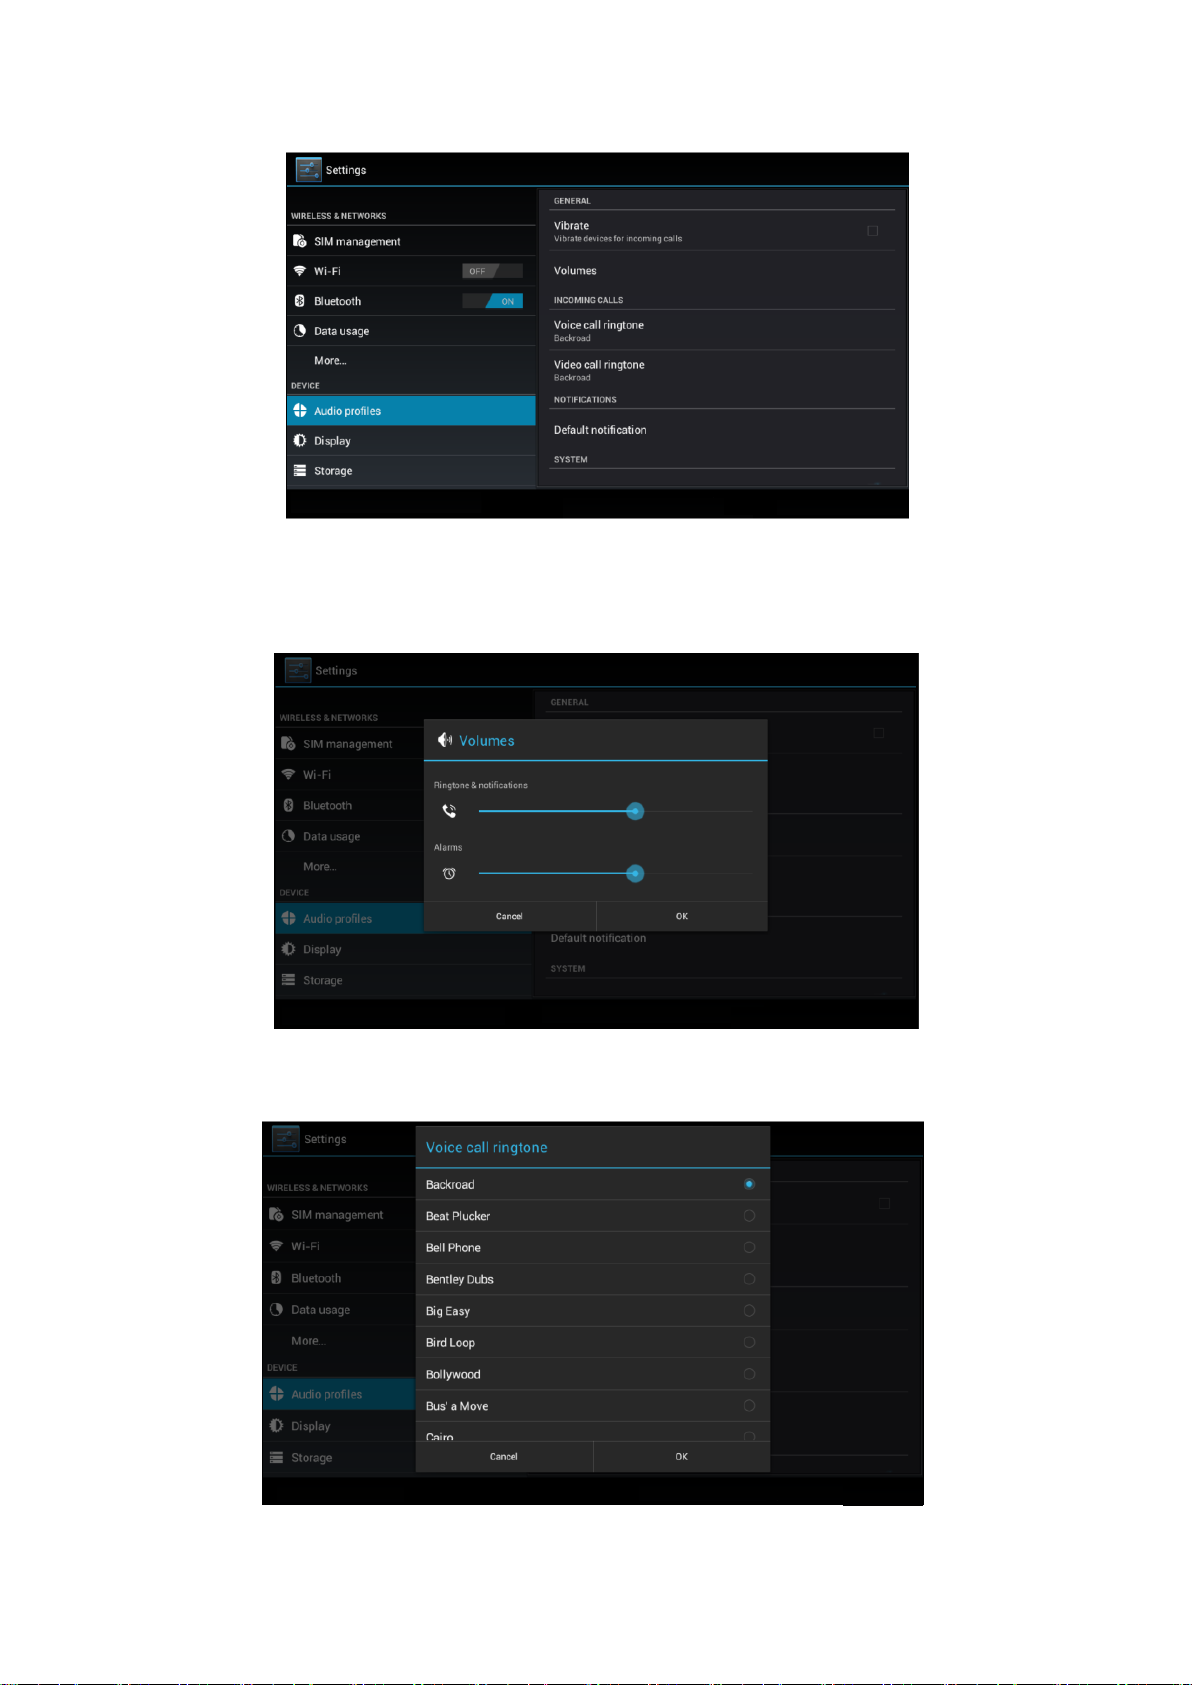
4.6 Contextual Model
1. Open settings, click contextual model, as Picture 4.26,

81
Picture 4.26
2. Click standard to enter into Picture 4.27
Picture 4.27
1. Vibrate
In picture 4.27, click vibrate, MID will vibrate when someone calls
you.
2. Volume
In picture 4.27, click volume, you can set ringtone, notice, and alarm
volume, as Picture 4.28
Picture 4.28

82
3. Voice call Ringtone
In picture 4.27, click voice call ringtone to choose voice
call ringtone, as Picture 4.29
Picture 4.29
ii. Video call ringtone
In Picture 4.27, click video call ringtone to choose video call
ringtone, as Picture 4.30
Picture 4.30
(Note: Except standard, silent, meet, outdoor are only for selection,

83
they can’t be set.)
4.7 Display
4.7-1 Adjust the screen brightness
1 . Click Setting application procedure.
2. Click display, choose brightness,
3. Drag the portlito to adjust the brightness volume.As Picture
4.31
Picture 4.31
4. Click OK after brightness is adjusted.
4.7-2 Wallpapers
1. Click setting application.
2. Click display, click wallpaper.
3. You can choose different wallpapers as you like—live
wallpapers---gallery(user defined)---wallpapers (system
defect)---video wallpaper, as Picture 4.32

84
Picture 4.32
4.7-3 Auto rotation
System is defaulted as open auto rotation, when it is turned off,
system won’t rotate MID screen by G-sensor.
4.7-4 Sleep
1. Click setting appliation.
2. Click display.
3. Click sleep.
4. Set the sleep time as you want, as Picture 4.33

85
Picture 4.33
4.7-5 Font size
Click font size to adjust the font size, as Picture 4.34
Picture 4.34
(1) OSD postion setting
Click OSD position setting, MID will adjust OSD position
setting, as Picture 4.37
Picture 4.37
4.8 Storage

86
Open setting function, click memory, click preferred install
location, you can choose isntall new application to choose
preferred install location.
Check SD card and MID storage space.
1. Enter into setting application.
2. Click storage, check storage space.
1. Internal storage
(1) System storage
System storage is the spcae MID leave for system
file, as Picture 4.38. it can’t be viewed.
Picture 4.38
(2)Internal storage
Internal storage is MID local NAND storage, as Picture 4.39, if you
need to check the storage content, you can check it in main menu.

87
Picture 4.39
2. SD card
You can check storage space, SD card available space, unmount SD
card and erease SD card, as Picture 4.40
Picture 4.40
Safely remove SD card
1. Click setting application.
2. Click memory.
3. Click uninstall SD card.

88
4. Now you can remove SD card safely.
Note: Removing SD card safely can protect SD card and increase its
lifetime.
4.9 Battery
Click setting function, select battery, you can view the battery
situation, as Picture 4.41
Picture 4.41
4.10 Application program
1. Click setting application in Apps.
2. Select application, after enter, you can manage and delete
installed application and check system used storage
space and left space. (As Picture 4.42)

89
Picture 4.42
3. View internal storage used space and left space, as Picture
4.43
Picture 4.43
4. View the working device, used space and available space,
as Picture 4.44

90
Picture 4.44
4.11 Account and Sync
1. Select setting application
2. Open account and sync, as Picture 4.45
Picture 4.45
3. Click add an account, as Picture 4.46

91
Picture 4.46
4. After successfully load, it will open the sync function, as
Picture 4.47
Picture 4.47
4.12 Location service
Click setting, select location service, as Picture 4.48

92
Picture 4.48
1. Google’s location service
Open Google location service, you can use WIFI to positioning
MID.
2. GPS satellites
Open GPS satellite, you can use GPS to positioning MID.
3. GPS Assistance
Open GPS Assistance, it can insrease the speed of GPS
positioning, but you need to insert SIM card and use data
transimission.
4. A-GPS
After opening A-GPS, you can inscease positioning speed
through network.
5. A-GPS settings
Click A-GPS setting, enter into Picture 4.50

93
Picture 4.50
4. Disable after reboot
Click disable after reboot, when you reboot your MID, A-GPS
will auto turn off.
5. Network Request
Click network request, MID can get your location through
network.
6. Network used
Open network used, you can choose network type, as Picture
4.51

94
Picture 4.51
4. Server
Click server, it can switch location service, as Picture 4.52
Picture 4.52
5. Location and Google search
Open location and allow google search, you can use your
location information to improve search result and other
services.

95
4.13 Safety setting
Set locked screen
Lock the touch screen by unlock icon or password to protect your
MID.
Note: After setting screen locked, you should enter the
passcode each time when you startup or screen is locked
Set unlocked picture
1. Click setting application in main interface.
2. Click safe.
3. Click locked the screen.
4. Choose picture in text setting area.
5. Click next following the remind message.
6. The unlocked pattern board pop up, there are nine
touch spots, connect 4 points from vertical, horizontal
or diagonal direction. As Picture 4.10, move your finger
from the screen when finish. The system will record
yous new unlock pattern.
7. Click continue.
8. When you see the reminder, enter the unlock pattern,
then click confirm.
Picture 4.53
Set unlock PIN code

96
1. Click setting application in main interface.
2. Click safe.
3. Click screen locked.
4. Choose PIN in text setting area.
5. Enter new PIN code(numbers) and click continue.
6. Ener new PIN code again and click confirm.
Set unlock password
1. Click setting application in main interface.
2. Click safe.
3. Click screen locked.
4. Set password in text seting area.
5. Set new password(letters and numbers) and
then click continue.
6. Enter the password again and the click confirm.
Unknown source
1. In main interface, click setting.
2. Click safety.
3. Click unknown source,as Picture 4.54
Picture 4.54
Note: Manual installing APK files needs to turn on unknown source.

97
4.14 Language and Input Method
Click setting, select language and input method, choose language
to switch language, as
Picture 4.55
Click setting, choose language and input, choose Android
keyboard setting, click input language, as Picture 4.56
Picture 4.56
Choose the language you want to change in the language list,

98
as Picture 4.57
Picture 4.57
Return to langauge and input method, click default, as Picture
4.58, select input method you want to use
Picture 4.58
4.15 Backup and Reset
Connect WIFI and login your google account, choose backup my
data, system will backup your data into google server.

99
If you need to recovery factory reset, please click reset, as Picture
4.59, if you need to formulate NAND, please click reset tablet.
Picture 4.59
2.1 4.16 Date and Time
According to the preset, system will voluntorily apply the date, zone,
and time provided by internet.
Manual set date, time and zone
1.Click Setting application procedure.
2.Slide down the screen, then click date and time.
3.Turn off “auto setting of date and time”.
4.Turn off “auto setting zone’.
5.Click Zone Selecting, then choose the zone lists. Slide down
the list to view more zones.
6.Click Date setting, then click upper or down buton to adjust
date, month, and year, click setting when you finish
selection.
7.Click Time setting, then click upper or down button to adjust
hour and minute, click AM or PM to change morning or
afternoon ( there is no such selection when you se 24-hour
format). Click Setting to finish.
8.Click 24-hour format, switch between 12-hour or 24-hour
formay, the time format you choose will be used on the alarm
clock.

100
9.Click date format setting, then choose the time format you
want to show on MID.
Picture 4.60
Note: If you use the time internet provided, you will not able to set the
date, time and time zone.
4.17 Fixed-time Startup and Shutdown
1. Click Setting application procedure
2. Click fixed-tine startup and shutdown.
3. Operate as below Picture 4.61
 Loading...