

Page 1

®
BRIGHTFLOW CHEMICAL DISPENSING SYSTEMS
4 CHANNEL REAL TIME CLOCK
®
B926
(v1.0)
Page 2

Operation
•
Bright-time is a waterproof, 4 channel, real time clock
•
Each channel may be programmed with up to 8 timing entries
•
The timing entries may be programmed to operate in a continuous
‘TIMED’ mode or a pulsed ‘CYCLIC’ mode
•
The 4 outputs can be individually selected to be used as ‘volt free’ (Max
6A) contacts or to give a 24V DC output (Max 0.7A, 16W)
•
The volt-free contact option gives ‘normally open’ connections
•
When the channels are not programmed to be ON, or they are
DISABLED, or the unit is not powered, then the relays are in a normally
open state
2
Page 3
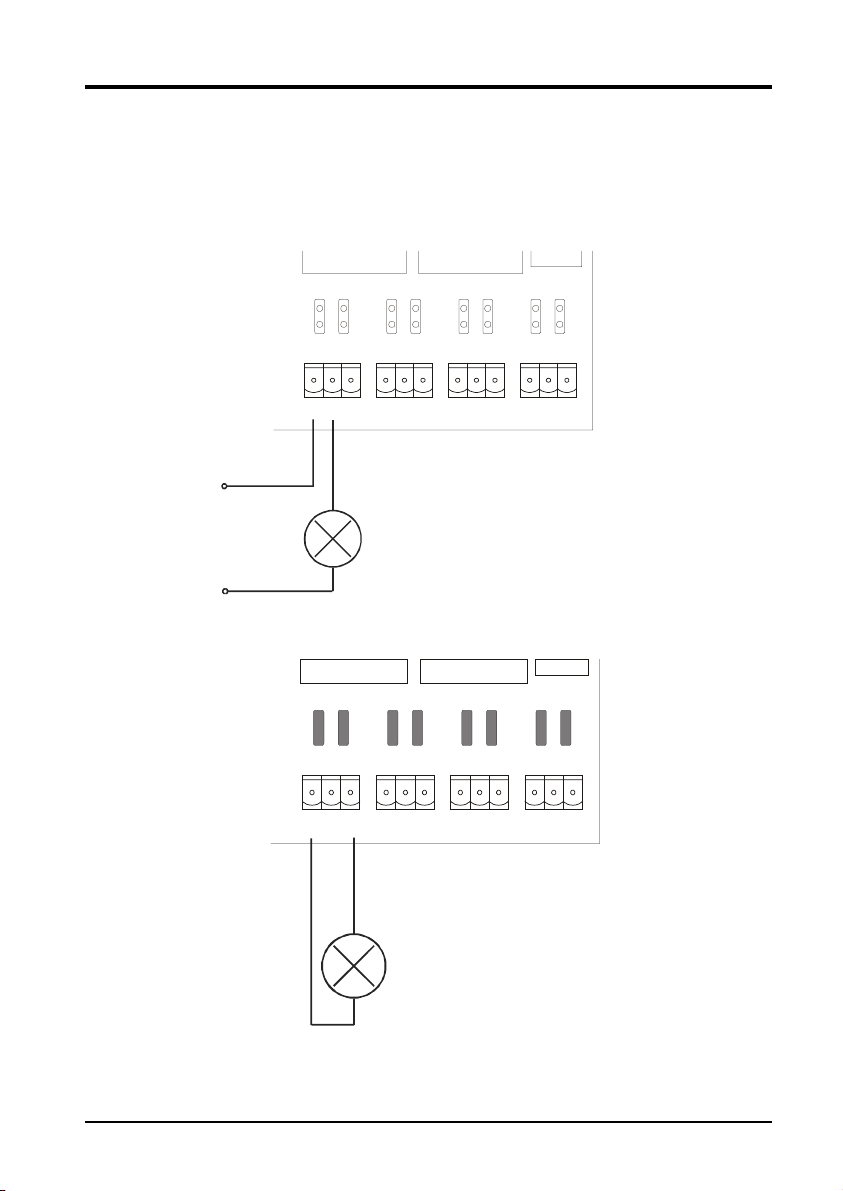
(1)
Installation Diagram
(2)
~230V
NO C GND
CH1 CH2 CH3 CH4
NO C GND
CH1 CH2 CH3 CH4
0V
+24V
NO C GNDNO C GNDNO C GND
NO C GNDNO C GNDNO C GND
3
Page 4
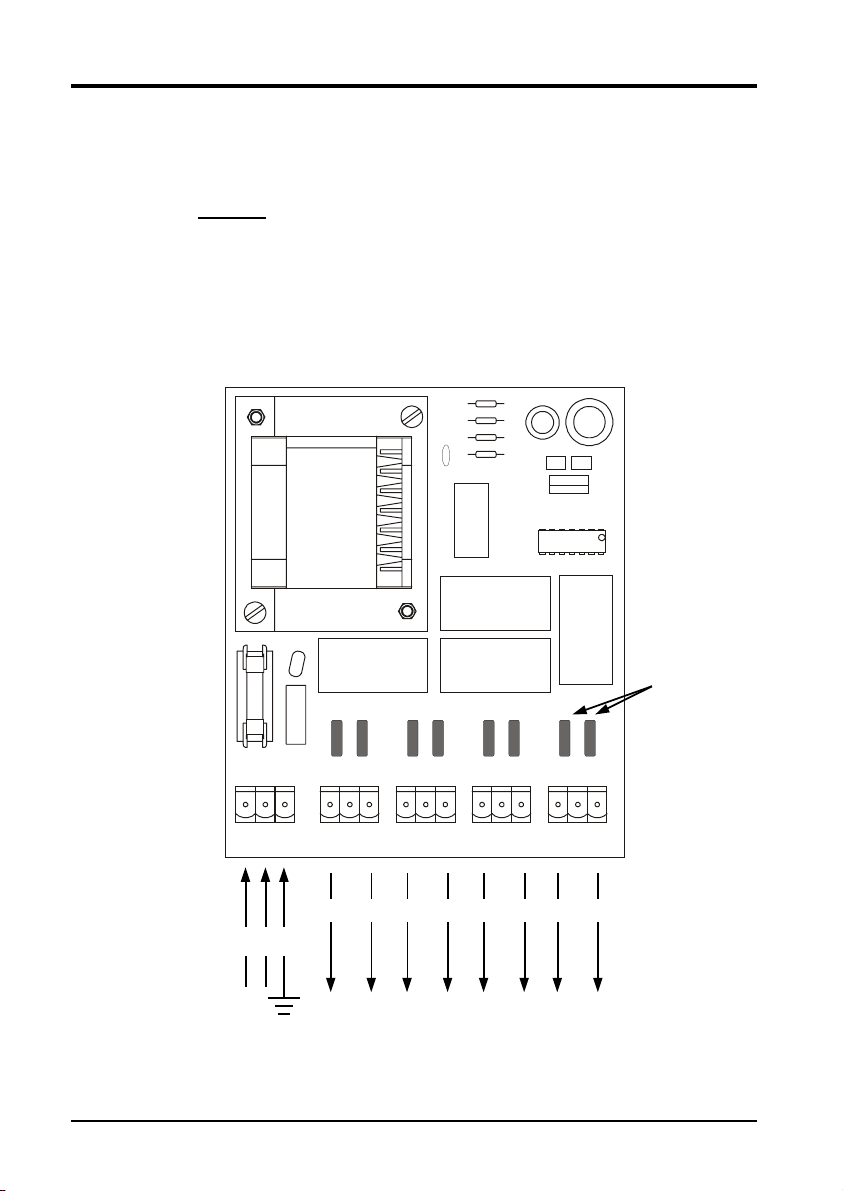
(1) Wiring
With the links in place, the relevant outputs will supply 24V DC
Channel 1 - LK1 & LK2
Channel 2 - LK3 & LK4
Channel 3 - LK5 & LK6
Channel 4 - LK7 & LK8
G756-3
BRIGHTWELL DISPENSERS
Links in
place
LNE NOCGND
CH1 CH2 CH3 CH4MAINS IN
24VDC 0V 24VDC 0V 24VDC 0V 24VDC 0V
NO C GNDNO C GNDNO C GND
~230V L N E
NO - + 24VDC when ON
C - N/A
GND - Ground
4
Page 5
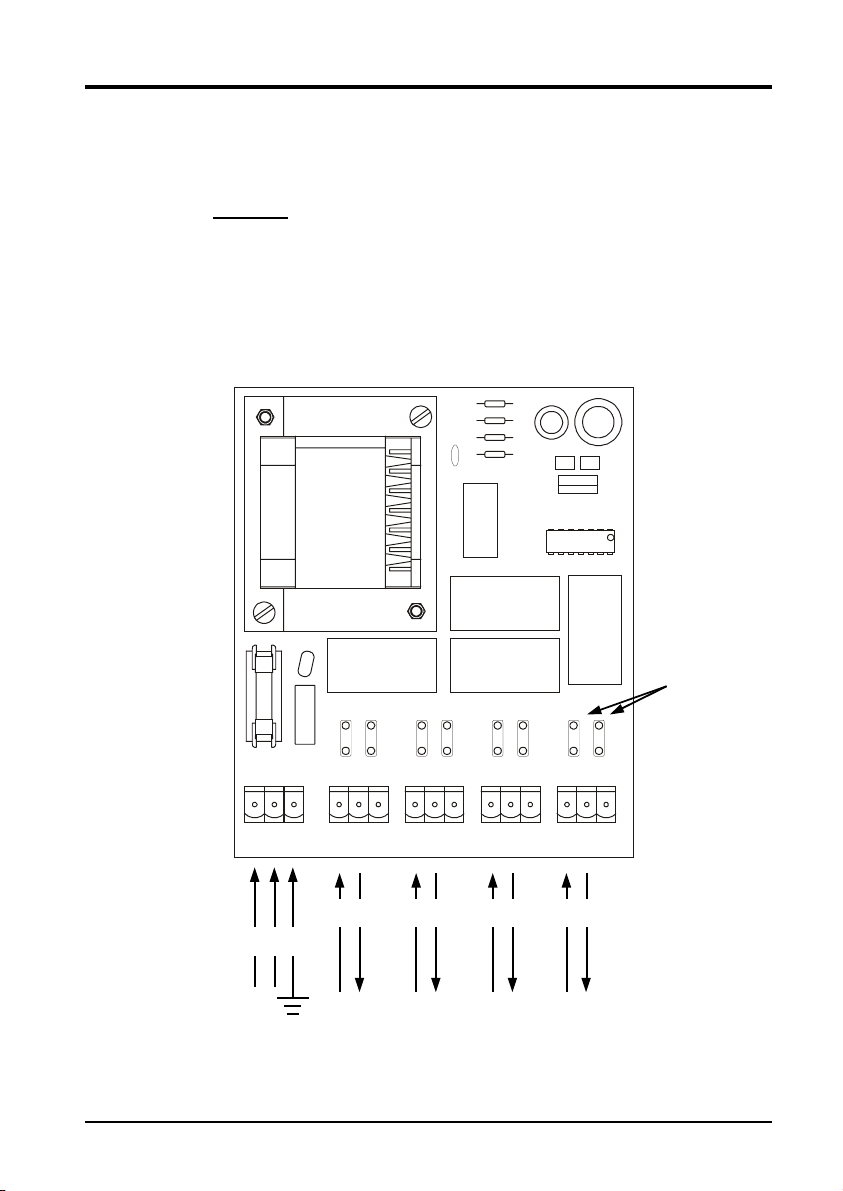
(2) Wiring
With the links removed, the relevant outputs will be set to operate as zero
volt contacts
Channel 1 - LK1 & LK2
Channel 2 - LK3 & LK4
Channel 3 - LK5 & LK6
Channel 4 - LK7 & LK8
G756-3
BRIGHTWELL DISPENSERS
Links
removed
LNE NOCGND
~230V L N E
CH1 CH2 CH3 CH4MAINS IN
NO C NO C NO C NO C
NO C GNDNO C GNDNO C GND
NO - Normally open
C - Common
GND - N/A
5
Page 6
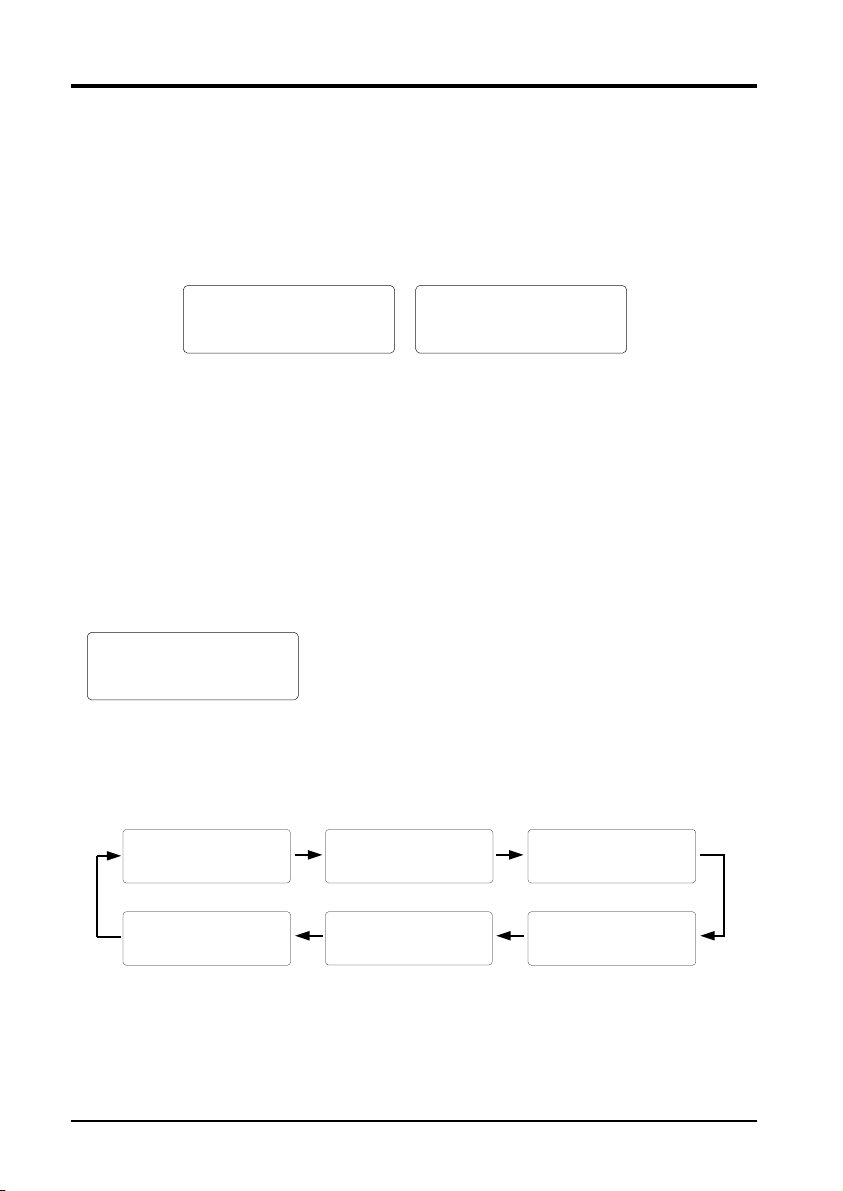
Programming Instructions
BRIGHTWELL
Wednesday
14:52:02
Tel:+44 1273 513566
Shown above are the default screens available when in
operating mode. Either screen can be selected using the
+ and - keys. The second screen shows t he current st ate
of each channel.
E = Enabled D = Disabled O = Over-ridden
PROGRAM MODE
Program channel
PROGRAM MODE
Program channel
Channel 1 E
Channel 2 E
Channel 3 E
Channel 4 E
Press the Accept key to enter the program mode menu.
Scroll through the menu using the + and - keys.
Select the required option by pressing the Enter key.
PROGRAM MODE
View channel
PROGRAM MODE
Clear timing entries
PROGRAM MODE
Set up system
PROGRAM MODE
View total time
PROGRAM MODE
Enable channel
6
Page 7
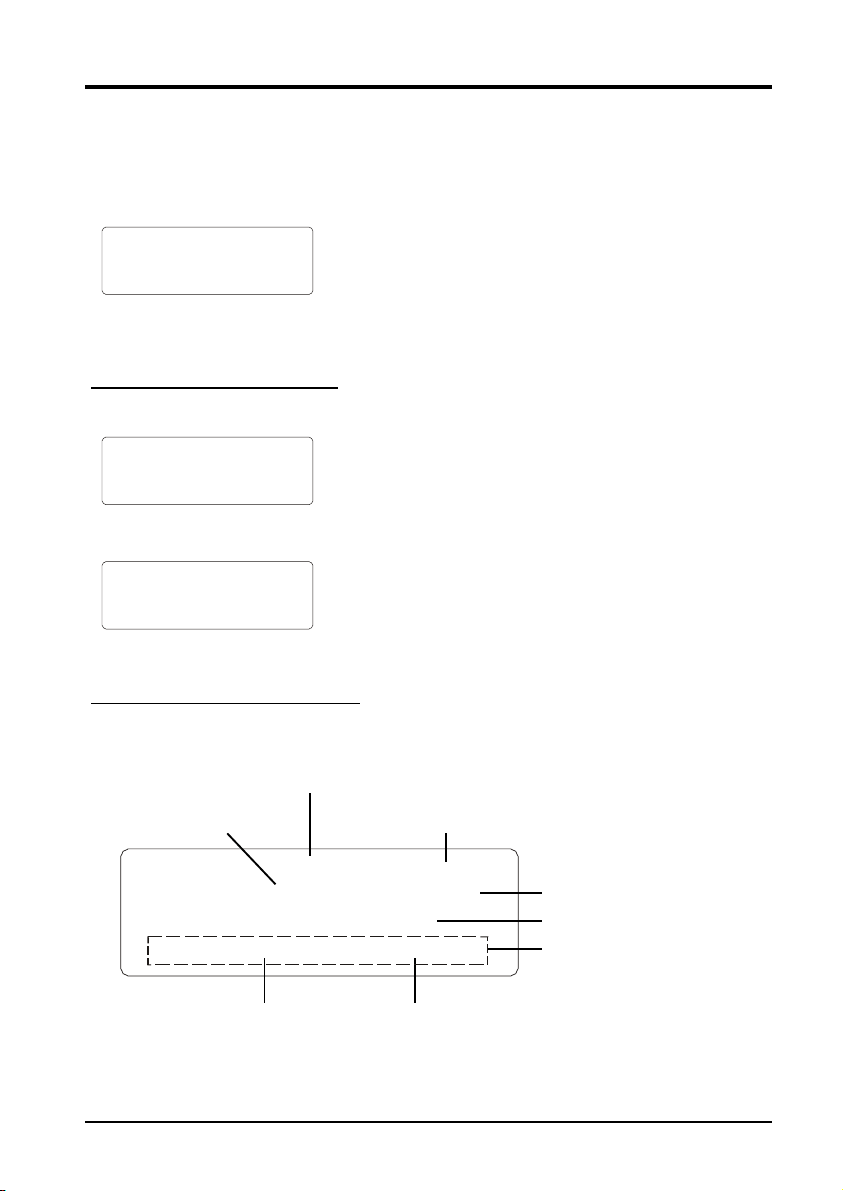
Program channel, Clear timing entries and Set up system options will require a PIN number
before allowing access.
When selecting one of these options, the following screen
will be displayed.
PROGRAM MODE
Program channel
Enter PIN number
0---
Use the + and - key to enter your 4 digit access code and
press the ACCEPT key to move on.
During programming, the access code will only be
required to be entered once, until Program Mode is exited.
This is done by pressing the ESCAPE key.
Programming Timing Entries
PROGRAM MODE
Program channel
Channel 1
PROGRAM MODE
Program channel
Channel 1
Entry 1
Timing entry programming screens
Channel/Entry Number
Operational Days
(access code protected)
Using the + and - keys, select the Channel that you wish
to program.
Using the + and - keys, select the Timing entry that you
wish to program.
Edit 1/1 CYCLIC
START M------ 00:00
DURATION 00:00:0 0
ON=00:00:00/00:00:00
Mode; TIMED (Continuous);
CYCLIC (Pulsed)
Start time; HRS:MIN
Run duration; HRS:MIN:SEC
CYCLIC mode only
CYCLE ON time;
HRS:MIN:SEC
CYCLE OFF time;
HRS:MIN:SEC
7
Page 8
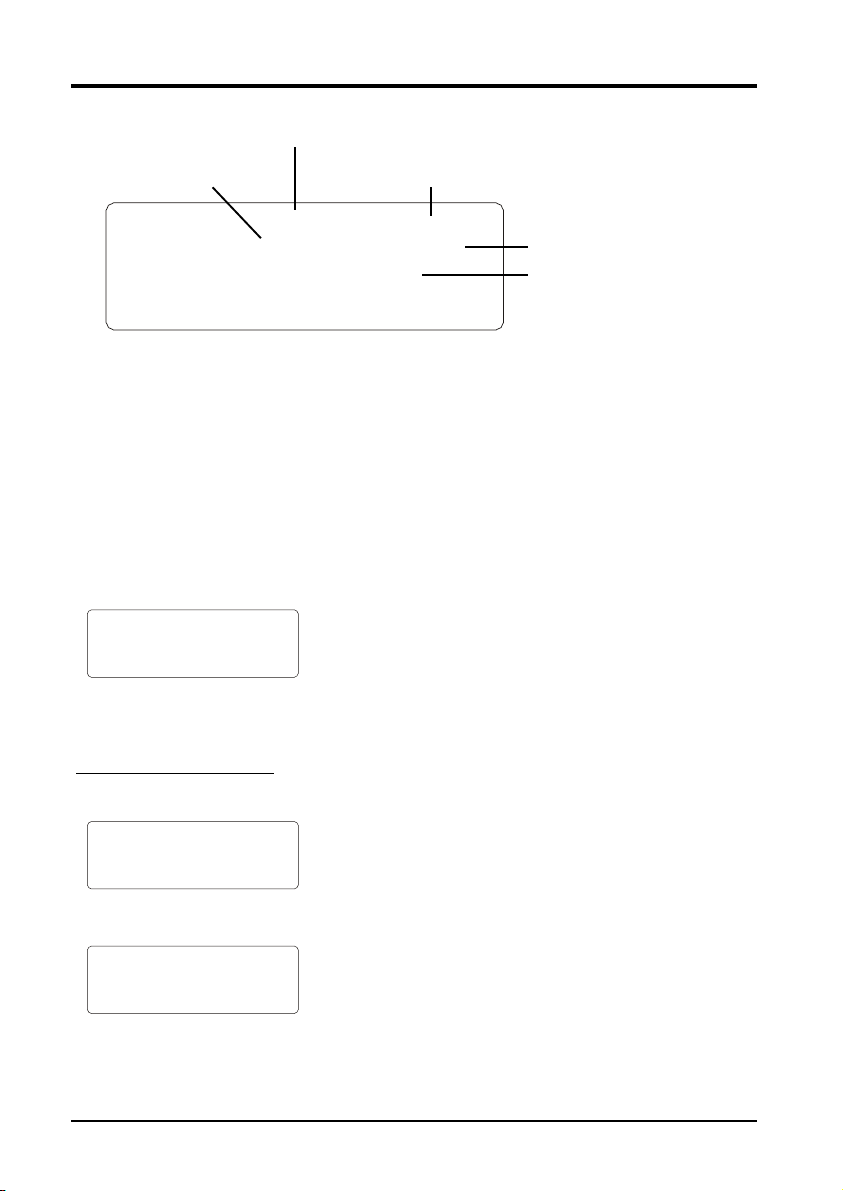
Operational Days
Channel/Entry Number
Mode; TIMED (Continuous);
CYCLIC (Pulsed)
Edit 1/1 TIMED
START M------ 00:00
DURATION 00:00:0 0
•
Using the + and - keys, select the mode that you wish the c hannel entry to operate in,
TIMED or CYCLIC
•
Select the days of operation (a selected day is shown by its c orresponding letter, a
non-selected day is shown by a dash)
•
Program the various settings, pressing the ACCEPT key to move on (Each setting will
flash in turn to prompt adjustment). Press the ESCAPE key to jump back if a mistake
is made
•
On completion ‘SAVE?’ Will flash in the top left-hand corner. Press ACCEPT to save
the settings. ‘Please Wait’ will be displayed briefly whilst the information is stored.
WARNING
For safety, saving
will turn off
Channel 1/1
Viewing Timing Entries
If the programmed entry is currently active then it will
revert to an off state once edited. This warning screen is
displayed, and must be accepted, before the entry is
switched off.
Start time; HRS:MIN
Run duration; HRS:MIN:SEC
PROGRAM MODE
View channel
Channel 1
View 1/1 CYCLIC
START M------ 00:00
DURATION 00:00:00
ON=00:00:00/00:00:00
8
Using the + and - keys, select the Channel that you wish
to view.
Using the + and - keys, scroll through the 8 t im ing entri es
of the chosen channel.
Page 9

Clearing Timing Entries
(access code protect ed)
PROGRAM MODE
Clear timing entries
Channel 1
PROGRAM MODE
Clear timing entries
Channel 1
Please wait
Using the + and - keys, select the Channel that you wish
to clear.
Press ACCEPT to clear ALL the timing entries of the
chosen channel.
Enabling and Disabling Channels
The DISABLE function will stop a channel from operating without the need to
clear the programmed timing entries. Note that a DISABLED channel cannot be
OVER-RIDDEN.
PROGRAM MODE
Enable channel
Channel 1
CHANNEL 1
Currently ENABLED
Using the + and - keys, select the Channel that you wish
to ENABLE/DISABLE.
Using the + and - keys, select the Channel to be
ENABLED or DISABLED.
9
Page 10
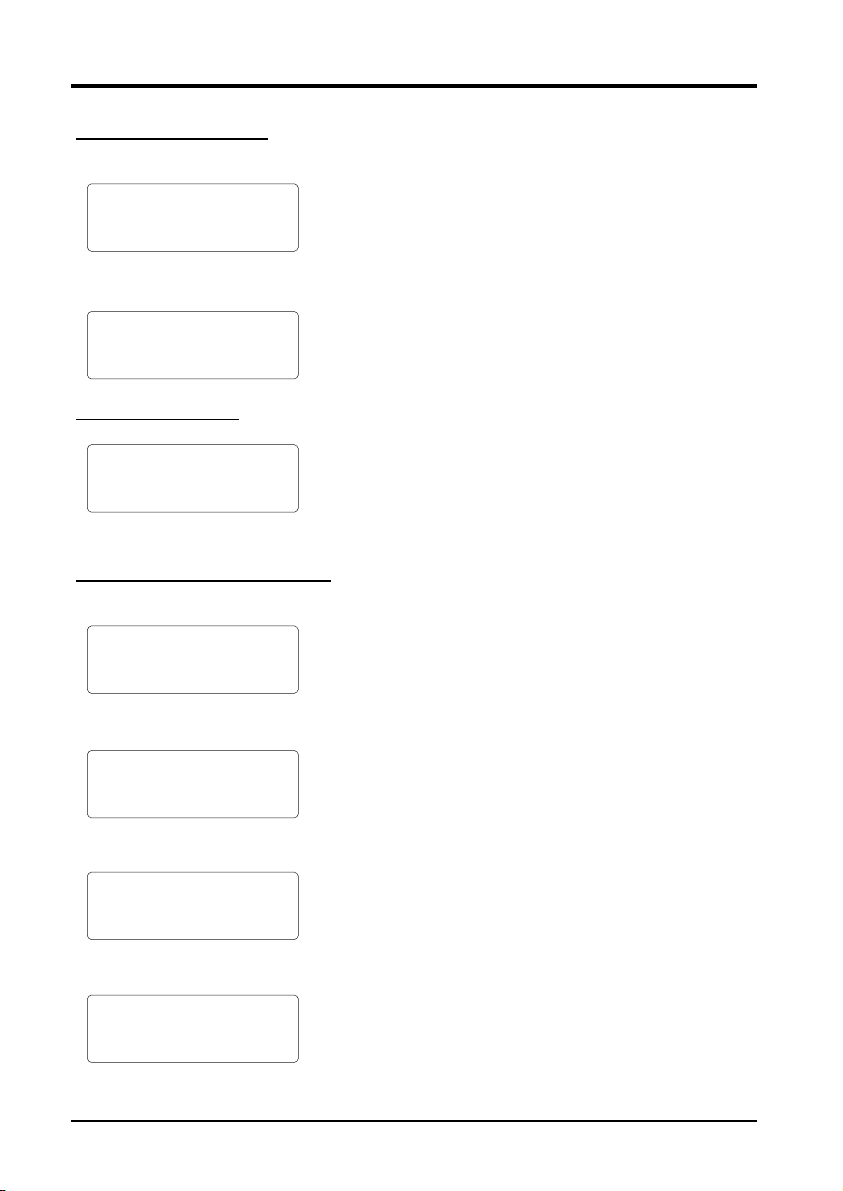
Viewing Total run time
PROGRAM MODE
View total time
Channel 1
CHANNEL 1 TOTAL TIME
SINCE --/--/-- --:-=----Hrs --min --sec
EXIT
To clear total run times
CHANNEL 1 TOTAL TIME
SINCE --/--/-- --:-=----Hrs --min --sec
CLEAR
Setting the day, date and time
PROGRAM MODE
Set up system
Edit date and time
PROGRAM MODE
Set up system
Edit date and time
Monday
Using the + and - keys, select the Channel that you wish
to view the total run time of.
The total run time will be displayed along with the date
and time that it was last reset.
Using the + and - keys, select CLEAR to reset the Total
run time.
(access code protected)
Press ACCEPT to edit the date and time.
Using the + and - keys, select the current day and then
press ACCEPT.
PROGRAM MODE
Set up system
Edit date and time
00:00 dd/mm/yy
WARNING
For safety, saving
will turn off
All Channels
10
Using the + and - keys, set the current time and date,
pressing ACCEPT to move on.
Any active channels will revert to an off state when the
date and time are edited. This warning screen is
displayed, and must be accepted, before any channels
are switched off.
Page 11

Over-riding a Channel
The OVER-RIDE facility allows any one, or all of the channels to be reversed in state. If
the channel is ON, then it will be switched OFF and if the channels is OFF, then it will be
switched ON.
An OVER-RIDDEN channel will only remain in this state until the next programmed ON/
OFF time.
The OVER-RIDE feature only works from the default screens.
BRIGHTWELL
Wednesday
14:52:02
Tel:+44 1273 513566
OVERRIDE MENU E
Channel 1 E
E
E
OVERRIDE MENU O
Channel 1 E
E
E
Press the OVER-RIDE key to enter the OVER-RIDE
menu.
Using the + and - keys, select channel 1 to 4, or all
channels.
Once a channel has been OVER-RIDDEN, it will be
indicated by a O in the right-hand column. Any
DISABLED channels will be indicated by a D and cannot
be OVER-RIDDEN.
11
Page 12
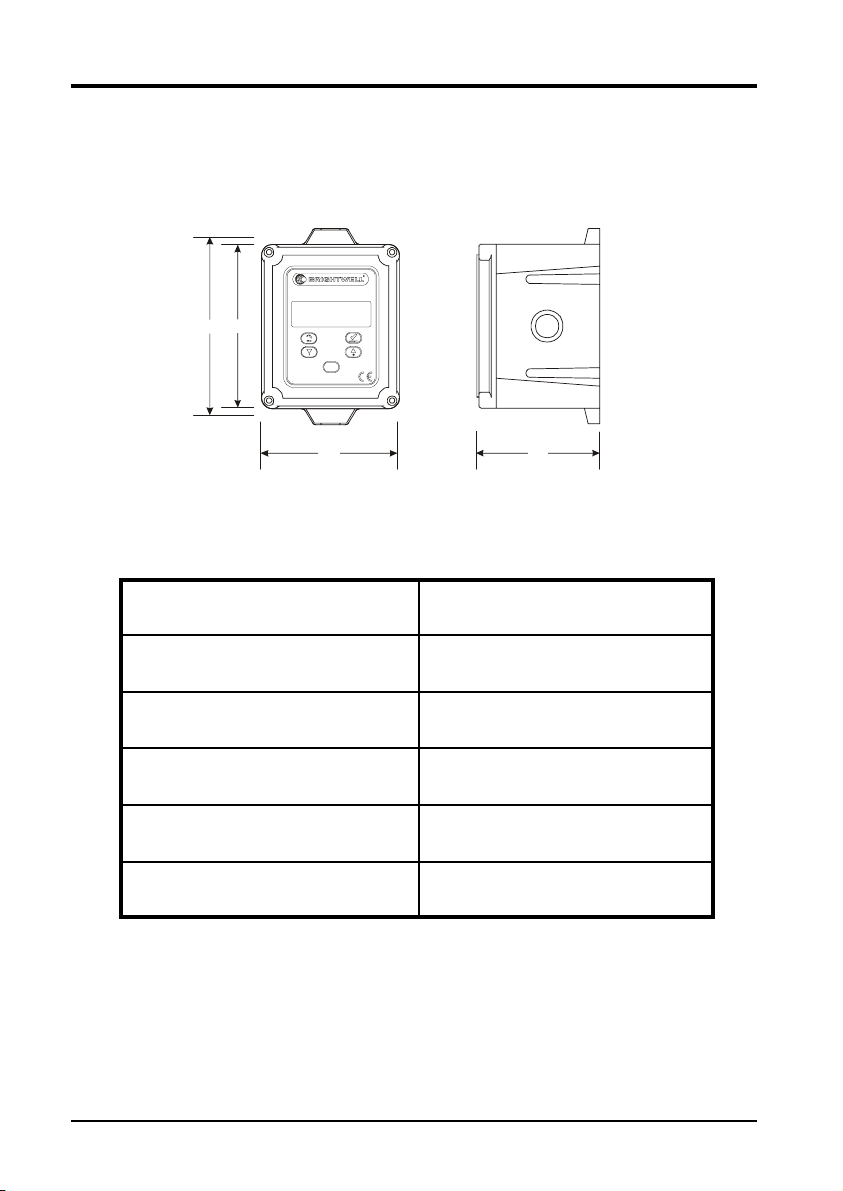
Specification
157
169
OVERRIDE
Enclosure:
Supply:
Fusing:
Maximum Outputs:
Clock Accuracy:
Approvals:
132
IP66M ABS
~
230V 50/60Hz
T400mA
Volt free - 250V 6A
DC - 24V DC 0.7A
±4 Min/Yr
EMC 89/336/EEC - EN50081-1:EN50082-1
LVD 72/23/EEC - EN60335-1
115
12
Page 13

13
Page 14

14
Page 15

15
Page 16

HEAD OFFICE
Brightwell Dispensers Ltd
Brightwell Industrial Estate
Norton Road
Newhaven
BN9 OJF
UK
All Orders: +44 (0)1273 513566
Sales: +44 (0)1273 511300
Fax: +44 (0)1273 516134
2000 Brightwell Dispensers Ltd. All rights reserved. C
BENELUX & GERMAN OFFICE
Brightwell Dispensers Ltd
Lonneker Steumke 21
Enschede
NL-7524 DN
The Netherlands
Sales: +31 (0)53 4344018
Fax: +31 (0)53 4344022
www.brightwell.co.uk
 Loading...