

Page 1

User Manual
FXP-860 / FXP-860R / FXP-960
Dual band Fixed Wireless Phone
Page 2

-----------------------------------------------------------------------------------------------------------USER’S GUIGE
This page intentionally left blank
1
Page 3

PREFACE
WELCOME
Congratulations on the purchase of your FXP-860 / FXP-860R / FXP-960 product!
Please retain your original dated sales receipt for your records.
For warranty service of your FXP-860 / FXP-860R / FXP-960 product, you will need to
provide a copy of your dated sales receipt to confirm warranty status.
Thank you for choosing Motorola product.
Please read important safety instructions before use.
Read and understand all instructions before use.
Please retain this guide for future reference.
The information contained in the FXP-860 / FXP-860R / FXP-960 user guide is
believed to be correct at the time of printing. We reserve the right to change or modify
any information, product specifications, features or functionality without notice. The
contents of the FXP-860 / FXP-860R / FXP-960 user guide are provided “as is.”
Certain features may not be activated by your service provider, and/or their network
settings may limit the feature’s functionality. Additionally, certain features may require
a subscription.
Contact your service provider for details.
2
Page 4

CONTENTS
SAFETY PRECAUTIONS 6
PRECAUTIONS 6
SAFETY INFORMATION 7
PACKAGE CONTENTS 11
PACKAGE CONTENTS 11
ABOUT YOUR PHONES 12
PHONE OVERVIEW 12
INSTALLATION 13
KEY FUNCTION 15
DISPLAY INDICATORS AND ICONS 17
BASIC FUNCTION 18
BASIC OPERATION 18
USING PHONE MENUS 22
ENTER LETTERS AND NUMBERS 23
MAIN MENU 26
OVERVIEW OF MENU TREE 26
THE CONTACTS 29
READ 29
ADD 29
MEMORY STATUS 30
SERVICE DIAL 30
SPEED DIAL 30
COPY 31
3
Page 5

CLEAR ALL RECORDS 32
GROUP 32
MY NUMBER 33
MESSAGE 34
WRITE NEW 34
INBOX 35
OUTBOX 36
DRAFTS 36
VOICEMAIL 37
BROADCAST MESSAGE 37
MESSAGE SETTINGS 37
TEMPLATE 38
MEMORY STATUS 38
DIAL RECORDS 39
INCOMING CALL 39
OUTGOING CALL 39
MISSED CALL 39
CALL OPTIONS 40
CALL DURATION 40
SETTINGS 41
PHONE SETTINGS 41
MELODY 43
DISPLAY 44
CALL SETUP 44
NETWORK SETUP 47
SECURITY SETUP 48
4
Page 6

FACTORY DEFAULT 50
APPLICATION 51
ALARM 51
CALCULATOR 51
CALENDAR 52
RADIO 52
REFERENCE INFORMATION 54
TECHNICAL INFORMATION 54
REGULATORY 55
FCC NOTICE TO USERS 56
TROUBEL SHOOTING 58
5
Page 7

SAFETY PRECAUTIONS
PRECAUTIONS
1. Please do not try to take out the SIM card of this phone.
This SIM card is a special encrypt card, it cannot be used in other mobile phones. It’s
the warranty of the product, if you try to rip or remove the SIM Card, the warrant will
be not valid and your product will not be warranty in any case.
2. Please do not turn around the antenna at will, in order to avoid create the
damage of antenna.
3. Keep the phone away from water and damp areas.
Water or other liquids may cause overheating, electrical leakage, and failure of the
phone.
4. Do not try to disassemble the phone.
This can cause electric shock and failure of the phone. Tampering will also void the
phone’s warranty.
5. Put the phone in a safe and stable place.
6. Keep away from dust and heat radiation (i.e. microwaves, stoves, etc.)
7. Try to use the phone away from ordinary telephones, television sets, radios,
and automated office equipment to avoid interference between the devices.
8. Use clean soft dry cloth to wipe the phone. Do not use any chemical agents.
9. Do not put the phone near explosive or inflammable materials.
10. Use the phone only within the temperature range of -20℃~60℃ and humidity
range of 0%~90%.
11. Keep all accessories or batteries out of the reach of small Children or babies.
Please instruct children the proper ways of handling phone during usage. Shock
circuit or breakdown may occur and may cause severe danger to user due to
improper usage.
6
Page 8

SAFETY INFORMATION
1. EXPOSURE TO RADIO FREQUENCY (RF) ENERGY
Your phone contains a transmitter and a receiver. When it is ON, it receives and
also sends out radio frequency (RF) signals. When you communicate with your phone,
the system handling your call controls the power level at which your phone transmits.
Your phone is designed to comply with local regulatory requirements in your
country concerning exposure of human beings to RF energy.
2. OPERATIONAL PRECAUTIONS
To assure optimal phone performance and make sure human exposure to RF
energy is within the guidelines set forth in the relevant standards; always adhere to
the following procedures.
3. EXTERNAL ANTENNA CARE
Use only the supplied Motorola approved antenna. Unauthorized antennas,
modifications, or attachments could damage the phone.
Do NOT hold the antenna when the phone is IN USE. Holding the antenna
affects call quality and may cause the phone to operate at a higher power level than
needed. In addition, use of unauthorized antennas may result in non-compliance with
the local regulatory requirements in your country.
4. PHONE OPERATION
When placing or receiving a phone call, hold your phone as you would use a
wireless telephone.
To maintain compliance with RF energy exposure guidelines, ensure the phone
antenna is at least 10 inches (25centimeters) from your body when transmitting.
7
Page 9

5. APPROVED ACCESSORIES
Use of accessories not approved by Motorola, including but not limited to
batteries and antennas, may cause your phone to exceed RF energy exposure
guidelines.
6. RF ENERGY INTERFERENCE / COMPATIBILITIES
Nearly every electronic device is susceptible to RF energy interference from
external sources if inadequately shielded, designed, or otherwise configured for RF
energy compatibility. In some circumstances your phone may cause interference.
7. MEDICAL DEVICES
1) Pacemakers
Pacemaker manufacturers recommend that a minimum separation of 10 inches
(25centimeters) be maintained between the fixed wireless phone and a pacemaker.
Persons with pacemakers should:
Always keep the phone more than 10 inches (25 centimeters) from your pacemaker
when the phone is turned ON. Turn OFF the phone immediately if you have any
reason to suspect that interference is taking place.
2) Hearing Aids
Some digital wireless phones may interfere with some hearing aids. In the event of
such interference, you may want to consult your hearing aid manufacturer to discuss
alternatives.
3) Other Medical Devices
If you use any other personal medical device, consult the manufacturer of your device
to determine if it is adequately shielded from RF energy. Your physician may be able
to assist you in obtaining this information.
8
Page 10
8. BATTERIES
Batteries can cause property damage and / or bodily injury such as burns if a
conductive material such as jewelry, keys, or beaded chains touches exposed
terminals. The conductive material may complete an electrical circuit (short circuit)
and become quite hot. Exercise care in handling any charged battery, particularly
when placing it inside a pocket, purse or other container with metal objects. Use only
original batteries and chargers.
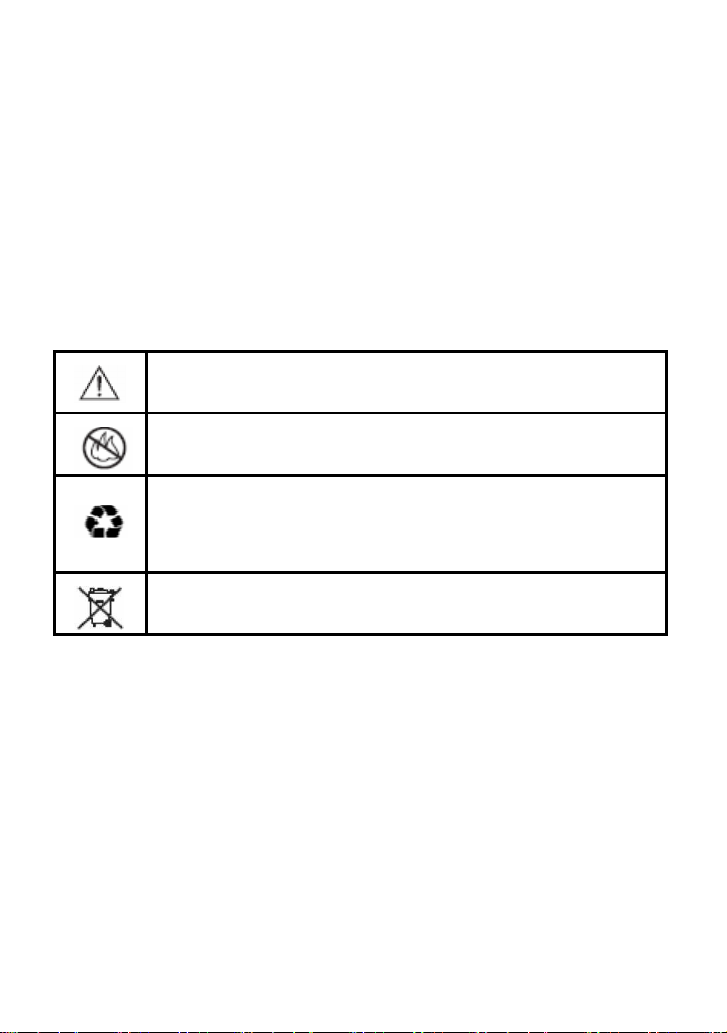
Your battery or phone may contain symbols, defined as follows.
Important safety information will follow
Your battery or phone should not be disposed of in a fire
Your battery or phone may require recycling in
accordance with local laws. Contact your local
regulatory authorities for more information
Your battery or phone should not be thrown in the trash
Please don’t use any damaged battery or charger and use the battery only for
its intended purpose.
Don’t apply extreme shock to the battery. It’s dangerous to disassemble a
battery or to apply extreme shock to the battery via nail or heavy metal objects.
Keep the charger or batteries out of reach of small children or babies.
Always try to keep the battery between -10 ~ 55 Celsius.
Use only manufacturer approved rechargeable batteries and charger
designated for this devise.
9
Page 11

9. Seizures / Blackouts
Some people may be susceptible to epileptic seizures or blackouts when
exposed to flashing lights, such as when watching television or playing video games.
These seizures or blackouts may occur even if a person never had a previous seizure
or blackout.
If you experienced seizures or blackouts, or if you have a family history of such
occurrences, please consult with your doctor.
10
Page 12
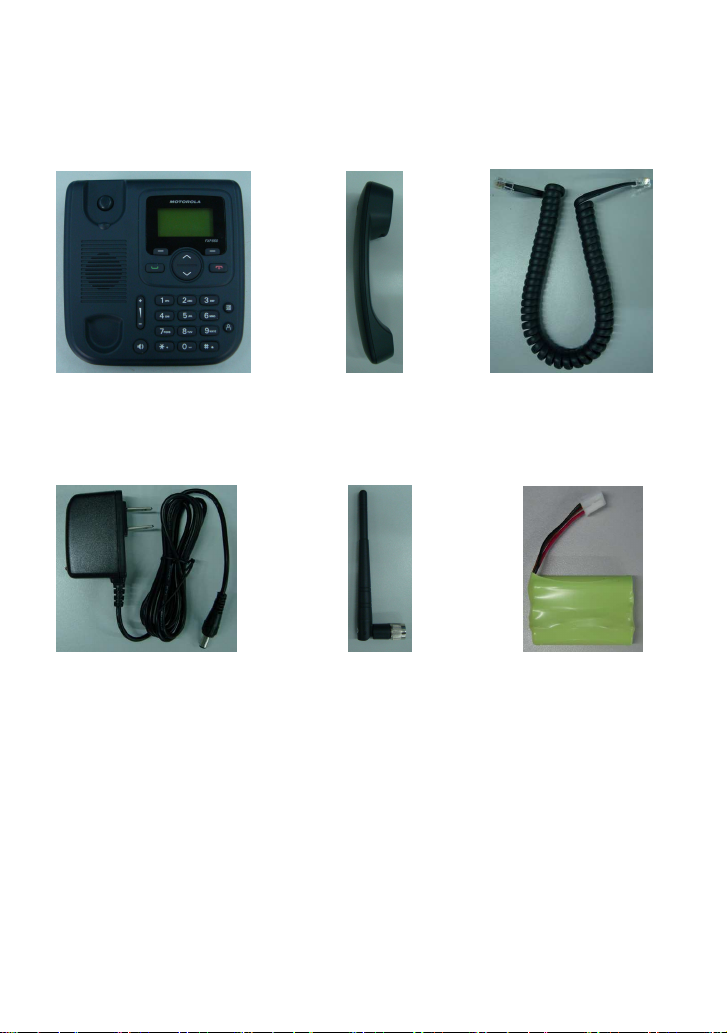
PACKAGE CONTENTS
Transceiver / Phone Handset Handset Cord
Adapter / Charger Antenna Backup Battery
The appearance of the parts in your package may be different from those in this
Manual.
Package contents may vary by market. Please check with your service provider.
11
Page 13
ABOUT YOUR PHONES
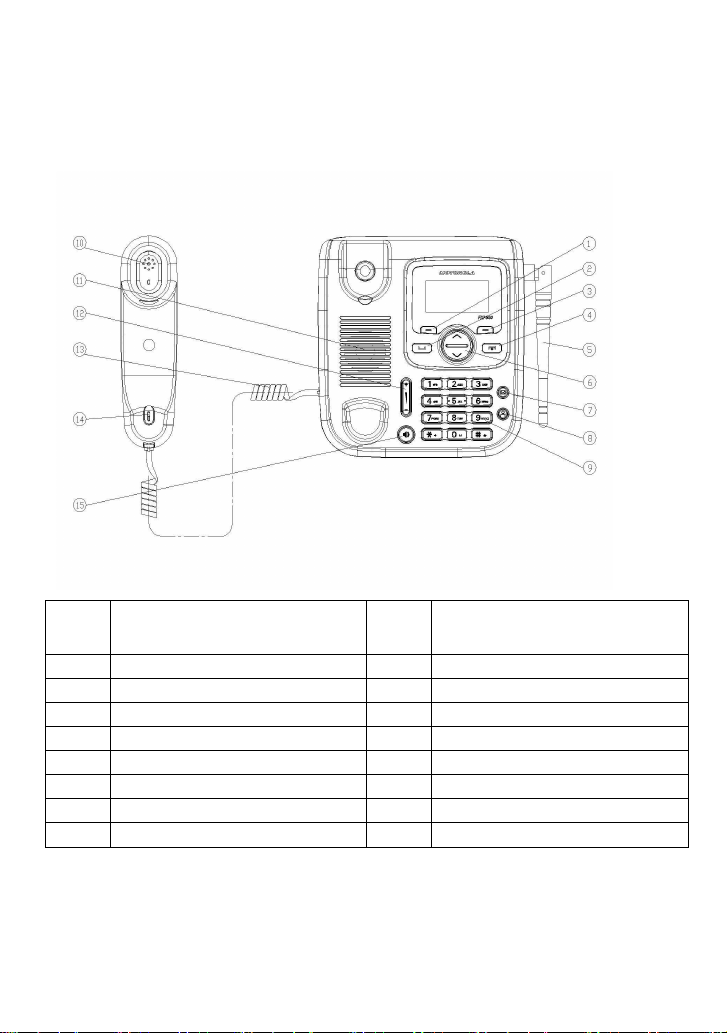
PHONE OVERVIEW
No. Description No. Description
1 Left / Menu / OK Key 9 Numeric Key
2 Call / Send key 10 Receiver of Handset
3 Right / Dial Record / Back Key 11 Speaker
4 End / Power off Key 12 Volume key
5 Antenna 13 Coil cord
6 Up / Down Key 14 Microphone
7 SMS / FM.AM Key* 15 Speaker key
8 Contacts Key
* In case of above no. 6, the function could be different according to the model
name ( FXP-860 have SMS key for this, in the other hands, FXP-860R have
FM/AM key instead )
12
Page 14

INSTALLATION
[1] Installing Coil Cord
Connect the coil cord to both the handset and the transceiver (phone).
[2] Installing Antenna
Install the antenna to the antenna connector. Hold the plastic portion of the antenna
and turn the metal screw clock-wise.
[3] Plugging AC/DC Adapter
Connect the adaptor to the AC Wall outlet and put adapter jack into the hole on the
rear side of transceiver
[4] SIM Card and battery
1) Remove the battery door.
2) Insert SIM card into the SIM slot in the right direction.
3) Connect the rechargeable battery pack into the battery plug.
4) Replace the battery door.
[5] Turning Phone’s Power On/Off
After installing the handset correctly, press the power key which is on the right of the
front panel for about 3 seconds, the phone will then automatically test whether the
SIM Card is inserted and valid. Wait for the antenna icon to display indicator bars
before you make a call.
1) When the battery icon is empty, connect the external power adapter’s barrel
connector to the external power input on back panel of unit.
2) Plug the external power adapter into the power socket. The unit will power up
automatically.
3) Check the cellular signal strength and move the unit until the best signal possible is
achieved.
4) In state of power-on, press and hold power key button, LCD screen closes.
13
Page 15

Note:
The battery pack is a backup for emergencies in case of a power failure. Do not
operate the phone without having the AC/DC adaptor connected.
Be sure to carefully match the positive and negative terminals as shown on the
battery. When using the phone for the first time, charge it for over 6 hours to
ensure optimum battery charge.
Caution:
It is prohibited to use the SIM card for this Fixed Wireless Phone in other GSM
phone. Once the SIM pin number is entered, the SIM pin maybe automatically
changed so the initial PIN is no longer valid. Therefore, it is highly
recommended
NOT to take out the SIM card once it is installed in this product.
DO NOT bend or scratch your SIM card, and avoid exposing it to static
electricity, water, or dirt.
14
Page 16

KEY FUNCTION
[1] Left / Right Soft Key ( Menu / Contacts key )
Press the left soft key (Menu/OK) to perform the function indicated by the text on
the screen above the key.
Press the right soft key (Dial Record/Back) to directly access the Dial Record
list
Note:
The functions of the soft keys depend on the guiding text shown above the keys. For
example, when the text Menu is above the left soft key, press, and the left key enters
the menu functions. Similarly, pressing the right soft key under the text Dial Record
accesses the Dial Record list functions
[2] Send key
Press to make a call to a name / number shown on the screen.
Press to answer a call.
Press to access the list of recently outgoing call .
[3] End key
Press to end a call.
Press once to exit a function and return to the idle screen.
[4] Numeric Keys / ‘****’ keys / ‘#’ Keys
Used for entering numbers and letters.
Press and hold number 1 key to call the voice mailbox.
Press ‘#’ key to toggle between upper case, lower case and numeric modes in
message mode.
15
Page 17

Press ‘****’ key to toggle between letters and symbols in message mode.
[5] Scroll keys
Press up/down key to up / down the phone’s menu.
[6] Speaker key
If you are using the handset to call and you want to transfer the call to the
speakerphone mode, press the Speaker key button and hang up the receiver to
transfer the call to the speakerphone.
[7] Volume key
Press Volume up/down key to change volume level.
Press Volume up/down key to move the cursor when entering letters.
16
Page 18
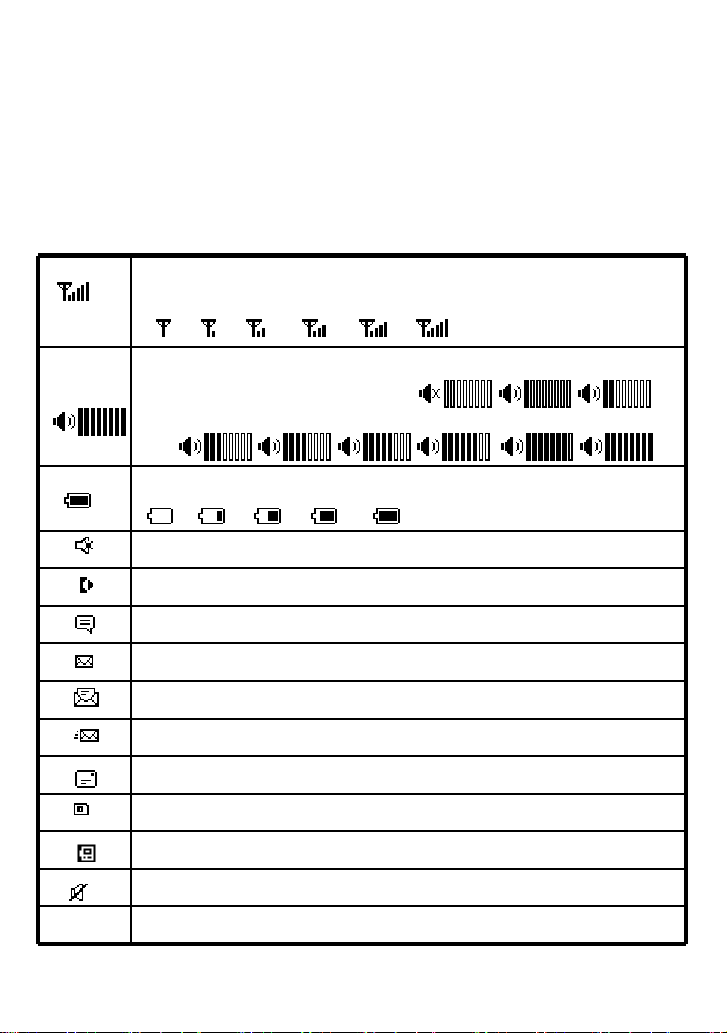
Mute: s
hows when
turn off the volume of MIC
Call Divert
Voice message
Received New message
SMS read already
Sent SMS
Unread SMS
Contacts / Messages stored in SIM card
Contacts / Messages stored in Phone
s
hows when
turn off the volume of ring tone
DISPLAY INDICATORS AND ICONS
The display indicators and icons provide information about the operation of the phone.
The start screen is displayed when the phone is turned ON. Several features can be
used only when the phone is at the start screen.
Signal Strength Indicator
Battery Level indicator
Indicate the strength of the network signal
Volume tone Indicator
Indicate the tones of the Volume
17
Page 19

BASIC FUNCTION
BASIC OPERATION
[1] Switching the phone ON and OFF
1) To turn on your phone, press and hold “End key” for a few seconds or until the
display turns on.
2) To turn off your phone, press and hold “End key” for a few seconds.
[2] Making a call
1) Dial a Call
Raise your receiver and enter phone number which you want to call. After entering
phone number and press “Call key” to make a call.
Tip: In some menus like Contacts, Dial Records, etc. which have individual
phone number, Press “Call key” directly to make a call.
2) Dial the Fixed Phone Extension Number
Some fixed phone extension can’t be called directly, it need a phone exchange. If you
input the pause character ‘P’ between the exchange phone number and extension n
umber, the phone will finish the dial procedure, connect to the extension. To get the “P
”, press the “
3) Dial a International Call
Press the “
Input the country code and the phone number after the prefix.
4) Dial From Contacts
Press Contact key to get into the phone book. Press Up / Down key to scroll the list t
****
” key some time till the “P” displayed on the phone screen.
****
” key some time till the character “+” displayed on the phone screen.
18
Page 20

o search the caller’s name. Then press call key to make a call.
5) Speed Dial
Press 2 9 keys for a while, the phone number stored in speed dial list will be sent out. Make
sure the speed dial key has been set up.
[3] Answering a call
When your phone rings, just raise your receiver to answer, or press “Call key” or
“Speaker key” to answer in speaker phone mode.
[4] Speaker mode.
You can make or answer a phone call by pressing Speaker key when the handset is
on the base
To make a call:
1) Press the number you want to connect to without pick the handset up.
2) Press Send key
Note: The call is automatically made without pressing, approximately 3
seconds after you dial the number.
To answer a call
When the phone rings, press Speaker key to turn ON the speaker phone mode.
[5] Adjusting the Ring Volume
You can adjust the ring tone volume by pressing the Volume keys on the phone in
setting menu.
19
Page 21

[6] Redialing the last-dialed number
The phone stores up to 10 last dialed numbers.
1) Press Send key to find the most recently dialed numbers.
2) Press navigation key to scroll to the number you wish to dial.
3) Press Send key once.
Note: If no recently dialed numbers are stored, you will not be able
to use this function.
[7] Caller ID
Requires a subscription to a calling plan that supports this feature. Not available in all
areas. Contact you telephone service provider for availability and details. When Caller
ID is active, your phone shows the caller’s phone number during an incoming call, as
long as this number is a part of your service provider’s wireless network.
The wireless network lets you know if it does not recognize the caller’s phone number.
The wireless network will also let you know if the calling party has blocked the Caller
ID feature.
If you have stored the name and number of the calling party in your Contacts and that
number is supported by the wireless network, the caller’s name will also appear.
[8] SMS and Voice Mail
Requires a subscription to a calling plan that supports this feature. Not available in all
areas. Contact you telephone service provider for availability and details.
A new SMS arrives:
The back light of the LCD is ON and the display shows “New Message, Read Now ?”
text message with SMS icon . And if you want to read received new Message,
press the left soft key ( Yes ). If you want to check message later, press the right soft
key ( No ).
20
Page 22

Voice mail arrives :
The back light of the LCD is ON and the display shows “New Voice Message, Listen
Now ?” text message with Voicemail icon . And if you want to check new voice
message, press the left soft key ( Yes ). If you want to check message later, press the
right soft key ( No ).
21
Page 23

USING PHONE MENUS
[1] Menus
A menu is a list of choices you can make. Your phone has 5 menus. ( And your
service provider may add STK menu extra depending on network service ) Each
menu contains options that allow you to use the message, change the ring tone, etc.
You can use menus and sub-menus in two ways: by scrolling or by using shortcuts.
[2] Scrolling through menus
1) From the Start screen, press Menu, and then scroll through the menus using Up /
Down key.
2) Use the scroll and OK key to select the submenus and back key to return to the
Start screen.
[3] Exiting menu levels
1) To return to the previous menu level, press Back key.
2) To return to the Start screen, press End key. No menu setting changes will be
saved.
[4] Menu Tree
You can refer to pages 25 about Menu tree for more details.
[5] Using shortcuts through menu
1) Dial Record : press the right soft key directly
2) Outgoing call: press Call key one time for a second.
22
Page 24

ENTER LETTERS AND NUMBERS
You can enter letters, as well as numbers, when storing information in your phone by
using your phone’s keypad. To enter letters, press the key associated with the letter
you wish to enter until it appears on the screen (numbers will also appear).
[1] Entering Letters
When you want to add new names or when you view names in the Contacts, your
phone automatically switches to the abc (ABC) mode and displays the abc icon on
the right upper side in Display.
Key Characters
Key Characters Key Characters
1 , . ? ! 1 2 a b c 2 å æ ä à ç á
3 d e f 3 è é 4 g h i 4 ì í
5 j k l 5 £ 6 m n o 6 ö ø ò ñ ó
7 p q r s 7 β $ 8 t u v 8 ù ü ú
9 w x y z 9 0 (Space) 0
, . ‘ ? ! “ @ ¥¥¥¥ $ _ ‘ ˆ { } ﹨﹨﹨﹨
*
*
**
[∼∼∼∼] | # ¤ % & ( ) * + - / : ;
< = > ¡ § ¿
※
※: abc → Abc →ABC →123 rotated
※※
[2] Editing name or phone number
To edit a name already stored in the Contacts:
Change letter case(※※※※)
#
23
Page 25

1) From the main screen, press Contact shortcut key.
2) From the Contacts list ( Read ), select the name you want to edit by scrolling Up /
Down key and press OK key.
3) To edit, press the left soft key and scroll down to the edit option and press OK key.
4) Edit the name you want to change and / or press again OK key to change the
phone number.
5) Press Volume down key to scroll the cursor to the left.
6) Press Volume up key to scroll the cursor to the right.
7) Press Clear key to correct any mistakes or press hold to clear all.
8) Press the OK key to save changes or the Back key to cancel.
[3] Changing the case of letters and numbers
You can switch the mode among uppercase and lowercase letters and numbers by
pressing # key.
24
Page 26

MAIN MENU
OVERVIEW OF MENU TREE
Your phone’s menu may differ from the following list, depending on the
Network services to which you have subscribed and the accessories you
are using. If you have any questions, please call your service provider.
1. Contacts
1. Read
2. Add 1. Save to SIM
2. Save to Phone
3. Memory Status
4. Service dial
5. Speed dial
6. Copy 1. SIM to Phone
2. Phone to SIM
7. Clear all records 1. Phone Records
2. SIM Records
8. Group 1. Family
2. Friends
3. Office
4. Others
9. My number
2. Messages
1. Write New
2. Inbox
25
Page 27

3. Outbox
4. Drafts
5. Voice mail 1. Number
2. Clear
3. Call Voice mail
6. Broadcast Message 1. Receive Mode
2. Languages
7. Message Settings 1. Service center number
2. Expire Period
3. Message Type
4. Status Report
5. Alert Period
8. Template
9. Memory Status
3. Dial Records
1. Incoming Call
2. Outgoing Call
3. Missed Call(s)
4. Call Duration
4. Settings
1. Phone Settings 1. Clock Settings
2. Language
3. Answer Mode
2. Melody 1. Melody Setup
2. Volume
3. Display 1. Idle Display
2. Contrast
26
Page 28

3. Backlight
4. Call Setup 1. Call Divert
2. Call Barring
3. Call Waiting
4. Auto Redial
5. Caller ID
5. Network Setup 1. Network select mode
6. Security Setup 1. PIN SIM
2. Phone Lock
3. Change Password
7. Factory Default
5. Applications
1.Alarm
2.Calculator
3.Calendar
4.Radio *
* In case of Radio function of Application menu, FXP-860R model support this
function only and other model don’t support this function.
27
Page 29

THE CONTACTS
New entries can be stored in the SIM card or in your Phone.
You can store up to 100 entries in the phone and an additional 250 in the SIM
depending on the SIM limitations. Entries stored in the phone allow numbers of up to
30 digits, and names of up to 16 characters.
In standby mode, you can press Contact Shortcut key in the low right side of
transceiver to immediately access the Contacts list. When the name is found by
pressing Contacts, press OK key to select option sub menu ( you can choose to send
Message to, edit, clear, add to group, copy )
Using Contact Menus
The Contacts has several menus to select from. These menus appear when you
press Menu/OK (Left Soft key) and select Contacts menu by pressing OK key. Press
Back key (right soft key) to move back to the main menu.
Read : Show the names stored in phone and / or SIM card.
Add: Add new entry (s)
Memory Status: Memory status of phone and SIM
Service dial : Show service name provided by Service networks the phone
Speed Dial: One button dialing
Copy: Copy from SIM (Phone) to Phone (SIM)
Clear All Records : Clear all Phone or SIM entries
Group: Organizing group of Contacts
My number: Inputting or check your own number
[1] Read (by name)
28
Page 30

From the Contacts menu, select Read and press OK key
Enter the first letters of the name you need and then the cursor goes to the
name you wanted directly after one second or select name using to scroll and press
OK key
After choosing one of the name, you can press OK key and you can choose
five sub menus.
Send Message To: You can send SMS to this entry
Edit : You can edit the name and number of this entry
Clear : You can delete this entry only ( You need to re-confirm )
Add to group: You can put this entry to group, but you cannot use SIM entry to
a group.
Copy: If you select a SIM card’s entry and select Copy, you can copy it to
phone memory. If your selection is Phone memory’s entry, Copy means copy chosen
entry to SIM card
[2] Adding a new Contacts Entry
To create a Contacts entry:
1) Press Menu > Contacts > Scroll to Add and press OK key
2) Press Save To SIM or Save To Phone depending on where you want to store
the phone entry.
3) Add Name and press OK key
4) Add Number and press OK key
[3] Memory Status
29
Page 31

To press’ Memory Status’ and you can see the capacity of SIM card used / SIM card
total and Phone used / Phone total.
[4] Service dial
You can check or / and call service number provided by your network Service. This
menu may differ depending on the Network services to which you have subscribed.
Not available in all areas. Contact your telephone service provider for availability and
details.
[5] Speed Dial
1) Press Menu > Contacts
2) Scroll to Speed Dial and press OK key
3) Select one entry. If the numbers are Empty, Press OK key > Select Set/Change
and press OK key, you can assign one phone number. After choosing one, press OK
key
4) If you assigned one phone number already, you can see four sub categories
Set / Changes : You can change the assigned number
Detail : You can see the number of this entry
Clear : You can delete this entry
Dial to : You can dial to this entry
You can use only phone entries and SIM entries and appoint 8 entries. On the
idle display, press one assigned button and press Call button or press one
assigned number for about 3 seconds till make a call.
Ex> If the number assigned in 2 is 01-34-567, just press 2 and Call button
[6] Copy
30
Page 32

You can use this function to copy all numbers from the SIM card to your fixed phone,
or vice versa:
1) Press Menu > Contacts
2) Scroll to Copy and press OK key
3) Press SIM to phone or Phone to SIM depending on where you want to copy all
Contacts entries.
4) Press OK key, then the copy process is done promptly
[7] Clear All Records
You can delete all Contacts entries:
1) Press Menu > Contacts
2) Scroll to Clear all Records and press OK key
3) Press Phone Records or SIM Records, depending on where you want to delete
all Contacts entries.
4) Press OK key to confirm the deletion of all Contacts entries.
5) Select OK key if you want to delete. Otherwise, select Back key to go back to
the previous menu.
Caution: When complete all information stored in your Contacts
will be deleted and can no longer be restored.
[8] Group
Contacts entries can be grouped to some units:
31
Page 33

1) Press Menu > Contacts
2) Scroll to Group and press OK key
3) And you can see four groups 1) Family 2) Friends 3) Office 4) Others
4) Select one and press left OK key and you can see the sub menus
In one group, you can select three sub menus
Group Member: You can see entry (s) belongs to the group
Rename : You can edit the name of this group itself (Ex> Family→
Home)
Alert Tone: You can change the tone when the member of this group called
you.
Note: Only phone memory numbers can be added to group
[9] My Number
You can check, edit, erase and save your owner name and number
1) Press Menu > Contacts
2) Scroll to My number and press OK
3) Select Line 1 Number or Line 2 Number and press OK key
Press Option>Edit to edit your own name and number and press OK key.
Press Option>Clear to remove your own name and number and press OK
key.
32
Page 34

MESSAGE
Requires a subscription to a calling plan that supports this feature. Not available in all
areas. Contact you telephone service provider for availability and details. You can
send or receive text messages with your phone. Text messages that you receive may
contain ring tones that you can store in your phone. It supports 160 characters.
You can also send maximum about 600 characters. If your message is about 600
characters, the phone divides the message into four parts and sends these in each
time. This function is called SMS concatenation.
After completing the message content, you can choose to send it out right away, or
save it as a draft.
Write New
Inbox
Outbox
Drafts
Voice Mail
Broadcast Message
Message Settings
Template
Memory Status
[1] Write New
You can send a text message to one recipient. You can manually enter each
Recipient’s phone number, or you can select the numbers from the Contacts.
Note: The maximum length of a text message differs, depending on the
33
Page 35

capabilities of the network from which it originated. Also, text messages may
appear different at different times because messages can originate in networks
other than your own. Contact your service provider for more information about
this feature.
1) Press Menu > Message> OK key.
2) Scroll to Write New and press OK key
3) You can create the message.
4) When you press OK key, you can see three submenus;
Only Send: After sending, the message is deleted
Only save: No sending. The message is saved into Drafts.
Send and Save : After sending the message is saved into Outbox
[2] Inbox
When a message arrives, a pop-up message is displayed and a new message icon
appears. You can read it immediately, or read it later in your Inbox. You can see the
icon
1) Press Menu > Message.
2) Scroll to the Inbox and press OK key.
3) From the list, highlight the one you need and press OK key.
4) You can choose six options
Reply: You can reply your messages.
Forward : You can forward the chosen message
Edit: You can edit the chosen message.
Clear: You can delete the chosen one.
Clear All: You can empty the Inbox
34
Page 36

You can cut and save the phone number from outbox
Cut Number : You can cut and save the phone number from Inbox message
[3] Outbox
The Outbox stores messages sent and saved.
1) Press Menu > Message.
2) Scroll to the Outbox and press OK key.
3) From the list, highlight the one you need and press OK key.
4) You can choose six options
Send: You can send the chosen message.
Forward : You can forward the chosen message to others
Edit: You can edit the chosen message.
Clear: You can delete the chosen one.
Clear All: You can empty the Out box
Cut Number:
message.
[4] Drafts
You can see draft messages which you already saved. After choosing one of them,
you can have four choices
Forward: You can send the chosen message.
Edit: You can edit and save the chosen message.
Clear: You can delete the chosen one.
Clear All: You can empty the draft box.
35
Page 37

[5] Voicemail (Network Service)
You can listen to your voicemail messages by calling your network voicemail phone
number. Voicemail messages are stored in the network voicemail box, not in your
phone. Also refer to [ 8 ] section in page 20.
1) Press MENU > Message.
2) Scroll to Voice Mail and press OK key.
3) There are three submenus. Select one and press OK key
Number: Enter or modify the network service number.
Clear: Delete Pre-saved service number
Call Voice Mail: Dial the network service number and connect to the Voicemail
Server.
[6] Broadcast Message
There are 2 submenus you can choose
Receive Mode
Languages
[7] Message Settings
There are 5 submenus you can choose.
Service Center Number: The SMS Center Number is required in order to send
messages. Ask your service provider for this number.
Expire Period: Set the period of time the message is stored in the service
center. You can set the period for 1 hour, 12 hours, 1 day, 1week, maximum. When
36
Page 38

the set period expires, the service center will delete all messages, even if the user
has not received the message.
Message Type: When you set the message type, the network will convert the
message to the type you have set. (Text//Fax//E-mail)
Status Report: If you turn On this option, you can be notified if the recipient
received your message.
Alert Period: you can choose message alert time with one time // Every 2 min //
Off when we receive new message.
[ 8 ] Template
There are some sample messages in SMS template and you can edit & save the
template or send the message you selected.
1) Press Menu > Message.
2) Scroll to the Template and press OK key.
There are 2 options as below
Edit: press Option>Edit, you can edit the message template and press save.
Forward: press Option>Forward, you can use SMS template to send the
message
[ 9 ] Memory Status
Check memory status in the SIM and in the Phone. The total capacity of
SIM is depends on your SIM card, total capacity of phone is 100. Also you can see
used area of SIM and phone.
37
Page 39

our phone can store up to 30 call numbers including missed,
DIAL RECORDS
The Call History function keeps track of:
Incoming Calls
Outgoing Calls
Missed Calls
Call Duration
Note: Y
received and dialed calls.
When you miss a call (s), the Missed Calls message appears on your phone’s
screen. You can press OK key to view the Missed Calls list or press Back key to
ignore the message and go back to Standby. The records will be stored in Call History.
You are notified of missed calls only when your phone is turned ON in the service
area from which the missed call originated.
[ 1 ] Checking Incoming/Outgoing/Missed Call
1) Press Menu > Dial Records
2) Select Incoming // Outgoing // Missed Call and press OK key
3) From the list of records, scroll the one you need
4) The screen shows Call Information including Number, Date and Time of
receiving.
38
Page 40

[ 2 ] Call options
You can choose some options in related with Missed Calls, Dialed Calls or Received
Calls when you have any call log.
1) Press Menu > Dial Records
2) Choose one of them;
Incoming call / Outgoing call / Missed call and press OK key
3) You can press left Option
4) You can see six different menus;
Dial To: When you choose one entry and select OK key, directly calls to.
Send Message To: You can send this entry the SMS message without selecting
recipient.
Clear : You can delete chosen entry
Save Number: You can save chosen number to SIM or Phone.
Clear all: You can delete all entries in the category (If you select Outgoing call
all the Outgoing call entries are deleted)
Show Number: You can see the number of chosen entry
[ 3 ] Call Duration
You can check the total duration of incoming call and last call duration
You can see Outgoing Duration, Incoming Duration and Last Call Duration
in one display.
The type of checking time is hh : mm : ss ( h: Hours, m: Minute, s: Second )
You can press left Reset to erase all call duration time.
39
Page 41

SETTINGS
Setting menu includes:
Phone Settings
Melody
Display
Call Setup
Network Setup
Security Setup
Factory Default
[1] Phone Settings
[ 1.1 ] Clock settings
This menu guides you to set Time/Date.
Date/Time Setting: Set the correct time and date.
Date & Time Setting
1) Press Menu > Settings > OK key
2) Scroll Phone Settings and press OK key.
3) Select Clock Settings then press OK key.
4) Select Date & Time Setting and press OK key.
5) Input month / day / year and hour/minute/am or pm by using numeric keys and
left / right key.
6) Press Save key
40
Page 42

Date Format: There are four types of expressions of dates
DD / MM / YY (day / month / last two digits of this year)
MM / DD / YY
DD / MM / YYYY (day / month / full digits of this year)
MM / DD / YYYY
Date Separator: There are four types of separators of date digits
OO-OO-OO (Hyphen)
OO/OO/OO (Slash)
OO.OO.OO (Dot)
OO OO OO (Blank)
Time Format:
You can choose 12h or 24 hours. For example, if the time is 1:22 pm ( 12h
expression) , it can be shown as 13:22 (24h expression)
[ 1.2 ] Language
Three languages options can be selected: English / Spanish ( Español ). Also you
may choose automatic option; Your native language can be chosen without manual
selection.
1) Press Menu > Settings and press OK key
2) Scroll Phone Settings and press OK key
3) Select Language and then press OK key
4) Select the language you need and press OK key
[ 1.3 ] Answer Mode
Normal answer: You can press only answer key and speaker phone key to receive the
41
Page 43

incoming call.
You can also receive the incoming call by pick the handset up without press any other
key.
Any key answer: To answer your receiving call, you can press any key except End
key and Back key.
[2] Melody
[ 2.1 ] Melody setup
Set Melody for Incoming Call and Message Tone
Note: For each tone setup, you can choose one of 10 ring tones for
Incoming call and 4 ring tones for Message Tone.
[ 2.2 ] Volume
Eight volume levels are available for Call, ring tone and keypad tone. Adjust the
volume to your preference using Volume up / down key. Also you can use this
Volume key on the keyboard to adjust the volume directly.
[3] Display
[ 3.1 ] Idle Display
Clock and Date
When you choose Enable, you can see the date and clock on your idle display (The
phone should be in full service state, otherwise display net state)
[ 3.2 ] Contrast
42
Page 44

There are 20 levels for LCD contrast. Press Volume up key then the contrast goes
up. Press Volume down key then the contrast is down.
[ 3.3 ] Backlight
Set Specific LCD and Keypad Backlight time.
1) Select Backlight and press OK key
2) Toggle Always off, 5 sec, 15 sec, 30 sec or 45 sec and press OK key
[4] Call Setup
The following features may require a subscription to a calling plan that supports them.
Not available in all areas. Contact you telephone service provider for availability and
details
[ 4.1 ] Call Divert
Call Divert is a network or subscription dependent service. It allows you to forward a
call to another number, based on various conditions.
1) Press Menu > Settings and press OK key
2) Scroll Call Setup and press OK key
3) Press Call Divert and press OK key
4) Select one of the options below, and then press OK key
All Voice Calls: All incoming calls to a designated number.
On Busy: Divert all incoming calls when there is at least one call in progress.
No Answer : Divert the incoming call if it is not answered
Unreachable: Divert all incoming calls when the phone is not reachable due to a
network error or some other reason.
43
Page 45

5) Select Check Status, Activate, or Deactivate and press OK key
Check Status: Check current Call Divert setting status.
Activate: Activate the chosen Call Divert option. Type the number you want a call
to be forwarded to.
Deactivate: Deactivate the chosen Call Divert option.
[ 4.2 ] Call Barring (Network Service)
Call Barring is a network or subscription dependent service.
This feature allows you to restrict or bar certain or all types of calls to and from your
phone.
1) Press Menu > Settings and press OK key
2) Scroll Call Setup and press OK key
3) Press Call Barring and press OK key
4) Select one of the options below, and then press OK key
All Outgoing Calls: Bar all outgoing calls.
All Calls abroad: Bar all outgoing international calls.
Abroad but Home: Prevent users from making any international calls other than
to home
All Incoming Calls: All Calls Bar all incoming calls.
Incoming While Roam: Bar all incoming calls when the phone is roaming.
5) Select Check Status, Activate, Deactivate and press OK key
Check Status: Check current Call Barring setting status.
Activate: the chosen Call Barring option.
Deactivate: Deactivate the chosen Call Barring option.
Note: To activate and deactivate Outgoing, Incoming, and Cancel Calls, the SIM
password may be required. Contact your service provider.
44
Page 46

[ 4.3 ] Call waiting (Network service)
Call Waiting is a network or subscription dependent service. If set it to Activate, the
Call Waiting feature enables the network to remind you of other incoming calls during
a call in progress.
1) Press Menu > Settings and press OK key
2) Scroll Call Setup and press OK key
3) Select Call Waiting and press OK key
4) Select Check Status, Activate, Deactivate and then press OK key
Check Status: Check current Call Waiting setting status.
Active: Activate Call Waiting function
Deactivate: Deactivate Call Waiting function.
[ 4.4 ] Auto Redial
If set the Auto Redial to toggle enable, the phone would keep dialing until the called
party is available or end the call.
1) Press Menu > Settings and press OK key
2) Scroll Call Setup and press OK key
3) Select Auto Redial and press OK key
4) Toggle Enable or Disable, and then press OK key
[ 4.5 ] Caller ID
Caller ID is a network or subscription dependent service. Not available in all areas.
Contact you telephone service provider for availability and details.
If call ID enable, you can choose to send/hide your phone number to/from the calling
party under your network service provider’s support.
45
Page 47

If call ID disable, the phone number show or not in call party depend on your network
service provider’s support. You can not choose send/hide your phone number to/from
the calling party.
1) Press Menu > Settings and press OK key
2) Scroll Call Setup and press OK key
3) Select Caller ID and press OK key
4) Toggle Set by Network, Hide Number or Show Number and then press OK key
Set By Network: Accepts the default value set by Network.
Show Number: Shows your phone number to the calling party.
Hide Number: Does not show your phone number to the calling party.
[5] Network Setup
[ 5.1 ] Network Select mode
You can set the phone to automatically search the most suitable network to camp on
or to manually select the network you need.
1) Press Menu > Settings and press OK
2) Scroll Network Setup and press OK
3) Select Network Select mode and press OK
4) Select Automatic selection or Manual selection and then press OK
Manual mode: The phone starts searching available networks. Use the up and
down key to browse the network list, and press OK to set the highlighted
networks
[6] Security Setup
There are three options available:
46
Page 48

: Allow or disallow the use of SIM PIN by entering SIM
SIM PIN : Prevent unauthorized use of the SIM card and or the some features of
services of telephone service provider
Phone Lock: Prevent unauthorized use of the phone
Change Password : Change by inputting the phone password two times
[ 6.1 ] SIM PIN
SIM PIN (SIM Personal Identification number) is a four-to-eight digit numeric or
password. It is related with the service of your service provider. For more detail,
contact your service provider.
1) Press Menu > Settings and press OK key
2) Scroll Security Set Up and press OK key
3) Select SIM PIN and press OK key
4) Select PIN Check, Change PIN1, Change PIN2 and then press OK key.
PIN Check
PIN code
Change PIN 1: This is a pin code that locks the SIM card until you enter the
correct code. The default code is set by the Service Provider. You can change it if you
like by entering defaulted PIN code by Service provider, but make sure you don't
forget the new code
Change PIN 2: This SIM card code controls access to some of the more
advanced features of the phone. The default code is set by the Service Provider. You
can change it if you like by entering defaulted PIN code by Service provider, but make
sure you don't forget the new code. Not all networks support pin 2.
Caution: If you unsuccessfully enter the SIM PIN code some times
depends on SIM card or country in succession the SIM card will be Locked.
And then contact your telephone service provider to get PUK code to unlock
47
Page 49

SIM card.
[ 6.2 ] Phone Lock
The default password is “0000”.
1) Press Menu > Settings and press OK key
2) Scroll Security Set Up and press OK key
3) Select Phone Lock and press OK key
4) When ‘On’ is chosen, there are two options.
Verify when Power-on: Every time you must enter password when power on
Verify with new SIM: When you change SIM card, you enter the password
Change Password
This feature allows you to change the password.
1) Press Menu > Settings and press OK key
2) Scroll Security Setup and press OK key
3) Select Change Password and press OK key
Note: You need to input three times. Old password, the new password and
confirmation. Every time you enter the input press OK key
[ 7 ] Factory Default
This feature resets the current settings to the factory default values. The default
phone code is “0000”.
1) Press Menu > Settings and press OK key
2) Select Factory Default and press OK key
48
Page 50

3) Enter the 4-digit password and press OK key
Note: Before factory reset please save you important information!
49
Page 51

APPLICATIONS
Applications include:
Alarm
Calculator
Calendar
Radio
[ 1 ] Alarm
When alarm is set, the icon appears on the standby screen.
1) Press Menu > Applications and press OK
2) Select Alarm and press OK
3) Select Alarm 1and or 2 and or 3 for setting alarm and Press OK
4) You can select four cases. Off//One time // Mon~Fri // Everyday. Select your
favorite by scrolling Volume up /down key
5) After selecting one type, you can go down using up down navigation key and set
the alarm time by pressing numeric key ( time ) and Volume up/down key ( am / pm ).
6) After setting the time, you can go down using up down navigation key and
choose alarm ring tone by pressing Volume up/down key. There are 3 options of ring
tone.
7) Press Save
[ 2 ] Calculator
You can calculate 9 digits.
Key description:
50
Page 52

+, -, /, x: Use up / down navigation keys to select.
Clear: Press once to clear one digit.
. (Point) : Press ‘ # ’ Key.
1) Press Menu > Applications and press OK
2) Select Calculator and press OK.
3) Enter the first value by number keys
4) Select the calculating mark by the up and down navigation keys.
5) The calculating mark will toggle among ﹢﹢﹢﹢, ﹣﹣﹣﹣, × , ÷ by turns
6) Enter the second value by number keys
7) Press OK to display the result of calculation. And you can press OK again to use
calculated results in the next calculation.
[ 3 ] Calendar
You can examine the month and date by Navigation keys .
1) Press Menu > Applications and press OK
2) Select Calendar and press OK
[ 4 ] Radio ( Note : This function can be supported in FXP-860R model only)
1) Press Menu > Applications and press OK
2) Select Radio and press OK.
3) Press Option key you can chose
Switch to AM / PM: you can change to AM or PM
All channels: Display all channels
Manual tune: you can input the channel you want.
51
Page 53

All CH scan
Exit: you can back to Radio
4) Press Play key you can start to listen to the radio.
52
Page 54

REFERENCE INFORMATION
TECHNICAL INFORMATION
Technical Specification
Weight
Size
Wireless Network
Frequency range
Battery
LCD Resolution 128*64 ( pixel * pixel )
Adapter
* Above technical specification maybe changed without any notice
Handset 99.1gram
Transceiver 333.4gram
Handset 175 MM*47MM*37.2MM
Transceiver 185MM*170MM*50MM
Antenna 161.6MM(L)
FXP-860 / FXP-860R : 850 / 1900 MHz
FXP-960 : 900 / 1800 MHz
FXP-860/FXP860R : 824~849MHz, 1850~1910MHz
FXP-960 : 880~915MHz, 1710~1785MHz
Type Rechargeable / Ni-MH
Talk time 1.5 Hours
Standby time 180 Hours
Antenna External
Type CA
Input Voltage 100 - 240 Vca, 50-60 Hz, 0,2 A
Output Voltage 5,00 Vcc, 0,6 A
53
Page 55

REGULATORY
Brightstar Corp. hereby declares this unit to be in compliance with the relevant
Provisions of the Low Voltage Directive 73/23/EEC and the EMC Directive 89 / 336 /
EEC.
Brightstar Corp. hereby declares this unit to be in compliance with the essential
requirements and other relevant provisions of Directive 1999/5/EEC.
The FCC certification is applicable only for FXP-860 / FXP-860R
54
Page 56

FCC NOTICE TO USERS
We have not approved any changes or modifications to this device by the user. Any
changes or modifications could void the user’s authority to operate the equipment.
See 47 CFR Sec. 15.19(3).
This device complies with part 15 of the FCC Rules. Operation is subject to the
following two conditions:
1) This device may not cause harmful interference, and
2) this device must accept any interference received, including interference that may
cause undesired operation. See 47 CFR Sec. 15.19(3).
If your mobile device or accessory has a USB connector, or is otherwise considered a
computer peripheral device whereby it can be connected to a computer for purposes
of transferring data, then it is considered a Class B device and the following statement
applies:
This equipment has been tested and found to comply with the limits for a Class B
digital device, pursuant to part 15 of the FCC Rules. These limits are designed to
provide reasonable protection against harmful interference in a residential installation.
This equipment generates uses and can radiate radio frequency energy and, if not
installed and used in accordance with the instructions, may cause harmful
interference to radio communications.
However, there is no guarantee that interference will not occur in a particular
installation. If this equipment does cause harmful interference to radio or television
reception, which can be determined by turning the equipment off and on, the user is
encouraged to try to correct the interference by one or more of the following
measures:
55
Page 57

• Reorient or relocate the receiving antenna.
• Increase the separation between the equipment and the receiver.
• Connect the equipment to an outlet on a circuit different from that to which the
receiver is connected.
• Consult the dealer or an experienced radio/TV technician for help.
56
Page 58

TROUBLE SHOOTING
Before contacting the after-sales service, perform the following simple checks. They
may save you the time and expense of an unnecessary service call.
When you power your phone on, the following messages appear
Insert SIM Card
• Check that the SIM card is correctly installed. (Try opposite direction)
Phone Locked
• The automatic locking function has been enabled. You must enter the phone’s
password before you can use the phone.
Enter PIN
• You are using your phone for the first time. You must enter the Personal
Identification Number supplied with the SIM card.
• The option requiring that the PIN be entered each time when the phone is
powered on has been enabled. You must enter your PIN and then disable this option
if so required.
Enter PUK
• The PIN code was entered wrongly some times depends on SIM card or
Country in succession and the phone is now blocked. Enter the PUK supplied
by your network operator.
“No service” is displayed
• The network connection was lost. You may be in a weak reception area (in a tunnel
57
Page 59

or surrounded by buildings). Move and try again.
• You are trying to access an option for which you have not taken out a subscription
with your service provider. Contact the service provider for further details.
You have entered a number but it was not dialed
• Have you pressed?
• Are you accessing the right cellular network?
• You may have set an outgoing call barring option.
Your correspondent cannot reach you
• Is your phone switched on ( pressed for more than one second)?
• Are you accessing the right cellular network?
• You may have set an incoming call barring option.
Your correspondent cannot hear you speaking
• Have you switched off the microphone (appears)?
• Are you holding the phone close enough to your mouth? The microphone is located
in the right side of front cover of the phone.
The audio quality of the call is poor
• Check the signal strength indicator in the display. The number of bars after it
indicates the Signal strength from strong to weak.
• Try moving the phone slightly or moving closer to a window if you are in a building.
No number is dialed when you recall a phonebook entry
• Check that the numbers have been stored correctly, by using the Contacts Read
feature.
• Re-store them, if necessary.
58
Page 60

Access Codes
There are several access codes that are used by your phone and its SIM card. These
codes help you protect the phone against unauthorized use.
The access codes (except for the PUK codes) can be changed using the
Security Settings menu options.
Phone Password
The phone password can be set to avoid unauthorized use of the phone. The
password generally supplied with the phone is 0000. You are advised to change it
before you start using your phone.
Keep the new password secret and in a safe place, separate from the phone.
PIN
The PIN (Personal Identification Number) protects your SIM card against
unauthorized use. The PIN is usually supplied with the SIM card. When the PIN
Check feature is enabled, the PIN is needed each time the phone is powered on.
If you key in an incorrect PIN sometimes depends on SIM card or Country in
succession, key in the PUK and press the OK soft key.
Key in a new PIN and press the OK soft key. Key in the new PIN again and
press the OK soft key.
PUK
The PUK (Personal Unblocking Key) is required to change a blocked PIN. The PUK
may be supplied with the SIM card. If not, contact your local service provider.
If you key in an incorrect PUK sometimes depends on SIM card or Country in
succession, the SIM card cannot be used anymore.
Contact your service provider for a new card.
You cannot change the PUK.
User Manual of FXP-860 / FXP-860R / FXP-960 version 1.0 [ENG] 13/6/2012
Copyright 2012, Motorola Inc., All rights reserved.
59
Page 61

FCC Regulations:
FCC Regulations:
FCC Regulations:FCC Regulations:
This mobile phone complies with part 15 of the FCC Rules.
Operation is subject to the following two conditions: (1) This device
may not cause harmful interference, and (2) this device must accept
any interference received, including interference that may cause
undesired operation.
This mobile phone has been tested and found to comply with the
limits for a Class B digital device, pursuant to Part 15 of the FCC
Rules. These limits are designed to provide reasonable protection
against harmful interference in a residential installation. This
equipment generates, uses and can radiated radio frequency energy
and, if not installed and used in accordance with the instructions,
60
Page 62

may cause harmful interference to radio communications. However,
there is no guarantee that interference will not occur in a particular
installation If this equipment does cause harmful interference to
radio or television reception, which can be determined by turning the
equipment off and on, the user is encouraged to try to correct the
interference by one or more of the following measures:
-Reorient or relocate the receiving antenna.
-Increase the separation between the equipment and receiver.
-Connect the equipment into an outlet on a circuit different from that
to which the receiver is connected.
-Consult the dealer or an experienced radio/TV technician for help.
FCC Caution:
61
Page 63

Any Changes or modifications not expressly approved by the party
responsible for compliance could void the user‘s authority to operate
the equipment.
The antenna(s) used for this transmitter must not be co-located or
operating in conjunction with any other antenna or transmitter.
62
Page 64

4444RF Exposure Information (SAR)
RF Exposure Information (SAR)
RF Exposure Information (SAR)RF Exposure Information (SAR)
This mobile phone meets the government’s requirements for
exposure to radio waves.
This phone is designed and manufactured not to exceed the
emission limits for exposure to radio frequency (RF) energy set by
the Federal Communications Commission of the U.S. Government.
The exposure standard for wireless mobile phones employs a unit of
measurement known as the Specific Absorption Rate, or SAR. The
SAR limit set by the FCC is 1.6W/kg. *Tests for SAR are conducted
using standard operating positions accepted by the FCC with the
phone transmitting at its highest certified power level in all tested
frequency bands. Although the SAR is determined at the highest
certified power level, the actual SAR level of the phone while
63
Page 65

operating can be well below the maximum value. This is because
the phone is designed to operate at multiple power levels so as to
use only the poser required to reach the network. In general, the
closer you are to a wireless base station antenna, the lower the
power output.
For complying with the FCC RF exposure limit, please keep the
phone away at least 2.5cm from your body during the usage. The
FCC has granted an Equipment Authorization for this model phone
with all reported SAR levels evaluated as in compliance with the
FCC RF exposure guidelines. SAR information on this model phone
is on file with the FCC and can be found under the Display Grant
section of www.fcc.gov/oet/ea/fccid after searching on FCC ID:
WVB-FXP860. The highest reported SAR value for this model is
0.219 W/kg.
64
 Loading...