

Page 1

User Manual
USER’S GUIDE
This page is intentionally left blank
FX1900P
Dual band wireless local loop phone
1
Page 2

WELCOME
Congratulations on the purchase of your Motorola FX-803C product!
Please retain your original dated sales receipt for your records.
For warranty service of your Motorola FX-803C product, you will need to provide a
copy of your dated sales receipt to confirm warranty status.
Thank you for choosing a Motorola product.
Please read important safety instructions before use.
Read and understand all instructions before use.
Please retain this guide for future reference.
Index
1. KNOW YOUR PHONE .....................................................................................7
1.1 Unpack........................................................................................................7
1.2 Keypad........................................................................................................7
1.3 Installation...................................................................................................9
1.4 Power Supply..............................................................................................9
1.5 Switching Power .......................................................................................10
1.6 Connecting to Network..............................................................................10
2. FEATURE HIGHLIGHTS................................................................................ 11
3. BASIC OPERATIONS....................................................................................12
3.1 Making Calls .............................................................................................12
3.2 Receive a Call...........................................................................................12
3.3 Hang up a Call ..........................................................................................12
3.4 Menu during Conversation........................................................................12
3.5 Menu Tree.................................................................................................12
4. TEXT INPUT...................................................................................................16
2
4.1 Multitap Input ............................................................................................17
4.2 Numbers Input ..........................................................................................17
4.3 eZiText Input .............................................................................................18
4.4 Symbols Input ...........................................................................................18
5. CONTACTS....................................................................................................19
3
Page 3

5.1 Add a Contact ...........................................................................................19
7.1 Recent Call Icons......................................................................................28
5.2 Search for a Contact.................................................................................20
5.3 View a Contact..........................................................................................21
5.4 Modify a Contact .......................................................................................21
5.5 Erase a Contact ........................................................................................21
5.6 Speed Dial Number...................................................................................21
5.6.1 Add a Speed Dial Number..................................................................22
5.6.2 Dial a Speed Dial Number..................................................................22
5.7 Check Memory Status...............................................................................22
5.8 Erase All Contacts.....................................................................................22
6. MESSAGES ...................................................................................................23
6.1 Edit Short Messages.................................................................................23
6.2 Inbox .........................................................................................................24
6.2.1 View Messages ..................................................................................24
6.2.2 Save Phone Number from Message ..................................................24
6.2.3 Receive New Message ......................................................................24
6.2.4 Full Inbox............................................................................................25
6.3 Outbox ......................................................................................................25
6.4 Send to Multi-receivers .............................................................................25
6.5 Delete Messages ......................................................................................26
6.6 Preset Messages ......................................................................................26
6.7 Voice Mail..................................................................................................26
6.8 Short Message Settings............................................................................27
7. RECENT CALLS............................................................................................28
7.2 View Recent Calls.....................................................................................28
7.3 Delete an Entry .........................................................................................29
7.4 Delete All...................................................................................................29
7.5 Send Message from Recent Calls ............................................................29
7.6 Edit Phone Number of Recent Calls .........................................................29
7.7 Dial from Recent Calls ..............................................................................29
8. SETTINGS......................................................................................................30
8.1 Sound........................................................................................................30
8.2 Display ......................................................................................................30
8.3 Alert...........................................................................................................31
8.4 Call Timers................................................................................................32
8.5 Security .....................................................................................................32
9. EXTRA ...........................................................................................................34
9.1 Games ......................................................................................................34
9.1.1 BlackJack ...........................................................................................34
9.1.2 Video Poker........................................................................................34
9.1.3 Teris....................................................................................................35
9.2 Stop Watch................................................................................................35
9.3 Alarm.........................................................................................................35
9.3.1 Alarm Setting......................................................................................35
9.3.2 Turn off the Alarm ...............................................................................35
9.4 Scheduler..................................................................................................36
9.4.1 Add New Scheduler ...........................................................................36
4
5
Page 4
9.4.2 View the Scheduler ............................................................................36
9.4.3 Modify the Scheduler .........................................................................37
1. KNOW YOUR PHONE
9.4.4 Delete the Scheduler..........................................................................37
9.4.5 Set Options.........................................................................................37
9.5 Calculator..................................................................................................38
10. DATA SERVICES .........................................................................................39
11. FAILURE ANALYSIS....................................................................................42
12. TECHNICAL INFORMATION.......................................................................43
12.1 Specific Absorption Rate Data ................................................................43
12.2 Technical Specifications..........................................................................44
13. SAFETY INFORMATION .............................................................................45
14. WARRANTY.................................................................................................50
15. REGULATORY.............................................................................................54
16. FCC NOTICE TO USERS ............................................................................55
1.1 Unpack
Parts Quantity
Phone(FWP) set 1
Handset (Receiver) 1
Ni-MH Battery 1
External Power Adapter 1
Antenna 1
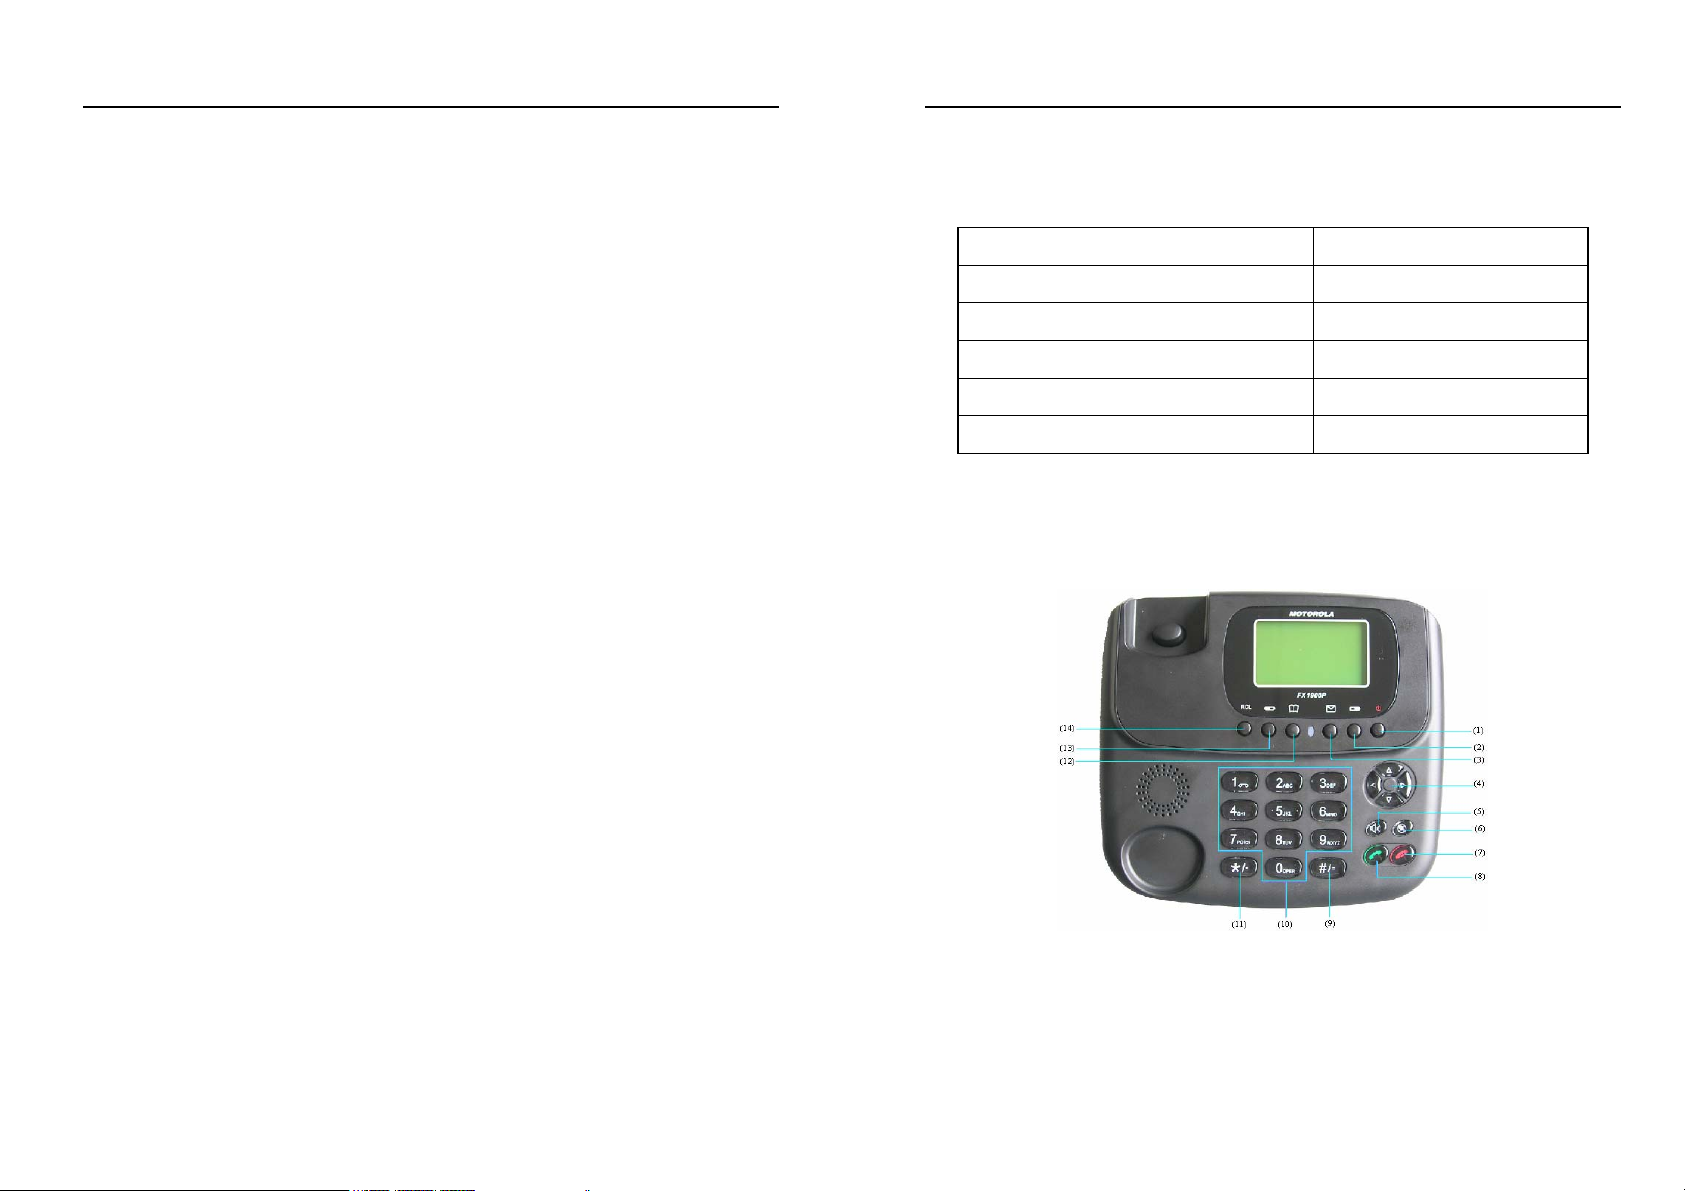
1.2 Keypad
6
7
Page 5
1
2
key Power switch
Under the status of text editing,
DEL/QUIT key
clearing all the existing text by pressing
and holding it, or clearing the letter
before cursor. Under other status,
returning to the previous menu.
Note:
◆
Keys in this manual may shape different from actual ones on your phone.
◆ “Press the key” in manual means pressing certain key once, “Hold the key”
means pressing key for 2 or 3 seconds.
3
4
5
6
7
8
9
10
11
12
Message key
Direction
Mute key
End
Send
# key
0-9 number keys
* key
Contact key
Press this key to enter Messages
menu.
Move the cursor or scroll Scrolling the
menu, or moving the cursor as
inputting the text. Adjust the volume.
Adjust the volume in idle mode or
during a conversation.
In idle mode, press left acting as the
shortcut for recent calls (all call
records); press right acting as the
shortcut for menu.
Handfree key.
Used to be silent sound mode.
Hanging up the terminal during a
conversation; returning to idle mode;
Sending or receiving a call. In idle mode,
acting as the shortcut for call history (all
call records).
In idle or dialing mode, press this key to
input corresponding digital, press and hold
this key to input Pause signal
In idle or dialing mode, press these keys
to input the phone number..
In idle or dialing mode, press this key to
input corresponding digital.
When input method invoked, press this
key to input special char.
Press this key to enter Contacts menu.
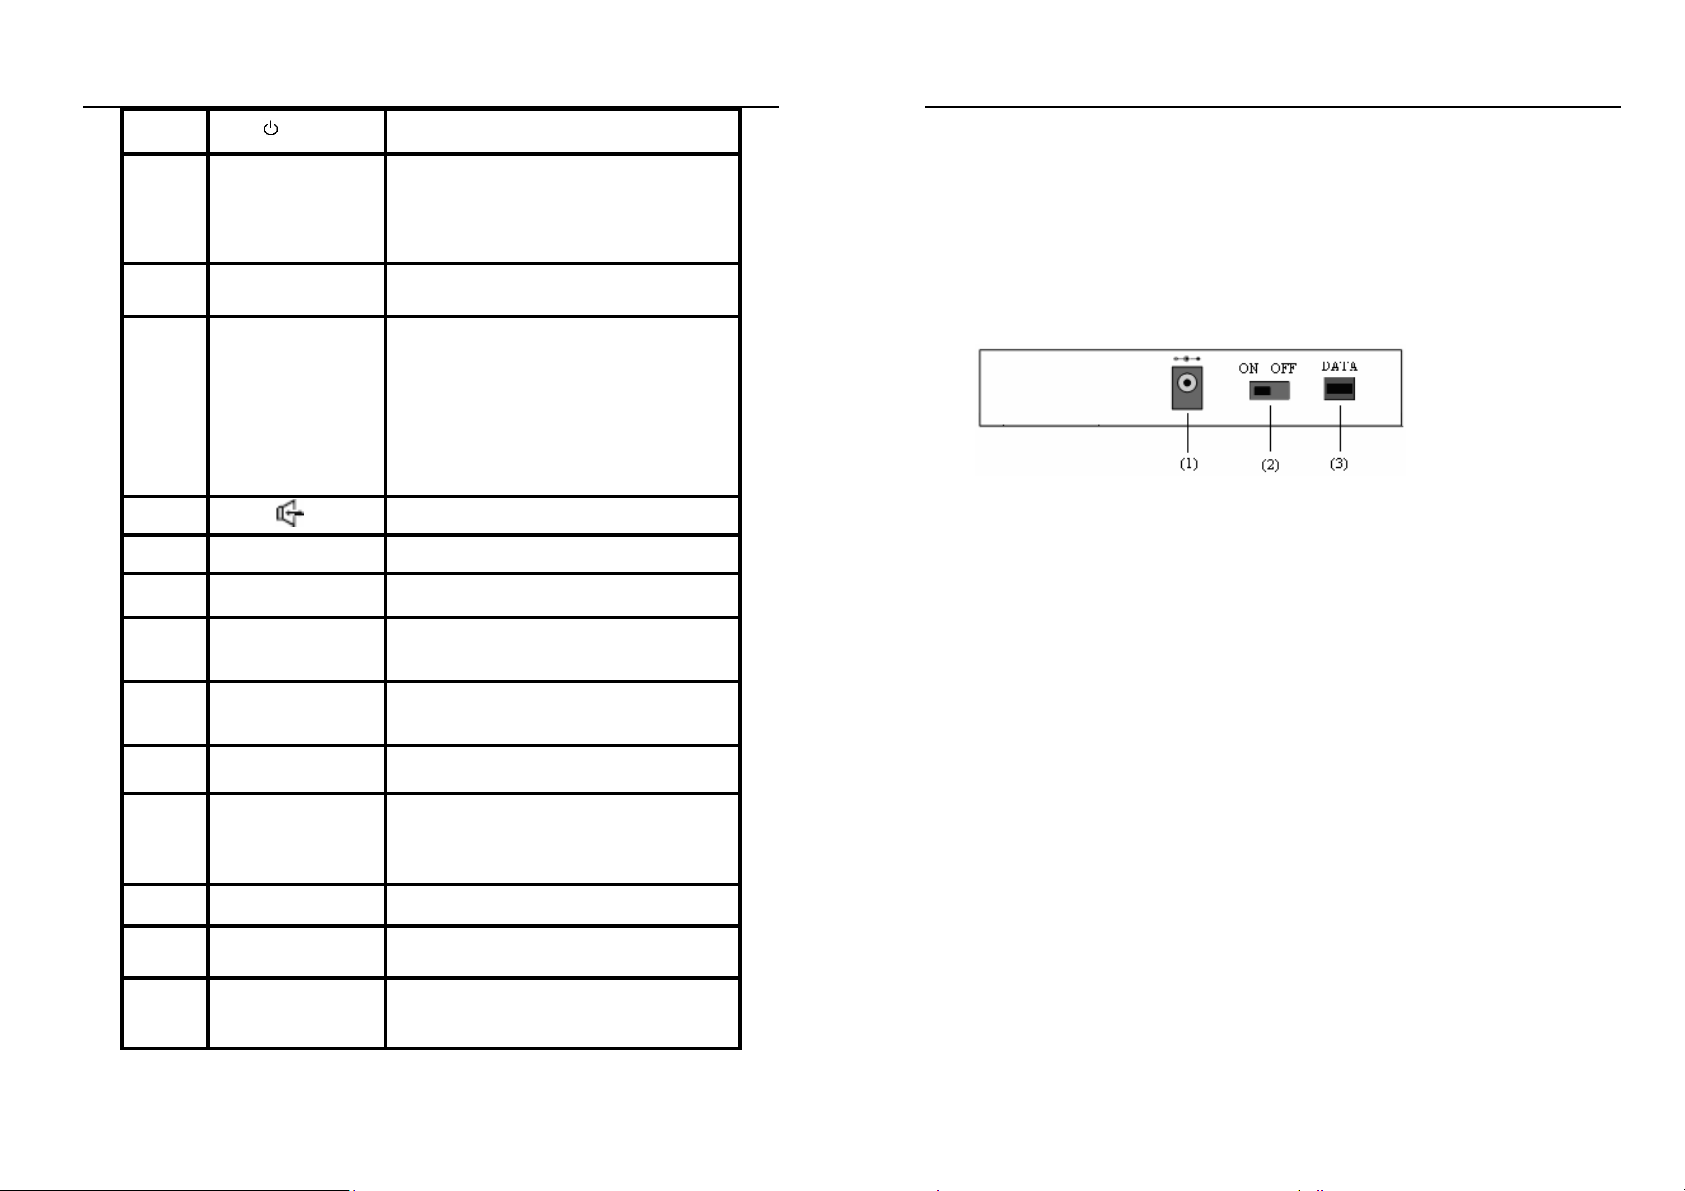
1.3 Installation
Rear view of FX1900P:
(1) External power socket
(2) Toggle switch
(3) Data interface DATA
1. Receiver:
Connect phone set and receiver with the handset cord.
2. Antenna:
Install antenna to antenna connector ANT. Hold the plastic stick of the antenna and
rotate the metal screw cap in clockwise direction to fix it up. Do not rotate antenna
directly.
3. Adapter:
Connect the lead from the external power adapter to socket at rear back of phone
set and connect adapter to an external AC socket.
13
14
Menu/Ok
RCL key
Entering the menu or selecting from the
menu
Press this key to enter All Recent Calls
menu.
8
Good ground may guarantee phone’s reliable performance.
1.4 Power Supply
There are two ways of power supply:
9
Page 6

1. External power supply
2. Spare rechargeable battery supply
As usual, suggest make use of external power supply. When power down or
unavailable power supply nearby, you can use battery for backup.
With external power supply connection and power on the phone, FWP can
automatically detect battery’s current capability and charge the battery accordingly.
At that time, external power adapter becomes hot. It is normal.
Note: When the battery is in low-voltage, FWP may not work normally:
- In state of standby, FX1900P alerts.
- During a call, alert may interrupt your call.
- FX1900P powers off automatically when in extreme low-voltage.
1.5 Switching Power
Slide the Toggle switch at rear of the phone to “ON” to power on battery, and to
“OFF” to power off battery supply.
Power-on: Press and hold button
Power off: Press and hold button
Note: Power cut can cause unexpected the phone restart, in this situation
disconnect and reconnect external power adapter, and then switch on the phone.
Slide the Toggle switch at rear of the phone to “OFF” position to power off battery
supply, or remove battery if the phone won’t be in use for a long time.
key, to power on the phone.
key, to power off the phone.
1.6 Connecting to Network
2. FEATURE HIGHLIGHTS
• Dial tone generation
• Auto Dialing
• Voice mail
• Short Message Service
• Emergency call
• Call logs
• Caller ID
• Alarm clock
• Calculator
• Scheduler
• Stop Watch
• Multi-ring tone
• Speaker phone
• Multi-language (English, Spanish, It may vary by market)
• 200 Phone Book memory
• Rechargeable battery
Power-on FWP, the phone automatically searches for the network. If connected,
FWP enters standby state.
Note: If “Emergency Mode” appears on the screen, then you can only send
emergency calls.
10
11
Page 7

3. BASIC OPERATIONS
3.1 Making Calls
You can make a call in any of the following ways:
1. Direct dial.
2. Dial from recent calls.
Direct dial
Enter the desired telephone number in idle mode and press “Send” to dial.
Dial from recent calls
1. Press “Menu/Ok” key in idle mode to access Recent Calls.
2. Press “▲/▼” key to select Missed Calls, Incoming Calls, Outgoing Calls and All
Recent Calls, Select the desired number.
3.2 Receive a Call
When a call is incoming, pick the handset up to receive it or press “ ” key to
Handfree it, press “End” Key to reject the incoming call.
3.3 Hang up a Call
Press “End” Key to hang up a call during conversation.
3.4 Menu during Conversation
services to which you have subscribed and the accessories you are using. If you
have any questions, please call your service provider.
1. Contacts
2. Add to phone
3. In phone
4. Personal
5. Business
6. Speed dial list
7. Memory status
2. Message
1. Find
8. Erase all
According to name
According to number
Phone
Email
Address
Web page
Back
In phone
During conversation, the other side can not hear your voice when you press “Mute”
key; Press “Mute” key again to return to normal conversation.
During conversation, press “Mute” key, the operation will not end the conversation.
3.5 Menu Tree
Your phone’s menu may differ from the following list, depending on the network
12
4. Send to multi
5. Erase message Back
1. Create message
2. Inbox
3. Outbox
Add receiver
List ok
13
Page 8

6. Pref Msg
7. Voice Mail
3. Recent calls
4. Settings
8 Message Settings
1. Missed Calls
2. Incoming Calls
3. Outgoing Calls
4. All Recent Calls
5. Delete All Calls
Entire inbox
Entire outbox
Old inbox
1. Voice mail number
2. Message alert
3.Auto erase inbox
1. Volume
3. Alert
4. Call Timers
5. Extra
1. Games
2. Stop Watch
3. Alarm
5. Security
4. Contrast
5. Menu Format
6. Time Format
7. Date Format
8. Screensaver
1. Missed Call
2. Roaming
3. Minute Alert
1. Outgoing Calls
2. Incoming Calls
3. All Calls
1. Sound
2. Display
14
2. Alert Type
3. Ringer Type
4. Key Beep
5. Key Tone Length
6. SMS Ringer Type
7. Clock Ringer Type
1. Backlighting
2. Banner
3. Language
4. Scheduler
5. Calculator
5. Data Service
15
Page 9

4. TEXT INPUT
Your phone offers text input modes: Multitap Input (abc/ABC), Numbers Input (123),
eZiText Input (eng), and Symbol Input (Symbols). Input mode includes capital letter
and lowercase mode.
You can key in letters, digits, characters and symbols when writing text or editing
contact record information in Names or Messages etc., following the common
instruction in hereinafter table.
Operation Method
Input Letters
Multitap (abc/ABC) Input—“abc/ABC”, press
corresponding letter key till the letter appears.
Input Space
Erase Character
Move cursor left or
right
Change input mode
4.1 Multitap Input
corresponding digit key to enter.
Or press “1” key till the symbol (common
symbols) appears except for Numbers Input
mode.
Press 0 key, except for being in numbers mode.
Press DEL/QUIT key.
Press Left/Right key.
Press # key to select another text mode.
Input Words
Input Digits
Input Symbol
eZiText Input—“eng”, press any key once to key
in any word.
Numbers Input—“123”, press digit key once.
Symbols Input —Press * key to enter the
symbols mode, press Up/Down key or
Left/Right key to page up/down and press
16
Select Multitap Input (abc/ABC) — Each key stands for multiple letters. Press key
till your letter appears. When the cursor moves, enter the next letter.
4.2 Numbers Input
Select Numbers Input (123) — Press the corresponding key once to input the
number. In Numbers input mode, you can not enter space.
17
Page 10

4.3 eZiText Input
Select eZiText Input (eng) — Predictive word input is based on a built-in dictionary.
One letter asks for pressing only once.
Press the digit key corresponding to the letters once till the word appears on the
screen.
If the word displayed is not the word you want, press Left/Right key or Up/Down
key to look for another matching word. Then press Speaker/Ok key to confirm.
4.4 Symbols Input
• Press 1 key to input till the symbol appears. Most common punctuation
marks and special characters are available.
Or select Symbols mode by pressing * key:
• Press Up/Down key to page up/down. And press digit key to enter
corresponding symbol.
Note: in text input, press * key twice will enter Set Idiom menu.
5. CONTACTS
You can save names and phone numbers in the terminal. Up to 200 entries can be
stored in the terminal. Five methods of storing number are available: Work, Home,
Phone, Pager and Other.
For easy search, contacts are divided into 2 groups: Personal Group and Business
Group.
Contacts Icons
Icons Descriptions Icons Descriptions
Work
phone
Email
Web Page Pager
5.1 Add a Contact
Home
Other(phone
number)
Address
18
5.1.1 Store in the terminal
1. Select Menu
2. Select the information you want to add: Phone, Email, Address, Web Page.
3. Press “Menu/Ok” Key twice and select Next , input the name.
4. After inputting, select Next.
5. Scroll the highlight to the information which was added just now ( such as phone ),
Contacts Add to Phone .
19
Page 11

then press “Menu/Ok” You can continue other operations, such as Edit, Erase,
Send text msg, Number Type, or Add to Speed Dial.
6. Scroll the highlight to Options , press “Menu/Ok” key to confirm.
z Add New: Add new information.
z Edit Name: Edit the name of contact.
z Classify Contact: Divide the information into Personal and Business.
z Erase Contact: Erase the new record.
5.1.2 Store in idle mode
Input the name to be searched, and then press “Menu/Ok” Key.
Use “
▲/▼” Key
Search by Number
1. Press “Menu/Ok” Key in idle mode to enter Contacts
According to number .
Input the phone number to be searched, and then press “Menu/Ok” Key.
2. Use “▲/▼” Key to select the contact you want to search.
Search by Group
1.Press “Menu/Ok” Key in idle mode to enter Menu
to select the contact you want to search.
Find
Contacts
Input the phone number in idle mode, press “◄ / ►” Key
Existing, then press “Menu/Ok” key to the next operation.
Note:
Under the editing status,press
the screen one by one, or hold
inputson the screen.
“DEL/QUIT” Key
“DEL/QUIT” Key
to select To Phone , To
to clear the inputs on
to clear all the
5.2 Search for a Contact
This terminal provides four methods to search a phone number: direct search,
search by name, search by number and search by group.
Direct Search
Press “Menu/Ok” Key on the idle screen to enter Contacts
All the contacts are listed, and use “
search.
Search by Name
Press “Menu/Ok” Key in idle mode to enter Contacts
According to name.
▲/▼” Key
to select the name you want to
In Phone .
Find
Personal / Business .
2. Use “▲/▼” Key to select the contact you want to search.
5.3 View a Contact
1. Search the contact you want to view (Refer to "Search for a contact").
2. Press “Menu/Ok” Key to view the details of the contact. At this point, use “
to select the number, and press “Send
Key
to dial the number.
” Key
5.4 Modify a Contact
1. Search the contact you want to view (Refer to "Search for a contact").
2. View the contact you want to modify (Refer to "View a contact").
3. Edit the contact. The operation is the same as "Add a contact".
5.5 Erase a Contact
1. Search the contact you want to view (Refer to "Search for a contact").
2. View the contact you want to erase (Refer to "View a contact").
3. Select Options
Erase Contact.
5.6 Speed Dial Number
There are totally 8 speed dial numbers in the terminal, ranging from 2 to 9.
▲/▼”
20
21
Page 12

5.6.1 Add a Speed Dial Number
6. MESSAGES
1. View the contact you want to modify (Refer to "View a contact").
2. Press
to Select Add to Speed Dial .
5.6.2 Dial a Speed Dial Number
In idle mode, press and hold the corresponding numeric keys to dial the phone
number.
Note:
or ▼ to scroll to your desired record, press “Menu/Ok” Key
▲
Press “Menu/Ok” Key in idle mode to enter
Menu
speed dials.
Contacts Speed Dial List to view the list of all the
5.7 Check Memory Status
In idle mode, press “Menu/Ok” Key to enter Menu Contacts
Memory Status .
5.8 Erase All Contacts
1. In idle mode, press “Menu/Ok” Key to enter Menu Contacts
Erase All.
2. Select In Phone or Back to cancel this step.
This function enables you to send, view, reply, forward, send to multi-receivers and
delete the short messages. The received short message are stored in the inbox,
and unsent or sent short messages are stored in the outbox.
Enter "Messages":
In idle mode, select Menu to enter, and then press
“Menu/Ok” Key to enter, or press “Message” Key directly to enter.
to select Messages, press
▲/▼
6.1 Edit Short Messages
After editing a short message, you can send it immediately, or save it as draft.
1. Enter "Messages", select Create Message .
2. Input the text, press “Menu/Ok” Key and
3. Input number of the recipient or select from Contacts.
4. Press Continue
Outbox ; select Send to multireceiver to send it to several recipients (Refer to
"Send to Multi" chapter).
Send to send it immediately; select Save to save it in
“►” Key to set Priority and Pref Msg.
22
23
Page 13

6.2 Inbox
the idle screen.
Icons in the inbox
Icons Descriptions
Unread Messages
Read Messages
Emergent Messages
6.2.1 View Messages
1. Enter "Messages", select Inbox.
2. P r e s s
to choose the desired short message and press
▲ / ▼
“Menu/Ok” Key to view.
3. During viewing, press
or ▼ to view the whole message; press
▲
e/f
Reply / Forward / Next / Erase / Sender.
6.2.2 Save Phone Number from Message
1. Enter the message you want to view, press “
2. Press “Menu/Ok” Key and “
►” Key
to select Call to dial this phone number.
►” Key
to select Sender .
3. Choose Reply to reply to the sender.
4. Select To Phone to save the phone number of sender in your terminal.
to select
6.2.4 Full Inbox
1. The messages in the inbox
"The Message memory is approaching capacity.
≥
15.
You may wish to delete some old messages." will be displayed on the screen
when a new message comes. Select Menu/Ok to exit; select Erase old to enter
inbox directly, and press
2. The messages in the inbox
to delete the messages.
▲/▼
= 20 . "The last text message was rejected. You
may wish to delete some old messages." will be displayed on the screen and
" flicks on the status bar when a new message comes. Select Menu/Ok to
"
exit, select Erase old to enter inbox directly, and press
to delete the
▲/▼
messages.
6.3 Outbox
Icons in outbox
Icons Descriptions
In the outbox, you can view all the sent & unsent messages.
1. Enter "Messages", and select Outbox .
2. Press “
to select the desired message and then press “Menu/Ok” Key to
▲/▼”
view.
Sent Messages
Unsent Messages
5. Select To Existing to save the phone number of sender in existed records.
6.2.3 Receive New Message
1. The system will alert upon receiving a new message. Select View to go into the
inbox directly; select Ignore to exit the menu.
2. If there are unread messages in the inbox, "
" will appear on the status bar on
24
3. Press “◄/►” Key to select Erase
/ Send / Forward / Edit
(
only the unsent
message can be edited).
6.4 Send to Multi-receivers
1. Enter "Messages", and select Send to Multi .
2. Select Add Receiver and add 10 receiver numbers at most; You can add the
phone number directly or press “Menu/Ok” Key and “►” Key
Contacts.
25
to add from the
Page 14

3. Press “Menu/Ok” Key to confirm, select List OK to edit the message
text to send.
Note:
The function requires network support.
Note:
1. You can delete or edit the phone numbers of the list.
2. You can [Resend] or [
] the number which is failed to send.
Abort
6.5 Delete Messages
Enter "Messages", select Erase Messages and then Entire Inbox / Entire Outbox
/ Old Inbox.
6.6 Preset Messages
There are some common messages stored in your terminal for you to select and
send directly, or send after editing. You can also insert it as writing a message.
The operation of inserting the message is as below:
1. Enter "Messages", select Create Message .
2. Input the text and then press “Menu/Ok” Key and “► ” Key
select Pref Msg , select the desired messages.
3. Select Continue to input the phone number of receiver, press Continue
Send to send the message or select the phone number from
Contacts and then press “Menu/Ok” Key to send.
to
6.7 Voice Mail
Please consult your network service provider before use. If a new voice message is
received, the system will send a text message to your terminal automatically. View
the message and dial the number to listen to the voice mail.
6.8 Short Message Settings
You can set the short message functions based on your own needs.
Voice Mail Number
Note:
Consult your network service provider for the specific number.
1. Enter "Messages", select Message Settings Voice Mail Number .
2. Select Yes to add the number and then press “Menu/Ok” Key .
Message Alert
Set alert mode when a new message comes. You may select Alert Once or Alert &
Remind .
z Alert Once : Only alert once when a new message comes.
z Alert & Remind : When a new message is not acknowledged, the terminal will
ring per minute to remind the user until it is acknowledged.
Note:
The message alert can be set in [Sound] of [Settings]. "Vibe+Ringer"
and "vibration" can only be used as incoming call alert.
Auto Erase Inbox
When Enable is activated and the inbox is full, the messages read earliest will be
automatically deleted when a new message comes.
Hold
to dial the voice mail number to read the voice mail.
26
27
Page 15

7. RECENT CALLS
In idle mode, press “RCL” Key to enter the list of All Recent Calls .
Press▲or▼to scroll to your desired record, and press “Menu/Ok”
Recent incoming calls, missed calls and outgoing calls are saved in Recent Calls.
The earliest call will be deleted automatically when the records are full.
7.1 Recent Call Icons
Icons Descriptions
Missed Calls
Incoming Calls
Outgoing Calls
All Recent Calls
7.2 View Recent Calls
Two methods are available to view recent calls.
View from Menu
1. In idle mode, press “Menu/Ok” Key to enter the main menu, press
“
to select Recent Calls and press “Menu/Ok” Key to enter.
▲/▼”
2. Press▲or▼to scroll to the desired type of recent calls (Missed Calls, Incoming
Key and Call Information to view the detailed information
7.3 Delete an Entry
1. Enter the call list ( see "View Recent Calls" ).
2. Press ▲ or ▼ to scroll to the desired record, and then press
“Menu/Ok” Key to select Delete Entry .
7.4 Delete All
1. In idle mode, press “Menu/Ok” Key to enter Menu Recent Calls
Delete All Calls.
2. Select Missed Calls / Incoming Calls / Outgoing Calls / All Recent Calls to delete.
7.5 Send Message from Recent Calls
1. Enter the call list (see section "View Recent Calls").
2. Press▲or▼to scroll to the desired number and then press
“Menu/Ok” key to select Send text msg.
7.6 Edit Phone Number of Recent Calls
1. Enter the call list ( see section " View Recent Calls ").
2. Press ▲or ▼ to scroll to the desired number and then press “Menu/Ok” key to
select Edit Number; After the editing, you could dial the edited number.
Calls, Outgoing Calls, All Recent Calls), press “Menu/Ok” Key enter the call list of
the selected type.
3. Press▲or▼to choose the desired record, and then press “Menu/Ok” Key and
Call Information to view the details.
Quick View
28
7.7 Dial from Recent Calls
1. Enter the call list ( see section "View Recent Calls").
2. Press▲or▼to scroll to the desired number and then press “Menu/Ok” and “Send”
Key to dial.
29
Page 16

8. SETTINGS
press ▲/▼to select the desired contents to enter:
In idle mode, press “Menu/Ok” Key to enter Menu, and press “▲/▼” to select
Settings.
8.1 Sound
In idle mode, press “Menu/Ok” Key to enter Settings Sound, then press ▲/▼
to select the desired contents:
Press ▲/▼ to select "Volume", then
Volume
Alert Type
Ringer Type
Key Beep
Key Tone
Length
SMSRinger
Type
ClockRinger
Type
press “Menu/Ok” Key to enter, press
▲/▼ to select the volume mode, use
“▲/▼” Key to adjust the volume.
Enter "Alert Type", press “▲/▼” to
select
Key to save.
Select the ringer type, press
“Menu/Ok” Key to save.
Enter "Key Beep", press “▲/▼” to
select Tones or
Key to save.
Enter "Key Tone Length", press ▲/▼
to select
“Menu/Ok” Key to save.
Select the alert when a new message
comes, press “Menu/Ok” Key to save.
Select the alert of ring, press
“Menu/Ok” Key to save.
Ringer
Normal
or
, press “Menu/Ok”
Off
, press “Menu/Ok”
Off
or
Long
, press
Backlighting
Select Off / 10s / 30s / 10s and in call / 30s and in call, press “Menu/Ok” Key to
save.
Banner
View and edit the banners.
Language
Press “▲/
Contrast
Press “▲/
Key to save.
Menu Format
Press “▲/
“Menu/Ok” Key to save.
Time Format
Press “▲/
Data Format
Press “▲/
“Menu/Ok” Key to save.
Screensaver
Press “▲/
Key to save.
to select
▼”
or “◄/►” Key
▼”
to select large icons or small icons of the main menu, press
▼”
to select AM / PM or 24HR , press “Menu/Ok” Key to save.
▼”
▼”
to select the type and timeout of the screensaver, press “Menu/Ok”
▼”
Spanish
to select MM/DD/YYYY, DD/MM/YYYY, YYYY/MM/DD, press
or
English
to adjust the contrast of the screen, press “Menu/Ok”
, press “Menu/Ok” Key to save.
8.3 Alert
8.2 Display
In idle mode, press “Menu/Ok” Key to enter Settings Display, then
30
In idle mode, press “Menu/Ok” Key to enter Settings Alert:
Missed Call
31
Page 17

Select if the alert is needed when there is a missed call.
Keypad Password change
Roaming
Select if the alert is needed when the terminal is roaming.
Minute Alert
Alert is on before each minute during call or alert is turn off.
8.4 Call Timers
In idle mode, press “Menu/Ok” Key to enter Settings Call Timers:
Outgoing Calls
The total duration of all outgoing calls. It can be reset to zero.
Incoming Calls
The total duration of all incoming calls. It can be reset to zero.
All Calls
The total duration of all calls. It can be reset to zero.
8.5 Security
The PIN code is needed to enter the security. Generally, the default PIN code is:
"0000". Please modify it to a private PIN Code as soon as possible.
Phone Reset
When you select "Phone Reset", all the settings will be reset to their default value.
Note:
Contents such as password, contacts, recent calls and alarm will not be deleted.
PIN Change
Input new PIN code.
Press “Menu/Ok” Key to input the new PIN code again.
Input new Keypad Password code.
Press “Menu/Ok” Key to input the new Keypad Password code again.
Press “Menu/Ok” Key to confirm.
Phone Password change
Input new Phone Password code.
Press “Menu/Ok” Key to input the new Phone Password code again.
Press “Menu/Ok” Key to confirm.
Press “Menu/Ok” Key to confirm.
32
33
Page 18

9. EXTRA
9.1.3 Teris
Enter "Extra": in idle mode, press “Menu/Ok” Key to enter Menu Extra.
9.1 Games
"BlackJack", "Video Poker" and "Teris" are provided.
9.1.1 BlackJack
Enter "BlackJack", and the game instruction appears on the screen. Press
Menu/Ok to enter New or select Continue to continue the last game.
z Deal: Start the new game, the banker is on the upper screen and the player is on the
lower screen.
z Bet: Select the sum of ante.
9.1.2 Video Poker
Enter "Teris" to start a new game.
z Press “
z Press “
z Press “
z Press
” Key to move the falling squares to the left / right.
◄/►
▲” Key
▼” Key
“DEL/QUIT” key to exit.
to rotate the squares clockwise.
to drop the squares rapidly.
9.2 Stop Watch
This function is used for timing.
1. Enter "Extra", select Stopwatch to enter.
2. Press “Menu/Ok” Key to select Start to begin to keep time.
3. Press “Menu/Ok” Key again to stop keeping time.
4. Select Start to continue. Select Reset the timer will be set to 0.
9.3 Alarm
9.3.1 Alarm Setting
1. Enter "Extra", and then select Alarm to enter.
2. Press “
time, press “
“Menu/Ok” Key to confirm.
◄/►
” Key
to select Set , press alphanumeric keys or “
” Key to switch between hour and minute, then press
◄/►
▲/▼”
to input the
Enter "Video Poker", and the game instruction appears on the screen. Press
Menu/Ok to enter New or select Continue to continue the last game.
z Deal: Start the new game.
z Bet: Select the sum of ante.
z Payout: Display the cash sum of different kinds of cards.
34
3. Press “
◄/►
to select the alarm mode Once / Daily / Weekdays, press
”
“Menu/Ok” Key to confirm.
9.3.2 Turn off the Alarm
1. Enter "Extra", and then select Alarm to enter.
2. Select Disable to turn off the alarm.
35
Page 19

Note:
1. Set the alarm ringing in the specified time. The alarm can work only
when the terminal is turned on.
2. Select [
] to turn off the alarm when it is ringin; select [Snooze]
OFF
Press “
enter.
Press
◄/►
“▲/▼”
” or
“▲/▼”
to select the date you want to view and enter it.
to select the desired date, and then press “Menu/Ok” to
9.4 Scheduler
9.4.1 Add New Scheduler
1. Enter "Extra", and then select Scheduler
2. Input the name of new scheduler, press “Menu/Ok” Key to confirm.
3. Select Next , then press “
“
” to switch between hour and minute.
◄/►
4. Press “
5. Press “
turn off the alarm.
6. Press “Menu/Ok” to confirm the settings, input the contents of events and then
select Next.
9.4.2 View the Scheduler
View the scheduler per day or per month.
View Day
View the scheduler per day.
Enter "Extra", and select Scheduler
Press “
◄/►
press “Menu/Ok” Key to view the details.
View Month
View one day in different months.
” to select Duration, then press “
◄/►
” to select Alarm, then press “
◄/►
to select the desired date, press “
” Key
” to set the beginning time of scheduler,press
▲/▼
View Day.
Add Event.
” to set the period of events.
▲/▼
” to set time quantum of alarm or
▲/▼
to select scheduler, then
▲/▼”
9.4.3 Modify the Scheduler
1. Enter the desired scheduler to view (see section "View the Scheduler").
2. Press “
3. Modify the correlative contents in the scheduler, press “
9.4.4 Delete the Scheduler
1. Enter the desired scheduler to view (see section "View the Scheduler").
2. Press “
3. Select Yes to delete the scheduler.
9.4.5 Set Options
Set the default options of the scheduler. Enter "Extra", and then select
Scheduler
Set Work Hours
Set working time, namely, the beginning and ending time of work in scheduler every
day.
Auto Delete
Delete the record time for event after the event happened.
Default Alarm
Set the default of alarm when you add the scheduler.
” to select Edit to enter.
◄/►
”
to select Erase to enter.
◄/►
Options:
Menu/Ok”
to save it.
Enter "Extra", and select Scheduler
View Month .
36
37
Page 20

9.5 Calculator
The calculator enables you to have basic mathematical computation.
10. DATA SERVICES
1. Enter "Extra", and select Calculator to enter.
2. Press number keys to input the desired numbers, press “
operator symbols.
Operator Symbols Notes
Note:
Division Sign
÷
Equal Sign, result
=
Multiply Sign
x
Clear the numbers
inputted and display
C
zero.
The definition of calculator is limited and rounding errors may occur.
Subtraction Sigh
-
Plus Sign
+
.
Radix Point
Change the positive and
negative value of the
±
numbers.
” Key to input the
◄/►
1. Connect FX1900P to PC with usb cable, power on the phone. Double click
CDMA20001x Setup.exe to start installing dialing tool.
Figure 1.
2. Press Next to continue.
Figure 2.
3. Select a disk directory to install.
38
Figure 3.
39
Page 21

4. Rename the shortcut’s folder. Or keep the default name.
Figure 4.
5. Press Install to continue and finish the installation.
Figure 5.
Figure 6
7. Click on Internet. Click the connect button to dial and access internet.
6. Run the CDMA20001x.exe on the desktop. Click on Setting. Enter the user name,
password, and number(Please refer to local service provider for more information.)
40
Figure 7
41
Page 22

11. FAILURE ANALYSIS
Symptoms Possible Causes Solutions
Power- on
Failure
Automatic
power- off
Inadequate
standby
time
Network
connection
failure
Call drop
during a
call
No ring for
a incoming
call
Prompt to
input PUK
Inadequate battery
power
Poor battery contact Re-install the battery
Seriously poor
battery power
Deceasing of battery
performance
Poor network signal Move to other places
Poor network signal Move to other places
Out of the service
area
Poor network signal Move to other places
The terminal is set to
Silence, or the
volume for incoming
call ringtone is set to
0.
UIM card is locked
due to successive
inputting false PIN
code for three times.
Charge the battery
Recharge the battery
Replace the battery
Confirm whether it
is in the CDMA
network service area
Enter [Settings] and
set the mode as
non-mute; or check
ringtone volume.
Contact with
operators.
12. TECHNICAL INFORMATION
12.1 Specific Absorption Rate Data
This model meets international guidelines for exposure to radio waves.
Your mobile device is a radio transmitter and receiver. It is designed not to exceed
the limits for exposure to radio waves recommended by international guidelines.
These guidelines were developed by the independent scientific organization
ICNIRP and include safety margins designed to assure the protection of all persons,
regardless of age and health.
The guidelines use a unit of measurement known as the Specific Absorption Rate,
or SAR. The ICNIRP SAR limit for mobiles devices used by the general public is 2
W/kg and the highest SAR values for this device when tested, were Body: <value>
W/kg, Head: <value> W/kg.>*
As SAR is measured utilizing the device’s highest transmitting power, the actual
SAR of this device while operating is typically below that indicated above. This is
due to automatic changes to the power level of the device to ensure it only uses the
minimum level required to reach the network.
While there may be differences between the SAR levels of various phones and at
42
various positions, they all meet the governmental requirements for safe exposure.
Please note that improvements to this product model could cause differences in the
SAR value for later products; in all cases, products are designed to be within the
guidelines.
The World Health Organization has stated that present scientific information does
not indicate the need for any special precautions for the use of mobile devices. They
note that if you want to reduce your exposure then you can do so by limiting the
43
Page 23

length of calls or using a “hands-free” device to keep the mobile phone away from
the head and body. Additional Information can be found on the websites of the
World Health Organization (http://www.who.int/emf) or Motorola, Inc.
13. SAFETY INFORMATION
Important information on safe and efficient operation.
(http://www.motorola.com/rfhealth).
* The tests are carried out in accordance with international guidelines for testing.
The limit incorporates a substantial margin for safety to give additional protection for
the public and to account for any variations in measurements. Additional related
information includes the Motorola testing protocol, assessment procedure, and
measurement uncertainty range for this product.
12.2 Technical Specifications
z Air Interface Protocol:IS-2000SR1,downward compatible with IS-95A/B.
z Frequency Range: 1900MHZ
z External Interface:a. External power socket
b. Data interface DATA
c. Antenna connector
d. Battery switch ON OFF
z Power Supply:100V-240V ( AC)
z Voice Coding: 8K EVRC
z Dimension (Length × Width × Thick):200mm*175mm*72mm
z Battery:
Continuous Standby Time: Approx. 100 hours (Subject to Network).
Continuous Talk Time: Approx. 3 hours (Subject to Network).
Please refer to the real objects for the related parameters about the battery
and charger.
Read this information before using your phone.
• Exposure to Radio Frequency (RF) Energy. Your phone contains a
transmitter and a receiver. When it is ON, it receives and also sends out radio
frequency (RF) signals. When you communicate with your phone, the system
handling your call controls the power level at which your phone transmits.
Your Motorola phone is designed to comply with local regulatory requirements
in your country concerning exposure of human beings to RF energy.
• Potentially Explosive Atmospheres. Areas with potentially explosive
atmospheres are often but not always posted and can include fueling areas
such as below decks on boats, fuel or chemical transfer or storage facilities, or
areas where the air contains chemicals or particles, such as grain dust, or
metal powders. When you are in such an area, turn off your wireless device,
and do not remove, install, or change batteries. In such areas, sparks can
occur and cause an explosion or fire.
• Operational Precautions. To assure optimal phone performance and make
sure human exposure to RF energy is within the guidelines set forth in the
relevant standards; always adhere to the following procedures.
o External Antenna Care. Use only the supplied Motorola approved
antenna. Unauthorized antennas, modifications, or attachments could
damage the phone. Do NOT hold the antenna when the phone is IN
USE. Holding the antenna affects call quality and may cause the phone
to operate at a higher power level than needed. In addition, use of
44
45
Page 24

unauthorized antennas may result in non-compliance with the local
Some digital wireless phones may interfere with some hearing aids. In the
regulatory requirements in your country.
o Phone Operation. When placing or receiving a phone call, hold your
phone as you would a wireless telephone. To maintain compliance with
RF energy exposure guidelines, ensure the phone antenna is at least 8
inches (20 centimeters) from your body when transmitting.
o Approved Accessories. Use of accessories not approved by Motorola,
including but not limited to batteries and antennas, may cause your
phone to exceed RF energy exposure guidelines.
o RF Energy Interference / Compatibilities. Nearly every electronic
device is susceptible to RF energy interference from external sources if
inadequately shielded, designed, or otherwise configured for RF energy
compatibility. In some circumstances your phone may cause
interference.
• Medical Devices
Pacemakers
event of such interference, you may want to consult your hearing aid
manufacturer to discuss alternatives.
Other Medical Devices
If you use any other personal medical device, consult the manufacturer of your
device to determine if it is adequately shielded from RF energy. Your physician
may be able to assist you in obtaining this information.
• Batteries. Batteries can cause property damage and / or bodily injury such as
burns if a conductive material such as jewelry, keys, or beaded chains touches
exposed terminals. The conductive material may complete an electrical circuit
(short circuit) and become quite hot. Exercise care in handling any charged
battery, particularly when placing it inside a pocket, purse or other container
with metal objects. Use only original batteries and chargers.
Your battery or phone may contain symbols, defined as follows.
Important safety information will follow
Pacemaker manufacturers recommend that a minimum separation of 8 inches
(20centimeters) be maintained between the fixed wireless phone and a
pacemaker. Persons with pacemakers should:
1) Always keep the phone more than 8 inches (20 centimeters) from
your pacemaker when the phone is turned ON.
2) Turn OFF the phone immediately if you have any reason to suspect
that interference is taking place.
Hearing Aids
46
Your battery or phone should not be disposed of in a fire
Your battery or phone may require recycling in accordance
with local laws. Contact your local regulatory authorities for
more information.
Your battery or phone should not be thrown in the trash
47
Page 25

• Please don’t use any damaged battery or charger and use the battery only for
person never had a previous seizure or blackout. If you experienced seizures
its intended purpose.
• Don’t apply extreme shock to the battery. It’s dangerous to disassemble a
battery or to apply extreme shock to the battery via nail or heavy metal objects.
• Keep the charger or batteries out of reach of small children or babies. Please
instruct children the proper ways of handling phone during usage.
• Shock circuit and breakdown may occur and cause severe danger to user due
to improper usage.
• Always try to keep the battery between -10° ~ 55° Celsius.
• Use only manufacturer approved rechargeable batteries and charger
designated for this device.
• AC/DC Adapter
AC/DC Adapter for this phone has met applicable UL safety requirements.
Please adhere to the following safety instructions per UL guidelines.
This power unit is intended to be correctly orientated in a vertical or horizontal
or floor mount position,
or blackouts, or if you have a family history of such occurrences, please
consult with your doctor.
Important Safety Instructions – Save these instructions
Danger – To reduce the risk of fire or electric shock, carefully follow
these instructions
For connection to a supply not in the U.S.A., use an attachment plug adapter
of the proper configuration for the power outlet.
• Seizures / Blackouts. Some people may be susceptible to epileptic seizures
or blackouts when exposed to flashing lights, such as when watching television
or playing video games. These seizures or blackouts may occur even if a
48
49
Page 26

14. WARRANTY
Limited Warranty for Personal Communication Products, Accessories and Software.
resulting from misuse; (b) contact with liquid, water, rain, extreme
humidity or heavy perspiration, sand, dirt or the like, extreme heat, or
food; (c) use of the Product for commercial purposes or subjecting the
What Does this Warranty Cover? Subject to the exclusions contained below,
BRIGHTSTAR warrants the Motorola branded FX1900P that it manufactures
(“Products”), to be free from defects in materials and workmanship under normal
consumer usage for the period(s) outlined below. This limited warranty is a
consumer’s exclusive remedy, and applies as follows to new Motorola branded
Products manufactured by BRIGHTSTAR, and purchased by consumers around the
world, which are accompanied by this written warranty:
Products Covered
Products as defined above.
1) The Fixed Wireless Telephone.
2) The accessories included with the Fixed Wireless Telephone.
Length of Coverage
One (1) year from the date of purchase by the original consumer/purchaser of
the product.
Exclusions
1) Batteries. Only batteries whose fully charged capacity falls below 80%
of their rated capacity and batteries that leak are covered by this limited
warranty.
2) Abuse & Misuse. Defects or damage that results from: (a) improper
operation, storage, misuse or abuse, accident or neglect, such as
physical damage (cracks, scratches, etc.) to the surface of the product
50
Product to abnormal usage or conditions; or (d) other acts which are not
the fault of BRIGHTSTAR, are excluded from coverage.
3) Use of Non-Motorola branded Products and Accessories. Defects or
damage that results from the use of non-Motorola branded or certified
Products, Accessories, Software or other peripheral equipment are
excluded from coverage.
4) Unauthorized Service or Modification. Defects or damages resulting
from service, testing, adjustment, installation, maintenance, alteration, or
modification in any way by someone other than BRIGHTSTAR or its
authorized service centers are excluded from coverage.
5) Altered Products. Products or Accessories with (a) serial numbers or
date tags that have been removed altered or obliterated; (b) brOKen
seals or those that show evidence of tampering; (c) mismatched board
serial numbers; or (d) nonconforming or non-Motorola branded housings,
or parts, are excluded from coverage.
6) Communication Services. Defects, damages, or the failure of products,
due to any communication service or signal you may subscribe to or use
with the Products is excluded from coverage.
Who is covered?
This warranty extends only to the first consumer/purchaser, and is not
transferable.
What will BRIGHTSTAR Do?
51
Page 27

BRIGHTSTAR, at its option, will at no charge repair, replace or refund the
OF ALL OTHER WARRANTIES, EXPRESS OR IMPLIED. IN NO EVENT SHALL
purchase price of any Product that does not conform to this warranty. We may
use functionally equivalent reconditioned / refurbished / pre-owned or new
Products, Accessories or parts. No data, software or applications added to your
Product, Accessory or Software, including but not limited to personal contacts,
games and ringer tones, will be reinstalled. To avoid losing such data, software
and applications please create a back up prior to requesting service.
How to Obtain Warranty Service or Other Information
For information on how to obtain service, contact the place where the product
was purchased or a BRIGHTSTAR Service Center in your country.
In order for this Warranty to take effect, take your unit, along with this policy, to
the place of purchase or to a BRIGHTSTAR Authorized Service Center.
You will receive instructions on how to ship the Products, at your expense, to a
BRIGHTSTAR Authorized Repair Center. To obtain service, you must include: (a)
a copy of your receipt, bill of sale or other comparable proof of purchase; (b) a
written description of the problem; (c) the name of your service provider, if
applicable; (d) the name and location of the installation facility (if applicable) and,
BRIGHTSTAR BE LIABLE, WHETHER IN CONTRACT OR TORT (INCLUDING
NEGLIGENCE) FOR DAMAGES IN EXCESS OF THE PURCHASE PRICE OF
THE PRODUCT, OR FOR ANY INDIRECT, INCIDENTAL, SPECIAL OR
CONSEQUENTIAL DAMAGES OF ANY KIND, OR LOSS OF REVENUE OR
PROFITS, LOSS OF BUSINESS, LOSS OF INFORMATION OR DATA OR
OTHER FINANCIAL LOSS ARISING OUT OF OR IN CONNECTION WITH THE
ABILITY OR INABILITY TO USE THE PRODUCTS, TO THE FULL EXTENT
THESE DAMAGES MAY BE DISCLAIMED BY LAW.
Some states and jurisdictions do not allow the limitation or exclusion of
incidental or consequential damages, or limitation on the length of an
implied warranty, so the above limitations or exclusions may not apply to
you. This warranty gives you specific legal rights, and you may also have
other rights that vary from state to state or from one jurisdiction to another.
most importantly; (e) your address and telephone number.
What Other Limitations Are There?
ANY IMPLIED WARRANTIES, INCLUDING WITHOUT LIMITATION THE
IMPLIED WARRANTIES OF MERCHANTABILITY AND FITNESS FOR A
PARTICULAR PURPOSE, SHALL BE LIMITED TO THE DURATION OF THIS
LIMITED WARRANTY, OTHERWISE THE REPAIR, REPLACEMENT, OR
REFUND AS PROVIDED UNDER THIS EXPRESS LIMITED WARRANTY IS
THE EXCLUSIVE REMEDY OF THE CONSUMER, AND IS PROVIDED IN LIEU
52
53
Page 28

15. REGULATORY
Brightstar Corp. hereby declares this unit to be in compliance with the relevant
Provisions of the Low Voltage Directive 73/23/EEC and the EMC Directive 89 / 336 /
EEC.
Brightstar Corp. hereby declares this unit to be in compliance with the essential
requirements and other relevant provisions of Directive 1999/519/EC.
16. FCC NOTICE TO USERS
We have not approved any changes or modifications to this device by the user.
Any changes or modifications could void the user’s authority to operate the
equipment. See 47 CFR Sec. 15.19(3).
This device complies with part 15 of the FCC Rules. Operation is subject to the
following two conditions
1) This device may not cause harmful interference, and
2) This device must accept any interference received, including interference
that may cause undesired operation. See 47 CFR Sec. 15.19(3).
If your mobile device or accessory has a USB connector, or is otherwise considered
a computer peripheral device whereby it can be connected to a computer for
purposes of transferring data, then it is considered a Class B device and the
following statement applies:
This equipment has been tested and found to comply with the limits for a Class B
digital device, pursuant to part 15 of the FCC Rules. These limits are designed to
provide reasonable protection against harmful interference in a residential
installation.
This equipment generates uses and can radiate radio frequency energy and, if not
installed and used in accordance with the instructions, may cause harmful
interference to radio communications.
54
However, there is no guarantee that interference will not occur in a particular
installation. If this equipment does cause harmful interference to radio or television
reception, which can be determined by turning the equipment off and on, the user is
encouraged to try to correct the interference by one or more of the following
55
Page 29

measures:
• Reorient or relocate the receiving antenna.
• Increase the separation between the equipment and the receiver.
• Connect the equipment to an outlet on a circuit different from that to which the
receiver is connected.
Consult the dealer or an experienced radio/TV technician for help
RF exposure information: To maintain compliance with FCC RF exposure
requirements, use handset that maintain a 20cm separation distance between the
user's body and the host.
2
MPE limit for RF exposure at prediction frequency is 1mW/cm
CDMA1900MHz. The MPE for this device is 0.25mW/cm
2
. It satisfy RF exposure
for
compliance.
Motorola, the Stylized M Logo, and other Motorola trademarks and trade dress are
owned by Motorola, Inc. and are used under license from Motorola, Inc.
MOTOROLA and the Stylized M Logo are registered in the U.S. Patent & Trademark
Office. All other products or service names are the property of their respective
owners. © Motorola, Inc 2008. All rights reserved.
The information contained in the FX-803C user guide is believed to be correct at the
time of printing. We reserve the right to change or modify any information, product
specifications, features or functionality without notice. The contents of the FX-803C
user guide are provided “as is.” Certain features may not be activated by your
service provider, and/or their network settings may limit the feature’s functionality.
Additionally, certain features may require a subscription. Contact your service
provider for details.
56
57
Page 30

FX-1900P User Guide version 1.1 12/30/2008
© Copyright 2008, Motorola Inc., All rights reserved
58
 Loading...