

Page 1

PN: 5839000000
Page 2

© 2011. All rights are reserved. No part of this document may be
reproduced without permission. All trademarks and brand names
mentioned in t his p ublication are property of the ir re spective
owners.
While all ef forts have be en made to ens ure th e accuracy of all
contents i n this ma nual, we as sume n o liabilit y for error s or
omissions or statements of any kind in this manual, whether such
errors or omi ssions or st atements res ulting from negligence,
accidents, or any ot her cause. The contents of this ma nual are
subject to change without notice.
Protect our en vironment! We striv e to produc e prod ucts in
compliance with global environmental standards. Please consult
your local authorities for proper disposal.
Note: User ’s Manual is Jus t to guide the us er ab out t he
functionality of the p hone. This dose not seems any certificate of
technology. Some fu nctions ma y very due to m odifications a nd
up gradations of software or due to print mistake.
Page 3

SAFETY PRECAUTIONS
Before u sing your p hone, pl ease r ead t he follo wing im portant
information t o eli minate o r red uce any possi bility of ca using
damage and personal injury.
Do not use wireless phones while driving.
Switch off wireless devices in aircraft. The signal may
cause interference. Using them on aircraft is illegal.
Do not use mobil e phones where bla sting is in
progress. Follow regulations and rules strictly.
Do not u se mo bile phones at a ref ueling point. Don’t
use near fuel or chemicals
Follow regulations or rules in hospital and health care
facilities. Switch phone off near medical equipment.
All wireles s de vices may get int erference that could
affect performance.
Only quali fied ser vice personnel can i nstall or rep air
this device.
Use only approved accessories and batteries.
Use on ly in norm al positio n. D o no t e xpose your
phone t o e xtreme high te mperatures above +60℃
(+140°F). Do not use anything static to clean your
phone.
Ensure th e phone is turned on an d in se rvice. Enter
the emergency number, then press Pick Up key. Give
your location. Do not end the call until told to do so.
Improper use will in validate t he warranty! T hese saf ety
instructions also apply to original accessories.
Page 4

Table of Content
GENERAL INFORMATION ......................... 1
Antenna ............................................................... 1
Network Service ................................................... 1
Accessories ......................................................... 1
Privacy ................................................................. 1
KNOW YOUR MOBILE PHONE ................. 2
The usage of the Smart Touch Screen................. 3
States Icons ......................................................... 4
IMPORTANT INFORMATION...................... 5
Use of Passwords ................................................ 5
Battery Information .............................................. 6
Usage & Maintenance ......................................... 8
Emergency Calls .................................................. 9
GETTING STA RTED ................................. 10
First Call............................................................. 10
Mounting the SIM Card ...................................... 10
Mounting the T-Flash Card ................................ 11
Charging the Battery .......................................... 12
Switching Your Phone On/Off ............................ 12
CALLING................................................... 13
Making a call ...................................................... 13
Answering Calls ................................................. 14
Options in Call ................................................... 14
Page 5

GUIDE TO MENU OPERA TIONS ............. 15
Messaging ......................................................... 15
Phonebook ......................................................... 17
Call Center ......................................................... 17
Audio Player ...................................................... 19
Camera .............................................................. 20
File Manager ...................................................... 20
User Profiles ...................................................... 20
Settings .............................................................. 21
Bluetooth............................................................ 22
Games ............................................................... 23
WAP ................................................................... 23
TV ...................................................................... 23
Video Player ...................................................... 24
Video recorder ................................................... 24
FM ..................................................................... 25
Sound Recorder ................................................. 25
Image viewer ..................................................... 26
Java ................................................................... 26
Slide show ......................................................... 27
Calculator........................................................... 27
Organizer ........................................................... 27
Book shelf .......................................................... 28
APPENDIX ................................................ 29
Appendix A: Troubleshooting ............................. 29
Appendix B: FCC Statement .............................. 30
Page 6

GENERAL INFORMATION
Antenna
Use of other antenna devices could damage your mobile phone
and r educe pe rformance. Your ph one h as a built- in antenna.
Don’t tou ch the a ntenna area unnecessarily when the pho ne is
switched on . Co ntact with the ant enna affects c all q uality and
may ca use th e ph one to operate at a higher power le vel t han
otherwise needed.
Network Service
A lot of features described in this man ual ar e ca lled net work
service. T hey are special services provided by wireless service
providers. You sho uld su bscribe to th ese ser vices fro m your
home service provider and learn instructions on uses before you
select the network you want to use.
Accessories
Li-Ion battery is the manufacturer-approved rechargeable battery
available for your phone. May be some batteries performs best
after several full charge/discharge cycles.
Use onl y ba tteries, chargers and acc essories a pproved b y the
phone manufacturer for use with this particular model. The use of
any other types will invalidate any approval or warranty applying
to the phone, and may be dangerous.
Please co nsult with y our deal er for a vailability of appr oved
accessories.
Privacy
The shoot or record ing of photo s, imag es or sound s pri vately
may be prohibited by law and/or subject to criminal prosecution.
We recommend you to b e responsible and respectful of privacy
laws when you are taking photos, or doing records.
1
Page 7
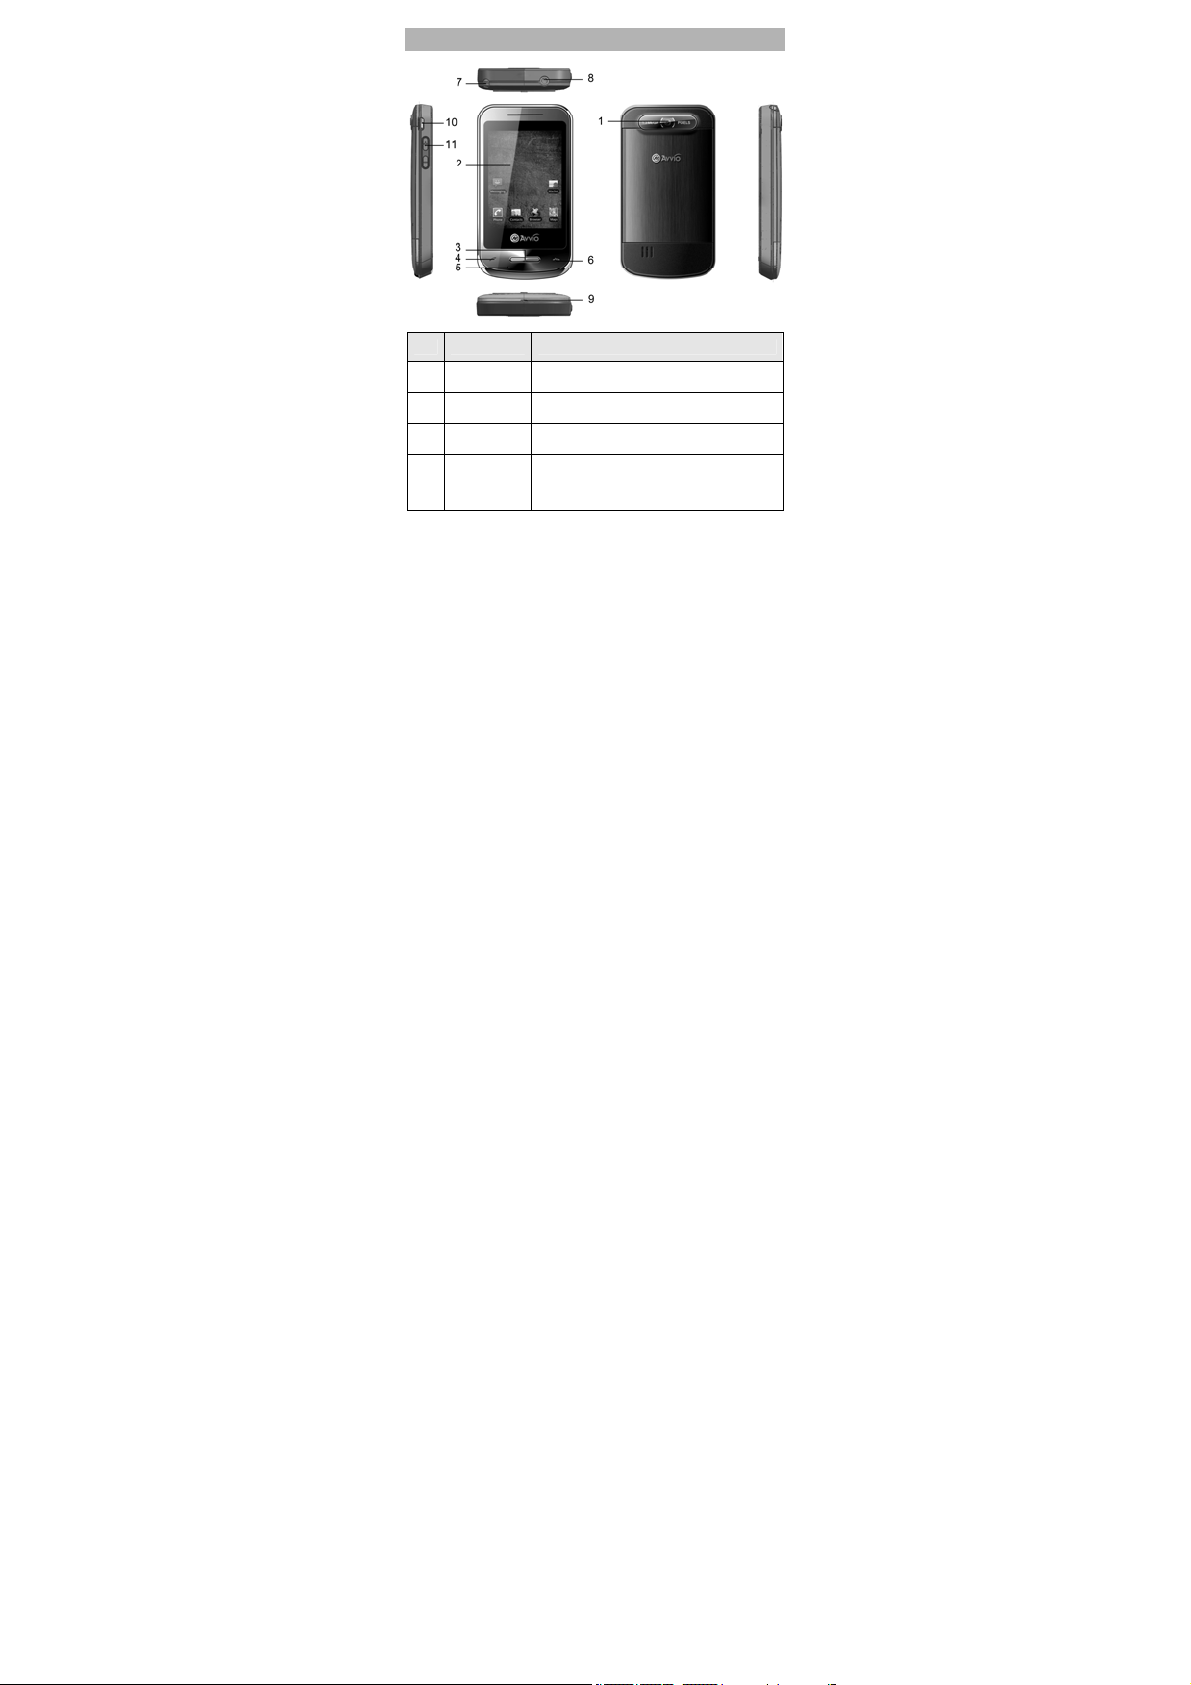
KNOW YOUR MOBILE PHONE
NO. Item Function
1 Camera
2 Screen
3 OK Key
Send Key
4
Use the ca mera t o t ake p hotos and
record videos
Tap the screen t o write or ma ke oth er
operations.
Press OK ke y to confirm the cu rrent
operation
Use th e Ca lling K ey to m ake o r a nswer a
call.
In th e s tandby m ode, pr ess thi s k ey to
access the Call History.
2
Page 8

5 Microphone
Right soft
key/ Call end
6
Key / Power
key
Antenna
7
Earphone
8
Jack
9 Cord hole
USB
10
connecter
11 Side keys
Speak into th e micropho ne when
receiving or makin g a call or voice
recording.
Use Call end Key to d isconnect an ongoing
call.
Long pr ess thi s k ey to t urn o n or o ff th e
mobile phone.
In t he menu mode, press this key to return
the s tandby mod e an d ca ncel c urrent
operations.
You can use your phone to listen to FM or
watch TV once the antenna is opened.
Use this connect to the headset.
Attach a strap for carrying your device.
Use this con nector to synchro nize da ta
by conn ecting the pro vided USB S ync
cable or t o re charge the battery via the
provided AC adapter.
Use the side keys to scroll options in the
function list or the phone book.
During a call, sli de up or do wn to adjus t
the earpiece volume.
The usage of the Smart Touch Screen
The controls on the touch screen change dynamically to suit the
task at hand.
1. Tap the “ “ at the button of the screen to open the menu.
2. Flick or drag up or down to scroll.
3
Page 9

3. Press and drag out the icon that you want, and then you can
icon side to side.
4. Drag the icon into the scroll to shutdown it, and then you can
choose another function.
Tip: Press won’t be close the function.
States Icons
Network Signal
Connecting GPRS and using GPRS
Divert all Voice Calls
Auto Keypad Lock
Alarm Clock is activated
Battery States
Missed Calls
New Message or Message Memory Full
MMS is busy
Roaming Startup
Sound States
Ring Only
Vib. Only
Vib. then Ring
Vib. and Ring
4
Page 10

IMPORTANT INFORMATION
Use of Passwords
Your mobile phone and SIM card have various passwords. Those
passwords avoid unauthorized use of your phone and SIM card.
You ca n cha nge PIN, PIN 2 and ph one password in the
“Settings > Security Settings”
Phone Code
The Phone code can be used to avoid unauthorized use of your
phone. The factory setting for the phone code is 1122. If phone
lock is enable d, you will be ask ed to inp ut the phone password
when you switch on your phone.
PIN (4 to 8 digits)
The PIN (Personal Identification Number) code protects your SIM
card from un authorized use. T he PIN c ode is usuall y supplied
with the SI M card. When the PIN co de request is enabled, the
password is asked every time the phone is turned on.
Three times wrong PIN input, the SIM card will be locked and you
will need to use the PUK to unlock it. PUK is usually set by the
network operator.
1. Enter the correct PUK to unlock the SIM card, and then enter
the new PIN and press OK.
2. If you are prompted to enter the new PIN again, enter it and
press OK.
3. If the P UK is c orrect, the SI M card will b e unlocked and the
PIN will be reset.
PUK (8 digits)
The PUK (Personal Unblocking Key) code is required to ch ange
a blocked PIN code. Please contact your network operator for the
code.
5
Page 11

Note: Ten tim es wrong input in succession, the SIM card will be
invalid and you need to consult with your network operator for a
new SIM card.
PIN2 (4 to 8 digits)
The PIN2 code, su pplied with s ome SIM card, is used f or some
functions, such as Call Cost, Fixed Dial and so on. Please consult
your network operator to confirm whether your SIM card supports
those services or not.
Three times w rong PIN2 code input, the SIM card will be locked
and you will need to use the PUK2 to unlock it.
1. Enter th e corr ect P UK2 to unlock PIN2, and th en e nter th e
new PIN2 and press OK.
2. If you are prompted to enter the new PIN2 again, enter it and
press OK.
PUK2 (8 digits)
The PUK2 c ode, su pplied with some SI M card, is r equired to
change a blocked PIN2 code. It may be supplied with t he S IM
card. If not, contact your network operator.
Note: Ten tim es wrong input in succession, the SIM card will be
invalid and you need to consult with your network operator for a
new SIM card.
Barring Code
To activate call barring, you need a Barring Code. You obtain the
password from your service provider.
Battery Information
Charing and Discharging
The charger is designed to be used in temperatures between
-10°C to 55°C.
Do not charge the phone in wet and damp conditions.
6
Page 12

Use only batteries approved by the phone manufacturer and
recharge your battery only with the charges approved by the
manufacturer.
We striv e to pro duce pro ducts in com pliance with glo bal
environmental standards
The charge r m eets the st andard f or s afety of i nformation
technology eq uipment and of fice equi pment use. It m ust be
used for this purpose only.
Your phone is po wered by a re chargeable batt ery. Full
performance of the battery is achieved only after two or three
complete charge and discharge cycles.
When a charger is not in use , disco nnect it from th e po wer
source. D o not le ave the batt ery con nected to a ch arger for
longer than 12 hours, since overcharging may shorten its life.
Temperature extremes will affect the ability of y our battery to
charge.
Tips for Battery
Placing the battery in hot or cold places, such as in a cl osed
car in su mmer or winter, will reduce the capacity and lifetime
of the battery.
Do not let the metal contacts on the battery touch other metal
contacts. It c ould sh ort-circuit and damage the batt ery. Use
the battery only for its intended purpose.
Do not disassemble or modify the battery by yourself.
Do not clean the battery with water or any organic solvent.
Always keep the battery dry.
The battery can be charged and discharged many times but it
will wear out as last. When the t alk a nd s tandby time is
obviously shorter th an normal , pleas e change t he origi nal
battery approved by manufacturer.
Do not short-circuit the battery.
Turn off mobile phone before removing the battery.
7
Page 13

Do not dispose of batteries in fire.
If you smell anything strange from the battery or find that the
battery is o verheated, y ou should st op using it immedi ately
and contact the authorized After Service Center in your region.
If you don’t use the battery for a long time, please fully charge
the battery before you store it.
Batteries should never be placed in municipal waste. Batteries
must be recycled or disposed of properly. Please follow local
regulations for disposal of batteries.
Usage & Maintenance
To keep your product working well, take a moment to review the
following usage & maintenance tips, which will help you to ful fill
any warranty obligations an d to e njoy this prod uct fo r ma ny
years.
Keep your ph one a nd all i ts parts an d acce ssories o ut of
children’s reach.
Your prod ucts ar e not w ater-resistant. Keep it dr y.
Precipitation, humi dity and liq uids c ontain mineral s that will
corrode the connectors.
Always treat your products with care and keep it in a clean and
dust-free place.
Do not e xpose your pro duct to e xtreme hi gh o r lo w
temperatures. Your phone op erates best in tem perature
between 15 °C and 25°C. M inimum and maximum
temperatures recommended b y the man ufacturer are -10°C
and 55°C.
Do not e xpose your produ ct to ope n fl ames o r lit tobacco
products.
Do not atte mpt to di sassemble or modi fy your produ ct. Only
authorized personnel should perform service.
Do not drop, throw or try to bend your product.
8
Page 14

Do not paint your product.
Do not use harsh chemicals, clea ning sol vents, or stro ng
detergents to clean it.
Keep anything magnetic, such as credit cards, far away from
your product.
If you find that th e batter y h as an y crack, defo rmation or
anything else, you should stop using the battery immediately.
If the electrolyte leak out and contact your skin or clothes, you
should imme diately use soap and clean water to clean it. In
case the electrolyte spatters into your eyes, you must use the
clean water to wash your e yes tho roughly a nd g o to the
hospital immediately.
If y our phone or a ny ac cessory does n’t function nor mally,
please s end the m t o the near est aut horized service facility.
The qualified personnel there will assist you, and if necessary,
arrange for service.
Emergency Calls
This phone, like a ny wireless phones, oper ates using ra dio
signals, wireless and landline networks which cannot guarantee
connection in all conditions. T herefore, you s hould ne ver r ely
solely upo n an y wireless pho ne for ess ential comm unications
(e.g. medical emergencies). To make an emergency call:
1> Switch your phone on.
Some net works may requir e that a v alid SIM card is properly
inserted in the phone.
2> Dial the official emergency number. Emergency numbers vary
by location.
While making an emergenc y call, please rememb er to gi ve all
information as p articularly as possi ble. Never h and o ff the call
please until you are given permission to do so.
9
Page 15

GETTING STARTED
First Call
Insert a SIM car d ( Switch o ff your phone at first , and then
remove th e batter y). Enter the ar ea co de and the p hone
number and press Pick Up Key.
Tip: Before you get started, you must insert a valid SIM card in
your phone and charge the battery first.
SIM Card: Please refer to “ Mounting the SIM Card” for m ore
reference on installation.
Charging the battery: please refer to “Charging the battery” for
more details.
Mounting the SIM Card
Your mobile phone number, PIN (Personal Identification Number),
PIN2, PUK ( Personal Unlo ck K ey), P UK2 (P ersonal Un lock
Key2), I MSI (I nternational Mobile Su bscriber Identity), t he
network information, the phonebook data, SMS (short messages)
and other data are stored in your SIM card.
Note: This particular phone model only supports the SIM cards of
1.8V and 3V.
Some net work oper ators don’t of fer PI N2 and PUK 2, so
functions using those passwords will be unavailable.
The SIM card and its contacts can be damaged by scratches
or ben ding easil y, s o be careful while handling, ins erting or
removing the card.
Keep all miniature SIM cards out of children’s reach.
Note: Alwa ys m ake sure the pho ne is switched off before you
insert or remove the SIM card, otherwise it may damage the SIM
card.
10
Page 16

Mounting
Remove the battery cover by sliding it. In sert the SIM card, with
the n otch at the bottom right and the gold con tacts face down,
into the card slot. Align the card to the arrow sign as the following
picture shows:
Replace the battery and close the cover tightly.
Note:
If the SIM Card is installed improperly or damaged, the prompt
words “Insert SIM” will display on the screen after you switch
on your phone. Remove the SIM Card and check the way that
performs as pictures show, and then mount it again.
If “Inser t SI M” still appears on the scr een a fter you ha ve
inserted the SIM correctly, there may be something wrong with
your SIM card. Please ask the network operator to repair it.
If the screen displays that the SIM card is locked permanently,
please consult with your network operator.
Mounting the T-Flash Card
Insert th e T-Flash card, with the gold contacts f ace down, and
into the card slot. Align the card to the arrow sign as the following
picture shows:
11
Page 17

Charging the Battery
Note: Please al ways keep your ph one connector an d char ger
dry.
1. Connect the connector of the travel adapter to the phone.
2. Plug the travel adapter into a proper AC wall outlet.
3. When your phone indicates that the battery is fully charged,
please pull the ravel adapter out from th e I/O socket of the
phone.
Tip:
1. If the batt ery is totally empty or not enough, it may take a few
minutes before the charging indicator appears on the screen.
2. You can turn on/off, and use the phone while charging.
Warning: Make sure that the standard voltage/power of the place
where you char ge the batt ery m atches with the rat ed
voltage/power of our travel adapter.
Switching Your Phone On/Off
Press and ho ld Po wer Ke y for a fe w seconds to s witch your
phone on.
If the phone ask for a phone lock code:
Enter the phone lock code, and press OK.
If the phone ask for a PIN code:
Enter the PI N code, and press OK . T he PIN code is us ually
supplied with the SIM card. Please consult your network operator
for more information.
Access the standby mode.
Press and ho ld Po wer Ke y for a fe w seconds to s witch your
phone off.
12
Page 18

CALLING
Making a call
You can make a call from Phone, Contacts, Speed Dial and Call
History.
Make a call from Phone
In the standby mode, tap dial Pad( ), enter the desired phone
number, and tap
Make a call from phonebook
In the standby mode, tap phonebook( ), roll the scroll bar
up/down or tap the
name, Tap the desired number or name and select “call”.
Make a call from call history
In the standby mode, Press send key to access the call history,
select call history, scroll to the desired number or n ame and tap
Call.
Speed a call from speed dial
You can sa ve 8 S peed Dial Num bers you often dial to positi ons
titled with num ber keys from “2” to “ 9” respe ctively. Sel ect
“Phonebook > Options > Phonebook settings > Speed dial >
Set Number”, and t hen set “Status” o n. On the Phone scre en,
press and hold the number key to dial the corresponding number.
Make an International Call
1. On the Ph one scr een, t ap the * t wice for the inter national
prefix symbol +.
2. Enter the country code, area code and phone number.
3. T ap
Clear Wrong Enters
If y ou t ap a w rong number , tap clear or ←( ) to er ase t he
to make a call.
and enter the initial letter of the person's
to make an International call.
13
Page 19

wrong nu mber. T o erase the e ntire nu mber, t ap and h old the
clear or ←(
Adjusting the Sound Volume
During a call, you can press the side Key to adjust the earpiece
volume.
).
Answering Calls
1. To answer an incoming call, press the send key.
2. To end or reject an incoming /ongoing call, press the
Key.
Tip: If the caller can be identifie d, the screen will dis play t he
caller’s name. If the caller can’t be identified, the screen will only
display the caller’s number.
Call end
Options in Call
Your p hone pro vides a nu mber of fu nctions th at you can u se
during a call.
During a call, you c an ac cess Hold /End singl e ca ll, N ew Call,
Phone Book, Messages, Sound Recorder and other functions.
14
Page 20

GUIDE TO MENU OPERATIONS
Function options about the mobile phone are listed as below with
brief descriptions. Tap
Messaging
Only when your network operator supports this service, you can
use the function.
SMS
Write Message
You can edit the SMS.
Inbox
The phone will prompt you when you receive a new message.
Outbox
This function is used to check messages in outbox.
Drafts
In the Drafts, please tap Options, and then you can do send, edit
and some other operations.
Templates
Your phone saves messages both for SMS in co mmon use. You
can use, edit, or remove message.
SMS Settings
You can configure the default information about SMS properties.
Before using mes sage fu nction, you need t o d o ne cessary
settings as follows:
1. Profile settings: User sh ould set a proper pr ofile for mobile
message. Enter into each mode to find the profile name, SMSC
address, validity period and message type.
2. Voicemail server:
Edit: Input or modify the number and the name of voice mailbox.
Connect to Voice: You can hear messages in the voice mailbox.
Note: T his ser vice is supp lied by t he network, suc h as t he
access to the Main Menu.
15
Page 21

message mac hine service. It en ables the cal ler to lea ve
messages w hen yo u can't or y ou are un willing to ans wer the
coming call. Your n umber f or the voice mailbox is saved in this
phone. In s tandby mode, hol d the nu mber ke y 1 to dial the
number of the voice mailbo x a fter the number is config ured.
Please consult your network operator for more details.
3. Common settings: Activate Delivery Reports, Reply Path and
Save sent message.
4. Memory status: User can check the available space in SIM
card or mobile message box.
5. Preferred storage: User can ch oose location to sa ve th e
message either in mobile or SIM card.
Schedule SMS
Tap the Add or Opti ons > Add, and th en y ou can set the d ate,
time, m essage, and enter nu mber.
message. The message w ill be sent to the input n umber as you the
time desired by you.
Note: The time format of this function is 24 hours.
MMS
Write Message: You can edit the MMS message.
Inbox: The phone will prompt you when you receive a new MMS.
Outbox: This function is used to check MMS in outbox.
Drafts: This function is used to check messages in drafts.
MMS Settings: You can con figure th e default info rmation f or
MMS.
Chat
Use this function to chat with the sender by sending messages.
Chat Room Info: select on e chat r oom to set My
Nickname and Destn. Number.
Start New: enter wo rds and start to c hat with the preset
number.
Press do ne a nd sav e t he
16
Page 22

Broadcast Message
This net work s ervice enabl es you to r eceive all kind s of t ext
messages, such as weather reports or transportation information.
Until no w, ther e are se veral networks af ford the service in t his
world. Please consult your network operator for more reference.
Broadcast message:
Receive Mode: Turn on or off the Cell Broadcast.
Read Message: Scroll the Up/Down Key to select the message.
Languages: Select the desir ed la nguage to display t he
broadcast message.
Note: Your net work operator d ecides whether th e langu age is
supported or not.
Channel Settings: You can choose Select, Add, Edit or Delete to
receive the Broadcast information.
Phonebook
You can fast locate the number of the person you want to contact.
Tap the
related r ecords about it will display in the middle o f the s creen.
Tap the desired number; and tap options, then you can
SMS/MMS, and call and so on.
and ent er the initial lett er of t he person ’s name ,
view, send
Call Center
Call Center
Call history
Missed Calls
With this function, you can check recent missed calls. In this function,
you can Delete, Save to Phone book, Edit and so on.
Dialed Calls
With this function, you can check recent dialed calls. In this function,
you can Delete, call, send text message and so on.
17
Page 23

Received Calls
With this function, you can check recent received calls. In this function,
you can Delete, call, send text message and so on.
Delete Call Logs
You can remove all records of missed, dialled, received calls or delete
all calls with this function.
Call times
L ast Call: The last call time can be checked.
Dia lled calls: The total time of all dialed calls can be checked.
Received ca lls: The total ti me of all re ceived ca lls ca n be
checked.
Reset All: TO reset the counters.
Call Cost
Last Call Cost: You can check the last call’s charges.
Total Cost: You can check the whole call’s charges.
Reset Cost: You can modify the call’s charges, and reset the cost
to 0. PIN2 code is required while modifying.
Max Cost: You can check and modify the upper limit. PIN2 code is
required while modifying.
Price per U nit: You can check and m odify the c all’s r ate. PIN2
code is required while modifying.
Note: This function is related with the SIM card. Some SIM cards don’t
support the function. PIN2 i s pr ovided from th e netw ork oper ator.
Please consult your network operator to obtain the number.
Text Message Counter
Sent: You can check and clear the number of sent messages.
Received: Y ou ca n c heck and cl ear t he number o f r eceived
messages.
Note: This function has nothing to do with the SIM card. The amount of
sent or received messages will not change even if you change the SIM
card.
GPRS Counter
You can ch eck or r eset th e Last Sent, L ast R eceived, Al l Sent, All
Received and Reset Counter.
18
Page 24

Call Settings
Call settings
1. Caller ID (Net work Service): You can select Set By Network,
Hide ID or Send ID. The default state is the Set By Network.
2. Call W aiting > Ac tivate, t he network will notif y you of a new
incoming call while you have a c all i n prog ress (Net work
Service).
3. Call Di vert: T his net work s ervice allows you to divert your
incoming calls to anther number. For details, contact your service
provider.
4. Call Barring > A ctivate, this n etwork serv ice allo ws you to
restrict incoming calls from your pho ne. For details, contact your
service provider.
5. Line Switching: Switch to Line 1 or 2, the default one is Line 1.
Note: If Line 2 is selected, making calls from Line 2 depends on
the network operator.
Advance settings
1. Blac klist:
enabled, you won’t receive the calls from the numbers entered in
the Blacklist.
2. Auto Redial > O n, the ph one will automatically redial the l ast
called number after a while if you fail to connect to th e number.
The times f or auto redial are up to 10 times. Press Abort to end
Auto Redial.
3. Call Time Display > On, the call time will display.
4. Call Time Reminder: This function prompts you to end t he call
in time to sa ve the call cost. You can select Of f, Singl e, or
Periodic.
5. Aut o C all Disconnect: You can set O N/ OFF, an d se t a ti me
(1~9999s) as your desire.
you c an set 20 n umbers. When this Black list is
Audio Player
19
Page 25

The Play, Stop, Back, Forward functions correspond to the (
) button respectively, Please press the side key or tap
( ) to adjust music volume. Tap “list” to access the View All, and
then tap Options to perform the following functions: play, details, add to
ringtones, refresh list and settings.
Note:
To enjoy non-stop music, please download music/Songs to the Music
folder of the Phone/ memory card. The Audio Player of the phone will
automatically play music files from the Music folder. You may need to
refresh it manually from the settings in case you have earlier opted for
manual refresh settings.
Warning: Make sure that the volume is a ppropriate for your hearing
while using the audio player.
Camera
You can take photos with the built-in camera. Tap the ( ) to take
a picture; tap the (
Photos: To display the file list.
Camera Settings: To set some relative spec of the camera.
Image Settings: This includ es phot o size and p hoto qu ality
adjustment.
White balance: To set the balance of light.
Scene Mode: To set the scene mode auto or night.
Effect settings: To set special shot effect.
Storage: To set the default storage path.
Restore Default: Can restore default.
) access the following options:
File Manager
You can use the function to manage all types of files saved in the
Memory card or Phone.
User Profiles
20
Page 26

You can s elect General, Silent, Ou tdoor, In door, Headset, Bl uetooth.
For each mode, you can cust omize the Tone Settings, Volume, Alert
Type, Ring Type, Extra Tone or Answer Mode according to your need.
Note: Insert the earphone to access the Headset mode automatically.
This mode has no Activate option. Press # key to enable or cancel the
silent mode. In the Silent mode, you can not hear any sound indicates
a call or a message is coming.
Settings
Pen calibration
If your device does not accurately respond to screen taps, follow
these steps to re-calibrate it:
1. Tap Settings > Pen Calibrate
2. Click anywhere on the screen to start calibrate, then follow the
on-screen instructions to complete the calibration.
Phone Settings
Time and Date
Set Home City: Select the desired home city.
Set Time / Date: Enter the current time and date.
Set Format: Select a time and a date format.
Update With Time Zone: You can set On or Off.
Schedule Power On/Off: You can set t he time for a uto po wer
on/off.
Language: Select the desired language for the display text.
Pref. Input Methods: Select the desired input m ethod for t he
default input method.
Display settings:
saver, P ower o n display, Po wer off display, Inter active Screen,
Main Menu Ef fect, Show Op erator Name, and C an aut o open
keypad light.
Greeting Text: Set O N, edi t th e g reeting t ext and s ave, th en these
words will be show on the screen when you turn on your phone.
You can confi gure the Wallpaper, Screen
21
Page 27

Auto Update of Date and Time: It can be s et to ON or OFF.
(Network Service).
Flight Mode: You can choose one mode as your desire.
Misc. Settings: LCD backlight: You can set the LCD backlight.
Network Settings
You ca n confi gure t he follo wing o ptions as desir ed: Ne twork
Selection (Automatic suggested), Preferences.
Security Settings
Your ph one is e quipped with a versatile securit y system to
prevent unauthorized use of the phone or the SIM card, such as
SIM Lock, Phone Lock, Auto keypad Lock, Fixed Dial, Barred Dial
and Change Password.
Restore Factory Settings
Access Sett ings to select Rest ore Factory S ettings, a nd press
OK. Al l se ttings ca n be rest ored to fa ctory s ettings with t his
function. The default password is 1122.
Bluetooth
You can use Bl uetooth trans mission of docume nts dir ectly.
Search equi pment to the tran sfer, In accor dance with the
onscreen instructions can o perate, and accepts data, choose to
receive the same , document will be automatically st ored in the
directory.
Power: Bluetooth Switched on or off.
Inquiry audio device: You can search audio device.
Remote control: Connect by remote HID host device.
My device: Can inquiry new device.
Active devices: Can use Active devices connected.
Settings: Some devices can be set up.
About: Can read information about my devices.
22
Page 28

Games
There are several interesting games in the phone. Please refer to
instructions from the menu for more details.
Tip: The game me nu inclu des S tart G ame, Be st Gra des and
Game Help.
WAP
STK Service
This service is offered as the SIM card service provided by the
network operator.
Service
Internet service enables you tour around the Internet world easily
and happily. Please follow the steps described as below:
1. Homepage: The default Internet Web Address.
2. Bookmarks: Save the Web address you often use.
3. History: Records after you browse the Website.
4. Input Address: Press t he le ft so ft ke y to access Ent er
Address, and then input the web address to go to the Internet.
5. Service Inbox: Messages sent to users from the Web site.
6. Wap Settings: You can configure: Profiles, Browser Options,
Service Message Settings, Clear Cache, and Clear Cookies.
Data account
Tap OK to perform following steps:
1. GSM Data:Edit the GSM account.
2. GPRS:Edit the GPRS account.
TV
Draw out the antenna in the top right corner of the phone.
States Icons:
23
Page 29

Press the to access these options as below:
1. Set Region: to choose your area/city.
2. Input Channel: to get into the function of manual search.
3. Program List: to pick up a channel.
4. Auto Scan: to preset list.
5. Full Screen: to switch full screen.
Indicates the network signal strength of TV.
Full screen
Adjust the volume
Adjust the Channel
Auto Scan
Program List
Options
Video Player
You can perform the following operations:
Play: You can play the specified video.
Send: You can forward the video to Bluetooth and so on.
Rename: You can rename the specified video.
Delete: You can delete the specified video.
Delete All Files: You can delete all videos.
Sort by: You can sort your videos by Name, Type, Time and so
on.
Storage: To set the default storage path.
Video recorder
24
Page 30

Your phone supports the video recorder function. Tap the or
to get s tart or pause. Tap the to get stop. Tap th e
you can perform the following operations:
Camcorder Settings: To set some spec. of the video recorder.
Video settings: You can set the video quality, size limit and so
on.
White balance: To set the balance of light.
Effect settings: To set special shot effect.
Storage: You can store the Video in the phone or Memory card.
Restore Default: Press the left soft key and select Yes to return
to default settings.
FM
FM radio
You c an use your phone to listen to FM radio stations once the
antenna is opened. Please press the side key or tap (
adjust music volume. Tap the (
) to search the channels.
the (
Schedule FM Record
With this function, your phone can record the FM program as the
schedules once the antenna is opened. You can set off or on, the
date and time, repeat style, channel settings and record settings.
) to play/stop the FM radio. Tap
/ ) to
Sound Recorder
The mobile phone supports 3 recording formats: WAV, AWB and
AMR. You can record conversations, which may be saved to the
Audio folder under File Manager. If there is a record, press the left
soft key you can select: Play, Append (only for A MR), Re name,
Delete, Delete all files, Use as and Send.
25
Page 31

Image viewer
Enter the “image v iewer” to v iew the im age files in the default
folder “Photos”.
Java
Java
You may download the latest Java games and applications from
the Internet. If you know where you can download the application
software (the web address), please follow the steps described as
below:
1> In the st andby m ode, t ap
service > Bookmarks. You shoul d input the web address
and name it.
2> To connect to the internet, tap Options > Go to.
3> Please choose your favorite application software, and then
tap Option > Go to.
4> Your phone will ask you download it or not, with their name,
version number, type, and size.
5> Tap “Yes”, and then you should select where to s ave that
application file. Phone is recommended.
6> These do wnloaded game s a nd applications are
automatically saved to the Java.
Select a Java game or an application and then tap the OK key to
run it. You can view the details of installed games or applications,
remove them form your device, and specify installation settings.
Warning: Onl y in stall and use ap plications an d ot her software
from trusted sources.
Java Settings
This functio n i ncludes set tings of Ja va Audi o, J ava V ibration,
Select SI M, a nd so on. Y ou can con figure thos e option s as
desired.
> Ser vices > Internet
26
Page 32

Java Default Security
There are 4 option s you can set: Third Party, Untrusted domain,
Restore Setti ngs a nd Do main optio ns. For T hird Party a nd
Untrusted dom ain, you can defin e which functi ons t he Ja va
application can ac cess. T he v alue that y ou ca n set for e ach
functionally d epends on th e prot ection d omain of the so ftware
package.
Network access: Create a data connection to the network
Auto Invocation: Open the application automatically.
Messaging: Send messages.
Multimedia Cent er: Capture i mages or record videos or
sound.
Read user data: Read your calendar entries, contacts, or
any other personal data.
Write user da ta: Ad d perso nal d ata, su ch as e ntries to
Contacts.
Local connectivity: set Prompt at first, Prompt once, Never,
Prompt always.
After you finished settings, please select OK to save.
Slide show
Select a f older a nd then you can e njoy the slide s how without
manual modulation.
Calculator
The calculator can add, subtract, multiply and divide.
Organizer
Offer you several little tools to let you feel more comfortably.
27
Page 33

Calendar
You can view and e dit the m emo o f a s pecified date with th is
function.
Tasks
You can Vie w, Add, Edit, Del ete, D elete o verdue, De lete All,
Jump to date , Vie w uncompleted, Send vCalendar and Sa ve as
file as desired. Start up the Memo and tap done. Tap Options to
access the next step to add a new memo.
Alarm
The mobile phone provides several alarms and you can set them
as your need.
World Clock
Tap the ( ) to browse every city’s time zones in the world
map. The related date and time will display at the bottom of the
screen.
Unit Converter
You can convert the units for weight and length. Enter the number into
the column, and then press OK to get the result.
Currency Converter
You can m ake c urrency conv ersions. Pr ess OK a fter e nter the
exchange rate, and then enter the number of the currency, and press
OK to get the result.
Stopwatch
The stop watch has two m odes – T ypical stop watch an d nWay
stopwatch.
Book shelf
You ca n read E-book with “*.T XT” forma t which s aved i n your
memory card.
28
Page 34

APPENDIX
Appendix A: Troubleshooting
This section lists some problems that you might meet while using your
phone. I f y ou feel that y our ph one d o n ot operate normally, pl ease
reset settings first, and then follow Troubleshooting Guide. If you are
still unable t o solv e problems, please contact the a uthorized serv ice
center or the store from where you purchased the phone.
Problems Solutions
Make sure that the phone has been switched on.
Make sure that the battery is charged.
Make sure that the signal intensity is high enough.
Can not
answer
or make
a call
Low
voice
No ring
T-Flash
card
detect
slowly
Make sur e th e ow n number function i n t he cal l
setting is system preset or number sending.
Make sure the line switch in call setting is the system
preset l ine. C heck w hether y ou h ave set up cal l
barring or fixed dialing or any other safety function.
Check whether you have set up call diverts. Check
whether y ou have i nserted th e proper S IM car d
correctly.
Check if the volume has been set too low.
Check whether you have set up the” Silent” option.
Check whether the ring volume is not too low
Move away from a noisy place to check if you can
hear the phone ringing.
Check whether you have set up call diverts.
Format your T-Flash card with your phone.
Note: To protect your files from getting lost, please
backup the important information into the safe place
before you formatting card.
29
Page 35

Appendix B: FCC Statement
This device has been tested and found to comply with Part 15 of the
FCC rules. Performance is subject to the following conditions:
1. This device may not cause harmful interference.
2. This device mus t ac cept a ny i nterference r eceived, i ncluding
interference that may cause undesired operation.
3. Changes or m odifications n ot ex pressly appr oved by the
manufacturer or authorized ser vice center could v oid t he us er ’s
authority to operate this equipment.
FCC Regulations:
This mobile phone complies w ith p art 15 of the FCC Rule s.
Operation is su bject to t he f ollowing t wo con ditions: (1) T his
device ma y n ot cause harmful int erference, and (2) this d evice
must accept any interference received, including interference that
may cause undesired operation.
This mobile phone has been tested and found to comply with
the limits for a Class B digital device, pursuant to Part 15 of the
FCC Rules. These limits are designed to provide reasonable
protection against harmful interference in a residential installation.
This equipment generates, uses and can radiated radio
frequency energy and, if not installed and used in accordance
with the instructions, may cause harmful interference to radio
communications. However, there is no guarantee that
interference will not occur in a particular installation If this
equipment does cause harmful interference to radio or television
reception, which can be determined by turning the equipment off
and on, the user is encouraged to try to correct the interference
by one or more of the following measures:
30
Page 36

-Reorient or relocate the receiving antenna.
-Increase the separation between the equipment and receiver.
-Connect the equipment into an outlet on a circuit different from
that to which the receiver is connected.
-Consult the d ealer or an e xperienced r adio/TV techni cian f or
help.
Changes or mo difications n ot e xpressly appro ved b y th e party
responsible for c ompliance c ould void t he user‘s a uthority to
operate the equipment.
The antenna(s) used for this transmitter must not be co-located
or operating in conjunction with any other antenna or transmitter.
31
Page 37

4RF Exposure Information (SAR)
This mobile pho ne meets the go vernment’s r equirements f or
exposure to radio waves.
This phone is designed and manufactured not to exceed the
emission limits for exposure to radio frequency (RF) energy set
by the Federal Communications Commission of the U.S.
Government.
The exposure standard for wireless mobile phones employs a
unit of measurement known as the Specific Absorption Rate, or
SAR. The SAR limit set by the FCC is 1.6W/kg.
are conducted using standard operating positions accepted by
the FCC with the phone transmitting at its highest certified power
level in all tested frequency bands. Although the SAR is
determined at the highest certified power level, the actual SAR
level of the phone while operating can be well below the
maximum value. This is because the phone is designed to
operate at multiple power levels so as to use only the poser
required to reach the network. In general, the closer you are to
a wireless base station antenna, the lower the power output.
The highest SAR value for the model phone as reported to the
FCC when tested for use at the ear is 1.
on the bod
(Body
depending upon available accessories and FCC requirements.)
While there may be differences between the SAR levels of
various phones and at various positions, they all meet the
government requirement.
y, as described in this user guide, is 0.433 W
-worn measurements differ among phone models,
*
Tests for SAR
45
W/kg and when worn
32
/kg
Page 38

The FCC has granted an Equipment Authorization for this model
phone with all reported SAR levels evaluated as in compliance
with the FCC RF exposure guidelines. SAR information on this
model phone is on file with the FCC and can be found under the
Display Grant section of www.fcc.gov/oet/ea/fccid after searching
on FCC ID: WVBAVVIOT519
For body worn operation, this phone has been tested and meets
the FCC RF exposure guidelines for use with an accessory that
contains no metal and the positions the handset a minimum of
1 .5 cm from the body. Use of other accessories may not ensure
compliance with FCC RF exposure guidelines. If you do no t
use a body-worn accessory and are not holding the phone at the
ear, position the handset a minimum of 1.5 cm from your body
when the phone is switched on.
33
 Loading...